Embed Size (px)
Citation preview
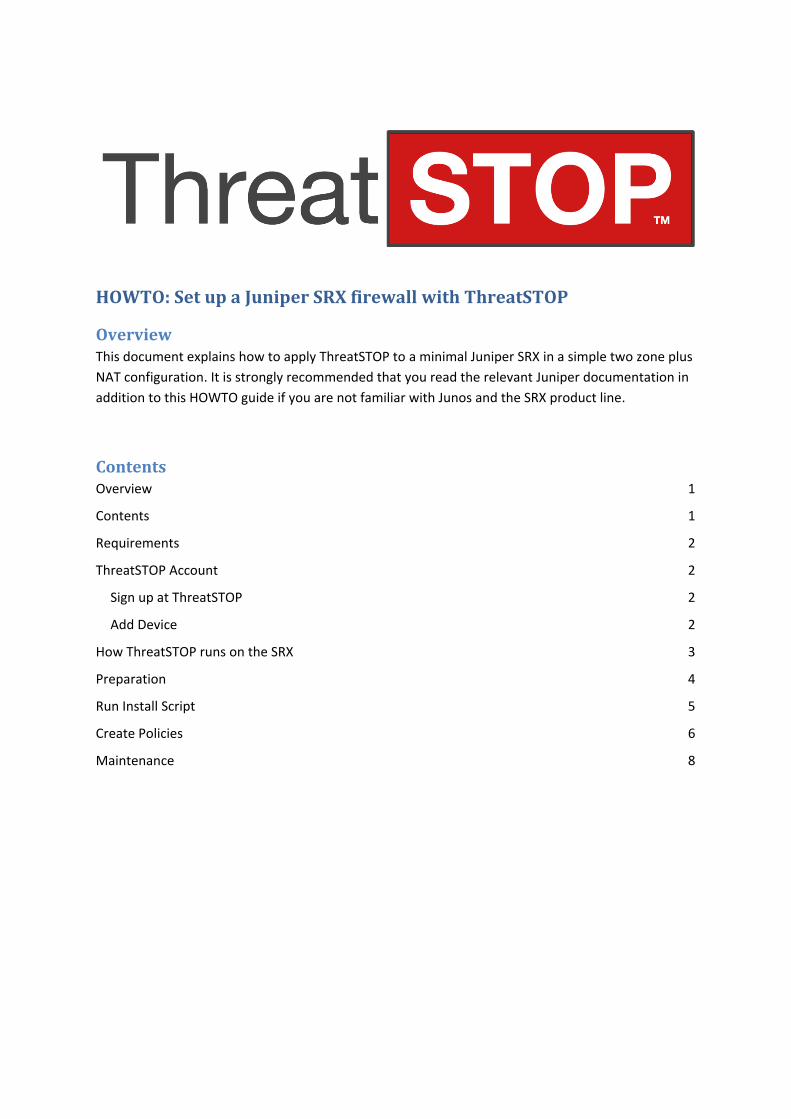
HOWTO: Set up a Juniper SRX firewall with ThreatSTOP
Overview This document explains how to apply ThreatSTOP to a minimal Juniper SRX in a simple two zone plus
NAT configuration. It is strongly recommended that you read the relevant Juniper documentation in
addition to this HOWTO guide if you are not familiar with Junos and the SRX product line.
Contents Overview 1
Contents 1
Requirements 2
ThreatSTOP Account 2
Sign up at ThreatSTOP 2
Add Device 2
How ThreatSTOP runs on the SRX 3
Preparation 4
Run Install Script 5
Create Policies 6
Maintenance 8
Requirements A Juniper SRX 210 or above firewall running at least Junos 10.3. (Note older Junos versions and the
SRX 100 have not been tested and may lack key CLI commands). The SRX should be set up to permit
SSH access by the ‘root’ account from a management platform. Once ThreatSTOP has been set up
and is working this access may be disabled.
In addition to the firewall, a management platform is required. This machine should have an SSH
client installed (linux/Mac OS X machines have this by default, for windows you should install a client
such as PuTTY - http://www.putty.org/ - or Mindterm -
http://www.appgate.com/index/products/mindterm/ ), access to the Internet and a web browser.
ThreatSTOP Account Before you setup the SRX you should sign yourself up with ThreatSTOP if you have not already done
so and add the SRX to your account.
Sign up at ThreatSTOP
At the ThreatSTOP website (www.threatstop.com) look for the “Sign up
now” button and click on it. Or visit http://www.threatstop.com/signup
directly. On this page select the 30 day trial link.
The next page (https://www.threatstop.com/index.php?page=index&action=trial) is a standard sign
up page requesting contact details and so on, as well as setting up your account password. Please
make a note of the password as it will not be sent to you and ensure that the email address you use
is valid. Once signed up an email will be sent with an activation link and instructions. The account
must be activated for you to be able to log in.
Add Device
Ideally this section will be done from the management station that you will be later using to SSH to
the SRX. Open a web browser and log in at https://threatstop.com using your registered email
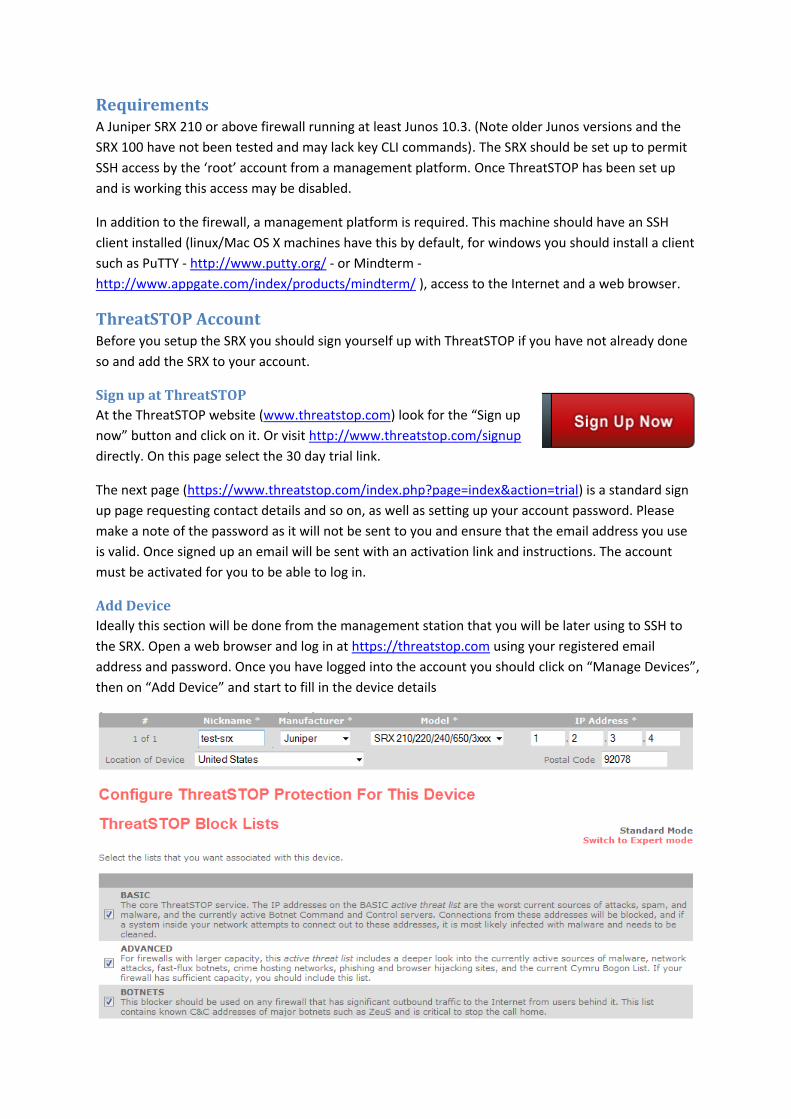
address and password. Once you have logged into the account you should click on “Manage Devices”,
then on “Add Device” and start to fill in the device details
You should add the device as Manufacturer “Juniper”, model “SRX 210/…” and enter the IP address
that it will be seen as on the internet (in this example document the address used is 1.2.3.4 but you
must use the actual address of your device).
You should also select which block lists you wish to use. A good choice for a firewall with end users
behind it would be “Basic”, “Advanced” and “Botnets” however you should feel free to ask
ThreatSTOP tech support for advice. Since you can change your selection at any time without
needing to change anything on the firewall there is no harm in making an initial choice now and then
later modifying it.
Having entered the device details and chosen your block lists, click on “save” to add the device and
display the information on how to configure it. If you are using the management station keep this
page open while you set up the SRX.
It is also possible to create a custom whitelist of addresses that you never wish to block. If you have
created such a list you can select it as well. This document does not describe the use of such ‘allow
lists’.
Note: if you have an account with “expert mode” enabled, you are strongly recommended to check
with ThreatSTOP before enabling it and choosing feeds as some (the “parasites” feed in particular)
are known to block access to sites that some people feel should not be blocked.
How ThreatSTOP runs on the SRX ThreatSTOP can be applied to the SRX in a number of different ways, depending on how exactly the
firewall has been set up. The usual way to apply it is to leverage the firewall’s security zones and
policies by creating a number of policies between the ‘untrust’ zone and internal zones (e.g. ‘trust’).
This is the way that is described in this document and it should work for most SRX firewalls. If you
are not using zones, or you have a complex multizone configuration, you may wish to contact
ThreatSTOP support to discuss how best to apply ThreatSTOP to your firewall. In particular you must
contact ThreatSTOP support if you do not have an ‘untrust’ zone as significant changes to our
standard method are required in this case.
In normal use ThreatSTOP dynamically creates, and periodically updates, address-sets in the ‘untrust’
zone. These address-sets are called ThreatSTOP-block-X (where X is an integer). These address-sets
are used in policies created between the ‘untrust’ and the internal zones. The policies are normally
symmetrical, blocking traffic to and from all addresses in the address-sets.
The ThreatSTOP set up process creates the initial address-sets by means of op scripts and then adds
the relevant policies to the configuration. If you add more block lists to apply to the SRX you should
reconnect to the SRX and check that all the address-sets have corresponding policies in the
configuration.
In this document it is assumed that the firewall is set up in a simple configuration with two zones:
‘untrust’ and ‘trust’. The ‘trust’ zone is the 10.0.0.0/8 network and there is a management network
of 10.10.10.0/24. On the management network the management station is 10.10.10.10 and the
firewall is 10.10.10.12. The management station is assumed to access the internet via NAT on the
SRX and to have the same apparent external IP address (1.2.3.4).
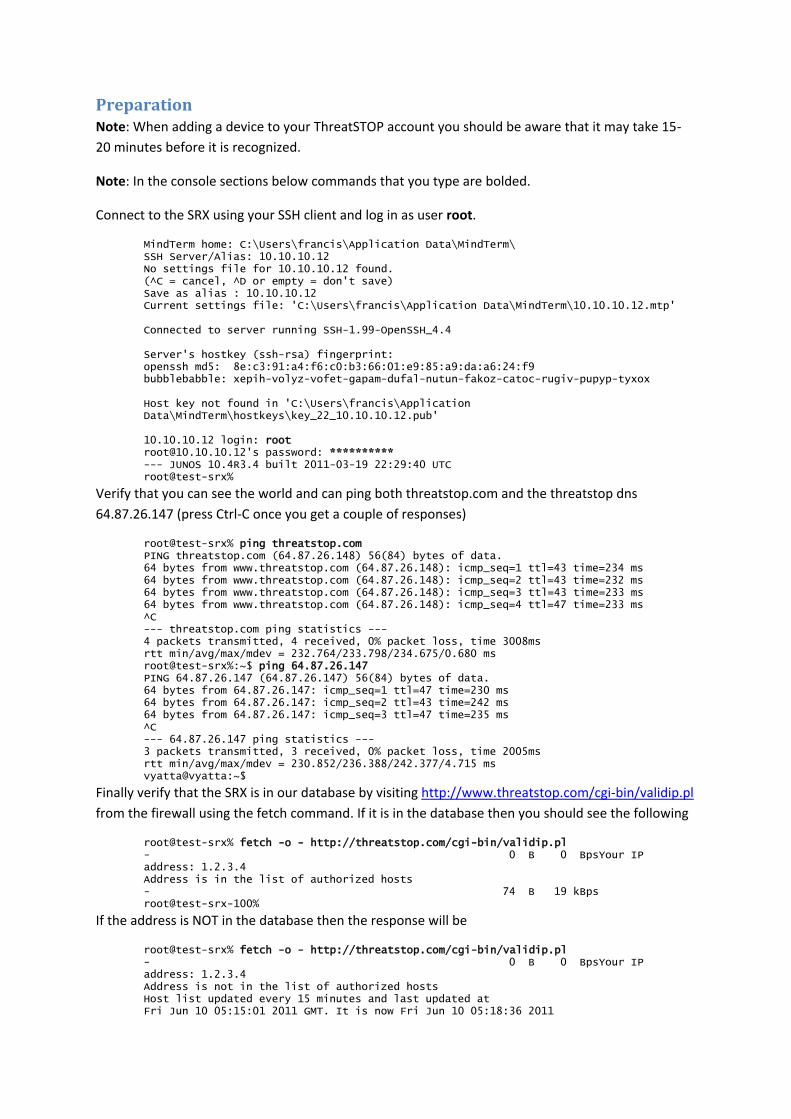
Preparation Note: When adding a device to your ThreatSTOP account you should be aware that it may take 15-
20 minutes before it is recognized.
Note: In the console sections below commands that you type are bolded.
Connect to the SRX using your SSH client and log in as user root.
MindTerm home: C:\Users\francis\Application Data\MindTerm\ SSH Server/Alias: 10.10.10.12 No settings file for 10.10.10.12 found. (^C = cancel, ^D or empty = don't save) Save as alias : 10.10.10.12 Current settings file: 'C:\Users\francis\Application Data\MindTerm\10.10.10.12.mtp' Connected to server running SSH-1.99-OpenSSH_4.4 Server's hostkey (ssh-rsa) fingerprint: openssh md5: 8e:c3:91:a4:f6:c0:b3:66:01:e9:85:a9:da:a6:24:f9 bubblebabble: xepih-volyz-vofet-gapam-dufal-nutun-fakoz-catoc-rugiv-pupyp-tyxox Host key not found in 'C:\Users\francis\Application Data\MindTerm\hostkeys\key_22_10.10.10.12.pub' 10.10.10.12 login: root [email protected]'s password: ********** --- JUNOS 10.4R3.4 built 2011-03-19 22:29:40 UTC root@test-srx%
Verify that you can see the world and can ping both threatstop.com and the threatstop dns
64.87.26.147 (press Ctrl-C once you get a couple of responses)
root@test-srx% ping threatstop.com PING threatstop.com (64.87.26.148) 56(84) bytes of data. 64 bytes from www.threatstop.com (64.87.26.148): icmp_seq=1 ttl=43 time=234 ms 64 bytes from www.threatstop.com (64.87.26.148): icmp_seq=2 ttl=43 time=232 ms 64 bytes from www.threatstop.com (64.87.26.148): icmp_seq=3 ttl=43 time=233 ms 64 bytes from www.threatstop.com (64.87.26.148): icmp_seq=4 ttl=47 time=233 ms ^C --- threatstop.com ping statistics --- 4 packets transmitted, 4 received, 0% packet loss, time 3008ms rtt min/avg/max/mdev = 232.764/233.798/234.675/0.680 ms root@test-srx%:~$ ping 64.87.26.147 PING 64.87.26.147 (64.87.26.147) 56(84) bytes of data. 64 bytes from 64.87.26.147: icmp_seq=1 ttl=47 time=230 ms 64 bytes from 64.87.26.147: icmp_seq=2 ttl=43 time=242 ms 64 bytes from 64.87.26.147: icmp_seq=3 ttl=47 time=235 ms ^C --- 64.87.26.147 ping statistics --- 3 packets transmitted, 3 received, 0% packet loss, time 2005ms rtt min/avg/max/mdev = 230.852/236.388/242.377/4.715 ms vyatta@vyatta:~$
Finally verify that the SRX is in our database by visiting http://www.threatstop.com/cgi-bin/validip.pl
from the firewall using the fetch command. If it is in the database then you should see the following
root@test-srx% fetch -o - http://threatstop.com/cgi-bin/validip.pl - 0 B 0 BpsYour IP address: 1.2.3.4 Address is in the list of authorized hosts - 74 B 19 kBps root@test-srx-100%
If the address is NOT in the database then the response will be
root@test-srx% fetch -o - http://threatstop.com/cgi-bin/validip.pl - 0 B 0 BpsYour IP address: 1.2.3.4 Address is not in the list of authorized hosts Host list updated every 15 minutes and last updated at Fri Jun 10 05:15:01 2011 GMT. It is now Fri Jun 10 05:18:36 2011
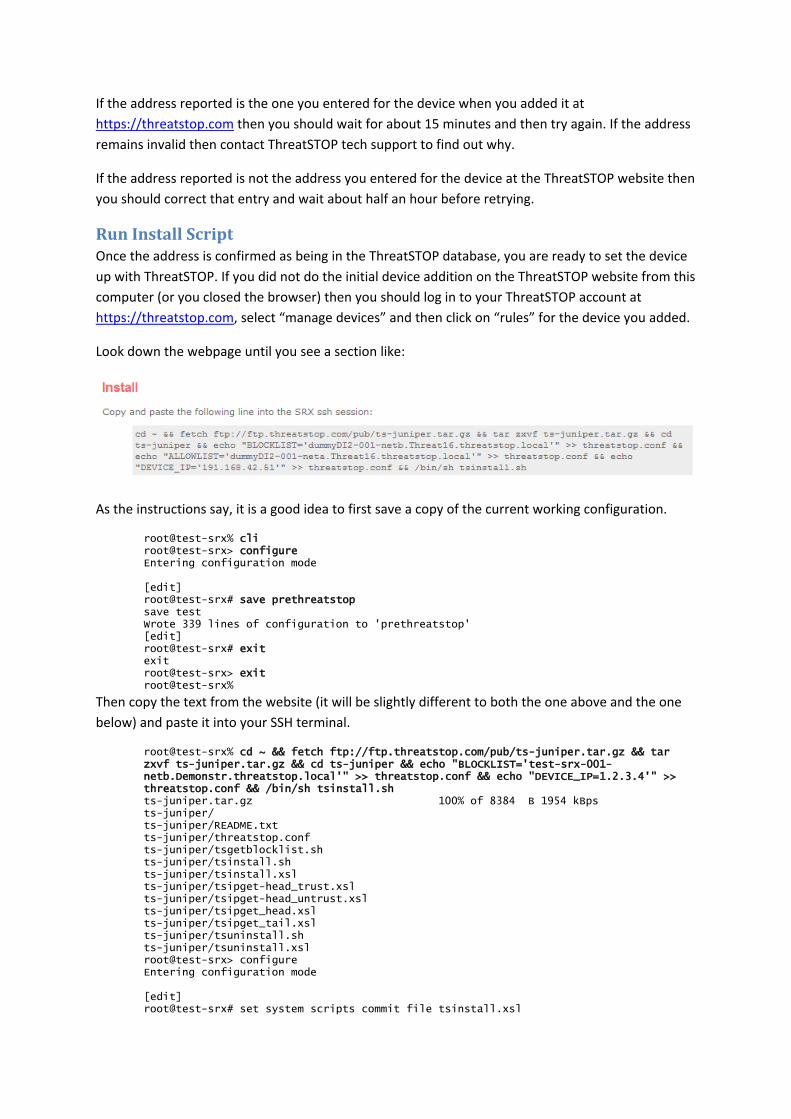
If the address reported is the one you entered for the device when you added it at
https://threatstop.com then you should wait for about 15 minutes and then try again. If the address
remains invalid then contact ThreatSTOP tech support to find out why.
If the address reported is not the address you entered for the device at the ThreatSTOP website then
you should correct that entry and wait about half an hour before retrying.
Run Install Script Once the address is confirmed as being in the ThreatSTOP database, you are ready to set the device
up with ThreatSTOP. If you did not do the initial device addition on the ThreatSTOP website from this
computer (or you closed the browser) then you should log in to your ThreatSTOP account at
https://threatstop.com, select “manage devices” and then click on “rules” for the device you added.
Look down the webpage until you see a section like:
As the instructions say, it is a good idea to first save a copy of the current working configuration.
root@test-srx% cli root@test-srx> configure Entering configuration mode [edit] root@test-srx# save prethreatstop save test Wrote 339 lines of configuration to 'prethreatstop' [edit] root@test-srx# exit exit root@test-srx> exit root@test-srx%
Then copy the text from the website (it will be slightly different to both the one above and the one
below) and paste it into your SSH terminal.
root@test-srx% cd ~ && fetch ftp://ftp.threatstop.com/pub/ts-juniper.tar.gz && tar zxvf ts-juniper.tar.gz && cd ts-juniper && echo "BLOCKLIST='test-srx-001-netb.Demonstr.threatstop.local'" >> threatstop.conf && echo "DEVICE_IP=1.2.3.4'" >> threatstop.conf && /bin/sh tsinstall.sh ts-juniper.tar.gz 100% of 8384 B 1954 kBps ts-juniper/ ts-juniper/README.txt ts-juniper/threatstop.conf ts-juniper/tsgetblocklist.sh ts-juniper/tsinstall.sh ts-juniper/tsinstall.xsl ts-juniper/tsipget-head_trust.xsl ts-juniper/tsipget-head_untrust.xsl ts-juniper/tsipget_head.xsl ts-juniper/tsipget_tail.xsl ts-juniper/tsuninstall.sh ts-juniper/tsuninstall.xsl root@test-srx> configure Entering configuration mode [edit] root@test-srx# set system scripts commit file tsinstall.xsl
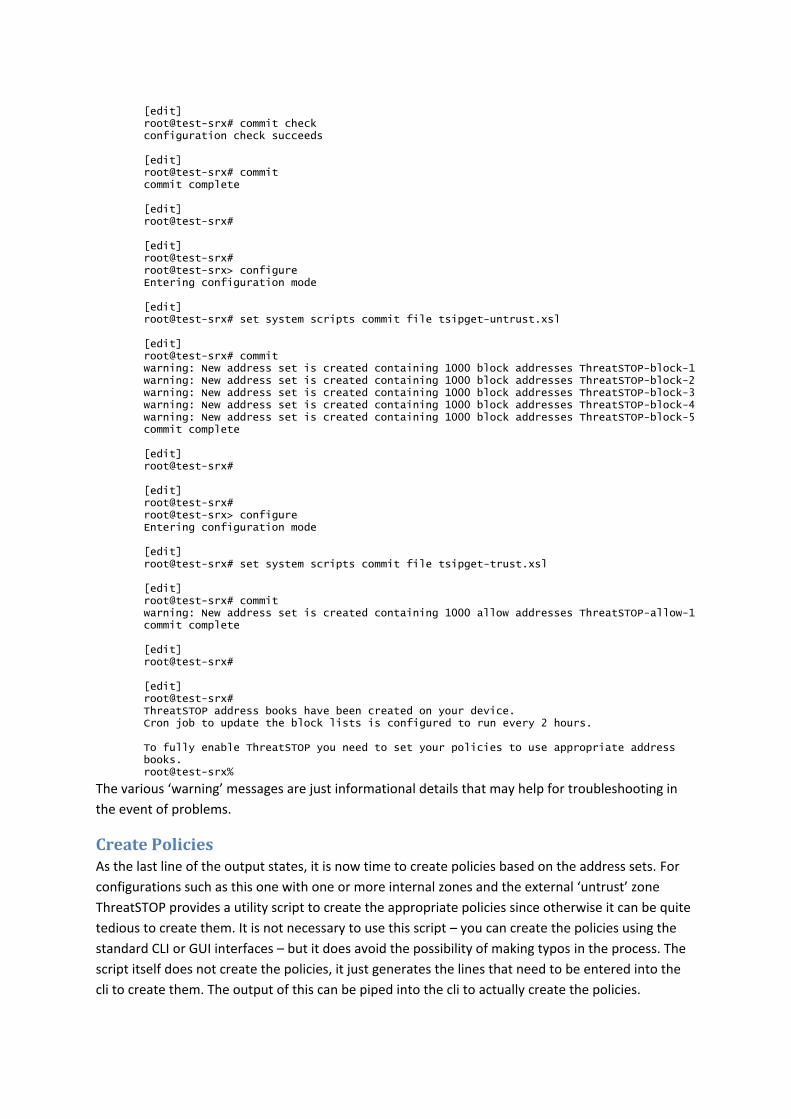
[edit] root@test-srx# commit check configuration check succeeds [edit] root@test-srx# commit commit complete [edit] root@test-srx# [edit] root@test-srx# root@test-srx> configure Entering configuration mode [edit] root@test-srx# set system scripts commit file tsipget-untrust.xsl [edit] root@test-srx# commit warning: New address set is created containing 1000 block addresses ThreatSTOP-block-1 warning: New address set is created containing 1000 block addresses ThreatSTOP-block-2 warning: New address set is created containing 1000 block addresses ThreatSTOP-block-3 warning: New address set is created containing 1000 block addresses ThreatSTOP-block-4 warning: New address set is created containing 1000 block addresses ThreatSTOP-block-5 commit complete [edit] root@test-srx# [edit] root@test-srx# root@test-srx> configure Entering configuration mode [edit] root@test-srx# set system scripts commit file tsipget-trust.xsl [edit] root@test-srx# commit warning: New address set is created containing 1000 allow addresses ThreatSTOP-allow-1 commit complete [edit] root@test-srx# [edit] root@test-srx# ThreatSTOP address books have been created on your device. Cron job to update the block lists is configured to run every 2 hours. To fully enable ThreatSTOP you need to set your policies to use appropriate address books. root@test-srx%
The various ‘warning’ messages are just informational details that may help for troubleshooting in
the event of problems.
Create Policies As the last line of the output states, it is now time to create policies based on the address sets. For
configurations such as this one with one or more internal zones and the external ‘untrust’ zone
ThreatSTOP provides a utility script to create the appropriate policies since otherwise it can be quite
tedious to create them. It is not necessary to use this script – you can create the policies using the
standard CLI or GUI interfaces – but it does avoid the possibility of making typos in the process. The
script itself does not create the policies, it just generates the lines that need to be entered into the
cli to create them. The output of this can be piped into the cli to actually create the policies.
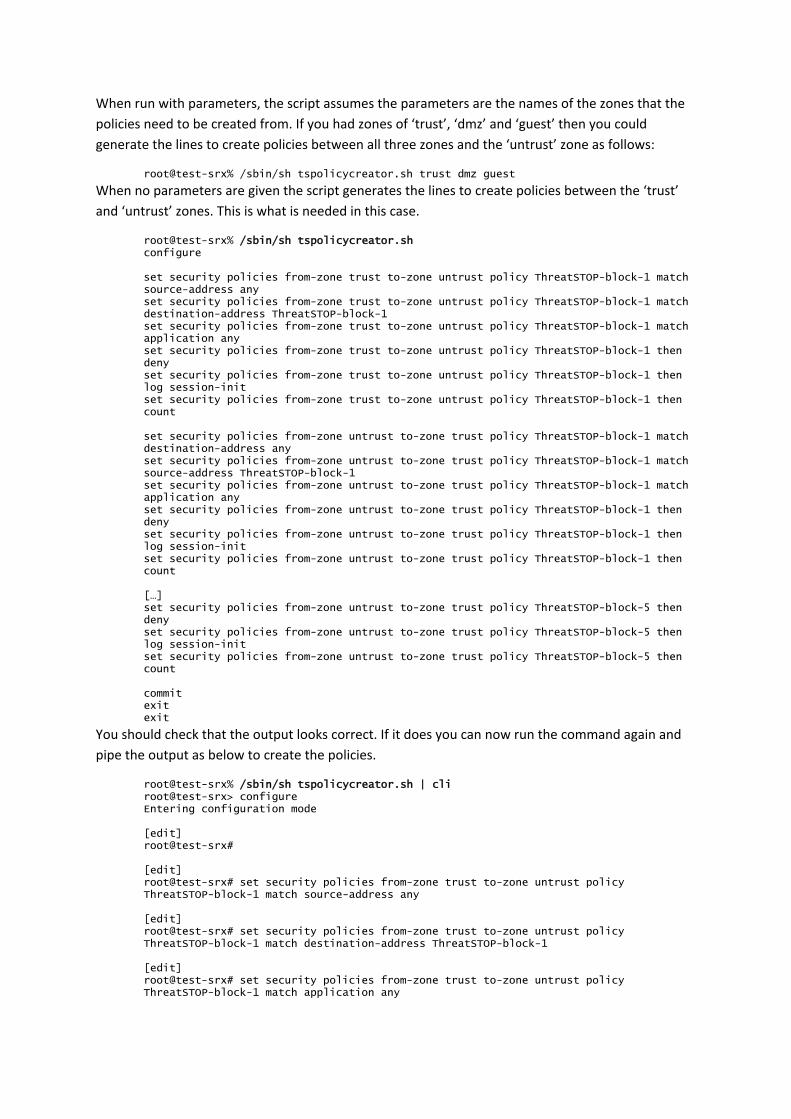
When run with parameters, the script assumes the parameters are the names of the zones that the
policies need to be created from. If you had zones of ‘trust’, ‘dmz’ and ‘guest’ then you could
generate the lines to create policies between all three zones and the ‘untrust’ zone as follows:
root@test-srx% /sbin/sh tspolicycreator.sh trust dmz guest
When no parameters are given the script generates the lines to create policies between the ‘trust’
and ‘untrust’ zones. This is what is needed in this case.
root@test-srx% /sbin/sh tspolicycreator.sh configure set security policies from-zone trust to-zone untrust policy ThreatSTOP-block-1 match source-address any set security policies from-zone trust to-zone untrust policy ThreatSTOP-block-1 match destination-address ThreatSTOP-block-1 set security policies from-zone trust to-zone untrust policy ThreatSTOP-block-1 match application any set security policies from-zone trust to-zone untrust policy ThreatSTOP-block-1 then deny set security policies from-zone trust to-zone untrust policy ThreatSTOP-block-1 then log session-init set security policies from-zone trust to-zone untrust policy ThreatSTOP-block-1 then count set security policies from-zone untrust to-zone trust policy ThreatSTOP-block-1 match destination-address any set security policies from-zone untrust to-zone trust policy ThreatSTOP-block-1 match source-address ThreatSTOP-block-1 set security policies from-zone untrust to-zone trust policy ThreatSTOP-block-1 match application any set security policies from-zone untrust to-zone trust policy ThreatSTOP-block-1 then deny set security policies from-zone untrust to-zone trust policy ThreatSTOP-block-1 then log session-init set security policies from-zone untrust to-zone trust policy ThreatSTOP-block-1 then count […] set security policies from-zone untrust to-zone trust policy ThreatSTOP-block-5 then deny set security policies from-zone untrust to-zone trust policy ThreatSTOP-block-5 then log session-init set security policies from-zone untrust to-zone trust policy ThreatSTOP-block-5 then count commit exit exit
You should check that the output looks correct. If it does you can now run the command again and
pipe the output as below to create the policies.
root@test-srx% /sbin/sh tspolicycreator.sh | cli root@test-srx> configure Entering configuration mode [edit] root@test-srx# [edit] root@test-srx# set security policies from-zone trust to-zone untrust policy ThreatSTOP-block-1 match source-address any [edit] root@test-srx# set security policies from-zone trust to-zone untrust policy ThreatSTOP-block-1 match destination-address ThreatSTOP-block-1 [edit] root@test-srx# set security policies from-zone trust to-zone untrust policy ThreatSTOP-block-1 match application any
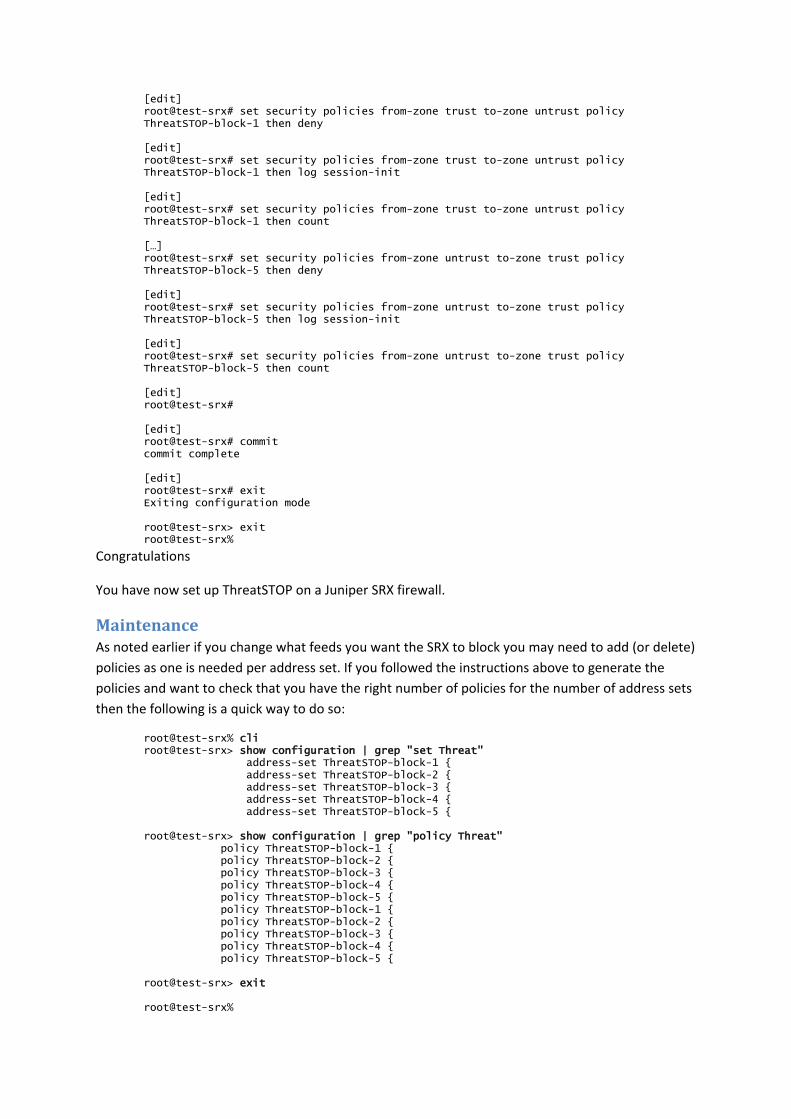
[edit] root@test-srx# set security policies from-zone trust to-zone untrust policy ThreatSTOP-block-1 then deny [edit] root@test-srx# set security policies from-zone trust to-zone untrust policy ThreatSTOP-block-1 then log session-init [edit] root@test-srx# set security policies from-zone trust to-zone untrust policy ThreatSTOP-block-1 then count […] root@test-srx# set security policies from-zone untrust to-zone trust policy ThreatSTOP-block-5 then deny [edit] root@test-srx# set security policies from-zone untrust to-zone trust policy ThreatSTOP-block-5 then log session-init [edit] root@test-srx# set security policies from-zone untrust to-zone trust policy ThreatSTOP-block-5 then count [edit] root@test-srx# [edit] root@test-srx# commit commit complete [edit] root@test-srx# exit Exiting configuration mode root@test-srx> exit root@test-srx%
Congratulations
You have now set up ThreatSTOP on a Juniper SRX firewall.
Maintenance As noted earlier if you change what feeds you want the SRX to block you may need to add (or delete)
policies as one is needed per address set. If you followed the instructions above to generate the
policies and want to check that you have the right number of policies for the number of address sets
then the following is a quick way to do so:
root@test-srx% cli root@test-srx> show configuration | grep "set Threat" address-set ThreatSTOP-block-1 { address-set ThreatSTOP-block-2 { address-set ThreatSTOP-block-3 { address-set ThreatSTOP-block-4 { address-set ThreatSTOP-block-5 { root@test-srx> show configuration | grep "policy Threat" policy ThreatSTOP-block-1 { policy ThreatSTOP-block-2 { policy ThreatSTOP-block-3 { policy ThreatSTOP-block-4 { policy ThreatSTOP-block-5 { policy ThreatSTOP-block-1 { policy ThreatSTOP-block-2 { policy ThreatSTOP-block-3 { policy ThreatSTOP-block-4 { policy ThreatSTOP-block-5 { root@test-srx> exit root@test-srx%

The policies and address set names should match. If you have multiple internal zones there will of
course be more policy lines than in this example.