Embed Size (px)
Citation preview

How you can grow muga food plantation
• Select a suitable site • Prepare land • Raise seedlings • Plant seedlings • Replenish nutrients • Training and pruning • Maintain the plantation • Maintain chawki garden
Suitable host plants
Muga silkworm is polyphagous in nature. Feeds on the foliage of a variety of food plants Primary food plants Som (Persea bombycina) and Soalu (Litsaea
polyantha,Juss) Secondary food plants are mentioned as below: Mezankari (Litsaea citrate) Kathalua (Litsaea nitida) Dighalati (Litsaea salicifolia) Patihonda (Actinodaphne obovate) Baghnala (Actinodaphne anquistifolia) Bogori (Ziziphus jujube) Bhimloti (Celastrus monosperma)
Select a suitable site Select high land for plantation which are well drained.
Prepare the land Prepare land by deep digging or ploughing up to depth of 30 cm
depth. In the hilly tracts, terrace the land and raise bunds on all sides to
prevent soil erosion. Mark out the site into convenient plots. Dig pits of one cubic foot size at a spacing of 3 m x 3 m.
Propagation through Seed Collect ripe and mature seeds during May-June. Select seeds weighing at least 0.3 g and measuring at least 0.7 mm in
diameter. Remove the seed pulp by washing the seeds in running water.

Test the seed viability by dipping seeds in water. Dry the seeds in shade and treat them with 0.2 % Ceresan. Mix the dug out soil of the pit thoroughly with 0.5 cft (5 kg) farm yard
manure (FYM) and fill up the mixture in the pits. Sow the treated seeds after soaking in water for 24 hours. Prepare the nursery bed of 5x1.5 m size and 15-20 cm height. Apply 5 cft FYM and broadcast about 2 kg seeds in each bed and
mulch with thatch. Seeds germinate in 45-60 days. Alternatively, sow the seed directly in polythene tube filled with soil,
sand and FYM mixture (1:1:1). Transfer the 2-3 months old seedlings to 15 cm x 20 cm size polytubes When the seedlings attain a height of 30 cm, nip off the apical tips with
3 to 4 leaves by hand. Spray 0.03% Dimecron solution on the seedlings/ Use seedlings for planting when they are 9 - 12 months old.
Propagation through single leaf and bud cutting
Cut 4 cm long tender branches with single leaf and single bud of selected variety of som plants.
Insert the cutting in a poly bag filled with coarse sand. The tube should be kept in shady place covering with polythene. Spray water to provide 90% moisture inside the cover Rooting started after 45 days and saplings are transferred to
nutritional media when about 60% rooting is obtained. By adopting this methodology the gestation period of seedling for
can be reduced. Use seedlings for planting when they are 9 - 12 months old.

Transplantation
The monsoon season (April - August.) when the rainfall is high, is ideal for planting of muga food plants
Select about 450 vigorously growing seedlings/ saplings for plantation in one acre of land.
Transplant 9-12 months old seedlings or 6 months old saplings / layers/ stem cuttings into pits
Plant one seedling/ sapling in each pit. Before transplanting, slit open the poly bag with a blade and remove it
gently to avoid disturbance to the root system.
Erect fencing around plantation site to avoid damage to plant from the cattle before plantation
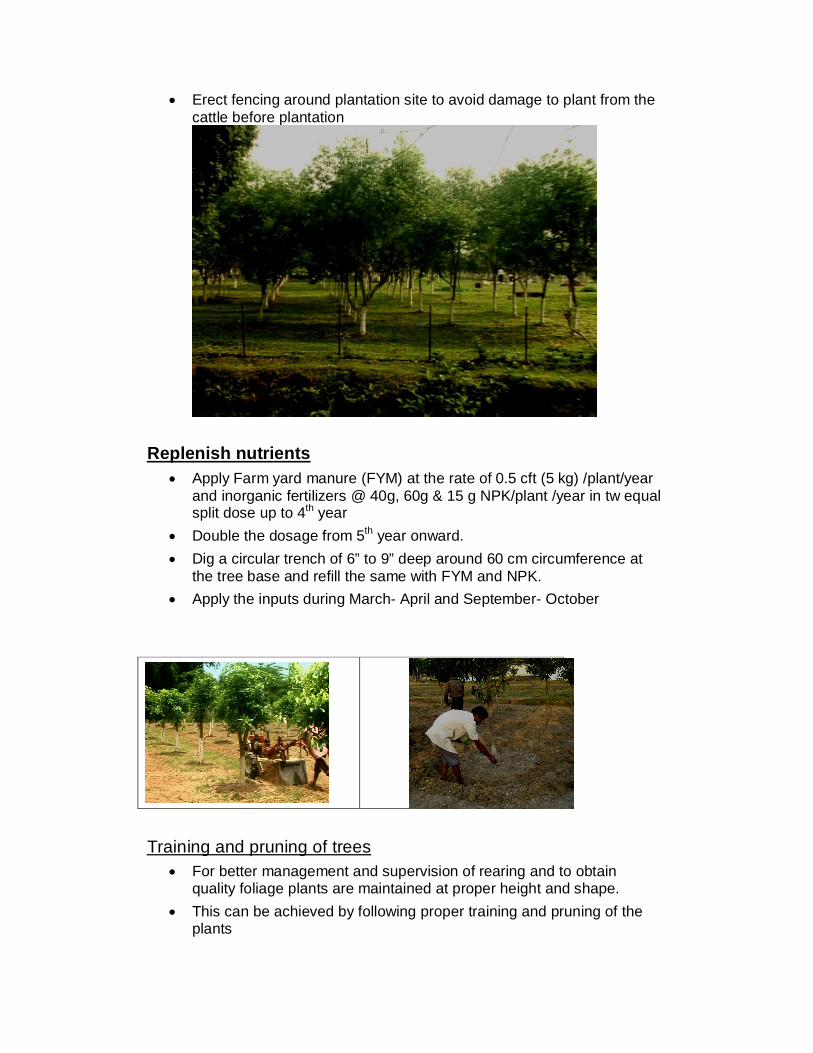
Replenish nutrients Apply Farm yard manure (FYM) at the rate of 0.5 cft (5 kg) /plant/year
and inorganic fertilizers @ 40g, 60g & 15 g NPK/plant /year in tw equal split dose up to 4th year
Double the dosage from 5th year onward. Dig a circular trench of 6” to 9” deep around 60 cm circumference at
the tree base and refill the same with FYM and NPK. Apply the inputs during March- April and September- October
Training and pruning of trees
For better management and supervision of rearing and to obtain quality foliage plants are maintained at proper height and shape.
This can be achieved by following proper training and pruning of the plants
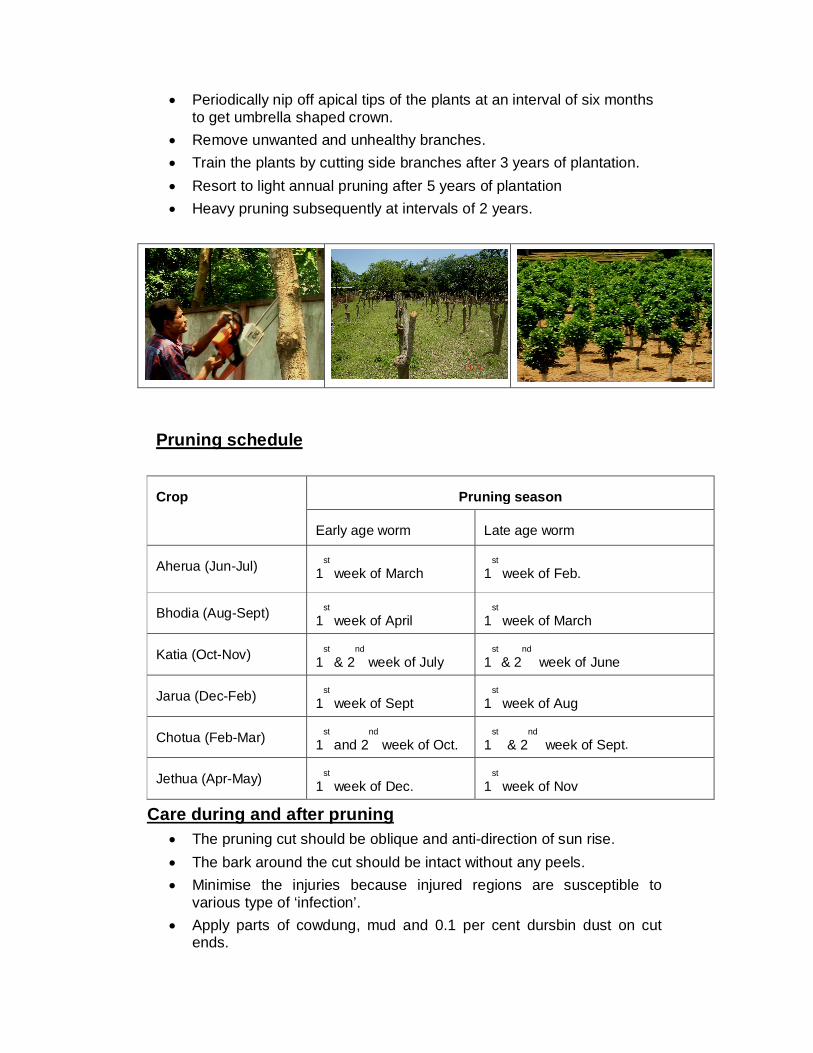
Periodically nip off apical tips of the plants at an interval of six months to get umbrella shaped crown.
Remove unwanted and unhealthy branches. Train the plants by cutting side branches after 3 years of plantation. Resort to light annual pruning after 5 years of plantation Heavy pruning subsequently at intervals of 2 years.
Pruning schedule
Crop Pruning season
Early age worm Late age worm
Aherua (Jun-Jul) 1st
week of March 1st
week of Feb.
Bhodia (Aug-Sept) 1st
week of April 1st
week of March
Katia (Oct-Nov) 1st
& 2nd
week of July 1st
& 2nd
week of June
Jarua (Dec-Feb) 1st
week of Sept 1st
week of Aug
Chotua (Feb-Mar) 1st
and 2nd
week of Oct. 1st
& 2nd
week of Sept.
Jethua (Apr-May) 1st
week of Dec. 1st
week of Nov
Care during and after pruning The pruning cut should be oblique and anti-direction of sun rise. The bark around the cut should be intact without any peels. Minimise the injuries because injured regions are susceptible to
various type of ‘infection’. Apply parts of cowdung, mud and 0.1 per cent dursbin dust on cut
ends.

Apply FYM and fertilizer (NPK) doses immediate after pruning. Maintain the plantation
Weeds are a common feature in any cultivated land. Carryout regular weeding to avoid competition for nutrients. Remove weeds manually before they flower. Loose the soil to provide good aeration to roots and percolation of
water. Control weeds like thatch grass with spray of glycel. Practice intercrops during gestation period in the vacant space of the
plantation site. Intercropping control weeds and provides additional income on the
other.
Maintain chawki garden About 20% plants should be maintained as ‘chawki garden’ by pruning
at a crown height of 6 ft. above the ground. Prune/clip the branches of the chawki garden for chawki worms as per
pruning schedule. Apply additional doses of FYM at 1cft (10 kg) and 80g ,120g, 30 g
(NPK)per plant /crop after sprouting of new leaves in addition to normal dose.
Ensure watering of the ‘chawki plants’ coinciding application of fertilizers and about 15 days before the brushing of silkworms in Chotua seed crop.
Carryout regular weeding to reduce competition for nutrients and aeration in the soil.
Inter crops with Som To increase soil fertility and soil health – dhaincha, sun hemp.

Muga Silkworm Grainage Technology
Introduction Quality seed production is one of the most important activities in
Sericulture. Rearing of healthy seed is prime requisite for success of a seed crop. It is highly essential to adopt the prescribed procedure meticulously for
production of silkworm seed cocoons and seed (eggs). Grainage operation Grainage is the site of production of disease free laying (Dfls). It is therefore imperative to adpot strict hygienic methods for production
of disease free laying. The grainage building should be well aerated with cross ventilation and
high roof with false ceiling. A broad range of temperature between 22- 28 oC and 75-85 % relative
humidity are congenial for grainage operation. METHOD OF DISINFECTION Seal the grainage hall 5-7 days prior to consignment of seed cocoons. Drench the walls & other bigger appliances with 5% bleaching powder
solution (add 50 gm bleaching powder per litre water) or 2% formalin solution (Formalin 1 part: 18 parts of water).
Dip smaller appliances in 5% bleaching powder solution. Use high grade bleaching powder with 30% chlorine content. Prepare fresh disinfectants by mixing 5 gram slaked lime / liter of 2%
formalin solution (prepare 2% formalin solution and add 5 gm slaked lime per litre).
Carry out disinfections perfectly on sunny days. Spray 2% formalin and 0.5 % slaked lime mixture @ 1liter per 2.5 sq.
mtr and leave the hall closed. During high humid condition fumigate the hall with 5% formaldehyde
solution for 24 hrs at least 3-4 days prior to and immediately after grainage.
Protective measures to be adopted like gas mask, hand gloves should be used during disinfections.

Seed cocoons collection Select only fully formed & compact cocoons from Bhorpak ( mid
period of ripen worms) or plus-minus 1 day. If needed transport the seed cocoons in single layer on trays or
cushioning with straws to avoid jerking. Avoid exposure to direct sun light, rain etc.
Consign the cocoon on trays / cages in single layer Store the seed cocoons in single layer. Maintain temp. & humidity at optimum level.

Norms for selection of seed cocoons
Crops Larval wt. (gm)
Fecundity (no) Wt. of eggs/dfl (gm)
Aherua (P2) 6.90< 145< 0.90<
Bhodia (P1) 7.23< 160< 1.00<
Aghenua(P2) 6.40< 130< 1.11<
Chatua (P1) 7.00< 150< 0.90<
Moth Emergence
Place the emerged moth in mating cage at 2:1ratio (2 male and 1 female)
and place the cage in dark and well aerated place. Keep excess male moth under Nylon net for future use in well aerated,
cool and shady place.

Moth Coupling Complete the moth pairing during evening hours. Allow 5-6 hours of coupling. During shortage of male moth, allow he same male moth a rest for 4
hours after first pairing and then use it for 2nd pairing. Natural coupling is preferred. Attend decoupling during the night itself.
Oviposition Put the fertilized female moth in Oviposition bag, hung on aerated place. Allow 3 days for oviposition.
Moth Examination-(Fujiwara method): Mark the mother moth serially after 3 days oviposition for examination. Dissect the entire (other than head and wings) portion of abdomen and
crush in moth crushing set with 0.08% potassium carbonate solution. Filter the solution with the help of thin layer of cotton spread over the
funnel and poured the filtrate in to 15 ml tube.

The tubes containing the filtrate are allowed to centrifuge for 4-5 minutes at 4000-5000 rpm for precipitation.
Precipitation in the tube will be observed after removing the water from the tube.
Put a small smear of the precipitation with the help of a small and thin stick on a slide and examine under microscope with 15 x 40 magnification.
Sort out pebrinized laying, collect and burn.
Egg Surface Sterilization , Drying and supply Wash the dfls in 2% formalin solution (1 part formalin: 18 part water) for 5
minutes and then in running water till disappearance of formalin smell. At high temperature above 30oC, 2-3 minutes washing in 2% formalin is
adequate. Place the egg in a single layer on blotting paper and dry in shade in case
of loose eggs.

Egg Incubation Put the eggs in BOD incubator at room temperature. Adjust BOD temperature to 26o C +- 1 oC in ascending/descending order
allowing the eggs to remain at least 12 hrs at each step to avoid temperature shock.
Maintain BOD RH% at 80-90 % by placing saturated solution of Potassium Chloride in a wide petridish.
Incubate till hatching. Restrict temperature fluctuation during incubation. In case of non-availability of incubator the incubation room should be
maintained at 24-28O C and with relative humidity 75-90% through indigenous technology.
DO’S DON’TS
Disinfect the grainage hall & equipments 3-4 days prior to grainage operation.
Prepare fresh disinfectant and use immediately for better result.
Spinkle Bleaching powder with Slaked lime mixture (100 gram beaching powder + 900 gram slake lime) at the entrance and around the grainage hall @ 200 gram per sq, mt in every alternate day.
Use disinfectant musk and gloves during disinfections.
Maintain proper aeration in the grainage hall.
Do not wash the grainage hall with plain water prior to spraying of formalin, bleaching powder solution.
Do not conduct grainage operation without prior disinfection.
Do not store seed cocoons in a heap.
Do not store cut/pierced cocoons, dead moth etc in the grainage hall.
Avoid dampening of grainage hall. Do not enter the grainage hall
without disinfecting hands/feet. Do not transport seed cocoons/
eggs during sunny hours of the

Maintain temperature 26-300C & 80-90 % RH during cocoon storage & grainage operation.
Store seed cocoons in a single layer in moth cages to avoid disease contamination.
Attend decoupling after 6-7 hrs of coupling.
Upon detection of pebrine burn the infected moths along with the eggs.
Use soak pit away from grainage hall.
Dispose off crushed moths etc with 2% formalin in soak pits away from grainage hall.
Burn of dead / decaying / infected pupae / moths / eggs and melted cocoons.
day. Do not use poly bags for carrying
eggs. Do not allow unauthorized person
to frequent the grainage hall.
Muga silkworm rearing technology Muga crop cycle:
Climatic conditions during Rearing of Muga Silkworm
• During commercial crops the climatic condition mostly remain congenial with suitable foliage for Muga Silkworm rearing.
• During pre-seed and seed crops the climatic condition mostly remain unsuitable with high incidence of diseases and heavy infestation of pests and predators.
• Occurrence of heavy winds and hailstorms.
IMPORTANCE OF SEED CROP Successful rearing and harvesting of quality cocoons during commercial
crops. Production of disease free and elite seed during commercial seasons. Thus to utilise the full bearing capacity of food plants. To check the outbreak of disease which generally occurs due to rearing
of inferior quality of seed. CONSTRAINTS OF PRE-SEED AND SEED CROP REARING A.Jarua crop (Dec-Jan) & Chotua crop (Feb-Mar) : • Low temperature (15-25OC), low humidity (45-80%), short
photoperiodism (6-8 hrs). • Prolong larval period (40-45 days) • High rate of uzi infestation ( 40-80%) • High incidence of diseases viz. flacherie, grasserie and muscardine. • Foliage less succulent, over matured and less nutritive. • Poor cocoon quality. B) Aherua crop (Jun-Jul) & Bhodia crop (Aug-Sept): • High temperature (34-36OC), high humidity (81-91%), and their
fluctuations. • Water stagnation in rearing field leading to high humidity. • Wastage of early stage worms due to heavy rain and hailstorms. • High incidence of Pests and predators like ants, spiders, bugs, wasps,
birds etc. • High incidence of bacterial and viral diseases. IMROVED MUGA REARING PACKAGE A. PRE BRUSHING CARE OF FOOD PLANTS: • Select systematic plantation in elevated plot for rearing. • Maintain 20% plants as chawki plot by pruning at 6 ft height as per
pruning schedule. • Apply 1 cft FYM / plant and 40:60:15 gram NPK/plant in 2 split doses 1
week before pruning. • Clear the undergrowths in the field. • Remove dry, yellow, over mature, very tender leaves, dry twigs, ant and
wasp nests from the plants 10-15 days before rearing. • Resort to regular watering of plants 15-20 days before rearing to improve
moisture content of foliage. • Dust bleaching powder & lime in the rearing plot 1 week before rearing.

PRE BRUSHING CARE OF EGGS: • Sterilize the egg surface in 2% formalin followed by through washing in
running water & dry in shade. • Incubate eggs at 26 0 C & 85% relative humidity. • Do not expose the eggs to heat, bright light or chemicals. • Adopt prescribed methods for transportation of eggs.
CARE DURING BRUSHING & CHOWKI REARING: • Cover the rearing plot with nylon net to protect silkworm . • Brush the newly hatched eggs between 5-7 am on tender leaves . • Consider the worms hatched on the 1st-3rd days only for rearing. • Brush only 2-3 dfls per plant so that the worms can feed till the 3rd instar. • Keep regular vigil on the movement of pests & predators at the rearing
site during brushing • Brush worms indoor under inclement weather conditions. • During rearing apply grease on the trunk & cover with polythene sheet to
prevent the worms crawling down and crawling up of ants on the tree.
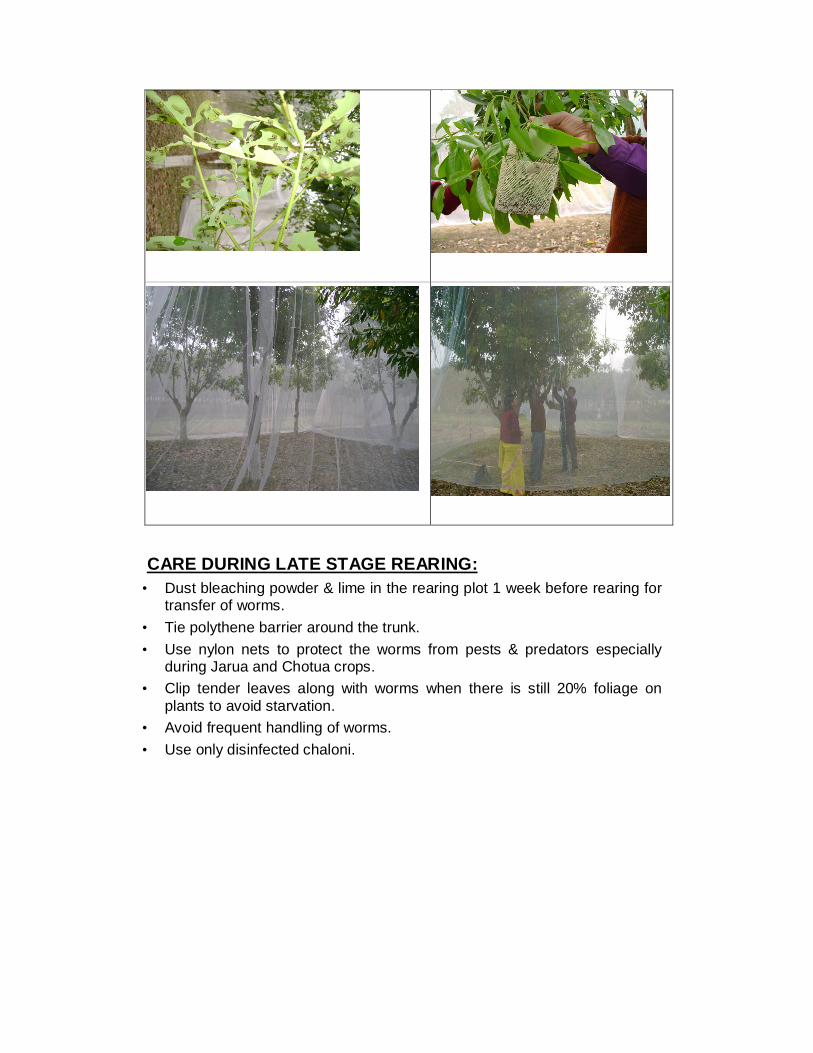
CARE DURING LATE STAGE REARING:
• Dust bleaching powder & lime in the rearing plot 1 week before rearing for transfer of worms.
• Tie polythene barrier around the trunk. • Use nylon nets to protect the worms from pests & predators especially
during Jarua and Chotua crops. • Clip tender leaves along with worms when there is still 20% foliage on
plants to avoid starvation. • Avoid frequent handling of worms. • Use only disinfected chaloni.

COLLECTION OF RIPE WORMS, COCOON HARVESTING • Collect ripe worms in bamboo baskets (khasa) • Allow the worms to spin cocoons on mountage (jali/bamboo box
mountage) • Hang jali in semi dark, well aerated and rat proof room for better
cocooning. • Harvest cocoons only after pupation (8-10 days) • Sort out good, flimsy, uzi infested cocoons after harvesting. • Cocoons weighing 5-6 gram with 0.4-0.5 gram shell weight are ideal.
PROPHYLACTIC MEASURES:
• Collect dead/diseased/irregular/weak worms & litters and examine under microscope.
• In case of pebrine out break, destroy the worms and defoliate the plants followed spaying 1% formalin solution in the rearing plots and avoid rearing in the plot for 6 months.
• Collect irregular, weak, diseased and dead worms in basin with 2% formalin solution and burn/burry in pit away from rearing.
• After completion of rearing, resort to light clipping of the plants & apply FYM/NPK.
• Clean the rearing plot and dispose the unwanted remains in the compost pit.
DO’S AND DON’TS FOR PRE-SEED & SEED CROPS
DO’S DON’TS
JARUA & CHOTUA CROP Maintain 20% plants as chawki plot & prun
the plants at 6 ft height 4 months before rearing season.
For late age rearing, prune the plants 5 months prior to rearing.
Apply FYM & NPK one week after pruning. Resort to regular watering of plants to
improve moisture content of foliage. Remove dry, yellow, over mature, very
tender leaves, dry twigs, ant & wasp nets and spider webs from plants.
Dust bleaching powder and lime mixture (1:9) in the rearing plot 1 week before rearing.
Cover the rearing site with nylon net. Brush the worms indoor under inclement
weather conditions i.e. hailstorms, heavy rain, whirl winds etc. and delay brushing by 2-5 days.
Allow the worms to spin cocoons on mountage in semi-dark, well aerated and rat-proof room for better cocooning.
Harvest cocoons only after 9-10 days of spinning.
Sort out good, flimsy, uzi infested cocoons after harvesting.
AHERUA & BHODIA CROP Select systematic plantation in elevated plot
for rearing. Maintain 20% plants as chawki plot by
pruning at 6 ft height 3 months before rearing season.
For late age rearing, prune the plants 4 months prior to rearing.
Apply FYM & NPK to the plant one week after pruning.
Remove dry, yellow, over mature, very tender leaves, dry twigs, ant & wasp nets
Do not brush excess worms / tree. Do not transfer the worms during
moult. Do not allow dead / diseased/ weak
worms to remain on food plants to prevent spreading of disease.
Do not prepare Jali with wet leaves as it may attract fungus.
Do not remove the under growth of rearing site completely to conserve moisture among the rearing plants.
Do not mount healthy, ripe worms along with uzi-infested worms.
Do not harvest cocoons before complete pupation.
Do not disturb the worms while spinning.
Do not select plantation of low lying
areas as rearing site. Do not brush worms on trees having
over matured foliage. Do not brush worms towards direct
sunlight. Do not conduct rearing in un-
maintained plots. Do not brush excess worms / tree.

Leaf spot infected twig
and spider webs from plants 10-15 days before rearing.
Apply commercial grease on tree trunk to prevent entry of ants from soil to plants.
Dust bleaching powder and lime mixture (1:9) in the plot 1 week before rearing.
Brush the newly hatched worms between 5-7 AM on tender leaves opposite to sunlight.
Transfer the worms when there is still 20% foliage on plants to avoid starvation.
Use only disinfected Chaloni. Cocoonage hall should semi-dark, well
aerated and rat-proof. Harvest cocoons only after 6-7 days of
spinning.
Do not transfer the worms during moult.
Do not allow dead / diseased/ weak worms to remain on food plants to prevent spreading of disease.
Do not prepare Jali with wet leaves as it may attract fungus.
Do not disturb the worms while spinning.
Do not harvest cocoons before complete pupation.
Diseases and pests of muga food plants Diseases of muga food plant som Leaf Spot (Phyllosticta perseae) Symptoms Appearance of circular or irregular brown spots surrounded
by yellow margin on both surface of the young and matured leaves.
More prominent on the upper surface. The first sign of the disease is appearance of slightly pale
areas on upper surface of the leaves. The lower leaf surface shows collapse of epidermis, which
loses contact with mesophyll tissues. As the disease progresses, the minute spots spread
irregularly and become brown in colour, get collapsed and form larger patches causing drying up of entire lamina.
Excessive spotting and destruction of green tissues of the leaf leads to heavy reduction in leaf yield.
Peak Season: July with 12-22 PDI. Foliar spray of 0.1% Dithane-M45 twice in 15 days interval controls the
disease up to 85% Leaf Blight or Anthracnose (Colletotrichum gloeosporioides Penz) Symptoms

Anthracnose infected twig
grey blight infected twig
Red rust infected twig
Appearance of ash coloured, round to oval spots spread irregularly over the entire young as well as matured leaves.
As the disease progresses, the spots get collapsed and malformed.
Spots usually appear nearer to the leaf edges and infected area dries into brownish black colour.
With the disease severety, brownish coloured lesions/ streaks (stromatic masses or sclerotia) appear on the twigs of the plant. The entire branch or top of the branch may get withered.
Causes severe premature leaf fall. Peak season: June- July with 48-60% plant
infection and 14-22% leaf area destruction. Management Pluck and burn the infected leaves. Since the pathogen is soil born and remain viable under the soil surface,
practice deep hoeing to destroy the pathogen inocula. Cultural practices such as pruning and pollarding are effective in
controlling the disease Spray 0.1% Indofil-M45 twice in 15 days interval. Grey Blight (Pestalotiopsis desiminata
(Thuem.) Stey) Symptoms Appearance of small, oval brown grey lesions
irregularly scattered on the leaves.
Symptoms appear both in young and matured leaves.
With the progress in disease infection, the spots get collapsed, malformed and ultimately the entire leaf dries up.
Peak season: May to August with 48-60% plant infection and 22-28% leaf area destruction. Management: Spray 0.1% Bavistin on leaves twice in 15 days interval. Red Rust (Cephaleuros parasiticus Karst) Symptoms Appearance of yellow green to orange or grey
coloured hairy postules on the upper surface of the leaves.
The postules tend to elongate into the stems and petioles.
The affected branches become stunted and bear few leaves.
Peak season: May to Augus with 12-22% leaf damage. Management

Brown blight infected twig
Red rust infected twig
Application of optimum dose of potasic fertilizers also helps in containing the disease.
Pruning and plucking of infected plant parts and leaves help in reducing the disease spread.
Spraying of 1 % Bordeoux mixture is general protective measure Diseases of muga food plant soalu BROWN BLIGHT (Colletotrichum gloeosporioides Penz.) Symptoms:
The symptoms appears roundish to irregular brown spots on young and mature leaves in the form of ‘ash’ colour, round to oval spots irregularly spread to the entire leaf.
As the disease progresses, the spots ,turning to grayish colour.
The spots got collapsed and giving a blighted appearance.
These spots usually appear nearer to the leaf edges.
The infected areas dries up and become brown to black in colour.
At the advanced stage of disease development, brownish colour (stromatic masses or sclerotia) lesions / streaks appears on the twigs also.
The top of the branch or the entire brunch may wither away Peak season: Sept-Oct. is the peak season with 76 % plant infection and
42.47 % leaf area destruction. Management: Plucking and burning of infected leaves at the initial stage can minimize
the pathogen. Use of phyto-blighton (developed by CMERTI,Lahdoigarh) @ 50 ml/ liter
of water during the month of June July to protects the leaves from the disease.
Spraying of Copper oxiychloride (Fytolan or Blitox - 50) @ 3gm/liter of water can be used as a prophylactive measures to control the disease.
Red Rust (Cephaleuros parasiticus Karst) Symptoms Yellow green, orange or gray colour hairy spots appear mostly on
the upper surface of the leaves. The pustules are circular or irregular in shape and surrounded by
chlorotic halos.

Stem borer infested plant
The affected branches become stunted and bear fewer chlorotic leaves.
Peak season: May to August. Causes 39% leaf damage. Management: Application of optimum dose of potasic fertilizers also helps in
containing the disease. Pruning and plucking of infected plant parts and leaves help in
reducing the disease spread. Spraying of 1 % Bordeoux mixture is general protective measure Source A Diagnostic Manual of Diseases and Pests of Muga Silkwoms and their
Host plants by R Chakravorty, R. Das, K. Neog, K.das and M. Sahu. Published by Central Silk Board, 2007.
Directory of Sericulture Technology 2008, Karnataka State Sericulture
Research and Development Institute, Bangalore- 560 062.
Stem Borer (Zeuzera indica) Season: December- January Nature of damage: The pest is found in both Som and Soalu plants and prevalent in entire north eastern region. The moths lay eggs on the bark of the tree and hatched larvae enter into the stem by making holes. The larvae feed on vascular tissues and pith. The life cycle takes nearly one year. Extent of damage: Maximum infestation is 71% in Som and 73% in
Soalu. The number of holes/ plant is 1 to 5. size of the holes varies from 0.5 to 2.0 cm. Management Biological method: Plugging of borer holes with cotton swab soaked in 5-15% plant
extract of Pochotia/ Neem/Titabahak can be controlled up to level of 80% infestation
Chemical method: Plug the borer holes with cotton swab soaked in 1.5% Nuvan solution
followed by mud plastering. It controls up to 90% of infestation.

Shoot borer in som twig
Amphutukoni
Leaf gall (Pauropsylla beesoni in Soalu and Aspondylia sp in Som plants).
Nature of damage: Gall is malignant tumour like growth on the leaves induced by the toxin like saliva secreted by gall insects inside the leaf epidermis.
Extent of damage: Maximum infestation is 30% in Som and 49% in Soalu. Size of the galls varies between 0.5 to 1.2 cm in diameter. Number of galls/ leaf ranges between 20 to 90.
Extent of damage: September to November with78-80% infestation.. Management Pluck and burn the infested leaves. Cultural practices like pruning, pollarding, weeding and deep hoeing are
also effective in controlling the pests. Shoot Borer Nature of damage It is common in Som and found in apical twigs of the
plants. Side shoots are bored from the nodal portion through the
axils and the main veins of the leaves. A tunnel is formed inside the main stem. Young plants die in severe cases of infestation. Extent of damage: September to November with 70-80% occurs during Management Mechanical control is the only way to reduce the infestation by cutting/
clipping and burning the infested twigs. Amphutukoni (Cricula trifenestrata Helf) Nature of damage Feed on som leaves cause serious damage. Extent of damage: June to September with 80-90% leaf loss. Management Collect the cutterpiller in any stage of
development and destroy.
Leaf gall of som Leaf gall of soalu
Source R Chakravorty, R. Das, K. Neog, K.Das and M. Sahu,(2007), A Diagnostic
Manual of Diseases and Pests of Muga Silkwom and their host plants. Published by Central Muga Eri Research & Training Institute, Central Silk Board, Jorhat, Assam.
B.K. Singh, N. Tiken Singh, 2010, Muga Silkworm Seed Organization (MSSO), P-4 Unit, Mendipathar, East Garo Hills, Meghalaya.
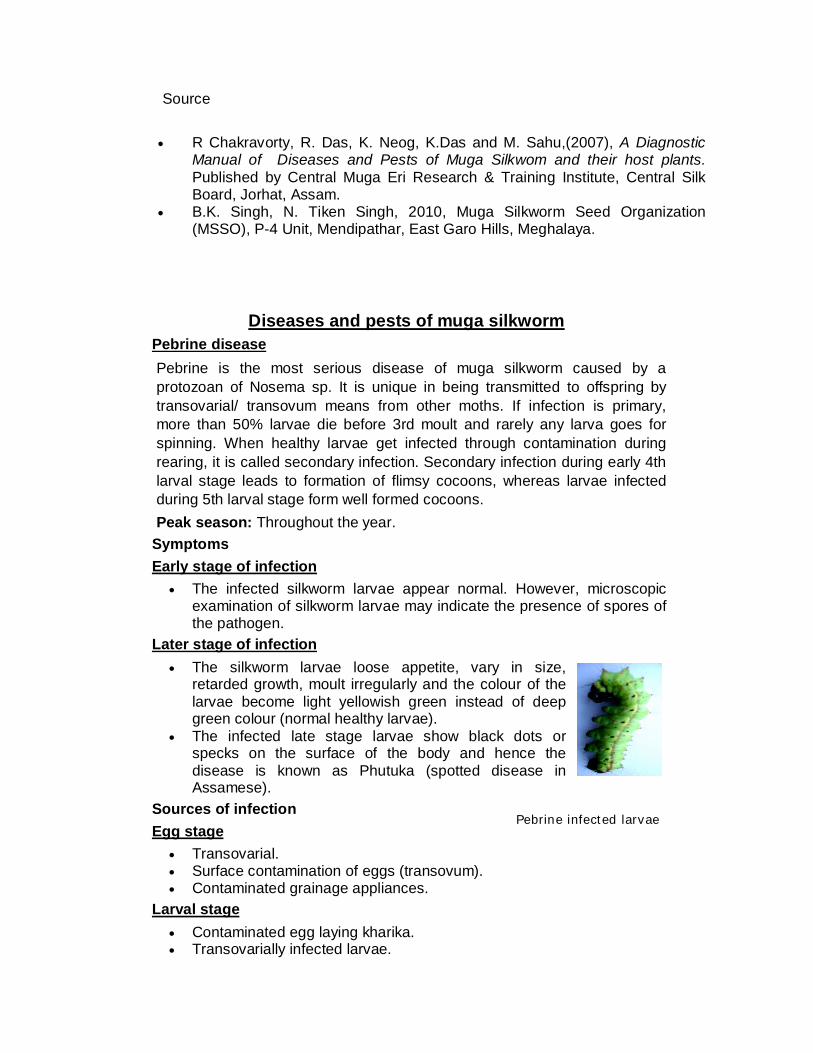
Diseases and pests of muga silkworm Pebrine disease Pebrine is the most serious disease of muga silkworm caused by a protozoan of Nosema sp. It is unique in being transmitted to offspring by transovarial/ transovum means from other moths. If infection is primary, more than 50% larvae die before 3rd moult and rarely any larva goes for spinning. When healthy larvae get infected through contamination during rearing, it is called secondary infection. Secondary infection during early 4th larval stage leads to formation of flimsy cocoons, whereas larvae infected during 5th larval stage form well formed cocoons. Peak season: Throughout the year.
Symptoms Early stage of infection
The infected silkworm larvae appear normal. However, microscopic examination of silkworm larvae may indicate the presence of spores of the pathogen.
Later stage of infection The silkworm larvae loose appetite, vary in size,
retarded growth, moult irregularly and the colour of the larvae become light yellowish green instead of deep green colour (normal healthy larvae).
The infected late stage larvae show black dots or specks on the surface of the body and hence the disease is known as Phutuka (spotted disease in Assamese).
Sources of infection Egg stage
Transovarial. Surface contamination of eggs (transovum). Contaminated grainage appliances.
Larval stage Contaminated egg laying kharika. Transovarially infected larvae.
Pebrine infected larvae

Faecal materials of infected larvae. Contaminated foliage. Contaminated rearing site. Contaminated rearing appliances.
Moth stage Infected seed cocoons. Infected moth. Infected grainage appliances. Meconium and moth scales. Grainage dust.
Spread of the disease: Pebrinized larvae extrude faecal material, gut juice and vomit which contaminate the rearing environment, appliances and host plant foliage. Mostly, consumption of contaminated foliage/ egg shell results in spread of the disease.
Management Scientific inspection of individual mother moths for detection of pebrine
during egg production. Disinfection of grainage appliances with 2% formalin before and after
every grainage operation. Use microscopically tested disease free disinfected eggs only. Surface sterilization of eggs with 2% formalin for 5 minutes. Maintain hygienic condition in egg production room and rearing sites. Follow cellular method of rearing for basic stock maintenance. Disinfection of rearing appliances before use. Check the faecal materials, unequal/ lathergic/ unsettled irregular
moulters periodically. If pebrine spores are detected, reject the entire infected crop.
Source: Central Muga Eri Research & Training Institute, Lahdoigarh, Jorhat, Assam
Flacherie: The disease is caused by bacterial species. Pseudomonas sp. and Bacillus thuringensis.
Symptoms The infected larvae become lethargic and
motionless. The colour of the haemolymph turns black. Vomits gut juices and excretes semi solid
faeces. Excreata looks like chain The larva becomes soft and translucent. Dead usually occurs within a few days of infection
Source of infection Diseased/ dead silkworms. Faucal matterof diseased worm.
Flacherie infected larvae

Infectious flacherie infected larvae
Contaminated leaves and rearing appliances. Predisposing factors
Wide fluctuation in temperature and humidity with poor quality leaves are the major predisposing factors for flacherie.
Extent of damage • Through out the year with 14.5-40% crop loss • Maximum during Aherua, Bhodia and Jarua crops when Temperature
and Relative humidity above or below the optimum ranges. Management
Use disinfected good quality seeds of disease free zones. Disinfection of rearing site with 2% formalin solution before rearing. Dust 3% slaked lime in addition to formalin in case of high incidence of
the disease in the preceding year. Identify and pick out of early stage infected larvae and destroy. Proper handling of worms during transfer Maintain hygienic condition during rearing. Feed with age specific leaves.
It is a major viral disease of muga silkworm caused by a baculovirus. High temperature clubbed with high humidity, poor quality host plant leaves are predisposing factors. Peak season: Throughout the year, predominant during rainy summer months of the year. Infectious flacherie SYMPTOMS:
• The infected silkworms are sluggish in movement.
• Lethargic and week. • The anal portion of the larvae become swollen
and ruptured. • After 2 - 3 days of infection the silkworms die
Extent of damage : • The disease is recorded during 4th and 5th
inster silkworm in Aherua pre-peed crop. • May-June with 12 - 22% crop loss.
Management • Feeding of quality and stage specific leaf. • Dusting of rearing field with lime powder. • Maintain hygienic condition of rearing field.
Grassarie The disease is caused by virus. Symptoms

Grassarie infected larvae
Mascardine infected larvae
The silkworm larvae fail to moult.
The integument becomes fragil and inter segmental portions becomes swollen.
Also stretched the skin. The body tissues and
haemolymph of the infected larvae get disintegrated into turbid white fluid
The turbid fluid contains large number of hexagonal polyhedral bodies. Source of infection
Feeding of contaminated foliage. Disintegrating diseased silkworms, their body fluids. Contaminated rearing sites and appliances.
Predisposing factors
High temperature and humidity with poor quality leaves are the major predisposing factors.
Management Disinfection of rearing site with 2% formalin solution before rearing. Dust 3% slaked lime in addition to usual disinfection in case of high
incidence of disease in preceding rearing. Pick out growth retarded/ lethargic/ irregular moulters and destroy. Feeding of quality and stage specific leaf. Ensure proper hygiene during rearing. .
Mascardine Causal Organism: Beauvoria bassiana Mascardine is one of the major diseases of silkworm. However, it is less prevalent in muga silkworm and occurs
Symptoms The infected larvae loose
the appetite . Become inactive. The colour of the larvae
change to pale . Ceased the movement
within 12-18 hours of infection.
Within another 6 -8 hours the larvae die and gradually whole body of the larvae covered with white encrustation.
Source of infection Contaminated soil. Mummified / diseased larvae.

Uzi maggot and adult
Contaminated rearing environment. Spread of the disease
The conidia/ spores of the pathogenic fungus are dispersed by wind. The conidia on contact with larval integument germinate, penetrate into
the larval body and cause infection. Extent of damage : Winter seasons, when night temperature fall down and day
temperature high with foggy weather is the most favourable for out break of it.
57- 88 % crop loss
Management • Brushing of newly hatch worms in the sunny places during winter. • Disinfect the rearing field with lime powder and bleaching powder
before and after rearing. • Dusting of slaked lime during rearing period to maintain the humidity. • Maintain hygienic condition. Provide silk worm stage wise quality
leaves. • Use the “LAHDOI” developed by Pathology section ,CMER&TI. Collection and destruction of dead/ diseased larvae Pickout sick or dead worms with forceps/ chopstick and put in 2%
formalin solution. Bury the carcasses in a pit and cover the soil. Wash hands with formalin or dettol solution after handling dead or
infected larvae. Do not allow birds, ants or poultry to eat the carcasses.
Uzi fly (Exorista sorbillans and Blepharipa zebina ) Nature of damage: It is the major pest of muga silkworm. The fly lays eggs on the integument of the worms in the dorsal and dorso-lateral side. After hatching from the eggs, the maggots of the
fly penetrate into the larval body and feed on the tissues of the worms. The mature maggots come out of the larvae/ pupae and undergo pupation in the rearing field or grainage hall. The uzi infested muga silkworm dies during larval or pupal stage. Season of incidence: Prevalent throughout the year, peak during December to march.
Management Rear the silkworm under nylon mosquito net during peak infestation
period (December to March), which ensures 80-90% control. During transfer of late stage worms, remove the fly eggs from the
integument of the silkworm larvae with the help of forceps. Keep the rearing field clean and dust with bleaching powder during
rearing.

Spider
Red ant
Mount uzi infested worms in separate Jali. Harvest and stifle the uzi infested cocoons on 4th and 5th day of
spinning. Collect and destroy the maggot/ pupae of the fly. Burn heavily infested worms.
Apanteles (Apanteles stantoni) Nature of damage Usually infect the early stage silkworms. Apanteles lays eggs inside the body of silkworm larvae by inserting the ovipositor through the tubercles after maturation. The mature maggots form pupae in aggregation outside the body of the silkworm larvae. Season of incidence: Prevalent during summer and winter months of the year.
Management Rearing of silkworm under nylon mosquito net. Keep the rearing field clean and dust with bleaching powder during
rearing. Collect and destroy the maggots/ pupae of the fly
along with the silkworm larvae. Spider: Attacks 1st instar worms
Wasp (Vespa orientalis) It occurs during June-July to August-September months. It attacks early stage worms by lacerating and picking young age worms. It can be controlled by covering silkworm rearing by nylon nets and destroying hives.
Red ants The red ants are also serious pest in many muga growing areas. It attacks 1st stage worms. The lost due to red ants are reported to be 5-10%. They can be controlled with the spray of 2% Rogor (insecticide) before 15 days of rearing or burning down their nest well before the rearing.
Grass hopper: They attack the 2nd to 3rd stage worms. Lost due to grass hoppers are minimal
Source:
R Chakravorty, R. Das, K. Neog, K. Das and M. Sahu,(2007), A Diagnostic Manual of Diseases and Pests of Muga Silkwom and their host plants. Published by Central Muga Eri Research & Training Institute, Central Silk Board, Jorhat, Assam
Apanteles stantoni

Package of practices of Muga, Eri and Mulberry Sericulture for North Eastern region of India, 2005, Central Muga Eri Research & Training Institute, Lahdoigarh, Jorhat, Assam.
Contributors: Dr. R. Das, Dr. K. Das, Dr. K. Neog, CMER&TI, Lahdoigarh.