Embed Size (px)
Citation preview

How to wear HijabHow to wear HijabHow to wear HijabHow to wear Hijab

How to Wear HijabHow to Wear HijabHow to Wear HijabHow to Wear Hijab
Hijab Style 1:Hijab Style 1:Hijab Style 1:Hijab Style 1:
Step 1. Step 1. Step 1. Step 1. Place a pashmina over your head with one side longer than the
other, as seen in the picture.
Step 2.Step 2.Step 2.Step 2. Fold back the scarf behind the nape/neck so the two edges meet
together.
Step 3. Step 3. Step 3. Step 3. Using a safety pin, pin the two edges together behind the back of
the neck.
Step 4. Step 4. Step 4. Step 4. This picture shows the front view of step 3. When pinning behind
the neck, make sure the front of the scarf has a smooth finish and is a
comfortable fit.
Step 5. Step 5. Step 5. Step 5. Take the longer end of the scarf and start to bring round under the
chin.

Step 6. Step 6. Step 6. Step 6. Continue to take the scarf up round to the other side. You may have
to adjust the rest of the scarf around the shoulders a little so that it wraps
round smoothly.
Step 7. Step 7. Step 7. Step 7. Here is a side view of step 6. This will help understand step 7 more
clearly.
Step 8. Step 8. Step 8. Step 8. This picture shows how the scarf has been brought round to the
opposite side.
Step 9. Step 9. Step 9. Step 9. Adjust the scarf so it falls evenly around your shoulders, you may
also have to finger comb the the scarf at the forehead so no creases show
on the front part of the scarf. Once everything is to your satisfaction, pin the
top scarf to the part around the neck.
Step 10. Step 10. Step 10. Step 10. Front view of step 9. Once the scarf has been pinned, you can
adjust the scarf a little more until you're happy with the way it looks.
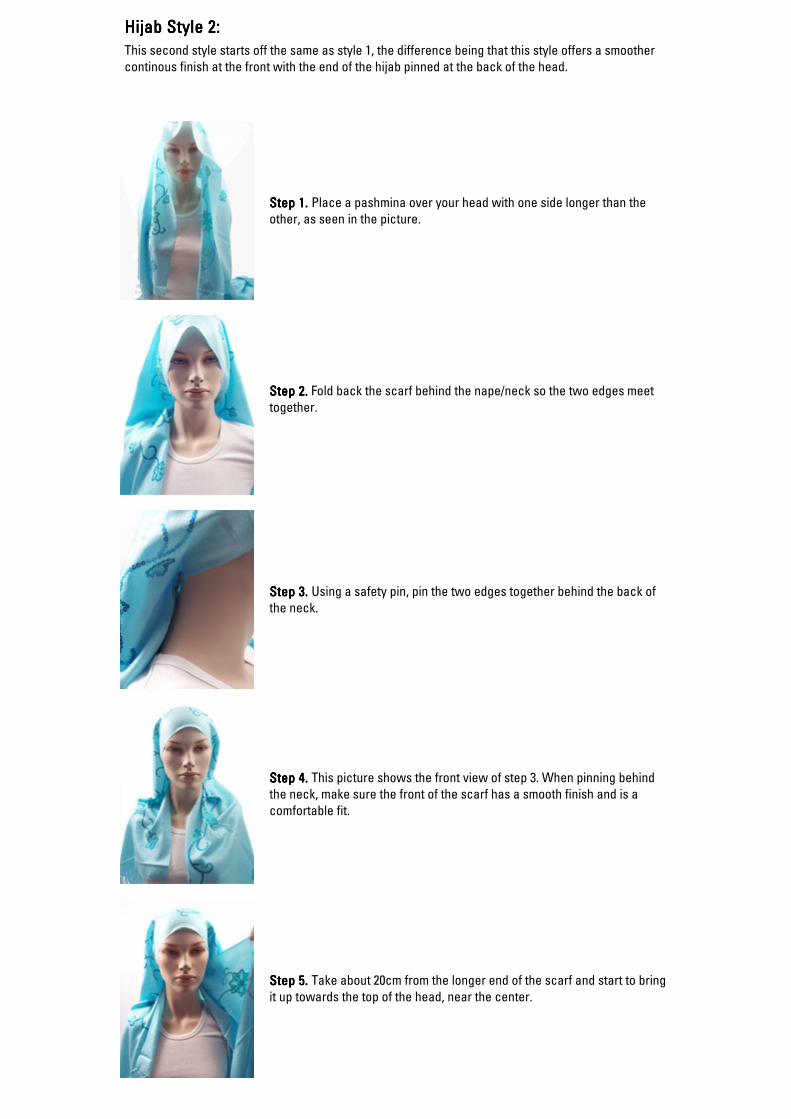
Hijab Style 2:Hijab Style 2:Hijab Style 2:Hijab Style 2:
This second style starts off the same as style 1, the difference being that this style offers a smoother
continous finish at the front with the end of the hijab pinned at the back of the head.
Step 1. Step 1. Step 1. Step 1. Place a pashmina over your head with one side longer than the
other, as seen in the picture.
Step 2.Step 2.Step 2.Step 2. Fold back the scarf behind the nape/neck so the two edges meet
together.
Step 3. Step 3. Step 3. Step 3. Using a safety pin, pin the two edges together behind the back of
the neck.
StStStStep 4. ep 4. ep 4. ep 4. This picture shows the front view of step 3. When pinning behind
the neck, make sure the front of the scarf has a smooth finish and is a
comfortable fit.
Step 5. Step 5. Step 5. Step 5. Take about 20cm from the longer end of the scarf and start to bring
it up towards the top of the head, near the center.
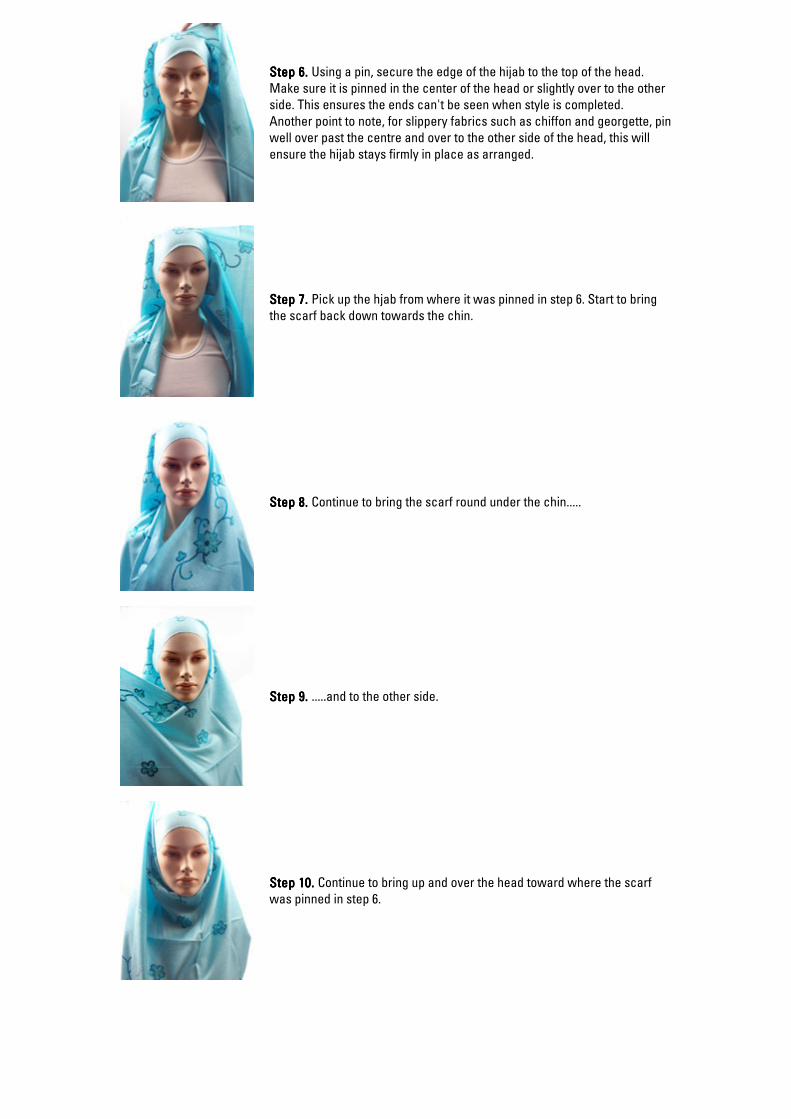
Step 6. Step 6. Step 6. Step 6. Using a pin, secure the edge of the hijab to the top of the head.
Make sure it is pinned in the center of the head or slightly over to the other
side. This ensures the ends can't be seen when style is completed.
Another point to note, for slippery fabrics such as chiffon and georgette, pin
well over past the centre and over to the other side of the head, this will
ensure the hijab stays firmly in place as arranged.
Step 7. Step 7. Step 7. Step 7. Pick up the hjab from where it was pinned in step 6. Start to bring
the scarf back down towards the chin.
Step 8. Step 8. Step 8. Step 8. Continue to bring the scarf round under the chin.....
Step 9. Step 9. Step 9. Step 9. .....and to the other side.
Step 10. Step 10. Step 10. Step 10. Continue to bring up and over the head toward where the scarf
was pinned in step 6.
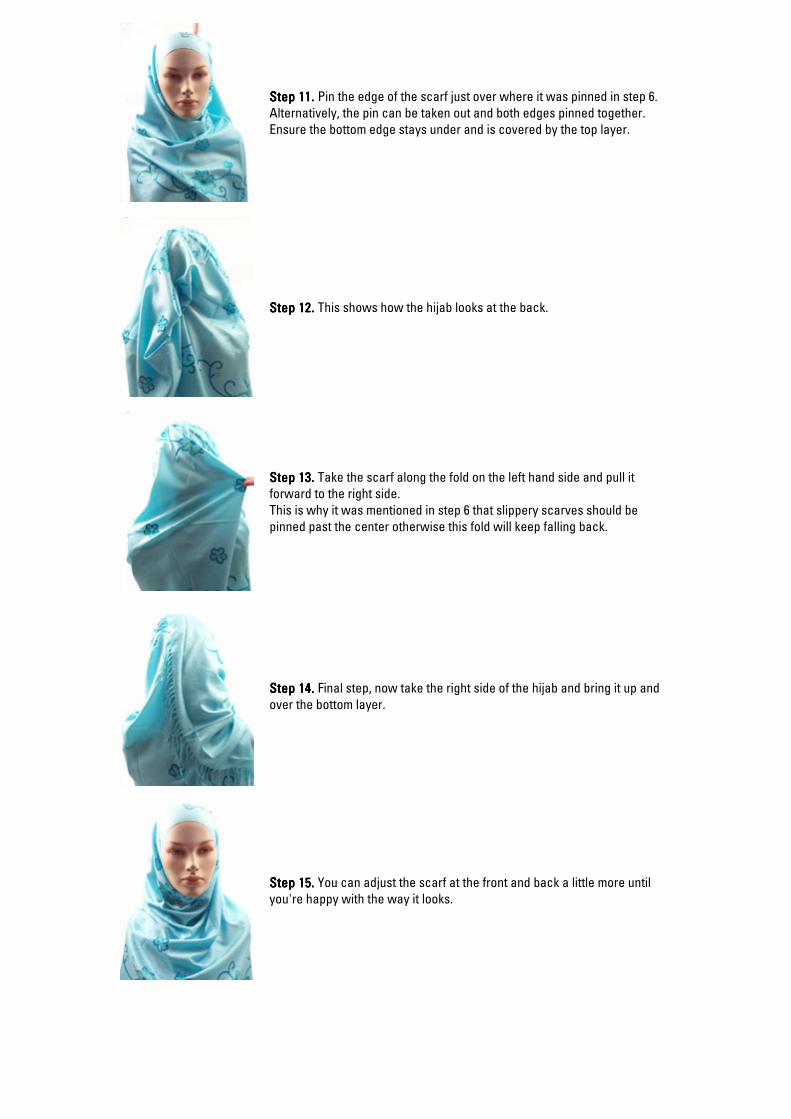
Step 11. Step 11. Step 11. Step 11. Pin the edge of the scarf just over where it was pinned in step 6.
Alternatively, the pin can be taken out and both edges pinned together.
Ensure the bottom edge stays under and is covered by the top layer.
Step 12. Step 12. Step 12. Step 12. This shows how the hijab looks at the back.
Step 13. Step 13. Step 13. Step 13. Take the scarf along the fold on the left hand side and pull it
forward to the right side.
This is why it was mentioned in step 6 that slippery scarves should be
pinned past the center otherwise this fold will keep falling back.
Step 14. Step 14. Step 14. Step 14. Final step, now take the right side of the hijab and bring it up and
over the bottom layer.
Step 15. Step 15. Step 15. Step 15. You can adjust the scarf at the front and back a little more until
you're happy with the way it looks.
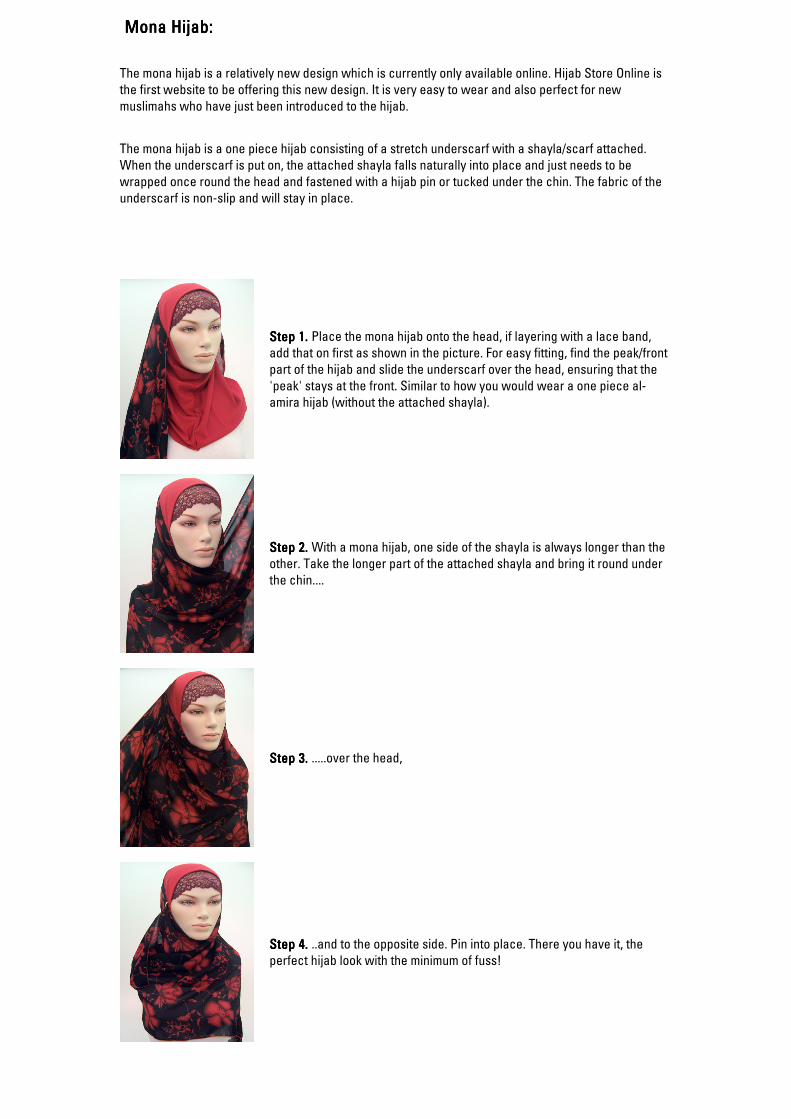
Mona Hijab:Mona Hijab:Mona Hijab:Mona Hijab:
The mona hijab is a relatively new design which is currently only available online. Hijab Store Online is
the first website to be offering this new design. It is very easy to wear and also perfect for new
muslimahs who have just been introduced to the hijab.
The mona hijab is a one piece hijab consisting of a stretch underscarf with a shayla/scarf attached.
When the underscarf is put on, the attached shayla falls naturally into place and just needs to be
wrapped once round the head and fastened with a hijab pin or tucked under the chin. The fabric of the
underscarf is non-slip and will stay in place.
Step 1. Step 1. Step 1. Step 1. Place the mona hijab onto the head, if layering with a lace band,
add that on first as shown in the picture. For easy fitting, find the peak/front
part of the hijab and slide the underscarf over the head, ensuring that the
'peak' stays at the front. Similar to how you would wear a one piece al-
amira hijab (without the attached shayla).
Step 2. Step 2. Step 2. Step 2. With a mona hijab, one side of the shayla is always longer than the
other. Take the longer part of the attached shayla and bring it round under
the chin....
Step 3. Step 3. Step 3. Step 3. .....over the head,
Step 4. Step 4. Step 4. Step 4. ..and to the opposite side. Pin into place. There you have it, the
perfect hijab look with the minimum of fuss!

Velcro Hijab: Velcro Hijab: Velcro Hijab: Velcro Hijab:
The 'Velcro Hijab' is a new design, exclusive to Hijab Store Online. These have elastic velcro
atttached to the front of the hijab which is then connected at the back of the neck for a secure, neat
finish.
Step 1. Step 1. Step 1. Step 1. First image shows how the elastic velcro is connected to the ends
of the front part of the hijab.
Step 2. Step 2. Step 2. Step 2. The velcro ends are taken to the back of the nape and fastened at
the back of the neck, giving a clean secure fit.
Step 3. Step 3. Step 3. Step 3. For a simple finish, one end of the hijab can be placed over one
shoulder.
Step 4. Step 4. Step 4. Step 4. Following on from the last image, the other end is placed over the
other shoulder. This can also be pinned at the back of the head for a more
secure finish with a hijab pin.

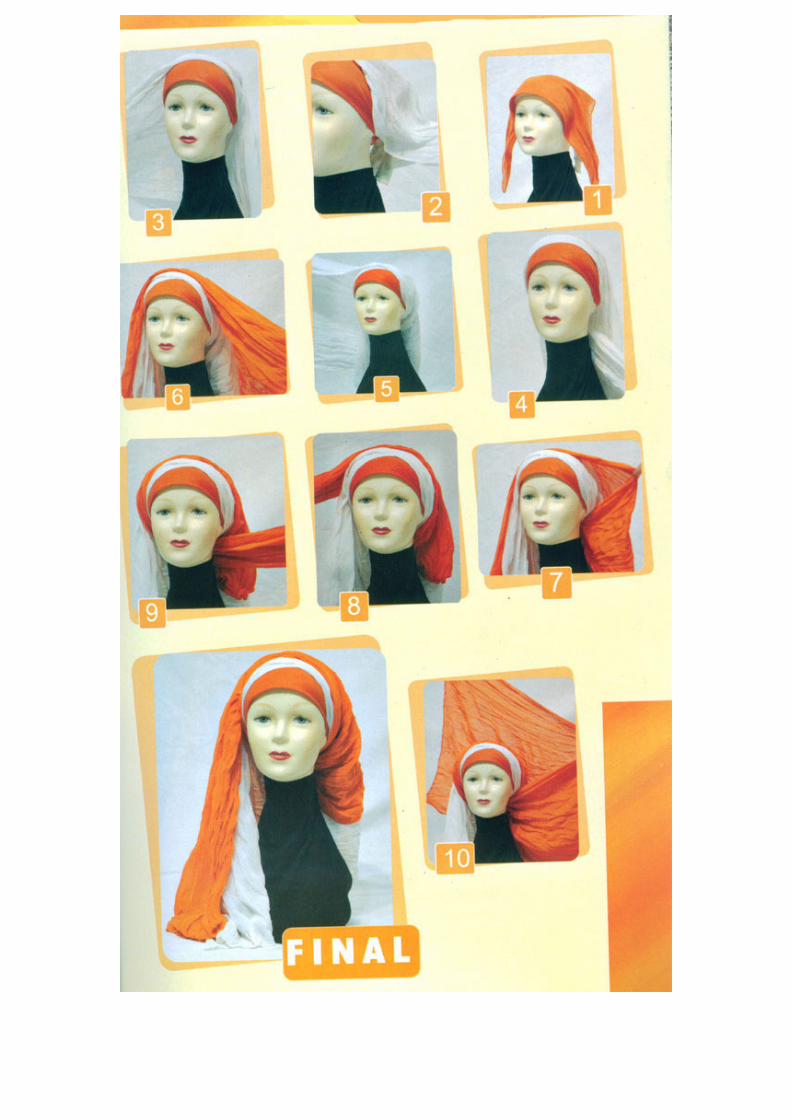
Turban StyTurban StyTurban StyTurban Style Bonnets:le Bonnets:le Bonnets:le Bonnets:
NEW design turban style bonnets. Easy to
wear and wrap as shown below.
Step 1. Step 1. Step 1. Step 1. Centre ruched portion on head.
Step 2. Step 2. Step 2. Step 2. Take sides to the back of the head and bring each
side round to the front on the opposite shoulder.
Step 3. Step 3. Step 3. Step 3. Fold sides and swing around head.
Step 4. Step 4. Step 4. Step 4. Let it overlap in the centre, proceed alternating
sides until no more fabric is left.
Step 5. Step 5. Step 5. Step 5. Tuck excess parts underneath. As an alternative,
tuck one end in and bring the other round to the front and
pin up at the side, below the ear. Or add a shayla/scarf
and drape as you wish on the turban.