Embed Size (px)
Citation preview
How to Setup Scan to SMB to a Microsoft® Vista™ Workstation
Using a bizhub C451/ C550
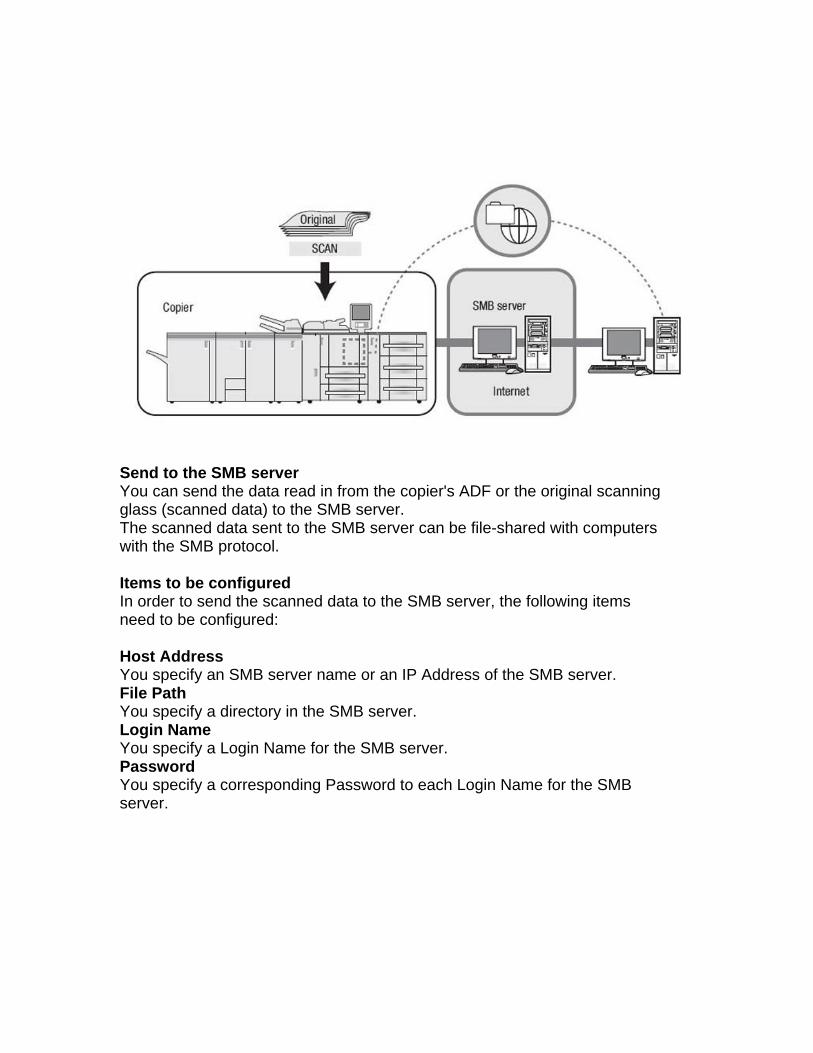
Send to the SMB server You can send the data read in from the copier's ADF or the original scanning glass (scanned data) to the SMB server. The scanned data sent to the SMB server can be file-shared with computers with the SMB protocol. Items to be configured In order to send the scanned data to the SMB server, the following items need to be configured: Host Address You specify an SMB server name or an IP Address of the SMB server. File Path You specify a directory in the SMB server. Login Name You specify a Login Name for the SMB server. Password You specify a corresponding Password to each Login Name for the SMB server.

Configuring your Microsoft® Vista™ Workstation To be able to Scan to SMB
At the Workstation/PC: 1. Right-click on the Network icon on the desktop. 2. Select Properties.
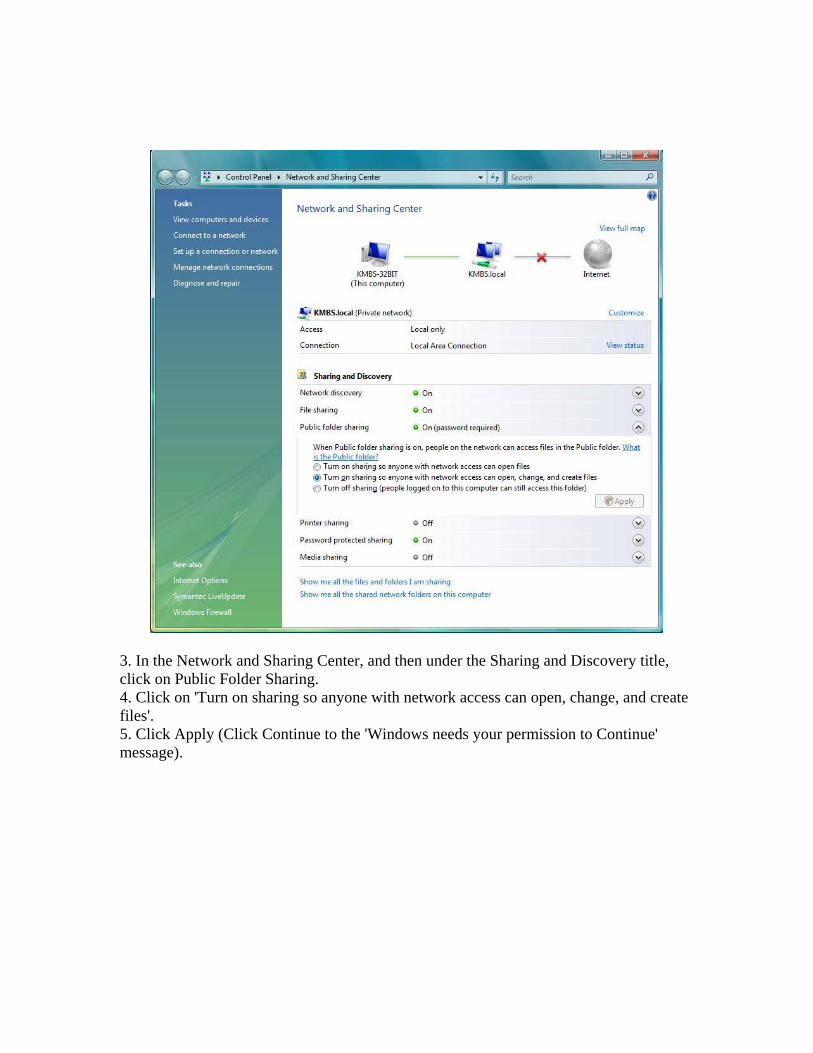
3. In the Network and Sharing Center, and then under the Sharing and Discovery title, click on Public Folder Sharing. 4. Click on 'Turn on sharing so anyone with network access can open, change, and create files'. 5. Click Apply (Click Continue to the 'Windows needs your permission to Continue' message).
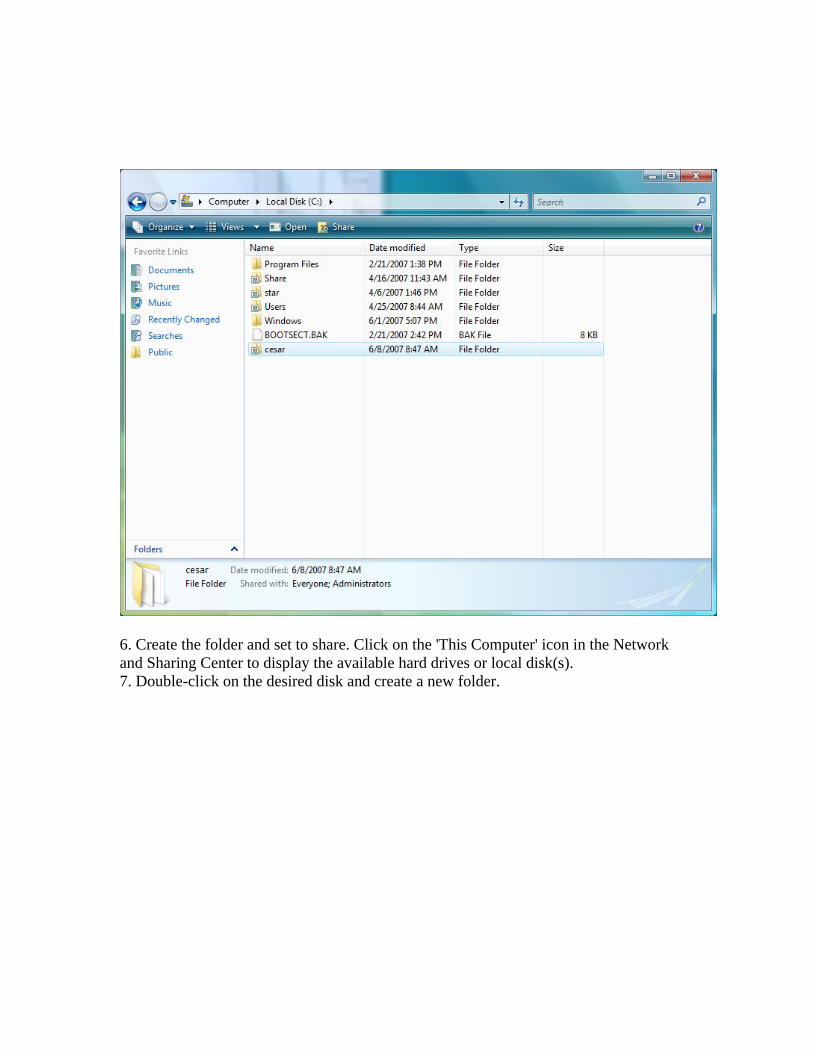
6. Create the folder and set to share. Click on the 'This Computer' icon in the Network and Sharing Center to display the available hard drives or local disk(s). 7. Double-click on the desired disk and create a new folder.
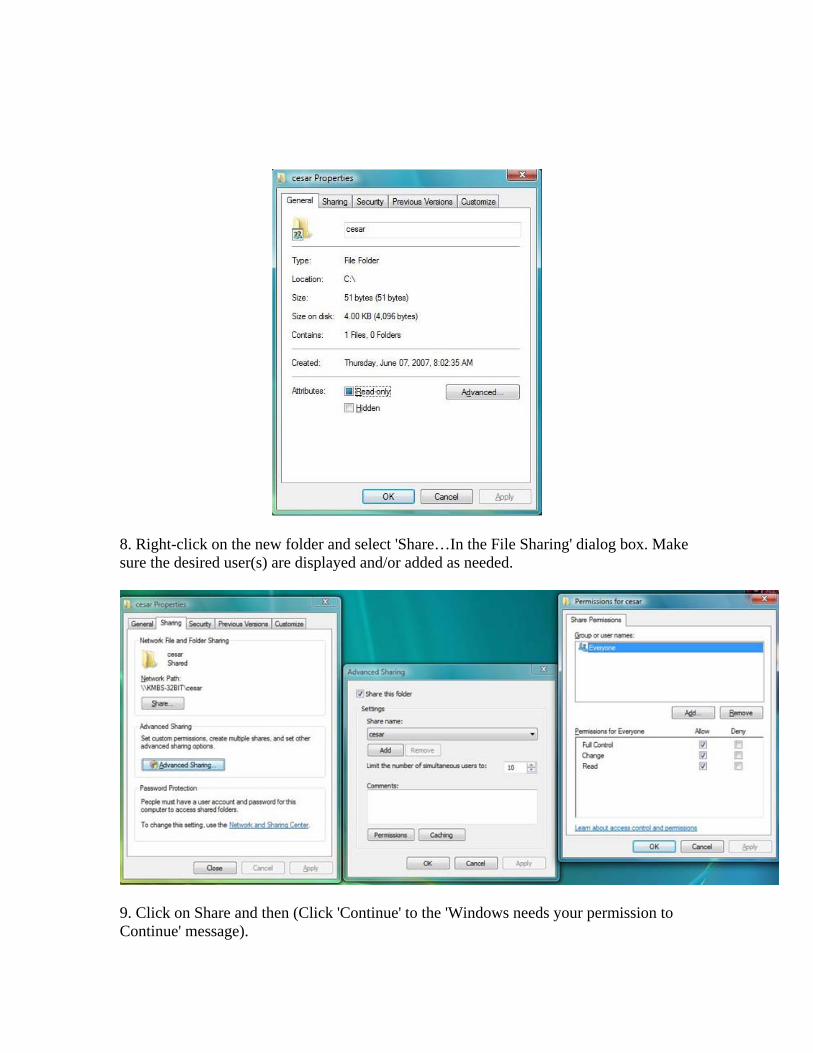
8. Right-click on the new folder and select 'Share…In the File Sharing' dialog box. Make sure the desired user(s) are displayed and/or added as needed.
9. Click on Share and then (Click 'Continue' to the 'Windows needs your permission to Continue' message).
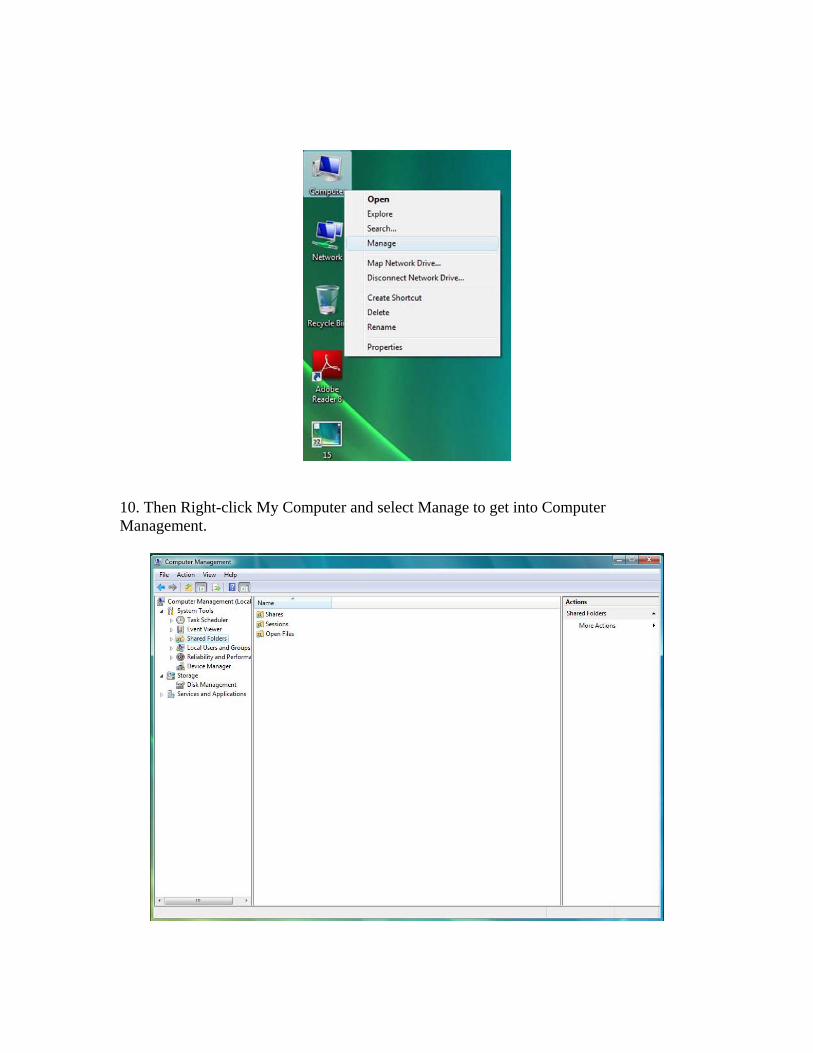
10. Then Right-click My Computer and select Manage to get into Computer Management.

11. Select Shared Folders
12. Under Shares right click on the screen and select New Share 13. Click on Next
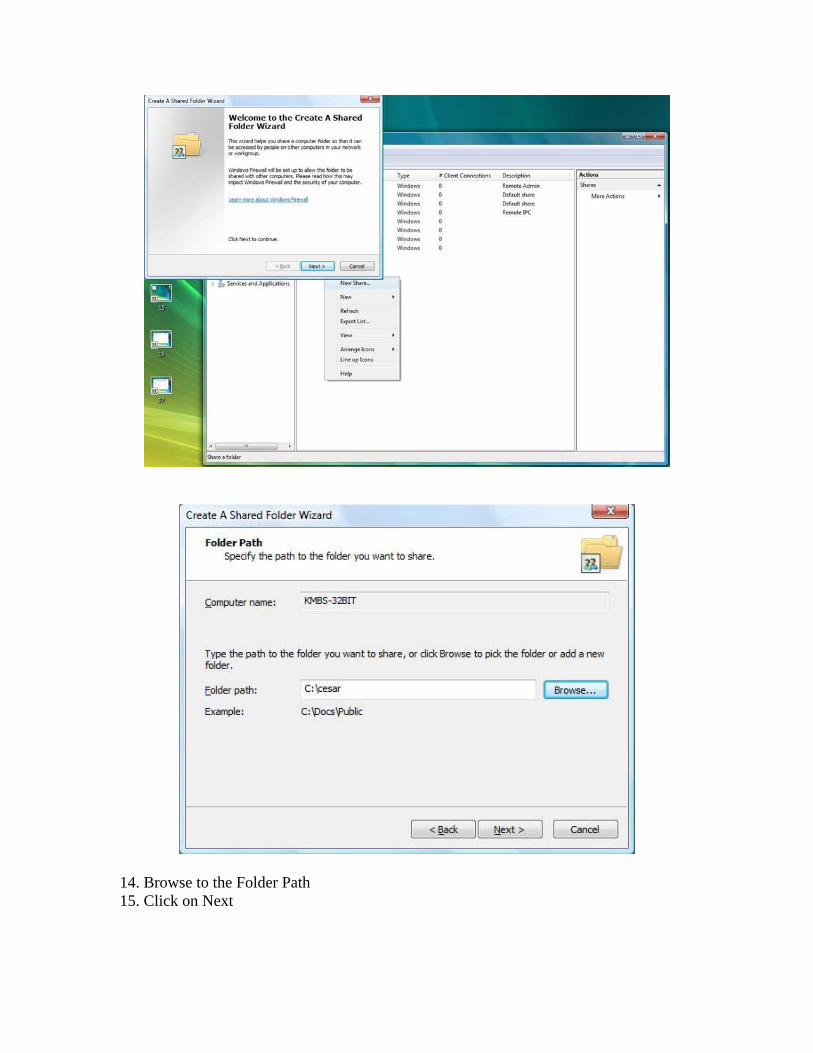
14. Browse to the Folder Path 15. Click on Next
16. Enter the Share Name 17. Click on Next
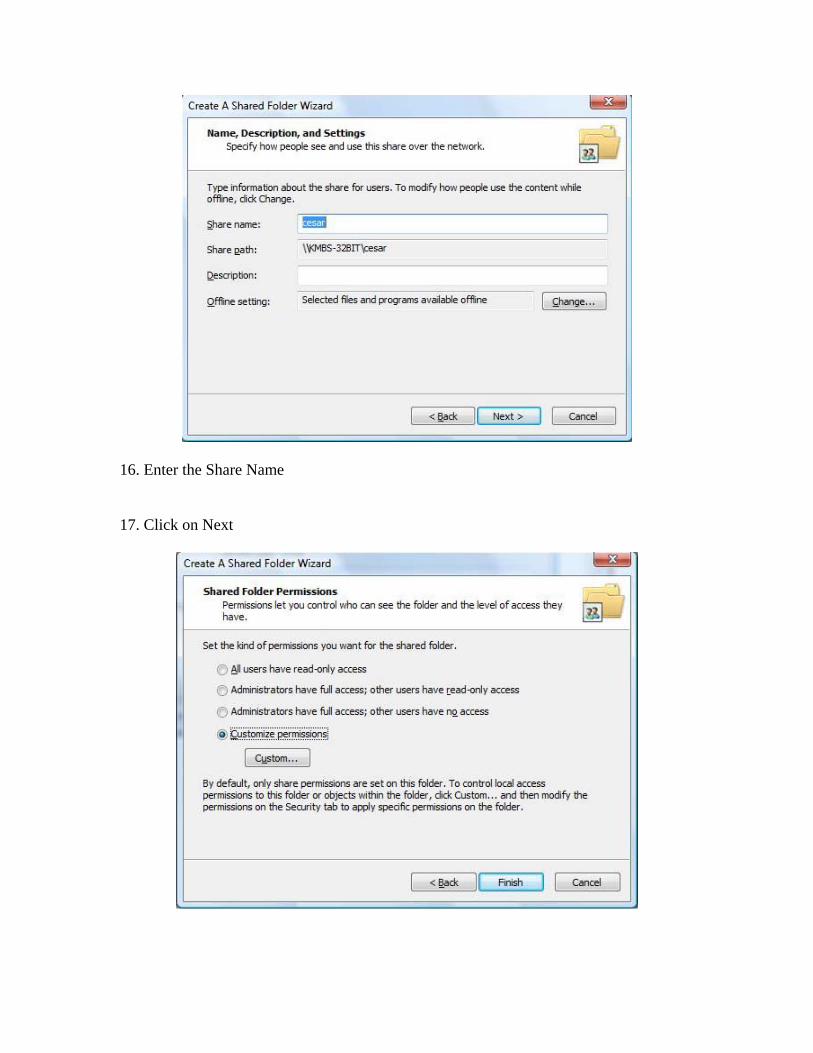
18. Under Shared Folder Permissions choose Customize Permissions 19. Click on Custom
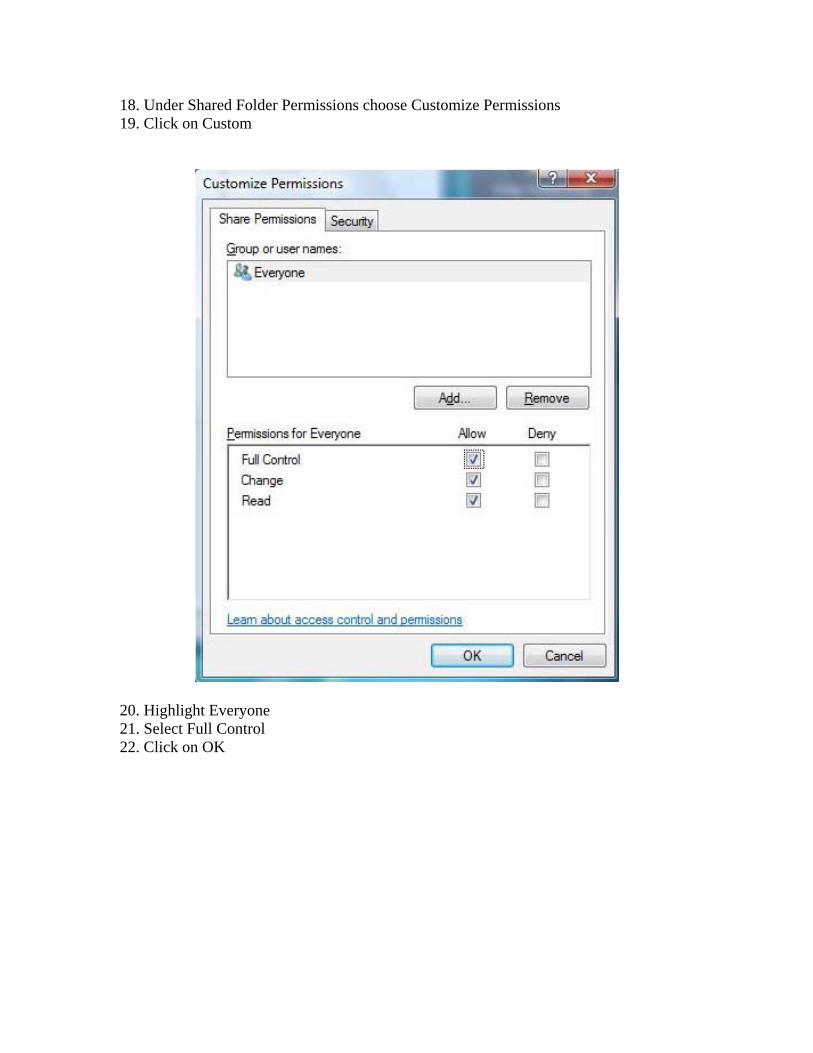
20. Highlight Everyone 21. Select Full Control 22. Click on OK
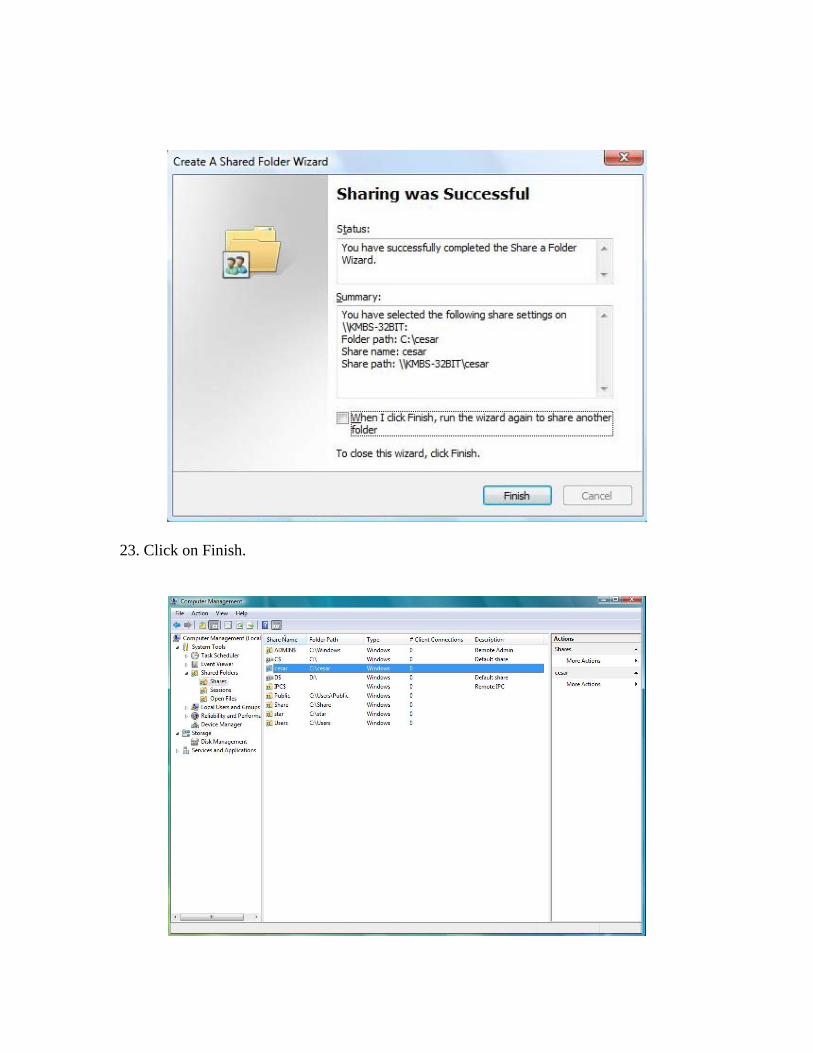
23. Click on Finish.
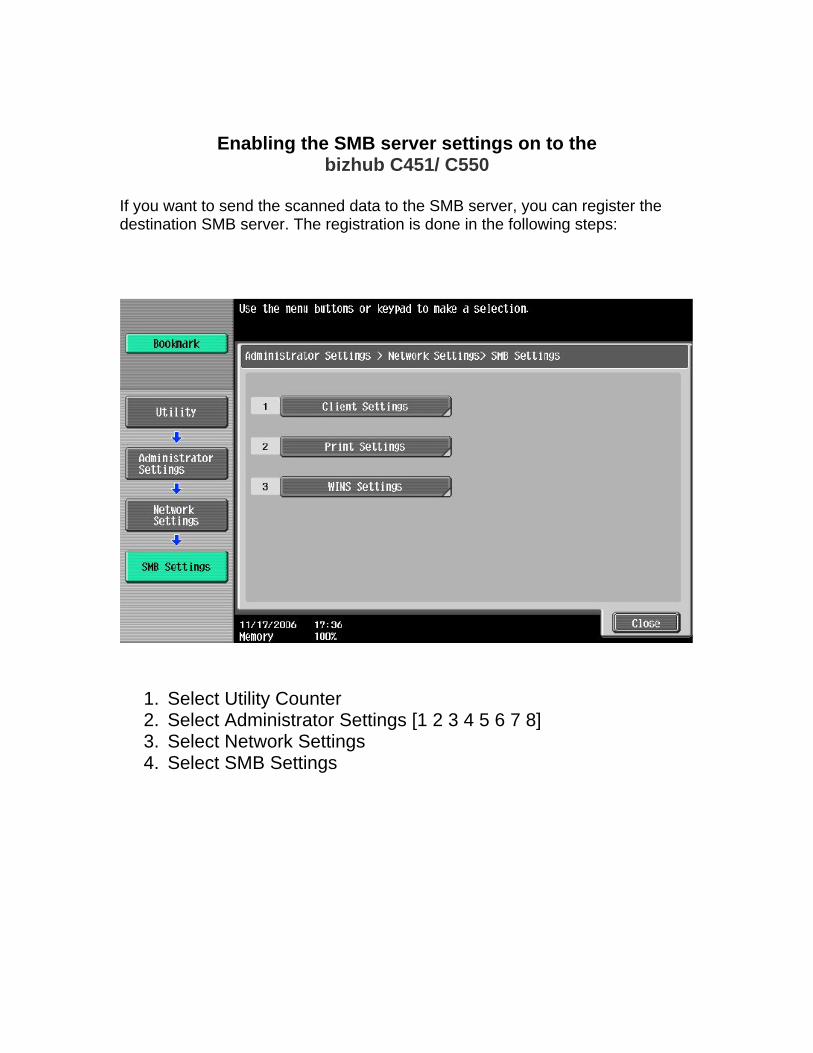
Enabling the SMB server settings on to the bizhub C451/ C550
If you want to send the scanned data to the SMB server, you can register the destination SMB server. The registration is done in the following steps:
1. Select Utility Counter 2. Select Administrator Settings [1 2 3 4 5 6 7 8] 3. Select Network Settings 4. Select SMB Settings
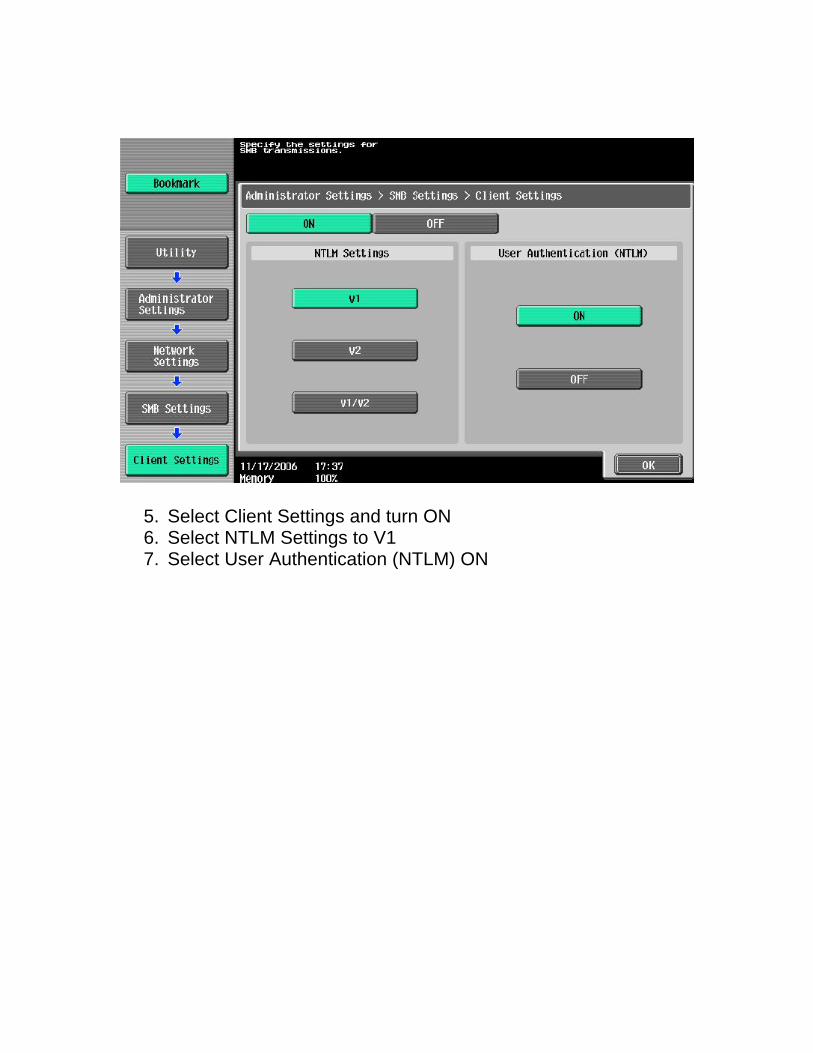
5. Select Client Settings and turn ON 6. Select NTLM Settings to V1 7. Select User Authentication (NTLM) ON
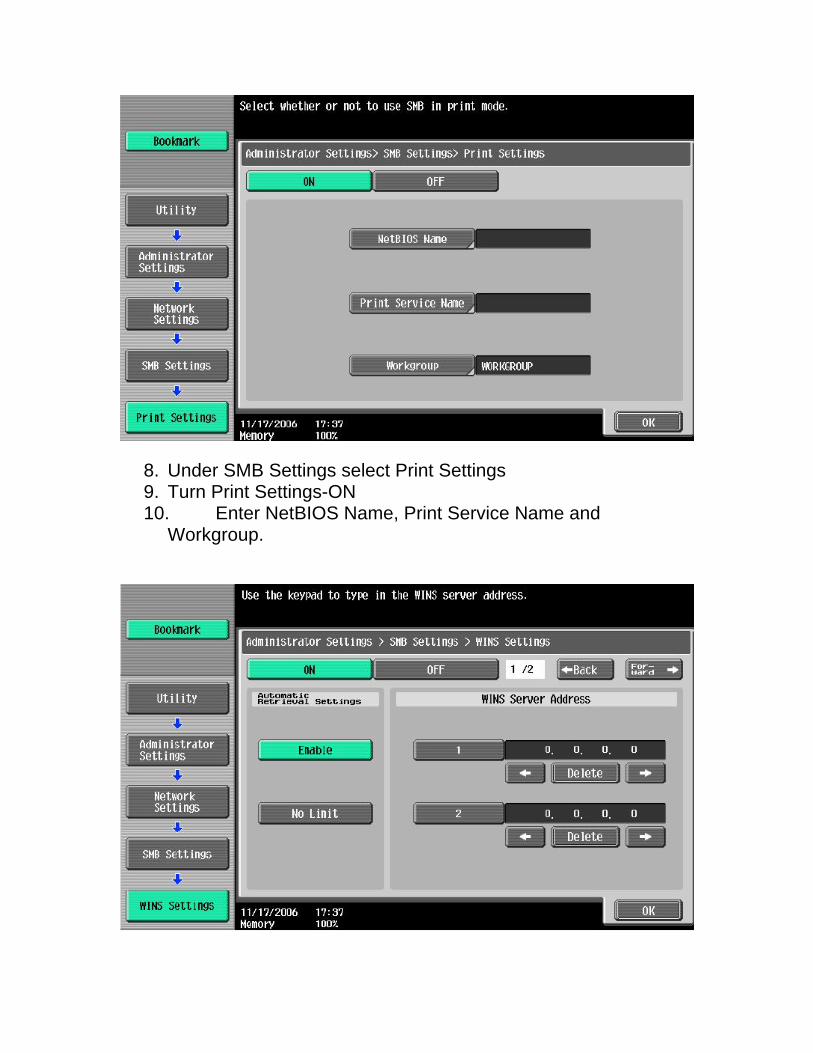
8. Under SMB Settings select Print Settings 9. Turn Print Settings-ON 10. Enter NetBIOS Name, Print Service Name and
Workgroup.
11. Under SMB Settings go to WINS Settings 12. Enable WINS Settings and enter IP Address if Customer
is using WINS for Name Resolution.
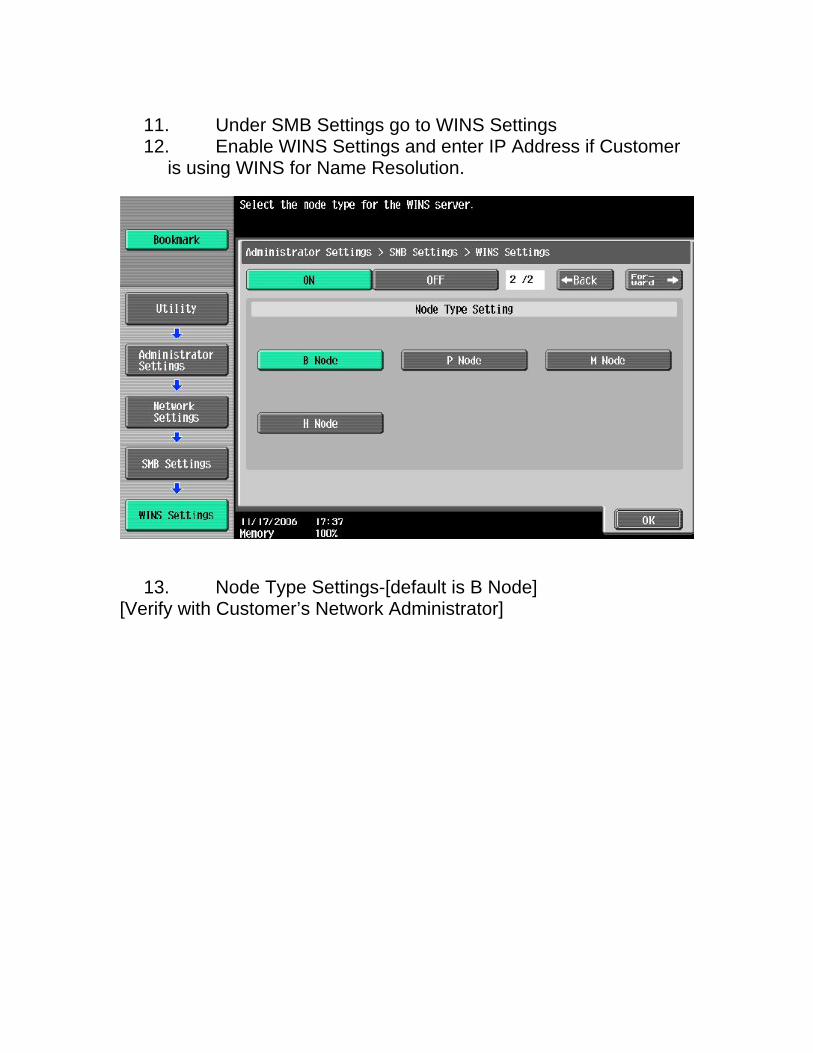
13. Node Type Settings-[default is B Node] [Verify with Customer’s Network Administrator]
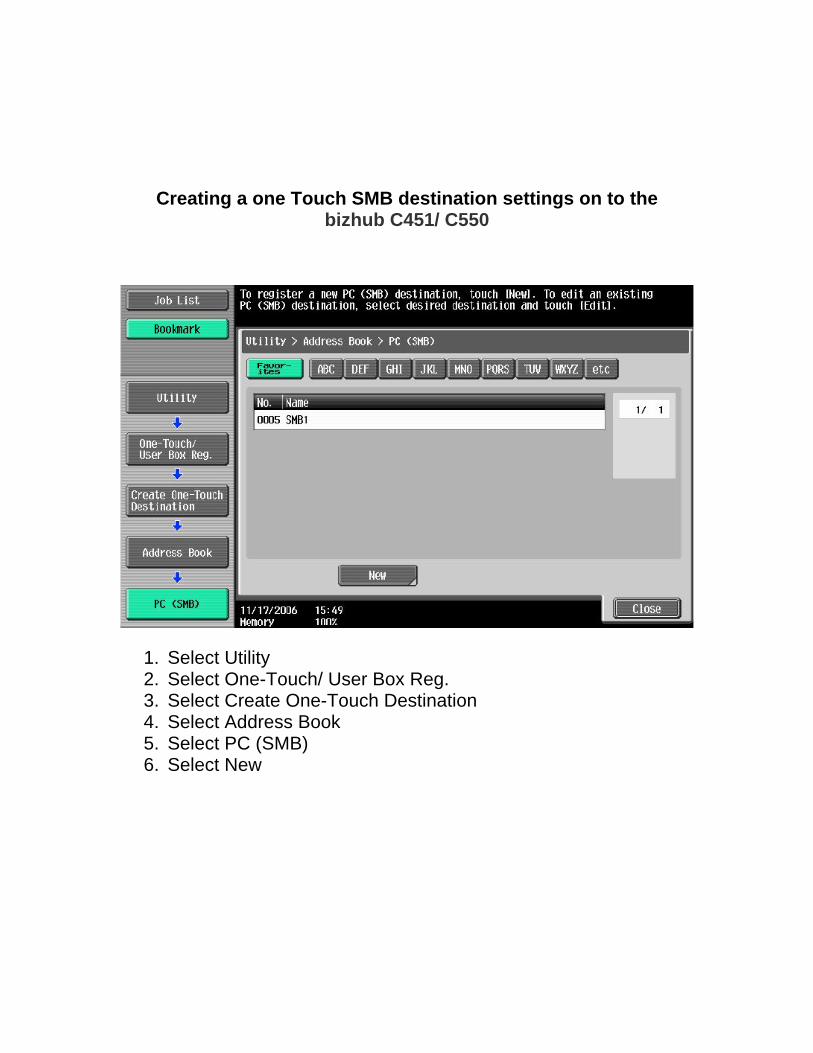
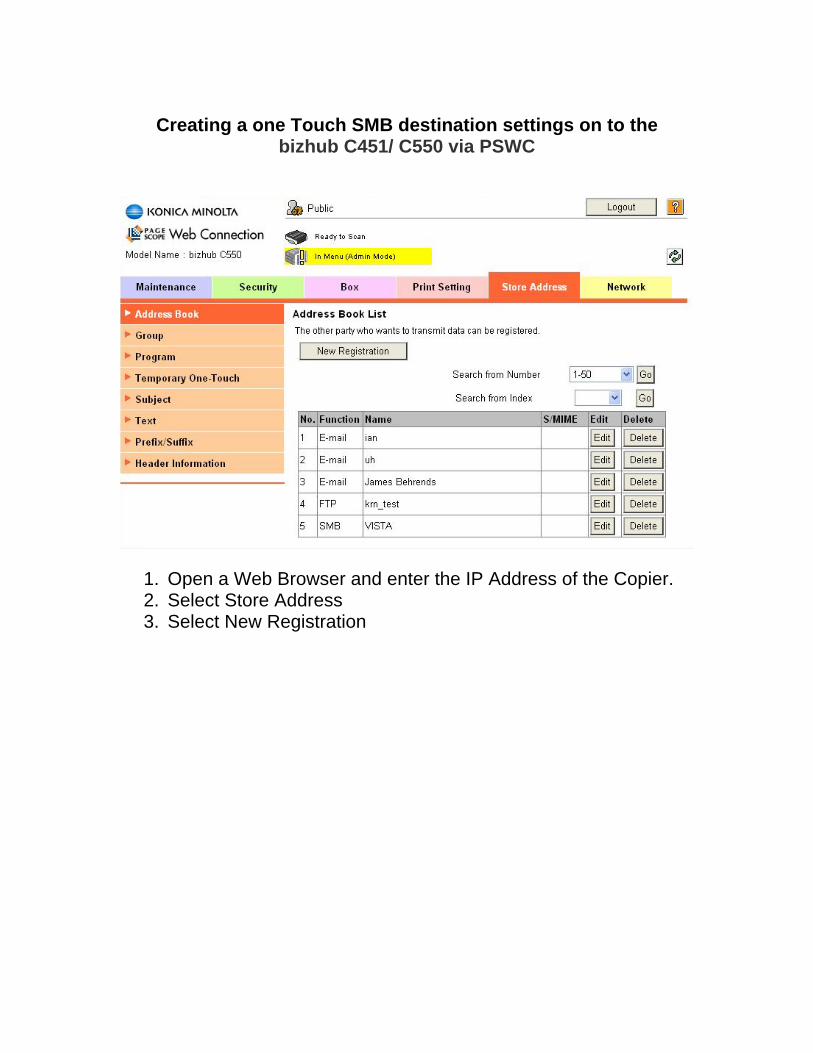
Creating a one Touch SMB destination settings on to the bizhub C451/ C550
1. Select Utility 2. Select One-Touch/ User Box Reg. 3. Select Create One-Touch Destination 4. Select Address Book 5. Select PC (SMB) 6. Select New
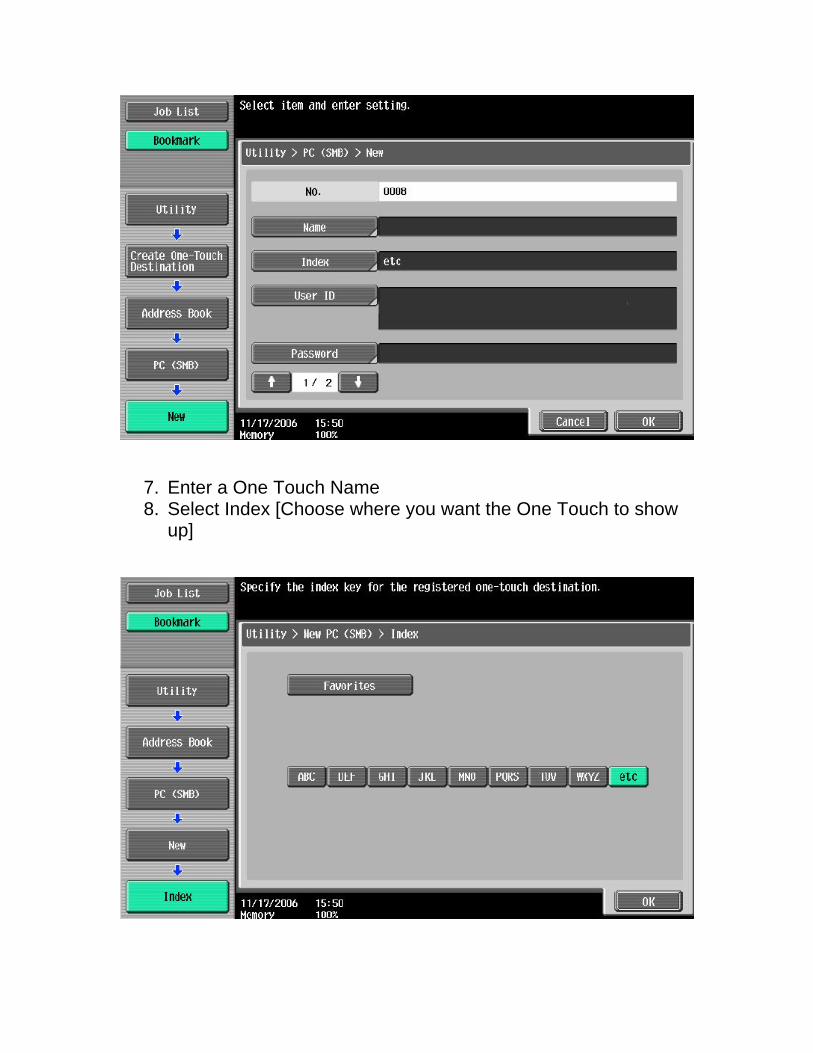
7. Enter a One Touch Name 8. Select Index [Choose where you want the One Touch to show
up]
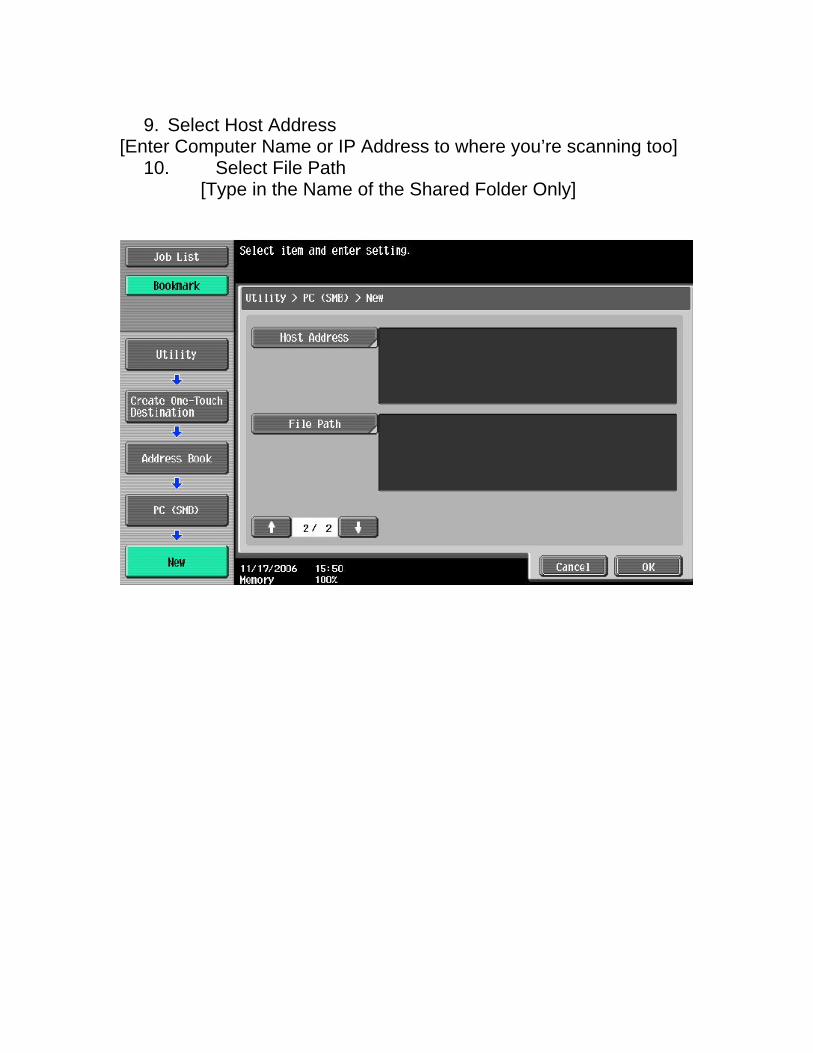
9. Select Host Address
[Enter Computer Name or IP Address to where you’re scanning too] 10. Select File Path [Type in the Name of the Shared Folder Only]
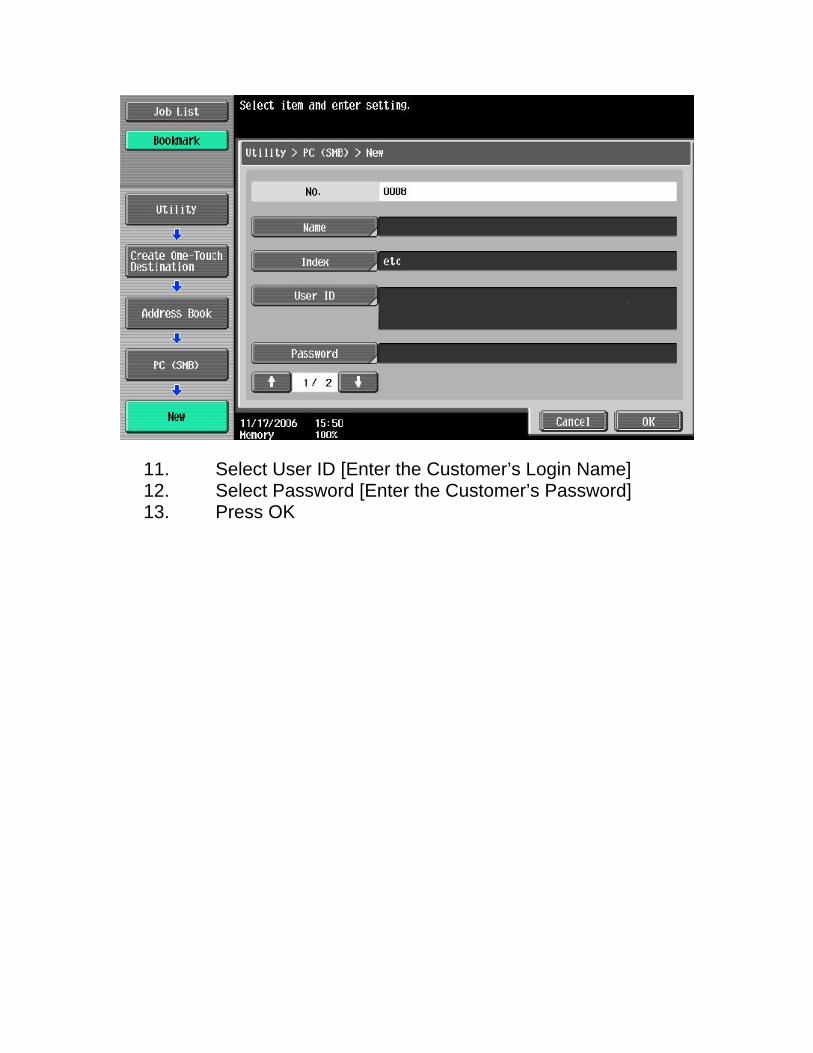
11. Select User ID [Enter the Customer’s Login Name] 12. Select Password [Enter the Customer’s Password] 13. Press OK
Creating a one Touch SMB destination settings on to the
bizhub C451/ C550 via PSWC
1. Open a Web Browser and enter the IP Address of the Copier. 2. Select Store Address 3. Select New Registration

4. Select SMB 5. Under Name [Enter a One Touch Name]

6. Select Index [Choose where you want the One Touch to show up]
7. Choose to enter a Host Name or IP Address [Of the Computer you’re Scanning too]
8. Under File Path [Enter the Shared Folder Name only] 9. Under User ID [Enter the User Name] 10. Under Password [Enter the Password]

11. Press OK 12. Press OK again.


![[MS-SMB-Diff]: Server Message Block (SMB) Protocol... · 2018. 9. 10. · Server Message Block (SMB)](https://img.pdfslide.us/doc/110x75/601e82785cca6a3942273390/ms-smb-diff-server-message-block-smb-protocol-2018-9-10-server-message.jpg)