Embed Size (px)
Citation preview

How to Register as a Vendor

How to Register as a Vendor
STEP 1If you received an email inviting you to register as a vendor, click the Registration link in the email . If you did not receive such an email, click the following link: REGISTRATION.
How to Register as a Vendor
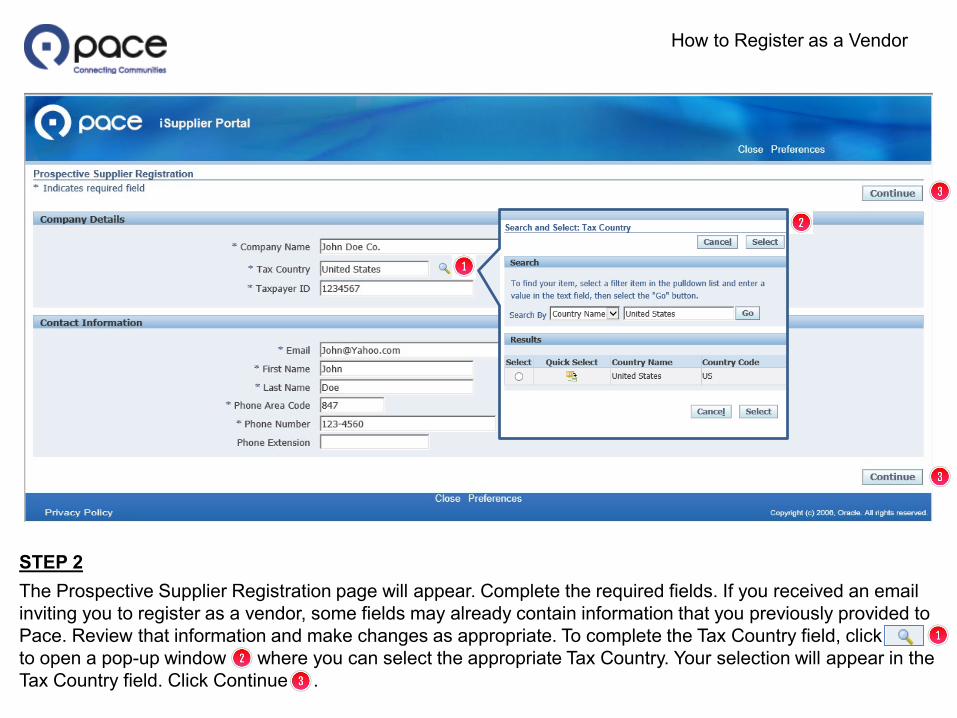
STEP 2The Prospective Supplier Registration page will appear. Complete the required fields. If you received an email inviting you to register as a vendor, some fields may already contain information that you previously provided to Pace. Review that information and make changes as appropriate. To complete the Tax Country field, click to open a pop-up window where you can select the appropriate Tax Country. Your selection will appear in the Tax Country field. Click Continue .
How to Register as a Vendor
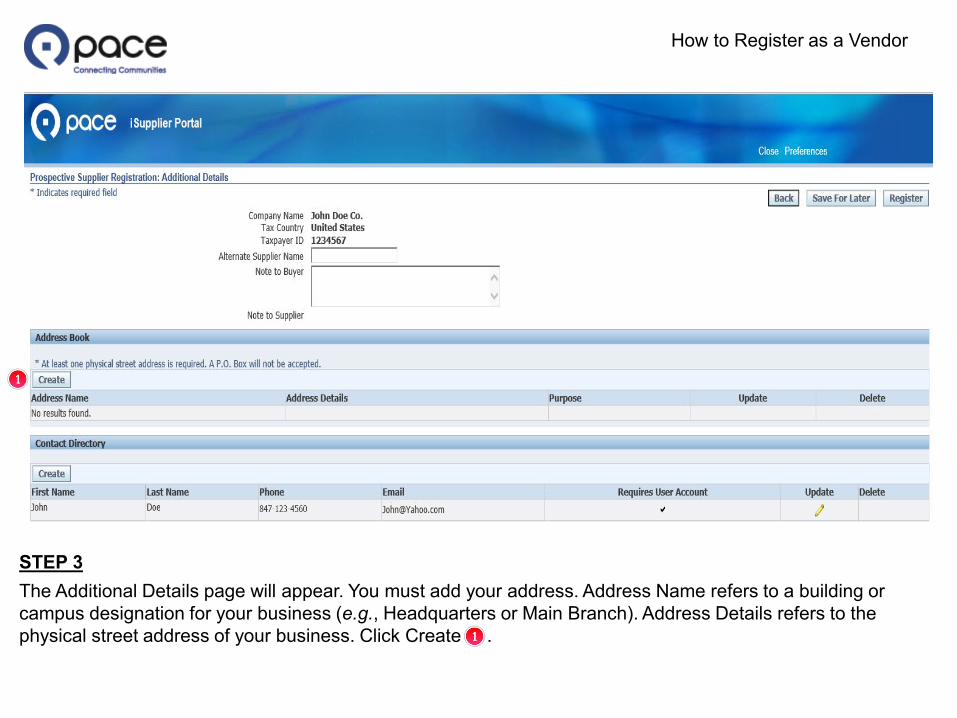
STEP 3The Additional Details page will appear. You must add your address. Address Name refers to a building or campus designation for your business (e.g., Headquarters or Main Branch). Address Details refers to the physical street address of your business. Click Create ..
How to Register as a Vendor
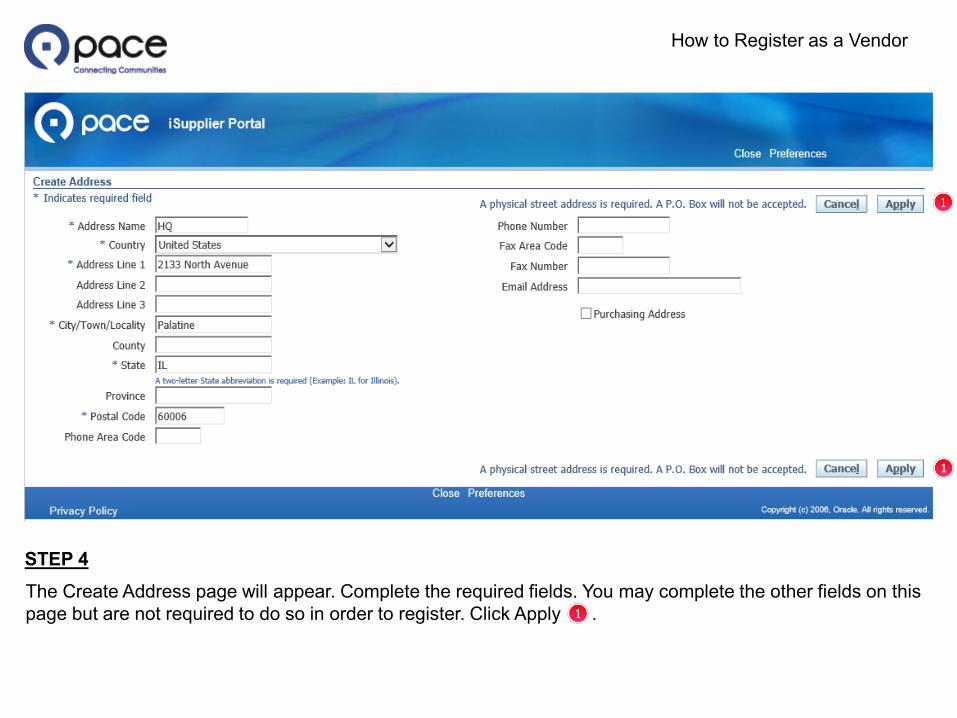
STEP 4The Create Address page will appear. Complete the required fields. You may complete the other fields on this page but are not required to do so in order to register. Click Apply .
How to Register as a Vendor
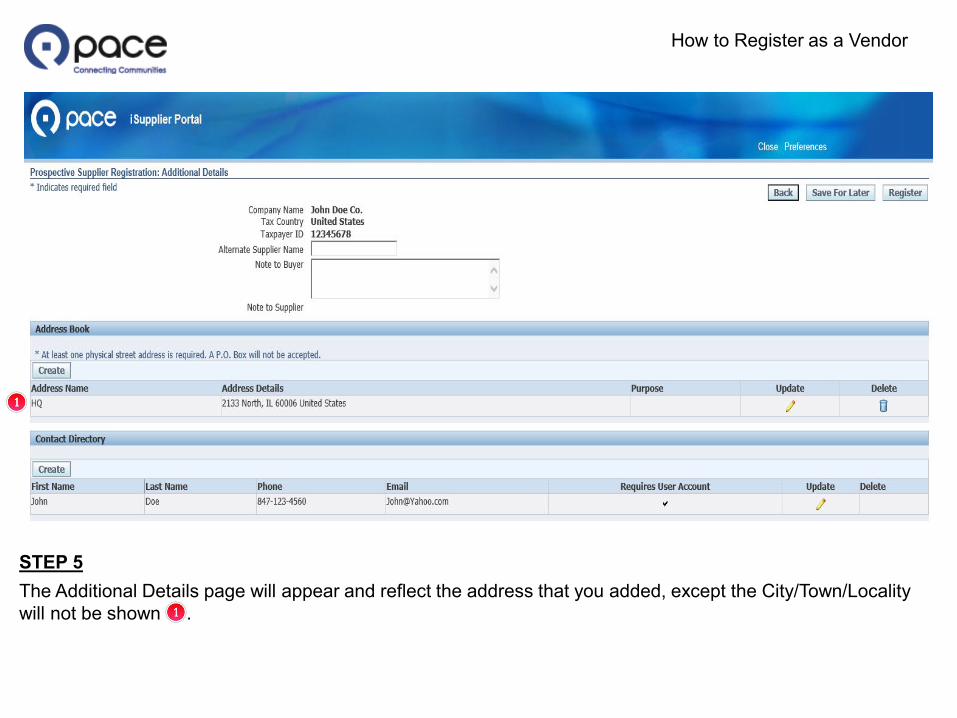
STEP 5The Additional Details page will appear and reflect the address that you added, except the City/Town/Locality will not be shown .
How to Register as a Vendor
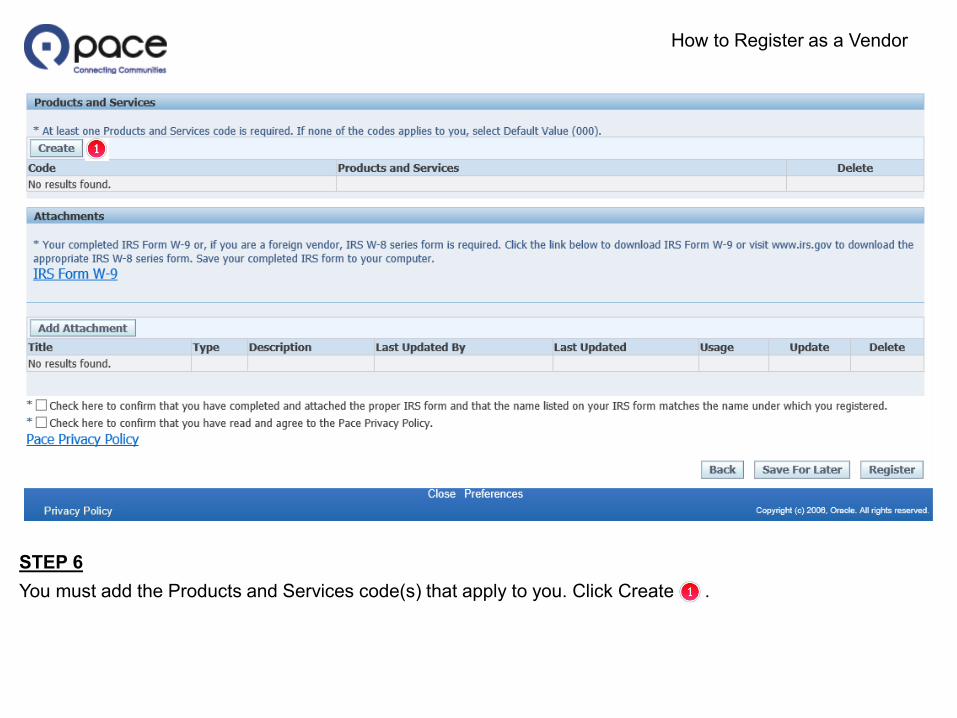
STEP 6You must add the Products and Services code(s) that apply to you. Click Create .
How to Register as a Vendor
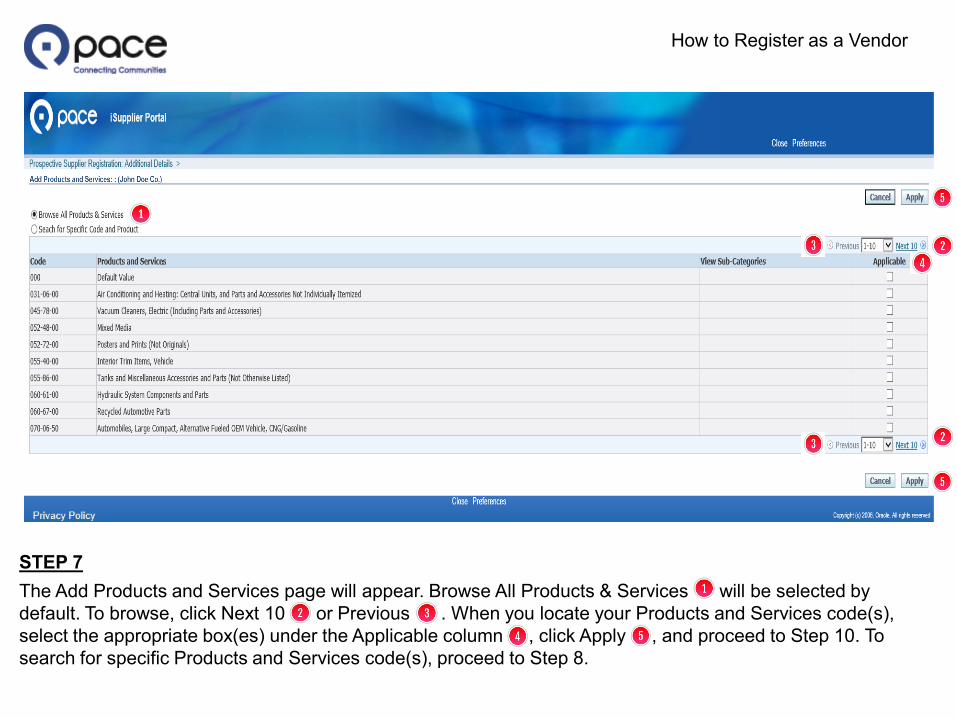
STEP 7The Add Products and Services page will appear. Browse All Products & Services will be selected by default. To browse, click Next 10 or Previous . When you locate your Products and Services code(s), select the appropriate box(es) under the Applicable column , click Apply , and proceed to Step 10. To search for specific Products and Services code(s), proceed to Step 8.
How to Register as a Vendor
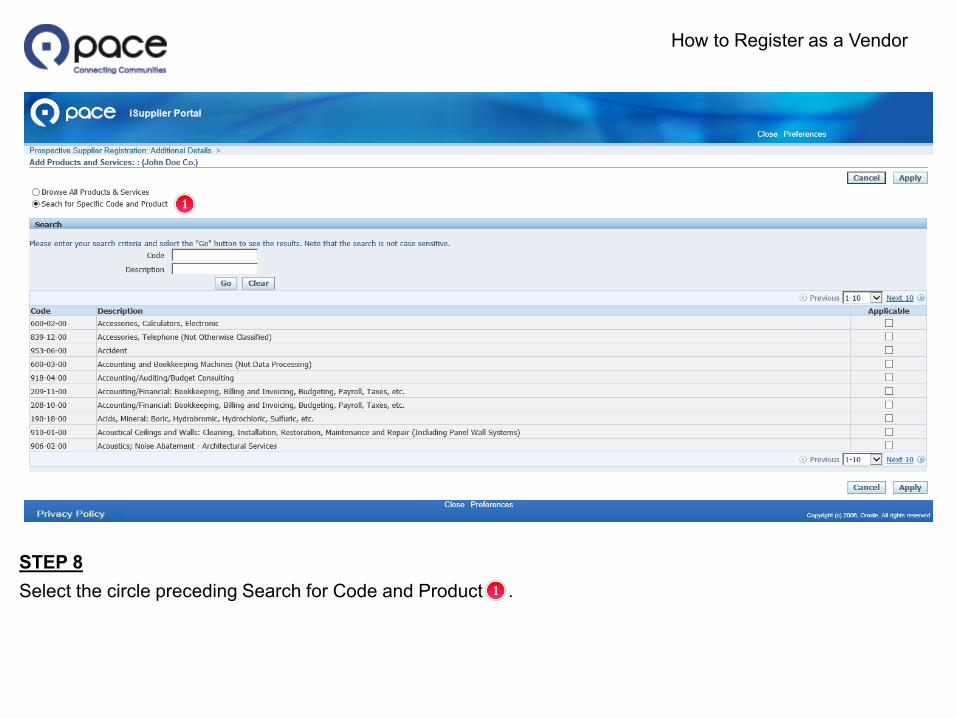
STEP 8Select the circle preceding Search for Code and Product .
How to Register as a Vendor
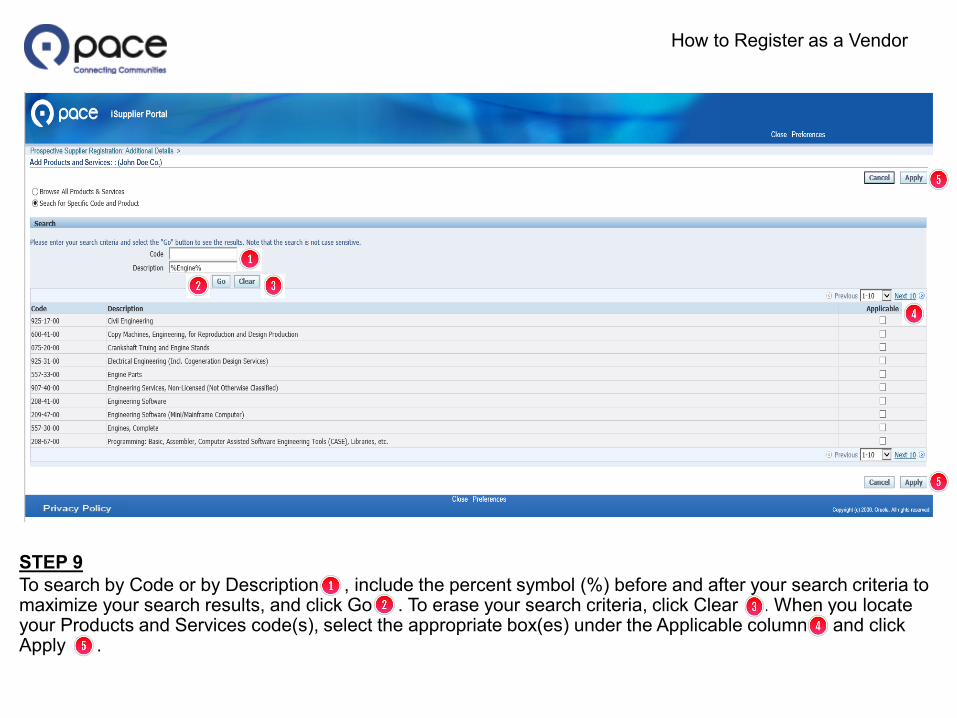
STEP 9To search by Code or by Description , include the percent symbol (%) before and after your search criteria to maximize your search results, and click Go . To erase your search criteria, click Clear . When you locate your Products and Services code(s), select the appropriate box(es) under the Applicable column and click Apply .
How to Register as a Vendor
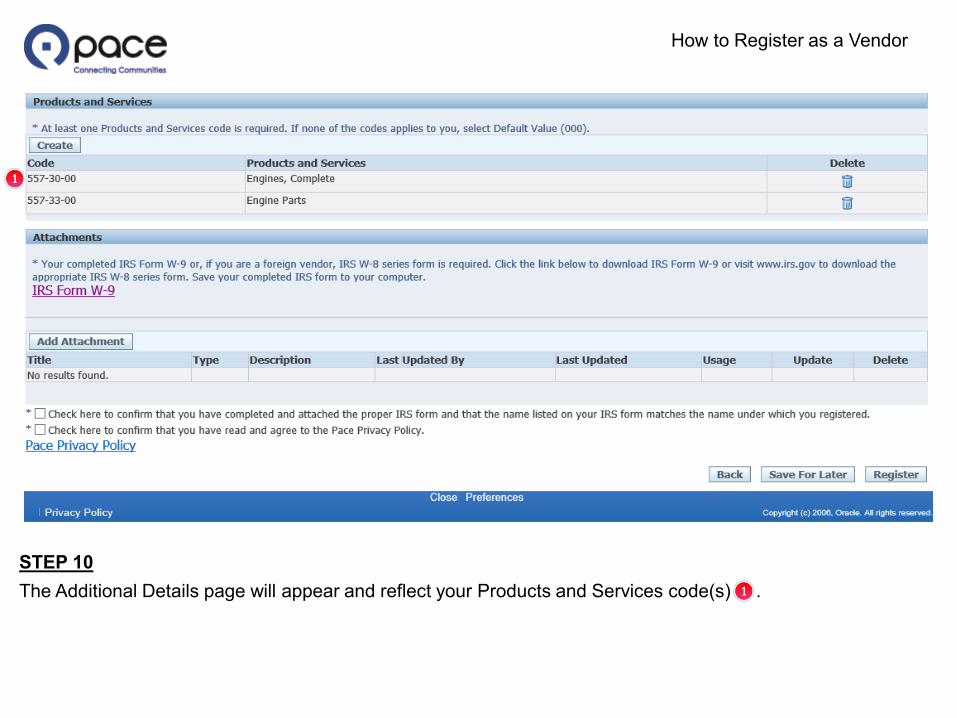
STEP 10The Additional Details page will appear and reflect your Products and Services code(s) .
How to Register as a Vendor
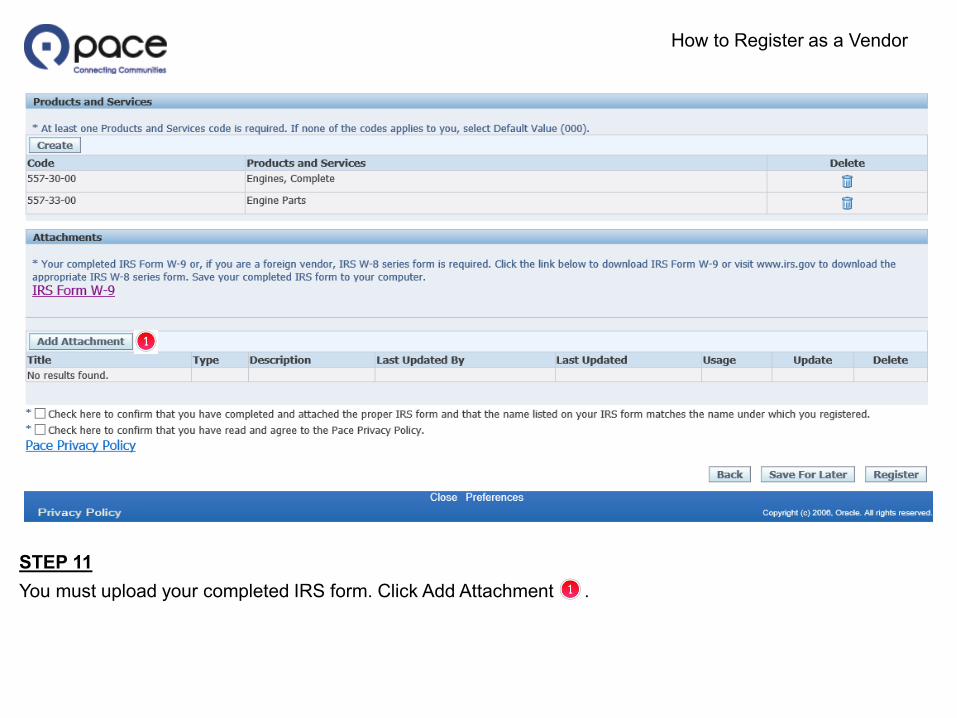
STEP 11You must upload your completed IRS form. Click Add Attachment .
How to Register as a Vendor
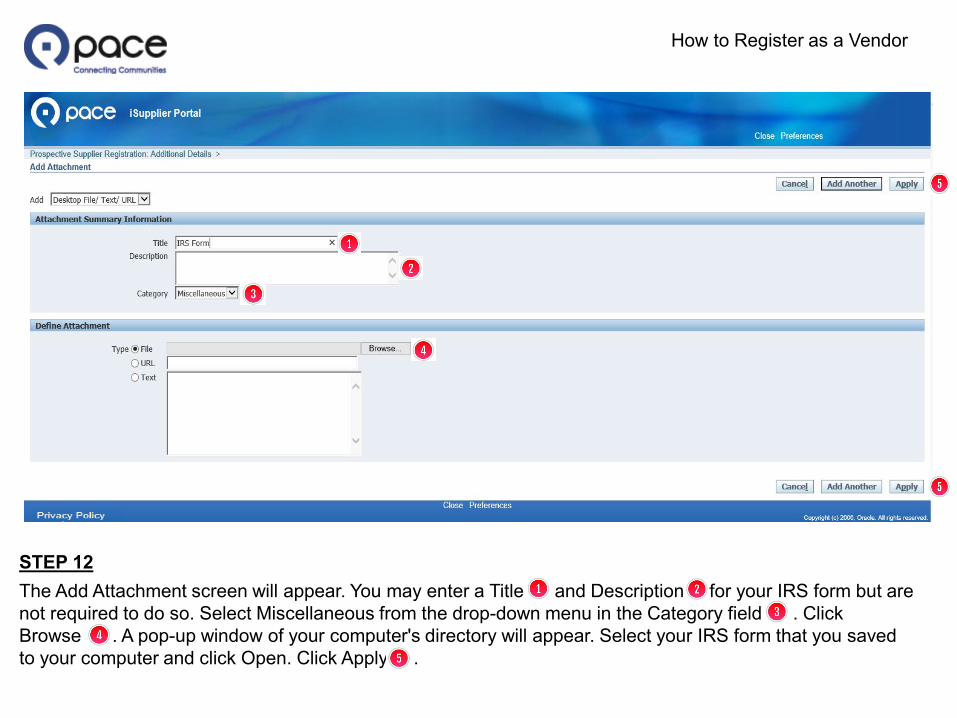
STEP 12The Add Attachment screen will appear. You may enter a Title and Description for your IRS form but are not required to do so. Select Miscellaneous from the drop-down menu in the Category field . Click Browse . A pop-up window of your computer's directory will appear. Select your IRS form that you saved to your computer and click Open. Click Apply .
How to Register as a Vendor
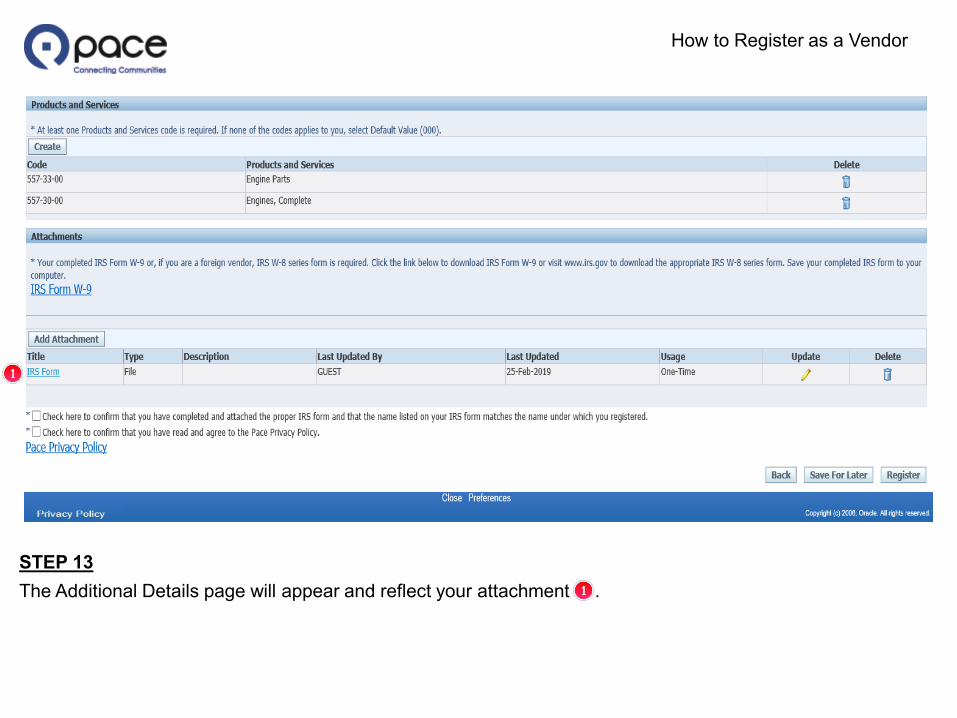
STEP 13The Additional Details page will appear and reflect your attachment .
How to Register as a Vendor
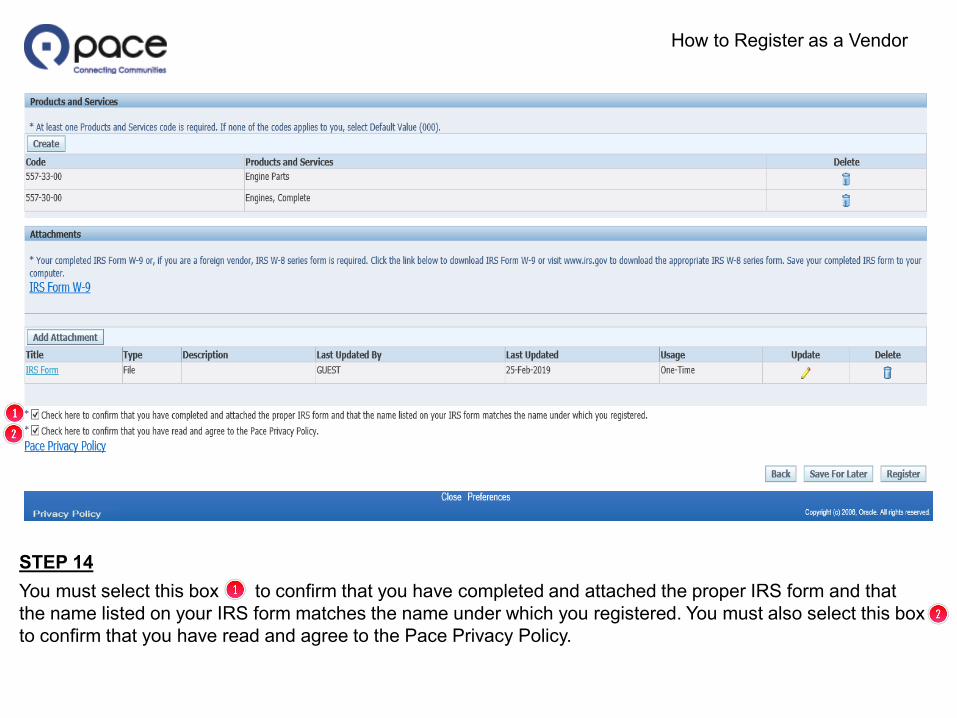
STEP 14You must select this box to confirm that you have completed and attached the proper IRS form and that the name listed on your IRS form matches the name under which you registered. You must also select this box to confirm that you have read and agree to the Pace Privacy Policy.
How to Register as a Vendor
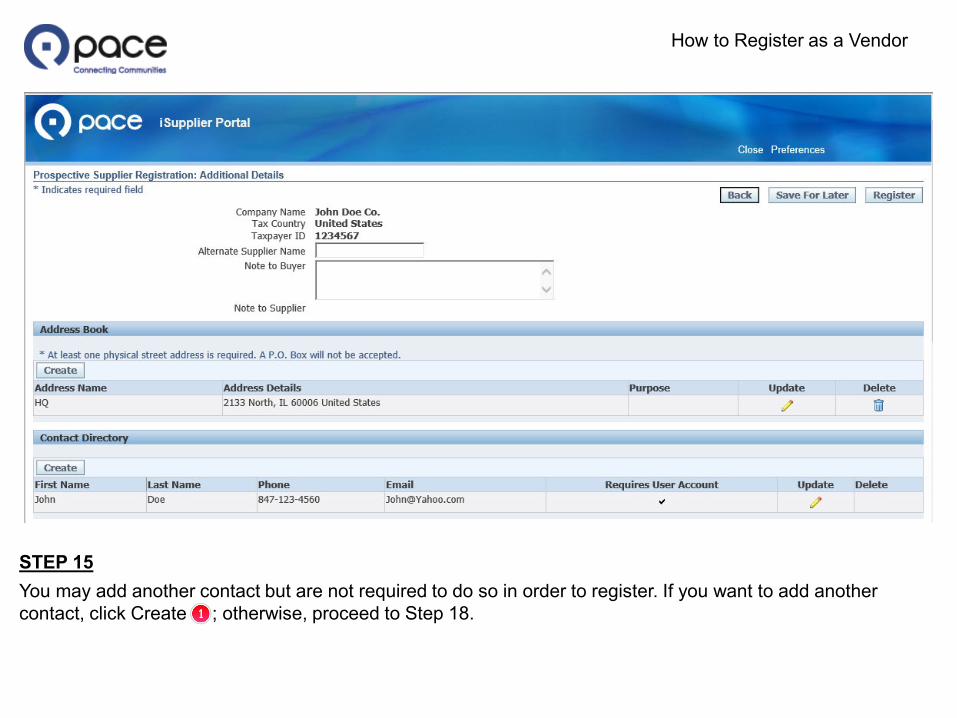
STEP 15You may add another contact but are not required to do so in order to register. If you want to add another contact, click Create ; otherwise, proceed to Step 18.
How to Register as a Vendor
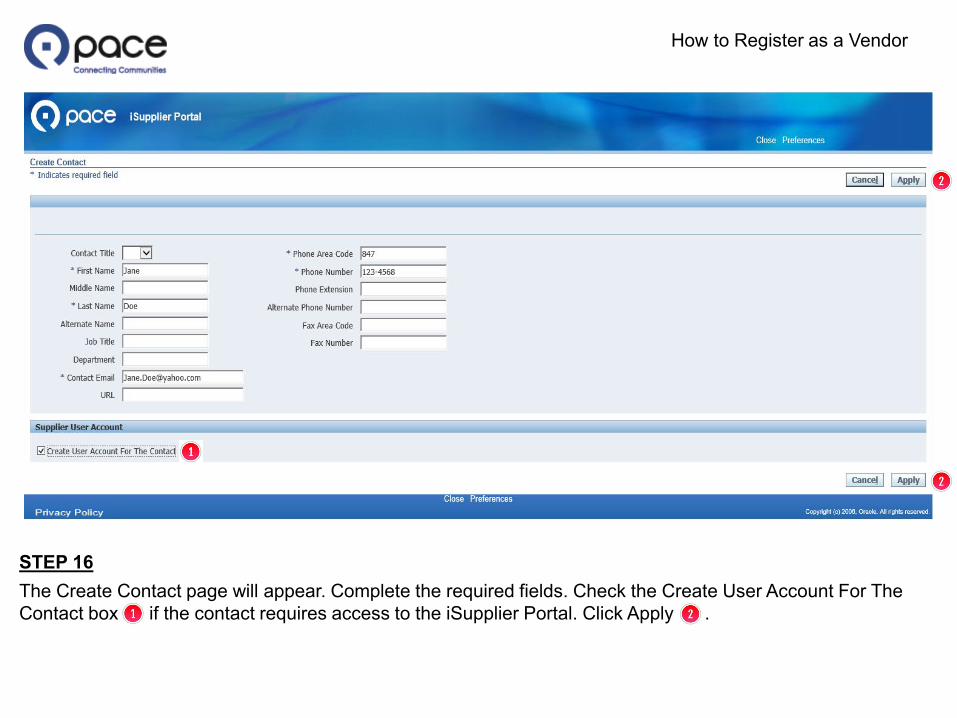
STEP 16The Create Contact page will appear. Complete the required fields. Check the Create User Account For The Contact box if the contact requires access to the iSupplier Portal. Click Apply .
How to Register as a Vendor
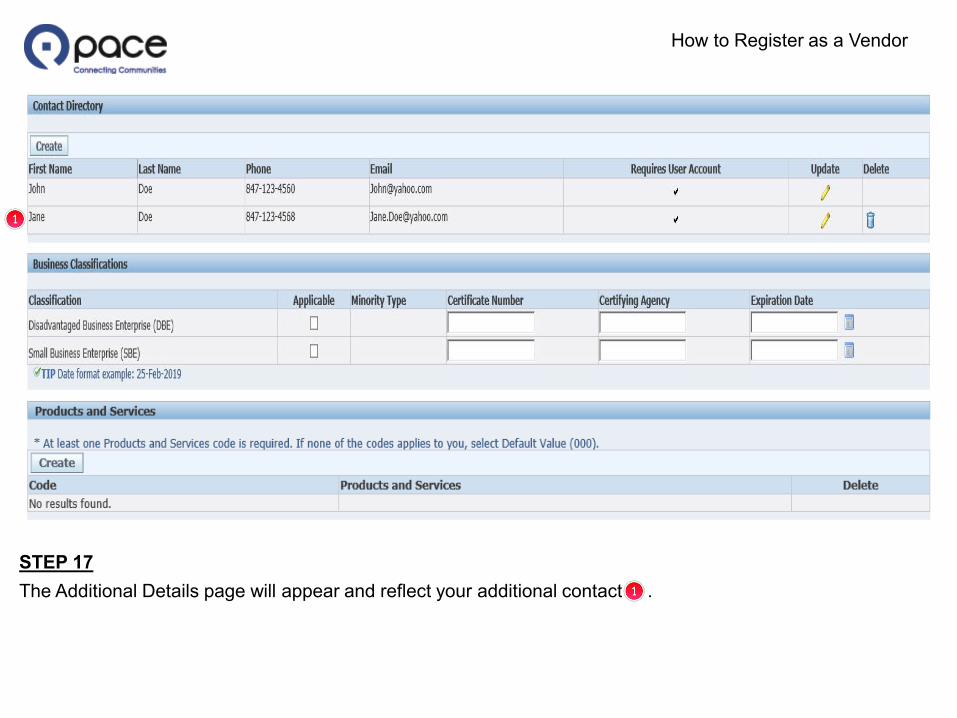
STEP 17The Additional Details page will appear and reflect your additional contact .

How to Register as a Vendor
STEP 18You may provide information concerning your classification as a DBE or an SBE but are not required to do so in order to register. If you want to provide such information, select the appropriate classification under the Applicable column and complete the corresponding Certificate Number, Certifying Agency, and Expiration Date fields; otherwise, proceed to Step 19.

How to Register as a Vendor
STEP 19Click Register to complete the registration process.
How to Register as a Vendor
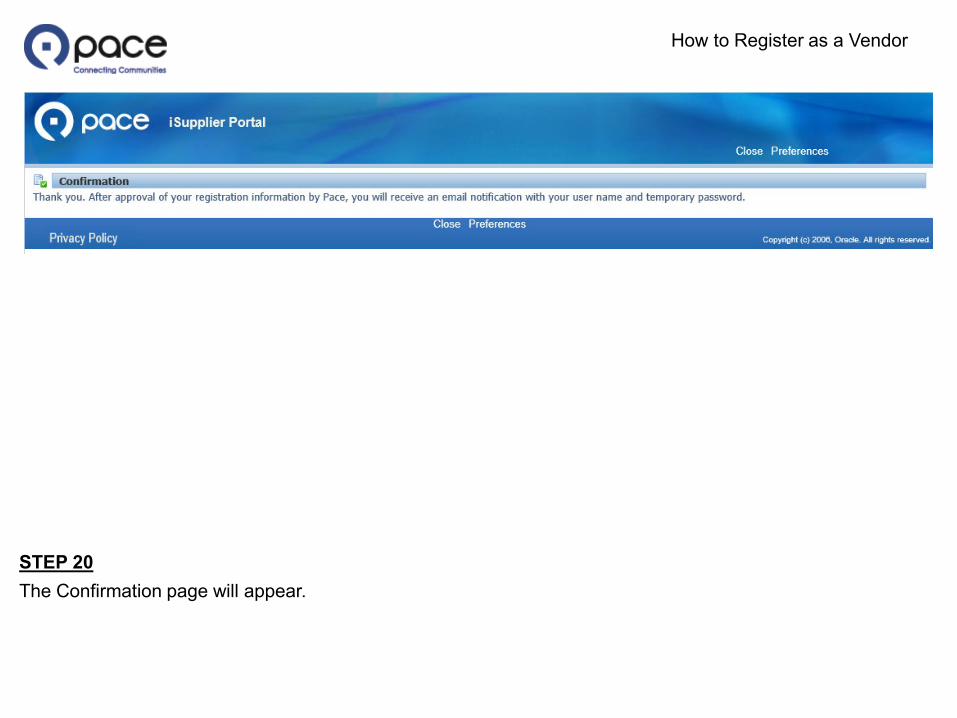
STEP 20The Confirmation page will appear.