Embed Size (px)
Citation preview
How to prepare Saturation Mail with
How to Guide 2011
i
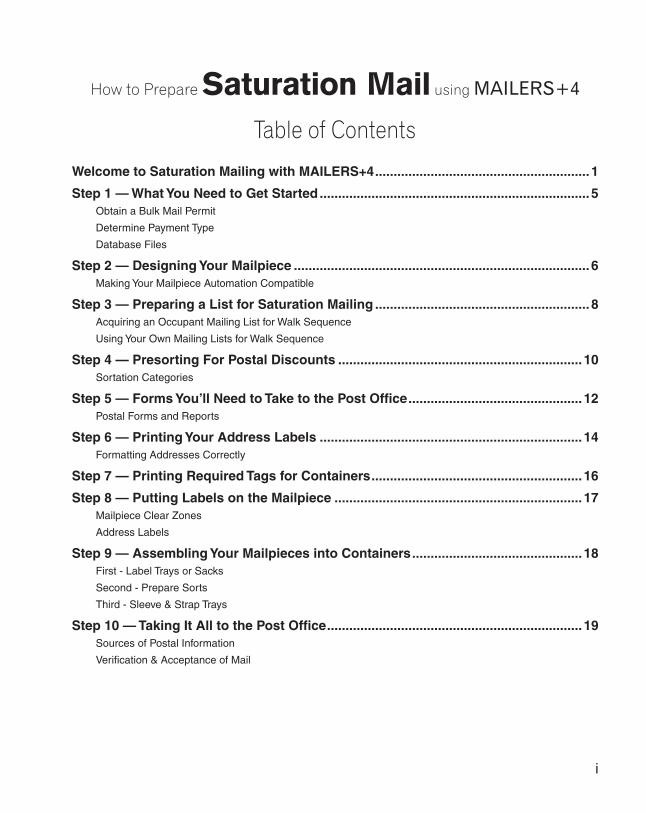
Table of Contents
Welcome to Saturation Mailing with MAILERS+4 ..........................................................1
Step 1 — What You Need to Get Started .........................................................................5Obtain a Bulk Mail Permit
Determine Payment Type
Database Files
Step 2 — Designing Your Mailpiece ................................................................................6Making Your Mailpiece Automation Compatible
Step 3 — Preparing a List for Saturation Mailing ..........................................................8Acquiring an Occupant Mailing List for Walk Sequence
Using Your Own Mailing Lists for Walk Sequence
Step 4 — Presorting For Postal Discounts ..................................................................10Sortation Categories
Step 5 — Forms You’ll Need to Take to the Post Office ...............................................12Postal Forms and Reports
Step 6 — Printing Your Address Labels .......................................................................14Formatting Addresses Correctly
Step 7 — Printing Required Tags for Containers .........................................................16
Step 8 — Putting Labels on the Mailpiece ...................................................................17Mailpiece Clear Zones
Address Labels
Step 9 — Assembling Your Mailpieces into Containers ..............................................18First - Label Trays or Sacks
Second - Prepare Sorts
Third - Sleeve & Strap Trays
Step 10 — Taking It All to the Post Office .....................................................................19Sources of Postal Information
Verification & Acceptance of Mail
How to Prepare Saturation Mail using MAILERS+4
ii
CopyrightInformation in this document is subject to change without notice. Companies, names, and data used in examples herein are fictitious unless otherwise noted. No part of this document may be repro-duced or transmitted in any form or by any means, electronic or mechanical, for any purpose, with-out the express written permission of Melissa Data Corporation. This document and the software it describes are furnished under a license agreement, and may be used or copied only in accordance with the terms of the license agreement.
Copyright © 2011 by Melissa Data Corporation. All rights reserved.
Information in this document is subject to change without notice. Melissa Data Corporation as-sumes no responsibility or liability for any errors, omissions, or inaccuracies that may appear in this document.
TrademarksWindows is a registered trademark of Microsoft Corp.
The following names are registered trademarks of Melissa Data Corporation®: Address Object; AddressPlus; ListWare; MAILERS+4; Presort Object; ZIP+USA; Melissa Data and the Melissa Data logo.
Melissa Data is a nonexclusive NCOALink Interface Distributor and Full Service Provider Licensee of the USPS. The prices for NCOALink processing are not established or controlled by the USPS. Melissa Data receives weekly NCOALink updates. DSF2 processing is performed by a nonexclu-sive licensee of the United States Postal Service.
The following trademarks are owned by the United States Postal Service®: ACS; CASS; CASS Certified; DMM; DPV; DSF2; eLOT; First-Class; First-Class Mail; Intelligent Mail; IM barcode; LACSLink; NCOALink; PAVE; PLANET Code; Post Office; POSTNET; Standard Mail; SuiteLink; United States Postal Service; USPS; ZIP; ZIP Code; and ZIP + 4.
To view PAVE Gold Presort categories: MelissaData.com/pave.
Melissa Data is a nonexclusive NCOA Licensee of Canada Post and SERP Certified. The following trademark is owned by Canada Post Corporation®: NCOA.
MELISSA DATA CORPORATION22382 Avenida EmpresaRancho Santa Margarita, CA 92688Phone: (800) MELISSA (1-800-635-4772)Fax: 949-589-5211
E-mail: [email protected]
Internet: www.MelissaData.com
For the most recent version of this document, visit http://www.melissadata.com/tech/mailers+4.htm
Document Code: MP4SMGRevision Number: 100623.054Last Update: June 23, 2010
1
Welcome to Direct-Mail Marketing with MAILERS+4
Saturation mailing gets you the lowest postage rate because of the discounts for sharing the workload. When you do some of the processing and sorting, it saves the Postal Service time and money. They pass those savings on to you in the form of postage discounts. A standard letter can be mailed for as little as 12¢ per piece. Non-profit organizations save even more.
You can also save money by dropping your mailing at the postal facility handling the delivery. To save the most in postage, deposit the mailing with the Destination Delivery Unit (DDU), the local post office that services the addresses being targeted by your mailing..
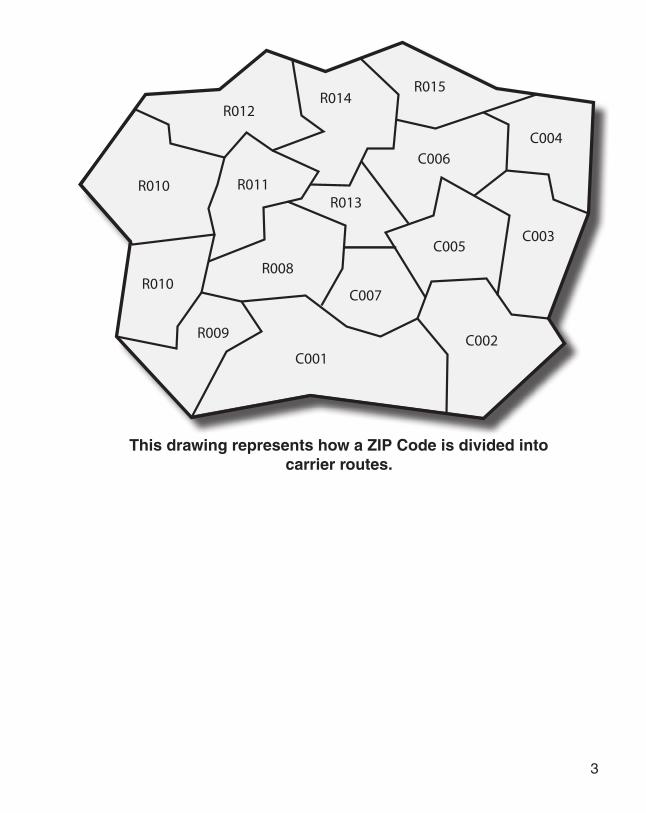
Saturation mailing is targeted toward ad-dresses in the same neighborhood. Specifi-cally, a saturation mailing is directed toward addresses in the same postal carrier route.
In addition to the significant cost sav-ings, this makes saturation mail ideal for local businesses to direct their advertising to nearby residents. Businesses such as delivery services, restaurants and auto repair shops can send out discount coupons to raise awareness of their services.
Qualification Types Sales or promotional
messages Form letters At least 200 sorted and
addressed pieces (or 50 lbs.), all the same size, shape and weight.
Rules Saturation: Mailing sent to 75%
of all addresses or 90% of residential addresses within a single carrier route.
High Density: Mailing sent to 125 or more addresses within a single carrier route.
Mailpieces sorted in walk sequence.
Mailpieces weigh less than 16 oz.
No Personal letters No Bills, invoices or statements No Contracts
No Valuables or currency
Additional ResourcesQSG 240d, 340c, 703
2
The best results are obtained by targeting carrier routes within 2 to 5 miles of the loca-tion you are advertising.
This manual provides you with a checklist of the steps necessary to process a mailing for the Saturation Mail discounts possible using MAILERS+4. It includes a list of im-portant elements required to get you started as a direct mailer, from mailpiece design for postal automation compatibility, to properly packaging the mailpieces in their containers and taking them to the post office.
Good luck with your direct-mail marketing initiative. If you need further assistance, please call on our customer service or technical support staff at 1-800-MELISSA.
Saturation mailing is based on the “car-rier route” which is the area serviced by a single postal carrier. To qualify for satura-tion postage rates, a mailing must be in walk sequence order and sent to at least 75% of all addresses in a carrier route or 90% of the residential addresses in the route. For ex-ample, if a carrier delivers to 500 addresses, 400 of which were residences, your satura-tion mailing would have to reach 375 out of all addresses (75% of 500) or 360 residential addresses (90% of 400).
To qualify for high density postage, the mailing must be in walk sequence order and reach 125 addresses in a carrier route, regardless of the total number of addresses in the route.
If a carrier route has fewer than 165 addresses, the High Density minimum of 125 addresses would also qualify for Saturation rates, therefore Saturation rates should always be used for these carrier routes.
To qualify for either saturation or high density postage rates, a list must have Walk Sequence numbers.
The Walk Sequence number indicates the order in which a carrier delivers to addresses on his route. This number must be attached to every record and updated every 90 days. You can have this added to your list with DSF2 processing, or you can also purchase an occupant list with the Walk Sequence numbers from Melissa Data. See Step 3 for more details about obtaining a mailing list with Walk Sequence numbers.
MAILERS+4 offers you a double benefit: it is a powerful program that processes your mailing for the best discounts possible; it enhances your database for an efficient, successful direct marketing campaign.
Additional ResourcesQSG 240d, 340c, 703
For more information about how much you can save by using saturation mailing with MAILERS+4, visit:
http://www.melissadata.com/saturation
3
C001C002
C003
C004
C005
C006
C007
R008
R009
R010
R010
R012
R011R013
R014R015
This drawing represents how a ZIP Code is divided into carrier routes.

4
Step 1 — What You Need to Get Started
Checklist:
Obtain a Bulk Mail Permit from your local post office.
Determine payment type and obtain authorization from the post office.
Get materials and supplies from the post office, includ-ing rubber bands, trays and sleeves.
Purchase tie straps.
Pick up any books or pam-phlets including the Quick Service Guide (Pub 95).
Obtain a mailing list or sales leads that target your market.
Obtain a Bulk Mail PermitYou must have a valid mailing permit be-
fore you can mail at presorted postage rates. You’ll pay a fee when you apply and when you renew the permit every 12 months. Your post office can tell you how much the fee is.
Determine Payment Type Precanceled Stamps
If you want your mailing to look more personalized, use precanceled stamps.
Meter
Using a postage meter is a convenient way to pay for postage. Me-ters are leased from authorized manufac-turers.
Imprint
You can have permit im-print information– called an indicia–printed in the upper right corner of the mailpiece.
Database FilesTo process a mailing using MAILERS+4,
you will need a database file. To meet the re-quirements for Saturation mailing discounts, the database must contain at least 90% of the residential addresses (for a residential-only mailing) or at least 75% of all addresses for a residential and business mailing.
If you do not currently have a database that meets the Saturation mailing qualifica-tions, your best option would be to purchase a list from Melissa Data. Call 1-800-ME-LISSA (635-4772) or visit www.MelissaData.com/Lists and click Occupant Mailing Lists.
Payment Types and Requirements
Form 3615 (Yearly Fee)
Other Fees
Other Forms
Stamps X
Imprint X X
Meter X 3601-A
5
Step 2 — Designing Your Mailpiece
Checklist Verify your mailpiece qualifies
for automation compatibility. Measure your mailpiece to
determine if it qualifies for letter or flat rates.
The size of your mailpiece will determine the rates available to you. The major pro-cessing categories of Standard Mail (A) in-clude letters or cards and flats. All the pieces in your mailing must be the same size, shape, and weight.
Making Your Mailpiece Automation Compatible
Making your mailpiece automation-com-patible is important. Automated equipment can process mail quickly and more efficiently than manual operations can, allowing the Postal Service to set lower rates for these pieces and increase delivery time.
Your automation-compatible mailpiece should: Meet size and weight standards. Be made of good quality white or
light-colored paper. Contain no sharp items including
staples. Contain no bulky items larger than
1/4” thick. Be sealed securely with wafer tabs if
applicable. Be readable by automation equipment.
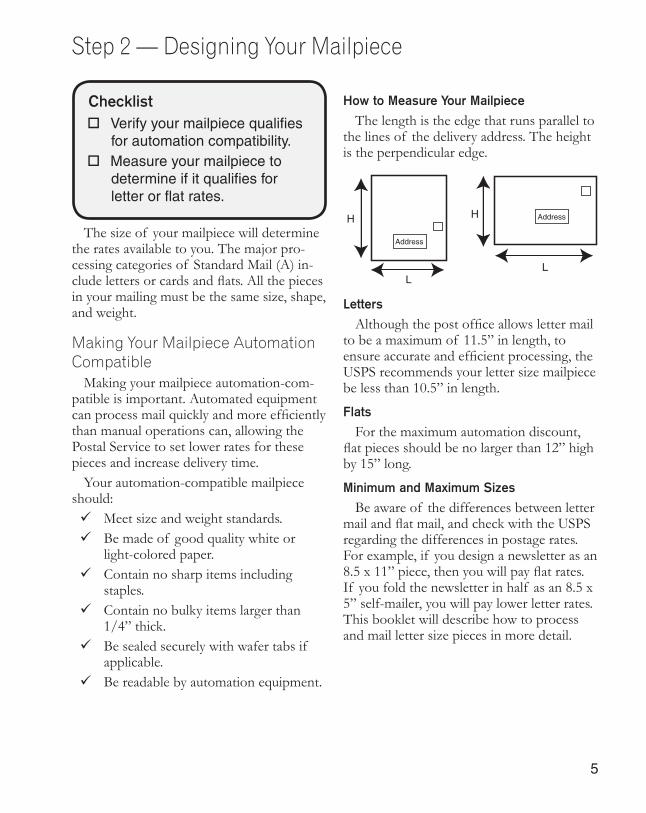
How to Measure Your Mailpiece
The length is the edge that runs parallel to the lines of the delivery address. The height is the perpendicular edge.
Letters
Although the post office allows letter mail to be a maximum of 11.5” in length, to ensure accurate and efficient processing, the USPS recommends your letter size mailpiece be less than 10.5” in length.
Flats
For the maximum automation discount, flat pieces should be no larger than 12” high by 15” long.
Minimum and Maximum Sizes
Be aware of the differences between letter mail and flat mail, and check with the USPS regarding the differences in postage rates. For example, if you design a newsletter as an 8.5 x 11” piece, then you will pay flat rates. If you fold the newsletter in half as an 8.5 x 5” self-mailer, you will pay lower letter rates. This booklet will describe how to process and mail letter size pieces in more detail.
L
H
Address
AddressH
L
6
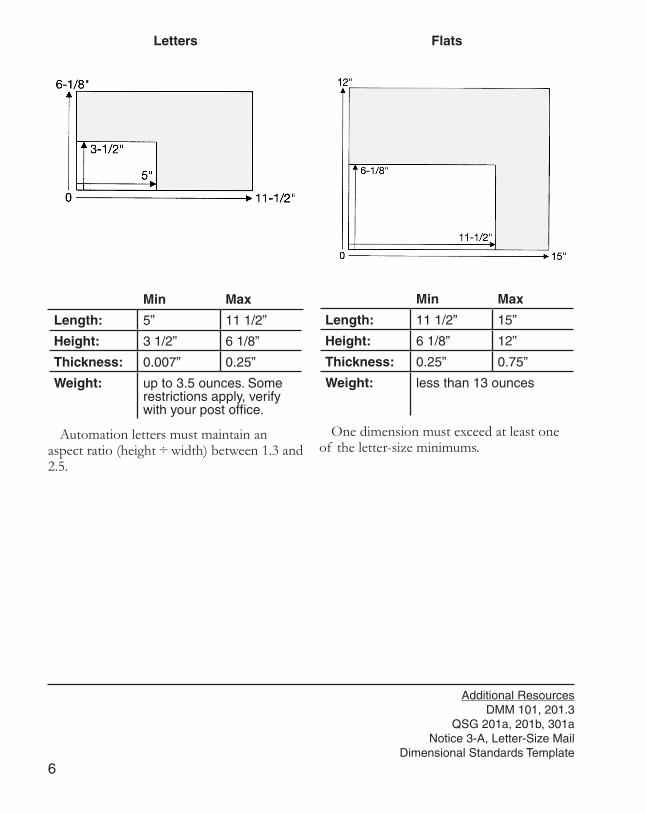
Letters Flats
Min Max
Length: 11 1/2” 15”
Height: 6 1/8” 12”
Thickness: 0.25” 0.75”
Weight: less than 13 ounces
One dimension must exceed at least one of the letter-size minimums.
Min Max
Length: 5” 11 1/2”
Height: 3 1/2” 6 1/8”
Thickness: 0.007” 0.25”
Weight: up to 3.5 ounces. Some restrictions apply, verify with your post office.
Automation letters must maintain an aspect ratio (height ÷ width) between 1.3 and 2.5.
Additional ResourcesDMM 101, 201.3
QSG 201a, 201b, 301aNotice 3-A, Letter-Size Mail
Dimensional Standards Template
7
Step 3 — Preparing a List for Saturation Mailing
Checklist
Acquire a certified occupant mailing list, or…
Have Walk Sequence numbers appended to the records in your mailing list
Acquiring an Occupant Mailing List for Walk Sequence
It is rare that mailing lists that built up via existing customer relationships will contain the necessary 75% of addresses within a given carrier route to qualify for saturation mailing. More likely, it will be necessary to buy a list from Melissa Data. You can purchase a list by calling 1-800-MELISSA (635-4772) or by visiting www.MelissaData.com/Lists on the web.
Buying Occupant Mailing Lists over the Web1. Point your web browser at
www.MelissaData.com/Occupant.2. Alternatively, from inside MAILERS+4,
click on the Internet menu and click Order Occupant Lists Online.
3. To target addresses within a given distance of your location, select Radius and enter the maximum number of miles (Again two to five miles are usually ideal for saturation mailing and the address, city, state and ZIP Code of your location).
4. Alternatively to receive all carrier routes with a single ZIP Code, select ZIP Code and enter the five-digit ZIP that you want to target.
5. Under Check to Include, select the types of addresses to include in your occupant list. To meet the minimum requirements of a saturation mailing, you should leave all boxes checked. You can also check the box to Include Names Where Available but this is not required for saturation mailing.
6. Click Add Selection. The web page will display a summary of the list to be purchased, including the number of addresses included.
7. To purchase only some of the carrier routes within the selected radius, click Carrier Route(s) and uncheck the carrier routes that you don’t want. Click Confirm and Return to My List to finish.
8. Click Next Step. The web page will display the cost of the selected occupant list and a list of available file formats. dBase (*.dbf) is the best for working within MAILERS+4 (although the others will work).
9. Select the desired format and click Next Step.
10. Enter a job name. This will allow you to retrieve the same settings to purchase an updated list in the future.
11. Click Check Out.12. The web page will display your shopping
cart. Verify that the information is correct and click Check Out.
13. Enter your shipping address and click Continue.
14. Enter your billing information and click Submit Order.

8
After processing your order and compiling the occupant list, the web page will display a gray Download button. Click this to download your new database.
Your occupant list must be used within 90 days of purchase. After 90 days, you must purchase an updated list.
Using Your Own Mailing Lists for Walk Sequence
To use your own mailing list, your data-base must contain enough addresses to meet the requirement of 75% of all addresses or 90% of residential addresses in a given car-rier route.
DSF Processing
In order to use your list for saturation mailing, the database must have Walk Se-quence numbers appended to each record. This is called DSF2 processing.
You can send your list to Melissa Data for DSF2 processing. Call 1-800-MELISSA (635-4772) to speak to our Data En-hancement Services department or visit www.MelissaData.com/DSF for more infor-mation.
Your list must be used within 90 days after it is returned to you from processing.
Using MAILERS+4 to Determine If Your Mailing List Qualifies for Saturation Mailing1. Select List > Tally…2. Check Carrier Route3. If your mailing list covers a large
geographic area, you should consider using a filter to limit the tally to the ZIP to be targeted by your saturation mailing. See the MAILERS+4 User’s
Guide for more information on using filters.
4. Click Go.5. After MAILERS+4 finishes the tally, it
will display the Print/Preview dialog.6. Select Carrier Route and click Preview or
Print.7. The report will show the number of
addresses in your database compared with the number of possible addresses, broken down by carrier route.
CASS Report 3553
9
Step 4 — Presorting For Postal Discounts
Checklist
Measure and weigh your mailpiece and enter in the correct data in the Presort Wizard.
Select the appropriate presort categories to sort to.
Sortation CategoriesYou can receive a larger discount on post-
age if you share the work of processing the mail. When you do some of the preparation and sortation, it saves the Postal Service time and money and they pass the savings on to you.
To receive automation rates, addresses must be CASS verified, have a ZIP + 4 Code, and labels must be barcoded.
To receive non-automation rates, addresses must have a valid 5-digit ZIP Code, presort-ed packages must be rubberbanded, and ad-dresses do not need to be CASS processed.
Miscellaneous pieces are known as residu-als when the addresses have an invalid ZIP Code, no ZIP at all, or have international addresses.
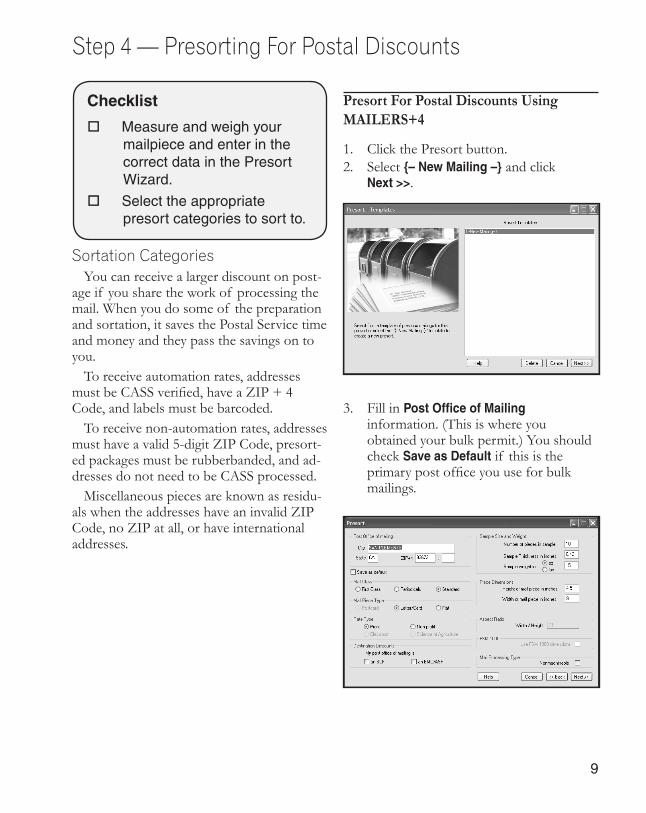
Presort For Postal Discounts Using MAILERS+4
1. Click the Presort button. 2. Select {– New Mailing –} and click
Next >>.
3. Fill in Post Office of Mailing information. (This is where you obtained your bulk permit.) You should check Save as Default if this is the primary post office you use for bulk mailings.
10
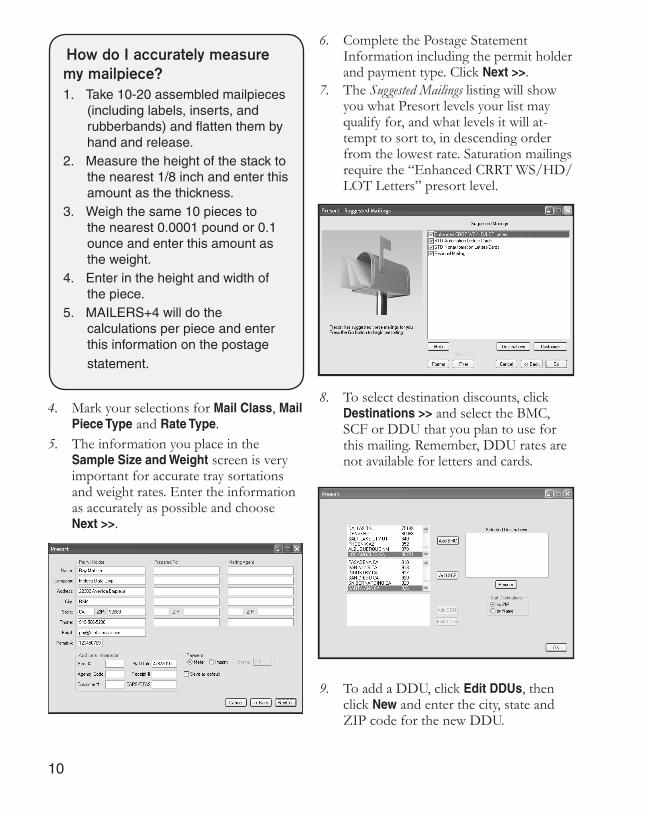
4. Mark your selections for Mail Class, Mail Piece Type and Rate Type.
5. The information you place in the Sample Size and Weight screen is very important for accurate tray sortations and weight rates. Enter the information as accurately as possible and choose Next >>.
How do I accurately measure my mailpiece?1. Take 10-20 assembled mailpieces
(including labels, inserts, and rubberbands) and flatten them by hand and release.
2. Measure the height of the stack to the nearest 1/8 inch and enter this amount as the thickness.
3. Weigh the same 10 pieces to the nearest 0.0001 pound or 0.1 ounce and enter this amount as the weight.
4. Enter in the height and width of the piece.
5. MAILERS+4 will do the calculations per piece and enter this information on the postage statement.
6. Complete the Postage Statement Information including the permit holder and payment type. Click Next >>.
7. The Suggested Mailings listing will show you what Presort levels your list may qualify for, and what levels it will at-tempt to sort to, in descending order from the lowest rate. Saturation mailings require the “Enhanced CRRT WS/HD/LOT Letters” presort level.
8. To select destination discounts, click Destinations >> and select the BMC, SCF or DDU that you plan to use for this mailing. Remember, DDU rates are not available for letters and cards.
9. To add a DDU, click Edit DDUs, then click New and enter the city, state and ZIP code for the new DDU.
11
Entry LevelsWhere you actually deposit your mailing has a big impact on the level of saturation discounts that you receive. The closer you can your mailpiece to its destination before turning it over to the post office, the lower the postage.
The following explains the difference between entry levels, listed in descending order of cost.
Post Office of Mailing – These rates apply if you drop your mailing with the Post Office that issued your bulk mail permit.
Network Distribution Center (NDC) Entry – A BMC is a centralized, highly mechanized mail processing planet for distributing Standard Mail in bulk form.
Sectional Center Facility (SCF) Entry – An SCF is a postal facility that serves as a processing and distribution center for post offices in a geographic area
defined by the first three digits of the ZIP. Some SCFs serve more than one such area.
Destination Delivery Unit (DDU) Entry – A DDU is the local postal facility that directly serves a delivery address. DDU Entry provides the lowest mailing cost possible. To qualify for this rate, you deposit your sorted and prepared mailpieces directly at the DDU that serves the area that you are targeting with your mailing. This discount is only available for flats.
10. Click Format, then click Autoformat. Verify that Carrier Route and Walk Sequence are formatted. Click OK.
12
Step 5 — Forms You’ll Need to Take to the Post Office
Checklist Review the Qualification
Report and Postage Statement and make a copy for your records.
Prepare to pay the amount of postage due on the Postage Statement.
Sign the Postage Statement certifying you are in accordance with all USPS rules and regulations.
Postal Forms and ReportsDocumentation must be generated by
PAVE certified software like MAILERS+4. PAVE certified by the USPS means MAILERS+4 meets the standard of excellence for presort software. Certification at the Gold level is your guarantee that MAILERS+4 surpassed the standard qualification criteria for presorting and accuracy that includes Standard Mail, FirstClass, and Periodicals.
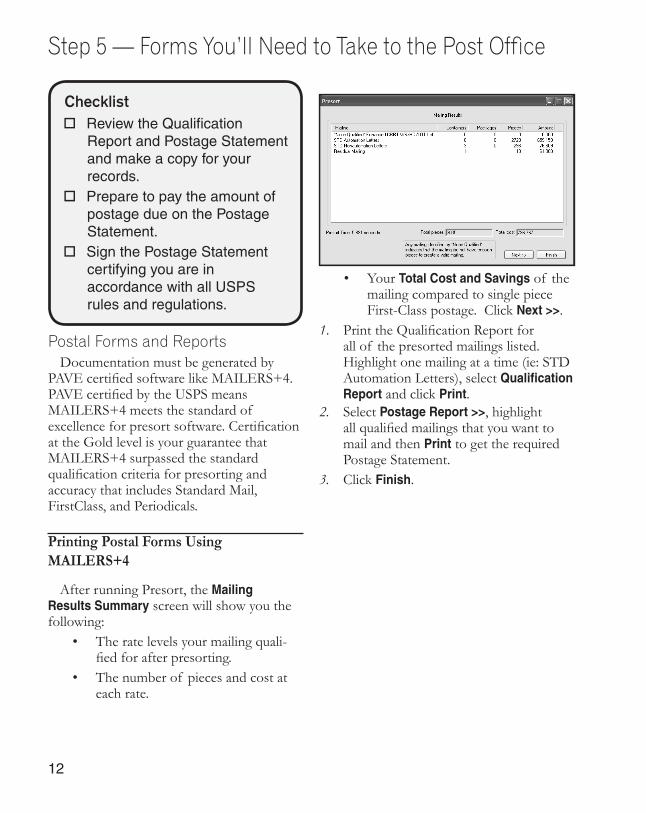
• Your Total Cost and Savings of the mailing compared to single piece First-Class postage. Click Next >>.
1. Print the Qualification Report for all of the presorted mailings listed. Highlight one mailing at a time (ie: STD Automation Letters), select Qualification Report and click Print.
2. Select Postage Report >>, highlight all qualified mailings that you want to mail and then Print to get the required Postage Statement.
3. Click Finish.
Printing Postal Forms Using MAILERS+4
After running Presort, the Mailing Results Summary screen will show you the following:
• The rate levels your mailing quali-fied for after presorting.
• The number of pieces and cost at each rate.
13
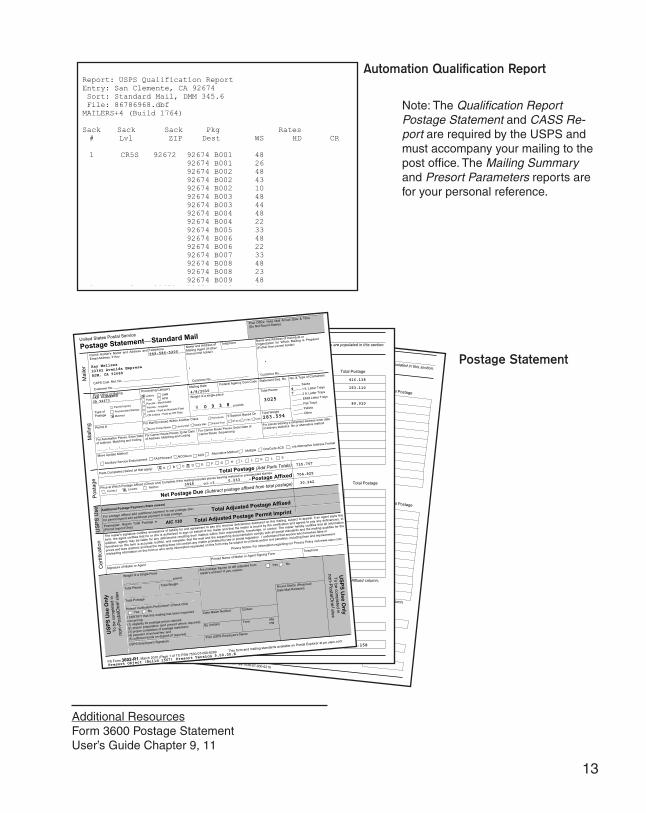
Report: USPS Qualification Report Mailer: Melissa Data Corp.Entry: San Clemente, CA 92674 Mail ID: 1234567890 Sort: Standard Mail, DMM 345.6 Date: 2/8/2008 File: 86786968.dbf Page 1 of 1MAILERS+4 (Build 1764) Presort Version 7.70.00.I
Sack Sack Sack Pkg Rates Run Mailed Act Resid# Lvl ZIP Dest WS HD CR Tot to Dlv Delv Per
1 CR5S 92672 92674 B001 48 4892674 B001 26 74 74 72 100%92674 B002 48 12292674 B002 43 16592674 B002 10 175 101 101 100%92674 B003 48 22392674 B003 44 267 92 92 100%92674 B004 48 31592674 B004 22 337 70 70 100%92674 B005 33 370 33 33 100%92674 B006 48 41892674 B006 22 440 70 70 100%92674 B007 33 473 33 33 100%92674 B008 48 52192674 B008 23 544 71 71 100%92674 B009 48 592
2 CR5S 92672 92674 B009 20 612 68 68 100%92674 B010 48 66092674 B010 19 679 67 68 98%92674 B011 48 72792674 B011 16 743 64 64 100%92674 B012 48 79192674 B012 17 808 65 65 100%92674 B013 48 85692674 B013 12 868 60 60 100%92674 B014 28 896 28 29 96%92674 B015 48 94492674 B015 14 958 62 62 100%92674 B016 48 100692674 B016 13 1019 61 61 100%92674 B017 48 106792674 B017 33 1100 81 81 100%92674 B018 48 114892674 B018 20 1168 68 68 100%92674 B019 33 1201
3 CR5S 92672 92674 B019 15 121692674 B019 28 1244 76 76 100%92674 B020 48 129292674 B020 35 1327 83 83 100%92674 B021 43 1370 43 43 100%92674 B022 48 141892674 B022 37 1455 85 85 100%92674 B023 40 1495 40 40 100%92674 B024 48 154392674 B024 27 1570 75 75 100%92674 B025 48 161892674 B025 11 1629 59 59 100%92674 B026 48 167792674 B026 13 1690 61 61 100%92674 B027 44 173492674 B027 10 1744 54 54 100%92674 B028 48 1792 48 48 100%92674 B029 20 1812
4 CR5S 92672 92674 B029 25 183792674 B029 10 1847 55 55 100%92674 B030 34 1881 34 34 100%92674 B031 27 1908 27 27 100%92674 B032 34 1942 34 34 100%92674 B033 28 1970 28 28 100%92674 B034 25 1995 25 25 100%92674 B035 32 2027 32 32 100%92674 B036 40 2067 40 40 100%92674 B037 18 2085 18 18 100%92674 B038 35 2120 35 35 100%92674 B039 37 2157 37 37 100%
5 CR5S 92672 92674 B040 17 2174 17 17 100%
Totals 2174 0 0 2174------------------------- ---- ---- ---- ----Rate Summary PiecesSaturation(WS): 2174High Density(HD): 0Basic(CR): 0TOTAL Enh. Car. Rt. 2174
Automation Qualification Report
Postage Statement
Note: The Qualification Report Postage Statement and CASS Re-port are required by the USPS and must accompany your mailing to the post office. The Mailing Summary and Presort Parameters reports are for your personal reference.
Additional ResourcesForm 3600 Postage StatementUser’s Guide Chapter 9, 11
Standard Mail
PS Form 3602-R3, March 2010 (Page 3 of 11) PSN 7530-07-000-6210
Check box at left if prices are populated in this section.
Part BAutomation Flats
Entry PriceCategory
PiecePrice
Or AmountAffixed
No. of Pieces
PiecesSubtotal
PoundPrice Pounds Pounds
Subtotal Total Postage
Flats 3.3 oz. (0.2063 lbs.) or lessEntry Price Category Price
No. of Pieces
Total Postage
B1 None 5-Digit $0.346B2 None 3-Digit 0.418B3 None ADC 0.486B4 None Mixed ADC 0.496B5 DNDC 5-Digit 0.312B6 DNDC 3-Digit 0.384B7 DNDC ADC 0.452B8 DNDC Mixed ADC 0.462B9 DSCF 5-Digit 0.303B10 DSCF 3-Digit 0.375B11 DSCF ADC 0.443Flats Over 3.3 Oz. but less than 16 oz.
B12 None 5-Digit $0.196
$0.725
B13 None 3-Digit 0.268
0.725
B14 None ADC 0.336
0.725
B15 None Mixed ADC 0.346
0.725
B16 DNDC 5-Digit 0.196
0.562
B17 DNDC 3-Digit 0.268
0.562
B18 DNDC ADC 0.336
0.562
B19 DNDC Mixed ADC 0.346
0.562
B20 DSCF 5-Digit 0.196
0.517
B21 DSCF 3-Digit 0.268
0.517
B22 DSCF ADC 0.336
0.517
For affixed postage mailings as described in DMM 343, compute and enter the price for each piece in the Amount Affixed column,
multiply by No. of Pieces and total in the Total column.
Full Service Intelligent Mail Option
B23
Standard Mail Automation Flats Subtotal (Lines B1-B22)
Number of Pieces that Comply_________ x $0.001 =
B24
Part B Total (Line B23 minus B24)
Standard Mail
PS Form 3602-R, March 2010 (Page 2 of 11)
Check box at left if prices are populated in this section.Part AAutomation Letters
Entry PriceCategory
PiecePrice
Or AmountAffixed
No. of Pieces
PiecesSubtotal
PoundPrice Pounds Pounds
Subtotal Total Postage
Letters 3.3 oz. (0.2063 lbs.) or less
Entry Price Category Price No. of Pieces Total Postage
A1 None 5-Digit $0.233
A2 None 3-Digit 0.251
A3 None AADC 0.253
A4 None Mixed AADC 0.270
A5 DNDC 5-Digit 0.199
A6 DNDC 3-Digit 0.217
A7 DNDC AADC 0.219
A8 DNDC Mixed AADC 0.236
A9 DSCF 5-Digit 0.190
A10 DSCF 3-Digit 0.208
A11 DSCF AADC 0.210
Letters Over 3.3 Oz. up to 3.5 oz.
A12 None 5-Digit $0.083 $0.725
A13 None 3-Digit 0.101 0.725
A14 None AADC 0.103 0.725
A15 None Mixed AADC 0.120 0.725
A16 DNDC 5-Digit 0.083 0.562
A17 DNDC 3-Digit 0.101 0.562
A18 DNDC AADC 0.103 0.562
A19 DNDC Mixed AADC 0.120 0.562
A20 DSCF 5-Digit 0.083 0.517
A21 DSCF 3-Digit 0.101 0.517
A22 DSCF AADC 0.103 0.517
For affixed postage mailings as described in DMM 243, compute and enter the price for each piece in the Amount Affixed column,multiply by No. of Pieces and total in the Total column.
Full Service Intelligent Mail Option
A23 Standard Mail Automation Letters Subtotal (Lines A1-A22)
Number of Pieces that Comply_________ x $0.001 =A24
Part A Total (Line A23 minus A24)
1786 416.138
610 153.110
333 89.910
659.158
X
Additional Postage Payment (State reason)
United States Postal Service
Postage Statement—Standard Mail
Post Office: Note Mail Arrival Date & Time
(Do Not Round-Stamp)
Mai
ling
Mai
ler
Pos
tage
Cer
tific
atio
n
PS Form 3602-R1, March 2010 (Page 1 of 11) PSN 7530-07-000-6209 This form and mailing standards available on Postal Explorer at pe.usps.com.
Permit Holder's Name and Address and
Email Address, If Any
Name and Address of
Mailing Agent (If other
than permit holder)
Name and Address of Individual or
Organization for Which Mailing is Prepared
(If other than permit holder)
Telephone
Telephone
Post Office of Mailing
CAPS Cust. Ref. No.
Customer No.
Customer No.Customer No.
Parts Completed (Select all that apply) Total Postage (Add Parts Totals)
Price at Which Postage Affixed (Check one) Complete if the mailing includes pieces bearing metered or precanceled stamps.
Correct Lowest Neither __________ pcs. x $ _________ . _________= Postage Affixed
A B C D E F G H I J K L S
Net Postage Due (Subtract postage affixed from total postage)
Total Adjusted Postage Affixed
Total Adjusted Postage Permit Imprint
The mailer's signature certifies acceptance of liability for and agreement to pay any revenue deficiencies assessed on this mailing, subject to appeal. If an agent signs this
form, the agent certifies that he or she is authorized to sign on behalf of the mailer and that the mailer is bound by the certification and agrees to pay any deficiencies. In
addition, agents may be liable for any deficiencies resulting from matters within their responsibility, knowledge, or control. The mailer hereby certifies that all information
furnished on this form is accurate, truthful, and complete; that the mail and the supporting documentation comply with all postal standards and the mailing qualifies for the
prices and fees claimed; and that the mailing does not contain any matter prohibited by law or postal regulation. I understand that anyone who furnishes false or
misleading information on this form or who omits information requested on this form may be subject to criminal and/or civil penalties, including fines and imprisonment.
Privacy Notice: For information regarding our Privacy Policy visit www.usps.com.
Signature of Mailer or Agent
Printed Name of Mailer or Agent Signing FormTelephone
For postage affixed add additional payment to net postage due;
for permit imprint add additional payment to total postage.
Postmaster: Report Total Postage in
(Permit Imprint Only)
Processing CategoryMailing Date Federal Agency Cost Code Statement Seq. No. No. & Type of Containers
Type ofPostage
Weight of a single-pieceTotal Pieces
Permit #
For Automation Pieces, Enter Date
of Address Matching and Coding
For Mail Enclosed Within Another ClassIf Sacked, Based On Total Weight
For Carrier Route Pieces, Enter Date
of Address Matching and CodingFor Carrier Route Pieces, Enter Date of
Carrier Route Sequencing
Move Update Method:
Permit Imprint
Precanceled Stamps
Metered
Letters
Flats
Parcels - Machinable
Parcels - Irregular
Letters - Paid as Nonauto Flats
CR Letters - Paid as CR Flats
CMM
NFM
____ . ____ ____ ____ ____ pounds0
Sacks
1 ft. Letter Trays
2 ft. Letter Trays
EMM Letter Trays
Flat Trays
Pallets
Other
___ ___ / __ __ / ___ ___ ___ ___ __ ___ / ___ ___ / ___ ___ ___ ___ ___ ___ / ___ ___ / ___ ___ ___ ___
125 pcs 15 lbs. both
OneCode ACS n/a Alternative Address Format
Bound Printed Matter Library Mail Media Mail Parcel Post
Periodicals
AIC 130
Ancillary Service Endorsement FASTforward NCOALink ACS Alternative Method Multiple
US
PS
Use
For pieces bearing a simplified address enter date
of delivery statistics file or alternative method
___ ___ / ___ ___ / ___ ___ ___ ___
Weight of a Single Piece
____ ____ . ____ ____ ____ ____ pound
Total Pieces Total Weight
Total Postage
Presort Verification Performed? (Check One)
I CERTIFY that this mailing has been inspected
concerning:
(1) eligibility for postage prices claimed;
(2) proper preparation (and presort where required);
(3) proper completion of postage statement;
(4) payment of annual fee; and
(5) sufficient funds on deposit (if required)
Yes No
USPS Employee's Signature
Are postage figures at left adjusted from
mailer's entries? If yes, reason:
Yes No
Round Stamp (Required)
Date Mail Released.
Print USPS Employee's Name
Date Mailer Notified Contact
By (Initials)Time
AMPM
US
PS
Use
On
ly
To
be c
ompl
eted
in
non-
Pos
talO
ne!s
ites
US
PS
Use
On
ly
To be com
pleted in
non-PostalO
ne!sites
Ray Melissa
22382 Avenida Empresa
RSM, CA 92688
949-586-5200
,
,
SAN CLEMENTE
CA 92673
4/8/201047
0 9 3 83025
283.594x
x
735.767
30250.233
704.825
30.942
x
XX
Presort Object (Build
1567) Presort Version 9.00.0
0.K
14
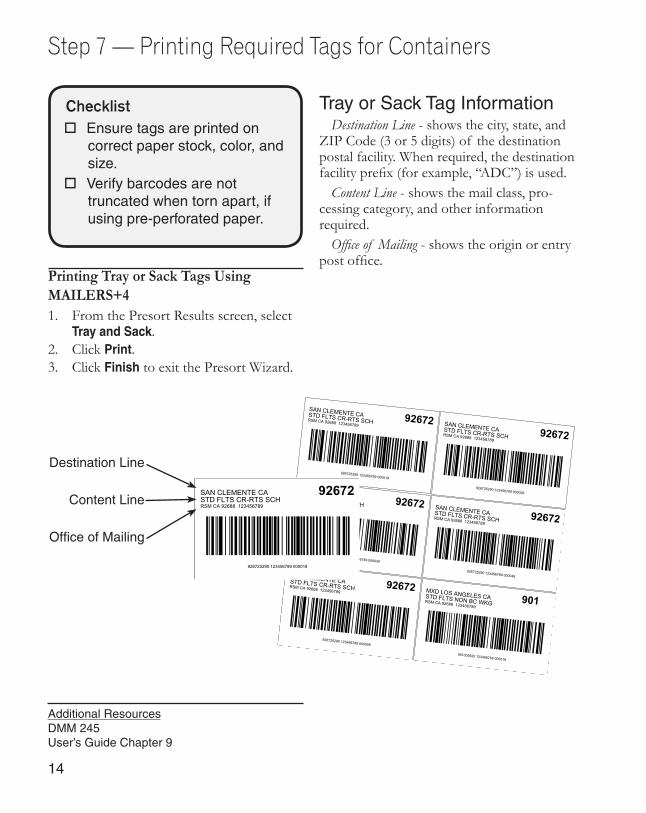
Printing Tray or Sack Tags Using MAILERS+41. From the Presort Results screen, select
Tray and Sack.2. Click Print.3. Click Finish to exit the Presort Wizard.
Step 7 — Printing Required Tags for Containers
ChecklistEnsure tags are printed on
correct paper stock, color, and size.
Verify barcodes are not truncated when torn apart, if using pre-perforated paper.
Tray or Sack Tag InformationDestination Line - shows the city, state, and
ZIP Code (3 or 5 digits) of the destination postal facility. When required, the destination facility prefix (for example, “ADC”) is used.
Content Line - shows the mail class, pro-cessing category, and other information required.Officeof Mailing - shows the origin or entry
post office.
SAN CLEMENTE CASTD FLTS CR-RTS SCHRSM CA 92688 12345678992672
926725290 123456789 000018
SAN CLEMENTE CASTD FLTS CR-RTS SCHRSM CA 92688 12345678992672
926725290 123456789 000028SAN CLEMENTE CASTD FLTS CR-RTS SCHRSM CA 92688 12345678992672
926725290 123456789 000038
SAN CLEMENTE CASTD FLTS CR-RTS SCHRSM CA 92688 12345678992672
926725290 123456789 000048SAN CLEMENTE CASTD FLTS CR-RTS SCHRSM CA 92688 12345678992672
926725290 123456789 000058
MXD LOS ANGELES CASTD FLTS NON BC WKGRSM CA 92688 123456789901
901005820 123456789 000018
SAN CLEMENTE CASTD FLTS CR-RTS SCHRSM CA 92688 123456789
92672
926725290 123456789 000018
SAN CLEMENTE CASTD FLTS CR-RTS SCHRSM CA 92688 123456789
92672
926725290 123456789 000028
SAN CLEMENTE CASTD FLTS CR-RTS SCHRSM CA 92688 123456789
92672
926725290 123456789 000038
SAN CLEMENTE CASTD FLTS CR-RTS SCHRSM CA 92688 123456789
92672
926725290 123456789 000048
SAN CLEMENTE CASTD FLTS CR-RTS SCHRSM CA 92688 123456789
92672
926725290 123456789 000058
MXD LOS ANGELES CASTD FLTS NON BC WKGRSM CA 92688 123456789
901
901005820 123456789 000018
Destination Line
Content Line
Office of Mailing
Additional ResourcesDMM 245User’s Guide Chapter 9
15
Step 6 — Printing Your Address Labels
Checklist
Verify the data on the label is printed according to USPS guidelines.
Verify automation barcodes are not truncated and have the correct number of bars.
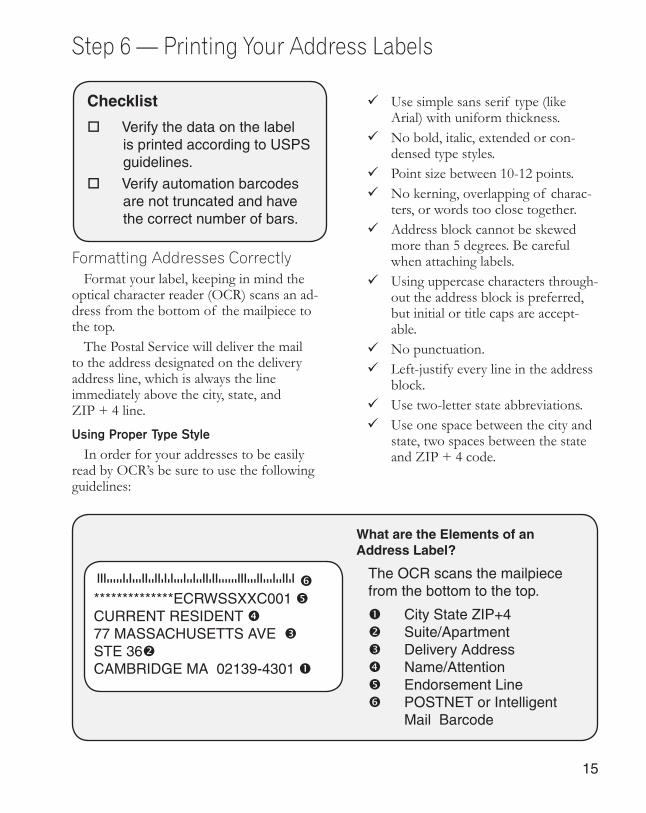
Formatting Addresses CorrectlyFormat your label, keeping in mind the
optical character reader (OCR) scans an ad-dress from the bottom of the mailpiece to the top.
The Postal Service will deliver the mail to the address designated on the delivery address line, which is always the line immediately above the city, state, and ZIP + 4 line.
Using Proper Type Style
In order for your addresses to be easily read by OCR’s be sure to use the following guidelines:
Use simple sans serif type (like Arial) with uniform thickness.
No bold, italic, extended or con-densed type styles.
Point size between 10-12 points. No kerning, overlapping of charac-
ters, or words too close together. Address block cannot be skewed
more than 5 degrees. Be careful when attaching labels.
Using uppercase characters through-out the address block is preferred, but initial or title caps are accept-able.
No punctuation. Left-justify every line in the address
block. Use two-letter state abbreviations. Use one space between the city and
state, two spaces between the state and ZIP + 4 code.
s021394301773s **************ECRWSSXXC001 CURRENT RESIDENT 77 MASSACHUSETTS AVE STE 36CAMBRIDGE MA 02139-4301
What are the Elements of an Address Label?
The OCR scans the mailpiece from the bottom to the top.
City State ZIP+4 Suite/Apartment Delivery Address Name/Attention Endorsement Line POSTNET or Intelligent
Mail Barcode
16
Printing Address Labels Using MAILERS+4
1. Click the Print Address Labels button.2. Select the appropriate label description
from the list by highlighting it. (i.e. Avery 5161) Select Next >>.
3. At the Template tab, create a new template. Place the appropriate fields for your label design by double-clicking the Field Names. Save your template and click Next >>.
4. Select the following Sequence commands: Presort Order, Normal Sequence; All Pages; and click Next >>.
5. Select the following Presort Options: The mailings from the Job List you wish to mail; print the Endorsement Line on all pieces; and a Header Label between tray changes. Select Next >>.
6. On the Print To tab, select a compatible printer driver from the listing. Selecting Windows Driver is best for small ink jet and laser printers and will use your default printer in the Windows Control Panel. Select Next >>.
7. Click Preview to verify your labels will print as expected, and click Print to start printing labels.
Additional ResourcesPub. 28 Postal Addressing Standards
Notice 67 Automation TemplateDMM 602, 708
QSG 708User’s Guide Chapter 10

17
Step 8 — Putting Labels on the Mailpiece
ChecklistPeel labels in order from left to
right. Keep labels and mailpieces
in the same order as the Qualification Report.
Place labels in the proper location—with less than five degree skew—on the mailpiece.
Ensure OCR readability according to USPS guidelines.
Mailpiece Clear ZonesSeveral places on the address side of a
mailpiece are reserved for addressing and related information only. Always have your post office check the validity of your mail-piece before applying labels.
OCR Read Area - Extraneous (non-ad-dress) printing in the OCR read area can cause the rejection of the mailpiece. Be sure to have at least 1/2” all the way around the label.
You may place non-address print-ing such as compa-ny logos, advertis-ing, and die cuts within the OCR read area only if you position this printing so that the lowest point is above the delivery address line.
Return Address - The return address must be above the OCR read area and should be printed in a type size smaller than the type size used in the delivery address.
Barcode Clear Zone - To ensure that the barcode is readable by barcode sorters, the barcode clear zone must be clear of all print-ing, markings, and colored borders.
Address LabelsBe sure to use address labels that are at
least 3” long to ensure proper fit of the barcode. When applying labels to your mail-piece, be sure to place the label on straight within the OCR read area so there is less than a five degree skew.
s021394301773s
**************ECRWSSXXC001
CURRENT RESIDENT
123 MAIN STREET
SAN CLEMENTE, CA 92672-0001
5°

18
ChecklistInsert bar-coded tray tags into
holders. Place mailpieces into trays
or sacks according to the Qualification Report.
Sleeve and strap appropriate trays.
Step 9 — Assembling Your Mailpieces into Containers
First - Label Trays or SacksPlace a tag
securely on each sack or tray. Do not tape labels onto trays or label holders. Do not make handwrit-ten changes to pre-printed bar-coded labels—the machines read only the barcode.
Front
BackSAN CLEMENTE CA
STD FLTS CR-RTS SCH
RSM CA 92688 123456789
92672
926725290 123456789 000018
SAN CLEMENTE CA
STD FLTS CR-RTS SCH
RSM CA 92688 123456789
92672
926725290 123456789 000028
SAN CLEMENTE CA
STD FLTS CR-RTS SCH
RSM CA 92688 123456789
92672
926725290 123456789 000038
SAN CLEMENTE CA
STD FLTS CR-RTS SCH
RSM CA 92688 123456789
92672
926725290 123456789 000048
SAN CLEMENTE CA
STD FLTS CR-RTS SCH
RSM CA 92688 123456789
92672
926725290 123456789 000058
MXD LOS ANGELES CA
STD FLTS NON BC WKG
RSM CA 92688 123456789
901
901005820 123456789 000018
Second - Prepare SortsPieces mailed to the same carrier route
should not be rubber banded, but mailpieces in sacks and trays with multiple car-rier routes must be rubber banded by carrier route.
Third - Sleeve & Strap TraysSleeve all the trays and strap non-local
trays for transport. Strapping is not required for trays going to your local post office. See your Business Mail Entry Unit (BMEU) manager for details.
How do I rubber band packages?
If your package is 1 to 6 inches thick, place the first rubber band lengthwise, and the second rubber band around the height. If your package is less than 1” thick, only place one rubber band around the height.
Additional ResourcesDMM 243.5, 343.5, 443.5, 301.3, 245.5
QSG 240a, 240b, 240c
19
ChecklistSigned CASS Form 3553. Signed Postage Statement. Printed Qualification Reports. ZIP Code Record Report
(shows the CDS Certification date of a list that you purchased from Melissa Data) or Walk Sequence Report (provided by Melissa Data when we return your list after DSF processing.
Sleeved and strapped trays. Payment ready. Deposit mail early in the day. Pick up extra supplies.
Verification & Acceptance of MailAll presorted mailings are deposited at
their designated Business Mail Entry Unit (BMEU) or drop points with completed, ac-curate postage statements.
Business mail acceptance clerks will make sure your mail is properly prepared so that the Postal Service can efficiently process and deliver it. They will check your mailing for correct postage payment, correct endorse-ments, proper addressing, and the contents’ eligibility for the class of mail indicated. They will also check to see whether the mail is properly sorted and barcoded.
If problems are discovered with the prepa-ration of your mailing, you may correct the errors, or pay additional postage to compen-sate the Postal Service for the errors found.
Remember, the BMEU acceptance staff is there to help you. They want your mail-ing to be a success. Using Standard Mail for direct mail advertising is an effective way to reach clients, potential customers, members, friends, and other businesses.Business Mail Entry Unit (BMEU)
Name of Unit Manager Extension
Additional Contact Extension
Address
Telephone Number
Telephone Number (Account Balance Information)
Hours of Operation
Sources of Postal Information
Postal Business Center (PBC)
Address
Telephone Number
Hours of Operation
Step 10 — Taking It All to the Post Office

20