Embed Size (px)
Citation preview
sarahraven.com
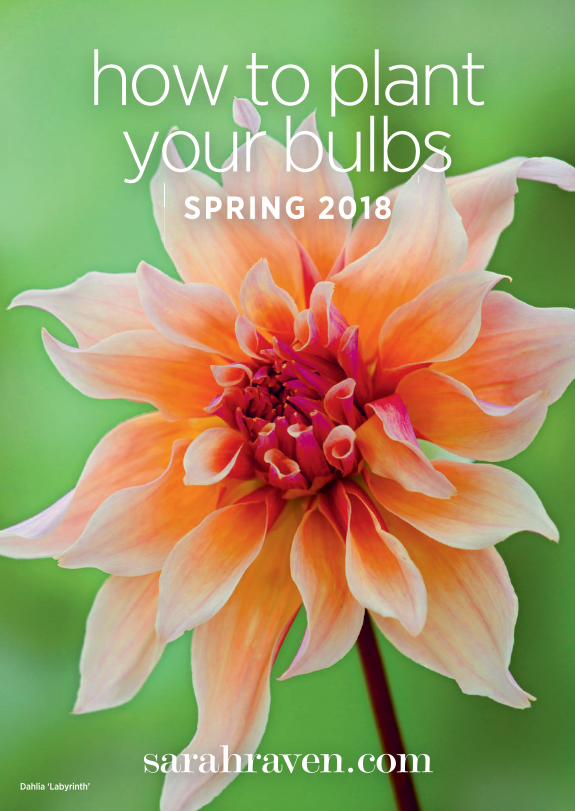
how to plant your bulbsyour bulbs
SPRING 2018
Dahlia ‘Labyrinth’
SR SPRING bulb guide 2018.indd 1 24/01/2018 11:39
2
spring bulbs
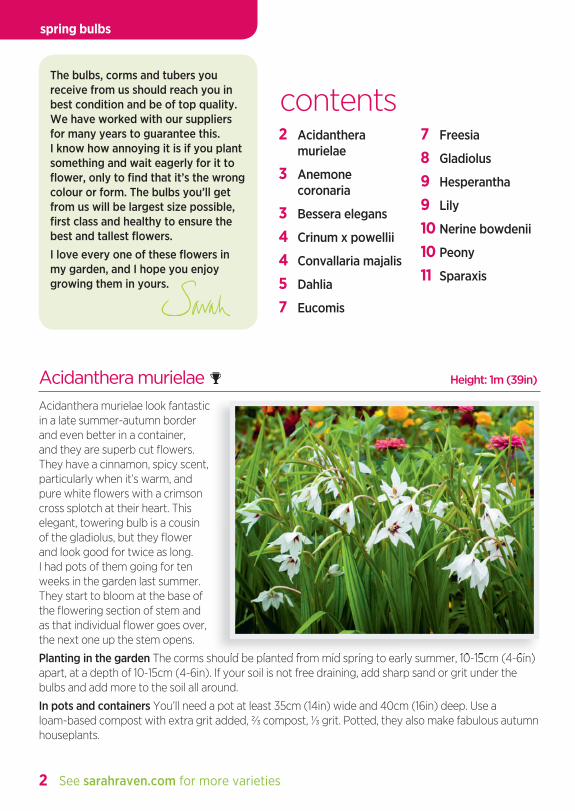
Acidanthera murielae Height: 1m (39in)
Acidanthera murielae look fantastic in a late summer-autumn border and even better in a container, and they are superb cut fl owers. They have a cinnamon, spicy scent, particularly when it’s warm, and pure white fl owers with a crimson cross splotch at their heart. This elegant, towering bulb is a cousin of the gladiolus, but they fl ower and look good for twice as long. I had pots of them going for ten weeks in the garden last summer. They start to bloom at the base of the fl owering section of stem and as that individual fl ower goes over, the next one up the stem opens.
Planting in the garden The corms should be planted from mid spring to early summer, 10-15cm (4-6in) apart, at a depth of 10-15cm (4-6in). If your soil is not free draining, add sharp sand or grit under the bulbs and add more to the soil all around.
In pots and containers You’ll need a pot at least 35cm (14in) wide and 40cm (16in) deep. Use a loam-based compost with extra grit added, ⅔ compost, ⅓ grit. Potted, they also make fabulous autumn houseplants.
See sarahraven.com for more varieties
contents2 Acidanthera
murielae
3 Anemone coronaria
3 Bessera elegans
4 Crinum x powellii
4 Convallaria majalis
5 Dahlia
7 Eucomis
7 Freesia
8 Gladiolus
9 Hesperantha
9 Lily
10 Nerine bowdenii
10 Peony
11 Sparaxis
The corms should be planted from mid spring to early summer, 10-15cm (4-6in)
The bulbs, corms and tubers you receive from us should reach you in best condition and be of top quality. We have worked with our suppliers for many years to guarantee this. I know how annoying it is if you plant something and wait eagerly for it to fl ower, only to fi nd that it’s the wrong colour or form. The bulbs you’ll get from us will be largest size possible, fi rst class and healthy to ensure the best and tallest fl owers. I love every one of these fl owers in my garden, and I hope you enjoy growing them in yours.
SR SPRING bulb guide 2018.indd 2 24/01/2018 11:39
3
individual bulb planting instructions
Care and maintenance Acidanthera’s exotic origins (they come from Ethiopia) mean that they won’t start to grow until summer has really arrived, so don’t give up on them. As soon as the fl ower spikes appear, apply a high potash feed such as comfrey pellets (see our website) every two weeks. Continue until at least three weeks after fl owering. This makes all the difference on poor soils, as fl owering can diminish in successive seasons. See our website for Comfrey Pellets and fertilisers.
Acidanthera are not reliably hardy. If mulched deeply, they sometimes survive the winter in my garden, but it is best to lift them. This should be done when the leaves turn yellow/brown; snap the corms from the stems, dust with copper mixture, dry for two weeks then snap the new corms (there should be lots) from the old and discard the old corms. They must then be stored cold (but frost free) and dry until replanting. I store mine in a frost-free barn, hanging in a net or onion bag to guarantee good air circulation.
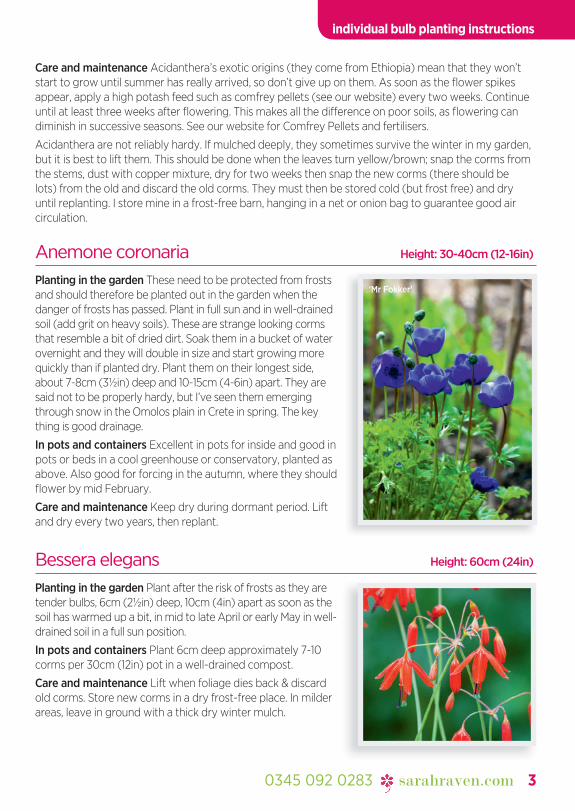
Anemone coronaria Height: 30-40cm (12-16in)
Planting in the garden These need to be protected from frosts and should therefore be planted out in the garden when the danger of frosts has passed. Plant in full sun and in well-drained soil (add grit on heavy soils). These are strange looking corms that resemble a bit of dried dirt. Soak them in a bucket of water overnight and they will double in size and start growing more quickly than if planted dry. Plant them on their longest side, about 7-8cm (3½in) deep and 10-15cm (4-6in) apart. They are said not to be properly hardy, but I’ve seen them emerging through snow in the Omolos plain in Crete in spring. The key thing is good drainage.
In pots and containers Excellent in pots for inside and good in pots or beds in a cool greenhouse or conservatory, planted as above. Also good for forcing in the autumn, where they should fl ower by mid February.
Care and maintenance Keep dry during dormant period. Lift and dry every two years, then replant.
Bessera elegans Height: 60cm (24in)
Planting in the garden Plant after the risk of frosts as they are tender bulbs, 6cm (2½in) deep, 10cm (4in) apart as soon as the soil has warmed up a bit, in mid to late April or early May in well-drained soil in a full sun position.
In pots and containers Plant 6cm deep approximately 7-10 corms per 30cm (12in) pot in a well-drained compost.
Care and maintenance Lift when foliage dies back & discard old corms. Store new corms in a dry frost-free place. In milder areas, leave in ground with a thick dry winter mulch.
0345 092 0283 sarahraven.com
‘Mr Fokker’
SR SPRING bulb guide 2018.indd 3 24/01/2018 11:39

4
spring bulbs
Convallaria majalis Height: 20cm (8in)
These delicate, scented native wild fl owers will thrive in dry or damp shade. They’ll live there happily forever and of course, no May garden (or bedside) is quite complete without them. Supplied as crowns with long rhizomatous roots, each crown will have a ‘pip’ or growing point.
Planting in the garden Convallaria pips can be tricky to establish directly in the ground and are best started off in pots under cover before planting out in mid-May. When you are ready to plant them out choose a spot in light shade with moist soil and plenty of organic matter added in. The long thin rhizomes should be laid out horizontally, just under the surface of the soil 5-7cm deep. Space them about 20cm (8in) apart. Water them in well and give them a mulch of leaf mould or good garden compost.
In pots and containers Gently tease apart each crown and soak for half an hour if they seem dry. Use a loam-based compost with extra grit added, 2/3 compost, 1/3 grit. Plant each crown in a 7-8cm pot ensuring the shoot is visible just above the surface. Place in a cool greenhouse. Keep well-watered, they will be ready to plant out when the roots have spread to fi ll the pot.
Care and maintenance After the leaves have died down, give each plant a mulch of leaf mould in the autumn. After three to four years you can divide the clumps and replant to spread them into other parts of the garden.
Crinum x powellii Height: 80-100cm (32-40in)
Vast trumpet fl owers in white, which come just at the right time in late summer/early autumn when there is less drama around for the garden. The large, strap-shaped leaves make them diffi cult to integrate into a mixed border, but they are perfect fi lling a sunny corner or running along the base of a sunny wall.
Planting in the garden Pick a spot wisely, they dislike being moved. They need full sun and moist soil – deep fertile stuff with plenty of organic matter added. The bulbs are huge and are best planted in spring. Plant them so the nose of the bulb is level with the soil surface. Space them 50-60cm (20-24in) apart and water in well. They may not fl ower in the fi rst year.
In pots and containers Crinums look good in large pots, and can be moved into a shed or cold greenhouse over winter for extra protection. Use a loam-based compost with extra grit added, ⅔ compost, ⅓ grit. In pots, you can leave the upper part of the bulb out of the soil (because of limited soil depth) and they’ll do fi ne.
Care and maintenance In cold areas, mulch during winter for extra protection. Otherwise do nothing but water a little in summer and while they’re fl owering. They hate any root disturbance.
Crinums look good in large pots, and can be moved into a shed or cold
See sarahraven.com for great gardening kit
SR SPRING bulb guide 2018.indd 4 24/01/2018 11:39

5
individual bulb planting instructions
Dahlia Height: 60-120cm (24-47in)
Dahlias are one of the lowest maintenance, highest production cut fl owers and garden plants you can grow. In a good year, they’ll fl ower from late June to early December (particularly in a sheltered spot). They come in all shapes and sizes, and are available in most of the best fl ower colours. These are some of my favourite ever garden plants.
What to do with them when they arrive Dahlias are tender tubers. Their root structures look like a bunch of salamis gathered together on a stem. If you plant them out before the frosts are over, they may get frosted and die, so pot them up in March or early April, in a generous (at least 2 litre) pot fi lled with multi-purpose potting compost. Place them in a light, frost-free place and keep the compost moist. They will have formed bushy plants by the time the frosts have ended and will be in fl ower by the beginning of July. If you don’t have anywhere to grow potted tubers, put them straight into the ground when the frosts are nearly over, mulching them or protecting them with a cloche or protective horticultural fl eece if the foliage appears before the frosts have fi nished. This system involves less work, but you’ll have plants several weeks behind those brought on inside.
Pinching out Whether you have raised your dahlias outside in the garden or under cover, you need to pinch out the tips of the main shoot as they grow. Either with a sharp knife or squeezed between your thumb and forefi nger, remove the main shoot down to the top pair of leaves.
You also need to remove all but fi ve shoots sprouting from the tuber. There may be several more shoots, some of them weedy, but all but fi ve must go. It feels brutal, but pinching out encourages bushy plants and with only fi ve stems allowed to develop, you will get strong, vigorous growth that will produce lots of fl owers.
Rooting cuttings Turn one tuber into 10. Both the pinched-out tips and the shoots from the main tuber can be used as cuttings to make more plants. Reduce the cuttings to about 5-6cm (2in) tall and remove all but the top pair of leaves. Insert them into a gritty mix of compost, all the way round the edge of a pot, spaced so that they are not touching. Water and cover the whole thing with a plastic bag supported on short canes round the edge of the pot and secured with a rubber band. Put the pot in a propagator on capillary matting (to reduce the need for watering) and leave for three to four weeks. They should then have rooted and will need potting up individually. When the frosts are over, these can also be planted out in the garden and, by mid summer, you’ll hardly know mother from daughter.
Planting in the garden Dahlias thrive in most sunny situations and do best in a fertile soil, with moisture and good drainage. To plant them, dig a hole at least 15cm (6in) square and 15cm (6in) deep for each one, spacing them 75cm (30in) apart (depending on expected fi nal size of variety) and ensure there is 5-10cm (2-4in) of soil above the tuber. Cover the base of the hole with compost or manure and give it a good dousing with a full watering can, then plant the dahlia. Add grit to the planting hole on heavy
0345 092 0283 sarahraven.com
involves less work, but you’ll have plants several weeks behind those brought on inside.
‘Blue Bayou’
SR SPRING bulb guide 2018.indd 5 24/01/2018 11:39
6
spring bulbs
clay. You will need a stout stake, not just a bamboo cane, to support each plant and it is a good idea to knock this in fi rst and then place the plant by its side.
Care and maintenanceFeeding and watering After about a week in the ground, scatter a couple of trowelfuls of GroChar fertiliser around the clump and give them another good soaking. Once a fortnight, feed them with a liquid balanced feed like Powerfeed Organic Fertiliser (see our website for details). In a drought, it’s a good idea to water them once a week, with a good fl ood not a gentle sprinkle.
Staking With the stake in place at planting, tie them in every couple of weeks. Dahlias grow very quickly once they get going and can easily break off right at the base in wind or rain if they are not securely staked.
Deadheading If you don’t pick every fl ower for the house, it’s a good idea to have an occasional blitz of deadheading. This will make them look much better and will prolong fl owering. Cut heads off, removing the whole dead fl owering stem.
Digging them up – or not? In recent years, our winters in the South of England have been so mild that dahlias left in the ground, mulched deeply to protect them from the frost, have re-emerged fi ne, bulking up and fl owering well before the other plants grown on in pots. You could opt for this low-maintenance regime, but you risk losing your plants if we are hit by a hard winter. To replace them is cheap and easy, so this is what we do at Perch Hill, saving lots of time and hassle in the autumn and again in the spring.To be sure of conserving your plants for next year, dig them up after the tops have been frosted once or twice in the autumn. Cut them down to 15cm (6in) before you do so. Knock off the surplus soil and, with a small piece of stick, scoop out the loose soil between the tubers – but leave enough to hold them in place. Do not clean the tubers under a tap; to get water on a tuber at this time of year often spells disaster. Let them dry, hanging upside down from a dried stalk, leaving them there for a couple of weeks, then pack them away in a storage box in moist compost or sand. This prevents the tubers drying out. Store them in a cool, frost-free place – a garage or shed is ideal.
Pests and diseases Earwigs can be a problem with dahlias, eating the fl owers and the leaves. The organic way of control is to position pots fi lled with straw upside-down raised on canes dotted throughout your dahlias. The earwigs crawl into the straw in the heat of the day. At the end of the day you can bag them, burn them or release them somewhere else far from your dahlias. Slugs also love dahlias, especially when they fi rst shoot, so protect them from the word go with Wool Pellets (see our website), creating a slug repelling barrier.
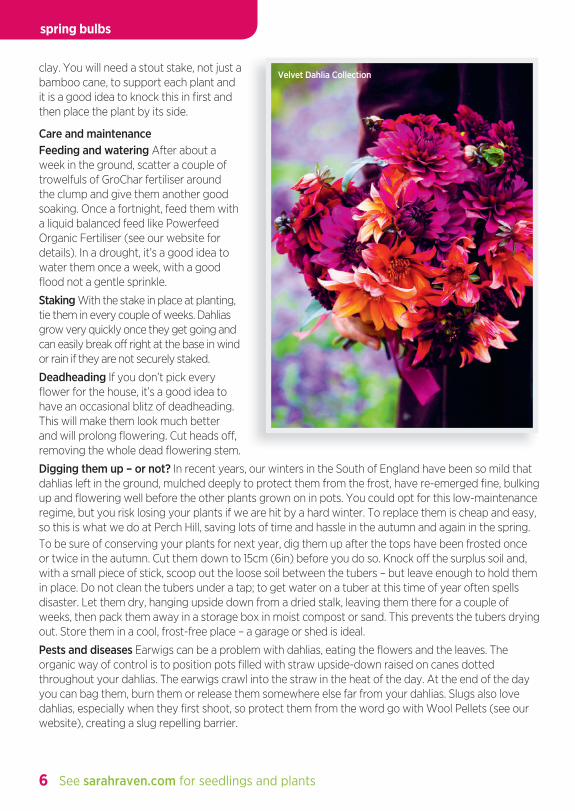
Velvet Dahlia Collection
See sarahraven.com for seedlings and plants
SR SPRING bulb guide 2018.indd 6 24/01/2018 11:39
7
individual bulb planting instructions
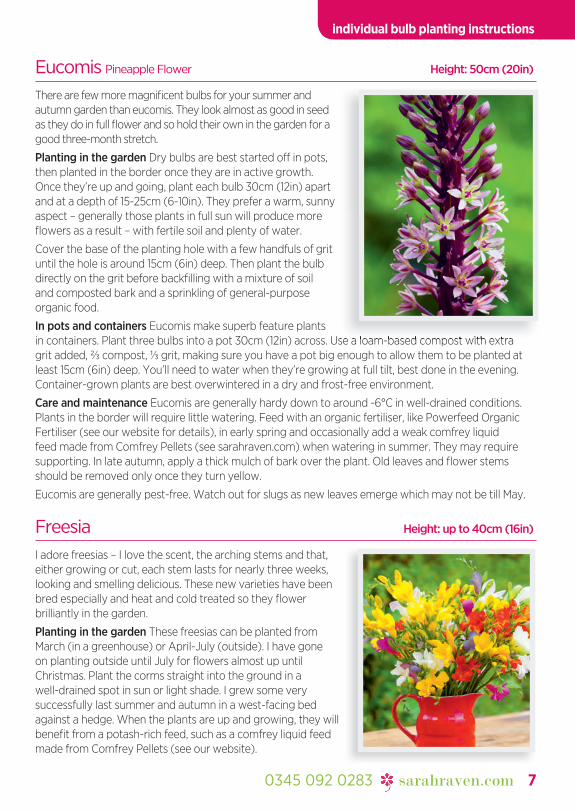
Eucomis Pineapple Flower Height: 50cm (20in)
There are few more magnifi cent bulbs for your summer and autumn garden than eucomis. They look almost as good in seed as they do in full fl ower and so hold their own in the garden for a good three-month stretch.
Planting in the garden Dry bulbs are best started off in pots, then planted in the border once they are in active growth. Once they’re up and going, plant each bulb 30cm (12in) apart and at a depth of 15-25cm (6-10in). They prefer a warm, sunny aspect – generally those plants in full sun will produce more fl owers as a result – with fertile soil and plenty of water.
Cover the base of the planting hole with a few handfuls of grit until the hole is around 15cm (6in) deep. Then plant the bulb directly on the grit before backfi lling with a mixture of soil and composted bark and a sprinkling of general-purpose organic food.
In pots and containers Eucomis make superb feature plants in containers. Plant three bulbs into a pot 30cm (12in) across. Use a loam-based compost with extra grit added, ⅔ compost, ⅓ grit, making sure you have a pot big enough to allow them to be planted at least 15cm (6in) deep. You’ll need to water when they’re growing at full tilt, best done in the evening. Container-grown plants are best overwintered in a dry and frost-free environment.
Care and maintenance Eucomis are generally hardy down to around -6°C in well-drained conditions. Plants in the border will require little watering. Feed with an organic fertiliser, like Powerfeed Organic Fertiliser (see our website for details), in early spring and occasionally add a weak comfrey liquid feed made from Comfrey Pellets (see sarahraven.com) when watering in summer. They may require supporting. In late autumn, apply a thick mulch of bark over the plant. Old leaves and fl ower stems should be removed only once they turn yellow.
Eucomis are generally pest-free. Watch out for slugs as new leaves emerge which may not be till May.
Freesia Height: up to 40cm (16in)
I adore freesias – I love the scent, the arching stems and that, either growing or cut, each stem lasts for nearly three weeks, looking and smelling delicious. These new varieties have been bred especially and heat and cold treated so they fl ower brilliantly in the garden.
Planting in the garden These freesias can be planted from March (in a greenhouse) or April-July (outside). I have gone on planting outside until July for fl owers almost up until Christmas. Plant the corms straight into the ground in a well-drained spot in sun or light shade. I grew some very successfully last summer and autumn in a west-facing bed against a hedge. When the plants are up and growing, they will benefi t from a potash-rich feed, such as a comfrey liquid feed made from Comfrey Pellets (see our website).
0345 092 0283 sarahraven.com
in containers. Plant three bulbs into a pot 30cm (12in) across. Use a loam-based compost with extra
SR SPRING bulb guide 2018.indd 7 24/01/2018 11:39
8
spring bulbs
In pots and containers Plant six bulbs, pointy end upwards, in a 13cm (5in) pot, with a cane support added on planting to keep the foliage and fl owering stems upright as they grow. Use a loam-based compost with extra grit added, ⅔ compost, ⅓ grit. Water regularly and keep them moist and shaded at all times – a cold greenhouse or conservatory is ideal. Once the corms start to sprout, move the pots into full sunlight and keep watering. When the buds show colour, bring them indoors.
Care and maintenance If planted in good soil or compost, they will not require feeding. Flowering takes around 100-120 days from planting. These are not fully hardy, so lift the plants in the autumn either when the plants yellow or after the fi rst frost. Cut the stems back to 2cm (1in) and allow the corms to dry. Remove the old, shrivelled portion, keeping only the new plump corms. These store easily in vermiculite or sand. Store them in a cool, dry, frost-free place. Plant directly, when the ground begins to warm. Stagger plantings to extend the season of bloom.
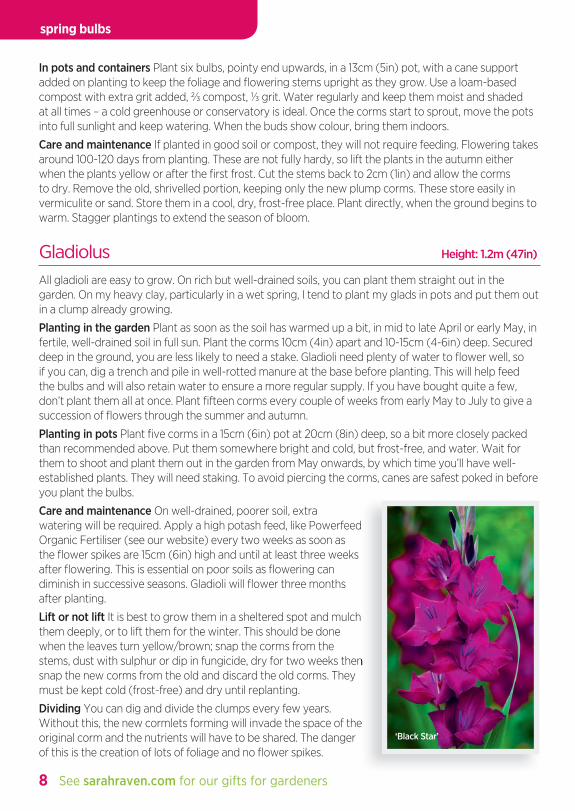
Gladiolus Height: 1.2m (47in)
All gladioli are easy to grow. On rich but well-drained soils, you can plant them straight out in the garden. On my heavy clay, particularly in a wet spring, I tend to plant my glads in pots and put them out in a clump already growing.
Planting in the garden Plant as soon as the soil has warmed up a bit, in mid to late April or early May, in fertile, well-drained soil in full sun. Plant the corms 10cm (4in) apart and 10-15cm (4-6in) deep. Secured deep in the ground, you are less likely to need a stake. Gladioli need plenty of water to fl ower well, so if you can, dig a trench and pile in well-rotted manure at the base before planting. This will help feed the bulbs and will also retain water to ensure a more regular supply. If you have bought quite a few, don’t plant them all at once. Plant fi fteen corms every couple of weeks from early May to July to give a succession of fl owers through the summer and autumn.
Planting in pots Plant fi ve corms in a 15cm (6in) pot at 20cm (8in) deep, so a bit more closely packed than recommended above. Put them somewhere bright and cold, but frost-free, and water. Wait for them to shoot and plant them out in the garden from May onwards, by which time you’ll have well-established plants. They will need staking. To avoid piercing the corms, canes are safest poked in before you plant the bulbs.
Care and maintenance On well-drained, poorer soil, extra watering will be required. Apply a high potash feed, like Powerfeed Organic Fertiliser (see our website) every two weeks as soon as the fl ower spikes are 15cm (6in) high and until at least three weeks after fl owering. This is essential on poor soils as fl owering can diminish in successive seasons. Gladioli will fl ower three months after planting.
Lift or not lift It is best to grow them in a sheltered spot and mulch them deeply, or to lift them for the winter. This should be done when the leaves turn yellow/brown; snap the corms from the stems, dust with sulphur or dip in fungicide, dry for two weeks then snap the new corms from the old and discard the old corms. They must be kept cold (frost-free) and dry until replanting.
Dividing You can dig and divide the clumps every few years. Without this, the new cormlets forming will invade the space of the original corm and the nutrients will have to be shared. The danger of this is the creation of lots of foliage and no fl ower spikes.
watering will be required. Apply a high potash feed, like Powerfeed
It is best to grow them in a sheltered spot and mulch
stems, dust with sulphur or dip in fungicide, dry for two weeks then
Without this, the new cormlets forming will invade the space of the ‘Black Star’
See sarahraven.com for our gifts for gardeners
SR SPRING bulb guide 2018.indd 8 24/01/2018 11:39

9
individual bulb planting instructions
Hesperantha Height: 45cm (18in)
These are South African plants, which grow on stream banks and damp meadows and fl ower late – in September and October, making them invaluable for autumn colour and cut fl owers. The sword-shaped leaves are almost evergreen.
Planting in the garden They are happiest in damp, rich, but well-drained soil in full sun or light shade. They hate to really dry out, so putting them on the margin of a pond, or with lots of organic matter added to a thin soil is key. Plant the rhizomes 5cm (2in) deep and 10cm (4in) apart. The small rhizome produces stolons and the plants spread quite rapidly into big patches, up to 90cm (36in) across. They are fully hardy.
Planting in pots Plant in a moisture retentive compost and do not allow to dry out.
Care and maintenance This loves plenty of water during the summer.
Lily Height: 60-120cm (24-48in)
Lilies can be planted at any time during the autumn, winter or early spring. As long as they are in by the end of March, they will be fi ne. On very heavy soils, March planting is better.
Planting in the garden All our lilies are reliably perennial – reappearing year after year – so bear this in mind when you choose where to plant them. If possible, fi nd them a spot in sun or light shade (most colours stay better with some shade, particularly the pinks) where they won’t be disturbed. Plant them pointy end up. Don’t worry if the bulbs have a sprout. Plant them with the sprout just above ground and, even if it is bent, it will right itself in three to four weeks.
I always plant lily bulbs in clumps of at least three to fi ve. Without these numbers, you get a very dotty effect. Dig a hole for each group at least 20cm (8in) deep. I dig out a trench or shallow hole, taking up as much space as I have room for between other plants. It’s just one big hole dug at the same time, rather than lots of mini cores. Spread a 5cm (2in) layer of grit all over the bottom – drainage is the most important thing. All lilies fl ower better and live longer if the soil is not cold and clammy, with feet in the shade, fl owers in the sun. Mark clearly wherever you plant a lily bulb so you don’t later slice through it, and protect against slugs.
In pots and containers On heavy, clay soils, the best way to grow lilies is in pots, either ornamental or black plastic ones which you can drop into borders where you want extra fl owers. Plant the bulbs using a loam-based compost, mixed with grit, ⅔ compost, ⅓ grit. They like to be fed while they’re growing. Ideally give a liquid comfrey feed made from Comfrey Pellets (see our website) every two weeks as well as a top dressing of Orgrow Concentrated Manure.
Care and maintenance The main current issue with lilies is lily beetle. These are scarlet, easy to see, small beetles which munch away on the lilies’ foliage and fl owers through the spring. Squash them whenever you see them (particularly in April and May when they are at their most active) or use a systemic insecticide.
0345 092 0283 sarahraven.com
They are happiest in damp, rich, but well-drained
mind when you choose where to plant them. If possible,
with the sprout just above ground and, even if it is bent, it will right itself in three to four weeks.
Lilium regale
SR SPRING bulb guide 2018.indd 9 24/01/2018 11:39
10
spring bulbs
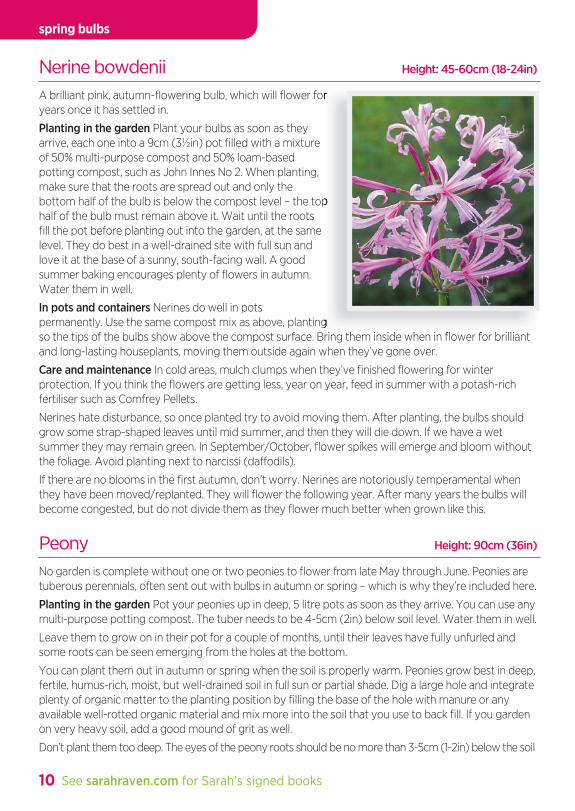
Nerine bowdenii Height: 45-60cm (18-24in)
A brilliant pink, autumn-fl owering bulb, which will fl ower for years once it has settled in.
Planting in the garden Plant your bulbs as soon as they arrive, each one into a 9cm (3½in) pot fi lled with a mixture of 50% multi-purpose compost and 50% loam-based potting compost, such as John Innes No 2. When planting, make sure that the roots are spread out and only the bottom half of the bulb is below the compost level – the top half of the bulb must remain above it. Wait until the roots fi ll the pot before planting out into the garden, at the same level. They do best in a well-drained site with full sun and love it at the base of a sunny, south-facing wall. A good summer baking encourages plenty of fl owers in autumn. Water them in well.
In pots and containers Nerines do well in pots permanently. Use the same compost mix as above, planting so the tips of the bulbs show above the compost surface. Bring them inside when in fl ower for brilliant and long-lasting houseplants, moving them outside again when they’ve gone over.
Care and maintenance In cold areas, mulch clumps when they’ve fi nished fl owering for winter protection. If you think the fl owers are getting less, year on year, feed in summer with a potash-rich fertiliser such as Comfrey Pellets.
Nerines hate disturbance, so once planted try to avoid moving them. After planting, the bulbs should grow some strap-shaped leaves until mid summer, and then they will die down. If we have a wet summer they may remain green. In September/October, fl ower spikes will emerge and bloom without the foliage. Avoid planting next to narcissi (daffodils).
If there are no blooms in the fi rst autumn, don’t worry. Nerines are notoriously temperamental when they have been moved/replanted. They will fl ower the following year. After many years the bulbs will become congested, but do not divide them as they fl ower much better when grown like this.
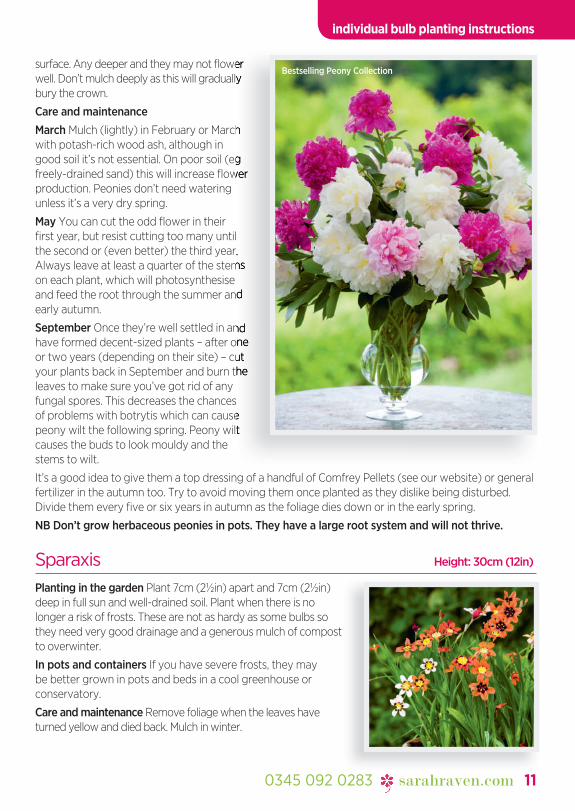
Peony Height: 90cm (36in)
No garden is complete without one or two peonies to fl ower from late May through June. Peonies are tuberous perennials, often sent out with bulbs in autumn or spring – which is why they’re included here.
Planting in the garden Pot your peonies up in deep, 5 litre pots as soon as they arrive. You can use any multi-purpose potting compost. The tuber needs to be 4-5cm (2in) below soil level. Water them in well.
Leave them to grow on in their pot for a couple of months, until their leaves have fully unfurled and some roots can be seen emerging from the holes at the bottom.
You can plant them out in autumn or spring when the soil is properly warm. Peonies grow best in deep, fertile, humus-rich, moist, but well-drained soil in full sun or partial shade. Dig a large hole and integrate plenty of organic matter to the planting position by fi lling the base of the hole with manure or any available well-rotted organic material and mix more into the soil that you use to back fi ll. If you garden on very heavy soil, add a good mound of grit as well.
Don’t plant them too deep. The eyes of the peony roots should be no more than 3-5cm (1-2in) below the soil
See sarahraven.com for Sarah’s signed books
A brilliant pink, autumn-fl owering bulb, which will fl ower for
bottom half of the bulb is below the compost level – the top
permanently. Use the same compost mix as above, planting so the tips of the bulbs show above the compost surface. Bring them inside when in fl ower for brilliant
SR SPRING bulb guide 2018.indd 10 24/01/2018 11:39
11
individual bulb planting instructions
surface. Any deeper and they may not fl ower well. Don’t mulch deeply as this will gradually bury the crown.
Care and maintenanceMarch Mulch (lightly) in February or March with potash-rich wood ash, although in good soil it’s not essential. On poor soil (eg freely-drained sand) this will increase fl ower production. Peonies don’t need watering unless it’s a very dry spring.
May You can cut the odd fl ower in their fi rst year, but resist cutting too many until the second or (even better) the third year. Always leave at least a quarter of the stems on each plant, which will photosynthesise and feed the root through the summer and early autumn.
September Once they’re well settled in and have formed decent-sized plants – after one or two years (depending on their site) – cut your plants back in September and burn the leaves to make sure you’ve got rid of any fungal spores. This decreases the chances of problems with botrytis which can cause peony wilt the following spring. Peony wilt causes the buds to look mouldy and the stems to wilt.
It’s a good idea to give them a top dressing of a handful of Comfrey Pellets (see our website) or general fertilizer in the autumn too. Try to avoid moving them once planted as they dislike being disturbed. Divide them every fi ve or six years in autumn as the foliage dies down or in the early spring.
NB Don’t grow herbaceous peonies in pots. They have a large root system and will not thrive.
Sparaxis Height: 30cm (12in)
Planting in the garden Plant 7cm (2½in) apart and 7cm (2½in) deep in full sun and well-drained soil. Plant when there is no longer a risk of frosts. These are not as hardy as some bulbs so they need very good drainage and a generous mulch of compost to overwinter.
In pots and containers If you have severe frosts, they may be better grown in pots and beds in a cool greenhouse or conservatory.
Care and maintenance Remove foliage when the leaves have turned yellow and died back. Mulch in winter.
0345 092 0283 sarahraven.com
surface. Any deeper and they may not fl ower well. Don’t mulch deeply as this will gradually
Mulch (lightly) in February or March
good soil it’s not essential. On poor soil (eg freely-drained sand) this will increase fl ower
fi rst year, but resist cutting too many until the second or (even better) the third year. Always leave at least a quarter of the stems
and feed the root through the summer and
Once they’re well settled in and have formed decent-sized plants – after one or two years (depending on their site) – cut your plants back in September and burn the
fungal spores. This decreases the chances of problems with botrytis which can cause peony wilt the following spring. Peony wilt
Bestselling Peony Collection
SR SPRING bulb guide 2018.indd 11 24/01/2018 11:39

1 Woodstock Court, Blenheim Road, Marlborough, Wiltshire SN8 4AN
0345 092 0283
For more growing advice, Sarah’s videos and gardening articles visit our website:
sarahraven.com
SR SPRING bulb guide 2018.indd 12 24/01/2018 11:39