Embed Size (px)
Citation preview
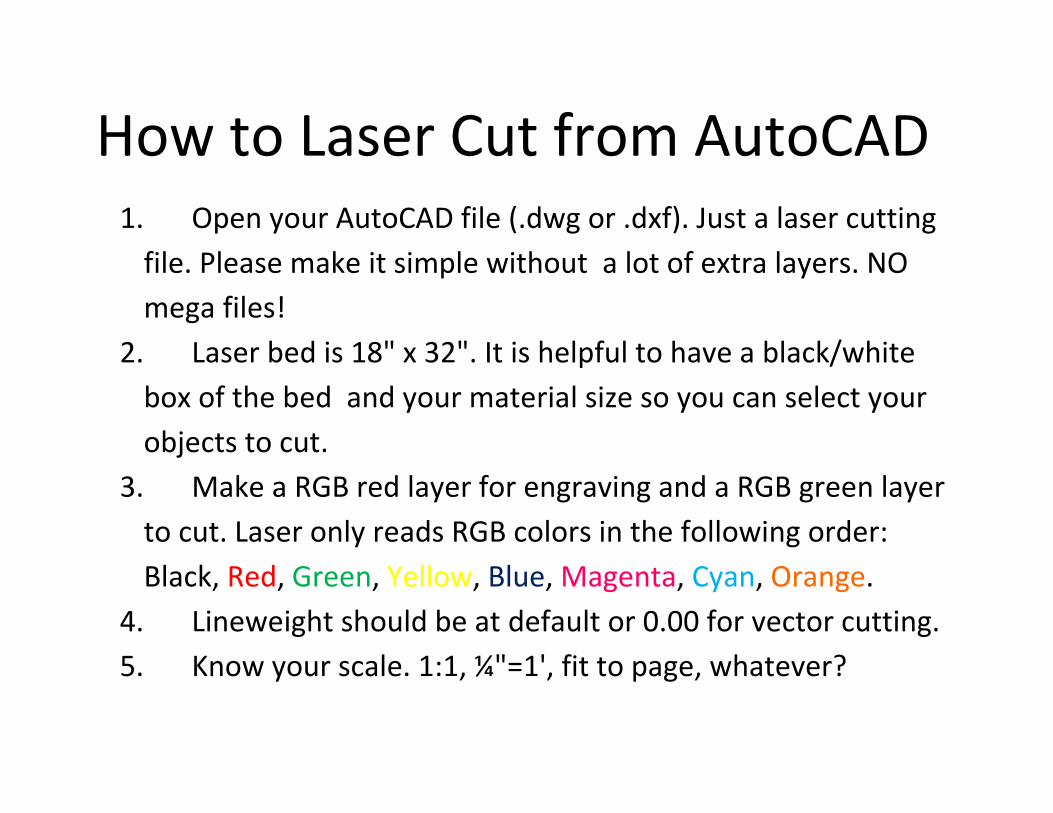
How to Laser Cut from AutoCAD 1. Open your AutoCAD file (.dwg or .dxf). Just a laser cutting
file. Please make it simple without a lot of extra layers. NO
mega files!
2. Laser bed is 18" x 32". It is helpful to have a black/white
box of the bed and your material size so you can select your
objects to cut.
3. Make a RGB red layer for engraving and a RGB green layer
to cut. Laser only reads RGB colors in the following order:
Black, Red, Green, Yellow, Blue, Magenta, Cyan, Orange.
4. Lineweight should be at default or 0.00 for vector cutting.
5. Know your scale. 1:1, ¼"=1', fit to page, whatever?

6. Make sure your printer is “on” your layer. DO NOT SAY NO
TO THE PRINTER ICON.
7. OVERKILL IT! If you have multiable lines over each other,
the laser will read them and go over and over on them. It’s a
waste of time=$$$, and it will burn your material more.
8. Materials that can be CUT: matteboard, cardboard,
museumboard, paper, acrylic/plexyglass/lucite up to ½” thick
(NO POLYCABONITES = LEXAN), hardwoods: Balsa, Bass, Birch
ply, poplar, oak, walnut, cherry, ash…. Up to ¼” thick MDF,
hardboard. NO SOFTWOODS: pine, cedar, cypress (cause of
fire) and NO METAL CAN BE CUT! If you are unsure about a
material, ask shop personnel.

1. Click or type Plot
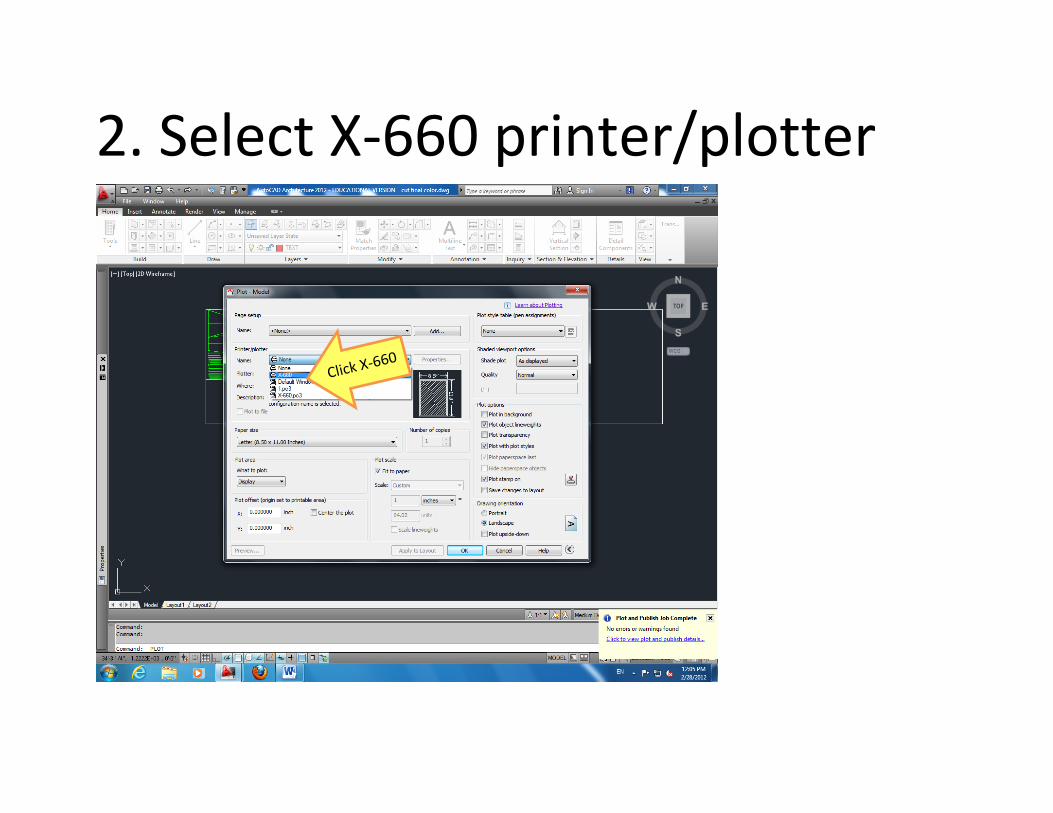
2. Select X-660 printer/plotter
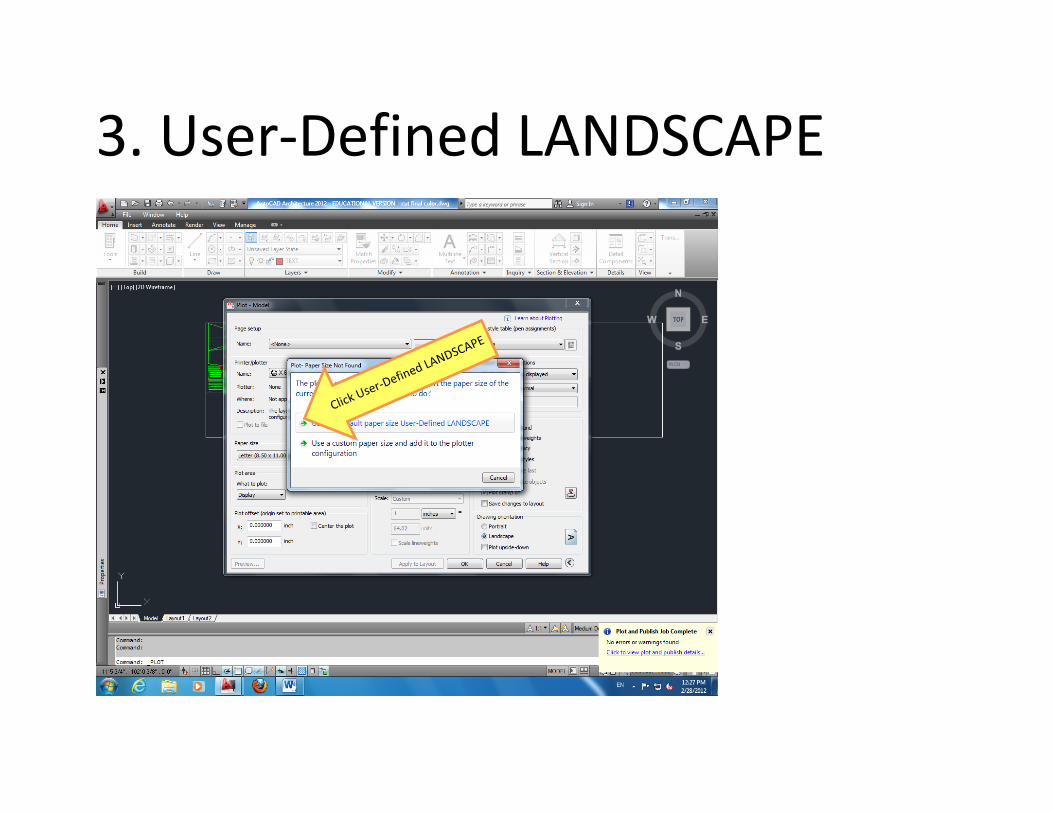
3. User-Defined LANDSCAPE
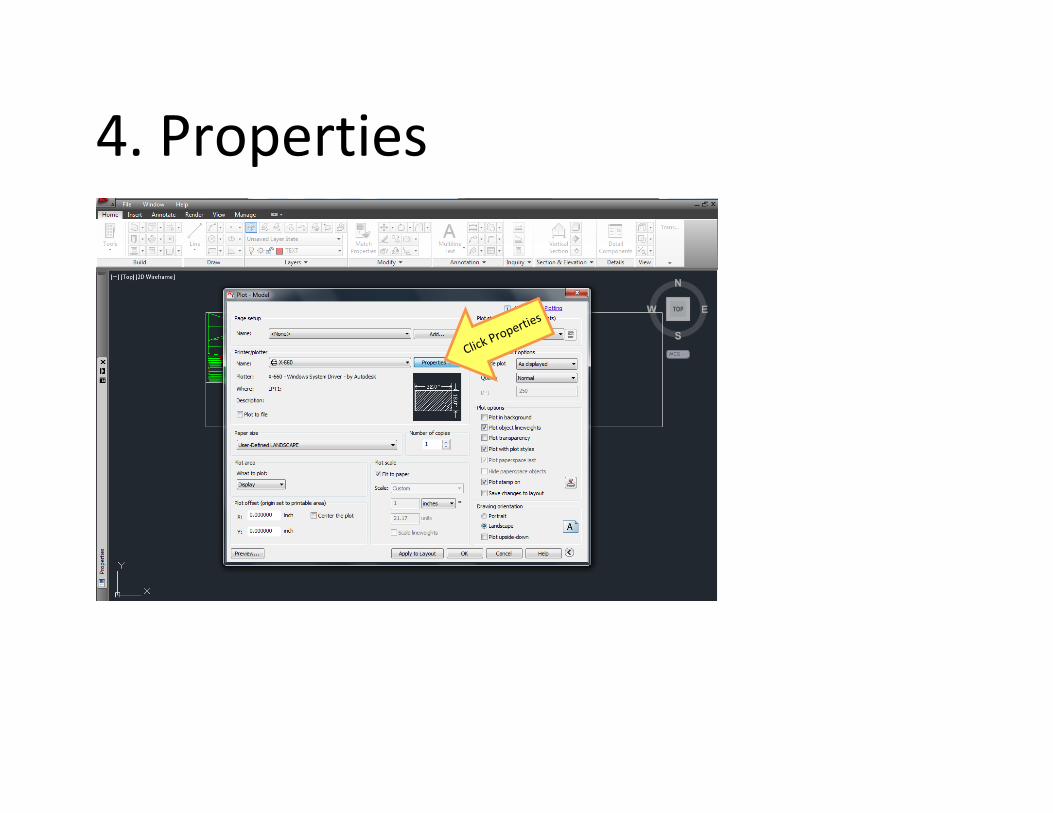
4. Properties

5. Custom Properties

6. Laser Settings
1. Choose pen mode. VECT for line
cutting and engraving. RAST to
raster engrave a text body, solid fill,
image, bitmap. SKIP if you don’t
want color to cut. If color isn’t
selected than it will not cut also.
RAST/VECT not recommended.
2. Click the color word to adjust
Power, Speed, PPI
3. Adjust the Power, Speed & PPI
(Pulses Per Inch). Go to material
sample board for settings.
4. Press Set Bar before you select your
next color.
5. Click OK when done. 3. Adjust Power, Speed, PPI
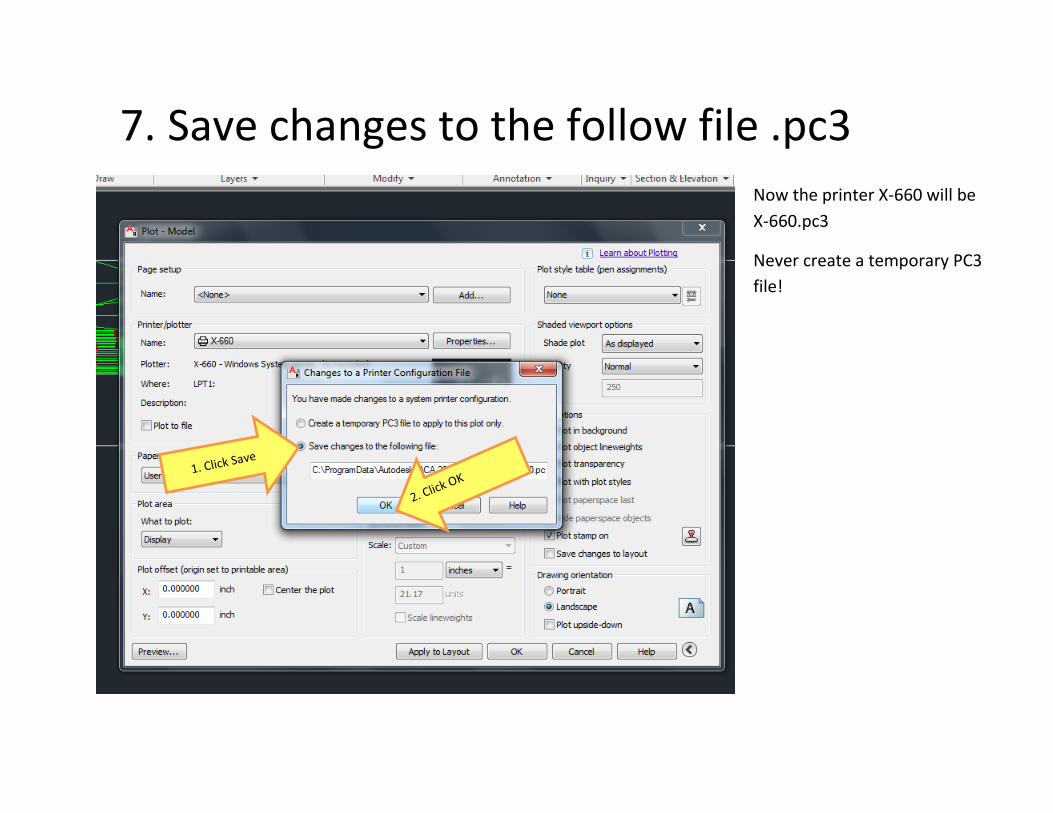
7. Save changes to the follow file .pc3
Now the printer X-660 will be
X-660.pc3
Never create a temporary PC3
file!

8. Plot Screen
1. Plot Options. ONLY PLOT STAMP ON SHOULD
BE CHECK! If not, when you send file to the
laser, the power, speed & PPI will have 0.00s
and you won’t be able to cut.
2. Select your scale or choose “fit to paper”. Fit
to paper will make it fit as large as it can in the
18 x 32 window. NOTE, there’s an inset of .01”
around the perimeter so it will never be a true
to scale.
3. Select “window” to select what you want to
plot.

9. Select your window box

10. Apply to Layout, Preview, OK print
1. It’s very important to apply to layout
before you send it to the laser. This
will set the plot page so you don’t
have to go and check every step we
just did if you have another window
to print. If you didn’t apply to layout,
then go to page setup at the top and
select previous plot.
2. Preview it. Make sure everything
looks right. If not right, check you
scale or check you plot area selected
window.
3. OK to laser cut.

11. Go to the Laser 1. Turn Laser on. The Amber/Orange switch on lower back right side of the machine. 2. Check the Laser Screen to make sure your file is displayed with proper Power, Speed & PPI settings.
3. Place material to be cut on laser bed. Make sure laser bed (honeycomb table) is in upper left corner (this table
is designed to float). Material should be in lower left in in landscape or upper left if portrait.
4. Press Z to focus the laser lens with material. The focus tool is stored on the left inside of X-660. Bevel should be
just under the lens plate. Use up & down arrows to adjust Z axes. Each press will move the laser up or down
.10inch. Press the select to adjust Z height .01 inches. It’s very important that the lens is focused or you will not
get a good cut or engraving. YOUR MATERIAL SHOULD ALSO BE FLAT! Warped material will change the focus of
laser lens causing problems or even FIRE! FIRE IS BAD! See step 10 about fire.
5. Remove the 3 screws of the lens plate and slide out. Check for cleanliness and clean if you need to with lens
tissue or Q-tip and lens cleaning solution. Place lens plate back when done and screw back down.
6. Press Z to return back to XY 0 origin.
7. Turn exhaust on. THE RED LIGHT SWITCH!
8. Swipe card, when lights turn from red to green, you are ready to laser cut. Then press START. You should be
laser cutting not laser red dot pointing.

9. Laser should be cutting through material. Press “Pause” to check. Laser will pause at the end of the line. Check,
if OK than press “Resume”. If it is not cutting through, check lens for cleanliness, check focus, then go to custom
properties to slow speed down. Resend file and start over.
10. Flames: This is a laser burning through material and it’s common to see a flame flare up or trail laser beam. If
flame remains on material, then it is on fire and you should extinguish it. Open lid and first try to blow it out. If
that does not work then squirt with water. IF THIS IS A SEVERE FIRE THEN SCREAM, “FIRE!”. PULL FIRE ALARM
AND TRY TO USE A FIRE EXTINGUISHER.
11. Once complete, the Laser will beep and go back to XY 0s. Open lid and remove pieces.
12. Got more to plot? Just click plot, go to window, select what you want, apply to layout, OK. LASER IS SETUP TO
ONLY HOLD ONE FILE AT A TIME. EVERTIME YOU SEND A FILE, IT WILL ERASE THE CURRENT FILE UNLESS IT IS
CUTTING.