Embed Size (px)
Citation preview
How to Handle Preserved Biological Specimens
Read all of the information in this document before beginning any dissections. Closely follow all directions outlined below and in the experimental procedures of the lab.
Preservatives:
Preservatives prevent mold and bacterial growth on and in dissection specimens while maintaining tissue consistency similar to that of the living organism. Specimens are rinsed and packaged in non-toxic solutions such as a 2% propylene glycol and 98% water solution with less than 0.6% formalin.
The presence of formaldehyde in specimens has been minimized by the supplier to be reportedly <0.1 ppm.1 Formaldehyde is an identified carcinogen. To protect yourself and your household, prudence demands that you avoid direct contact with any residual formaldehyde by following the safety precautions below.
1. Wear safety glasses. Safety glasses will prevent the possibility of chemicals splashing into your eyes. These precautions also lessen any eye irritation from formalin vapors. If any preservative does get in the eye, rinse the eye thoroughly with water. Wear prescription glasses; do not wear contact lenses.
2. Wear nitrile or latex safety gloves and a lab coat or apron. Wearing gloves while dissecting or otherwise working with specimens, especially those preserved in formalin, is one of the most important of these precautions and is strongly recommended. If your skin contacts formalin, you should wash your hands (or other contact areas) with soap and water.
3. Work in a well-ventilated area; open a window and use a fan if needed. Avoid performing dissections in small, confined areas with closed doors.
4. Do not eat, drink, or store food and beverages in the dissection area.
5. Always remove used gloves before touching or using water faucet handles, door knobs, cabinet or drawer handles, or other general surfaces. This is a best practice at all times.
6. In general, gloves, lab coats, and aprons should remain in the dissection area during the dissection (remove them before going to the bathroom, another room, etc.).
7. Pregnant women should check with their physicians before opening the specimens bag or exposing themselves to any potential formaldehyde residues.
1 ppm represent parts per million. In this case, the report is that there is less than 1/10th part of formalin per million parts of preservative solution.
www.LabPaq.com 1 ©Hands-On Labs, Inc.
How to Handle Preserved Biological Specimens
Setting up the Dissection Area:
Select an area to perform the dissection. The area must be well-ventilated, near a source of running tap water, and have a stable work surface that can be disinfected with a bleach-based cleaner. Place a trash bag or an absorbent layer of newspaper or paper towels on the work surface before opening specimen packages. Place any related equipment, such as dissection tools and trays, in the center of the covered area.
Opening the Packaging:
Dissection specimens are packaged in plastic bags and jars, and all packages are sealed within an outer plastic bag for shipping. With gloved hands, open the outer packaging by cutting along the side edge of the bag with household scissors (DO NOT use the dissection scissors supplied in your lab kit to open the package to avoid dulling the scissor blades). The outer bag may be set aside for later storage of specimens. If the specimen is in a jar, use tweezers to carefully remove the specimen, and recap the jar. If the specimen is in a plastic bag, use the household scissors to cut open the edge of the bag, and remove the specimen. Reserve the bag and any packing materials and cloths that surround the specimen. They may be used to save the specimen for later.
Note: For specific instructions on preparing and handling the fetal pig and cat specimens, refer to these instructions as well as later instructions in this document.
Rinsing Specimens:
Small specimens should be handled with tweezers. To remove as much preservative as possible, fill a sink or plastic container with tap water and gently swish the specimens in the water. Change the water at least twice. Larger, durable specimens should be rinsed under a sink faucet with plenty of running water.
Storing Specimens:
You may store partially dissected specimens. If the specimen was shipped in a jar, simply return the specimen to the jar and tighten the lid. If the specimen was shipped in plastic bags, cover the specimen with the preservative cloths or with moist paper towels. Be sure to place paper towels on the outside of the specimen as well as along any internal organs. Place the specimen in a large sealable plastic bag or return the specimen to the bag in which it was shipped. If the specimen is a fetal pig or cat that has been secured to a dissection tray, the entire tray may be placed within a plastic trash bag. Always tightly seal bags with tape or binder clips to prevent the sample from drying out.
Store specimens in a cool area. Do not place specimens in a refrigerator that contains consumable food or beverages. All specimens should be out of the reach of children and pets.
www.LabPaq.com 2 ©Hands-On Labs, Inc.
How to Handle Preserved Biological Specimens
Disposing of Specimens:
Contact your local waste management department to determine appropriate disposal methods. Preserved specimens are not considered hazardous waste and normally may be disposed of in the trash.
To dispose of specimens in the trash, place specimens and any associated tissues in a sealable plastic bag or the bags in which they were shipped. Seal the bag and place it in an additional plastic trash bags. Deposit the specimens in a securely covered trash container that will not allow children and animals to access the contents. While still wearing gloves, use a 10% bleach solution or a bleach-based cleaner to clean any space (including the sink) that may have been contaminated during the dissection. Clean all dissection equipment, including tools and trays with the bleach solution, rinse and wash them again with soap and water, and thoroughly dry them before storage. Remove and throw away used gloves, but clean and save the apron for reuse in future dissections. Any additional waste materials, such as paper towels, should also be safely discarded in outdoor trash containers.
www.LabPaq.com 3 ©Hands-On Labs, Inc.
How to Handle Preserved Biological Specimens
Fetal Pig Dissection Preparation Instructions
Preparing for the Dissection
1. Gather the following: fetal pig specimen, safety goggles, gloves, face mask, apron, string, metal spatula, trash bags, foam, dissection kit, lid of a plastic bin or a tray or cookie sheet, paper towels, scissors, bleach, a sheet of paper, a pen or pencil, and tape.
2. Wear old clothes during dissection and perform this exercise near a source of running water and in a well-ventilated area.
3. Prepare a 10% bleach solution by adding 1 part bleach to 9 parts water. For example, add ½ cup of bleach to 4 ½ cups of water.
4. Write your name and the date on a small piece of paper. This sheet of paper will be used in your photos throughout the experiment.
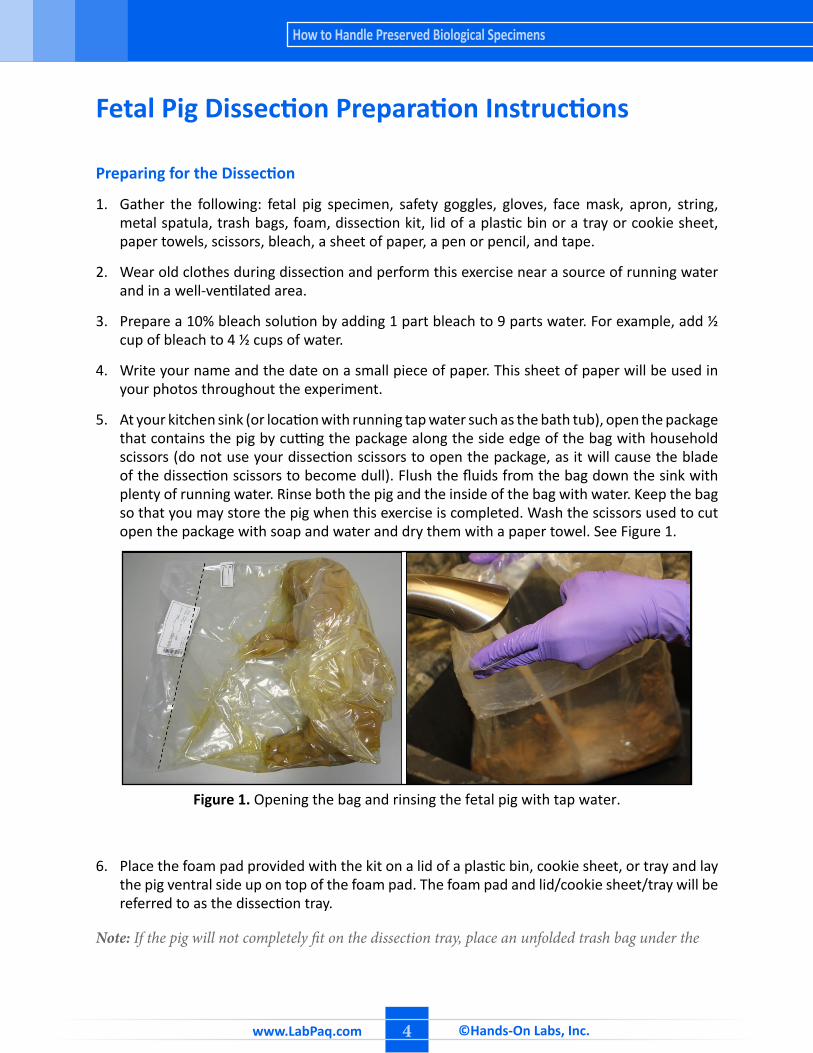
5. At your kitchen sink (or location with running tap water such as the bath tub), open the package that contains the pig by cutting the package along the side edge of the bag with household scissors (do not use your dissection scissors to open the package, as it will cause the blade of the dissection scissors to become dull). Flush the fluids from the bag down the sink with plenty of running water. Rinse both the pig and the inside of the bag with water. Keep the bag so that you may store the pig when this exercise is completed. Wash the scissors used to cut open the package with soap and water and dry them with a paper towel. See Figure 1.
Figure 1. Opening the bag and rinsing the fetal pig with tap water.
6. Place the foam pad provided with the kit on a lid of a plastic bin, cookie sheet, or tray and lay the pig ventral side up on top of the foam pad. The foam pad and lid/cookie sheet/tray will be referred to as the dissection tray.
Note: If the pig will not completely fit on the dissection tray, place an unfolded trash bag under the
www.LabPaq.com 4 ©Hands-On Labs, Inc.
How to Handle Preserved Biological Specimens
dissection tray to protect your work surface.
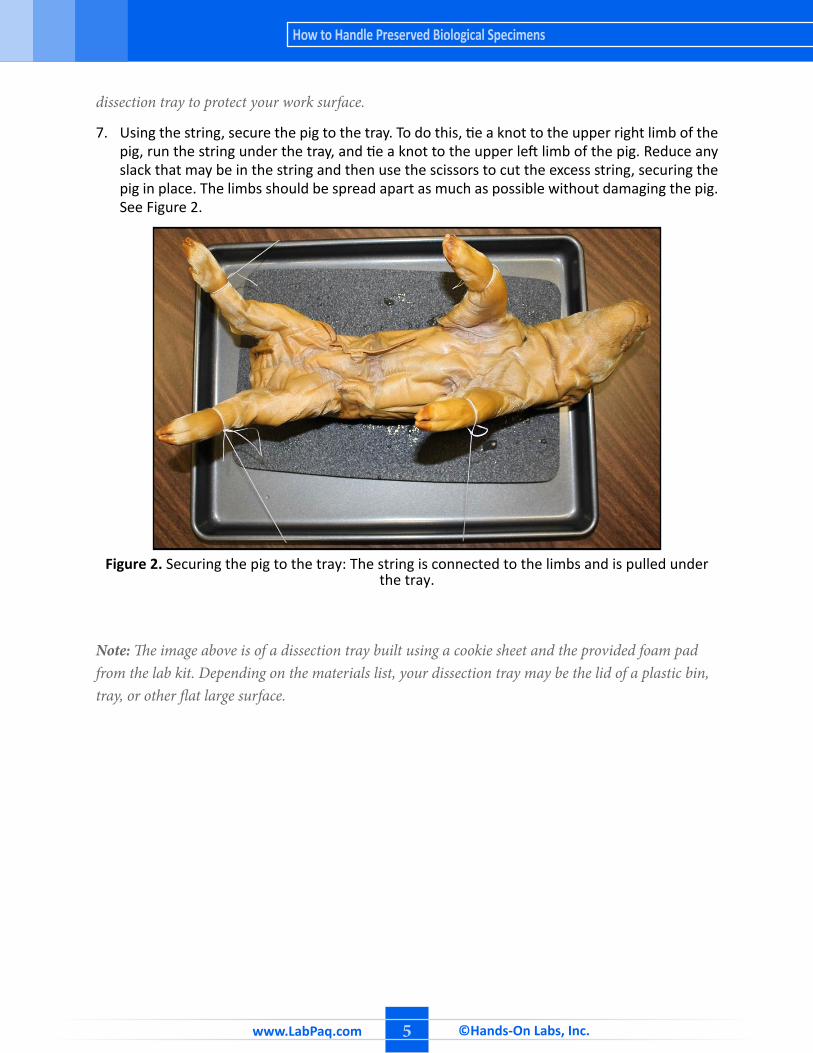
7. Using the string, secure the pig to the tray. To do this, tie a knot to the upper right limb of the pig, run the string under the tray, and tie a knot to the upper left limb of the pig. Reduce any slack that may be in the string and then use the scissors to cut the excess string, securing the pig in place. The limbs should be spread apart as much as possible without damaging the pig. See Figure 2.
Figure 2. Securing the pig to the tray: The string is connected to the limbs and is pulled under the tray.
Note: The image above is of a dissection tray built using a cookie sheet and the provided foam pad from the lab kit. Depending on the materials list, your dissection tray may be the lid of a plastic bin, tray, or other flat large surface.
www.LabPaq.com 5 ©Hands-On Labs, Inc.
How to Handle Preserved Biological Specimens
www.LabPaq.com 6 ©Hands-On Labs, Inc.
How to Handle Preserved Biological Specimens
Cat Dissection Preparation Instructions
Preparing for the Dissection
1. Gather the following: cat specimen, safety goggles, gloves, face mask, apron, string, metal spatula, trash bags, foam, dissection kit, large tray or cookie sheet, paper towels, scissors, bleach, a sheet of paper, a pen or pencil, and tape.
2. Wear old clothes during dissection and perform this exercise near a source of running water and in a well-ventilated area.
3. Prepare a 10% bleach solution by adding 1 part bleach to 9 parts water. For example, add ½ cup of bleach to 4 ½ cups of water.
4. Write your name and the date on a small piece of paper. This sheet of paper will be used in your photographs throughout the experiment.
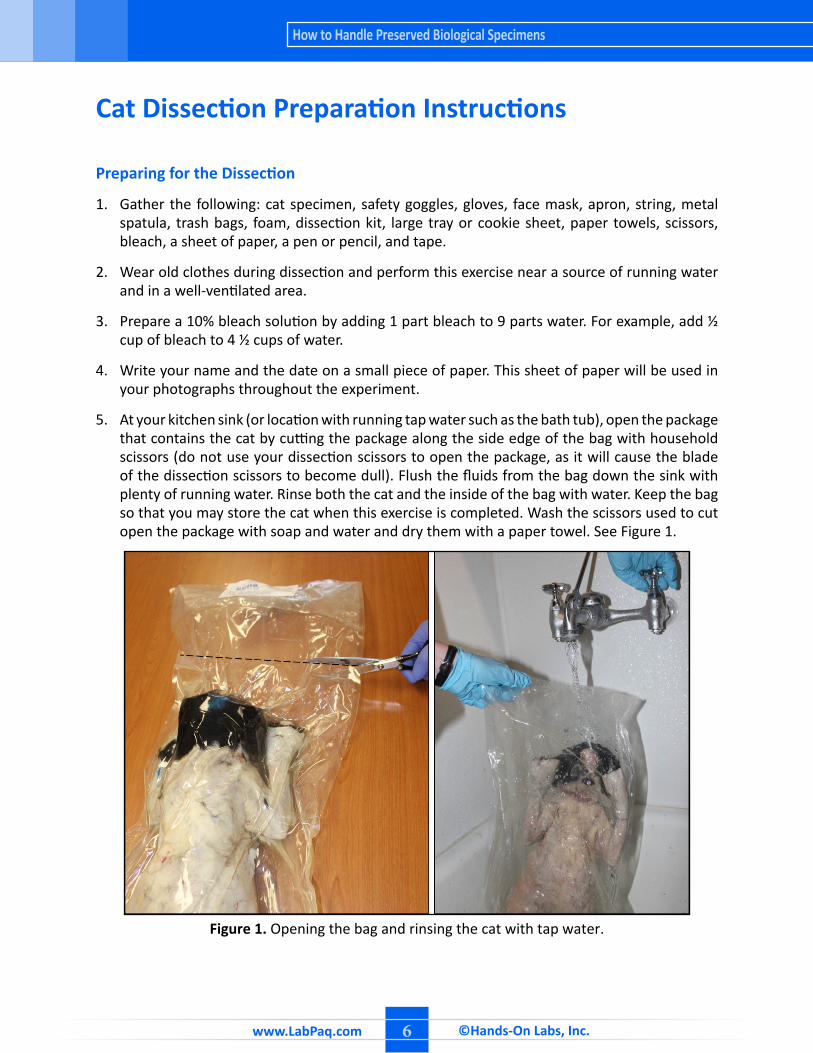
5. At your kitchen sink (or location with running tap water such as the bath tub), open the package that contains the cat by cutting the package along the side edge of the bag with household scissors (do not use your dissection scissors to open the package, as it will cause the blade of the dissection scissors to become dull). Flush the fluids from the bag down the sink with plenty of running water. Rinse both the cat and the inside of the bag with water. Keep the bag so that you may store the cat when this exercise is completed. Wash the scissors used to cut open the package with soap and water and dry them with a paper towel. See Figure 1.
Figure 1. Opening the bag and rinsing the cat with tap water.
www.LabPaq.com 7 ©Hands-On Labs, Inc.
How to Handle Preserved Biological Specimens
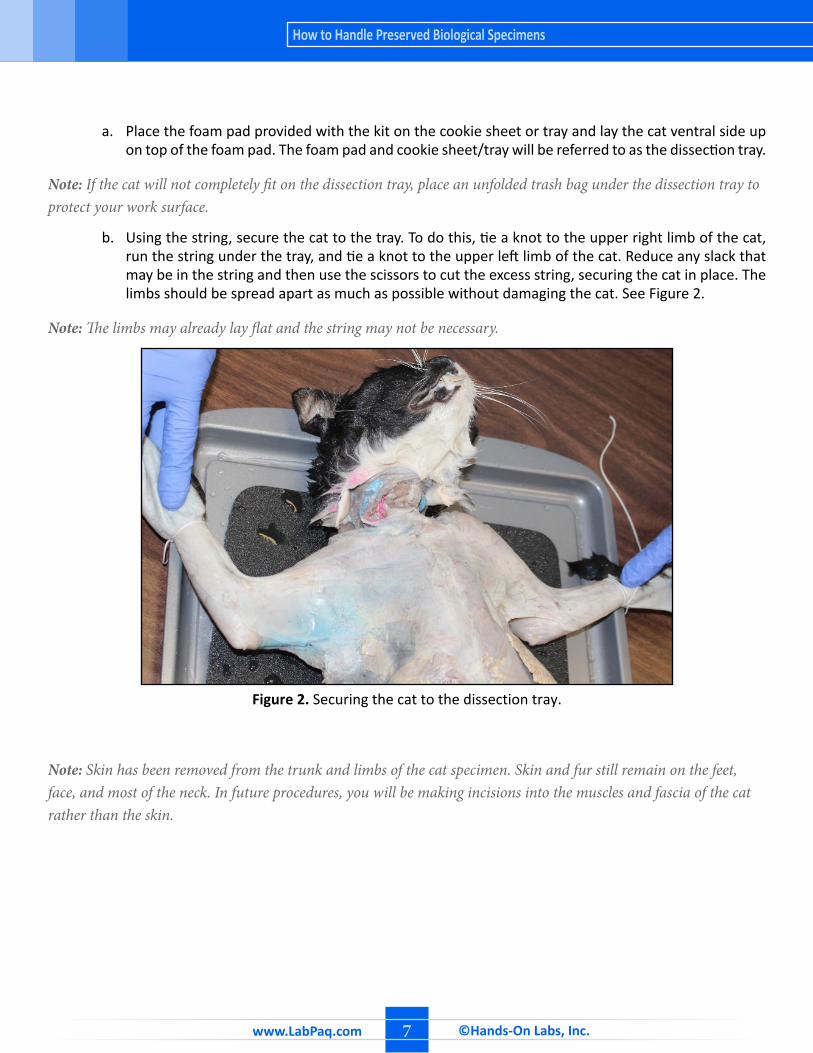
a. Place the foam pad provided with the kit on the cookie sheet or tray and lay the cat ventral side up on top of the foam pad. The foam pad and cookie sheet/tray will be referred to as the dissection tray.
Note: If the cat will not completely fit on the dissection tray, place an unfolded trash bag under the dissection tray to protect your work surface.
b. Using the string, secure the cat to the tray. To do this, tie a knot to the upper right limb of the cat, run the string under the tray, and tie a knot to the upper left limb of the cat. Reduce any slack that may be in the string and then use the scissors to cut the excess string, securing the cat in place. The limbs should be spread apart as much as possible without damaging the cat. See Figure 2.
Note: The limbs may already lay flat and the string may not be necessary.
Figure 2. Securing the cat to the dissection tray.
Note: Skin has been removed from the trunk and limbs of the cat specimen. Skin and fur still remain on the feet, face, and most of the neck. In future procedures, you will be making incisions into the muscles and fascia of the cat rather than the skin.
www.LabPaq.com 8 ©Hands-On Labs, Inc.
How to Handle Preserved Biological Specimens
“Spreading the Scissors” Technique
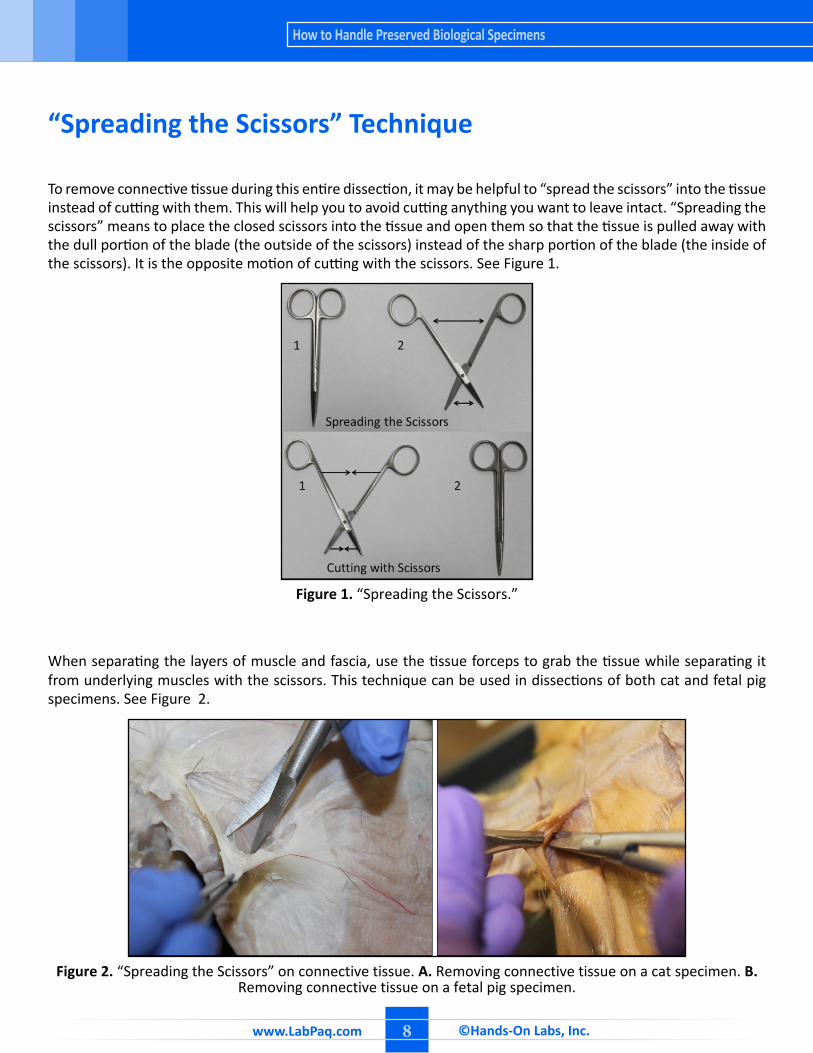
To remove connective tissue during this entire dissection, it may be helpful to “spread the scissors” into the tissue instead of cutting with them. This will help you to avoid cutting anything you want to leave intact. “Spreading the scissors” means to place the closed scissors into the tissue and open them so that the tissue is pulled away with the dull portion of the blade (the outside of the scissors) instead of the sharp portion of the blade (the inside of the scissors). It is the opposite motion of cutting with the scissors. See Figure 1.
Figure 1. “Spreading the Scissors.”
When separating the layers of muscle and fascia, use the tissue forceps to grab the tissue while separating it from underlying muscles with the scissors. This technique can be used in dissections of both cat and fetal pig specimens. See Figure 2.
Figure 2. “Spreading the Scissors” on connective tissue. A. Removing connective tissue on a cat specimen. B. Removing connective tissue on a fetal pig specimen.