Embed Size (px)
Citation preview
1
SAP BusinessObjects
EPM RIG
How-To Guide
How-To Get Consistent Results with
UJ_CUSTOM_LOGIC BAdi’s
Applicable Releases:
SAP BusinessObjects Planning and Consolidation 7.5, version for SAP
NetWeaver
SAP BusinessObjects Planning and Consolidation 7.0, version for SAP
NetWeaver
IT Practice / Topic Area:
Development
Version 1.0.0
November 2010
© Copyright 2010 SAP AG. All rights reserved.
No part of this publication may be reproduced or
transmitted in any form or for any purpose without the
express permission of SAP AG. The information contained
herein may be changed without prior notice.
Some software products marketed by SAP AG and its
distributors contain proprietary software components of
other software vendors.
Microsoft, Windows, Outlook, and PowerPoint are
registered trademarks of Microsoft Corporation.
IBM, DB2, DB2 Universal Database, OS/2, Parallel
Sysplex, MVS/ESA, AIX, S/390, AS/400, OS/390,
OS/400, iSeries, pSeries, xSeries, zSeries, z/OS, AFP,
Intelligent Miner, WebSphere, Netfinity, Tivoli, Informix,
i5/OS, POWER, POWER5, OpenPower and PowerPC are
trademarks or registered trademarks of IBM Corporation.
Adobe, the Adobe logo, Acrobat, PostScript, and Reader
are either trademarks or registered trademarks of Adobe
Systems Incorporated in the United States and/or other
countries.
Oracle is a registered trademark of Oracle Corporation.
UNIX, X/Open, OSF/1, and Motif are registered
trademarks of the Open Group.
Citrix, ICA, Program Neighborhood, MetaFrame,
WinFrame, VideoFrame, and MultiWin are trademarks or
registered trademarks of Citrix Systems, Inc.
HTML, XML, XHTML and W3C are trademarks or
registered trademarks of W3C®, World Wide Web
Consortium, Massachusetts Institute of Technology.
Java is a registered trademark of Sun Microsystems, Inc.
JavaScript is a registered trademark of Sun Microsystems,
Inc., used under license for technology invented and
implemented by Netscape.
MaxDB is a trademark of MySQL AB, Sweden.
SAP, R/3, mySAP, mySAP.com, xApps, xApp, SAP
NetWeaver, and other SAP products and services
mentioned herein as well as their respective logos are
trademarks or registered trademarks of SAP AG in
Germany and in several other countries all over the world.
All other product and service names mentioned are the
trademarks of their respective companies. Data contained
in this document serves informational purposes only.
National product specifications may vary.
These materials are subject to change without notice.
These materials are provided by SAP AG and its affiliated
companies ("SAP Group") for informational purposes only,
without representation or warranty of any kind, and SAP
Group shall not be liable for errors or omissions with
respect to the materials. The only warranties for SAP
Group products and services are those that are set forth in
the express warranty statements accompanying such
products and services, if any. Nothing herein should be
construed as constituting an additional warranty.
These materials are provided “as is” without a warranty of
any kind, either express or implied, including but not
limited to, the implied warranties of merchantability,
fitness for a particular purpose, or non-infringement.
SAP shall not be liable for damages of any kind including
without limitation direct, special, indirect, or consequential
damages that may result from the use of these materials.
SAP does not warrant the accuracy or completeness of the
information, text, graphics, links or other items contained
within these materials. SAP has no control over the
information that you may access through the use of hot
links contained in these materials and does not endorse
your use of third party web pages nor provide any warranty
whatsoever relating to third party web pages.
SAP NetWeaver “How-to” Guides are intended to simplify
the product implementation. While specific product
features and procedures typically are explained in a
practical business context, it is not implied that those
features and procedures are the only approach in solving a
specific business problem using SAP NetWeaver. Should
you wish to receive additional information, clarification or
support, please refer to SAP Consulting.
Any software coding and/or code lines / strings (“Code”)
included in this documentation are only examples and are
not intended to be used in a productive system
environment. The Code is only intended better explain and
visualize the syntax and phrasing rules of certain coding.
SAP does not warrant the correctness and completeness of
the Code given herein, and SAP shall not be liable for
errors or damages caused by the usage of the Code, except
if such damages were caused by SAP intentionally or
grossly negligent.
Disclaimer
Some components of this product are based on Java™. Any
code change in these components may cause unpredictable
and severe malfunctions and is therefore expressively
prohibited, as is any decompilation of these components.
Any Java™ Source Code delivered with this product is only
to be used by SAP’s Support Services and may not be
modified or altered in any way.

Document History
Document Version Description
1.0.0 Initial release

Typographic Conventions
Type Style Description
Example Text Words or characters quoted
from the screen. These
include field names, screen
titles, pushbuttons labels,
menu names, menu paths,
and menu options.
Cross-references to other
documentation
Example text Emphasized words or
phrases in body text, graphic
titles, and table titles
Example text File and directory names and
their paths, messages,
names of variables and
parameters, source text, and
names of installation,
upgrade and database tools.
Example text User entry texts. These are
words or characters that you
enter in the system exactly as
they appear in the
documentation.
<Example
text>
Variable user entry. Angle
brackets indicate that you
replace these words and
characters with appropriate
entries to make entries in the
system.
EXAMPLE TEXT Keys on the keyboard, for
example, F2 or ENTER.
Icons
Icon Description
Caution
Note or Important
Example
Recommendation or Tip
Table of Contents
1. Business Scenario............................................................................................................... 1
2. Background Information ..................................................................................................... 1
3. Prerequisites ........................................................................................................................ 1
4. Example Configuration ....................................................................................................... 2
4.1 Create a copy of Apshell .............................................................................................. 2
4.2 Add LEQ/AST Members to P_ACCT ............................................................................ 3
5. Development Tasks ............................................................................................................. 6
5.1 Import the Z_CL_REVERSE_SIGN Class ................................................................... 6
5.1.1 Copy R/K files to NetWeaver System .............................................................. 6
5.1.2 Import the Transport of Copies ........................................................................ 6
5.2 Create the Sample BAdi Implementation ..................................................................... 9
5.2.1 Creating the BAdi Implementation ................................................................... 9
5.2.2 Set the Filter Value ........................................................................................ 12
5.2.3 Implement IF_UJ_CUSTOM_LOGIC~EXECUTE ......................................... 14
5.2.4 Update Default Logic to call the Sample BAdi ............................................... 16
6. Example Execution ............................................................................................................ 19
6.1 Use Case 1 ................................................................................................................. 19
6.1.1 Disable REVERSE_SIGNS call: .................................................................... 19
6.1.2 Submit Data via an Input Schedule ............................................................... 21
6.1.3 Executing Default Logic via Data Manager .................................................... 27
6.2 Use Case 2 ................................................................................................................. 37
6.2.1 Enable REVERSE_SIGNS call: ..................................................................... 37
6.2.2 Submit Data via an Input Schedule ............................................................... 39
6.2.3 Executing Default Logic via Data Manager .................................................... 44
7. Combining with existing BAdis ........................................................................................ 48
1. Business Scenario
Sap BusinessObjects Planning and Consolidation, version for Netweaver (hereafter referred to as
“BPC”) provides a BAdi (UJ_CUSTOM_LOGIC) that can be used to extend the functionality of script
logic packages. Due to the way Input Schedule initiated script logic operations (i.e. included in default
logic) differ from data manager initiated script logic operations you get inconsistent results with the
same logic depending on where it was executed from. The reason for this is that Data Manager
Packages return SIGNEDDATA whereas Input Schedules send Periodic values. The reason for the
variation is as follows: Periodic values do not have signs reversed for LEQ/INC (Liability-
Equity/Income) accounts while the SIGNEDDATA does.
2. Background Information
This How-To guide provides a solution to this in the form of a class that can be included in all BAdi
implementations. It checks the source of data submitted to the BAdi, and if it originated from an Input
Schedule it reverses the signs for INC/LEQ accounts and returns the updated “SIGNED DATA” in a
new standard table. Otherwise, it will return the original, unaltered records in a new standard table.
Logic in the BAdi can then perform calculations based on the data in the returned table which will
allow for consistent results regardless of the logic execution method. This HTG also includes an
example BAdi implementation based on the delivered Apshell application set.
3. Prerequisites
SAP GUI / Developer Access to SAP Business Warehouse (SAP BW)
SAP BusinessObjects Planning and Consolidation, version for SAP NetWeaver
Version 7.5
Version 7.0
4. Example Configuration
This section outlines the configuration of an example application set for use with the sample BAdi.
4.1 Create a copy of Apshell
The sample BAdi is based on the Planning application delivered in Apshell. The first step of
configuring the example is to create a copy of Apshell. To do this:
...
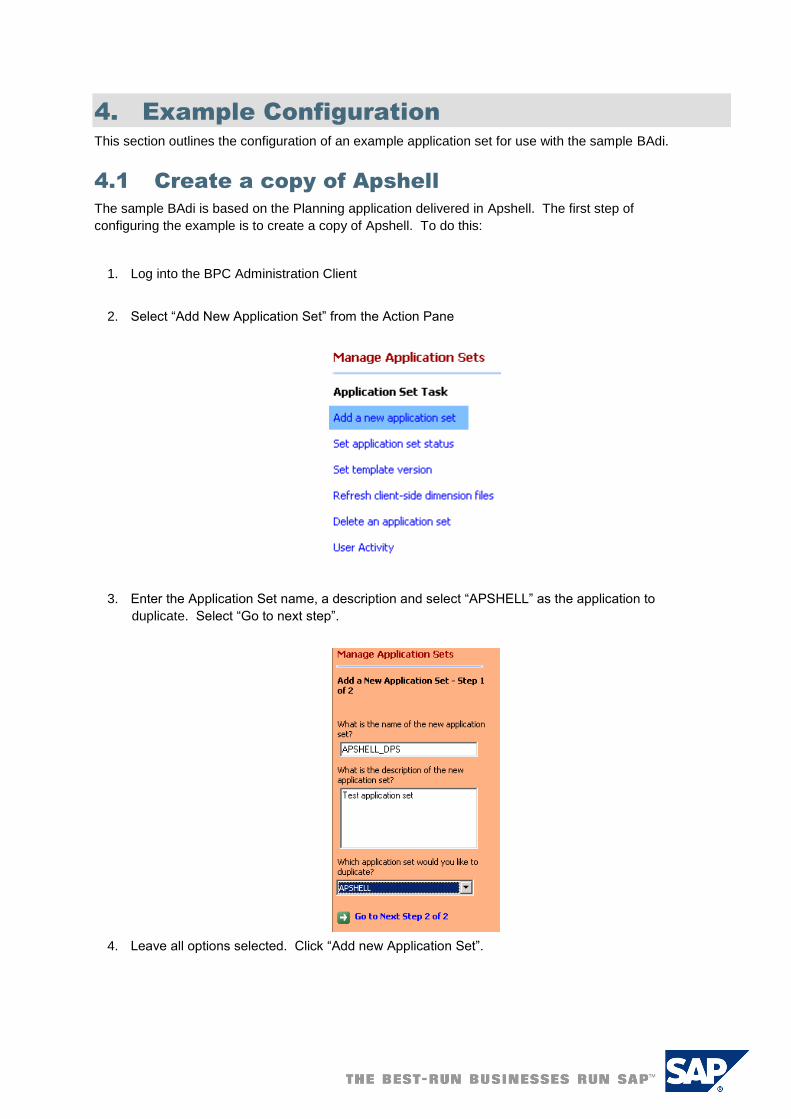
1. Log into the BPC Administration Client
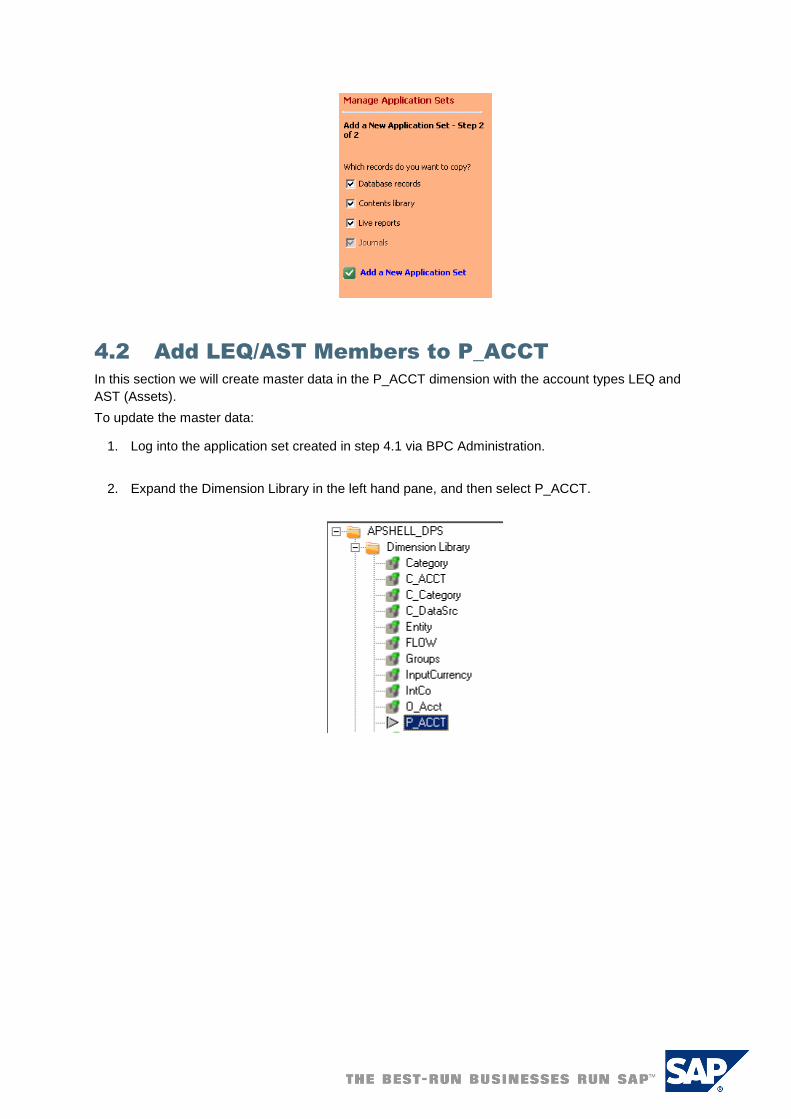
2. Select “Add New Application Set” from the Action Pane
3. Enter the Application Set name, a description and select “APSHELL” as the application to
duplicate. Select “Go to next step”.
4. Leave all options selected. Click “Add new Application Set”.
4.2 Add LEQ/AST Members to P_ACCT
In this section we will create master data in the P_ACCT dimension with the account types LEQ and
AST (Assets).
To update the master data: ...
...
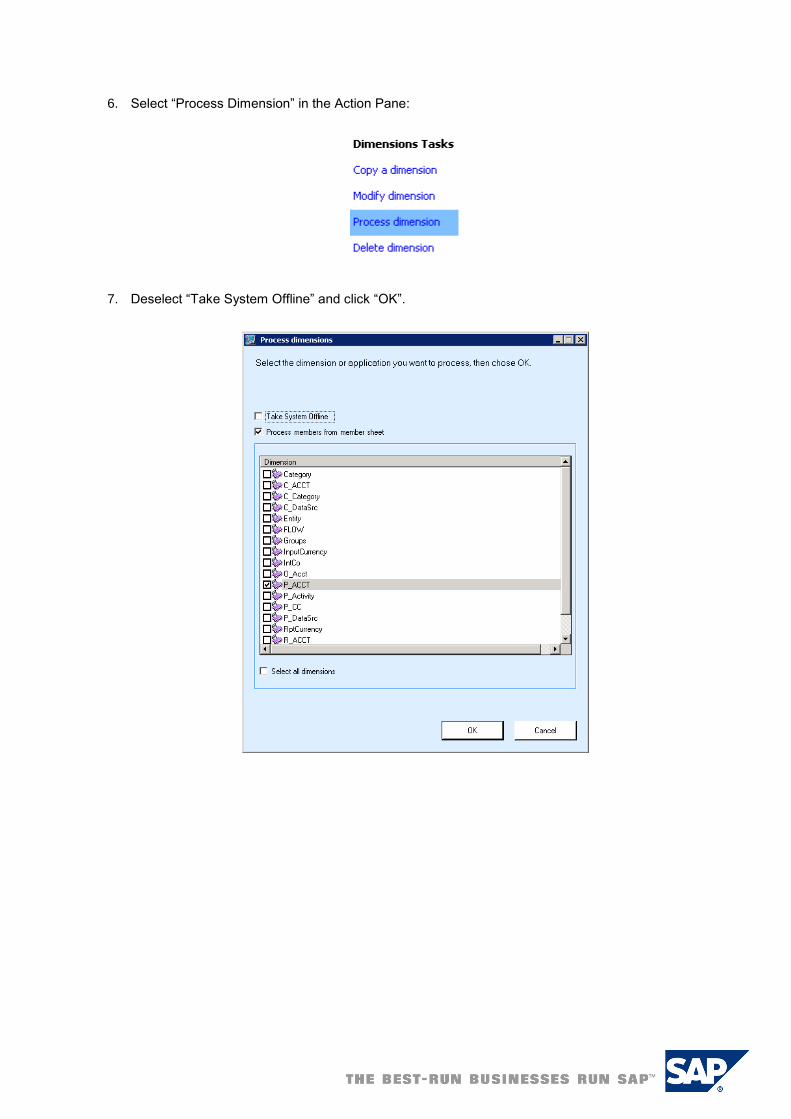
1. Log into the application set created in step 4.1 via BPC Administration.
2. Expand the Dimension Library in the left hand pane, and then select P_ACCT.

3. Select “Maintain dimension members” in the Action Pane.
4. Add the following members to P_ACCT highlighted in rows 31 through 34:
5. Select “Save to Server” in the Action Pane:
6. Select “Process Dimension” in the Action Pane:
7. Deselect “Take System Offline” and click “OK”.
5. Development Tasks
This section outlines the development tasks involved in importing the Z_CL_REVERSE_SIGN class,
as well as setting up and configuring the sample BAdi for use case testing in section 6.
5.1 Import the Z_CL_REVERSE_SIGN Class
This section describes the process of importing the Z_CL_REVERSE_SIGN class from a “transport of
copies” into your NetWeaver system.
The Z_CL_REVERSE_SIGN class exposes one public method, REVERSE_SIGNS. This method
takes the following import parameters:
P_APPSET_ID – the application set where the incoming data resides.
P_APP_ID – the application id where the incoming data resides.
P_CT_DATA – the data to check for INC/LEQ accounts and reverse signs (when appropriate).
It exports the following parameter:
E_CT_DATA – a table including all of the records in P_CT_DATA, with signed data reversed for
INC/LEQ accounts (when appropriate).
This method checks the source of the request to see if it has been manually submitted (i.e. via an
input schedule). If it has, the signs will be reversed for INC/LEQ accounts and all data, will be
returned in P_CT_DATA. If the source of the request is a Data Manager package, all data will be
returned in P_CT_DATA without any modification. This allows you to perform calculations based on
P_CT_DATA in a consistent manner.
5.1.1 Copy R/K files to NetWeaver System ...
Download R/K files from this link.
1. Copy K900322.EPM to the usr\sap\trans\cofiles directory.
2. Copy R900322.EPM to the usr\sap\trans\data.
5.1.2 Import the Transport of Copies
1. Log into SAPGUI.
2. Go to the transport management system (t-code STMS)
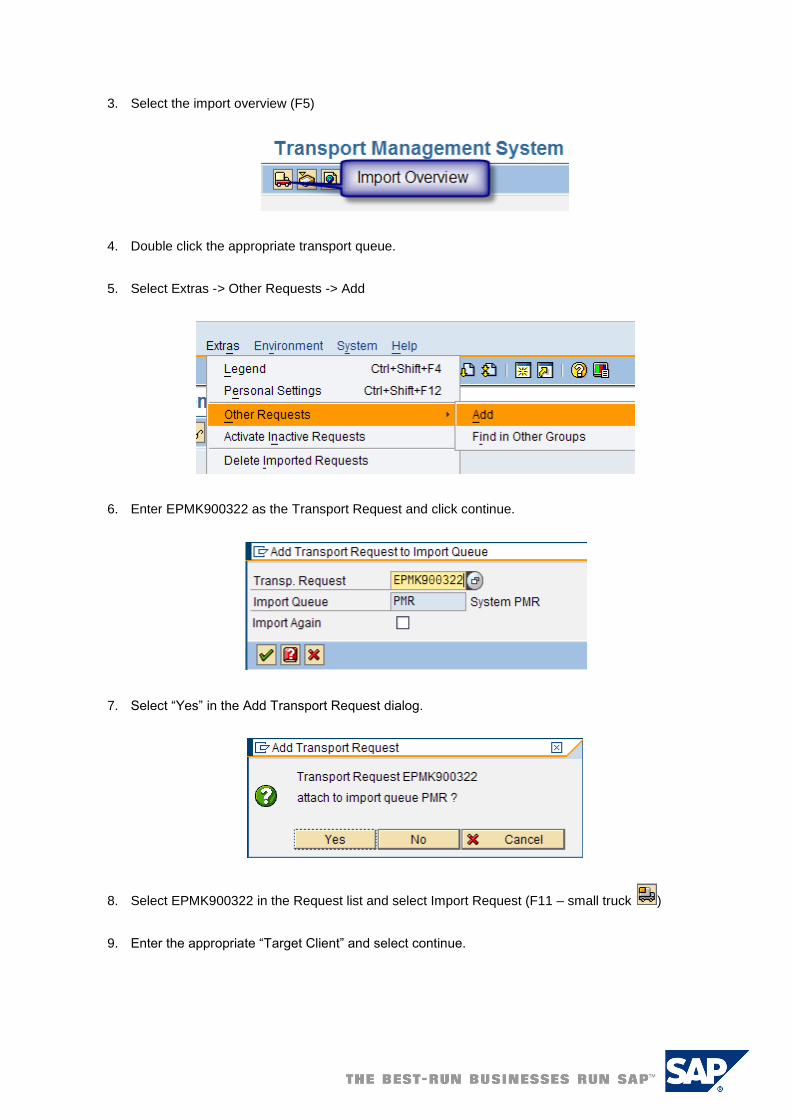
3. Select the import overview (F5)
4. Double click the appropriate transport queue.
5. Select Extras -> Other Requests -> Add
6. Enter EPMK900322 as the Transport Request and click continue.
7. Select “Yes” in the Add Transport Request dialog.
8. Select EPMK900322 in the Request list and select Import Request (F11 – small truck )
9. Enter the appropriate “Target Client” and select continue.

10. Select “Yes” to start the import.
11. You should see a line similar to the following in the request list once the import has completed
successfully.
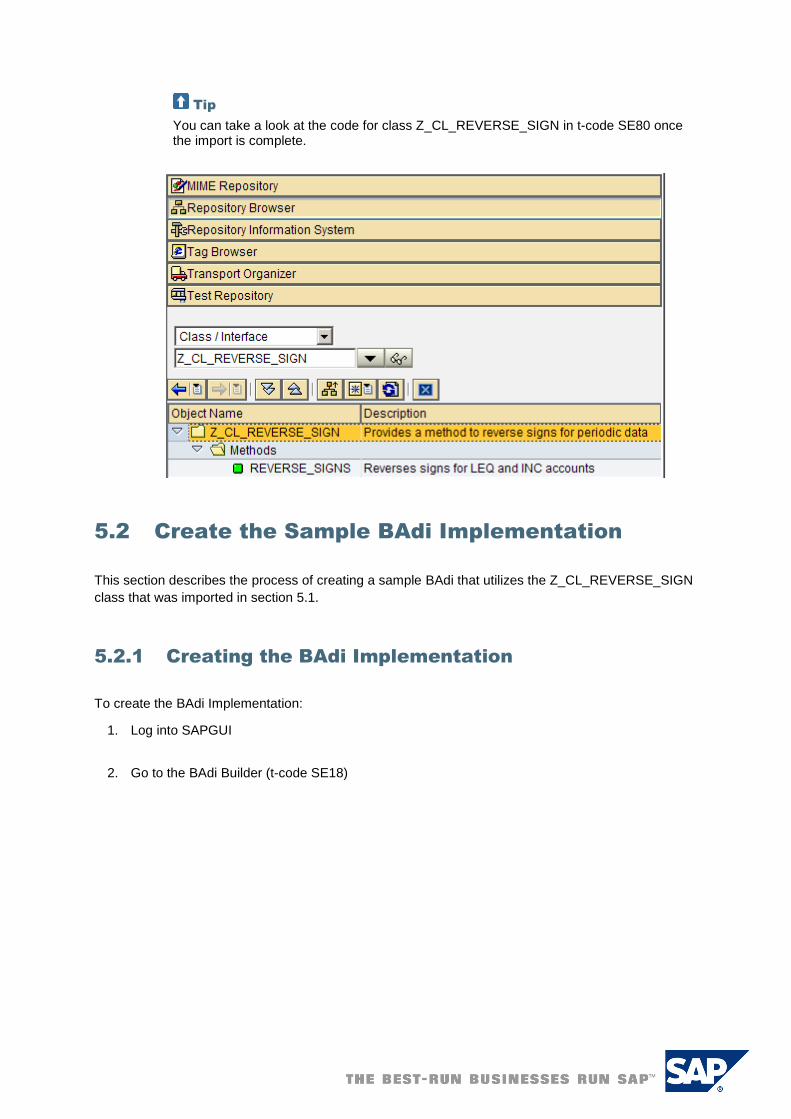
Tip
You can take a look at the code for class Z_CL_REVERSE_SIGN in t-code SE80 once the import is complete.
5.2 Create the Sample BAdi Implementation
This section describes the process of creating a sample BAdi that utilizes the Z_CL_REVERSE_SIGN
class that was imported in section 5.1.
5.2.1 Creating the BAdi Implementation
To create the BAdi Implementation: ...
1. Log into SAPGUI
2. Go to the BAdi Builder (t-code SE18)

3. Enter UJ_CUSTOM_LOGIC as the Enhancement Spot and click the Display button.
4. Click the Create BAdi Implementation Button
5. Click the “Create Enhancement Implementation” button (F8).
6. Enter “Z_EI_REVERSE_SIGN” as the Enhancement Implementation as well as a descriptive
short text, click continue.
7. Select “Local Object” in the “Create Object Directory Entry” dialog.
8. Select the Z_IE_REVERSE_SIGN Enhancement Implementation and click continue.

9. Enter the following in the “Create BAdi Implementation” dialog, then click continue:
10. Select “Local Object” in the “Create Object Directory Entry” dialog.
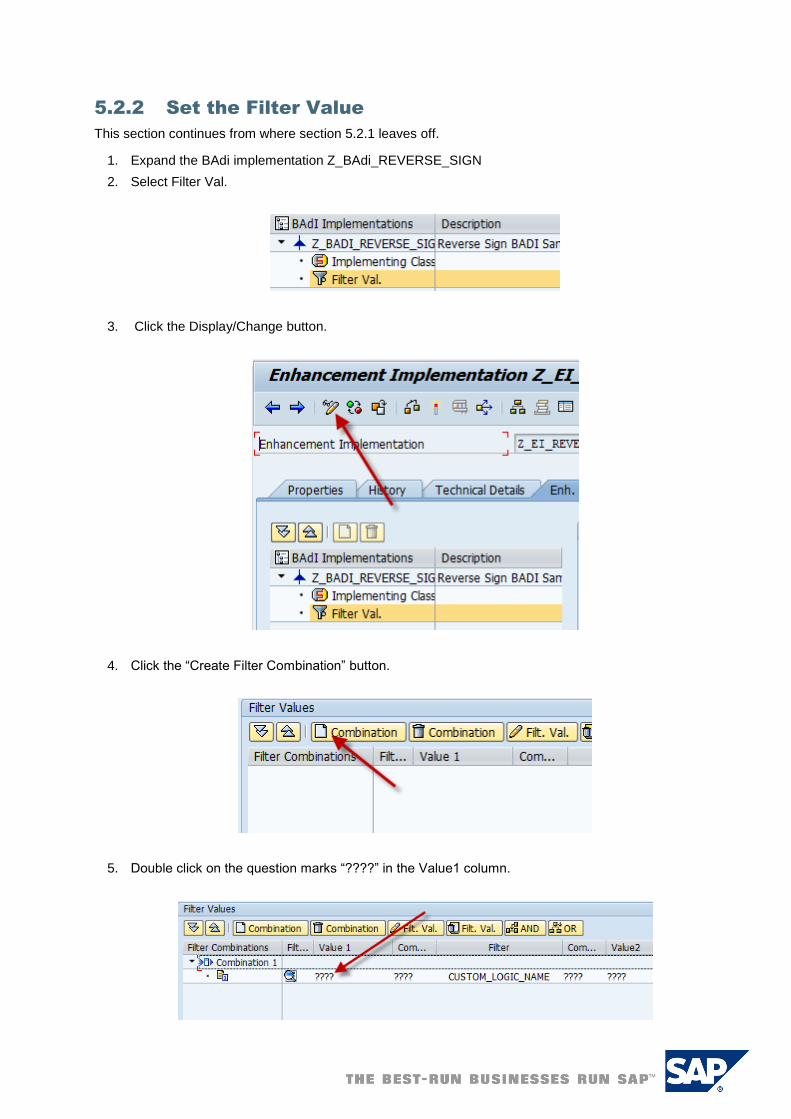
5.2.2 Set the Filter Value
This section continues from where section 5.2.1 leaves off. ...
1. Expand the BAdi implementation Z_BAdi_REVERSE_SIGN
2. Select Filter Val.
3. Click the Display/Change button.
4. Click the “Create Filter Combination” button.
5. Double click on the question marks “????” in the Value1 column.
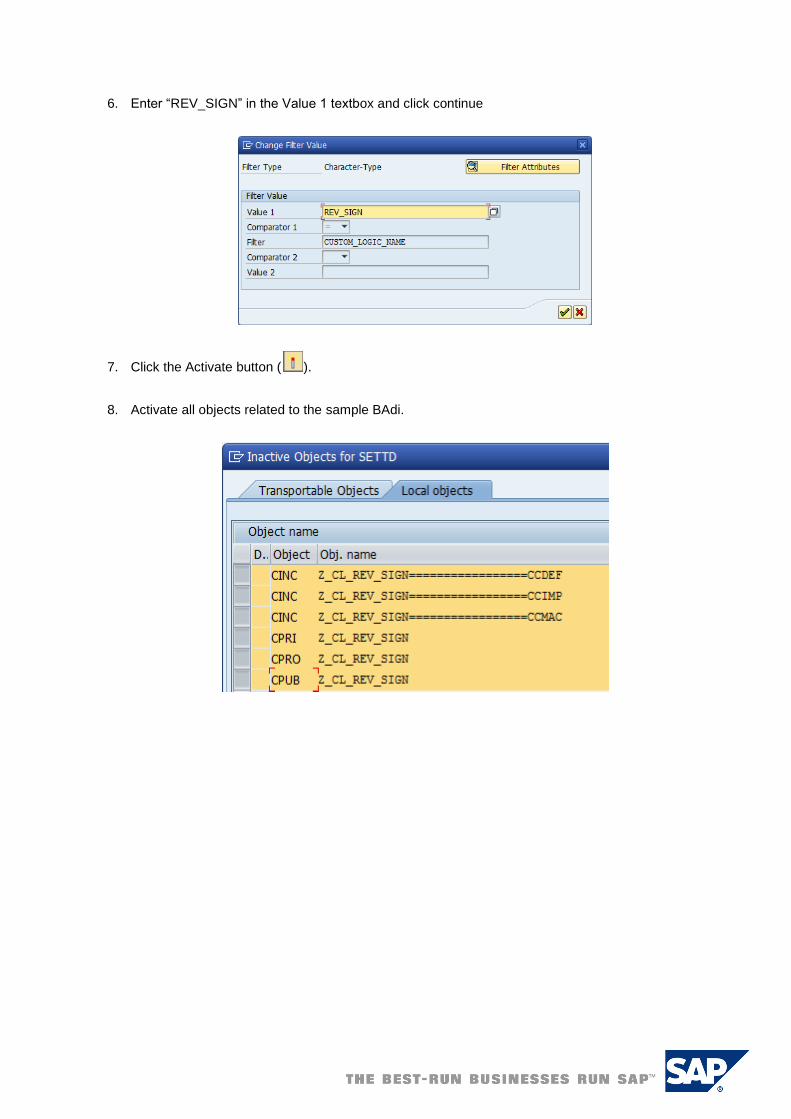
6. Enter “REV_SIGN” in the Value 1 textbox and click continue
7. Click the Activate button ( ).
8. Activate all objects related to the sample BAdi.

5.2.3 Implement IF_UJ_CUSTOM_LOGIC~EXECUTE
In this section we will implement the Execute method for our sample BAdi. This sample BAdi
calculates the difference between two sample accounts – an LEQ account (CE0002010) and an AST
account (CE0003010) and store the value in the VALIDATION account. Before calculating the
difference,
The instructions continue from where section 5.2.2 left off. ...
1. Expand the BAdi implementation Z_BAdi_REVERSE_SIGN
2. Select Implementing Class.
3. Double click on method IF_UJ_CUSTOM_LOGIC~EXECUTE
4. Select “Yes” in the Create Method Implementation dialog box.
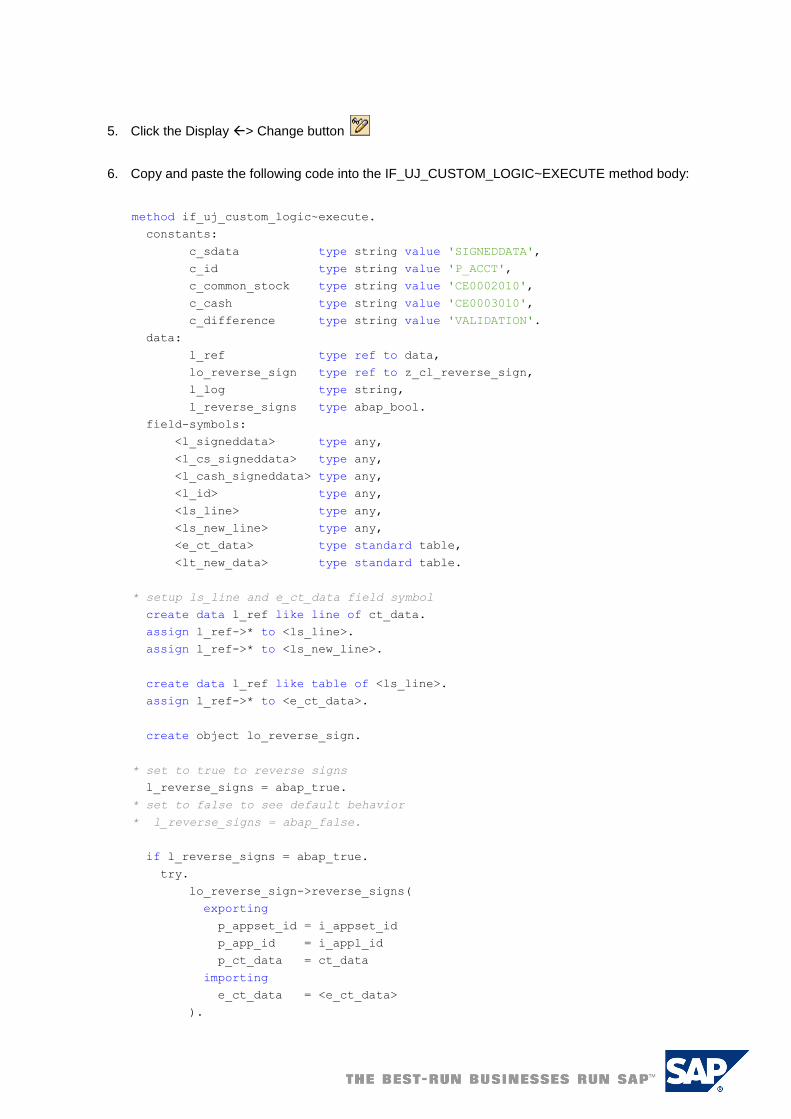
5. Click the Display > Change button
6. Copy and paste the following code into the IF_UJ_CUSTOM_LOGIC~EXECUTE method body:
method if_uj_custom_logic~execute.
constants:
c_sdata type string value 'SIGNEDDATA',
c_id type string value 'P_ACCT',
c_common_stock type string value 'CE0002010',
c_cash type string value 'CE0003010',
c_difference type string value 'VALIDATION'.
data:
l_ref type ref to data,
lo_reverse_sign type ref to z_cl_reverse_sign,
l_log type string,
l_reverse_signs type abap_bool.
field-symbols:
<l_signeddata> type any,
<l_cs_signeddata> type any,
<l_cash_signeddata> type any,
<l_id> type any,
<ls_line> type any,
<ls_new_line> type any,
<e_ct_data> type standard table,
<lt_new_data> type standard table.
* setup ls_line and e_ct_data field symbol
create data l_ref like line of ct_data.
assign l_ref->* to <ls_line>.
assign l_ref->* to <ls_new_line>.
create data l_ref like table of <ls_line>.
assign l_ref->* to <e_ct_data>.
create object lo_reverse_sign.
* set to true to reverse signs
l_reverse_signs = abap_true.
* set to false to see default behavior
* l_reverse_signs = abap_false.
if l_reverse_signs = abap_true.
try.
lo_reverse_sign->reverse_signs(
exporting
p_appset_id = i_appset_id
p_app_id = i_appl_id
p_ct_data = ct_data
importing
e_ct_data = <e_ct_data>
).

catch cx_uj_custom_logic .
catch cx_uja_admin_error .
l_log = 'Exception encountered calling lo_reverse_sign-
>reverse_signs()'.
cl_ujk_logger=>log( i_object = l_log ).
endtry.
else.
<e_ct_data> = ct_data.
endif.
* this is a very simple implentation that will loop through all data sent
* set cash and commonstock signed data if found
* only works for a single time period
loop at <e_ct_data> assigning <ls_line>.
assign component c_id of structure <ls_line> to <l_id>.
if <l_id> eq c_common_stock.
assign component c_sdata of structure <ls_line> to <l_cs_signeddata>.
elseif <l_id> eq c_cash.
assign component c_sdata of structure <ls_line> to <l_cash_signeddata>.
endif.
endloop.
create data l_ref like ct_data.
assign l_ref->* to <lt_new_data>.
* if we have set signed data for cash and common stock, calculate kpi100
if <l_cs_signeddata> is assigned and <l_cash_signeddata> is assigned.
move-corresponding <ls_line> to <ls_new_line>.
assign component c_id of structure <ls_new_line> to <l_id>.
assign component c_sdata of structure <ls_new_line> to <l_signeddata>.
<l_id> = c_difference.
<l_signeddata> = <l_cash_signeddata> + <l_cs_signeddata>.
collect <ls_new_line> into <lt_new_data>.
endif.
ct_data = <lt_new_data>.
endmethod.
7. Click the Save button ( ).
8. Click the Activate button ( ) and activate the updated method.
5.2.4 Update Default Logic to call the Sample BAdi
In this section, we will update default logic to call the sample BAdi.
...
1. Log into the application set created in section 4.1 via the BPC Administration client.
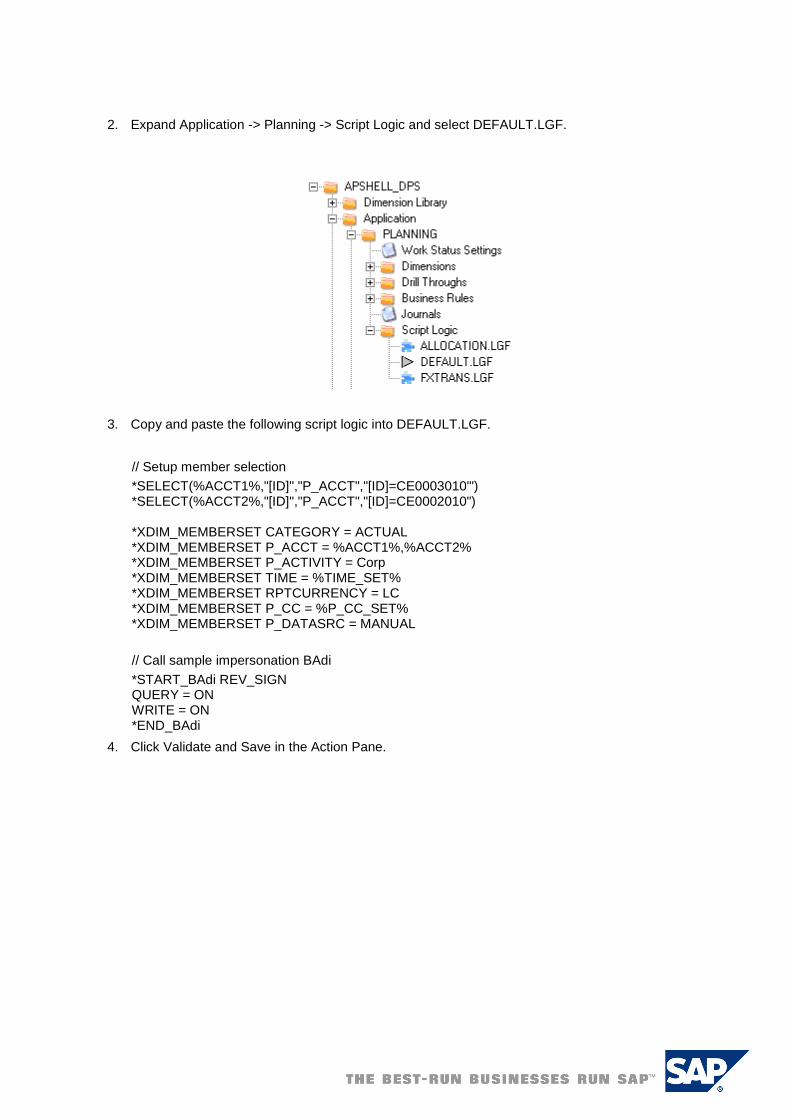
2. Expand Application -> Planning -> Script Logic and select DEFAULT.LGF.
3. Copy and paste the following script logic into DEFAULT.LGF.
// Setup member selection
*SELECT(%ACCT1%,"[ID]","P_ACCT","[ID]=CE0003010'") *SELECT(%ACCT2%,"[ID]","P_ACCT","[ID]=CE0002010") *XDIM_MEMBERSET CATEGORY = ACTUAL *XDIM_MEMBERSET P_ACCT = %ACCT1%,%ACCT2% *XDIM_MEMBERSET P_ACTIVITY = Corp *XDIM_MEMBERSET TIME = %TIME_SET% *XDIM_MEMBERSET RPTCURRENCY = LC *XDIM_MEMBERSET P_CC = %P_CC_SET% *XDIM_MEMBERSET P_DATASRC = MANUAL
// Call sample impersonation BAdi
*START_BAdi REV_SIGN QUERY = ON WRITE = ON *END_BAdi
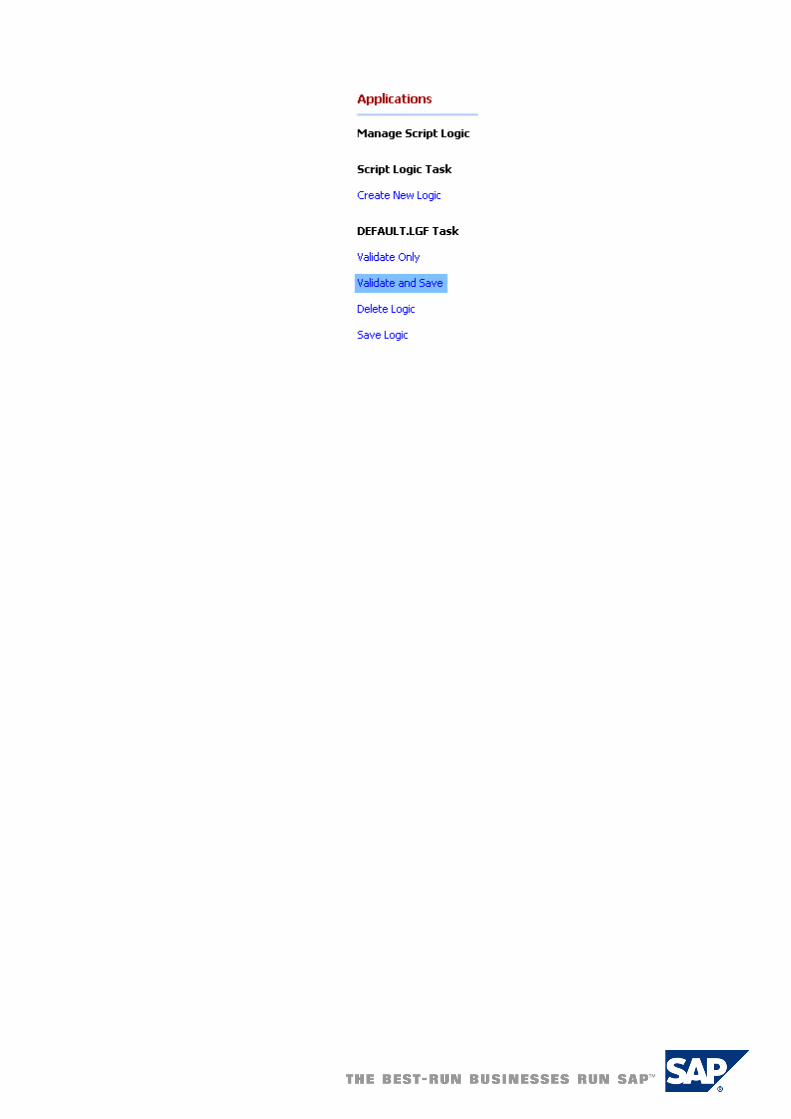
4. Click Validate and Save in the Action Pane.

6. Example Execution
In this section, we will review two use cases that demonstrate the behavior of the
Z_CL_REVERSE_SIGN class, as well as our sample BAdi.
6.1 Use Case 1
This use-case demonstrates the default behavior of BPC / UJ_CUSTOM_LOGIC BAdi’s in default
logic when sending data from an Input Schedule and executing default logic from a Data Manager
package.
This is a three step process involving:
a. Disabling the REVERSE_SIGNS method call in the BAdi
b. Submitting data via an Input Schedule
c. Executing default logic via a Data Manager package against the same region used in
step b.
6.1.1 Disable REVERSE_SIGNS call: ...
1. Log into SAPGUI
2. Go to T-Code SE19
3. Enter “Z_EI_REVERSE_SIGN” as the Enhancement Implementation and click “Change”:
4. Expand “Z_BAdi_REVERSE_SIGNS” and double click “Implementing Class”.
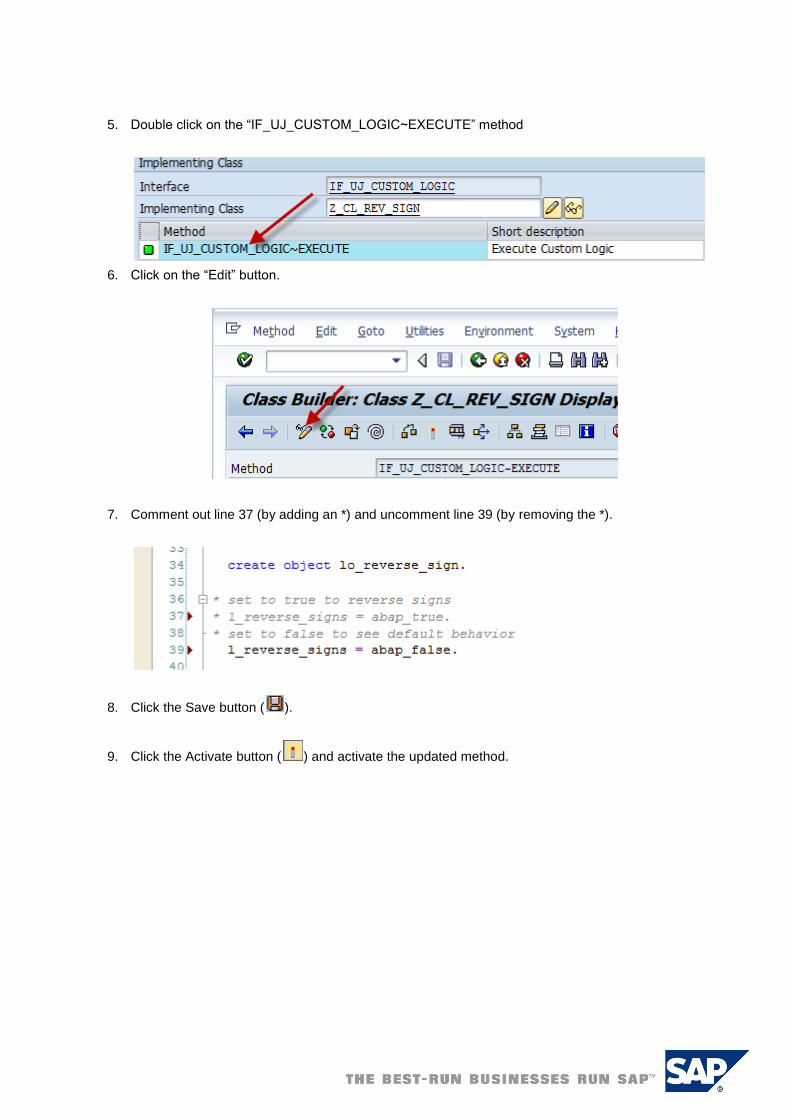
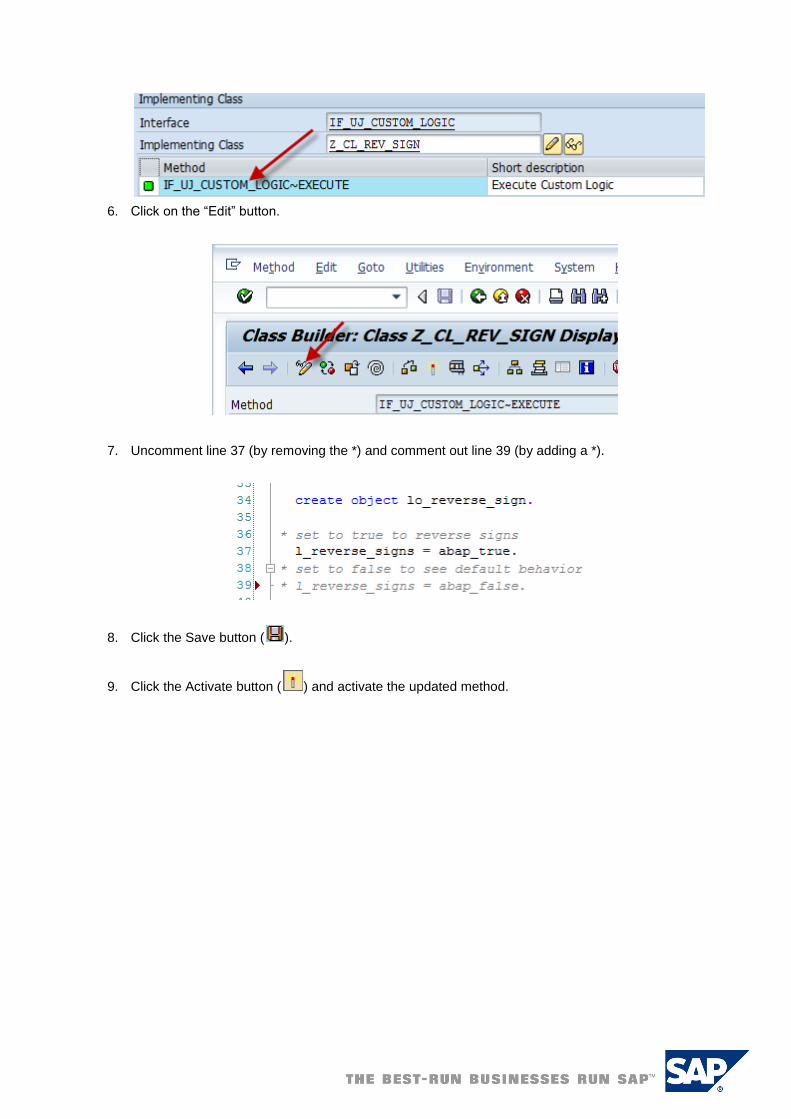
5. Double click on the “IF_UJ_CUSTOM_LOGIC~EXECUTE” method
6. Click on the “Edit” button.
7. Comment out line 37 (by adding an *) and uncomment line 39 (by removing the *).
8. Click the Save button ( ).
9. Click the Activate button ( ) and activate the updated method.
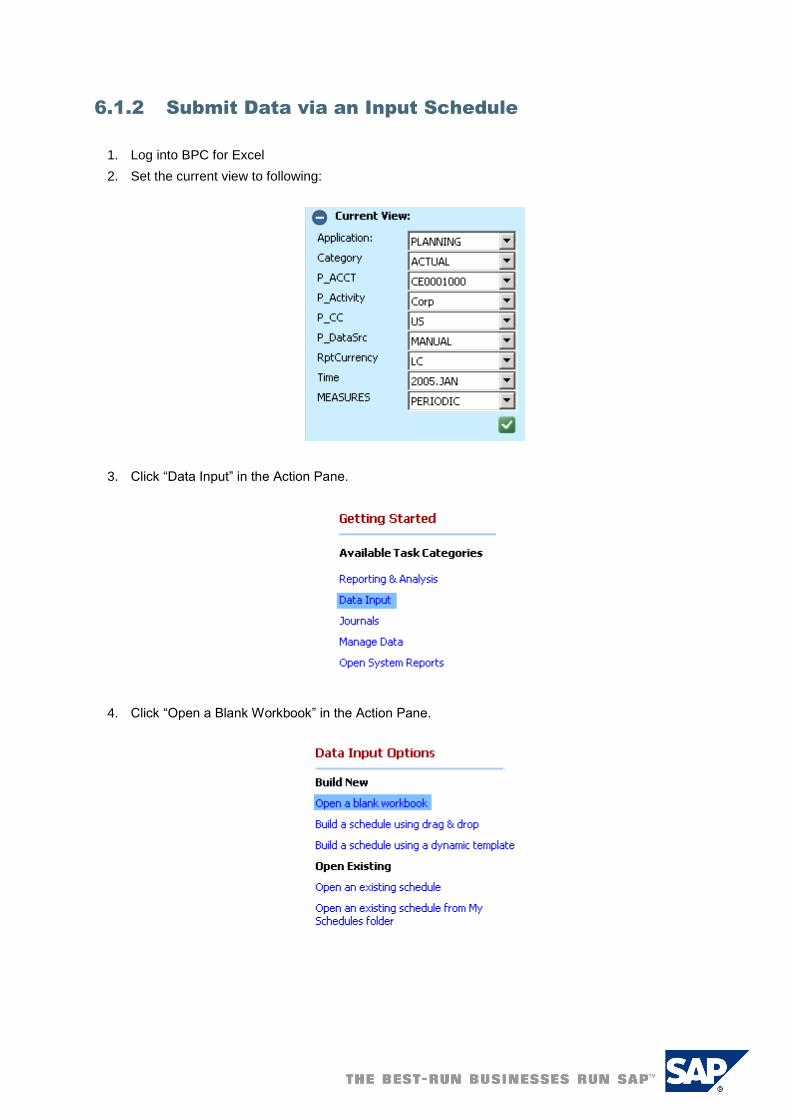
6.1.2 Submit Data via an Input Schedule
1. Log into BPC for Excel
2. Set the current view to following:
3. Click “Data Input” in the Action Pane.
4. Click “Open a Blank Workbook” in the Action Pane.

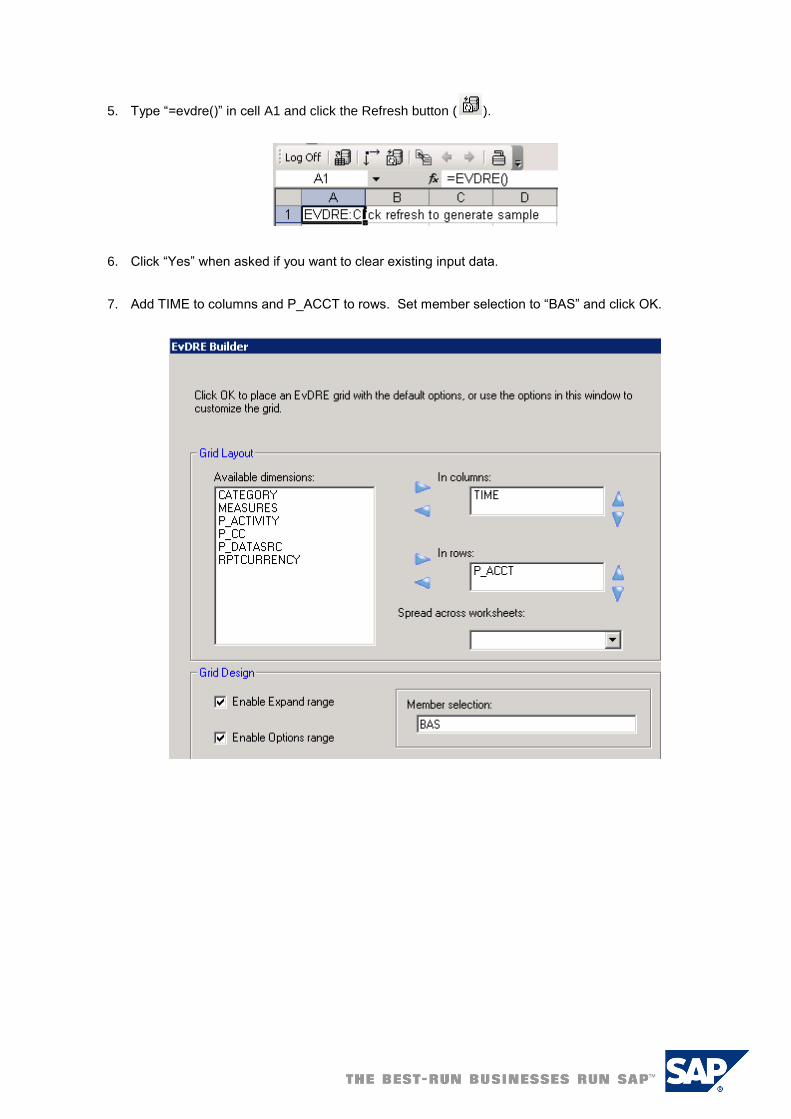
5. Type “=evdre()” in cell A1 and click the Refresh button ( ).
6. Click “Yes” when asked if you want to clear existing input data.
7. Add TIME to columns and P_ACCT to rows. Set member selection to “BAS” and click OK.

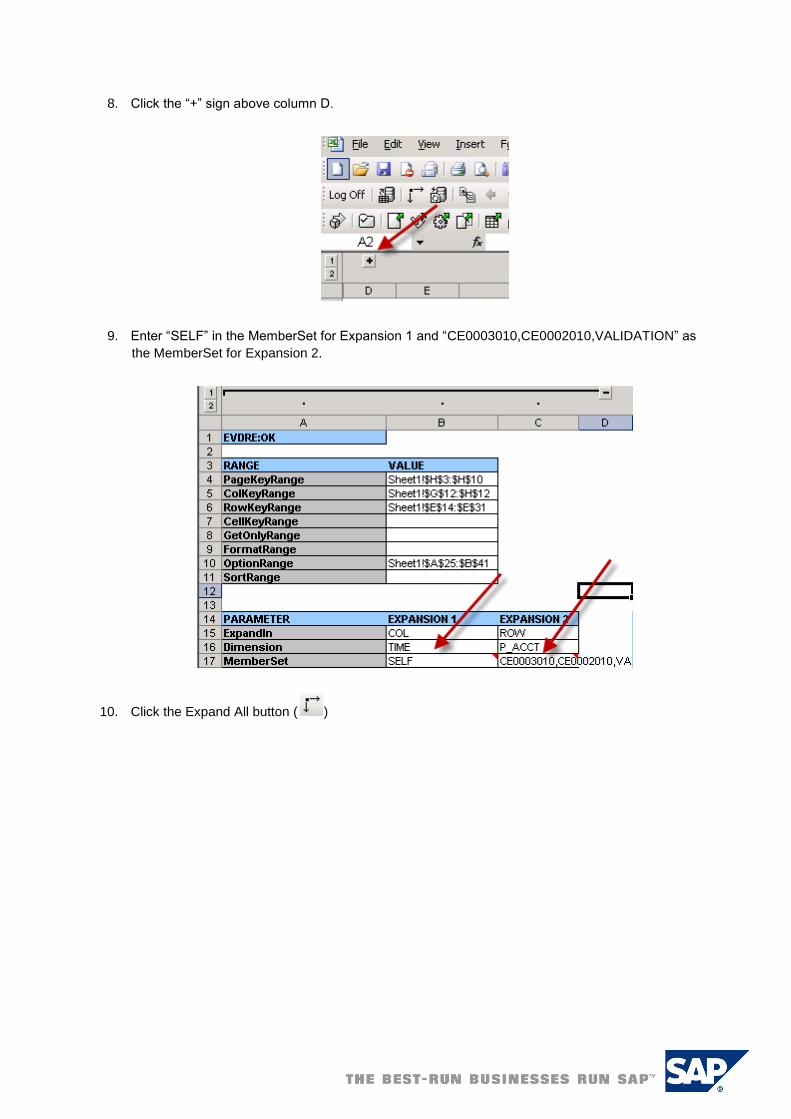
8. Click the “+” sign above column D.
9. Enter “SELF” in the MemberSet for Expansion 1 and “CE0003010,CE0002010,VALIDATION” as
the MemberSet for Expansion 2.
10. Click the Expand All button ( )
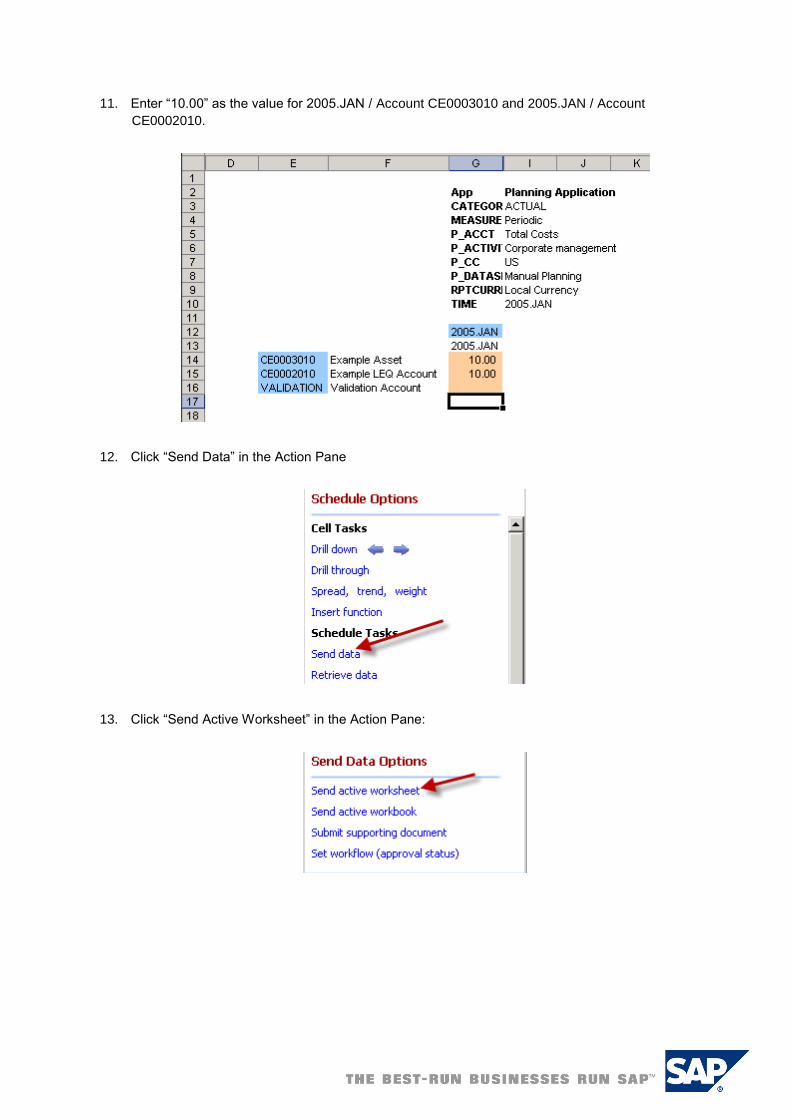
11. Enter “10.00” as the value for 2005.JAN / Account CE0003010 and 2005.JAN / Account
CE0002010.
12. Click “Send Data” in the Action Pane
13. Click “Send Active Worksheet” in the Action Pane:

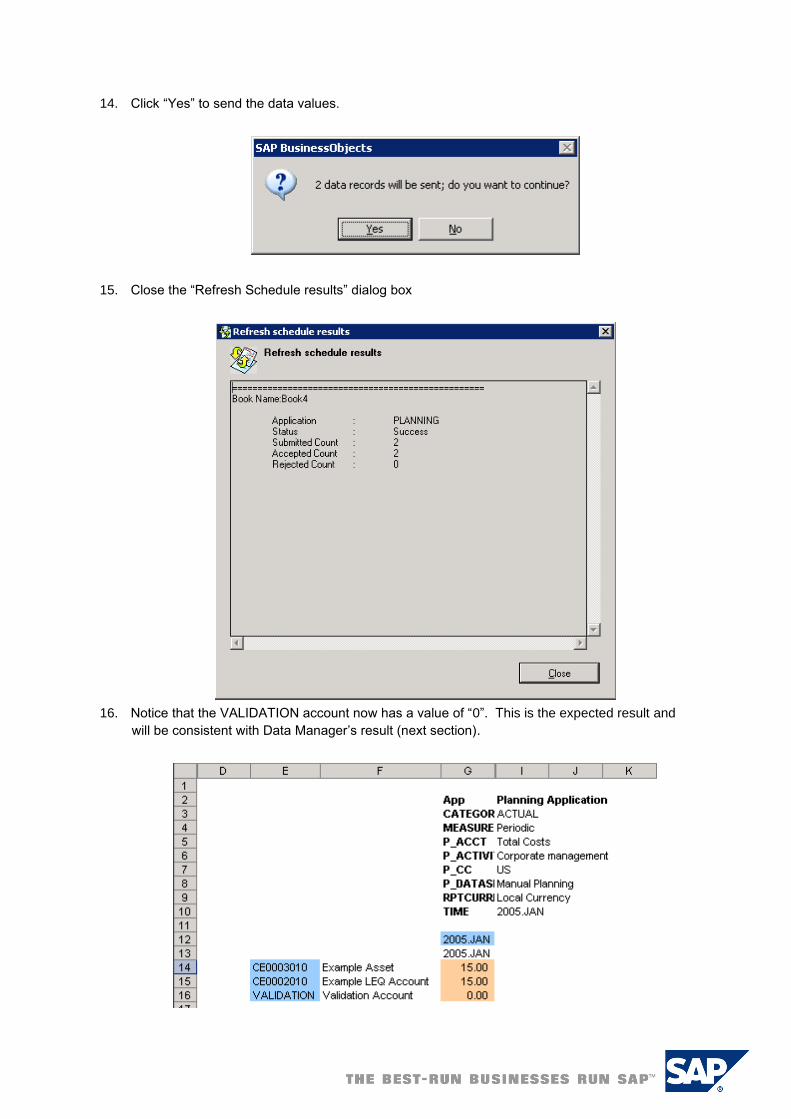
14. Click “Yes” to send the data values.
15. Close the “Refresh Schedule results” dialog box
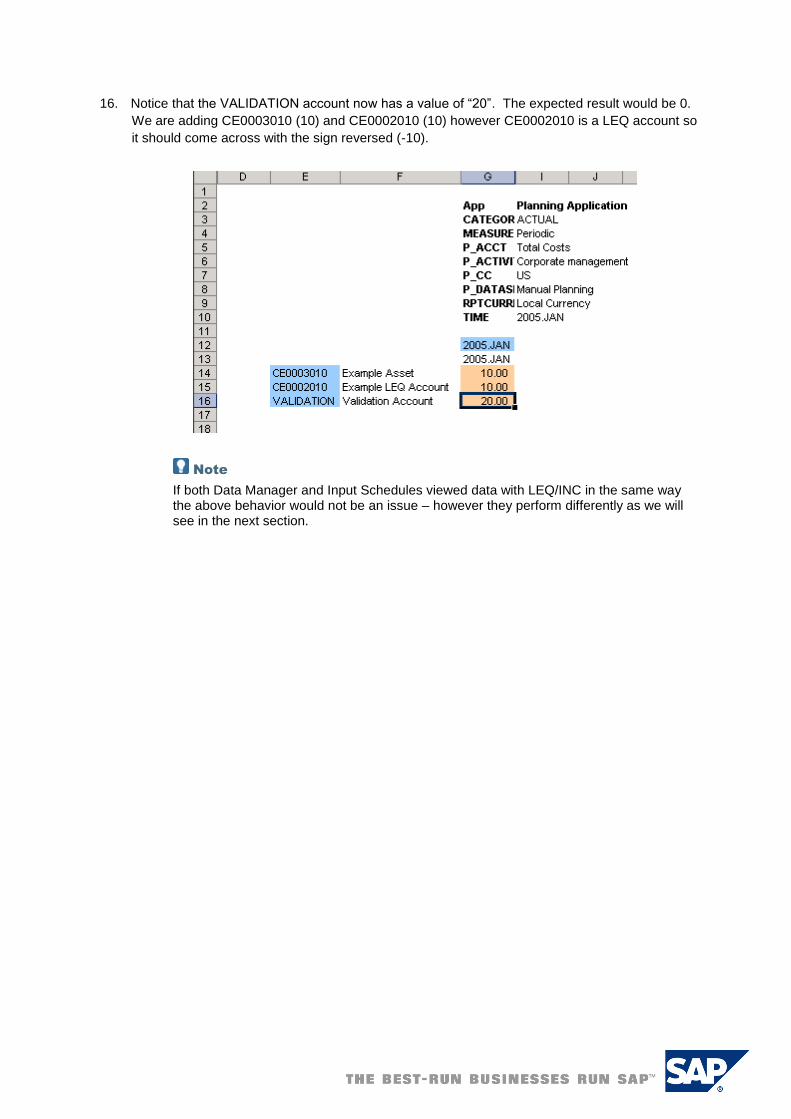
16. Notice that the VALIDATION account now has a value of “20”. The expected result would be 0.
We are adding CE0003010 (10) and CE0002010 (10) however CE0002010 is a LEQ account so
it should come across with the sign reversed (-10).
Note
If both Data Manager and Input Schedules viewed data with LEQ/INC in the same way the above behavior would not be an issue – however they perform differently as we will see in the next section.
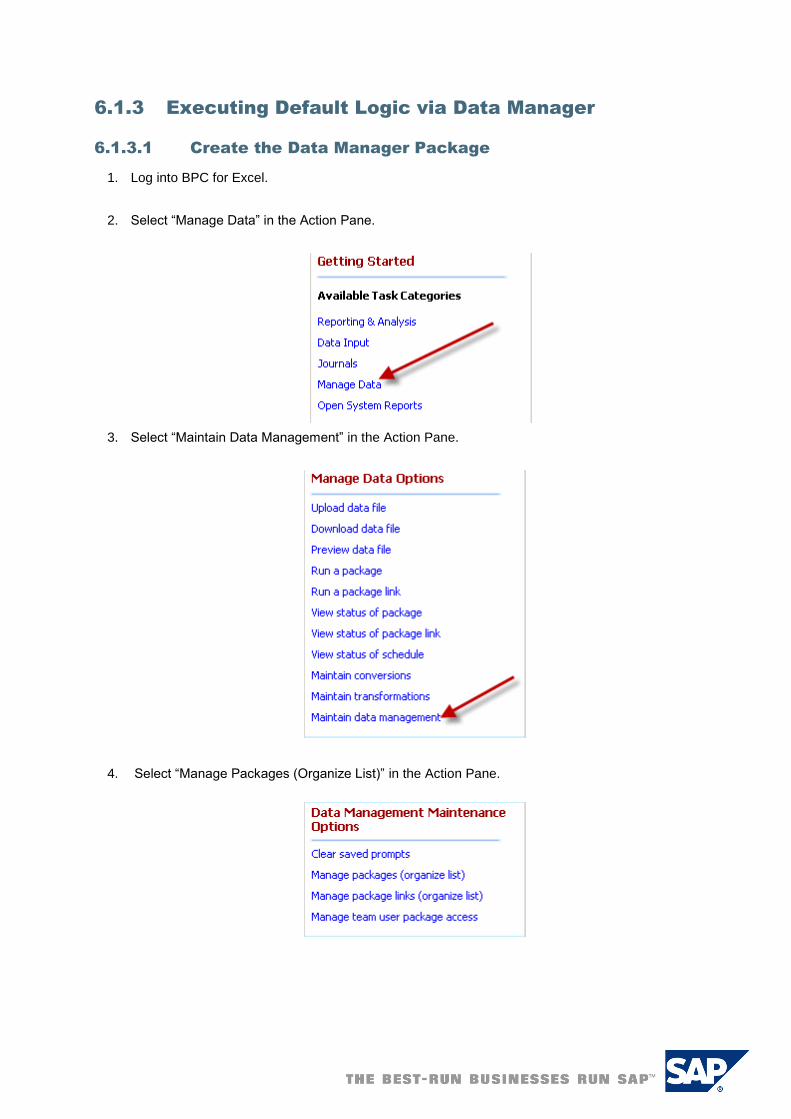
6.1.3 Executing Default Logic via Data Manager
6.1.3.1 Create the Data Manager Package ...
1. Log into BPC for Excel.
2. Select “Manage Data” in the Action Pane.
3. Select “Maintain Data Management” in the Action Pane.
4. Select “Manage Packages (Organize List)” in the Action Pane.
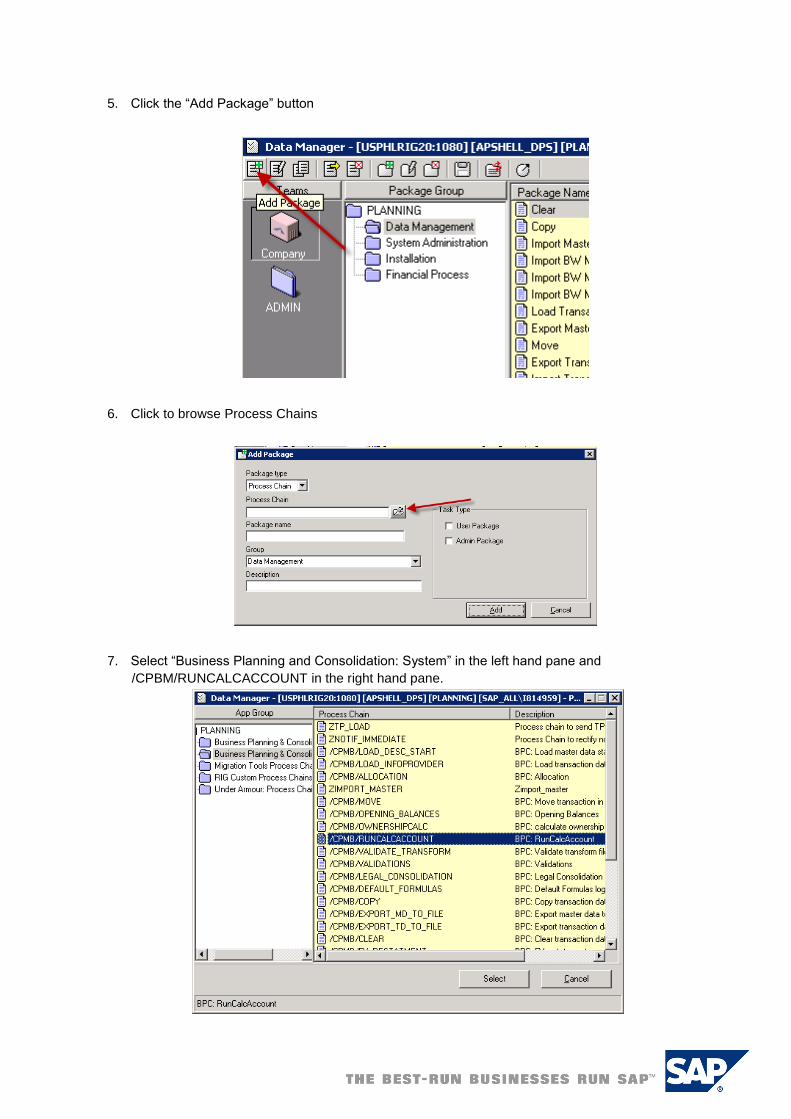
5. Click the “Add Package” button
6. Click to browse Process Chains
7. Select “Business Planning and Consolidation: System” in the left hand pane and
/CPBM/RUNCALCACCOUNT in the right hand pane.
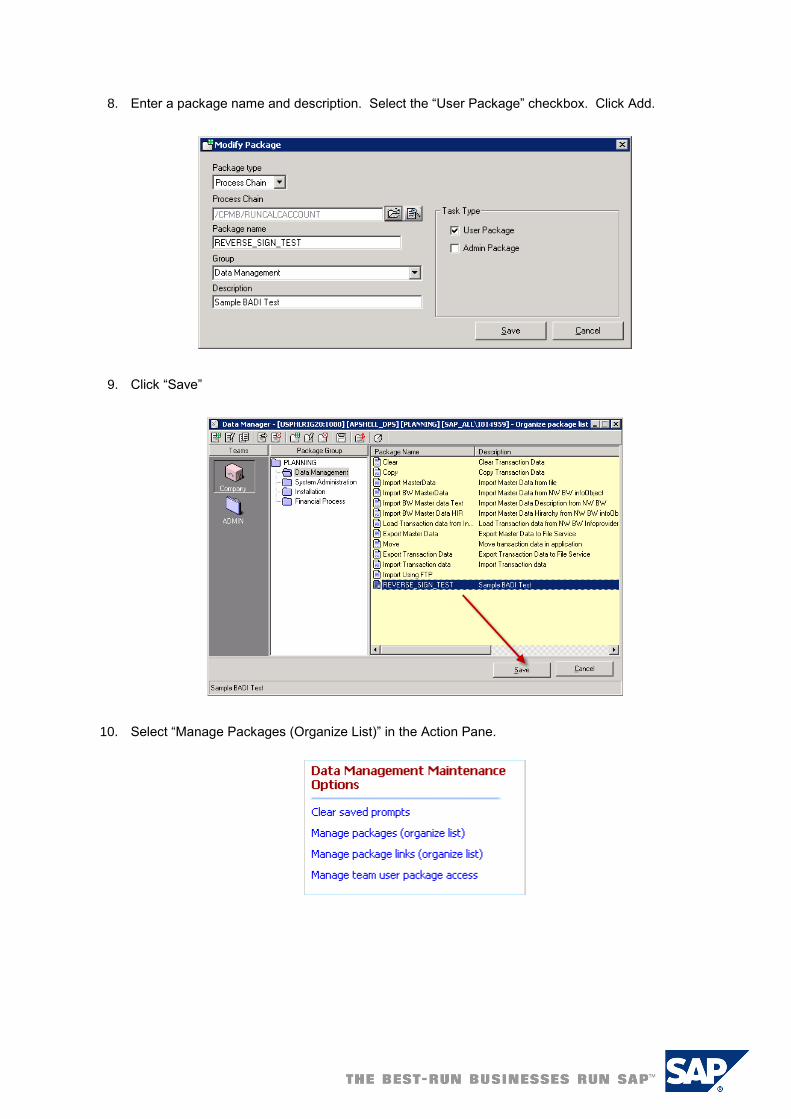
8. Enter a package name and description. Select the “User Package” checkbox. Click Add.
9. Click “Save”
10. Select “Manage Packages (Organize List)” in the Action Pane.
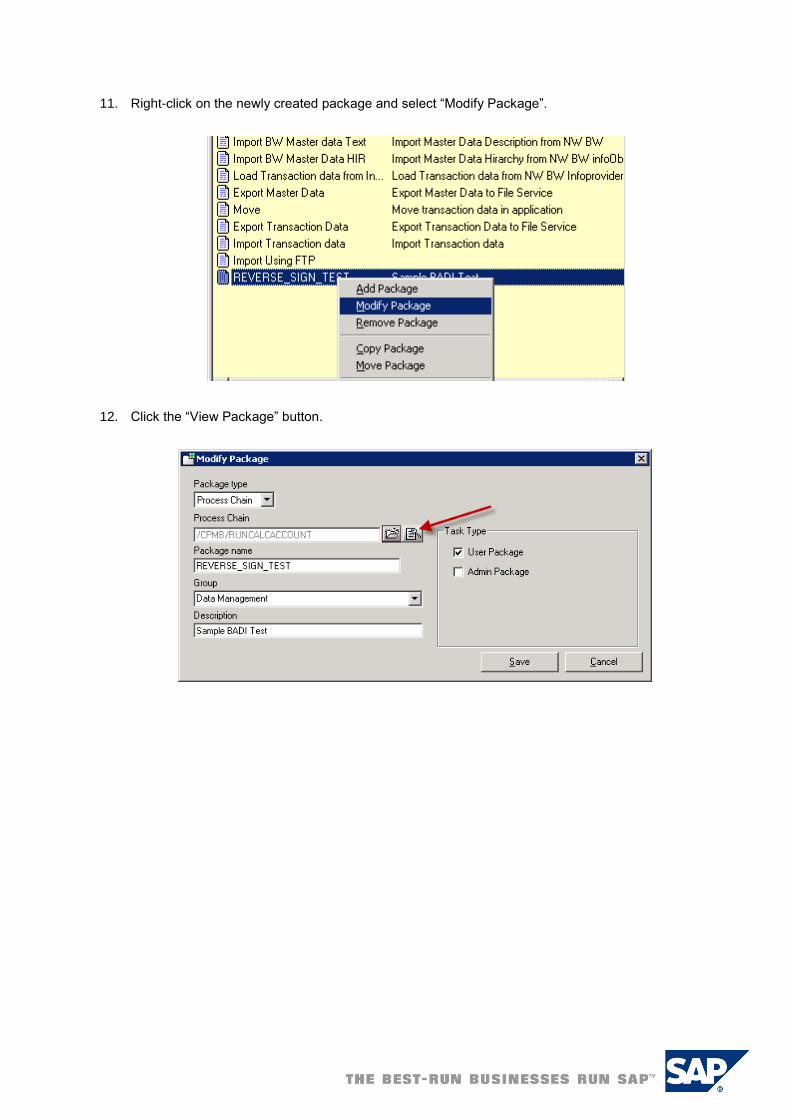
11. Right-click on the newly created package and select “Modify Package”.
12. Click the “View Package” button.
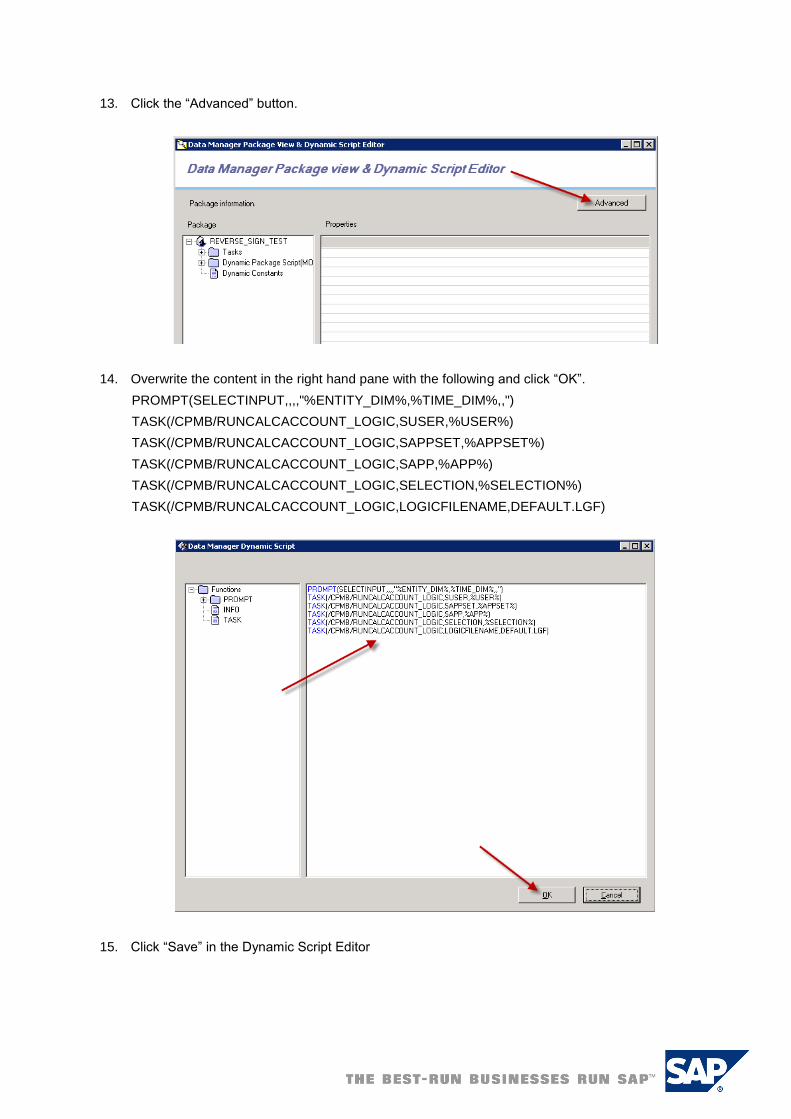
13. Click the “Advanced” button.
14. Overwrite the content in the right hand pane with the following and click “OK”.
PROMPT(SELECTINPUT,,,,"%ENTITY_DIM%,%TIME_DIM%,,")
TASK(/CPMB/RUNCALCACCOUNT_LOGIC,SUSER,%USER%)
TASK(/CPMB/RUNCALCACCOUNT_LOGIC,SAPPSET,%APPSET%)
TASK(/CPMB/RUNCALCACCOUNT_LOGIC,SAPP,%APP%)
TASK(/CPMB/RUNCALCACCOUNT_LOGIC,SELECTION,%SELECTION%)
TASK(/CPMB/RUNCALCACCOUNT_LOGIC,LOGICFILENAME,DEFAULT.LGF)
15. Click “Save” in the Dynamic Script Editor

16. Click “Save” in the “Modify Package” dialog.
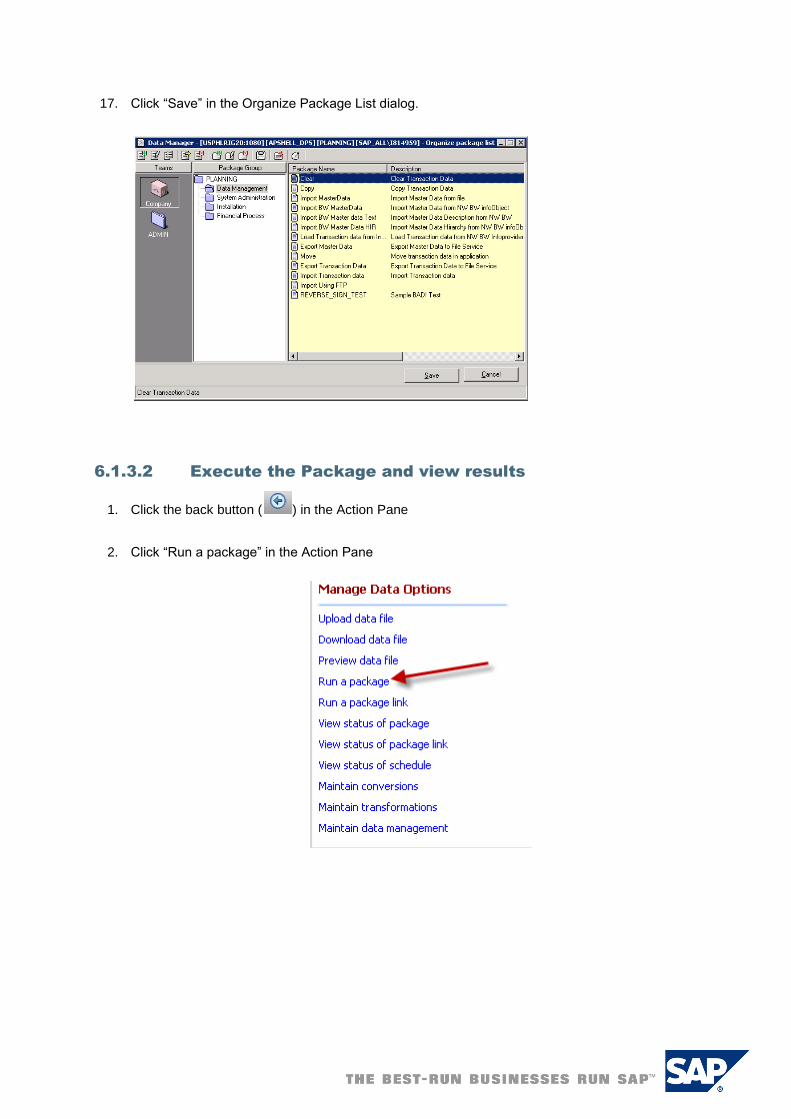
17. Click “Save” in the Organize Package List dialog.
6.1.3.2 Execute the Package and view results ...
1. Click the back button ( ) in the Action Pane
2. Click “Run a package” in the Action Pane

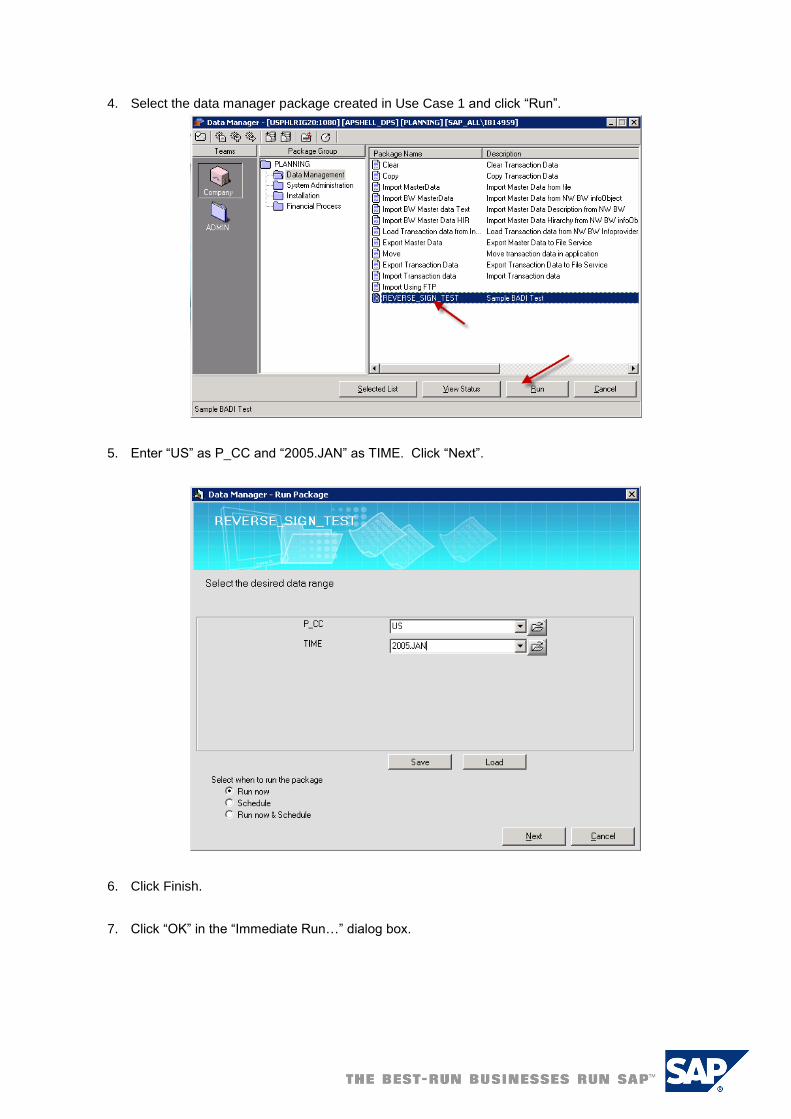
3. Select the newly created data manager package and click “Run”.
4. Enter “US” as P_CC and “2005.JAN” as TIME. Click “Next”.
5. Click Finish.
6. Click “OK” in the “Immediate Run…” dialog box.
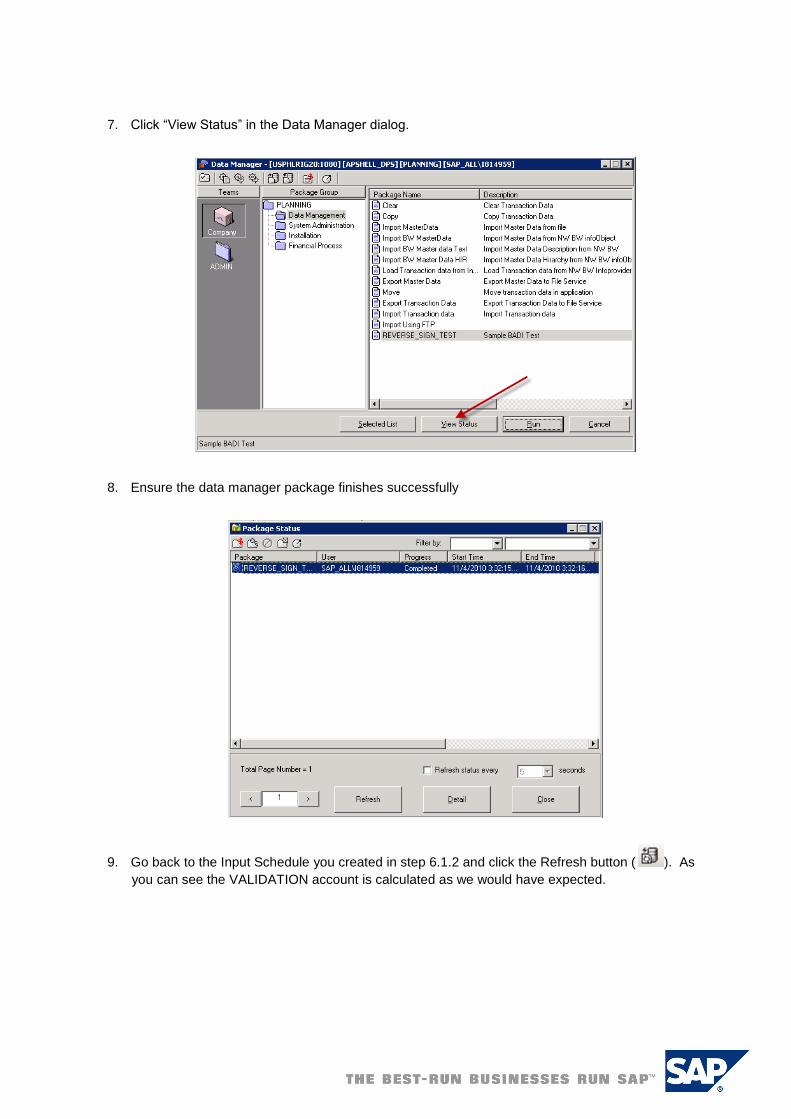
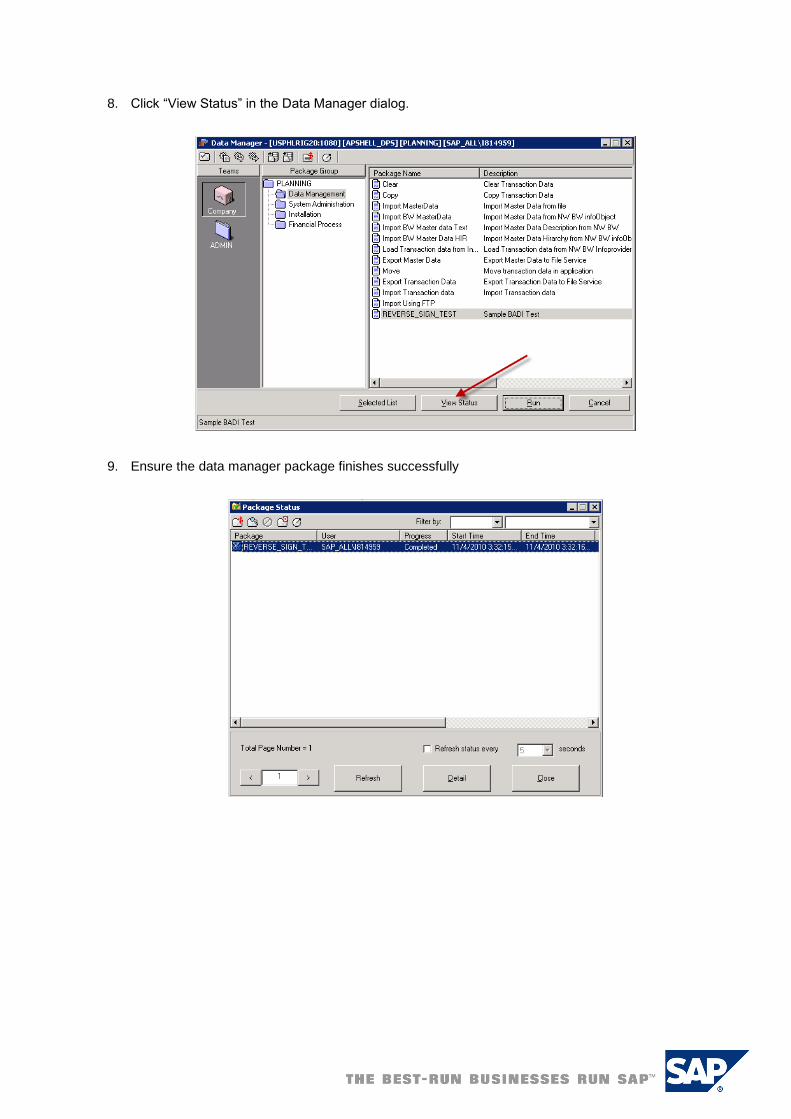
7. Click “View Status” in the Data Manager dialog.
8. Ensure the data manager package finishes successfully
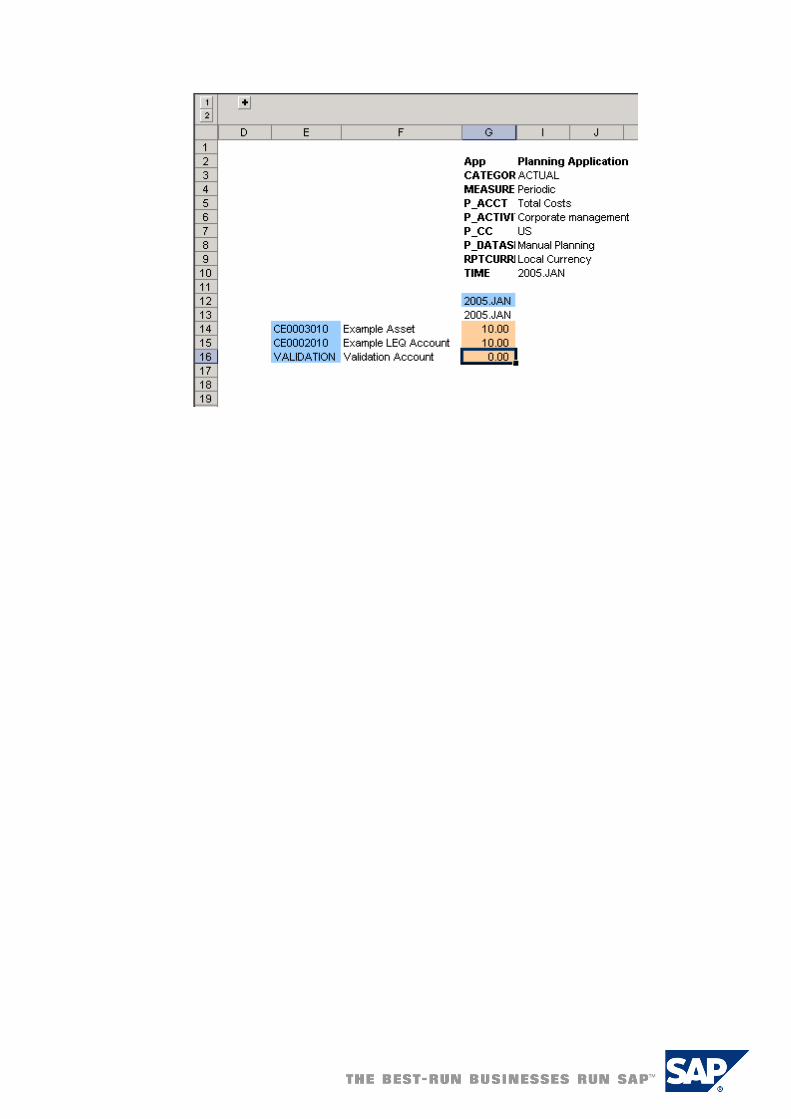
9. Go back to the Input Schedule you created in step 6.1.2 and click the Refresh button ( ). As
you can see the VALIDATION account is calculated as we would have expected.

6.2 Use Case 2
This use-case demonstrates the new behavior of BPC / UJ_CUSTOM_LOGIC BAdi’s in default logic
when using the REVERSE_SIGNS method in your BAdi’s.
This is a three step process involving:
a. Enabling the REVERSE_SIGNS method call in the BAdi
b. Re-submitting data via the same Input Schedule as Use Case 1.
c. Re-executing default logic via the Data Manager package created in Use Case 1.
6.2.1 Enable REVERSE_SIGNS call: ...
1. Log into SAPGUI
2. Go to T-Code SE19
3. Enter “Z_EI_REVERSE_SIGN” as the Enhancement Implementation and click “Change”:
4. Expand “Z_BAdi_REVERSE_SIGNS” and double click “Implementing Class”.
5. Double click on the “IF_UJ_CUSTOM_LOGIC~EXECUTE” method
6. Click on the “Edit” button.
7. Uncomment line 37 (by removing the *) and comment out line 39 (by adding a *).
8. Click the Save button ( ).
9. Click the Activate button ( ) and activate the updated method.
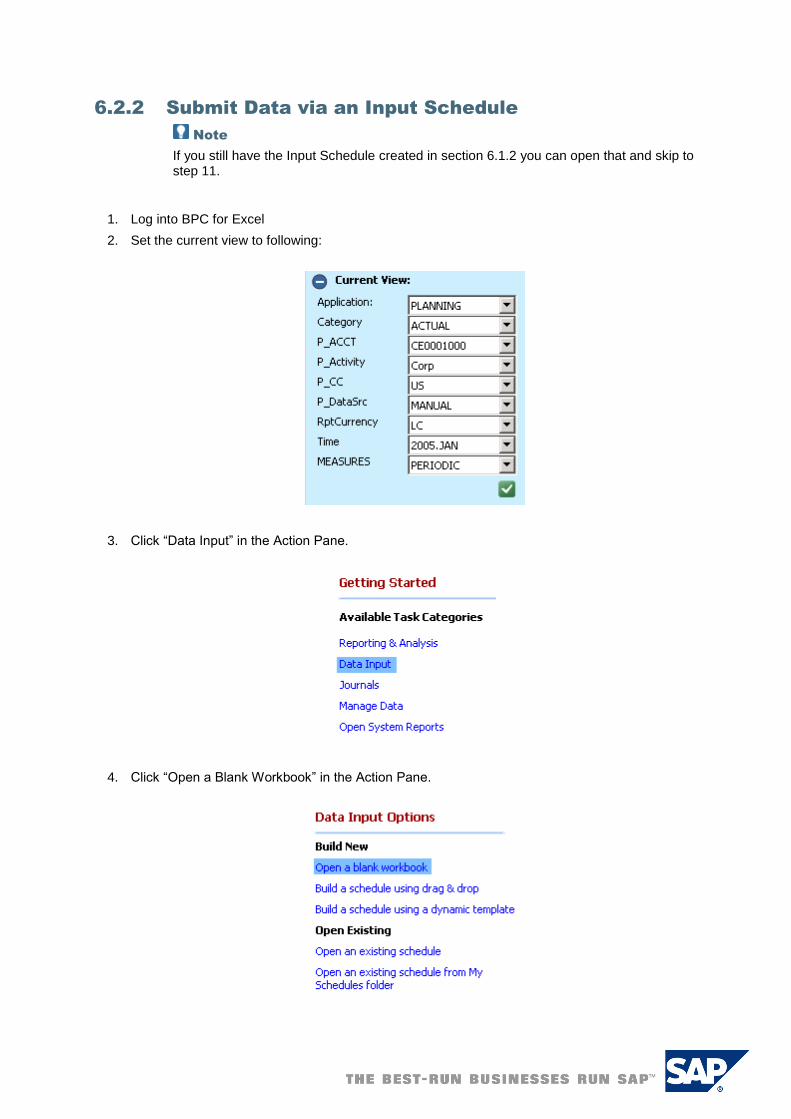
6.2.2 Submit Data via an Input Schedule
Note
If you still have the Input Schedule created in section 6.1.2 you can open that and skip to step 11.
...
1. Log into BPC for Excel
2. Set the current view to following:
3. Click “Data Input” in the Action Pane.
4. Click “Open a Blank Workbook” in the Action Pane.
5. Type “=evdre()” in cell A1 and click the Refresh button ( ).
6. Click “Yes” when asked if you want to clear existing input data.
7. Add TIME to columns and P_ACCT to rows. Set member selection to “BAS” and click OK.
8. Click the “+” sign above column D.
9. Enter “SELF” in the MemberSet for Expansion 1 and “CE0003010,CE0002010,VALIDATION” as
the MemberSet for Expansion 2.
10. Click the Expand All button ( )

11. Enter “15.00” as the value for 2005.JAN / Account CE0003010 and 2005.JAN / Account
CE0002010.
12. Click “Send Data” in the Action Pane
13. Click “Send Active Worksheet” in the Action Pane:
14. Click “Yes” to send the data values.
15. Close the “Refresh Schedule results” dialog box
16. Notice that the VALIDATION account now has a value of “0”. This is the expected result and
will be consistent with Data Manager’s result (next section).

6.2.3 Executing Default Logic via Data Manager
...
1. Log into BPC for Excel.
2. Select “Manage Data” in the Action Pane.
3. Click “Run a package” in the Action Pane
4. Select the data manager package created in Use Case 1 and click “Run”.
5. Enter “US” as P_CC and “2005.JAN” as TIME. Click “Next”.
6. Click Finish.
7. Click “OK” in the “Immediate Run…” dialog box.
8. Click “View Status” in the Data Manager dialog.
9. Ensure the data manager package finishes successfully
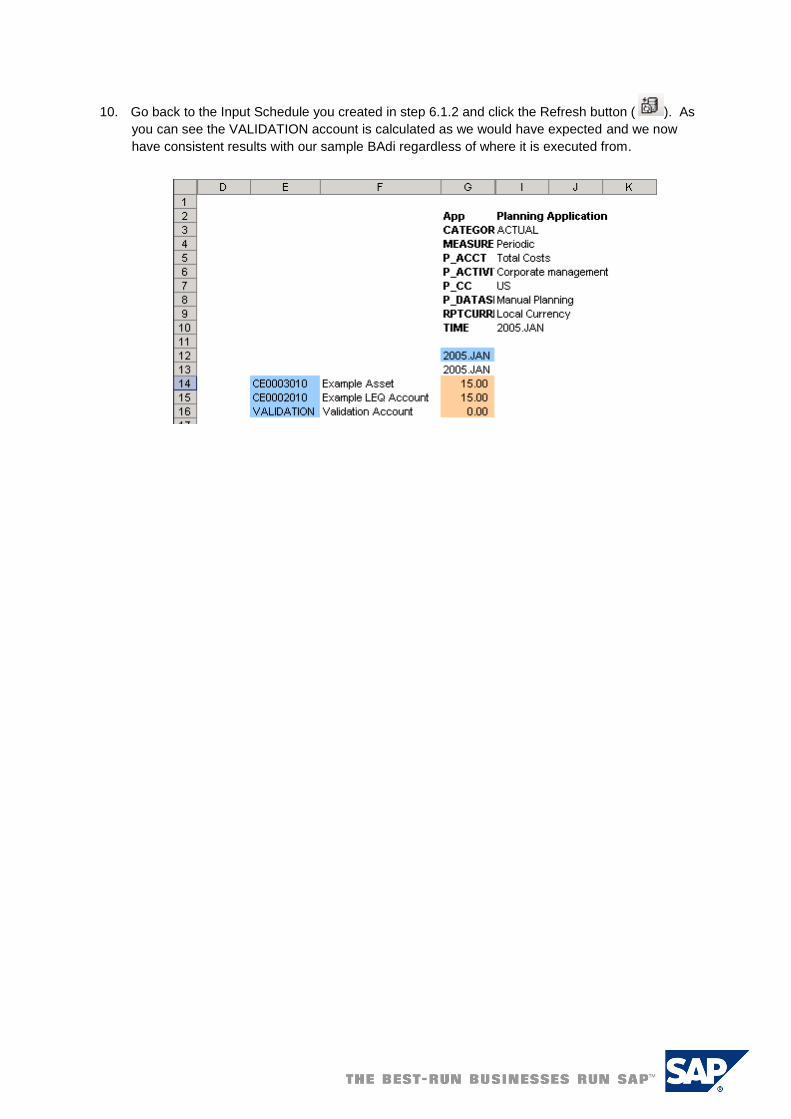
10. Go back to the Input Schedule you created in step 6.1.2 and click the Refresh button ( ). As
you can see the VALIDATION account is calculated as we would have expected and we now
have consistent results with our sample BAdi regardless of where it is executed from.

7. Combining with existing BAdis
It is simple to add this functionality to new or existing BAdis, simply: ...
1. Go into your BAdi implementation.
2. Incorporate the following to the beginning of the BAdi implementation:
data:
l_ref type ref to data,
lo_reverse_sign type ref to z_cl_reverse_sign,
l_log type string,
field-symbols:
<ls_line> type any,
<e_ct_data> type standard table,
* setup ls_line and e_ct_data field symbol
create data l_ref like line of ct_data.
assign l_ref->* to <ls_line>.
create data l_ref like table of <ls_line>.
assign l_ref->* to <e_ct_data>.
create object lo_reverse_sign.
try.
lo_reverse_sign->reverse_signs(
exporting
p_appset_id = i_appset_id
p_app_id = i_appl_id
p_ct_data = ct_data
importing
e_ct_data = <e_ct_data>
).
catch cx_uj_custom_logic .
catch cx_uja_admin_error .
l_log = 'Exception encountered calling lo_reverse_sign-
>reverse_signs()'.
cl_ujk_logger=>log( i_object = l_log ).
endtry.
3. Use <e_ct_data>, which will have the same structure as ct_data, as the basis for all of your
calculations.

www.sdn.sap.com/irj/sdn/howtoguides