Embed Size (px)
Citation preview
8/2/2019 How to Dual Boot Windows XP and Windows 7
http://slidepdf.com/reader/full/how-to-dual-boot-windows-xp-and-windows-7 1/14
8/2/2019 How to Dual Boot Windows XP and Windows 7
http://slidepdf.com/reader/full/how-to-dual-boot-windows-xp-and-windows-7 2/14
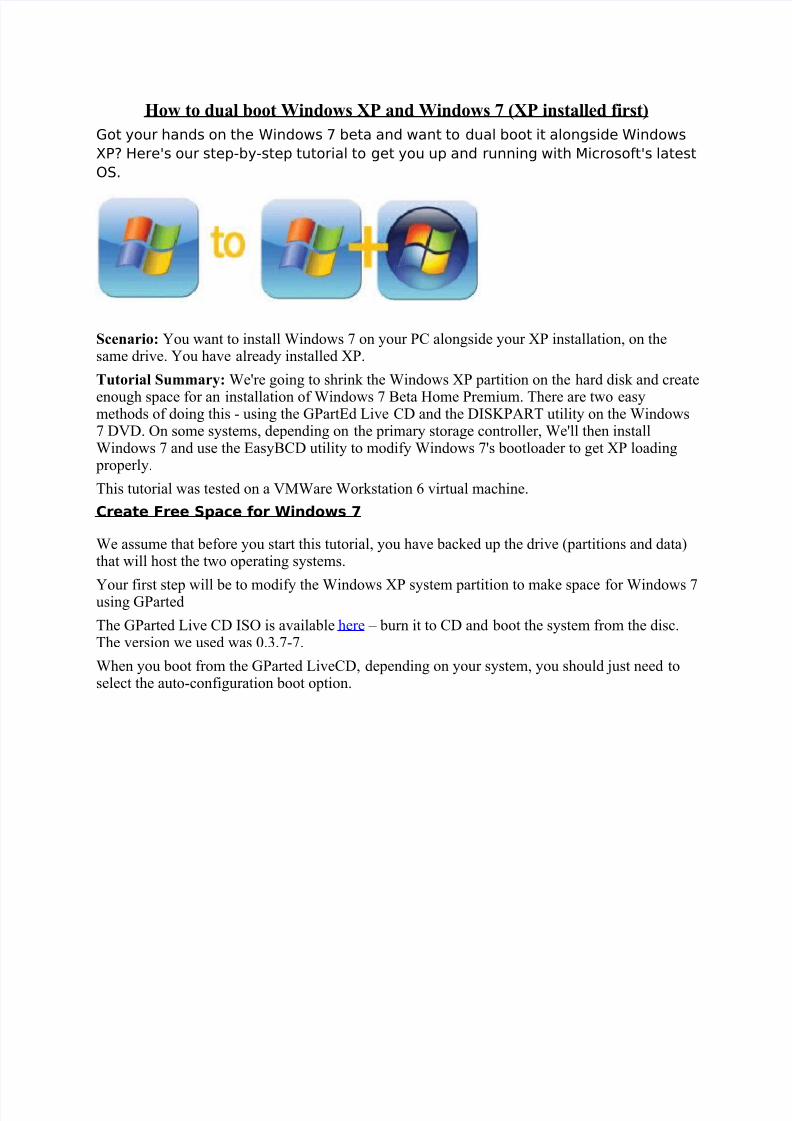
Option 1 - Using GPartEd
During boot, press Enter three times to accept the defaults for keymap, language and graphicssettings.
When the main GUI loads, right-click on the main Windows XP NTFS partition (depending onyour setup, probably /dev/hda1) and select Resize/Move.
Use the slider to reduce the partition size and free up enough room to install Windows 7 (at least10GB) and click Resize/Move.
8/2/2019 How to Dual Boot Windows XP and Windows 7
http://slidepdf.com/reader/full/how-to-dual-boot-windows-xp-and-windows-7 3/14
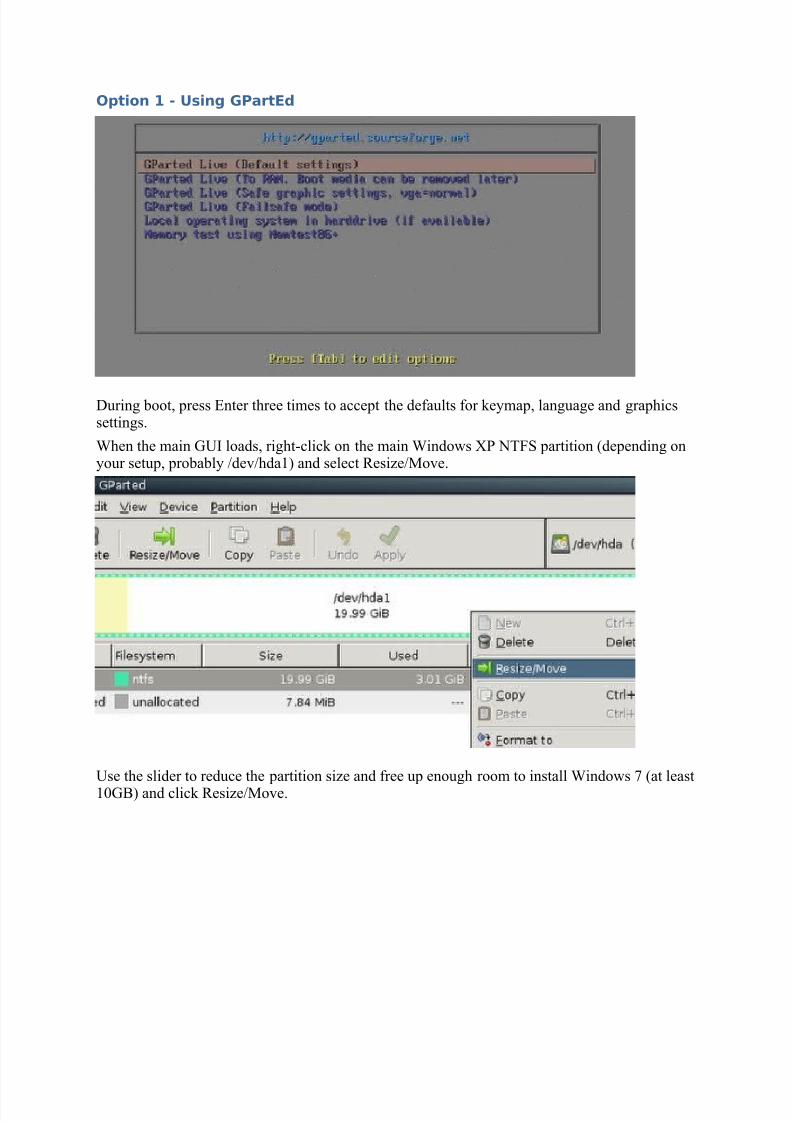
The changes haven’t actually been made, they’ve just been scheduled to run. To commit thechanges and resize the partition, click Apply. GParted will ask to confirm the changes – hit OK and away you go.
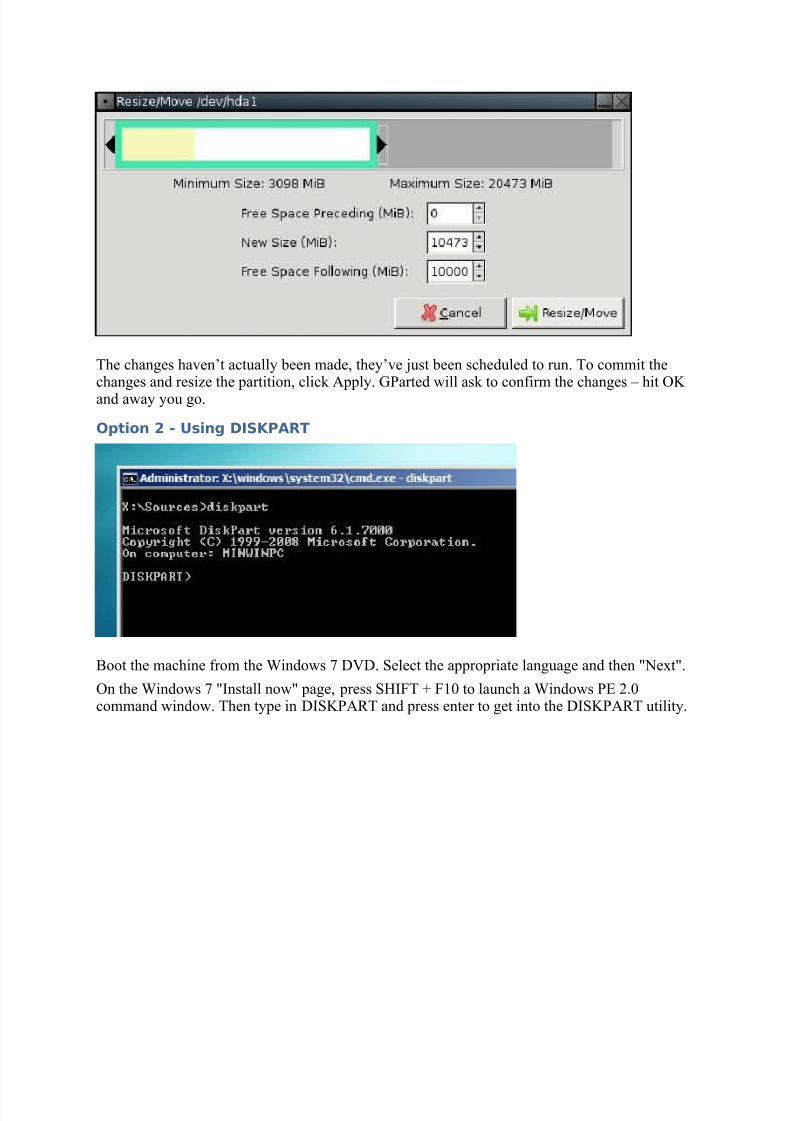
Option 2 - Using DISKPART
Boot the machine from the Windows 7 DVD. Select the appropriate language and then "Next".
On the Windows 7 "Install now" page, press SHIFT + F10 to launch a Windows PE 2.0command window. Then type in DISKPART and press enter to get into the DISKPART utility.
8/2/2019 How to Dual Boot Windows XP and Windows 7
http://slidepdf.com/reader/full/how-to-dual-boot-windows-xp-and-windows-7 4/14
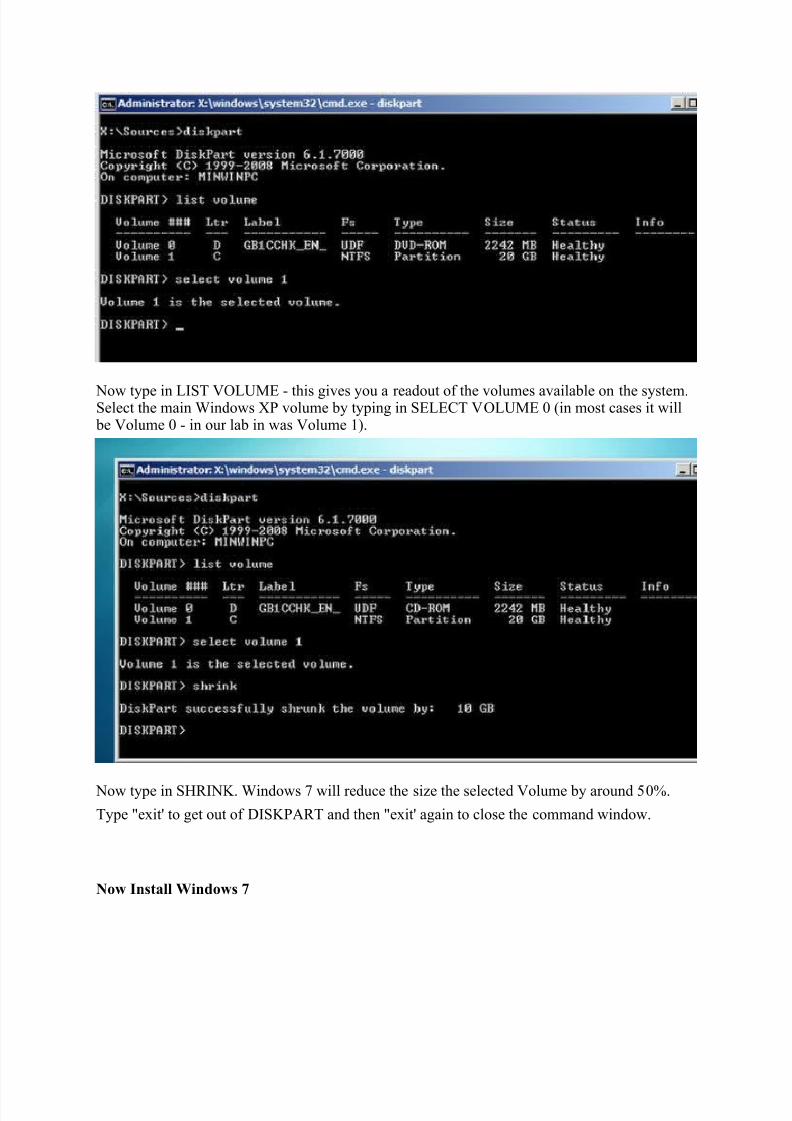
Now type in LIST VOLUME - this gives you a readout of the volumes available on the system.Select the main Windows XP volume by typing in SELECT VOLUME 0 (in most cases it will be Volume 0 - in our lab in was Volume 1).
Now type in SHRINK. Windows 7 will reduce the size the selected Volume by around 50%.Type "exit' to get out of DISKPART and then "exit' again to close the command window.
Now Install Windows 7
8/2/2019 How to Dual Boot Windows XP and Windows 7
http://slidepdf.com/reader/full/how-to-dual-boot-windows-xp-and-windows-7 5/14
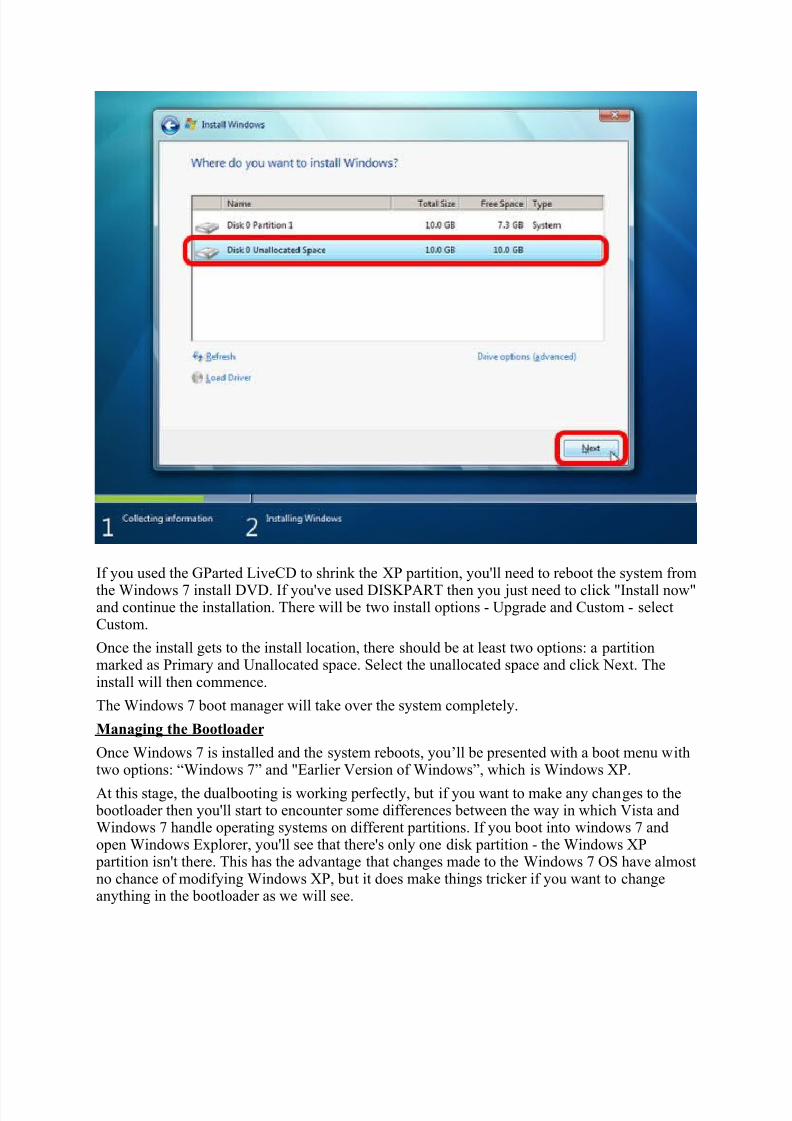
If you used the GParted LiveCD to shrink the XP partition, you'll need to reboot the system fromthe Windows 7 install DVD. If you've used DISKPART then you just need to click "Install now"and continue the installation. There will be two install options - Upgrade and Custom - selectCustom.
Once the install gets to the install location, there should be at least two options: a partitionmarked as Primary and Unallocated space. Select the unallocated space and click Next. Theinstall will then commence.
The Windows 7 boot manager will take over the system completely.
Managing the Bootloader
Once Windows 7 is installed and the system reboots, you’ll be presented with a boot menu withtwo options: “Windows 7” and "Earlier Version of Windows”, which is Windows XP.
At this stage, the dualbooting is working perfectly, but if you want to make any changes to the bootloader then you'll start to encounter some differences between the way in which Vista andWindows 7 handle operating systems on different partitions. If you boot into windows 7 andopen Windows Explorer, you'll see that there's only one disk partition - the Windows XP
partition isn't there. This has the advantage that changes made to the Windows 7 OS have almostno chance of modifying Windows XP, but it does make things tricker if you want to changeanything in the bootloader as we will see.
8/2/2019 How to Dual Boot Windows XP and Windows 7
http://slidepdf.com/reader/full/how-to-dual-boot-windows-xp-and-windows-7 6/14
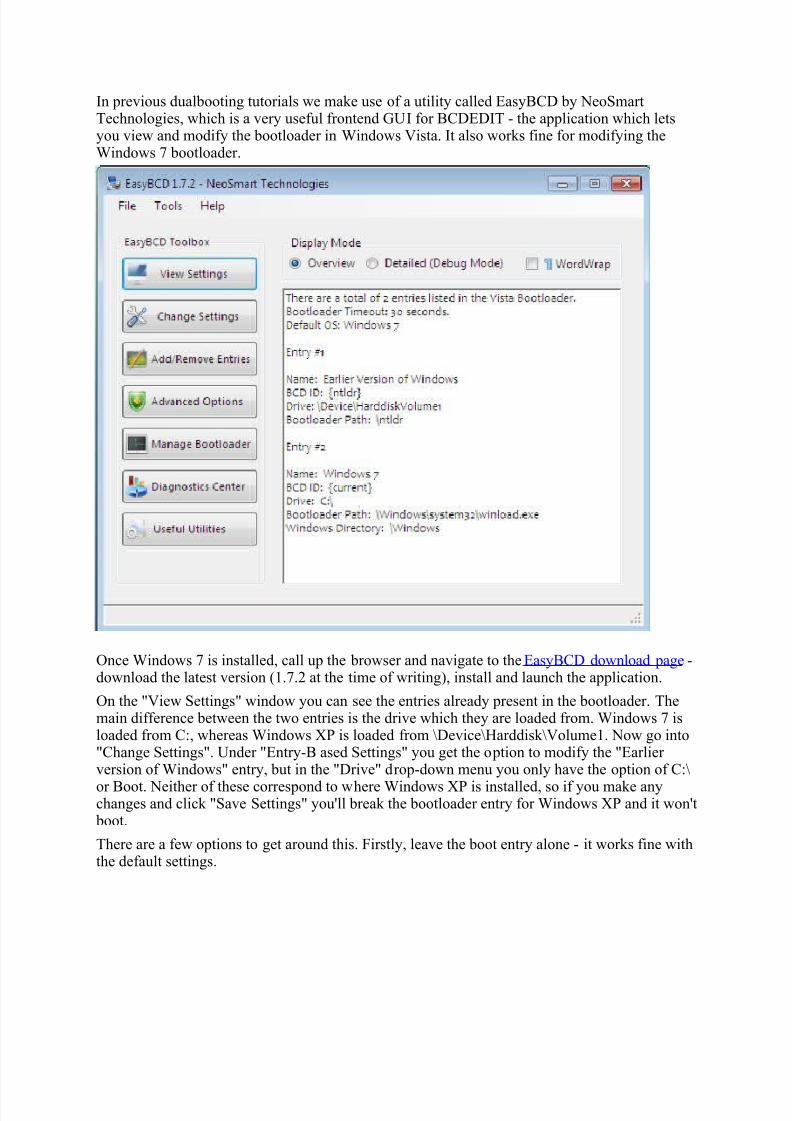
In previous dualbooting tutorials we make use of a utility called EasyBCD by NeoSmartTechnologies, which is a very useful frontend GUI for BCDEDIT - the application which letsyou view and modify the bootloader in Windows Vista. It also works fine for modifying theWindows 7 bootloader.
Once Windows 7 is installed, call up the browser and navigate to the EasyBCD download page -download the latest version (1.7.2 at the time of writing), install and launch the application.
On the "View Settings" window you can see the entries already present in the bootloader. Themain difference between the two entries is the drive which they are loaded from. Windows 7 isloaded from C:, whereas Windows XP is loaded from \Device\Harddisk\Volume1. Now go into"Change Settings". Under "Entry-B ased Settings" you get the option to modify the "Earlier version of Windows" entry, but in the "Drive" drop-down menu you only have the option of C:\or Boot. Neither of these correspond to where Windows XP is installed, so if you make anychanges and click "Save Settings" you'll break the bootloader entry for Windows XP and it won't
boot.
There are a few options to get around this. Firstly, leave the boot entry alone - it works fine withthe default settings.
8/2/2019 How to Dual Boot Windows XP and Windows 7
http://slidepdf.com/reader/full/how-to-dual-boot-windows-xp-and-windows-7 7/14
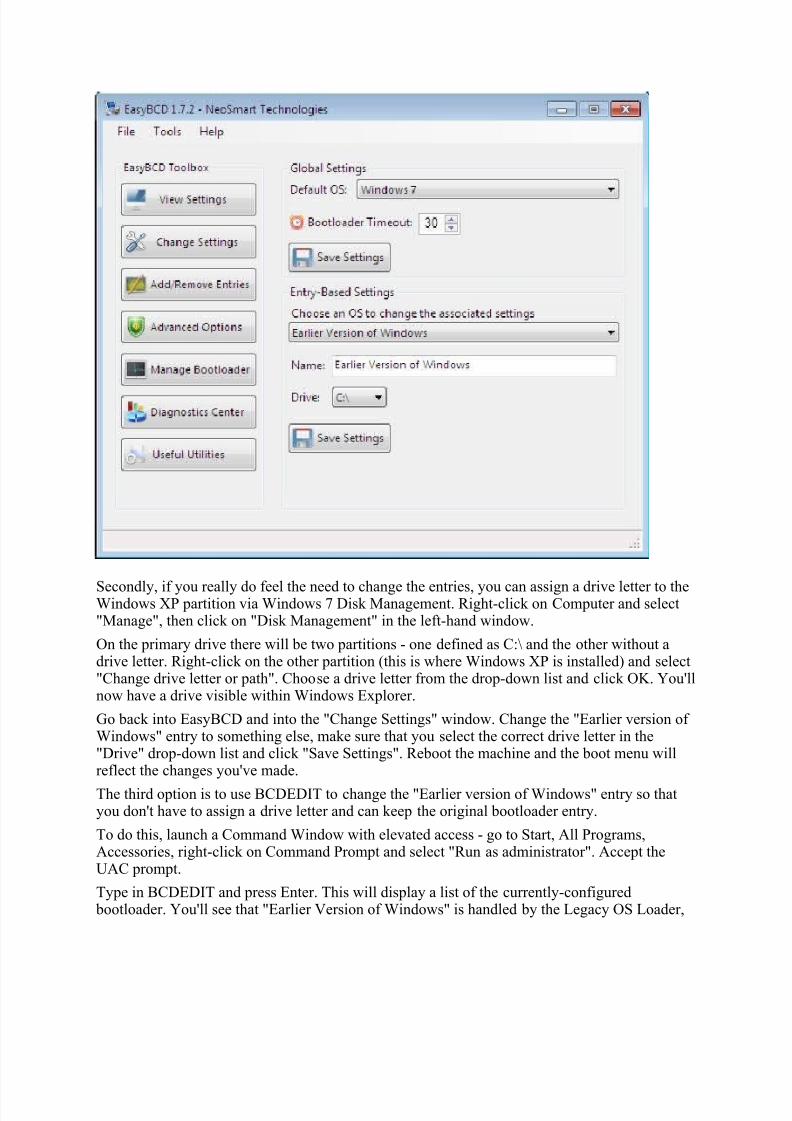
Secondly, if you really do feel the need to change the entries, you can assign a drive letter to theWindows XP partition via Windows 7 Disk Management. Right-click on Computer and select"Manage", then click on "Disk Management" in the left-hand window.
On the primary drive there will be two partitions - one defined as C:\ and the other without adrive letter. Right-click on the other partition (this is where Windows XP is installed) and select"Change drive letter or path". Choose a drive letter from the drop-down list and click OK. You'llnow have a drive visible within Windows Explorer.
Go back into EasyBCD and into the "Change Settings" window. Change the "Earlier version of Windows" entry to something else, make sure that you select the correct drive letter in the"Drive" drop-down list and click "Save Settings". Reboot the machine and the boot menu willreflect the changes you've made.
The third option is to use BCDEDIT to change the "Earlier version of Windows" entry so thatyou don't have to assign a drive letter and can keep the original bootloader entry.
To do this, launch a Command Window with elevated access - go to Start, All Programs,Accessories, right-click on Command Prompt and select "Run as administrator". Accept theUAC prompt.
Type in BCDEDIT and press Enter. This will display a list of the currently-configured bootloader. You'll see that "Earlier Version of Windows" is handled by the Legacy OS Loader,

8/2/2019 How to Dual Boot Windows XP and Windows 7
http://slidepdf.com/reader/full/how-to-dual-boot-windows-xp-and-windows-7 8/14
which has an identifier of [ntldr]. To change the description (which is what you see in the bootmenu), type in the following command:
bcdedit /set [ntldr] Description "Windows XP"
Press Enter and the changes are committed. Obviously the description can be anything, but you
have to include the quotation marks. Type in BCDEDIT again to make sure that the changeshave taken hold, and then reboot. The boot menu will be updated with the modified entry.
If you decide that dual-booting Windows 7 and XP is not for you, then it's fairly easy to wind back the clock using EasyBCD.
All you have to do is remove the Windows 7 boot manager – in EasyBCD go to “ManageBootloader”, select “Uninstall the Vista Bootloader” and then “Write MBR”. At the momentEasyBCD isn't aware of a distinction between Vista and Windows 7, but using this option stillworks fine.
Restart the machine and that’s it – the XP boot loader is the only one left on the system and XPloads. You can then delete the Windows 7 partition and use GPartEd to re-extend the partition totake up the entire disk, or the EXTEND command in Vista DISKPART.
Dual Boot Windows 7 with XP/Vista in three easy steps
Windows 7 has proved to be quite the drastic improvement over Vista, enough that it even hasXP stragglers crawling out of the woodwork to check it out. Your chance to test drive the releasecandidate is now running thin , in fact, if you haven’t tried the new OS until now you are better off postponing your plans for a week and installing the real thing. The final version of Windows7 has already been sent to partners and is scheduled to debut publicly later this week on October 22.
Even if you have pre-ordered Microsoft’s latest OS, installing it on top of your existing copy of
Windows may feel a bit premature if you haven't been running the beta or RC as your maininstallation. Thankfully, setting up a dual boot configuration is both easy and practical. If you’relooking for a quick and dirty, yet thorough how-to on getting Windows 7 to run alongside your installation of XP or Vista, read on.
Step 1:Create/Obtain an Installation Disc
8/2/2019 How to Dual Boot Windows XP and Windows 7
http://slidepdf.com/reader/full/how-to-dual-boot-windows-xp-and-windows-7 9/14
Yes, we’re all aware most motherboards these days allow you to boot from a USB flash drive, but setting that up is a guide in itself. We’re going to assume that you either already have aWindows 7 DVD, or have an ISO file. If the former is true, feel free to skip ahead to Step 2.
To create a Windows 7 disc, pop a blank DVD into your burner, and burn it as an image file withany of the countless apps that can handle ISOs. Our personal favorite is ImgBurn , but to name
some others: Burn4Free CD and DVD , CDBurnerXP and Ashampoo Burning Studio Free .Step 2:Create a New Partition
Editor’s note: Before continuing I’d like to take a moment to acknowledge the fact that datacorruption is a possibility. Even though this guide is absolutely harmless, random softwareanomalies can and do occur – do yourself a favor and backup your precious data before
proceeding.
Moving on to more pressing matters, we will need to create unallocated disk space by resizing anexisting partition in your current hard drive, and then create a new partition on that free space for Windows 7 to run on. Most of you who are reading this will probably only have one existing
partition, dedicated to the operating system you’re currently using.
With that in mind, to help you in the process of creating a new partition we’ll be looking at twoseparate approaches. While Windows Vista has built-in utilities to resize active partitions, XPdoes not, and thus we must resort to using a third party application (GParted).
Create a New Partition on Windows VistaIf you are currently running Windows Vista as your primary operating system, we can use its
built-in tools to modify your hard drive partitions. You can also use a third-party tool calledGParted, which we are recommending to Windows XP users (see below). You can skip to the XPsection and follow the exact same directions if you prefer the GParted route for any reason.
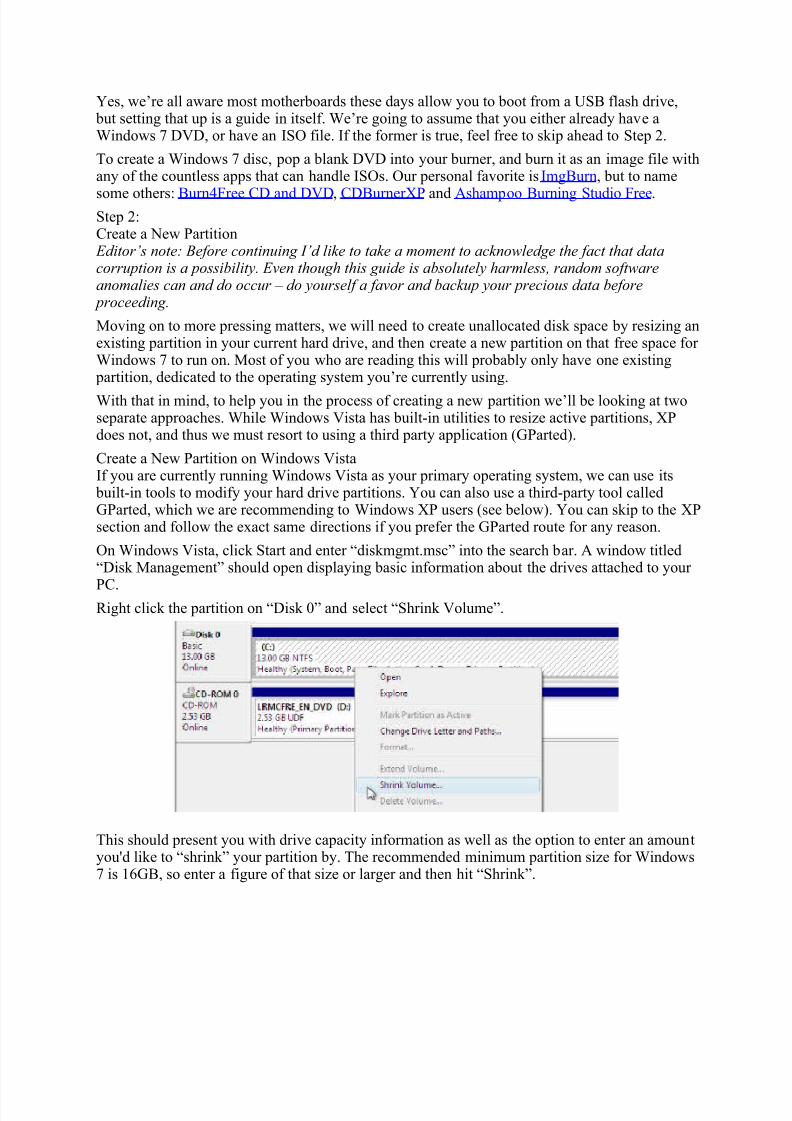
On Windows Vista, click Start and enter “diskmgmt.msc” into the search bar. A window titled“Disk Management” should open displaying basic information about the drives attached to your
PC.Right click the partition on “Disk 0” and select “Shrink Volume”.
This should present you with drive capacity information as well as the option to enter an amountyou'd like to “shrink” your partition by. The recommended minimum partition size for Windows7 is 16GB, so enter a figure of that size or larger and then hit “Shrink”.
8/2/2019 How to Dual Boot Windows XP and Windows 7
http://slidepdf.com/reader/full/how-to-dual-boot-windows-xp-and-windows-7 10/14
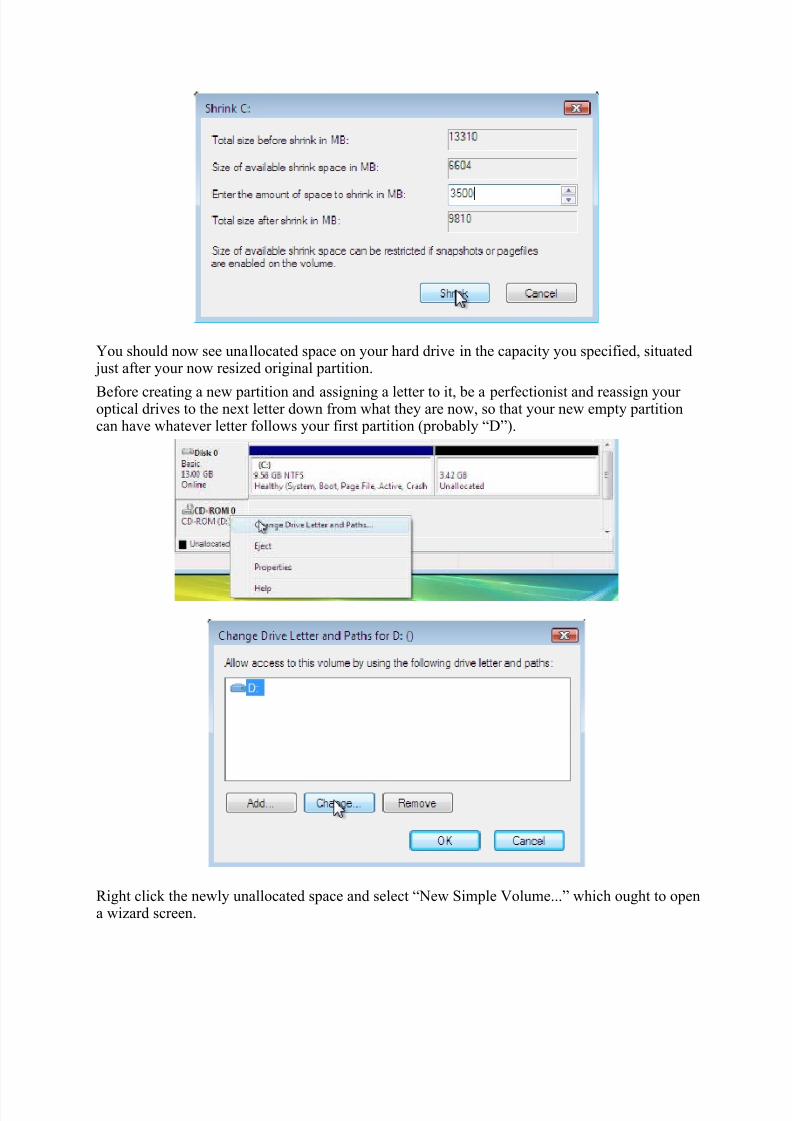
You should now see unallocated space on your hard drive in the capacity you specified, situated just after your now resized original partition.
Before creating a new partition and assigning a letter to it, be a perfectionist and reassign your optical drives to the next letter down from what they are now, so that your new empty partitioncan have whatever letter follows your first partition (probably “D”).
Right click the newly unallocated space and select “New Simple Volume...” which ought to opena wizard screen.
8/2/2019 How to Dual Boot Windows XP and Windows 7
http://slidepdf.com/reader/full/how-to-dual-boot-windows-xp-and-windows-7 11/14
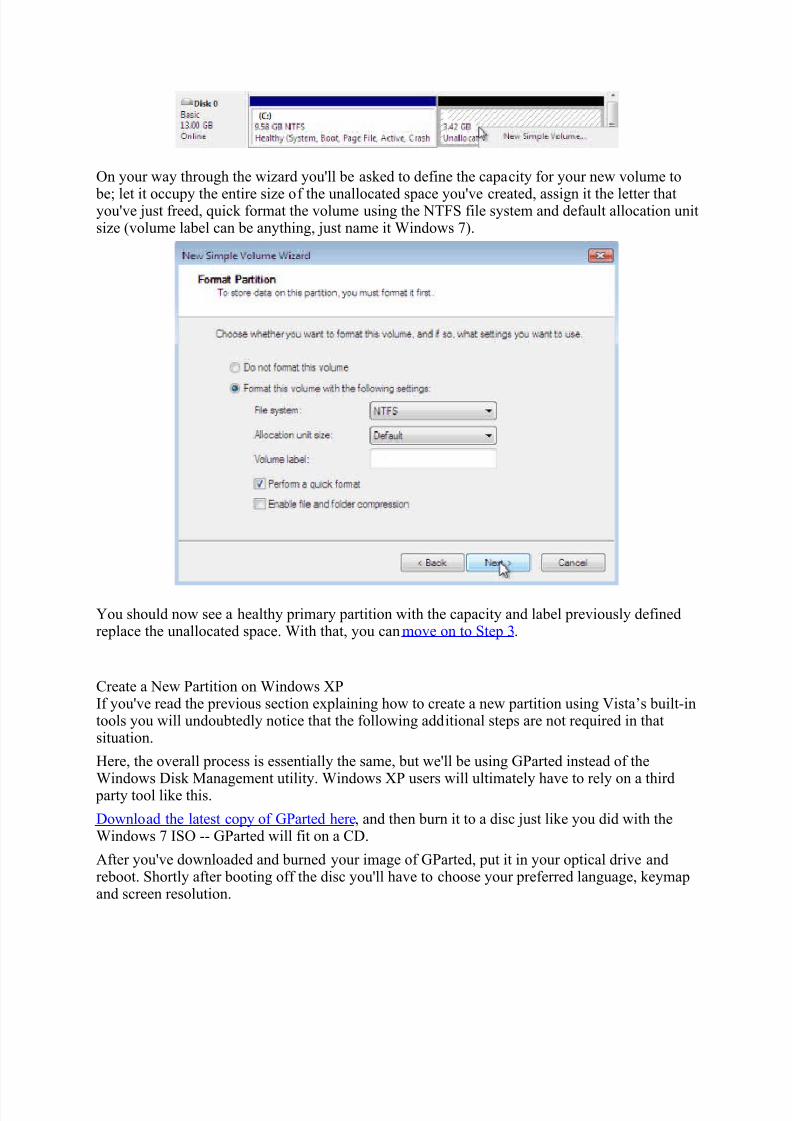
On your way through the wizard you'll be asked to define the capacity for your new volume to
be; let it occupy the entire size of the unallocated space you've created, assign it the letter thatyou've just freed, quick format the volume using the NTFS file system and default allocation unitsize (volume label can be anything, just name it Windows 7).
You should now see a healthy primary partition with the capacity and label previously definedreplace the unallocated space. With that, you can move on to Step 3 .
Create a New Partition on Windows XPIf you've read the previous section explaining how to create a new partition using Vista’s built-intools you will undoubtedly notice that the following additional steps are not required in thatsituation.
Here, the overall process is essentially the same, but we'll be using GParted instead of the
Windows Disk Management utility. Windows XP users will ultimately have to rely on a third party tool like this.
Download the latest copy of GParted here , and then burn it to a disc just like you did with theWindows 7 ISO -- GParted will fit on a CD.
After you've downloaded and burned your image of GParted, put it in your optical drive andreboot. Shortly after booting off the disc you'll have to choose your preferred language, keymapand screen resolution.
8/2/2019 How to Dual Boot Windows XP and Windows 7
http://slidepdf.com/reader/full/how-to-dual-boot-windows-xp-and-windows-7 12/14
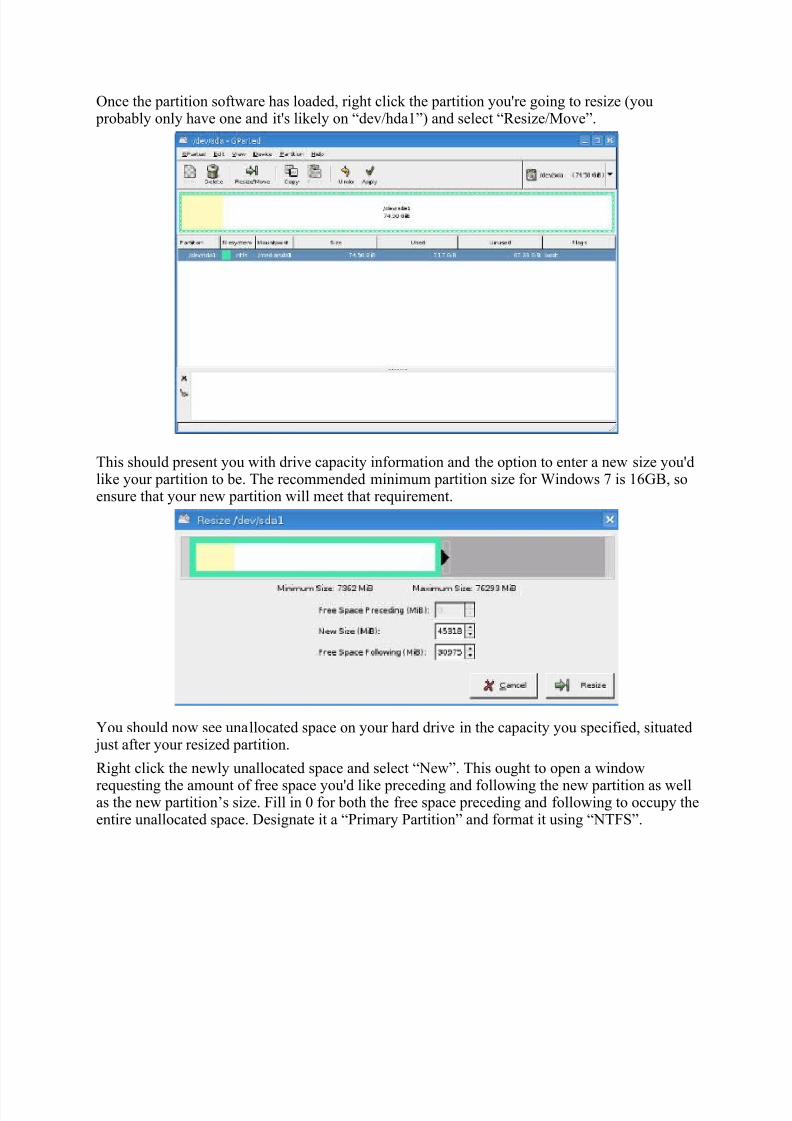
Once the partition software has loaded, right click the partition you're going to resize (you probably only have one and it's likely on “dev/hda1”) and select “Resize/Move”.
This should present you with drive capacity information and the option to enter a new size you'dlike your partition to be. The recommended minimum partition size for Windows 7 is 16GB, soensure that your new partition will meet that requirement.
You should now see unallocated space on your hard drive in the capacity you specified, situated just after your resized partition.
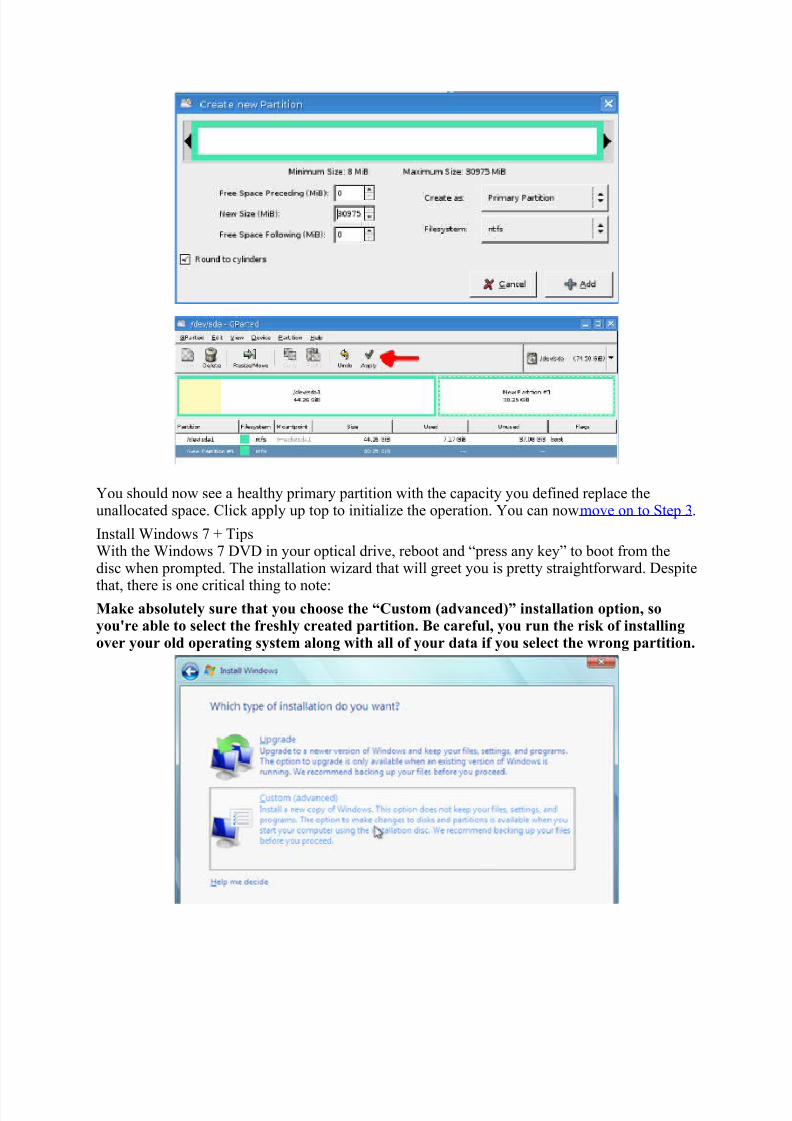
Right click the newly unallocated space and select “New”. This ought to open a window
requesting the amount of free space you'd like preceding and following the new partition as wellas the new partition’s size. Fill in 0 for both the free space preceding and following to occupy theentire unallocated space. Designate it a “Primary Partition” and format it using “NTFS”.
8/2/2019 How to Dual Boot Windows XP and Windows 7
http://slidepdf.com/reader/full/how-to-dual-boot-windows-xp-and-windows-7 13/14
You should now see a healthy primary partition with the capacity you defined replace theunallocated space. Click apply up top to initialize the operation. You can now move on to Step 3 .
Install Windows 7 + TipsWith the Windows 7 DVD in your optical drive, reboot and “press any key” to boot from thedisc when prompted. The installation wizard that will greet you is pretty straightforward. Despite
that, there is one critical thing to note:Make absolutely sure that you choose the “Custom (advanced)” installation option, soyou're able to select the freshly created partition. Be careful, you run the risk of installingover your old operating system along with all of your data if you select the wrong partition.
8/2/2019 How to Dual Boot Windows XP and Windows 7
http://slidepdf.com/reader/full/how-to-dual-boot-windows-xp-and-windows-7 14/14
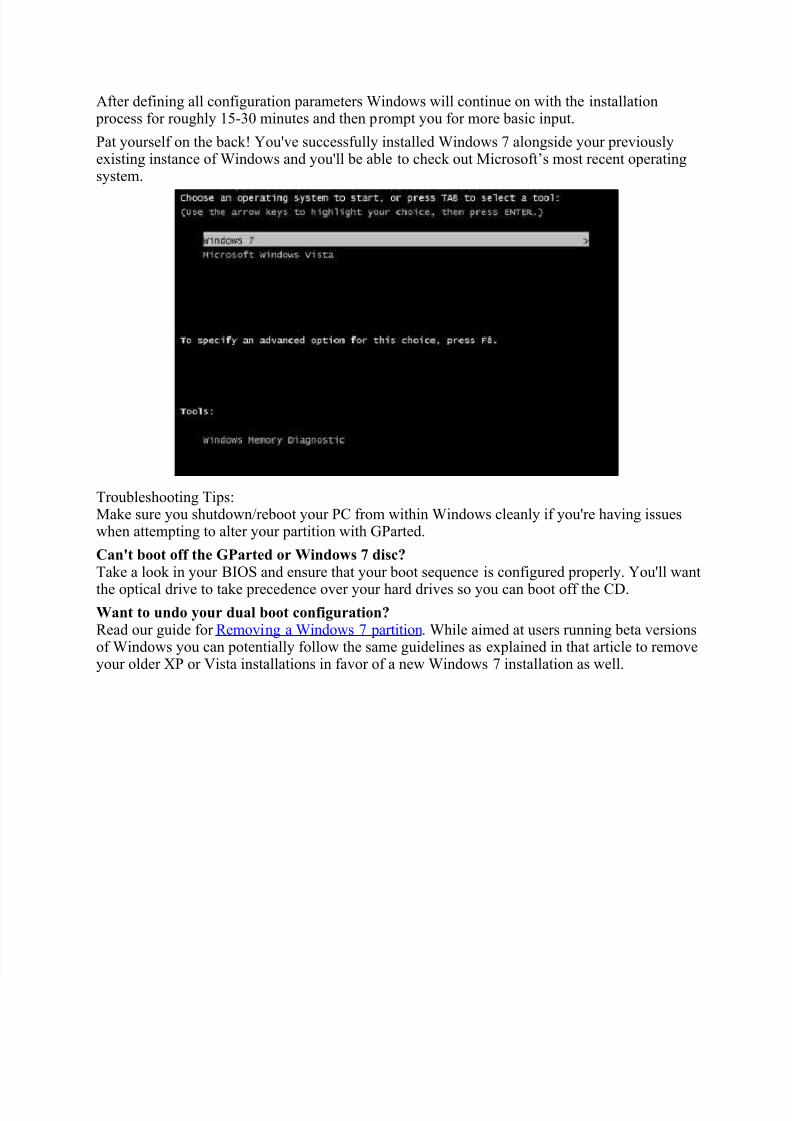
After defining all configuration parameters Windows will continue on with the installation process for roughly 15-30 minutes and then prompt you for more basic input.
Pat yourself on the back! You've successfully installed Windows 7 alongside your previouslyexisting instance of Windows and you'll be able to check out Microsoft’s most recent operatingsystem.
Troubleshooting Tips:Make sure you shutdown/reboot your PC from within Windows cleanly if you're having issueswhen attempting to alter your partition with GParted.
Can't boot off the GParted or Windows 7 disc?Take a look in your BIOS and ensure that your boot sequence is configured properly. You'll want
the optical drive to take precedence over your hard drives so you can boot off the CD.Want to undo your dual boot configuration?Read our guide for Removing a Windows 7 partition . While aimed at users running beta versionsof Windows you can potentially follow the same guidelines as explained in that article to removeyour older XP or Vista installations in favor of a new Windows 7 installation as well.