Embed Size (px)
Citation preview

How to draft a pleading.
Using Microsoft Word 2010
By Adam Jacobs
Step One
• How to open Microsoft word 2010. • 1. Left click on the start button. • 2. Left click on all programs. • 3. Scroll down until you see the
Microsoft office folder and then left click it.
• 4. Then left click Microsoft word 2010 to open the software.

Visuals of Step One
1. The Start button
2. This says all programs before you click it
3. Microsoft office folder
4. Microsoft Word 2010 software
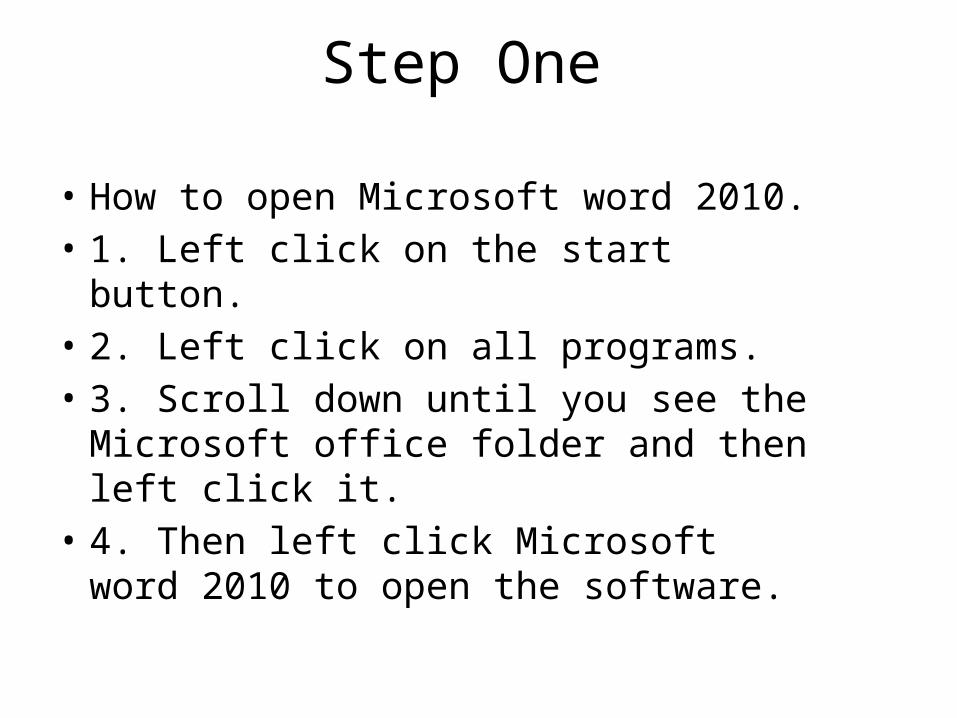
Complete Step One
• This is what your screen should look like after completing step one.

Step Two
• 1. In the top left corner click the tab that says page layout.
• 2. In that tab click Margins, a list will pop up and at the very bottom it says custom margins click it and a dialog box will open.
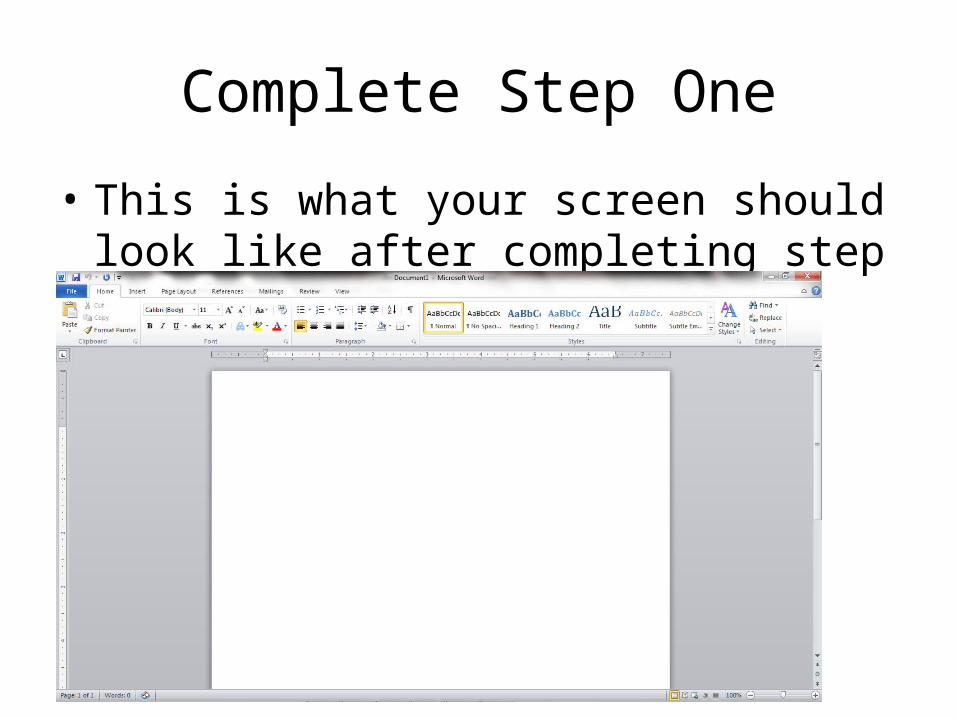
• 3. Make the top margin 2”. The bottom margin .5”. The left and right margins should be 1”.
• 4. Click okay after you changed all the margins.

Visuals of Step Two1. Page layout
tab
2. Margins in the page layout tab.
2. Custom Margins to open the dialog box
Visuals of Step Two
3. Top Margin
3. Left Margin
3. Bottom Margin
3. Right Margin
4. Click okay after changing the margins.
2. This is the dialog box that pulls up.

Complete Step Two
This is how it should look after completing step two.

Step Three
• At the begging of the page.• 1. Type your attorneys name and bar number.• 2. Type the name of your law firm.• 3. Type your law firms address.• 4. Type your law firms telephone number.• 5. Type your lawyers email. Then push enter
twice.• 6. Type if the attorney is for the plaintiff or
defendant.

Visuals of Step Three
1. Attorneys name and bar number
2. Law firms name
3. Law firms address
4. Law firms phone number
5. Attorneys email
6. Shows this attorney is for the plaintiff

Complete Step Three

Step Four
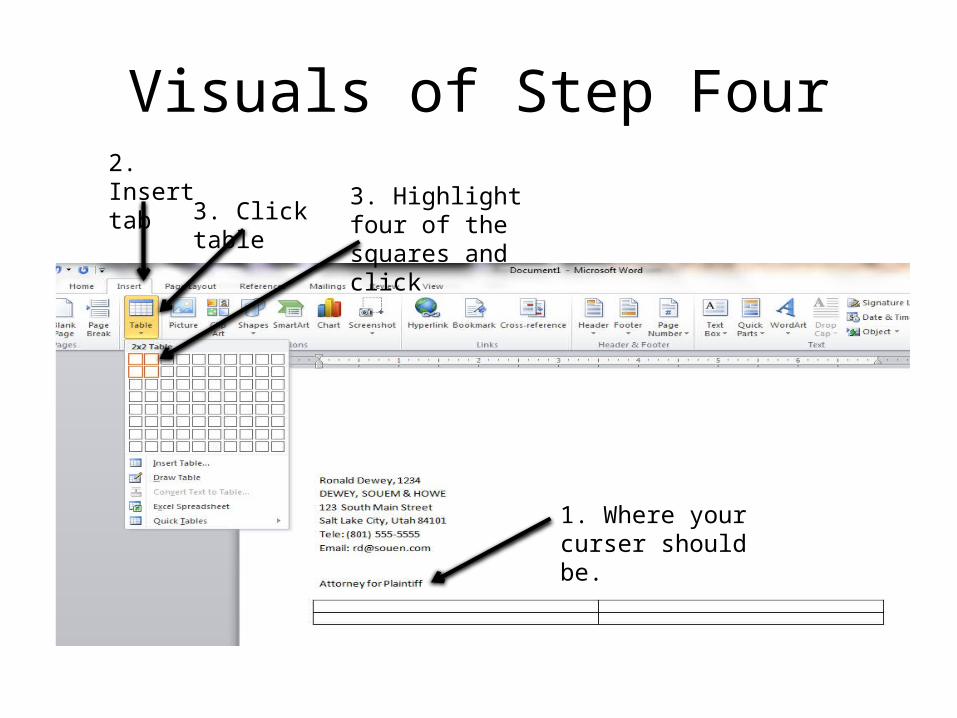
• 1. Make the curser location be after plaintiff and push enter.
• 2. Click the insert tab at the top of the page.• 3. Click table and highlight four of the squares in the
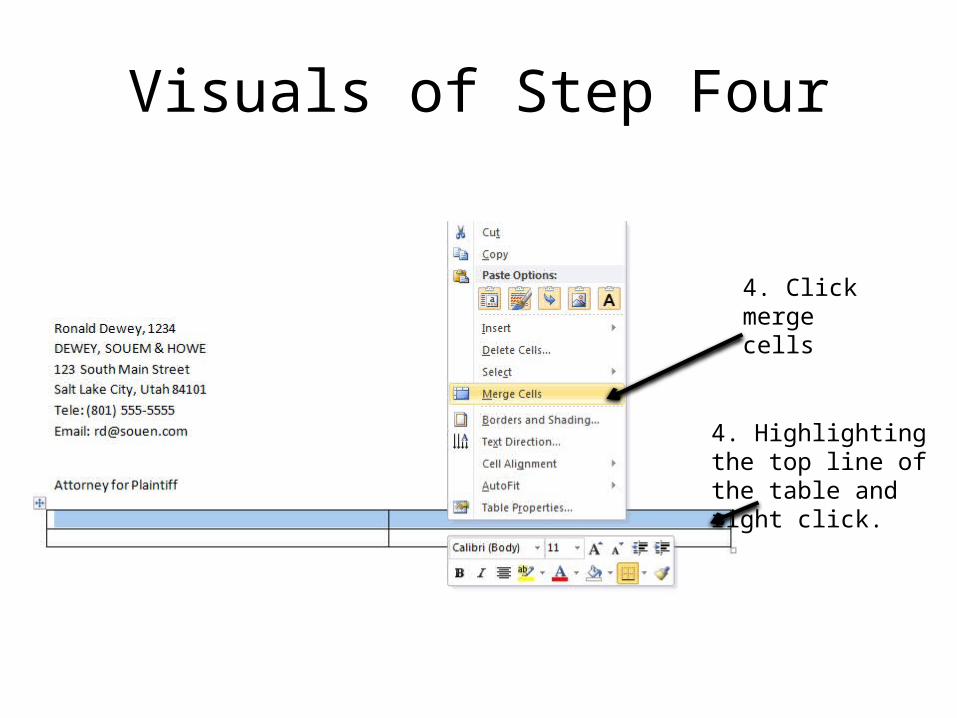
table box then click them.• 4. Highlight the top line of the table, right click it and
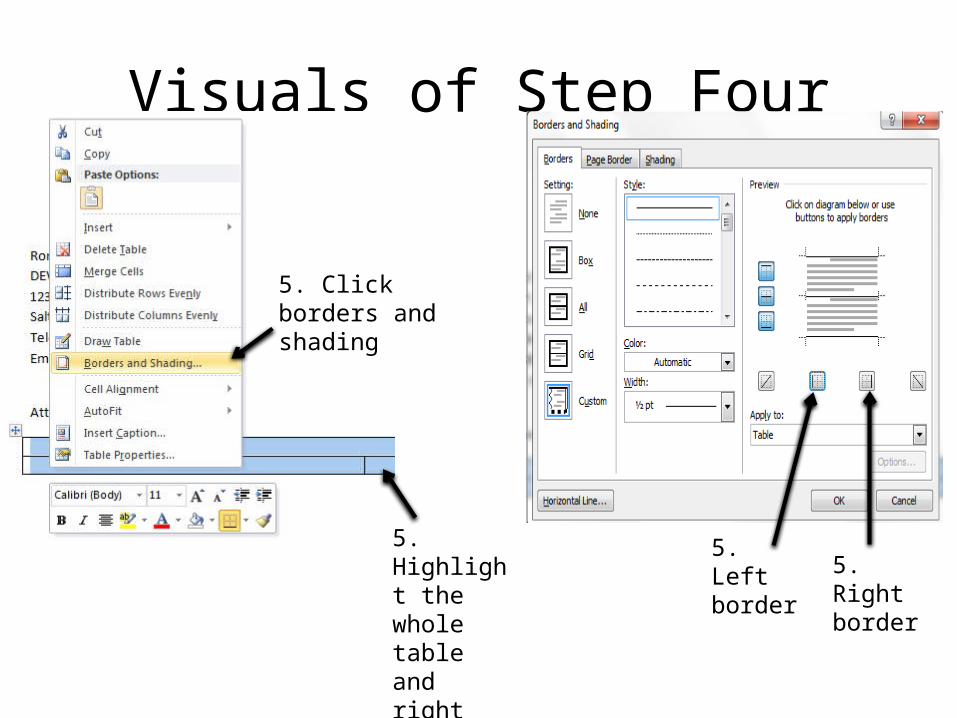
click merge cells.• 5. Highlight the whole table and right click, and click
borders and shading. In the dialog box click the left and the right borders so it takes them off.
Visuals of Step Four
1. Where your curser should be.
2. Insert tab
3. Click table
3. Highlight four of the squares and click
Visuals of Step Four
4. Highlighting the top line of the table and right click.
4. Click merge cells
Visuals of Step Four
5. Click borders and shading
5. Highlight the whole table and right click
5. Left border 5. Right
border

Step four complete

Step Five
• 1. Click into the first table, press enter. • 2. At the top of the page click the center button.• 3. In all capital letters type the name of the court, state, and the
county that the court is in, then press enter again.• 4. Click the left bottom side of the table and press enter. Type
the name of the plaintiff with a comma make the name in all capital letters, push enter twice. Push the space bar about 20 times and type the word plaintiff along with a comma. Push enter twice and type vs.
• 5. Then push enter twice and type the name of the defendant in all capital letters then add a comma, Final push space about 20 times and type the word defendant adding a comma at the end.

Visuals of Step Five1. This is the first table.
2. This is the center button.
3. This is the court, state and county that the court is in.
4. This is the plaintiffs name, along with the word plaintiff and the vs.
5. This is defendants name along with the word defendant

Step Five complete
Step Six
• 1. Click the right bottom table and press enter three times. • 2. Push the center and bold button, Then type the name of the pleading you are doing
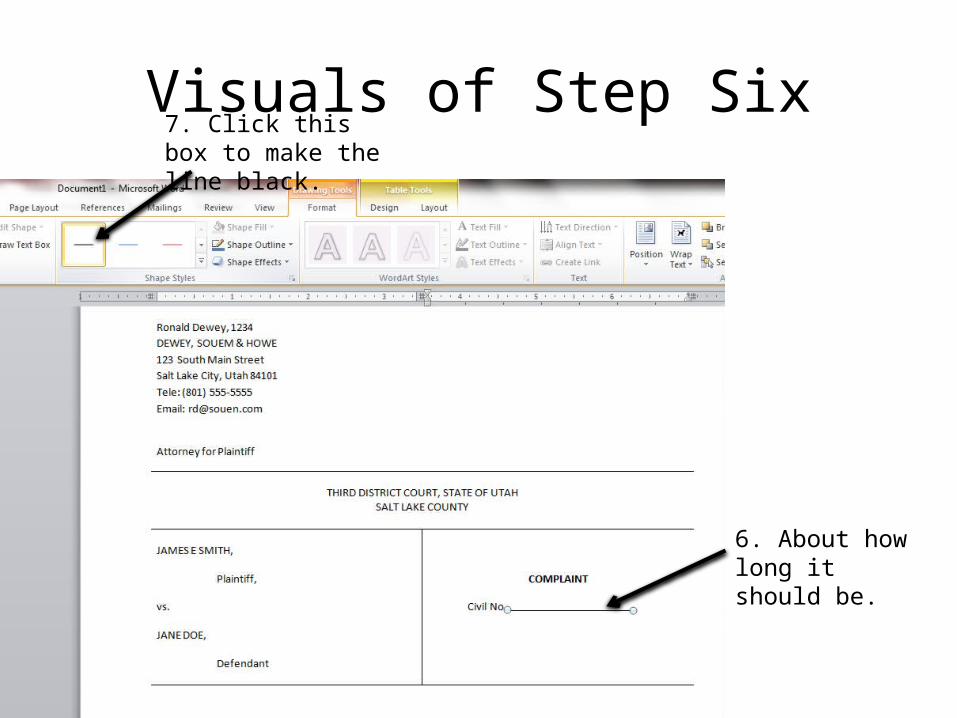
in capital letters. Then press enter twice. Push the center and bold button again. • 3. Push the space bar 15 times and type Civil No. • 4. Go to the insert tab at the top of the screen• 5. Click shapes and choose the line shape.• 6. Click right after the period of Civil No. and drag your mouse making a line passed
the word complaint and about an inch farther.• 7. At the top of the screen you will see a box highlighted with a blue line. Click the
black line that is to the left of it so the line will turn black.• 8.Pushe enter twice, and push the space bar 15 times and type Honorable. • 9. Click after the e in honorable and drag your mouse making a line that’s about as
long as the one above it.• 10. At the top of the screen you will see the same box highlighted with a blue line.
Click the black line that is to the left of it so the line turns black.

Visuals of Step Six
1. Bottom right table
2. Bold button 2. Center
button
2. Name of the pleading

Visuals of Step Six
3. About where you should type civil no
4. Insert tab
5. Shapes and the line you click.
6. Where you start the line.
Visuals of Step Six
6. About how long it should be.
7. Click this box to make the line black.

Visuals of Step Six
8. Where you type honorable.
9. Where the line goes and how long it is.
10. Click this box to make the line black.

Step Six Complete

Step Seven
• 1. Click under the bottom table and push enter and the tab key.• 2. Type the plaintiffs name by and threw there councils name
herby alleges and complains as follows. • 3. To double space the words. Highlight all the words. Click the
home tab and the paragraph section. Click the symbol with a blue up and down arrow along with four lines. Then click the 2.0 to make it double spaced.
• 4. Press enter click the center button, the bold button, and the underline button. Then type parties. Then click the center button, the bold button and the underline button again and push enter.
• 5. Type the name of the parties involved in the complaint and there residents.

Step Seven Visuals
2. Plaintiffs name and counsel
1. The bottom of the table

Step Seven Visuals
3. Highlight all these words
3. Home tab 3. Blue up and down arrow with four lines
3. Clicking the 2.0

Step Seven Visuals
4. Bold button
4. Underline button
4. Center button
5. Parties, in this section right the parties name and residents

Step Eight
• 1. Push enter and click the bold button, underline button, and the center button. Type Jurisdiction
• 2. Push enter and type General Allegations• 3. Push enter and type Claim for Relief. Push enter and type Prayer for
relief. Click the bold button, underline button and the center button and push enter.
• 4. Fill in each of the sections, under the jurisdiction section add the jurisdiction and venue.
• 5. In the General Allegations section add the facts of the case and what happened to the persons involved.
• 6. In the Claims for Relief section add what law the defendant broke and how they broke it to harm the plaintiff.
• 7. In the Prayer for Relief section add what the plaintiff requests the court to grant him for his loss.

Step Eight Visuals1. Bold button
1. Underline button 1. Center button
4. Add the jurisdiction and venue in this section
5. Add the facts of the case and what happened to the parties involved in this section
6. What law the defendant broke and how they broke it in this section
7. What the plaintiff wishes the court to do.

Step Nine
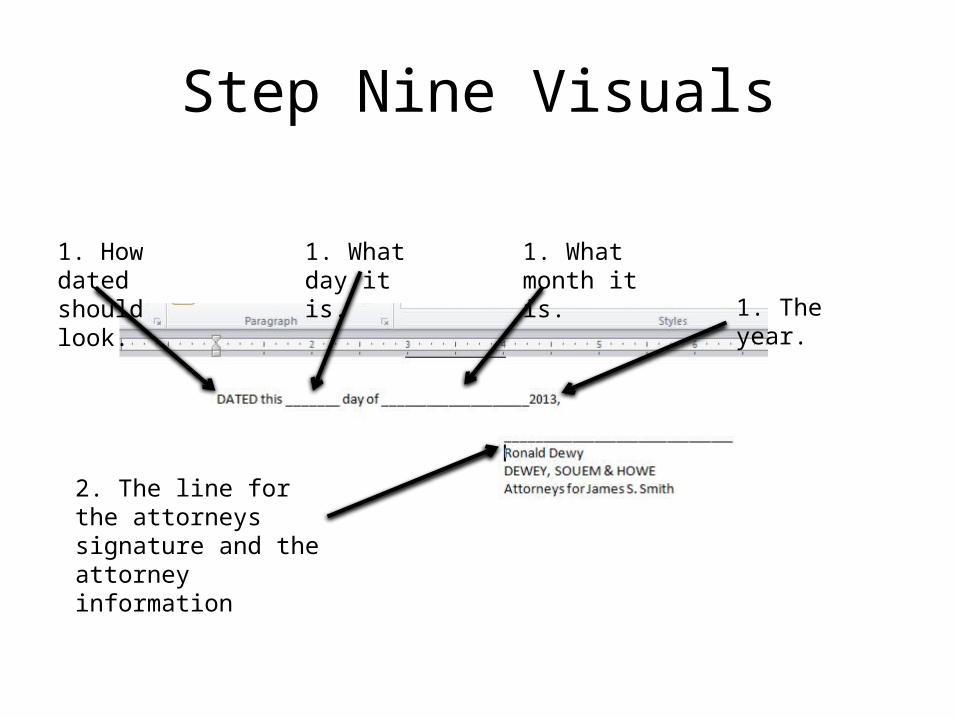
• 1. Type dated in all capital letters “this” add what day it is, . Then add “day of” and add the month it is and what year it is.
• 2. Press enter and add a line for the attorney to sign. Add the attorneys name, law firm and how they are the attorney for.
Step Nine Visuals
1. How dated should look.
1. What day it is.
1. What month it is.
1. The year.
2. The line for the attorneys signature and the attorney information


![THE BURDENS OF PLEADING - PennLawReview.com · 2014] The Burdens of Pleading 1769 written about the burden plausibility pleading imposes upon claimants.13 As most commentators have](https://img.pdfslide.us/doc/110x75/5e58ce0b075c987d9c059cac/the-burdens-of-pleading-2014-the-burdens-of-pleading-1769-written-about-the-burden.jpg)