Embed Size (px)
Citation preview
1
CHAPTER I
BUILDING: THE PROCESS AND PULSE OF COB
In this book we encourage you to go out and build something yourself that is highly relevant to the place and the space that you inhabit, to become tuned to the structure and the pulse of your particular place.
-Adam Weismann and Katy Bryce, Building with Cob: A Step-by Step-Guide24
The only proven way to learn about cob building is to try it!
-Ianto Evans, Michael G. Smith, and Linda Smiley, The Hand-Sculpted House25
I have to admit that I am a natural building novice. I learned how to build with
cob through practice and playing. I was guided by the hands-on instruction of my dear
friend, Tim. Tim is a cob expert from Chicago who lives and builds communities with
cob. His story comes later. For now, I thank him for all of his help, expertise, and
enthusiasm. His knowledge helped this project survive. I also thank the authors of such
texts as Building with Cob: A Step-by-Step Guide and The Hand-Sculpted House.
Without these illustrated books, I wouldn’t have made it this far. When I started my
24 Adam Weismann and Katy Bryce, Building with Cob: A Step-by-Step Guide (UK, Green Books, 2006) 7.
25 Evans, Smith, and Smiley 1.
2
natural building journey, I did not understand the scale, weight, or depth of a cob building
project. I took on each project in stride with a bit of naïveté.
I offer you this how-to-cob guide to get down to the nitty-gritty of cob building. I
want you to feel the dirt and grime of building with cob. As Ianto Evans so accurately
says above, the only proven way to learn about cob is to try it. I want you to learn how to
shape the earth beneath your feet responsibly, through cooperation with others, and with
your environment in mind. Building with cob aligns people with the pulse of a space.26
Knowing and feeling the pulse of a space is recognizing with the whole body that what
surrounds us is alive. When cob builders enter a potential site, they listen to the pulse of
the earth. Cob builders look to the past to inform their futures. They look to the practices
of our pre-industrial ancestors for models of efficiency and resourcefulness. They listen
to the natural rules of the environment. They build.
These first pages serve as a guide for you, the reader, to learn about the process of
cob building. Through examples, sketches, and a step-by-step tour through the cob
building process, I want to teach you how to cob. In order to do this, I want to teach you
about the natural laws of the environment. As a new cobber, you should try and let
yourself work through the process, to learn about cob building through brilliant attempts
and teachable failures. I want you to kick your shoes off and step in the cob.
How to Make a Batch of Cob
While there are plenty of steps that come before and during the actual process of
cobbing, I think it’s important to first introduce you to the materials. What is cob? Where
does it come from? Cob is a mixture of clay, sand, water, and straw. Each of these
26 Michel De Certeau in The Practice of Everyday Life, Trans. Steven Rendell, (Berkeley: U of California P, 1984) 117 states, “A place is thus an instantaneous configuration of positions. It implies an indication of stability. A space exists when one takes into consideration vectors of direction, velocities, and time variables. Thus space is composed of intersections of mobile elements. It is in a sense actuated by the ensemble of movements deployed within it.” The cob building environment is a space situated within a place. The environment pulses, moves, and intersects living and non-living beings.
3
Fig. 2. Clay
Figure 2
Fig. 3. Sand aggregate
Figure 3
. Sand aggregate
elements has an important function in the cob mix. I address each element in turn below
followed by the mixing process.
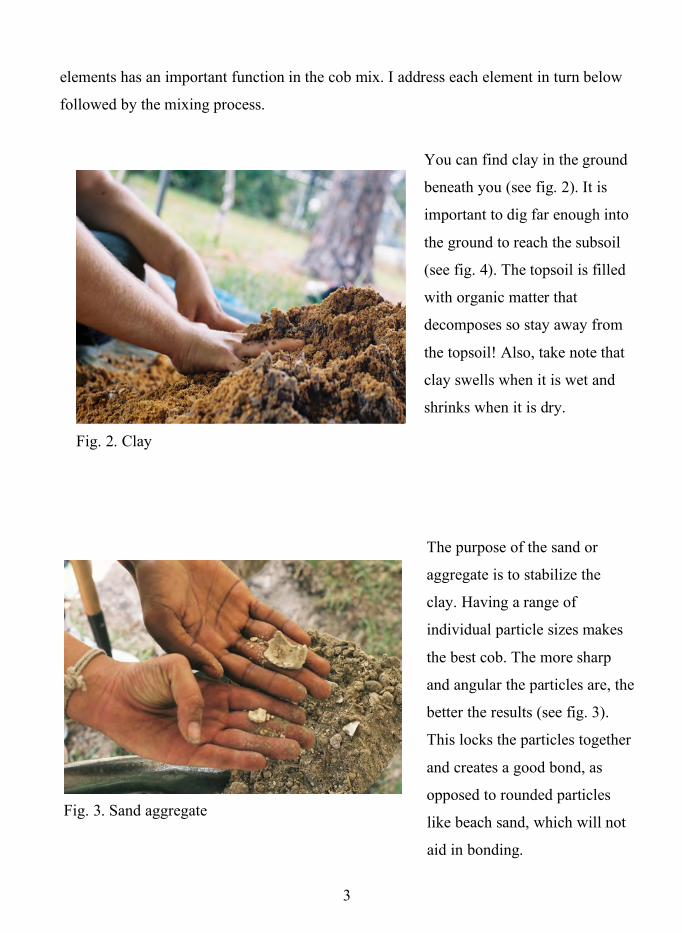
You can find clay in the ground
beneath you (see fig. 2). It is
important to dig far enough into
the ground to reach the subsoil
(see fig. 4). The topsoil is filled
with organic matter that
decomposes so stay away from
the topsoil! Also, take note that
clay swells when it is wet and
shrinks when it is dry.
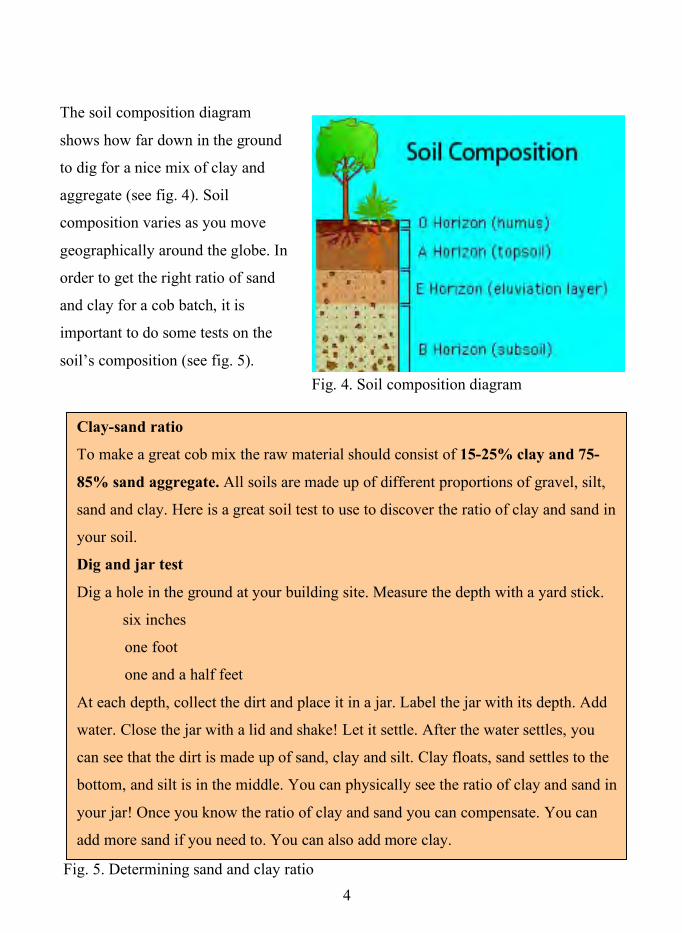
The purpose of the sand or
aggregate is to stabilize the
clay. Having a range of
individual particle sizes makes
the best cob. The more sharp
and angular the particles are, the
better the results (see fig. 3).
This locks the particles together
and creates a good bond, as
opposed to rounded particles
like beach sand, which will not
aid in bonding.
4 Fig. 5. Determining sand and clay ratio
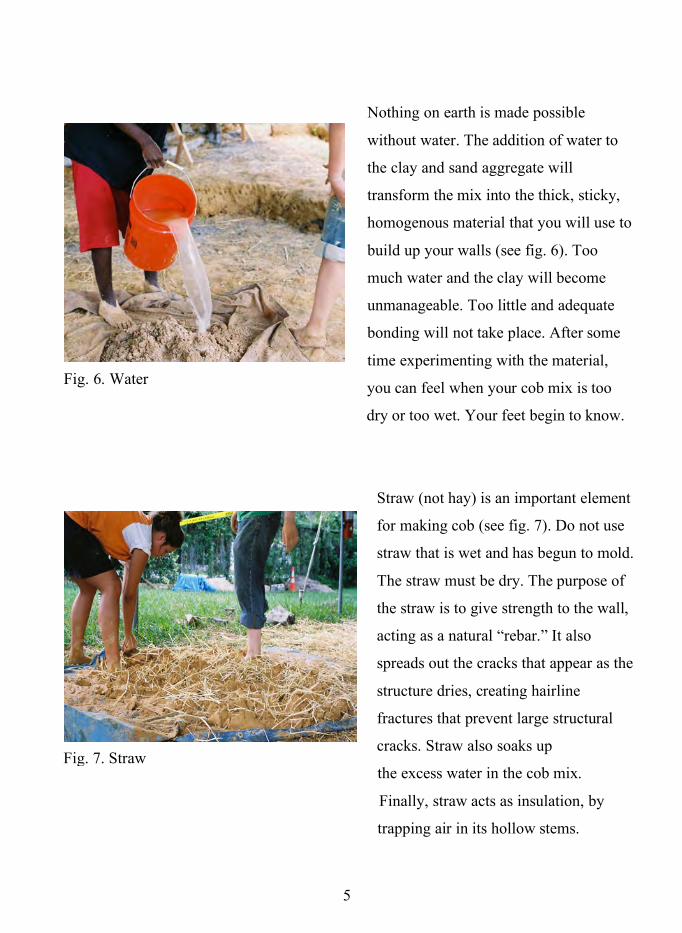
Fig. 4. Soil composition diagram
The soil composition diagram
shows how far down in the ground
to dig for a nice mix of clay and
aggregate (see fig. 4). Soil
composition varies as you move
geographically around the globe. In
order to get the right ratio of sand
and clay for a cob batch, it is
important to do some tests on the
soil’s composition (see fig. 5).
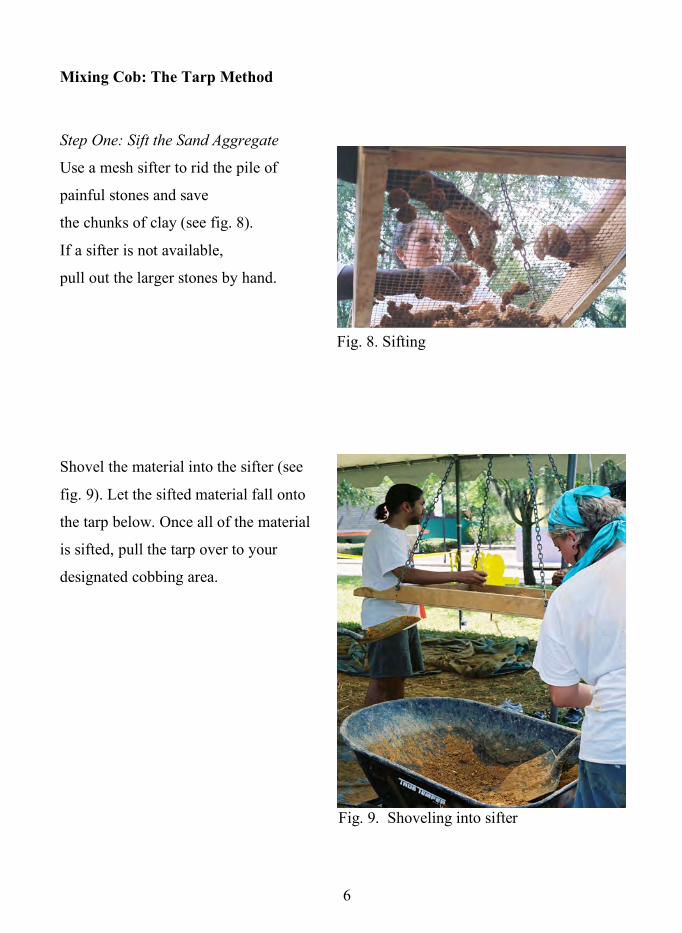
Clay-sand ratio
To make a great cob mix the raw material should consist of 15-25% clay and 75-
85% sand aggregate. All soils are made up of different proportions of gravel, silt,
sand and clay. Here is a great soil test to use to discover the ratio of clay and sand in
your soil.
Dig and jar test
Dig a hole in the ground at your building site. Measure the depth with a yard stick.
six inches
one foot
one and a half feet
At each depth, collect the dirt and place it in a jar. Label the jar with its depth. Add
water. Close the jar with a lid and shake! Let it settle. After the water settles, you
can see that the dirt is made up of sand, clay and silt. Clay floats, sand settles to the
bottom, and silt is in the middle. You can physically see the ratio of clay and sand in
your jar! Once you know the ratio of clay and sand you can compensate. You can
add more sand if you need to. You can also add more clay.
5
Fig. 6. Water
Fig. 7. Straw
Nothing on earth is made possible
without water. The addition of water to
the clay and sand aggregate will
transform the mix into the thick, sticky,
homogenous material that you will use to
build up your walls (see fig. 6). Too
much water and the clay will become
unmanageable. Too little and adequate
bonding will not take place. After some
time experimenting with the material,
you can feel when your cob mix is too
dry or too wet. Your feet begin to know.
Straw (not hay) is an important element
for making cob (see fig. 7). Do not use
straw that is wet and has begun to mold.
The straw must be dry. The purpose of
the straw is to give strength to the wall,
acting as a natural “rebar.” It also
spreads out the cracks that appear as the
structure dries, creating hairline
fractures that prevent large structural
cracks. Straw also soaks up
the excess water in the cob mix.
Finally, straw acts as insulation, by
trapping air in its hollow stems.
6
Fig. 8. Sifting
Fig. 9. Shoveling into sifter
Mixing Cob: The Tarp Method
Step One: Sift the Sand Aggregate
Use a mesh sifter to rid the pile of
painful stones and save
the chunks of clay (see fig. 8).
If a sifter is not available,
pull out the larger stones by hand.
Shovel the material into the sifter (see
fig. 9). Let the sifted material fall onto
the tarp below. Once all of the material
is sifted, pull the tarp over to your
designated cobbing area.
7
Fig. 10. Volcano
method
Fig. 11. The cob dance
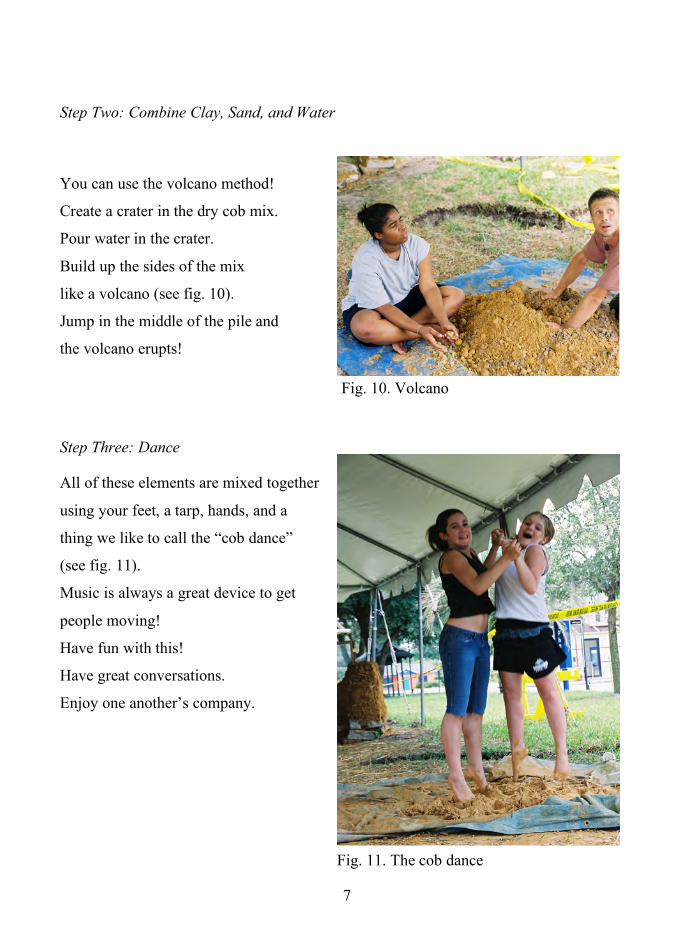
Step Two: Combine Clay, Sand, and Water
You can use the volcano method!
Create a crater in the dry cob mix.
Pour water in the crater.
Build up the sides of the mix
like a volcano (see fig. 10).
Jump in the middle of the pile and
the volcano erupts!
Step Three: Dance
All of these elements are mixed together
using your feet, a tarp, hands, and a
thing we like to call the “cob dance”
(see fig. 11).
Music is always a great device to get
people moving!
Have fun with this!
Have great conversations.
Enjoy one another’s company.
8
Fig. 13. Using the tarp
Fig. 12. Get to the edges
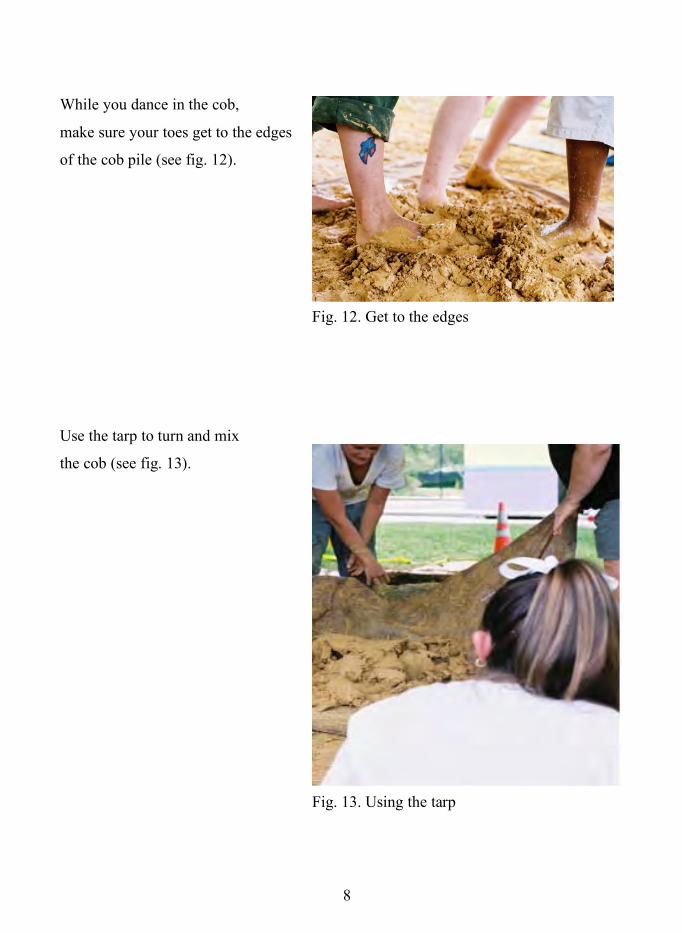
While you dance in the cob,
make sure your toes get to the edges
of the cob pile (see fig. 12).
Use the tarp to turn and mix
the cob (see fig. 13).
9
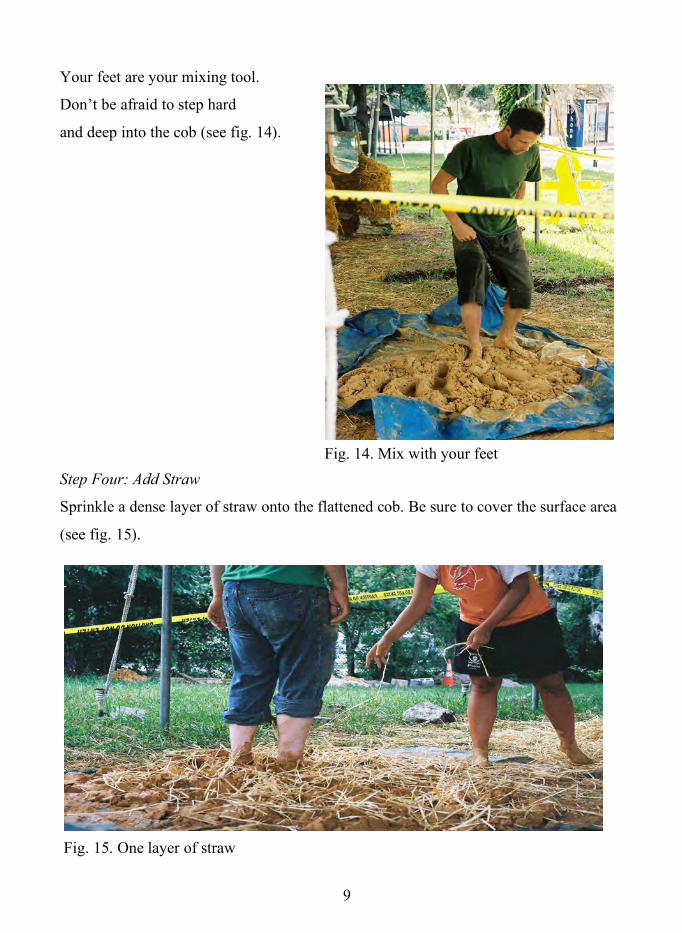
Fig. 14. Mix with your feet
Fig. 15. One layer of straw
Your feet are your mixing tool.
Don’t be afraid to step hard
and deep into the cob (see fig. 14).
Step Four: Add Straw
Sprinkle a dense layer of straw onto the flattened cob. Be sure to cover the surface area
(see fig. 15).
10
Fig. 17. The cob is ready
Fig. 16. Cob burrito
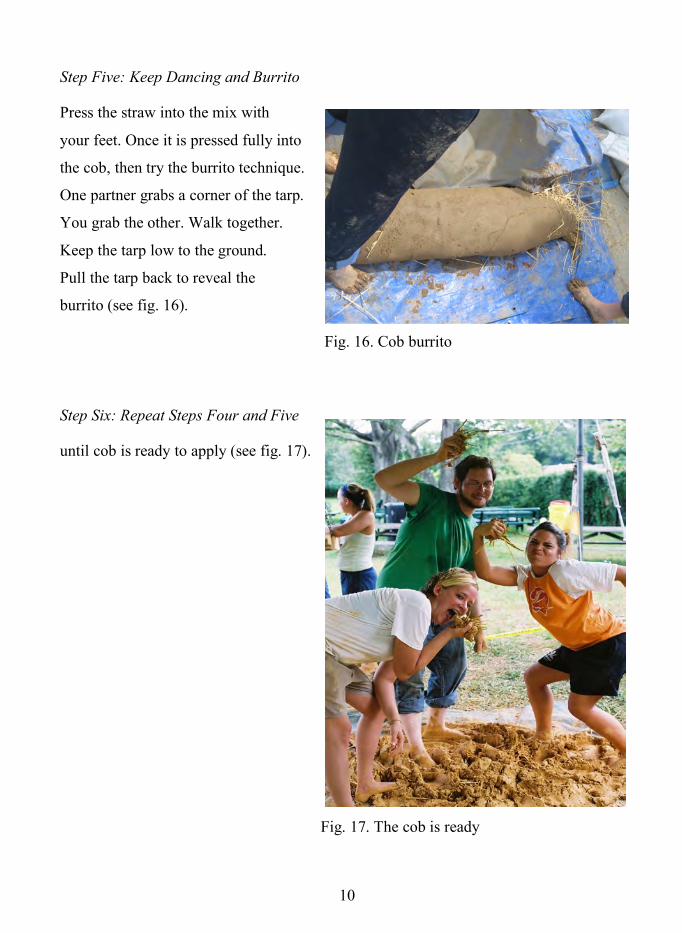
Step Five: Keep Dancing and Burrito
Press the straw into the mix with
your feet. Once it is pressed fully into
the cob, then try the burrito technique.
One partner grabs a corner of the tarp.
You grab the other. Walk together.
Keep the tarp low to the ground.
Pull the tarp back to reveal the
burrito (see fig. 16).
Step Six: Repeat Steps Four and Five
until cob is ready to apply (see fig. 17).
11
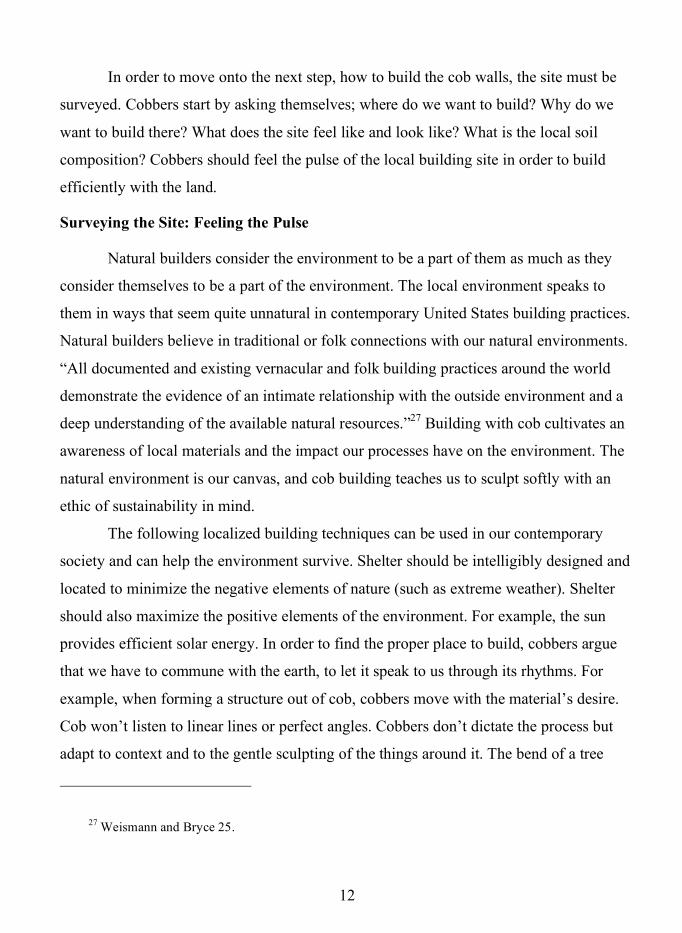
Fig. 19. Cob balls
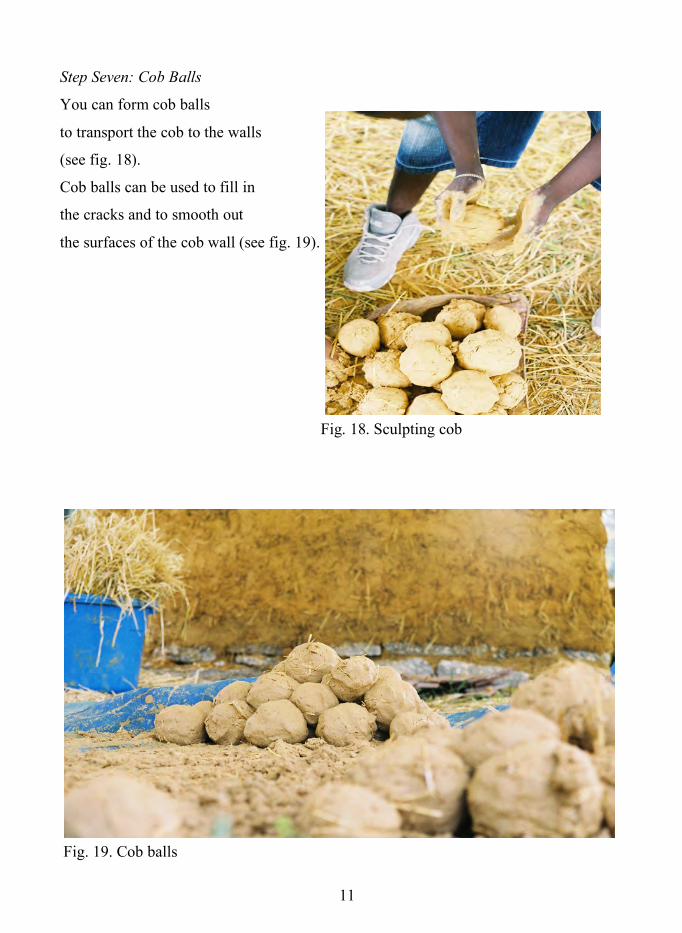
Fig. 18. Sculpting cob
balls
Step Seven: Cob Balls
You can form cob balls
to transport the cob to the walls
(see fig. 18).
Cob balls can be used to fill in
the cracks and to smooth out
the surfaces of the cob wall (see fig. 19).
12
In order to move onto the next step, how to build the cob walls, the site must be
surveyed. Cobbers start by asking themselves; where do we want to build? Why do we
want to build there? What does the site feel like and look like? What is the local soil
composition? Cobbers should feel the pulse of the local building site in order to build
efficiently with the land.
Surveying the Site: Feeling the Pulse
Natural builders consider the environment to be a part of them as much as they
consider themselves to be a part of the environment. The local environment speaks to
them in ways that seem quite unnatural in contemporary United States building practices.
Natural builders believe in traditional or folk connections with our natural environments.
“All documented and existing vernacular and folk building practices around the world
demonstrate the evidence of an intimate relationship with the outside environment and a
deep understanding of the available natural resources.”27 Building with cob cultivates an
awareness of local materials and the impact our processes have on the environment. The
natural environment is our canvas, and cob building teaches us to sculpt softly with an
ethic of sustainability in mind.
The following localized building techniques can be used in our contemporary
society and can help the environment survive. Shelter should be intelligibly designed and
located to minimize the negative elements of nature (such as extreme weather). Shelter
should also maximize the positive elements of the environment. For example, the sun
provides efficient solar energy. In order to find the proper place to build, cobbers argue
that we have to commune with the earth, to let it speak to us through its rhythms. For
example, when forming a structure out of cob, cobbers move with the material’s desire.
Cob won’t listen to linear lines or perfect angles. Cobbers don’t dictate the process but
adapt to context and to the gentle sculpting of the things around it. The bend of a tree
27 Weismann and Bryce 25.
13
branch is not fixed. Trees move to find the sun. These are some examples of the natural
rules of the environment. These rules include:
- Nothing is ever created or destroyed, it just changes form.
- Everything is unique.
- There are no monocultures in nature. This means living things exist in the
company of other beings.
- Nature has a series of fundamental geometries. Nature rarely produces straight
lines or right angles.28
- Nature uses as many resources as necessary and no more.
The following suggested techniques are ways to get new cobbers feel the pulse of
the environment that surrounds and sustains them. It also helps new cobbers realize how
they can build with the local materials that surround them. Intention journals can help
cobbers work through careful observation of the building site and the way the natural
rules of the environment function within it.
Using an intention journal to create daily prompts and offer a space of reflection
can help cobbers articulate their journey through the cob process. Intention journals can
help cobbers catalog interesting moments of the cob project and to reflect upon the
natural rules of the environment. Cobbers write, reflect, sketch, and jot notes down after
each technique for surveying the land.29 Intention journaling about the experience,
experiment, and process helps cobbers to reflect and to articulate what they learned
through the process. In the following techniques, I write as if the reader of this text is a
28 Evans, Smith, and Smiley 10 state, “Biological forms tend to be irregularly curved. On the scale from humans to homes, natural objects never come in perfect squares, circles, triangles or cubes. Nature produces few straight lines, right angles, flat surfaces, or unbroken colors, and when they accidentally arise, she rapidly sets about diversifying them.”
29 Sometimes cobbers do not want to reflect in written form. They may want to talk through their experiences or just be silent. Allow people to move through their own process of reflection.
14
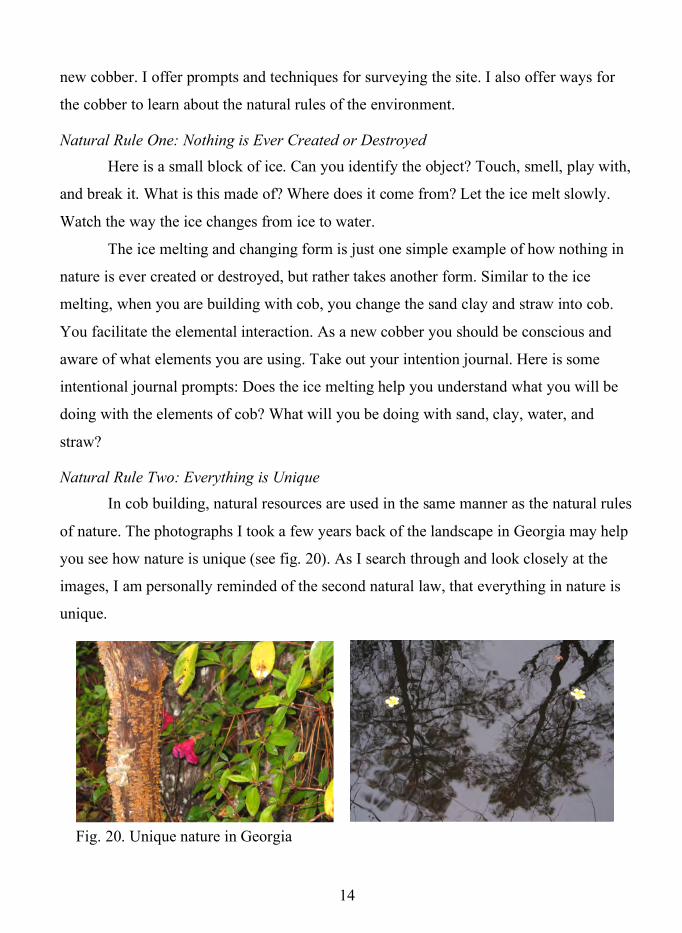
Fig. 20. Unique nature in Georgia
new cobber. I offer prompts and techniques for surveying the site. I also offer ways for
the cobber to learn about the natural rules of the environment.
Natural Rule One: Nothing is Ever Created or Destroyed Here is a small block of ice. Can you identify the object? Touch, smell, play with,
and break it. What is this made of? Where does it come from? Let the ice melt slowly.
Watch the way the ice changes from ice to water.
The ice melting and changing form is just one simple example of how nothing in
nature is ever created or destroyed, but rather takes another form. Similar to the ice
melting, when you are building with cob, you change the sand clay and straw into cob.
You facilitate the elemental interaction. As a new cobber you should be conscious and
aware of what elements you are using. Take out your intention journal. Here is some
intentional journal prompts: Does the ice melting help you understand what you will be
doing with the elements of cob? What will you be doing with sand, clay, water, and
straw?
Natural Rule Two: Everything is Unique In cob building, natural resources are used in the same manner as the natural rules
of nature. The photographs I took a few years back of the landscape in Georgia may help
you see how nature is unique (see fig. 20). As I search through and look closely at the
images, I am personally reminded of the second natural law, that everything in nature is
unique.
15
Cob buildings and structures are unique because they are built from local
materials that come from our natural environment. Cob structures take the shape of
nature. Bring your intention journals and observe the local environment for twenty
minutes. Pick a certain natural element, like a tree, leaf, or stone. Find two different
examples of this element and compare them. What makes them the same? What makes
them different?
If you are with a group of cobbers, show each other what you have observed. For
example, if you are really interested in leaves, physically revisit them. Can you identify
the uniqueness of each individual leaf? While the leaves have a similar pattern, they are
not exactly alike. Sketch the unique elements of the leaves and write about them in your
intention journals. Share with each other what you have learned about the uniqueness of
nature. Intention journal prompts: If everything in nature is unique, how will your cob
structure follow this example? What do you want your cob structure to look like? Will
each cob structure have its own unique characteristics?
Natural Rule Three: There are No Monocultures in Nature Everything in nature is interconnected. Taking apart the soil is an interesting
technique to help you understand the complexity of nature. For example, soil is made up
of living and nonliving elements. Dig a hole in the ground. Sift through your collected
soil. You will discover living creatures in the soil. Depending on your geographical
location, you might discover bugs, worms, or frogs. There are also microorganisms living
in the soil. The soil thrives off of these organisms. The relationship between the living
and nonliving elements in the soil is a symbiotic relationship that speaks to the third
natural law; there are no monocultures in nature. Living things exist only in the company
of other living and nonliving beings. Intentional journal prompts: How does interacting
with the worms and frogs that live in the ground teach us about the living and nonliving
elements of nature? How do nonliving and living beings interact with each other?
Natural Rule Four: Nature’s Fundamental Geometries The fourth natural rule is important for cob building because new cobbers often
want to build boxes. Most people living in the United States are used to straight angles
16
because of their exposure to mass manufactured homes. They want to build something
that fits what they have seen before. In our contemporary western culture, most modern
builders use processed materials to erect structures that are not entirely unique. Modern
building practices produce homes in shapes that are rarely seen in nature. Cob doesn’t
easily form into linear or sharp lines. Cob follows the natural geometries of leaves,
grasses, trees, and stones. While we are building with cob, we encounter the fourth
natural rule quite frequently. There are fundamental geometries in nature that aren’t
perfectly angular or reproduced.
Walk outside. Take time to look for geometries in nature. Write down what you
see, feel, and hear. What shapes appeal to you? What colors do you see? Can you identify
texture? Can you identity patterns? Sketch in your intention journals the geometries you
find in different natural elements. Take time to study the shapes. Intention journal
prompts: What geometries did you encounter in nature? Would you describe them as
round, curvy, triangles, rectangles, or circles? How do you think building with cob might
reflect these natural geometries?
Natural Rule Five: Nature’s Conservation of Resources Think about what you buy and throw away. Write in your intention journals
something you or your family bought in the past week. What did you buy? What is the
item’s function in your household? Why did you buy the item? Find a trashcan in the
surrounding area. Sift through these the items that have been thrown away. Can we reuse
any of these elements?
Now, think about non-human living beings. Think about specific examples. For
instance, think about a plant. If the plant is over watered, it will most likely wilt. If the
plant isn’t watered enough, it will most likely die. Nature doesn’t over indulge.
Comparing the way humans consume certain items with the way non-human living
beings use elements can help you conceptualize the fifth natural rule: Nature uses as
many resources as necessary and no more. Intention journal prompts: What is necessary
to live, for survival? Do you need to scale down your consumption? In terms of building
17
a cob structure, how do you build for survival? How can you think about building a
structure that doesn’t use too much space or so many disposable elements?
The intention journals and the interactive work with these techniques will
hopefully get you thinking about the natural rules of the environment in different ways
and get you excited about the building tasks ahead. As a new cobber, I encourage you to
reengage with nature. Through this process, you learn how to build a building that does
not dominate the environment but grows out of and with the environment. After learning
about the natural rules of the environment, it should be clear that humans are part of the
environment, not above it. Everything in nature is unique. Each person is unique.
Intention journaling can also get you to think about how cobbers will relate to each other,
within a cob building community.
Intention Journals: Reflections and Motivations Each one of you will arrive at the cob building with your own challenges,
problems, personal situations, and contexts that make the act of dependence and
cooperation quite difficult. In order to make sense of these complicated relationships, I
suggest you use your intention journals to uncover the ways you respond to the day’s
energy, each other, and their reactions to the cobbing process. On the tarp, you may start
to see and understand the interrelations of people’s actions and emotions. The cobbing
process can create a positive and embodied rhythm. As you move through the process,
you may realize that the body responds, knows, and feels. You may start to lean on each
other and work with each other the process of creating cob becomes smooth. You may
become frustrated because you want to finish three more cob piles before the end of the
day. Conflict arises because your group may be dependant upon someone who doesn’t
want to work. In all of these moments, of productivity and conflict, you depend on each
other. Intention journaling helps to make sense of these complicated relationships and
positionalities.
At the beginning of each day, gather together and think about where you are in the
building process and how you are feeling that day. Think about the work you have to
accomplish. Write in your intention journal the goals you have set for that particular day.
18
After the five-minute30 writing session, share the intentions of that day. Some words that
may come up throughout the cob process are motivation, magnificence, and strength.
Throughout the day, remind each other of these words. The words become a theme, a
reminder, and motivation for cob building work.
Throughout the weeks of cob building, mixing the cob, and gathering the
materials there will be an interesting array of emotional fluxes that occur. Each one of
these movements is productive in the sense that it is part of the cycle. The aim is not to
create static emotion but recognize the rivers of emotion in flux. It is important to realize
and reflect upon these movements of energy.
At the end of the building session, gather together and reflect on the day’s events.
Pay close attention to your body and the muscles you have worked that day. Reflecting
on the day’s events is important for community spirit. The intention journals offer
stability, repetition, and reflection. As a new cobber, you begin to see and intimately
understand the relationships that develop through cob building. Intention journaling is a
helpful technique to keep you connected to your own thought processes as well as your
connection to the larger group. Before you can begin to build a structure out of cob, you
need to learn how to survey the site for environmental, material, and practical concerns
and components that impact cob building.
Surveying the Building Site: Practical Ideas31
It is time to survey the site. As a new cobber, there are some important
circumstances to think about before you begin to build and work with your site. When
building an inhabitable structure out of cob, your building site is of utmost importance. A
30 Writing time period depends on age group, time frame, and attention span. 31 For further discussion of each of these elements see Weismann and Bryce. Many of the following
sections and ideas are paraphrased from their site surveying suggestions.
19
cob dwelling should work with the land. You want to minimize ecological disruption.32
Here are a few tips for surveying the site that will lessen ecological destruction. These
tips will also help you to situate your building so it works within the space and not
against it. These important components are location, building codes, access, local
materials, and peaceful observation.
Location There are many elements to consider when choosing a building location. First,
consider your local bioregion. Consider the bioregion’s geography, ecology, and climate.
Think about the native vegetation. Pay respect to existing occupants on the land. For
instance, you don’t want to drain a pond or a wetland in order to build a cob structure.
The wetland is home to many important species. You also want to avoid building on
flood plains or in gullies. Cob needs to be protected from water. Build on the most solid
subsoil you can find because cob is heavy. Avoid building on an exposed hill or cliff. The
wind will impact the structure. To help pinpoint potential building sites, you might want
to make maps or models of the site characteristics.
Building Codes Most states in the U.S. do not have building codes for cob structures. Each state,
town, and city in the U.S. has their own building codes and processes to obtain building
permits. If this structure will be inhabited, I suggest you learn which codes will affect you
and your construction project. Contact your local building inspection department, the
office of planning and zoning, and the department of permits. Start by calling the
government body that has jurisdiction over the your building site. They will provide you
with specific information about building codes and appropriate building permits.
32 Evans, Smith, and Smiley 64 state, “Any kind of construction (including roads, leach fields, yards, fences, and even gardening) creates havoc for the plants and animals that are already there. Such damage is often obvious and dramatic but the damage caused by the ongoing existence and use of the building after it is finished may cumulatively be even worse (or may be healing if done right).”
20
Access You are transporting the materials from the dig site to the building site. Consider
the difficulties in transporting materials or tools to the building site. Will you be able to
transport your materials and tools easily? Is your building site close enough to your dig
site? You want to be kind to yourself and the other cobbers. Make the distance between
these two points relatively close and easily accessible. You also want to minimize
ecological destruction. Each road that is built causes ecological disruption. Carefully plan
access to your site.
Local Materials Local materials are the most useful and efficient for the climate of the local area.
The materials are part of the local environment. The materials have survived and adapted
to the local climate. Using local materials ensures that the structure will be able to
withstand and endure the elements. Local materials will also provide the most
comfortable space within which to live for that particular place.
Peaceful Observation and Intuition After thinking about the elements of surveying the site, it is still up to you, the cob
builder, to discover where the building would best fit with the land. Sit quietly with the
site during different times of the day. Watch the patterns of the sun, trees, and slope of
the ground. Once you are drawn to a space, sit there for a longer period of time. You
were drawn to this space for a reason. Natural building implies building in harmony with
the environment. As a new cobber, convening with your building site will help you
respectfully create a cob building that works with/in the land.
These are components that natural builders take into consideration before they
build on a site. These practical components can help your cob structure find its proper
place to be with and within the natural environment. A cob structure should work with
nature, not against it. Selecting a building site is one of the most critical design decisions
you will make. Your site should empower your home’s potential and your home should
empower the lands potential, not destroy it.
21
Using Simple Technologies: Hand Tools and Labor
Each cob project requires that you gather particular tools and materials. Simple
technologies can help us complete a cob project. I do not recommend building with large
industrial machines.33 Natural building wants to leave as little environmental impact as
possible. Large industrial machines expend and waste large amounts of energy. Industrial
machines disconnect cobbers from their work. “Cob invites involvement in a very direct
way—dirty hands, dirty feet. Choose tools that don’t steal that involvement.”34 I
recommend using simple hand tools to complete cob projects. “Handwork is sensual; that
is, revealing to the senses.”35 Using hand tools can remind us of our own power to propel
the tool with our physical energies.
List of Tools and Materials36 - Sand
- Clay
- Straw
- Water
- Shovels (three to four, depending on the size of your group)
- Wheelbarrow
- Pitchfork
33 Jan Sturmann, “Hand Tool Reflections,” The Hand Sculpted House, eds. Ianto Evans, Michael G. Smith and Linda Smiley (White River Junction, VT: Chelsea Green P, 2002) 137-140 states, “Building by hand encourages us to build more deliberately, ponderously, aware of our actions that ripple beyond us.” He also admits that he is no purist. “My power tools, well used, cared for, will continue to be used, although with less frequency as I discover again the joy of using just my body to propel tools to do their magic” (140).
34 Evans, Smith, and Smiley, 135. 35 Evans, Smith, and Smiley, 135.
36 This list was compiled through my own experience and with the guidance of two different texts, The Hand-Sculpted House and Cob Building: A Step-by-Step Guide. This list is subject to change depending on what type of project you undertake. For instance, if you are working on building a cob oven, you will need firebricks and extra sand to help you form the dome shape of the oven.
22
- Tarps for making cob mixes
- Five-gallon plastic or metal buckets
- Sculpting tools (spoons, knives, plaster’s trowels)
- Mesh screens for sifting
- Tape measure
- Spray bottle for dampening sand form
- Spirit level
- Rubber mallet
- Carpentry tools (hammer, saw, crowbar)
- Recycled concrete for the foundation plinth (amount depends on each project)
- Stone or concrete rubble as filler for the foundation plinth
- Wood and screws
- Lime for outer plaster (NHL 3.5 lime)
Some of these materials are not readily available. While clay, sand, and water are right
under your feet, it takes a good amount of time to scavenge for them. There are other
materials that are harder to find. Lime, for instance, is an unprocessed version of
concrete. Lime is difficult to obtain. I recommend you start early. Ask for help when you
need it. Ask your friends to keep an eye out for certain materials such as recycled chunks
of concrete. Rather than buying these tools, ask to borrow them. You will be surprised at
the amount of support you have around you.
Scavenging for Materials
Scavenging for local materials and recycled components is an important part of
the cob building process. Scavenging takes time, energy, and a source of transportation.
Transporting the materials takes a truck or a car with a nice size trunk. Wheelbarrows,
buckets, and shovels are tools cobbers use to move found materials to the cobbing site.
You want to have enough time to scour the streets for your materials. Look for sidewalks
being uprooted or construction sites. Take the broken pieces of concrete from these
construction sites once you have gained permission. It also takes time to unload the
concrete pieces before your cobbing sessions begin. Scavenging for concrete is an
23
excellent lesson that everything in nature changes form and everything can be used for
something else.
To find straw, I recommend calling local horse stables. Remember you are asking
for straw, not hay. If you can purchase the material, there are feed supply stores that carry
bales of hay. Depending on the size of your project you may need anywhere from one to
four bales of straw. Cob is a process-based project. I cannot predict the exact amount of
straw you will need for any given project. I can tell you that you do not want to over run
the cob mix with straw. This project is about balance. In my experience, for one batch of
cob, we used two layers of straw, which approximately is equivalent to five handfuls of
straw (see fig. 7).
To scavenge for clay and aggregate, you must dig into the ground (see fig. 12).
Transporting the found source of clay and soil requires shoveling the material out of the
ground and then moving it from the digging site to the building site.
Building the Foundation
The foundation of a building carries the weight of the roof, walls, furniture, and
floor. It is the element that evenly distributes this weight so that the building doesn’t sink
into the ground, so its floors do not crack, and so the walls do not crumble. There are two
foundation elements in a cob structure. There is the footing or plinth wall and the stem
wall. The plinth wall, or below-ground footing, supports the load of the structure and
distributes the weight evenly over the surface area (see fig. 22). The stem wall, or the
wall above ground, should be one and a half feet above ground (see fig. 23). This protects
the cob walls from water damage and allows for drainage away from the structure. Here
are some tips and steps to laying a solid foundation.
- Clear the top soil of all vegetation and organic matter.
- Mark out the perimeter of your building with pegs and string.
- Dig a trench wider then the stem wall. The trench is where you place your
footing or plinth wall (see fig 22).
- Familiarize yourself with the stones so that over time you will know which
stones will make the best fit.
24
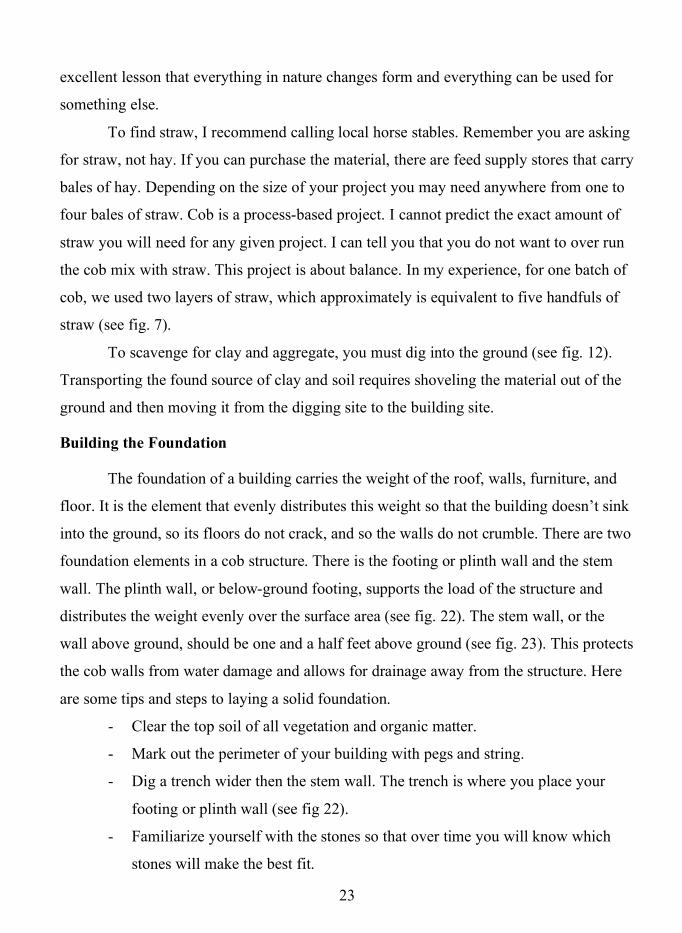
Fig. 21. Puzzle pieces fitting together
Fig. 21. Marrying the stones
- Lay the concrete stones. The largest stones should be on the bottom. This
distributes the weight more evenly.
- Marrying the stones is like putting a puzzle together. The puzzle piece process
can be enjoyable and an excellent lesson in working together to solve a
problem.
- The stones should fit together so they are stable (see fig. 21). Test the stones.
Stand on them. If there are any wobbling stones, they should be stabilized by
chipping away protruding stones or adding smaller pieces of stone to offer
balance. The stones should feel solid and stable beneath your feet as you walk
on them. The footing stones should come up to ground level
- Build your stem wall (see fig. 23). As you build higher, the stem wall should
become increasingly narrower. The stem wall’s width is same width of the
cob wall. Remember, this stem wall should be one and a half feet above
ground. This height depends on what and where you are building. This height
almost always ensures that flooding water cannot impact the cob wall.
25
Fig. 23. Stem wall: Above ground
Fig. 22. Plinth wall: In the ground
26
Fig. 24. Applying cob
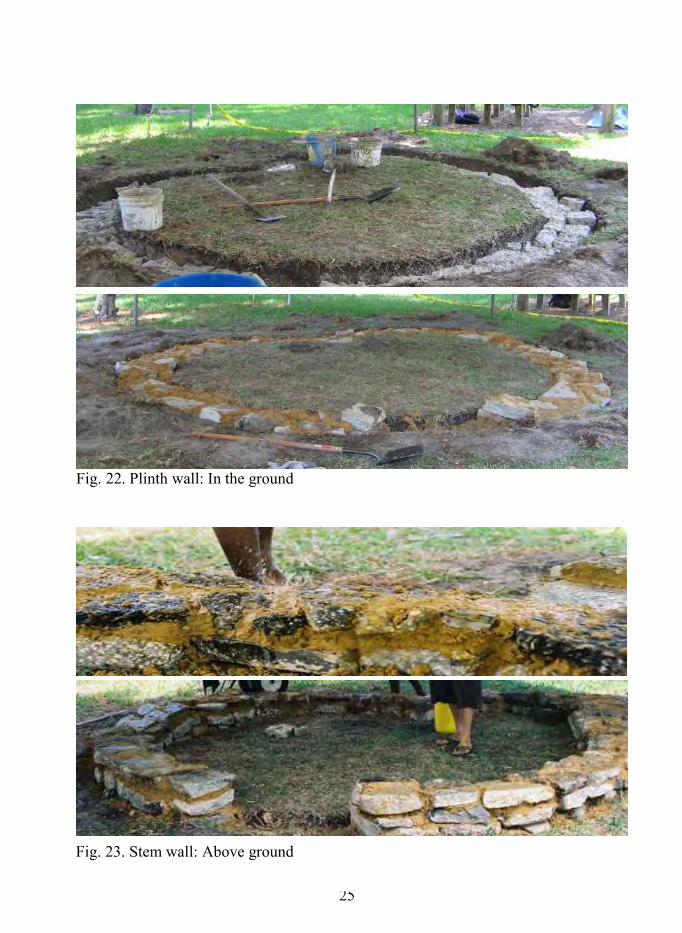
The Cobbing Process
After the materials, sand, clay, straw, and concrete are collected, move the
materials through a large sifter (see fig. 8). Break up the large pieces and get rid of the
larger rocks. This makes the cob pile softer for those who step on it. Emphasize how your
sifting efforts help, rather than hinder, the process. Divide into groups. One group can sift
the material and then pull the tarp of sifted material to the designated cobbing spot (see
fig. 9). The designated cobbing group can add water to the mix of sand and clay. This
group steps on the tarp together and mixes the elements with their feet (see fig. 14).
Music helps to spark and continue the energy of the cob dance. Each group can rotate
tasks. The cobbing process, building the walls of your cob structure, may take some time.
Rotating tasks and using your intention journals can regenerate your energy level and
reorient you to the tasks you have completed and the tasks you may have ahead. Intention
journal prompts: How did it feel doing the cob dance? What did your body do to get the
task accomplished? Did you feel strange being so close to people? Did it impact the way
we worked together?
Use your hands to move the cob from the tarp to the wall (see fig. 24).
27
Fig. 25. Making cob balls
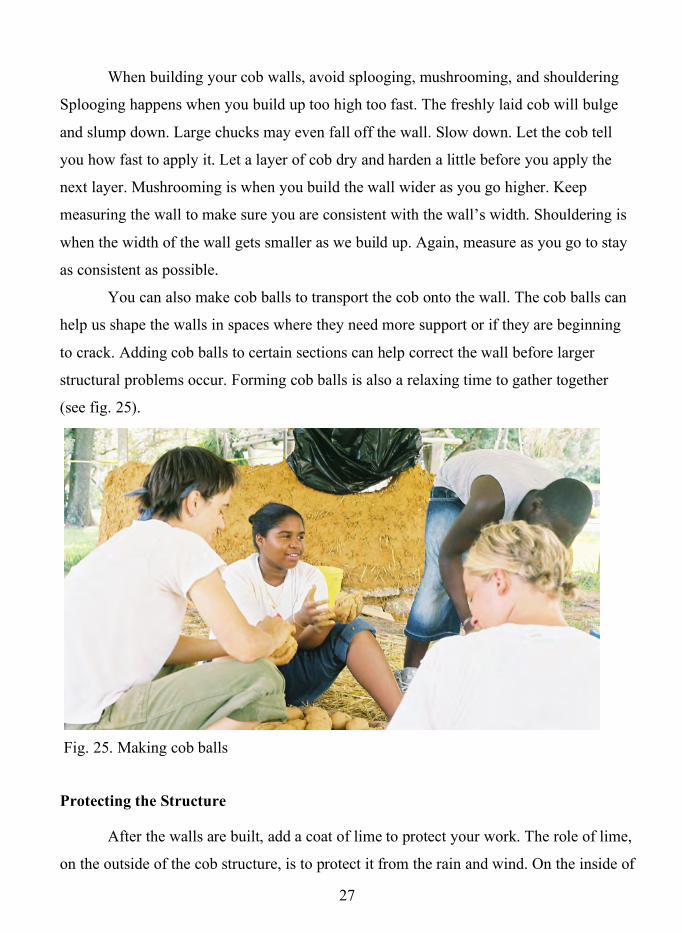
When building your cob walls, avoid splooging, mushrooming, and shouldering
Splooging happens when you build up too high too fast. The freshly laid cob will bulge
and slump down. Large chucks may even fall off the wall. Slow down. Let the cob tell
you how fast to apply it. Let a layer of cob dry and harden a little before you apply the
next layer. Mushrooming is when you build the wall wider as you go higher. Keep
measuring the wall to make sure you are consistent with the wall’s width. Shouldering is
when the width of the wall gets smaller as we build up. Again, measure as you go to stay
as consistent as possible.
You can also make cob balls to transport the cob onto the wall. The cob balls can
help us shape the walls in spaces where they need more support or if they are beginning
to crack. Adding cob balls to certain sections can help correct the wall before larger
structural problems occur. Forming cob balls is also a relaxing time to gather together
(see fig. 25).
Protecting the Structure
After the walls are built, add a coat of lime to protect your work. The role of lime,
on the outside of the cob structure, is to protect it from the rain and wind. On the inside of
28
Fig. 27. Applying lime
the cob structure, add plaster to lighten the room and protect the cob walls from dust or
everyday scratches and scuffs. A natural plaster also serves as a background for other
natural dyes or pigments. Here are some tips on how to make lime. There are four coats
of lime that protect your cob walls.
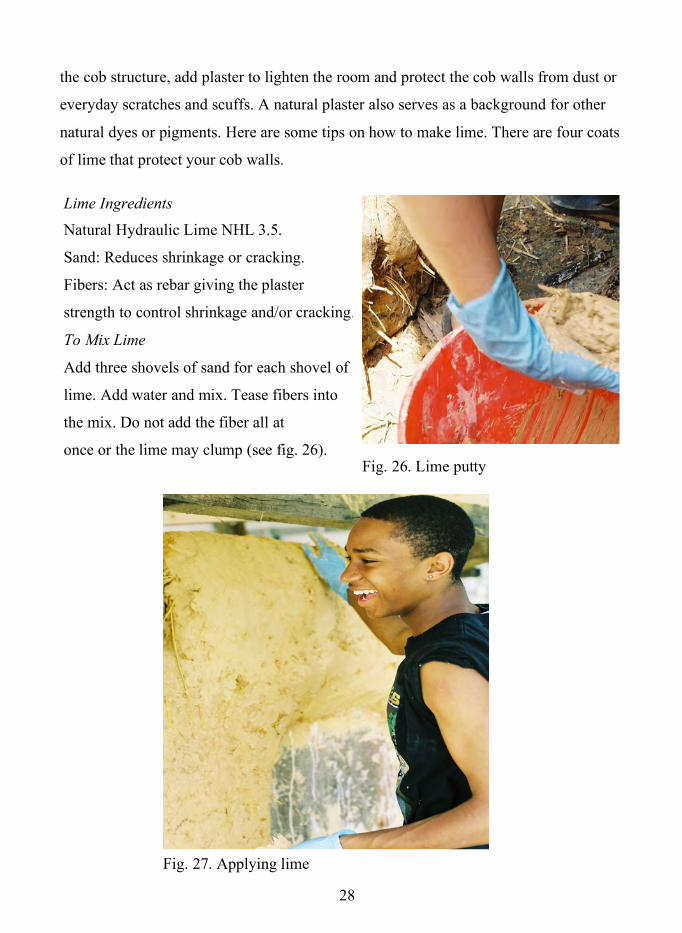
Lime Ingredients Natural Hydraulic Lime NHL 3.5.
Sand: Reduces shrinkage or cracking.
Fibers: Act as rebar giving the plaster
strength to control shrinkage and/or cracking.
To Mix Lime
Add three shovels of sand for each shovel of
lime. Add water and mix. Tease fibers into
the mix. Do not add the fiber all at
once or the lime may clump (see fig. 26).
Figure 22.
Applying lime:
In layers
Fig. 26. Lime putty
Ingredientto make
lime putty
29
Fig. 28. Scratch coat: Final coat
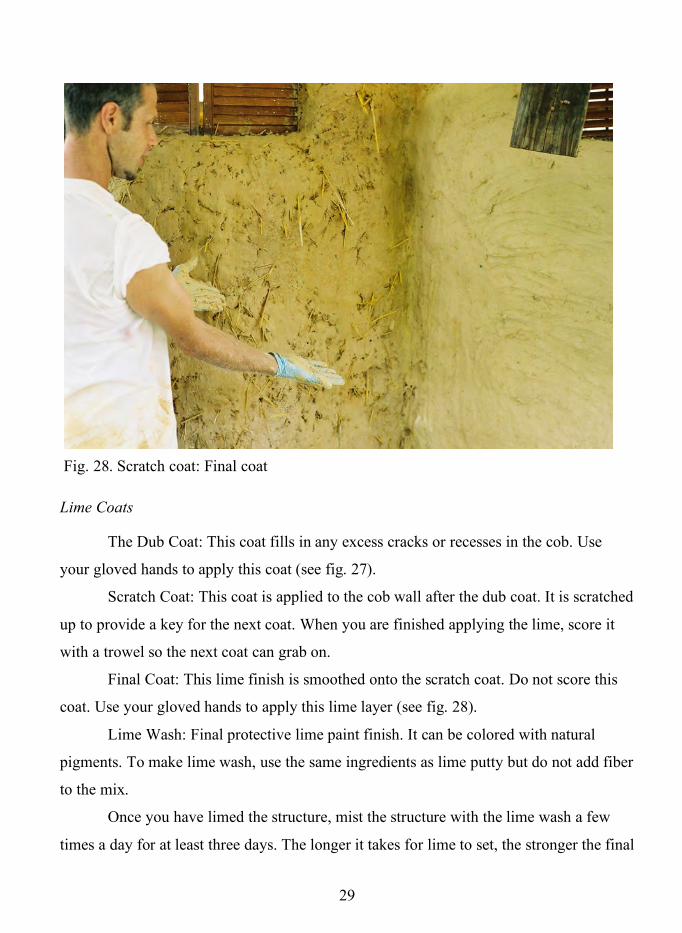
Lime Coats
The Dub Coat: This coat fills in any excess cracks or recesses in the cob. Use
your gloved hands to apply this coat (see fig. 27).
Scratch Coat: This coat is applied to the cob wall after the dub coat. It is scratched
up to provide a key for the next coat. When you are finished applying the lime, score it
with a trowel so the next coat can grab on.
Final Coat: This lime finish is smoothed onto the scratch coat. Do not score this
coat. Use your gloved hands to apply this lime layer (see fig. 28).
Lime Wash: Final protective lime paint finish. It can be colored with natural
pigments. To make lime wash, use the same ingredients as lime putty but do not add fiber
to the mix.
Once you have limed the structure, mist the structure with the lime wash a few
times a day for at least three days. The longer it takes for lime to set, the stronger the final
30
Fig. 29. Sand dome
product will be. You can also use natural paints in the final coat of lime. Add a layer of
lime wash to add color to the structure. To make natural paint, combine Natural
Hydraulic Lime (NHL 2 in powder form), water, and the natural pigment. When applying
the wash, the pigment will be much lighter than you might expect it to be. A cob wall
needs at least three coats of lime wash to achieve a deep color. I have been writing mostly
about larger cob projects. There are some smaller cob projects that can help move you
into cob building. For example, creating a cob oven is a fun way to begin your cob
adventure.
Cob Ovens
One of the most rewarding cob building practices is building a cob oven. Cob
ovens are not only aesthetically pleasing but also functional. Building a cob oven can
bring people together through the building process and gather people to delight in the
food you bake in the oven. The following is a how-to for building a cob oven.
The Materials
(Amounts dependent on oven size)
Sand, Clay, Straw, Water
Play sand (to form inner dome)
Firebricks
Gravel fill
Concrete block
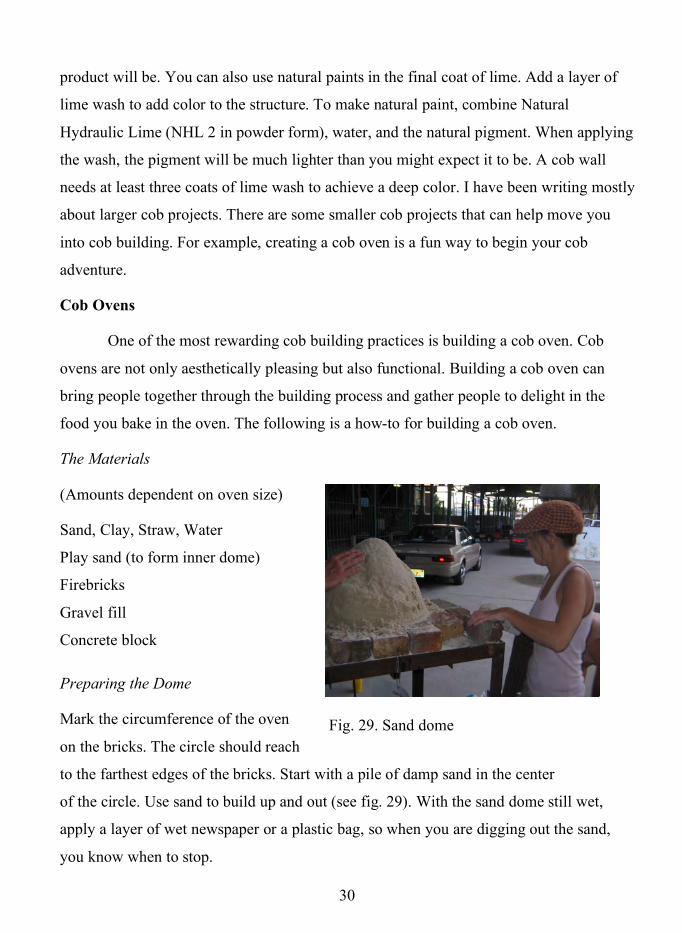
Preparing the Dome
Mark the circumference of the oven
on the bricks. The circle should reach
to the farthest edges of the bricks. Start with a pile of damp sand in the center
of the circle. Use sand to build up and out (see fig. 29). With the sand dome still wet,
apply a layer of wet newspaper or a plastic bag, so when you are digging out the sand,
you know when to stop.
31
Fig. 31. Sand scrape
Fig. 30. Cob layers
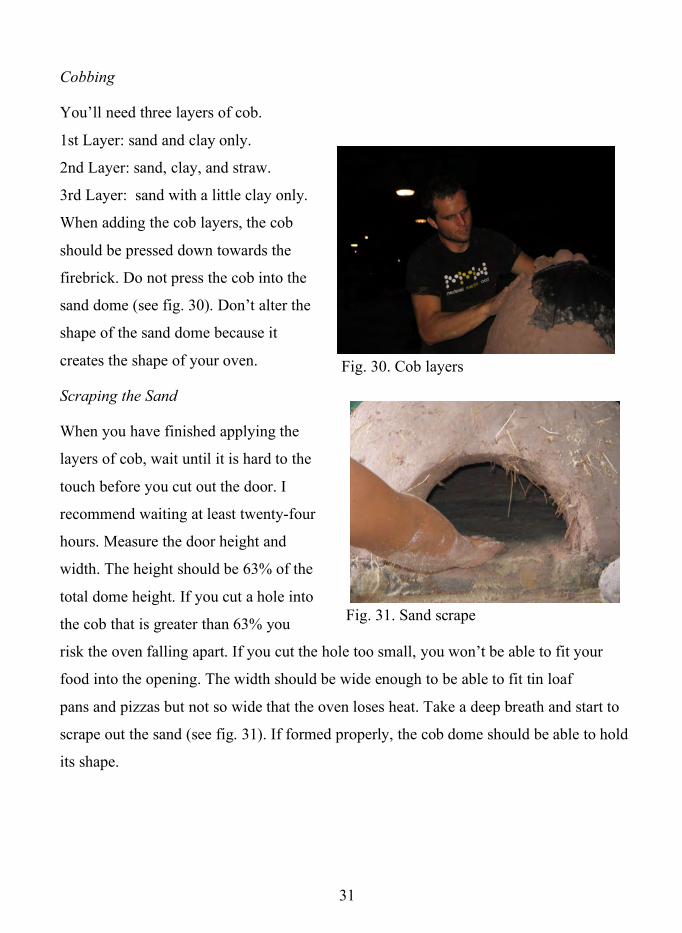
Cobbing
You’ll need three layers of cob.
1st Layer: sand and clay only.
2nd Layer: sand, clay, and straw.
3rd Layer: sand with a little clay only.
When adding the cob layers, the cob
should be pressed down towards the
firebrick. Do not press the cob into the
sand dome (see fig. 30). Don’t alter the
shape of the sand dome because it
creates the shape of your oven.
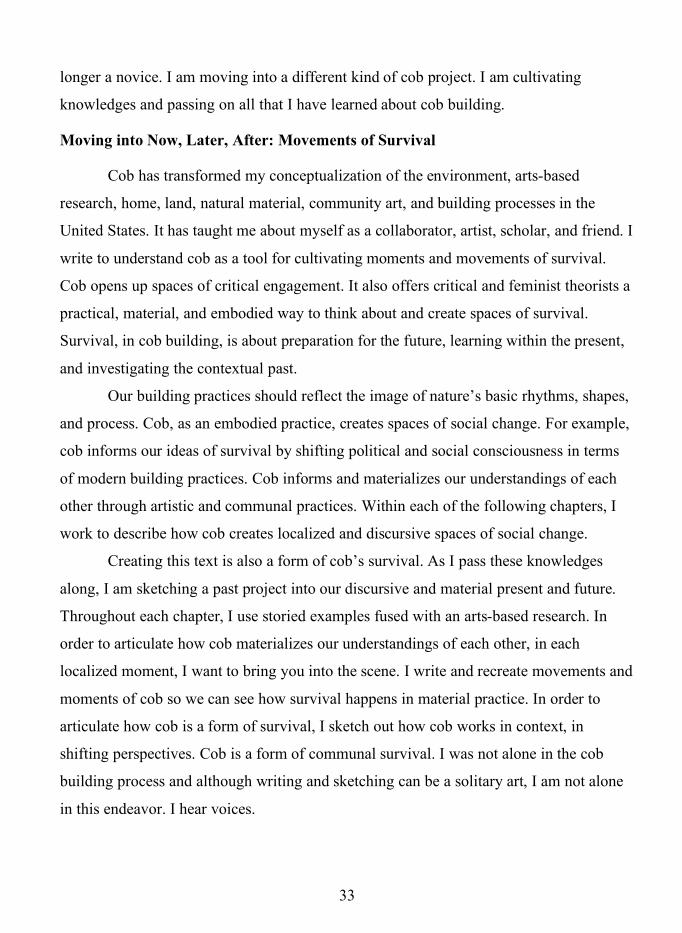
Scraping the Sand
When you have finished applying the
layers of cob, wait until it is hard to the
touch before you cut out the door. I
recommend waiting at least twenty-four
hours. Measure the door height and
width. The height should be 63% of the
total dome height. If you cut a hole into
the cob that is greater than 63% you
risk the oven falling apart. If you cut the hole too small, you won’t be able to fit your
food into the opening. The width should be wide enough to be able to fit tin loaf
pans and pizzas but not so wide that the oven loses heat. Take a deep breath and start to
scrape out the sand (see fig. 31). If formed properly, the cob dome should be able to hold
its shape.

32
Fig. 32. The finished oven
Now that the oven is finished, you can build your first fire in the oven (see fig.
32). Cob ovens retain heat. Once you heat the oven, it remains hot enough to cook inside
for three to four hours. To build a fire in the oven, use dry, thick, wood. Stack loosely to
allow air to fuel the flames. Without a chimney, there will be smoke coming out the front
mouth. Allow the fire to burn for thirty minutes to heat the oven to 700°F. Spread the
coals and embers across the whole floor of the oven to heat the firebricks evenly. Rake
out the remains. Let the oven heat for another thirty minutes. Then you are ready to place
your pizza or bread in the oven.
As I write, I can hear our laughter as we piled on strange pizza toppings. I
remember feeling so proud when that first pizza came out of our first cob oven. I can
taste the pizza. It wasn’t perfect, but it tasted fabulous. It was the taste of cob success. I
was a novice at cob building just like you. Cob building has been a rewarding experience
for me. I think the best way to learn about cob is to try it. Experiment with different
techniques and see which method works best for you in your environment. Remember,
each space has a different pulse. Don’t forget to listen to yourself and to the environment
around you. After some time playing, practicing, and experimenting with cob, I am no
33
longer a novice. I am moving into a different kind of cob project. I am cultivating
knowledges and passing on all that I have learned about cob building.
Moving into Now, Later, After: Movements of Survival
Cob has transformed my conceptualization of the environment, arts-based
research, home, land, natural material, community art, and building processes in the
United States. It has taught me about myself as a collaborator, artist, scholar, and friend. I
write to understand cob as a tool for cultivating moments and movements of survival.
Cob opens up spaces of critical engagement. It also offers critical and feminist theorists a
practical, material, and embodied way to think about and create spaces of survival.
Survival, in cob building, is about preparation for the future, learning within the present,
and investigating the contextual past.
Our building practices should reflect the image of nature’s basic rhythms, shapes,
and process. Cob, as an embodied practice, creates spaces of social change. For example,
cob informs our ideas of survival by shifting political and social consciousness in terms
of modern building practices. Cob informs and materializes our understandings of each
other through artistic and communal practices. Within each of the following chapters, I
work to describe how cob creates localized and discursive spaces of social change.
Creating this text is also a form of cob’s survival. As I pass these knowledges
along, I am sketching a past project into our discursive and material present and future.
Throughout each chapter, I use storied examples fused with an arts-based research. In
order to articulate how cob materializes our understandings of each other, in each
localized moment, I want to bring you into the scene. I write and recreate movements and
moments of cob so we can see how survival happens in material practice. In order to
articulate how cob is a form of survival, I sketch out how cob works in context, in
shifting perspectives. Cob is a form of communal survival. I was not alone in the cob
building process and although writing and sketching can be a solitary art, I am not alone
in this endeavor. I hear voices.