Embed Size (px)
Citation preview
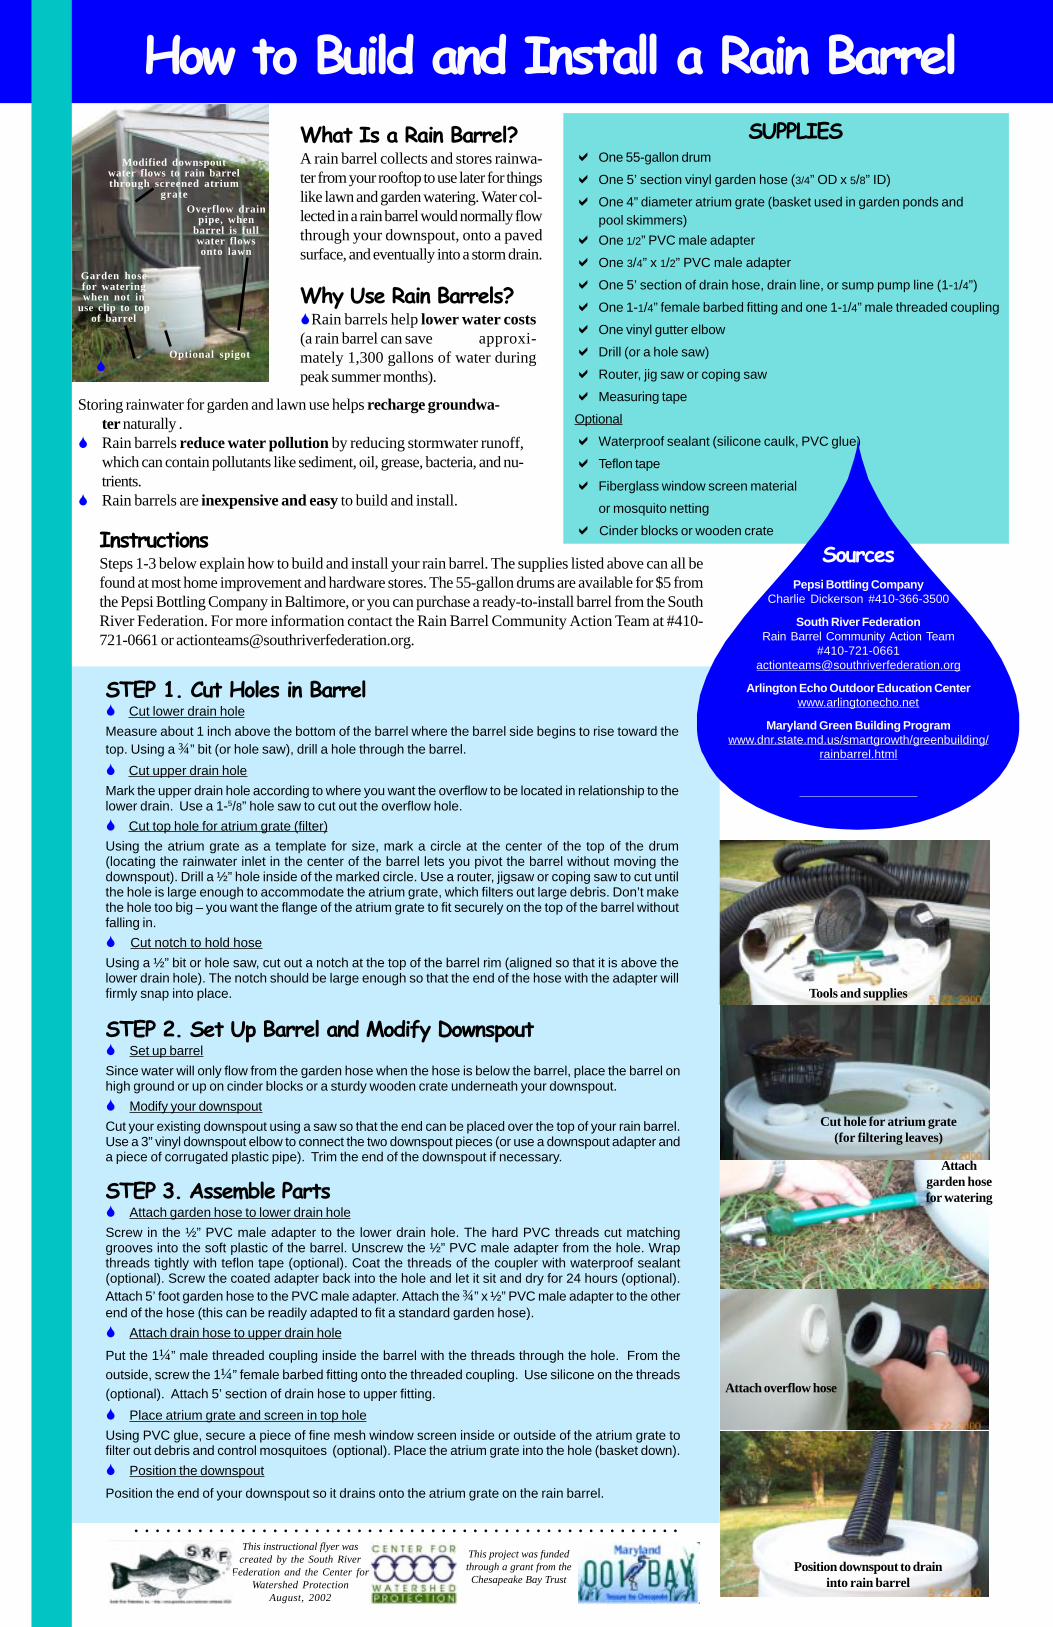
How to Build and Install a Rain Barrel
STEP 2. Set Up Barrel and Modify Downspout! Set up barrel
Since water will only flow from the garden hose when the hose is below the barrel, place the barrel onhigh ground or up on cinder blocks or a sturdy wooden crate underneath your downspout.
! Modify your downspout
Cut your existing downspout using a saw so that the end can be placed over the top of your rain barrel.Use a 3” vinyl downspout elbow to connect the two downspout pieces (or use a downspout adapter anda piece of corrugated plastic pipe). Trim the end of the downspout if necessary.
STEP 1. Cut Holes in Barrel! Cut lower drain hole
Measure about 1 inch above the bottom of the barrel where the barrel side begins to rise toward thetop. Using a ¾” bit (or hole saw), drill a hole through the barrel.
! Cut upper drain hole
Mark the upper drain hole according to where you want the overflow to be located in relationship to thelower drain. Use a 1-5/8” hole saw to cut out the overflow hole.
! Cut top hole for atrium grate (filter)
Using the atrium grate as a template for size, mark a circle at the center of the top of the drum(locating the rainwater inlet in the center of the barrel lets you pivot the barrel without moving thedownspout). Drill a ½” hole inside of the marked circle. Use a router, jigsaw or coping saw to cut untilthe hole is large enough to accommodate the atrium grate, which filters out large debris. Don’t makethe hole too big – you want the flange of the atrium grate to fit securely on the top of the barrel withoutfalling in.
! Cut notch to hold hose
Using a ½” bit or hole saw, cut out a notch at the top of the barrel rim (aligned so that it is above thelower drain hole). The notch should be large enough so that the end of the hose with the adapter willfirmly snap into place.
STEP 3. Assemble Parts! Attach garden hose to lower drain hole
Screw in the ½” PVC male adapter to the lower drain hole. The hard PVC threads cut matchinggrooves into the soft plastic of the barrel. Unscrew the ½” PVC male adapter from the hole. Wrapthreads tightly with teflon tape (optional). Coat the threads of the coupler with waterproof sealant(optional). Screw the coated adapter back into the hole and let it sit and dry for 24 hours (optional).Attach 5’ foot garden hose to the PVC male adapter. Attach the ¾” x ½” PVC male adapter to the otherend of the hose (this can be readily adapted to fit a standard garden hose).
! Attach drain hose to upper drain hole
Put the 1¼” male threaded coupling inside the barrel with the threads through the hole. From theoutside, screw the 1¼” female barbed fitting onto the threaded coupling. Use silicone on the threads(optional). Attach 5’ section of drain hose to upper fitting.
! Place atrium grate and screen in top hole
Using PVC glue, secure a piece of fine mesh window screen inside or outside of the atrium grate tofilter out debris and control mosquitoes (optional). Place the atrium grate into the hole (basket down).
! Position the downspout
Position the end of your downspout so it drains onto the atrium grate on the rain barrel.
What Is a Rain Barrel?A rain barrel collects and stores rainwa-ter from your rooftop to use later for thingslike lawn and garden watering. Water col-lected in a rain barrel would normally flowthrough your downspout, onto a pavedsurface, and eventually into a storm drain.
Why Use Rain Barrels?!Rain barrels help lower water costs(a rain barrel can save approxi-mately 1,300 gallons of water duringpeak summer months).
InstructionsSteps 1-3 below explain how to build and install your rain barrel. The supplies listed above can all befound at most home improvement and hardware stores. The 55-gallon drums are available for $5 fromthe Pepsi Bottling Company in Baltimore, or you can purchase a ready-to-install barrel from the SouthRiver Federation. For more information contact the Rain Barrel Community Action Team at #410-721-0661 or [email protected].
This instructional flyer wascreated by the South River
Federation and the Center forWatershed Protection
August, 2002
This project was fundedthrough a grant from theChesapeake Bay Trust
Tools and supplies
Cut hole for atrium grate(for filtering leaves)
Position downspout to draininto rain barrel
○ ○ ○ ○ ○ ○ ○ ○ ○ ○ ○ ○ ○ ○ ○ ○ ○ ○ ○ ○ ○ ○ ○ ○ ○ ○ ○ ○ ○ ○ ○ ○ ○ ○ ○ ○ ○ ○ ○ ○ ○ ○ ○ ○ ○ ○ ○ ○ ○ ○ ○ ○
Attach overflow hose
Attachgarden hosefor watering
Modified downspoutwater flows to rain barrelthrough screened atrium
grateOverflow drain
pipe, whenbarrel is fullwater flowsonto lawn
Garden hosefor wateringwhen not in
use clip to topof barrel
Optional spigot
SUPPLIES! One 55-gallon drum
! One 5’ section vinyl garden hose (3/4” OD x 5/8” ID)
! One 4” diameter atrium grate (basket used in garden ponds andpool skimmers)
! One 1/2” PVC male adapter
! One 3/4” x 1/2” PVC male adapter
! One 5’ section of drain hose, drain line, or sump pump line (1-1/4”)
! One 1-1/4” female barbed fitting and one 1-1/4” male threaded coupling
! One vinyl gutter elbow
! Drill (or a hole saw)
! Router, jig saw or coping saw
! Measuring tape
Optional
! Waterproof sealant (silicone caulk, PVC glue)
! Teflon tape
! Fiberglass window screen material
or mosquito netting
! Cinder blocks or wooden crate
SourcesPepsi Bottling Company
Charlie Dickerson #410-366-3500
South River FederationRain Barrel Community Action Team
Arlington Echo Outdoor Education Centerwww.arlingtonecho.net
Maryland Green Building Programwww.dnr.state.md.us/smartgrowth/greenbuilding/
rainbarrel.html
!
Storing rainwater for garden and lawn use helps recharge groundwa-ter naturally .
! Rain barrels reduce water pollution by reducing stormwater runoff,which can contain pollutants like sediment, oil, grease, bacteria, and nu-trients.
! Rain barrels are inexpensive and easy to build and install.

Native Plants for Rain Gardens = sun or part sun = part sun/part shade = shade
Fernsrattlesnake fernhay-scented fernGrassesblue wood sedgeCanada wild ryebottle brush grassVirginia wild rye
PerennialsbutterflyweedNew England asterjoe-pye weedwild snakerootcardinal flowerwild bergamotblue-eyed grass
hostagrass-leaf blazingstarShrubsmountain laurelhighbush blueberryspicebushinkberrysweet pepperbush
Solomon’s sealblack-eyed Susanwild pinkpurple conefloweryellowflag irisSt. John’s wortearly goldenroddaylily
Step 1: Size and Locate your Rain GardenFirst, measure the footprint of your house and determine how much of your rooftop area drains to thedownspout you’re using for your garden (for gutters with a downspout at each end, assume that halfthe water goes to each downspout). Be sure you measure the house footprint only; do not take theroof slope into account. The surface area of your rain garden should be between 20% and 30% of theroof area that will drain into the rain garden. Locate the garden at least 10 feet away from the house(to prevent soggy basements), and maintain a minimum 1% slope from the lawn down to the raingarden (you can also create a shallow ditch to ensure the water flows from roof to the garden, or usea downspout extension to direct the flow into the garden). Lay out the boundary of the garden with arope.
Rain garden sizing example:30’ x 30’ house area
1/4 of this area drains to one downspout15’ x 15’ = 225 ft2
20% of 225ft2 = 45ft2
30% of 225ft2 = 67.5ft2
The rain garden area should be between 45 and 67.5 square feet,depending on soil type (use 20% for sandier soils).
Step 2: Dig the Rain GardenTo enable the rain garden to hold several inches of water during a storm, you’ll have to dig a hole 3-4 inches deep across the entire surface of the garden. If the soil lacks organic material, you canimprove it by digging the hole 5-6 inches deep, and adding 2-3 inches of humus or other organicmaterial. Make sure the bottom is level. Next, test how the garden will hold water during a storm byletting water flow into the rain garden from a hose placed at the downspout. Based on this test,make any necessary adjustments (e.g., create a berm on the lower side of the garden using thediggings, or use a downspout extension or shallow ditch to direct the water into the garden).
Step 3: Add Plants to the Rain GardenChoose drought-tolerant plants that won’t require much watering, but make sure they can withstandwet soils for up to 24 hours. A list of native plants that meet these criteria is provided below. Alsotake into account how much sun your garden receives. It’s often helpful to draw out a planting planbefore you start, and mark planting areas within the garden with string. After planting, weeding maybe required until the plants become more established. You may also need to periodically prune someof the plants to let others grow. In the winter, leave dead or dormant plants standing and cut back inthe spring. Your garden may need a bit more maintenance than a lawn in the beginning, but in thelong run it will be easier to care for and provide many added benefits!
What Is a Rain Garden?A rain garden uses native landscaping to soak up rain water from your downspout. The middlepart of the garden holds several inches of water, allowing it to slowly infiltrate into the groundinstead of being delivered to the stormdrain all at once.
This instructional flyer was created by the South River Federation and the Center for Watershed Protection, August 2002This project was funded through a grant from the Chesapeake Bay Trust
1/4 of the roof drains to onedownspout = 15’ x 15’
dig down 3-4 inches
lay out the site
add plants
a beautiful two-year old rain garden!
SourcesWeems Creek Conservancy www.weemscreek.org
Rain Gardens: A household way to improve water quality inyour community University of Wisconsin -Extension andWisconsin Department of Natural Resources http://clean-water.uwex.edu/pubs/raingarden/gardens.pdf
15 feet 15 feet
How to Install a Rain Garden
InstructionsFollow the three steps below to install a rain garden in your yard. Materials you’ll need includeplants for the garden (see plant list below); a hose, rope or string; a level; a shovel or spade;humus or other soil amendments (optional); a measuring tape; and a downspout extension (alsooptional).
Source: Roger Bannerman
Source: Roger Bannerman
Source: Roger Bannerman
Source: Corinne Reed-Miller
Source: Corinne Reed-Miller
Source: Corinne Reed-Miller
Why Install a Rain Garden?A rain garden allows 30% more water to infiltrate into the ground than a conventional lawn. This helps replenish the groundwater supply (important duringa drought!), and reduces the amount of pollution that reaches our streams through stormwater runoff. Since studies show that the first inch of rainfall is
responsible for the bulk of the pollutants in stormwater, a rain garden is designed to temporarilyhold water from a one-inch rainstorm, and slowly filter out many common pollutants like sediment,oil, grease and nutrients. Rain gardens require less watering and fertilizer than conventional lawns,and provide habitat for birds and butterflies.
The South River Federation (SRF) is a non-profit organization dedicated to restoring, protectingand preserving the South River watershed. For more information on how you can help the protectthe South River or for information about membership, rain barrels or rain gardens, visit SRF’swebsite at www.geocities.com/RainForest/Wetlands/2002/ or call Drew Koslow, SRF presi-dent, at #410-990-9173 or send email to [email protected]
What Is the South River Federation?