Embed Size (px)
Citation preview
HOW TO: BUILD A RAISED-BED GARDEN
bhg.com/urbangardenplans © Copyright 2011, Meredith Corporation. All Rights Reserved.
WHAT YOU NEEDForty 2×4-inch 8-foot pressure-treated boardsTen 2×6-inch 8-foot pressure-treated boardsSixteen 1×2-inch 8-foot pressure-treated boardsThirty-two 2×4-inch 10-foot pressure-treated boards5-pound box of 2-1/2-inch deck screws 1-pound box of 1-5/8-inch deck screws1-pound box of #4 galvanized finish nails10-ounce cartridge of construction adhesiveExterior primer and paintMiter sawImpact driver with #2 Phillips driver bitElectric drill3/16-inch drill bit, 4-inch hole sawClampsCaulking gunHammerPaintbrush or roller
1. BUILD THE PLANTER BOX SIDESFrom the 2×4s, use a miter saw to cut 36 side slats 52 inches long and 36 end slats 28-1/2 inches long, making 45-degree cuts at both ends. Cut 20 uprights 32-1/2 inches long. To make L-shape corners to connect the sides to the ends, drill 3/16-inch holes through the face of eight uprights, 3/4 inch from one edge. Then lap the drilled face of these uprights over the edges of another eight uprights, and fasten them with 2-1/2-inch deck screws driven through the holes. You now have eight corner connectors with an L-shape cross section of 3-1/2×5 inches.
Arrange nine side slats edge to edge on a flat surface with the mitered ends facing up. Position a corner connector on the slats at each end with the 5-inch leg down, aligning the corner of the connector with the “heel” of the miters. Align the top and bottom slats with the ends of the connectors, drill 3/16-inch holes through the connector, and drive 2-1/2-inch deck screws through the connectors and into the slats. Now space the remaining slats to leave uniform gaps between them, drill 3/16-inch holes through the connectors, and drive 2-1/2-inch deck screws. Repeat to form three additional planter box sides. Next, center
one of the remaining uprights between each pair of corner connectors, drill 3/16-inch holes through the uprights, and drive 2-1/2-inch deck screws.
2. ATTACH THE ENDSHave a helper hold two planter box sides upright. Clamp end slats to the corner connectors at the top and bottom at both ends of the sides, aligning the top and bottom edges and butting the miters tightly together. Drill 3/16-inch holes through the connectors. Drive 2-1/2-inch deck screws through the connectors and into the slats. Align the remaining end slats with the side slats, drill holes, and drive screws. Repeat with the second pair of sides and remaining slats. You now have two rectangular boxes under each post to align the face of the post with the surface of the adjacent deck board. (This is the inside face of the bin back.) Now drive 3-inch deck screws through the pallet rail end blocks and into the posts.
3. ADD THE TRIMFrom 2x6s, use the miter saw to cut four side sills 54 inches long and four end sills 30 inches long, making 45-degree cuts at both ends. Then drill 3/16-inch holes from the inside of each box through the top 2x4 side and end slats, angling the holes so they exit at the center of each slat. Now lay the sills flat on top of the 2x4 box walls, aligning the miters and overhanging the sides evenly all around. Drive 1-5/8-inch deck screws through the holes in the slats and into the sills. Next, from the 1x2s, cut 16 corner caps 32-1/2 inches long. Squeeze a bead of construction adhesive onto the backs of the caps, position two caps at each planter box corner with one cap overlapping the other and the top ends against the bottoms of the sills. Secure the caps with just enough #4 galvanized finish nails to hold them in place until the adhesive cures.
4. DO FINISHING TOUCHESChuck a 4-inch hole saw into your electric drill and cut two holes in each side wall, centered on the joint between the top and second slats. Cut another hole in each side midway between the first holes and centered on the joint between the fourth and fifth slats from the top. Use these holes to grow strawberries or other plants that will trail down the sides. If you will be adding the bench box and/or the tool bin to the ensemble, do not cut holes in the planter box side that accepts the bench or the tool bin.
Apply exterior latex primer and paint to the planter boxes, or leave the wood exposed. Once the paint is dry, fill the planters with potting soil and plants. (If you are building the trellis, don’t add the potting soil until the trellis is in place.) Remember to fertilize periodically to keep your plants healthy.
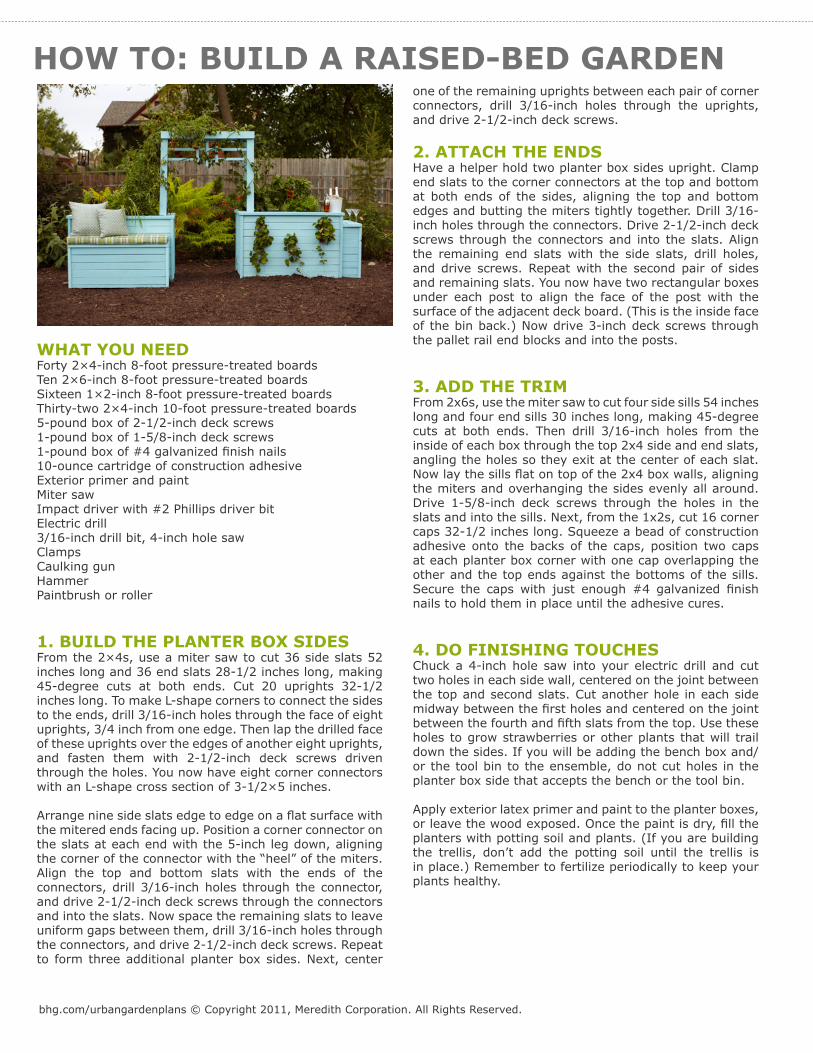
HOW TO: BUILD A GARDEN TRELLIS
bhg.com/urbangardenplans © Copyright 2011, Meredith Corporation. All Rights Reserved.
WHAT YOU NEEDFive 2×4-inch 8-foot pressure-treated boardsSeven 1×2-inch 8-foot pressure-treated boards1-pound box of 2-1/2-inch deck screws1-1/4-inch collated nails for the brad nailerExterior primer and paintMiter sawElectric drillClampImpact driver with #2 Phillips driver bitPneumatic or electric brad nailerPaintbrush or roller
1. BUILD THE FRAMEBefore you begin, decide how tall you want your trellis to stand. We started with 8-foot uprights, then decided to trim them to 7 feet. This gives the arrangement a more intimate feel, but you’ll have to duck to walk under the trellis. When you determine the height of your uprights, cut four 2×4s to that length. Position the planter boxes with the ends 4 feet apart. Then place the uprights in the inside corners of the facing ends of the boxes with the 3-1/2-inch dimension parallel to the box sides. Now drill 3/16-inch holes through the uprights and drive 2-1/2-inch deck screws through the uprights and into the planter box corner connectors.
Cut one 2×4 into two headers 48 inches long. Using a header as a gauge, adjust the distance between the planter boxes so the header ends are flush with the far edges of the uprights. Then clamp the headers to the outside faces of the uprights, flush at the top and far edges. Drill 3/16-inch holes through the inside faces of the uprights and drive 2-1/2-inch deck screws through the uprights and into the headers.
2. MAKE THE LATTICEFrom the 1×2s, cut eight rails 48 inches long. Position one rail on the inside faces of the front uprights, with the top of the rail 4 inches down from the bottom of the header. Fasten the rail to the upright using a brad nailer with 1-1/4-inch nails. Then position a second rail 4 inches below the first rail and nail it in place. Repeat on the inside faces of the rear uprights with two more rails.
From the remaining 1×2s, cut 11 crossbars 17 inches long. Starting at one end, position a crossbar across both headers, centered 4 inches from the ends. Use the brad nailer to attach the crossbar to the headers. Then nail the remaining crossbars to the headers on 4 inch centers. Now position the four remaining rails on top of the crossbars and parallel to the headers. Space them evenly front to back on 4 inch centers and nail them in place.
Finally, from 1×2s, cut two center verticals 13 inches long and four flanking verticals 9 inches long. Position a center vertical at the midpoint of the front rails so that it evenly overlaps the upper and lower rails and nail it in place. Position a pair of flanking verticals 4 inches from each side of the center vertical so they evenly overlap the upper and lower rails and nail them in place. Repeat on the rear rails.
3. APPLY A FINISHApply exterior latex primer and paint to the trellis, or leave the wood exposed. Plant vines or other climbing plants in the planter boxes next to the uprights and train them onto the trellis.
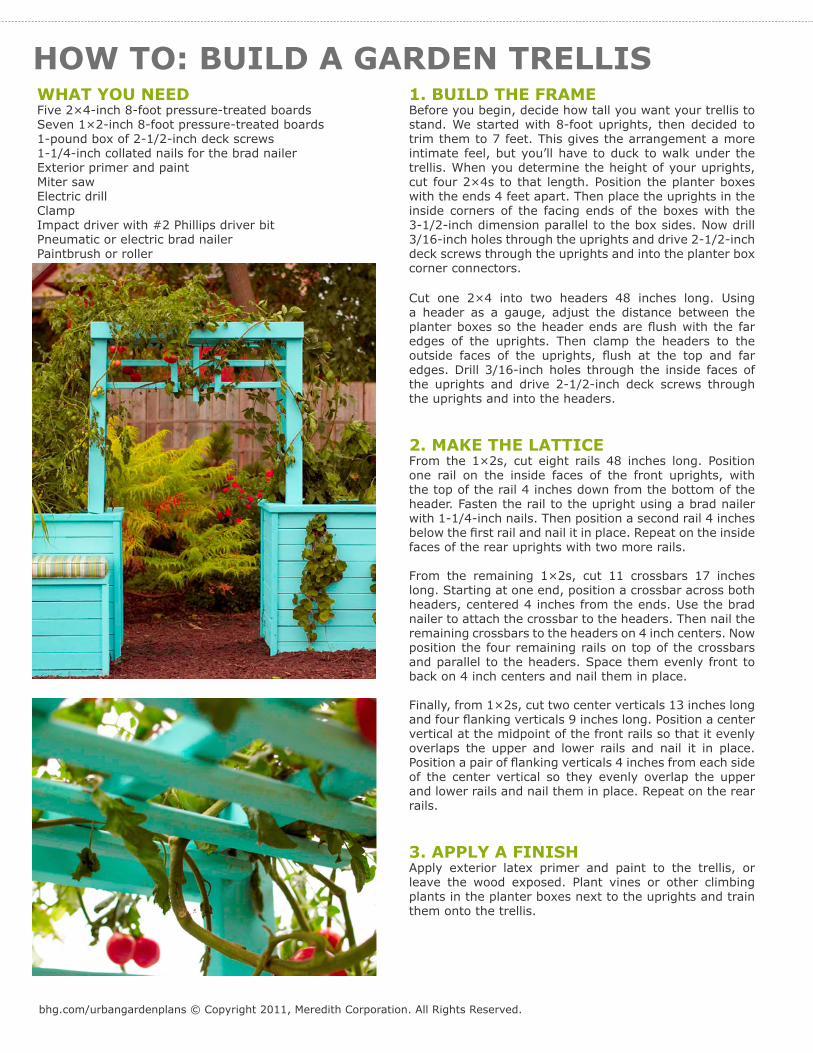
HOW TO: BUILD A BENCH BOX
bhg.com/urbangardenplans © Copyright 2011, Meredith Corporation. All Rights Reserved.
WHAT YOU NEED1-pound box of 2-1/2-inch deck screws1-pound box of #4 galvanized finish nails10-ounce cartridge of construction adhesiveFour 6-inch deck screwsTwo 4-inch door hingesExterior primer and paintMiter sawElectric drillImpact driver with #2 Phillips driver bit3/16-inch drill bitClampsHammerCaulking gunPaintbrush or roller
1. BUILD A THREE-SIDED BOXFrom the 2×4s, use a miter saw to cut 6 front slats 47 inches long and 12 end slats 12-1/2 inches long. Make 45-degree cuts at both ends of the front slats and at only one end of the end slats. Cut eight uprights 21-1/2 inches long. To make L-shape corners to connect the sides to the ends, drill 3/16-inch holes through the face of four uprights, 3/4 inch from one edge, then lap the drilled face of these uprights over the edges of another four uprights, and fasten them with 2-1/2-inch deck screws driven through the holes. You now have four corner connectors with an L-shape cross section of 3-1/2×5 inches.
Arrange the front slats edge to edge on a flat surface with the mitered ends facing up. Position a corner connector on the slats at each end with the 5-inch leg down, aligning the corner of the connector with the “heel” of the miters. Then align the top and bottom slats with the ends of the connectors, drill 3/16-inch holes through the connector, and drive 2-1/2-inch deck screws through the connectors and into the slats. Now space the remaining slats to leave uniform gaps between them, drill 3/16-inch holes through the connectors, and drive 2-1/2-inch deck screws.
STEP 1 CONTINUEDArrange six end slats edge to edge on a flat surface with the mitered ends facing up. Position a corner connector on the slats at the square-cut end with the 3-1/2-inch leg down, aligning the corner of the connector with the ends of the slats. Then align the top and bottom slats with the ends of the connectors, drill 3/16-inch holes through the connector, and drive 2-1/2-inch deck screws through the connectors and into the slats. Next, space the remaining slats to leave uniform gaps between them, drill 3/16-inch holes through the connectors, and drive 2-1/2-inch deck screws. Repeat to make a second box end.
With the front assembly on a flat surface and the miters facing up, clamp one end assembly to the corner connectors, aligning the top and bottom front and end slats and butting the miters tightly together. Drill 3/16-inch holes through the connectors. Drive 2-1/2-inch deck screws through the connectors and into the slats. Align the remaining end slats with the front slats, drill holes, and drive screws. Repeat with the other end. You now have a three-sided box.
CONTINUED ON NEXT PAGE
HOW TO: BUILD A BENCH BOX (PAGE 2)
bhg.com/urbangardenplans © Copyright 2011, Meredith Corporation. All Rights Reserved.
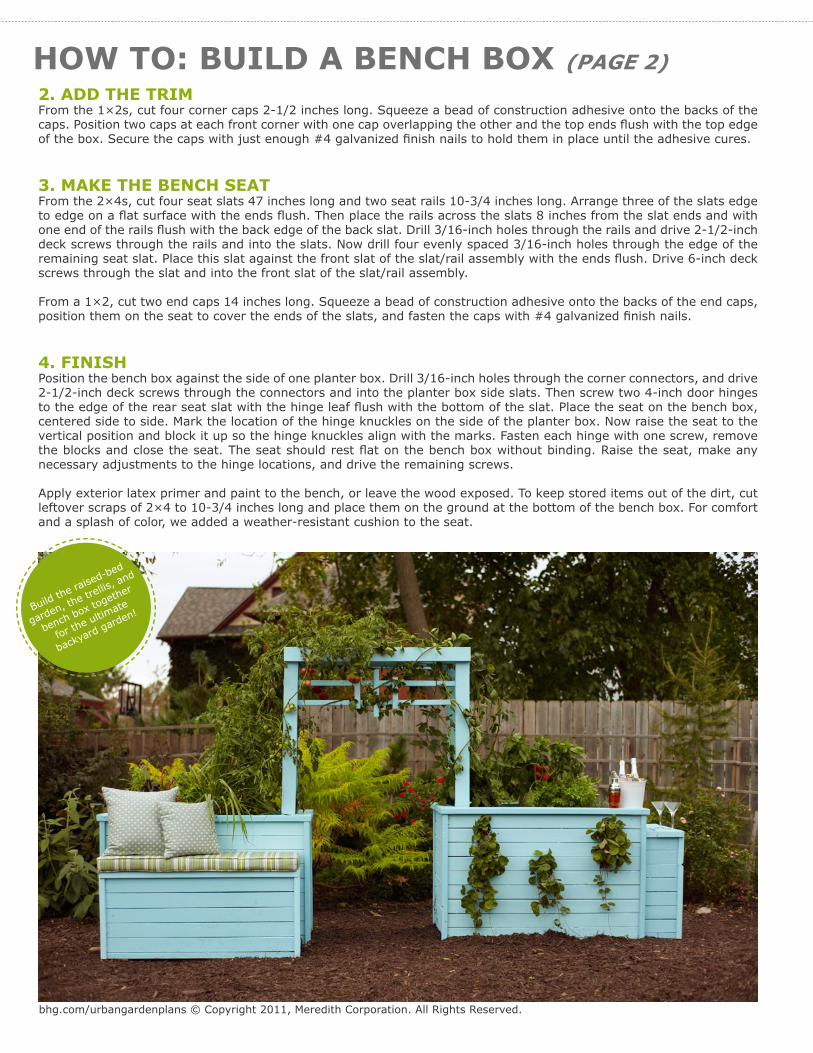
2. ADD THE TRIMFrom the 1×2s, cut four corner caps 2-1/2 inches long. Squeeze a bead of construction adhesive onto the backs of the caps. Position two caps at each front corner with one cap overlapping the other and the top ends flush with the top edge of the box. Secure the caps with just enough #4 galvanized finish nails to hold them in place until the adhesive cures.
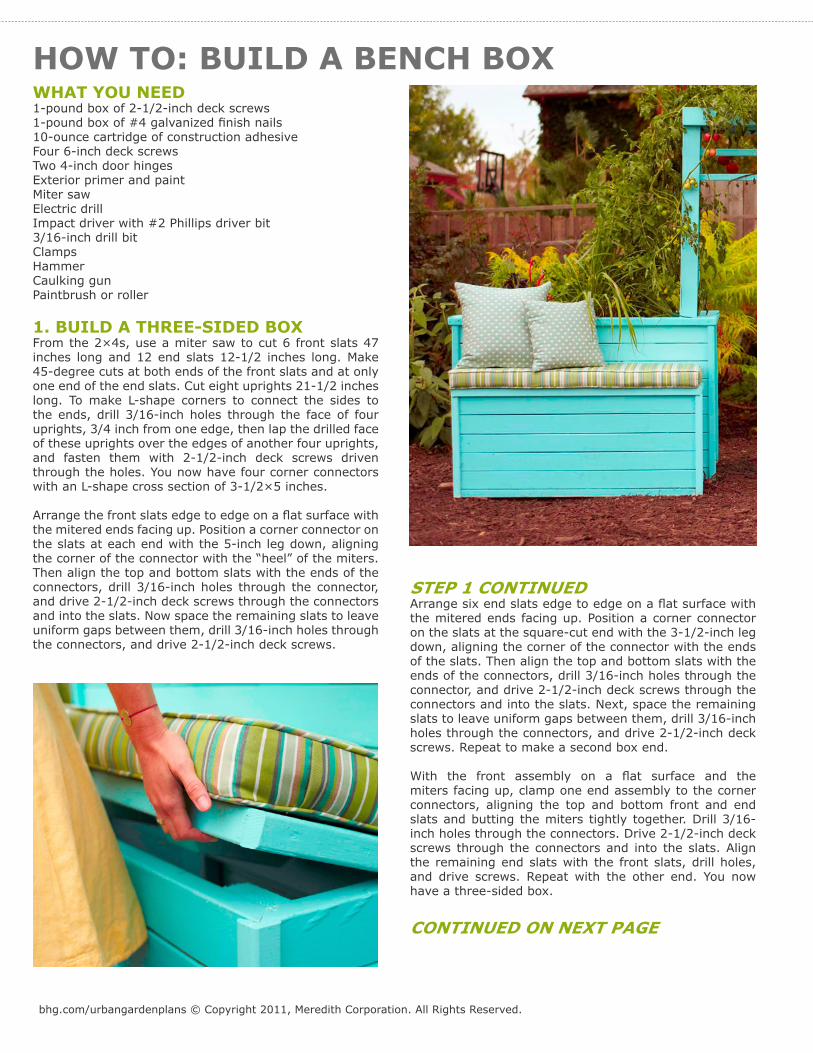
3. MAKE THE BENCH SEATFrom the 2×4s, cut four seat slats 47 inches long and two seat rails 10-3/4 inches long. Arrange three of the slats edge to edge on a flat surface with the ends flush. Then place the rails across the slats 8 inches from the slat ends and with one end of the rails flush with the back edge of the back slat. Drill 3/16-inch holes through the rails and drive 2-1/2-inch deck screws through the rails and into the slats. Now drill four evenly spaced 3/16-inch holes through the edge of the remaining seat slat. Place this slat against the front slat of the slat/rail assembly with the ends flush. Drive 6-inch deck screws through the slat and into the front slat of the slat/rail assembly.
From a 1×2, cut two end caps 14 inches long. Squeeze a bead of construction adhesive onto the backs of the end caps, position them on the seat to cover the ends of the slats, and fasten the caps with #4 galvanized finish nails.
4. FINISHPosition the bench box against the side of one planter box. Drill 3/16-inch holes through the corner connectors, and drive 2-1/2-inch deck screws through the connectors and into the planter box side slats. Then screw two 4-inch door hinges to the edge of the rear seat slat with the hinge leaf flush with the bottom of the slat. Place the seat on the bench box, centered side to side. Mark the location of the hinge knuckles on the side of the planter box. Now raise the seat to the vertical position and block it up so the hinge knuckles align with the marks. Fasten each hinge with one screw, remove the blocks and close the seat. The seat should rest flat on the bench box without binding. Raise the seat, make any necessary adjustments to the hinge locations, and drive the remaining screws.
Apply exterior latex primer and paint to the bench, or leave the wood exposed. To keep stored items out of the dirt, cut leftover scraps of 2×4 to 10-3/4 inches long and place them on the ground at the bottom of the bench box. For comfort and a splash of color, we added a weather-resistant cushion to the seat.
Build the raised-bed
garden, the tre
llis, and
bench box together
for the ultim
ate
backyard garden!
HOW TO: BUILD A COMPOST BIN
bhg.com/urbangardenplans © Copyright 2011, Meredith Corporation. All Rights Reserved.
WHAT YOU NEEDThree double-sided shipping pallets of the same sizeThree 4×4-inch 8-foot pressure-treated postsThirty 3-inch deck screwsExterior primerExterior paintShovelCircular saw or jigsawElectric drillImpact driver with #2 Phillips bitPaintbrush or roller Clamps
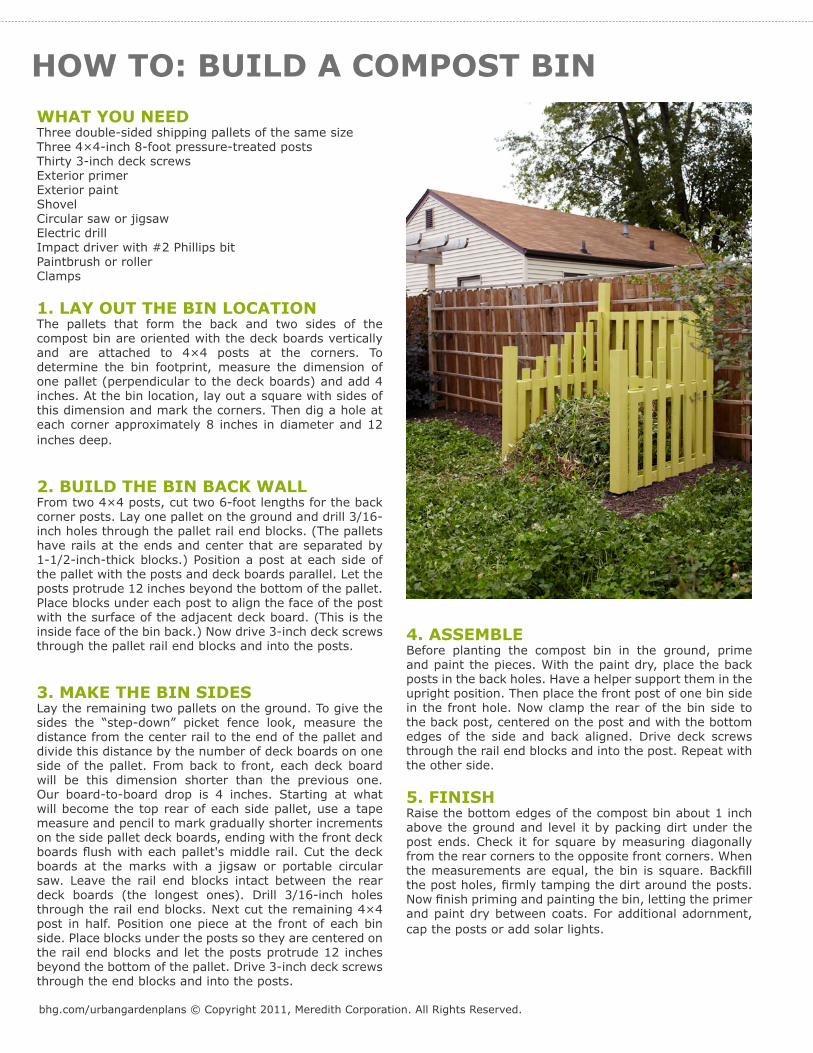
1. LAY OUT THE BIN LOCATIONThe pallets that form the back and two sides of the compost bin are oriented with the deck boards vertically and are attached to 4×4 posts at the corners. To determine the bin footprint, measure the dimension of one pallet (perpendicular to the deck boards) and add 4 inches. At the bin location, lay out a square with sides of this dimension and mark the corners. Then dig a hole at each corner approximately 8 inches in diameter and 12 inches deep.
2. BUILD THE BIN BACK WALLFrom two 4×4 posts, cut two 6-foot lengths for the back corner posts. Lay one pallet on the ground and drill 3/16-inch holes through the pallet rail end blocks. (The pallets have rails at the ends and center that are separated by 1-1/2-inch-thick blocks.) Position a post at each side of the pallet with the posts and deck boards parallel. Let the posts protrude 12 inches beyond the bottom of the pallet. Place blocks under each post to align the face of the post with the surface of the adjacent deck board. (This is the inside face of the bin back.) Now drive 3-inch deck screws through the pallet rail end blocks and into the posts.
3. MAKE THE BIN SIDESLay the remaining two pallets on the ground. To give the sides the “step-down” picket fence look, measure the distance from the center rail to the end of the pallet and divide this distance by the number of deck boards on one side of the pallet. From back to front, each deck board will be this dimension shorter than the previous one. Our board-to-board drop is 4 inches. Starting at what will become the top rear of each side pallet, use a tape measure and pencil to mark gradually shorter increments on the side pallet deck boards, ending with the front deck boards flush with each pallet's middle rail. Cut the deck boards at the marks with a jigsaw or portable circular saw. Leave the rail end blocks intact between the rear deck boards (the longest ones). Drill 3/16-inch holes through the rail end blocks. Next cut the remaining 4×4 post in half. Position one piece at the front of each bin side. Place blocks under the posts so they are centered on the rail end blocks and let the posts protrude 12 inches beyond the bottom of the pallet. Drive 3-inch deck screws through the end blocks and into the posts.
4. ASSEMBLEBefore planting the compost bin in the ground, prime and paint the pieces. With the paint dry, place the back posts in the back holes. Have a helper support them in the upright position. Then place the front post of one bin side in the front hole. Now clamp the rear of the bin side to the back post, centered on the post and with the bottom edges of the side and back aligned. Drive deck screws through the rail end blocks and into the post. Repeat with the other side.
5. FINISHRaise the bottom edges of the compost bin about 1 inch above the ground and level it by packing dirt under the post ends. Check it for square by measuring diagonally from the rear corners to the opposite front corners. When the measurements are equal, the bin is square. Backfill the post holes, firmly tamping the dirt around the posts. Now finish priming and painting the bin, letting the primer and paint dry between coats. For additional adornment, cap the posts or add solar lights.
HOW TO: BUILD A CHICKEN COOP
bhg.com/urbangardenplans © Copyright 2011, Meredith Corporation. All Rights Reserved.
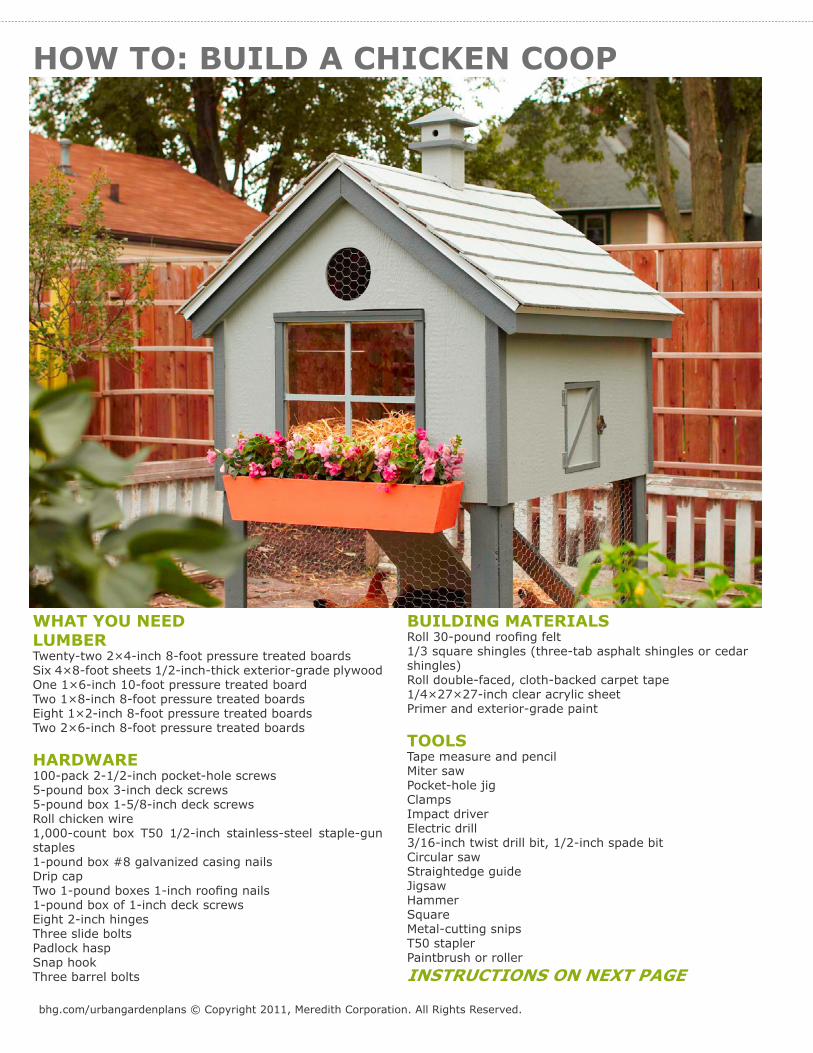
WHAT YOU NEEDLUMBERTwenty-two 2×4-inch 8-foot pressure treated boardsSix 4×8-foot sheets 1/2-inch-thick exterior-grade plywoodOne 1×6-inch 10-foot pressure treated boardTwo 1×8-inch 8-foot pressure treated boardsEight 1×2-inch 8-foot pressure treated boardsTwo 2×6-inch 8-foot pressure treated boards
HARDWARE100-pack 2-1/2-inch pocket-hole screws5-pound box 3-inch deck screws5-pound box 1-5/8-inch deck screwsRoll chicken wire 1,000-count box T50 1/2-inch stainless-steel staple-gun staples1-pound box #8 galvanized casing nailsDrip capTwo 1-pound boxes 1-inch roofing nails1-pound box of 1-inch deck screwsEight 2-inch hingesThree slide boltsPadlock haspSnap hookThree barrel bolts
BUILDING MATERIALSRoll 30-pound roofing felt1/3 square shingles (three-tab asphalt shingles or cedar shingles)Roll double-faced, cloth-backed carpet tape1/4×27×27-inch clear acrylic sheetPrimer and exterior-grade paint
TOOLSTape measure and pencilMiter sawPocket-hole jigClamps Impact driverElectric drill3/16-inch twist drill bit, 1/2-inch spade bitCircular sawStraightedge guideJigsawHammerSquareMetal-cutting snipsT50 staplerPaintbrush or roller
INSTRUCTIONS ON NEXT PAGE
HOW TO: BUILD A CHICKEN COOP (PAGE 2)
bhg.com/urbangardenplans © Copyright 2011, Meredith Corporation. All Rights Reserved.
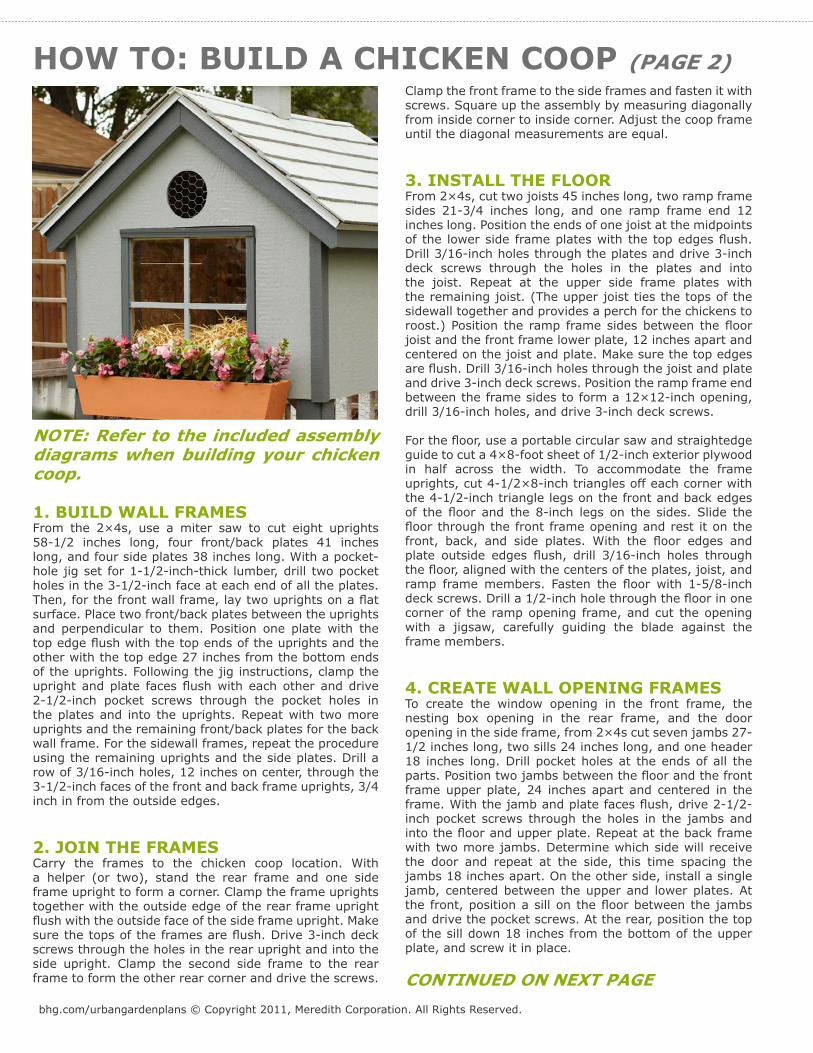
NOTE: Refer to the included assembly diagrams when building your chicken coop.
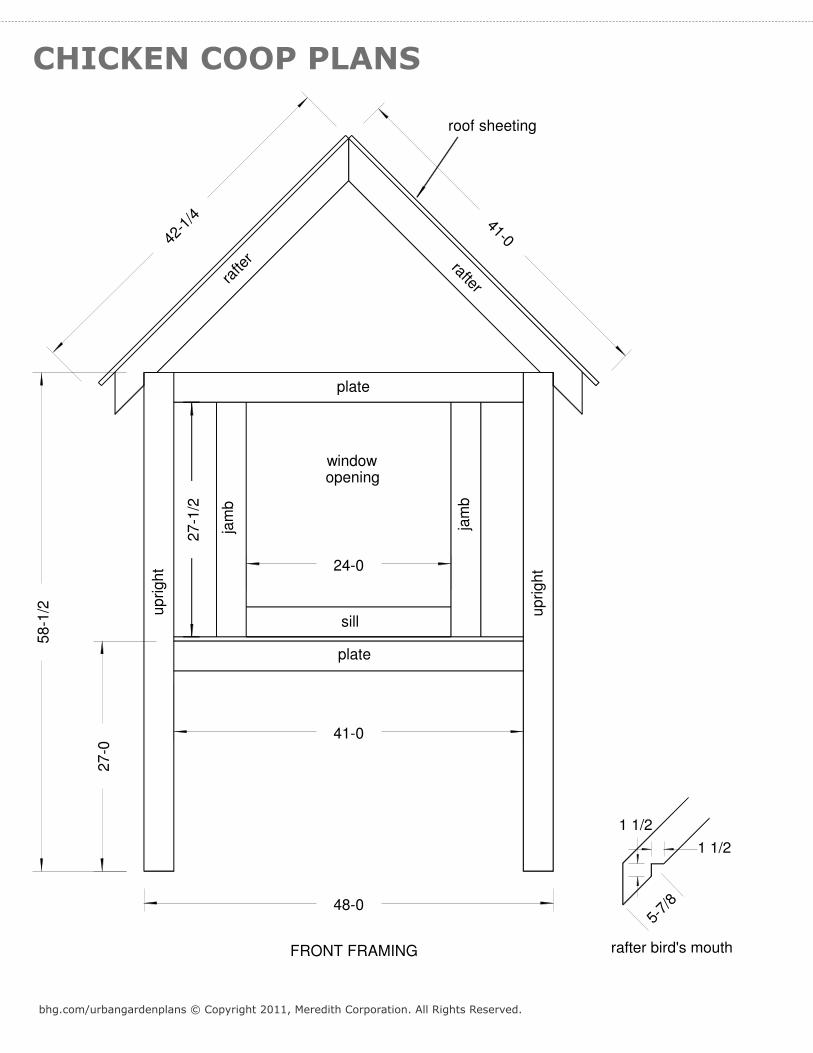
1. BUILD WALL FRAMESFrom the 2×4s, use a miter saw to cut eight uprights 58-1/2 inches long, four front/back plates 41 inches long, and four side plates 38 inches long. With a pocket-hole jig set for 1-1/2-inch-thick lumber, drill two pocket holes in the 3-1/2-inch face at each end of all the plates. Then, for the front wall frame, lay two uprights on a flat surface. Place two front/back plates between the uprights and perpendicular to them. Position one plate with the top edge flush with the top ends of the uprights and the other with the top edge 27 inches from the bottom ends of the uprights. Following the jig instructions, clamp the upright and plate faces flush with each other and drive 2-1/2-inch pocket screws through the pocket holes in the plates and into the uprights. Repeat with two more uprights and the remaining front/back plates for the back wall frame. For the sidewall frames, repeat the procedure using the remaining uprights and the side plates. Drill a row of 3/16-inch holes, 12 inches on center, through the 3-1/2-inch faces of the front and back frame uprights, 3/4 inch in from the outside edges.
2. JOIN THE FRAMESCarry the frames to the chicken coop location. With a helper (or two), stand the rear frame and one side frame upright to form a corner. Clamp the frame uprights together with the outside edge of the rear frame upright flush with the outside face of the side frame upright. Make sure the tops of the frames are flush. Drive 3-inch deck screws through the holes in the rear upright and into the side upright. Clamp the second side frame to the rear frame to form the other rear corner and drive the screws.
Clamp the front frame to the side frames and fasten it with screws. Square up the assembly by measuring diagonally from inside corner to inside corner. Adjust the coop frame until the diagonal measurements are equal.
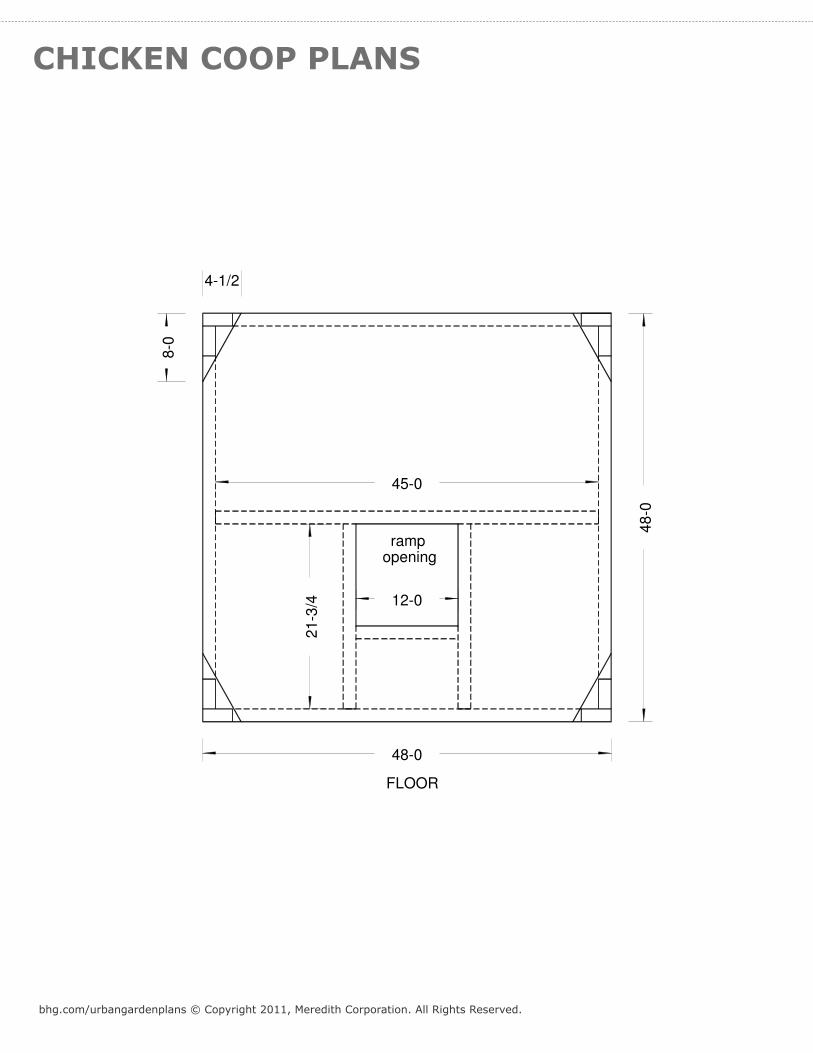
3. INSTALL THE FLOORFrom 2×4s, cut two joists 45 inches long, two ramp frame sides 21-3/4 inches long, and one ramp frame end 12 inches long. Position the ends of one joist at the midpoints of the lower side frame plates with the top edges flush. Drill 3/16-inch holes through the plates and drive 3-inch deck screws through the holes in the plates and into the joist. Repeat at the upper side frame plates with the remaining joist. (The upper joist ties the tops of the sidewall together and provides a perch for the chickens to roost.) Position the ramp frame sides between the floor joist and the front frame lower plate, 12 inches apart and centered on the joist and plate. Make sure the top edges are flush. Drill 3/16-inch holes through the joist and plate and drive 3-inch deck screws. Position the ramp frame end between the frame sides to form a 12×12-inch opening, drill 3/16-inch holes, and drive 3-inch deck screws.
For the floor, use a portable circular saw and straightedge guide to cut a 4×8-foot sheet of 1/2-inch exterior plywood in half across the width. To accommodate the frame uprights, cut 4-1/2×8-inch triangles off each corner with the 4-1/2-inch triangle legs on the front and back edges of the floor and the 8-inch legs on the sides. Slide the floor through the front frame opening and rest it on the front, back, and side plates. With the floor edges and plate outside edges flush, drill 3/16-inch holes through the floor, aligned with the centers of the plates, joist, and ramp frame members. Fasten the floor with 1-5/8-inch deck screws. Drill a 1/2-inch hole through the floor in one corner of the ramp opening frame, and cut the opening with a jigsaw, carefully guiding the blade against the frame members.
4. CREATE WALL OPENING FRAMESTo create the window opening in the front frame, the nesting box opening in the rear frame, and the door opening in the side frame, from 2×4s cut seven jambs 27-1/2 inches long, two sills 24 inches long, and one header 18 inches long. Drill pocket holes at the ends of all the parts. Position two jambs between the floor and the front frame upper plate, 24 inches apart and centered in the frame. With the jamb and plate faces flush, drive 2-1/2-inch pocket screws through the holes in the jambs and into the floor and upper plate. Repeat at the back frame with two more jambs. Determine which side will receive the door and repeat at the side, this time spacing the jambs 18 inches apart. On the other side, install a single jamb, centered between the upper and lower plates. At the front, position a sill on the floor between the jambs and drive the pocket screws. At the rear, position the top of the sill down 18 inches from the bottom of the upper plate, and screw it in place.
CONTINUED ON NEXT PAGE

HOW TO: BUILD A CHICKEN COOP (PAGE 3)
bhg.com/urbangardenplans © Copyright 2011, Meredith Corporation. All Rights Reserved.
5. ADD THE ROOF FRAMEFrom 2×4s, use the miter saw to cut 12 rafters 42-1/2 inches long, making 45-degree cuts at both ends with the cut angles going in the same direction. To make a “bird’s mouth” notch in the rafter where it will sit on the top plate of the side wall, measure 5-7/8 inches from the point of one rafter and use a square to mark a line perpendicular to the rafter edge. Draw an equilateral triangle with 1-1/2-inch-long legs with the perpendicular line running through the 90-degree corner of the triangle and the hypotenuse along the rafter edge. (One leg of the triangle is parallel to the rafter end cut and the other leg is perpendicular to the end cut.) Cut the notch with a jigsaw. (The bird’s mouth cutout is at the bottom end of the rafter, cut into the bottom edge.) Using this rafter as a template, trace the notch onto seven additional rafters and cut them out. Set the remaining four rafters aside.
Using the jig, drill two pocket holes at the top ends of four rafters, offsetting the holes closer to the bottom of the 45-degree end cut. Drill a pocket hole at each bird’s mouth, positioning the jig against the triangle leg that will be parallel to the ground. Lay the rafters flat on the ground in pairs, one with pocket holes at the top and one without. With the angled ends held tightly together, drive the pocket screws. With a helper, carefully position two sets of rafters, one pair at a time, on the front and rear frames with the bird’s mouths sitting on the tops of the uprights. Drive the pocket screws. Position the remaining rafter pairs on the side frame upper plates, spacing them 16 inches on center between the front and rear rafters. Temporarily brace the rafters in place.
6. SHEET THE WALLSFor the front wall, clamp a 4×8-foot sheet of 1/2-inch exterior plywood to the frame, leaving 1-1/2 inches of the frame lower plate exposed. Trace the top edges of the rafters onto the plywood. Remove the plywood and cut along the lines using a portable circular saw and straightedge guide. For the gable vent, mark a point on the centerline of the sheet, 22 inches down from the point of the gable. With this point as the center, draw an 8-inch-diameter circle. Drill a 1/2-inch hole inside the circle and cut it out with the jigsaw. Cut a 12×12-inch piece of chicken wire and staple it over the hole on the inside face. Re-clamp the plywood to the frame. Drill 3/16-inch holes through the plywood where there are frame members, and drive 1-5/8-inch deck screws through the holes and into the frame members. Repeat for the rear wall.
For the side walls, cut two 37×48-inch pieces of 1/2-inch plywood. Clamp one piece to one side frame with the top edge against the bottom edges of the rafters. To mark notches for the rafters, hold a square against the sides of the rafters and draw lines onto the plywood. Measure from the top edge of the sheet to the top of a rafter. Remove the sheet, mark the depth of the rafter notches, and cut them with a jigsaw. Re-clamp the sheet to the frame. Drill 3/16-inch holes through the plywood where there are frame members, and drive 1-5/8-inch deck screws through the holes and into the frame members. Repeat for the other sidewall.
Drill a 1/2-inch hole through the wall sheeting in one corner of the window opening frame and cut the opening with a jigsaw, carefully guiding the blade against the frame members. Repeat for the door and nesting box openings.
CONTINUED ON NEXT PAGE
HOW TO: BUILD A CHICKEN COOP (PAGE 4)
bhg.com/urbangardenplans © Copyright 2011, Meredith Corporation. All Rights Reserved.
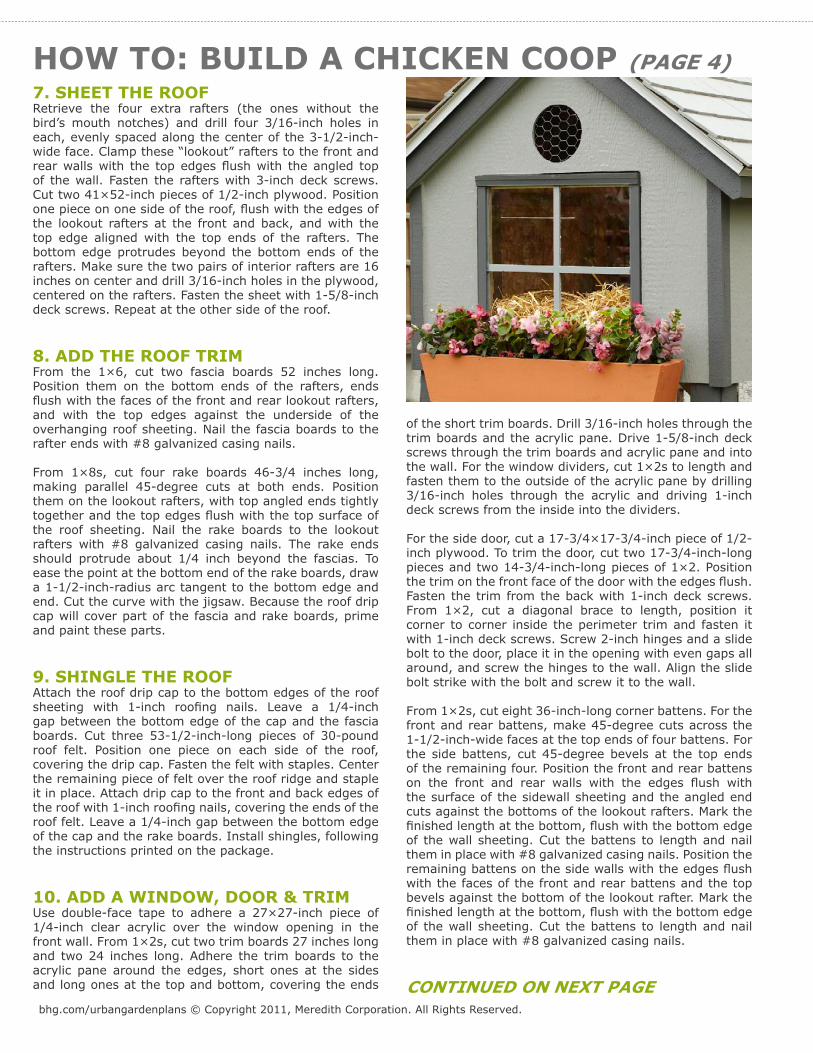
7. SHEET THE ROOFRetrieve the four extra rafters (the ones without the bird’s mouth notches) and drill four 3/16-inch holes in each, evenly spaced along the center of the 3-1/2-inch-wide face. Clamp these “lookout” rafters to the front and rear walls with the top edges flush with the angled top of the wall. Fasten the rafters with 3-inch deck screws. Cut two 41×52-inch pieces of 1/2-inch plywood. Position one piece on one side of the roof, flush with the edges of the lookout rafters at the front and back, and with the top edge aligned with the top ends of the rafters. The bottom edge protrudes beyond the bottom ends of the rafters. Make sure the two pairs of interior rafters are 16 inches on center and drill 3/16-inch holes in the plywood, centered on the rafters. Fasten the sheet with 1-5/8-inch deck screws. Repeat at the other side of the roof.
8. ADD THE ROOF TRIMFrom the 1×6, cut two fascia boards 52 inches long. Position them on the bottom ends of the rafters, ends flush with the faces of the front and rear lookout rafters, and with the top edges against the underside of the overhanging roof sheeting. Nail the fascia boards to the rafter ends with #8 galvanized casing nails.
From 1×8s, cut four rake boards 46-3/4 inches long, making parallel 45-degree cuts at both ends. Position them on the lookout rafters, with top angled ends tightly together and the top edges flush with the top surface of the roof sheeting. Nail the rake boards to the lookout rafters with #8 galvanized casing nails. The rake ends should protrude about 1/4 inch beyond the fascias. To ease the point at the bottom end of the rake boards, draw a 1-1/2-inch-radius arc tangent to the bottom edge and end. Cut the curve with the jigsaw. Because the roof drip cap will cover part of the fascia and rake boards, prime and paint these parts.
9. SHINGLE THE ROOFAttach the roof drip cap to the bottom edges of the roof sheeting with 1-inch roofing nails. Leave a 1/4-inch gap between the bottom edge of the cap and the fascia boards. Cut three 53-1/2-inch-long pieces of 30-pound roof felt. Position one piece on each side of the roof, covering the drip cap. Fasten the felt with staples. Center the remaining piece of felt over the roof ridge and staple it in place. Attach drip cap to the front and back edges of the roof with 1-inch roofing nails, covering the ends of the roof felt. Leave a 1/4-inch gap between the bottom edge of the cap and the rake boards. Install shingles, following the instructions printed on the package.
10. ADD A WINDOW, DOOR & TRIMUse double-face tape to adhere a 27×27-inch piece of 1/4-inch clear acrylic over the window opening in the front wall. From 1×2s, cut two trim boards 27 inches long and two 24 inches long. Adhere the trim boards to the acrylic pane around the edges, short ones at the sides and long ones at the top and bottom, covering the ends
of the short trim boards. Drill 3/16-inch holes through the trim boards and the acrylic pane. Drive 1-5/8-inch deck screws through the trim boards and acrylic pane and into the wall. For the window dividers, cut 1×2s to length and fasten them to the outside of the acrylic pane by drilling 3/16-inch holes through the acrylic and driving 1-inch deck screws from the inside into the dividers.
For the side door, cut a 17-3/4×17-3/4-inch piece of 1/2-inch plywood. To trim the door, cut two 17-3/4-inch-long pieces and two 14-3/4-inch-long pieces of 1×2. Position the trim on the front face of the door with the edges flush. Fasten the trim from the back with 1-inch deck screws. From 1×2, cut a diagonal brace to length, position it corner to corner inside the perimeter trim and fasten it with 1-inch deck screws. Screw 2-inch hinges and a slide bolt to the door, place it in the opening with even gaps all around, and screw the hinges to the wall. Align the slide bolt strike with the bolt and screw it to the wall.
From 1×2s, cut eight 36-inch-long corner battens. For the front and rear battens, make 45-degree cuts across the 1-1/2-inch-wide faces at the top ends of four battens. For the side battens, cut 45-degree bevels at the top ends of the remaining four. Position the front and rear battens on the front and rear walls with the edges flush with the surface of the sidewall sheeting and the angled end cuts against the bottoms of the lookout rafters. Mark the finished length at the bottom, flush with the bottom edge of the wall sheeting. Cut the battens to length and nail them in place with #8 galvanized casing nails. Position the remaining battens on the side walls with the edges flush with the faces of the front and rear battens and the top bevels against the bottom of the lookout rafter. Mark the finished length at the bottom, flush with the bottom edge of the wall sheeting. Cut the battens to length and nail them in place with #8 galvanized casing nails.
CONTINUED ON NEXT PAGE
HOW TO: BUILD A CHICKEN COOP (PAGE 5)
bhg.com/urbangardenplans © Copyright 2011, Meredith Corporation. All Rights Reserved.
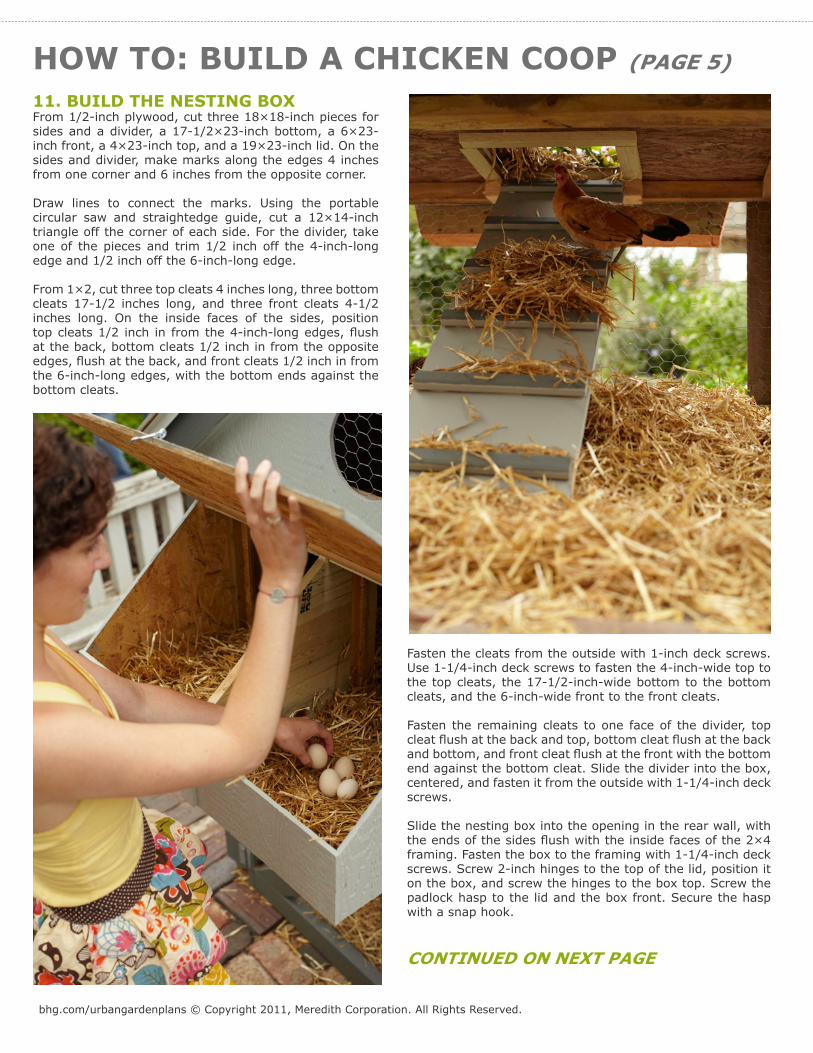
11. BUILD THE NESTING BOXFrom 1/2-inch plywood, cut three 18×18-inch pieces for sides and a divider, a 17-1/2×23-inch bottom, a 6×23-inch front, a 4×23-inch top, and a 19×23-inch lid. On the sides and divider, make marks along the edges 4 inches from one corner and 6 inches from the opposite corner.
Draw lines to connect the marks. Using the portable circular saw and straightedge guide, cut a 12×14-inch triangle off the corner of each side. For the divider, take one of the pieces and trim 1/2 inch off the 4-inch-long edge and 1/2 inch off the 6-inch-long edge.
From 1×2, cut three top cleats 4 inches long, three bottom cleats 17-1/2 inches long, and three front cleats 4-1/2 inches long. On the inside faces of the sides, position top cleats 1/2 inch in from the 4-inch-long edges, flush at the back, bottom cleats 1/2 inch in from the opposite edges, flush at the back, and front cleats 1/2 inch in from the 6-inch-long edges, with the bottom ends against the bottom cleats.
Fasten the cleats from the outside with 1-inch deck screws. Use 1-1/4-inch deck screws to fasten the 4-inch-wide top to the top cleats, the 17-1/2-inch-wide bottom to the bottom cleats, and the 6-inch-wide front to the front cleats.
Fasten the remaining cleats to one face of the divider, top cleat flush at the back and top, bottom cleat flush at the back and bottom, and front cleat flush at the front with the bottom end against the bottom cleat. Slide the divider into the box, centered, and fasten it from the outside with 1-1/4-inch deck screws.
Slide the nesting box into the opening in the rear wall, with the ends of the sides flush with the inside faces of the 2×4 framing. Fasten the box to the framing with 1-1/4-inch deck screws. Screw 2-inch hinges to the top of the lid, position it on the box, and screw the hinges to the box top. Screw the padlock hasp to the lid and the box front. Secure the hasp with a snap hook.
CONTINUED ON NEXT PAGE
HOW TO: BUILD A CHICKEN COOP (PAGE 6)
bhg.com/urbangardenplans © Copyright 2011, Meredith Corporation. All Rights Reserved.
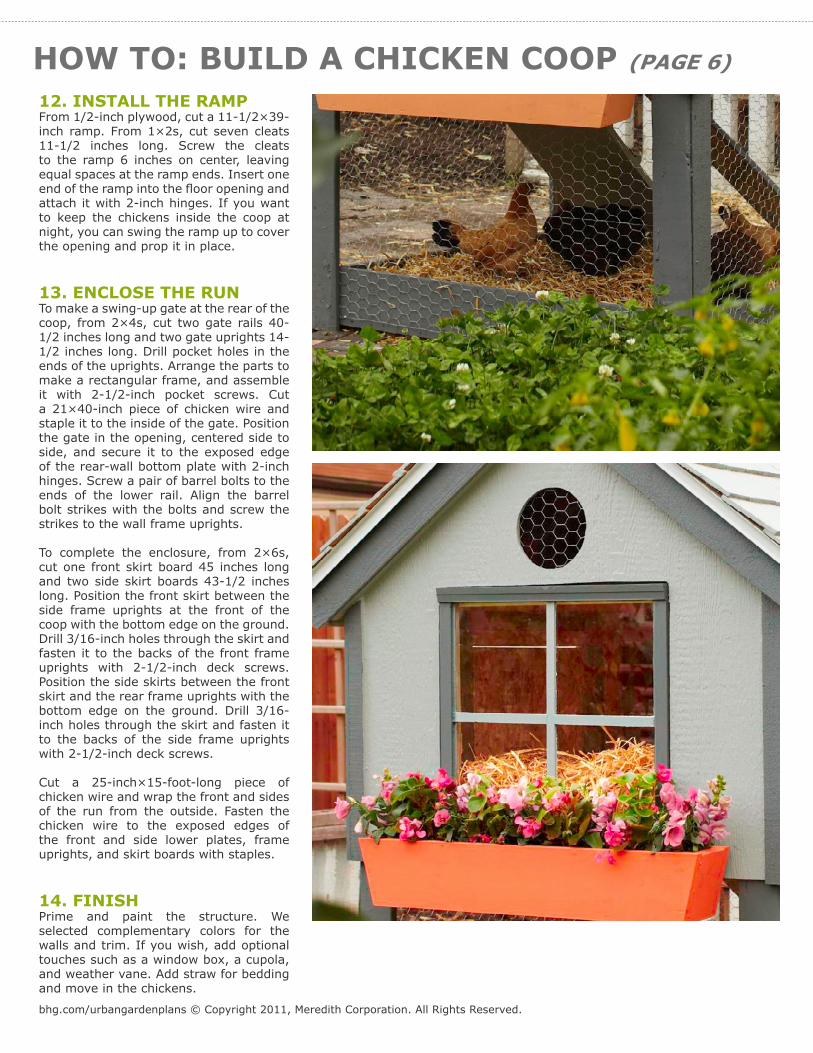
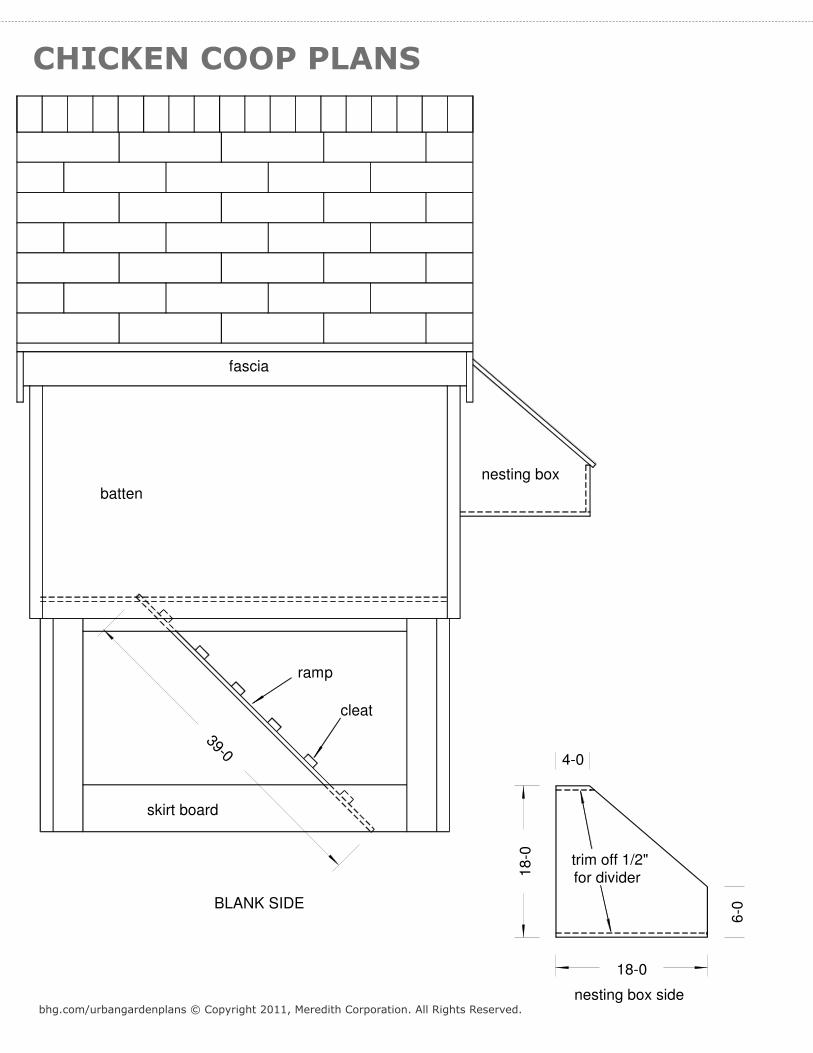
12. INSTALL THE RAMPFrom 1/2-inch plywood, cut a 11-1/2×39-inch ramp. From 1×2s, cut seven cleats 11-1/2 inches long. Screw the cleats to the ramp 6 inches on center, leaving equal spaces at the ramp ends. Insert one end of the ramp into the floor opening and attach it with 2-inch hinges. If you want to keep the chickens inside the coop at night, you can swing the ramp up to cover the opening and prop it in place.
13. ENCLOSE THE RUNTo make a swing-up gate at the rear of the coop, from 2×4s, cut two gate rails 40-1/2 inches long and two gate uprights 14-1/2 inches long. Drill pocket holes in the ends of the uprights. Arrange the parts to make a rectangular frame, and assemble it with 2-1/2-inch pocket screws. Cut a 21×40-inch piece of chicken wire and staple it to the inside of the gate. Position the gate in the opening, centered side to side, and secure it to the exposed edge of the rear-wall bottom plate with 2-inch hinges. Screw a pair of barrel bolts to the ends of the lower rail. Align the barrel bolt strikes with the bolts and screw the strikes to the wall frame uprights.
To complete the enclosure, from 2×6s, cut one front skirt board 45 inches long and two side skirt boards 43-1/2 inches long. Position the front skirt between the side frame uprights at the front of the coop with the bottom edge on the ground. Drill 3/16-inch holes through the skirt and fasten it to the backs of the front frame uprights with 2-1/2-inch deck screws. Position the side skirts between the front skirt and the rear frame uprights with the bottom edge on the ground. Drill 3/16-inch holes through the skirt and fasten it to the backs of the side frame uprights with 2-1/2-inch deck screws.
Cut a 25-inch×15-foot-long piece of chicken wire and wrap the front and sides of the run from the outside. Fasten the chicken wire to the exposed edges of the front and side lower plates, frame uprights, and skirt boards with staples.
14. FINISHPrime and paint the structure. We selected complementary colors for the walls and trim. If you wish, add optional touches such as a window box, a cupola, and weather vane. Add straw for bedding and move in the chickens.
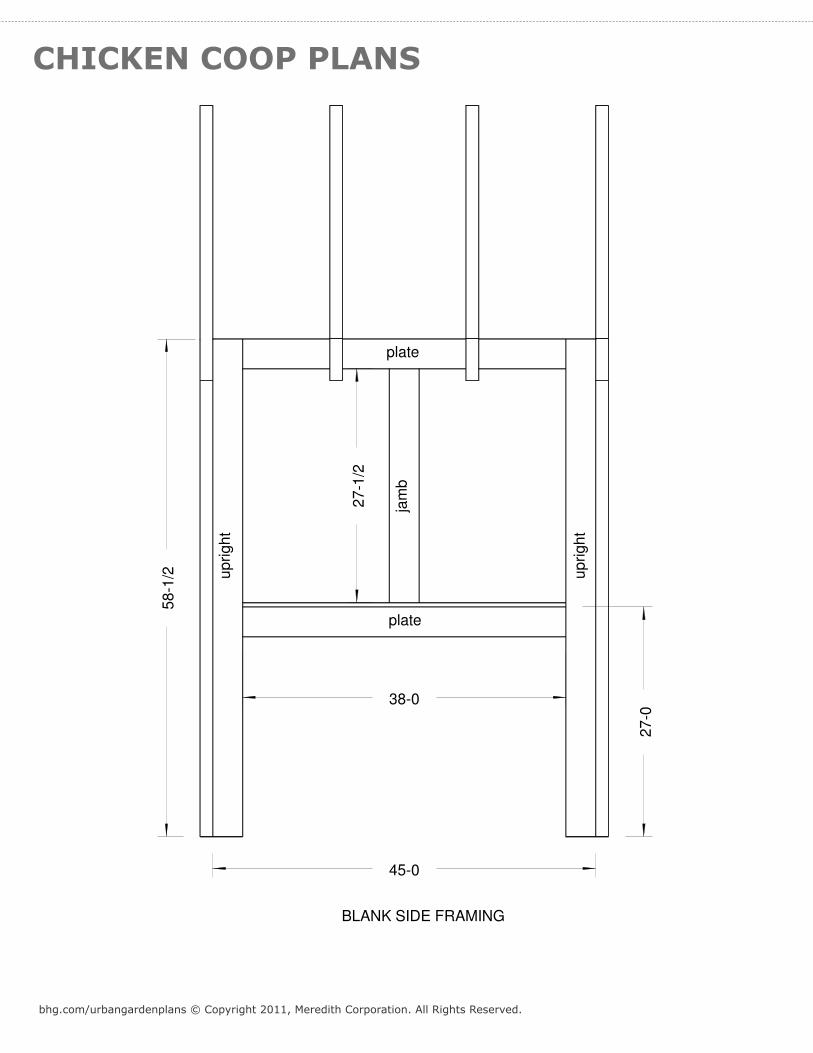
CHICKEN COOP PLANS
bhg.com/urbangardenplans © Copyright 2011, Meredith Corporation. All Rights Reserved.
BLANK SIDE FRAMING
27
-1/2
plate
plate
up
rig
ht
up
rig
ht
jam
b
45-0
27
-0
58
-1/2
38-0
CHICKEN COOP PLANS
bhg.com/urbangardenplans © Copyright 2011, Meredith Corporation. All Rights Reserved.
BLANK SIDE
39-0
fascia
nesting box
ramp
cleat
batten
skirt board
nesting box side
4-0
6-0
18-0
18
-0 trim off 1/2"for divider
5-7/
8
1 1/2
1 1/2
rafter bird's mouth

CHICKEN COOP PLANS
bhg.com/urbangardenplans © Copyright 2011, Meredith Corporation. All Rights Reserved.
DOOR SIDE FRAMING
18-0
27
-1/2
door opening
rafters2
7-0
58
-1/2
38-0
48-0
plate
plate
header
up
rig
ht
up
rig
ht
jam
b
jam
b
CHICKEN COOP PLANS
bhg.com/urbangardenplans © Copyright 2011, Meredith Corporation. All Rights Reserved.
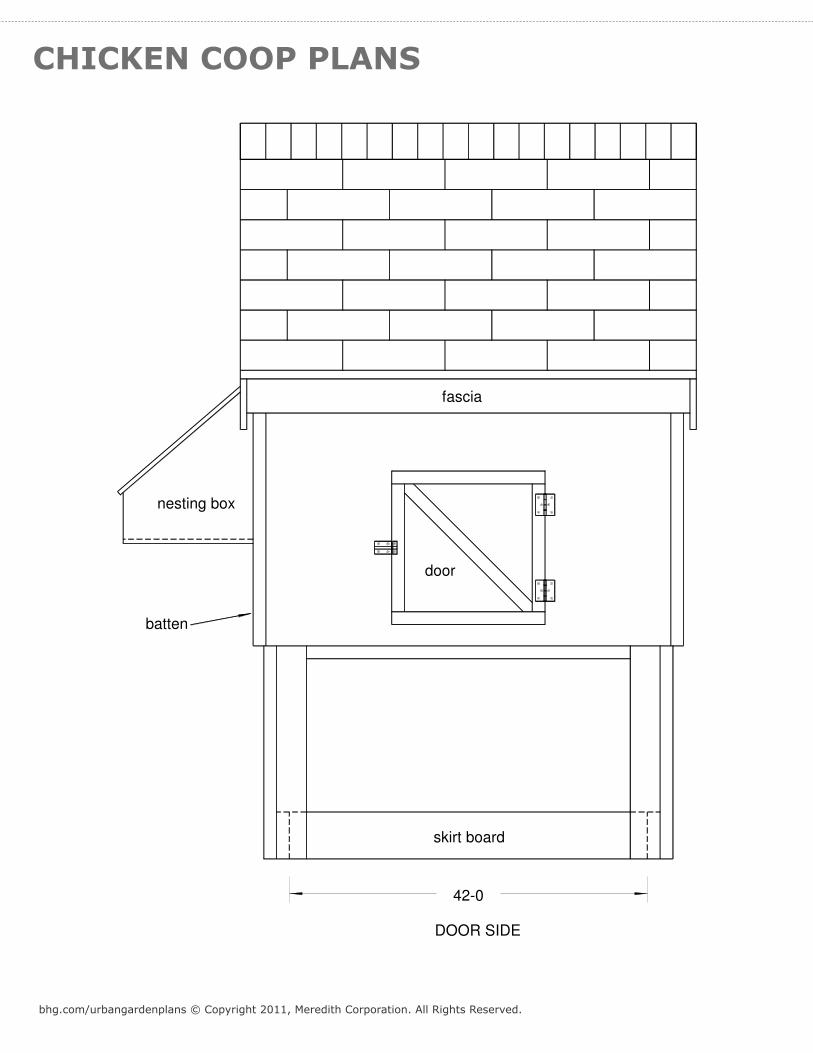
DOOR SIDE
42-0
fascia
door
nesting box
skirt board
batten
CHICKEN COOP PLANS
bhg.com/urbangardenplans © Copyright 2011, Meredith Corporation. All Rights Reserved.
45-0
21
-3/4 12-0
4-1/2
8-0
FLOOR
rampopening
48-0
48
-0
CHICKEN COOP PLANS
bhg.com/urbangardenplans © Copyright 2011, Meredith Corporation. All Rights Reserved.
42-1
/4
58
-1/2
41-0
27
-1/2
24-0
27
-0
FRONT FRAMING
windowopening
48-0
plate
plate
sill
rafte
r rafter
up
rig
ht
up
rig
ht
jam
b
jam
b
41-0
roof sheeting
nesting box side
4-0
6-0
18-0
18
-0 trim off 1/2"for divider
5-7/
8
1 1/2
1 1/2
rafter bird's mouth
CHICKEN COOP PLANS
bhg.com/urbangardenplans © Copyright 2011, Meredith Corporation. All Rights Reserved.
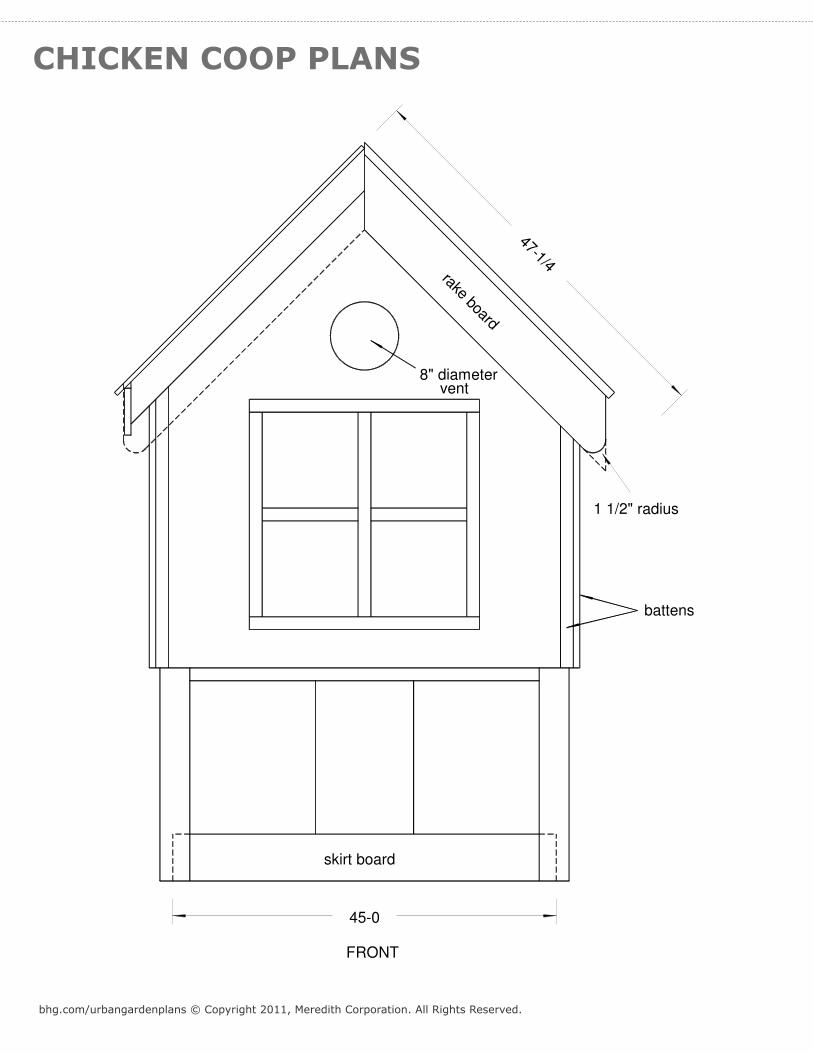
FRONT
47-1/4
45-0
rake board
skirt board
battens
8" diametervent
1 1/2" radius
CHICKEN COOP PLANS
bhg.com/urbangardenplans © Copyright 2011, Meredith Corporation. All Rights Reserved.
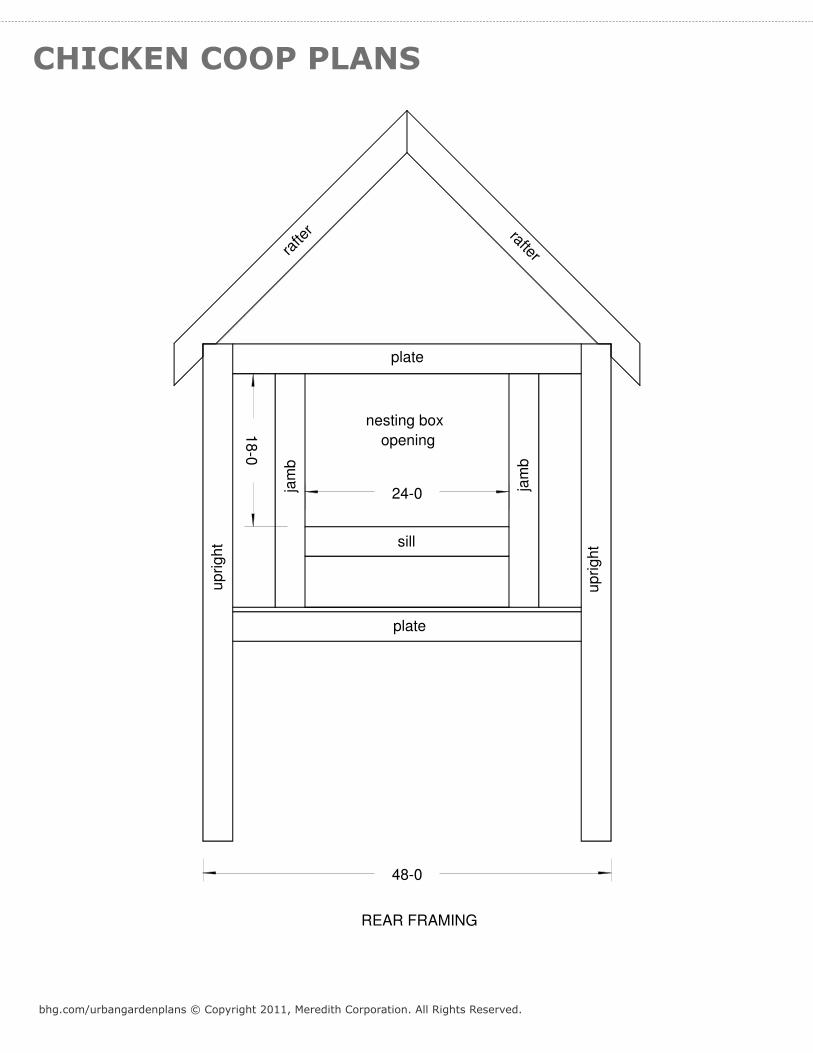
REAR FRAMING
24-0
18
-0
nesting box
opening
sill
plate
plate
rafte
r rafter
up
rig
ht
up
rig
ht
jam
b
jam
b
48-0
CHICKEN COOP PLANS
bhg.com/urbangardenplans © Copyright 2011, Meredith Corporation. All Rights Reserved.
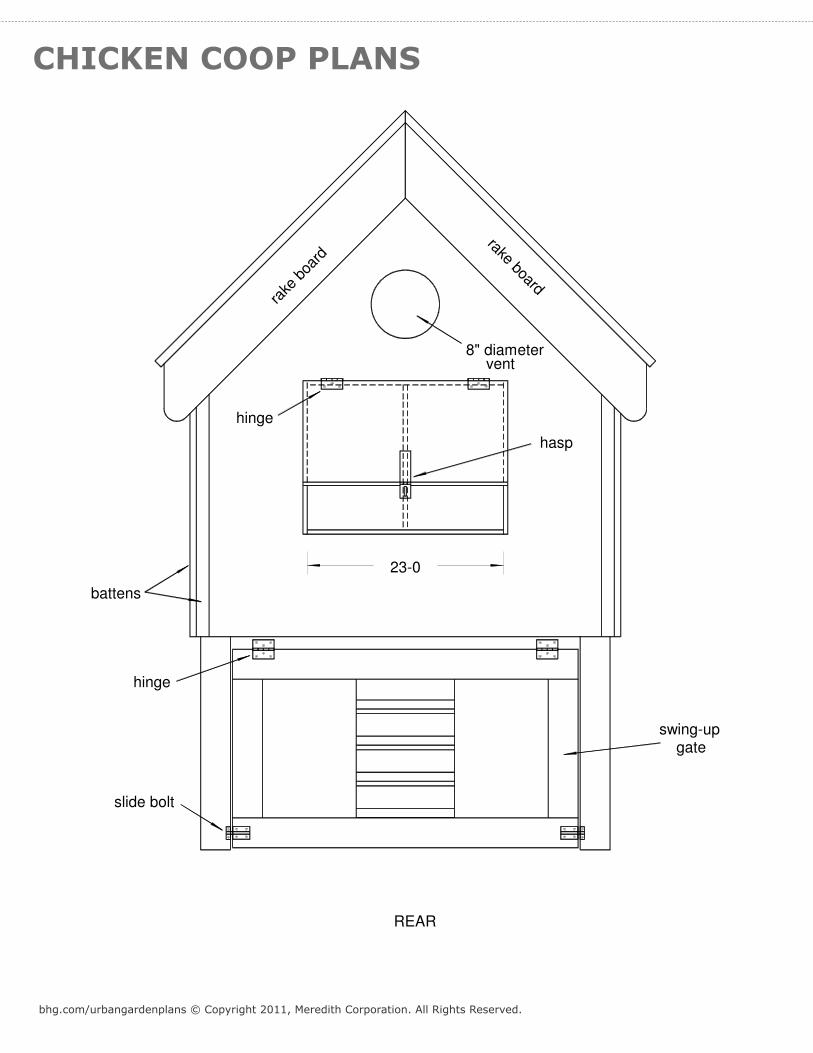
REAR
23-0
rake boardra
ke b
oard
battens
8" diametervent
swing-upgate
hinge
slide bolt
hinge
hasp