Embed Size (px)
Citation preview

SAP NetWeaver
How-To Guide
How To... Apply Custom Branding
Using the AJAX Framework L-Shape
APIs
Applicable Releases:
SAP NetWeaver 7.3 SP2 and above
IT Practice :
User Productivity Enablement
IT Capability:
Running an Enterprise Portal
Version 1.0
June 2011

© Copyright 2011 SAP AG. All rights reserved.
No part of this publication may be reproduced or
transmitted in any form or for any purpose without the
express permission of SAP AG. The information contained
herein may be changed without prior notice.
Some software products marketed by SAP AG and its
distributors contain proprietary software components of
other software vendors.
Microsoft, Windows, Outlook, and PowerPoint are
registered trademarks of Microsoft Corporation.
IBM, DB2, DB2 Universal Database, OS/2, Parallel
Sysplex, MVS/ESA, AIX, S/390, AS/400, OS/390,
OS/400, iSeries, pSeries, xSeries, zSeries, z/OS, AFP,
Intelligent Miner, WebSphere, Netfinity, Tivoli, Informix,
i5/OS, POWER, POWER5, OpenPower and PowerPC are
trademarks or registered trademarks of IBM Corporation.
Adobe, the Adobe logo, Acrobat, PostScript, and Reader
are either trademarks or registered trademarks of Adobe
Systems Incorporated in the United States and/or other
countries.
Oracle is a registered trademark of Oracle Corporation.
UNIX, X/Open, OSF/1, and Motif are registered
trademarks of the Open Group.
Citrix, ICA, Program Neighborhood, MetaFrame,
WinFrame, VideoFrame, and MultiWin are trademarks or
registered trademarks of Citrix Systems, Inc.
HTML, XML, XHTML and W3C are trademarks or
registered trademarks of W3C®, World Wide Web
Consortium, Massachusetts Institute of Technology.
Java is a registered trademark of Sun Microsystems, Inc.
JavaScript is a registered trademark of Sun Microsystems,
Inc., used under license for technology invented and
implemented by Netscape.
MaxDB is a trademark of MySQL AB, Sweden.
SAP, R/3, mySAP, mySAP.com, xApps, xApp, SAP
NetWeaver, and other SAP products and services
mentioned herein as well as their respective logos are
trademarks or registered trademarks of SAP AG in
Germany and in several other countries all over the world.
All other product and service names mentioned are the
trademarks of their respective companies. Data contained
in this document serves informational purposes only.
National product specifications may vary.
These materials are subject to change without notice.
These materials are provided by SAP AG and its affiliated
companies ("SAP Group") for informational purposes only,
without representation or warranty of any kind, and SAP
Group shall not be liable for errors or omissions with
respect to the materials. The only warranties for SAP
Group products and services are those that are set forth in
the express warranty statements accompanying such
products and services, if any. Nothing herein should be
construed as constituting an additional warranty.
These materials are provided “as is” without a warranty of
any kind, either express or implied, including but not
limited to, the implied warranties of merchantability,
fitness for a particular purpose, or non-infringement.
SAP shall not be liable for damages of any kind including
without limitation direct, special, indirect, or consequential
damages that may result from the use of these materials.
SAP does not warrant the accuracy or completeness of the
information, text, graphics, links or other items contained
within these materials. SAP has no control over the
information that you may access through the use of hot
links contained in these materials and does not endorse
your use of third party web pages nor provide any warranty
whatsoever relating to third party web pages.
SAP NetWeaver “How-to” Guides are intended to simplify
the product implementation. While specific product
features and procedures typically are explained in a
practical business context, it is not implied that those
features and procedures are the only approach in solving a
specific business problem using SAP NetWeaver. Should
you wish to receive additional information, clarification or
support, please refer to SAP Consulting.
Any software coding and/or code lines / strings (“Code”)
included in this documentation are only examples and are
not intended to be used in a productive system
environment. The Code is only intended better explain and
visualize the syntax and phrasing rules of certain coding.
SAP does not warrant the correctness and completeness of
the Code given herein, and SAP shall not be liable for
errors or damages caused by the usage of the Code, except
if such damages were caused by SAP intentionally or
grossly negligent.
Disclaimer
Some components of this product are based on Java™. Any
code change in these components may cause unpredictable
and severe malfunctions and is therefore expressively
prohibited, as is any decompilation of these components.
Any Java™ Source Code delivered with this product is only
to be used by SAP’s Support Services and may not be
modified or altered in any way.

Document History
Document Version Description
1.00 First official release of this guide

Typographic Conventions
Type Style Description
Example Text Words or characters quoted
from the screen. These
include field names, screen
titles, pushbuttons labels,
menu names, menu paths,
and menu options.
Cross-references to other
documentation
Example text Emphasized words or
phrases in body text, graphic
titles, and table titles
Example text File and directory names and
their paths, messages,
names of variables and
parameters, source text, and
names of installation,
upgrade and database tools.
Example text User entry texts. These are
words or characters that you
enter in the system exactly as
they appear in the
documentation.
<Example
text>
Variable user entry. Angle
brackets indicate that you
replace these words and
characters with appropriate
entries to make entries in the
system.
EXAMPLE TEXT Keys on the keyboard, for
example, F2 or ENTER.
Icons
Icon Description
Caution
Note or Important
Example
Recommendation or Tip

Table of Contents
1. Business Scenario ............................................................................................................... 1
2. Background Information ..................................................................................................... 1
3. Prerequisites ........................................................................................................................ 2
4. Step-by-Step Procedure ...................................................................................................... 2
4.1 Create Your Own Framework Page ............................................................................. 2
4.1.1 Create a Portal Application .............................................................................. 2
4.1.2 Using the LSAPI ............................................................................................... 2
4.2 Steps to Perform in SAP NetWeaver Portal ............................................................... 12
4.2.1 Create an iView and a Layout ........................................................................ 12
4.2.2 Create Your Own Copy of the Ajax Framework Page ................................... 14
4.2.3 Create a Desktop ........................................................................................... 15
4.2.4 Create a Display Rule .................................................................................... 17
5. Some Notes about the Provided Sample Code .............................................................. 19
5.1.1 Enhanced Portal Response ........................................................................... 19
5.1.2 JavaScript Coding Style ................................................................................. 20

How To... Apply Custom Branding Using the AJAX Framework L-Shape APIs
July 2011 1
1. Business Scenario
This guide provides an overview about fully customizing your own Ajax framework page using the L-
Shape APIs of SAP NetWeaver Portal 7.3.
Note
This document does not discuss customizing the Ajax Framework Page for enterprise workspaces.
2. Background Information
The Ajax Framework Page (AFP) is provided with SAP NetWeaver Portal 7.3. Based on Ajax
technology, this framework page provides improved performance, enhanced user experience and a
wide set of client side-based APIs (also known as “L-Shape APIs”) to consume and modify its content.
Architectural outline:
For more information, visit http://wiki.sdn.sap.com/wiki/display/AFP/SAP+Portal+-
+Ajax+Framework+Page

How To... Apply Custom Branding Using the AJAX Framework L-Shape APIs
July 2011 2
3. Prerequisites
You need the following for developing your custom framework page:
SAP NetWeaver 7.3 SP2 and NWDS.
A basic knowledge of configuring SAP portal desktops.
Some basic experience with the Ajax Framework Page, for example by working through the AFP
tutorials provided in the wiki page http://wiki.sdn.sap.com/wiki/display/AFP/SAP+Portal+-
+Ajax+Framework+Page.
4. Step-by-Step Procedure
This tutorial walks you through the steps needed for creating a new framework page using the Ajax
Framework L-Shape API.
4.1 Create Your Own Framework Page
4.1.1 Create a Portal Application
1. Connect SAP NetWeaver Developer Studio with the Code Exchange subversion repository
https://code.sdn.sap.com/svn/sap-portal-ajax-framework and download the source code that is
located in the "ExampleFromScratchJQuery" folder that contains the component required for this
tutorial.
2. The package you downloaded includes two folders: i.
An .ear file ready to be deployed on your SAP NetWeaver Portal (if you do not want to make
changes to this example).
A folder containing the source code of the example.
Note
If you do not intend to modify this code sample, continue to section 4.2.
3. Copy the folder com.customer.afp.fromscratch to your Developer Studio workspaces
folder.
4. Open the NetWeaver Developer Studio and import this portal application (from the File menu
Import Existing Projects into Workspace).
4.1.2 Using the LSAPI
4.1.2.1 Using the Ajax Framework APIs
Starting from NW Portal 7.3, before using the Ajax Framework APIs, you must register to the following
event:
EPCM.subscribeEventReliable('urn:com.sapportals:navigation',
'AFPisLoaded',
function _afpLoaded() {...}
);

How To... Apply Custom Branding Using the AJAX Framework L-Shape APIs
July 2011 3
Once the Ajax Framework is ready for use, the AFPisLoaded event will be raised and you can start
using the Ajax Framework APIs. This step was added to prevent a situation where the Ajax
Framework scripts are loaded after the custom code, and are not yet accessible. Using this event
ensures that the custom implementation only starts using the Ajax framework APIs when they are
ready to be used. It is sufficient to use the above line of code. You do not need to wait for the window
onload or document ready event (such as in jQuery syntax: $(document).ready(<the event
handler>);).
Important
The APIs are not accessible and cannot be used until this event is raised.
4.1.2.2 Create the Content Area and Initialize the Ajax Framework Page
To create a valid content area you must include the following HTML elements at the desired place in
the page layout:
<div id="divContentArea"></div>
Once the HTML is rendered, call the following API (from within the AFPisLoaded event handler):
LSAPI.AFPPlugin.service.initAjaxFrameworkPage();
This will initialize the portal content area frame and allow you to navigate between the different portal
pages.
4.1.2.3 Render the Navigation Tree
Use the following method to get the list of initial nodes assigned to the current user:
LSAPI.AFPPlugin.model.getNavigationSubTree(null, renderNavigation);
renderNavigation is a callback method to which the result is returned. The callback function will
receive an array of navigation nodes objects as parameters.
function renderNavigation(nodes)
{
var i = 0,
len = nodes.length,
node,
html = '',
bc = LSAPI_AFPPlugin_model.getCurrentSelectedPath();
// construct the HTML of the first level (here: rendered as tiles)
while (i < len) {
node = nodes[i++];
var imgNum = 'img' + Math.floor(Math.random()*7) + '.png',
colorNum = 'color' + Math.floor(Math.random()*4);
html += '<a href="'+node.getNodeURI()+'"
node="'+node.getName()+'" showType="'+node.getShowType()+
'" class="tile '+colorNum+'"><span class="icon"><img
src="'+FWK.mimesPath+'/mimes/'+ imgNum +'"></span><span
class="title">'+ node.getTitle()+'</span></a>';

How To... Apply Custom Branding Using the AJAX Framework L-Shape APIs
July 2011 4
}
html += '<div style="clear:both"></div>';
$('#tiles').html(html).sortable({
update: function _onUpdate(event, ui) {
var tabset = LSAPI_tabsetPlugin.getCurrentTabset(),
undockedNodes = [];
// get the names of the tiles in the new order
$('>.tile', '#tiles').each(function _each() {
undockedNodes.push($(this).attr('node'));
});
LSAPI_AFPPlugin_service.setInitialNodes(tabset, [],
undockedNodes, function _callback() {/*no follow-up action
needed*/});
}
}).disableSelection();
}
The actual navigation (clicking on a link) is done by using the following API:
LSAPI.AFPPlugin.service.navigate(node, mode, params, title,
windowAttributes, windowID, workProtect, toHistory, i_postBody);
In most cases the first two or three parameters are sufficient.
In our example, click events on the tiles are registered like follows and trigger navigation after fetching
name and showType (= mode) of the clicked node/link:
function doNavigate(name, mode, params) {
...
// trigger navigation
LSAPI_AFPPlugin_service.navigate(name, mode, params);
}
$('.tile', '#tiles').live('click', function _onClick(e) {
var $this = $(this),
name = $this.attr('node'),
showType = $this.attr('showType');
...
doNavigate(name, showType, "InitialNodesFirstLevel=true");
...
});
To receive notification each time a navigation step is performed and to then update the highlighting of
the navigation step, use the following registration method:
LSAPI.AFPPlugin.controller.registerOnNavigate(onNavigate);

How To... Apply Custom Branding Using the AJAX Framework L-Shape APIs
July 2011 5
The method receives a callback function that is called when navigation is performed. The callback
function receives the current navigation node and launch node as parameters, and in this example, it
updates the tiles and view with the relevant information:
function onNavigate(currentNode, launchedNode) {
var bc = LSAPI_AFPPlugin_model.getCurrentSelectedPath(),
i = 0,
len = bc.length,
bcEntries = [];
// show content frame again
$('#contentAreaFrame').css('visibility', 'visible');
// update DTN
if (len > 0 && bc[0].hasChildren()) {
bc[0].getChildren(renderDTN, {
bc: bc,
lvl: 1,
elid: '#dtn'
});
} else {
$('#dtn').empty();
}
// update breadcrumb
for (i = 0; i < len; i++) {
bcEntries.push({
title: bc[i].getTitle(),
name: bc[i].getName(),
showType: bc[i].getShowType(),
href: bc[i].getNodeURI()
});
}
renderBreadcrumb(bcEntries);
// update history
$('#histback').toggleClass('disabled',
!LSAPI_historyPlugin.isBackwardEnabled());
$('#histfrwd').toggleClass('disabled',
!LSAPI_historyPlugin.isForwardEnabled());
// update favorites
var favId = getFavoriteID(launchedNode);
if (favId) {
$('#favsadd').addClass('set').attr('favId', favId);
} else {
$('#favsadd').removeClass('set');
}
}

How To... Apply Custom Branding Using the AJAX Framework L-Shape APIs
July 2011 6
4.1.2.4 Create the Welcome Message and Log Off Link
To create the welcome message, use the following API:
var user = LSAPI.AFPPlugin.configuration.getUser();
This will return a user object from which it is possible to get the user’s display name:
$('#welcome').text("Welcome: " + user.DisplayName);
To set up the log off link, use the following API method:
LSAPI.getSessionPlugin().logoff();
Here’s how we use it in our example:
$('#logoff').click(function _onclick() {
LSAPI_sessionPlugin.logoff();
});
4.1.2.5 Build the Portal Search
In this example, we decided that upon entering a search term in the portal search input field:
Pressing Enter will search for the entered search term in the default search provider. This is done
by calling the following API:
var defaultProvider = LSAPI_searchProviderPlugin.getDefaultProvider();
LSAPI_searchProviderPlugin.search(term, defaultProvider,
defaultProvider.getSearchTypes()[0], null);
where term is the search term entered in the input field.
Esc closes the suggestions menu.
Typing in either a character or a number displays the suggestions menu with the relevant
suggested items. This is done by calling the following API:
LSAPI_suggestionPlugin.getSuggestions(term, drawQLMenu);
where term is the search term entered in the input field, and drawQLMenu is a callback function
to which the list of suggestion items will be returned.
How To... Apply Custom Branding Using the AJAX Framework L-Shape APIs
July 2011 7
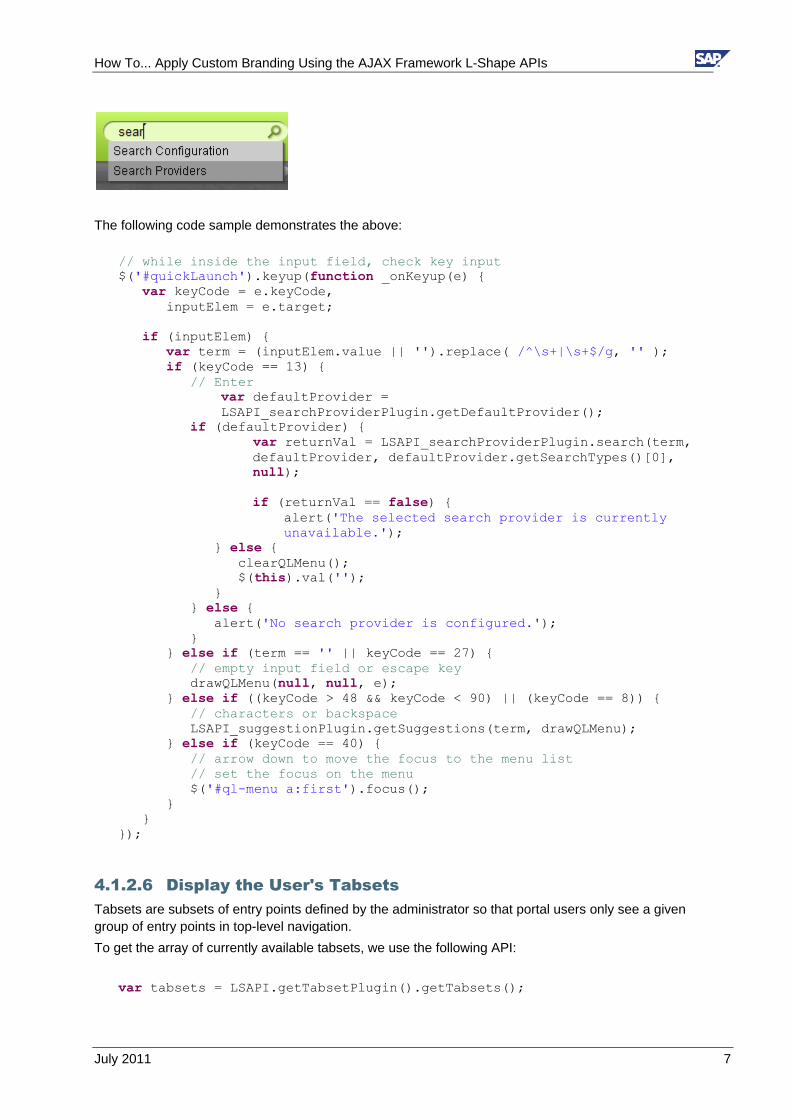
The following code sample demonstrates the above:
// while inside the input field, check key input
$('#quickLaunch').keyup(function _onKeyup(e) {
var keyCode = e.keyCode,
inputElem = e.target;
if (inputElem) {
var term = (inputElem.value || '').replace( /^\s+|\s+$/g, '' );
if (keyCode == 13) {
// Enter
var defaultProvider =
LSAPI_searchProviderPlugin.getDefaultProvider();
if (defaultProvider) {
var returnVal = LSAPI_searchProviderPlugin.search(term,
defaultProvider, defaultProvider.getSearchTypes()[0],
null);
if (returnVal == false) {
alert('The selected search provider is currently
unavailable.');
} else {
clearQLMenu();
$(this).val('');
}
} else {
alert('No search provider is configured.');
}
} else if (term == '' || keyCode == 27) {
// empty input field or escape key
drawQLMenu(null, null, e);
} else if ((keyCode > 48 && keyCode < 90) || (keyCode == 8)) {
// characters or backspace
LSAPI_suggestionPlugin.getSuggestions(term, drawQLMenu);
} else if (keyCode == 40) {
// arrow down to move the focus to the menu list
// set the focus on the menu
$('#ql-menu a:first').focus();
}
}
});
4.1.2.6 Display the User's Tabsets
Tabsets are subsets of entry points defined by the administrator so that portal users only see a given
group of entry points in top-level navigation.
To get the array of currently available tabsets, we use the following API:
var tabsets = LSAPI.getTabsetPlugin().getTabsets();

How To... Apply Custom Branding Using the AJAX Framework L-Shape APIs
July 2011 8
In addition, we need to listen to the tabset switch event, to get notifications when a tabset is switched
and the list of entry points should be updated:
LSAPI.getTabsetPlugin().registerOnTabsetSwitch(onTabsetSwitch);
The onTabsetSwitch is the callback method which will be triggered once a tabset is switched, and
all it does in our example is the following:
function onTabsetSwitch() {
LSAPI_AFPPlugin_model.getNavigationSubTree(null, renderNavigation);
}
When a specific tabset is selected in the menu, we first set it as the current selected tabset:
LSAPI.getTabsetPlugin().setCurrentTabset(id);
In our example, this gives the following results. Before selecting a tabset:
After selecting the "Administration" tabset:

How To... Apply Custom Branding Using the AJAX Framework L-Shape APIs
July 2011 9
4.1.2.7 Display the User's Portal Favorites
To add a navigation node to the portal favorites we use the following API:
LSAPI.getFavoritesPlugin().addFavorite(id, title, updateFavsContent);
where updateFavsContent is a callback method that is triggered when the favorite item is added to
the favorites list. Here’s how we use it in our example:
// set up the "Add to favorites" button
$('#favsadd').click(function _onClick() {
var $this = $(this),
isSet = $this.hasClass('set'),
currentNode = LSAPI_AFPPlugin_model
.getCurrentLaunchNode().originalObject;
$this.toggleClass('set');
if (isSet) {
var favId = $this.attr('favId');
LSAPI_favoritesPlugin.deleteFavorite(favId, updateFavsContent);
$this.removeAttr('favId');
} else {
LSAPI_favoritesPlugin.addFavorite(currentNode.id,
currentNode.title, updateFavsContent);
}
});
In our example, adding a page to favorites at runtime is done using the star icon next to the Favorites
menu. When the star is activated (yellow), it means that this page is already in the list of favorites.
Clicking the star removes the item from the list of favorites (and vice versa for adding a page to the
list):

How To... Apply Custom Branding Using the AJAX Framework L-Shape APIs
July 2011 10
To retrieve the favorites list and display it in a menu, you need to use the following API method:
LSAPI.getFavoritesPlugin().getFavoritesProviders(updateFavProviders);
Where updateFavProviders is a callback function that is called with the current favorite providers
available for the user. In this example, we are only displaying the portal favorites, therefore, to read
those we do the following:
var favoritesProviders = null;
function updateFavProviders(favProviders) {
favoritesProviders = favProviders;
}
// set up the "Favorites" menu trigger
$('#favsmenu').click(function _onClick() {
var favorites = favoritesProviders[0].getFavorites(),
favMenuItems = [];
// loop through favorites and build items for menu
for (var i = 0; i < favorites.length; i++) {
var currFav = favorites[i],
itemUrl = currFav.getURL();
favMenuItems[i] = {
title: currFav.getTitle(),
click: navigateToItem(itemUrl, 0),
href: itemUrl,
css: ''
}
}
var $this = $(this),
offs = $this.offset(),
w = $this.width(),
h = $this.height(),
items = favMenuItems;
// open menu by positioning it below the triggering element and
// passing the menu items to it
$.popupMenu(
'favs-menu',
{left: offs.left + w - 175, top: offs.top + h},
items,
$this
);
});

How To... Apply Custom Branding Using the AJAX Framework L-Shape APIs
July 2011 11
4.1.2.8 Display the Navigation History List
The History API enables you to access and control the navigation history.
In this example, we used the History API to display the last navigation nodes the user visited, and to
navigate back and forward between these entries.
Here is how we retrieve the history list and add the entries to a dropdown menu:
// set up the "History" menu trigger
$('#histmenu').click(function _onClick() {
var histEntries = LSAPI_historyPlugin.getEntries();
if (histEntries) {
var histMenuItems = [];
// loop through history entries and build items for menu
for (var i = 0; i < histEntries.length; i++) {
var currItem = histEntries[i],
itemURL = currItem.getUrl();
histMenuItems[i] = {
title: currItem.title,
click: navigateToItem(itemURL, 0),
href: itemURL,
css: ''
}
}
var $this = $(this),
offs = $this.offset(),
w = $this.width(),
h = $this.height(),
items = histMenuItems;
// open menu by positioning it below the triggering element and
// passing the menu items to it
$.popupMenu(
'hist-menu',
{left: offs.left + w - 175, top: offs.top + h},
items,
$this
);
}
});
And here is how we navigate back and forward between the history entries:
// set up the "Back" button
$('#histback').click(function _onClick () {
if (LSAPI_historyPlugin.isBackwardEnabled()) {
LSAPI_historyPlugin.back(true);
}
});
// set up the "Forward" button
$('#histfrwd').click(function _onClick () {
if (LSAPI_historyPlugin.isForwardEnabled()) {
LSAPI_historyPlugin.forward(true);
}

How To... Apply Custom Branding Using the AJAX Framework L-Shape APIs
July 2011 12
4.2 Steps to Perform in SAP NetWeaver Portal
4.2.1 Create an iView and a Layout ...
1. Log onto the portal
2. Navigate to Content Administration Portal Content Management.
3. Within the Portal Catalog, go to Portal Content.
4. Create a new folder named Ajax Framework from Scratch.
5. Go to Portal Applications com.customer.afp.fromscratch.
6. Copy the two objects (iview and layout) to a folder under Portal Content by repeating the
following steps:
a. Right-click an object in the application's folder and select Copy from the context menu.
b. Right-click you’re the new folder (Ajax Framework from Scratch) and paste the
object by selecting Paste as PCD Object from the context menu.
c. Enter the relevant information.
d. Choose Next and Finish.

How To... Apply Custom Branding Using the AJAX Framework L-Shape APIs
July 2011 13
The iView and the layout are created.

How To... Apply Custom Branding Using the AJAX Framework L-Shape APIs
July 2011 14
4.2.2 Create Your Own Copy of the Ajax Framework Page
1. Navigate to Content Administration Portal Content Management.
2. In the Portal Catalog go to Portal Content Portal Users Standard Portal Users Ajax
Framework Content Ajax Framework Page.
3. Right-click the Ajax Framework Page and select Copy from the context menu.
4. Go to Portal Content and paste the page in the folder that you created in the previous section
(Ajax Framework from Scratch) by right-clicking the folder and selecting Paste from the
context menu.
5. In the Paste wizard that opens choose Create a delta link. Choose Next and then Finish.
6. Right-click the copied page and choose Open Properties in the context menu. Click Modify
Properties and provide a new Name for the framework page.
Open the Page editor.
a. Remove all iViews except AFP Resources.
b. Change the page layout to the layout that you created in step 4.2.1:
i. Choose Add/Remove Layouts.
ii. Remove all layouts from the page.
iii. Move layout from the Available Layouts list to the Selected Layouts list.

How To... Apply Custom Branding Using the AJAX Framework L-Shape APIs
July 2011 15
c. Add the iView you created in step 4.2.1 to the page:
Right-click the iView and choose Add iView to Page Delta link from the context menu.
2. Save your changes and close the page.
4.2.3 Create a Desktop
1. Navigate to System Administration System Configuration Portal Display Desktops &
Display Rules.
2. Locate the folder you created in step 4.2.1 (5) in the Portal Catalog.
3. Right-click the folder and choose: New Portal Desktop.
4. Provide a name for the desktop (for example: Custom Desktop), and click Next.
5. Add your page to the desktop: right-click on the page and choose: Add Framework Page to
Portal Desktop).

How To... Apply Custom Branding Using the AJAX Framework L-Shape APIs
July 2011 16
6. Add a theme to the desktop. You can find themes in the Portal Catalog under Portal Content
themes. In this example, we will add the SAP Chrome theme to the desktop.
7. Click Next and Finish.

How To... Apply Custom Branding Using the AJAX Framework L-Shape APIs
July 2011 17
4.2.4 Create a Display Rule
A portal alias is the part of the URL after the section that specifies the portal J2EE application (irj),
which by default is http://<server>:<port>/irj.
Note
Standard portal aliases are defined in the portal's J2EE deployment descriptor
(web.xml) in com.sap.portal.runtime.dispatcher.ear, which is located under
EP-Basis SCA. If a user specifies an undefined alias, it is ignored.
Important
Changes you make to the web.xml will be overwritten after upgrading your portal to a
new release or support package stack.
1. Locate the com.sap.portal.runtime.dispatcher.war
2. In the .ear file, open the com.sap.portal.runtime.dispatcher.war file then the WEB-
INF file and extract the web.xml file.
3. In the web.xml file of the irj J2EE application, add an initial parameter (<init-param>
element) for the gateway servlet.
4. Set the <param-name> element to the new portal alias.
5. Set the <param-value> element to a string of key-value pairs, separated by commas (,). All
values are either 0 (false) or 1 (true).
The following shows the XML added to create a new alias called "customFrwkPage":
<param-name>portal/customFrwkPage</param-name>
<param-value>
anonymous=0,proxy=0,low_bandwidth=1,include_in_url=1,
include_application _name_in_url=1
</param-value>
</init-param>
6. Save the XML in com.sap.portal.runtime.dispatcher.war.
7. Locate the com.sap.portal.runtime.dispatcher.ear. This file is part of the
com.sap.portal.runtime.dispatcher.sda file located in the EP-Basis SCA.
8. Make a copy of the .ear file.
9. Insert the .war file into com.sap.portal.runtime.dispatcher.ear, overwriting the
existing .war file.
10. Deploy the modified .ear file on the server.
11. Restart the portal.
12. In the portal administration environment, go to System administration System Configuration
Portal Display Desktop & Display Rules.
13. In the Portal Catalog, go to Portal Content Portal Administrators Super Administrators
Master Rule Collection. Right-click the Master Rule Collection and choose Open Rule
Collection.
14. Add an IF expression: URL Alias = portal/customFrwkPage and choose Apply.
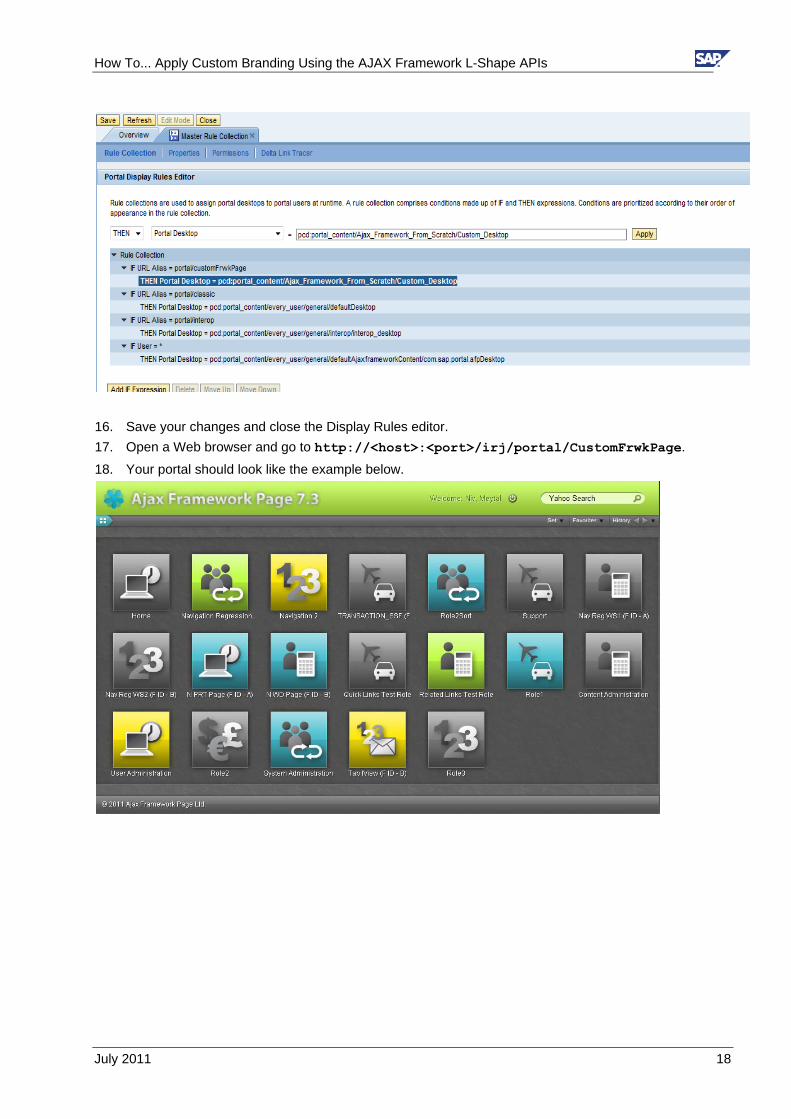
15. Select the Then line of the IF expression. In the Portal Catalog, go to the custom desktop that
you created and choose Add Portal Desktop to Expression.
How To... Apply Custom Branding Using the AJAX Framework L-Shape APIs
July 2011 18
16. Save your changes and close the Display Rules editor.
17. Open a Web browser and go to http://<host>:<port>/irj/portal/CustomFrwkPage.
18. Your portal should look like the example below.

How To... Apply Custom Branding Using the AJAX Framework L-Shape APIs
July 2011 19
5. Some Notes about the Provided Sample Code
5.1.1 Enhanced Portal Response
The example’s source code contains a Java library provided by SAP Consulting
(com.sapconsulting.portal.utils.html_api.jar) which provides a way of enhancing the
portal response with HTML output. For example:
Set a <!DOCTYPE> ((X)HTML5, HTML 4.01, XHTML 1.0)
Add specific <meta>, <link> and other tags to the <head> element
Set the <title>
Defer the loading of a <script> by placing it just above the closing </body> tag
In the doContent() method of your component that inherits from AbstractPortalComponent
instantiate the class EnhancedPortalResponse like this:
EnhancedPortalResponse epResponse =
new EnhancedPortalResponse(request, true, true);
Then use the instance to directly manipulate or add certain elements or attributes, for example:
epResponse.setDocTypeToHtml5();
epResponse.setTitle("Ajax Framework from Scratch");
epResponse.removeBodyClass();
Include <meta>, <link>, or <script> tags, or even browser-specific conditional comments in the
<head> section, with the help of the static createXY() methods of the HtmlFactory class:
epResponse.include(
HtmlFactory.createHttpEquivMeta("X-UA-Compatible", "IE=edge"));
epResponse.include(
HtmlFactory.createLink("stylesheet",
mimesPath + "/mimes/fwk.min.css", null, null));
epResponse.include(
HtmlFactory.createLink("shortcut icon",
mimesPath + "/mimes/favicon.ico", "image/x-icon", null));
epResponse.include(
HtmlFactory.createConditionalComment("lt IE 9", false,
HtmlFactory.createScript(mimesPath + "/mimes/html5.js",
null)));
How To... Apply Custom Branding Using the AJAX Framework L-Shape APIs
July 2011 20
You can defer <script>s (and other elements) and place them before the end of the <body>:
epResponse.defer(
HtmlFactory.createInlineScript(
"var FWK={mimesPath:'" + mimesPath + "'}", null));
epResponse.defer(
HtmlFactory.createScript(mimesPath + "/mimes/jquery-1.6.1.min.js",
null));
epResponse.defer(
HtmlFactory.createComment("sven://kannengiesser"));
5.1.2 JavaScript Coding Style
The style in which the provided JavaScript file
(\com.customer.afp.fromscratch\dist\mimes\fwk.js) is written requires some
explanation.
1. There is a self-invoking, anonymous function called _afp() that encapsulates the entire
functionality needed by the custom framework implementation. It takes a number of arguments
(see top of the fwk.js file) that are passed immediately when it invokes itself (see bottom of the
fwk.js file). This serves two purposes:
a. Passing global variables (such as window, document, EPCM) and namespaced objects
(such as LSAPI.AFPPlugin.model) as an argument (thus making them local to the
function) helps JavaScript obfuscators such as YUI Compressor or Google Closure
Compiler, otherwise rather lengthy names.
b. Variables (declared with var inside a function) and arguments (declared in the signature of
the function) in JavaScript are scoped to the enclosing function (also known as “closure”).
This helps to optimize lookups in the scope chain, due to the fact that when a
variable/argument is accessed, the interpreter first looks it up in the inner function, and then
searches for it in the wrapping/upper function(s), until the global scope (the window object)
is reached.
Note that the plug-ins of the LSAPI object are accessed indirectly from within the code of
_afp().For instance:
LSAPI_AFPPlugin_controller.registerOnNavigate(onNavigate);
LSAPI_tabsetPlugin.registerOnTabsetSwitch(onTabsetSwitch);
instead of:
LSAPI.AFPPlugin.controller.registerOnNavigate(onNavigate);
LSAPI.getTabsetPlugin().registerOnTabsetSwitch(onTabsetSwitch);
2. Many, if not all, anonymous functions start with an underscore (to distinguish them from real
functions), for example:
$('#logoff').click(function _onClick() {
...
});).

How To... Apply Custom Branding Using the AJAX Framework L-Shape APIs
July 2011 21
This is helpful in for the following reasons:
a. At design time, when editing the JavaScript code in the NetWeaver Developer Studio, you
can use the Outline and the code folding feature better.
b. At runtime, when debugging the JavaScript code with Firebug or other tools, you have more
fine-grained insight in the call stack.
3. There are also a number of self-invoking, named anonymous functions, such as:
(function _setupLogoffLink() {
...
})();
The main reason for this is to better manage scopes and “blocks of functionality” (= modules).
www.sdn.sap.com/irj/sdn/howtoguides