Embed Size (px)
Citation preview
QuickHelp Sorenson ntouch VP2
Calling FeaturesUse the bookmarks in the left-hand column to jump to the QuickHelp answers to these questions:
How do I use the Group Call feature?
How do I set up Voice Carry Over (VCO) calling?
How do I show the in-call audio level meter?
How do I change how long the options bar appears when a call starts?
How do I change my Self-View image video settings during a call?
How do turn the Do Not Disturb mode on and off?
How do I use the Group Call feature?
You can use the Group Call feature to have a conversation with up 4 other people at one time. A group call begins when you “join” two calls together into one call. You can then add up to 2 other calls (for a total of 4 calls) at once. You can use the ntouch VP2 Group Call feature with all Sorenson endpoints during a point-to-point call. The Group Call feature does not work with Sorenson Video Relay Service (SVRS) calls.
The example images below show the Video Privacy mode enabled on all endpoints. This was done to make it easier to see how to use the feature.
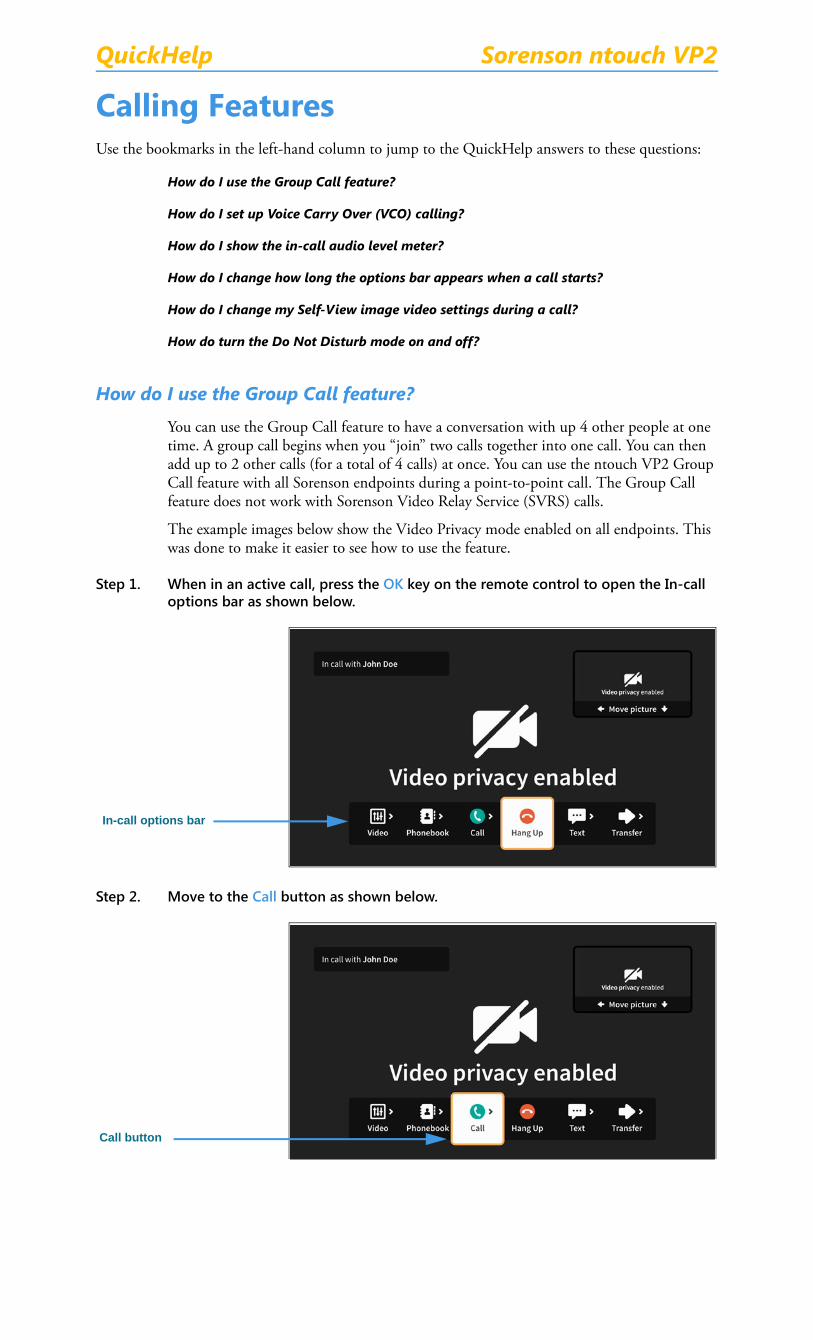
Step 1. When in an active call, press the OK key on the remote control to open the In-call options bar as shown below.
Step 2. Move to the Call button as shown below.
In-call options bar
Call button

Step 3. Select the Call button to open the Call menu as shown below.
You can choose to make a call from your Call History list, Favorites list, Phonebook Contacts list or dial a number using the on-screen keypad.
Step 4. Select the Call History button to open the dialog shown below.
Step 5. Select a phone number (or name) from the list to dial a call as shown below.
Step 6. When the new call is answered, you will see a message like that shown below.
Call menu open
Call History list open
Call on hold, new call being dialed
In call with new caller, first caller on hold

Step 7. Press the OK key on the remote control to open the In-call options bar as shown below.
Step 8. Move to the Join button as shown below.
Step 9. Select the Join button to join the calls as shown below.
Step 10. As the calls are being joined, you will briefly see the message shown below.
In-call options bar
Join button
Joining calls message
Group Call ID message

Step 11. After the calls are joined, you will see the received video images from both calls appear in the center of the screen as shown below.
Step 12. To add more calls to the Group Call, repeat Steps 1 through 10 above. You can add up to 2 other calls (for a total of 4 persons other than yourself) at one time. Everyone in the Group Call will see the same four images on their screens.
1st Received image
2nd Received image

How do I set up Voice Carry Over (VCO) calling? Step 1. Start at the Home screen as shown below.
Step 2. Select the Settings button to open the screen shown below.
Step 3. Select the Call Options button to open the screen shown below.
Step 4. Move to the Voice Carry Over button to open the screen shown below.
Settings button
Call Options button selected
Voice Carry Over button
Voice Carry Over checkbox
Voice Carry Over button

Step 5. Move to and select the Voice Carry Over checkbox as shown below.
Selecting the Turn on Voice Carry Over (VCO)? checkbox reveals the VCO audio choices radio buttons. You can use either 1-line VCO or 2-line VCO. If you select 2-line VCO, you must enter a call back phone number of the voice telephone you will be using.
If you select 1-line VCO, you can return to the Home screen by pressing the Home key on the remote control. Your VCO selection will be saved.
Step 6. To use 2-line VCO, select the Use 2-line VCO radio button as shown below.
Selecting the 2-line VCO radio button reveals the call back phone number field. Enter your call back phone number in the field and then press the Home key on the remote control to return to the Home screen. Your VCO selection will be saved.
Turn on Voice Carry Over (VCO)? checkbox
VCO audio choices radio buttons
Callback phone number field

How do I show the in-call audio level meter? Step 1. Start at the Home screen as shown below.
Step 2. Select the Settings button to open the screen shown below.
Step 3. Move to the Device Options button as shown below.
Step 4. Select the Device Options button to open the screen shown below.
Settings button
Call Options button selected
Device Options button selected
Sound Options heading

Step 5. Move to the Sound button to open the screen shown below.
Step 6. Move to and select the Use point-to-point audio checkbox as shown below.
Selecting the Use point-to-point audio? checkbox reveals the Show audio meter? radio button. If you choose to show the audio meter it will appear only during an active call.
Step 7. Move to and select the Show audio meter? checkbox as shown below.
Return to the Home screen by pressing the Home key on the remote control. Your audio selections will be saved.
Step 8. During an active videophone call, you will see the audio meter (a stack of 7 bars) appear over the Self-view image as shown below.
Sound button
Use point-to-point audio? checkbox
Show audio meter? checkbox
Audio meter appears over Self-view image

How do I change how long the options bar appears when a call starts?Step 1. Start at the Home screen as shown below.
Step 2. Select the Settings button to open the screen shown below.
Step 3. Select the Call Options button to open the screen shown below.
Step 4. Move to and select the + control under How long should I display my options bar? as shown below.
Use the + (more time) or – (less time) controls to set how long the options bar is displayed. Return to the Home screen by pressing the Home key on the remote control. Your options bar selections will be saved.
Settings button
Call Options button selected
In-Call Options button
+ (more time) button

How do I change my Self-View image video settings during a call? Step 1. When in an active call, press the OK key on the remote control to open the In-call
options bar as shown below.
Step 2. Move to the Video button in the In-call options bar as shown below.
Step 3. Select the Video button to open the Video menu as shown below.
The Video menu lets you choose to adjust these video settings during a call:
• Use the Zoom & Pan button to zoom or move the image that is being recorded by your camera.
• Use the View Mode button to select the active View mode. The three choices are: Full-screen with Self-view, Split-screen and Full-screen without Self-view. Using this button is described under the “How do I change the View Mode during a call?” QuickHelp topic in the User Interface Features section.
• Use the Focus control to adjust the camera’s focus. • Use the Brightness/Saturation control to adjust the camera’s brightness and color
saturation levels.
In-call options bar
Self-View image
Video button in the In-call options bar
Video menu open

Step 4. Select the Zoom & Pan button to open the controls shown below.
• Use the Zoom control to zoom the camera image in and out.
• Press the OK key on the remote control to move between the Zoom and Pan controls.
• Use the Pan control to move the camera image up, down, left or right.
Step 5. Select the Focus button to open the controls shown below.
• Use the Focus control to manually adjust the camera’s focus.
• Select the Auto Focus button to reactivate the camera’s auto focus function.
When you use Auto Focus, remember to sit very still to let the camera find the best focus. If needed, you can select Auto Focus again until you get a satisfactory image.
Step 6. Select the Brightness and Saturation button to open the controls shown below.
• Use the Brightness control to manually adjust the camera’s brightness level.
• Use the Saturation control to manually adjust the camera’s color saturation level.
Zoom and Pan controls
Focus controls
Brightness and Saturation controls

How do turn the Do Not Disturb mode on and off?Step 1. Start at the Home screen as shown below.
Step 2. Select the Settings button to open the screen shown below.
Step 3. Move to the Do not disturb button as shown below.
Step 4. Select the Do not disturb button to open the dialog shown below.
Settings button
Do not disturb button

Step 5. Select the OK button to turn on the Do Not Disturb mode. When you return to the Home screen, its appearance will have changed as shown below.
Notice that the top area of the Home screen now shows a diagonal pattern and the “Do not disturb; please no calls” message next to an icon of the crescent moon.
Step 6. To turn off the Do Not Disturb mode, repeat Steps 1 through 3 above. Selecting the Do not disturb button again in Step 3 will disable the feature.