Embed Size (px)
Citation preview
Melodye Gordon ENGL 5181
User Document No. 2 Draft 1
1
How Create A Letter-Size Trifold Brochure
On a Mac Computer Using InDesign
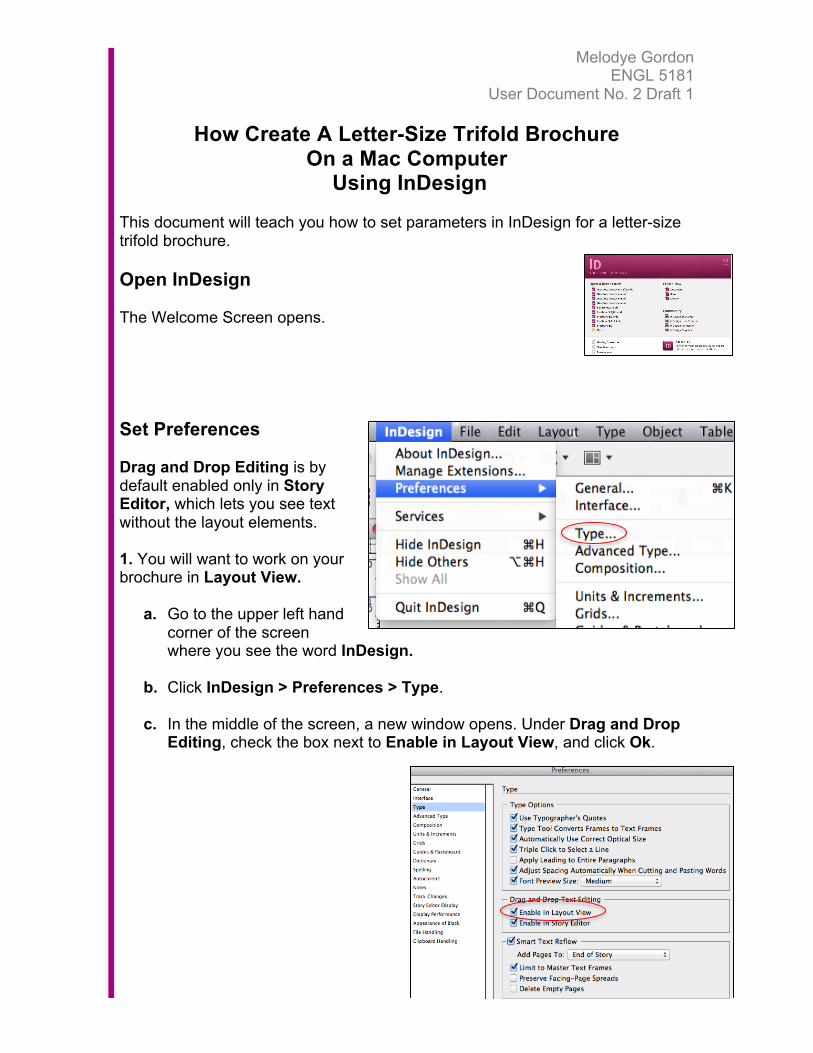
This document will teach you how to set parameters in InDesign for a letter-size trifold brochure. Open InDesign The Welcome Screen opens. Set Preferences Drag and Drop Editing is by default enabled only in Story Editor, which lets you see text without the layout elements. 1. You will want to work on your brochure in Layout View.
a. Go to the upper left hand corner of the screen where you see the word InDesign.
b. Click InDesign > Preferences > Type.
c. In the middle of the screen, a new window opens. Under Drag and Drop
Editing, check the box next to Enable in Layout View, and click Ok.
Melodye Gordon ENGL 5181
User Document No. 2 Draft 1
2
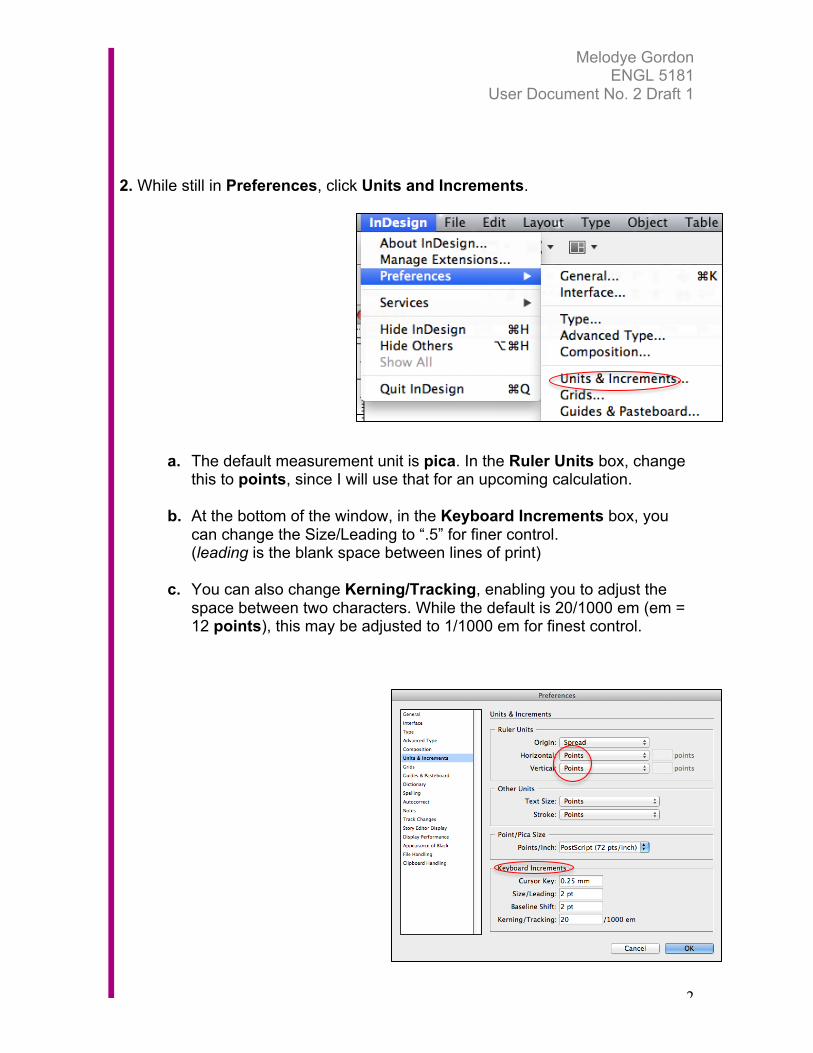
2. While still in Preferences, click Units and Increments.
a. The default measurement unit is pica. In the Ruler Units box, change this to points, since I will use that for an upcoming calculation.
b. At the bottom of the window, in the Keyboard Increments box, you
can change the Size/Leading to “.5” for finer control. (leading is the blank space between lines of print)
c. You can also change Kerning/Tracking, enabling you to adjust the
space between two characters. While the default is 20/1000 em (em = 12 points), this may be adjusted to 1/1000 em for finest control.
Melodye Gordon ENGL 5181
User Document No. 2 Draft 1
3
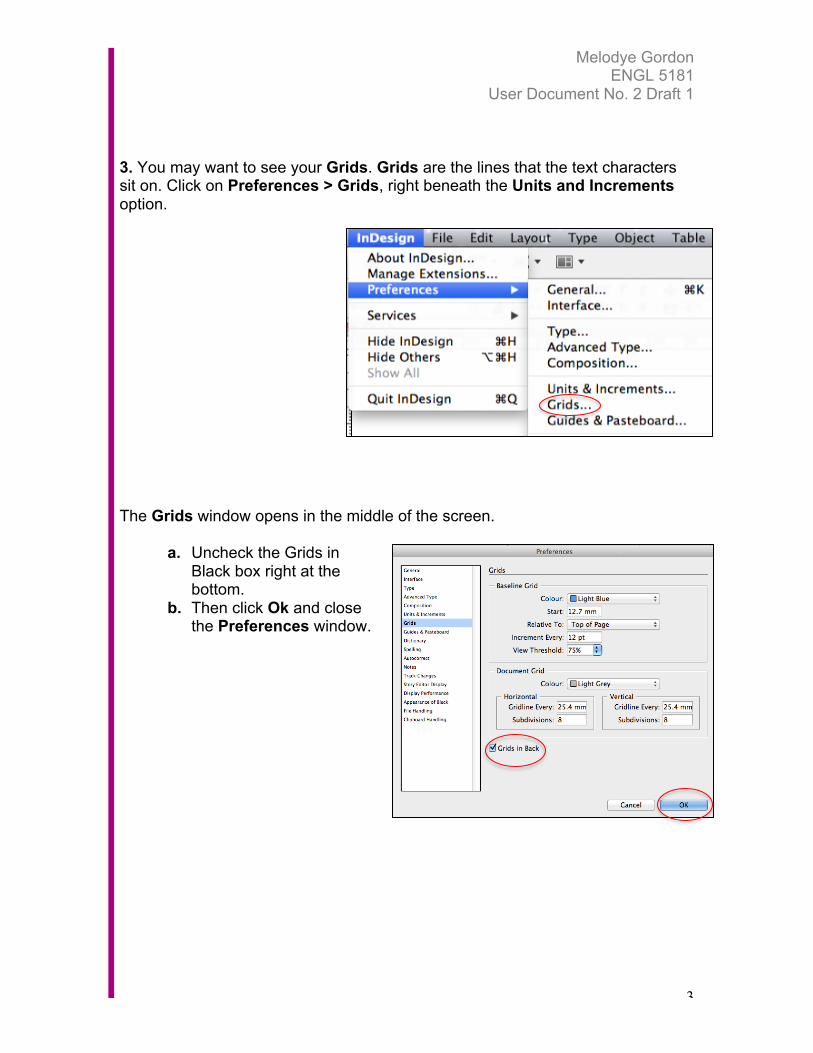
3. You may want to see your Grids. Grids are the lines that the text characters sit on. Click on Preferences > Grids, right beneath the Units and Increments option. The Grids window opens in the middle of the screen.
a. Uncheck the Grids in Black box right at the bottom.
b. Then click Ok and close the Preferences window.

Melodye Gordon ENGL 5181
User Document No. 2 Draft 1
4
Set up your new document When you opened InDesign, the Welcome Screen opened. Under Create New, click on Document. The New Document window will open.
Melodye Gordon ENGL 5181
User Document No. 2 Draft 1
5
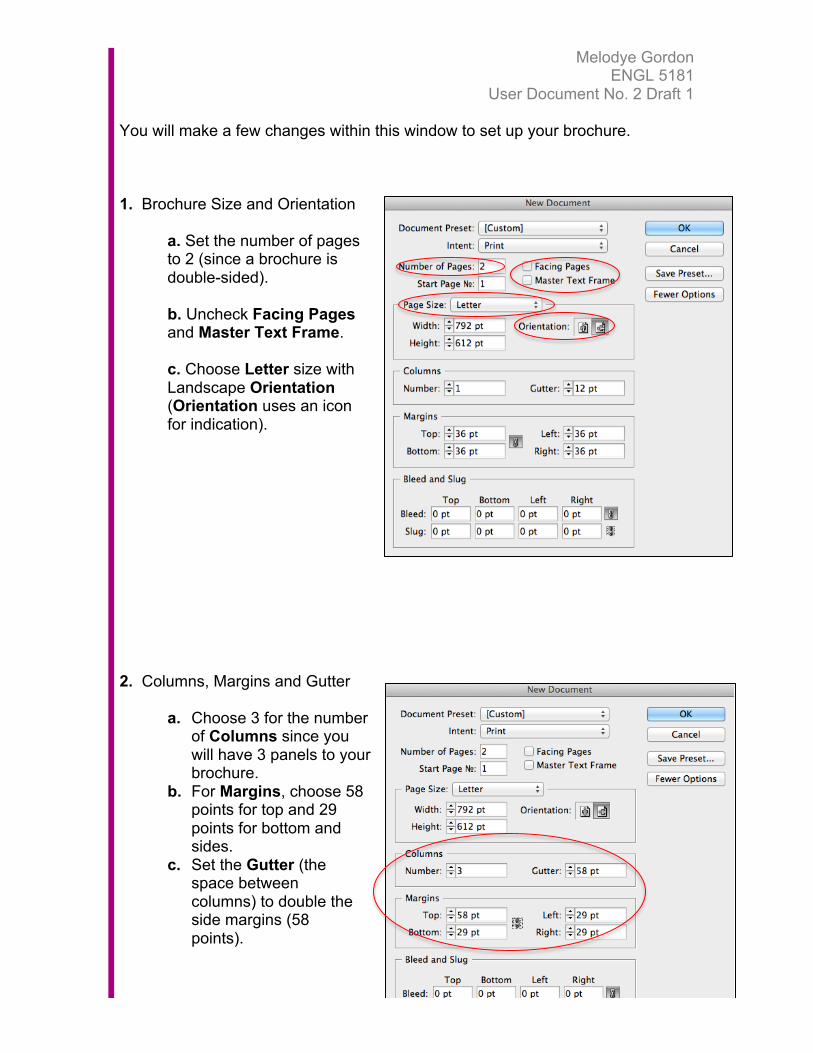
You will make a few changes within this window to set up your brochure. 1. Brochure Size and Orientation a. Set the number of pages to 2 (since a brochure is double-sided). b. Uncheck Facing Pages and Master Text Frame. c. Choose Letter size with Landscape Orientation (Orientation uses an icon for indication). 2. Columns, Margins and Gutter
a. Choose 3 for the number of Columns since you will have 3 panels to your brochure.
b. For Margins, choose 58 points for top and 29 points for bottom and sides.
c. Set the Gutter (the space between columns) to double the side margins (58 points).
Melodye Gordon ENGL 5181
User Document No. 2 Draft 1
6
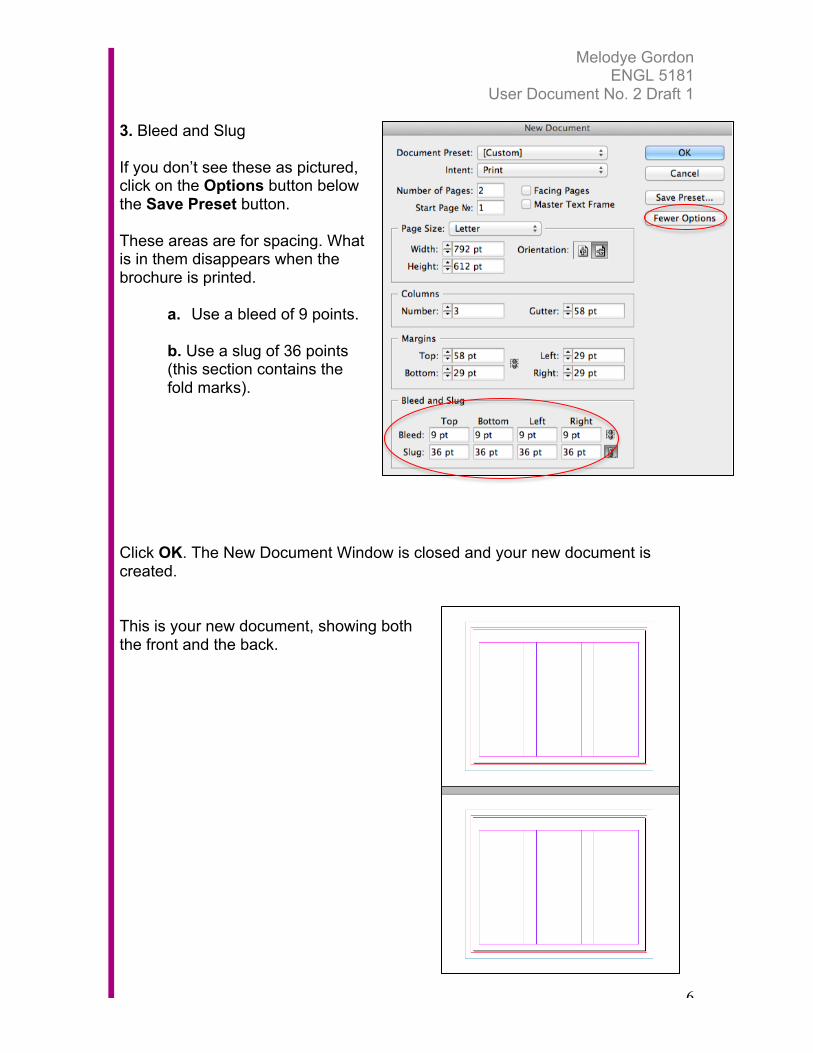
3. Bleed and Slug If you don’t see these as pictured, click on the Options button below the Save Preset button. These areas are for spacing. What is in them disappears when the brochure is printed.
a. Use a bleed of 9 points. b. Use a slug of 36 points (this section contains the fold marks). Click OK. The New Document Window is closed and your new document is created. This is your new document, showing both the front and the back.
Melodye Gordon ENGL 5181
User Document No. 2 Draft 1
7
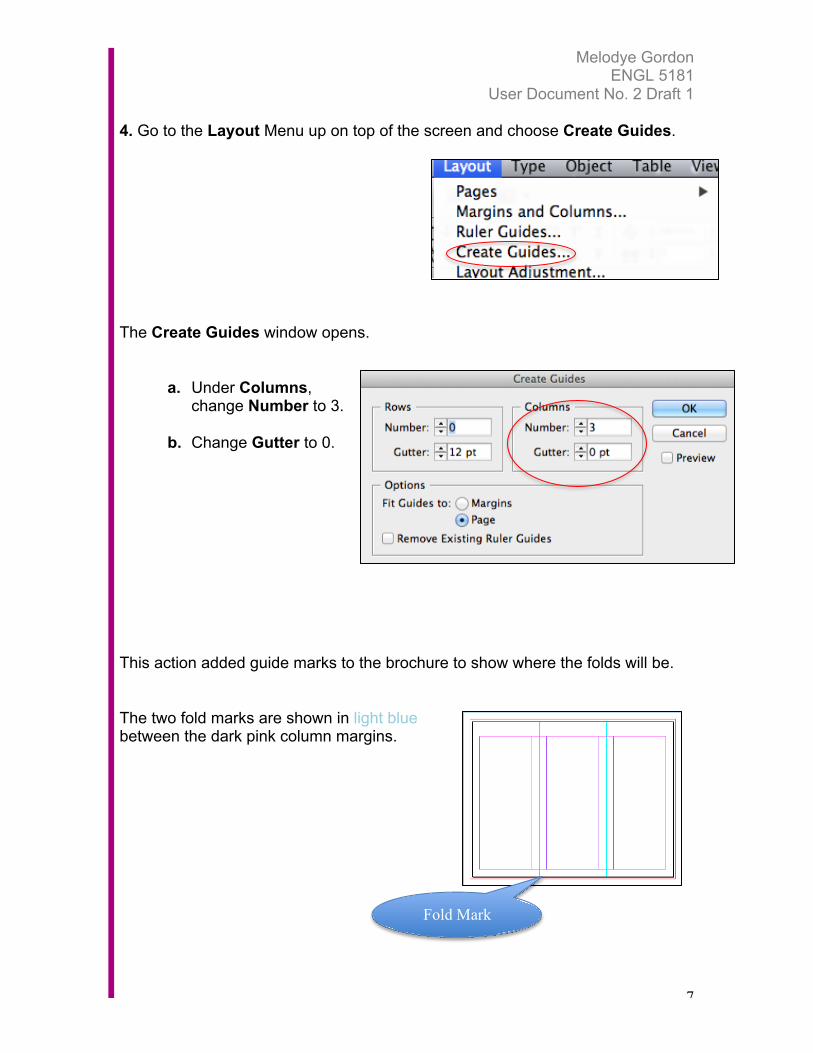
4. Go to the Layout Menu up on top of the screen and choose Create Guides. The Create Guides window opens.
a. Under Columns, change Number to 3.
b. Change Gutter to 0.
This action added guide marks to the brochure to show where the folds will be. The two fold marks are shown in light blue between the dark pink column margins.
Fold Mark
Melodye Gordon ENGL 5181
User Document No. 2 Draft 1
8
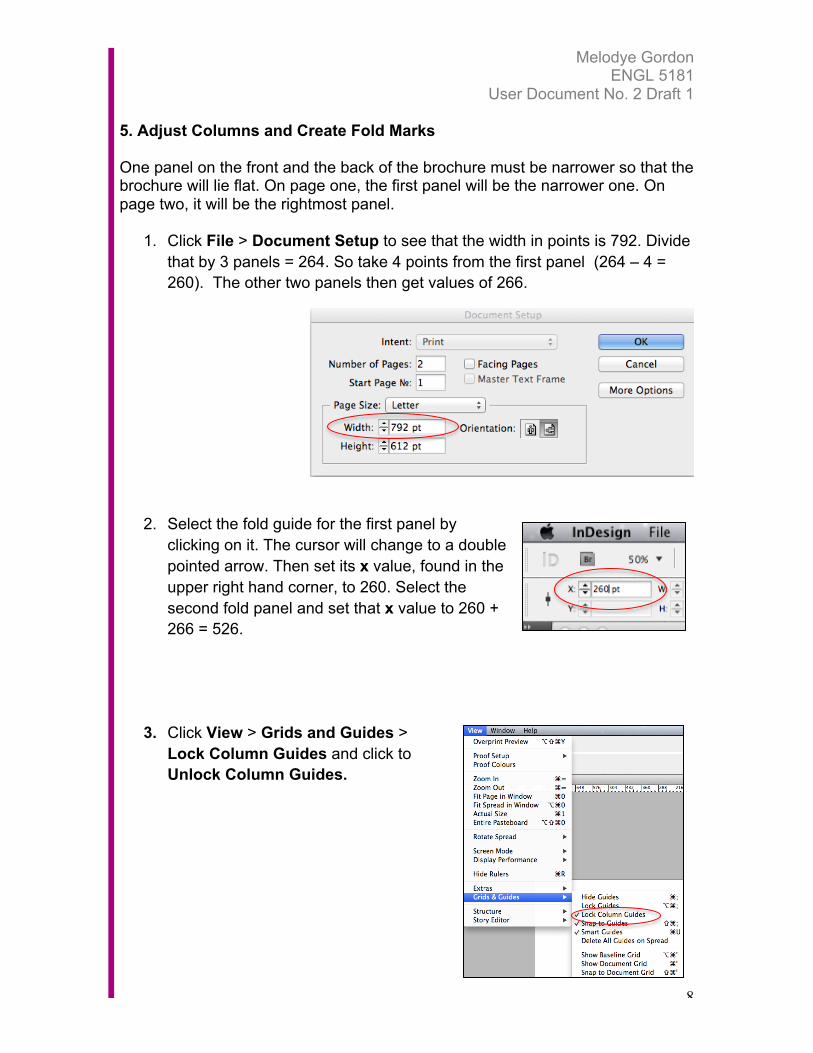
5. Adjust Columns and Create Fold Marks One panel on the front and the back of the brochure must be narrower so that the brochure will lie flat. On page one, the first panel will be the narrower one. On page two, it will be the rightmost panel.
1. Click File > Document Setup to see that the width in points is 792. Divide that by 3 panels = 264. So take 4 points from the first panel (264 – 4 = 260). The other two panels then get values of 266.
2. Select the fold guide for the first panel by clicking on it. The cursor will change to a double pointed arrow. Then set its x value, found in the upper right hand corner, to 260. Select the second fold panel and set that x value to 260 + 266 = 526.
3. Click View > Grids and Guides > Lock Column Guides and click to Unlock Column Guides.
Melodye Gordon ENGL 5181
User Document No. 2 Draft 1
9
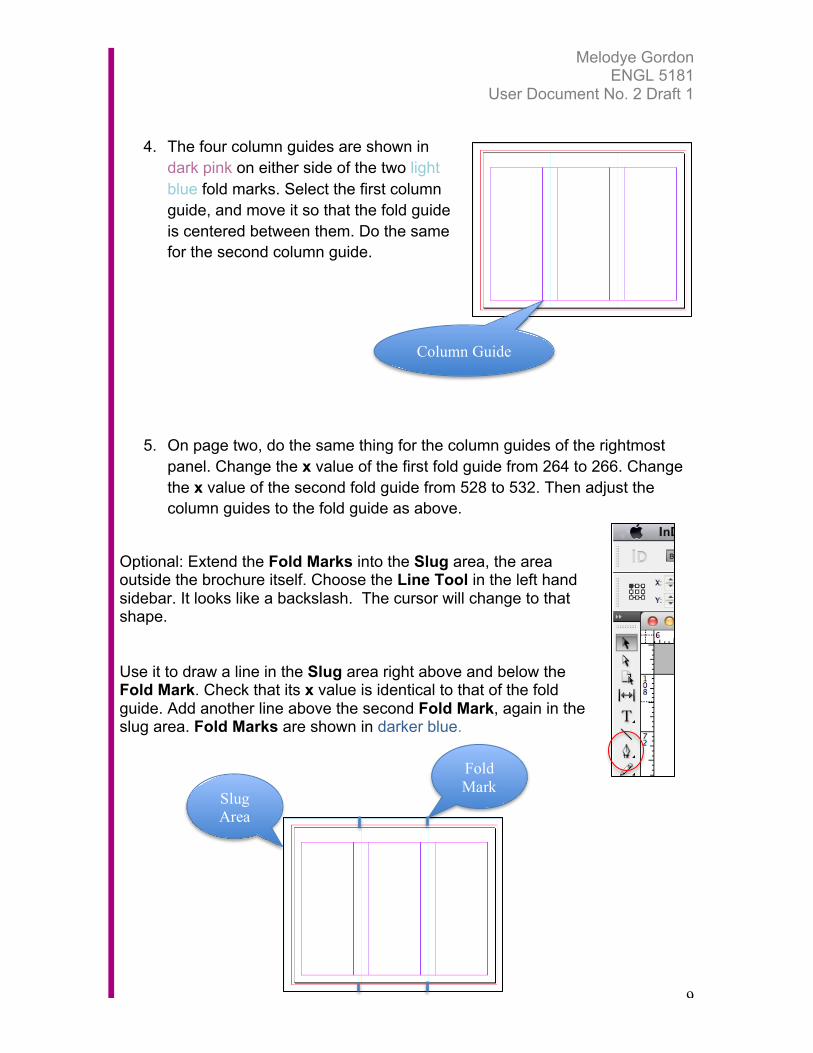
4. The four column guides are shown in dark pink on either side of the two light blue fold marks. Select the first column guide, and move it so that the fold guide is centered between them. Do the same for the second column guide.
5. On page two, do the same thing for the column guides of the rightmost panel. Change the x value of the first fold guide from 264 to 266. Change the x value of the second fold guide from 528 to 532. Then adjust the column guides to the fold guide as above.
Optional: Extend the Fold Marks into the Slug area, the area outside the brochure itself. Choose the Line Tool in the left hand sidebar. It looks like a backslash. The cursor will change to that shape. Use it to draw a line in the Slug area right above and below the Fold Mark. Check that its x value is identical to that of the fold guide. Add another line above the second Fold Mark, again in the slug area. Fold Marks are shown in darker blue.
Slug Area
Fold Mark
Column Guide