Embed Size (px)
Citation preview

1
Horticopia Professional Reference

2
Table of Contents USING HORTICOPIA PROFESSIONAL......................................................................5
Main Window.......................................................................................................................5
The Garden Workbench®...................................................................................................6
Working with Plant Lists ....................................................................................................9
Finding Plants and Information .......................................................................................10
Working with Pictures.......................................................................................................11
Saving Your Work .............................................................................................................13
Features for Education and Training...............................................................................15
Creating and Running a Slideshow ..................................................................................16
Keyboard Shortcuts ...........................................................................................................18
Troubleshooting Technical Problems...............................................................................20
Contacting HORTICOPIA®.............................................................................................22
Copyrights ..........................................................................................................................23
MENUS .............................................................................................................................24
HORTICOPIA® Professional Menus ..............................................................................24
File Menu ............................................................................................................................25
Edit Menu ...........................................................................................................................28
Workbench Menu ..............................................................................................................30
Data Menu ..........................................................................................................................33
Favorites Menu...................................................................................................................35
Collections Menu................................................................................................................38
Format Menu......................................................................................................................39
Window Menu ....................................................................................................................41
Slideshow Menu .................................................................................................................43
Tools Menu .........................................................................................................................45
Help Menu ..........................................................................................................................48
Main Window Toolbar ......................................................................................................50
CUSTOMIZATION.........................................................................................................53
HORTICOPIA® Professional Customization.................................................................53
Workbench Tab .................................................................................................................54
Navigation Tab...................................................................................................................56
3
Pictures Tab........................................................................................................................57
Slideshow Tab.....................................................................................................................59
Collections Tab...................................................................................................................61
THE GARDEN WORKBENCH ....................................................................................62
Garden Workbench® Window.........................................................................................62
Workbench Tools ...............................................................................................................63
Workbench Techniques.....................................................................................................66
Selecting Plants by Characteristics ..................................................................................68
Plant Attributes and Characteristics................................................................................71
Hardiness ............................................................................................................................87
WORKING WITH PLANT LISTS................................................................................88
Using Plant List Icons........................................................................................................88
Controlling List Appearance.............................................................................................89
Navigating the Plant List...................................................................................................90
Highlighting and Getting Information.............................................................................91
Find Feature .......................................................................................................................92
Creating and Using MyList...............................................................................................95
Making List Entries ...........................................................................................................98
Ordering the Plant List......................................................................................................99
Added Notes Manager .....................................................................................................101
PLANT INFORMATION .............................................................................................102
Plant Information Window .............................................................................................102
Previews Tab ....................................................................................................................103
Information Tab...............................................................................................................104
Contributed Data Tab .....................................................................................................107
Notes Tab ..........................................................................................................................108
Garden Studio Tab ..........................................................................................................109
Added Notes Tab..............................................................................................................110
Growth Area Tab.............................................................................................................111
PLANT PICTURES.......................................................................................................112
Picture Window................................................................................................................112
Thumbnails Window .......................................................................................................114
PLANT NAMES.............................................................................................................117

4
Names Window.................................................................................................................117
Synonyms..........................................................................................................................118
Aliases................................................................................................................................119
SLIDESHOWS...............................................................................................................120
Slideshow Window ...........................................................................................................120
LAYOUT ........................................................................................................................121
Layout Window................................................................................................................121
DOCUMENT SETUP....................................................................................................124
Document Setup ...............................................................................................................124
List Tab.............................................................................................................................126
Data Tab ...........................................................................................................................128
Layout Tab .......................................................................................................................131
Pictures Tab......................................................................................................................134
Set Header/Footer Window.............................................................................................136
Print Preview Window.....................................................................................................138
MAPS ..............................................................................................................................139
Hardiness Map .................................................................................................................139
Zone Keys .........................................................................................................................140
HELP...............................................................................................................................141
System Parameters...........................................................................................................141
CREDITS........................................................................................................................142
HORTICOPIA® Credits.................................................................................................142
COLLECTIONS TAB...................................................................................................143
FAVORITES MENU.....................................................................................................144
ADD TO FAVORITES FEATURE..............................................................................146
ORGANIZE FAVORITES WINDOW........................................................................148
GLOSSARY....................................................................................................................150

5
Using Horticopia Professional
Main Window The HORTICOPIA® Professional main window is the window that appears when the program is opened (and remains until the program is closed). All features of HORTICOPIA® Professional are contained in this window. It contains Menus and the Main Toolbar. In addition, it contains the Garden Workbench® Window (the central work area of the program), as well as the windows for all other aspects of the program.
Title Bar
The left side of the main window title bar contains the HORTICOPIA® Professional icon and the program name. The right side contains the familiar WINDOWS buttons.
Menu Bar
Directly below the main window title bar is the main window menu bar. It contains the drop-down menus that enable you to work with HORTICOPIA® Professional. Here you can select commands to carry out any of HORTICOPIA® Professional's many and varied functions. Click Here to see a list with hyperlinks to detailed descriptions of each menu.
Main Toolbar
Directly below the main window menu bar and along the right side of the window are the main toolbars. Many users prefer the convenience of a toolbar button to a menu selection. The fully customizable toolbar enables you to keep all the menu functions you use most often readily available on the main toolbar. Click Here to view a detailed description of the main toolbar.
Garden Workbench®
The HORTICOPIA® Professional main window also contains the central work area of the program, the Garden Workbench®. The functions and uses of this feature are described in conjunction with many Help topics, but you can click Here for an overview.
6
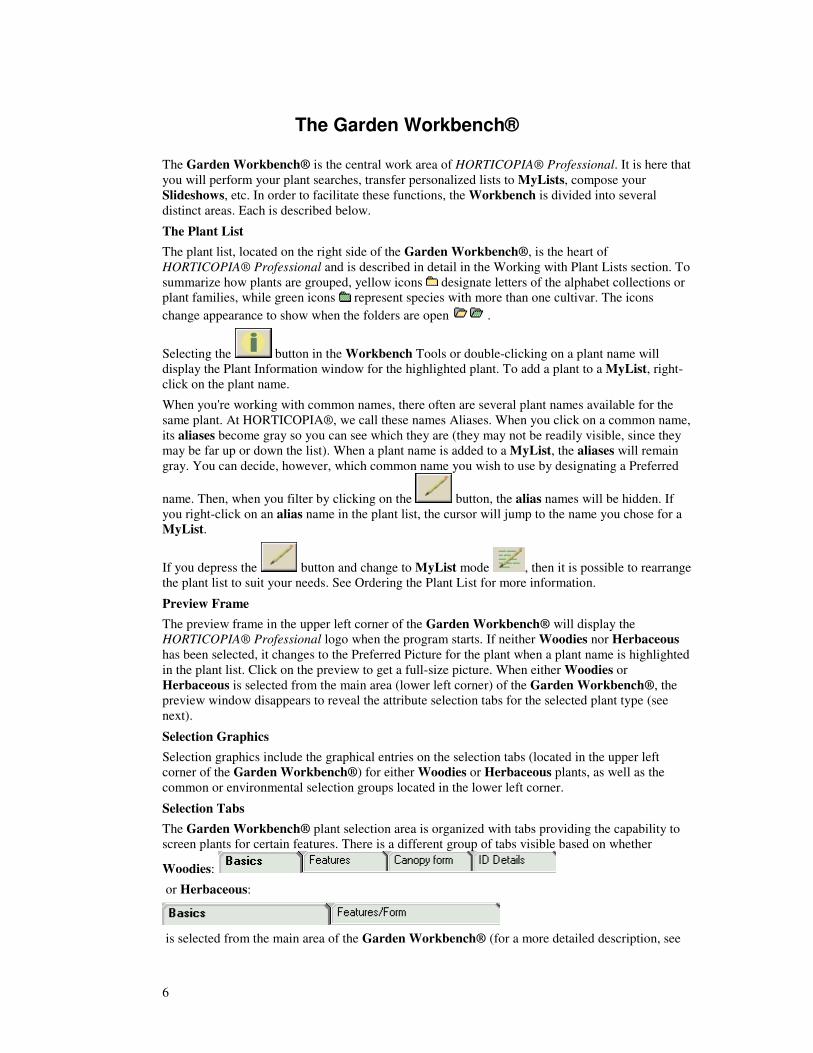
The Garden Workbench® The Garden Workbench® is the central work area of HORTICOPIA® Professional. It is here that you will perform your plant searches, transfer personalized lists to MyLists, compose your Slideshows, etc. In order to facilitate these functions, the Workbench is divided into several distinct areas. Each is described below.
The Plant List The plant list, located on the right side of the Garden Workbench®, is the heart of HORTICOPIA® Professional and is described in detail in the Working with Plant Lists section. To summarize how plants are grouped, yellow icons designate letters of the alphabet collections or plant families, while green icons represent species with more than one cultivar. The icons change appearance to show when the folders are open .
Selecting the button in the Workbench Tools or double-clicking on a plant name will display the Plant Information window for the highlighted plant. To add a plant to a MyList, right-click on the plant name.
When you're working with common names, there often are several plant names available for the same plant. At HORTICOPIA®, we call these names Aliases. When you click on a common name, its aliases become gray so you can see which they are (they may not be readily visible, since they may be far up or down the list). When a plant name is added to a MyList, the aliases will remain gray. You can decide, however, which common name you wish to use by designating a Preferred
name. Then, when you filter by clicking on the button, the alias names will be hidden. If you right-click on an alias name in the plant list, the cursor will jump to the name you chose for a MyList.
If you depress the button and change to MyList mode , then it is possible to rearrange the plant list to suit your needs. See Ordering the Plant List for more information.
Preview Frame
The preview frame in the upper left corner of the Garden Workbench® will display the HORTICOPIA® Professional logo when the program starts. If neither Woodies nor Herbaceous has been selected, it changes to the Preferred Picture for the plant when a plant name is highlighted in the plant list. Click on the preview to get a full-size picture. When either Woodies or Herbaceous is selected from the main area (lower left corner) of the Garden Workbench®, the preview window disappears to reveal the attribute selection tabs for the selected plant type (see next).
Selection Graphics
Selection graphics include the graphical entries on the selection tabs (located in the upper left corner of the Garden Workbench®) for either Woodies or Herbaceous plants, as well as the common or environmental selection groups located in the lower left corner.
Selection Tabs
The Garden Workbench® plant selection area is organized with tabs providing the capability to screen plants for certain features. There is a different group of tabs visible based on whether
Woodies:
or Herbaceous:
is selected from the main area of the Garden Workbench® (for a more detailed description, see
7
Plant Attributes and Characteristics).
Selection Groups
Selection Groups are comprised of those attributes or characteristics that usually include a range of values. Some, like Fall Leaf Color, are applicable to either Woodies or Herbaceous and are on the tabs mentioned immediately above. Follow the hyperlink to Plant Attributes and Characteristics for a complete description. Others, like the environmental characteristics, are common to both Woody and Herbaceous plants and are located in the lower left corner of the Garden Workbench®, along with the plant categories (Woodies and Herbaceous) . They include the following:
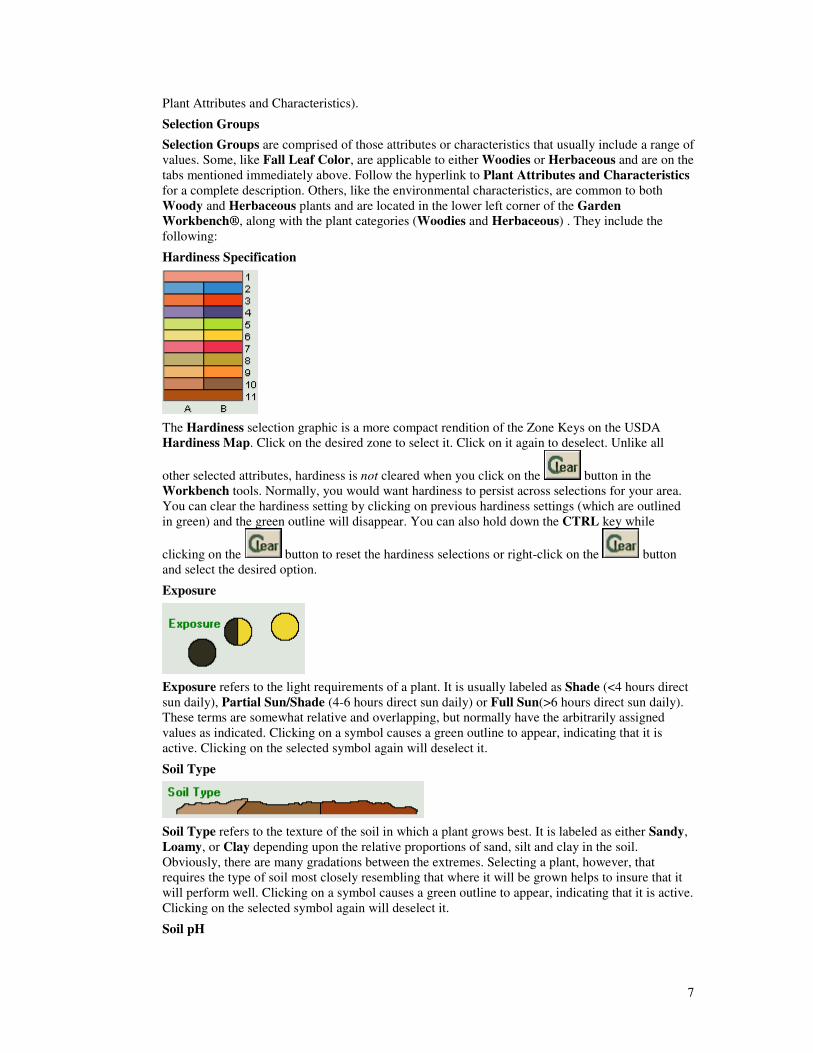
Hardiness Specification
The Hardiness selection graphic is a more compact rendition of the Zone Keys on the USDA Hardiness Map. Click on the desired zone to select it. Click on it again to deselect. Unlike all
other selected attributes, hardiness is not cleared when you click on the button in the Workbench tools. Normally, you would want hardiness to persist across selections for your area. You can clear the hardiness setting by clicking on previous hardiness settings (which are outlined in green) and the green outline will disappear. You can also hold down the CTRL key while
clicking on the button to reset the hardiness selections or right-click on the button and select the desired option.
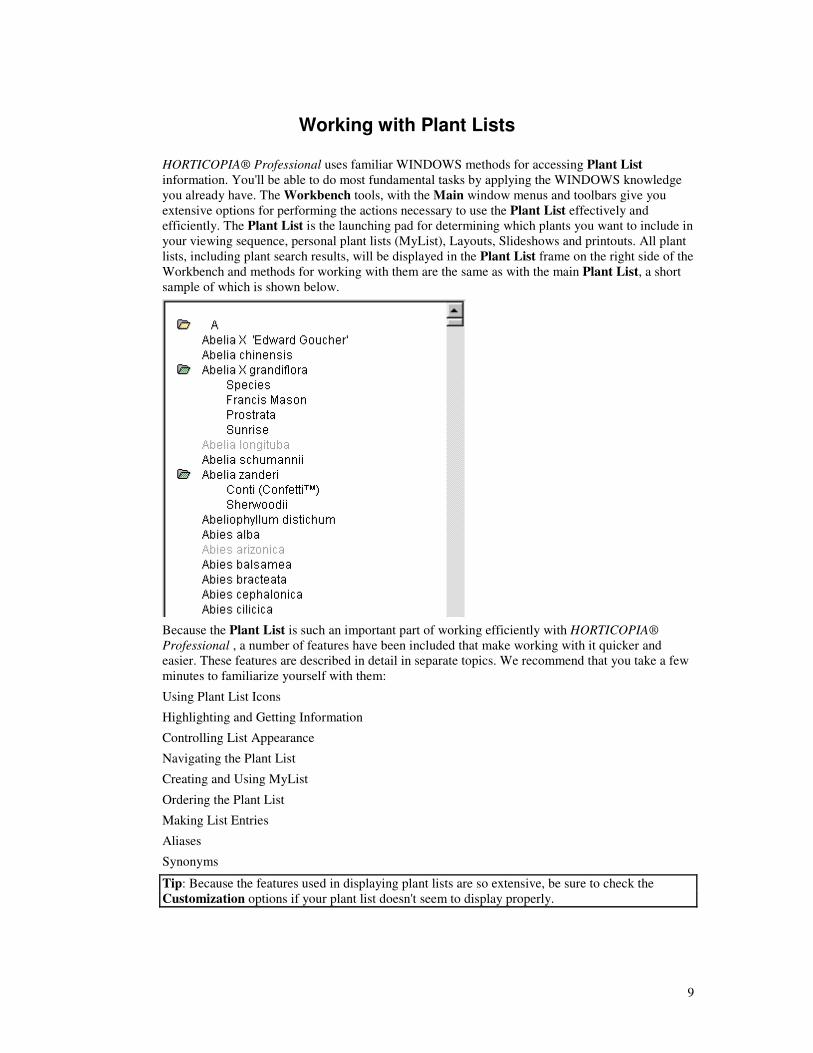
Exposure
Exposure refers to the light requirements of a plant. It is usually labeled as Shade (<4 hours direct sun daily), Partial Sun/Shade (4-6 hours direct sun daily) or Full Sun(>6 hours direct sun daily). These terms are somewhat relative and overlapping, but normally have the arbitrarily assigned values as indicated. Clicking on a symbol causes a green outline to appear, indicating that it is active. Clicking on the selected symbol again will deselect it.
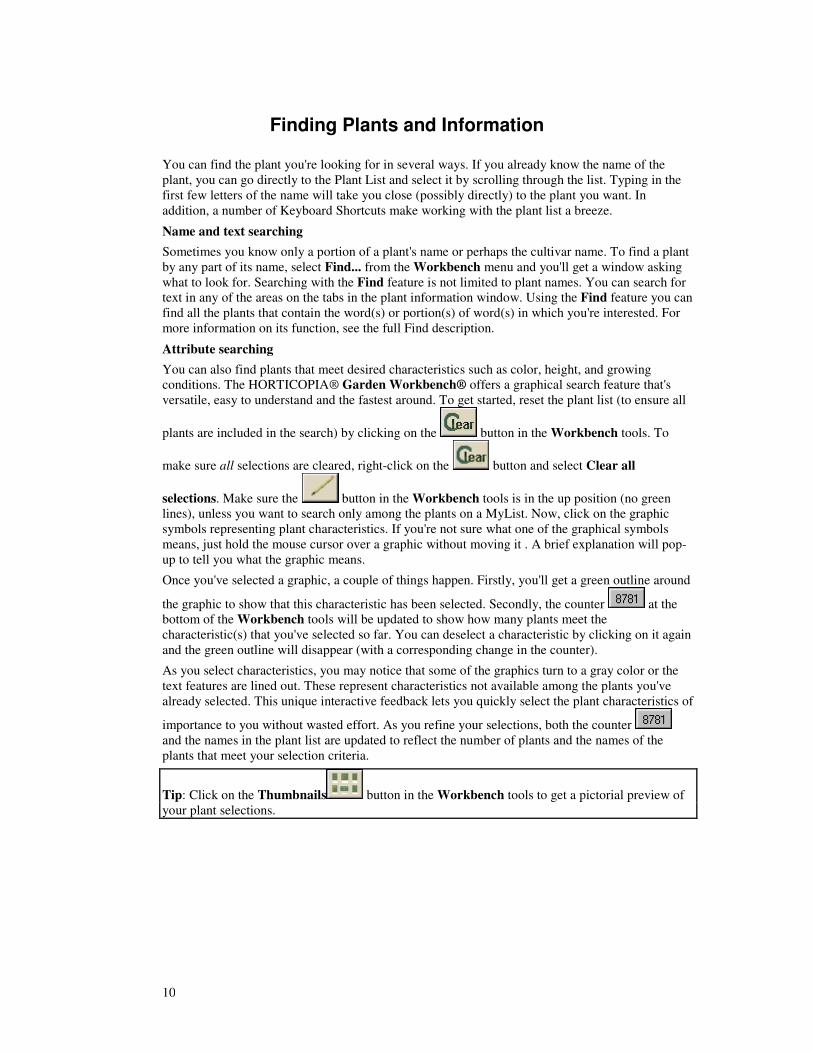
Soil Type
Soil Type refers to the texture of the soil in which a plant grows best. It is labeled as either Sandy, Loamy, or Clay depending upon the relative proportions of sand, silt and clay in the soil. Obviously, there are many gradations between the extremes. Selecting a plant, however, that requires the type of soil most closely resembling that where it will be grown helps to insure that it will perform well. Clicking on a symbol causes a green outline to appear, indicating that it is active. Clicking on the selected symbol again will deselect it.
Soil pH

8
Soil pH indicates the level of acidity/alkalinity in the soil. It is measured on a scale from 0 (strongly acidic) to 14 (strongly basic). Most plants perform best at a pH of 6-6.5, although there are some that prefer higher or lower values. The scale is logarithmic, so progressing from 4-5 means a tenfold increase. Clicking on a symbol causes a green outline to appear, indicating that it is active. Clicking on the selected symbol again will deselect it.
In all cases, the plant list will be updated to contain only plants with the selected attribute(s).
9
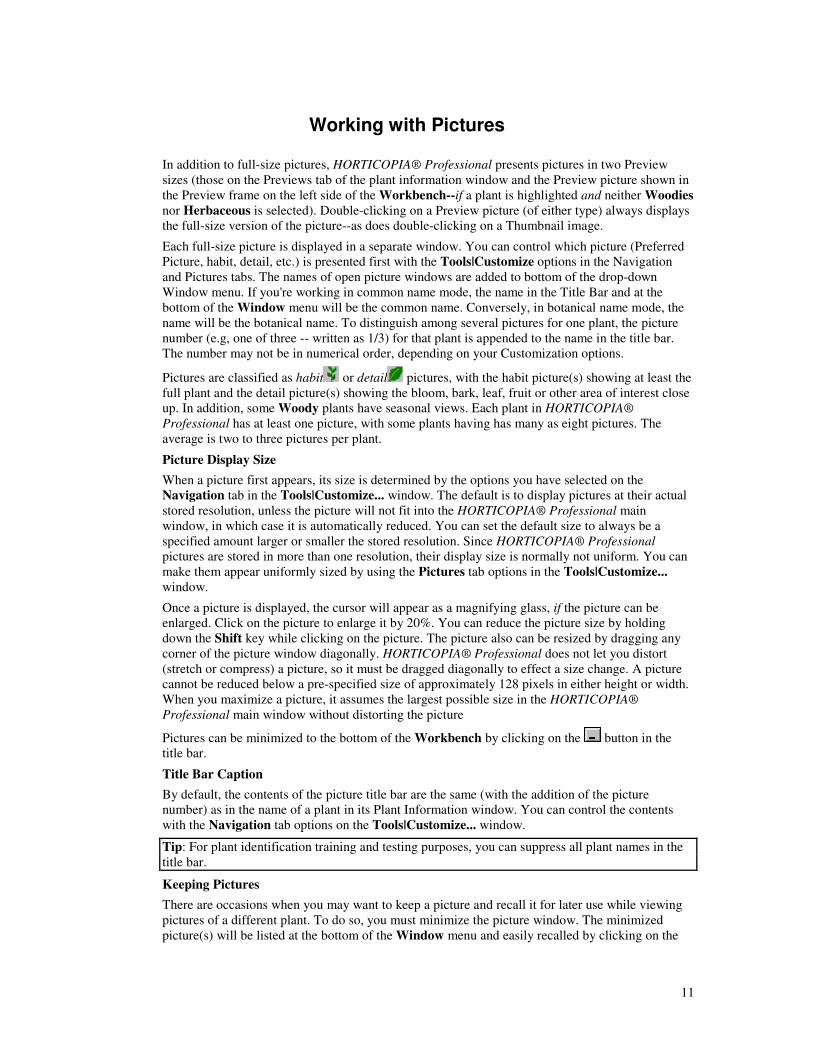
Working with Plant Lists HORTICOPIA® Professional uses familiar WINDOWS methods for accessing Plant List information. You'll be able to do most fundamental tasks by applying the WINDOWS knowledge you already have. The Workbench tools, with the Main window menus and toolbars give you extensive options for performing the actions necessary to use the Plant List effectively and efficiently. The Plant List is the launching pad for determining which plants you want to include in your viewing sequence, personal plant lists (MyList), Layouts, Slideshows and printouts. All plant lists, including plant search results, will be displayed in the Plant List frame on the right side of the Workbench and methods for working with them are the same as with the main Plant List, a short sample of which is shown below.
Because the Plant List is such an important part of working efficiently with HORTICOPIA® Professional , a number of features have been included that make working with it quicker and easier. These features are described in detail in separate topics. We recommend that you take a few minutes to familiarize yourself with them:
Using Plant List Icons
Highlighting and Getting Information
Controlling List Appearance
Navigating the Plant List
Creating and Using MyList
Ordering the Plant List
Making List Entries
Aliases
Synonyms
Tip: Because the features used in displaying plant lists are so extensive, be sure to check the Customization options if your plant list doesn't seem to display properly.
10
Finding Plants and Information You can find the plant you're looking for in several ways. If you already know the name of the plant, you can go directly to the Plant List and select it by scrolling through the list. Typing in the first few letters of the name will take you close (possibly directly) to the plant you want. In addition, a number of Keyboard Shortcuts make working with the plant list a breeze.
Name and text searching
Sometimes you know only a portion of a plant's name or perhaps the cultivar name. To find a plant by any part of its name, select Find... from the Workbench menu and you'll get a window asking what to look for. Searching with the Find feature is not limited to plant names. You can search for text in any of the areas on the tabs in the plant information window. Using the Find feature you can find all the plants that contain the word(s) or portion(s) of word(s) in which you're interested. For more information on its function, see the full Find description.
Attribute searching
You can also find plants that meet desired characteristics such as color, height, and growing conditions. The HORTICOPIA® Garden Workbench® offers a graphical search feature that's versatile, easy to understand and the fastest around. To get started, reset the plant list (to ensure all
plants are included in the search) by clicking on the button in the Workbench tools. To
make sure all selections are cleared, right-click on the button and select Clear all
selections. Make sure the button in the Workbench tools is in the up position (no green lines), unless you want to search only among the plants on a MyList. Now, click on the graphic symbols representing plant characteristics. If you're not sure what one of the graphical symbols means, just hold the mouse cursor over a graphic without moving it . A brief explanation will pop-up to tell you what the graphic means.
Once you've selected a graphic, a couple of things happen. Firstly, you'll get a green outline around
the graphic to show that this characteristic has been selected. Secondly, the counter at the bottom of the Workbench tools will be updated to show how many plants meet the characteristic(s) that you've selected so far. You can deselect a characteristic by clicking on it again and the green outline will disappear (with a corresponding change in the counter).
As you select characteristics, you may notice that some of the graphics turn to a gray color or the text features are lined out. These represent characteristics not available among the plants you've already selected. This unique interactive feedback lets you quickly select the plant characteristics of
importance to you without wasted effort. As you refine your selections, both the counter and the names in the plant list are updated to reflect the number of plants and the names of the plants that meet your selection criteria.
Tip: Click on the Thumbnails button in the Workbench tools to get a pictorial preview of your plant selections.
11
Working with Pictures In addition to full-size pictures, HORTICOPIA® Professional presents pictures in two Preview sizes (those on the Previews tab of the plant information window and the Preview picture shown in the Preview frame on the left side of the Workbench--if a plant is highlighted and neither Woodies nor Herbaceous is selected). Double-clicking on a Preview picture (of either type) always displays the full-size version of the picture--as does double-clicking on a Thumbnail image.
Each full-size picture is displayed in a separate window. You can control which picture (Preferred Picture, habit, detail, etc.) is presented first with the Tools|Customize options in the Navigation and Pictures tabs. The names of open picture windows are added to bottom of the drop-down Window menu. If you're working in common name mode, the name in the Title Bar and at the bottom of the Window menu will be the common name. Conversely, in botanical name mode, the name will be the botanical name. To distinguish among several pictures for one plant, the picture number (e.g, one of three -- written as 1/3) for that plant is appended to the name in the title bar. The number may not be in numerical order, depending on your Customization options.
Pictures are classified as habit or detail pictures, with the habit picture(s) showing at least the full plant and the detail picture(s) showing the bloom, bark, leaf, fruit or other area of interest close up. In addition, some Woody plants have seasonal views. Each plant in HORTICOPIA® Professional has at least one picture, with some plants having has many as eight pictures. The average is two to three pictures per plant.
Picture Display Size
When a picture first appears, its size is determined by the options you have selected on the Navigation tab in the Tools|Customize... window. The default is to display pictures at their actual stored resolution, unless the picture will not fit into the HORTICOPIA® Professional main window, in which case it is automatically reduced. You can set the default size to always be a specified amount larger or smaller the stored resolution. Since HORTICOPIA® Professional pictures are stored in more than one resolution, their display size is normally not uniform. You can make them appear uniformly sized by using the Pictures tab options in the Tools|Customize... window.
Once a picture is displayed, the cursor will appear as a magnifying glass, if the picture can be enlarged. Click on the picture to enlarge it by 20%. You can reduce the picture size by holding down the Shift key while clicking on the picture. The picture also can be resized by dragging any corner of the picture window diagonally. HORTICOPIA® Professional does not let you distort (stretch or compress) a picture, so it must be dragged diagonally to effect a size change. A picture cannot be reduced below a pre-specified size of approximately 128 pixels in either height or width. When you maximize a picture, it assumes the largest possible size in the HORTICOPIA® Professional main window without distorting the picture
Pictures can be minimized to the bottom of the Workbench by clicking on the button in the title bar.
Title Bar Caption
By default, the contents of the picture title bar are the same (with the addition of the picture number) as in the name of a plant in its Plant Information window. You can control the contents with the Navigation tab options on the Tools|Customize... window.
Tip: For plant identification training and testing purposes, you can suppress all plant names in the title bar.
Keeping Pictures
There are occasions when you may want to keep a picture and recall it for later use while viewing pictures of a different plant. To do so, you must minimize the picture window. The minimized picture(s) will be listed at the bottom of the Window menu and easily recalled by clicking on the
12
name of the desired picture. The picture can be closed when you finish with it by clicking on the button. It can also be closed, along with all other open windows, by clicking on the Close all
command on the Window menu.
Arranging Pictures On-Screen
In addition to moving pictures by dragging them by the title bar, you can cause HORTICOPIA® Professional to arrange the pictures on the screen by choosing one of the standard WINDOWS tiling options -- Tile Horizontally, Tile Vertically or Cascade -- from the Window menu. If a picture is minimized when you select a tiling option (except Cascade), it also participates in the arrangement.
Printing Pictures
Pictures can be included in printed lists, layouts, data sheets, or picture printouts by using the appropriate Print command on the File menu (or for Layouts, using the Copy to Layout command from the Data Menu or Data toolbar). See the pertinent tab in the Document Setup window for details. The active picture window or active Thumbnails window can be quickly printed by using the Snapshot command on the File menu.
13
Saving Your Work When you configure HORTICOPIA® Professional with the Customize options on the Tools menu, any settings you make are automatically retained for subsequent sessions, as are the printing options set with the tabs in the Document Setup window and the toolbar Customization options made on the Tools|Toolbars... menu. Also, the Hardiness zone you've specified on the Workbench Hardiness selection grid is automatically remembered. Once you've set these options to your needs, you won't have to change them unless your requirements change.
Tip: You can temporarily override some of these settings by right-clicking on the buttons in the Workbench tools.
MyList You can create any number of MyLists and save them as files on your hard disk or on any removable disk. You can customize your MyList by rearranging the Plant Order, omitting certain pictures, designating Preferred Common Names, etc. If you save a MyList, these custom features are also saved. Landscapers will find this useful for creating plant lists for different clients; Garden Centers can create lists of plants that are featured at different times of the year, and educators can maintain customized lists for teaching/testing purposes.
You save a plant list with either the Save or Save As command on the File menu. You might want to create a separate folder (directory) on your hard drive where you save such lists. If you don't specify a folder, HORTICOPIA Professional automatically creates a Documents subfolder in the HORTICOPIA® folder where the saved lists will be located. Once you've saved a MyList, you can use the File|Save MyList command to save any changes to it. The current file name appears in the title bar of the Garden Workbench®.
When you use Save As command, you can specify that the file be saved in text format by clicking
on the to the right of the Save as type: text box and selecting Text (*.txt). Click and this will save the plant list in a tab-delimited format that is compatible with spreadsheets and database applications such as Excel®, Lotus®, Access® and dBase®. Note, however, that plant lists saved in text format cannot be read back by HORTICOPIA® Professional.
Previously saved MyLists can be recalled with the Open|Open MyList command on the File menu. Additionally, the six most recently saved (or opened) files are listed at the bottom of the File menu and can be recalled directly by clicking on the file name.
Layouts
Layouts can get to be fairly complex and take a lot of effort to get just right. You can save a layout for later use with the Save Layout or Save Layout as commands on the File menu. Later, you can recall the saved layout with the Open Layout command on the File menu.
In addition to saving layouts, you can create layout templates that might include your name, address, phone number and/or other permanent information. When you then want to create a new layout, you can open the saved template, add new information, and print it or save it with a different name.
Saving to an External File
There may be occasions when you want to save documents outside of HORTICOPIA® Professional. You can do this with the printing utilities found in the Print Preview window. You can save printouts (layouts, lists, data sheets, or pictures) as a PDF file by clicking on the
button. This allows you to recall the file using a program like ADOBE Acrobat® Reader™. You can also save documents in HPD (printer readable only) format by clicking the button in the lower right corner next to the button. In either case, you will get a dialog box asking you to specify a path to the saved file. Even if you do not need to save the file for later use, you may find it beneficial to use this capability--especially if you are experiencing

14
problems with printing. Many printers require substantial system resources and are not able to function properly if other programs are running. Printing the file when HORTICOPIA® Professional is closed may solve this problem. You may also find this useful for creating and saving frequently used documents. Neither PDF nor HPD files is readable in HORTICOPIA® Professional, so if you will need to work with the document later, you should save it in the normal fashion described above or place it on the Favorites menu.
15
Features for Education and Training HORTICOPIA® Professional includes a number of features designed specifically for education and training purposes, including:
��accurate Pronunciation of botanical names
��full support for Viewing plants by family names
��inclusion of Synonyms for botanical names
��extensive Common name cross-reference
��data on native Habitat
��creation of Slideshows for presentation and testing
��special training and quiz modes for plant identification:
Plant Identification Training
To practice identifying plants, you can hide all plant names from the title bars of plant pictures (including those in Slideshows). These options are set with the Pictures tab and the Slideshow tab on the Tools|Customize menu. You can suppress the botanical name and keep the family name or show only the common name to test yourself on the botanical name, or use other combinations to suit your needs.
If you check Thumbnail Identification Mode at the bottom of the Pictures tab on the
Tools|Customize menu, then the next time you click on the Thumbnails button:
��the names field underneath each picture will be empty, and
��the thumbnail pictures will appear in random order.
If you double-click on a thumbnail picture to display a full-size picture, the full-size view will have Thumbnail Identification Mode in the title bar in place of the plant name. When you allow the mouse cursor to linger over a thumbnail picture which has the name suppressed, however, the name will pop-up.
Tip: You can right-click on the thumbnail image to display the plant information window, which contains complete name information including family, botanical and common names on the Information tab.
Quiz Mode
If you right-click on the Thumbnails button in the Workbench tools, you'll see a pop-up menu from which you can choose Identification mode. In this mode, there will be no plant name fields in the Thumbnail window at all and the order of the thumbnails will be randomized. If you want to see the name of the plant, however, you can hold the mouse cursor over a thumbnail picture and the name of the plant will pop-up.
You can still double-click on the thumbnail to enlarge it, but the title bar of the full-size picture will be in Plant Identification Mode, i.e., it will contain no name for the plant. You can right-click on the full-size picture, however, and the plant information window for the plant, which includes the plant name information, will appear.
The thumbnails right-click option described here is essentially the same as the Thumbnail Identification Mode described previously. The difference is that the right-click option is only temporarily operative, overriding any Customization settings.
16
Creating and Running a Slideshow HORTICOPIA® Professional can be used to present a slideshow, which includes plants you have selected (highlighted) or an entire plant list. If no plant in the list is highlighted, then the entire current list will be used in the slideshow. (A highlighted name beside a closed green folder always includes two or more plants.) If you've highlighted one or more plant names, then only those plants will be used (a single highlighted plant constitutes a list). See Working with Plant Lists for more information on selecting the plants that will appear in the slideshow. A slideshow can be saved to a file to be recalled for use at a later time and/or can be added to the Favorites menu for even more convenient access.
You can arrange the list of plants in a slideshow in any order you choose by using MyList. You cannot, however, control the order of the plants presented after the slideshow begins. The order of presentation in the slideshow will be the order of your plant list at the time you start the slideshow. See Ordering the Plant List for more information on determining the order in which plants will appear in the slideshow (if using MyList for the slideshow). Within each plant's Previews tab in the plant information window, you can also rearrange the order of the pictures for that plant, as well as omit any pictures you don't want. Pictures are omitted by right-clicking on the Preview picture to be left out. A red border will appear on the right side and bottom of the designated Preview picture. If you decide later to include the picture, simply right-click again to deselect it.
Customize options
Extensive Customization options are provided for slideshows by choosing Tools|Customize... and selecting the Slideshow tab. Some of the items you can specify are:
��whether to display all pictures for a plant or only the Preferred Picture
��whether to include plant names, their sounds and when they should be heard -- or exclude them entirely
��size of the pictures in the slideshow (All pictures can be maximized, i.e., scaled to the size of the slideshow window, or be reduced or enlarged by a specified amount, maintaining their original resolution. You can even use the entire screen for a slideshow, hiding all other programs and open WINDOWS.)
��which items of plant nomenclature to include in slide titles and whether titles should appear in the title bar or as large text superimposed over the picture
��either automatic or manual slide advance and the time interval for automatic advances
��automatic display of slide controls (Slideshow toolbar)
��whether or not the entire slideshow should repeat automatically
��optional background music (You can even have your own background music. Just replace the Obgmusic.wav file in the C:\Program Files\HORTICOPIA\Hortalk\O directory with a .wav file of your own choosing.)
Running the Slideshow
Once you've decided which plants to include and made your Customization options, you can start the slideshow with the Slideshow menu Start Slideshow command (or the button on the Data toolbar). If you have used the Tools|Toolbars... Customize options to make the Slideshow toolbar visible on the Workbench before the slideshow begins, you can also use its button to start the slideshow. Several of the buttons on the Slideshow toolbar may not be available (grayed out) depending on whether you've selected manual or automatic mode for the slide advance in your Customization options.
When the slideshow starts, a HORTICOPIA® Professional opening screen will appear while the program prepares data for presentation. Controlling the slideshow from this point depends somewhat on which viewing mode you have selected. If you are viewing the slideshow in full
17
window mode, you can use the Slideshow menu for some slideshow functions, but the Slideshow toolbar is normally used. You must use the Slideshow toolbar to stop the slideshow before the Slideshow menu can be displayed. The Slideshow toolbar will appear automatically when the slideshow starts, unless you have suppressed it by placing a checkmark beside Do not show Slideshow toolbar on the Slideshow tab of the Tools|Customize... window. You can then place it wherever you wish (usually docking it with the other toolbars is convenient) and it will remain there until you change the position. If the Slideshow toolbar is hidden, it can be recalled by pressing the Space Bar.
If you are viewing a slideshow in full screen mode, you must use the Slideshow toolbar to control the slideshow, since the Slideshow menu will not be visible. The Slideshow toolbar will appear automatically when the slideshow starts, unless you have suppressed it by placing a checkmark beside Do not show Slideshow toolbar on the Slideshow tab of the Tools|Customize... window. If you have suppressed the Slideshow toolbar, you can make it reappear by pressing the Space Bar. In entire screen mode, the Slideshow toolbar is always floating and cannot be docked.
You can pause or stop a sideshow at any time with the Slideshow toolbar. You can then resume by the same means. To pause a slideshow, click on the Pause Slideshow button on the Slideshow toolbar. To resume a slideshow, click on the Resume Slideshow button on the Slideshow toolbar. If you want to stop and discontinue a slideshow, you can do so by pressing the Esc key or by clicking on the Stop Slideshow button on the Slideshow toolbar.
Continuous Slideshow
You can start a slideshow and have it automatically repeat from the beginning when it reaches the end. From the Tools|Customize... menu check Run continuously on the Slideshow tab.
Slideshow Notes
If you don't want to see the multimedia effects where each slide is rolled over the previous one, you can suppress the special effects by choosing that option on the Slideshow tab in the Tools|Customize... window. This may speed up the slide display on slower computers. If the slideshow gets stuck on your system, you should suppress the multimedia effects.
If you need to make a more customized slideshow than is possible with HORTICOPIA® Professional, you can export the pictures you want to show to Power Point or a similar presentation program.
Tip: Because the slideshow options are so extensive, be sure to check the Customization settings if your slideshow doesn't seem be operating correctly.
18
Keyboard Shortcuts Although most users will probably rely on the mouse for program navigation by clicking on icons, plant names and/or menu items, some users may want to use the keyboard. In this regard, HORTICOPIA® Professional uses standard WINDOWS procedures. Be sure to explore the menus to learn the keyboard shortcuts that are available. Many common menu functions can be executed by pressing a key or a combination of keyboard keys. In addition, to the common WINDOWS keyboard functions, several HORTICOPIA® Professional keyboard shortcuts are described below.
Alt Key
All Workbench menus can be opened by pressing Alt+(underlined letter). Any command on the resulting drop-down menu can be executed by then pressing the underlined letter in the desired command. Alt is also used in some keyboard shortcuts.
Arrow, Page, Home and End Keys
You can use the keyboard Up Arrow, Down Arrow, Page Up, Page Down, Home and End keys instead of the mouse and scroll bar to navigate through plant lists and thumbnail displays, as well as the tabs in the plant information window.
Enter Key
The Enter key is equivalent to clicking on the Information button in the Workbench or double-clicking on a plant name. It will bring up the plant information window for the highlighted plant.
Shift Key
The Shift key can be used to highlight a range of contiguous plants by holding it down while clicking on the first and last plants in the range. Shift is also used in some keyboard shortcuts, as well as some Workbench functions, e.g, designating preferred common names.
CTRL Key
The CTRL key can be used to highlight a series of non-contiguous plants by holding it down while clicking on individual plant names. CTRL is also used in some keyboard shortcuts.
Space Bar
The Space Bar can be used to recall a hidden Slideshow toolbar.
Esc Key
During a Slideshow, you can press the Esc key at any time to terminate it. If the Slideshow is being viewed without a title bar, then the Space bar will recall the hidden Slideshow toolbar.
Tip: When working with the Garden Workbench, you can use the keyboard alphabetic keys to jump to the plant name in the current list that is the closest to beginning with the letter(s) entered.
Keyboard Shortcuts
Various keyboard shortcuts allow you to perform certain commands quickly and easily. The following is a list of keyboard shortcuts available while at the Garden Workbench. (It is not practical to memorize all of these shortcuts but it would be helpful to remember some of the ones that you use frequently)
F-Key Commands
F1 - Open Help + CTRL - Show Cultivars + Shift - Collapse List + CTRL + Shift - Show All Plants in List
F2 - Go to the Workbench + Shift - Show Hardiness Map
19
F3 - Find + Shift - Undo Find
F4 - Play Sound
F5 - Next Plant + CTRL - Start Slideshow + Shift - Resume Slideshow + CTRL + Shift - Stop Slideshow
F6 - Previous Plant + CTRL - Pause Slideshow
F7 - Show Plant Information + CTRL - Launch Control Panel
F8 - Copy to Layout + CTRL - Document Setup
F9 - Display Name Data + CTRL - Authoring Mode + Shift - Switch to Common/Botanical Name
F10 - Open Garden Studio + CTRL - Go to the Layout Window + Shift - Publish
F11 - Unlock Data Edit + Shift - Open Customization Window
F12 - Cycle Picture
Letter Shortcuts
CTRL + A - Highlight All + B - Bold-face Text + C - Copy to Clipboard + I - Italicize Text + J - Jump to Next Alias Name + M - Add All to MyList + N - Remove All from MyList + O - Open MyList + P - Print Layout + R - Set MyList to Current List + S - Save MyList + T - Remove Selected from MyList + U - Underline Text + V - Paste from Clipboard + X - Cut and Place in Clipboard + Z - Undo
Other Shortcuts
CTRL + Insert - Move Down
Shift + Insert - Move Up
Delete - Clear

20
Troubleshooting Technical Problems
Performance
Significant factors in performance, in order of importance are:
��color resolution (256 colors is slower)
��memory (less than 16 megabytes will make HORTICOPIA® Professional run slowly
��CD-ROM speed, with speeds above 4X offering diminishing returns, depending on CPU speed
Color resolution
The number of colors that can be displayed simultaneously is a function of the video memory, the monitor resolution, the video card's capability and the video drivers installed on your computer.
Whenever you change video modes, you should restart HORTICOPIA® Professional. For video mode changes other than resolution, WINDOWS will normally have to be restarted anyway.
To change the display settings on your system, click on the Display icon in the WINDOWS Control Panel and adjust your video settings with the Settings tab. It is recommended that you use a resolution of at least 800 x 600 with at least thousands of colors (also called 65536 colors or high color). 800 x 600 is the minimum resolution necessary to run HORTICOPIA® Professional. It is highly likely that this will not prove satisfactory for most users, so set your resolution higher, if possible.
Most video adapter vendors maintain websites with the most current video drivers. If you are experiencing display problems, you should check to see if you are using the most current video driver.
256-color Mode
When running in 256-color mode, performance of HORTICOPIA® Professional is significantly degraded. Since all HORTICOPIA® Professional pictures are stored in full color, they must be mapped to an optimum 256 color palette as they are retrieved from disk. On non-Pentium-class computers, this can take several seconds per picture.
Following are factors in appearance and performance in 256-color mode:
��When starting HORTICOPIA® Professional, you will get a message informing you that you are running 256-color mode and that both picture quality and performance are adversely affected. This message cannot be suppressed. It will be displayed every time you run HORTICOPIA® Professional in 256-color mode.
��There will be a very noticeable palette shift when you switch between open windows. If you have a picture and the Garden Workbench® open at the same time, the active window receives the "best" color rendition. In Thumbnail and picture Previews, the palette has been chosen to provide the best color mix for plant photographs.
��Many of the photographs will show noticeable "pixelizing" because of the limited number of unique colors available. In most cases, the pictures will not be as vibrant as when viewed with a higher resolution video adapter.
��Running in 256-color mode may make portions of the Workbench and other windows unreadable.
On desktop systems, the cost of a display adapter capable of supporting thousands or even millions of colors is considerably less than the cost of HORTICOPIA® Professional . If you are using HORTICOPIA® Professional on a regular basis, we urge you to seriously consider this upgrade. Due to the number of problems that will inevitably be encountered in this mode, we cannot provide Technical Support for this mode of operation.
Printing Problems
HORTICOPIA® Professional uses standard Microsoft WINDOWS interfaces for printing both

21
pictures and data. The actual printing is done by the printer driver that was supplied with your printer or operating system. Printer driver problems are not uncommon and you should check with your printer manufacturer to determine if you have the latest printer driver installed. Most printer manufacturers maintain websites on the Internet where you can download the most current driver.
Here are a few items to check when having printing problems:
��Make sure that you have all colors of ink in your cartridges or toner.
��Select the graphics mode in your print setup, if the printer offers a choice.
��Select the color mode in the printer settings, if this choice is offered.
��Make sure the type and size of paper in your printer corresponds to the printer settings.
��Try saving the file to your hard disk from Print Preview and print from Internet Explorer after closing HORTICOPIA® Professional.
Operating system specific
If you get execution time errors, there will usually be an error message and an attempted recovery from the error. Please note the specific error, so our Technical Support staff can help you resolve it most expeditiously. Also, use System Parameters to obtain a diagnostic of your computer. Have it available if you call or print out a copy to mail or fax.
Technical Support See Contacting HORTICOPIA regarding Technical Support.
22
Contacting HORTICOPIA® If you encounter a non-technical problem (i.e., the Program simply doesn't seem to be doing what it should be doing), be sure to check all your Customization settings. Due to the extensive array of options available, it is sometimes possible that certain combinations of selections will lead to unexpected results. Making sure that the options you want are selected, will sometimes solve the problem.
Before contacting Technical Support, you may wish to look at the technical support pages of our website at:
http://www.horticopia.com/support/
There you'll find technical memos with answers to questions you may have, as well as software updates.
When contacting technical support, it would be helpful if you have the following information available:
��Product version number. This can be found by clicking on System Parameters in the Help menu.
��The type of computer hardware you are using. If you are having display problems, we'll also need to know what kind of display adapter (video card) you are using.
��The software version of WINDOWS (WINDOWS 95/98, WINDOWS ME, WINDOWS NT, or WINDOWS 2000). This can be found by clicking on System Parameters in the Help menu.
��The exact wording of any messages that appear on your screen.
��What you were doing when the problem occurred.
Tip: Print out a copy of System Parameters from the Help menu and have it available when you call. You can also include a copy with any e-mail or fax correspondence you send.
You may contact our Technical Support Center by:
��e-mail: [email protected]
��Please see our website at www.horticopia.com/support for additional help and other support options.

23
Copyrights All HORTICOPIA® Professional pictures, data and software are copyrighted. HORTICOPIA® Professional is a horticultural reference. It is not a royalty free picture library or clip art library. As far as copyright is concerned, you should use HORTICOPIA® Professional in the same manner as a printed book.
Printing pictures or data from HORTICOPIA® Professional or exporting them to other applications should be consistent with using HORTICOPIA® Professional as a horticultural reference. Specifically:
No Publication
No pictures, data, or output either generated or derived from HORTICOPIA® Professional may be published in any form including, but not limited to, books, catalogs, advertisements, brochures or web pages.
No Digital Media
Under no circumstances may any digital information (pictures, data, or software) be copied or distributed. The sole purpose of the exporting and copying capabilities in HORTICOPIA® Professional is to use pictures or data therein in another application on the same computer.
No Commercial Gain
You may not sell pictures or other output generated with pictures or data from HORTICOPIA® Professional either as a stand-alone product or packaged with another product. This precludes using HORTICOPIA® Professional to make plant labels. On the other hand, signage made by the owner of HORTICOPIA® Professional for use in his business would be allowable, so long as such signage is not created in volume or sold to others. Similarly, incorporating products generated with HORTICOPIA® Professional into one-of-a-kind landscape proposals would also be allowed.

24
Menus
HORTICOPIA® Professional Menus When you're working with HORTICOPIA® Professional, you can get help on a specific menu by first clicking on the menu name at the top of the main window and then immediately pressing the F1 key while the menu is expanded and visible. Individual menu items are discussed in detail in each of the following topics.
File Menu
Edit Menu
Workbench Menu
Data Menu
Favorites Menu
Collections Menu
Format Menu
Window Menu
Slideshow Menu
Tools Menu
Help Menu

25
File Menu The File menu contains commands that let you create a new MyList (or add plants to a saved list); open, close, save and print plant lists, Layouts or Slideshows; customize and preview document printouts; modify printer settings and exit HORTICOPIA® Professional. As with other HORTICOPIA® Professional menus, the commands of the File menu are made available on a fully customizable toolbar in the main window. You can use the corresponding toolbar buttons or, in some cases keyboard shortcuts, to execute these commands.
New List By default, HORTICOPIA® Professional opens with this command operative and it will remain unavailable (grayed out) on the menu until a list has been saved, at which point it can be used to create a new list. The word "New" will show in parenthesis in the title bar of the Workbench window to indicate that any current list has not yet been saved. After saving a list (MyList), the previous list will remain the current list until the user explicitly clicks on the New List command. This will affect subsequent saves, since once New List is clicked, there is no longer a current list until new plants are added (technically there is a current list--with zero plants on it--which can actually be saved, should one ever want to do so).
Open
The Open command opens files previously saved with HORTICOPIA® Professional. The cascading menu allows you to select either a previously saved MyList, Layout or Slideshow. Clicking on the desired option will cause the Open File dialog box to appear, from which you can select the file to be opened.
Tip: The keyboard shortcut for the Open command is CTRL + O.
The cascading menu also contains the Merge into MyList... command, a feature that enables you to merge a new MyList with a saved MyList. When merging MyLists, the saved values will replace new list values except for changes made in the new list. For example, the list order of the saved list will be used in the merged list, unless you have made changes in the new list. In other words, a changed value in the new list is not overwritten by one from the saved list.
Tip: The six most recently opened or saved files appear at the bottom of the File menu for quick selection and recall.
Close MyList Use this command to close a previously saved MyList. It will remove the currently displayed MyList and restore the displayed list order to the main plant list. It will not save any changes to the MyList and the displayed list reverts to the default order.
Save
With HORTICOPIA® Professional you can save files and then reopen them for use at a later time. If you are working with a file that's been saved previously, this command will save all your changes in the current file. The cascading menu lets you select either a Mylist, layout or slideshow to be saved. If you click Save when working with a new MyList, layout, or slideshow, the Program defaults to the Save As... command described below.
Tip: The keyboard shortcut for the Save command is CTRL + S.
Save As... When you put the pointer over Save As..., the cascading menu lets you select either a Mylist, layout or slideshow to be saved. You can also save the revised state of a previously saved file with the Save As... command; thereby leaving the original file intact. You will be prompted to enter a file name and path to where the file will be saved.
26
The Print command provides a means of printing selected information. The cascading menu allows you to choose layout, list, data or Pictures. In each case, the Print Setup dialog box for your printer will appear, in which you can make any needed adjustments. We recommend that you also use the tabs in the Document Setup window to ensure that the printout is configured as you wish. Otherwise, default settings will be used. Except for the layout, which is totally designed by the user, all items will print with the Default Footer, unless changed. Before printing, use the Print Preview commands to pre-examine all documents to make certain that they are configured satisfactorily.
Tip: The keyboard shortcut for the Print Layout command is CTRL + P.
��The Print Layout command will cause the current layout to be sent to the default printer for printing. . If there is no layout window open or nothing has been copied to the layout, this command will be inactive.
��The Print List command prints a list of plants on the current plant list in the same order as they appear in the plant list frame on the Garden Workbench®. If no plants are highlighted, the entire list will be printed. If one or more plants are highlighted, the list will start with the first highlighted plant (A closed green folder next to a plant name always includes two or more plants). If only one plant is highlighted, then the list will consist of only one plant.
��The Print Data command will print the information items contained in the tabs of the plant information window as specified in the Data tab of the Document Setup window for the plant(s) on the current plant list. If no plants are highlighted, data sheets for all plants in the entire list will be printed. If one or more plants are highlighted, the list will start with the first highlighted plant. If only one plant is highlighted, then the list will consist of only one plant.
��The Print Pictures command will print pictures from the Previews tab in the plant information window for the highlighted plant(s) in the current plant list. You can adjust the picture settings in the Pictures tab of the Document Setup window. If no plants are highlighted, pictures for all plants in the entire list will be printed. If one or more plants are highlighted, the list will start with the first highlighted plant. If only one plant is highlighted, then the list will consist of only one plant. If there is a particular picture you want to omit, right-click on the Preview you don't want printed (a red border will indicate it is to be omitted from the printout). You can undo this action by right-clicking on the picture again. The botanical name and the HORTICOPIA copyright will be printed under each picture.
Tip: If you want to print only the items on MyList, be sure to first click on the button so that only MyList names appear in the plant list. See Making List Entries for more information on controlling which items are printed.
Print Preview
The Print Preview command includes a cascading menu with the options of Preview Layout, Preview List, Preview Data, Preview Picture. By selecting one of these, you have the opportunity to examine the item to be printed and to make any correction(s) before the actual printing is accomplished. Click Here for more on Print Preview.
Document Setup... This command enables you to configure your document settings prior to printing. When you click on Document Setup... you will get the Document Setup window that contains a separate tab for specifying how plant lists, plant data, layouts and plant pictures will be displayed, and what information will be included in the printed document(s). Click Here for detailed information.
Snapshot The Snapshot command applies only to the currently active window as it will capture and print the information that is in the active window. If the plant information window for a plant is active, it will print a data printout using the current Document Setup configuration. (This will include the Preferred Picture and the three data tabs.) If a picture window is open it will print the contents of

27
the window. If a Thumbnails window is active, it will print the thumbnails. This is handy for obtaining quick printouts of specific items, but does not allow previewing.
Exit The Exit command terminates HORTICOPIA® Professional. You will be prompted to save any unsaved work before closing the program.
Recent Files
The six most recently opened or saved files are attached to the bottom of the File menu. You may open one of these files by clicking on its name. If you have moved or deleted the file since it was saved, you will get an error message when you try to open it.

28
Edit Menu The Edit menu provides standard WINDOWS commands to enable you to manipulate data and pictures. As with other HORTICOPIA® Professional menus, the commands of the Edit menu are made available on a fully customizable toolbar in the main window. You can use the corresponding toolbar buttons or, in some cases keyboard shortcuts, to execute these commands.
Undo
This command nullifies the previous operation and restores conditions to its previous format.
Tip: The keyboard shortcut for the Undo command is CTRL + Z.
Cut This command removes selected (highlighted) text from the document being worked and places it on the WINDOWS Clipboard. It can then be pasted into other areas or into other applications.
Tip: The keyboard shortcut for the Cut command is CTRL + X.
Copy
This command makes a copy of selected (highlighted) text in an active window and places it on the WINDOWS Clipboard. This lets you transfer text you have entered, as well as any text appearing in the tabs of the plant information window, to the Windows Clipboard. From there it can be Pasted into other areas or into other applications.
Tip: The keyboard shortcut for the Copy command is CTRL + C.
Paste
This command inserts the contents of the WINDOWS Clipboard into a document at the current cursor position.
Tip: The keyboard shortcut for the Paste command is CTRL + V.
Be sure to understand and honor the Copyright protection of HORTICOPIA® Professional data.
Clear
The Clear command will delete items that are selected, especially text.
Tip: The keyboard shortcut for the Clear command is Delete.
29
Find
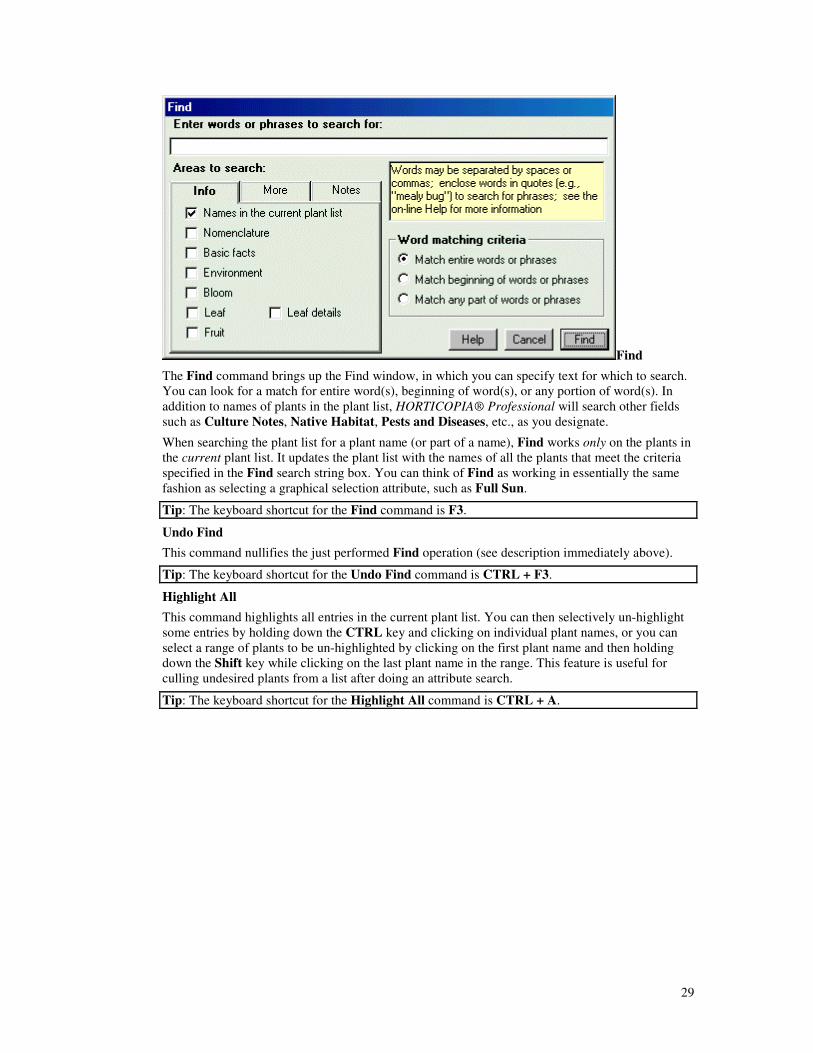
The Find command brings up the Find window, in which you can specify text for which to search. You can look for a match for entire word(s), beginning of word(s), or any portion of word(s). In addition to names of plants in the plant list, HORTICOPIA® Professional will search other fields such as Culture Notes, Native Habitat, Pests and Diseases, etc., as you designate.
When searching the plant list for a plant name (or part of a name), Find works only on the plants in the current plant list. It updates the plant list with the names of all the plants that meet the criteria specified in the Find search string box. You can think of Find as working in essentially the same fashion as selecting a graphical selection attribute, such as Full Sun.
Tip: The keyboard shortcut for the Find command is F3.
Undo Find
This command nullifies the just performed Find operation (see description immediately above).
Tip: The keyboard shortcut for the Undo Find command is CTRL + F3.
Highlight All This command highlights all entries in the current plant list. You can then selectively un-highlight some entries by holding down the CTRL key and clicking on individual plant names, or you can select a range of plants to be un-highlighted by clicking on the first plant name and then holding down the Shift key while clicking on the last plant name in the range. This feature is useful for culling undesired plants from a list after doing an attribute search.
Tip: The keyboard shortcut for the Highlight All command is CTRL + A.
30
Workbench Menu On the Workbench menu you'll find commands that help you arrange the Plant List and control the way it is displayed, including switching between common names and botanical nomenclature. As with other HORTICOPIA® Professional menus, the commands of the Workbench menu are made available on a fully customizable toolbar in the main window. You can use the corresponding toolbar buttons or, in some cases keyboard shortcuts, to execute these commands. In addition, many of the commands can be executed by right-clicking on the buttons in the Workbench tools located in the center of the Workbench.
Collapse List The Collapse List command collapses the entire current list. Depending on which mode you're working with, you will see nothing except the alphabet entries or the family names when the list is collapsed. Click on the closed yellow folder to the left of the letter or family name to expand that part of the list. See Controlling List Appearance for more information.
Tip: The keyboard shortcut for the Collapse List command is Shift + F1.
Show All Plants
Show All Plants expands the list to display all items to the species level. The yellow folders will be in the open position while the green folders will be in the closed position. See Controlling List Appearance for more information.
Tip: The keyboard shortcut for the Show All Plants command is Shift + CTRL + F1.
Show Cultivars
Show Cultivars expands all items in the list to the lowest (cultivar) level. Both yellow folders and green folders will be in the open position and you'll be able to see all entries. Use the scroll bars to navigate through the list or use the keyboard to type the first few characters of a name. Cultivar entries within the species folders are ignored when you use the first few characters to find a name, because they do not follow the general order of the plant list. See Controlling List Appearance for more information.
Tip: The keyboard shortcut for the Show Cultivars command is CTRL + F1.
Randomize List
When you have plants on a MyList and the button is down, you can randomize the order of the plant list (this feature only works with a MyList and if no MyList is active it will be grayed out). You can click on Randomize List again to re-randomize the list order. There is no limit to the number of times you can do this. This feature is very useful for plant identification Testing. A randomized list may be saved just like any other plant list so that, once established, the list may be kept in the same order, if desired. This feature does not work with MyLists added to the Favorites menu.
Add Selected to MyList This command adds the highlighted plant(s) in the currently displayed plant list to MyList. A range of plants or a number of individually selected plants can also be added by highlighting them and then executing the command.
Tip: The keyboard shortcut for the Add Selected to MyList command is CTRL + Y.
Add All to MyList The Add All to MyList command adds all the plant names in a currently displayed plant list to MyList, whether they are highlighted or not. This command does not add names that aren't in the currently displayed plant list (for example, those in the main plant list when it is not being
31
displayed). However, all names within closed folders are added, provided they would appear if the folder were opened. This command is useful, for example, after searching for plants by attributes, to save the current search results in a MyList.
Tip: The keyboard shortcut for the Add All to MyList is CTRL + M.
Remove Selected from MyList The Remove Selected from MyList command removes the highlighted plant(s) from a MyList. A range of plants or a number of individually selected plants can also be removed by highlighting them and then executing the command.
Tip: The keyboard shortcut for the Remove Selected from MyList command is CTRL + T.
Remove All from MyList
This command removes all plants from MyList. If the button is active, it will be reset to
automatically, and the displayed plant list will show all plants except those screened out with your current screening options.
Tip: The keyboard shortcut for the Remove All from MyList is CTRL + R.
Set MyList to Current List The Set MyList to Current List command replaces the current MyList with the plant names currently shown in the plant list, whether they are highlighted or not--unlike Add All to MyList, which adds the names currently in the plant list to MyList. If the replaced MyList had been previously saved, it will retain the same name as before. You’ll find this command useful when you wish to create a plant list, examine the plants in it, and then perform further searches, thereby refining the list.
Tip: The keyboard shortcut for the Set MyList to Current List command is CTRL + R.
Move Down
When you have plants on MyList and the button is down, you can rearrange the order of the plant list. Use this command to move the selected plant(s) down by one position. Click on the desired plant(s) to highlight it/them and then click on the menu command. The selected plant(s) will move down past the next unselected plant on the list.
Tip: The keyboard shortcut for the Move Down command is CTRL + Ins.
Move Up
When you have plants on MyList and the button is down, you can rearrange the order of the plant list. Use this command to move the selected plant(s) up by one position. Click on the desired plant(s) to highlight it/them and then click on the menu command. The selected plant(s) will move up past the next unselected plant on the list.
Tip: The keyboard shortcut for the Move Up command is Shift + Ins.
Move Selected
When you have plants on MyList and the button is down, you can rearrange the order of the plant list. Use this command to move the selected plant(s) in either direction. Click on the desired plant(s) to highlight it/them and then click on the menu command. You can then move the mouse cursor to the point in the list where you want to place the highlighted plant(s) and click the mouse button. The selected plant(s) will be moved to the designated location. Instead of using the menu command, you can also accomplish this action by holding down the Alt key and clicking the mouse cursor in the desired location.

32
Tip: Be very careful in the placement of the mouse cursor. If it touches the name of a plant, the highlighted plant(s) may be moved one position up or down from where you intended.
Use as Preferred Name
When the plant list is in common name mode, you can use this command to designate a preferred common name by selecting from among a plant's Aliases to highlight the desired name and then clicking on the command. This will then be the name shown on all plant lists when the Show only preferred common names box is checked on the Workbench tab of the Customization window. You can also select a preferred common name by holding down the Shift key, right-clicking on the desired common name and selecting the option from the pop-up menu. In both cases, this will be a permanent selection until changed. Note that a bona fide alias must be designated as the preferred common name. Cultivar names and Genus spp. (for example, Acer spp.) in a folder cannot be used as preferred common names. Note also that all folders disappear when using preferred common names.
Reset Preferred Name to Default This command cancels the action of Use as Preferred Name and resets the highlighted plant's Aliases to the default order. Resetting individual plant names can be accomplished only when the Show only preferred common names box is unchecked on the Workbench tab of the Customization window. You can also use the Tools|Reset|Preferred Names command to reset the common names of all plants on the list. This can be done at any time.
Jump to Next Alias Name
To help in selecting a preferred common name, use this command to cycle through all the Aliases for a plant.
Show Attribute Labels
The Show Attribute Labels command alternately shows and hides a text label for each main selection group on the Garden Workbench®. A checkmark next to the Show Attribute Labels command indicates the labels are active. Of course, you'll see them on the screen, as well. The mode of the attribute labels is saved when you terminate HORTICOPIA® Professional and will be used for your next session. There is no Keyboard equivalent.
Switch to Botanical/Common Names
You can use Workbench menu command instead of the button in the Workbench tools to switch between botanical and common nomenclature. The button shows the current nomenclature selection with a green underline. The menu command text changes to show the mode you would change to when you next click on the command.
Tip: The keyboard shortcut for the Switch to Botanical/Common Names command is Shift + F9.
33
Data Menu The Data menu provides the means to perform all plant navigation actions by using menu commands to move from plant-to- plant (information windows) or picture-to-picture within the Previews tab (there usually will be multiple pictures of each plant). As with other HORTICOPIA® Professional menus, the commands of the Data menu are made available on a fully customizable toolbar in the main window. You can use the corresponding toolbar buttons or, in some cases keyboard shortcuts, to execute these commands.
Cycle Picture
This command brings up the Plant Information window for the highlighted plant and opens the first picture for that plant. When you execute the command again, it displays the next picture for that plant. If you are viewing the last picture for a plant and execute this command, the program displays the first picture for the next plant.
If no plants are highlighted, the cycle starts with the first plant in the list, displays the first picture followed by the next plant on the list and so on to the end of the list.
If one plant is highlighted, that plant's pictures will be the first to be displayed. If two or more plants are highlighted, only pictures from these highlighted plants will be displayed when you execute this command.
The title bar for each picture displays the sequence number to tell you where you are in the current plant's picture sequence. The sequence numbers, however, may not be in numerical order if you have changed the Preferred Picture for the plant.
In the cycle, each picture is closed before displaying the next one. If you want to keep certain pictures for later use, you can minimize them and then use the Window|Tile commands to restore them for viewing.
Tip: The keyboard shortcut for the Cycle Picture command is F12 for this command.
Next Plant This command displays the plant information window for the next plant in your list. If you've highlighted two or more plants, the first highlighted plant in the list will be shown, followed by the others. If no plants have been highlighted, the first plant in the list will be shown. If one plant is highlighted, the sequence starts with that plant and continues with the next to the end of the list.
Tip: The keyboard shortcut for the Next Plant command is F5 for this command.
Previous Plant This command displays the plant information window for the previous plant in the list. All other aspects of this command are the same as for the Next Plant command (see above).
Tip: The keyboard shortcut for the Previous Plant command is F6 for this command.
Play Sound
This command lets you hear the botanical name for the selected plant pronounced. You may find this helpful in mastering the correct pronunciation of the Latin name.
Tip: The keyboard shortcut for the Play Sound command is F4 for this command.
Unlock Data Edit (used with the optional Authoring module)
The Unlock Data Edit command lets you make changes to plant information when you are not in the authoring mode. When you have a plant information displayed, this command will be available. When you execute the command, an Authored tab is added to the Contributed Data tab for Horticopia plants. You will also be able to modify a plant's Custom tab in the Information tab. Additionally, you can add pictures to the plants using the Previews tab.
Tip: The keyboard shortcut for the Unlock Data Edit command is F11.
34
Copy to Layout The Copy to Layout command is used to quickly paste items into the layout and is enabled (not grayed out) when the Information window is active or when a Picture window is active.
When the plant information window is open and the tab is active, you can select one or more Preview pictures (a green outline appears around selected pictures) to be copied to the Layout. If no picture has been selected, the Preferred Picture will be copied to the layout.
You can copy information in this manner from the other tabs also. You can copy from all of the tabs except the Garden Studio tab (with the optional Garden Studio module) and the Added Notes tab. From the My Information tab you can only copy information that you have entered into the Printable field.
If a picture window is the currently active window, the picture will be copied to the layout.
Tip: When items are copied to the layout, the layout window is automatically opened or maximized by the program. To add additional items to the layout, simply minimize the window to continue working from your previous window. Any number of items can be copied to the layout as long as the layout window is not closed.
Tip: The keyboard shortcut for the Copy to Layout command is F8.
35
Favorites Menu The Favorites menu is patterned after the popular Microsoft Internet Explorer® feature. It makes available a central location in the HORTICOPIA® Professional main window where you can store and quickly access frequently used items. You can delete any item (including those preselected by HORTICOPIA®) by using the Organize Favorites command (see below). As with other HORTICOPIA® Professional menus, the commands of the Favorites menu are made available on a fully customizable toolbar in the main window. You can use the corresponding toolbar buttons to perform these functions. There are no keyboard shortcuts. Most of the entries on this menu are self-explanatory, but a short description of each is provided below.
The top portion of the menu is devoted to commands that enable you to add items to the bottom of the menu. Clicking on any of the Add... commands will bring up the Add to Favorites window, which you use to place your entries on the Favorites menu. A particular command will be grayed out (not available) unless the named item is active.
Once a list has been added as a Favorite, you can quickly screen it for plants with a particular characteristic (this includes the Pre-Selected Favorites) by using the selection graphics on the Workbench in conjunction with the Shift key. For example, click on Shade in the selection graphics, then hold down the Shift key while selecting a Favorite. The list that displays will contain only those plants in the Favorite that tolerate Shade.
Add List Use this command to add a current plant list -- for example, the results of an attribute search -- to the Favorites menu. Since there is always a plant list active (even if it contains zero plants), this command is always available (not grayed out). When adding a list, the entire list is captured. All information is saved for every plant in the list. When you recall the list from the Favorites, the formatting of the list will be the same as that of the main plant list.
Add MyList Use this command to add a current or saved MyList (a plant list that has customized formatting) to the Favorites menu. When adding a MyList to Favorites, however, only the names of the plants on the list are kept (not the customized formatting). When you recall a MyList from the Favorites, it acts like a list that has been created by applying search criteria. The list does not appear in a MyList mode and the order is not affected. This is useful because a new MyList can now be developed from something that started out as a MyList, but no longer has customized formatting. In other
words, it facilitates subsetting. The MyList to be added must be active (the button showing in the Workbench tools) for the command to be available. Otherwise, it will be grayed out.
Tip: Since the recalled MyList is similar to a list obtained by searching for plants by
characteristics, it can be cleared with the button in the Workbench tools.
Add Layout Use this command to add a current or saved Layout to the Favorites menu. You must have a layout open for the command to be available. Otherwise, it will be unavailable (grayed out).
Add Plant Use this command to add the plant information window for a plant to the Favorites menu. The plant information window must be open to activate the command. Otherwise, it will be unavailable (grayed out).
Add Picture
Use this command to add the current Picture window to the Favorites menu. The window to be added must be the active window to activate the command. Otherwise, it will be unavailable
36
(grayed out).
Add Graphic
Use this command to add a graphic to the Favorites menu. The graphic can be any image located on any drive on your computer. Clicking on the command will bring up a browse box for you to locate and select the graphic to be added. This command is always active, since the graphic has to be located to be added.
Add Slideshow
Use this command to add a current slideshow to the Favorites menu. Like a plant list, there is always a potential slideshow active -- that is, the currently displayed plant list (or highlighted plants therein) -- so the command is always available (not grayed out). When you click on the command, HORTICOPIA® Professional will prepare a Slideshow, in the normal fashion, based on the currently displayed plant list. When complete, the Add to Favorites window will appear so you can designate (or create) a folder for the slideshow to be added to the menu.
Organize Favorites
This command brings up the Organize Favorites window. This works like the popular Microsoft Internet Explorer® feature. To organize your Favorites, you can segregate them by folders, move them around or delete them as you wish.
Added Notes Manager
This command brings up the Added Notes Manager window, with which you can add or remove any Added Notes you may have appended. Once you install added notes to plants on your list, an Added Notes folder will appear automatically among the Pre-Selected Favorites described below. These Added Notes Favorites can be organized the same as any other folder.
Pre-Selected Favorites
At the bottom of the Favorites menu are several folders with features or information that many users will find useful. Any of these can be deleted, if so desired, using the Organize Favorites feature (see above). Any of the plant lists produced by clicking on these features can be further customized and/or saved in the same way as any other list of selected plants displayed in the plant list frame. A short description of each folder follows:
Attributes
This item may be used as a quick screening device to locate plants with one of the attributes listed in the cascading menu. For example, clicking on Attributes|Attracts Butterflies will display all plants (both Woody and Herbaceous) that are attractive to butterflies. This is very useful if you are interested only in a plant that attracts butterflies regardless of Plant Category, since it eliminates having to search for the attribute twice. This feature does not update the list to include/exclude additional plants if you select a second Attribute search. It simply displays a new list of plants with the second Attribute.
FFA
This item has a cascading menu with the names of four lists of plants that are used in various (Future Farmers of America) FFA programs. Each of the four, Forestry, National List, Nursery and Landscape and Floriculture, will display the names of plants in the selected list.
ISA Certification Series
The International Society of Arborists (ISA) is the organization that administers the Certified Arborist program. In order to become a Certified Arborist one must pass a comprehensive test, including tree identification. ISA maintains separate listings of trees that are used in the testing in different parts of the U. S. The cascading menu contains the names of the various geographical listings. Clicking on one of the names will display a list of the trees for that area. Obviously, this is very helpful for anyone studying to become a Certified Arborist.
Tip: See Features for Education and Training to learn how to configure a plant list or slideshow for
37
testing purposes.
Native Plants
Clicking on this item will display a cascading menu with the names of each state in the U. S. and each province in Canada. Clicking on any of the names will display a list of native plants for the state or province selected.
NJHA
This item has a cascading menu with the names of plant lists used in various programs of the National Junior Horticulture Association (NJHA). Clicking on one of the names will display a list of the plants associated with it.
Special Selections
The cascading menu displayed by clicking on Special Selections contains several plant list categories considered by HORTICOPIA® to appeal to a wide range of users. Clicking on one of the names will display a list of the plants in that category.
State Associations
Clicking on this folder will display a cascading menu with a list of states (in a couple of cases--Florida and Missouri--there is another cascading menu). Clicking on the state will display a list of plants included in the test administered by the Landscape and Nurseryman Association of that state. One must pass the test to become a Certified Nurseryman in the state. The Florida test is further subdivided into geographical areas and the Missouri test into different levels.
Tip: See Features for Education and Training to learn how to configure a plant list or slideshow for testing purposes.
State Trees
Clicking on this item displays a cascading menu with the names of all the U. S. states. Clicking on one of the names displays the State Tree for that state.
Uses
This item is used the same as Attributes (see above). Clicking on one of the Uses named on the cascading menu will display a list of plants suitable for the Use selected. This feature does not update the list to include/exclude additional plants if you select a second Use search. It simply displays a new list of plants with the second Use.

38
Collections Menu The Collections Menu lists all the Horticopia libraries and portfolios that have been installed and licensed on your computer. If you have the optional authoring module, the last entry will be "Authored Plants."
You can alternately show or hide specific libraries or portfolios by selecting or deselecting the appropriate one in the Collections menu. When a check mark appears next to a Library or Portfolio name then that Library or Portfolio is included in the Horticopia plant list that appears on the Workbench.
You must select at least one library or portfolio.
39
Format Menu The Format menu enables you to use standard WINDOWS word processing features to perform text editing. This powerful feature allows you to format certain text within the program. As with other HORTICOPIA® Professional menus, the commands of the Format menu are made available on a fully customizable toolbar in the main window. You can use the corresponding toolbar buttons or, in some cases keyboard shortcuts, to execute these commands. Although most users will be familiar with these features and how to use them (most are self-explanatory), a short description of each is provided below:
Font Use this command to designate or change the font in your document(s). You will get a dialog box from which you can select from among the fonts installed on your computer. Make your selections in the dialog box and click OK. The changes will be effective for all new text immediately. To change text already entered, it must first be highlighted.
Bold
Click on this command to cause all new text and/or change all highlighted text to display in bold characters.
Tip: The keyboard shortcut for the Bold command is CTRL + B.
Underline
Click on this command to underline any new text and/or any highlighted text.
Tip: The keyboard shortcut for the Underline command is CTRL + U.
Italic
Click on this command to change all new text and/or highlighted text to display in italic form.
Tip: The keyboard shortcut for the Italicize command is CTRL + I.
Strikethrough
Click on this command to strike through any new text and/or highlighted text.
Align Left Use this command to cause the text of your document to align vertically along the left side of the page. This is the normal arrangement for most printed materials.
Align Center
Use this command to cause the text to align vertically along the center of the page. This is useful for many flyers, posters, etc.
Align Right Use this command to cause the text to align vertically along the right side of the page. This may be desirable in some specialized applications.
Decrease Indent Click on this command to decrease any indent made with the Tab key. Each click will decrease the indentation in the text by one Tab setting.
Increase Indent Click on this command to increase any indent made with the Tab key. Each click will increase the indentation in the text by one Tab setting.
Bullets

40
Use this command to insert bullets into your text.
Numbering
Use this command to insert numbering into your text.
Table... Use this command to insert a table into your text. Click on the arrow for a cascading menu with option for specifying how the table should display.
Hyperlink... Use this command to include a hyperlink to a web site in your text.
41
Window Menu The Window menu enables you to access and arrange windows on your screen. There is no corresponding toolbar for the Window menu, although some of the actions can be accomplished with the Workbench toolbar.
Workbench
The Workbench command makes the Garden Workbench® visible and brings it to the front of your screen when it may otherwise be covered by plant information windows or picture windows. The most recently opened windows will be listed at the bottom of the Window menu and can be recalled by clicking on them.
Tip: The keyboard shortcut for the Workbench command is F2.
Information
The Information command brings up the Plant Information Window for the highlighted plant
(similar to clicking on the button in the Workbench tools or double-clicking on a plant name). If no plant is highlighted, the command is grayed out and not available. If a plant information window is already in your work area, but hidden by other windows, it will be made the foremost window by clicking on this command. If more than one plant information window is active, the most recently opened one will be recalled. All open plant information windows are included in the list at the bottom of the Window menu. You can select one to recall by clicking on its name. This command is useful to recall plant information window(s) hidden behind other windows or when you're viewing pictures for a plant and wish to access the data for it.
Tip: The keyboard shortcut for the Information command is F7.
Thumbnails
The Thumbnails command makes the Thumbnails window for the highlighted plant(s) visible and
brings it to the front of your screen (similar to clicking on the in the Workbench tools). If no plant is highlighted, the thumbnails window will contain the Preferred Picture for all plants in the list. If one or more plants are highlighted, the thumbnails window will contain the Preferred Picture for the highlighted plants. All open Thumbnail windows are included in the list at the bottom of the Window menu. You can select one to recall by clicking on its name.
Tip: The keyboard shortcut for the Thumbnails command is CTRL + F2.
Names
The Names command will display a Names window summarizing the names for the currently selected plant in the plant list. The botanical name, synonyms, common name(s), botanical and common family names, and the cultivar name(s) are displayed. If no name is highlighted, the command will be grayed out (not available). If more than one name is highlighted, the Names window for the last highlighted plant will be displayed. Clicking anywhere in the Names window or the HORTICOPIA® Professional main window will close the Names window.
Tip: The keyboard shortcut for the Names command is F9.
Layout Window
This command maximizes or opens the layout window. From there you can create layouts which are custom documents that combine pictures and plant information from HORTICOPIA® with user-supplied pictures, graphics and text. All items in a layout can be sized, edited, and arranged prior to printing or saving. The documents in this window generally appear as they will when you print them out. (To be certain one should use the Print Preview command on the File menu to examine the layout prior to the actual printing as there are a few exceptions that will appear
42
differently.) The window size, when opened, is scaled based on the current print and document settings. The default layout is generally scaled similar to the standard 8 1\2 x 11 inch print page. If your default print setup is different, a new layout window will be sized according to your setup. Click Here for more information on layouts.
Close All This command closes all open windows (those listed at the bottom of the Window menu).
Windows Tile Commands
The bottom of the Window menu contains the normal WINDOWS tile commands. Because HORTICOPIA® Professional will not allow pictures to be distorted, these commands may not appear to work in the normal manner, but will still enable you to arrange the pictures (and other open windows).
Tile Horizontally
The Tile Horizontally command arranges the open Picture windows on your screen in a horizontal pattern. Minimized pictures participate in this tiling. All other windows will be minimized to allow the maximum amount of space for pictures. This includes the Workbench itself, which may be restored with the button on its title bar or with the Workbench command on the Window menu.
Tile Vertically
The Tile Vertically command arranges the open Picture windows on your screen in a vertical pattern. Minimized pictures participate in this tiling. All other windows will be minimized to allow the maximum amount of space for pictures. This includes the Workbench itself, which may be restored with the button on its title bar or with the Workbench command on the Window menu.
Cascade
The Cascade command arranges the open Picture windows on your screen one on top of the next, showing the title bars for each picture. Cascade will include all pictures by first restoring any minimized pictures to their normal size. It also includes any other windows that aren't minimized--including the Workbench window.
Active Windows
The names of the most recently opened picture windows (as well as other windows) will appear at the bottom of the Window menu. For pictures, the name will be a common name if you're currently in common name mode and will be a botanical name in botanical name mode. Appended to the name is a picture sequence number in the form "x/y" -- to be interpreted as picture x of y. Icons beside picture windows indicate whether the picture is a Habit or Detail picture. Identifying icons will also appear with other windows. For example, for Information windows and for Thumbnail windows.
43
Slideshow Menu The Slideshow menu contains commands that enable you to present a Slideshow. As with other HORTICOPIA® Professional menus, the commands of the Slideshow menu are made available on a fully customizable toolbar in the main window. You can use the corresponding toolbar buttons to execute these commands.
Start Slideshow
The Start Slideshow command is used to begin the presentation of a slideshow. If no plant in the currently displayed plant list is highlighted, then all plants in the list will be included in the slideshow. If there are one or more highlighted plants, only those will be displayed in the slideshow. One highlighted plant will produce a slideshow of only one plant. (If you highlight a plant name with a green folder to the side of it, the slideshow will include all the plants contained inside.)
After the slideshow has begun, you can control it by using either the commands on the Slideshow Menu or the slideshow toolbar. The Slideshow toolbar will appear automatically when a slideshow is started and can be positioned anywhere in the HORTICOPIA Professional main window. Menu items are described below:
Start Slideshow
Use this command to start a slideshow. Since there is always a potential slideshow (the displayed list), it is always available (not grayed out).
Resume Slideshow
Selecting this command resumes a paused slideshow. Normally used when a slideshow is running in automatic mode.
Pause Slideshow
This command pauses a slideshow. Used when a slideshow is running in automatic mode.
Stop Slideshow
This command causes a slideshow to be terminated if running in either manual or automatic mode and you are returned to the Garden Workbench®.
Tip: The keyboard shortcut for the Stop Slideshow command is Esc.
Go to Beginning
In manual mode, select this command to go to the first picture of the slideshow and restart it.
Go Back One Picture
When a slideshow is in manual mode, this command returns the presentation to the previous picture.
Go Forward One Picture
When a slideshow is in manual mode, this command advances the presentation to the next picture.
Go to End
In manual mode, use this command to skip to the end (final picture) of a slideshow.
Play Sound
This command causes the sound for the currently displayed plant to be played. It can be used to

44
repeat a plant name, or can be used for individual plant names when the sound is Off. This command will always provide the plant family name and species name, regardless of slideshow preferences set with the Customization options. The idea is to get the sound on demand when the sound is turned Off.
/ Sound On/Off This command will toggle the sound On/Off for a slideshow. The red bar will show on the sound icon when the sound is On (indicating that the Off status is available by clicking on the command -- or the button) . The information to be included in the sound is controlled by selecting options on the Slideshow tab in the Tools|Customize... window. It is automatically enabled (no red bar) if a sound option is checked on the Slideshow Customization tab.
45
Tools Menu The Tools menu contains a number of features you can use to make working with HORTICOPIA® Professional easier, more efficient and more personalized. Most of the Customization options are accessed here. There is no corresponding toolbar for the Tools menu.
USDA Hardiness Map
Clicking USDA Hardiness Map displays a map showing the USDA Hardiness Zones in North America. When you move the mouse over the map, you'll notice that the cursor change to a magnifying glass icon. You can click on an area of the map and get an enlarged view of that region. To the left of the map, you will see a miniature grid of the map Zone Keys. Clicking on this miniature will display an enlarged version of the Zone Keys.
Reset: This command has a cascading submenu with six subcommands: MyList Order, My Information Notes, Spreadsheet, Picture Ordering, Preferred Names and All settings to defaults. In each case, clicking on the desired option will cause the list to reset to default values for the particular item.
Special Note: These are global commands and will reset all indicated values to default in each instance. This includes any saved items.
��MyList Order: Clicking on this command re-establishes the standard order for any MyList which has been Randomized, or where plant names have been moved (See Ordering the Plant List). Since HORTICOPIA® Professional remembers the last mode of any MyList, if you remove all plants from an unsaved MyList and then create another one, the new MyList will be displayed like the last one, unless this command is used to reset the order.
��My Information Notes: Clicking on this command deletes any notes that have been entered in the Notes tab of the My Information tab in the plant information window for all the plants in the list. This applies to all plants.
��Spreadsheet: Clicking on this command works in the same fashion for information entered into the Spreadsheet tab (except for headers) as described above for My Information Notes.
��Picture Ordering: Clicking on this command re-establishes the standard order for all plant pictures and restores any pictures that have been omitted (by right-clicking on them to omit from a printout, MyList or slideshow) for all plants in the list.
��Preferred Names:Clicking on this command will remove the Preferred name option selected with the Use as preferred name command on the Workbench menu and will cause all Aliases to display in the plant list. Unlike the Reset preferred name to default command on the Workbench menu, this action can be accomplished at any time--not only when the Show only preferred common names box is unchecked on the Workbench tab of the Tools|Customize... window.
��All settings to defaults: Clicking on this command will cause all customizable settings in HORTICOPIA® Professional to be reset to the original default values. This could be useful in the event conflicting settings cause the program to behave erratically.
Customize... This command brings up the Customization window, where you can change default (or current) options that affect the appearance and operation of HORTICOPIA® Professional. These options are grouped by category in tabs in the Customization window. The Workbench, Navigation, Pictures ,Slideshow and Collections tabs are described in detail separately. Click on the hyperlinks to obtain information regarding the desired tab.
/ Authoring Mode (requires optional Authoring module)
Clicking on this command activates Authoring mode, with which you can add plants of your own choosing to the HORTICOPIA® Professional plant list and edit any pictures and/or information
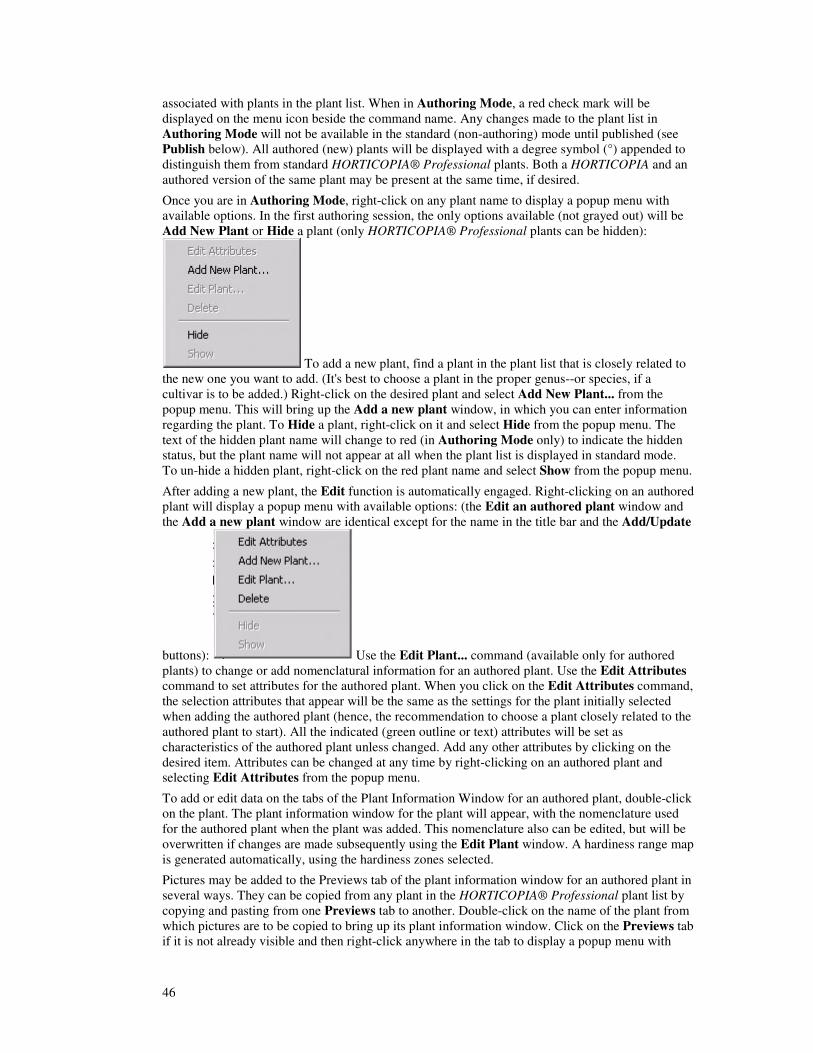
46
associated with plants in the plant list. When in Authoring Mode, a red check mark will be displayed on the menu icon beside the command name. Any changes made to the plant list in Authoring Mode will not be available in the standard (non-authoring) mode until published (see Publish below). All authored (new) plants will be displayed with a degree symbol (°) appended to distinguish them from standard HORTICOPIA® Professional plants. Both a HORTICOPIA and an authored version of the same plant may be present at the same time, if desired.
Once you are in Authoring Mode, right-click on any plant name to display a popup menu with available options. In the first authoring session, the only options available (not grayed out) will be Add New Plant or Hide a plant (only HORTICOPIA® Professional plants can be hidden):
To add a new plant, find a plant in the plant list that is closely related to the new one you want to add. (It's best to choose a plant in the proper genus--or species, if a cultivar is to be added.) Right-click on the desired plant and select Add New Plant... from the popup menu. This will bring up the Add a new plant window, in which you can enter information regarding the plant. To Hide a plant, right-click on it and select Hide from the popup menu. The text of the hidden plant name will change to red (in Authoring Mode only) to indicate the hidden status, but the plant name will not appear at all when the plant list is displayed in standard mode. To un-hide a hidden plant, right-click on the red plant name and select Show from the popup menu.
After adding a new plant, the Edit function is automatically engaged. Right-clicking on an authored plant will display a popup menu with available options: (the Edit an authored plant window and the Add a new plant window are identical except for the name in the title bar and the Add/Update
buttons): Use the Edit Plant... command (available only for authored plants) to change or add nomenclatural information for an authored plant. Use the Edit Attributes command to set attributes for the authored plant. When you click on the Edit Attributes command, the selection attributes that appear will be the same as the settings for the plant initially selected when adding the authored plant (hence, the recommendation to choose a plant closely related to the authored plant to start). All the indicated (green outline or text) attributes will be set as characteristics of the authored plant unless changed. Add any other attributes by clicking on the desired item. Attributes can be changed at any time by right-clicking on an authored plant and selecting Edit Attributes from the popup menu.
To add or edit data on the tabs of the Plant Information Window for an authored plant, double-click on the plant. The plant information window for the plant will appear, with the nomenclature used for the authored plant when the plant was added. This nomenclature also can be edited, but will be overwritten if changes are made subsequently using the Edit Plant window. A hardiness range map is generated automatically, using the hardiness zones selected.
Pictures may be added to the Previews tab of the plant information window for an authored plant in several ways. They can be copied from any plant in the HORTICOPIA® Professional plant list by copying and pasting from one Previews tab to another. Double-click on the name of the plant from which pictures are to be copied to bring up its plant information window. Click on the Previews tab if it is not already visible and then right-click anywhere in the tab to display a popup menu with
47
self-explanatory options. Use the options for copying and pasting the desired picture(s) to the Previews tab of the authored plant. Also, you can use the tools in the lower left corner of it's Previews tab to manipulate pictures and you can drag picture files from Windows Explorer into the tiny bottom section of the authored plant's Previews tab area. It is the section of the Previews tab where the buttons are located. Copied pictures can be mixed and matched and re-arranged in any order.
Tip: In Authoring Mode the button on the Workbench tools will cause only authored plants (i.e., plants that have been added or hidden) and plants that have been hidden to appear in the plant list.
Publish (requires optional Authoring module)
The Publish function is available only when in Authoring Mode and when changes have been made, i.e., when a new plant has been added to the plant list, when changes have been made to a previously added plant or a plant on the standard list has been hidden. Publishing can be a somewhat lengthy process, so this option allows the user to author in several sessions before publishing. Unpublished plants will not display in the plant list in standard mode, however, until published (you can leave the plant in unpublished state and return to it later). If you toggle out of Authoring Mode (return to standard mode) without publishing authored plants, the program will ask if you wish to continue or to publish the authored plants. Make a selection in the dialog box and proceed as desired.
To publish authored plants, select Publish from the Tools menu. You will see a status bar indicating progress of the process, which should be fairly rapid, depending on your computer's capability, the number of authored plants and the amount of information included with them. Once the publishing process is finished, the program returns to standard mode and all authored changes will display in the standard plant list.
Relink user Picture Folder... (requires optional Authoring module)
This command is used when in Authoring mode to specify the location of the user pictures folder.
Launch Control Panel Starts the Horticopia Professional Control Panel program. In the control panel you can assign plant/portfolio library locations, resolve licensing issues, and perform data conversion and maintenance functions.
Toolbars... Clicking on Toolbars... brings up the Customize window for configuring the various toolbars that can be included in the main toolbar. Click Here for more detailed information.
48
Help Menu
HORTICOPIA Help
This command will start the Help program and present the Help Topics window, which contains three tabs: Contents, Index and Search. The Contents tab provides a breakdown of Help topics displayed as a HORTICOPIA® Professional Table of Contents with several topics grouped together under broader, common headings. Double-clicking on a book icon will open it to display the topics contained therein. Double-clicking on a page icon will open the topic for viewing in the right frame. This type of presentation is useful for becoming familiar with all aspects of the program.
The Index tab presents an alphabetical list of terms associated with HORTICOPIA® Professional. You can browse the list using the scroll tab or enter text in the box at the top. When you find a term that could lead to information regarding your question, you can double-click on it to view a list of topics containing the term. Double-click on a topic to view it in the right frame. Usually, you will be taken to a bookmarked portion of the topic pertaining directly to the term. In some cases, however, you may be simply referred to the topic as a whole. In either case, this should lead to the answer to your question.
The Search tab functions in much the same way as the Index. You enter a keyword or phrase in the
text box at the top and then click on the button. A list of topics containing the keyword is displayed, from which you can select the one of your choice. Double-clicking on it opens it for viewing in the right frame. Scroll through the topic to find the keyword or phrase highlighted in the text.
Display Advisor
Click on Display Advisor to cause the advisor topic corresponding to the currently active window to appear. This command is meaningful only if the Advisor topic(s) have been closed or suppressed. Otherwise, they will display automatically. Using the Display Advisor command does not affect the future appearance of Advisor topics that have been suppressed.
Show All Advisor Topics
When you select Show All Advisor Topics, HORTICOPIA® Professional will reset the hidden status of all advisor topics and restore them to the state they were in when you first installed the program. The Advisor topic for the currently active window will henceforth be shown (in the current, as well as future, session). You will then have to individually suppress the Advisor topics you no longer want to see (or select Hide All Advisor Topics again).
Hide All Advisor Topics
Click on Hide All Advisor Topics to suppress all Advisor topics in the current, as well as future, session. Clicking on the button beside Don't show any more Advisor topics on the first Advisor card will also accomplish this. You can reverse this action by selecting Show All Advisor Topics, or you can cause the Advisor topic for the current window only to appear by selecting Display Advisor.
System Parameters
Technical information regarding your computer system and printer is displayed by selecting System Parameters. The information is displayed in a Notepad window for easy printing. If you contact HORTICOPIA® Technical Support, you should include this information (mail or e-mail) or have it available (telephone).
http://www.horticopia.com/... If you select this command and your system is configured to use a default web browser, you will be connected directly with the HORTICOPIA® website.

49
HORTICOPIA® Credits... HORTICOPIA® Credits... lists the primary contributors to the development of HORTICOPIA® Professional. You'll also find a photograph and brief biography of the featured photographers, Edward F. Gilman and Robert E. Lyons. You can get specific information regarding the credits for each picture by right-clicking anywhere on the full-size view of the picture.
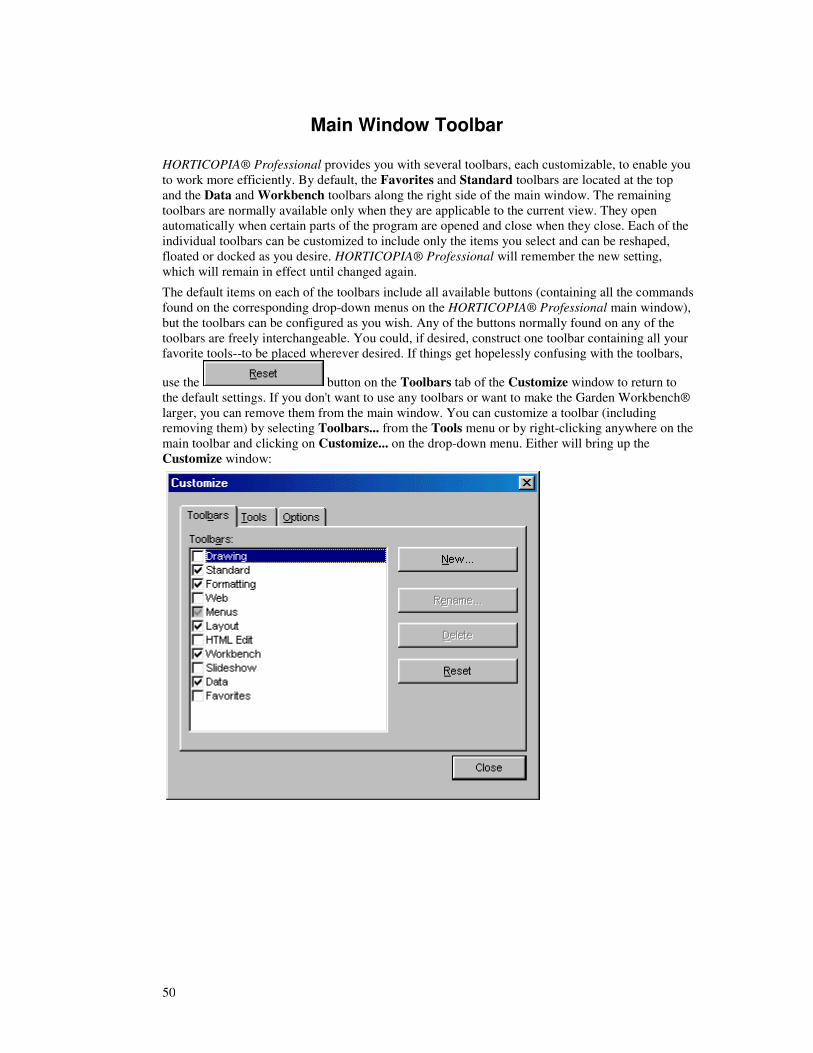
50
Main Window Toolbar HORTICOPIA® Professional provides you with several toolbars, each customizable, to enable you to work more efficiently. By default, the Favorites and Standard toolbars are located at the top and the Data and Workbench toolbars along the right side of the main window. The remaining toolbars are normally available only when they are applicable to the current view. They open automatically when certain parts of the program are opened and close when they close. Each of the individual toolbars can be customized to include only the items you select and can be reshaped, floated or docked as you desire. HORTICOPIA® Professional will remember the new setting, which will remain in effect until changed again.
The default items on each of the toolbars include all available buttons (containing all the commands found on the corresponding drop-down menus on the HORTICOPIA® Professional main window), but the toolbars can be configured as you wish. Any of the buttons normally found on any of the toolbars are freely interchangeable. You could, if desired, construct one toolbar containing all your favorite tools--to be placed wherever desired. If things get hopelessly confusing with the toolbars,
use the button on the Toolbars tab of the Customize window to return to the default settings. If you don't want to use any toolbars or want to make the Garden Workbench® larger, you can remove them from the main window. You can customize a toolbar (including removing them) by selecting Toolbars... from the Tools menu or by right-clicking anywhere on the main toolbar and clicking on Customize... on the drop-down menu. Either will bring up the Customize window:
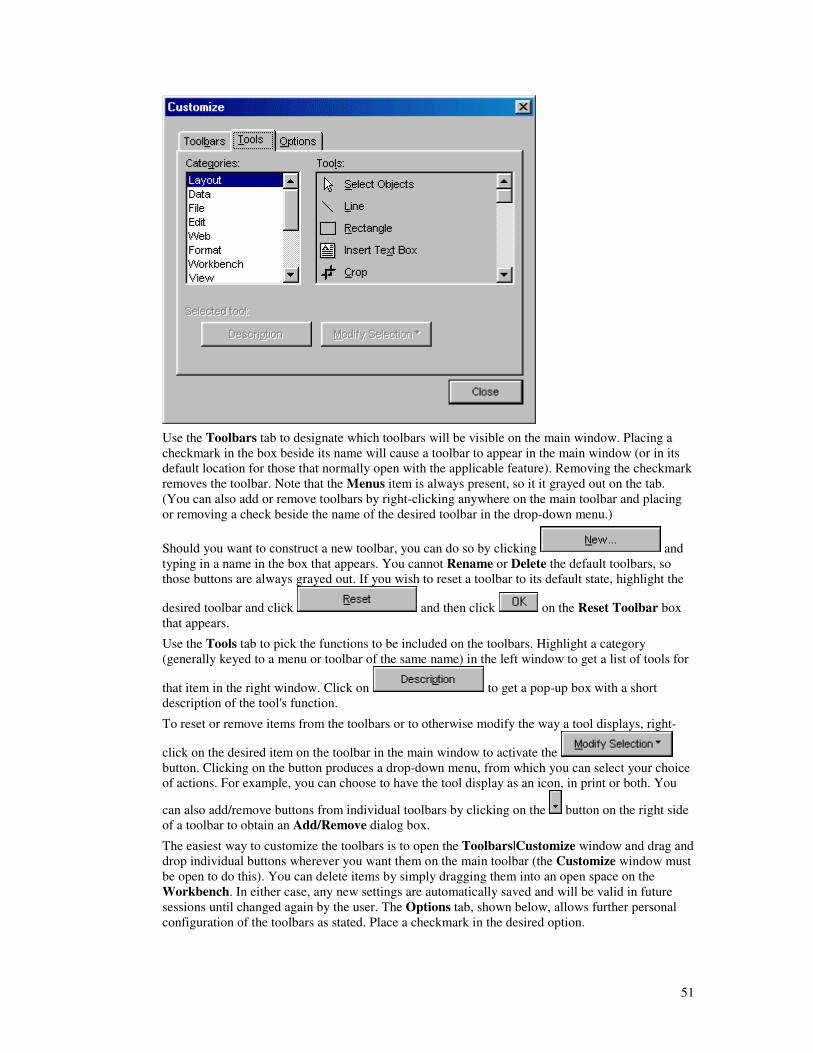
51
Use the Toolbars tab to designate which toolbars will be visible on the main window. Placing a checkmark in the box beside its name will cause a toolbar to appear in the main window (or in its default location for those that normally open with the applicable feature). Removing the checkmark removes the toolbar. Note that the Menus item is always present, so it it grayed out on the tab. (You can also add or remove toolbars by right-clicking anywhere on the main toolbar and placing or removing a check beside the name of the desired toolbar in the drop-down menu.)
Should you want to construct a new toolbar, you can do so by clicking and typing in a name in the box that appears. You cannot Rename or Delete the default toolbars, so those buttons are always grayed out. If you wish to reset a toolbar to its default state, highlight the
desired toolbar and click and then click on the Reset Toolbar box that appears.
Use the Tools tab to pick the functions to be included on the toolbars. Highlight a category (generally keyed to a menu or toolbar of the same name) in the left window to get a list of tools for
that item in the right window. Click on to get a pop-up box with a short description of the tool's function.
To reset or remove items from the toolbars or to otherwise modify the way a tool displays, right-
click on the desired item on the toolbar in the main window to activate the button. Clicking on the button produces a drop-down menu, from which you can select your choice of actions. For example, you can choose to have the tool display as an icon, in print or both. You
can also add/remove buttons from individual toolbars by clicking on the button on the right side of a toolbar to obtain an Add/Remove dialog box.
The easiest way to customize the toolbars is to open the Toolbars|Customize window and drag and drop individual buttons wherever you want them on the main toolbar (the Customize window must be open to do this). You can delete items by simply dragging them into an open space on the Workbench. In either case, any new settings are automatically saved and will be valid in future sessions until changed again by the user. The Options tab, shown below, allows further personal configuration of the toolbars as stated. Place a checkmark in the desired option.

52
In order to move a toolbar (it must be visible on the main toolbar), you must point the mouse cursor to ridge along the left edge, click and hold down the left mouse button as you drag the toolbar to the desired location. It can be docked to any of the main window's four sides or can be floated anywhere in the window. Once you release the mouse button, the toolbar will remain in place until you move it again. The toolbar will then appear as a window with a blue title bar and can be reshaped (not resized) and closed like any other window. You can move toolbars normally appearing as a window (those that appear with the functions they support) by dragging them by the title bar.
Tip: Holding the mouse cursor stationary over a toolbar button will display a pop-up box with a short description of its function.
53
Customization
HORTICOPIA® Professional Customization HORTICOPIA® has preset all user-selectable options to a set of defaults. You probably will want to change some of these options to accommodate your way of working. That can be done quickly and easily by selecting options in the Customization window, a powerful feature that allows you to select from among options regarding the way information is displayed on the Garden Workbench®. You can use it to configure HORTICOPIA® Professional in such a way that it suits your individual needs. The Customization window contains the four tabs indicated below, each of which controls different aspects of the plant information window display. See the individual tabs for more information. The active tab will be shown in bold type.
Tip: These settings can be temporarily overridden by right-clicking on the Workbench tools and selecting one of the available options in the popup boxes.
Common Customize Buttons
Common to all of the Customize tabs are the , and buttons:
Clicking on or pressing F1 will display context-sensitive information specific to the active tab in the Customization window. The title of the active tab is displayed in bold letters.
Clicking on causes all changes you have made in all Customize tabs to be discarded and closes the Customization window.
Clicking on causes all selected options to be accepted and the Customization window to be closed. Most changes will take effect immediately when you click on OK.
All Customize settings are saved automatically when exiting the program and will still be in effect the next time you start it.
Customize Tabs
Follow the links below to learn more about each of the tabs in the Customize window:
Workbench Tab
Navigation Tab
Pictures Tab
Slideshow Tab
Collections Tab
Further Customization options are available regarding Toolbars and Printing.
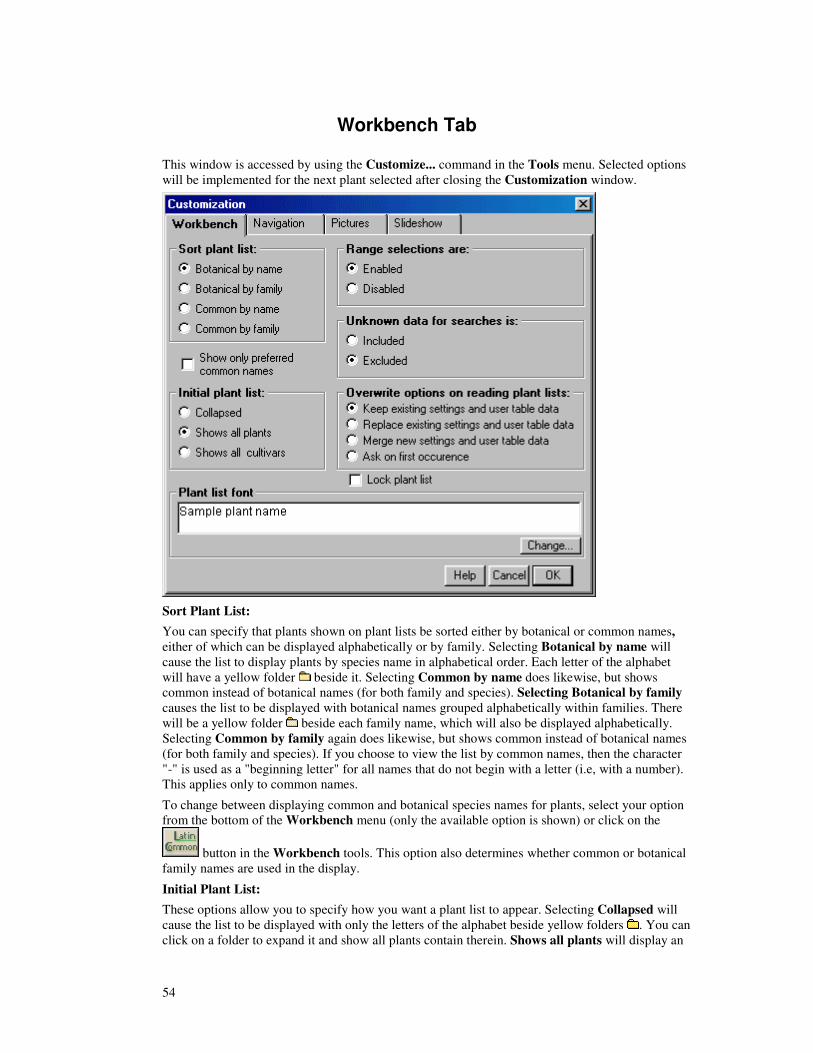
54
Workbench Tab This window is accessed by using the Customize... command in the Tools menu. Selected options will be implemented for the next plant selected after closing the Customization window.
Sort Plant List: You can specify that plants shown on plant lists be sorted either by botanical or common names, either of which can be displayed alphabetically or by family. Selecting Botanical by name will cause the list to display plants by species name in alphabetical order. Each letter of the alphabet will have a yellow folder beside it. Selecting Common by name does likewise, but shows common instead of botanical names (for both family and species). Selecting Botanical by family causes the list to be displayed with botanical names grouped alphabetically within families. There will be a yellow folder beside each family name, which will also be displayed alphabetically. Selecting Common by family again does likewise, but shows common instead of botanical names (for both family and species). If you choose to view the list by common names, then the character "-" is used as a "beginning letter" for all names that do not begin with a letter (i.e, with a number). This applies only to common names.
To change between displaying common and botanical species names for plants, select your option from the bottom of the Workbench menu (only the available option is shown) or click on the
button in the Workbench tools. This option also determines whether common or botanical family names are used in the display.
Initial Plant List: These options allow you to specify how you want a plant list to appear. Selecting Collapsed will cause the list to be displayed with only the letters of the alphabet beside yellow folders . You can click on a folder to expand it and show all plants contain therein. Shows all plants will display an
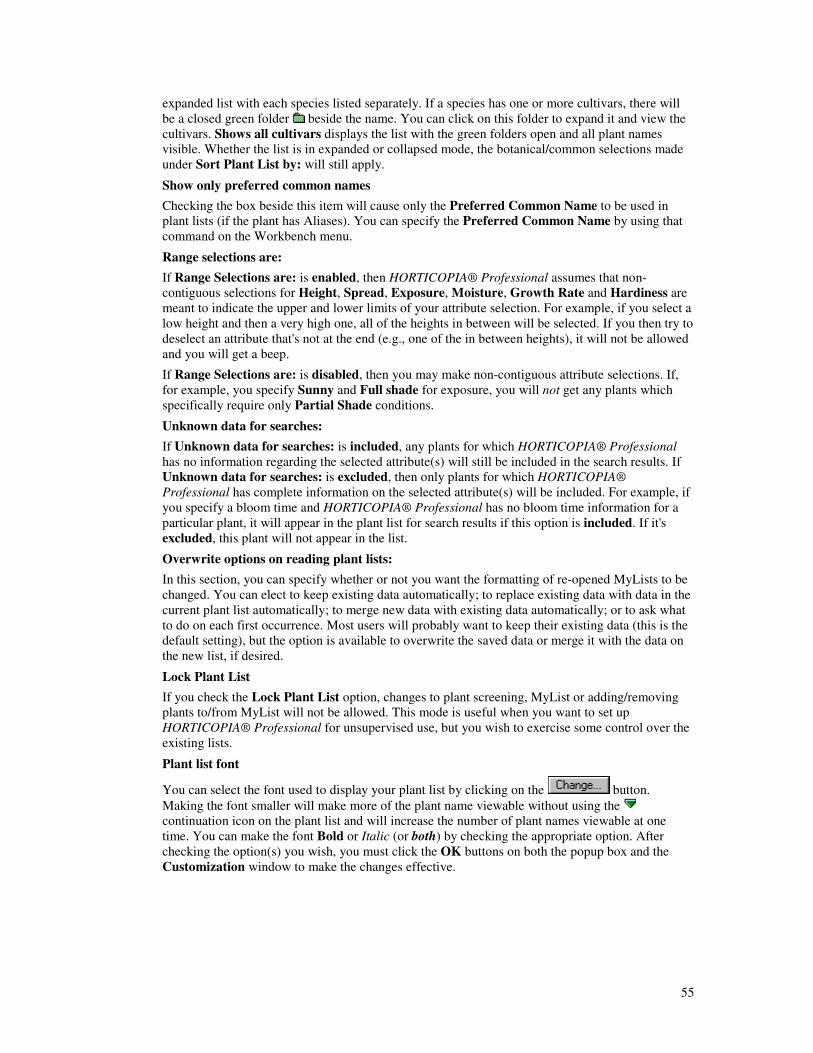
55
expanded list with each species listed separately. If a species has one or more cultivars, there will be a closed green folder beside the name. You can click on this folder to expand it and view the cultivars. Shows all cultivars displays the list with the green folders open and all plant names visible. Whether the list is in expanded or collapsed mode, the botanical/common selections made under Sort Plant List by: will still apply.
Show only preferred common names
Checking the box beside this item will cause only the Preferred Common Name to be used in plant lists (if the plant has Aliases). You can specify the Preferred Common Name by using that command on the Workbench menu.
Range selections are: If Range Selections are: is enabled, then HORTICOPIA® Professional assumes that non-contiguous selections for Height, Spread, Exposure, Moisture, Growth Rate and Hardiness are meant to indicate the upper and lower limits of your attribute selection. For example, if you select a low height and then a very high one, all of the heights in between will be selected. If you then try to deselect an attribute that's not at the end (e.g., one of the in between heights), it will not be allowed and you will get a beep.
If Range Selections are: is disabled, then you may make non-contiguous attribute selections. If, for example, you specify Sunny and Full shade for exposure, you will not get any plants which specifically require only Partial Shade conditions.
Unknown data for searches: If Unknown data for searches: is included, any plants for which HORTICOPIA® Professional has no information regarding the selected attribute(s) will still be included in the search results. If Unknown data for searches: is excluded, then only plants for which HORTICOPIA® Professional has complete information on the selected attribute(s) will be included. For example, if you specify a bloom time and HORTICOPIA® Professional has no bloom time information for a particular plant, it will appear in the plant list for search results if this option is included. If it's excluded, this plant will not appear in the list.
Overwrite options on reading plant lists: In this section, you can specify whether or not you want the formatting of re-opened MyLists to be changed. You can elect to keep existing data automatically; to replace existing data with data in the current plant list automatically; to merge new data with existing data automatically; or to ask what to do on each first occurrence. Most users will probably want to keep their existing data (this is the default setting), but the option is available to overwrite the saved data or merge it with the data on the new list, if desired.
Lock Plant List If you check the Lock Plant List option, changes to plant screening, MyList or adding/removing plants to/from MyList will not be allowed. This mode is useful when you want to set up HORTICOPIA® Professional for unsupervised use, but you wish to exercise some control over the existing lists.
Plant list font
You can select the font used to display your plant list by clicking on the button. Making the font smaller will make more of the plant name viewable without using the continuation icon on the plant list and will increase the number of plant names viewable at one time. You can make the font Bold or Italic (or both) by checking the appropriate option. After checking the option(s) you wish, you must click the OK buttons on both the popup box and the Customization window to make the changes effective.
56
Navigation Tab This window is accessed by using the Customize... command in the Tools menu. Selected options will be implemented for the next plant selected after closing the Customization window.
For a plant, first show:
When you highlight a plant name and click on the button in the Workbench tools or double-click on a plant name (or use the navigation features of the Data menu), the information tab first presented in the Plant Information window that appears is determined by this setting. You can
also control which information tab is presented first by right-clicking on the button and selecting the appropriate option from the popup menu (this will temporarily override any setting in the Customization window). or by using Keyboard Shortcuts.
Information title bar includes: Use the options in this section to control the taxonomic information appearing in the title bar of the plant information window. You can suppress names entirely, if desired, by un-checking all the options.
Family name sounds are: Use this setting to control the inclusion/exclusion of botanical family names when pronunciation of botanical names is desired. The species name is always included with the sound. The family name, when included, precedes the species name. This option can be temporarily overridden by right-
clicking on the button in the Workbench tools and selecting the desired option from the popup menu.

57
Pictures Tab This window is accessed by using the Customize... command in the Tools menu. Selected options will be implemented for the next plant selected after closing the Customization window.
Picture title bar includes: These options let you choose the nomenclatural information to be included in the title bar of each full-size picture. You can suppress names entirely, if desired, by un-checking all the options. In this case, only the Sequence Number (which may not be in numerical order if you have changed the order of the pictures on the Previews tab in the plant information window for the plant) will appear in the title bar of picture windows. This option is useful for plant identification Testing.
Pictures are initially shown: When you view a picture, HORTICOPIA® Professional will use this setting to make the picture larger or smaller, as you specify. As you make it larger, some “pixelizing” of the picture will occur. The default for this setting is 100% for 800 by 600 or larger video systems and 80% for smaller video systems. You can set the value to whatever works best with your system by moving the slide bar to the desired value. You may have to experiment a bit to find what works best.
��Check the uniformly sized option to automatically normalize the size of each picture. Since pictures are stored in different resolutions on the CD, they will normally appear as different sizes on your screen. Checking this option will adjust the picture size based on your current monitor settings.
��Check the maximized to window option if you always want the picture to fill the entire HORTICOPIA® Professional main window. The largest possible undistorted picture (that is, the aspect ratio will remain constant) will be presented within the current main window. Normally, pictures are decompressed with the best possible picture quality.
Tip: If one option is checked and you want to use the other one, you should un-check the unwanted
58
option. If both options remain checked, HORTICOPIA® Professional will use the first, i.e., uniformly sized.
Preferred woodies view
Selecting one of these options enables you to choose which view of Woody plants (if that view is available for the selected plant) that you want to display as the Preferred Picture. If the designated view is not available, the default view will be shown. For Woody plants, you can select a seasonal view (if available), which could be either a Habit or Detail view.
Preferred herbaceous views
Selecting one of these options enables you to choose which view -- Habit or Detail -- of Herbaceous plants (if that view is available for the selected plant) that you want to display as the Preferred Picture. If the designated view is not available, the default view will be shown.
Thumbnail identification mode
If you check Thumbnail identification mode, then all subsequent Thumbnails will appear without picture caption boxes containing the plant name(s), and in random order. This mode is useful for testing yourself on plant identification. A new random order will be used each time you display the Thumbnails. You can double-click on any Thumbnail picture to display a full-size picture (which will also appear in Plant Identification Mode, i.e., without nomenclatural information).
You can also invoke the Thumbnail identification mode temporarily by right-clicking on the
button in the Workbench tools and choosing Identification mode from the popup box.
Tip: You can learn the name of the plant in any Thumbnail picture without a caption box by letting the Mouse cursor linger over the image. A popup box will contain the botanical name.

59
Slideshow Tab This window is accessed by using the Customize... command in the Tools menu. Selected options will be implemented for the next plant selected after closing the Customization window.
Sound includes: The sound controls determine whether plant names and/or background music are to be played during slideshows. The name may include the family name or it may be excluded. If you want no botanical name sound, un-check both Family names and Botanical names.
Sound repeats for: This setting enables you to control when and how often the botanical name is sounded during the slideshow. You can have the sound occur only when the species changes, for each plant (the sound may occur more than once for a species when it has cultivars), or with each picture.
Slide size is: This setting determines the sizing of pictures in the slideshow window. It can be scaled to the original size of the picture or the entire window may be used. If the picture is not maximized, it is centered in the window. Slideshow uses: (see below) determines the slideshow window size.
Slide titles include: These options enable you to specify the nomenclatural information to be included with the slideshow pictures. Place a dot in the circle beside the desired option(s). If you do not want any nomenclatural information included in your slideshow, leave the circles empty.
Slideshow uses: You can have the plant nomenclatural information appear in the slide title bar or on-screen. If Window title bar for titles is selected, the names will appear in the title bar. If On-screen titles is selected, the names will be superimposed across the picture. For on-screen titles, up to three lines

60
are displayed per screen. If you choose all the name options, the first set of names will fade out and then the remaining names will appear. If neither of these options is selected, then the title bar will be empty and no superimposed names will appear.
You can also specify the size of the slideshow window in this section. Place a dot in the circle beside the desired option (Full window or Entire screen).
If you want to view only the Preferred Picture in your slideshow, place a check in the box beside Only preferred picture.
You can suppress the special roll-over effects during picture changes in the slideshow by placing a check in the box beside No special effects. Doing this may speed up the slide display on slower computers. If the slideshow hangs up on your system, you should suppress the special effects.
Slide Advance is: Manual or automatic specifies whether to advance the slide automatically after the number of seconds specified or to wait for a manual advance after each slide. The specified delay is applied after the picture appears and any sound or title displays, which may be a second or so depending upon the speed of your system. The time between slides can be as short as one second as as long as 90 seconds. This is very handy for self-testing or for constructing identification tests for various levels of competence.
The Run continuously option causes the slideshow to repeat at the end. The HORTICOPIA® Professional initial splash screen will not be repeated when the slideshow starts over.
Place a check in the box beside Do not show Slideshow toolbar if you do not want the Slideshow toolbar to appear automatically when a slideshow starts.
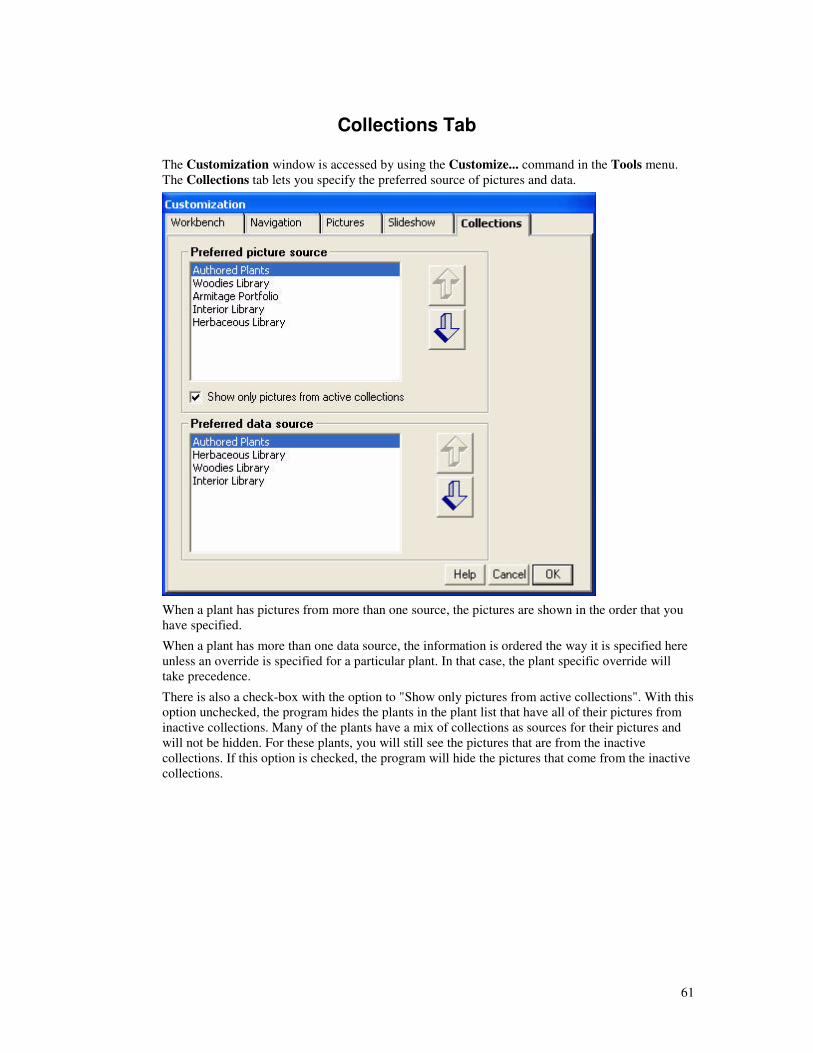
61
Collections Tab The Customization window is accessed by using the Customize... command in the Tools menu. The Collections tab lets you specify the preferred source of pictures and data.
When a plant has pictures from more than one source, the pictures are shown in the order that you have specified.
When a plant has more than one data source, the information is ordered the way it is specified here unless an override is specified for a particular plant. In that case, the plant specific override will take precedence.
There is also a check-box with the option to "Show only pictures from active collections". With this option unchecked, the program hides the plants in the plant list that have all of their pictures from inactive collections. Many of the plants have a mix of collections as sources for their pictures and will not be hidden. For these plants, you will still see the pictures that are from the inactive collections. If this option is checked, the program will hide the pictures that come from the inactive collections.
62
The Garden Workbench Garden Workbench® Window
Overview
The Garden Workbench® window (frequently shortened herein to Workbench) is the central work area of HORTICOPIA® Professional. It is the starting point for all subsequent actions. It has an intuitive interface and uses familiar WINDOWS methods, so you'll be able to do most tasks by applying the WINDOWS knowledge you already have. The Workbench is comprised of three major areas: the selection graphics on the left (sub-divided into plant attributes for either Woodies or Herbaceous above and Common or Environmental characteristics below), the Tools in the center, and the Plant List in the frame on the right. Each of these is described separately in detail. Click on the hyperlinks for more information.
While the Workbench has its own stationary tools to perform certain functions, the menu items and the other fully customizable toolbars in the main window also apply to the Workbench. In fact, the main window could be considered an integral, fourth part of the Workbench. The HORTICOPIA® Professional main window Menu items and Toolbars are also described separately in detail. Click on the hyperlinks for more information.
Title Bar
When HORTICOPIA® Professional is opened, there is no saved or named list displayed, so the title bar will include [New] to indicate that a new list is to be started (this is the same as clicking on New List in the File menu). When you open a saved file (MyList, Layout or Slideshow) or save a current list and give it a name, the Workbench title bar will then contain the name of that file.
Technical characteristics
The Workbench appears in a separate window inside the HORTICOPIA® Professional main window and is displayed when the program is opened. Like most other HORTICOPIA® Professional windows, the Garden Workbench® window can be minimized, maximized (normal position) or closed using the standard WINDOWS buttons in the upper right corner. (Note there is another set of identical buttons, with the same functions, for the main window. Clicking on the button on either of them will close the program, but you will get a dialog box -- and an audible beep -- asking if you wish to quit the program. Click Yes to exit and No to return to the Workbench.) If your video configuration allows, the Workbench window can be repositioned in the main window by dragging it by the title bar. It can also be resized by dragging one of the corners. Obviously, the horizontal size will affect the size of the Plant List.
Tip: A larger vertical area will make it possible to keep expanded Woodies selection graphics visible along with the common (environmental) selection graphics.
The Workbench cannot be reduced below a specified minimum size. The windows have been sized for a minimum 800 x 600 screen resolution with small fonts. Large fonts require a 1024 x 768 resolution or better. Non-standard font size models may cause unpredictable results. If the main window is too small, scroll bars will appear to help make the contents of the Workbench and other windows visible. You should experiment with your video settings to determine the best configuration for your needs.
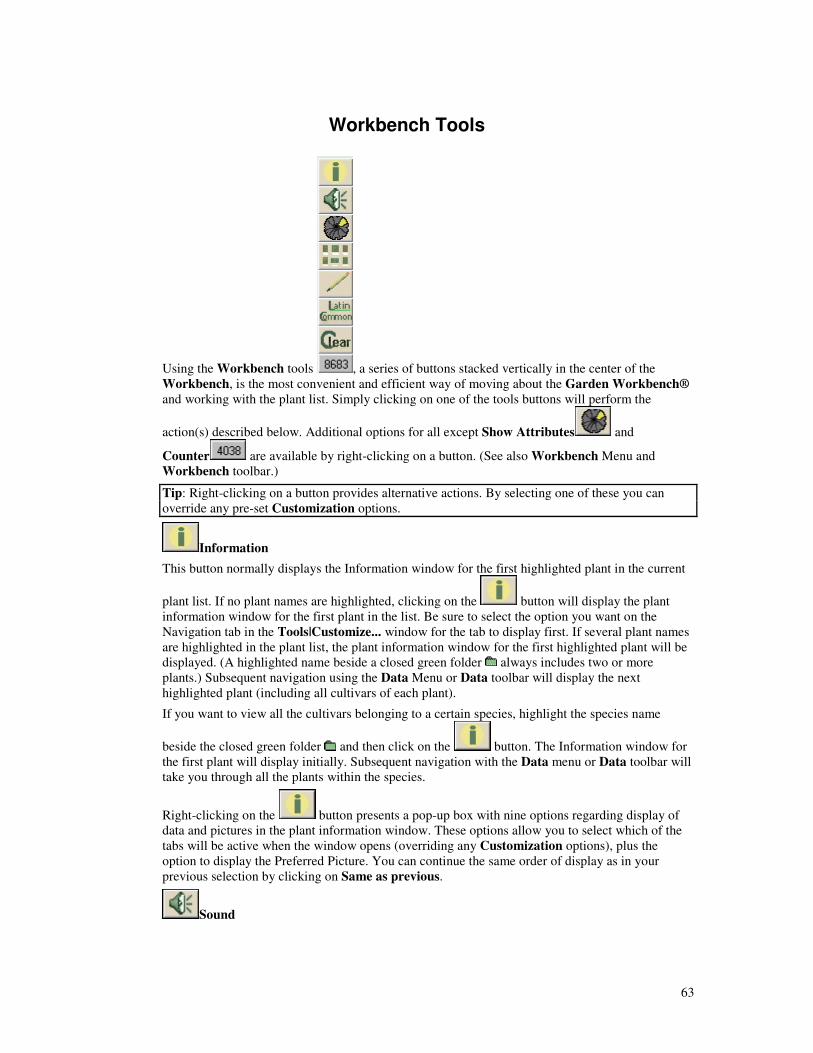
63
Workbench Tools
Using the Workbench tools , a series of buttons stacked vertically in the center of the Workbench, is the most convenient and efficient way of moving about the Garden Workbench® and working with the plant list. Simply clicking on one of the tools buttons will perform the
action(s) described below. Additional options for all except Show Attributes and
Counter are available by right-clicking on a button. (See also Workbench Menu and Workbench toolbar.)
Tip: Right-clicking on a button provides alternative actions. By selecting one of these you can override any pre-set Customization options.
Information
This button normally displays the Information window for the first highlighted plant in the current
plant list. If no plant names are highlighted, clicking on the button will display the plant information window for the first plant in the list. Be sure to select the option you want on the Navigation tab in the Tools|Customize... window for the tab to display first. If several plant names are highlighted in the plant list, the plant information window for the first highlighted plant will be displayed. (A highlighted name beside a closed green folder always includes two or more plants.) Subsequent navigation using the Data Menu or Data toolbar will display the next highlighted plant (including all cultivars of each plant).
If you want to view all the cultivars belonging to a certain species, highlight the species name
beside the closed green folder and then click on the button. The Information window for the first plant will display initially. Subsequent navigation with the Data menu or Data toolbar will take you through all the plants within the species.
Right-clicking on the button presents a pop-up box with nine options regarding display of data and pictures in the plant information window. These options allow you to select which of the tabs will be active when the window opens (overriding any Customization options), plus the option to display the Preferred Picture. You can continue the same order of display as in your previous selection by clicking on Same as previous.
Sound
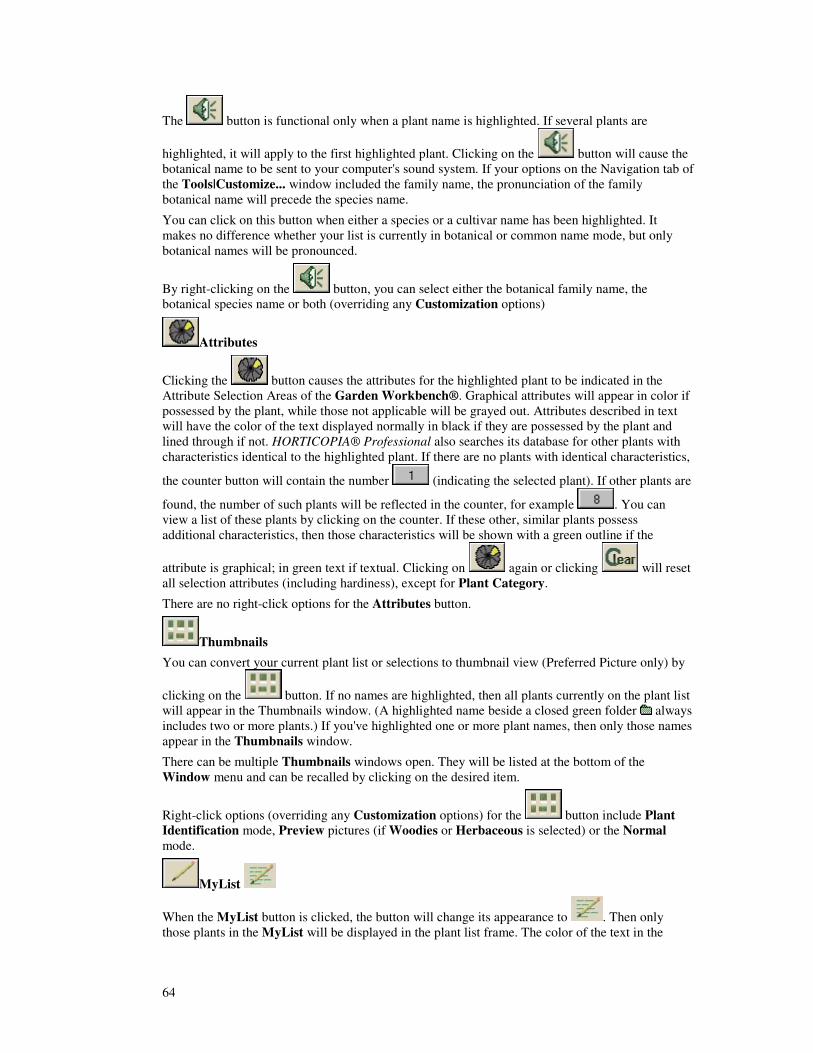
64
The button is functional only when a plant name is highlighted. If several plants are
highlighted, it will apply to the first highlighted plant. Clicking on the button will cause the botanical name to be sent to your computer's sound system. If your options on the Navigation tab of the Tools|Customize... window included the family name, the pronunciation of the family botanical name will precede the species name.
You can click on this button when either a species or a cultivar name has been highlighted. It makes no difference whether your list is currently in botanical or common name mode, but only botanical names will be pronounced.
By right-clicking on the button, you can select either the botanical family name, the botanical species name or both (overriding any Customization options)
Attributes
Clicking the button causes the attributes for the highlighted plant to be indicated in the Attribute Selection Areas of the Garden Workbench®. Graphical attributes will appear in color if possessed by the plant, while those not applicable will be grayed out. Attributes described in text will have the color of the text displayed normally in black if they are possessed by the plant and lined through if not. HORTICOPIA® Professional also searches its database for other plants with characteristics identical to the highlighted plant. If there are no plants with identical characteristics,
the counter button will contain the number (indicating the selected plant). If other plants are
found, the number of such plants will be reflected in the counter, for example . You can view a list of these plants by clicking on the counter. If these other, similar plants possess additional characteristics, then those characteristics will be shown with a green outline if the
attribute is graphical; in green text if textual. Clicking on again or clicking will reset all selection attributes (including hardiness), except for Plant Category.
There are no right-click options for the Attributes button.
Thumbnails
You can convert your current plant list or selections to thumbnail view (Preferred Picture only) by
clicking on the button. If no names are highlighted, then all plants currently on the plant list will appear in the Thumbnails window. (A highlighted name beside a closed green folder always includes two or more plants.) If you've highlighted one or more plant names, then only those names appear in the Thumbnails window.
There can be multiple Thumbnails windows open. They will be listed at the bottom of the Window menu and can be recalled by clicking on the desired item.
Right-click options (overriding any Customization options) for the button include Plant Identification mode, Preview pictures (if Woodies or Herbaceous is selected) or the Normal mode.
MyList
When the MyList button is clicked, the button will change its appearance to . Then only those plants in the MyList will be displayed in the plant list frame. The color of the text in the
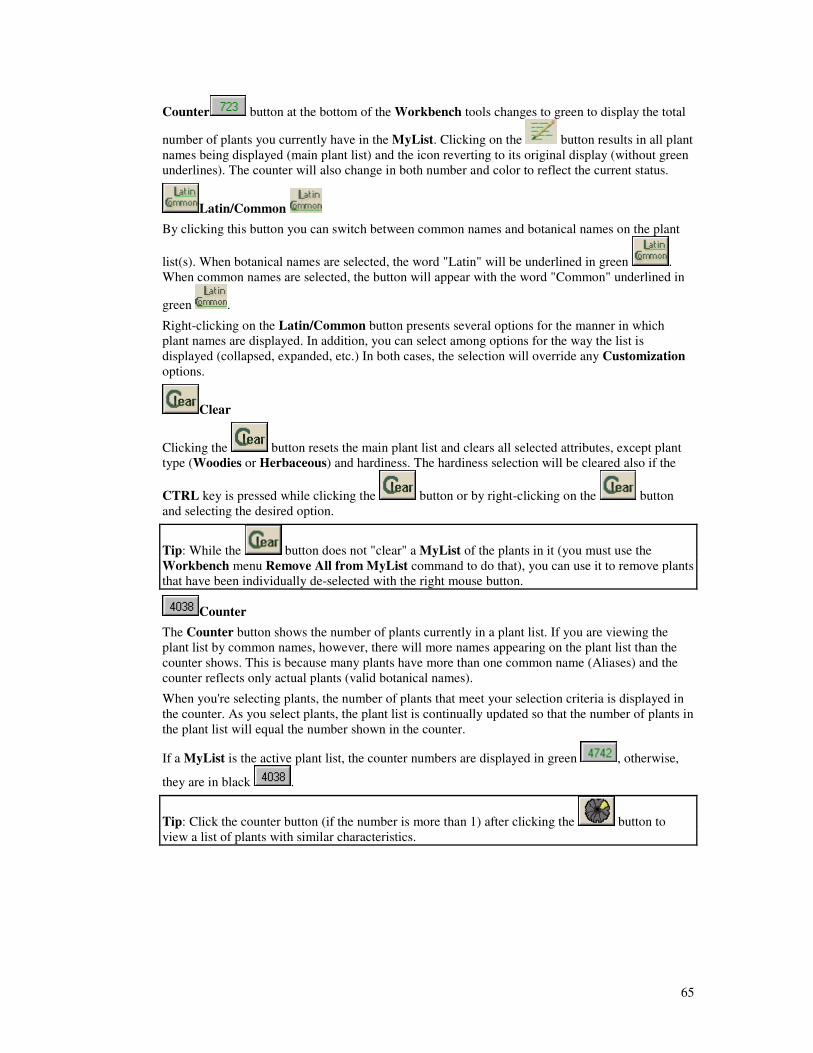
65
Counter button at the bottom of the Workbench tools changes to green to display the total
number of plants you currently have in the MyList. Clicking on the button results in all plant names being displayed (main plant list) and the icon reverting to its original display (without green underlines). The counter will also change in both number and color to reflect the current status.
Latin/Common
By clicking this button you can switch between common names and botanical names on the plant
list(s). When botanical names are selected, the word "Latin" will be underlined in green . When common names are selected, the button will appear with the word "Common" underlined in
green .
Right-clicking on the Latin/Common button presents several options for the manner in which plant names are displayed. In addition, you can select among options for the way the list is displayed (collapsed, expanded, etc.) In both cases, the selection will override any Customization options.
Clear
Clicking the button resets the main plant list and clears all selected attributes, except plant type (Woodies or Herbaceous) and hardiness. The hardiness selection will be cleared also if the
CTRL key is pressed while clicking the button or by right-clicking on the button and selecting the desired option.
Tip: While the button does not "clear" a MyList of the plants in it (you must use the Workbench menu Remove All from MyList command to do that), you can use it to remove plants that have been individually de-selected with the right mouse button.
Counter
The Counter button shows the number of plants currently in a plant list. If you are viewing the plant list by common names, however, there will more names appearing on the plant list than the counter shows. This is because many plants have more than one common name (Aliases) and the counter reflects only actual plants (valid botanical names).
When you're selecting plants, the number of plants that meet your selection criteria is displayed in the counter. As you select plants, the plant list is continually updated so that the number of plants in the plant list will equal the number shown in the counter.
If a MyList is the active plant list, the counter numbers are displayed in green , otherwise,
they are in black .
Tip: Click the counter button (if the number is more than 1) after clicking the button to view a list of plants with similar characteristics.
66
Workbench Techniques Using the plant list effectively is described in detail in Working with Plant Lists. In conjunction with plant selection, the plant list can provide answers to many of your questions about specific plants. You will normally use the Workbench to interface with the plant list. Here are some techniques you may find useful.
Finding Plants Without Specified Attributes
Occasionally, you may wish to find plants that do not have certain attributes, but do have other attributes. For example, you might want to find all plants that bloom in the summer, but don't want any with yellow blooms. Here's how to proceed:
1. Select Woodies or Herbaceous.
2. Remove any Screening that you don't need. (Make sure MyList mode is not active, i.e. not showing.)
3. Click on the button to reset the plant list attributes.
4. From the Workbench menu, select Add All to MyList.
5. Click on the button. All plants are now on both lists.
6. Click on the Yellow Bloom graphic.
7. From the Workbench menu, select Remove All from MyList.
8. Click on the button. At this point, the list shows only plants with no yellow blooms.
9. Click on the Summer Bloom Time attribute.
The list now includes only those plants that bloom in summer and have colors other than yellow. You can readily adapt this technique to other attribute searches.
Finding Compatible Plants
You might want to find plants that will be compatible with one that you already have or know about. You could continue the process as follows:
10. Find the name of a plant of interest in the plant list and highlight it by clicking on it once.
11. Click on the button.
12. If the Counter is more than 1, the list will show all plants which have nearly the same attributes
13. No matter what the counter shows, you can now deselect attributes that are not important. For example, you may want to keep Exposure, Moisture, Soil Composition and Hardiness the same. On the other hand, you could deselect, for example, Bloom Color or Leaf Color, if these aren't important in finding a compatible plant.
14. You can also impose additional attributes. For example, you might want a tall, pink-blooming plant to go with a short, yellow-blooming plant you already have.
15. As you make attribute changes, the plant list is updated to reflect the plants meeting the chosen characteristics. The counter will change to indicate the number of plants selected.
Climate Conditions
Not all plants can be adequately categorized by Hardiness. However, used in combination with

67
other HORTICOPIA® Professional attributes, you can quickly narrow down the plant list to those plants suited to specific conditions. For example, to find plants that grow well in high desert climates with cool winters and hot, dry summers, you would select the attribute Drought tolerant, Dry for Soil Moisture and an appropriate Hardiness Zone, say 9A or 9B.
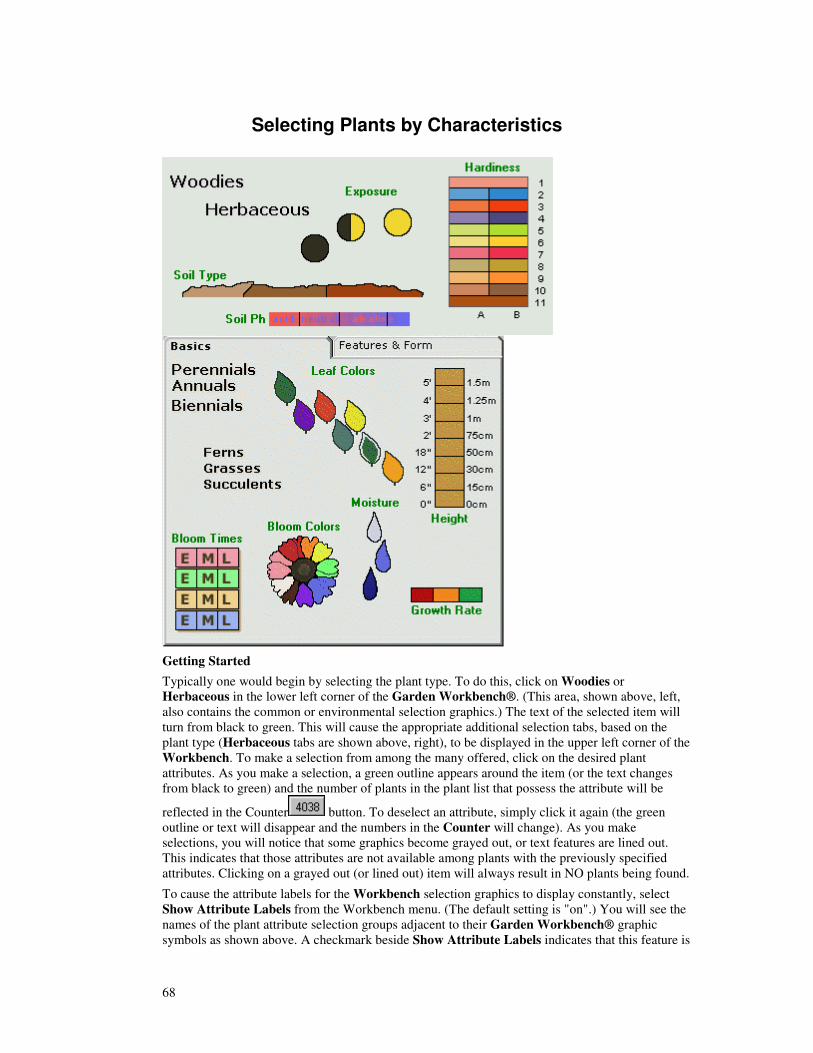
68
Selecting Plants by Characteristics
Getting Started
Typically one would begin by selecting the plant type. To do this, click on Woodies or Herbaceous in the lower left corner of the Garden Workbench®. (This area, shown above, left, also contains the common or environmental selection graphics.) The text of the selected item will turn from black to green. This will cause the appropriate additional selection tabs, based on the plant type (Herbaceous tabs are shown above, right), to be displayed in the upper left corner of the Workbench. To make a selection from among the many offered, click on the desired plant attributes. As you make a selection, a green outline appears around the item (or the text changes from black to green) and the number of plants in the plant list that possess the attribute will be
reflected in the Counter button. To deselect an attribute, simply click it again (the green outline or text will disappear and the numbers in the Counter will change). As you make selections, you will notice that some graphics become grayed out, or text features are lined out. This indicates that those attributes are not available among plants with the previously specified attributes. Clicking on a grayed out (or lined out) item will always result in NO plants being found.
To cause the attribute labels for the Workbench selection graphics to display constantly, select Show Attribute Labels from the Workbench menu. (The default setting is "on".) You will see the names of the plant attribute selection groups adjacent to their Garden Workbench® graphic symbols as shown above. A checkmark beside Show Attribute Labels indicates that this feature is
69
enabled (of course, you can also see them). You can turn them off by clicking Show Attribute Labels again, making the checkmark disappear.
Tip: You can use the mouse pointer to obtain specific information about any of the objects on the Garden Workbench®. Just hold the mouse cursor stationary over a plant attribute graphic, a toolbar button or a plant list icon. You will get a pop-up window with a short explanation of the function of the item.
Using Attribute Selection Items
NOTE: All attribute selection items (graphic and textual) are described in detail in the topic on Plant Attributes and Characteristics. Those mentioned here are given as examples of how they can be used in the plant selection process.
Selection items are divided into two types: grouped and ungrouped. Selection groups consist of one plant attribute that has several possible values. For example, Bloom Color. Other selection items (e.g., Attractive foliage) are individual and may be thought of as groups with only one member.
Tip: In general, attribute selection graphics are grouped and attribute textual descriptions are ungrouped.
When you make more than one selection in a plant group, then all plants that meet any of the attributes you have selected in that group will be selected. For example, if you clicked on both red and yellow blooms, then plants that have either red or yellow blooms will be selected.
When you select attributes in different groups -- for example, bloom colors and leaf colors -- then the plants selected must have one of the attributes selected in each of the groups. For example, if you clicked on both red and yellow blooms among the bloom colors and yellow and green leaves among the leaf colors, you will get all plants that have:
��red blooms and green leaves
��red blooms and yellow leaves
��yellow blooms and green leaves
��yellow blooms and yellow leaves
When you select ungrouped attributes or characteristics such as Attractive bark and Fragrant blooms, then only plants that have all the ungrouped characteristics selected will be shown.
Range Selections
The following selection groups have ranges where one value can be defined as less than or greater than another value. When you click on two different attributes in a range group, then normally any intermediate values will also be selected automatically. For example, if you click on 6-12" and 2-4' on the Height bar, you'll select plants that range from 6" to 4' high.
��Height
��Spread
��Growth Rate
��Exposure
��Moisture
��Hardiness.
Tip: You can disable range selection by using the Tools|Customize Workbench tab. In the above example, you would then select plants that are either 6-12" high or 2-4' high (passing over those in between).
Unknown Attributes
HORTICOPIA® Professional does not have all attributes for all plants in its database. You can include plants for which no data is available in your searches or exclude them with the Tools|Customize Workbench tab options. For example, if you specify yellow blooms and

70
variegated leaf color and have specified in the Customization window that plants with unknown attributes be included, you will get plants for which HORTICOPIA® Professional has no summer leaf color information, but where the bloom color is yellow. You would also get plants where neither leaf nor bloom color is known. If you exclude plants for which a specified attribute is unknown, then in the previous example you would get only plants where the HORTICOPIA® Professional database has specific information that the bloom color is yellow and the leaf color is variegated. Unknown data for attributes that have not been selected have no effect on the plant search.
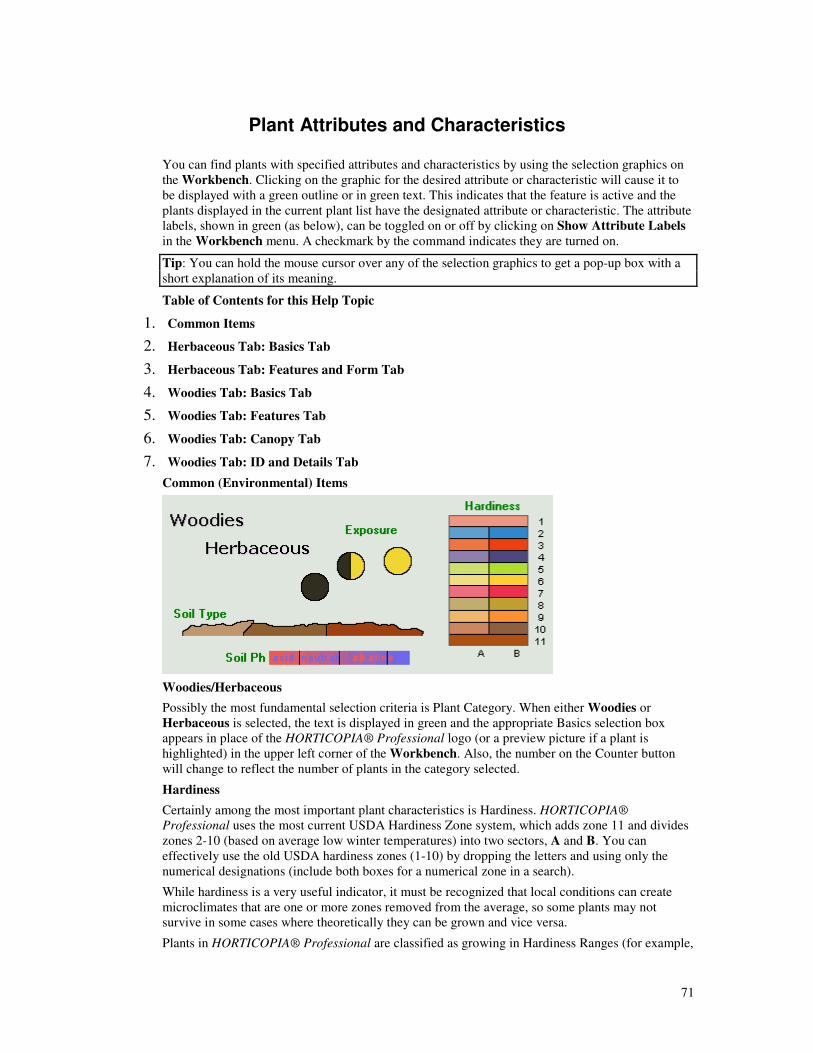
71
Plant Attributes and Characteristics You can find plants with specified attributes and characteristics by using the selection graphics on the Workbench. Clicking on the graphic for the desired attribute or characteristic will cause it to be displayed with a green outline or in green text. This indicates that the feature is active and the plants displayed in the current plant list have the designated attribute or characteristic. The attribute labels, shown in green (as below), can be toggled on or off by clicking on Show Attribute Labels in the Workbench menu. A checkmark by the command indicates they are turned on.
Tip: You can hold the mouse cursor over any of the selection graphics to get a pop-up box with a short explanation of its meaning.
Table of Contents for this Help Topic
1. Common Items
2. Herbaceous Tab: Basics Tab
3. Herbaceous Tab: Features and Form Tab
4. Woodies Tab: Basics Tab
5. Woodies Tab: Features Tab
6. Woodies Tab: Canopy Tab
7. Woodies Tab: ID and Details Tab
Common (Environmental) Items
Woodies/Herbaceous
Possibly the most fundamental selection criteria is Plant Category. When either Woodies or Herbaceous is selected, the text is displayed in green and the appropriate Basics selection box appears in place of the HORTICOPIA® Professional logo (or a preview picture if a plant is highlighted) in the upper left corner of the Workbench. Also, the number on the Counter button will change to reflect the number of plants in the category selected.
Hardiness
Certainly among the most important plant characteristics is Hardiness. HORTICOPIA® Professional uses the most current USDA Hardiness Zone system, which adds zone 11 and divides zones 2-10 (based on average low winter temperatures) into two sectors, A and B. You can effectively use the old USDA hardiness zones (1-10) by dropping the letters and using only the numerical designations (include both boxes for a numerical zone in a search).
While hardiness is a very useful indicator, it must be recognized that local conditions can create microclimates that are one or more zones removed from the average, so some plants may not survive in some cases where theoretically they can be grown and vice versa.
Plants in HORTICOPIA® Professional are classified as growing in Hardiness Ranges (for example,
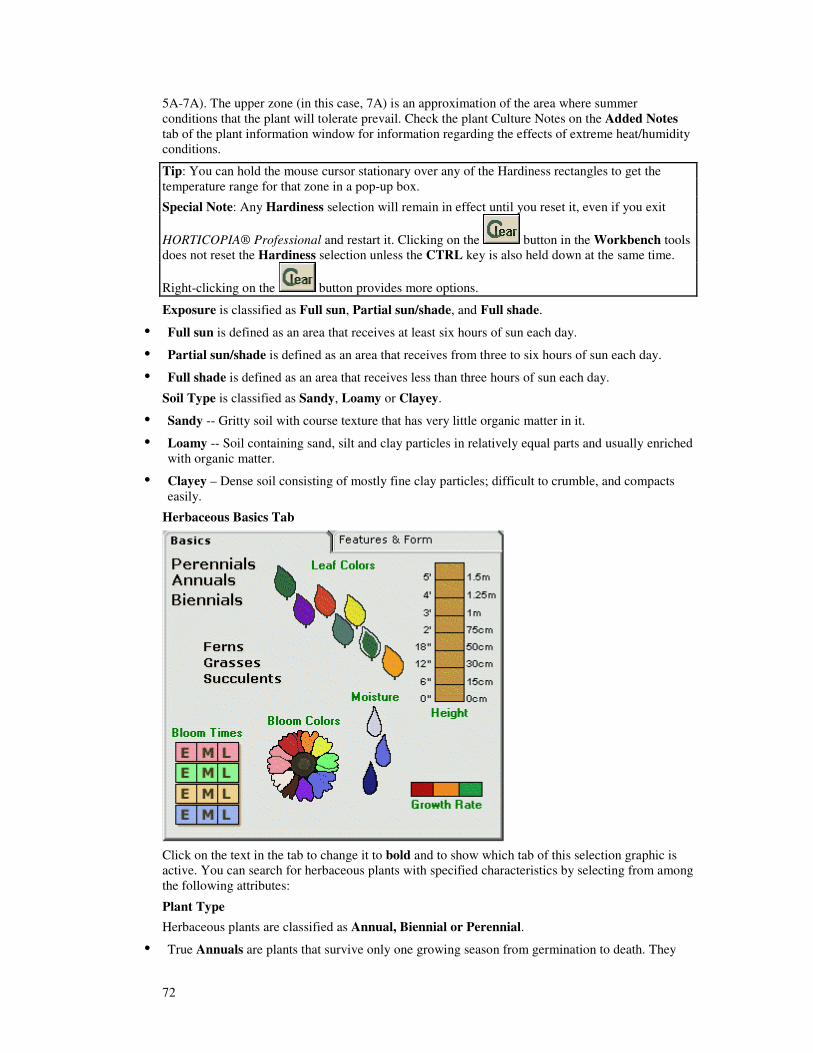
72
5A-7A). The upper zone (in this case, 7A) is an approximation of the area where summer conditions that the plant will tolerate prevail. Check the plant Culture Notes on the Added Notes tab of the plant information window for information regarding the effects of extreme heat/humidity conditions.
Tip: You can hold the mouse cursor stationary over any of the Hardiness rectangles to get the temperature range for that zone in a pop-up box.
Special Note: Any Hardiness selection will remain in effect until you reset it, even if you exit
HORTICOPIA® Professional and restart it. Clicking on the button in the Workbench tools does not reset the Hardiness selection unless the CTRL key is also held down at the same time.
Right-clicking on the button provides more options.
Exposure is classified as Full sun, Partial sun/shade, and Full shade.
��Full sun is defined as an area that receives at least six hours of sun each day.
��Partial sun/shade is defined as an area that receives from three to six hours of sun each day.
��Full shade is defined as an area that receives less than three hours of sun each day.
Soil Type is classified as Sandy, Loamy or Clayey.
��Sandy -- Gritty soil with course texture that has very little organic matter in it.
��Loamy -- Soil containing sand, silt and clay particles in relatively equal parts and usually enriched with organic matter.
��Clayey – Dense soil consisting of mostly fine clay particles; difficult to crumble, and compacts easily.
Herbaceous Basics Tab
Click on the text in the tab to change it to bold and to show which tab of this selection graphic is active. You can search for herbaceous plants with specified characteristics by selecting from among the following attributes:
Plant Type
Herbaceous plants are classified as Annual, Biennial or Perennial.
��True Annuals are plants that survive only one growing season from germination to death. They
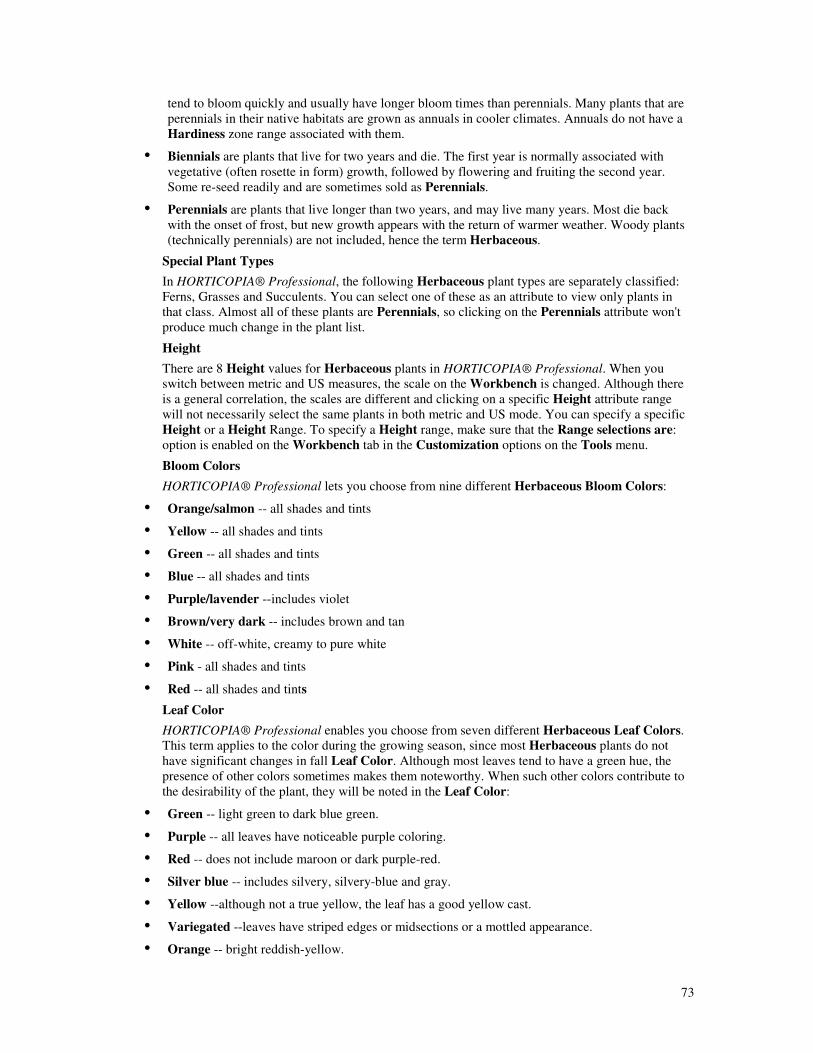
73
tend to bloom quickly and usually have longer bloom times than perennials. Many plants that are perennials in their native habitats are grown as annuals in cooler climates. Annuals do not have a Hardiness zone range associated with them.
��Biennials are plants that live for two years and die. The first year is normally associated with vegetative (often rosette in form) growth, followed by flowering and fruiting the second year. Some re-seed readily and are sometimes sold as Perennials.
��Perennials are plants that live longer than two years, and may live many years. Most die back with the onset of frost, but new growth appears with the return of warmer weather. Woody plants (technically perennials) are not included, hence the term Herbaceous.
Special Plant Types
In HORTICOPIA® Professional, the following Herbaceous plant types are separately classified: Ferns, Grasses and Succulents. You can select one of these as an attribute to view only plants in that class. Almost all of these plants are Perennials, so clicking on the Perennials attribute won't produce much change in the plant list.
Height There are 8 Height values for Herbaceous plants in HORTICOPIA® Professional. When you switch between metric and US measures, the scale on the Workbench is changed. Although there is a general correlation, the scales are different and clicking on a specific Height attribute range will not necessarily select the same plants in both metric and US mode. You can specify a specific Height or a Height Range. To specify a Height range, make sure that the Range selections are: option is enabled on the Workbench tab in the Customization options on the Tools menu.
Bloom Colors
HORTICOPIA® Professional lets you choose from nine different Herbaceous Bloom Colors:
��Orange/salmon -- all shades and tints
��Yellow -- all shades and tints
��Green -- all shades and tints
��Blue -- all shades and tints
��Purple/lavender --includes violet
��Brown/very dark -- includes brown and tan
��White -- off-white, creamy to pure white
��Pink - all shades and tints
��Red -- all shades and tints
Leaf Color
HORTICOPIA® Professional enables you choose from seven different Herbaceous Leaf Colors. This term applies to the color during the growing season, since most Herbaceous plants do not have significant changes in fall Leaf Color. Although most leaves tend to have a green hue, the presence of other colors sometimes makes them noteworthy. When such other colors contribute to the desirability of the plant, they will be noted in the Leaf Color:
��Green -- light green to dark blue green.
��Purple -- all leaves have noticeable purple coloring.
��Red -- does not include maroon or dark purple-red.
��Silver blue -- includes silvery, silvery-blue and gray.
��Yellow --although not a true yellow, the leaf has a good yellow cast.
��Variegated --leaves have striped edges or midsections or a mottled appearance.
��Orange -- bright reddish-yellow.
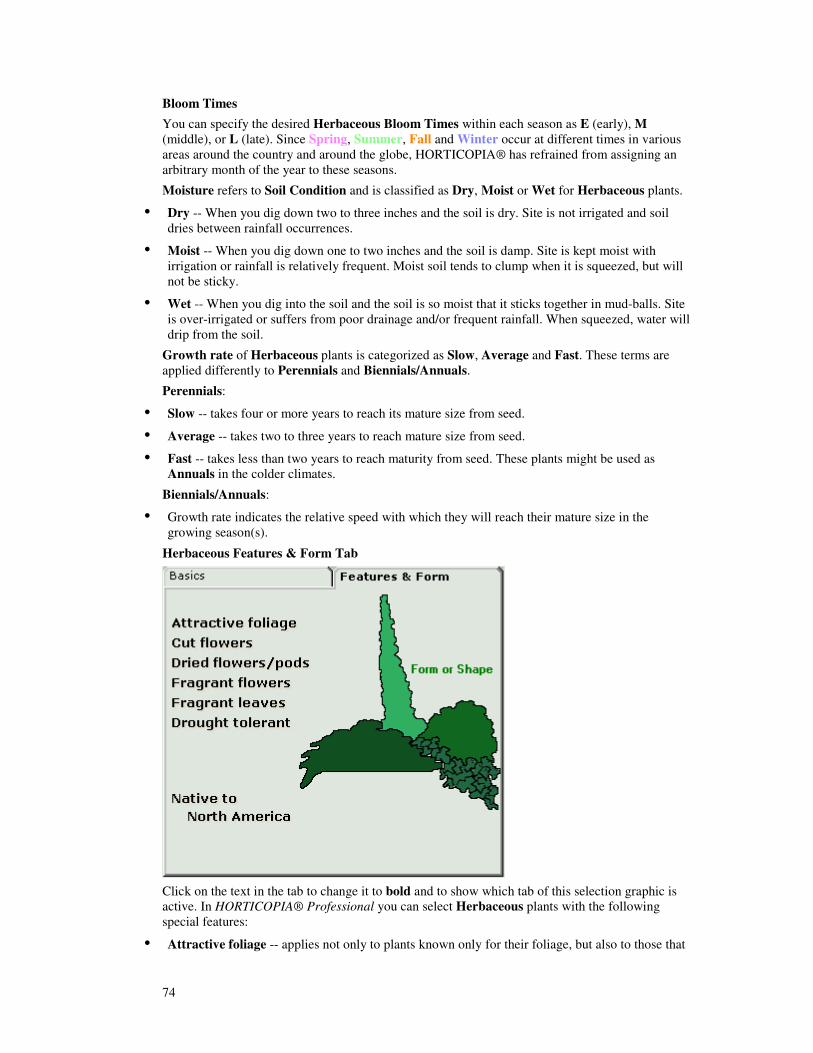
74
Bloom Times
You can specify the desired Herbaceous Bloom Times within each season as E (early), M (middle), or L (late). Since Spring, Summer, Fall and Winter occur at different times in various areas around the country and around the globe, HORTICOPIA® has refrained from assigning an arbitrary month of the year to these seasons.
Moisture refers to Soil Condition and is classified as Dry, Moist or Wet for Herbaceous plants.
��Dry -- When you dig down two to three inches and the soil is dry. Site is not irrigated and soil dries between rainfall occurrences.
��Moist -- When you dig down one to two inches and the soil is damp. Site is kept moist with irrigation or rainfall is relatively frequent. Moist soil tends to clump when it is squeezed, but will not be sticky.
��Wet -- When you dig into the soil and the soil is so moist that it sticks together in mud-balls. Site is over-irrigated or suffers from poor drainage and/or frequent rainfall. When squeezed, water will drip from the soil.
Growth rate of Herbaceous plants is categorized as Slow, Average and Fast. These terms are applied differently to Perennials and Biennials/Annuals.
Perennials:
��Slow -- takes four or more years to reach its mature size from seed.
��Average -- takes two to three years to reach mature size from seed.
��Fast -- takes less than two years to reach maturity from seed. These plants might be used as Annuals in the colder climates.
Biennials/Annuals:
��Growth rate indicates the relative speed with which they will reach their mature size in the growing season(s).
Herbaceous Features & Form Tab
Click on the text in the tab to change it to bold and to show which tab of this selection graphic is active. In HORTICOPIA® Professional you can select Herbaceous plants with the following special features:
��Attractive foliage -- applies not only to plants known only for their foliage, but also to those that
75
have attractive foliage after the blooms have gone.
��Cut flowers -- has flowers that will last at least a couple of days after cutting.
��Dried flowers/ pods -- either the flower, the resulting seed pod, or plume of the plant will dry well.
��Fragrant flowers -- flowers have fragrance (not necessarily pleasant to everyone) ranging from slight to heavy.
��Fragrant foliage -- leaves have fragrance (not necessarily pleasant to everyone) ranging from slight to heavy.
��Drought tolerant -- able to survive periods when soil is dry.
��Native to North America -- plant occurs naturally in North America (includes Canada, United States, Mexico, and Caribbean). For specific information about where in North America the plant is native, check the notes in Native Habitat on the Notes tab of the Contributed Data tab or the More tab of the Information tab in the plant information window.
Form or Shape
Since Herbaceous plants usually increase in lateral size each year of their lives, Spread is difficult to pin down. Therefore, although a Spread range is sometimes given in the plant's Information tab in the plant information window, no search capability is provided. Instead, HORTICOPIA® Professional provides a general plant form to describe the look of the plant in foliage and without blooms. Some plants aren't particularly cooperative in maintaining their shape, and their form may change throughout the season, their life or both, but this approach provides you with a guideline to the plant's basic habit.
��Upright -- The appearance of this plant is erect and it is taller than it is wide. HORTICOPIA® has assigned this form to vines, even though they may run along the ground or hang from baskets.
��Irregular -- This term is applied to plants whose foliage and/or blooms may flop, giving the plant a sprawling appearance. It also applies to those plants with otherwise irregular form. These plants tend to be wider than tall.
��Round -- The overall look of this plant is rounded, clumped or mounding. The plant will be wider than it is tall and generally appears compact.
��Spreading -- The plant grows horizontally and is generally spreading. Almost always wider than tall.
Woodies Basics Tab
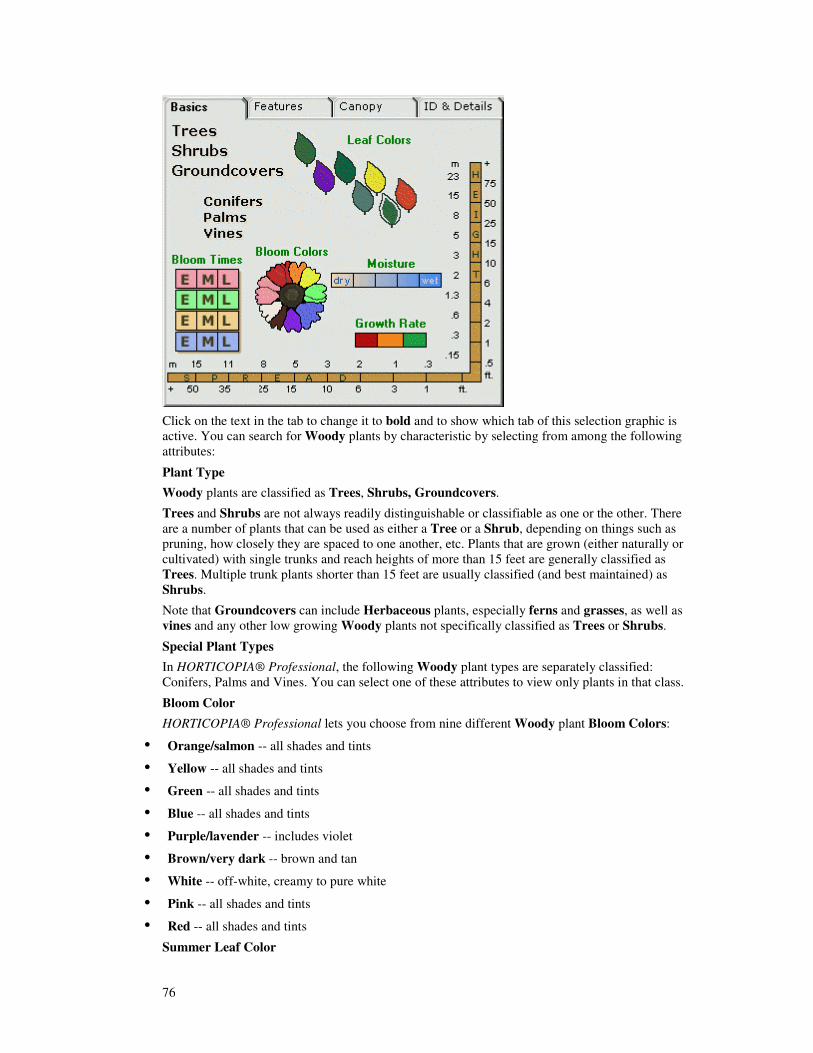
76
Click on the text in the tab to change it to bold and to show which tab of this selection graphic is active. You can search for Woody plants by characteristic by selecting from among the following attributes:
Plant Type
Woody plants are classified as Trees, Shrubs, Groundcovers.
Trees and Shrubs are not always readily distinguishable or classifiable as one or the other. There are a number of plants that can be used as either a Tree or a Shrub, depending on things such as pruning, how closely they are spaced to one another, etc. Plants that are grown (either naturally or cultivated) with single trunks and reach heights of more than 15 feet are generally classified as Trees. Multiple trunk plants shorter than 15 feet are usually classified (and best maintained) as Shrubs.
Note that Groundcovers can include Herbaceous plants, especially ferns and grasses, as well as vines and any other low growing Woody plants not specifically classified as Trees or Shrubs.
Special Plant Types
In HORTICOPIA® Professional, the following Woody plant types are separately classified: Conifers, Palms and Vines. You can select one of these attributes to view only plants in that class.
Bloom Color
HORTICOPIA® Professional lets you choose from nine different Woody plant Bloom Colors:
��Orange/salmon -- all shades and tints
��Yellow -- all shades and tints
��Green -- all shades and tints
��Blue -- all shades and tints
��Purple/lavender -- includes violet
��Brown/very dark -- brown and tan
��White -- off-white, creamy to pure white
��Pink -- all shades and tints
��Red -- all shades and tints
Summer Leaf Color
77
In HORTICOPIA® Professional you can choose from seven different Woody plant Leaf Colors. Although most leaves tend to have a green hue, the presence of other colors sometimes makes them noteworthy. When such other colors contribute to the desirability of the plant, they will be noted in the Leaf Color:
��Green -- light green to dark green.
��Purple -- noticeable purple coloring present.
��Blue green -- leaves have a definite bluish cast.
��Silver blue -- includes silvery, silvery-blue and gray.
��Yellow -- although not a true yellow, the leaf has a good yellow cast to it.
��Variegated -- leaves that have striped edges or midsections or a mottled appearance.
��Red -- does not include maroon or dark purple-red.
Bloom Times
You can specify the desired Woody plant Bloom Times by season. Since Spring, Summer, Fall and Winter occur at different times in various areas around the country and around the globe, we have refrained from assigning an arbitrary month of the year to these seasons.
Height There are 11 Height values for Woody plants in HORTICOPIA® Professional. When you switch between metric and US measures, the scale on the Workbench is changed. Since the scales are very different, clicking on a specific height attribute range graphic will not necessarily select the same plants in both metric and US mode. You can specify a specific Height or a Height Range. To specify a Height range, make sure that the Range selections are: option is enabled on the Workbench tab in the Customization options on the Tools menu.
Spread
There are 10 Spread values for Woody plants in HORTICOPIA® Professional. When you switch between metric and US measures, the scale on the Workbench is changed. Since the scales are very different, clicking on a specific spread attribute range graphic will not necessarily select the same plants in both metric and US mode. You can specify a specific Spread or a Spread Range. To specify a Spread range, make sure that the Range selections are: option is enabled on the Workbench tab in the Customization options on the Tools menu.
Moisture refers to soil condition and is classified as Very Dry, Dry, Moist, Wet, and Very Wet for Woody plants.
��Very Dry -- Drought tolerant. When you dig down several inches and the soil is dry. Site is not irrigated and soil dries between infrequent rainfall occurrences.
��Dry -- When you dig down two or three inches and the soil is dry. Site is not normally irrigated and soil dries between normal rainfall occurrences.
��Moist -- Normal soil moisture. When you dig down one to two inches and the soil is damp. Site is kept moist with irrigation or rainfall is relatively frequent. Moist soil tends to clump when it is squeezed, but will not be sticky.
��Wet -- Tolerates some wetness. When you dig into the soil and the soil is so moist that it sticks together in mud balls. Site is over-irrigated or suffers from poor drainage and/or frequent rainfall. When squeezed, water may drip from the soil.
��Very Wet -- Tolerates extreme wetness and flooding. Soil is constantly wet and muddy. Usually suitable only for bog-type plants.
Growth rate
Woody plant growth rates are relative terms and are applied to other plants of the same type. That is, a slow-growing Tree will always grow more slowly than a fast-growing Tree, although a slow-growing Shrub may grow faster than a fast-growing Tree. The Growth Rate is influenced by
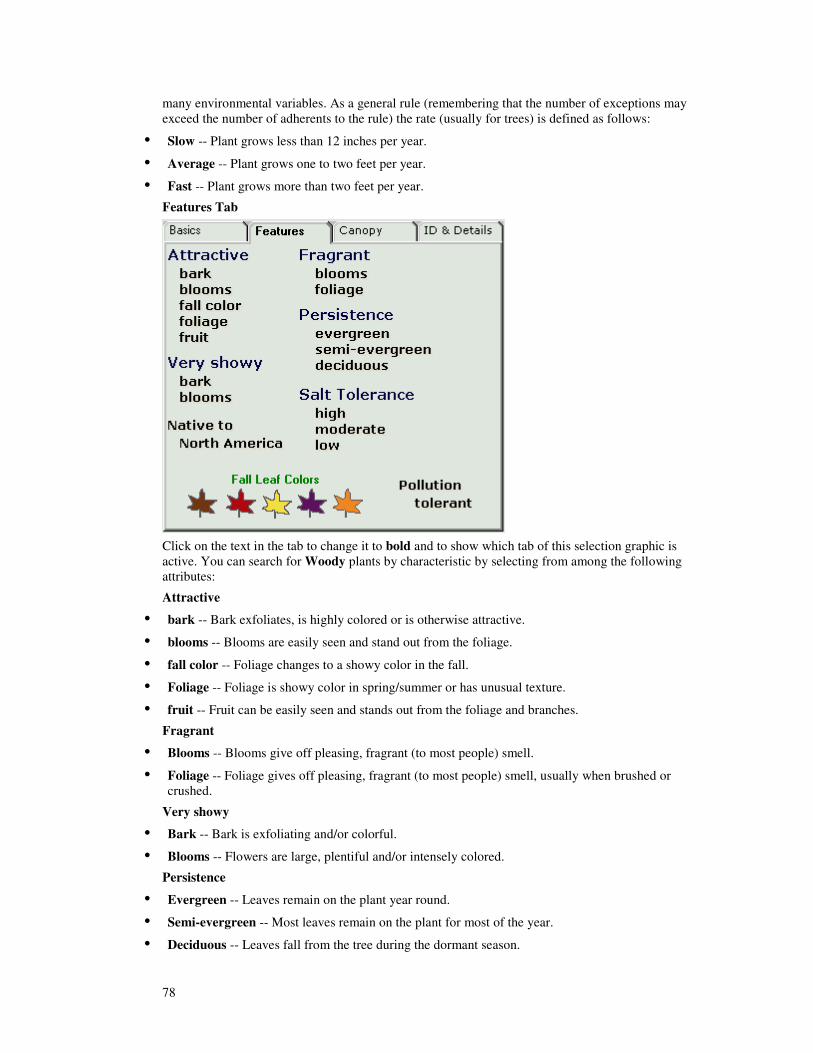
78
many environmental variables. As a general rule (remembering that the number of exceptions may exceed the number of adherents to the rule) the rate (usually for trees) is defined as follows:
��Slow -- Plant grows less than 12 inches per year.
��Average -- Plant grows one to two feet per year.
��Fast -- Plant grows more than two feet per year.
Features Tab
Click on the text in the tab to change it to bold and to show which tab of this selection graphic is active. You can search for Woody plants by characteristic by selecting from among the following attributes:
Attractive
��bark -- Bark exfoliates, is highly colored or is otherwise attractive.
��blooms -- Blooms are easily seen and stand out from the foliage.
��fall color -- Foliage changes to a showy color in the fall.
��Foliage -- Foliage is showy color in spring/summer or has unusual texture.
��fruit -- Fruit can be easily seen and stands out from the foliage and branches.
Fragrant
��Blooms -- Blooms give off pleasing, fragrant (to most people) smell.
��Foliage -- Foliage gives off pleasing, fragrant (to most people) smell, usually when brushed or crushed.
Very showy
��Bark -- Bark is exfoliating and/or colorful.
��Blooms -- Flowers are large, plentiful and/or intensely colored.
Persistence
��Evergreen -- Leaves remain on the plant year round.
��Semi-evergreen -- Most leaves remain on the plant for most of the year.
��Deciduous -- Leaves fall from the tree during the dormant season.
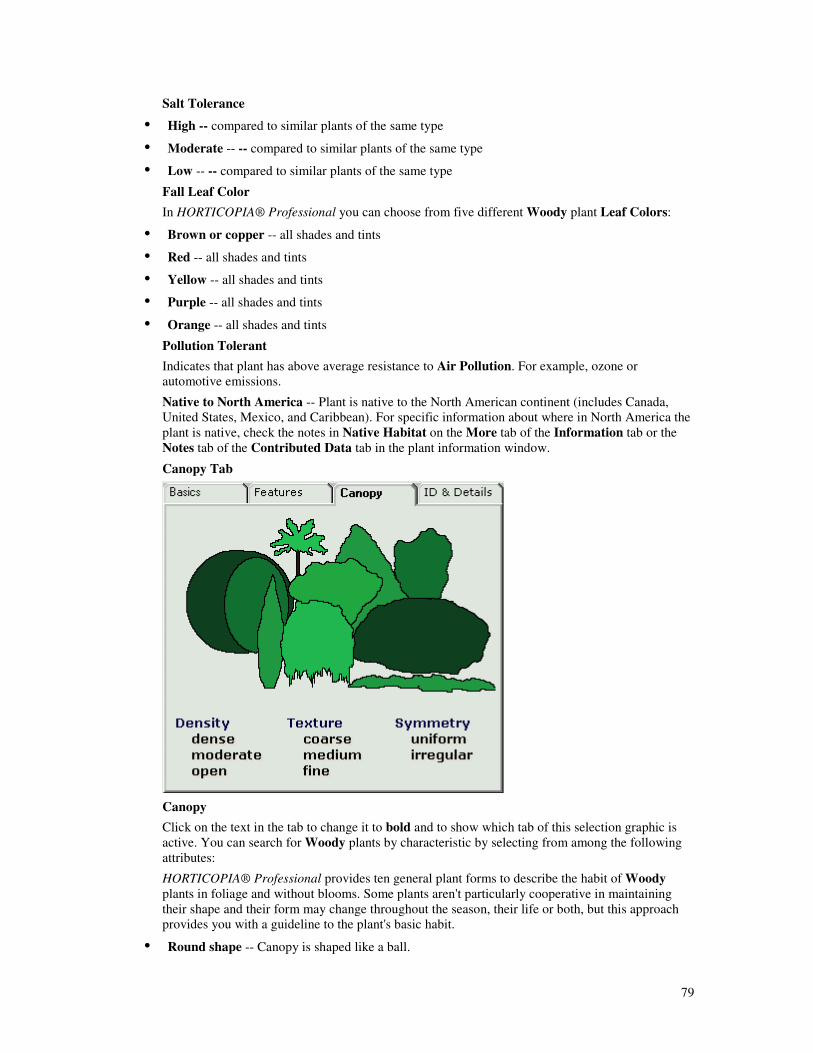
79
Salt Tolerance
��High -- compared to similar plants of the same type
��Moderate -- -- compared to similar plants of the same type
��Low -- -- compared to similar plants of the same type
Fall Leaf Color
In HORTICOPIA® Professional you can choose from five different Woody plant Leaf Colors:
��Brown or copper -- all shades and tints
��Red -- all shades and tints
��Yellow -- all shades and tints
��Purple -- all shades and tints
��Orange -- all shades and tints
Pollution Tolerant Indicates that plant has above average resistance to Air Pollution. For example, ozone or automotive emissions.
Native to North America -- Plant is native to the North American continent (includes Canada, United States, Mexico, and Caribbean). For specific information about where in North America the plant is native, check the notes in Native Habitat on the More tab of the Information tab or the Notes tab of the Contributed Data tab in the plant information window.
Canopy Tab
Canopy
Click on the text in the tab to change it to bold and to show which tab of this selection graphic is active. You can search for Woody plants by characteristic by selecting from among the following attributes:
HORTICOPIA® Professional provides ten general plant forms to describe the habit of Woody plants in foliage and without blooms. Some plants aren't particularly cooperative in maintaining their shape and their form may change throughout the season, their life or both, but this approach provides you with a guideline to the plant's basic habit.
��Round shape -- Canopy is shaped like a ball.
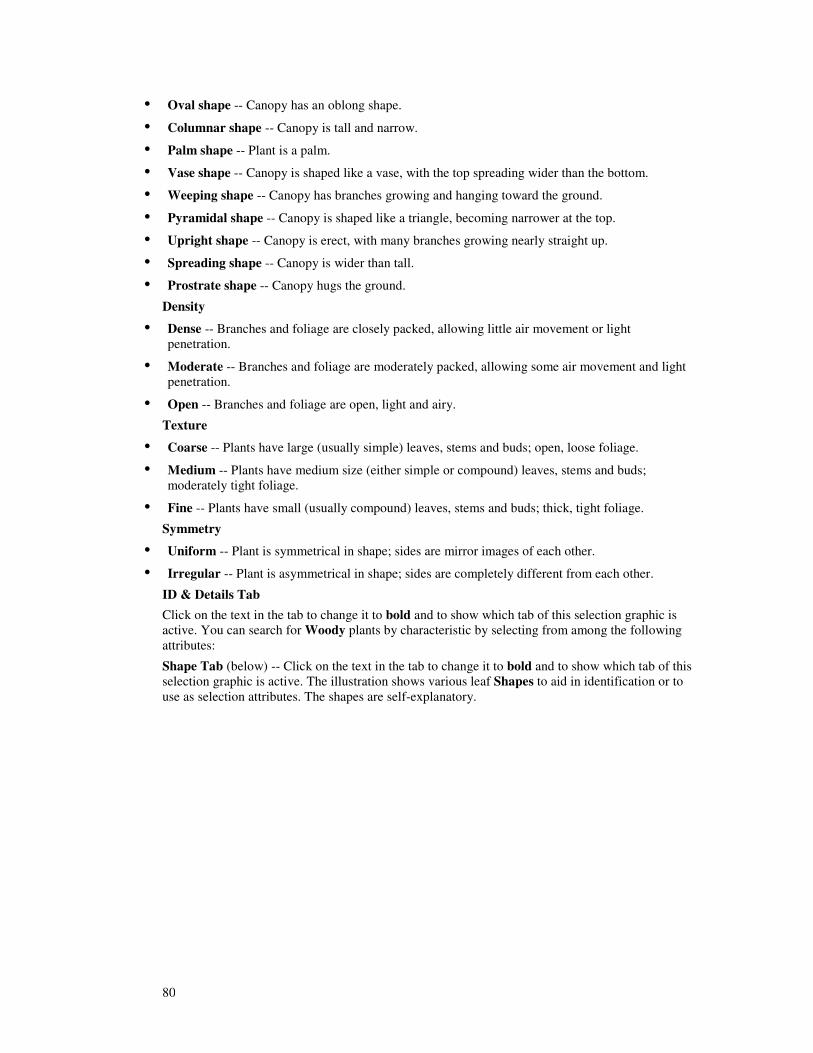
80
��Oval shape -- Canopy has an oblong shape.
��Columnar shape -- Canopy is tall and narrow.
��Palm shape -- Plant is a palm.
��Vase shape -- Canopy is shaped like a vase, with the top spreading wider than the bottom.
��Weeping shape -- Canopy has branches growing and hanging toward the ground.
��Pyramidal shape -- Canopy is shaped like a triangle, becoming narrower at the top.
��Upright shape -- Canopy is erect, with many branches growing nearly straight up.
��Spreading shape -- Canopy is wider than tall.
��Prostrate shape -- Canopy hugs the ground.
Density
��Dense -- Branches and foliage are closely packed, allowing little air movement or light penetration.
��Moderate -- Branches and foliage are moderately packed, allowing some air movement and light penetration.
��Open -- Branches and foliage are open, light and airy.
Texture
��Coarse -- Plants have large (usually simple) leaves, stems and buds; open, loose foliage.
��Medium -- Plants have medium size (either simple or compound) leaves, stems and buds; moderately tight foliage.
��Fine -- Plants have small (usually compound) leaves, stems and buds; thick, tight foliage.
Symmetry
��Uniform -- Plant is symmetrical in shape; sides are mirror images of each other.
��Irregular -- Plant is asymmetrical in shape; sides are completely different from each other.
ID & Details Tab
Click on the text in the tab to change it to bold and to show which tab of this selection graphic is active. You can search for Woody plants by characteristic by selecting from among the following attributes:
Shape Tab (below) -- Click on the text in the tab to change it to bold and to show which tab of this selection graphic is active. The illustration shows various leaf Shapes to aid in identification or to use as selection attributes. The shapes are self-explanatory.
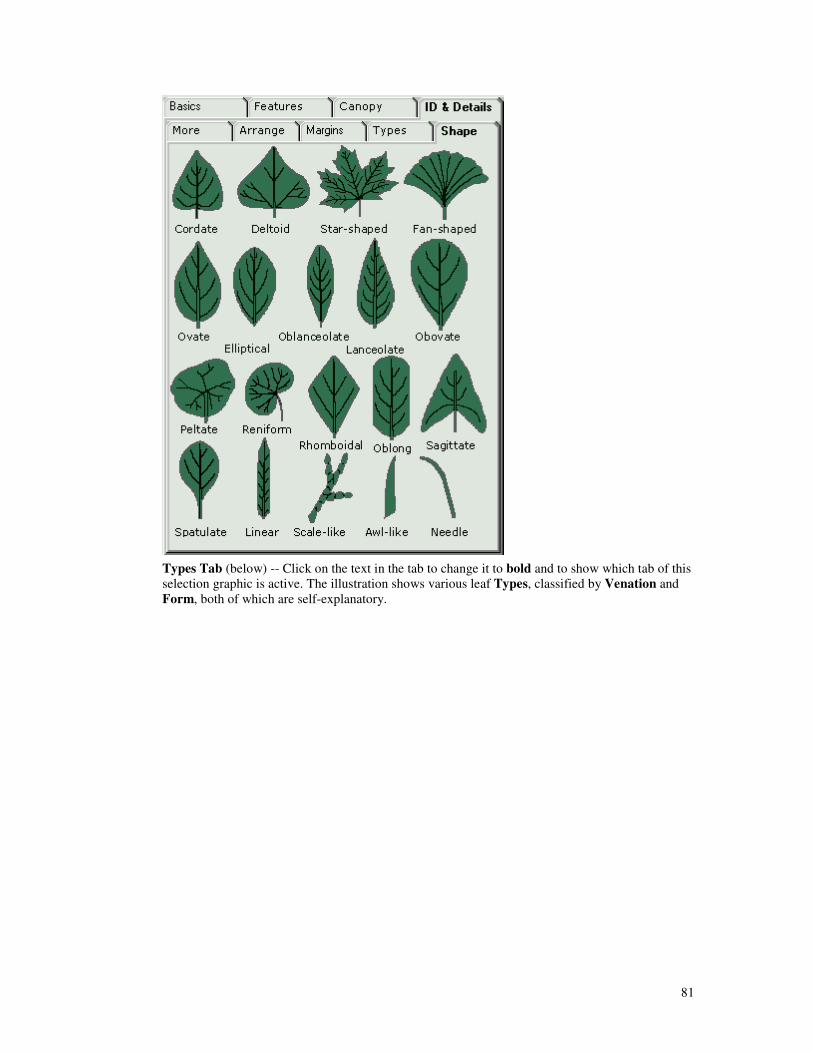
81
Types Tab (below) -- Click on the text in the tab to change it to bold and to show which tab of this selection graphic is active. The illustration shows various leaf Types, classified by Venation and Form, both of which are self-explanatory.
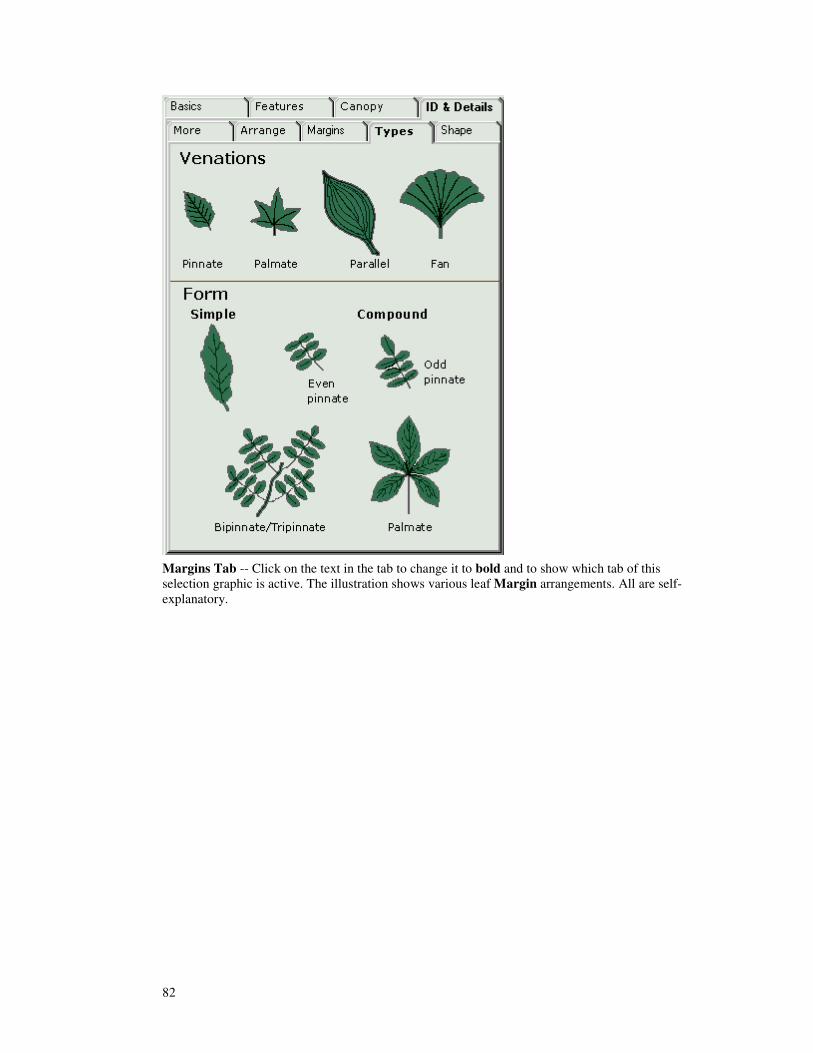
82
Margins Tab -- Click on the text in the tab to change it to bold and to show which tab of this selection graphic is active. The illustration shows various leaf Margin arrangements. All are self-explanatory.
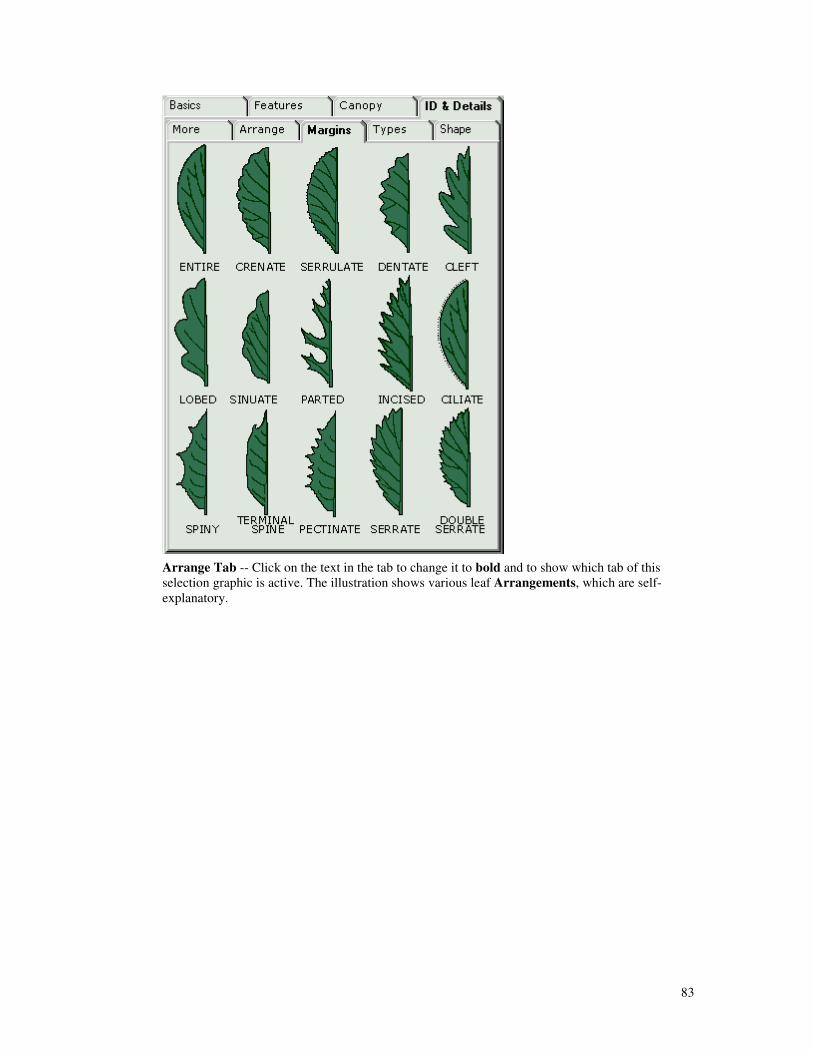
83
Arrange Tab -- Click on the text in the tab to change it to bold and to show which tab of this selection graphic is active. The illustration shows various leaf Arrangements, which are self-explanatory.

84
��More Tab -- Click on the text in the tab to change it to bold and to show which tab of this
selection graphic is active. The illustration shows additional descriptive information.
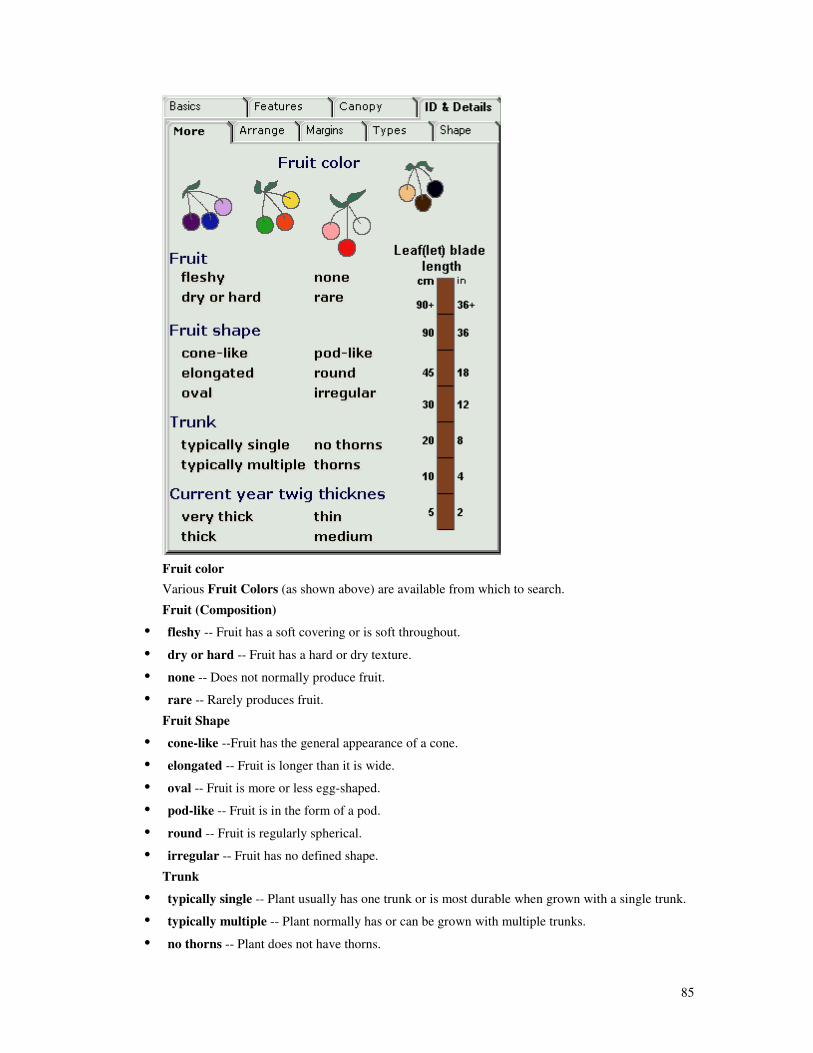
85
Fruit color
Various Fruit Colors (as shown above) are available from which to search.
Fruit (Composition)
��fleshy -- Fruit has a soft covering or is soft throughout.
��dry or hard -- Fruit has a hard or dry texture.
��none -- Does not normally produce fruit.
��rare -- Rarely produces fruit.
Fruit Shape
��cone-like --Fruit has the general appearance of a cone.
��elongated -- Fruit is longer than it is wide.
��oval -- Fruit is more or less egg-shaped.
��pod-like -- Fruit is in the form of a pod.
��round -- Fruit is regularly spherical.
��irregular -- Fruit has no defined shape.
Trunk
��typically single -- Plant usually has one trunk or is most durable when grown with a single trunk.
��typically multiple -- Plant normally has or can be grown with multiple trunks.
��no thorns -- Plant does not have thorns.

86
��thorns -- Plant has thorns.
Current year twig thickness
These are relative terms and apply to plants of similar mature size and growth pattern.
��very thick -- the thickest twig
��thick -- a thick twig
��medium -- a twig of moderate thickness
��thin -- the thinnest twig
Leaf(let) blade length
There are 7 leaf(let) blade length ranges for Woody plants in HORTICOPIA® Professional. When you switch between metric and US measures, the scale on the Workbench is changed. Since the scales are very different, clicking on a specific spread attribute range graphic will not necessarily select the same plants in both metric and US mode. You can specify a specific leaf(let) blade length or a Range of blade lengths. To specify a blade length range, make sure that the Range selections are: option is enabled on the Workbench tab in the Customization options on the Tools menu.

87
Hardiness HORTICOPIA® Professional uses the system devised by The United States Department of Agriculture (USDA) to designate the average low winter temperature in a particular area or zone of the United States. The zone designations can be extrapolated to areas outside the United States by using the temperature range of each zone for local (non-U. S) weather conditions. Hardiness zones are numbered 1 through 11. Zones 2 through 10 are divided into A and B divisions, each of which is a 5 degree Fahrenheit increment. Zone 1 includes areas with average winter low temperature below -50 degrees F. and zone 11 those with average winter low temperature above 40 degrees F. Zone 11 and the A and B divisions were added in 1995 and are not yet universally used. You can correlate the older USDA zone information (without the A and B designations) to the current zone designations, by simply ignoring the letters and using the zone number (include the entire temperature range for both A and B sections of the zone). While hardiness is a very useful indicator, it must be recognized that local conditions can create microclimates that are one or more zones removed from the average, so some plants will not survive in some cases where theoretically they can be grown and vice versa.
88
Working with Plant Lists
Using Plant List Icons There are two types of icons to the left of the list of plant names on the Plant List: yellow folders
and green folders . Depending on how you have customized your Plant List in the Tools|Customize... window, yellow folders will contain either the names of all plants beginning with the same letter or those that have the same Family Name. Green folders appear when there are several Cultivars for a Species in the HORTICOPIA® Professional database. Clicking on a folder icon alternately opens or closes it, revealing or hiding the plant names contained therein. The folder icons change appearance to show when they are collapsed (closed) or expanded (open) . Some or all plant names will not be visible in closed folders. A green arrow button to the right of a plant name appears only for plants with names too long to be displayed on one line. Click and hold down the left mouse button on the button (or let the mouse cursor linger over it) to display the full name in a pop-up box.
You can select an entire plant family or all the cultivars of a plant species by clicking on the family name or plant species name to highlight it when the folder icons are closed. When you right-click a species name next to a closed green folder icon, then any cultivars contained within it are included in MyList. Similarly, if you right-click one of the alphabet or family name entries next to a closed yellow folder icon, all plants within that folder will be included in the selection. If a folder is open and the MyList is expanded, cultivars or family members must be placed on the list by right-clicking on each one individually. When a plant folder contains plants only on a MyList, then the name beside the folder (either a species or a letter of the alphabet/family name) will appear in green. If the folder contains some items on a MyList and some not on a MyList, then the name will appear in blue.
89
Controlling List Appearance By default, HORTICOPIA® Professional displays the plant list with all species names shown and the cultivar names collapsed (hidden). Some users prefer the list to always appear in either fully collapsed or fully expanded mode. The Tools|Customize... Workbench tab allows you to select your preference. If you select Shows all cultivars in the Initial Plant List: you will always get a fully expanded list. Choosing Shows all plants (the default setting) hides cultivar names until you expand the folder for a particular plant by clicking on the closed green folder beside the species name. Selecting Collapsed causes the list to show in collapsed form, displaying only the family names or letters of the alphabet (whichever you choose under Sort Plant List by: on the Workbench Tab). Click on the yellow folder beside a particular Family or letter to expand it. You can change the expansion state of the plant list and temporarily override the Tools|Customize... options by selecting either Collapse List, Show all Plants or Show all
Cultivars from the drop-down Workbench menu or by right-clicking the button in the Workbench tools and selecting the desired option.
As described above, the Tools|Customize... options let you choose between displaying the plants initially either alphabetically or by plant families. The latter is frequently useful, as you can often find plants with similar characteristics by looking at members of the same plant family.
The main function of the button is to enable you to switch the list between botanical (Latin) and common names. The current list is not changed or cleared when you switch from one mode to another, so you can safely switch name modes right after a plant search and still preserve your
search results. If you right-click on the button, additional list ordering options are available from which you can select.
Tip: Right-clicking on buttons will frequently provide alternatives for the desired action.

90
Navigating the Plant List The Plant List is the starting point for all work with HORTICOPIA® Professional. It is displayed in the frame on the right side of the Workbench. This is where all plant lists (the main plant list, MyList or search results) are displayed.
There are a number of ways to quickly move through plant lists. The scroll bar at the right of the plant list frame lets you move to any part of the list being displayed, either by approximate location (by dragging the scroll bar button), one viewable page at a time (by clicking above or below the scroll bar button, or one plant at a time (by clicking on plant names. You can also use the Up and Down arrows, the Page Up and Page Down keys and the Home and End keys for this purpose. In addition, there are a number of Keyboard Shortcuts for working with the plant lists.
The Data Menu or Data toolbar can also be used in navigating plant lists.
Tip:A very useful way of accessing plants in the list is by typing in the first few characters of a plant name. The first plant that begins with the letter(s) you've typed (or the first one after those letters, if one can't be found) will be highlighted. You don't have to type really quickly -- you have about one second between keystrokes before HORTICOPIA® Professional will assume a new lookup is being requested.
91
Highlighting and Getting Information To get information about a plant, click on its name in the plant list to highlight it and then click on
the Information button in the Workbench tools to display the plant information window for the selected plant. If you wish, you can highlight several plant names before clicking on the
button and then use the navigation commands on the Data Menu or Data toolbar to sequence through the list of plants you've highlighted. The plant information window for the first highlighted plant on the list will be displayed first and you can continue on through the list. Use the options on the Navigation tab of the Customization window to configure the display of the plant information window (i.e., which tab will display first).
Tip: If you want to look at information for only one plant, you can skip clicking on the button by double-clicking on the plant's name.
Multiple plant highlighting is accomplished by:
��holding down the CTRL key while clicking on individual plant names;
��clicking on a plant name and holding down the Shift key while clicking on another name to select a range of plants between the two;
��selecting the Highlight All command from the Edit menu.
Right-clicking on a plant name will not only highlight it, but also place the plant on the MyList. The color of the text will change to green to indicate that the plant has been included on a MyList. It is necessary that a plant name be highlighted before some options on the menus and toolbars are available. That is, they will be grayed out. If you are trying to invoke one of these actions and it is grayed out, check first to see if you have highlighted a plant name or names or otherwise are ready to complete the action.

92
Find Feature The Find window is displayed when you execute the Find command on the Edit Menu.
Tip: The keyboard shortcut for the Find command is CTRL + F.
To use Find, you should first decide how you want to search for a plant name or text appearing in one of the text fields. You can enter words or phrases in the text box at the top of the window. Find is case insensitive -- it doesn't matter whether you enter upper case or lower case letters and it doesn't matter what the capitalization of the plant name or text might be. A word is defined as any combination of letter(s), number(s) and hyphen(s), without a space separation.
In the text box, you type in the word or part of a word you want to find. You can enter several words separated by either commas, spaces or the word "or" and HORTICOPIA® Professional will look for plants or text that have any of the words or parts of words you've entered. If you want to search for phrases (more than one word that must appear together), enclose the words in quotation marks ("). For example, entering New Mexico would find plants that have New Jersey, Mexico, New York, etc. However, if you enter "New Jersey" you will get only plants where these words appear together.
You can place a + (plus) before the word(s) or phrase(s) you're trying to find in order to find plants that have this text in their records. For example, to find plants native to both Virginia and Arkansas (assuming that Native habitat is checked on the More tab of the Find window), you can enter +Virginia +Arkansas. On the other hand, placing a - (minus) before a word or phrase will insure that no plant is selected which has entries with that text.
The Word matching criteria of the Find window let you choose from:
��matching entire word(s) or phrase(s) in the search string. For example, "golden" must appear as a word in order to be found.
��matching the beginning of word(s) or phrase(s) in the search string. For example, entering "gold" would get "golden" or "Goldstar".
��matching any part of word(s) or phrase(s) in the search string. For example, entering "old" would get "Golden," "Bold Beauty," or "Old Faithful")
Areas to Search
If you're sure the terms you're searching for are located in a particular location, you can designate any of the areas on any of the tabs in the Information window as the targeted search area. This will speed up the search (as opposed to including all areas). For example, you may wish to find a specific cultivar name in the currently selected plant list, in which case you would place a check mark beside the item Names in the current plant list on the Info tab. This search will be very fast.
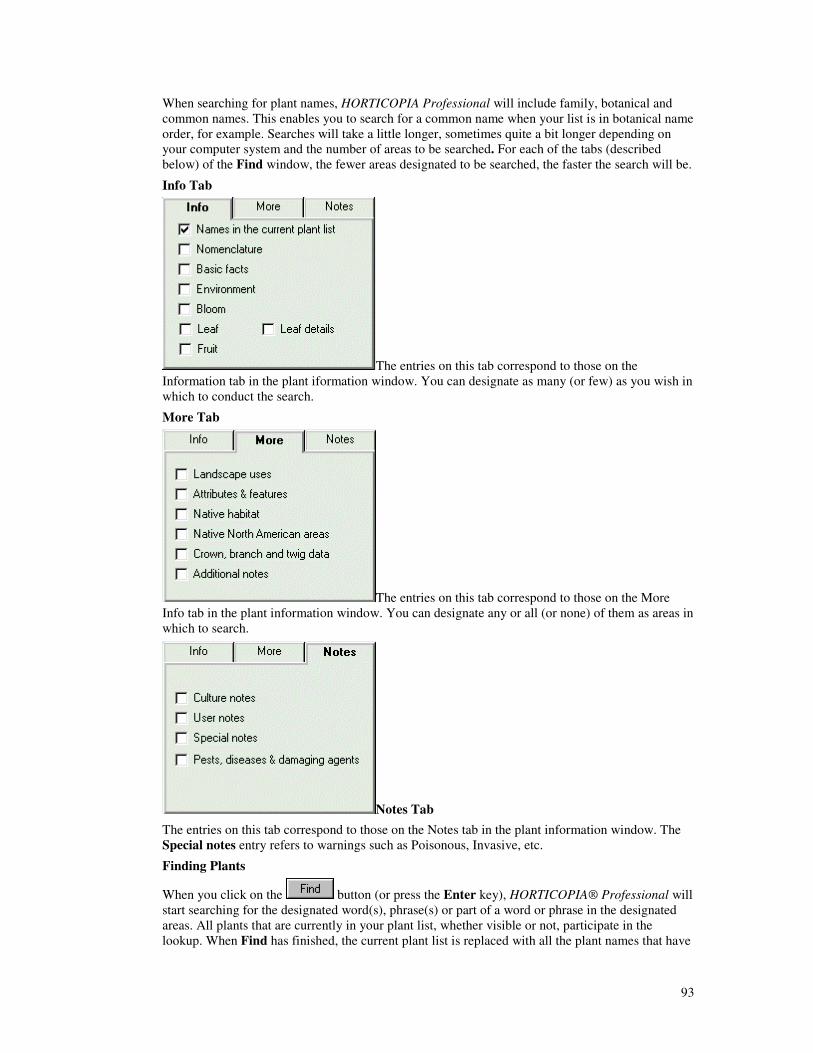
93
When searching for plant names, HORTICOPIA Professional will include family, botanical and common names. This enables you to search for a common name when your list is in botanical name order, for example. Searches will take a little longer, sometimes quite a bit longer depending on your computer system and the number of areas to be searched. For each of the tabs (described below) of the Find window, the fewer areas designated to be searched, the faster the search will be.
Info Tab
The entries on this tab correspond to those on the Information tab in the plant iformation window. You can designate as many (or few) as you wish in which to conduct the search.
More Tab
The entries on this tab correspond to those on the More Info tab in the plant information window. You can designate any or all (or none) of them as areas in which to search.
Notes Tab
The entries on this tab correspond to those on the Notes tab in the plant information window. The Special notes entry refers to warnings such as Poisonous, Invasive, etc.
Finding Plants
When you click on the button (or press the Enter key), HORTICOPIA® Professional will start searching for the designated word(s), phrase(s) or part of a word or phrase in the designated areas. All plants that are currently in your plant list, whether visible or not, participate in the lookup. When Find has finished, the current plant list is replaced with all the plant names that have

94
entries containing the designated text. You can think of Find as working just like another plant selection criteria, such as Bloom Color.
If multiple search areas (for example, Native habitat and Culture notes, etc.) are checked, then a match occurs if the text criteria is satisfied for any one (or more) of the checked areas.
You can use successive Find operations to refine your search. For example, if you wanted to find plants native to California that had problems with mites, you would enter California in the text box,
select Native North American Areas on the More tab, and then click on . Then, create a MyList with the results of the search and perform another Find, entering mites in the text box and selecting Pests and Diseases on the Notes tab. Replace the previous MyList with the results of the new search using the Set MyList to current list command on the Workbench menu. This produces a list with the plants fitting both your criteria. You can repeat this process as many times as you wish, narrowing down the list each time.
Tip: You can assign "keywords" to plants in your User Notes and then use Find to search for those keywords.
You can undo the last Find operation by selecting the Undo Find entry from the Edit menu.
95
Creating and Using MyList In HORTICOPIA® Professional, you can create a personalized plant list called a MyList, which will include only those plants of interest to you. This list can be created (and modified) in several ways as explained later, but the simplest, most direct way is by right-clicking on the name of a plant on the main plant list to select it (right-clicking again deselects it). This causes the color of the plant name to change to green, indicating that it has been selected and added to a MyList (if deselected, the color changes back to black). If you click on a Synonym (gray plant name), the cursor will jump to the valid plant name, which will be highlighted. To include it in a MyList, you must right-click on the valid name.
Selecting Plants
You can select an entire plant family or all the cultivars of a plant species by right-clicking on the family name or plant species name when the folder icons are closed. When you right-click a species name next to a closed green folder icon, then any cultivars contained within it are included in MyList. Similarly, if you right-click one of the alphabet or family name entries next to a closed yellow folder icon, all plants within that folder will be included in the selection. If the folder(s) is(are) open and the list(s) is(are) expanded, cultivars or family members must be placed on the list by right-clicking each one individually (right-clicking on the name beside the open folder will get a beep, indicating the action is not allowed). When a plant folder contains plants only on a MyList, then the name beside the folder (either a species or a letter of the alphabet/family name) will appear in green. If the folder contains some items on a MyList and some not on a MyList, then the name will appear in blue.
Adding/Removing Plants
You can add or remove several plants to or from a MyList simultaneously by first highlighting several plants. Then, the group of highlighted plants is added to the MyList by pressing the + (plus) key, or removed by pressing the - (minus) key. This is done most simply by using the numeric pad on the keyboard. You can also add or remove a group of plants by selecting the Add Selected to MyList or Remove Selected from MyList commands on the Workbench Menu or the
Workbench toolbar or by right-clicking on the button in the Workbench Tools and selecting the desired option from the pop-up menu.
Tip: The quickest and easiest way of all to add or remove a group of plants to/from a MyList is to highlight the group to be added or removed and then right-clicking on any of the plants in the group.
If you want to add all the plants currently in a plant list (possibly the results of a search) to a MyList, you can do so with the Add All to MyList command from the Workbench Menu or the Workbench toolbar. Plants that are already on a MyList aren't affected. Using Add All to MyList is very useful right after a plant search because it lets you capture the search results, do something
else, and then come back to the search results by clicking the button in the Workbench Tools. Similarly, you can remove all the plants from a current MyList by using the Remove All from MyList command on the Workbench menu or Workbench toolbar. To remove selected (highlighted) plants from the current MyList, use the Workbench menu Remove Selected from MyList command on the Workbench menu or Workbench toolbar. All these actions are possible
by right-clicking on the button and selecting the desired option from the pop-up menu.
Resetting a MyList If you have opened a saved MyList and changed the order of plants in it (by Moving or Randomizing), you can reset the list to its original order by using the Reset|MyList Order command on the Tools menu.
96
Replacing a MyList If you want to replace a current MyList with another list, use the Set MyList to current list command on the Workbench Menu or Workbench tools. This will remove all plants from the current MyList and replace them with the plants on the current list. If the replaced MyList had been previously saved, it will retain the same name as before. You’ll find this command useful when you wish to create a plant list, examine the plants in it, and then perform further searches, thereby refining the list. When you exit the program or close the MyList, you will be prompted to save the change.
Customizing a MyList You can further customize your MyList by rearranging the Plant Order, omitting certain preview pictures, designating Preferred common names, etc. Be sure to examine the Customization options in the Tools|Customize... window, as well as those on the List tab of the File|Document SetUp... window, since many of them also apply to a MyList.
Viewing a MyList If you want to view a list of only those plants contained in a MyList (those displayed in green on
the main plant list), they can be displayed by clicking the button in the Workbench tools
(which will change to when it is depressed) and the personalized MyList will be shown in the plant list frame. This is handy to use as a starting point for further searches.
Saving a MyList MyLists can be Saved to a file for later recall and use. If you save a MyList, all custom formatting is also saved. This enables you to continue screening plants to meet the same criteria as the original MyList. When you reopen a MyList, HORTICOPIA® Professional will remember the formatting and continue to apply it to any additional plants placed on the "old" MyList, even if all "old" plants are removed from it-- depending on the Customization settings you have made in the Overwrite options on reading plant lists: section of the Workbench tab. These settings will govern whether or not your recalled MyList keeps existing data, replaces existing data or you are asked what you wish to do in each instance. Most users will probably want to keep existing data for their MyLists, but the option to overwrite exists if you wish to use it.
Adding a MyList to Favorites
You can also add a MyList to the Favorites menu for even more convenient access. When adding a MyList to Favorites, however, only the names of the plants on the list are kept (not the customized formatting). When you recall a MyList from the Favorites, it acts like a list that has been created by applying search criteria. The list does not appear in MyList mode and the order is not affected. This is useful because a new MyList can now be developed from something that started out as a MyList, but no longer has customized formatting. In other words, it facilitates subsetting.
Closing a MyList When you have been using a saved MyList and no longer need it in the current session, you can use the Close MyList command on the File menu to close the current MyList. This will remove everything from the displayed list, and restore the list order to the main plant list. Unless the current MyList is explicitly closed, it remains the current list, even if all plants have been removed from it. Therefore, any plants added to an apparent new MyList will be formatted the same as the most recently opened MyList. Using Close MyList, however, will not restore any items read into the MyList when it was opened, if the Replace existing data option on the Workbench tab of the Tools|Customize... window was used and any items in the MyList were overwritten. In this case the closed MyList reverts to a non-MyList mode with all options in the default order of the plant list. You may have to experiment a bit with this powerful feature (MyList) in order to learn all its capabilities and how to best use it in your situation.
Tip: the Clear button in the Workbench tools does not normally reset or "clear" a MyList.

97
While its main function is to reset the main plant list to remove any previously applied selection criteria, it will also remove from MyList plants that have been screened out by refined attribute selection or those that have been manually deselected.
98
Making List Entries
When you click on the Information button or the Thumbnails button in the Workbench tools, or when you select Start Slideshow from the Slideshow menu or select any of the items on the File|Print or File|Print Preview cascading menus (or use the corresponding Toolbars for any of the foregoing), HORTICOPIA® Professional will use the entire current plant list if no plant name is highlighted. You can make sure that no names are highlighted by first clicking on a plant name to highlight it (this will turn off any other highlighting in the list) and then
clicking on it again to turn its highlighting off. Use the MyList button or other filters if you don't want the entire list to be printed. If one or more names are highlighted, then only those plants that are highlighted will be used for the plant information, slideshow, layout, thumbnails or printing sequence. If only one plant name is highlighted, your list will consist of one plant.
After you have performed a plant search, you can immediately click on the Information
button or Thumbnails button to work with the search results. At this point, you can also start a slideshow with the plants in the list.
You can be very selective as to which plants from a list are to be used for any of the purposes above. When you highlight a species name next to a closed green folder icon, all cultivars contained in it are included in the selection. Similarly, if you highlight one of the alphabet or family name entries next to a closed yellow folder icon, all plants within that folder will be included in the selection. If the folders are open (by clicking them individually or by displaying the list in expanded mode), cultivars or family members must be selected individually. See Highlighting and Getting Information for more on this subject.
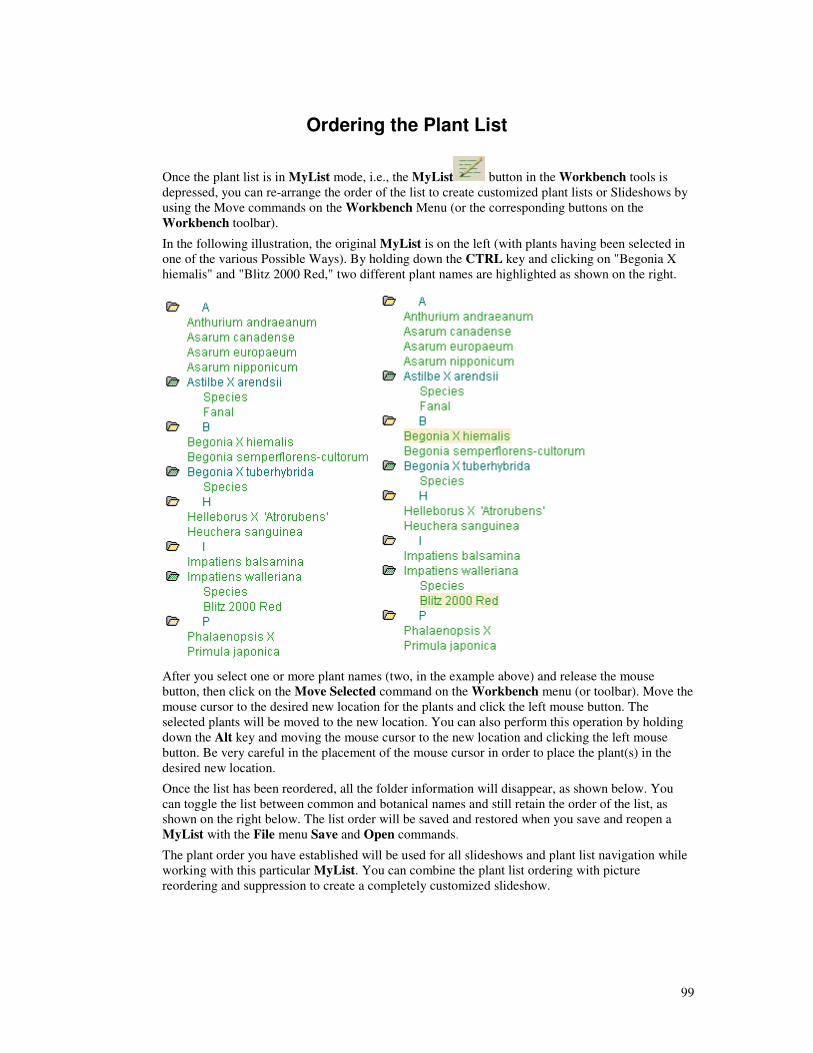
99
Ordering the Plant List
Once the plant list is in MyList mode, i.e., the MyList button in the Workbench tools is depressed, you can re-arrange the order of the list to create customized plant lists or Slideshows by using the Move commands on the Workbench Menu (or the corresponding buttons on the Workbench toolbar).
In the following illustration, the original MyList is on the left (with plants having been selected in one of the various Possible Ways). By holding down the CTRL key and clicking on "Begonia X hiemalis" and "Blitz 2000 Red," two different plant names are highlighted as shown on the right.
After you select one or more plant names (two, in the example above) and release the mouse button, then click on the Move Selected command on the Workbench menu (or toolbar). Move the mouse cursor to the desired new location for the plants and click the left mouse button. The selected plants will be moved to the new location. You can also perform this operation by holding down the Alt key and moving the mouse cursor to the new location and clicking the left mouse button. Be very careful in the placement of the mouse cursor in order to place the plant(s) in the desired new location.
Once the list has been reordered, all the folder information will disappear, as shown below. You can toggle the list between common and botanical names and still retain the order of the list, as shown on the right below. The list order will be saved and restored when you save and reopen a MyList with the File menu Save and Open commands.
The plant order you have established will be used for all slideshows and plant list navigation while working with this particular MyList. You can combine the plant list ordering with picture reordering and suppression to create a completely customized slideshow.

100
Your customized list order is presented only when you are viewing plants in the MyList mode (the button is down and the green lines showing). As always, you can remove the MyList
filtering by clicking on the button and the list will revert to the main plant list. If you want to reset the MyList order to its original order, use the Tools|Reset|MyList Order command.
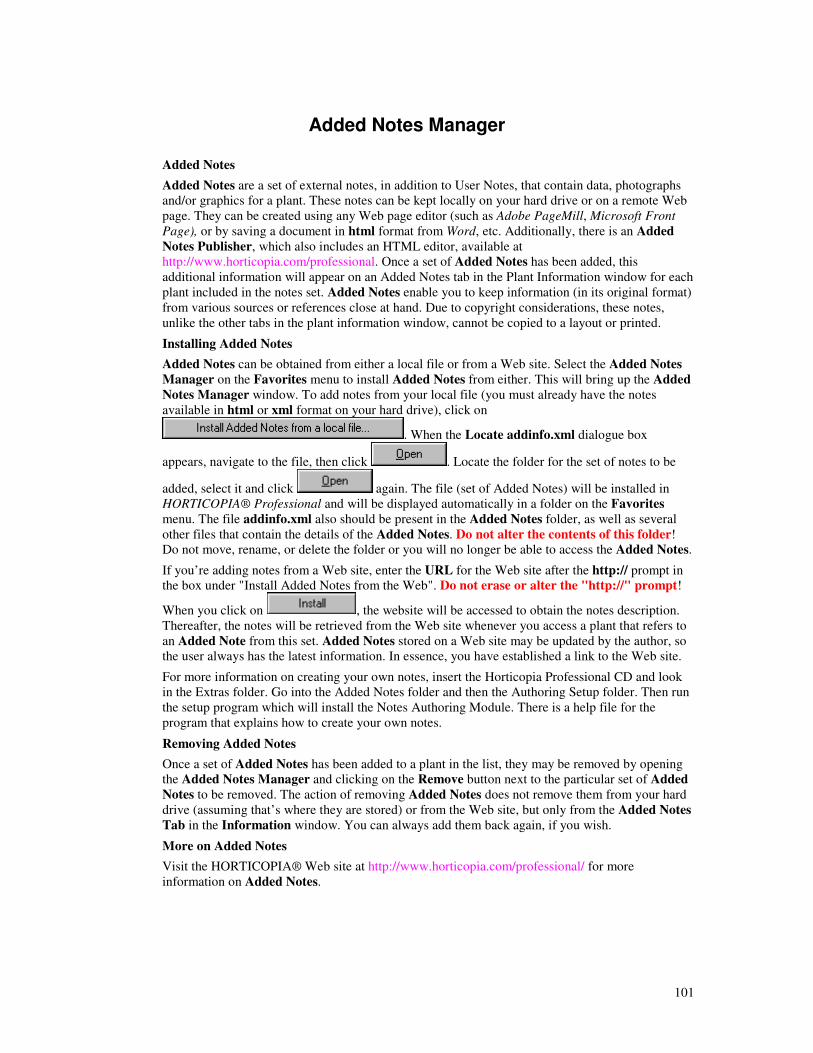
101
Added Notes Manager
Added Notes
Added Notes are a set of external notes, in addition to User Notes, that contain data, photographs and/or graphics for a plant. These notes can be kept locally on your hard drive or on a remote Web page. They can be created using any Web page editor (such as Adobe PageMill, Microsoft Front Page), or by saving a document in html format from Word, etc. Additionally, there is an Added Notes Publisher, which also includes an HTML editor, available at http://www.horticopia.com/professional. Once a set of Added Notes has been added, this additional information will appear on an Added Notes tab in the Plant Information window for each plant included in the notes set. Added Notes enable you to keep information (in its original format) from various sources or references close at hand. Due to copyright considerations, these notes, unlike the other tabs in the plant information window, cannot be copied to a layout or printed.
Installing Added Notes
Added Notes can be obtained from either a local file or from a Web site. Select the Added Notes Manager on the Favorites menu to install Added Notes from either. This will bring up the Added Notes Manager window. To add notes from your local file (you must already have the notes available in html or xml format on your hard drive), click on
. When the Locate addinfo.xml dialogue box
appears, navigate to the file, then click . Locate the folder for the set of notes to be
added, select it and click again. The file (set of Added Notes) will be installed in HORTICOPIA® Professional and will be displayed automatically in a folder on the Favorites menu. The file addinfo.xml also should be present in the Added Notes folder, as well as several other files that contain the details of the Added Notes. Do not alter the contents of this folder! Do not move, rename, or delete the folder or you will no longer be able to access the Added Notes.
If you’re adding notes from a Web site, enter the URL for the Web site after the http:// prompt in the box under "Install Added Notes from the Web". Do not erase or alter the "http://" prompt!
When you click on , the website will be accessed to obtain the notes description. Thereafter, the notes will be retrieved from the Web site whenever you access a plant that refers to an Added Note from this set. Added Notes stored on a Web site may be updated by the author, so the user always has the latest information. In essence, you have established a link to the Web site.
For more information on creating your own notes, insert the Horticopia Professional CD and look in the Extras folder. Go into the Added Notes folder and then the Authoring Setup folder. Then run the setup program which will install the Notes Authoring Module. There is a help file for the program that explains how to create your own notes.
Removing Added Notes
Once a set of Added Notes has been added to a plant in the list, they may be removed by opening the Added Notes Manager and clicking on the Remove button next to the particular set of Added Notes to be removed. The action of removing Added Notes does not remove them from your hard drive (assuming that’s where they are stored) or from the Web site, but only from the Added Notes Tab in the Information window. You can always add them back again, if you wish.
More on Added Notes
Visit the HORTICOPIA® Web site at http://www.horticopia.com/professional/ for more information on Added Notes.

102
Plant Information Plant Information Window
The plant information window is the final destination for many users. It is accessed by double
clicking on a name in the plant list, or highlighting the name of a plant and clicking the button in the Workbench tools, or by highlighting a plant name and pressing the F5 key. The plant information window contains voluminous data, as well as Preview pictures for the highlighted plant. Like other HORTICOPIA® Professional windows, it can be moved and/or resized (only vertically). The resizing will affect how the information is displayed and may not be effective for the current tab of the current plant until it is closed and reopened. Everything in the plant information window (except Added Notes) can be printed or exported to other applications. The title bar for the plant information window contains the name of the highlighted plant. If more than one plant is highlighted, the plant information window for the first highlighted plant will be displayed. There can be multiple plant information windows open at the same time. If you open a new plant information window without closing the current one, the new one will be created over the previous one (unless F5 is used to open the window, in which case opening a new plant information window automatically closes the old one). While most users will probably want to close plant information windows as they go on to other plants, any open plant information windows will be listed at and can be recalled from the bottom of the drop-down Window menu. The various tabs in the plant information window provide access to different types of information about the plant. Clicking on a tab will make it the active tab. You can control the tab that displays first by selecting the desired option from the Navigation tab of the Tools|Customize... menu. You can also use the right and left arrows on the keyboard to change tabs. Follow the hyperlinks below for a detailed description of each tab.
Previews Tab
Information Tab
Contributed Data Tab
My Information Tab
Garden Studio Tab
Added Notes Tab
Growth Area Tab
103
Previews Tab The Previews tab in the Plant Information window on the Workbench shows miniature images of the pictures available for the current plant.
You can double-click on a preview image to get a full-size picture. See Picture window for information on resizing full-size pictures. To select preview images for further action, click on each preview image once to put a green outline around it. If you decide you don't need a particular picture that you have selected, you can click on the preview image again and it will be deselected (the green outline disappears). If you want to omit a particular preview picture, right-clicking on it will place a red border on the right side and bottom and it will not be included in any picture printout, layout or slideshow. Right-click on the preview image again to reverse the omission and remove the red border.
The first preview picture (the one on the far left of the Previews tab) is called the Preferred Picture. The Preferred Picture can be changed by dragging another picture (from among the previews) over it with the mouse and dropping it. HORTICOPIA® Professional remembers the new Preferred Picture, so the change is permanent and will be remain in effect until changed again. The Preferred Picture is important, because it is not only the one that displays first on the Previews tab, but also the Preview picture shown on the Workbench and the picture displayed in the Thumbnails window. There are also designations for Second Preffered picture (the picture in the slot to the right of the Preferred picture) and Third Preferred picture (the picture in the slot to the right of the Second Preferred picture). These are used as picture designations for Garden Studio fields.
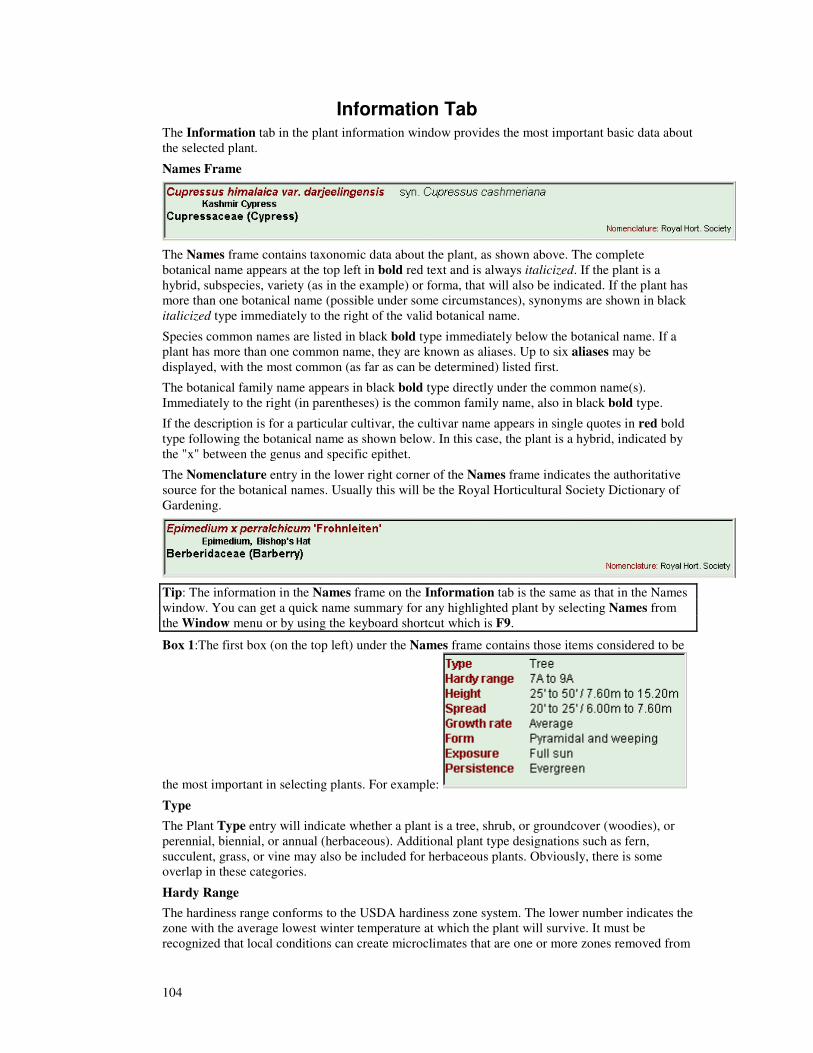
104
Information Tab The Information tab in the plant information window provides the most important basic data about the selected plant.
Names Frame
The Names frame contains taxonomic data about the plant, as shown above. The complete botanical name appears at the top left in bold red text and is always italicized. If the plant is a hybrid, subspecies, variety (as in the example) or forma, that will also be indicated. If the plant has more than one botanical name (possible under some circumstances), synonyms are shown in black italicized type immediately to the right of the valid botanical name.
Species common names are listed in black bold type immediately below the botanical name. If a plant has more than one common name, they are known as aliases. Up to six aliases may be displayed, with the most common (as far as can be determined) listed first.
The botanical family name appears in black bold type directly under the common name(s). Immediately to the right (in parentheses) is the common family name, also in black bold type.
If the description is for a particular cultivar, the cultivar name appears in single quotes in red bold type following the botanical name as shown below. In this case, the plant is a hybrid, indicated by the "x" between the genus and specific epithet.
The Nomenclature entry in the lower right corner of the Names frame indicates the authoritative source for the botanical names. Usually this will be the Royal Horticultural Society Dictionary of Gardening.
Tip: The information in the Names frame on the Information tab is the same as that in the Names window. You can get a quick name summary for any highlighted plant by selecting Names from the Window menu or by using the keyboard shortcut which is F9.
Box 1:The first box (on the top left) under the Names frame contains those items considered to be
the most important in selecting plants. For example:
Type
The Plant Type entry will indicate whether a plant is a tree, shrub, or groundcover (woodies), or perennial, biennial, or annual (herbaceous). Additional plant type designations such as fern, succulent, grass, or vine may also be included for herbaceous plants. Obviously, there is some overlap in these categories.
Hardy Range
The hardiness range conforms to the USDA hardiness zone system. The lower number indicates the zone with the average lowest winter temperature at which the plant will survive. It must be recognized that local conditions can create microclimates that are one or more zones removed from
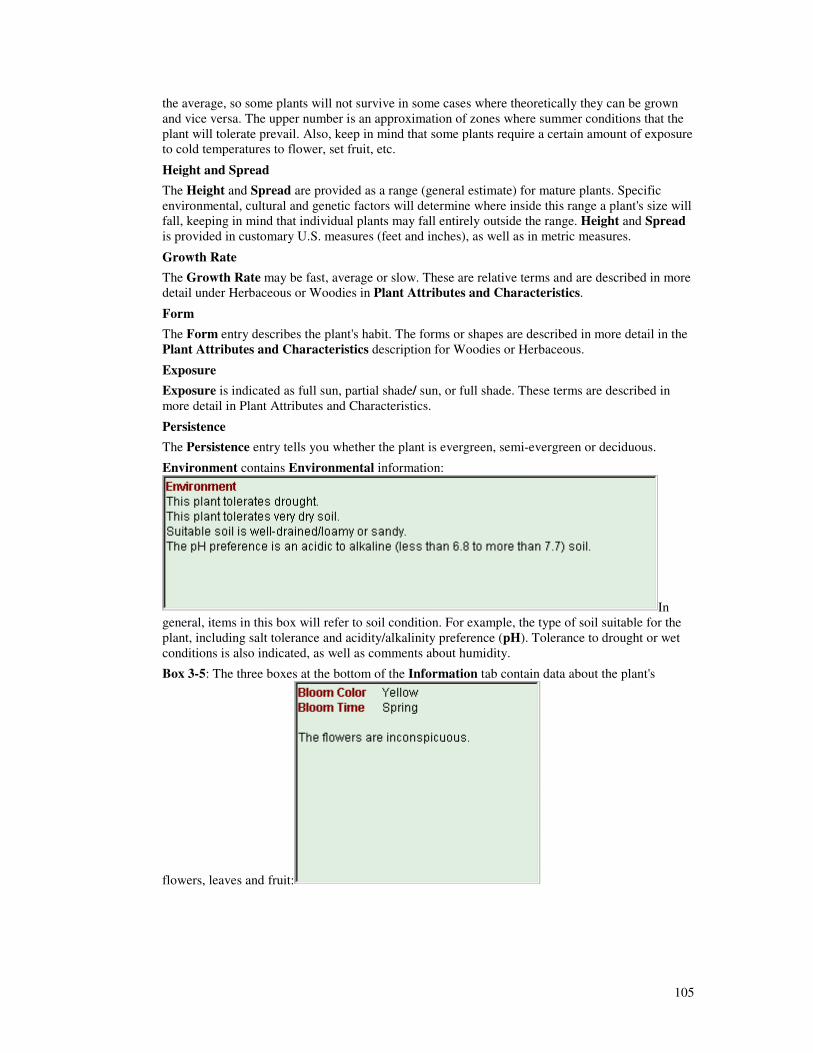
105
the average, so some plants will not survive in some cases where theoretically they can be grown and vice versa. The upper number is an approximation of zones where summer conditions that the plant will tolerate prevail. Also, keep in mind that some plants require a certain amount of exposure to cold temperatures to flower, set fruit, etc.
Height and Spread
The Height and Spread are provided as a range (general estimate) for mature plants. Specific environmental, cultural and genetic factors will determine where inside this range a plant's size will fall, keeping in mind that individual plants may fall entirely outside the range. Height and Spread is provided in customary U.S. measures (feet and inches), as well as in metric measures.
Growth Rate
The Growth Rate may be fast, average or slow. These are relative terms and are described in more detail under Herbaceous or Woodies in Plant Attributes and Characteristics.
Form
The Form entry describes the plant's habit. The forms or shapes are described in more detail in the Plant Attributes and Characteristics description for Woodies or Herbaceous.
Exposure
Exposure is indicated as full sun, partial shade/ sun, or full shade. These terms are described in more detail in Plant Attributes and Characteristics.
Persistence
The Persistence entry tells you whether the plant is evergreen, semi-evergreen or deciduous.
Environment contains Environmental information:
In general, items in this box will refer to soil condition. For example, the type of soil suitable for the plant, including salt tolerance and acidity/alkalinity preference (pH). Tolerance to drought or wet conditions is also indicated, as well as comments about humidity.
Box 3-5: The three boxes at the bottom of the Information tab contain data about the plant's
flowers, leaves and fruit:
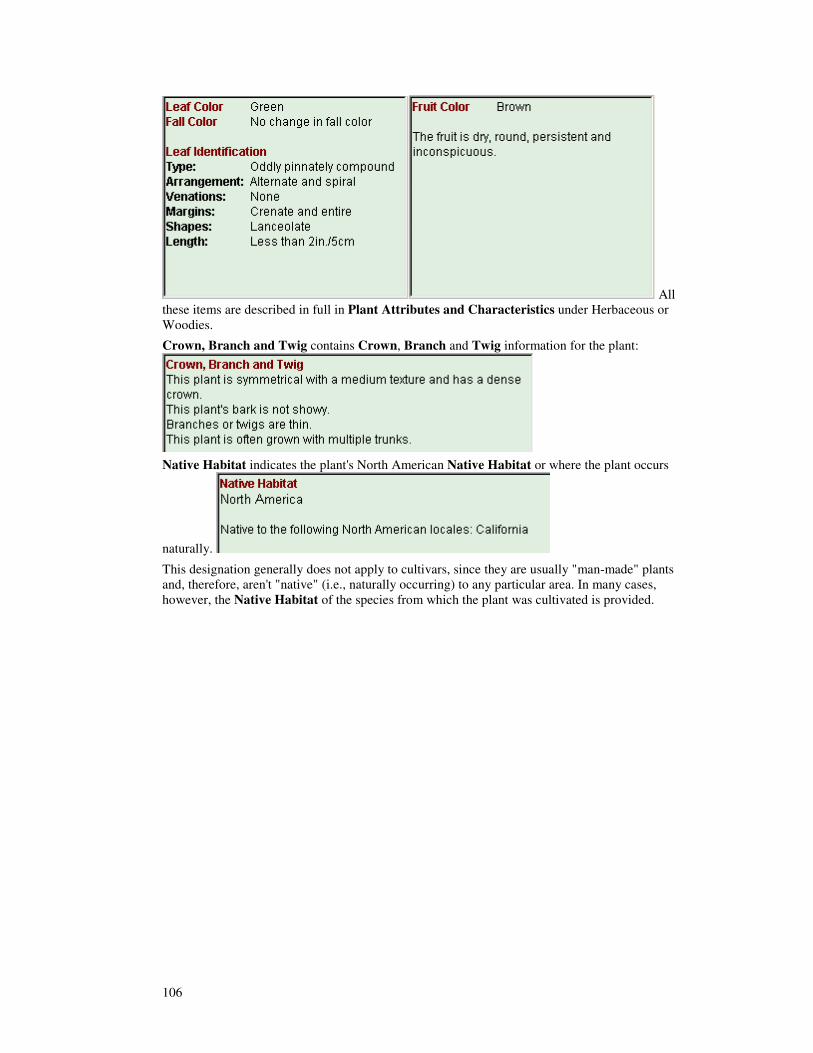
106
All these items are described in full in Plant Attributes and Characteristics under Herbaceous or Woodies.
Crown, Branch and Twig contains Crown, Branch and Twig information for the plant:
Native Habitat indicates the plant's North American Native Habitat or where the plant occurs
naturally.
This designation generally does not apply to cultivars, since they are usually "man-made" plants and, therefore, aren't "native" (i.e., naturally occurring) to any particular area. In many cases, however, the Native Habitat of the species from which the plant was cultivated is provided.
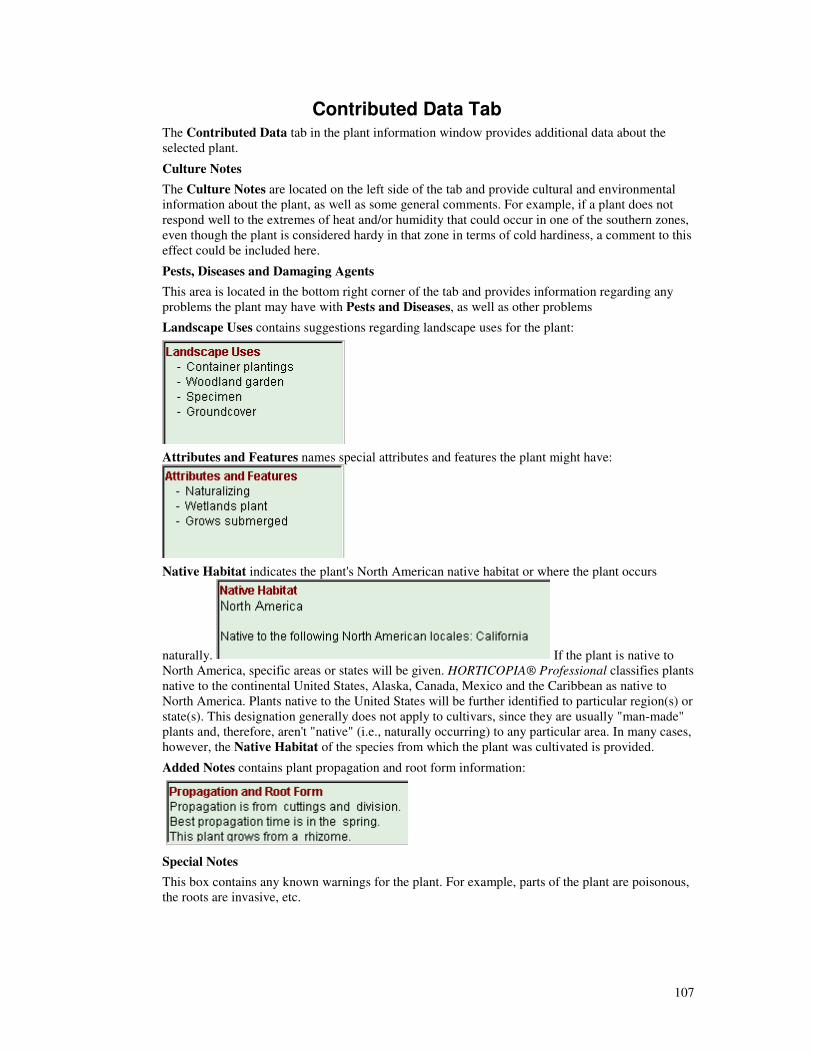
107
Contributed Data Tab The Contributed Data tab in the plant information window provides additional data about the selected plant.
Culture Notes
The Culture Notes are located on the left side of the tab and provide cultural and environmental information about the plant, as well as some general comments. For example, if a plant does not respond well to the extremes of heat and/or humidity that could occur in one of the southern zones, even though the plant is considered hardy in that zone in terms of cold hardiness, a comment to this effect could be included here.
Pests, Diseases and Damaging Agents
This area is located in the bottom right corner of the tab and provides information regarding any problems the plant may have with Pests and Diseases, as well as other problems
Landscape Uses contains suggestions regarding landscape uses for the plant:
Attributes and Features names special attributes and features the plant might have:
Native Habitat indicates the plant's North American native habitat or where the plant occurs
naturally. If the plant is native to North America, specific areas or states will be given. HORTICOPIA® Professional classifies plants native to the continental United States, Alaska, Canada, Mexico and the Caribbean as native to North America. Plants native to the United States will be further identified to particular region(s) or state(s). This designation generally does not apply to cultivars, since they are usually "man-made" plants and, therefore, aren't "native" (i.e., naturally occurring) to any particular area. In many cases, however, the Native Habitat of the species from which the plant was cultivated is provided.
Added Notes contains plant propagation and root form information:
Special Notes
This box contains any known warnings for the plant. For example, parts of the plant are poisonous, the roots are invasive, etc.

108
Notes Tab The My Information tab in the plant information window provides basic cultural data about the selected plant.
Scratchpad
This box has a white background and is located on the left side of the tab. It is provided for you to use for any additional comments or information you wish to include about the plant. The HTML edit toolbar can be used to further format information in the Scratchpad. With it, you can even
include the URL of a favorite Web site. Use the button in the upper right corner to toggle between Edit mode and Browse mode. When the button is in the up position, you can enter text in the Scratchpad area. When it is in the down position, the Mouse cursor will change to its normal browse shape. Then, when you click on a URL you have entered, this will launch your browser and automatically connect to the URL via the Internet.
Your notes are saved as you enter them for each plant on the plant list and remain in place (until deleted or changed) regardless of how the plant data is used (e.g., in MyLists or layouts). If you want to erase the notes in the My Information tab for all plants in a list, click on the appropriate command on the Tools|Reset menu. Note that this is a global command and will erase ALL of the notes for ALL plants.
Printable
The printable notes will be used when you want to print any of your own information. the scratchpad notes are never included in print-outs. The printable notes use rich text format which gives you more formatting options.
Spreadsheet The spreadsheet tab provides a spreadsheet entry that is on a separate tab. This is a non-printing item that is meant for your own personal entries.

109
Garden Studio Tab The Garden Studio tab appears only when you have installed the Garden Studio module (optional software).
The Garden Studio tab has two subtabs: one for text data and one for graphical data. The Link & Data subtab contains the following entries:
User Data 1 - User Data 7 provide seven user definable fields for typically short information bits such as price, stock code, UPC, etc. You can change the name from User Data... by double-clicking on the name (User data...) and entering a new one of your choice. You can also perform basic formatting (font name, style, size) for these fields. These data fields can also be modified while in Garden Studio.
User Text 1 - User Text 4 provides four text fields where you can enter longer descriptive information for the plant. The data can be formatted by selectively changing fonts, font styles, and font sizes. You can change the name from User Text... by double-clicking on the name and entering a new one of your choice.
The Graphics subtab contains six graphics fields -- User Graphics 1 - User Graphics 6. You can drag a graphics file name into one of these areas or right-click on one of the graphics areas and browse for a graphics file. If a file exists and you want to delete it, you can right click on the graphic and select Delete from the pop-up. You can change the name from User Graphic... by double-clicking on the name and entering a new one of your choice.

110
Added Notes Tab The Added Notes tab appears in the Plant Information window, but only for plants that have one or more Added Notes. You can add and remove these external notes with the Added Notes Manager located on the Favorites menu. Unlike the other tabs in the plant information window, these notes cannot be copied to a layout.
Within the Added Notes tab, you can select which Added Note(s) to view if there is more than one for the plant displayed. HORTICOPIA® Professional will remember the source of the last added note viewed, so if you select the Added Notes tab for another plant, you will get the added note from the same source (provided, of course, that an Added Note exists from the same source). Otherwise, you will be provided with a list of Added Notes from which to select.
A subset of the standard web browser buttons is provided for viewing the Added Notes. You can click on hyperlinks within the notes to move from place to place and also go forward and back. The Home button will take you to the page the notes author designated as a home page.

111
Growth Area Tab The Growth Area tab in the Plant Information window shows a map with the general outline of the area(s) in the United States where the plant could grow based on its Hardiness range.
Theoretically, a plant should grow in any of the green area on the map, which covers the zones included in the plant's hardiness range on the USDA Hardiness Map. It would not be likely to grow anywhere outside the green area. To determine if the plant would be likely to thrive in any particular region of the theoretical growth area, however, you should also examine the culture notes, exposure, moisture and other environmental factors affecting its survivability. A major problem, sometimes, is a plant's inability to cope with heat and/or humidity, as well as the requirement of some plants for a certain amount of cold weather to set buds, fruit, etc. While such plants might survive in the warmer sections of their hardiness range, they would not likely thrive there.
Annuals will not have a Growth Area tab, since Hardiness selection criteria does not apply.
112
Plant Pictures Picture Window
Full-size pictures are normally displayed by double-clicking on a Preview picture or a Thumbnail. Whether they are initially shown maximized to the window or uniformly sized is controlled by options on the Pictures tab of the Tools|Customize... window.
Title Bar
You can control how plant names appear in the title bar of each picture with the Pictures tab options on the Tools|Customize... menu. The icons at the extreme left of the title bar indicate the type picture: Detail and Habit. For those interested in using full-size pictures for a plant identification Test, plant names can be suppressed entirely by un-checking them on the Pictures tab on the Tools|Customize... menu.
Manipulating Picture Windows
Like most windows, picture windows can be moved by dragging by the title bar and/or resized by dragging a corner. Except during slideshows, picture windows may be resized at any time. If the mouse cursor shows a magnifying glass, you can click on the picture and get an automatic 25% enlargement. If you hold the Shift key down while clicking on the picture, its size is reduced by 20%. You can resize the picture manually by simply dragging one of the corners of the picture towards or away from the opposite corner to reduce or enlarge the size of the picture. HORTICOPIA® Professional will not allow you to distort a picture by stretching it vertically or horizontally. Also, in order that the best possible image is maintained, HORTICOPIA® Professional will not let you reduce the size of a picture to less than 128 pixels in either width or height.
A full-size picture is automatically closed when another is opened. If you want to keep more than one picture available for later viewing, you must use the button to minimize them. These pictures then will be kept in minimized form until each is closed by clicking the button. This capability is useful for making side-by-side visual comparisons of plant attributes.
Pictures can be maximized with the button in the title bar to the largest possible size within the HORTICOPIA® Professional main window without distorting the picture. If you have several pictures in your window, you can rearrange them with the Tile Vertically, Tile Horizontally, and Cascade commands found in the Window menu.
Printing or Copying Pictures
There are several ways HORTICOPIA® Professional pictures can be printed or copied. The active picture window -- the one with the title bar highlighted (blue) and in front of any other window -- can be copied to a layout with the Copy to Layout command from the Data Menu or Data toolbar.
Tip: The keyboard shortcut for the Copy to Layout command is F8.
You can copy an active picture window to the Windows Clipboard, whence it can be inserted into other applications. In this case, you will get a copyright notice, which you must Accept or Decline. If you Accept, the picture is copied -- with the HORTICOPIA® Professional copyright inserted at the bottom of the picture. If you Decline, the picture is not copied. The active picture window can also be printed using the Snapshot command on the File menu.
Although not picture windows, per se, a list of pictures can be printed using the Print Pictures command on the File menu in conjunction with the Pictures tab in the File|Document Setup... window and the pictures in a Thumbnails window can be printed using the Snapshot command on the File menu.
If you have Garden Studio installed, you can specify a cropping region for the picture. While holding down the CTRL key, drag the mouse on the picture to define the region of the picture you want to use in Garden Studio. If a region is already set, this process will replace the existing region. To delete a region, click on the picture with the CTRL key held down. You can suppress the

113
display of the cropping region (and turn it on) from the Customization option's Pictures Tab (at the bottom left).
Tip: You can get information about the nomenclature of the plant and about the photographer and other picture credits by right-clicking anywhere on the picture.
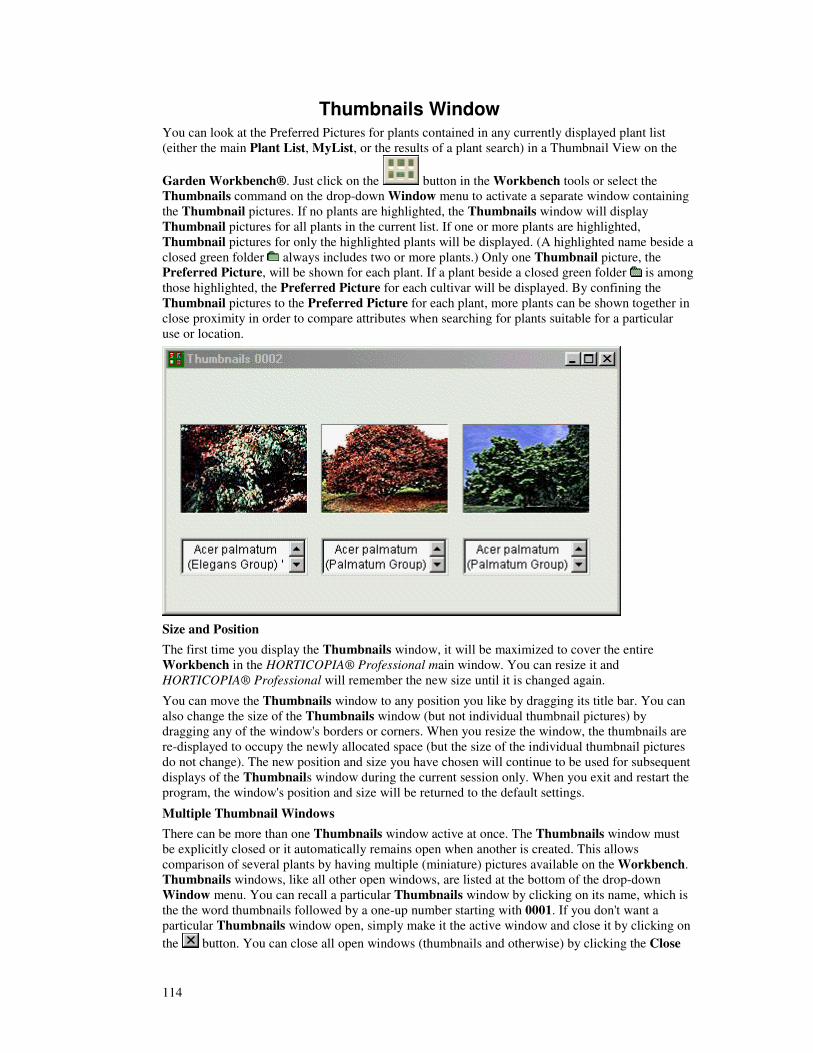
114
Thumbnails Window You can look at the Preferred Pictures for plants contained in any currently displayed plant list (either the main Plant List, MyList, or the results of a plant search) in a Thumbnail View on the
Garden Workbench®. Just click on the button in the Workbench tools or select the Thumbnails command on the drop-down Window menu to activate a separate window containing the Thumbnail pictures. If no plants are highlighted, the Thumbnails window will display Thumbnail pictures for all plants in the current list. If one or more plants are highlighted, Thumbnail pictures for only the highlighted plants will be displayed. (A highlighted name beside a closed green folder always includes two or more plants.) Only one Thumbnail picture, the Preferred Picture, will be shown for each plant. If a plant beside a closed green folder is among those highlighted, the Preferred Picture for each cultivar will be displayed. By confining the Thumbnail pictures to the Preferred Picture for each plant, more plants can be shown together in close proximity in order to compare attributes when searching for plants suitable for a particular use or location.
Size and Position
The first time you display the Thumbnails window, it will be maximized to cover the entire Workbench in the HORTICOPIA® Professional main window. You can resize it and HORTICOPIA® Professional will remember the new size until it is changed again.
You can move the Thumbnails window to any position you like by dragging its title bar. You can also change the size of the Thumbnails window (but not individual thumbnail pictures) by dragging any of the window's borders or corners. When you resize the window, the thumbnails are re-displayed to occupy the newly allocated space (but the size of the individual thumbnail pictures do not change). The new position and size you have chosen will continue to be used for subsequent displays of the Thumbnails window during the current session only. When you exit and restart the program, the window's position and size will be returned to the default settings.
Multiple Thumbnail Windows
There can be more than one Thumbnails window active at once. The Thumbnails window must be explicitly closed or it automatically remains open when another is created. This allows comparison of several plants by having multiple (miniature) pictures available on the Workbench. Thumbnails windows, like all other open windows, are listed at the bottom of the drop-down Window menu. You can recall a particular Thumbnails window by clicking on its name, which is the the word thumbnails followed by a one-up number starting with 0001. If you don't want a particular Thumbnails window open, simply make it the active window and close it by clicking on the button. You can close all open windows (thumbnails and otherwise) by clicking the Close

115
all command on the Window menu.
Using Thumbnails
You can obtain a full-size picture of any thumbnail picture by double-clicking on it. The resulting full-size picture responds as described in Picture windows. You can also display a plant's plant information window by double-clicking on the plant's name in the caption box under the thumbnail image. Plants can even be added to MyList directly from the thumbnail view by right-clicking on the name underneath the thumbnail picture. As usual, the text color will change to green to show it is included on MyList. Copying
Pictures cannot be selected from the Thumbnail window for copying to a layout nor printed using the Print Pictures command on the File menu. This function is available only from the plant information window Previews tab or from an open, full-size Picture window. (If you have the Thumbnails window open and execute one of the aforementioned commands, it will appear that the thumbnails are being printed, but, in fact, the pictures being printed are from the Previews tab of the highlighted plants and are being printed according to the options selected on the Pictures tab of the File|Document Setup... window.) A quick copy of the plants in the Thumbnails window can be printed by using the Snapshot command on the File menu. All printed pictures will contain the HORTICOPIA® copyright.
Thumbnails Caption Box
The caption box below each Thumbnail picture behaves very much like a name in the Plant List. You can perform the following actions using the caption box:
��Double-click to display a plant's Plant Information window.
��Add or remove the plant from MyList by right-clicking on it. The text color will change to green to show it is included on MyList.
��Use the Keyboard Shortcuts to view a specific picture or tab in a plant's plant information window.
Displaying Long Names
When the name of a plant is too long to display in the caption box underneath a Thumbnail picture, use the scroll bar in the caption box to view the complete name.
Identification Mode
If you are viewing Thumbnails in Identification Mode, there will be no caption box underneath the Thumbnail pictures. Thumbnails are displayed in Identification Mode when you select this
option in the Pictures tab on the Tools|Customize menu or when you right-click on the button in the Workbench tools and choose Identification Mode. As with the normal Thumbnail display, you can double-click on a Thumbnail in Identification Mode to display a full-size picture, which will have Plant Identification Mode in the title bar. You can also bring up the plant information window for a plant by right-clicking on the Thumbnail picture.
Tip: Hold the mouse cursor stationary over a Thumbnail picture in Identification Mode and the plant's name will appear in a pop-up box.
Advanced Features
When you click on the button in the Workbench tools, it takes a "snapshot" of the current plant list and displays the miniature images of those plants in a Thumbnails window. Clicking anywhere on the Workbench causes the Thumbnails window to be hidden behind the Workbench, so subsequent changes in the plant list are not reflected in it (or any active Thumbnails window). If you perform a new plant search or apply new filtering and then click on
the button again, a new Thumbnails window is automatically opened with the new plant
116
list. This works best if you first click on the button in the Workbench tools to remove any previous filtering before making the new plant search or applying new filtering. As always, if one
or more plant names are highlighted in the plant list when you click on the button, only those highlighted plants will be shown. Otherwise, all the plants on the list will appear in the Thumbnails window.
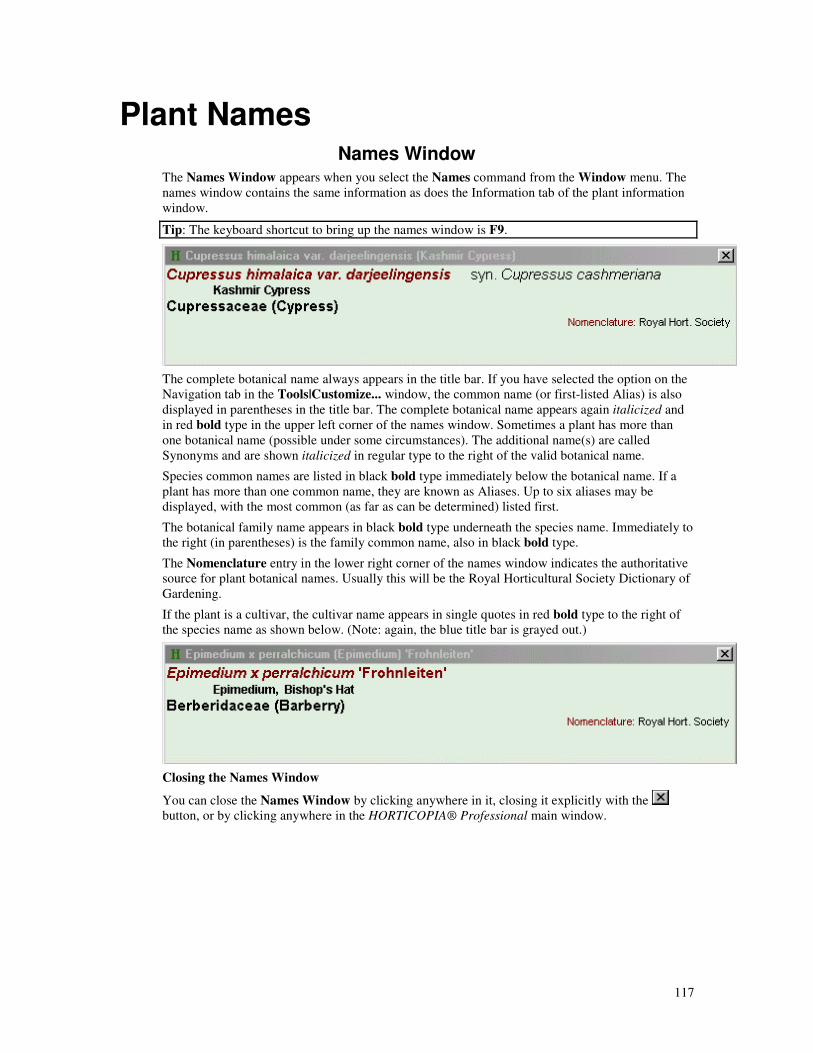
117
Plant Names Names Window
The Names Window appears when you select the Names command from the Window menu. The names window contains the same information as does the Information tab of the plant information window.
Tip: The keyboard shortcut to bring up the names window is F9.
The complete botanical name always appears in the title bar. If you have selected the option on the Navigation tab in the Tools|Customize... window, the common name (or first-listed Alias) is also displayed in parentheses in the title bar. The complete botanical name appears again italicized and in red bold type in the upper left corner of the names window. Sometimes a plant has more than one botanical name (possible under some circumstances). The additional name(s) are called Synonyms and are shown italicized in regular type to the right of the valid botanical name.
Species common names are listed in black bold type immediately below the botanical name. If a plant has more than one common name, they are known as Aliases. Up to six aliases may be displayed, with the most common (as far as can be determined) listed first.
The botanical family name appears in black bold type underneath the species name. Immediately to the right (in parentheses) is the family common name, also in black bold type.
The Nomenclature entry in the lower right corner of the names window indicates the authoritative source for plant botanical names. Usually this will be the Royal Horticultural Society Dictionary of Gardening.
If the plant is a cultivar, the cultivar name appears in single quotes in red bold type to the right of the species name as shown below. (Note: again, the blue title bar is grayed out.)
Closing the Names Window
You can close the Names Window by clicking anywhere in it, closing it explicitly with the button, or by clicking anywhere in the HORTICOPIA® Professional main window.
118
Synonyms Unlike common names, which can have several Aliases--all equally valid, the rules of the International Code of Botanical Nomenclature stipulate that a plant can have only one valid botanical (or scientific) name. The basic form of this name is the species, which consists of the Latin binomial that includes both the genus and the specific epithet. Plant taxonomy is a dynamic process, however, and for reasons much too complex to discuss here, plants are sometimes found with two or more botanical names. In this case, they are referred to as synonyms and are so listed in the Plant List and in the name frame of the Information tab in the plant information window. In most cases, HORTICOPIA® Professional uses the Royal Horticulture Society Dictionary as the standard reference for botanical names. The reference is indicated for each plant in the lower right corner of the name frame on the Information tab.
Plant synonyms appear on plant lists in gray text. They will never have a folder icon, since the synonym applies only to the species name, not its cultivars. Like common name aliases, synonyms may be far up or down the list from the valid name. Unlike aliases, however, synonyms appear constantly in gray text--not just when the valid name is highlighted. If you click on a synonym with either the left or right mouse button, the cursor will jump to the valid name, which will then be highlighted. Note that right-clicking on the synonym does not place the plant on a MyList (as would normally be the case). You must right-click on the valid name to do that. Right-clicking on the valid name, however, will automatically enter both the valid name and the synonym on a MyList, with the synonym retaining its gray color. The same procedure is used to remove the names from a MyList.

119
Aliases Many plants are known by more than one common name, all of which (unlike botanical names) are equally valid (although some may be more popular than others--especially in regional usage). In this case, when viewing the main plant list by common name, those plants have been assigned aliases, or additional common names. When you highlight the common name of a plant that has additional names, those additional names will appear on the Plant List in gray text. In many (perhaps most) cases, these additional names won't be immediately visible because they are much further up or down in the list. You can use the Jump to next alias name on the Workbench menu to find additional aliases. If you search the Plant List for aliases, be careful that the original name is not deselected, to insure the aliases retain the grayed text. If you have added Preferred Common Names to MyList and right-click on an alias for one of those names in the main Plant List, the list will jump to the corresponding Preferred Name that was added to MyList. For the most part, it won't matter which of the plant's several common names you choose. Double-clicking on any of the alias names will display the same plant plant information window. When the plant list is in common name mode, you can use the Use as preferred name command on the Workbench menu to designate a Preferred Common Name by selecting from among a plant's aliases to highlight the desired name and then clicking on the command. This will then be the only name shown for that plant on all plant lists when the Show only preferred common names box is checked on the Workbench tab of the Customization window. You can also select a Preferred Common Name by holding down the Shift key, right-clicking on the desired common name and selecting the option from the pop-up menu. In both cases, this will be a permanent selection until changed again. A bona fide alias must be designated as the Preferred Common Name. Cultivar names and Genus spp. (for example, Acer spp.) in a folder cannot be used as Preferred Common Names. Note that all folders disappear when using Preferred Common Names.
120
Slideshows Slideshow Window
A slideshow can be presented in two types of windows:
��A window which uses the full HORTICOPIA® Professional main window.
��A window which uses the entire screen of the computer monitor.
The settings you select on the Slideshow tab in the Tools|Customize... window will determine which type of window formatting is used. Both types of windows can be configured to display the names of plants in the title bar or leave them out (by placing or removing a checkmark beside the option desired). If you wish to display plant names, you can do so by including them in the title bar or by using on-screen displays (which will appear momentarily over the picture display).
Slideshow Toolbar
You normally control slideshows with the slideshow toolbar. The Slideshow toolbar appears by default when a slideshow is started--unless you have checked the Do not show slideshow toolbar on the Slideshow tab of the Tools|Customize... window--and it can be reshaped, floated or docked wherever you wish. The Slideshow toolbar can be made to appear in the main window before a slideshow starts by placing a checkmark beside Slideshow on the Toolbars tab in the Tools|Toolbars... Customize window. If the Slideshow toolbar is hidden, you can make it appear by pressing the Space Bar.
Menu Control If running in Full Window mode, you can control some slideshow functions using the Slideshow menu commands. The menu will not normally be available, however, when a slideshow is running. You must use the Slideshow toolbar to stop a slideshow before displaying the Slideshow menu. The menu will not be visible at all in Entire Screen mode. Click Here for a detailed explanation of the Slideshow menu.
Stopping the Slideshow
You can stop a slideshow and return to the Garden Workbench® at any time by selecting Stop Slideshow from the Slideshow toolbar or pressing the Esc key
121
Layout
Layout Window The HORTICOPIA® Professional Designer is a powerful feature combining aspects of a Desktop Publishing program with HORTICOPIA®'s plant database and search engine. Using the Designer you can create layouts which combines pictures, data and maps from HORTICOPIA® with your own pictures, text or clipart to create custom documents that can be edited, printed and/or saved. The Designer can also be used to create custom retail signage, plant data sheets for customers, or proposal sheets for landscape designs and more.
Opening the Designer
The layout window is activated at any time by clicking on Layout Window on the Window menu. If no layout window is open, a new one will appear when you click on the Copy to Layout button on the Data toolbar, or press F8 on the keyboard--assuming there is something available to be copied to a layout. The title of the layout will appear in the title bar of the layout window. If this is a brand new layout, the default title is "New Layout." If you are working with a previously saved layout, the title you assigned when you saved it will be shown. The page number is also shown in the title bar in the format 1/5, or page 1 of 5 pages.
Working with Layouts
You can specify items common to every page in the layout by creating a master page. You can think of the master page as a setup page that works similar to Headers and Footers on other printouts. When you click on the Master Page command found in the Document menu, the current (active) page becomes the master page for that layout. Everything placed on the master page will appear on each page of the layout. This is useful for logos, backgrounds, etc.
Pictures and data from HORTICOPIA® Professional can easily be copied to the layout using the Copy to Layout button on the Data toolbar or by pressing the F8 key on the computer keyboard. (To place your own text, pictures or graphics in a layout, use the Insert Image or Insert Text Box commands from the layout menu. Once on the layout, they can be manipulated the same as items from HORTICOPIA® Professional.) When visible in the layout window, images and text boxes can be moved and/or resized, images can be cropped, and the text can be edited.
Copying Information to a Layout HORTICOPIA® Professional pictures, maps and data can be copied from the Plant Information window. Pictures can also be copied from a full-size Picture window. Those items to be copied to a layout from HORTICOPIA® Professional must be in an active window on the desktop. (Except for manually entered text, you must indicate the location of your own items to be inserted into the layout.) You can specify the data items to be copied from the plant information window, as well as the nomenclatural information to be included with pictures by selecting the desired options from the Layout tab in the File|Document Setup... window. (Any previously selected options on the Layout tab will apply to a new layout when it is started.) If a layout is active, any changes you make to the options on the Layout tab will apply to only the active layout. Otherwise, changes in the Layout tab are global and will apply to any new layouts. Saved layouts will retain the settings in place when they were saved.
Any number of items can be copied to the layout window. To select additional items, simply minimize the layout window, select an additional item, and click Copy to Layout. The layout will be restored and you can use the special cursor to position the item to be copied on the page. If additional pages are needed, use the Insert Pages... command on the Document menu or Pages toolbar to add them.
Positioning and Resizing Items in the Layout When the Copy to Layout command (or any of its alternatives) is used, the mouse cursor will

122
change to a special cursor when positioned inside the active layout window to show that something is available to be placed on the layout. Hold down the mouse button, drag a box that is the size that you wish for the information area to be and release the mouse button. The information will be copied to the area you indicate. If no layouts are open at the time that you use the Copy to Layout command, a new one is automatically started. When you click on any enabled layout tool (selector, circle, etc.), the special cursor (and the copy operation) are terminated.
Once items have been copied to a layout, they can be moved and/or resized. You can move an item on a page by placing the mouse cursor over some point on the border of the frame surrounding the item. The mouse cursor will change to a four-directional arrow. Click and hold down the left mouse button while dragging the item to the new location. When positioned as desired, release the mouse button. To resize the frame, while the item is selected click and hold down the mouse button while the cursor is positioned over one of the "handles" (green squares) in the border. If the handle is on a corner, the frame will be resized both vertically and horizontally as you drag the mouse. To extend the frame either horizontally or vertically, click on one of the handles in the middle of the frame border and , while holding down the left mouse button, drag the frame in the desired direction. (HORTICOPIA® Professional will not allow the distortion of a picture or map, however, so dragging one of these horizontally or vertically will result in no change.)
If you decide to remove an item from a layout, you can do so by clicking anywhere inside the frame and then clicking on the Edit|Clear command. To clear a complete page or all items on a layout, use the Erase Template command found in the Document menu. To remove a page from the layout, use the Remove Page command on the Document menu or in the Pages toolbar.
Layering Items in a Layout As indicated above, the arrangement of items on a layout page is controlled totally by the user since any item can be placed wherever you wish. In addition, items can be layered (placed over or under each other) by using the arrange commands on the Control toolbar or Item menu. You can use the Shuffle Up, Shuffle Down, Move to Front and Move to Back commands to move an item's layering position in the "stack" of items. If you want several items to be considered as one (in the same layer), use the Group command on the Control toolbar or the Item menu. Once grouped, items are treated as a single layer and all will be moved as a unit. If you later want to remove an item from a group, use the Ungroup command on the Control toolbar or the Item menu. Additional pages can be included with the Insert Pages... command and you can use the Page Up or Page Down commands on the Pages toolbar or Document menu to "thumb through" the pages of your layout. The page number will be shown in the layout title bar.
Saving the Layout When a layout is saved or added to Favorites, it retains its own settings, which will be used when it is re-opened. Use the Save Layout command on the File menu to save your layout. You will be asked to supply a name and location for the layout. When saved, any outside graphics that are inserted into the layout are linked. When the layout is opened at a later time, the linked graphics are retrieved. For this reason, linked graphics should not be moved or deleted from the location where originally stored (such as the My Documents or My Pictures folder) or they will not be retrieved, because the program will not be able to find them.
Printing the Layout Once completed, the layout can be printed and/or saved for future reference. Use the Print|Print Layout command on the File menu or the button on the Standard toolbar to print the layout. It is recommended that you use the Print Preview|Preview Layout command on the File menu to preview your layout before printing. You can print the layout being previewed directly from the
preview page by clicking on the button in the lower right corner. Using the preview function enables you to correct any misplacements, as well as to make sure the proper print settings are selected--and to ensure that you are printing on the proper paper size. (For instance, if your document preferences are for 8 1/2 x 14 legal size paper but your printer paper size is set to 8 1/2 x 11 letter paper, your layout will be truncated.) The view of the layout shown on your monitor represents the actual printed area. Margins are not included, so the right edge, for example, would
123
be at the right margin when you print. Use the button on the Layout tab of the File|Document Setup... window to set margins as desired.
The quality of the printed output will depend on your printer. Colored text and background in User Text boxes may differ markedly on your printed output from the screen resolution, because many color printers do not render solid colors very well.
Closing the Layout When you quit HORTICOPIA® Professional, you will lose your current layout unless you save it with the File|Save Layout command. You will be prompted to do so--and to give the layout a name. It can then be recalled at any time by using the File|Open Layout command. You can also place the layout on the Favorites menu to make it even more conveniently available for recall. Remember, User Notes are associated with a particular plant and not with the layout. If you subsequently change these, they will be changed in the saved layout, as well.
124
Document Setup
Document Setup The File|Document Setup... window enables you to customize a wide range of HORTICOPIA® Professional printed material. You can print plant lists, plant data and plant pictures, as well as layouts containing pictures, data, graphics and user- specified text. The Print commands on the File menu can be used to initiate the printing process, but it is recommended that you use File|Document Setup... to customize your printouts and check your printer settings before printing. Also, it is best to use the File|Print Preview commands to view documents before actually printing them. This will prevent surprises regarding margin settings, paper size, page orientation, color settings, etc. Click Here for more on Print Preview.
The four tabs in the File|Document Setup... window are listed below, but are discussed separately
in detail. All of them have common elements, such as . Descriptions of these common elements are repeated in each tab.
List Tab
You can print lists of plants by using the File|Print List... command. When you print a plant list, the order in the printout will be the same as the current list you are viewing in the plant list frame on the Workbench. If no plants are highlighted, the entire list will be printed. Use the
MyList button in the Workbench tools or other filters if you don't want the entire list to be printed. If one or more plants are highlighted, then only those highlighted will be printed. If only one plant is highlighted, the list will consist of one plant. Use the options in the List tab in the File|Document Setup... window to further customize your printout.
Data Tab
You can print Data sheets for highlighted plants by using the File|Print Data command. The plant list order in the printout will be the same as the current list you are viewing in the plant list frame on the Workbench. If no plants are highlighted, the entire list will be printed. Use the
MyList button in the Workbench tools or other filters if you don't want the entire list to be printed. If one or more plants are highlighted, then only those highlighted will be printed. If only one plant is highlighted, the list will consist of one plant. The contents of the Data printout of the current plant list are determined by selecting options on the Data tab in the File|Document Setup... window. You can select from among the various categories of plant data contained in the Plant Information window, including a picture if you wish.
Layout Tab
The HORTICOPIA® Professional Designer offers complete flexibility in making layouts. You can
design your own customized, printed documents (hence no button as on the other tabs). You can mix and match pictures from different plants, include data, and add your own graphics and/or text. You can also save a layout as a disk file for future use. The layout to be printed can be configured further by using the options in the Layout tab in the File|Document Setup... window. Click Here for more information on layouts.
Pictures Tab
You can print pictures of highlighted plants by using the File|Print Pictures command. The plant list order in the printout will be the same as the current list you are viewing in the plant list frame on the Workbench. If no plants are highlighted, the entire list will be printed. Use the
MyList button in the Workbench tools or other filters if you don't want the entire list to be printed. If one or more plants are highlighted, then only those highlighted will be printed. If only

125
one plant is highlighted, the list will consist of one plant. You can specify how the pictures in the current plant list are displayed by selecting options in the Pictures tab in the File|Document Setup... window.
Tip: In all the above cases, use the File|Print Preview options to preview your printout before actually printing it.
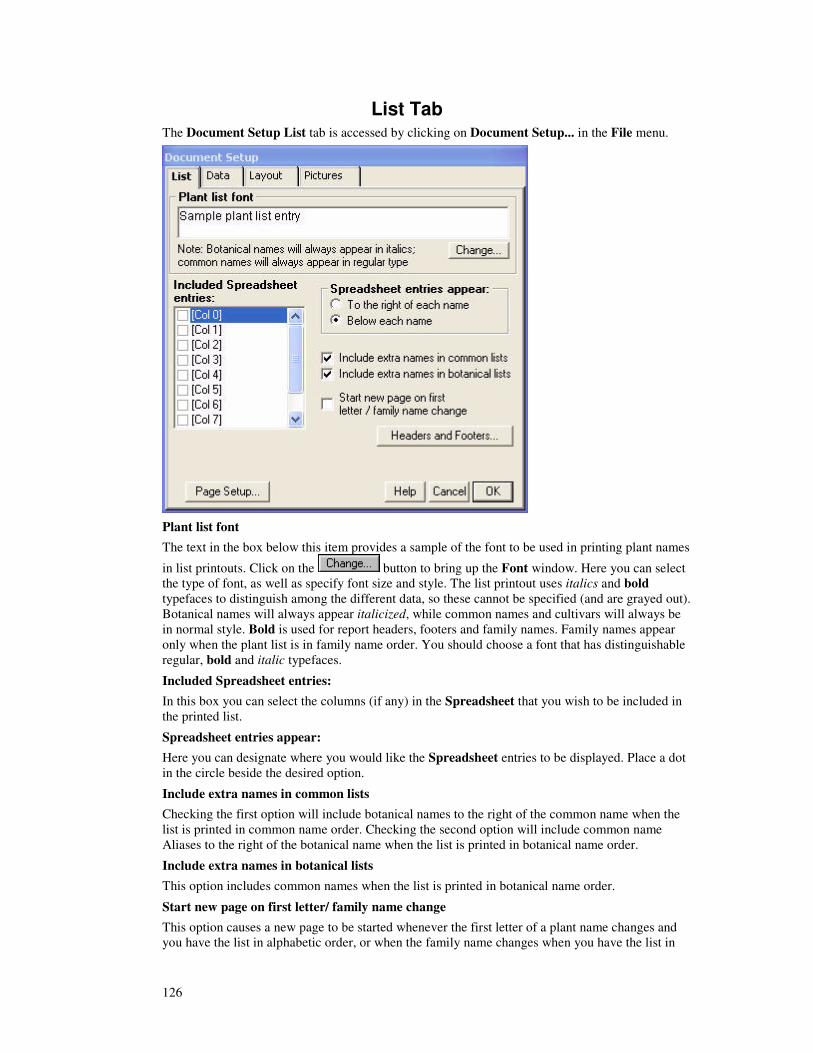
126
List Tab The Document Setup List tab is accessed by clicking on Document Setup... in the File menu.
Plant list font The text in the box below this item provides a sample of the font to be used in printing plant names
in list printouts. Click on the button to bring up the Font window. Here you can select the type of font, as well as specify font size and style. The list printout uses italics and bold typefaces to distinguish among the different data, so these cannot be specified (and are grayed out). Botanical names will always appear italicized, while common names and cultivars will always be in normal style. Bold is used for report headers, footers and family names. Family names appear only when the plant list is in family name order. You should choose a font that has distinguishable regular, bold and italic typefaces.
Included Spreadsheet entries: In this box you can select the columns (if any) in the Spreadsheet that you wish to be included in the printed list.
Spreadsheet entries appear: Here you can designate where you would like the Spreadsheet entries to be displayed. Place a dot in the circle beside the desired option.
Include extra names in common lists
Checking the first option will include botanical names to the right of the common name when the list is printed in common name order. Checking the second option will include common name Aliases to the right of the botanical name when the list is printed in botanical name order.
Include extra names in botanical lists
This option includes common names when the list is printed in botanical name order.
Start new page on first letter/ family name change
This option causes a new page to be started whenever the first letter of a plant name changes and you have the list in alphabetic order, or when the family name changes when you have the list in
127
family name order. Otherwise, each page will be filled before progressing to the next one.
Headers and Footers...
Clicking on the button brings up the Set Header/Footer window. Here you can configure your document(s) to always print with the same information at the top and bottom. These settings will be remembered and valid on all future printouts until changed. Click here for detailed information.Headers and Footers... Page Setup
The button enables you to select the printer to be used and to set printer-specific options such as page orientation, paper size, etc. You can specify a different printer and different options for each type of printout. Settings will be remembered and remain valid until changed.
Here you can also specify the page margins for your data printout. The printable area on almost all printers is less than the page size. Most printers require a margin of 5 mm (0.2 inches) or more (margins may be set in either millimeters or inches). If you set page margins to 0, then the entire printable area will be used. Otherwise, the margin values are applied to the paper width. If the desired printable area, after allowing for margins, is not supported by your printer, HORTICOPIA® Professional will attempt to adjust them automatically.
HORTICOPIA® Professional assumes that the printable area of your printer is centered on the page. In the case of some printers, however, this is not so. In this case, you will have to experiment with the margin settings to get the desired results.
Exit
Clicking on the button closes the File|Document Setup... window and returns you to the Workbench. Any changes to the List tab will be global and will take effect immediately. Clicking
on the button also closes the File|Document Setup... window and returns you to the Workbench, but any changes made to any of the tabs during the time the window was open will be cancelled.
Tip: Use the Print Preview commands on the File menu to examine documents prior to printing.
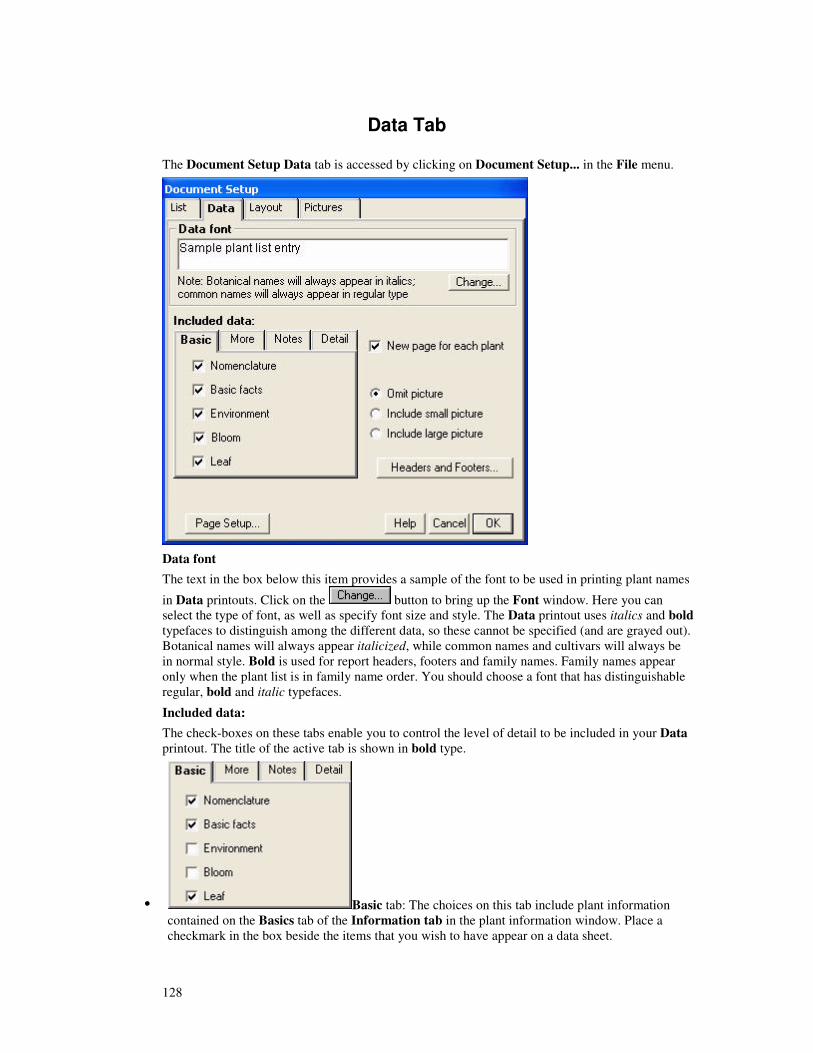
128
Data Tab The Document Setup Data tab is accessed by clicking on Document Setup... in the File menu.
Data font The text in the box below this item provides a sample of the font to be used in printing plant names
in Data printouts. Click on the button to bring up the Font window. Here you can select the type of font, as well as specify font size and style. The Data printout uses italics and bold typefaces to distinguish among the different data, so these cannot be specified (and are grayed out). Botanical names will always appear italicized, while common names and cultivars will always be in normal style. Bold is used for report headers, footers and family names. Family names appear only when the plant list is in family name order. You should choose a font that has distinguishable regular, bold and italic typefaces.
Included data: The check-boxes on these tabs enable you to control the level of detail to be included in your Data printout. The title of the active tab is shown in bold type.
�� Basic tab: The choices on this tab include plant information contained on the Basics tab of the Information tab in the plant information window. Place a checkmark in the box beside the items that you wish to have appear on a data sheet.
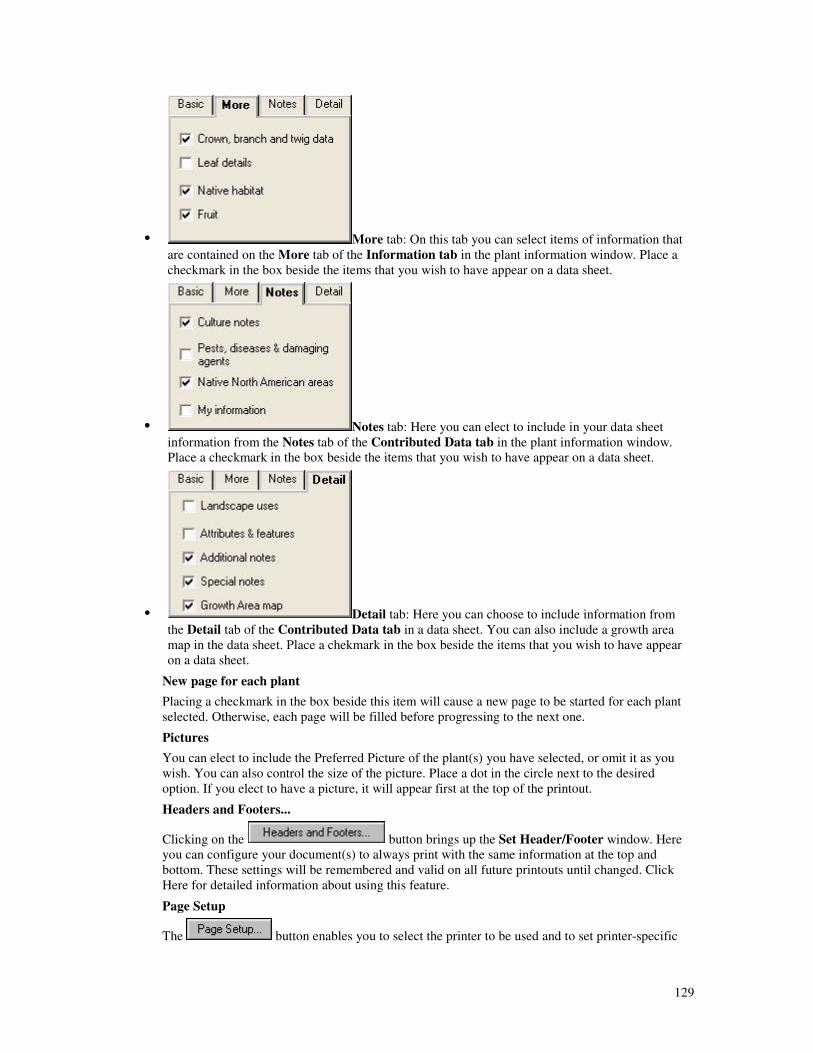
129
�� More tab: On this tab you can select items of information that are contained on the More tab of the Information tab in the plant information window. Place a checkmark in the box beside the items that you wish to have appear on a data sheet.
�� Notes tab: Here you can elect to include in your data sheet information from the Notes tab of the Contributed Data tab in the plant information window. Place a checkmark in the box beside the items that you wish to have appear on a data sheet.
�� Detail tab: Here you can choose to include information from the Detail tab of the Contributed Data tab in a data sheet. You can also include a growth area map in the data sheet. Place a chekmark in the box beside the items that you wish to have appear on a data sheet.
New page for each plant Placing a checkmark in the box beside this item will cause a new page to be started for each plant selected. Otherwise, each page will be filled before progressing to the next one.
Pictures
You can elect to include the Preferred Picture of the plant(s) you have selected, or omit it as you wish. You can also control the size of the picture. Place a dot in the circle next to the desired option. If you elect to have a picture, it will appear first at the top of the printout.
Headers and Footers...
Clicking on the button brings up the Set Header/Footer window. Here you can configure your document(s) to always print with the same information at the top and bottom. These settings will be remembered and valid on all future printouts until changed. Click Here for detailed information about using this feature.
Page Setup
The button enables you to select the printer to be used and to set printer-specific
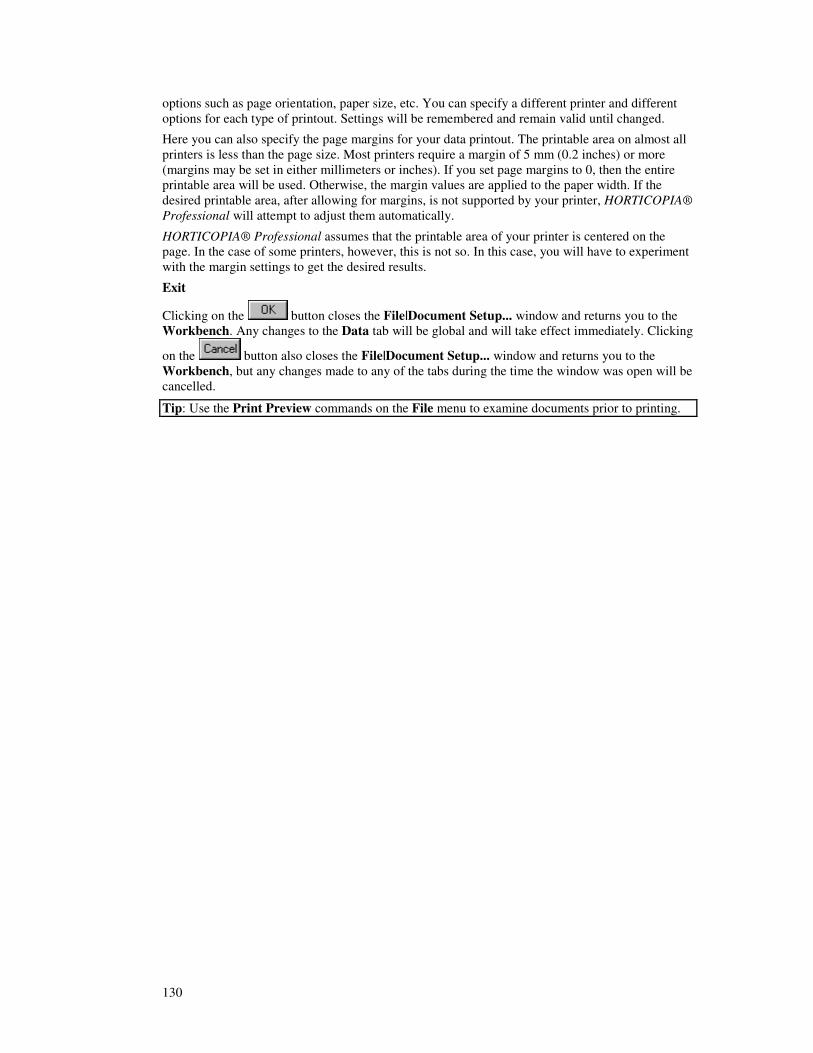
130
options such as page orientation, paper size, etc. You can specify a different printer and different options for each type of printout. Settings will be remembered and remain valid until changed.
Here you can also specify the page margins for your data printout. The printable area on almost all printers is less than the page size. Most printers require a margin of 5 mm (0.2 inches) or more (margins may be set in either millimeters or inches). If you set page margins to 0, then the entire printable area will be used. Otherwise, the margin values are applied to the paper width. If the desired printable area, after allowing for margins, is not supported by your printer, HORTICOPIA® Professional will attempt to adjust them automatically.
HORTICOPIA® Professional assumes that the printable area of your printer is centered on the page. In the case of some printers, however, this is not so. In this case, you will have to experiment with the margin settings to get the desired results.
Exit
Clicking on the button closes the File|Document Setup... window and returns you to the Workbench. Any changes to the Data tab will be global and will take effect immediately. Clicking
on the button also closes the File|Document Setup... window and returns you to the Workbench, but any changes made to any of the tabs during the time the window was open will be cancelled.
Tip: Use the Print Preview commands on the File menu to examine documents prior to printing.
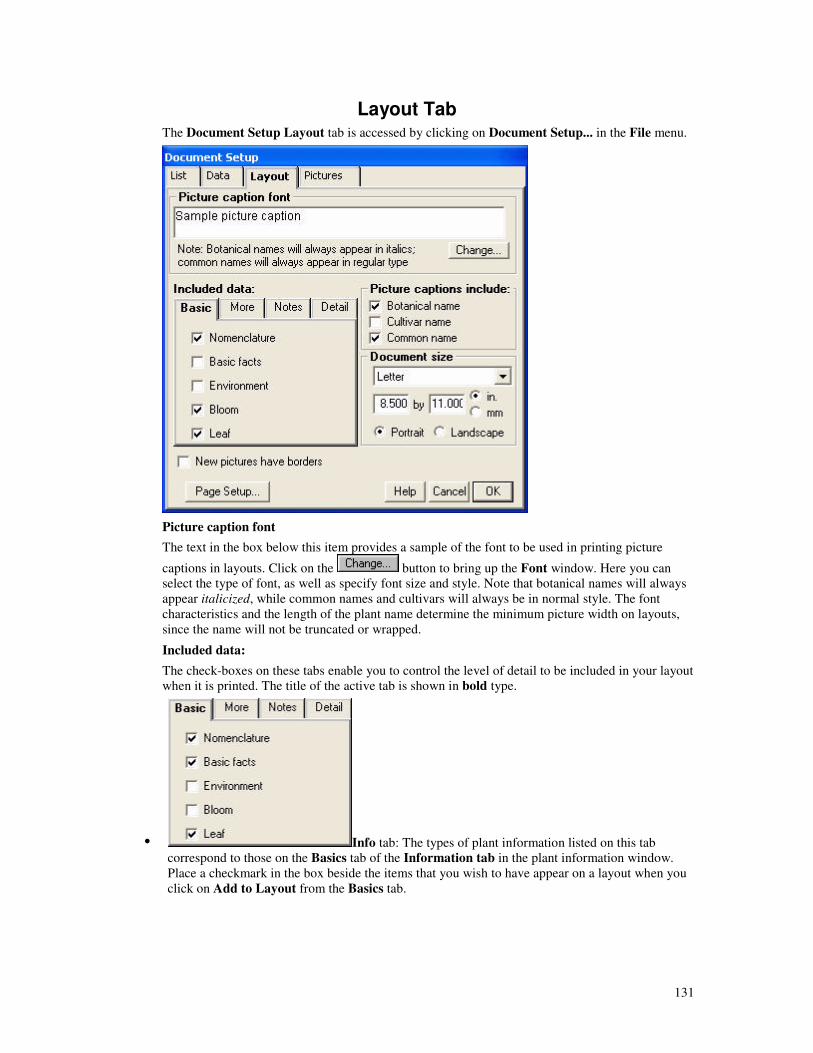
131
Layout Tab The Document Setup Layout tab is accessed by clicking on Document Setup... in the File menu.
Picture caption font The text in the box below this item provides a sample of the font to be used in printing picture
captions in layouts. Click on the button to bring up the Font window. Here you can select the type of font, as well as specify font size and style. Note that botanical names will always appear italicized, while common names and cultivars will always be in normal style. The font characteristics and the length of the plant name determine the minimum picture width on layouts, since the name will not be truncated or wrapped.
Included data: The check-boxes on these tabs enable you to control the level of detail to be included in your layout when it is printed. The title of the active tab is shown in bold type.
�� Info tab: The types of plant information listed on this tab correspond to those on the Basics tab of the Information tab in the plant information window. Place a checkmark in the box beside the items that you wish to have appear on a layout when you click on Add to Layout from the Basics tab.
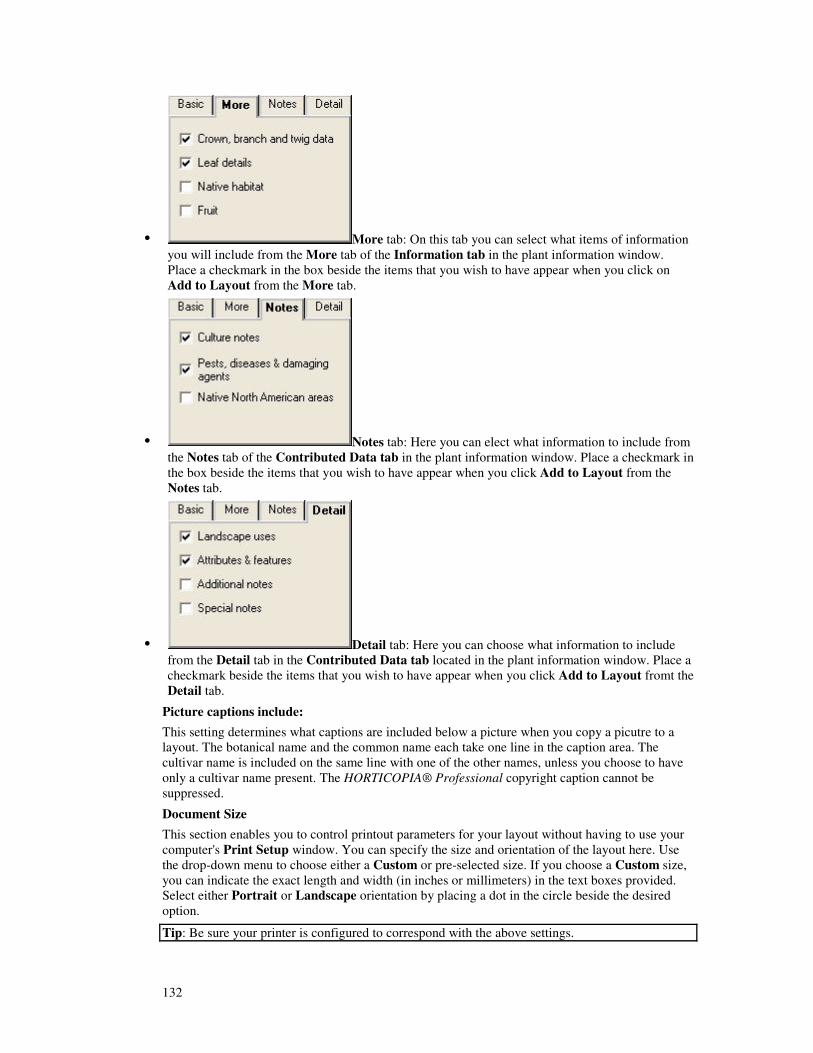
132
�� More tab: On this tab you can select what items of information you will include from the More tab of the Information tab in the plant information window. Place a checkmark in the box beside the items that you wish to have appear when you click on Add to Layout from the More tab.
�� Notes tab: Here you can elect what information to include from the Notes tab of the Contributed Data tab in the plant information window. Place a checkmark in the box beside the items that you wish to have appear when you click Add to Layout from the Notes tab.
�� Detail tab: Here you can choose what information to include from the Detail tab in the Contributed Data tab located in the plant information window. Place a checkmark beside the items that you wish to have appear when you click Add to Layout fromt the Detail tab.
Picture captions include: This setting determines what captions are included below a picture when you copy a picutre to a layout. The botanical name and the common name each take one line in the caption area. The cultivar name is included on the same line with one of the other names, unless you choose to have only a cultivar name present. The HORTICOPIA® Professional copyright caption cannot be suppressed.
Document Size
This section enables you to control printout parameters for your layout without having to use your computer's Print Setup window. You can specify the size and orientation of the layout here. Use the drop-down menu to choose either a Custom or pre-selected size. If you choose a Custom size, you can indicate the exact length and width (in inches or millimeters) in the text boxes provided. Select either Portrait or Landscape orientation by placing a dot in the circle beside the desired option.
Tip: Be sure your printer is configured to correspond with the above settings.
133
Page Setup
The button enables you to select the printer to be used and to set printer-specific options such as page orientation, paper size, etc. You can specify a different printer and different options for each type of printout. Settings will be remembered and remain valid until changed.
Here you can also specify the page margins for your data printout. The printable area on almost all printers is less than the page size. Most printers require a margin of 5 mm (0.2 inches) or more (margins may be set in either millimeters or inches). If you set page margins to 0, then the entire printable area will be used. Otherwise, the margin values are applied to the paper width. If the desired printable area, after allowing for margins, is not supported by your printer, HORTICOPIA® Professional will attempt to adjust them automatically.
HORTICOPIA® Professional assumes that the printable area of your printer is centered on the page. In the case of some printers, however, this is not so. In this case, you will have to experiment with the margin settings to get the desired results.
Exit
Clicking on the button closes the File|Document Setup... window and returns you to the Workbench. Any changes to the layout tab will take effect immediately. If there is no layout open, any changes made to the Layout tab will be global and will apply to all subsequent layouts. If there is a layout open when the Layout tab is changed, the changes will apply only to the open layout (which will retain the changes, if saved) and the Layout tab settings will revert to their previous status when the File|Document Setup... window is closed. Subsequent new layouts will still be governed by the previous settings in the Layout tab. All layouts retain their individual
configurations when saved. Clicking on the button also closes the File|Document Setup... window and returns you to the Workbench, but any changes made to any of the tabs during the time the window was open will be cancelled.
Tip: Use the Print Preview commands on the File menu to examine documents prior to printing.
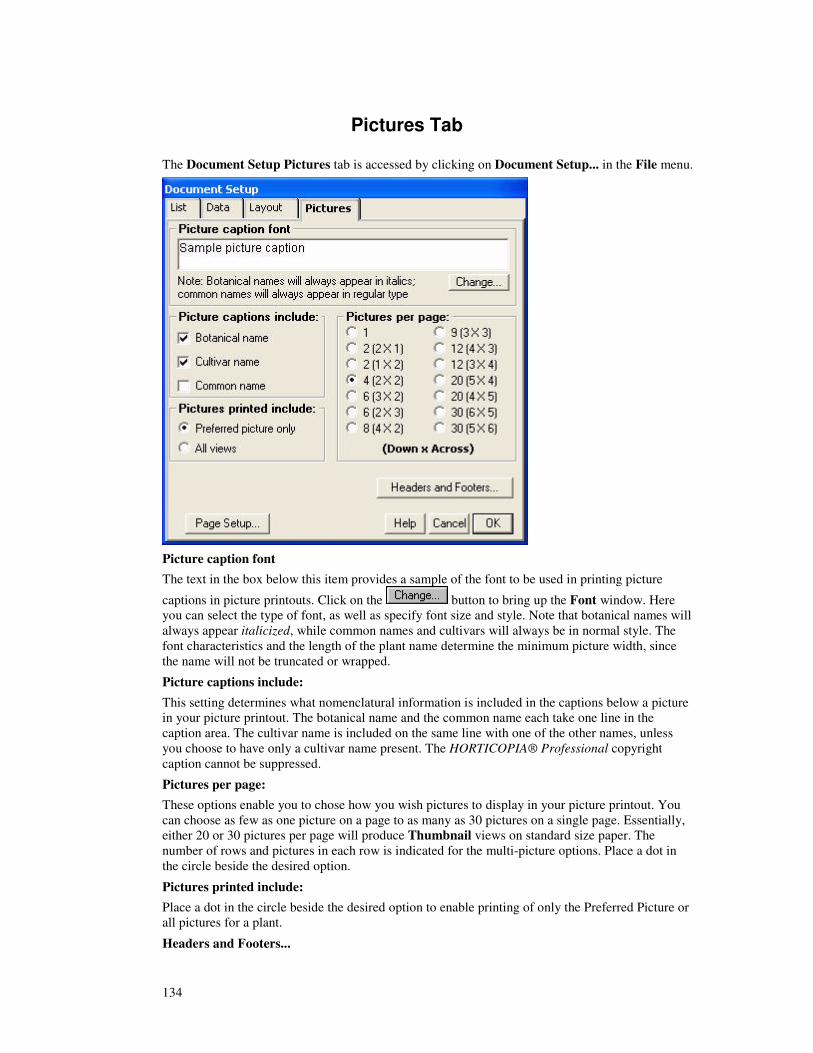
134
Pictures Tab The Document Setup Pictures tab is accessed by clicking on Document Setup... in the File menu.
Picture caption font The text in the box below this item provides a sample of the font to be used in printing picture
captions in picture printouts. Click on the button to bring up the Font window. Here you can select the type of font, as well as specify font size and style. Note that botanical names will always appear italicized, while common names and cultivars will always be in normal style. The font characteristics and the length of the plant name determine the minimum picture width, since the name will not be truncated or wrapped.
Picture captions include: This setting determines what nomenclatural information is included in the captions below a picture in your picture printout. The botanical name and the common name each take one line in the caption area. The cultivar name is included on the same line with one of the other names, unless you choose to have only a cultivar name present. The HORTICOPIA® Professional copyright caption cannot be suppressed.
Pictures per page: These options enable you to chose how you wish pictures to display in your picture printout. You can choose as few as one picture on a page to as many as 30 pictures on a single page. Essentially, either 20 or 30 pictures per page will produce Thumbnail views on standard size paper. The number of rows and pictures in each row is indicated for the multi-picture options. Place a dot in the circle beside the desired option.
Pictures printed include: Place a dot in the circle beside the desired option to enable printing of only the Preferred Picture or all pictures for a plant.
Headers and Footers...
135
Clicking on the button brings up the Set Header/Footer window. Here you can configure your document(s) to always print with the same information at the top and bottom. These settings will be remembered and valid on all future printouts until changed. Click here for detailed information.
Page Setup
The button enables you to select the printer to be used and to set printer-specific options such as page orientation, paper size, graphics modes, etc. You can specify a different printer and different options for each type of printout. Settings will be remembered and remain valid until changed.
Here you can also specify the page margins for your data printout. The printable area on almost all printers is less than the page size. Most printers require a margin of 5 mm (0.2 inches) or more (margins may be set in either millimeters or inches). If you set page margins to 0, then the entire printable area will be used. Otherwise, the margin values are applied to the paper width. If the desired printable area, after allowing for margins, is not supported by your printer, HORTICOPIA® Professional will attempt to adjust them automatically.
HORTICOPIA® Professional assumes that the printable area of your printer is centered on the page. In the case of some printers, however, this is not so. In this case, you will have to experiment with the margin settings to get the desired results.
Exit
Clicking on the button closes the File|Document Setup... window and returns you to the Workbench. Any changes to the Pictures tab will be global and will take effect immediately.
Clicking on the button also closes the File|Document Setup... window and returns you to the Workbench, but any changes made to any of the tabs during the time the window was open will be cancelled.
Tip: Use the Print Preview commands on the File menu to examine documents prior to printing.
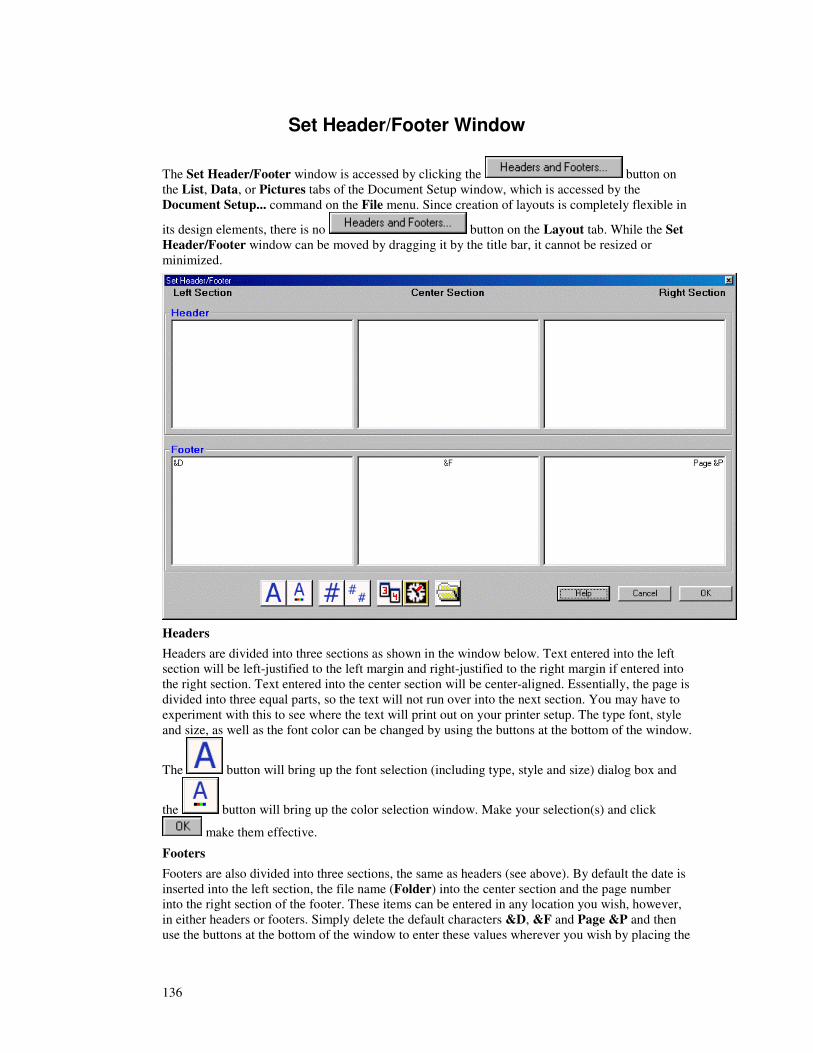
136
Set Header/Footer Window
The Set Header/Footer window is accessed by clicking the button on the List, Data, or Pictures tabs of the Document Setup window, which is accessed by the Document Setup... command on the File menu. Since creation of layouts is completely flexible in
its design elements, there is no button on the Layout tab. While the Set Header/Footer window can be moved by dragging it by the title bar, it cannot be resized or minimized.
Headers
Headers are divided into three sections as shown in the window below. Text entered into the left section will be left-justified to the left margin and right-justified to the right margin if entered into the right section. Text entered into the center section will be center-aligned. Essentially, the page is divided into three equal parts, so the text will not run over into the next section. You may have to experiment with this to see where the text will print out on your printer setup. The type font, style and size, as well as the font color can be changed by using the buttons at the bottom of the window.
The button will bring up the font selection (including type, style and size) dialog box and
the button will bring up the color selection window. Make your selection(s) and click
make them effective.
Footers
Footers are also divided into three sections, the same as headers (see above). By default the date is inserted into the left section, the file name (Folder) into the center section and the page number into the right section of the footer. These items can be entered in any location you wish, however, in either headers or footers. Simply delete the default characters &D, &F and Page &P and then use the buttons at the bottom of the window to enter these values wherever you wish by placing the
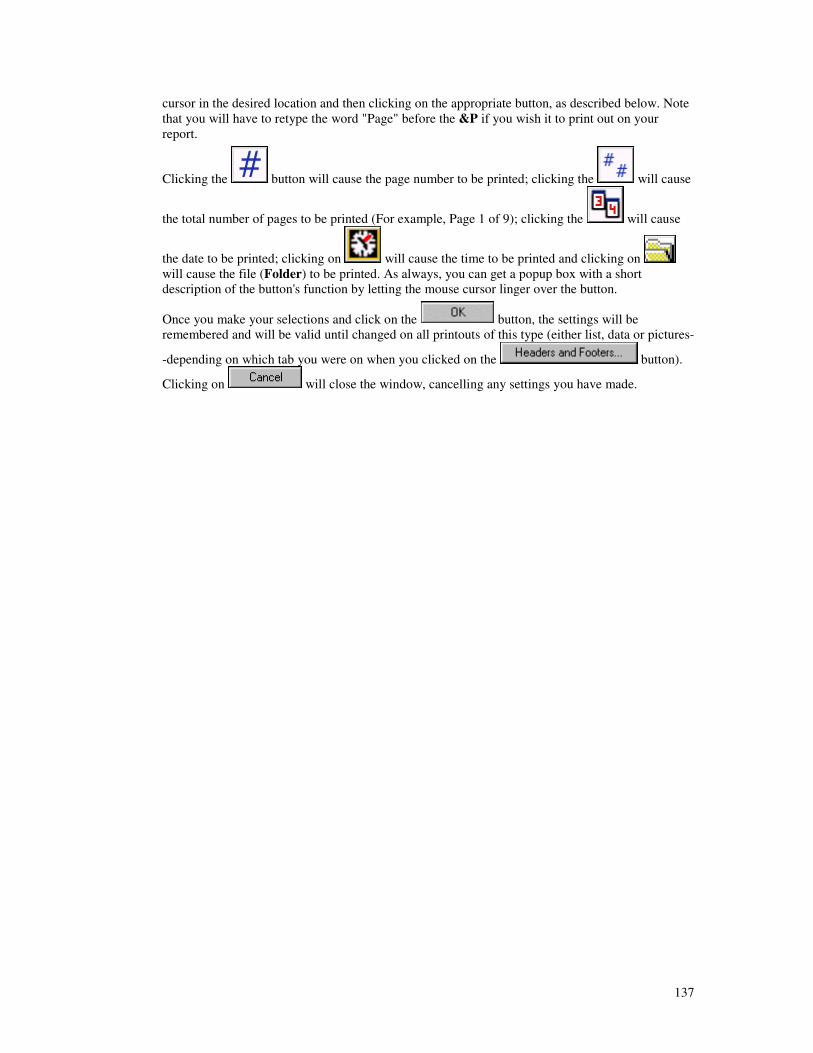
137
cursor in the desired location and then clicking on the appropriate button, as described below. Note that you will have to retype the word "Page" before the &P if you wish it to print out on your report.
Clicking the button will cause the page number to be printed; clicking the will cause
the total number of pages to be printed (For example, Page 1 of 9); clicking the will cause
the date to be printed; clicking on will cause the time to be printed and clicking on will cause the file (Folder) to be printed. As always, you can get a popup box with a short description of the button's function by letting the mouse cursor linger over the button.
Once you make your selections and click on the button, the settings will be remembered and will be valid until changed on all printouts of this type (either list, data or pictures-
-depending on which tab you were on when you clicked on the button).
Clicking on will close the window, cancelling any settings you have made.
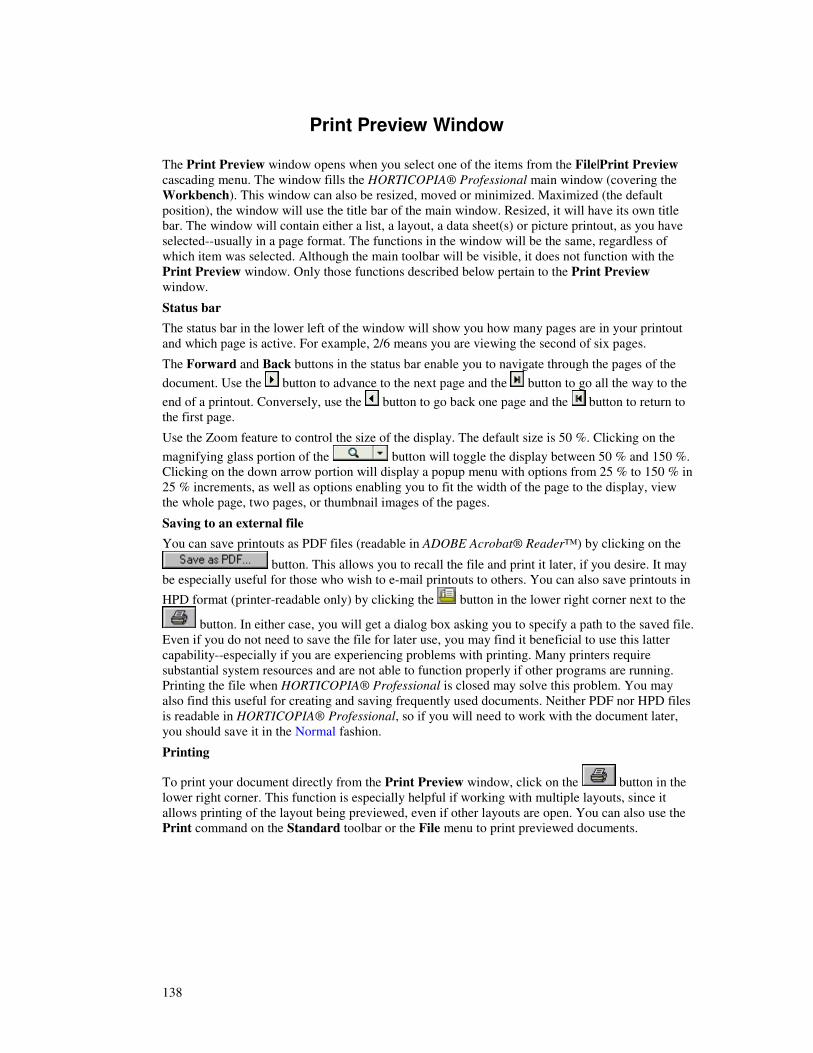
138
Print Preview Window The Print Preview window opens when you select one of the items from the File|Print Preview cascading menu. The window fills the HORTICOPIA® Professional main window (covering the Workbench). This window can also be resized, moved or minimized. Maximized (the default position), the window will use the title bar of the main window. Resized, it will have its own title bar. The window will contain either a list, a layout, a data sheet(s) or picture printout, as you have selected--usually in a page format. The functions in the window will be the same, regardless of which item was selected. Although the main toolbar will be visible, it does not function with the Print Preview window. Only those functions described below pertain to the Print Preview window.
Status bar
The status bar in the lower left of the window will show you how many pages are in your printout and which page is active. For example, 2/6 means you are viewing the second of six pages.
The Forward and Back buttons in the status bar enable you to navigate through the pages of the document. Use the button to advance to the next page and the button to go all the way to the end of a printout. Conversely, use the button to go back one page and the button to return to the first page.
Use the Zoom feature to control the size of the display. The default size is 50 %. Clicking on the magnifying glass portion of the button will toggle the display between 50 % and 150 %. Clicking on the down arrow portion will display a popup menu with options from 25 % to 150 % in 25 % increments, as well as options enabling you to fit the width of the page to the display, view the whole page, two pages, or thumbnail images of the pages.
Saving to an external file
You can save printouts as PDF files (readable in ADOBE Acrobat® Reader™) by clicking on the
button. This allows you to recall the file and print it later, if you desire. It may be especially useful for those who wish to e-mail printouts to others. You can also save printouts in HPD format (printer-readable only) by clicking the button in the lower right corner next to the
button. In either case, you will get a dialog box asking you to specify a path to the saved file. Even if you do not need to save the file for later use, you may find it beneficial to use this latter capability--especially if you are experiencing problems with printing. Many printers require substantial system resources and are not able to function properly if other programs are running. Printing the file when HORTICOPIA® Professional is closed may solve this problem. You may also find this useful for creating and saving frequently used documents. Neither PDF nor HPD files is readable in HORTICOPIA® Professional, so if you will need to work with the document later, you should save it in the Normal fashion.
Printing
To print your document directly from the Print Preview window, click on the button in the lower right corner. This function is especially helpful if working with multiple layouts, since it allows printing of the layout being previewed, even if other layouts are open. You can also use the Print command on the Standard toolbar or the File menu to print previewed documents.
139
Maps
Hardiness Map The USDA Hardiness Map is displayed when you select Hardiness Map from the Tools menu. The map will help you in determining your Hardiness zone within North America by fixing your location on the map. Users in other areas can determine if a plant is likely to survive in their locality by extrapolating the temperature range for each zone from the Zone Key grid (see below) and applying it to local weather conditions.
Zooming in
You can get an enlarged view of any region in the main map by positioning the mouse cursor (magnifying glass) over a desired area and clicking. This will "zoom in" to display a more detailed view of the area. Three levels of zooming are provided and you can enlarge or maximize any of the displayed maps with the button. The maps behave like a Picture window and can be moved, resized and printed.
Zooming in on an area does not close the main Hardiness Map window nor any of the previous levels. (See Closing Map Windows below.)
Key to zones
At the left side of the main Hardiness Map is a Zone Key grid. When you click on the grid, you will get an enlarged window with the Zone Keys, showing what temperature range (in Fahrenheit and Celsius) and zone assignment has been made for each color on the map.
Closing Map Windows
Each level of the Hardiness Map is in a separate window. HORTICOPIA® Professional does not automatically close any of these windows. You can minimize the maps, if you wish, by clicking on the button, but you should close the ones you no longer need by clicking on the button.
The Hardiness Map windows can coexist with the HORTICOPIA® Professional main windows and you can use the WINDOWS taskbar icons or Alt-Tab to switch between them. Open Hardiness Map windows will also be listed at the bottom of the Window menu and can be recalled by clicking on the desired item.

140
Zone Keys The Zone Keys are better displayed by clicking on the USDA Hardiness Map Zone Keys grid on the left side of the map, in order to enlarge them.
The Zone Keys identify the colored zone ranges found on the Hardiness Map. The hardiness selection graphic on the Workbench is a compact replica (minus the printed temperature ranges) of the Zone Keys. The temperature range for each zone is shown in degrees Fahrenheit and Celsius.
If you are correlating the older USDA zone information (without the a and b designations) to the current zone designations, simply ignore the letters and use the zone number (include the temperature range for both sections of the zone).
141
Help
System Parameters The System Parameters window is displayed by selecting the System Parameters command from the Help menu. What appears is the result a diagnostic examination of your computer. This information could be helpful to you in configuring your computer and is useful to HORTICOPIA® Professional support personnel in helping to resolve any problems you might encounter in running the program.
Version Number
The first section of the report includes the date and version number of HORTICOPIA® Professional. Your registration ID and your computer name are also shown.
Directories and Paths
The second section shows the location of HORTICOPIA® Professional on your computer. Also displayed are the locations of your system files and your temporary files.
System Information
The third section provides information regarding the operating system, computer memory, fonts and color.
Drive Information
The fourth section shows how much space is available on each of the drives on your computer.
Printer Information
This section shows the detected settings for your printer.
Tip: Before contacting HORTICOPIA® Professional support, print out a copy (if you call) or include a copy with any e-mail or fax correspondence.
142
Credits
HORTICOPIA® Credits The HORTICOPIA® Credits window is displayed only when you select HORTICOPIA® Credits from the Help menu. (You can, however, get photographic credits by right-clicking on a full-size Picture window.)
The HORTICOPIA® Credits window provides information about the people who worked so diligently in researching, developing, designing, editing and testing all the components that went into HORTICOPIA® Professional.
Navigating the Credits
Use the and buttons located at the bottom right of the HORTICOPIA®
Credits window to move back and forth among credit frames. Clicking on will close the HORTICOPIA® Credits window.
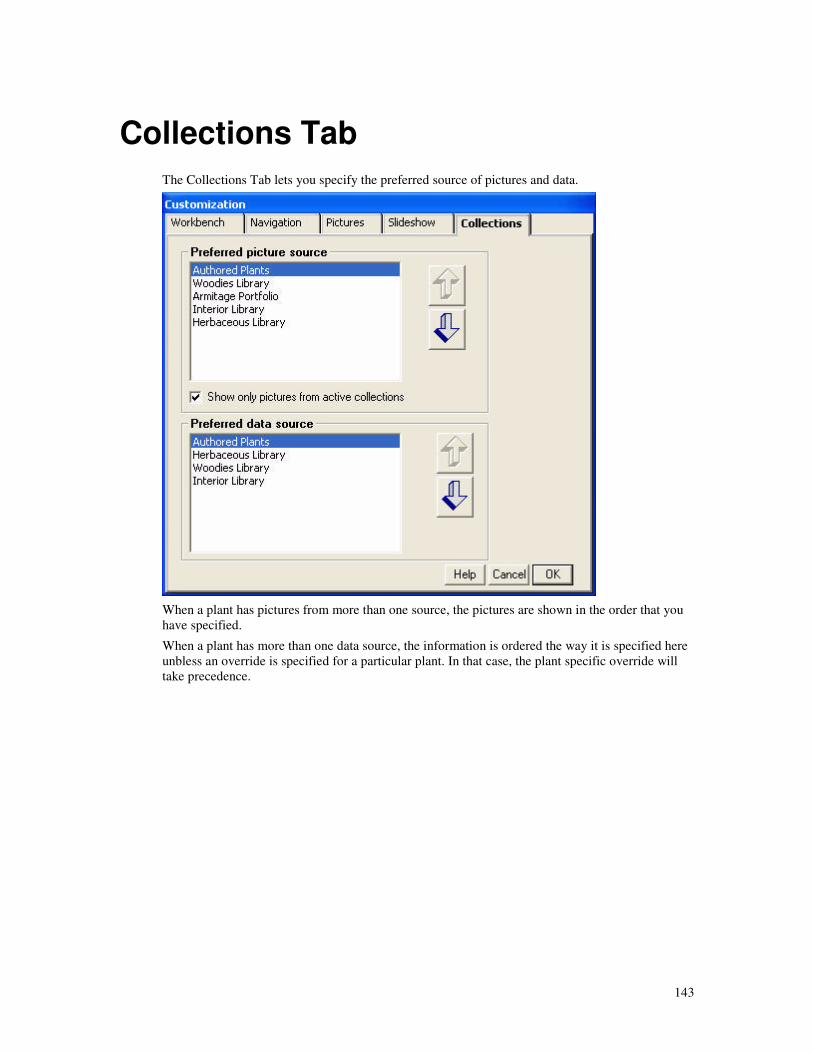
143
Collections Tab
The Collections Tab lets you specify the preferred source of pictures and data.
When a plant has pictures from more than one source, the pictures are shown in the order that you have specified.
When a plant has more than one data source, the information is ordered the way it is specified here unbless an override is specified for a particular plant. In that case, the plant specific override will take precedence.

144
Favorites Menu
Type topic text here.
145
HORTICOPIA® Professional is the latest in a widely acclaimed line of horticultural software. It includes a database of more than 8,500 plants with outstanding pictures and complete data for each plant--the most comprehensive collection available. This is combined with a powerful interactive search engine that enables you to search the database by any of dozens of plant attributes and characteristics, as well as environmental criteria. It even provides audible rendering of the botanical names to aid in mastering the difficult Latin pronunciations.
HORTICOPIA® Professional offers extensive printing options, making it especially useful to Landscapers, Garden Centers and Educators, as well as gardeners in general. In addition, there is the capability to compile and run Slideshows, which can be presented in a number of ways, also appealing to a wide range of users.
You can save the results of your plant searches to a file for future reference or use, as you can MyLists, Slideshows and Layouts. The possible uses to which the program can be put are limited only by the imagination.
HORTICOPIA® Professional has an intuitive interface and uses familiar WINDOWS methods, so you'll be able to perform most tasks by using the WINDOWS knowledge you already have. In working with HORTICOPIA® Professional, there are multiple ways to perform almost every desired action. It's always a good idea to try right-clicking for alternatives. Also, due to the extensive choice of Customization features, you should check the Customization options first if things don't seem to be working correctly. It could be that the feature you want is not activated (or vice versa).
To get you started, there is a system of advisor topics that will appear automatically with each feature until turned off. These topics are designed to answer most fundamental questions and will probably be sufficient for most users. In addition, context-sensitive Help is always available by pressing F1. (Be sure to keep the Mouse cursor on the item of interest.) If you need or desire additional information, the on-line Help covers all aspects of the Program. You can access the various Help topics by using the Table of Contents, the Index or the Search feature in the frame
to the left (which can be hidden by clicking on the button and shown again by clicking on
the button). The Glossary contains helpful, short definitions of terms used in HORTICOPIA® Professional.
In the unlikely event that you still have questions or there are technical problems running the program, Technical Support is available by phone or e-mail. See Contacting HORTICOPIA® for more information.
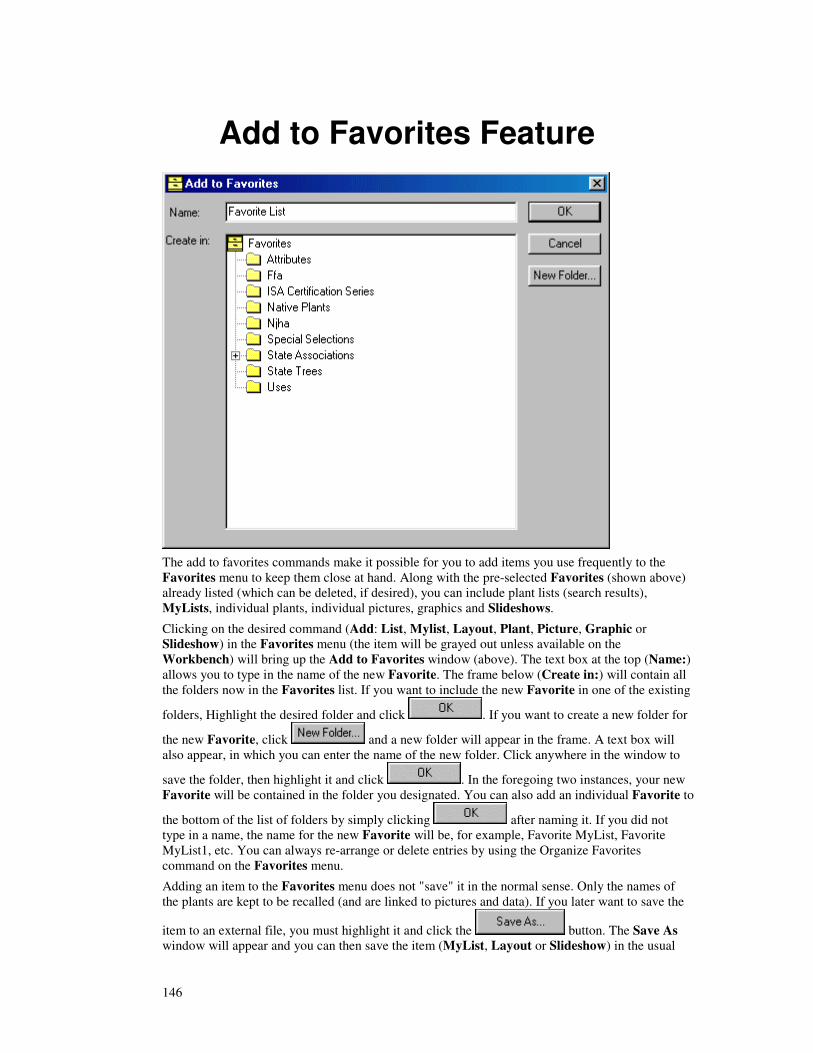
146
Add to Favorites Feature
The add to favorites commands make it possible for you to add items you use frequently to the Favorites menu to keep them close at hand. Along with the pre-selected Favorites (shown above) already listed (which can be deleted, if desired), you can include plant lists (search results), MyLists, individual plants, individual pictures, graphics and Slideshows.
Clicking on the desired command (Add: List, Mylist, Layout, Plant, Picture, Graphic or Slideshow) in the Favorites menu (the item will be grayed out unless available on the Workbench) will bring up the Add to Favorites window (above). The text box at the top (Name:) allows you to type in the name of the new Favorite. The frame below (Create in:) will contain all the folders now in the Favorites list. If you want to include the new Favorite in one of the existing
folders, Highlight the desired folder and click . If you want to create a new folder for
the new Favorite, click and a new folder will appear in the frame. A text box will also appear, in which you can enter the name of the new folder. Click anywhere in the window to
save the folder, then highlight it and click . In the foregoing two instances, your new Favorite will be contained in the folder you designated. You can also add an individual Favorite to
the bottom of the list of folders by simply clicking after naming it. If you did not type in a name, the name for the new Favorite will be, for example, Favorite MyList, Favorite MyList1, etc. You can always re-arrange or delete entries by using the Organize Favorites command on the Favorites menu.
Adding an item to the Favorites menu does not "save" it in the normal sense. Only the names of the plants are kept to be recalled (and are linked to pictures and data). If you later want to save the
item to an external file, you must highlight it and click the button. The Save As window will appear and you can then save the item (MyList, Layout or Slideshow) in the usual

147
fashion.
You can cancel all actions at any time by clicking on the button. In this case, nothing will be added to the Favorites menu.
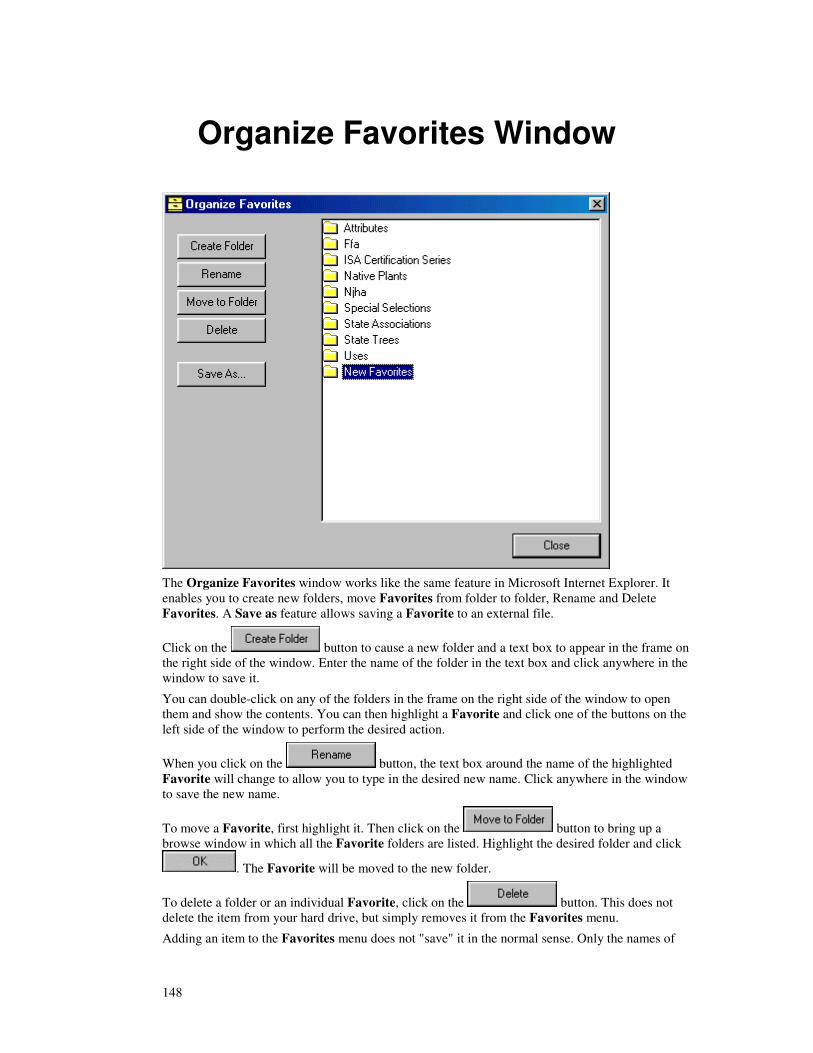
148
Organize Favorites Window
The Organize Favorites window works like the same feature in Microsoft Internet Explorer. It enables you to create new folders, move Favorites from folder to folder, Rename and Delete Favorites. A Save as feature allows saving a Favorite to an external file.
Click on the button to cause a new folder and a text box to appear in the frame on the right side of the window. Enter the name of the folder in the text box and click anywhere in the window to save it.
You can double-click on any of the folders in the frame on the right side of the window to open them and show the contents. You can then highlight a Favorite and click one of the buttons on the left side of the window to perform the desired action.
When you click on the button, the text box around the name of the highlighted Favorite will change to allow you to type in the desired new name. Click anywhere in the window to save the new name.
To move a Favorite, first highlight it. Then click on the button to bring up a browse window in which all the Favorite folders are listed. Highlight the desired folder and click
. The Favorite will be moved to the new folder.
To delete a folder or an individual Favorite, click on the button. This does not delete the item from your hard drive, but simply removes it from the Favorites menu.
Adding an item to the Favorites menu does not "save" it in the normal sense. Only the names of

149
the plants are kept to be recalled at a later time (and are linked to pictures and data). If you later
want to save the item to an external file, you must highlight it and click the button. The Save As window will appear and you can then save the item (MyList, layout or slideshow) in the usual fashion.
150
Glossary Added Notes
A set of external notes, in addition to Personal Notes, that contain data, photographs and/or graphics for a plant.
Alias
An additional common name by which a plant is known. Shown in gray text on HORTICOPIA plant lists.
Annual
A plant that completes its life cycle, seed to seed, in one year. Many perennial plants in their native, usually warmer, habitat are grown as annuals in cooler climates.
Attribute
A characteristic of a plant such as bloom color, bloom time, or height; generally, you can find plants by their attributes.
Authoring
The process of adding user-selected plants to the Horticopia Professional Plant List and editing the pictures and/or information associated with the new plants.
Authoring Mode
A function of Horticopia Pro accessed via the Tools menu by which one can add ones own plants to the standard Plant List. As opposed to Standard Mode (which see).
Biennial
A plant sewn one year to flower or fruit the next. Many reseed easily and are sometimes sold as perennials.
Binomial
The two Latin terms used to name a species; includes the genus and specific epithet.
Botanical Name
The Latin binomial by which a plant species is known. Same as Latin or Scientific Name. It consists of genus and specific epithet. Each species has only one valid botanical name worldwide.
Bulb
A short underground stem covered by enlarged and tightly packed scales (leaf bases) containing stored food. Corms, tubers and rhizomes are sometimes erroneously described as bulbs.
Center-justified
Text or other content that is positioned in the center of a page.
Click
Clicking the left mouse button once to perform a computer function. Same as Single-click.
Client
The requesting program or user in a client/server relationship.

151
Common Name
One or more names in the local language for a plant. The same plant can be known by many different common names, varying widely by location.
Conifer
Usually a cone-bearing tree, such as pine or fir, but sometimes another of the Coniferae group which does not produce cones, such as Gingko.
Corm
A thickened, solid underground stem, without scales, in which food is stored.
Counter
The button on the Workbench that indicates the number of plants in a plant list.
Cultivar
An acronym for "cultivated variety"; cultivars can be naturally occurring plants, but usually have been cultivated with specific desirable characteristics in appearance and/or resilience.
Deselect
The process of voiding a previously made choice--usually with the left mouse button, but sometimes with the right; same as un-select.
Double-click
Clicking the left mouse button twice to perform a computer function.
Drop-down
Description of menus that open downward to show available computer options.
Exfoliate
To peel off in thin layers or shreds; usually said of the bark of trees and considered to be an attractive attribute.
Exposure
The light requirements of a plant. For example, full sun or shade.
Family Name
The name assigned to a group of related plants, more comprehensive than a genus. Botanical family names usually end in -aceae.
Fern
A plant of the order Filicales which reproduces by spores instead of seeds; non-flowering, with fronds instead of leaves.
Fibrous Root
A root that branches in all directions. Usually applied to plants that have a mass of fine matted roots as distinct from thicker, fleshy ones.
Filtering
The process of displaying only some plants from the available database based on pre-selected criteria Same as screening. Filtering can be for hardiness, for plants on MyList, and/or plants with
152
specific selected attributes.
Folder
A green or yellow icon in the plant list; yellow icons represent letters of the alphabet (alphabetic view) or plant families (family view); green icons are used for plants where more than one cultivar for the same species is present in HORTICOPIA Professional.
Footer
Formatted information that is included at the bottom of each page of a printout.
Form
The general appearance of a plant; the way in which it grows--upright, spreading, trailing, etc. Synonymous with Habit.
Frame
A portion of a window display dedicated to specific content.
Garden Workbench
The central work area for HORTICOPIA Professional. Frequently shortened to Workbench.
Genus
The first word in the Latin binomial naming a species; represents the smallest natural group containing related, but distinct, species.
Grass
Any member of the family Poaceae, including the cereals and bamboos. Usually used to describe any grass-like plant, such as the sedges.
Green Outline
A green outline around a plant attribute or characteristic graphic indicates that it has been selected for the current search; the green outline is set (or reset) by clicking on the plant attribute or characteristic graphic.
Groundcover
Any relatively low-growing plant. Can be Herbaceous or Woody.
Growth Area
The general region wherein the plant will grow as determined by hardiness, an indicator of winter temperatures; upper hardiness zones are used as an approximation for summer weather extremes.
Habit
The general appearance of a plant; the way in which it grows--upright, spreading, trailing, etc. Synonymous with Form.
Hardiness
Describes the ability of a plant to survive outdoors year round without protection.
Hardiness Zone
The United States Department of Agriculture (USDA) designation for the average low winter temperature; hardiness is presented as zones ranging from 1 then 2a, 2b, through 10a, 10b, and then 11. Each of the 20 zones is a 5 degree (Fahrenheit) increment; the "a" and "b" divisions were
153
added in 1995. While this is a very useful indicator, it must be recognized that local conditions can create microclimates that are one or more zones removed from the average, so some plants will not survive in some cases where they can theoretically be grown and vice versa.
Header
Formatted information that is included at the top of each page of a printout.
Highlight
The process of indicating a choice; usually by clicking with a mouse button. Normally synonymous with Select.
Icon
A pictorial graphic representing an item in the program. HORTICOPIA Professional uses individual icons to distinguish between different windows. Detail and landscape pictures also have different icons.
Latin Name
The Latin binomial by which a plant species is known. Same as Botanical or Scientific Name. It consists of genus and specific epithet. Each species has only one valid Latinl name worldwide.
Layering
Placing items in layers on the Layout, allowing some items to overlap others.
Layout
The composition page created by HORTICOPIA Professional users with desired pictures and data; same as Print Layout.
Left-justified
Text or other content that is aligned along the left margin of a page.
List
Any plant list, including MyList.
Maximize
Making a window the largest size possible; this is usually done by using the appropriate button on the top right of the window's title bar.
Menu
A list of available options from which one can select to perform indicated computer functions.
Minimize
Converting a window to an icon; this is usually done by using the appropriate button on the top right of the window's title bar.
MyList
A listing of plants selected from the main Plant List that can include customized formatting. For example, omitted pictures, plant reordering, preferred alias, etc.
Native Habitat
The area in which a plant occurs naturally.
154
Palm
A tropical or subtropical monocotyledonous tree or shrub, usually having a woody, unbranched trunk and large, evergreen, fan-shaped leaves at the top.
Perennial
Plants that live more than two years.
Persistence
Designation applied to a plant it indicate whether it is evergreen, semi-evergreen or deciduous.
Personal Notes
Additional information entered by the user on the Notes tab of the Information window; same as User Notes.
pH
A symbol, followed by a number, used to indicate the degree of acidity or alkalinity of soil solutions.
Plant Category
Designation of a plant as Woody or Herbaceous.
Plant List
When occurring in bold print, refers to the main Plant List on the Garden Workbench. In regular print, refers to any other plant list, usually a MyList.
Plant Type
Disignation of a plant as to type. For example, shrub, groundcover, etc.
Popup
A small box containing information that appears as a result of clicking on a term with the Mouse.
Preferred Name
If a plant has multiple common names (aliases), the name selected by the user as the name to be displayed in plant lists..
Preferred Picture
The first image (on the far left) displayed on the Previews tab of the Information window. It can be changed by dragging and dropping another Preview in its place.
Preview
Miniature images of pictures available in HORTICOPIA professional; double-clicking on a Preview image will display the full-sized picture.
Print Layout
The composition of a printed page containing a combination of pictures, data, and text arranged by the HORTICOPIA Professional user. Same as Layout.
Publish
The command (found on the Tools Menu) used to finalize the process of adding one's own plants to the Horticopia Pro Plant List.
155
Range Selection
HORTICOPIA Professional automatically includes intermediate values in a range selection. For example, if you choose hardiness 5a and then hardiness 8b, all intermediate hardiness values are automatically selected. Range selection can be turned on or off by selecting the desired option on the Workbench tab of the Edit|Customize menu.
Rhizome
An underground stem, usually horizontal, with nodes from which shoots will arise and roots descend. Also, a type of root form.
Right-click
Using the right mouse button to perform a computer function. Usually only a single click.
Right-justified
Text or other content that is aligned along the right margin of a page.
Root Form
The type of root system a plant possesses. For example, fibrous, bulbous, etc.
Scientific Name
The Latin binomial by which a plant species is known. Same as Latin or Botanical Name. It consists of genus and specific epithet. Each species has only one valid scientific name worldwide.
Screening
The process of finding and displaying only some plants from the available database based on pre-selected criteria. Same as filtering. Screening can be for hardiness, for plants on MyList, and/or plants with specific selected attributes.
Select
The process of indicating a choice; usually by clicking with a mouse button. Normally synonymous with Highlight.
Selection
The process of selecting plants, usually by clicking on attribute graphics.
Session
A single run of HORTICOPIA A to Z -- from the time you start the program until you exit it.
Show
The process of displaying the result of a plant search.
Shrub
The name usually given to a relatively short (less than 15 feet) woody plant, with multiple stems.
Signage
Signs considered as a group; the design and use of signs and symbols
Single-click
Clicking the left mouse button once to perform a computer function. Same as Click.
156
Slideshow
Sequential display of pictures of plants in a customized or pre-selected list. Operation can be manual or automatic.
Snapshot
A quick printout of the currently active window (Information, Picture or Thumbnails).
Species
1. A group of plants with common characteristics, distinct from others of the same genus. 2. The basic unit in plant taxonomy; the Latin binomial consisting of the genus and specific epithet; it is both singular and plural.
Specific Epithet
The second (lower case) Latin term in the species name. Usually preceded by the genus.
Standard Mode
The term used to indicate the normal display of the Horticopia Professional Plant List. As opposed to Authoring Mode.
Succulent
A term usually applied to a plant with thick, fleshy, swollen leaves and/or stems, which enables them to survive in arid conditions.
Synonym
One of two or more botanical names applied to the same taxon.
Tap Root
A strong main root descending vertically with little or no lateral growth. A type of root form.
Thumbnail
Miniature images of the Preferred Picture of a plant.
Thumbnail View
A window containing miniature pictures of the the plants in a list. The picture shown of each plant will always be the Preferred Picture. Captions under the picture will include the name, unless suppressed.
Title Bar
The blue space at the top of a window, usually including an icon, as well as the name or title of the window and buttons to minimize, maximize or close the window.
Toolbar
A group of "buttons", usually with icons and/or text, used to execute computer functions by clicking on them with a mouse.
Tree
The name usually given to a relatively tall (more than 15 feet) woody plant with a single stem.
Tuber
Underground storage organ of certain plants. Can also be a root form.

157
Unhide
In Authoring Mode, to reverse the hiding of a standard Horticopia Professional plant by clicking on the Show command.
Unselect
The process of voiding a previously made choice--usually with the left mouse button; same as deselect.
URL
Acronym for Uniform Resource Locator, the global address for documents and other resources on the World Wide Web.
User Notes
Additional narative information entered by the user on the Notes tab of the Information window; same as Personal Notes.
User Table
A section of the Information window consisting of a spreadsheet of rows and columns, in which the User can enter tabular information.
Vine
In the U. S., any climbing plant with a long, stem that grows along the ground or climbs a wall or other support by means of tendrils, etc. In England and Europe, a grapevine.
Workbench
The central work area for HORTICOPIA Professional. Short version of Garden Workbench.
158
Index
2 256-color ...................................................................................................................................................... 20
3 3-D................................................................................................................................................................ 50
A Acidity ....................................................................................................................................................6, 104 Add All to MyList ....................................................................................................................................... 30 Add New Plant ............................................................................................................................................ 45 Added Notes .........................................................................................................................................35, 102
Manager ...........................................................................................................................................35, 101 Publisher................................................................................................................................................ 101 Selecting................................................................................................................................................. 110 Tab ......................................................................................................................................................... 110 Viewing .................................................................................................................................................. 110
Addinfo.xml............................................................................................................................................... 101 Advisor ...................................................................................................................................................... 145
Display ..................................................................................................................................................... 48 Hide All.................................................................................................................................................... 48 Show All................................................................................................................................................... 48
Alaska ........................................................................................................................................................ 107 Alias(es) ..................................................................................................................................................6, 119 Alkalinity ................................................................................................................................................6, 104 Annual ..................................................................................................................................................71, 104 Appearance ................................................................................................................................................. 89 Arrange ..................................................................................................................................................... 121 Arranging .................................................................................................................................................... 99
MyList...................................................................................................................................................... 99 Pictures On-screen.................................................................................................................................. 11
Attractive..................................................................................................................................................... 71 Bark ......................................................................................................................................................... 71 Blooms ..................................................................................................................................................... 71 Fall Color................................................................................................................................................. 71 Foliage...................................................................................................................................................... 71 Fruit ......................................................................................................................................................... 71
Attribute(s).....................................................................................................................................66, 71, 107 Grouped................................................................................................................................................... 68 Labels....................................................................................................................................................... 30 Screening ................................................................................................................................................. 68 Selecting..........................................................................................................................................6, 66, 68 Showing ................................................................................................................................................... 63 Ungrouped............................................................................................................................................... 68 Unknown ............................................................................................................................................54, 68
Authoring Mode ......................................................................................................................................... 45

159
B Biennial.................................................................................................................................................71, 104 Bloom Color ................................................................................................................................................ 71
Herbaceous.............................................................................................................................................. 71 Woodies ................................................................................................................................................... 71
Bloom Time ................................................................................................................................................. 71 Herbaceous.............................................................................................................................................. 71 Woodies ................................................................................................................................................... 71
Botanical Names ......................................................................................................................................... 54 Defining ................................................................................................................................................. 118 Selecting................................................................................................................................................... 89
Botanical Nomenclature........................................................................................................................... 118
C Canada....................................................................................................................................................... 107 Cancel ........................................................................................................................................................ 142 Canopy......................................................................................................................................................... 71 Caption .................................................................................................................................................11, 114 Caribbean.................................................................................................................................................. 107 Cascade...........................................................................................................................................11, 41, 112 Celsius........................................................................................................................................................ 140 Certification ................................................................................................................................................ 35 Certified Arborist ....................................................................................................................................... 35 Characteristics ...........................................................................................................................10, 66, 68, 71 Checkmark.............................................................................................................................................50, 68 Clayey ...................................................................................................................................................... 6, 71 Clear .......................................................................................................................................................28, 71 Clipart ....................................................................................................................................................... 121 Clipboard .............................................................................................................................................28, 112 Closing ......................................................................................................................................................... 25
HORTICOPIA Credits window .......................................................................................................... 142 Layouts .................................................................................................................................................. 121 Map Windows ....................................................................................................................................... 139 Names Windows.................................................................................................................................... 117 Picture Windows..............................................................................................................................11, 112 Slideshows ............................................................................................................................................... 16
Collapse List................................................................................................................................................ 89 Color .......................................................................................................................................................68, 71
Bloom....................................................................................................................................................... 71 Leaf .......................................................................................................................................................... 71
Commercial Gain........................................................................................................................................ 23 Compatible Plants ...................................................................................................................................... 66 Contacting HORTICOPIA® ..................................................................................................................... 22 Contacting Technical Support................................................................................................................... 22 Contents Tab............................................................................................................................................... 48 Context-sensitive Help.............................................................................................................................. 145 Controlling List Appearance ..................................................................................................................... 89 Copy to Layout ....................................................................................................33, 103, 104, 108, 112, 121 Copyrights ..............................................................................................................................23, 28, 101, 112 Counter........................................................................................................................................................ 63 Creating ....................................................................................................................................................... 95
Documents Subfolder ............................................................................................................................. 13 MyList...................................................................................................................................................... 95 Slideshow ................................................................................................................................................. 16
Credits ....................................................................................................................................................... 142
160
Cultivar(s) ................................................................................................................................63, 89, 95, 104 Culture Notes ............................................................................................................................................ 108 Customization ............................................................................................................................16, 45, 50, 53
D Data Menu................................................................................................................................................... 33 Data Tab.................................................................................................................................................... 128 DBase® ........................................................................................................................................................ 13 Deciduous .................................................................................................................................................. 104 Delete Favorites ........................................................................................................................................ 148 Dense............................................................................................................................................................ 71
Canopy..................................................................................................................................................... 71 Soil ........................................................................................................................................................... 71
Deselect .................................................................................................................................................95, 119 Desktop Publishing ................................................................................................................................... 121 Digital Media............................................................................................................................................... 23 Diseases...................................................................................................................................................... 108 Display ............................................................................................................................................20, 43, 114
Advisor .................................................................................................................................................... 48 Icon .......................................................................................................................................................... 20 Long Names........................................................................................................................................... 114 Pictures .................................................................................................................................................... 11
Document Setup...........................................................................................................................25, 124, 136 Documents Subfolder ................................................................................................................................. 13 Drop-down .................................................................................................................................................... 5 Drought Tolerant........................................................................................................................................ 66 Dry ............................................................................................................................................................... 71
E Edit Menu...............................................................................................................................................28, 92 Edit Text .................................................................................................................................................... 108 Education .................................................................................................................................................... 15 Environment(al)........................................................................................................................................ 104 Erase All .................................................................................................................................................... 121 Erase Page ................................................................................................................................................. 121 Error Message............................................................................................................................................. 20 Evergreen .................................................................................................................................................. 104 Excel®.......................................................................................................................................................... 13 Exfoliates ..................................................................................................................................................... 71 Exposure.................................................................................................................................................. 6, 71
F Fahrenheit ................................................................................................................................................. 140 Fall Leaf Color............................................................................................................................................ 71 Family ...................................................................................................................................................89, 117 Favorites ...................................................................................................................................................... 35
Adding ..................................................................................................................................................... 35 Creating ................................................................................................................................................. 148 Deleting.................................................................................................................................................. 148 Menu ........................................................................................................................................................ 35 Moving ................................................................................................................................................... 148 Organizing............................................................................................................................................... 35 Renaming .............................................................................................................................................. 148
Features ..................................................................................................................................6, 107, 114, 145 Features Tab ............................................................................................................................................... 71
161
FFA .............................................................................................................................................................. 35 File Menu..................................................................................................................................................... 25 Find .........................................................................................................................................................28, 92 Finding......................................................................................................................................................... 10
Information ........................................................................................................................................10, 92 Plants ..................................................................................................................................................10, 92
Flowers .................................................................................................................................................71, 104 Cut ........................................................................................................................................................... 71 Dried ........................................................................................................................................................ 71 Fragrant .................................................................................................................................................. 71
Foliage ......................................................................................................................................................... 71 Font .............................................................................................................................................................. 54 Footer(s) .............................................................................................................................................126, 136 Form .....................................................................................................................................................71, 104 Format Menu .............................................................................................................................................. 39 Fragrant ...................................................................................................................................................... 71
Flowers .................................................................................................................................................... 71 Foliage...................................................................................................................................................... 71
Fruit ......................................................................................................................................................71, 104 Color ........................................................................................................................................................ 71 Composition ............................................................................................................................................ 71
Full Sun ................................................................................................................................................... 6, 71 Full-size Picture ...................................................................................................................................11, 114 Future Farmers of America ....................................................................................................................... 35
G Garden Studio ..............................................................................................................................57, 109, 112 Garden Workbench®............................................................................................................................... 5, 6 Garden Workbench® Tools....................................................................................................................... 63 Genus ......................................................................................................................................................... 118 Getting Information ............................................................................................................................... 9, 91 Glossary ..................................................................................................................................................... 145 Graphics .................................................................................................................................................. 6, 68 Grass(es) ...............................................................................................................................................71, 104 Groundcover(s) ....................................................................................................................................71, 104 Growth Area Tab ..................................................................................................................................... 111 Growth Rate.........................................................................................................................................71, 104
H Habit .....................................................................................................................................................71, 104 Habitat..................................................................................................................................................71, 107 Hardiness..................................................................................................................................................... 87
Range ................................................................................................................................................71, 104 Specification .............................................................................................................................................. 6 Zone ..................................................................................................................................................71, 140
Header(s) ............................................................................................................................................126, 136 Heat/humidity ............................................................................................................................................. 71 Height ...................................................................................................................................................71, 104 Height bar ................................................................................................................................................... 68 Help Menu......................................................................................................................................22, 48, 142 Herbaceous.................................................................................................................................6, 68, 71, 104 Highlighting ...........................................................................................................................................28, 91 HORTICOPIA® Credits ....................................................................................................................48, 142 HORTICOPIA® Professional ................................................................................................................. 145
Customization ......................................................................................................................................... 53
162
Icon ............................................................................................................................................................ 5 Main Window ........................................................................................................................................... 5 Menus ...................................................................................................................................................... 24 Performance ............................................................................................................................................ 20
HPD file ..................................................................................................................................................... 138
I Icon(s) .....................................................................................................................................................68, 88 ID & Details Tab......................................................................................................................................... 71 Identification ............................................................................................................................................... 57
Mode .................................................................................................................................................57, 114 Test............................................................................................................................................57, 112, 114
Index .......................................................................................................................................................... 145 Information ................................................................................................................................................. 98
Button .............................................................................................................................................6, 63, 98 Tab ......................................................................................................................................................... 104 Window.......................................................................................................................................18, 41, 102
International Code of Botanical Nomenclature ..................................................................................... 118 International Society of Arborists ............................................................................................................. 35 ISA ............................................................................................................................................................... 35
K Keyboard Shortcuts...............................................................................................................................18, 90
L Labels................................................................................................................................................30, 68, 71 Landscape Uses ......................................................................................................................................... 107 Latin Name(s) ................................................................................................................................63, 89, 118 Layering .................................................................................................................................................... 121 Layout...........................................................................................................................13, 25, 39, 41, 50, 121
Tab ......................................................................................................................................................... 131 Window.................................................................................................................................................. 121
Leaf .............................................................................................................................................................. 71 Arrangement(s)....................................................................................................................................... 71 Blade Length ........................................................................................................................................... 71 Color ........................................................................................................................................................ 71 Identification ........................................................................................................................................... 71 Margins.................................................................................................................................................... 71 Midsections.............................................................................................................................................. 71 Types........................................................................................................................................................ 71 Venation .................................................................................................................................................. 71
List(s) ......................................................................................................................................9, 88, 90, 95, 98 Ordering .............................................................................................................................................89, 99 Randomize............................................................................................................................................... 30 Special...................................................................................................................................................... 35 Tab ......................................................................................................................................................... 126
Loamy ...................................................................................................................................................... 6, 71 Lock Plant List............................................................................................................................................ 54 Logrithmic..................................................................................................................................................... 6 Long Names..........................................................................................................................................88, 114
M Main Toolbar .....................................................................................................................................5, 45, 50 Main Window ............................................................................................................................................... 5 Map Window(s) ........................................................................................................................................ 139
163
Map(s).................................................................................................................................................139, 140 Growth Area ......................................................................................................................................... 111 Hardiness............................................................................................................................................... 139
Margin(s) ..................................................................................................................................................... 71 Master Page............................................................................................................................................... 121 Media ........................................................................................................................................................... 23 Menu Bar....................................................................................................................................................... 5 Mexico ....................................................................................................................................................... 107 Midsections.................................................................................................................................................. 71 Mode .......................................................................................................................................................20, 89
256-Color ................................................................................................................................................. 20 Authoring ................................................................................................................................................ 45 Automatic ...........................................................................................................................................43, 59 Collapsed ................................................................................................................................................. 89 Color ........................................................................................................................................................ 20 Expanded................................................................................................................................................. 89 Graphics .................................................................................................................................................. 20 Identification ......................................................................................................................................... 114 Manual................................................................................................................................................43, 59 Quiz.......................................................................................................................................................... 15 Standard .................................................................................................................................................. 45 Video ........................................................................................................................................................ 20
Moist ............................................................................................................................................................ 71 Moisture .................................................................................................................................................68, 71 More Information ..................................................................................................................................... 107 Move Favorites ......................................................................................................................................... 148 MyList ........................................................................................................................................................... 9
Adding Plants.....................................................................................................................................30, 95 Creating ................................................................................................................................................... 95 Enabling .................................................................................................................................................. 63 Filtering ................................................................................................................................................... 95 Opening ................................................................................................................................................... 25 Order ............................................................................................................................................30, 45, 99 Removing Plants ..................................................................................................................................... 30 Replacing ............................................................................................................................................30, 95 Saving ...................................................................................................................................................... 13 Screening ................................................................................................................................................. 95
N Name(s)...................................................................................................................................................... 117
Botanical.....................................................................................................................................33, 63, 117 Color ........................................................................................................................................................ 95 Common ...........................................................................................................................................63, 117 Cultivar.......................................................................................................................................63, 89, 117 Family .........................................................................................................................................33, 56, 117 Frame..................................................................................................................................................... 104 Long ..................................................................................................................................................88, 114 Options .................................................................................................................................................... 56 Preferred ................................................................................................................................................. 30 Pronunciation.....................................................................................................................................43, 63 Species.........................................................................................................................................63, 89, 118 Suppression ....................................................................................................................................112, 114 Window.............................................................................................................................................41, 117
National Junior Horticulture Association ................................................................................................ 35 Native Habitat......................................................................................................................................71, 107 Navigating ........................................................................................................................................33, 56, 90
164
Navigation ........................................................................................................................................33, 56, 90 Navigation Tab ........................................................................................................................................... 56 Next Picture............................................................................................................................................33, 43 Next Plant .................................................................................................................................................... 33 NJHA ........................................................................................................................................................... 35 Nomenclature .......................................................................................................................................30, 118 North America .....................................................................................................................................71, 107 Notes .......................................................................................................................................................... 108
Added..............................................................................................................................................101, 110 User ........................................................................................................................................................ 108
O One-of-a-kind.............................................................................................................................................. 23 One-up ....................................................................................................................................................... 114 On-line Help .............................................................................................................................................. 145 On-screen .................................................................................................................................................... 59 Ordering ...................................................................................................................................................... 99 Organize Favorites ................................................................................................................................... 148 Override settings....................................................................................................................................18, 63 Overwrite options ....................................................................................................................................... 54
P Page Down................................................................................................................................................. 121 Page Up...................................................................................................................................................... 121 Palm(s) ......................................................................................................................................................... 71 Partial Sun/Shade ................................................................................................................................71, 104 Pause Slideshow .......................................................................................................................................... 43 PDF File..................................................................................................................................................... 138 Persistence ............................................................................................................................................71, 104 Personal Notes........................................................................................................................................... 108 Pests ........................................................................................................................................................... 108 pH............................................................................................................................................................6, 104 Picture(s) ........................................................................................................................................11, 43, 114
Copying.................................................................................................................................................. 114 Cycling ..................................................................................................................................................... 33 Detail........................................................................................................................................................ 11 Display Size ........................................................................................................................................11, 57 Full-size.............................................................................................................................................11, 114 Habit ........................................................................................................................................................ 11 Keeping.............................................................................................................................................11, 112 Next .......................................................................................................................................................... 33 Omitting .......................................................................................................................16, 25, 33, 103, 128 Preferred ....................................................................................................................................6, 103, 114 Previous ................................................................................................................................................... 33 Reordering .........................................................................................................................................45, 99 Tab (Customization)............................................................................................................................... 57 Tab (Document SetUp)......................................................................................................................... 134 Title Bar................................................................................................................................................... 57 Window(s) ..............................................................................................................................103, 112, 114
Pixelizing ................................................................................................................................................20, 57 Plant............................................................................................................................................................... 6 Plant Identification Mode ........................................................................................................................ 114 Plant List ....................................................................................................................9, 88, 89, 90, 95, 98, 99
Attributes ................................................................................................................................................ 71 Counter...............................................................................................................................................10, 63
165
Icons ......................................................................................................................................................... 88 Identification ....................................................................................................................................15, 114 Information ....................................................................................................................................102, 104 List(s) ......................................................................................................................................................... 9 Lock ......................................................................................................................................................... 54 Name(s) .....................................................................................................................................95, 118, 119 Navigating ............................................................................................................................................... 90 Ordering .................................................................................................................................................. 99 Reset......................................................................................................................................................... 45 Screening ................................................................................................................................................. 95 Type ....................................................................................................................................................... 104
Polution Tolerant........................................................................................................................................ 71 Preferred ................................................................................................................................................... 103
Name ........................................................................................................................................................ 30 Picture.........................................................................................................................................6, 103, 114 View ......................................................................................................................................................... 57
Pre-selected Lists ........................................................................................................................................ 35 Preview Frame .............................................................................................................................................. 6 Previews............................................................................................................................................6, 11, 103 Previous ..................................................................................................................................................33, 43
Picture...................................................................................................................................................... 43 Plant ......................................................................................................................................................... 33
Print ............................................................................................................................................................. 25 Data.......................................................................................................................................................... 25 Document .............................................................................................................................................. 138 Layout...................................................................................................................................................... 25 List ........................................................................................................................................................... 25 Pictures .................................................................................................................................................... 25 Preview .................................................................................................................................................... 25
Printing Problems................................................................................................................................20, 138 Propagation............................................................................................................................................... 107 Publication .................................................................................................................................................. 23 Publish ......................................................................................................................................................... 45
Q Quit Slide Show .......................................................................................................................................... 43
R Randomize list............................................................................................................................................. 30 Range ........................................................................................................................................................... 68
Hardiness..........................................................................................................................................71, 104 Height .................................................................................................................................................... 104 Plant ......................................................................................................................................................... 18 Spread.................................................................................................................................................... 104 Temperature ......................................................................................................................................... 140
Removing................................................................................................................................................... 101 Added Notes .......................................................................................................................................... 101 Plants from MyList................................................................................................................................. 30
Rename ...................................................................................................................................................... 148 Reset............................................................................................................................................................. 95
All Settings to Defaults ........................................................................................................................... 45 My Information Notes ............................................................................................................................ 45 MyList Order .......................................................................................................................................... 45 Picture Ordering..................................................................................................................................... 45 Plant List ................................................................................................................................................. 10
166
Preferred Names ..................................................................................................................................... 45 Spreadsheet ............................................................................................................................................. 45
Resizing ......................................................................................................................................112, 114, 121 Resume Slideshow ...................................................................................................................................... 43 Royal Horticulture Society Dictionary ............................................................................................104, 118
S Sandy ....................................................................................................................................................... 6, 71 Save .........................................................................................................................................................13, 25 Save As ........................................................................................................................................................ 25 Saving Your Work...................................................................................................................................... 13 Screening ..................................................................................................................................................... 68
Attribute(s) .............................................................................................................................................. 68 Favorites .................................................................................................................................................. 35 MyList...................................................................................................................................................... 95
Search .......................................................................................................................................................... 92 Search tab.............................................................................................................................................48, 145 Selecting....................................................................................................................................................... 68
Botanical Names ................................................................................................................................30, 54 Common Names.................................................................................................................................30, 54 Plant Characteristics ................................................................................................................................ 6
Selection Criteria .............................................................................................................................66, 68, 71 Selection Graphics ........................................................................................................................................ 6 Selection Groups ........................................................................................................................................... 6 Selection Items ............................................................................................................................................ 68
Grouped................................................................................................................................................... 68 Individual ................................................................................................................................................ 68 Ungrouped............................................................................................................................................... 68
Selection Tabs ............................................................................................................................................. 71 Herbaceous.............................................................................................................................................. 71 Woodies ................................................................................................................................................... 71
Semi-evergreen ....................................................................................................................................71, 104 Settings ...................................................................................................................................................50, 53
Display ..................................................................................................................................................... 20 Printer...............................................................................................................................................20, 141
Setup ............................................................................................................................................................ 25 Shade ................................................................................................................................................6, 71, 104 Shape ....................................................................................................................................................71, 104 Show........................................................................................................................................................30, 89
All Plants ............................................................................................................................................30, 89 Attribute Labels.................................................................................................................................30, 68 Cultivars .............................................................................................................................................30, 89
Shrubs.......................................................................................................................................................... 71 Signage..................................................................................................................................................23, 121 Slideshow ................................................................................................................................................... 120 Slideshow Toolbar .................................................................................................................................... 120
Automatic Advance ................................................................................................................................ 59 Creating ................................................................................................................................................... 16 Customization ......................................................................................................................................... 59 Manual Advance ..................................................................................................................................... 59 Menu ........................................................................................................................................................ 43 Pausing .................................................................................................................................................... 43 Quitting.................................................................................................................................................... 43 Resuming ................................................................................................................................................. 43 Starting .................................................................................................................................................... 43 Terminating ............................................................................................................................................ 18
167
Toolbar .............................................................................................................................................16, 120 Window(s) ............................................................................................................................................. 120
Snapshot ...................................................................................................................................................... 25 Soil ................................................................................................................................................................. 6
Condition ............................................................................................................................................... 104 Moisture .................................................................................................................................................. 71 Type ........................................................................................................................................................... 6
Sort Plant List ........................................................................................................................................54, 89 Sound ......................................................................................................................................................33, 59 Special Lists................................................................................................................................................. 35 Specific Epithet ......................................................................................................................................... 118 Spread...................................................................................................................................................71, 104 Standard Mode ........................................................................................................................................... 45 Start Slideshow ........................................................................................................................................... 43 Subfolder ..............................................................................................................................................13, 108 Succulents.............................................................................................................................................71, 104 Summer Leaf Color .................................................................................................................................... 71 Sun/Shade................................................................................................................................................ 6, 71 Support ...................................................................................................................................................20, 22 [email protected]........................................................................................................................... 22 Synonyms .................................................................................................................................................. 118 System Parameters ........................................................................................................................22, 48, 141
T Tab ............................................................................................................................................................... 68 Tab-delimited.............................................................................................................................................. 13
Added Notes .......................................................................................................................................... 110 Contents................................................................................................................................................... 48 Data........................................................................................................................................................ 128 Features ................................................................................................................................................... 71 Growth Area ......................................................................................................................................... 111 Information ........................................................................................................................................... 104 Layout.................................................................................................................................................... 131 List ......................................................................................................................................................... 126 More Information ................................................................................................................................. 107 Navigation ............................................................................................................................................... 56 Notes ...................................................................................................................................................... 108 Pictures .............................................................................................................................................57, 134 Slideshow ................................................................................................................................................. 59 Workbench .............................................................................................................................................. 54
Table of Contents...................................................................................................................................... 145 Technical Memos ........................................................................................................................................ 22 Technical Support ...................................................................................................................................... 22 Techniques .................................................................................................................................................. 66 Text Format ................................................................................................................................................ 13 The United States Department of Agriculture ......................................................................................... 87 Thumbnail Caption Box........................................................................................................................... 114 Thumbnail View ..................................................................................................................................63, 114 Thumbnail(s)........................................................................................................................................98, 114
Command ................................................................................................................................................ 41 Quiz Mode ............................................................................................................................................... 15 View ..................................................................................................................................................63, 114 Window.................................................................................................................................................. 114
Tile ..................................................................................................................................................11, 41, 112 Tile Commands ........................................................................................................................................... 41 Tile Horizontally ......................................................................................................................................... 41
168
Tile Vertically ............................................................................................................................................. 41 Tiling............................................................................................................................................................ 41 Title Bar Caption........................................................................................................................................ 11 Toggle Botanical/Common Names .......................................................................................................30, 63 Tools Menu.................................................................................................................................................. 45 Tools|Customize .......................................................................................................................................... 45 Training ....................................................................................................................................................... 15 Trees ............................................................................................................................................................ 71 Troubleshooting .......................................................................................................................................... 20
U Undo Find.................................................................................................................................................... 28 Ungroup..................................................................................................................................................... 121 Unhide ......................................................................................................................................................... 45 URL ....................................................................................................................................................101, 108 USDA ....................................................................................................................................................87, 139 USDA Hardiness Map .........................................................................................................................45, 139 User Notes ..............................................................................................................................28, 45, 108, 121 User Tables................................................................................................................................................ 121 User Text ..............................................................................................................................................28, 121 Usermemo.dat ........................................................................................................................................... 108
V Venation(s) .................................................................................................................................................. 71 Very Wet ..................................................................................................................................................... 71 Viewing ........................................................................................................................................................ 98
Added Notes .......................................................................................................................................... 110 Entries...................................................................................................................................................... 98 Layouts .................................................................................................................................................. 121 MyLists .................................................................................................................................................... 95 Pictures .................................................................................................................................................. 103 Plant List ................................................................................................................................................... 9 Slideshows ............................................................................................................................................... 16 Thumbnails ........................................................................................................................................... 114
Vine(s)...................................................................................................................................................71, 104
W Web ............................................................................................................................................................ 101 Web-based ................................................................................................................................................. 101 Webpage .................................................................................................................................................... 101 Website ...................................................................................................................................................... 101
Referencing ........................................................................................................................................... 101 URL ................................................................................................................................................101, 108
Welcome .................................................................................................................................................... 145 Wet............................................................................................................................................................... 71 Window Menu............................................................................................................................................. 41 Window(s) ..................................................................................................................................................... 5
Customization ......................................................................................................................................... 53 Customize ................................................................................................................................................ 50 Garden Workbench ................................................................................................................................ 62 Information ......................................................................................................................................41, 102 Layout.................................................................................................................................................... 121 Main........................................................................................................................................................... 5 Names .................................................................................................................................................... 117 Picture.................................................................................................................................................... 112

169
Slideshow ............................................................................................................................................... 120 Thumbnails ........................................................................................................................................... 114
Woodies ..................................................................................................................................................... 104 Workbench.........................................................................................................................................6, 62, 66
Command ................................................................................................................................................ 41 Menu ........................................................................................................................................................ 30 Tab ........................................................................................................................................................... 54 Techniques .............................................................................................................................................. 66 Tools......................................................................................................................................................... 63
www.horticopia.com................................................................................................................................... 48 www.horticopia.com/professional/sample_notes ................................................................................... 101 www.horticopia.com/techsupp .................................................................................................................. 22
X X/Y ............................................................................................................................................................... 41
Z Zone ......................................................................................................................................................87, 140 Zone Keys .....................................................................................................................................87, 139, 140 Zoom .......................................................................................................................................................... 138

![1 The Attack and Defense of Computers Dr. 許 富 皓. 2 Virus [Internet Security Professional Reference ]Internet Security Professional Reference](https://img.pdfslide.us/doc/110x75/56649c8a5503460f94943f91/1-the-attack-and-defense-of-computers-dr-2-virus-internet-security.jpg)