Embed Size (px)
Citation preview
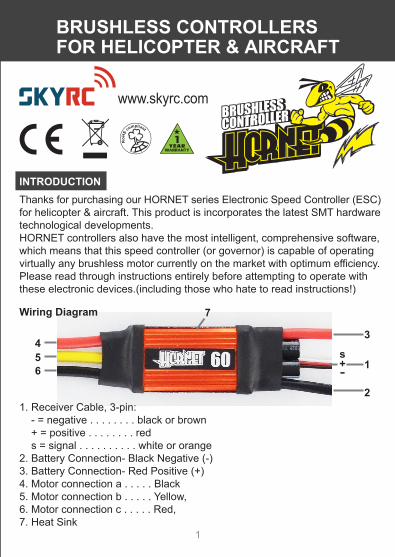
BRUSHLESS CONTROLLERS FOR HELICOPTER & AIRCRAFT
1
Thanks for purchasing our HORNET series Electronic Speed Controller (ESC) for helicopter & aircraft. This product is incorporates the latest SMT hardware technological developments. HORNET controllers also have the most intelligent, comprehensive software, which means that this speed controller (or governor) is capable of operating virtually any brushless motor currently on the market with optimum efficiency.Please read through instructions entirely before attempting to operate with these electronic devices.(including those who hate to read instructions!)
INTRODUCTION
Wiring Diagram
3
2
1
4
6
7
5
1. Receiver Cable, 3-pin: - = negative . . . . . . . . black or brown + = positive . . . . . . . . red s = signal . . . . . . . . . . white or orange2. Battery Connection- Black Negative (-)3. Battery Connection- Red Positive (+)4. Motor connection a . . . . . Black 5. Motor connection b . . . . . Yellow, 6. Motor connection c . . . . . Red, 7. Heat Sink
+-s
YEAR
www.skyrc.com
2
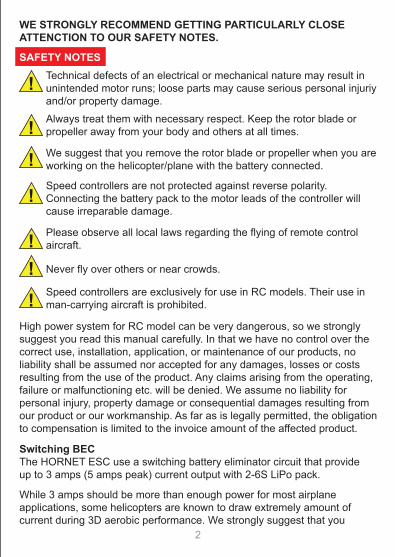
WE STRONGLY RECOMMEND GETTING PARTICULARLY CLOSE ATTENCTION TO OUR SAFETY NOTES.
SAFETY NOTESTechnical defects of an electrical or mechanical nature may result in unintended motor runs; loose parts may cause serious personal injuriy and/or property damage.
Always treat them with necessary respect. Keep the rotor blade or propeller away from your body and others at all times.
We suggest that you remove the rotor blade or propeller when you are working on the helicopter/plane with the battery connected.
Speed controllers are not protected against reverse polarity. Connecting the battery pack to the motor leads of the controller will cause irreparable damage.
Speed controllers are exclusively for use in RC models. Their use in man-carrying aircraft is prohibited.
Never fly over others or near crowds.
Please observe all local laws regarding the flying of remote control aircraft.
High power system for RC model can be very dangerous, so we strongly suggest you read this manual carefully. In that we have no control over the correct use, installation, application, or maintenance of our products, no liability shall be assumed nor accepted for any damages, losses or costs resulting from the use of the product. Any claims arising from the operating, failure or malfunctioning etc. will be denied. We assume no liability for personal injury, property damage or consequential damages resulting from our product or our workmanship. As far as is legally permitted, the obligation to compensation is limited to the invoice amount of the affected product.
Switching BECThe HORNET ESC use a switching battery eliminator circuit that provide up to 3 amps (5 amps peak) current output with 2-6S LiPo pack.
While 3 amps should be more than enough power for most airplane applications, some helicopters are known to draw extremely amount of current during 3D aerobic performance. We strongly suggest that you

3
determine the maximum current draw of the servos and other devices (receiver, gyro, etc) you plan to use in your application. If that value exceeds 3 amps, you must use another source to power up your system.
* Note 1: If you choose to use an RX battery pack or any form of external BEC device, you MUST disconnect the RED WIRE in the throttle cable from the Hornet ESC.
You will need to solder connectors on your HORNET controller.CONNECT YOUR HORNET ESC
FLY YOUR HORNET ESC
MotorBatterypack
HORNET ESC
Receiver
Solder or useconnectors
Remove the red wire if you need to disable BEC
Double-check your battery polarity and connections before plugging a battery into your controller. There is no polarity for the three motor wires. If the motor spins the wrong way when power is applied, swap any two of the motor side connections and it will then spin properly. You may also use programming function, described below, to reverse the rotation via the controller's software. We recommend using Velcro to attach the ESC to the airframe for easy removal. Double sided tape is also acceptable. Do not pack HORNET ESC in foam as this may lead to a heat buildt-up in the controller.
NOTE TO FUTABA TRANSMITTER USERS: You may have to reverse the throttle direction of your radio. Please see your radio's instructions on how to make this change.
Your HORNET ESC comes ready to fly with Lithium Polymer type batteries. No settings changes are needed. To fly, turn your transmitter on before connecting your HORNET ESC to the motor battery. When you connect the motor battery to the HORNET ESC, you will hear an initialization tone from the motor and a series of beeps telling you how many Lithium Polymer cells in series are in your battery pack, and the servos will be active. Make sure that the number of beeps matches the number of cells

4
HORNET series ESC offer users the option of changing programmable settings. You do not need to program anything to make the ESC work. Programming is only necessary if you want to change the default setting or if you want to use advanced features. There are three methods to change the settings on your HORNET ESC.
PROGRAMMING HORNET ESC
in your pack. If it doesn't, make sure your pack is fully charged. The HORNET ESC will not arm unless you move your throttle stick to the lowest position. When the HORNET ESC receives the low throttle command, it will arm and play a double tone through the motor, indicating it is armed and now ready to run. If this is the first time you are running the controller, advance the throttle slowly to ensure that the rotor or propeller rotation is correct. If it isn't, swap any two of the motor side connections and it will then spin properly.
1. Manual ProgrammingManual Programming HORNET ESC is as simple as answering a few questions. The HORNET ESC asks questing by beeping a setting number, followed by the possible setting values. There are eight settings that can be programmed in the HORNET ESC using your transmitter’s stick. You must answer "yes" or "no" to the setting values as they are presented by HORNET ESC. When you enter programming mode the ESC will emit a sequence of beeps that tell you which programming step you are in. There are two parts to the beep sequence. The first set of beeps indicates the 'Setting Number (Question), e.g. Cutoff Voltage, and the second set of beeps indicates a Setting Value, e.g. Auto LiPo. Answering "No" to a Setting value will cause the ESC to ask for the next value in that section. After a "Yes" answer is accepted, the ESC knows you aren't interested in any other option in that section, so it skips to the first option in the next section.Note: If you answer "no" to all Setting Values for a particular Setting Number, the ESC will keep whatever value had been previously programmed. Only by answering "Yes" to a Setting Value will the ESC store/change that value.How to Enter Programming Mode
Move throttle stick on full throttle (up) position first.
Turn on transmitter.

5
Connect the HORNET ESC to a battery pack and Motor.
You should hear the first multi-tone ring upon plug in, and the battery count in beeps if set for Auto-Lipo.
After 2 seconds, you should hear a second multi-tone ring, indicating the ESC sees full throttle.
Move throttle stick down to the middle position, and you will hear another ring.
Move throttle stick back to the top position, and you will hear another ring.
Move throttle stick to the middle position again.
And you will hear 4 rings all in a row.
At this point HORNET ESC will be beeping the following sequence:Beep-Pause-Beep... and then repeatsThis indicates that you are at Question 1 and it is asking to accept/reject value 1.
When answering a question, you will need to move the stick to yes (full throttle) position or the no (low/off) position and keep it there for about 3 seconds. When the ESC has accepted your answer it will confirm your reply by emitting a beeping tone. Move the stick to Neutral to confirm that you are ready for ESC to ask you next question. You are not required to continue through all eight programming options. For example, if you wish only to change the Cutoff Voltage (Option 1) then after programming that setting you can disconnect power from the ESC and you're ready to fly. Disconnecting the controller in the middle of programming simply retains the values for the remaining programming options that were previously set up.

6
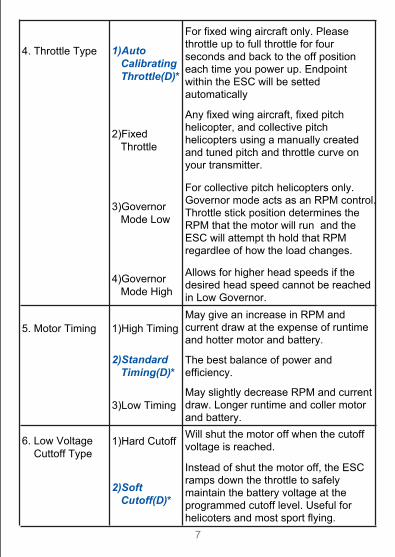
Programmable Features
Question(Setting) Value Description & Recommended Use
1.Cutoff Voltage 1)Auto- LiPo(D)*
HORNET ESC will beep the number of cells it's detected immediately after initialization tones. Automatically detects LiPo Cell count. Cutoff voltage is sets to 3V/cell.
2)4.0V Cutoff 5 cell NiCd/NiMH pack.3)5.0V Cutoff 5-8 cell NiCd/NiMH pack.
4)6.0V Cutoff 5-10 cell NiCd/NiMH pack or 2 cell LiPopack.
5)9.0V Cutoff 5-16 cell NiCd/NiMH pack or 3 cell LiPo Pack.
6)12.0V Cutoff Up to 16 cell NiMH/NiCd pack or 4 cellLiPo Pack.
2. Current Limiting
1)Very Sensitive
Shut down ESC immediately when overcurrent is detected.
2)Sensitive Shut down ESC quickly when over current is detected.
3)Normal(D)* Recommended for all application except helicopters.
4)Insensitive
5)Disable Disable current limiting, use at your own risk.
3. Brake Type 1)Soft Slow Brake
General aircraft use with fixed properller.
2)Hard Slow Brake
Application where more braking poweris required.
3)Soft Brake (D)*
Compectition use where a very short soft brake delay is required
4)Hard Brake Compectition use where a very short hard brake delay is required
For helicopters applications.
5)Brake Disabled
Helicopters, 3D airplanes or aerobatic airplanes
7
4. Throttle Type 1)Auto Calibrating Throttle(D)*
For fixed wing aircraft only. Please throttle up to full throttle for four seconds and back to the off position each time you power up. Endpoint within the ESC will be setted automatically
2)Fixed Throttle
Any fixed wing aircraft, fixed pitch helicopter, and collective pitch helicopters using a manually created and tuned pitch and throttle curve on your transmitter.
3)Governor Mode Low
For collective pitch helicopters only.Governor mode acts as an RPM control.Throttle stick position determines the RPM that the motor will run and the ESC will attempt th hold that RPM regardlee of how the load changes.
4)Governor Mode High
Allows for higher head speeds if the desired head speed cannot be reached in Low Governor.
5. Motor Timing 1)High TimingMay give an increase in RPM and current draw at the expense of runtime and hotter motor and battery.
2)Standard Timing(D)*
The best balance of power and efficiency.
3)Low TimingMay slightly decrease RPM and current draw. Longer runtime and coller motor and battery.
6. Low Voltage Cuttoff Type
1)Hard Cutoff Will shut the motor off when the cutoff voltage is reached.
2)Soft Cutoff(D)*
Instead of shut the motor off, the ESC ramps down the throttle to safely maintain the battery voltage at the programmed cutoff level. Useful for helicoters and most sport flying.
8
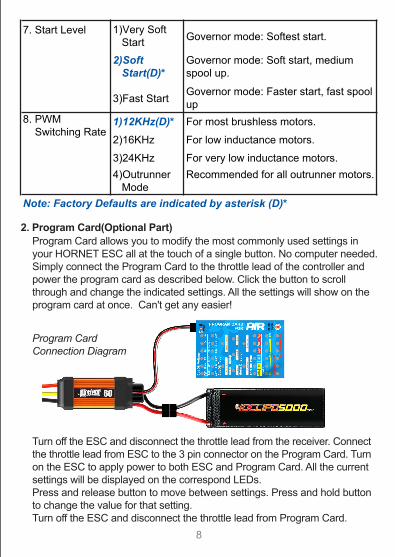
2. Program Card(Optional Part)Program Card allows you to modify the most commonly used settings in your HORNET ESC all at the touch of a single button. No computer needed. Simply connect the Program Card to the throttle lead of the controller and power the program card as described below. Click the button to scroll through and change the indicated settings. All the settings will show on the program card at once. Can't get any easier!
Turn off the ESC and disconnect the throttle lead from the receiver. Connect the throttle lead from ESC to the 3 pin connector on the Program Card. Turn on the ESC to apply power to both ESC and Program Card. All the current settings will be displayed on the correspond LEDs.Press and release button to move between settings. Press and hold button to change the value for that setting.Turn off the ESC and disconnect the throttle lead from Program Card.
Program Card Connection Diagram
7. Start Level 1)Very Soft Start Governor mode: Softest start.
2)Soft Start(D)*
Governor mode: Soft start, medium spool up.
3)Fast Start Governor mode: Faster start, fast spool up
8. PWM Switching Rate
1)12KHz(D)*2)16KHz For low inductance motors.
3)24KHz For very low inductance motors.4)Outrunner Mode
Recommended for all outrunner motors.
Note: Factory Defaults are indicated by asterisk (D)*
For most brushless motors.
SPECIFICATION
Model No.
Max Amps
Max Volts
BEC Output Size Net
Weight
Hornet 60A
Hornet 80A
Hornet 100A
Hornet 120A
60A 2-6S LiPo 5.7V/3A 70 x 26.8 x 16.5mm 45g
70 x 26.8 x 16.5mm 47g
70 x 26.8 x 23mm 59g
70 x 26.8 x 23mm 62g
5.7V/3A
5.7V/3A
5.7V/3A
2-6S LiPo
2-6S LiPo
2-6S LiPo
80A
100A
120A
9
3. Sky Link Programming Kit (Program Card + Software + USB Cable)If you want to change advanced settings, we highly recommend using the Sky Link (sold separately). It is easier and allows you to modify many more setting than Program Card and “stick” manual programming procedure.
Problem: Nothing is working – receiver, servos and motor are all dead.Solution: Check the connection to ensure that the polarity of connection is correct. Make sure the polarity of receiver plug is correct also.
Problem: The BEC (receiver and servos) works, but the motor does not respond to throttle.Solution: The ESC may not be seeing a low enough throttle signal to arm. Increase the low side throttle endpoint in your transmitter until you hear the ESC arm. If you do not have a computer transmitter, bring the throttle stick and throttle trim all the way down to arm the ESC. If using a Futaba transmitter, verify the throttle channel is reversed.
Problem: When I throttle all the way up, the controller “cutoff”, even with fully charged batteries.Solution: If the cutoff occurs with freshly charged batteries, it means that the voltage has dropped very quickly. This is usually an indication of a power system that is drawing too much current for the batteries to handle. Try to use a pack with a higher “C” rate and high mAh capacity.
TROUBLE SHOOTING
There are many features that may only be accessed via Sky Link Programming Kit.
*
* without wires
PRODUCT WARRANTY
10
CE APPROVALAll HORNET ESCs satisfy all relevant and mandatory EC directives:These are the EN61000-6-1:2007 Electromagnetic compatibility (EMC). Generic standards. Immunity for residential, commercial and light-industrial environments.EN61006-6-3:2007 Electromagnetic compatibility (EMC). Generic standards. Emission standard. For residential, commercial and light-industrial environments.The approval procedure includes a test of interference radiation, i.e. of interference generated by the speed controller. This speed controller has been tested under practical conditions at maximum load current and with a large number of cells, and remains within the interference limits.The procedure also includes also a test of interference susceptibility, i.e. the extent to which the device is vulnerable to interference from other devices. The test involves subjecting the speed controller to RF signals similar to those produced by an RC transmitter.
The HORNET Brushless ESC is guaranteed to be free from defects in materials or workmanship for a period of ONE YEAR from the original date of purchase (verified by dated, itemized sales receipt). Warranty does not cover incorrect installation, components worn by use, damage to case or exposed circuit boards, damage due to timing, damage from using more than 6 Li-Po cells input voltage, cross-connection of battery/motor power wires, overheating solder tabs, reverse voltage application, improper use or installation of external BEC, damage resulting from thermal overload or short-circuiting motor, damage from incorrect installation of FET servo or receiver battery pack, tampering with internal electronics, allowing water, moisture, or any other foreign material to enter ESC or get onto the PC board, incorrect installation/wiring of input plug plastic, allowing exposed wiring or solder tabs to short-circuit, or any damage caused by a crash, flooding or natural disaster. Because SKYRC has no control over the connection & use of the speed control or other related electronics, no liability may be assumed nor will be accepted for any damage resulting from the use of this product. Every SKYRC speed control & motor is thoroughly tested & cycled before leaving our facility and is, therefore, considered operational. By the act of connecting/operating speed control, user accepts all resulting liability. In no case shall our liability exceedthe product's original cost. We reserve the right to modify warranty provisions without notice.


![HORNET User Manual - Computation Structures Groupcsg.csail.mit.edu/hornet/docs/manual.pdf · 2 GETTING STARTED 1Introduction HORNET [HOR] is a highly configurable, cycle-level multicore](https://img.pdfslide.us/doc/110x75/5b1a7efb7f8b9a37258da939/hornet-user-manual-computation-structures-2-getting-started-1introduction.jpg)