Embed Size (px)
Citation preview
F
Hooded Baby Sweater with back zipperHooded Baby Sweater with back zipperHooded Baby Sweater with back zipperHooded Baby Sweater with back zipper
Adapted by Sarah Punderson The hood fits snuggly around the face and the zipper makes it very easy to get the sweater off and on. I have
adapted the original pattern to eliminate the crocheted edge around the back opening.
Sizes: Newborn 5-10lbs, 6 months 11-18lbs, 12 months 19-24lbs, 18 months 24lbs and over. The pattern is
written and yarn requirements are listed in the smallest size with changes for larger sizes in parenthesis.
Yarn
Worsted Weight Yarn
290 (300, 330 380)yds
All samples are knitted with
Plymouth Encore
Needles & Notions
Needles, size 5 & 8
(Circulars are easier to use for some
parts of the sweater even though it
is not done in the round.)
4 ring markers
1 split ring marker
Neckline zipper,18” (18”,18”, 22”)
Sewing thread & needle
Gauge: 18stitches = 4”,
24 rows = 4” in stockinette stitch
Directions: Sweater starts with
hood, stitches are picked up at neck
edge and the sweater is knitted from
top to bottom. The zipper is sewn
into the back opening.
Hood:
• With larger needles, CO 58(58, 62, 70)sts.
• Rows 1&3: *K2, P2 * repeat between ** to last 2 sts, K2. (Odd rows are RS rows. Top:hang a split
ring marker to mark RS.)
• Rows 2 & 4: *P2, K2 * repeat between ** to last 2 sts, P2.
• Rows 5 & 7: K6, cont in rib pattern to last 6 sts, K6.
• Row 6: P6, cont in rib pattern to last 6 sts, P6.
• Rows 8 & 10: K8, cont in rib pattern to last 8 sts, K8.
• Row 9: P8, cont in rib pattern to last 8 sts, P8.
• Rows 11& 13: K10, cont in rib pattern to last 10sts, K10.
• Row 12: P10, cont in rib pattern to last 10sts, P10.
• Continue in this manner, increasing the number of sts K or P at each end of the row by 2 every 4th
row, until 2sts are left in the center. K 1 row, bind off.
Body: Fold hood in half placing wrong sides together, with bound off edge kept for zipper opening in the
back. Starting at the bottom of bound off edge, with smaller needles, pick up and knit 27(29, 31,34)sts; CO
5(5,5,7)sts for chin; pick up and knit 27(29, 31, 34)sts on other side. (59, 63, 67, 75sts) (You will pick up
every other stitch plus a few extras.)
• Rows 1, 3, 5 &7:* P1, K1 * repeat between ** to last st, P1.
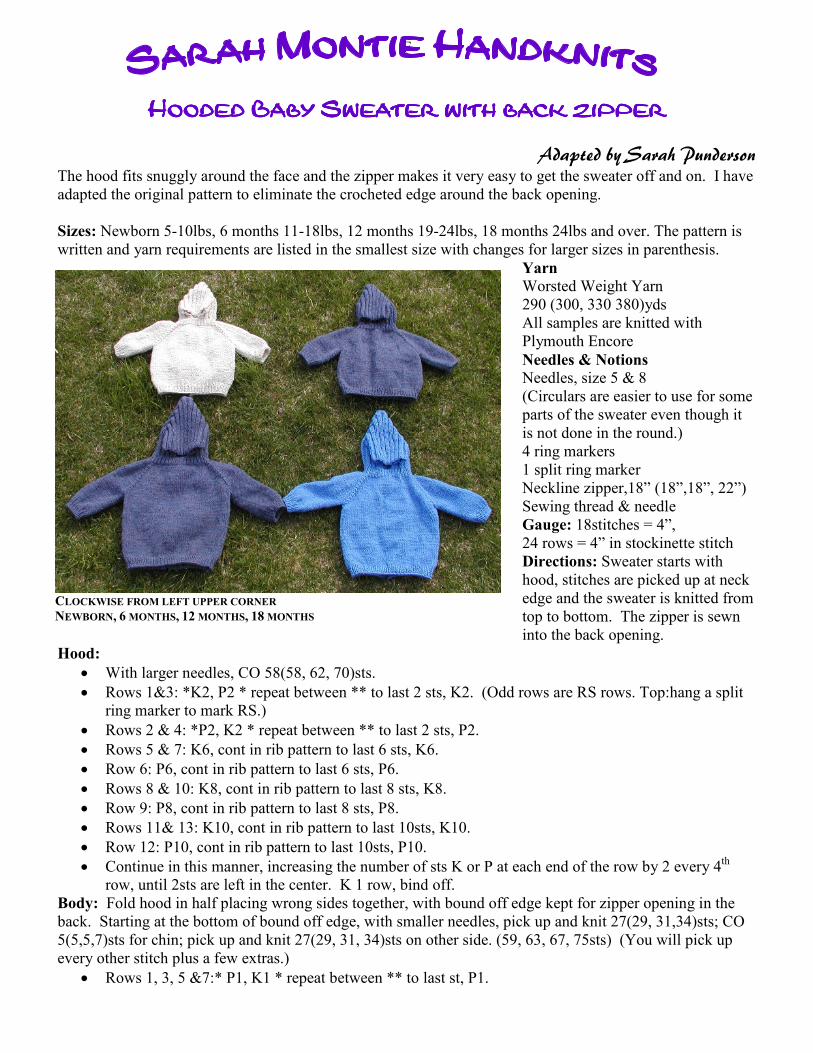
CLOCKWISE FROM LEFT UPPER CORNER
NEWBORN, 6 MONTHS, 12 MONTHS, 18 MONTHS

• Rows 2, 4 & 6: *K1, P1 * repeat between ** to last st, K1.
• Row 8 (RS): With larger needles K1, P1, K7 (8,9,10)sts, Kfb, PM, Kfb, K6 (6,6,8), Kfb, PM, Kfb,
K21 (23, 25, 27)sts, Kfb, PM, Kfb, K6 (6,6,8)sts, Kfb, PM, Kfb, K7 (8,9,10), P1, K1. (67, 71, 75,
83sts)
• Row 9 & all odd rows: P1, K1, Purl to last 2 sts, K1, P1.
• Row 10 & all even rows: K1, P1, Knit to last 2sts, P1, K1, increasing before and after each marker
(as established in row 8) until 155 (159, 163, 171) sts are on needle. End on wrong side.
• With RS facing: K1, P1, K across to 1st marker (right back), place next 32 (32,32,34) sts on holder
(sleeve), CO 2sts, K across 47 (49, 51, 53) sts (front), place next 32 (32,32,34) sts on holder (sleeve),
CO 2 sts, K across to last 2sts, P1, K1 (left back). (95, 99, 103, 107sts)
• Work in stockinette stitch with 1X1 ribbing at edges as establised until piece measures 5” (5”, 7”, 7”)
from underarm.
• Change to smaller needles, K1, P1 rib pattern for 1”. Bind off in pattern.
Sleeves: Work one at a time or both at the same time with separate balls of yarn or yarn coming from the
outside and inside of one skein.
• With larger needles, slide stitches from holder(s) onto needle.
• With RS facing, K2, Kfb, K to last 3sts, Kfb, K2.
• Work in stockinette stitch for 4” (5”, 6”, 6”) or desired length.
• Change to smaller needles and K1, P1 rib pattern for 1”. Bind off.
Finishing:
• Sew sleeve seams (I recommend the mattress stitch) and weave in loose ends.
• Sew in zipper, place closed end at top of hood, leaving open end at bottom of sweater. I recommend
the backstitch using the “purl” stitch as a guideline for the stitching.
Abbreviations
CO- cast on
Cont – continue
K – knit
Kfb – knit in front & back of stitch
P – purl
PM – place marker
RS – right side
St(s) – stitch(es)
Stitch Glossary
• Stockinette stitch – Knit 1 row, purl 1 row; repeat to create
stockinette stitch pattern.
• K1, P1 rib (1X1 rib)– With yarn in back, *K1, bring yarn to front under the right hand needle and purl the next stitch.
Bring yarn to back under the right hand needle *. Repeat between ** to create the rib pattern.
• Knit in front and back of stitch (Kfb) (increase) - Insert right hand needle into front of stitch as if to knit, bring yarn
around and pull the stitch through but do not remove the stitch from the left hand needle. Insert right hand needle into
back of the same stitch and wrap yarn around from back to front and bring that stitch through and slide stitch off left hand
needle.
• Mattress stitch – Place right sides up and edges to be seamed next to each other. Pick up the bar between first and second
stitches on right hand side. Cross to the left side and pick up bar between first and second stitches. Continue working
back and forth to create an invisible seam.
• Pick up and knit stitches: Using only one needle in your right hand, insert needle through 2 strands at the edge of the
worked piece. Wrap the yarn around the needle as if to knit and bring the yarn back through the strands with the needle,
leaving the stitch on the needle. Repeat for needed number of stitches.
• Backstitch – Insert sewing needle through work from wrong side to right side. Insert needle about ¼” to the right and
from wrong side about ½” to left. Continue to the end of the seam, knot. (Lefties can reverse direction.)
Copyright 2009, Sarah Montie Handknits, PO Box 178, IH, NJ 08732,
www.sarahmontie.com, [email protected]
This pattern may not be photocopied or reproduced without written authorization.
BACK VIEWS