Embed Size (px)
Citation preview

homeplug internet via the powerline
LN-550/551/552/553
User Manual
Full manual Sitecom homeplug 2
Table of Contents
1. Safety instructions ........................................................................................ 3
2. Introduction ................................................................................................. 4
2.1 What exactly is Homeplug? ....................................................................... 4
Cost factor and transmission quality ............................................................ 4
Data security and radiation ......................................................................... 4
2.2 Package Contents .................................................................................... 4
3. Introduction of the hardware ......................................................................... 5
4. Install the hardware...................................................................................... 7
4.1 Install the first Homeplug ......................................................................... 7
4.2 Install the second Homeplug ..................................................................... 8
5. Add an extra Homeplug to an existing network .............................................. 10
6. Setting security .......................................................................................... 11
6.1 Create a private encrypted network ......................................................... 12
6.2 Add an extra Homeplug .......................................................................... 13
6.3 Remove a device from a network Group ................................................... 13
6.4 Make two public network devices private .................................................. 13
6.5 Standby Mode ....................................................................................... 13
Appendix: Declaration of Conformity ................................................................ 13

Full manual Sitecom homeplug 3
1. Safety instructions
All safety and operating instructions should be read and understood before using
the device, and should be kept for future reference.
Never open the Homeplug adapter. There are no user-serviceable parts
inside the Homeplug adapter.
Do not try to service this product yourself! Contact qualified technicians
each and every time your device needs maintenance. There is a risk of
electric shock!
Use the Homeplug adapter in a dry location only.
Do not insert any objects into the openings of the Homeplug adapter.
To disconnect the Homeplug adapter from the power supply grid, pull the
power plug.
Do not keep the Homeplug adapter in direct sunlight.
Slots and openings on the case serve as ventilation. Never block or cover
them.
Never set up the Homeplug adapter near a heater or radiator.
The Homeplug adapter should be located only where sufficient ventilation
according to the instructions of the manufacturer can be ensured.
Disconnect the Homeplug adapter from the power supply grid before
cleaning. Use a moist towel to clean the device. Never use water, paint
thinner, benzene, alcohol or other strong cleaning agents when cleaning
the device, as these could damage the case.
Never use the Homeplug adapter with a power supply that does not meet
the specifications provided on the rating plate. If you do not know what
type of power supply you have at home, contact your dealer or energy
supplier.
In the event of damage, disconnect the Homeplug adapter from the power
supply grid and contact customer service. This applies, for example
o If the power cable or plug is damaged
o If liquid has been spilled on the Homeplug adapter or objects have
fallen into the device.
o If the Homeplug adapter has been exposed to rain or water.
o If the Homeplug adapter does not work, even though the operating
instructions have been followed properly.
o If the Homeplug adapter’s case is damaged.
Full manual Sitecom homeplug 4
2. Introduction
In this chapter, we will provide an overview of the Homeplug technology and
introduce it briefly.
2.1 What exactly is Homeplug?
Homeplug is home and office networking using the electric wiring already
installed in the building.
Cost factor and transmission quality
Homeplug is an economical and easy-to-use networking technology. You don't
need to lay cables and you can connect to the home network at every power
point.
The Homeplug standard modulates and demodulates additional frequencies on
the power lines. Modulation and demodulation is a well-known and proven
method of data transmission, which has been in use in other applications for a
number of years. Now it is used to set up Internet and network accesses in the
home or office. Depending on the damping factor, distances of at least 200
meters can be covered.
With a maximum data rate up to 500 Mbps and symmetrical upload and
download speeds, Homeplug is comparable to traditional Ethernet network
solutions.
Data security and radiation
128-bit AES encryption is used, which guarantees secure data transfer within the
network.
2.2 Package Contents Open the package carefully, and make sure that none of the items listed below
are missing. Do not discard the packing materials, in case of return; the unit
must be shipped back in its original package.
The Homeplug device(s)
A CD containing manuals and utility.
A quick installation guide.
Two CAT 5e Ethernet cables.

Full manual Sitecom homeplug 5
3. Introduction of the hardware
Power LED
ON: Power on and ready.
BLINKING:
1. (blink at slower rate) means Standby mode, or
2. During Group pairing procedure, the device joining or being joined into
same logical network will continue to blink for 2 minutes until the procedure is
successful or is canceled). To enter or cancel the Group pairing procedure,
just press the GROUP button 2~3 sec.
OFF: Power off.
Ethernet
Link/Activity LED
ON: Ethernet Link Detected.
BLINKING: Ethernet traffic detected.
OFF: No Ethernet Link detected.
PLC Link/Activity
LED
ON: Power line Link detected but no power line traffic.
OFF: Power line Link not detected (either other devices in same network are too
far to communicate or it is alone in its logical network).
Color:
Green: PHY RATE > 40Mbps
Orange: 20Mbps < PHY RATE < 40Mbps
Red: PHY RATE < 20Mbps
GROUP/Reset
Button
Press 10 seconds: clear the current network group name and randomly generate a
new network group name.
Press 2 to 3 seconds: this will enter Group pairing mode. In this mode the device
will join into an existing logical network of other device or announce its network
group name for other devices to join. This mode automatically ends after two
minutes or when it is successful, manually stopped. Press this button 2 to 3
seconds will manually stop the Group pairing mode.
Power LED Ethernet Link/Activity PLC Link/Activity Group/Reset button

Full manual Sitecom homeplug 6
Press the button when the device is powered on (not standby) to restore to Factory
default settings (including PLC network group name).
Every new PLC devices has the factory default network group name of
HomePlugAV. During trouble shooting, power line network communication and
network group assignment.
Full manual Sitecom homeplug 7
4. Install the hardware
Note: If you use this manual to add a single Homeplug to an already existing
Homeplug network, please follow the steps as described in Appendix A.
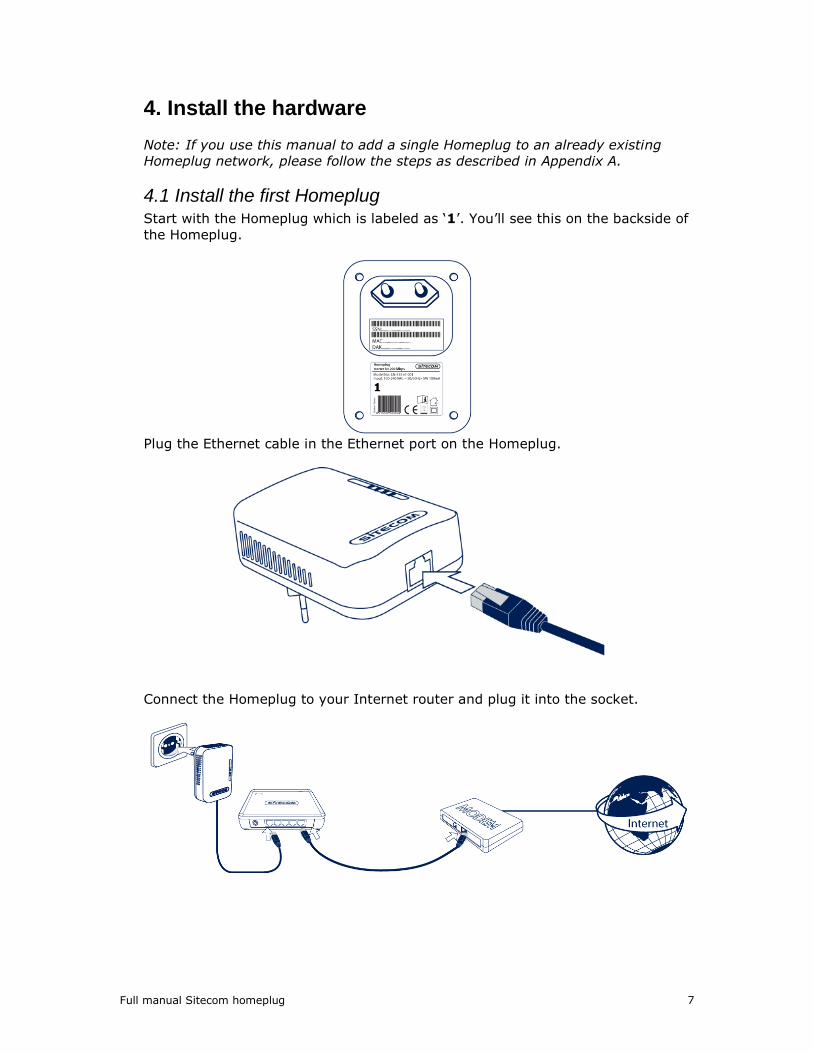
4.1 Install the first Homeplug Start with the Homeplug which is labeled as ‘1’. You’ll see this on the backside of
the Homeplug.
Plug the Ethernet cable in the Ethernet port on the Homeplug.
Connect the Homeplug to your Internet router and plug it into the socket.

Full manual Sitecom homeplug 8
4.2 Install the second Homeplug
Take the Homeplug which is labeled as ‘2’. You’ll see this on the backside of the
Homeplug.
Plug the Ethernet cable in the Ethernet port on the Homeplug.
Connect the Homeplug to your computer and plug it into the socket.

Full manual Sitecom homeplug 9
Your network is now fully functional. Follow the next steps to secure your
network.

Full manual Sitecom homeplug 10
5. Add an extra Homeplug to an existing network
Install the Hardware
Plug the Ethernet cable in the Ethernet port.
Plug the cable into the device you want to connect to your network.
Your network is now fully functional. Follow the next steps to secure your network.
Full manual Sitecom homeplug 11
6. Setting security
This product is a Homeplug AV power line device. Each Homeplug has a
Homeplug network name. Multiple Homeplug devices with the same network
names can communicate with one another, and thus belonging to a same
Homeplug network group. Devices with a different network name won’t
communicate.
Any ‘Homeplug-AV’ compliant Homeplug which comes new from the box,
including this device, has a default network name of HomeplugAV. It can
communicate with other brands of new Homeplug-AV compliant devices, thus
these new devices are so called belonging to the public network. Pushing the
GROUP button of the device will change its network name. This way, users can
create one or multiple private Homeplug network groups using this button,
without complicated setup software involved, thus protect their data which is
being transmitted over the power line. Pressing the RESET button of a power-
active Homeplug device will reset the network name back to its factory default
(HomeplugAV).
By pushing the GROUP button for more than 10 seconds, a random network
name (different from HomeplugAV) for the device will be generated. This device
can then ask other devices to join its Homeplug network to form a private
network group. Any other device, the Slave Homeplug for instance, which wants
to join this device’s (the Master) Homeplug network group can be added by the
steps below: (NOTE: it is more convenient to bring devices, which are to be
configured into the same logical network group, side by side during this
procedure. After the network group is set, the devices can be deployed anywhere
at home)
Full manual Sitecom homeplug 12
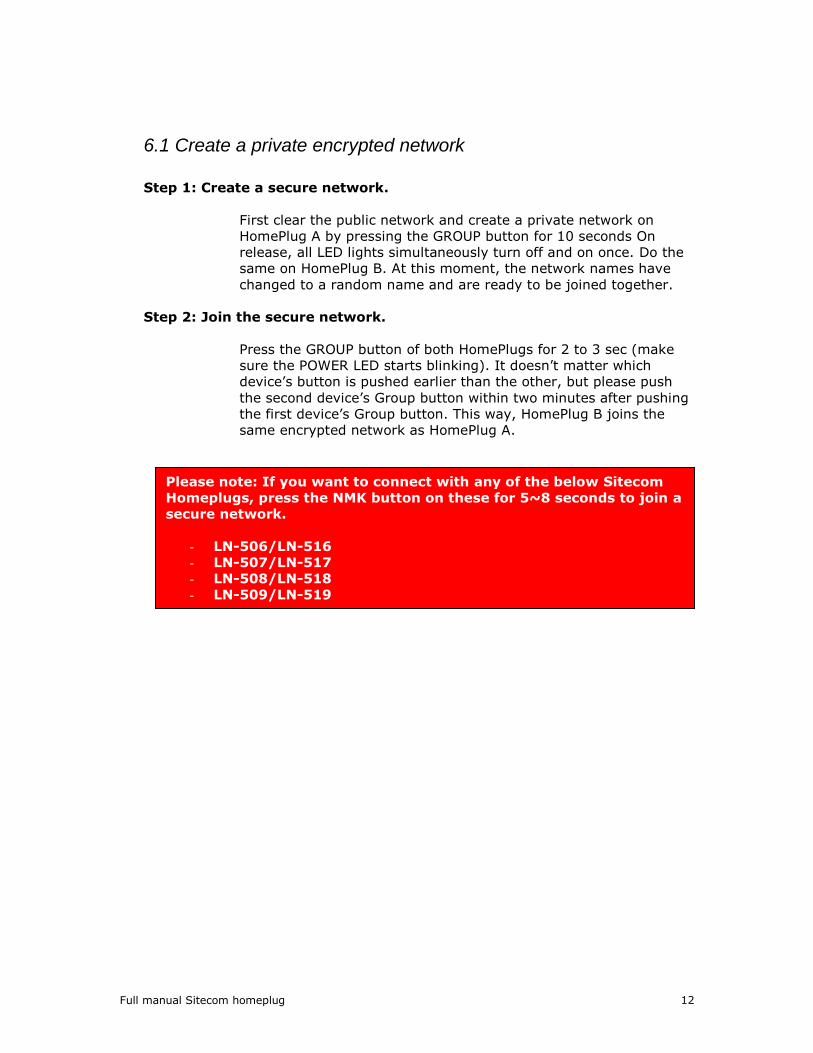
6.1 Create a private encrypted network
Step 1: Create a secure network.
First clear the public network and create a private network on
HomePlug A by pressing the GROUP button for 10 seconds On
release, all LED lights simultaneously turn off and on once. Do the
same on HomePlug B. At this moment, the network names have
changed to a random name and are ready to be joined together.
Step 2: Join the secure network.
Press the GROUP button of both HomePlugs for 2 to 3 sec (make
sure the POWER LED starts blinking). It doesn’t matter which
device’s button is pushed earlier than the other, but please push
the second device’s Group button within two minutes after pushing
the first device’s Group button. This way, HomePlug B joins the
same encrypted network as HomePlug A.
Please note: If you want to connect with any of the below Sitecom
Homeplugs, press the NMK button on these for 5~8 seconds to join a
secure network.
- LN-506/LN-516
- LN-507/LN-517
- LN-508/LN-518
- LN-509/LN-519
Full manual Sitecom homeplug 13
6.2 Add an extra Homeplug
First, clear the original network group of the extra HomePlug by pressing its
GROUP button for 10 seconds. On release, all LED lights simultaneously turn off
and on once. At this moment, its network group name has been changed to a
random name and is ready to be assigned another network name.
Next, press the GROUP button of the extra HomePlug and the GROUP button on a
HomePlug that is already connected to the network for 2 to 3 sec (make sure the
POWER LED starts blinking). It doesn’t matter which device’s button is pushed
earlier than the other, but please push the second device’s Group button within
two minutes after pushing the first device’s Group button. This way, the extra
HomePlug joins the same encrypted network as the rest.
6.3 Remove a device from a network Group
If for example, device A and device B are in the same logical network group and
you want to remove device A from this logical network group, just press the
GROUP button of device A for 10 seconds. This makes device A unable to
communicate with device B.
6.4 Make two public network devices private
If you want to make two new public devices (network name HomePlugAV) to
become private, please carry out Step 1 on both devices, then do step 2 on
these two devices. Finally, a private random network name is generated for
these two devices.
6.5 Standby Mode
The standby mode enables the Homeplug to save power consumption. The
Homeplug automatically enters standby if no Ethernet cable is connected, or the
connected device enters standby, hibernation, or is powered-off for over two
minutes. During standby, only the POWER LED blinks at a slow rate. To exit
standby, just insert the Ethernet cable to the Homeplug, or wake up the
connected device.
Note: Some computers support the Wake on LAN function that may
cause the Homeplug not to enter the standby mode.

Full manual Sitecom homeplug 14
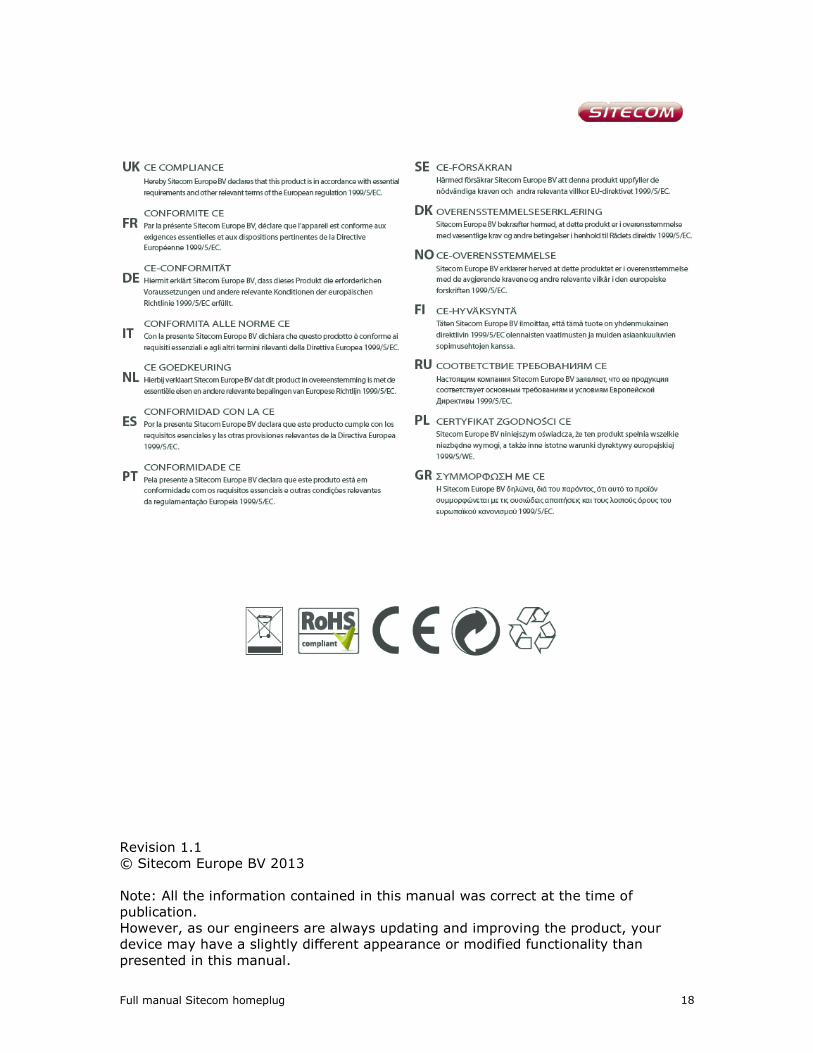
Appendix: Declaration of Conformity

Full manual Sitecom homeplug 15

Full manual Sitecom homeplug 16
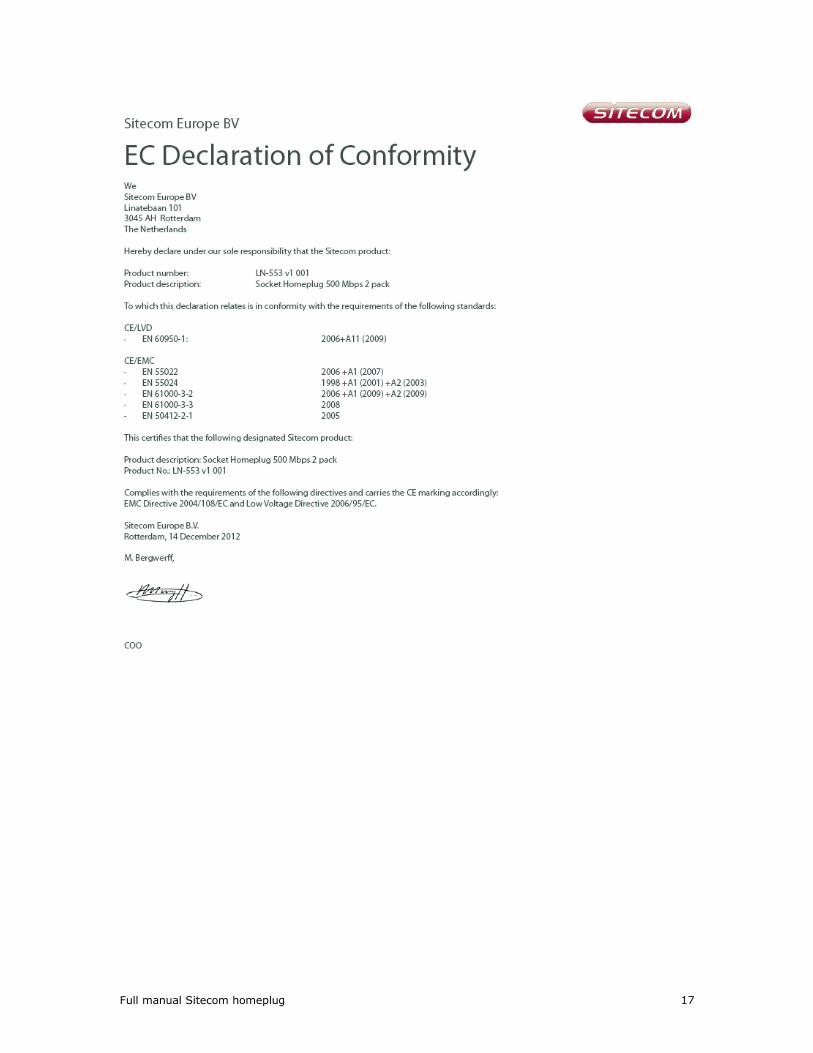
Full manual Sitecom homeplug 17
Full manual Sitecom homeplug 18
Revision 1.1
© Sitecom Europe BV 2013
Note: All the information contained in this manual was correct at the time of
publication.
However, as our engineers are always updating and improving the product, your
device may have a slightly different appearance or modified functionality than
presented in this manual.