Embed Size (px)
Citation preview
Home8 App User Manual V 3.1.3
1
Home8 App
User Manual
home8alarm.com | home8care.com 1-844-800-6482 | [email protected]
2
Home8 App User Manual V3.1.7
Table of Contents Chapter 1. Getting Started ............................................................................... 4
Chapter 2. Main Menu (Home Screen) ................................................................ 6
Chapter 3. Sidebar Menu ................................................................................. 8 a.) Edit Account Information (Password, Email Address, Display Name) .............................................. 9 b.) Notifications ................................................................................................................................. 9 c.) Add Authorized User ................................................................................................................ 10 d.) Edit/Delete Authorized User ...................................................................................................... 11 e.) Add Emergency Contact .......................................................................................................... 12 f.) Edit/Delete Emergency Contact ................................................................................................. 13 g.) Add Local Authority .................................................................................................................. 14 h.) Edit/Delete Local Authority ........................................................................................................ 15 i.) Amazon Echo ............................................................................................................................ 15 j.) Sidebar Menu -> Sign Out ......................................................................................................... 16 k.) Sign In/Request A New Password ............................................................................................ 16
Chapter 4. Device Management ...................................................................... 17 a.)Activate OPU/Shuttle (Add Location) ........................................................................................ 17 b.) Virtual Gateway ......................................................................................................................... 18 c.) Add A Device (IP Cameras And Sensors) ................................................................................. 19 d.) OPU/Shuttle Settings (Time Zone, Address, ARM, Siren, etc.) ................................................ 20 e.) Remove And Rename Shuttle And Devices ............................................................................. 21 f.) Replace OPU/Shuttle ................................................................................................................ 22 g.) Low Battery Indicator ................................................................................................................ 23 h.) 24/7 Continuous Recording ...................................................................................................... 24 i.) Camera Sensitivity (in regards to the motion detection feature) ................................................ 25 j.) Camera Sensitivity (in regards to the sound detection feature) ................................................. 27 k.)Unshare me ............................................................................................................................... 28 l.) Adding A Wi-Fi Network For The IP Camera ............................................................................. 29 m.) Adding A Wi-Fi Network Afterthoughts .................................................................................... 30 n.) Add Dropbox Backup ............................................................................................................... 31 o.) Add Z-Wave Dongle ................................................................................................................. 32 p.) Add Z-Wave Gateway .............................................................................................................. 33 q.) Add Z-Wave Sensor ................................................................................................................. 35
3
Home8 App User Manual V3.1.7
Chapter 5. Video.............................................................................................. 37 a.) Multi-Site Viewing ..................................................................................................................... 37 b.) Single Video Viewing/Turn Off Sounding Siren ........................................................................ 38 c.) Change Image Settings ............................................................................................................ 39 d.) Automation Pop-Up .................................................................................................................. 40 e.) Record/Share Video ................................................................................................................. 41 f.) Call An Emergency Contact ...................................................................................................... 42
Chapter 6. VideoGram .................................................................................... 43
Chapter 7. Automation ................................................................................... 46 a.) Remote Control ........................................................................................................................ 46 b.) Schedule Page and Rule Page ................................................................................................ 47
Chapter 8. Armed/Disarmed/Stay Mode ........................................................ 49 a.) Arm/Disarm Shuttle (Location) Or Event .................................................................................. 49 b.) Arm In Stay Mode ..................................................................................................................... 50 n.) Schedule Page .......................................................................................................................... 51
Chapter 9. Activity .......................................................................................... 52 a) Contact Sensor .......................................................................................................................... 52 b) Motion Sensor ........................................................................................................................... 53 b) Activity Sensor ........................................................................................................................... 53
Chapter 10. Care24 ......................................................................................... 54 a.) Set up Care24 .......................................................................................................................... 54 b.) Care24 GPS .............................................................................................................................. 56 c.) Add Geofence ........................................................................................................................... 57
Note:
Some information in this manual may not pertain to certain packages. Also, screenshots within are from the iOS version of our App. If you are using an Android or Windows Phone version of our App,
there might be slight differences in the interface.
4
Home8 App User Manual V3.1.7
Chapter 1. Getting Started a.) Set Up Account Using Your Smartphone
1) Download Home8 App from iPhone’s App Store, Android’s Google Play Store, or Windows’ Windows Phone Store.
2) Click on Home8 icon and go through the Phone Number Verification process (see below). b.) Phone Number Verification And Set New Password
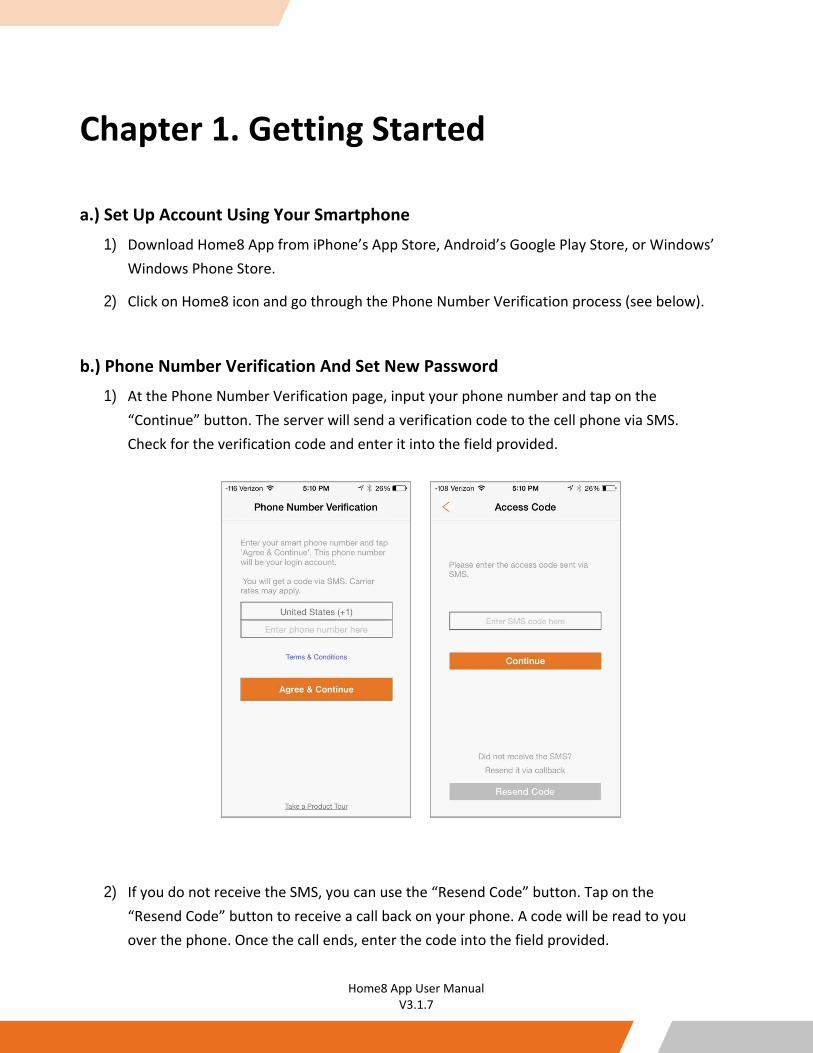
1) At the Phone Number Verification page, input your phone number and tap on the “Continue” button. The server will send a verification code to the cell phone via SMS. Check for the verification code and enter it into the field provided.
2) If you do not receive the SMS, you can use the “Resend Code” button. Tap on the “Resend Code” button to receive a call back on your phone. A code will be read to you over the phone. Once the call ends, enter the code into the field provided.

5
Home8 App User Manual V3.1.7
3) You will be asked to set a password for your account. Once you fill out all the requested information, please tap on the (Save) button. After you sign in with the new password, your phone number verification will have been completed.
6
Home8 App User Manual V3.1.7
Chapter 2. Main Menu (Home Screen)
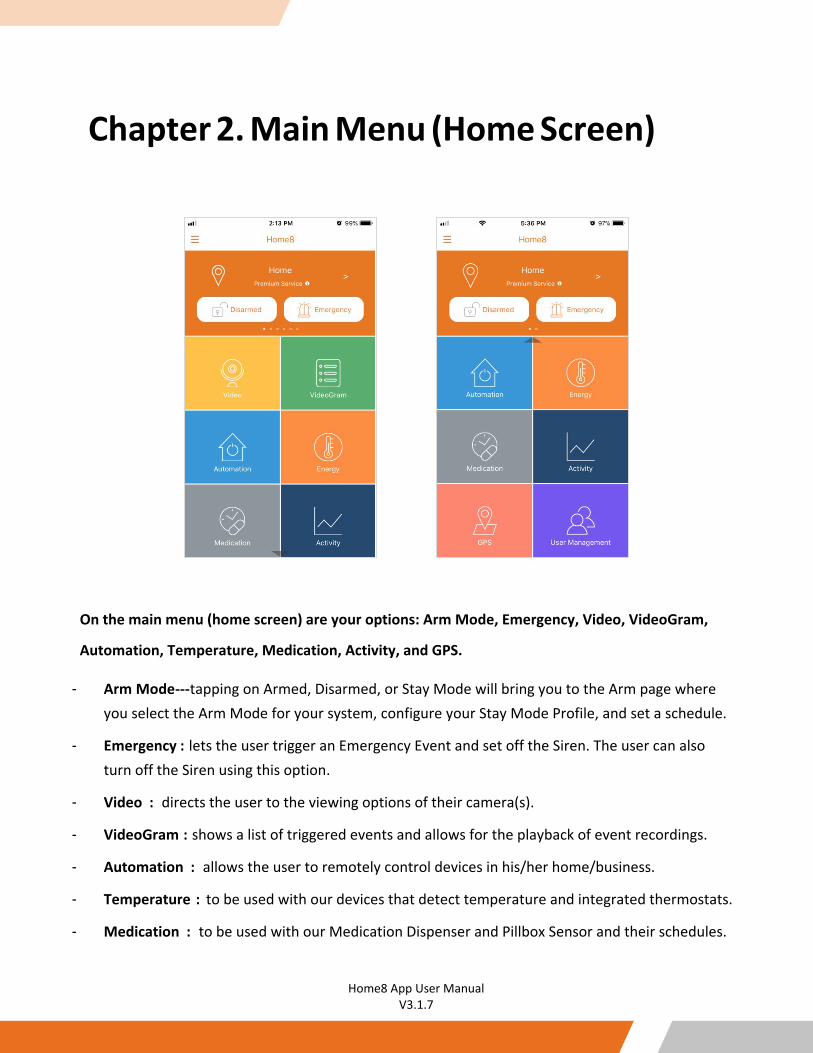
On the main menu (home screen) are your options: Arm Mode, Emergency, Video, VideoGram,
Automation, Temperature, Medication, Activity, and GPS.
- Arm Mode --- tapping on Armed, Disarmed, or Stay Mode will bring you to the Arm page where you select the Arm Mode for your system, configure your Stay Mode Profile, and set a schedule.
- Emergency : lets the user trigger an Emergency Event and set off the Siren. The user can also turn off the Siren using this option.
- Video : directs the user to the viewing options of their camera(s).
- VideoGram : shows a list of triggered events and allows for the playback of event recordings.
- Automation : allows the user to remotely control devices in his/her home/business.
- Temperature : to be used with our devices that detect temperature and integrated thermostats.
- Medication : to be used with our Medication Dispenser and Pillbox Sensor and their schedules.
7
Home8 App User Manual V3.1.7
- Activity : to be used with our motion and tracking sensors.
- GPS : allows the system owner to locate individuals with the Care24 app. The Care24 App utilizes the user’s smartphone as a fall detector, panic button and GPS locater.
- User Management : Shows the user list for Authorized User, Emergency Contact and Local Authority which will be listed by OPU/Shuttle.
8
Home8 App User Manual V3.1.7
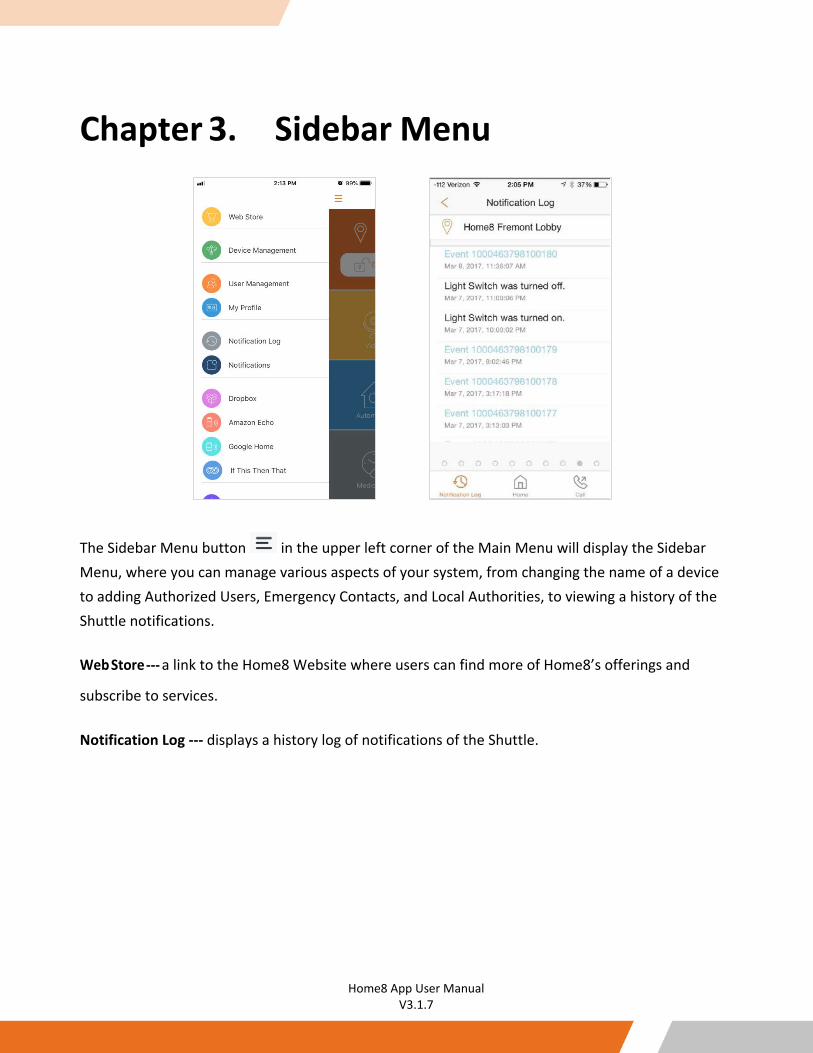
Chapter 3. Sidebar Menu
The Sidebar Menu button in the upper left corner of the Main Menu will display the Sidebar Menu, where you can manage various aspects of your system, from changing the name of a device to adding Authorized Users, Emergency Contacts, and Local Authorities, to viewing a history of the Shuttle notifications.
Web Store --- a link to the Home8 Website where users can find more of Home8’s offerings and
subscribe to services.
Notification Log --- displays a history log of notifications of the Shuttle.
9
Home8 App User Manual V3.1.7
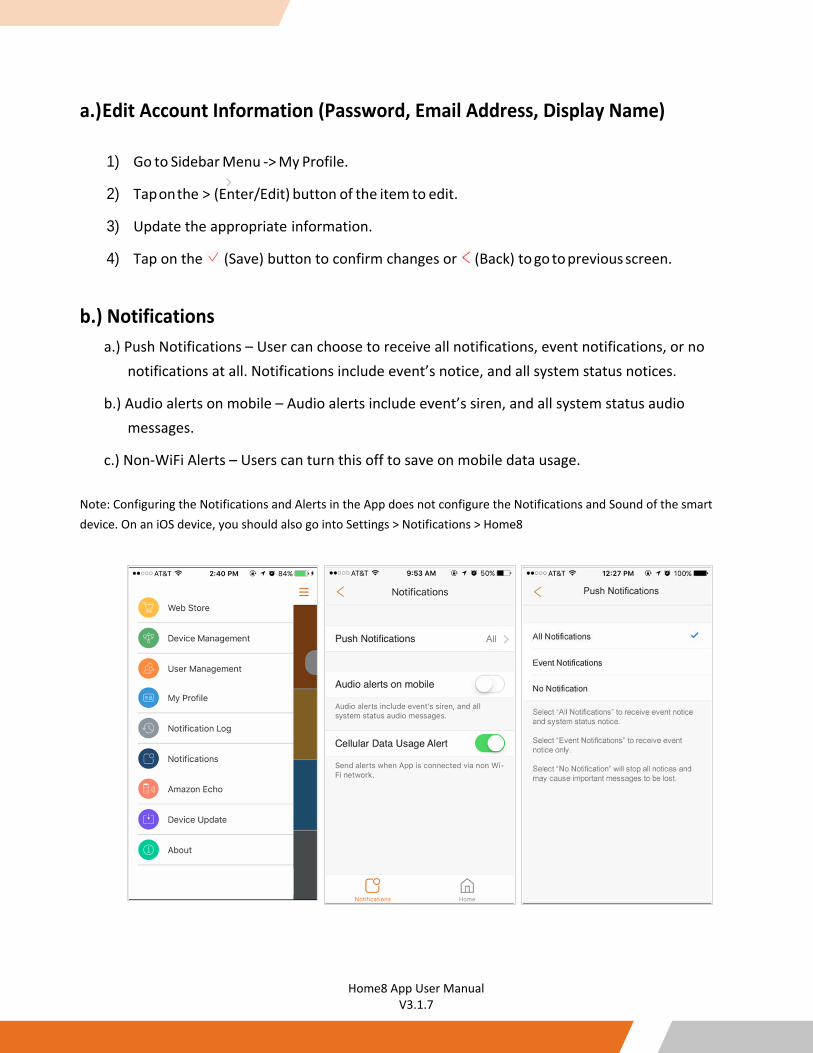
a.) Edit Account Information (Password, Email Address, Display Name)
1) Go to Sidebar Menu -> My Profile.
2) Tap on the > (Enter/Edit) button of the item to edit.
3) Update the appropriate information.
4) Tap on the (Save) button to confirm changes or (Back) to go to previous screen.
b.) Notifications
a.) Push Notifications – User can choose to receive all notifications, event notifications, or no notifications at all. Notifications include event’s notice, and all system status notices.
b.) Audio alerts on mobile – Audio alerts include event’s siren, and all system status audio messages.
c.) Non-WiFi Alerts – Users can turn this off to save on mobile data usage.
Note: Configuring the Notifications and Alerts in the App does not configure the Notifications and Sound of the smart device. On an iOS device, you should also go into Settings > Notifications > Home8
10
Home8 App User Manual V3.1.7
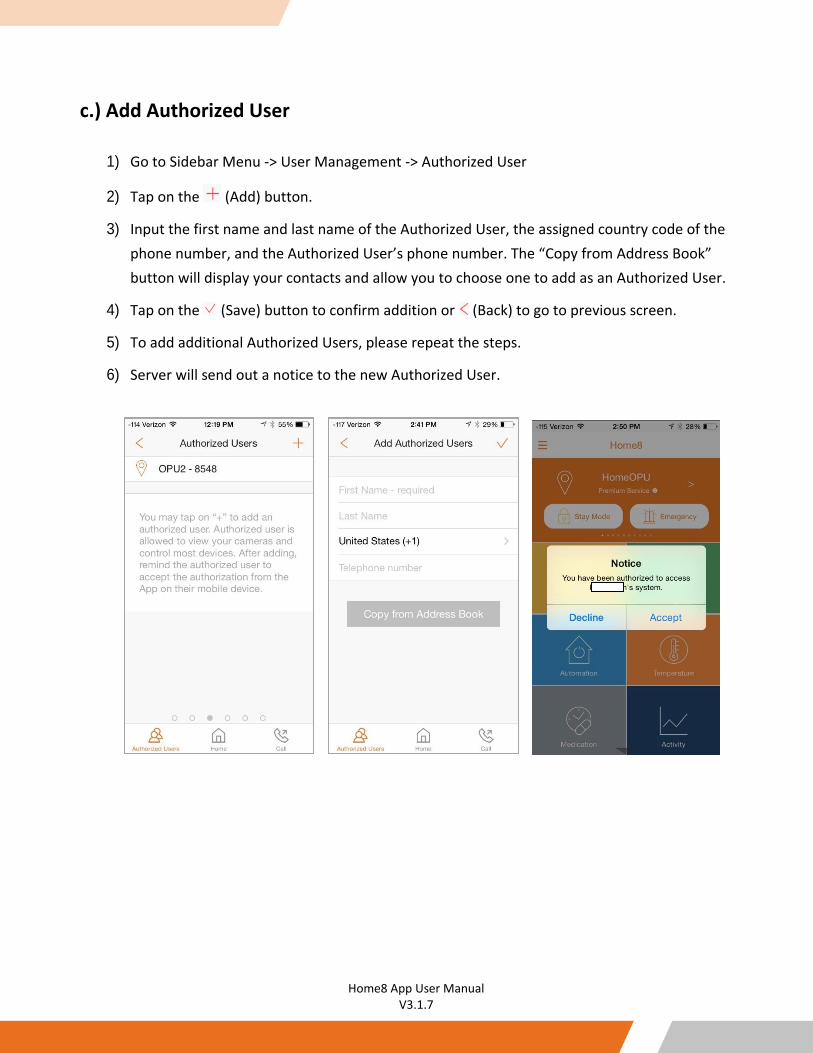
c.) Add Authorized User
1) Go to Sidebar Menu -> User Management -> Authorized User
2) Tap on the (Add) button.
3) Input the first name and last name of the Authorized User, the assigned country code of the phone number, and the Authorized User’s phone number. The “Copy from Address Book” button will display your contacts and allow you to choose one to add as an Authorized User.
4) Tap on the (Save) button to confirm addition or (Back) to go to previous screen.
5) To add additional Authorized Users, please repeat the steps.
6) Server will send out a notice to the new Authorized User.
11
Home8 App User Manual V3.1.7
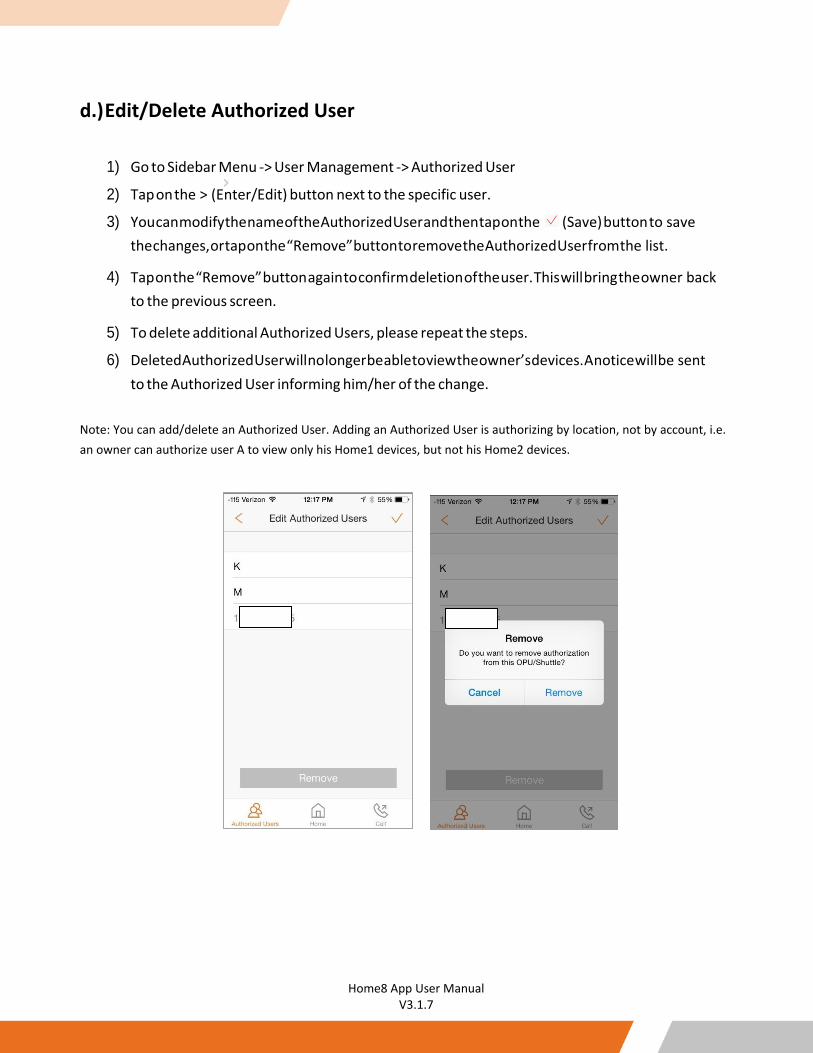
d.) Edit/Delete Authorized User
1) Go to Sidebar Menu -> User Management -> Authorized User
2) Tap on the > (Enter/Edit) button next to the specific user.
3) You can modify the name of the Authorized User and then tap on the (Save) button to save the changes, or tap on the “Remove” button to remove the Authorized User from the list.
4) Tap on the “Remove” button again to confirm deletion of the user. This will bring the owner back to the previous screen.
5) To delete additional Authorized Users, please repeat the steps.
6) Deleted Authorized User will no longer be able to view the owner’s devices. A notice will be sent to the Authorized User informing him/her of the change.
Note: You can add/delete an Authorized User. Adding an Authorized User is authorizing by location, not by account, i.e. an owner can authorize user A to view only his Home1 devices, but not his Home2 devices.

12
Home8 App User Manual V3.1.7
e.) Add Emergency Contact
1) Go to Sidebar Menu -> User Management -> Emergency Contact
2) Tap on the (Add) button.
3) Input the first name and last name of the Emergency Contact, the assigned country code of the phone number, and the Emergency Contact’s phone number.
4) The “Copy from Address Book” button will display your contacts and allow you to choose one to add as an Emergency Contact.
5) Tap on the (Save) button to confirm addition or (Back) to go to previous screen.
6) To add additional Emergency Contacts, please repeat the steps.
13
Home8 App User Manual V3.1.7
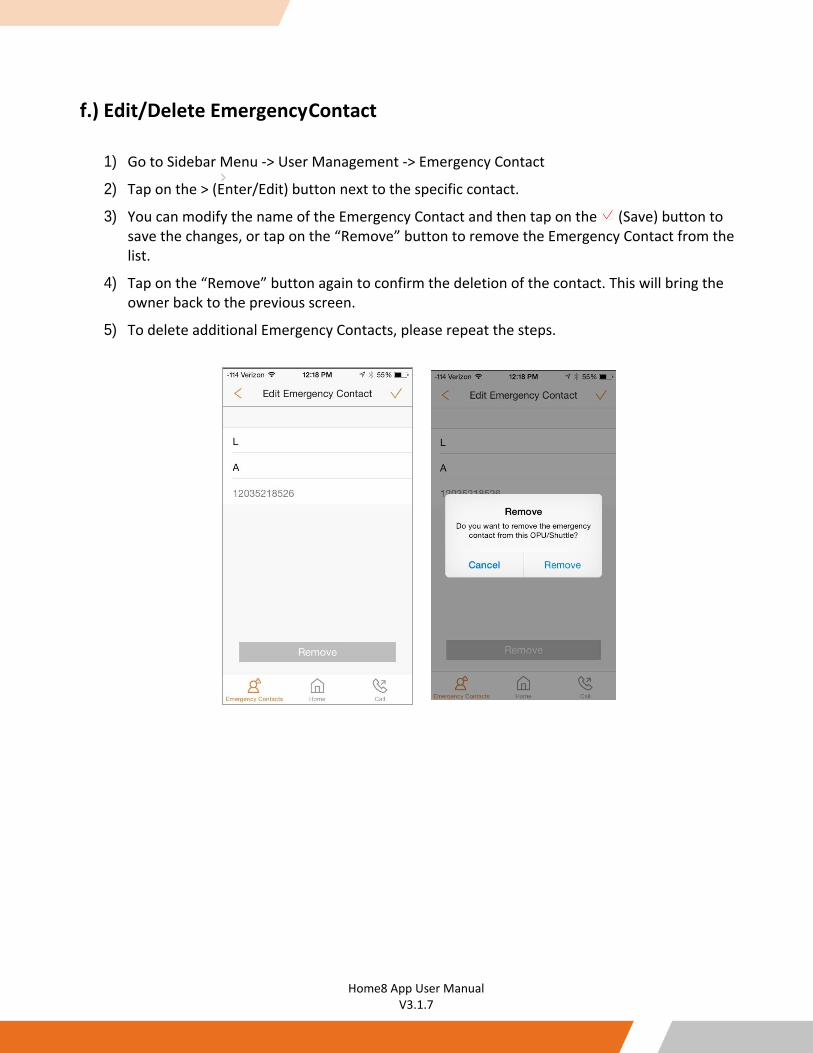
f.) Edit/Delete Emergency Contact
1) Go to Sidebar Menu -> User Management -> Emergency Contact
2) Tap on the > (Enter/Edit) button next to the specific contact.
3) You can modify the name of the Emergency Contact and then tap on the (Save) button to save the changes, or tap on the “Remove” button to remove the Emergency Contact from the list.
4) Tap on the “Remove” button again to confirm the deletion of the contact. This will bring the owner back to the previous screen.
5) To delete additional Emergency Contacts, please repeat the steps.
14
Home8 App User Manual V3.1.7
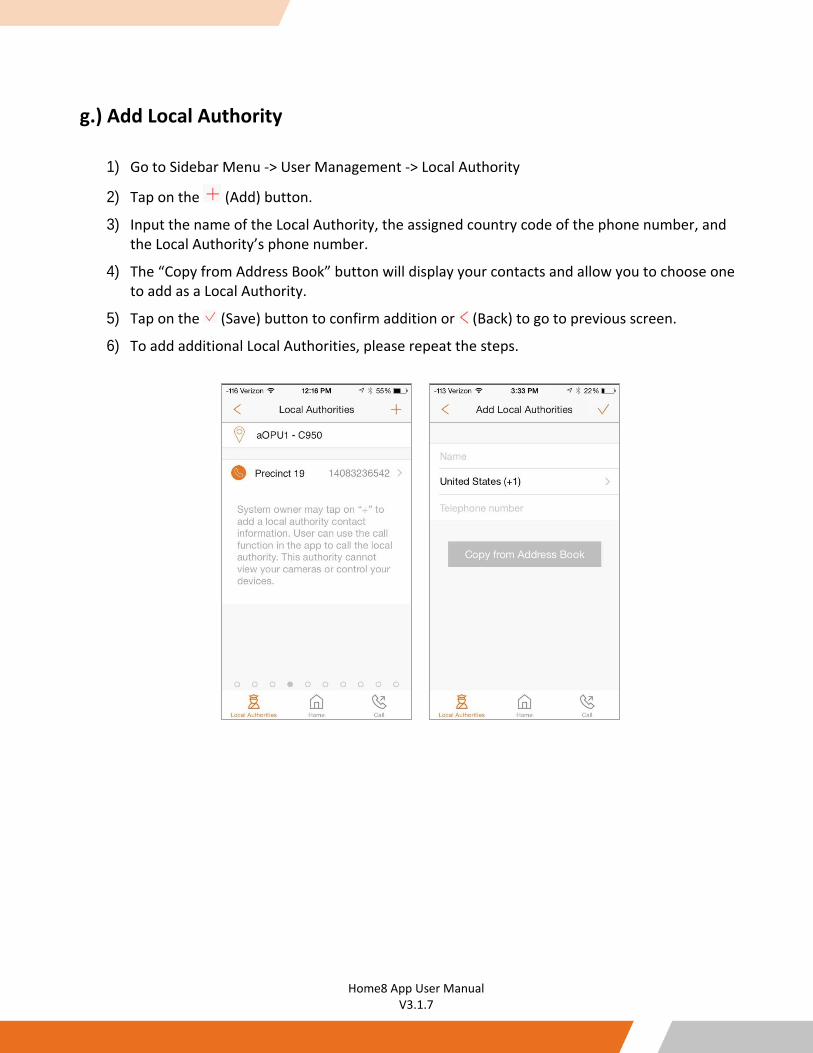
g.) Add Local Authority
1) Go to Sidebar Menu -> User Management -> Local Authority
2) Tap on the (Add) button.
3) Input the name of the Local Authority, the assigned country code of the phone number, and the Local Authority’s phone number.
4) The “Copy from Address Book” button will display your contacts and allow you to choose one to add as a Local Authority.
5) Tap on the (Save) button to confirm addition or (Back) to go to previous screen.
6) To add additional Local Authorities, please repeat the steps.
15
Home8 App User Manual V3.1.7
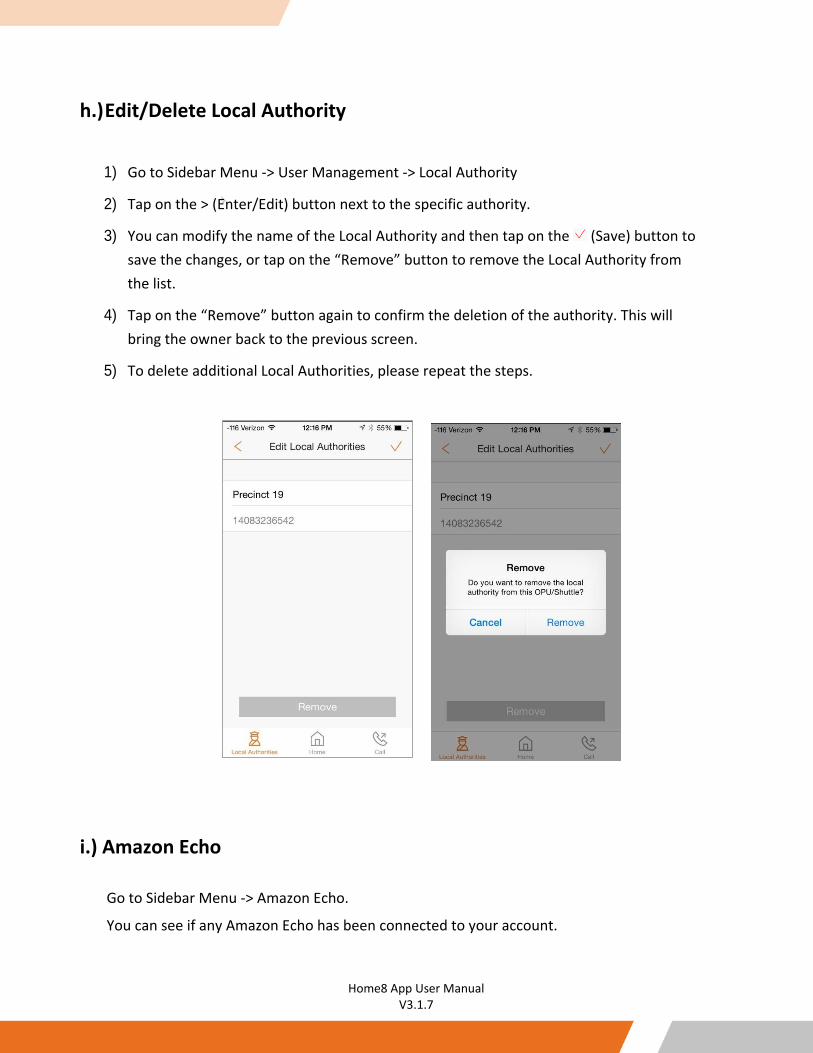
h.) Edit/Delete Local Authority
1) Go to Sidebar Menu -> User Management -> Local Authority
2) Tap on the > (Enter/Edit) button next to the specific authority.
3) You can modify the name of the Local Authority and then tap on the (Save) button to save the changes, or tap on the “Remove” button to remove the Local Authority from the list.
4) Tap on the “Remove” button again to confirm the deletion of the authority. This will bring the owner back to the previous screen.
5) To delete additional Local Authorities, please repeat the steps.
i.) Amazon Echo
Go to Sidebar Menu -> Amazon Echo.
You can see if any Amazon Echo has been connected to your account.
16
Home8 App User Manual V3.1.7
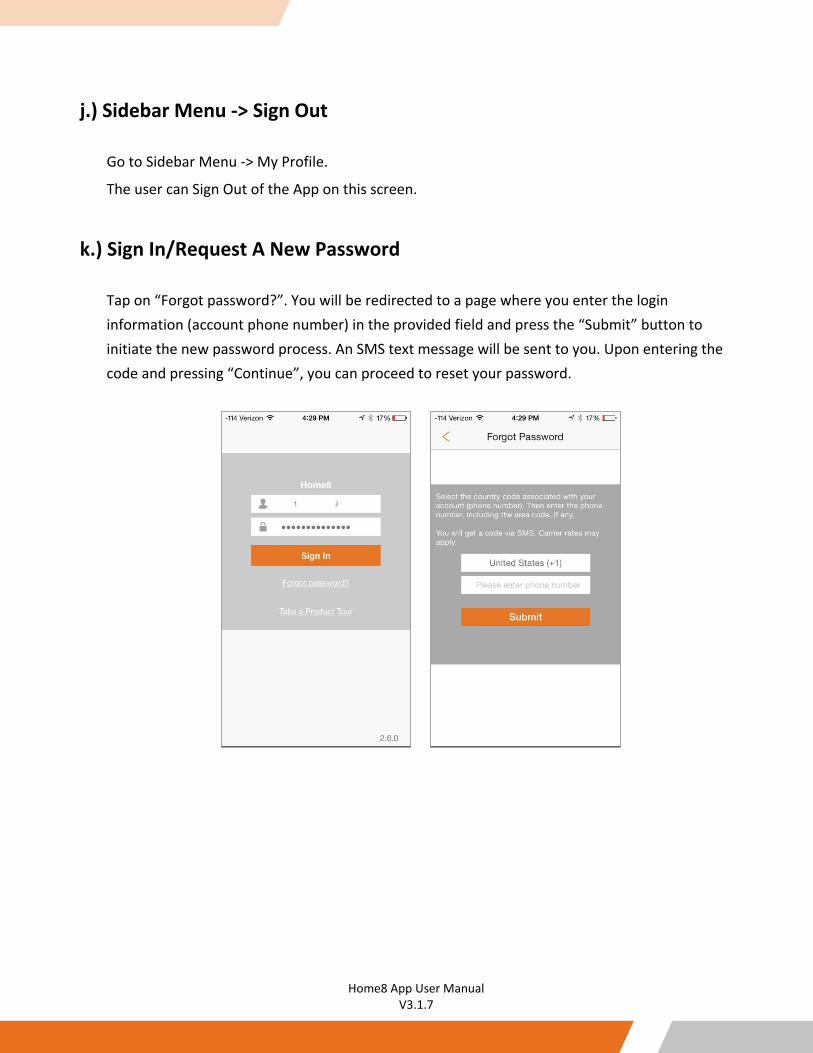
j.) Sidebar Menu -> Sign Out
Go to Sidebar Menu -> My Profile.
The user can Sign Out of the App on this screen.
k.) Sign In/Request A New Password
Tap on “Forgot password?”. You will be redirected to a page where you enter the login information (account phone number) in the provided field and press the “Submit” button to initiate the new password process. An SMS text message will be sent to you. Upon entering the code and pressing “Continue”, you can proceed to reset your password.
17
Home8 App User Manual V3.1.7
Chapter 4. Device Management
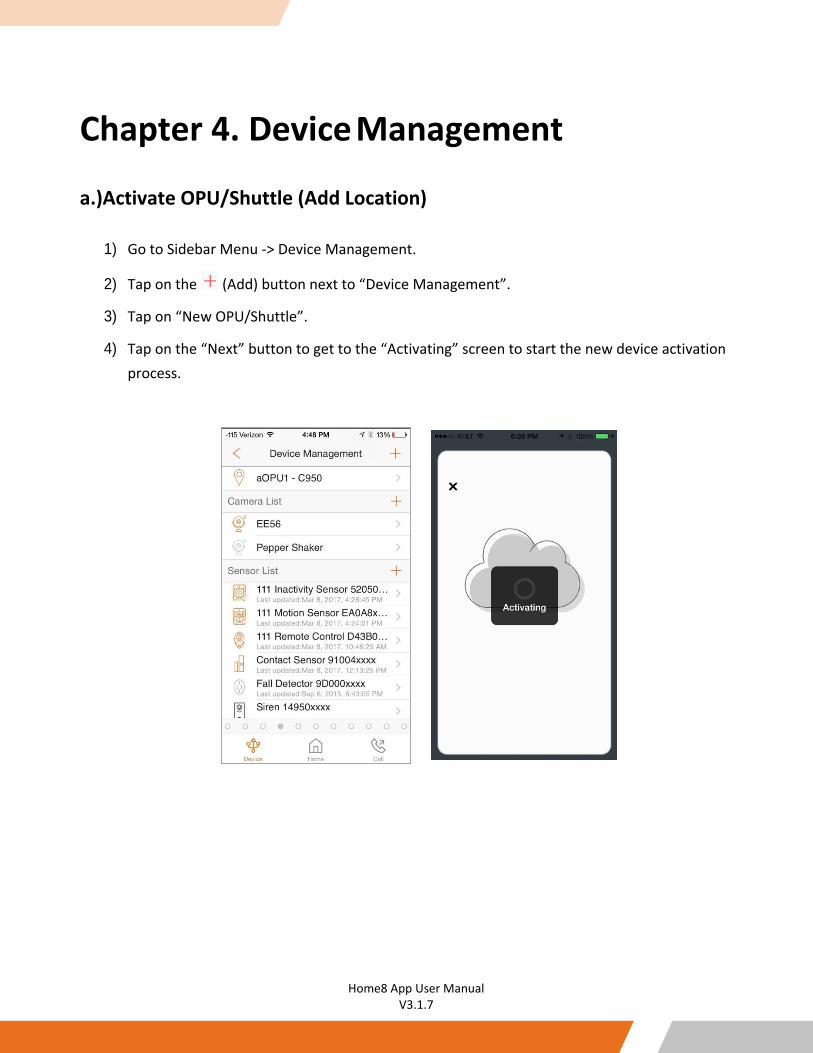
a.)Activate OPU/Shuttle (Add Location)
1) Go to Sidebar Menu -> Device Management.
2) Tap on the (Add) button next to “Device Management”.
3) Tap on “New OPU/Shuttle”.
4) Tap on the “Next” button to get to the “Activating” screen to start the new device activation process.
18
Home8 App User Manual V3.1.7
b.) Virtual Gateway
Virtual Gateway is a configuration method of selected Home8 devices without the need of a physical gateway. This function is available for free. All that is needed is our Home8 app and at least one of our supported hub-less devices. Here are the links to the quickstart guides for Virtual Gateway setup:
1) Twist HD Camera
2) Mini Cube HD Camera
3) Garage Door Control Button
4) Wi-Fi Camera
5) Mini Outdoor HD Camera
19
Home8 App User Manual V3.1.7
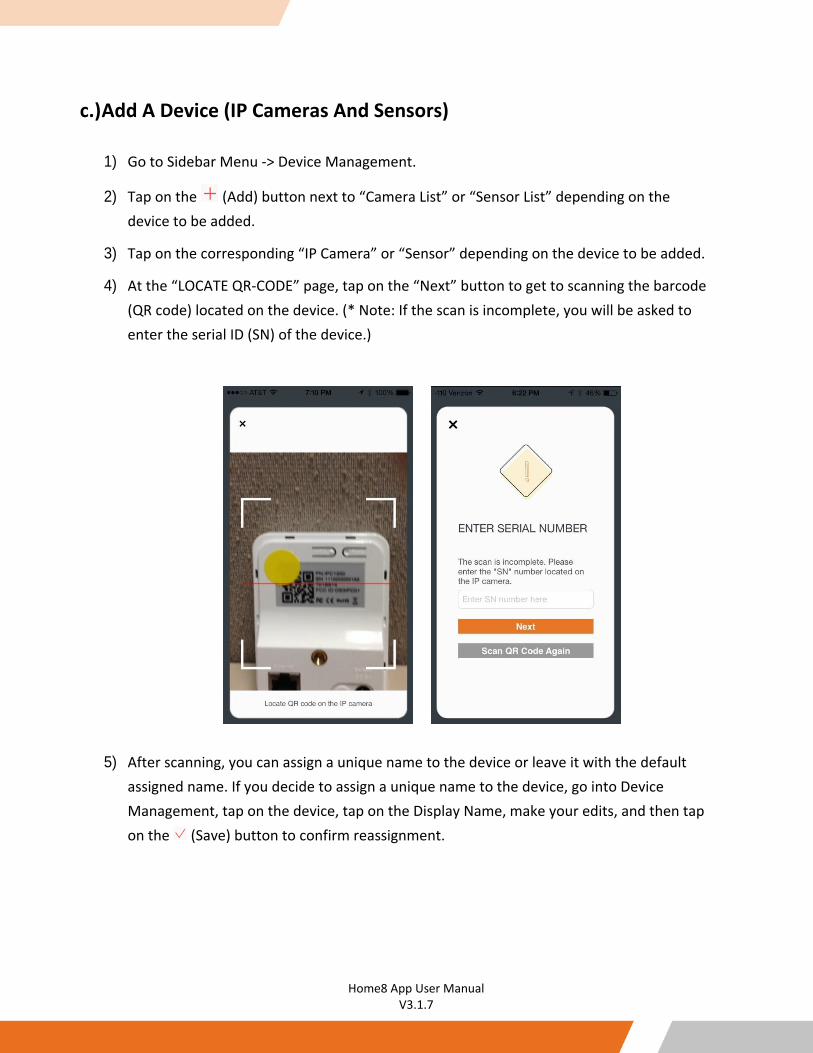
c.) Add A Device (IP Cameras And Sensors)
1) Go to Sidebar Menu -> Device Management.
2) Tap on the (Add) button next to “Camera List” or “Sensor List” depending on the device to be added.
3) Tap on the corresponding “IP Camera” or “Sensor” depending on the device to be added.
4) At the “LOCATE QR-CODE” page, tap on the “Next” button to get to scanning the barcode (QR code) located on the device. (* Note: If the scan is incomplete, you will be asked to enter the serial ID (SN) of the device.)
5) After scanning, you can assign a unique name to the device or leave it with the default assigned name. If you decide to assign a unique name to the device, go into Device Management, tap on the device, tap on the Display Name, make your edits, and then tap on the (Save) button to confirm reassignment.
20
Home8 App User Manual V3.1.7
d.) OPU/Shuttle Settings (Time Zone, Address, ARM, Siren, etc.)
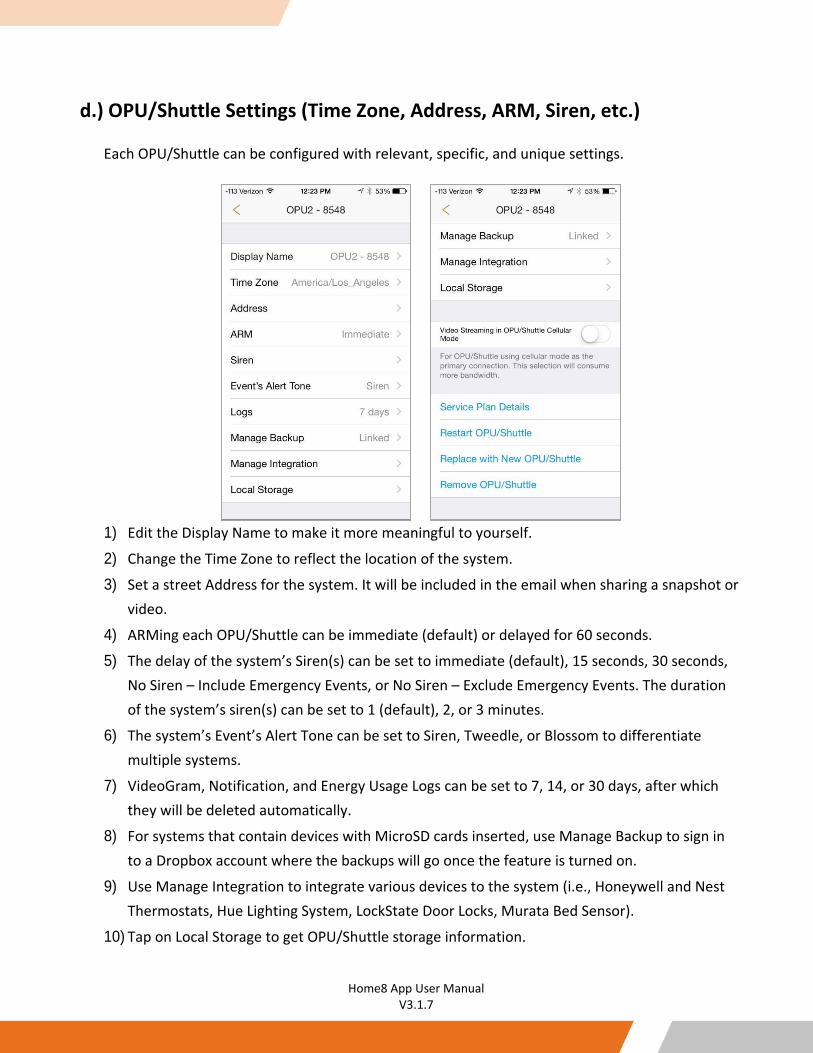
Each OPU/Shuttle can be configured with relevant, specific, and unique settings.
1) Edit the Display Name to make it more meaningful to yourself.
2) Change the Time Zone to reflect the location of the system.
3) Set a street Address for the system. It will be included in the email when sharing a snapshot or video.
4) ARMing each OPU/Shuttle can be immediate (default) or delayed for 60 seconds.
5) The delay of the system’s Siren(s) can be set to immediate (default), 15 seconds, 30 seconds, No Siren – Include Emergency Events, or No Siren – Exclude Emergency Events. The duration of the system’s siren(s) can be set to 1 (default), 2, or 3 minutes.
6) The system’s Event’s Alert Tone can be set to Siren, Tweedle, or Blossom to differentiate multiple systems.
7) VideoGram, Notification, and Energy Usage Logs can be set to 7, 14, or 30 days, after which they will be deleted automatically.
8) For systems that contain devices with MicroSD cards inserted, use Manage Backup to sign in to a Dropbox account where the backups will go once the feature is turned on.
9) Use Manage Integration to integrate various devices to the system (i.e., Honeywell and Nest Thermostats, Hue Lighting System, LockState Door Locks, Murata Bed Sensor).
10) Tap on Local Storage to get OPU/Shuttle storage information.
21
Home8 App User Manual V3.1.7
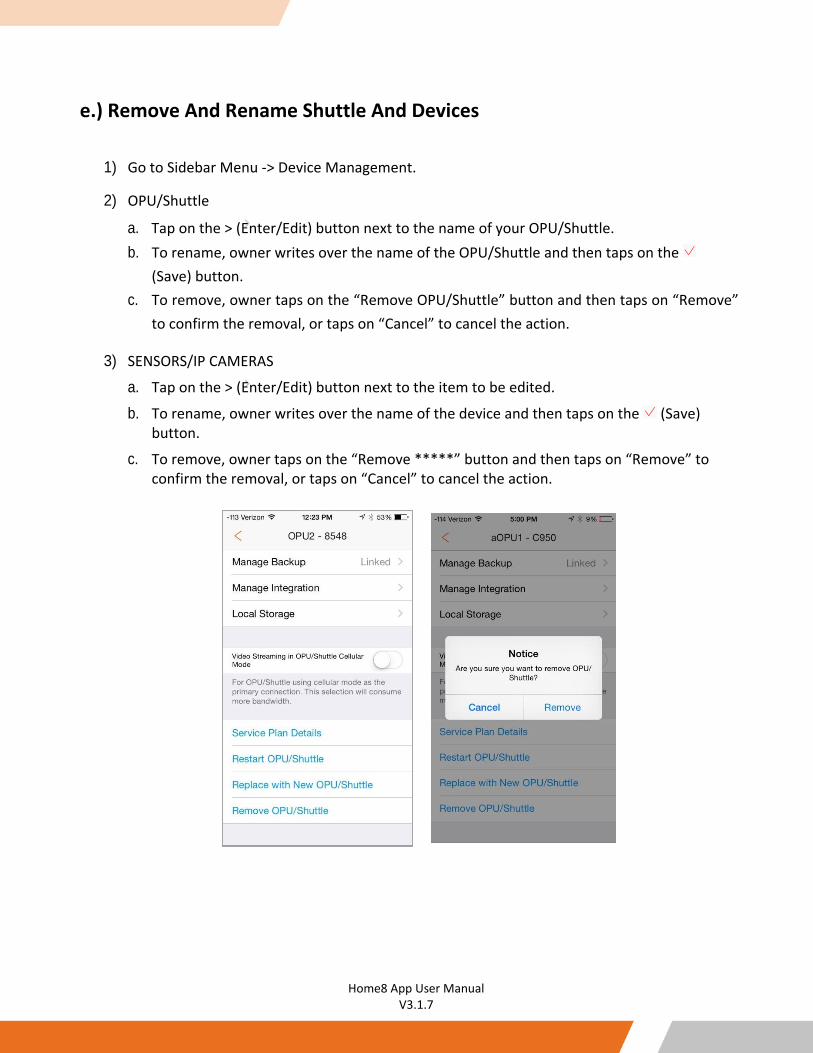
e.) Remove And Rename Shuttle And Devices
1) Go to Sidebar Menu -> Device Management.
2) OPU/Shuttle
a. Tap on the > (Enter/Edit) button next to the name of your OPU/Shuttle. b. To rename, owner writes over the name of the OPU/Shuttle and then taps on the
(Save) button. c. To remove, owner taps on the “Remove OPU/Shuttle” button and then taps on “Remove”
to confirm the removal, or taps on “Cancel” to cancel the action.
3) SENSORS/IP CAMERAS
a. Tap on the > (Enter/Edit) button next to the item to be edited.
b. To rename, owner writes over the name of the device and then taps on the (Save) button.
c. To remove, owner taps on the “Remove *****” button and then taps on “Remove” to confirm the removal, or taps on “Cancel” to cancel the action.
22
Home8 App User Manual V3.1.7
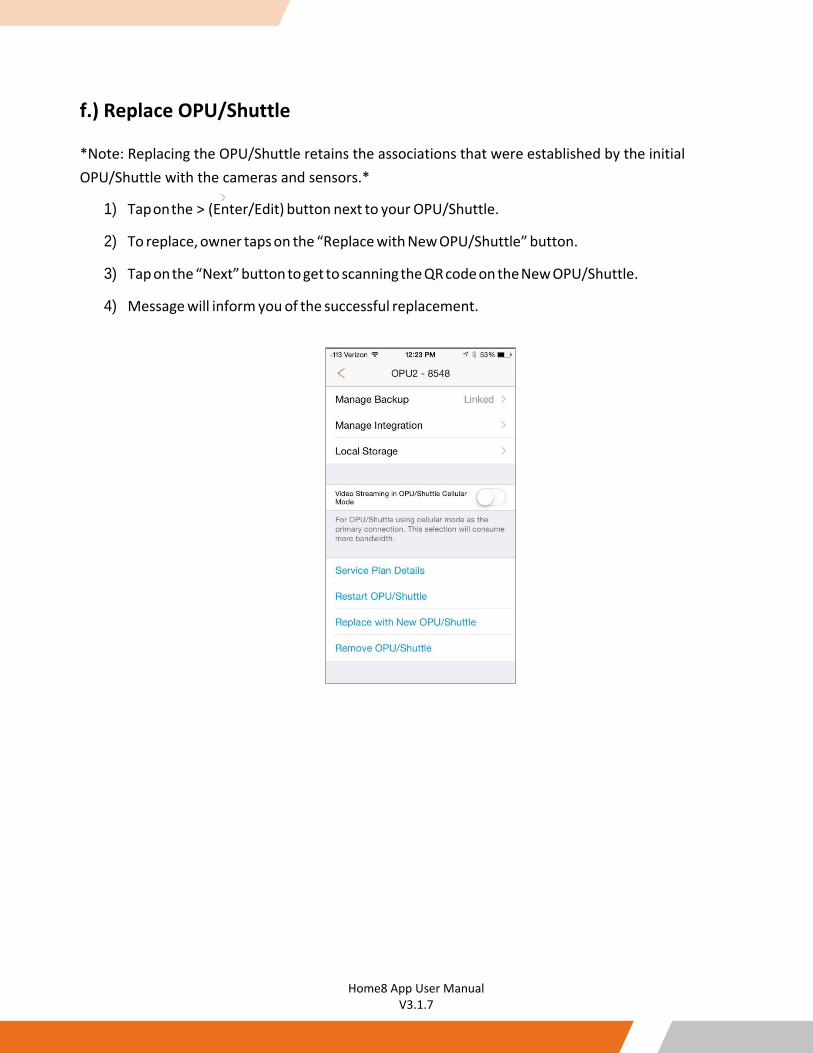
f.) Replace OPU/Shuttle
*Note: Replacing the OPU/Shuttle retains the associations that were established by the initial OPU/Shuttle with the cameras and sensors.*
1) Tap on the > (Enter/Edit) button next to your OPU/Shuttle.
2) To replace, owner taps on the “Replace with New OPU/Shuttle” button.
3) Tap on the “Next” button to get to scanning the QR code on the New OPU/Shuttle.
4) Message will inform you of the successful replacement.
23
Home8 App User Manual V3.1.7
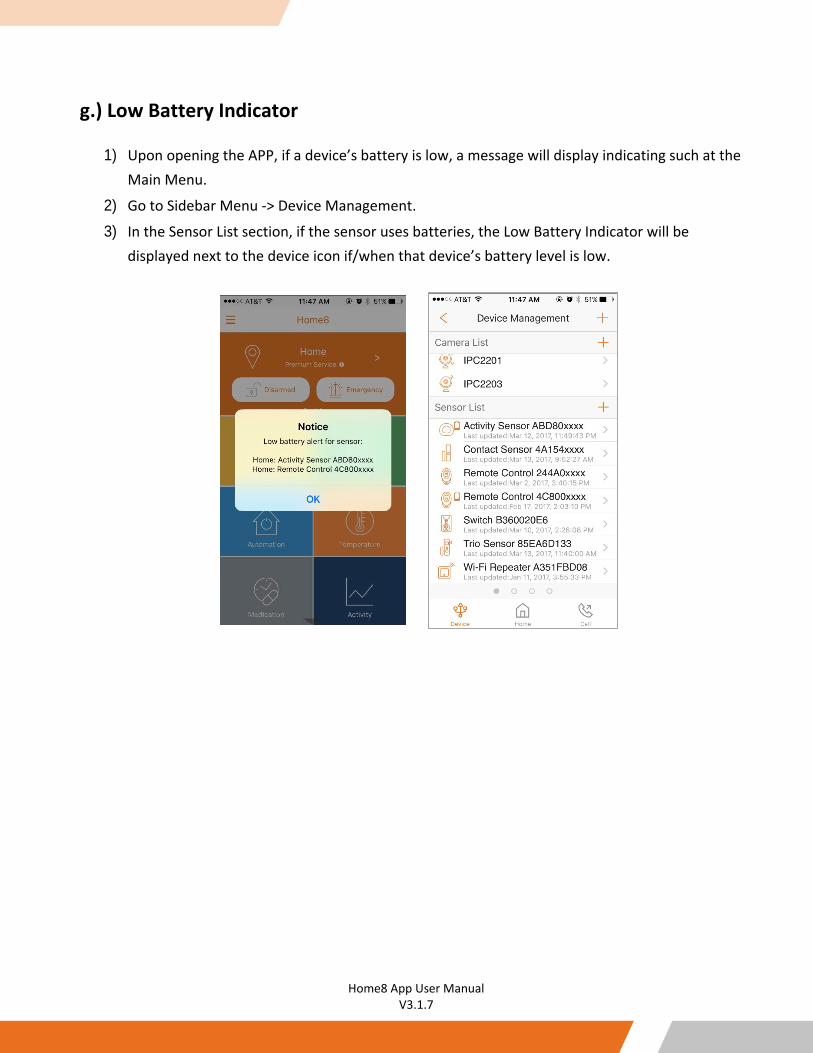
g.) Low Battery Indicator
1) Upon opening the APP, if a device’s battery is low, a message will display indicating such at the Main Menu.
2) Go to Sidebar Menu -> Device Management.
3) In the Sensor List section, if the sensor uses batteries, the Low Battery Indicator will be displayed next to the device icon if/when that device’s battery level is low.
24
Home8 App User Manual V3.1.7
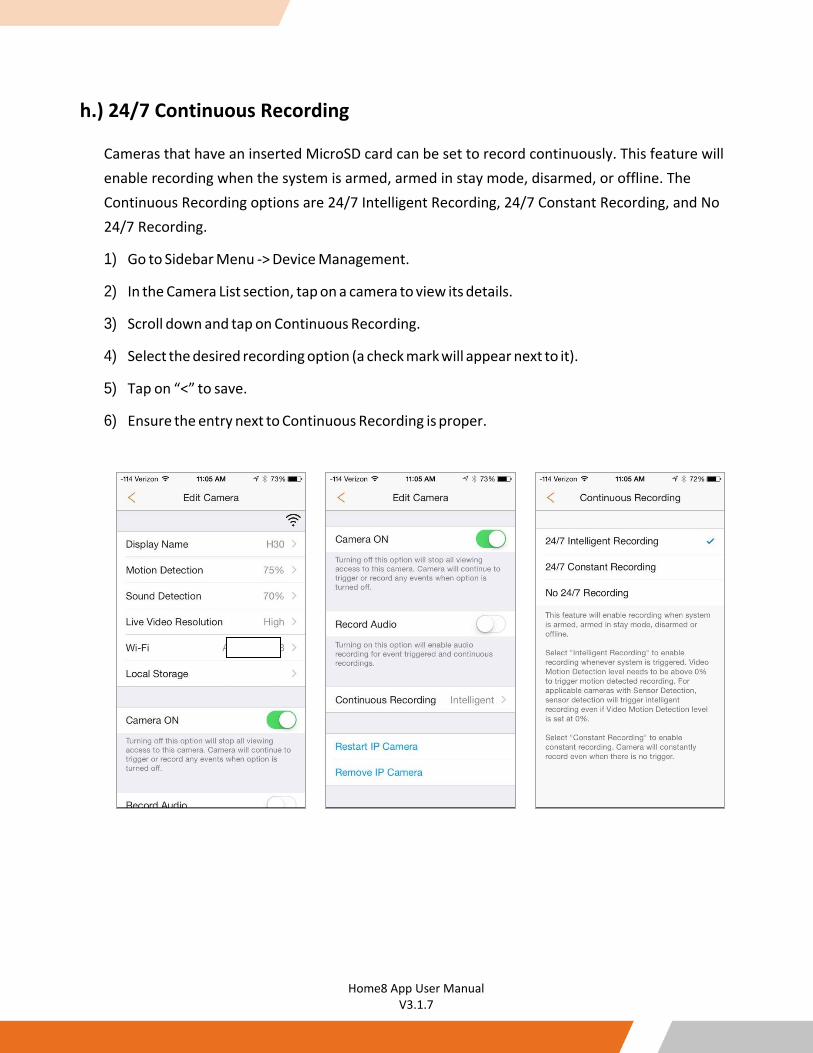
h.) 24/7 Continuous Recording
Cameras that have an inserted MicroSD card can be set to record continuously. This feature will enable recording when the system is armed, armed in stay mode, disarmed, or offline. The Continuous Recording options are 24/7 Intelligent Recording, 24/7 Constant Recording, and No 24/7 Recording.
1) Go to Sidebar Menu -> Device Management.
2) In the Camera List section, tap on a camera to view its details.
3) Scroll down and tap on Continuous Recording.
4) Select the desired recording option (a check mark will appear next to it).
5) Tap on “<” to save.
6) Ensure the entry next to Continuous Recording is proper.
25
Home8 App User Manual V3.1.7
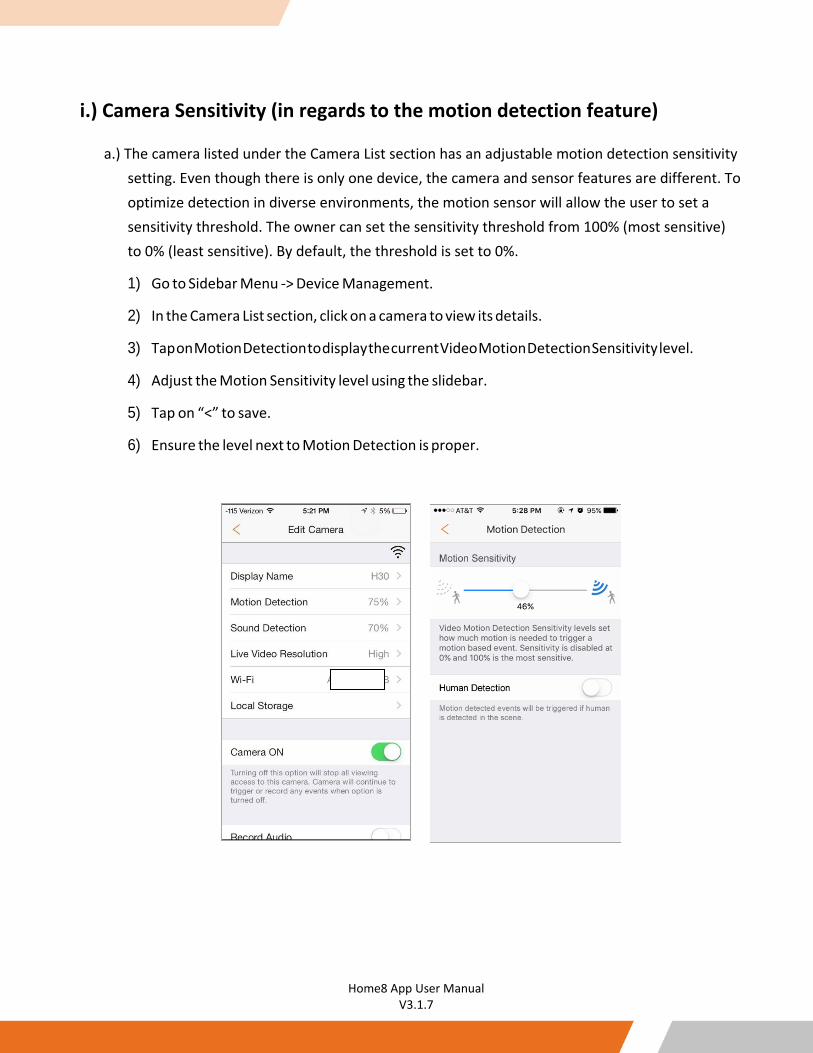
i.) Camera Sensitivity (in regards to the motion detection feature)
a.) The camera listed under the Camera List section has an adjustable motion detection sensitivity setting. Even though there is only one device, the camera and sensor features are different. To optimize detection in diverse environments, the motion sensor will allow the user to set a sensitivity threshold. The owner can set the sensitivity threshold from 100% (most sensitive) to 0% (least sensitive). By default, the threshold is set to 0%.
1) Go to Sidebar Menu -> Device Management.
2) In the Camera List section, click on a camera to view its details.
3) Tap on Motion Detection to display the current Video Motion Detection Sensitivity level.
4) Adjust the Motion Sensitivity level using the slidebar.
5) Tap on “<” to save.
6) Ensure the level next to Motion Detection is proper.
26
Home8 App User Manual V3.1.7
b.) Human Motion Detection - Human motion detection will decrease false alarm based on camera’s motion detection by detecting motion triggered by human. Human motion detection is turned off by default.
1) Go to Sidebar Menu -> Device Management
2) In the Camera List section, click on a camera to view its details.
3) Tap on Motion Detection
4) Toggle Human Detection on
27
Home8 App User Manual V3.1.7
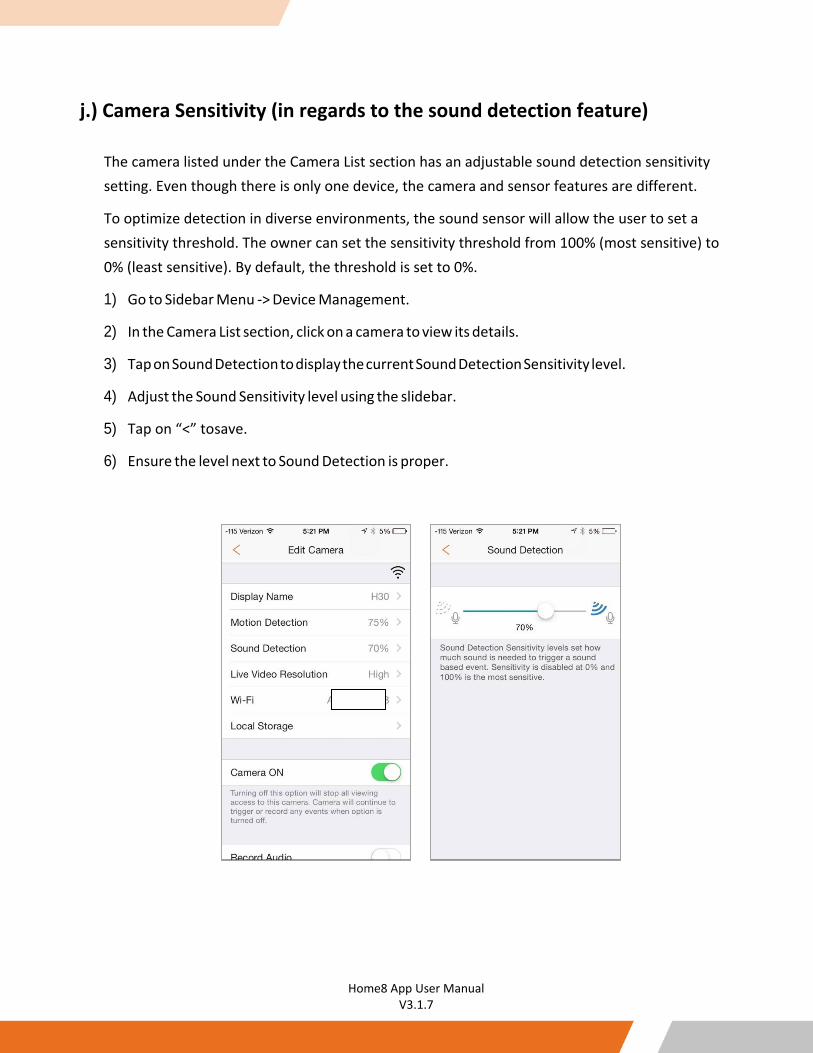
j.) Camera Sensitivity (in regards to the sound detection feature)
The camera listed under the Camera List section has an adjustable sound detection sensitivity setting. Even though there is only one device, the camera and sensor features are different.
To optimize detection in diverse environments, the sound sensor will allow the user to set a sensitivity threshold. The owner can set the sensitivity threshold from 100% (most sensitive) to 0% (least sensitive). By default, the threshold is set to 0%.
1) Go to Sidebar Menu -> Device Management.
2) In the Camera List section, click on a camera to view its details.
3) Tap on Sound Detection to display the current Sound Detection Sensitivity level.
4) Adjust the Sound Sensitivity level using the slidebar.
5) Tap on “<” to save.
6) Ensure the level next to Sound Detection is proper.
28
Home8 App User Manual V3.1.7
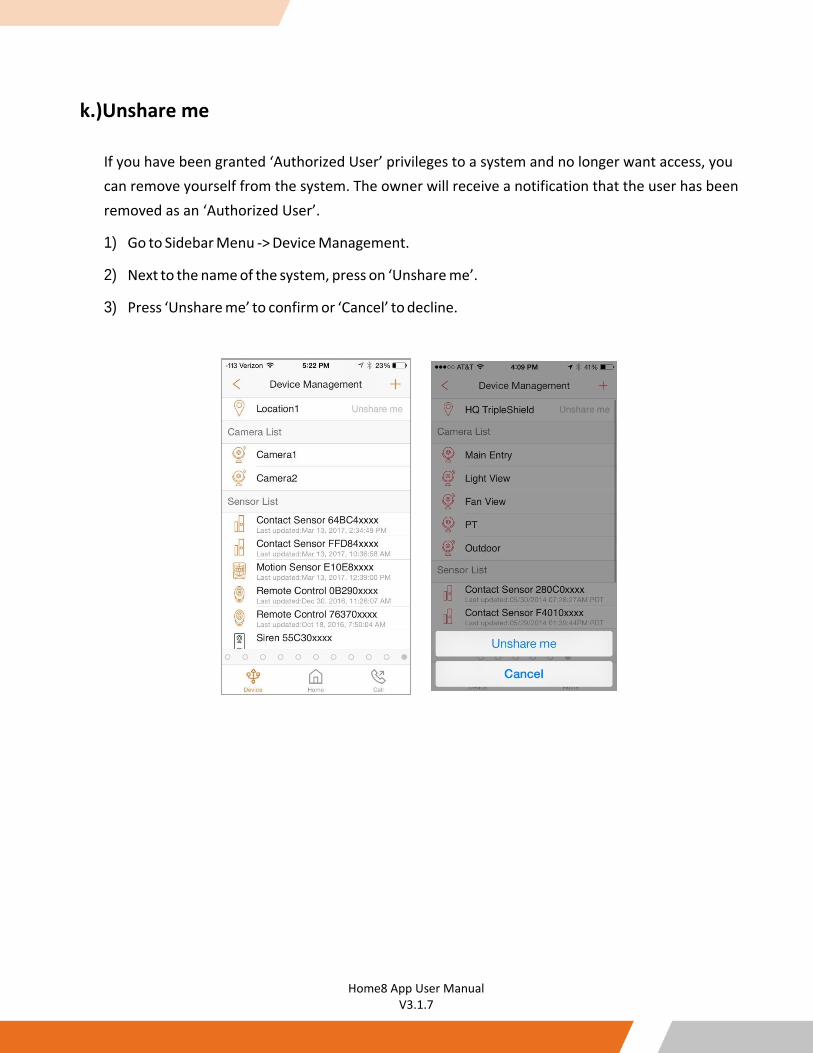
k.)Unshare me
If you have been granted ‘Authorized User’ privileges to a system and no longer want access, you can remove yourself from the system. The owner will receive a notification that the user has been removed as an ‘Authorized User’.
1) Go to Sidebar Menu -> Device Management.
2) Next to the name of the system, press on ‘Unshare me’.
3) Press ‘Unshare me’ to confirm or ‘Cancel’ to decline.
29
Home8 App User Manual V3.1.7
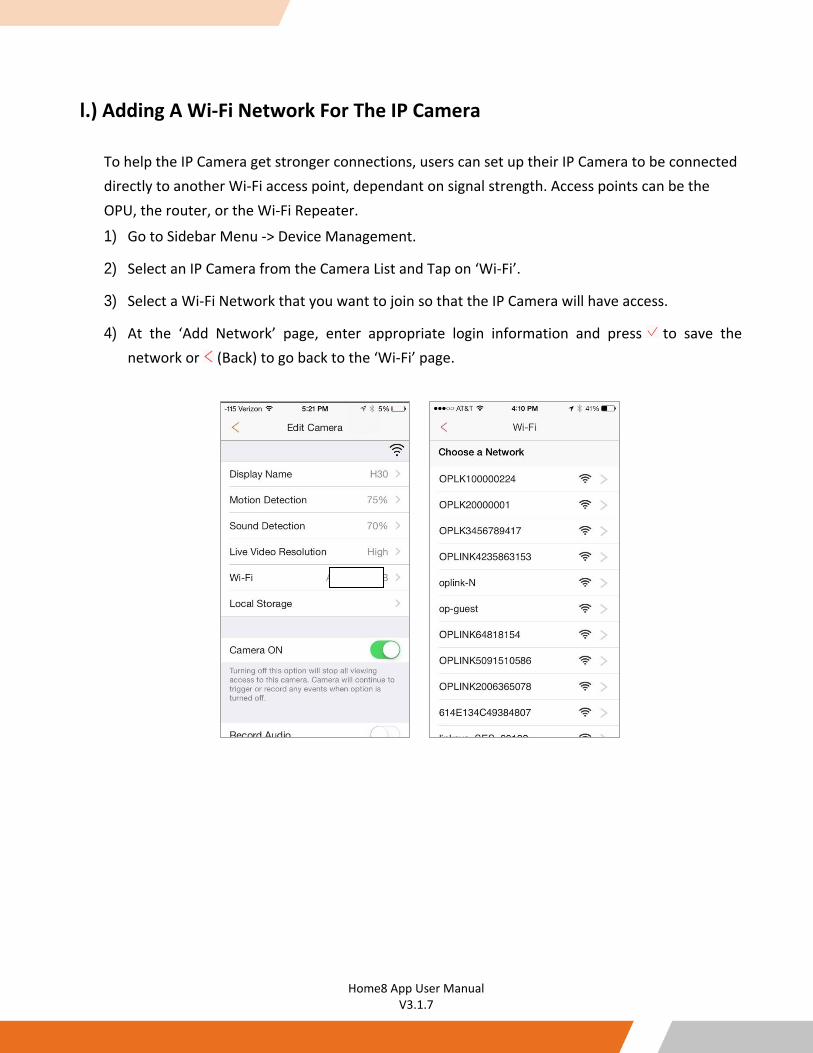
l.) Adding A Wi-Fi Network For The IP Camera
To help the IP Camera get stronger connections, users can set up their IP Camera to be connected directly to another Wi-Fi access point, dependant on signal strength. Access points can be the OPU, the router, or the Wi-Fi Repeater.
1) Go to Sidebar Menu -> Device Management.
2) Select an IP Camera from the Camera List and Tap on ‘Wi-Fi’.
3) Select a Wi-Fi Network that you want to join so that the IP Camera will have access.
4) At the ‘Add Network’ page, enter appropriate login information and press to save the network or (Back) to go back to the ‘Wi-Fi’ page.
30
Home8 App User Manual V3.1.7
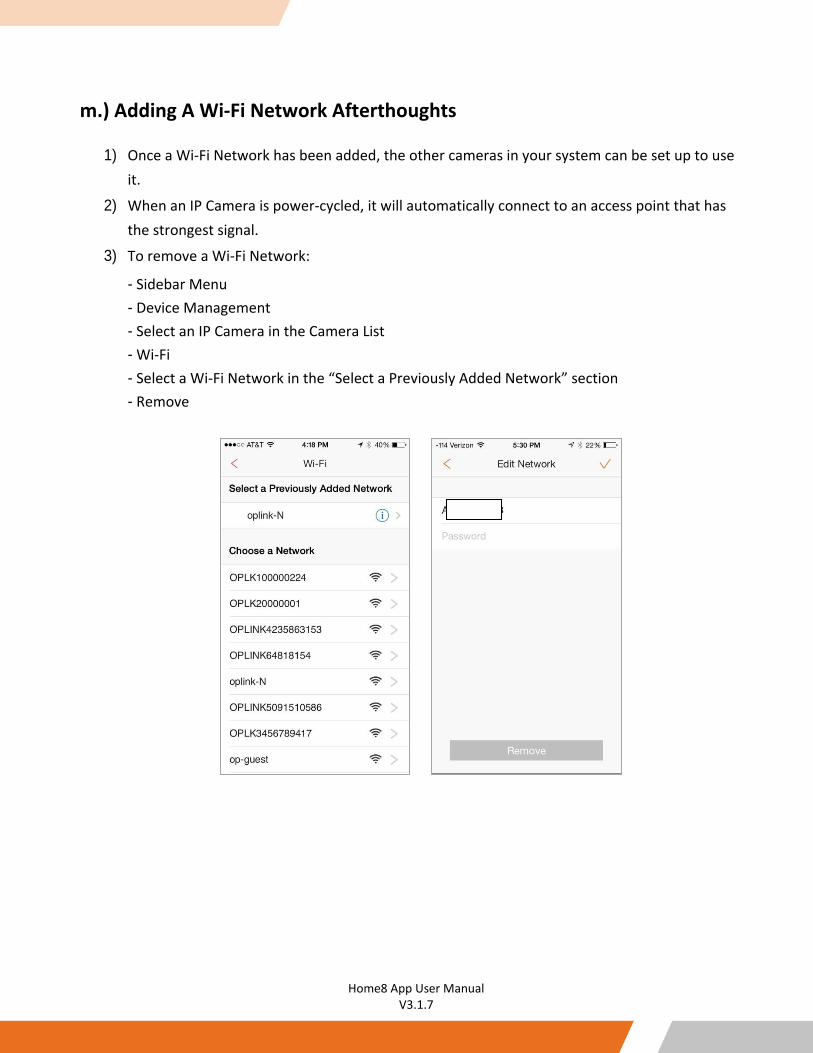
m.) Adding A Wi-Fi Network Afterthoughts
1) Once a Wi-Fi Network has been added, the other cameras in your system can be set up to use it.
2) When an IP Camera is power-cycled, it will automatically connect to an access point that has the strongest signal.
3) To remove a Wi-Fi Network:
- Sidebar Menu - Device Management - Select an IP Camera in the Camera List - Wi-Fi - Select a Wi-Fi Network in the “Select a Previously Added Network” section - Remove
31
Home8 App User Manual V3.1.7
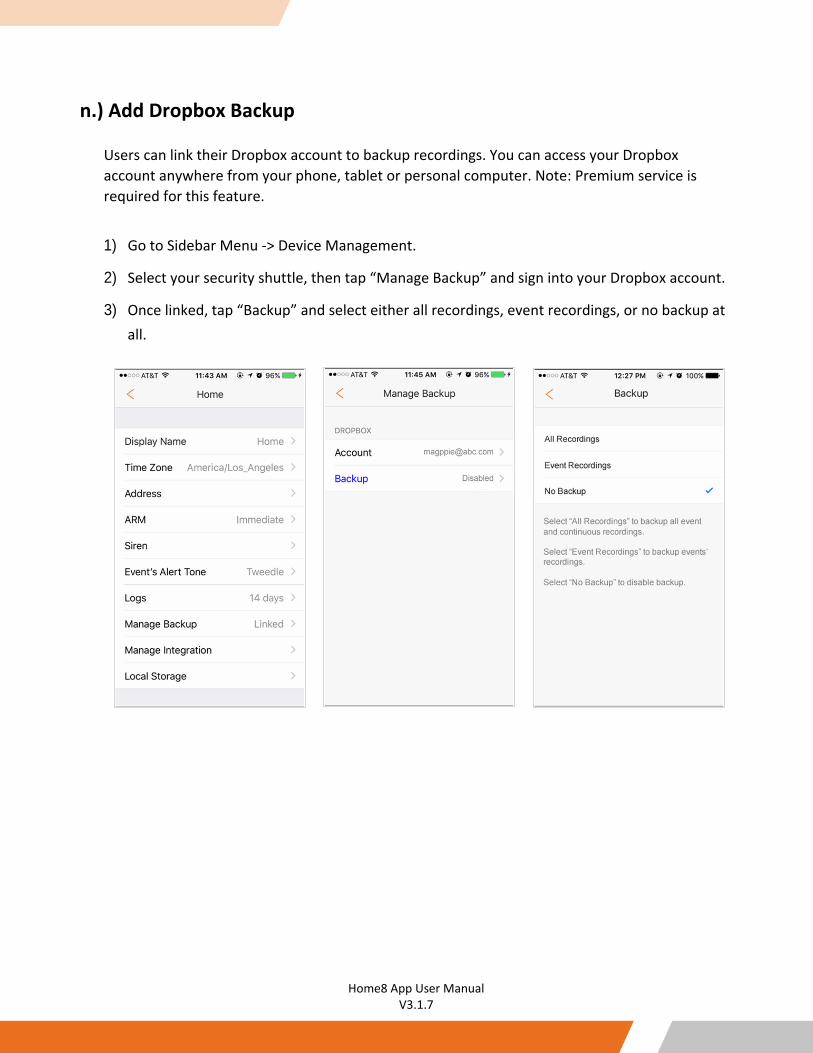
n.) Add Dropbox Backup
Users can link their Dropbox account to backup recordings. You can access your Dropbox account anywhere from your phone, tablet or personal computer. Note: Premium service is required for this feature.
1) Go to Sidebar Menu -> Device Management.
2) Select your security shuttle, then tap “Manage Backup” and sign into your Dropbox account.
3) Once linked, tap “Backup” and select either all recordings, event recordings, or no backup at all.
32
Home8 App User Manual V3.1.7
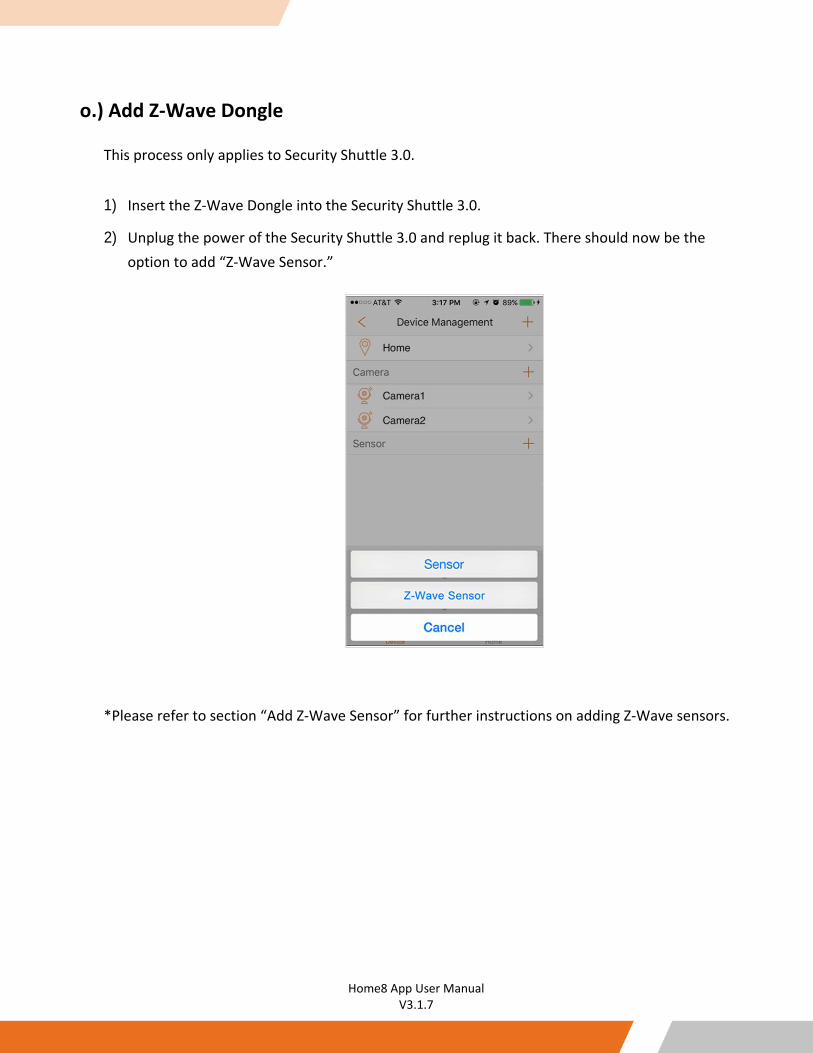
o.) Add Z-Wave Dongle
This process only applies to Security Shuttle 3.0.
1) Insert the Z-Wave Dongle into the Security Shuttle 3.0.
2) Unplug the power of the Security Shuttle 3.0 and replug it back. There should now be the option to add “Z-Wave Sensor.”
*Please refer to section “Add Z-Wave Sensor” for further instructions on adding Z-Wave sensors.
33
Home8 App User Manual V3.1.7
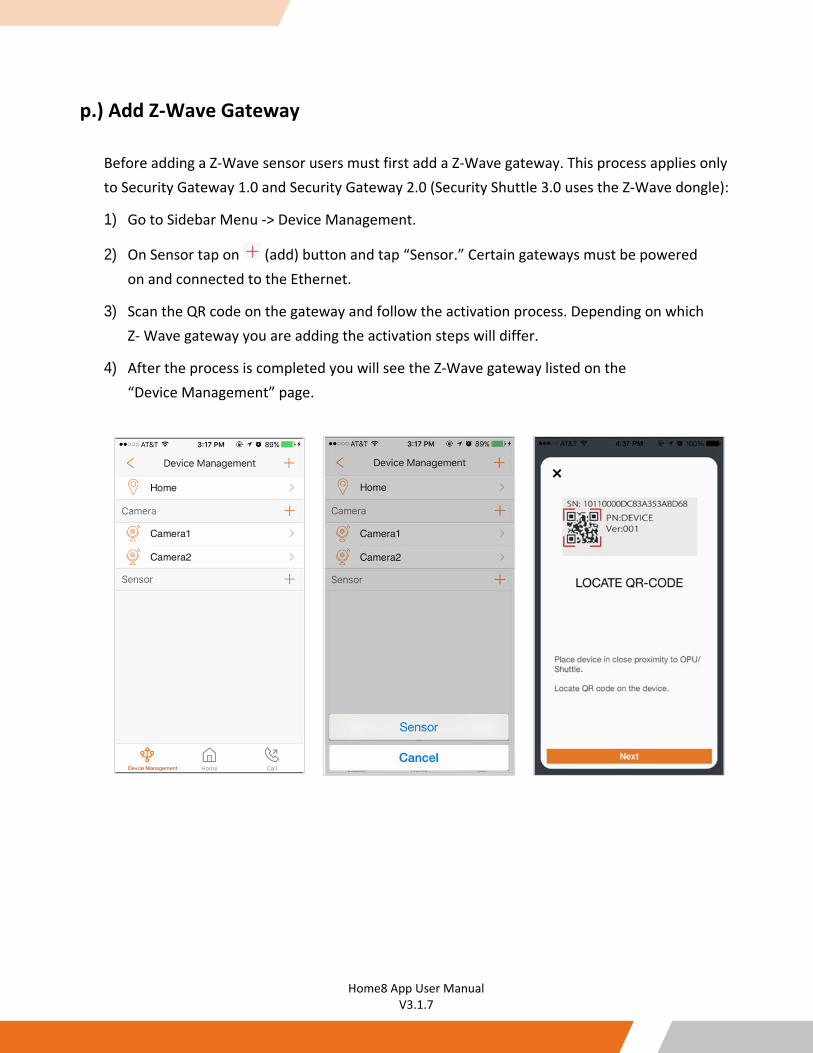
p.) Add Z-Wave Gateway
Before adding a Z-Wave sensor users must first add a Z-Wave gateway. This process applies only to Security Gateway 1.0 and Security Gateway 2.0 (Security Shuttle 3.0 uses the Z-Wave dongle):
1) Go to Sidebar Menu -> Device Management.
2) On Sensor tap on (add) button and tap “Sensor.” Certain gateways must be powered on and connected to the Ethernet.
3) Scan the QR code on the gateway and follow the activation process. Depending on which Z- Wave gateway you are adding the activation steps will differ.
4) After the process is completed you will see the Z-Wave gateway listed on the “Device Management” page.
34
Home8 App User Manual V3.1.7
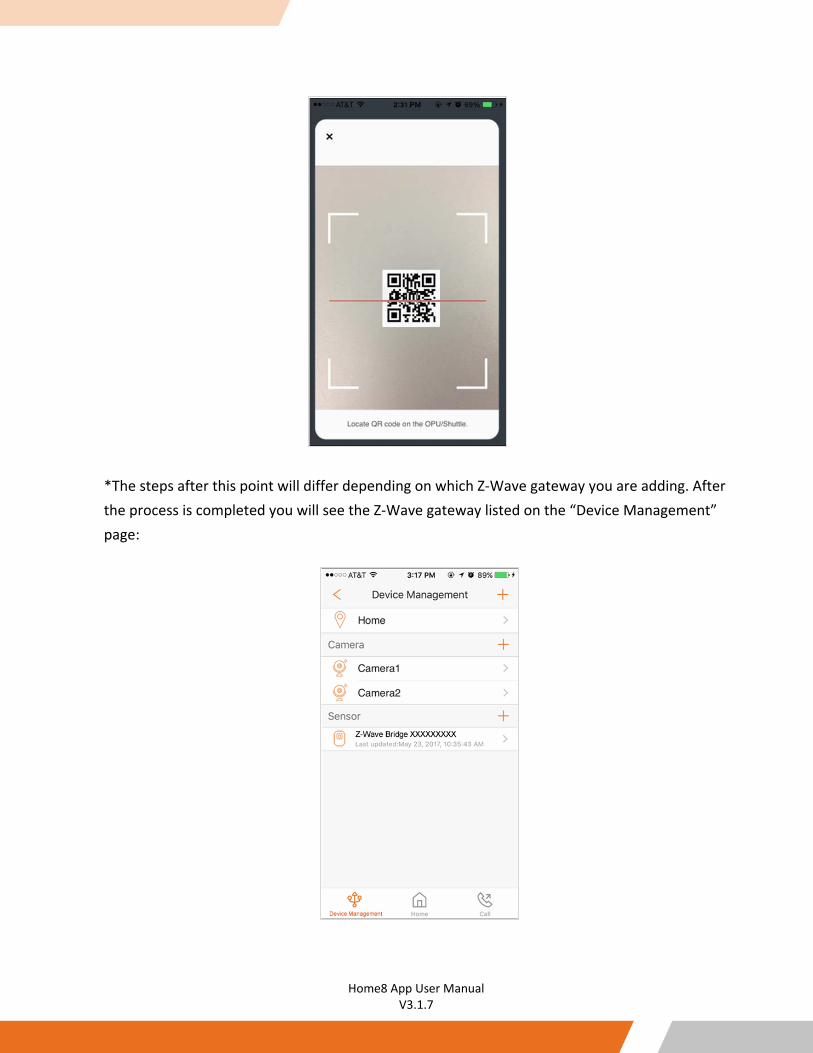
*The steps after this point will differ depending on which Z-Wave gateway you are adding. After the process is completed you will see the Z-Wave gateway listed on the “Device Management” page:
35
Home8 App User Manual V3.1.7
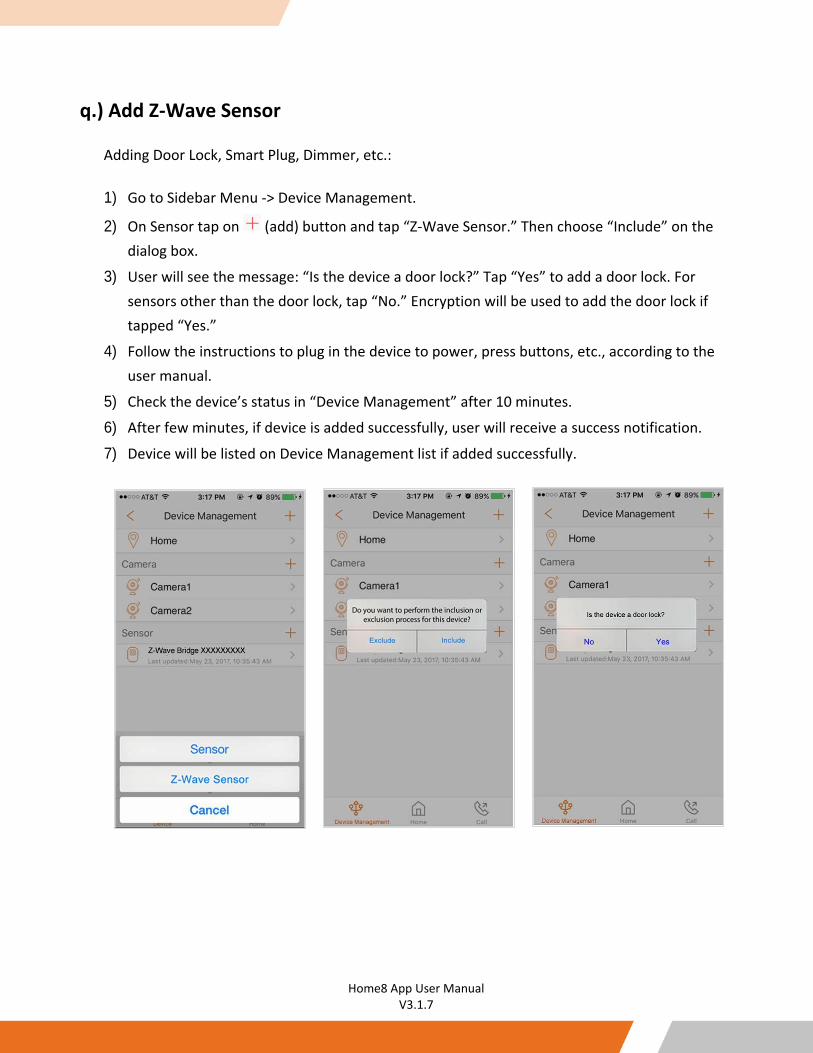
q.) Add Z-Wave Sensor
Adding Door Lock, Smart Plug, Dimmer, etc.:
1) Go to Sidebar Menu -> Device Management.
2) On Sensor tap on (add) button and tap “Z-Wave Sensor.” Then choose “Include” on the dialog box.
3) User will see the message: “Is the device a door lock?” Tap “Yes” to add a door lock. For sensors other than the door lock, tap “No.” Encryption will be used to add the door lock if tapped “Yes.”
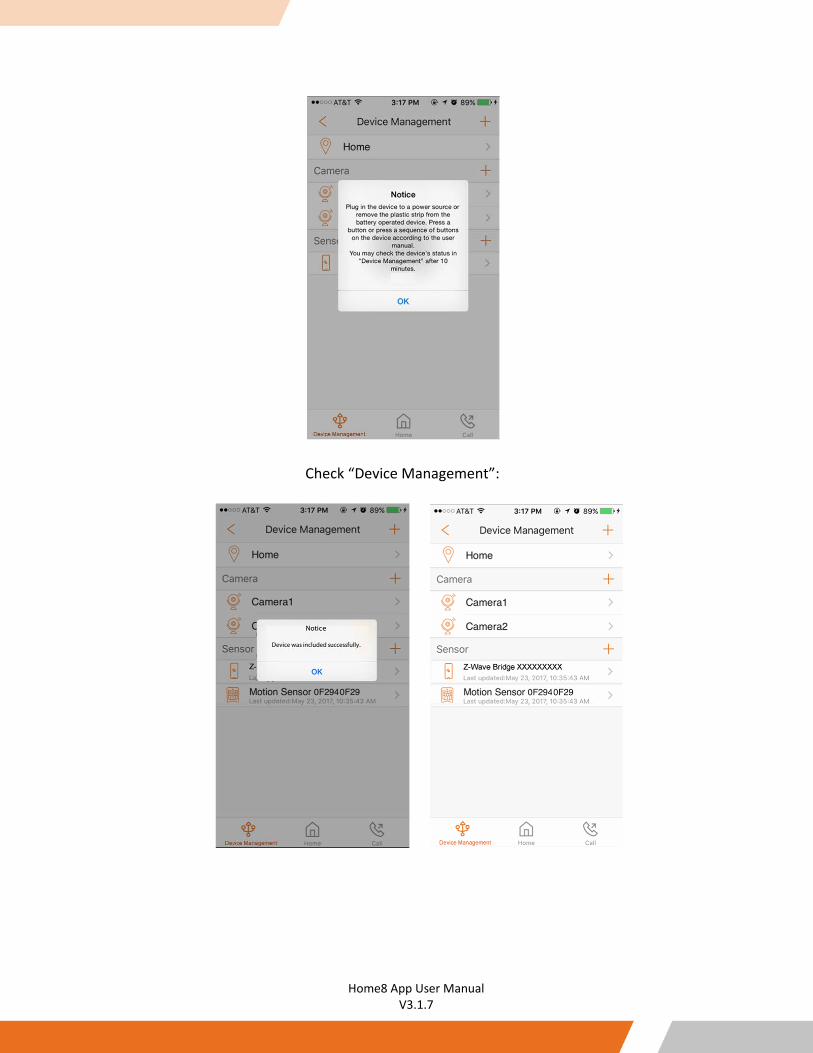
4) Follow the instructions to plug in the device to power, press buttons, etc., according to the user manual.
5) Check the device’s status in “Device Management” after 10 minutes.
6) After few minutes, if device is added successfully, user will receive a success notification.
7) Device will be listed on Device Management list if added successfully.
36
Home8 App User Manual V3.1.7
Check “Device Management”:
37
Home8 App User Manual V3.1.7
Chapter 5. Video a.) Multi-Site Viewing
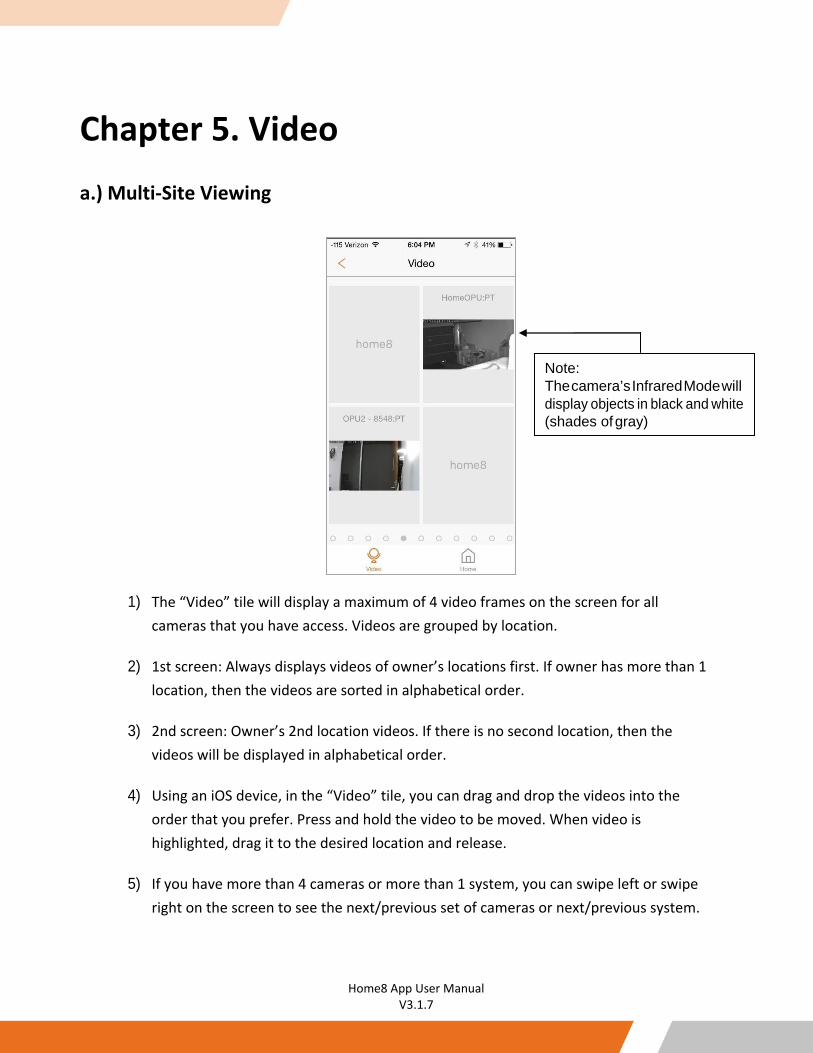
1) The “Video” tile will display a maximum of 4 video frames on the screen for all cameras that you have access. Videos are grouped by location.
2) 1st screen: Always displays videos of owner’s locations first. If owner has more than 1 location, then the videos are sorted in alphabetical order.
3) 2nd screen: Owner’s 2nd location videos. If there is no second location, then the videos will be displayed in alphabetical order.
4) Using an iOS device, in the “Video” tile, you can drag and drop the videos into the order that you prefer. Press and hold the video to be moved. When video is highlighted, drag it to the desired location and release.
5) If you have more than 4 cameras or more than 1 system, you can swipe left or swipe right on the screen to see the next/previous set of cameras or next/previous system.
Note: The camera’s Infrared Mode will display objects in black and white (shades of gray)
38
Home8 App User Manual V3.1.7
b.) Single Video Viewing/Turn Off Sounding Siren
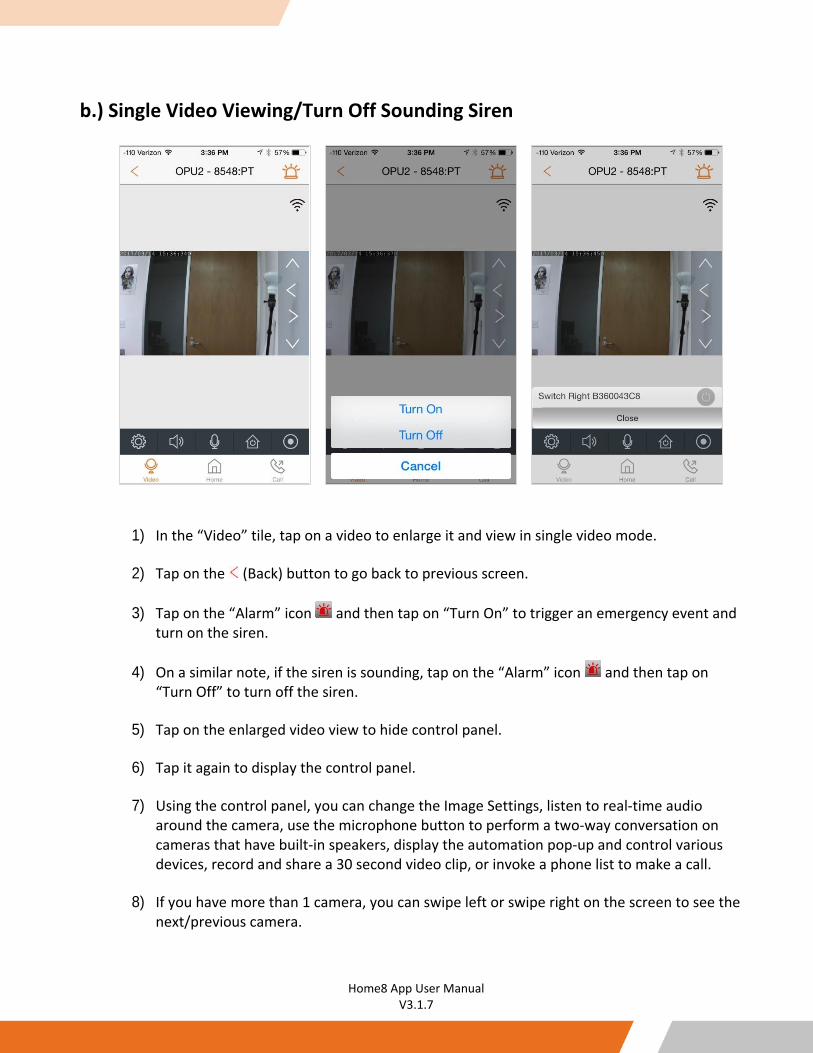
1) In the “Video” tile, tap on a video to enlarge it and view in single video mode.
2) Tap on the (Back) button to go back to previous screen.
3) Tap on the “Alarm” icon and then tap on “Turn On” to trigger an emergency event and turn on the siren.
4) On a similar note, if the siren is sounding, tap on the “Alarm” icon and then tap on “Turn Off” to turn off the siren.
5) Tap on the enlarged video view to hide control panel.
6) Tap it again to display the control panel.
7) Using the control panel, you can change the Image Settings, listen to real-time audio around the camera, use the microphone button to perform a two-way conversation on cameras that have built-in speakers, display the automation pop-up and control various devices, record and share a 30 second video clip, or invoke a phone list to make a call.
8) If you have more than 1 camera, you can swipe left or swipe right on the screen to see the next/previous camera.

39
Home8 App User Manual V3.1.7
c.) Change Image Settings
In single video mode, certain features of the camera can be changed.
1) Tap the Image Settings button (gear/cogwheel).
2) If the camera is mounted on the ceiling, use ‘Flip Camera View’ to invert the image.
3) The camera can be mounted so that it looks outside a window. To compensate for outdoor
lighting, tap on ‘Switch to Outdoor Scene’.
4) Tap on ‘Live Video Resolution’ to change the live streaming video resolution.
5) Change the camera’s video motion detection sensitivity level by tapping on ‘Motion Detection’.
6) Change the camera’s sound detection sensitivity level by tapping on ‘Sound Detection’.
7) On the motorized cameras, you can specify a view to ‘Set as Default Position’ so that when the
camera reboots, it will go to that view.
8) The motorized cameras, that allow for a default position setting, allow you to quickly go to it
by tapping on ‘Go to Default Position’.
9) To compensate for the amount of direct sunlight, some cameras have an ‘Adjust WDR’ option.
10) Tap ‘Close’ to exit Image Settings.
40
Home8 App User Manual V3.1.7
d.) Automation Pop-Up
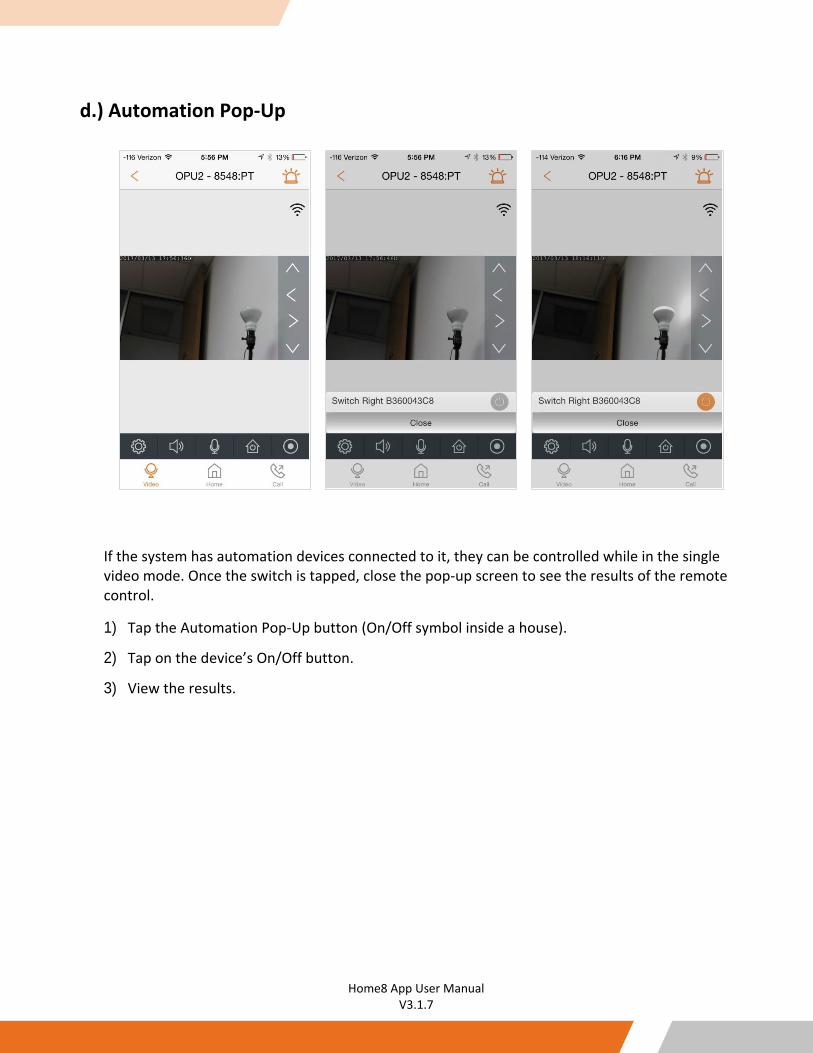
If the system has automation devices connected to it, they can be controlled while in the single video mode. Once the switch is tapped, close the pop-up screen to see the results of the remote control.
1) Tap the Automation Pop-Up button (On/Off symbol inside a house).
2) Tap on the device’s On/Off button.
3) View the results.

41
Home8 App User Manual V3.1.7
e.) Record/Share Video
1) In single video mode, tap the Record button (a solid dot in a bigger circle). The maximum recording time is 30 seconds. The recording will be saved automatically to the local photo album.
2) “Record” and “Stop” are toggle buttons showing different statuses accordingly.
3) Video stops recording when the recording time reaches 30 seconds. A message will ask the user: “Share video clip?”
4) If “No” is selected, the screen will be redirected to single video mode. The recorded video will be saved to the local photo album.
5) If “Share” is selected, you can select to share via email or Facebook Connect. Both will have a default Security template and the video clip attachment.
42
Home8 App User Manual V3.1.7
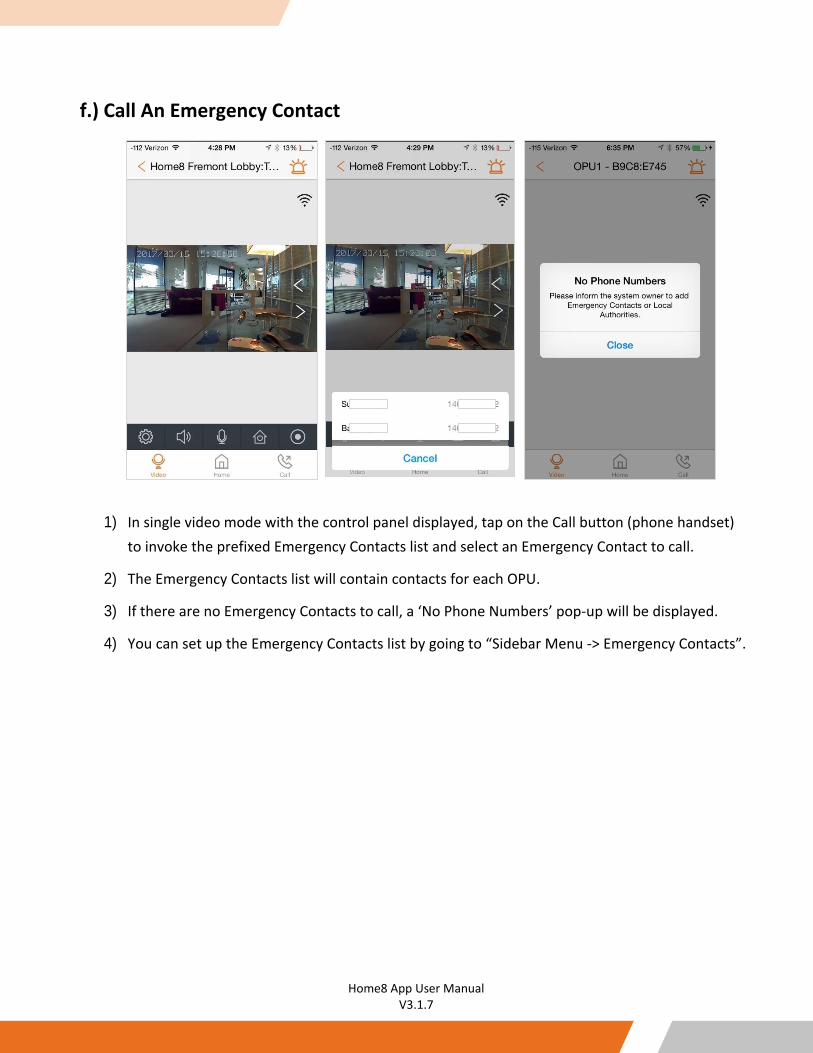
f.) Call An Emergency Contact
1) In single video mode with the control panel displayed, tap on the Call button (phone handset)
to invoke the prefixed Emergency Contacts list and select an Emergency Contact to call.
2) The Emergency Contacts list will contain contacts for each OPU.
3) If there are no Emergency Contacts to call, a ‘No Phone Numbers’ pop-up will be displayed.
4) You can set up the Emergency Contacts list by going to “Sidebar Menu -> Emergency Contacts”.
43
Home8 App User Manual V3.1.7
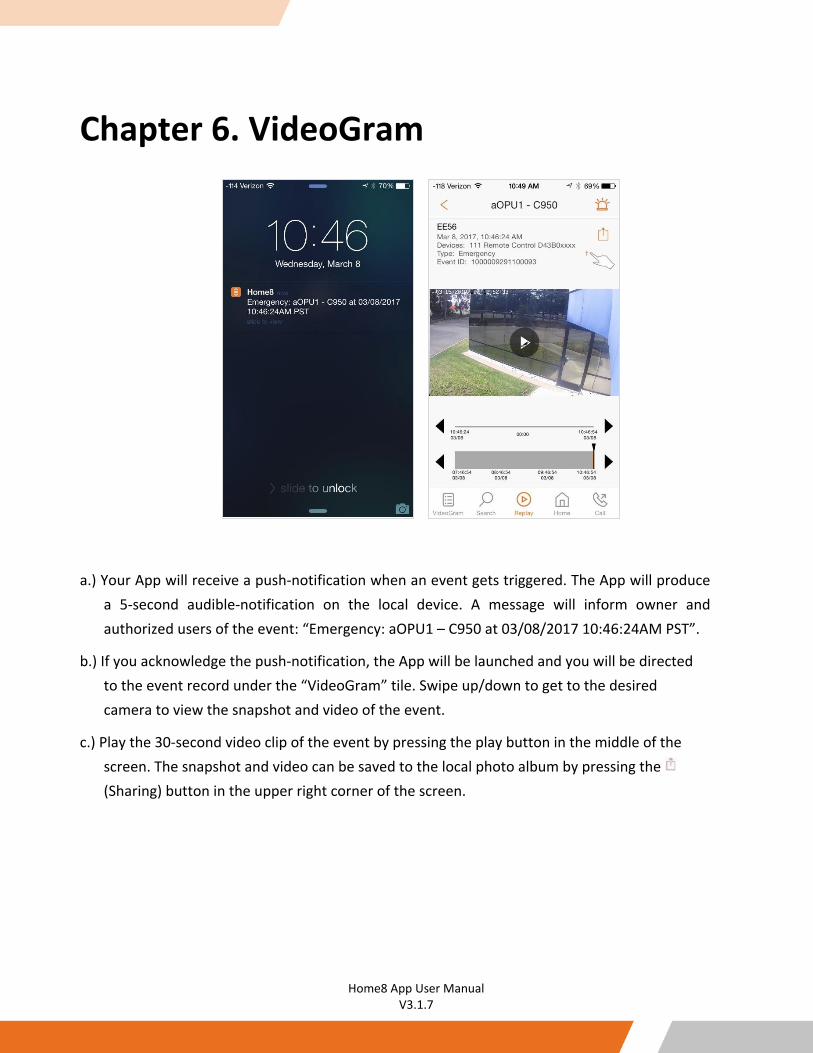
Chapter 6. VideoGram
a.) Your App will receive a push-notification when an event gets triggered. The App will produce a 5-second audible-notification on the local device. A message will inform owner and authorized users of the event: “Emergency: aOPU1 – C950 at 03/08/2017 10:46:24AM PST”.
b.) If you acknowledge the push-notification, the App will be launched and you will be directed to the event record under the “VideoGram” tile. Swipe up/down to get to the desired camera to view the snapshot and video of the event.
c.) Play the 30-second video clip of the event by pressing the play button in the middle of the screen. The snapshot and video can be saved to the local photo album by pressing the (Sharing) button in the upper right corner of the screen.
44
Home8 App User Manual V3.1.7
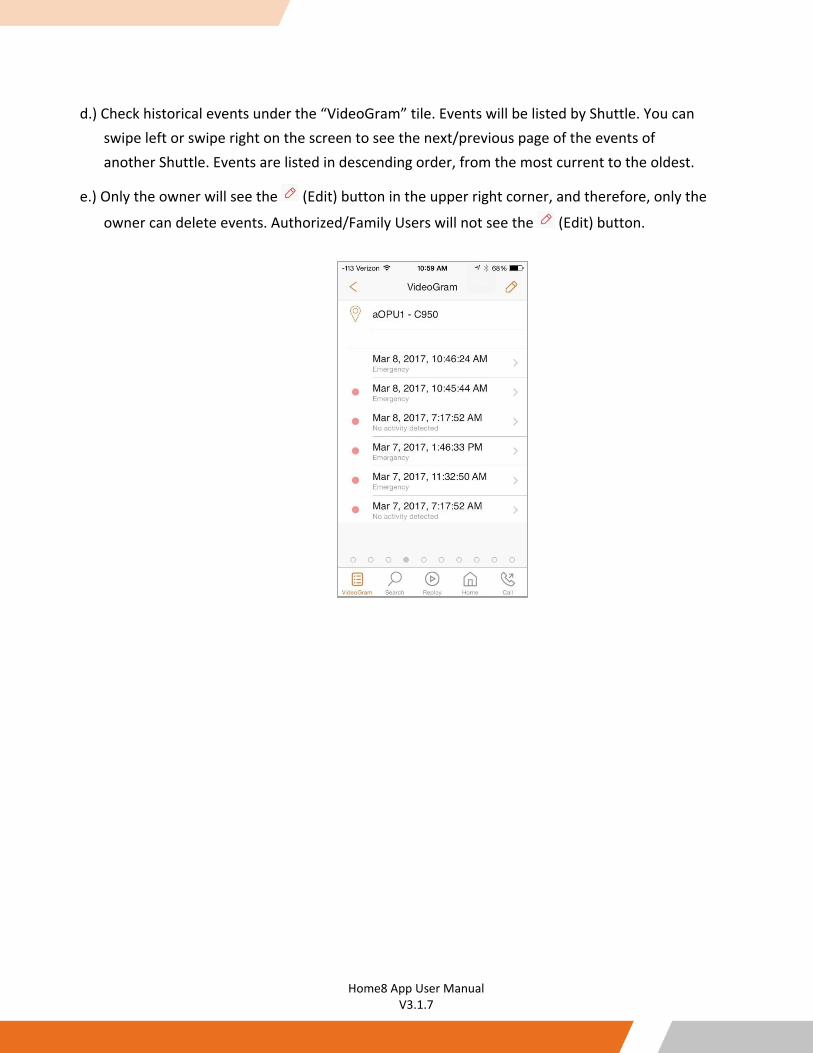
d.) Check historical events under the “VideoGram” tile. Events will be listed by Shuttle. You can swipe left or swipe right on the screen to see the next/previous page of the events of another Shuttle. Events are listed in descending order, from the most current to the oldest.
e.) Only the owner will see the (Edit) button in the upper right corner, and therefore, only the
owner can delete events. Authorized/Family Users will not see the (Edit) button.
45
Home8 App User Manual V3.1.7
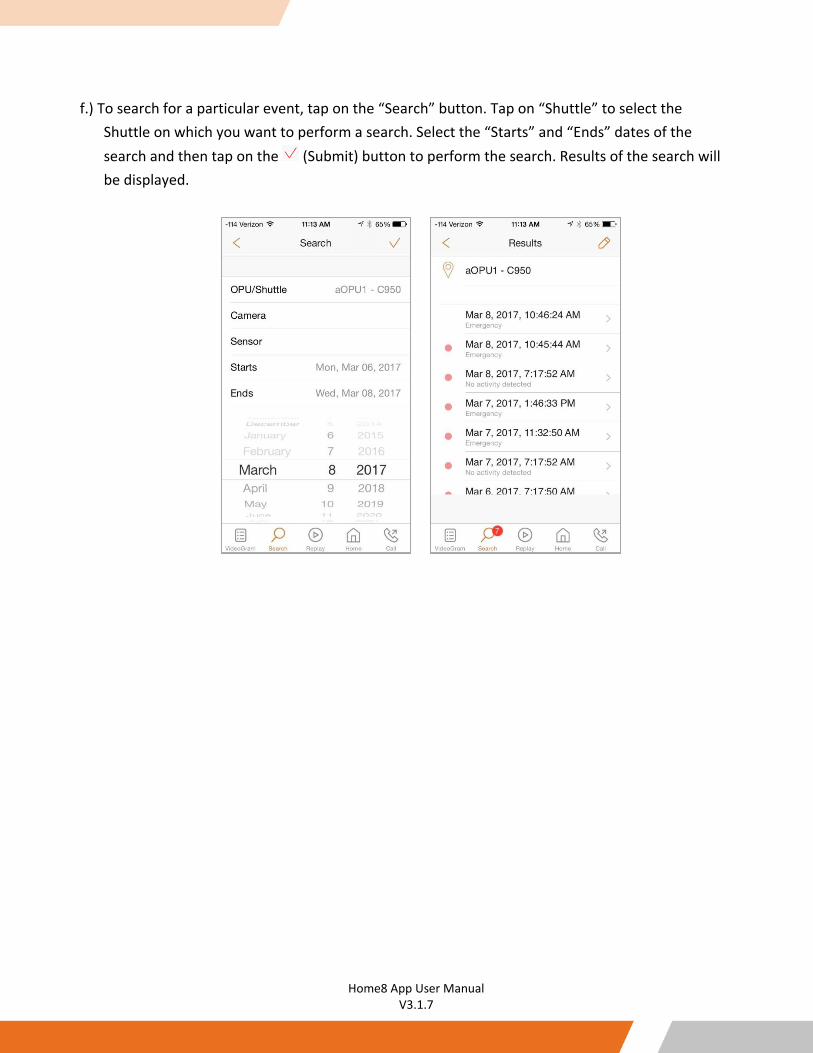
f.) To search for a particular event, tap on the “Search” button. Tap on “Shuttle” to select the Shuttle on which you want to perform a search. Select the “Starts” and “Ends” dates of the search and then tap on the (Submit) button to perform the search. Results of the search will be displayed.
46
Home8 App User Manual V3.1.7
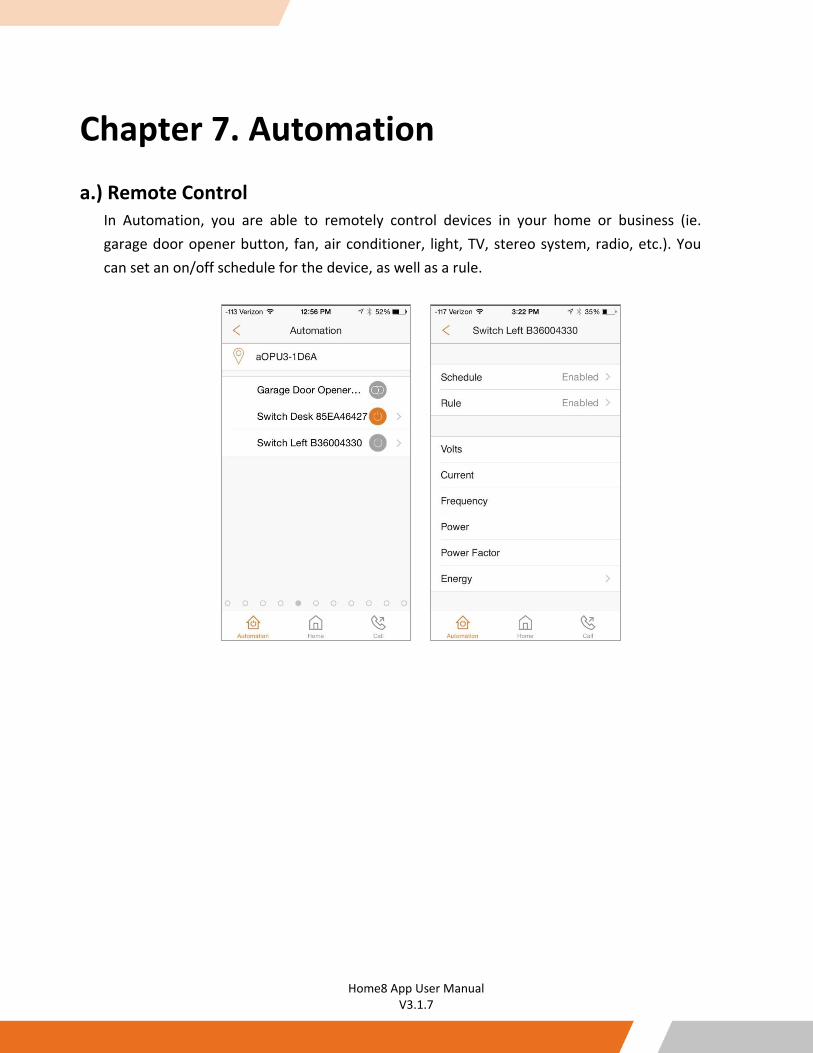
Chapter 7. Automation a.) Remote Control
In Automation, you are able to remotely control devices in your home or business (ie. garage door opener button, fan, air conditioner, light, TV, stereo system, radio, etc.). You can set an on/off schedule for the device, as well as a rule.
47
Home8 App User Manual V3.1.7
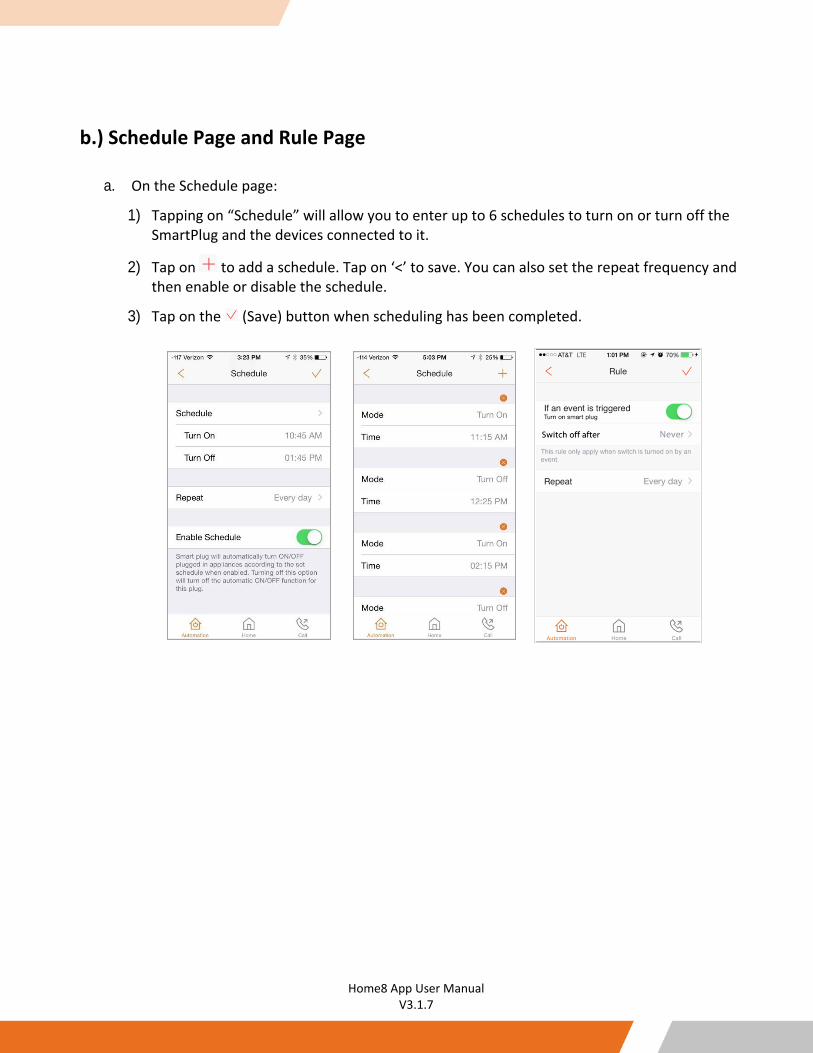
b.) Schedule Page and Rule Page
a. On the Schedule page:
1) Tapping on “Schedule” will allow you to enter up to 6 schedules to turn on or turn off the SmartPlug and the devices connected to it.
2) Tap on to add a schedule. Tap on ‘<’ to save. You can also set the repeat frequency and then enable or disable the schedule.
3) Tap on the (Save) button when scheduling has been completed.
48
Home8 App User Manual V3.1.7
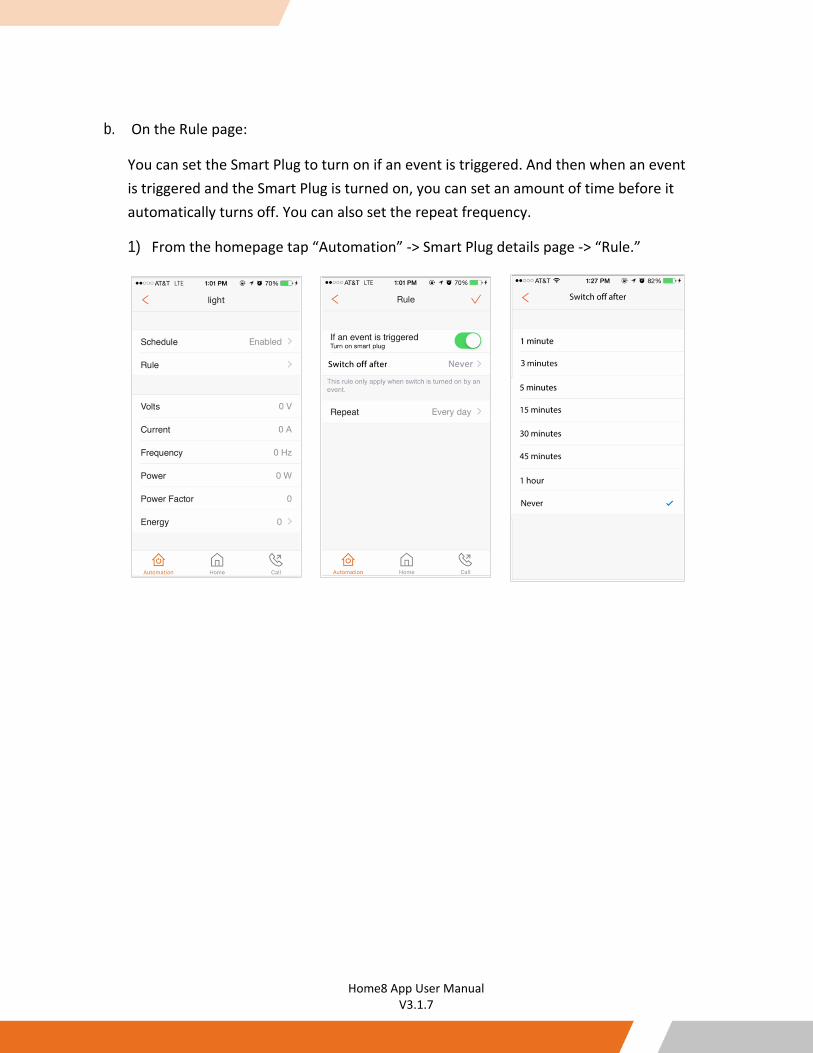
b. On the Rule page:
You can set the Smart Plug to turn on if an event is triggered. And then when an event is triggered and the Smart Plug is turned on, you can set an amount of time before it automatically turns off. You can also set the repeat frequency.
1) From the homepage tap “Automation” -> Smart Plug details page -> “Rule.”
49
Home8 App User Manual V3.1.7
Chapter 8. Armed/Disarmed/Stay Mode
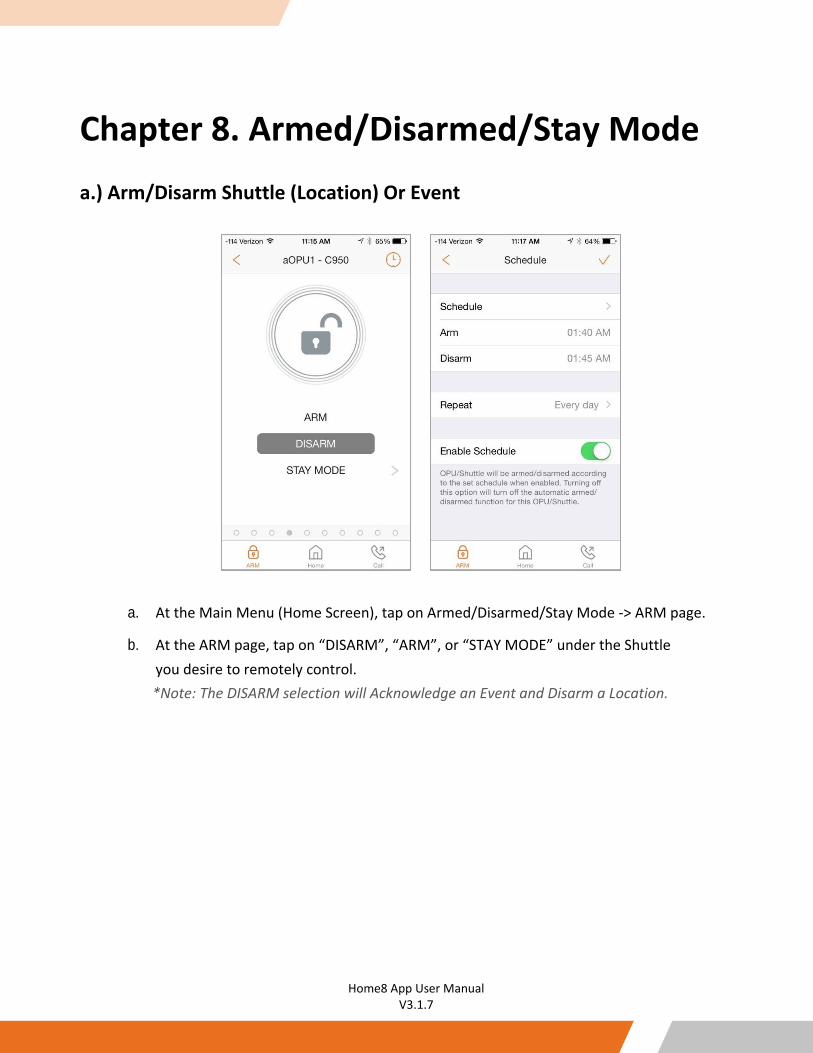
a.) Arm/Disarm Shuttle (Location) Or Event
a. At the Main Menu (Home Screen), tap on Armed/Disarmed/Stay Mode -> ARM page.
b. At the ARM page, tap on “DISARM”, “ARM”, or “STAY MODE” under the Shuttle you desire to remotely control.
*Note: The DISARM selection will Acknowledge an Event and Disarm a Location.
50
Home8 App User Manual V3.1.7
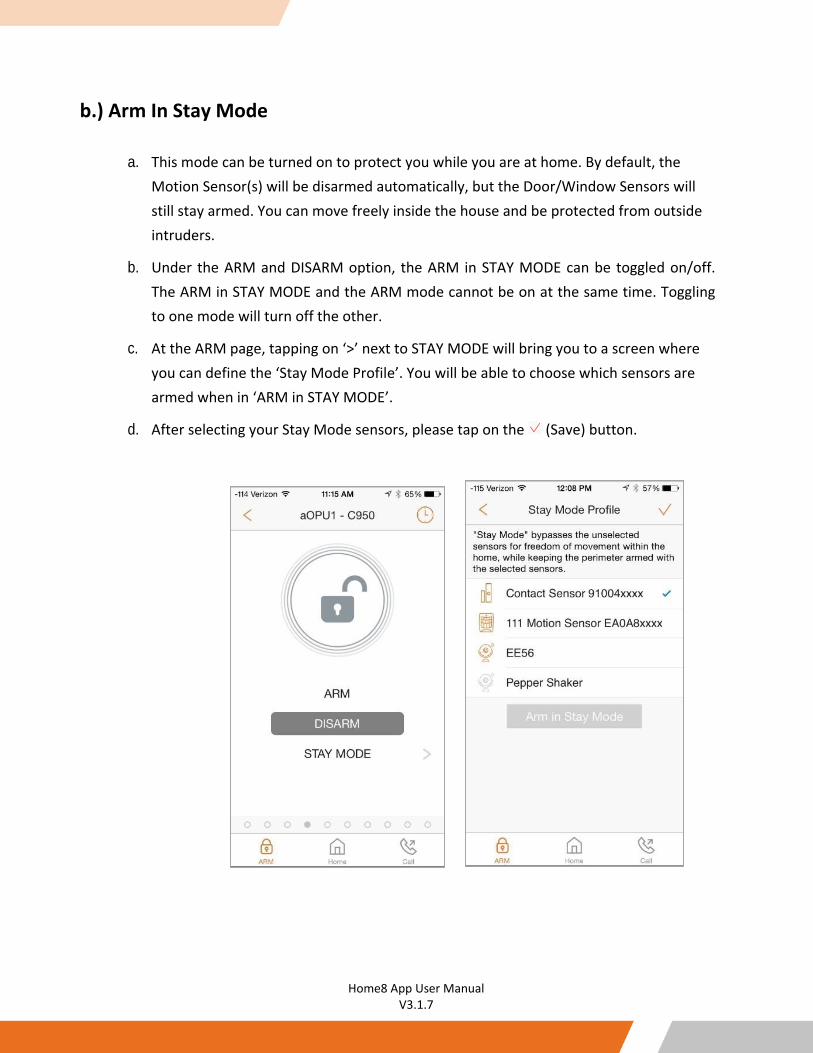
b.) Arm In Stay Mode
a. This mode can be turned on to protect you while you are at home. By default, the Motion Sensor(s) will be disarmed automatically, but the Door/Window Sensors will still stay armed. You can move freely inside the house and be protected from outside intruders.
b. Under the ARM and DISARM option, the ARM in STAY MODE can be toggled on/off. The ARM in STAY MODE and the ARM mode cannot be on at the same time. Toggling to one mode will turn off the other.
c. At the ARM page, tapping on ‘>’ next to STAY MODE will bring you to a screen where you can define the ‘Stay Mode Profile’. You will be able to choose which sensors are armed when in ‘ARM in STAY MODE’.
d. After selecting your Stay Mode sensors, please tap on the (Save) button.
51
Home8 App User Manual V3.1.7
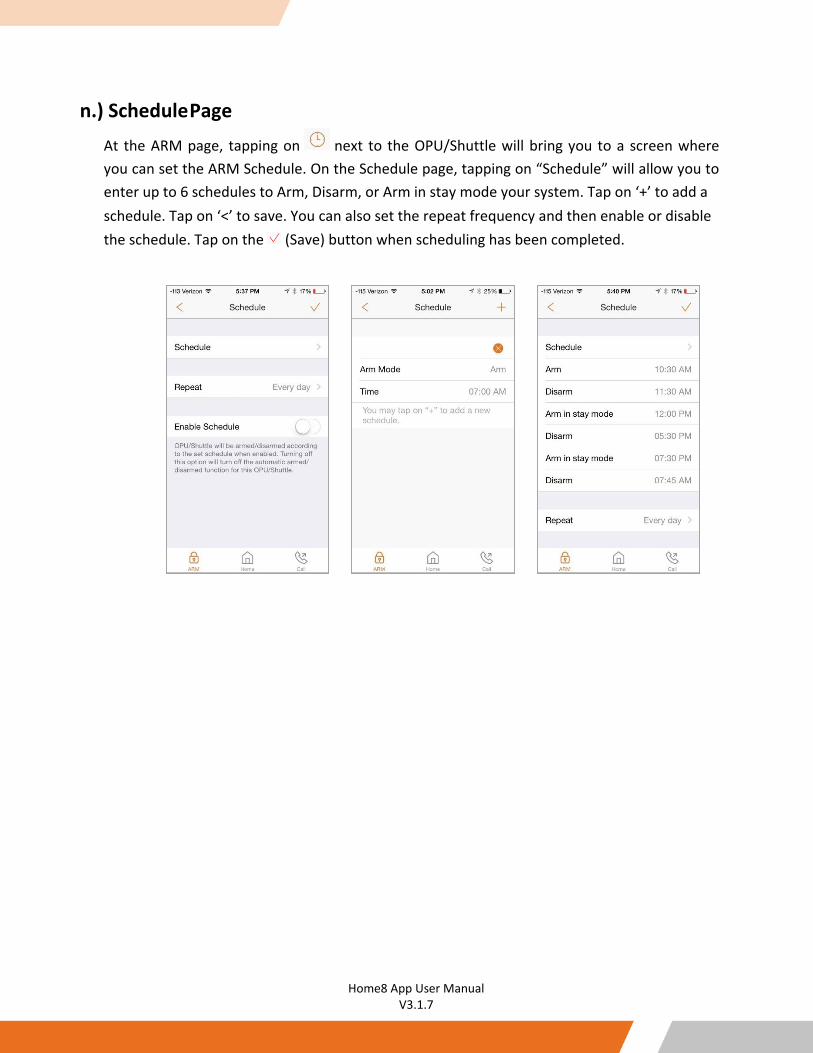
n.) Schedule Page At the ARM page, tapping on next to the OPU/Shuttle will bring you to a screen where you can set the ARM Schedule. On the Schedule page, tapping on “Schedule” will allow you to enter up to 6 schedules to Arm, Disarm, or Arm in stay mode your system. Tap on ‘+’ to add a schedule. Tap on ‘<’ to save. You can also set the repeat frequency and then enable or disable the schedule. Tap on the (Save) button when scheduling has been completed.
52
Home8 App User Manual V3.1.7
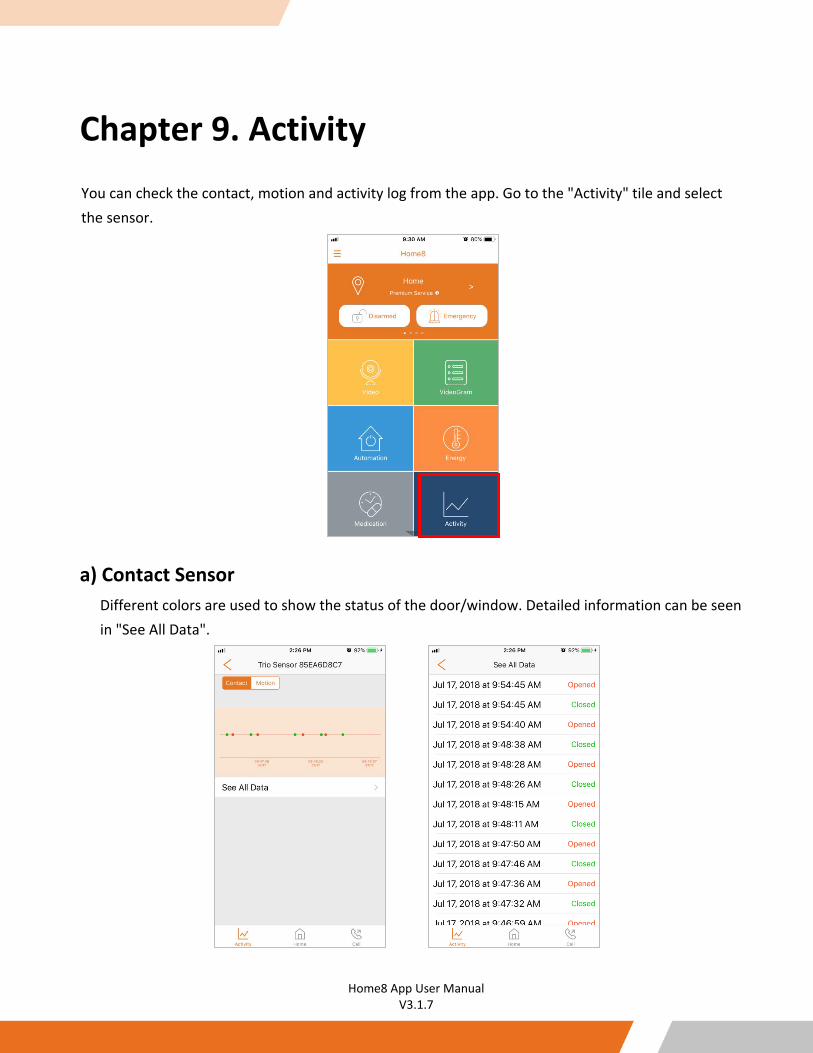
Chapter 9. Activity
You can check the contact, motion and activity log from the app. Go to the "Activity" tile and select the sensor.
a) Contact Sensor Different colors are used to show the status of the door/window. Detailed information can be seen in "See All Data".
53
Home8 App User Manual V3.1.7
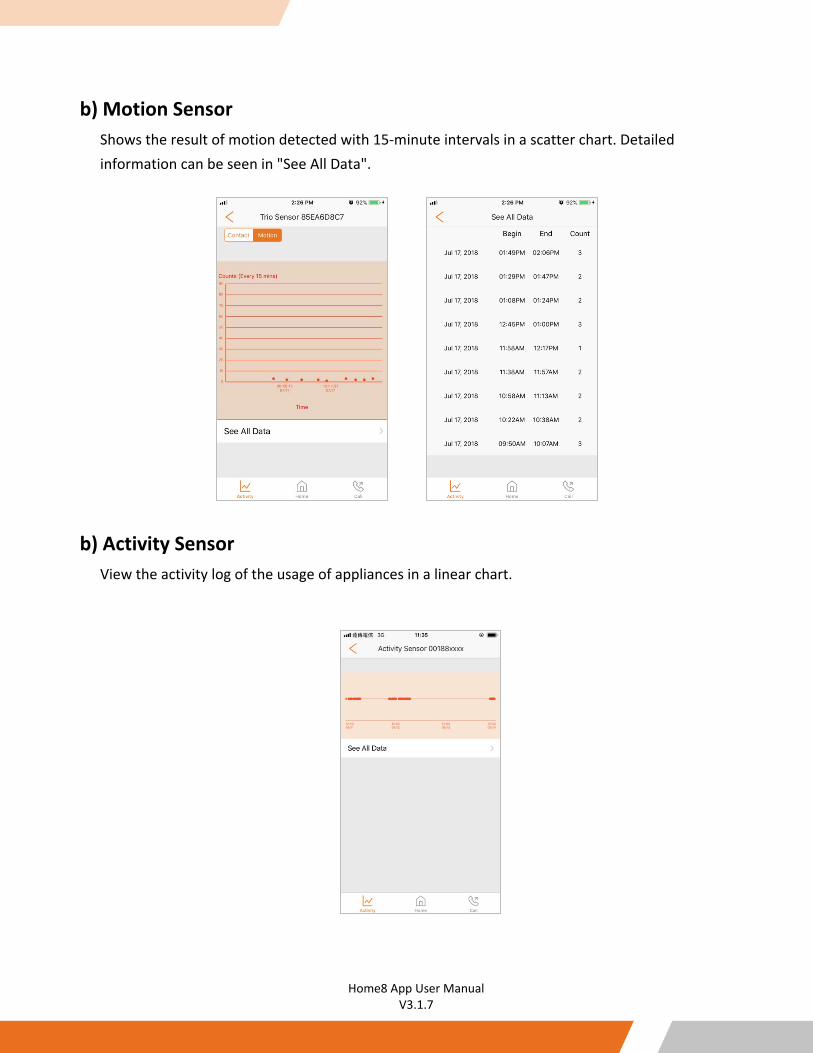
b) Motion Sensor Shows the result of motion detected with 15-minute intervals in a scatter chart. Detailed information can be seen in "See All Data".
b) Activity Sensor
View the activity log of the usage of appliances in a linear chart.
54
Home8 App User Manual V3.1.7
Chapter 10. Care24 a.) Set up Care24
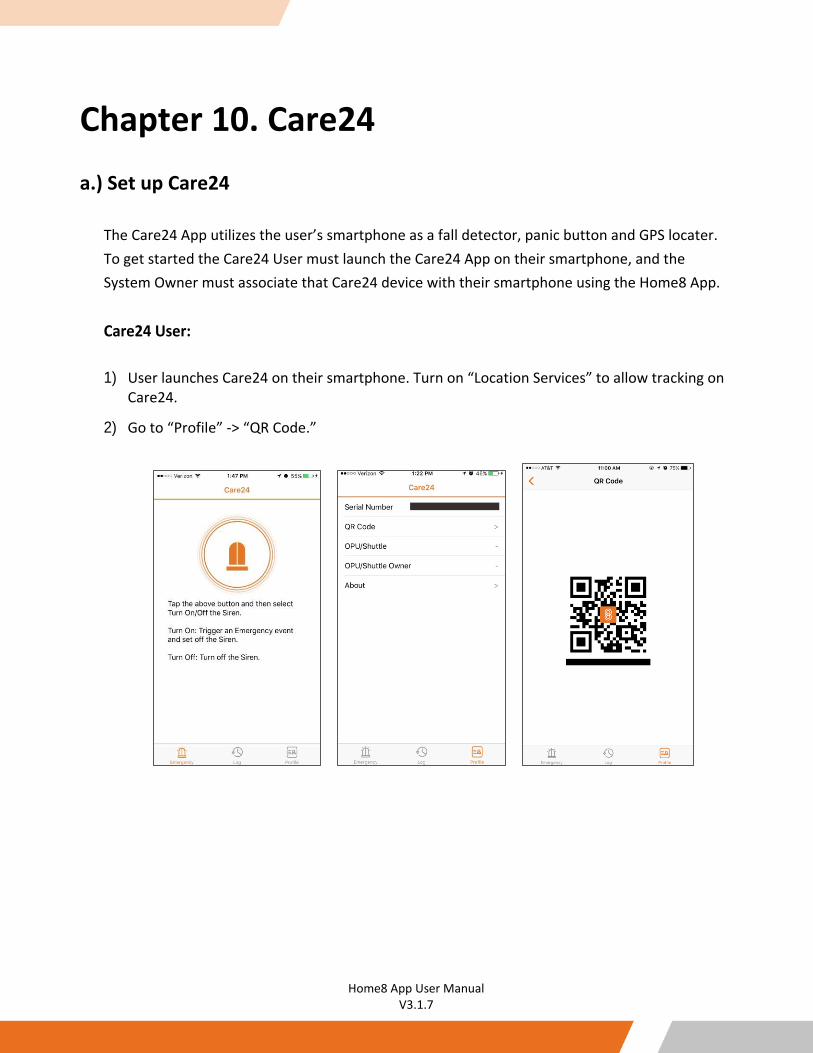
The Care24 App utilizes the user’s smartphone as a fall detector, panic button and GPS locater. To get started the Care24 User must launch the Care24 App on their smartphone, and the System Owner must associate that Care24 device with their smartphone using the Home8 App.
Care24 User:
1) User launches Care24 on their smartphone. Turn on “Location Services” to allow tracking on Care24.
2) Go to “Profile” -> “QR Code.”
55
Home8 App User Manual V3.1.7
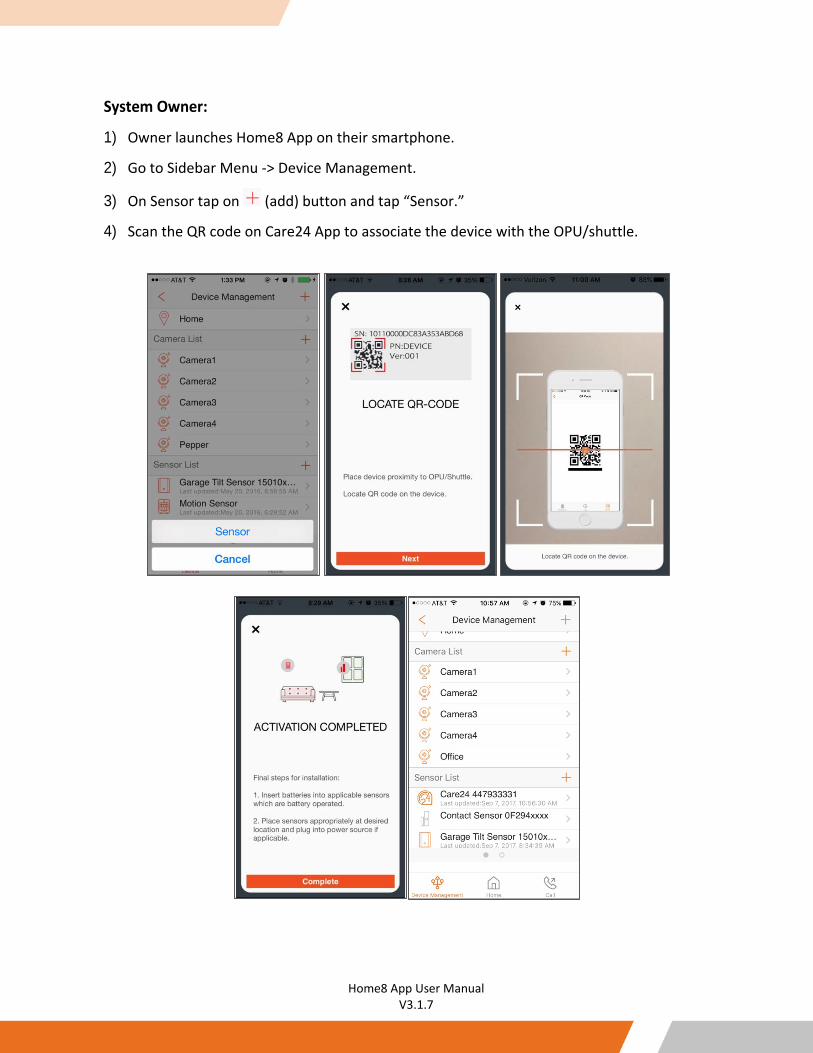
System Owner:
1) Owner launches Home8 App on their smartphone.
2) Go to Sidebar Menu -> Device Management.
3) On Sensor tap on (add) button and tap “Sensor.”
4) Scan the QR code on Care24 App to associate the device with the OPU/shuttle.
56
Home8 App User Manual V3.1.7
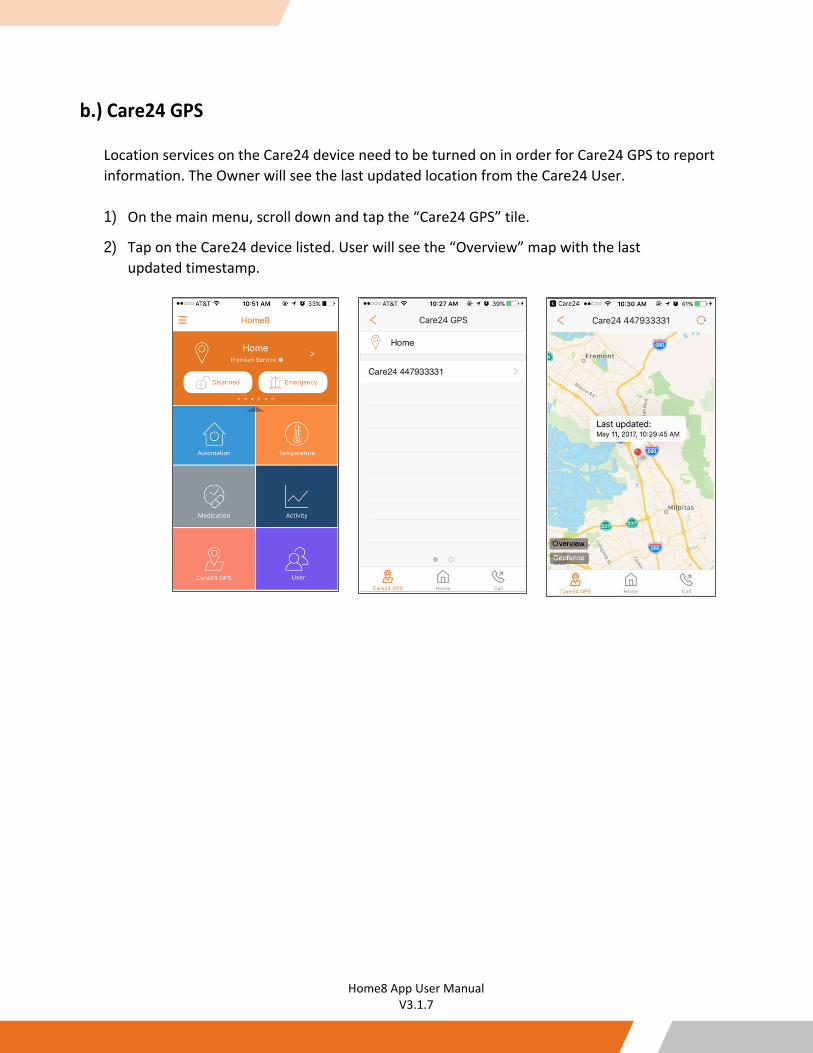
b.) Care24 GPS
Location services on the Care24 device need to be turned on in order for Care24 GPS to report information. The Owner will see the last updated location from the Care24 User.
1) On the main menu, scroll down and tap the “Care24 GPS” tile.
2) Tap on the Care24 device listed. User will see the “Overview” map with the last updated timestamp.
57
Home8 App User Manual V3.1.7
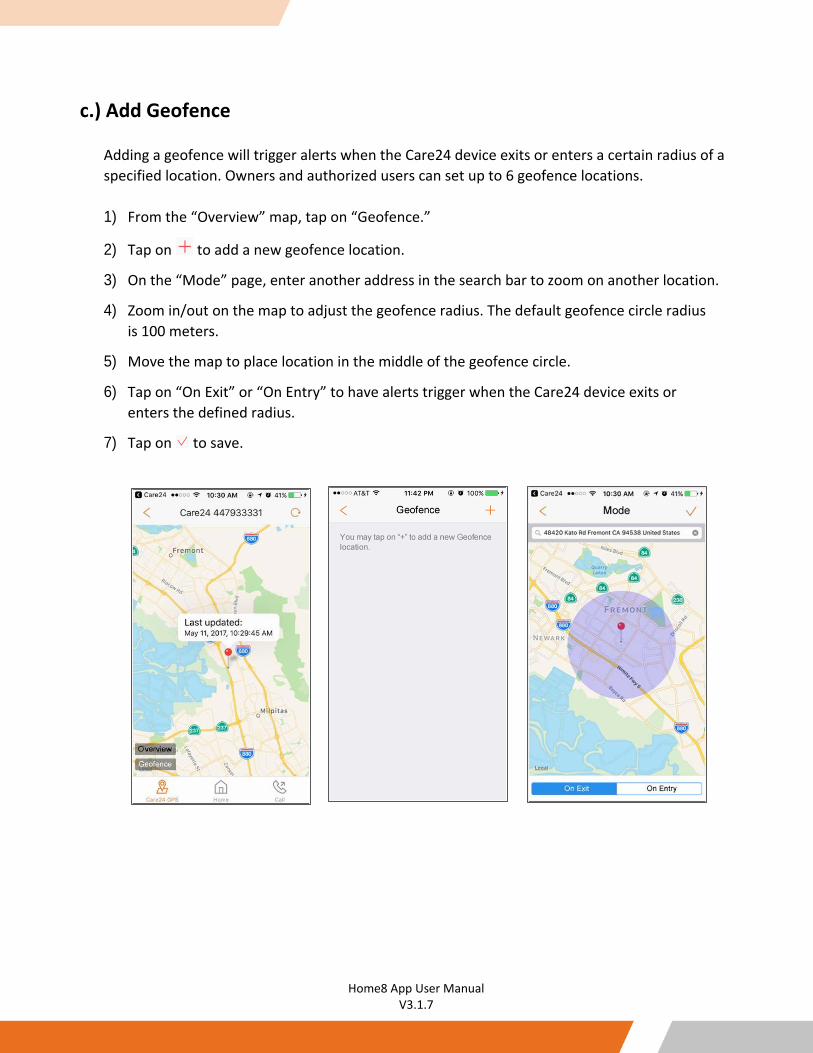
c.) Add Geofence
Adding a geofence will trigger alerts when the Care24 device exits or enters a certain radius of a specified location. Owners and authorized users can set up to 6 geofence locations.
1) From the “Overview” map, tap on “Geofence.”
2) Tap on to add a new geofence location.
3) On the “Mode” page, enter another address in the search bar to zoom on another location.
4) Zoom in/out on the map to adjust the geofence radius. The default geofence circle radius is 100 meters.
5) Move the map to place location in the middle of the geofence circle.
6) Tap on “On Exit” or “On Entry” to have alerts trigger when the Care24 device exits or enters the defined radius.
7) Tap on to save.
58
Home8 App User Manual V3.1.7
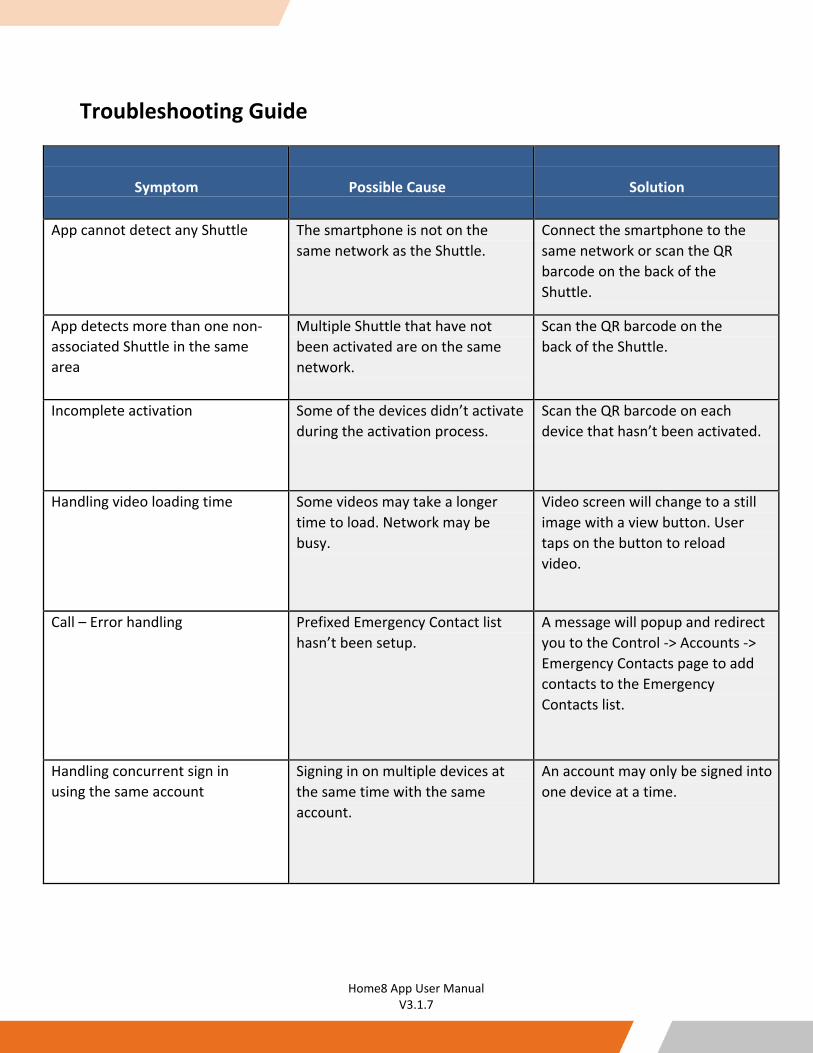
Troubleshooting Guide
Symptom
Possible Cause
Solution
App cannot detect any Shuttle The smartphone is not on the same network as the Shuttle.
Connect the smartphone to the same network or scan the QR barcode on the back of the Shuttle.
App detects more than one non-associated Shuttle in the same area
Multiple Shuttle that have not been activated are on the same network.
Scan the QR barcode on the back of the Shuttle.
Incomplete activation Some of the devices didn’t activate during the activation process.
Scan the QR barcode on each device that hasn’t been activated.
Handling video loading time Some videos may take a longer time to load. Network may be busy.
Video screen will change to a still image with a view button. User taps on the button to reload video.
Call – Error handling Prefixed Emergency Contact list hasn’t been setup.
A message will popup and redirect you to the Control -> Accounts -> Emergency Contacts page to add contacts to the Emergency Contacts list.
Handling concurrent sign in using the same account
Signing in on multiple devices at the same time with the same account.
An account may only be signed into one device at a time.