Embed Size (px)
Citation preview
Hollow Form Turning Tips
++++++++++++++++++++++++++++++++++++++++++++++++
by Lyle Jamieson
I have been using my supported boring bar system with the laser measuring d~vice now for more than ten years. As I travel around the country doing workshops, I have found many different techniques in use both with my bars and with other home-built systems. There are many pieces to the hollow form puzzle that will help increase the fun and enjoyment of turning these shapes, and in this article, I will share some of the techniques that work for me.
VIBRATION Make no mistake, vibration is the' enemy and whatever causes it must be eliminated. This is important when making any turning project-be it bowls, vessels, boxes, etc. Only bad things can happen if there is vibration and it always gets worse. Best case scenario would be minor vibration; worse case scenario is the wood comes loose, flies off, and hurts someone. Vibration is hard on a lathe, hard on chucking methods, hard on a laser, and hard on your body, so don't go there! If you can't figure out what is causing the vibration, get some help to troubleshoot the source.
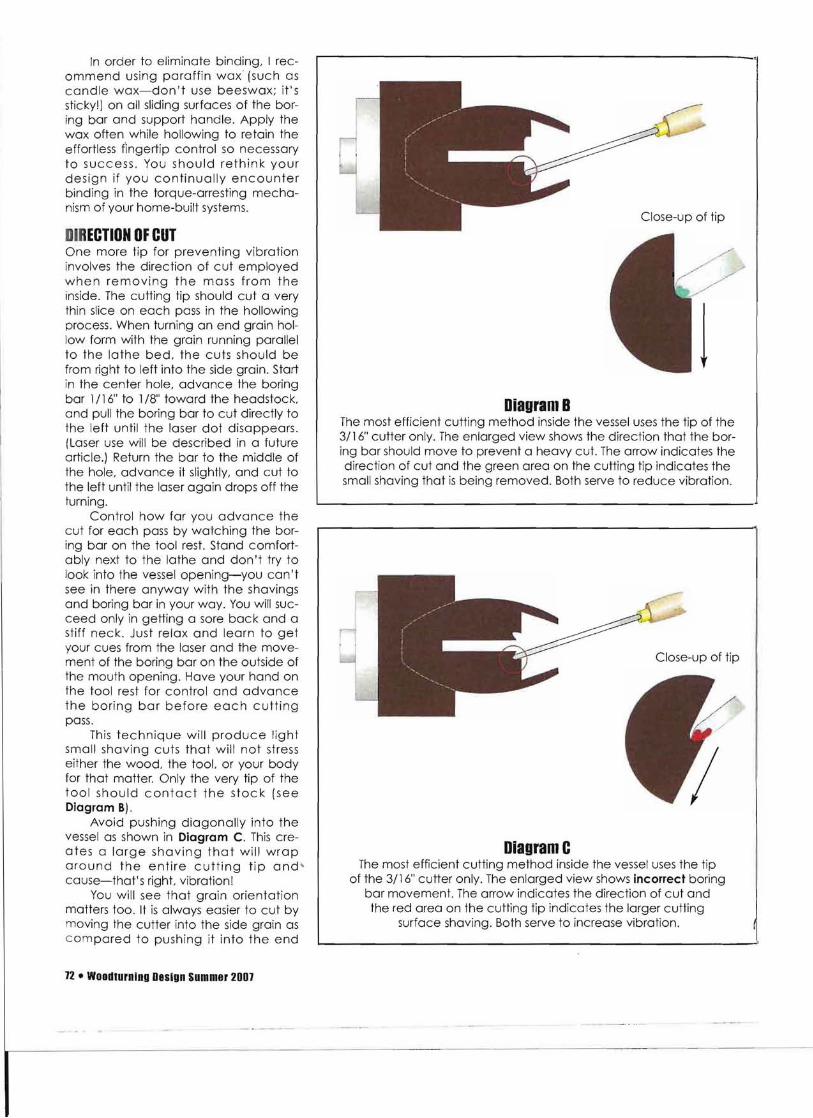
Even when the mounting grip is secure and many screws anchor the blank to the faceplate, vibration can appear when you start hollowing out beyond the headstock support. At this point, the wood just starts to flex with the stress of hollowing. One way to minimize flex is to keep excess wood at the base of the vessel for additional support and to complete the hollowing process in two or more stages (see Diagram A). Shape and hollow the top portion of the vessel first as shown in Stage 1. Be sure to turn the inside wall thickness so that it is uniform and smooth because, once completed, you cannot go back to refine this area again.
Next. shape the lower portion of the outside of the vessel to define the small foot area, and go in to hollow
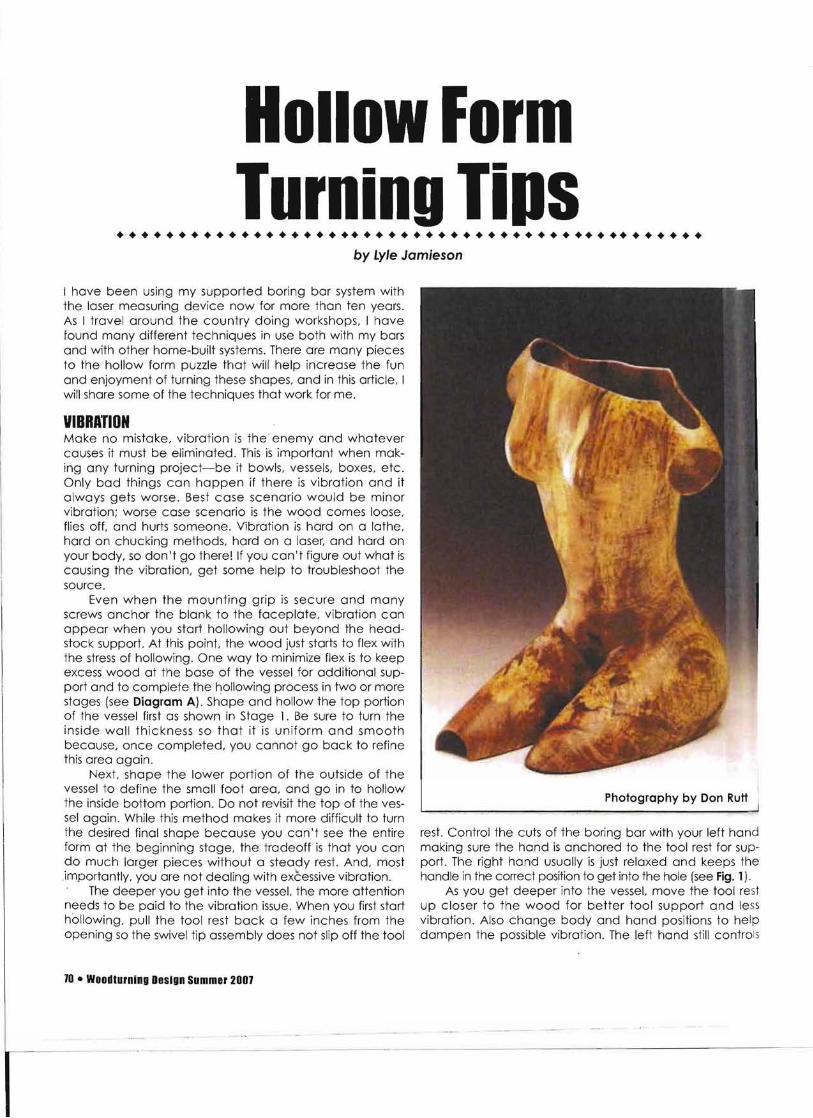
Photography by Don Ruttthe inside bottom portion. Do not revisit the top of the vessel again. While this method makes it more difficult to turn the desired final shape because you can't see the entire rest. Control the cuts of the boring bar with your left hand form at the beginning stage, the tradeoff is that you can making sure the hand is anchored to the tool rest for supdo much larger pieces without a steady rest. And, most port. The right hand usually is just relaxed and keeps the importantly, you are not dealing with excessive vibration. handle in the correct position to get into the hole (see Fig. 1),
The deeper you get into the vessel. the more attention As you get deeper into the vessel. move the tool rest needs to be paid to the vibration issue, When you first start up closer to the wood for better tool support and less hollOWing, pull the tool rest back a few inches from the vibration. Also change body and hand positions to help opening so the swivel tip assembly does not slip off the tool dampen the possible vibration. The left hand still controls
10 • Woodlurning Design Summer 2001
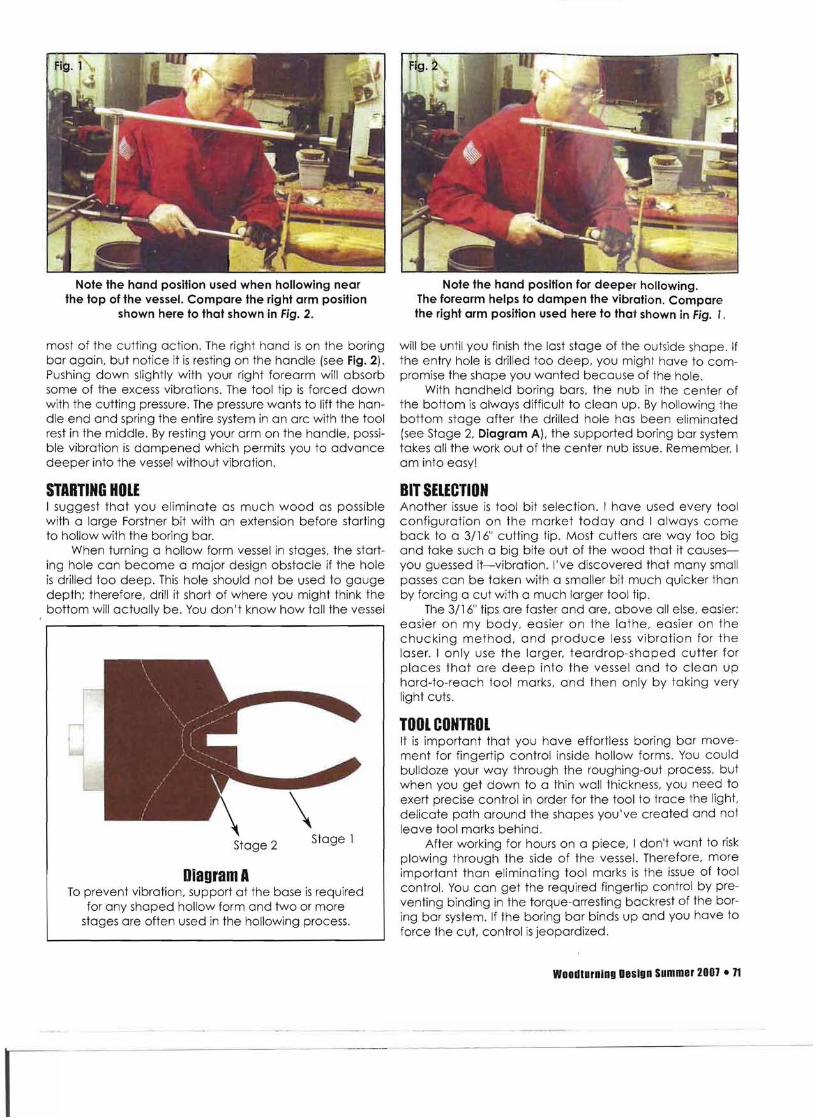
Note the hand position used when hollowing near the top of the vessel. Compare the right arm position
shown here to that shown in Fig. 2.
most of the cutting action. The right hand is on the boring bar again, but notice it is resting on the handle (see Fig. 2). Pushing down slightly with your right forearm will absorb some of the excess vibrations. The tool tip is forced down with the cutting pressure. The pressure wants to lift the handle end and spring the entire system in an arc with the tool rest in the middle. By resting your arm on the handle, possible vibration is dampened which permits you to advance deeper into the vessel without vibration.
STARTING HOLE I suggest that you eliminate as much wood as possible with a large Forstner bit with an extension before starting to hollow with the boring bar.
When turning a hollow form vessel in stages, the starting hole can become a major design obstacle if the hole is drilled too deep. This hole should not be used to gouge depth; therefore, drill it short of where you might think the bottom will actually be. You don't know how tall the vessel
Diagram A To prevent vibration, support at the bose is required
for any shaped hollow form and two or more stages are often used in the hollowing process.
Stage 2 Stage 1
Note the hand position for deeper hollowing. The forearm helps to dampen the vibration. Compare the right arm position used here to that shown in Fig. I.
will be until you finish the last stage of the outside shope. if the entry hole is drilled too deep, you might have to compromise the shape you wonted because of the hole.
With handheld boring bars, the nub in the center of the bottom is always difficult to clean up. By hollowing the bottom stage after the drilled hole has been eliminated [see Stage 2, Diagram A). the supported boring bar system tokes all the work out of the center nub issue. Remember. I am into easy!
BIT SELECTION Another issue is tool bit selection. I have used every tool configuration on the market today and I always come back to a 3/16" cutting tip. Most cutters are way too big and take such a big bite out of the wood that it causesyou guessed it-vibration. I've discovered that many small posses can be taken with a smaller bit much quicker than by forcing a cut with a much larger tool tip.
The 3/16" tips are faster and are, above all else, easier: easier on my body. easier on the lathe, easier on the chucking method, and produce less vibration for the laser. I only use the larger. teardrop-shaped cutter for places that are deep into the vessel and to clean up hard-to-reach tool marks, and then only by taking very light cuts.
TOOL CONTROL It is important that you have effortless boring bar movement for fingertip control inside hollow forms. You could bulldoze your way through the roughing-out process, but when you get down to a thin wall thickness. you need to exert precise control in order for the tool to trace the light, delicate path around the shapes you've created and not leave tool marks behind.
After working for hours on a piece, I don't want to risk plowing through the side of the vessel. Therefore, more important than eliminating tool marks is the issue of tool control. You can get the required fingertip control by preventing binding in the torque-arresting backrest of the boring bar system. If the boring bar binds up and you have to force the cut, control is jeopardized.
Woodturning Design summer 2001 • 11
In order to eliminate binding, I recommend using paraffin wax (such as candle wax-don't use beeswax; it's sticky!) on all sliding surfaces of the boring bar and support handle. Apply the wax often while hollowing to retain the effortless fingertip control so necessary to success. You should rethink your design if you continually encounter binding in the torque-arresting mechanism of your home-built systems.
DIRECTION OF CUT One more tip for preventing vibration involves the direction of cut employed when removing the mass from the inside. The cutting tip should cut a very thin slice on each pass in the hollowing process. When turning an end grain hollow form with the grain running parallel to the lathe bed, the cuts should be from right to left into the side grain. Start in the center hole, advance the boring bar 1/16" to 1/8" toward the headstock, and pull the boring bar to cut directly to the left until the laser dot disappears. (Laser use will be described in a future article.) Return the bar to the middle of the hole, advance it slightly, and cut to the left until the laser again drops off the turning.
Control how far you advance the cut for each pass by watching the boring bar on the tool rest. Stand comfortably next to the lathe and don't try to look into the vessel opening-you can't see in there anyway with the shavings and boring bar in your way. You will succeed only in getting a sore back and a stiff neck. Just relax and learn to get your cues from the laser and the movement of the boring bar on the outside of the mouth opening. Have your hand on the tool rest for control and advance the boring bar before each cutting pass.
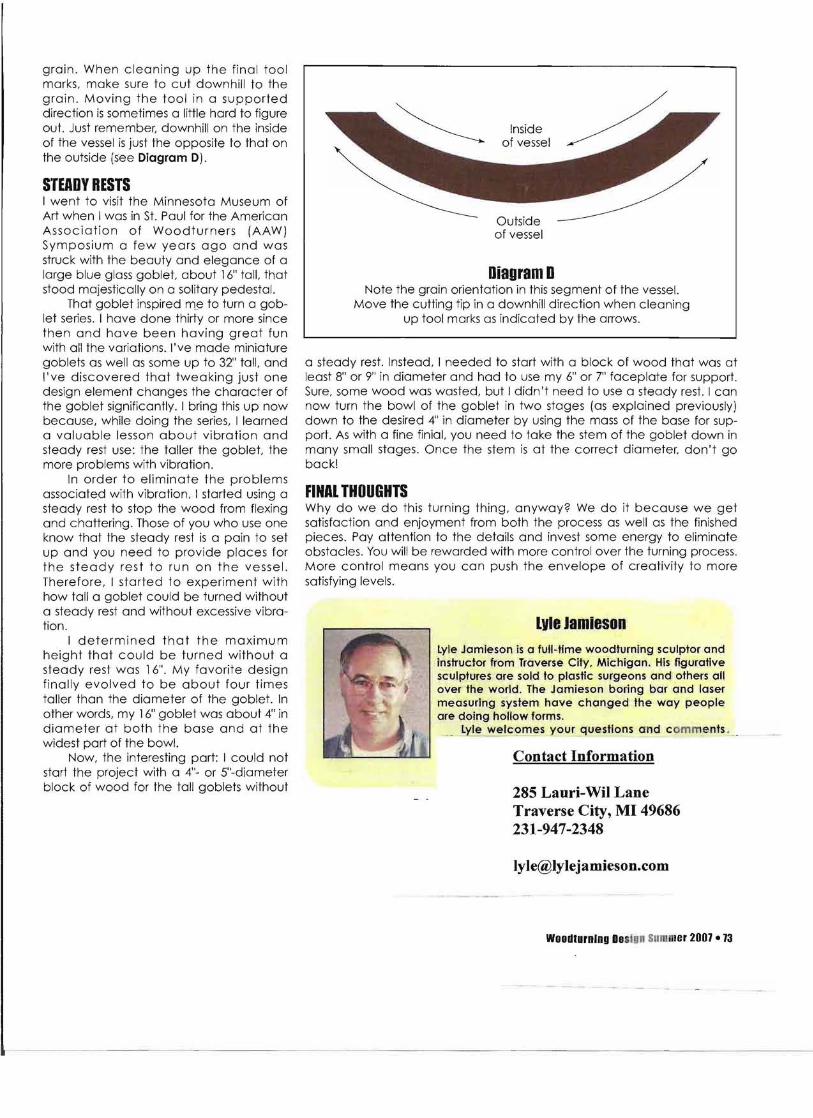
This technique will produce light small shaving cuts that will not stress either the wood, the tool. or your body for that matter. Only the very tip of the tool should contact the stock (see Diagram B).
Avoid pushing diagonally into the vessel as shown in Diagram C. This creates a large shaving that will wrap around the entire cutting tip and' cause-that's right, vibration!
You will see that grain orientation matters too. It is always easier to cut by moving the cutter into the side grain as compared to pushing it into the end
12 • Woodturnlng Design Summer 2DD}
Close-up of tip
Diagram B The most efficient cutting method inside the vessel uses the tip of the 3/16" cutter only. The enlarged view shows the direction that the boring bar should move to prevent a heavy cut. The arrow indicates the direction of cut and the green area on the cutting tip indicates the small shaving that is being removed. Both serve to reduce vibration.
Close-up of tip
Diagram C The most efficient cutting method inside the vessel uses the tip
of the 3/16" cutter only. The enlarged view shows incorrect boring bar movement. The arrow indicates the direction of cut and the red area on the cutting tip indicates the larger cutting
surface shaving. Both serve to increase vibration.
grain. When cleaning up the final tool marks, make sure to cut downhill to the grain. Moving the tool in a supported direction is sometimes a little hard to figure out. Just remember, downhill on the inside of the vessel is just the opposite to that on the outside (see Diagram D).
STEADY RESTS I went to visit the Minnesota Museum of Art when I was in St. Paul for the American Association of Woodturners (AAW) Symposium a few years ago and was struck with the beauty and elegance of a large blue glass goblet. about 16" tall. that stood majestically on a solitary pedestal.
That goblet inspired m_e to turn a goblet series. I have done thirty or more since then and have been having great fun with all the variations. I've made miniature goblets as well as some up to 32" tall, and I've discovered that twea king just one design element changes the character of the goblet significantly. I bring this up now because, while doing the series, I learned a valuable lesson about vibration and steady rest use: the taller the goblet, the more problems with vibration.
In order to eliminate the problems associated with vibration, I started using a steady rest to stop the wood from flexing and chattering. Those of you who use one know that the steady rest is a pain to set up and you need to provide places for the steady rest to run on the vessel. Therefore, I started to experiment with how tall a goblet could be turned without a steady rest and without excessive vibration.
I determined that the maximum height that could be turned without a steady rest was 16". My favorite design finally evolved to be about four times taller than the diameter of the goblet. In other words, my 16" goblet was about 4" in diameter at both the base and at the widest part of the bowl.
Now, the interesting part: I could not start the project with a 4"- or 5"-diameter block of wood for the tall goblets without
Inside of vessel
Outside of vessel
Diagram 0 Note the grain orientation in this segment of the vessel.
Move the cutting tip in a downhill direction when cleaning up tool marks as indicated by the arrows.
a steady rest. Instead, I needed to start with a block of wood that was at least 8" or 9" in diameter and had to use my 6" or 7" faceplate for support. Sure, some wood was wasted, but I didn't need to use a steady rest. I can now turn the bowl of the goblet in two stages (as explained previously) down to the desired 4" in diameter by using the mass of the base for support. As with a fine finial. you need to take the stem of the goblet down in many small stages. Once the stem is at the correct diameter, don't go back!
FINAL THOUGHTS Why do we do this turning thing, anyway? We do it because we get satisfaction and enjoyment from both the process as well as the finished pieces. Pay attention to the details and invest some energy to eliminate obstacles. You will be rewarded with more control over the turning process. More control means you can push the envelope of creativity to more satisfying levels.
Lvle Jamieson lyle Jamieson is a full-time woodturning sculptor and instructor from Traverse City, Michigan. His figurative sculptures are sold to plastic surgeons and others all over the world. The Jamieson boring bar and laser measuring system have changed the way people are doing hollow forms.
lyle welcomes your questions and comments,
Contact Information
285 Lauri-Wil Lane Traverse City, MI 49686 231-947-2348
WoodlurDIDg Desio Stl PIer 2001 • 13