Embed Size (px)
Citation preview
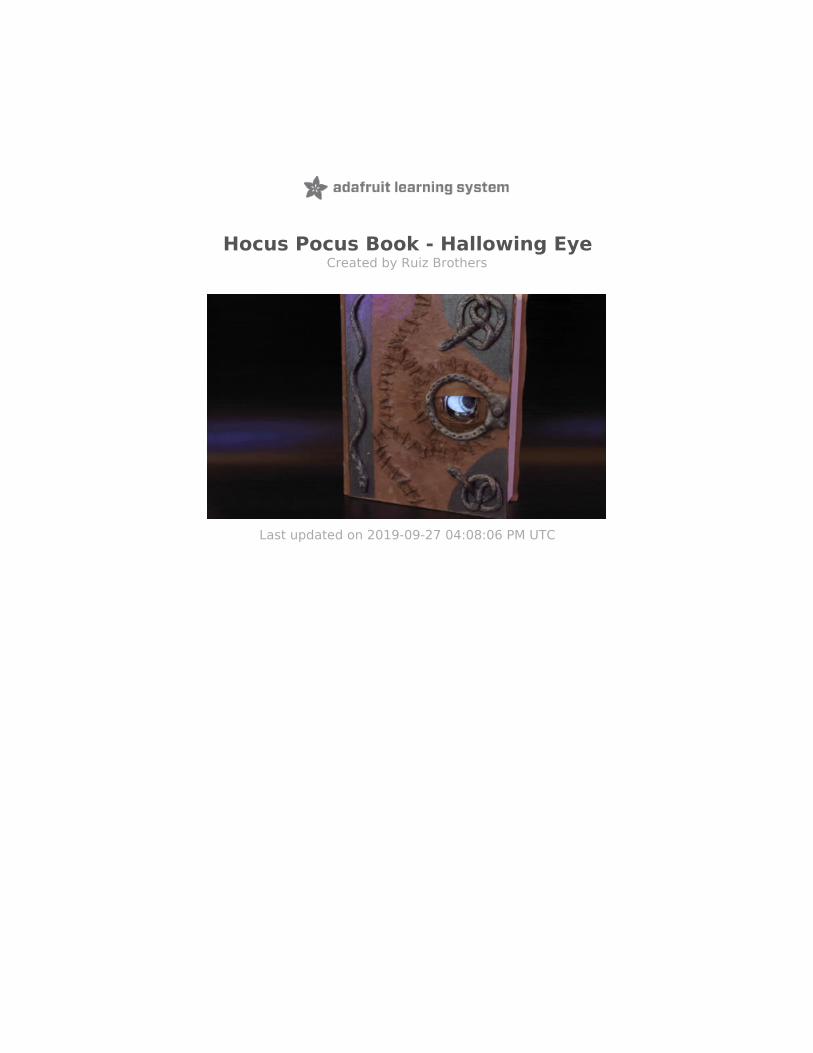
Hocus Pocus Book - Hallowing EyeCreated by Ruiz Brothers
Last updated on 2019-09-27 04:08:06 PM UTC

Overview
Use an Adafruit HalloWing M0 Express to build this
iconic spell book!
We've waited 300 years, right down to the day, now the
witch is back
and there's hell to pay!
In this project we'll put a spell on you and use our
witchcraft powers to build our very own book.
If you don't believe, you'd better get superstitious.
Your browser does not support the video tag. Adafruit HalloWing M0 Express
© Adafruit Industries https://learn.adafruit.com/hocus-pocus-book-eye Page 3 of 24

OUT OF STOCK
Out Of Stock
Lithium Ion Polymer Battery - 3.7v 350mAh
$6.95IN STOCK
Add To Cart
Convex Plastic Lens with Edge
OUT OF STOCK
Out Of Stock
Convex Glass Lens with Edge - 40mm Diameter
OUT OF STOCK
Out Of Stock
© Adafruit Industries https://learn.adafruit.com/hocus-pocus-book-eye Page 4 of 24

Prerequisite Guides
If you're new to Adafruit CRICKIT, Circuit Python and soldering, take a moment to walk through the following guides toget you started.
This is Hallowing (https://adafru.it/CwH)Welcome to Circuit Python (https://adafru.it/cpy-welcome)
Tools
A list of helpful tools used to make this project.
1 x 1 – 3/8in Spade Drill Bit1 – 3/8 in Spade Drill Bit for Lens opening
BUY NOW
1 x Crayola Air Dry ClayCrayola Air Dry Clay for snakes
BUY NOW
1 x Mod Podge Acrylic Sealer - MatteMod Podge Acrylic Sealer - Matte to glue and seal parts
BUY NOW
1 x 5M Burlap Twine5M Burlap Twine for the stitches
BUY NOW
1 x Tulip Soft Fabric PaintTulip Soft Fabric Paint Metalic Paint
BUY NOW
1 x Acrylic PaintAcrylic Paint
BUY NOW
Clear Acrylic Lens Holder + Hardware Kit for HalloWing
$2.95IN STOCK
Add To Cart
© Adafruit Industries https://learn.adafruit.com/hocus-pocus-book-eye Page 5 of 24

Circuit Diagram
Take a moment to review the components in the circuit diagram. This illustration is meant for referencing wiredconnections - The length of wire, position and size of components are not exact.
The 350 / 400 or 500mAh Lipo battery plugs directly into the JST battery connector.
You may have to coil the wires to get it to fit between the Feather Wing Sockets.
© Adafruit Industries https://learn.adafruit.com/hocus-pocus-book-eye Page 6 of 24

Spooky Eyes
Hallowing ships with a pre-loaded example of a human eye that looks around, blinks and reacts to light.
If you want to put the original spooky eye demo back on your Hallowing, enter bootloader mode by double-clicking theReset button (https://adafru.it/C8r) and then drag this UF2 file over onto HALLOWBOOT:
https://adafru.it/CmU
https://adafru.it/CmU
There’s a few customized variants as well, such as a fiery dragon eye:
https://adafru.it/CmV
https://adafru.it/CmV
A brown, animal-ish eye with no visible sclera:
https://adafru.it/CmW
https://adafru.it/CmW
A psychedelic eye from our Eye of Newt guide (https://adafru.it/Cmd):
https://adafru.it/CmX
https://adafru.it/CmX
And a Terminator-inspired robotic eye:
© Adafruit Industries https://learn.adafruit.com/hocus-pocus-book-eye Page 7 of 24

https://adafru.it/CFf
https://adafru.it/CFf
Customizing the Spooky Eye Demo
The software controlling Hallowing’s eye is extensively customizable. This requires some familiarity with the ArduinoIDE and, depending on the extent of customizations you have in mind, perhaps some image editing and using Pythonscripts on the command line.
This is all explained in the “Electronic Animated Eyes using Teensy 3.1/3.2 (https://adafru.it/j6B)” guide (despite thename, it also works on various Adafruit “M0” and “M4” boards as well, including the Hallowing).
Most of the code there will automatically work on the Hallowing hardware, such as the display and light sensor. OtherHallowing-specific features, such as the capacitive touch pads, are not handled by the code…but could be added ifyou’ve done some Arduino programming before.
© Adafruit Industries https://learn.adafruit.com/hocus-pocus-book-eye Page 8 of 24

Assemble
Painting book covers
First we'll need to select a large sized cook book that
can house our board, lens and battery. Our book
measured 8x9.5x2.5 inch (230mmx250mmx65mm).
The pages and cover that will hold the Hallowing in
place need to be at least 1.5mm thick. This includes the
thickness of the velcro / hook and loop that will attach
between the cover and pages.
Sanding
Next we'll need to sand the covers to make painting
easier. We used a 220 grit sand paper and lightly
sanded the front and back covers to remove the glossy
finish.
Base coat
For the base color, we used a light brown acrylic color
to coat the covers. Allow the paint to dry and then apply
a darker brown as a texture.
Snakes
While we allow the paint to dry, we can get started on
the snakes! Use air dry clay to mold, shape and texture
the three snakes that adorn the front cover.
Eye hole
To create the hole for the Convex Glass
Lens, (https://adafru.it/CBn) we'll need to use a 1 3/8
inch spade bit to drill out the opening. Use a hobby
knife to clean up the edges.
© Adafruit Industries https://learn.adafruit.com/hocus-pocus-book-eye Page 9 of 24
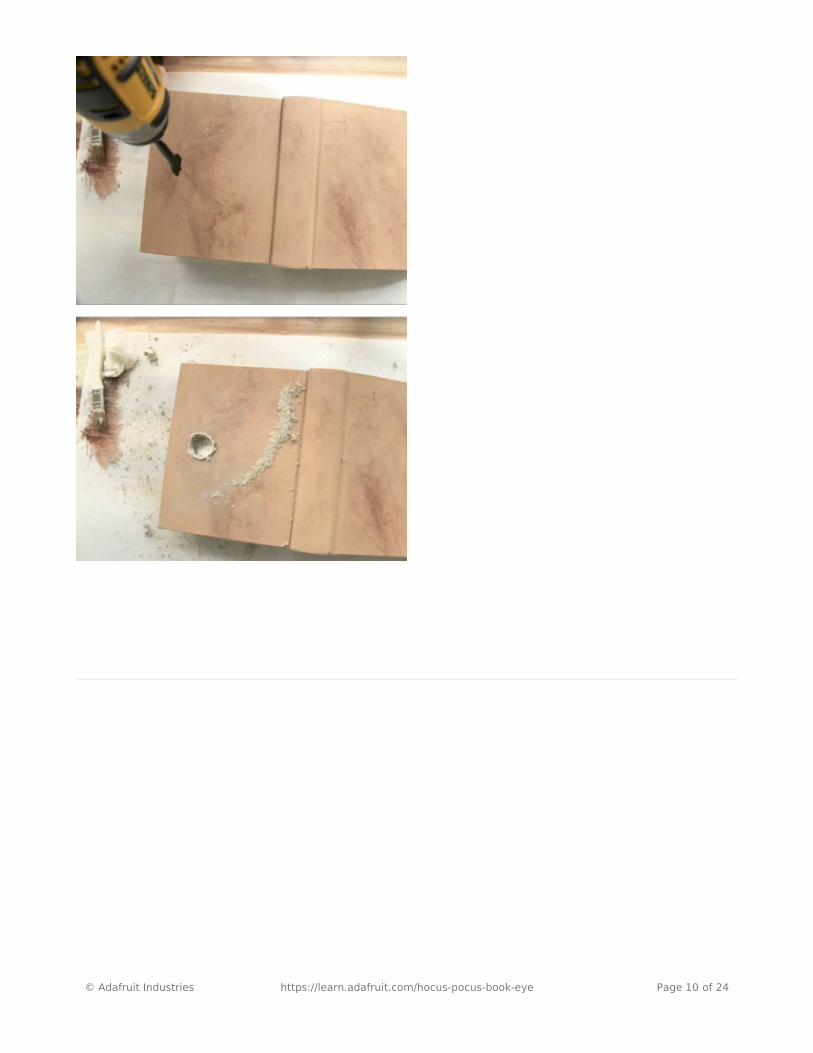
© Adafruit Industries https://learn.adafruit.com/hocus-pocus-book-eye Page 10 of 24
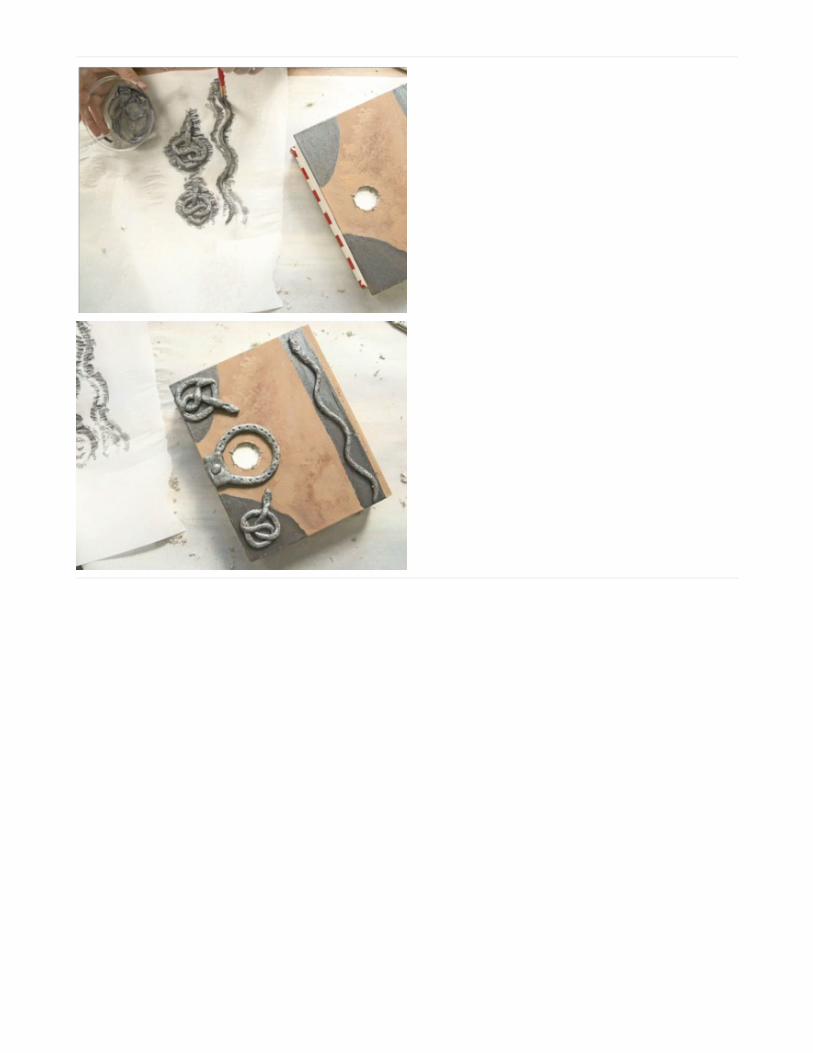
Silver coat
After testing the lenses properly fit through the cover,
we can move on to painting the snakes and applying a
silver coat to the covers.
Allow the cover and snakes to dry before aligning them
to the cover. Check placement and add additional silver
coats to the cover and match the design with the snakes
on top.
© Adafruit Industries https://learn.adafruit.com/hocus-pocus-book-eye Page 11 of 24
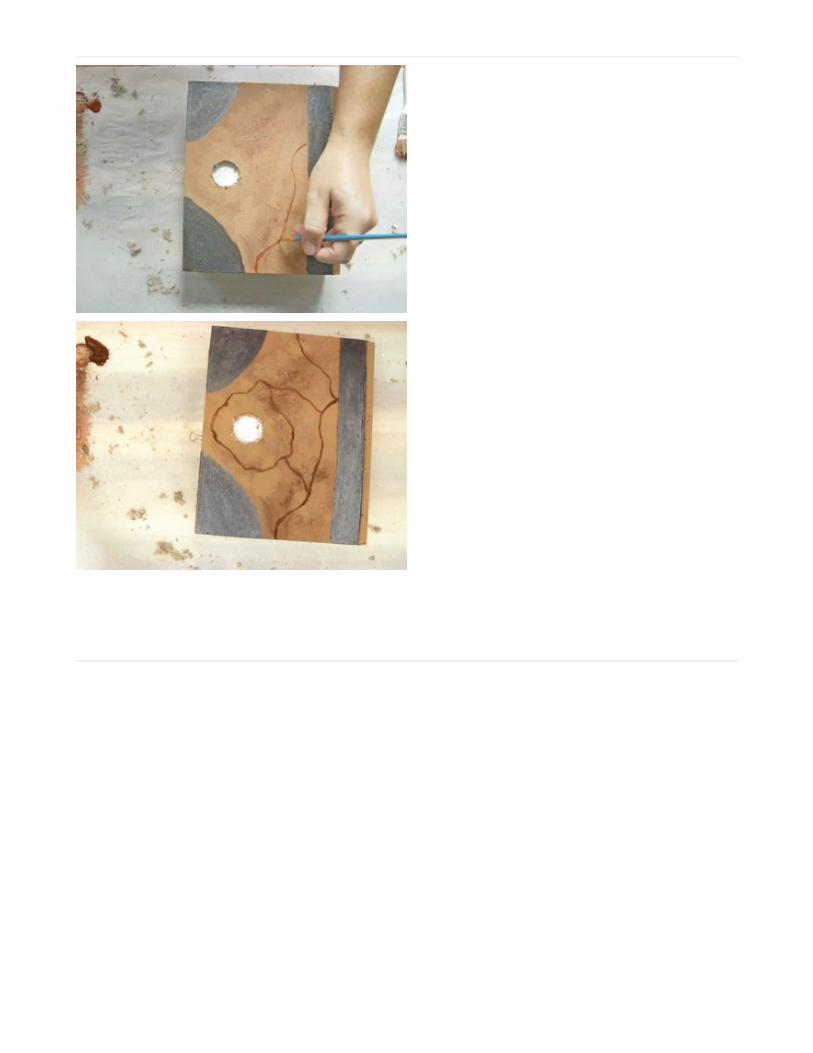
Stitch detail
Use the dark brown paint to lightly draw the line details
that will make up the stitches. Don't worry if you make a
mistake, we can easily dry brush it away to make it into
the skin texture.
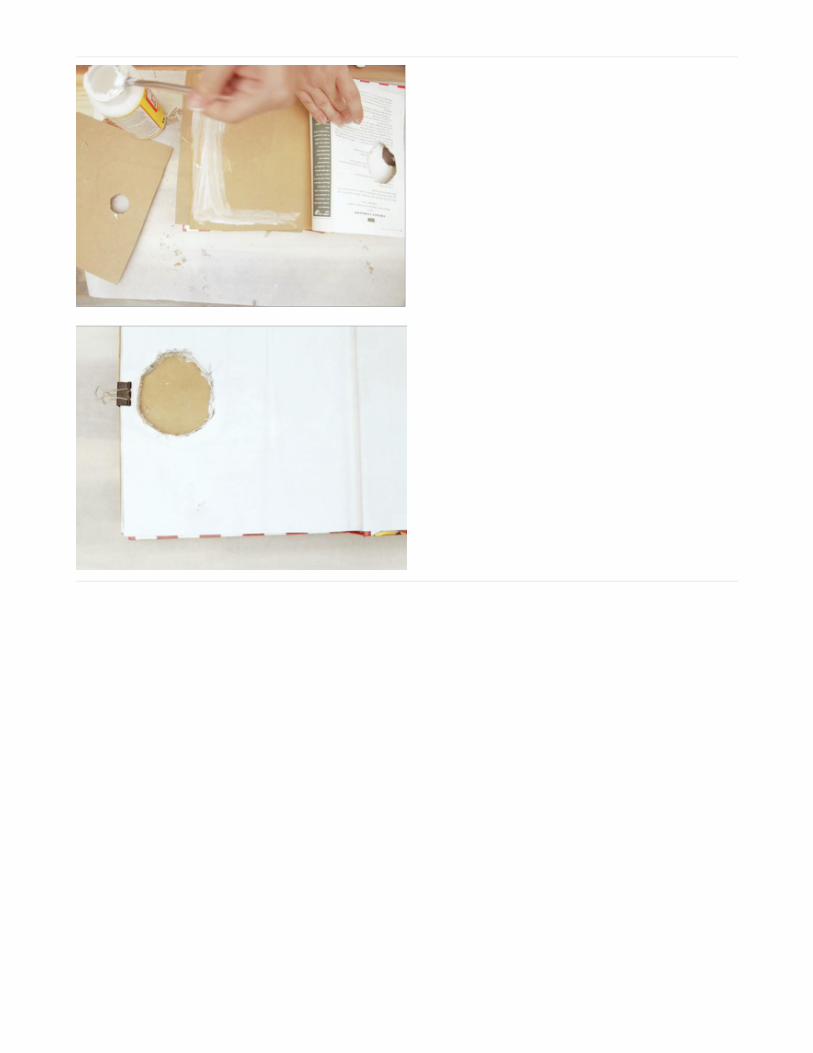
Mod Podge pages
After the stitch detail dries we'll move on to gluing the
pages that hold the Hallowing board in place. You will
need about 1.5mm (about 80 pages) to firmly hold the
board. Mod podge each page and then use a binder clip
to hold them together while they dry.
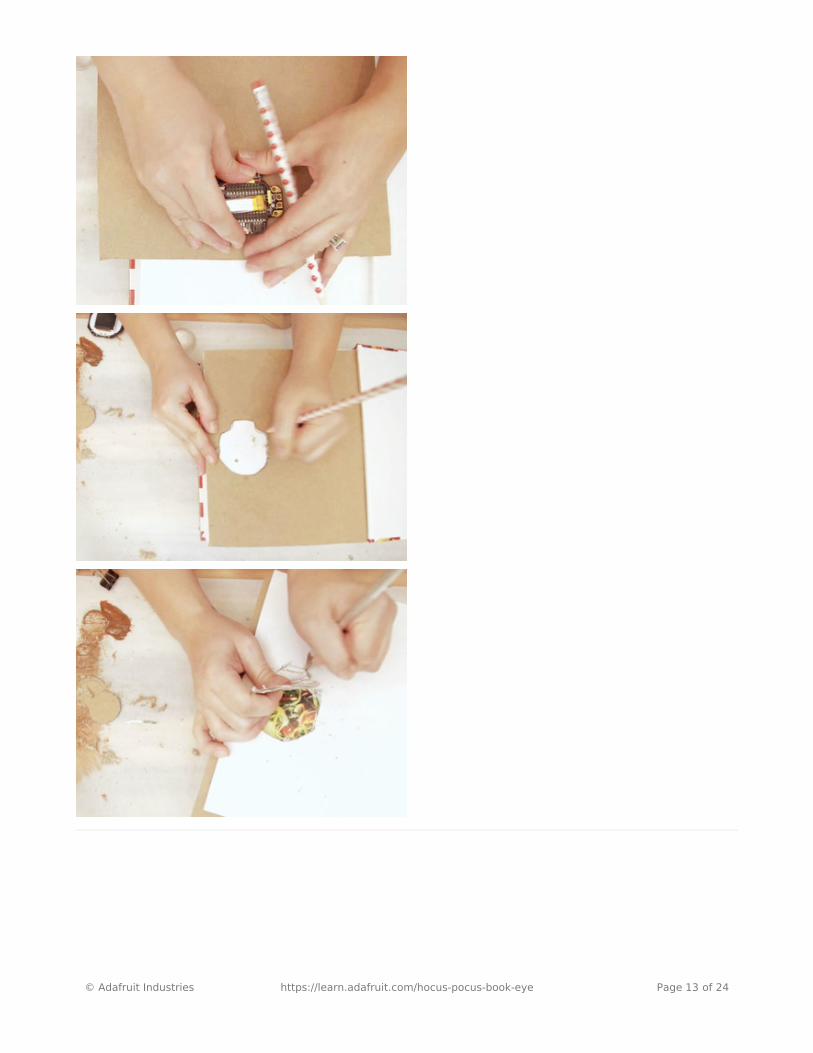
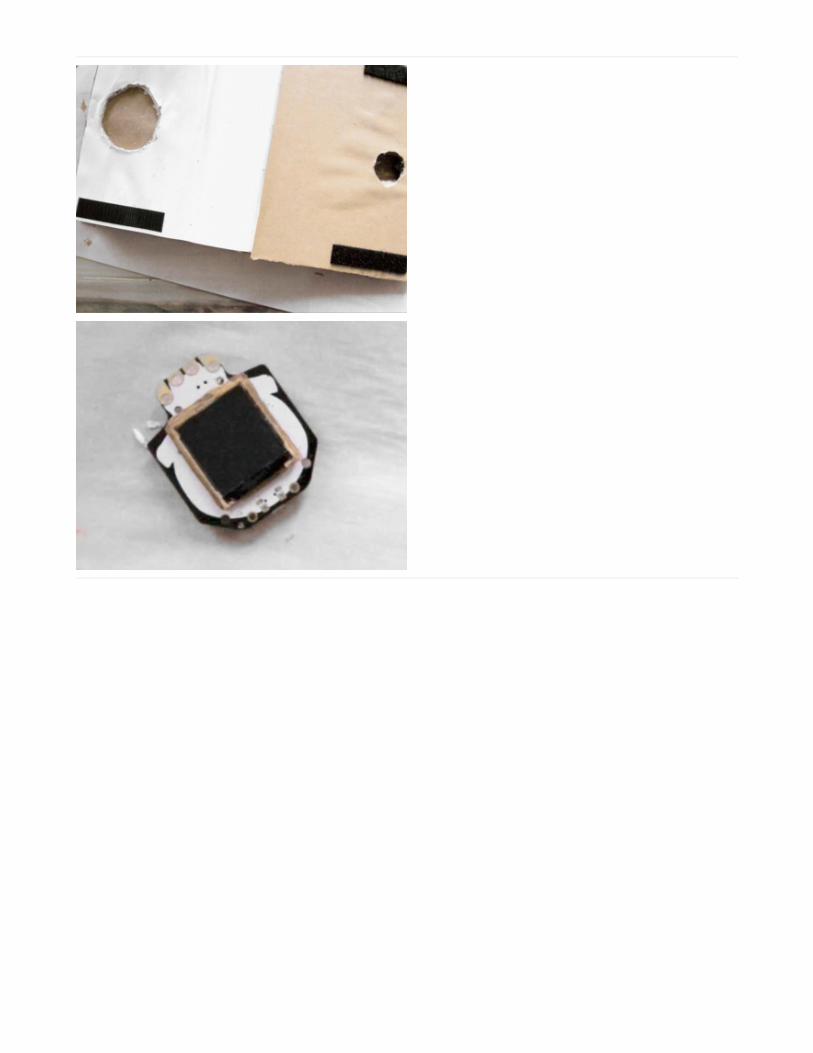
Chipboard backing
After the pages dry, we'll trace out the circle cutout to
allow ourselves to center the outline of the Hallowing
board on chipboard or card stock. This will help to cover
up the mod podged pages.
Board outline
Next, we'll create an outline of the Hallowing board and
trace it onto the mod podged pages. Use a hobby knife
to carefully cut out each page.
© Adafruit Industries https://learn.adafruit.com/hocus-pocus-book-eye Page 12 of 24
© Adafruit Industries https://learn.adafruit.com/hocus-pocus-book-eye Page 13 of 24
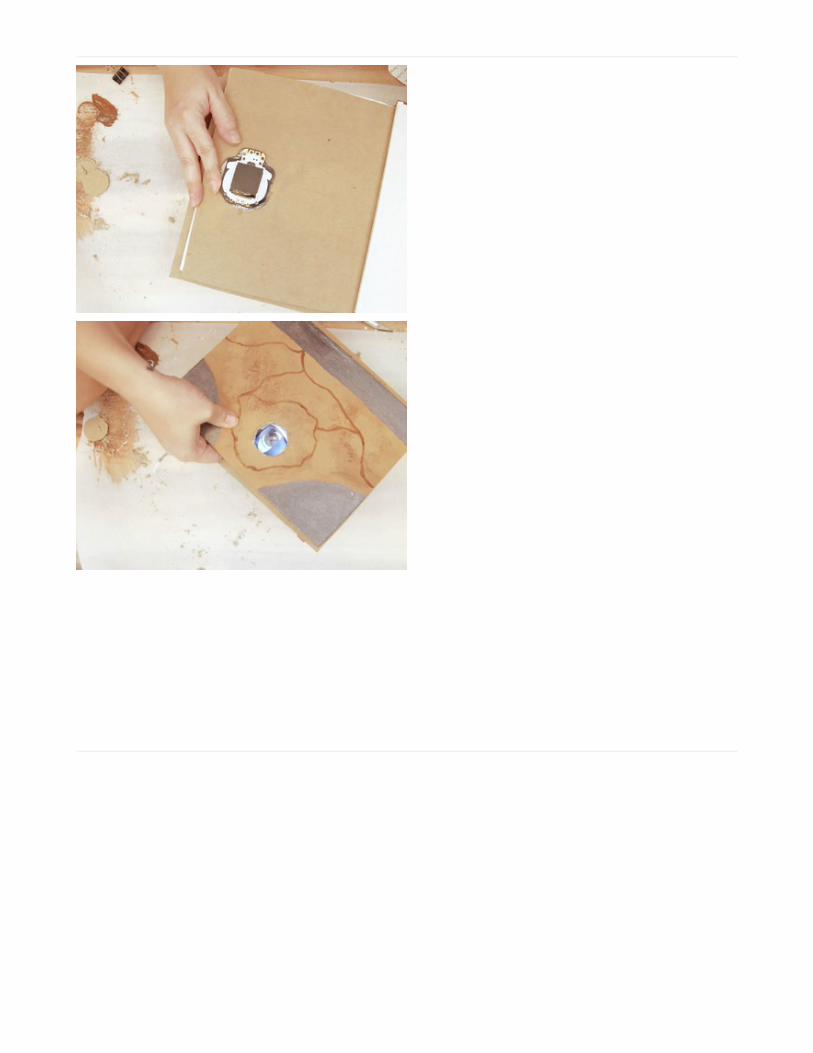
Test fit cutout
Place strips of velcro around the page boarders and
then place the board and Convex Glass Lens on top of
the display and carefully close the book cover to test
out our tolerances.
Do not apply pressure to the display, the board or the
battery (too much could damage the screen or battery,
be careful!).
Clean up any jagged edges and around the cover to
properly fit the parts.
© Adafruit Industries https://learn.adafruit.com/hocus-pocus-book-eye Page 14 of 24
Glue Backing
After we clean up all edges and test that all of our parts
fit, we'll move on to adding mod podge to the backing
card stock.
Use a small binder to help keep the pages together
while they dry.
© Adafruit Industries https://learn.adafruit.com/hocus-pocus-book-eye Page 15 of 24
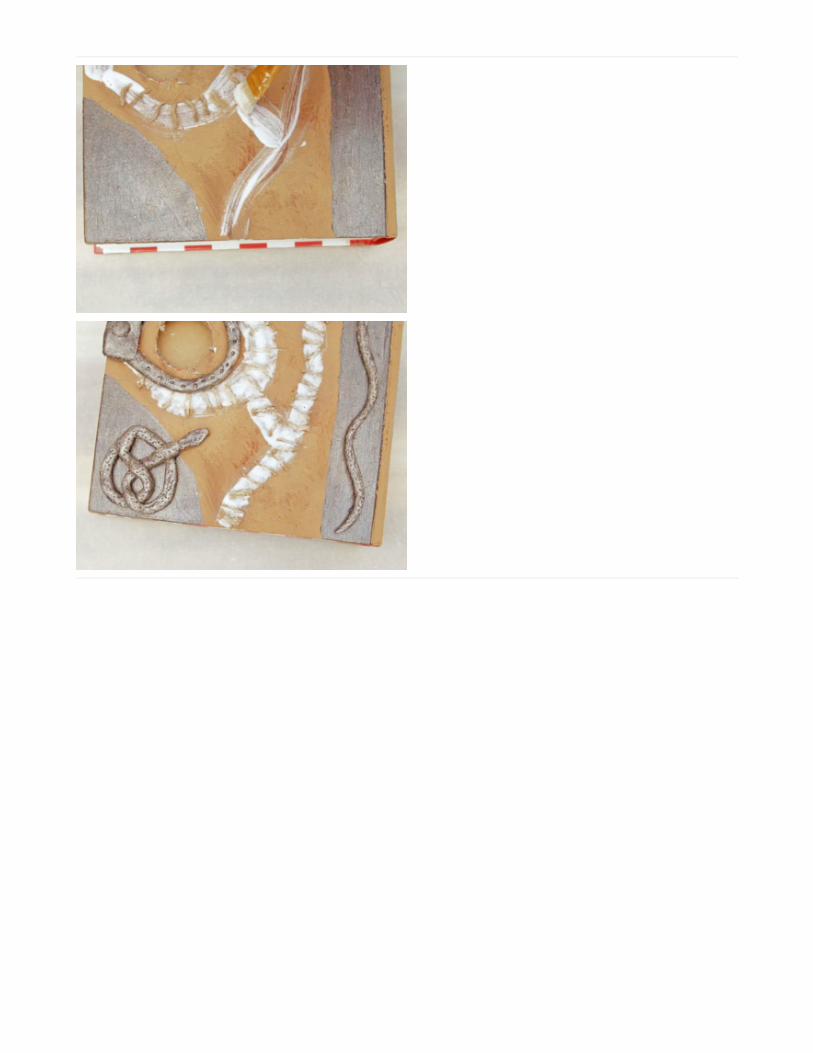
Stiches
On to adding stitches! We'll first prepare the surface by
tracing the details with a think layer of mod podge (adds
depth). Use a brush to apply mod podge along the lines
we drew earlier.
Now we'll cut about 50 pieces of twine. We'll cut them
20mm long and randomly place them over the glue
lines.
© Adafruit Industries https://learn.adafruit.com/hocus-pocus-book-eye Page 16 of 24
Glue Snakes and Lock
We used super to attach the snakes and lock parts into
place and sealed with a thick coat of mod podge.
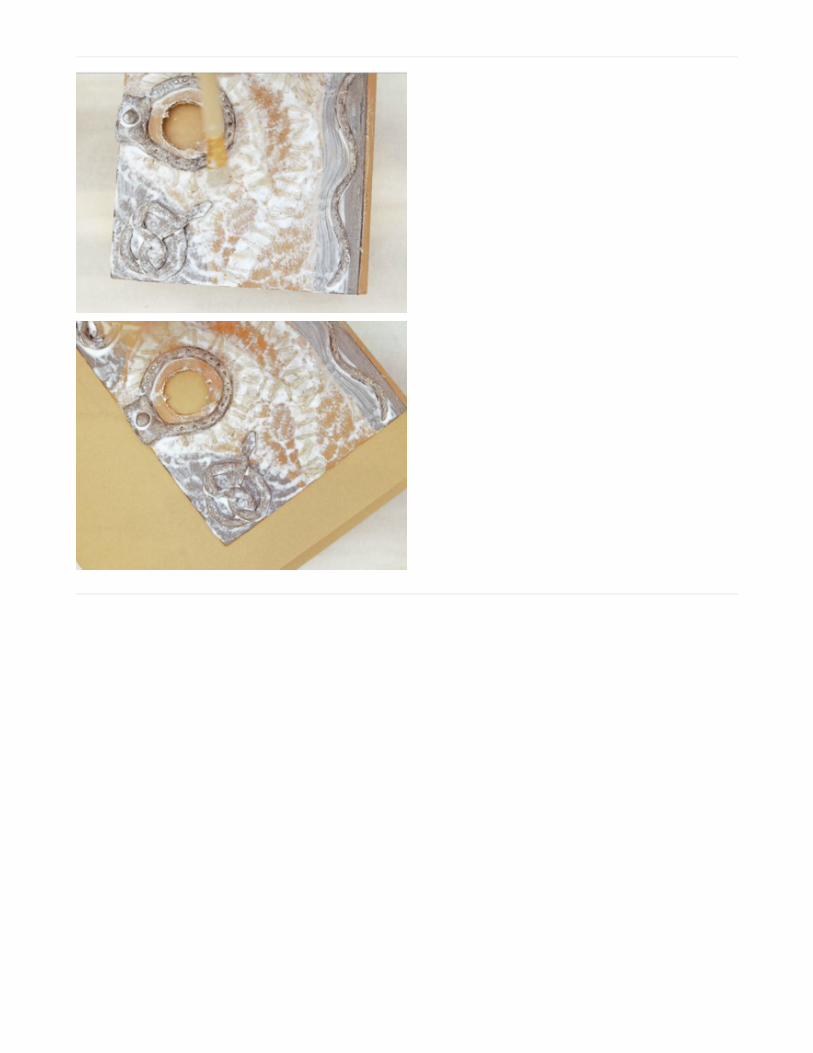
Stitch layer
Once we're happy with the layout we can apply a coat
of thick mod podge on top of the twine to keep the
fibers clumped together.
Allow the first mod podge layer to completely dry and
then apply a second "skin layer" by applying small
clumps in the form of wrinkles.
© Adafruit Industries https://learn.adafruit.com/hocus-pocus-book-eye Page 17 of 24
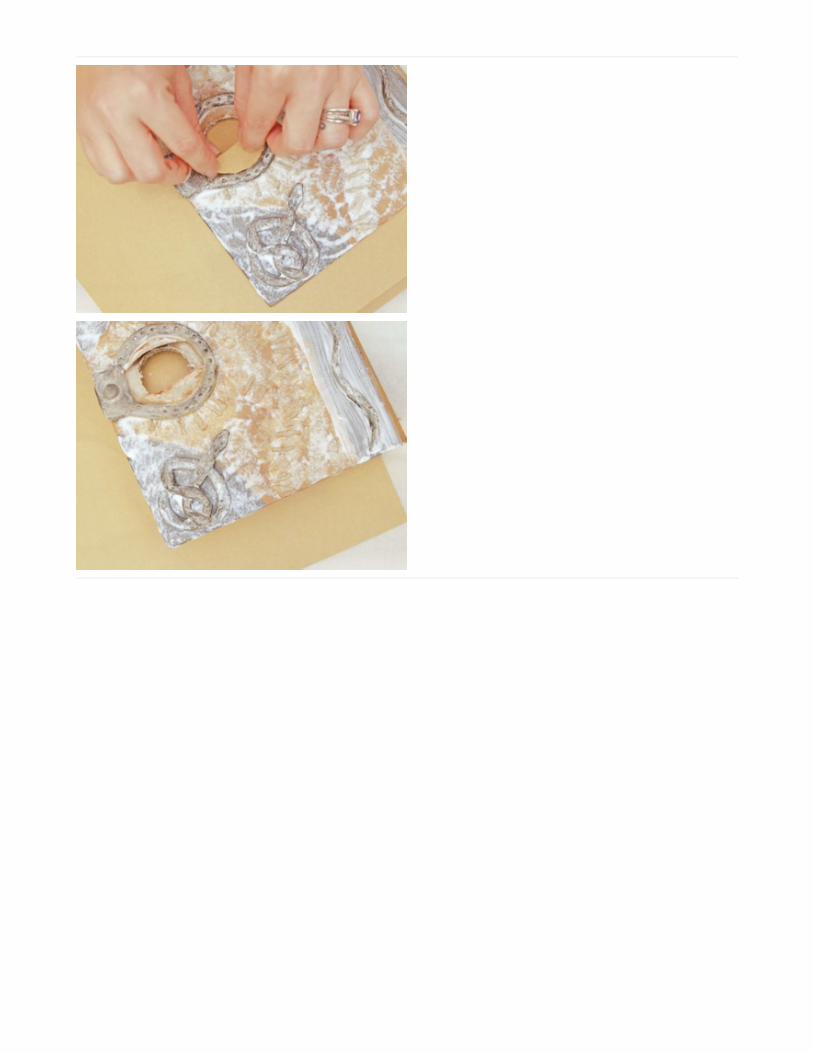
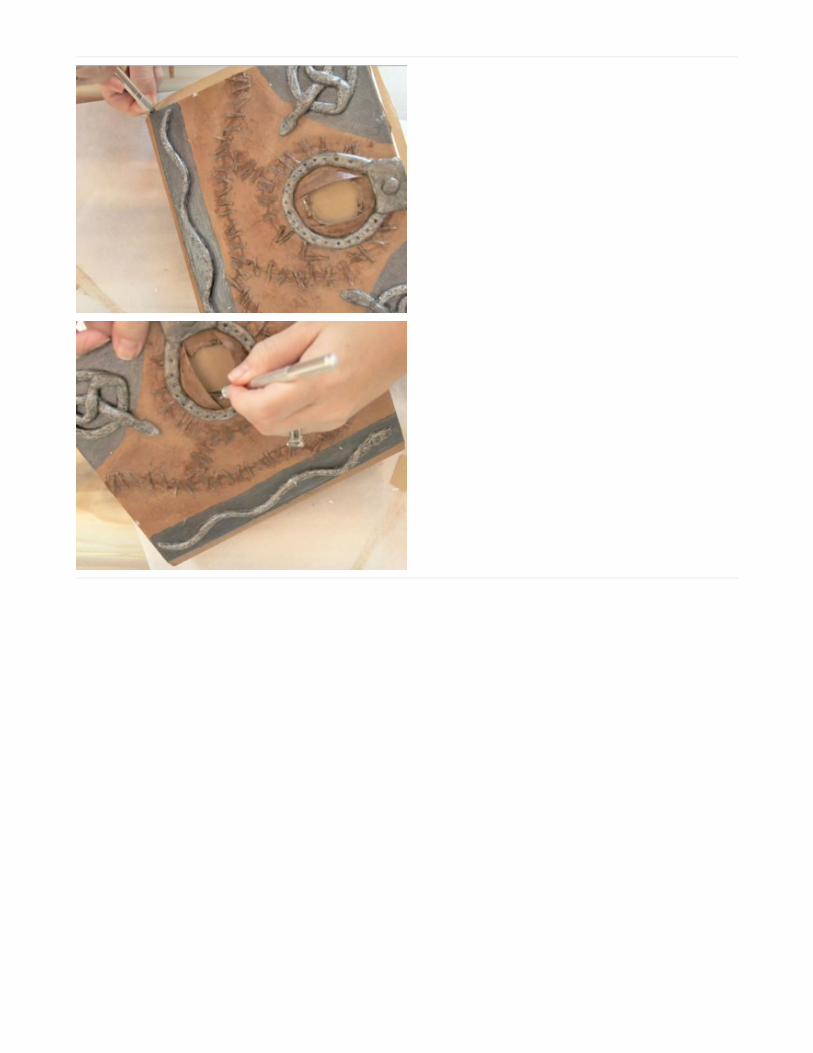
Eye lids
To make the eye lids, cut out 1/2 moon shapes until it fits
inside your lock (~54mm inner diameter lock). We'll
shape and mod podge the lids to the top and bottom of
the inner lock.
Allow the mod podge to fully dry before applying an
additional skin layers, like we did before.
© Adafruit Industries https://learn.adafruit.com/hocus-pocus-book-eye Page 18 of 24

Page details
Print out spell pages and then apply a mixture of light
brown paint and mod podge. After it dries, we'll apply
textured brush strokes using a darker brown color. We'll
try to apply it around the edges to make it appear aged.
Use a dry paper towel to apply darker brown for a
textured look.
© Adafruit Industries https://learn.adafruit.com/hocus-pocus-book-eye Page 19 of 24
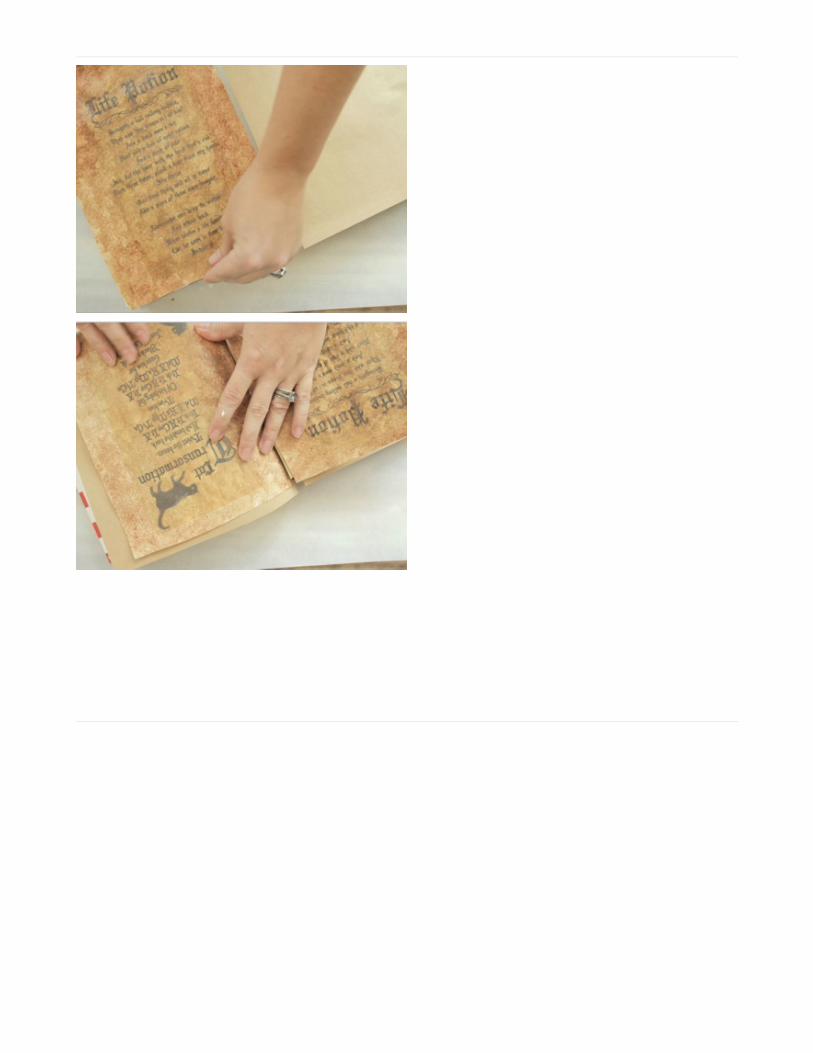
Attach spell pages
To increase the structure of the spell pages, we first
glued card stock to the pages in the book and then
apply more mod podge the spell pages on top of
chipboard.
We used cards tock that is bigger than the spell page so
we can mod podge all of the edges to prevent them
from curling. This also covers up uncovered areas (like
the original text from the book).
© Adafruit Industries https://learn.adafruit.com/hocus-pocus-book-eye Page 20 of 24
Trim card stock
Once our spell pages are fully dried, we'll go ahead and
trim off the excess and cut away at the Convex Glass
Lens opening with a sharp hobby knife.
© Adafruit Industries https://learn.adafruit.com/hocus-pocus-book-eye Page 21 of 24
Velcro / Hook and loop
Now we can stick our velcro / hook and loop that we
traced earlier, to enable easy access to the Hallowing.
Apply to Screen Bezel
The framing around the display is white and will show
up when we place the lens on top. Use light brown paint
to cover up the white areas. Leaving the protective film
over the screen on will help mask it while painting.
© Adafruit Industries https://learn.adafruit.com/hocus-pocus-book-eye Page 22 of 24

Finishing mod podge coat
Almost there! To create the final skin texture and to lock
every thing in place, apply a thick uneven layer of mod
podge and allow to dry.
We allowed ours to completely dry over night, for about
five hours.
Complete!
And thats it! You can now cast spells on people as they
get hypnotized by the eye movements!
© Adafruit Industries https://learn.adafruit.com/hocus-pocus-book-eye Page 23 of 24

© Adafruit Industries Last Updated: 2019-09-27 04:08:06 PM UTC Page 24 of 24