Embed Size (px)
Citation preview

HHooww ttoo aappppllyy ffoorr aann eePPllaann RReevviieeww PPeerrmmiitt OOnnlliinnee
UUsseerrss GGuuiiddee
CCoonnssttrruuccttiioonn SSeerrvviicceess && PPeerrmmiittttiinngg DDiivviissiioonn
2
ePlan Review Getting Started Online-User Guide Last Updated 04/01/17
1. Log on to City of St.
Petersburg website at
http://www.stpete.org/
2. Scroll to the bottom of the
page and under “take
action” select “Check a
Permit”.
3. This redirects you to the
Construction Service &
Permitting page.
4. Select “Apply Online”
under Services Offered.
3
ePlan Review Getting Started Online-User Guide Last Updated 04/01/17
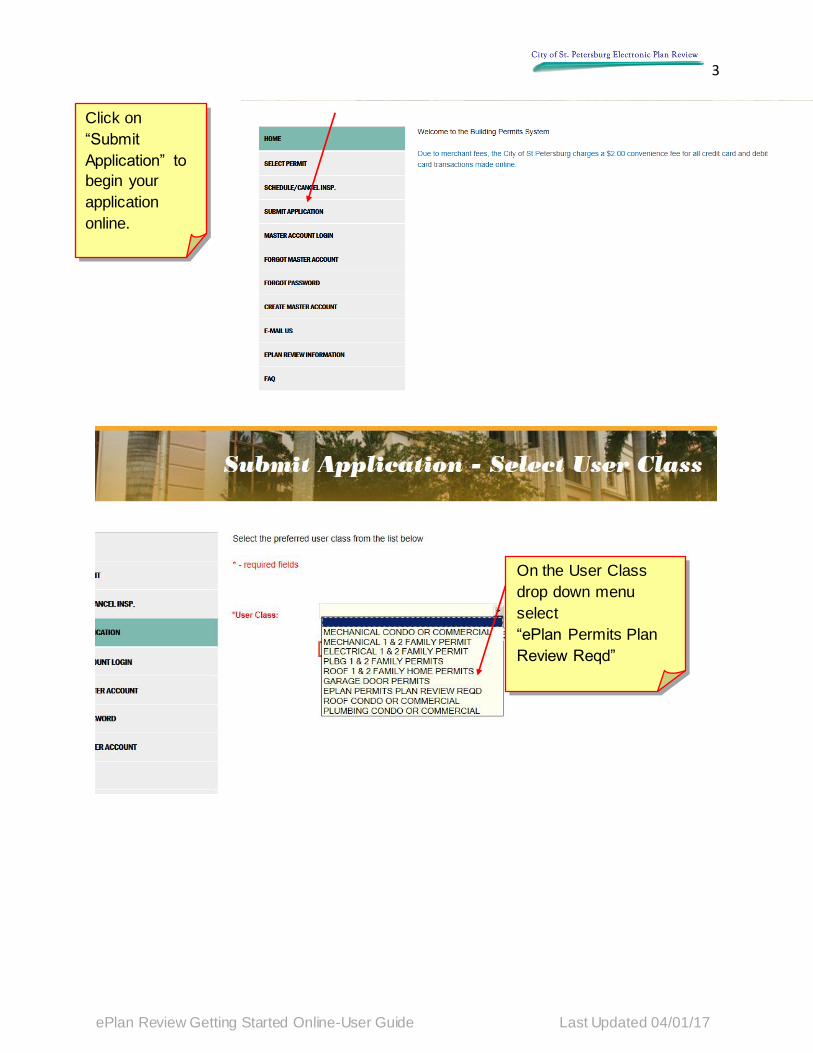
Click on
“Submit
Application” to
begin your
application
online.
On the User Class
drop down menu
select
“ePlan Permits Plan
Review Reqd”
4
ePlan Review Getting Started Online-User Guide Last Updated 04/01/17
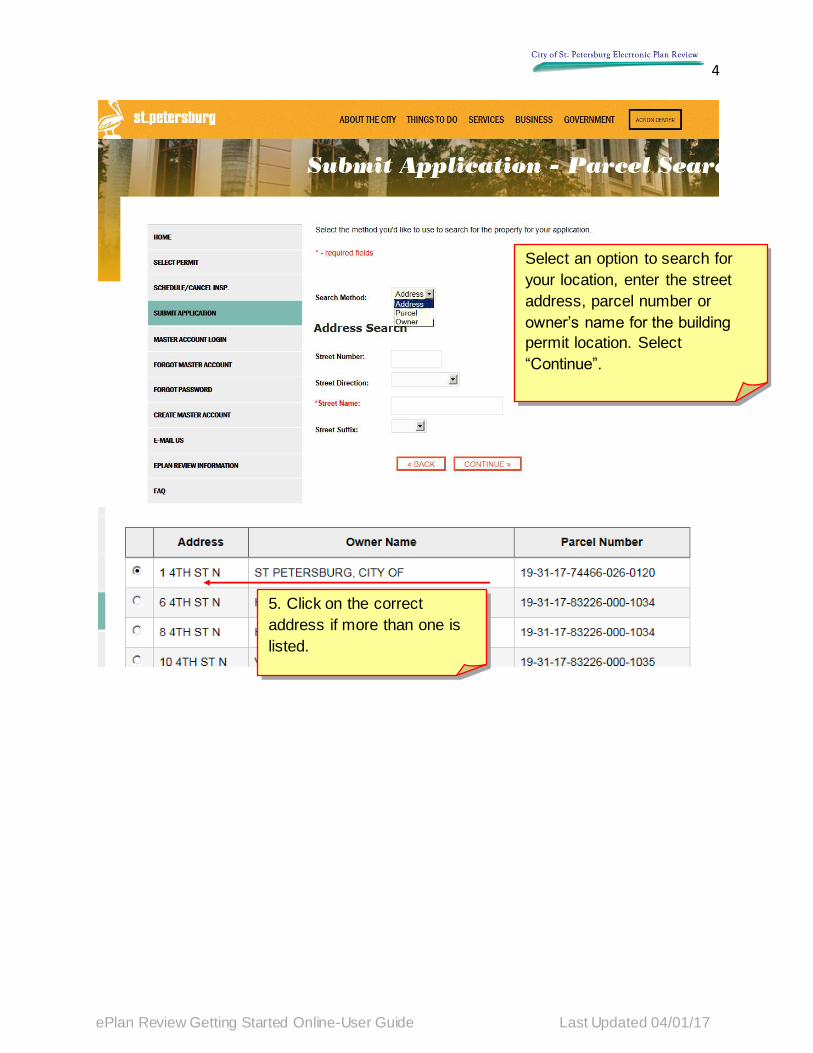
Select an option to search for
your location, enter the street
address, parcel number or
owner’s name for the building
permit location. Select
“Continue”.
5. Click on the correct
address if more than one is
listed.
5
ePlan Review Getting Started Online-User Guide Last Updated 04/01/17
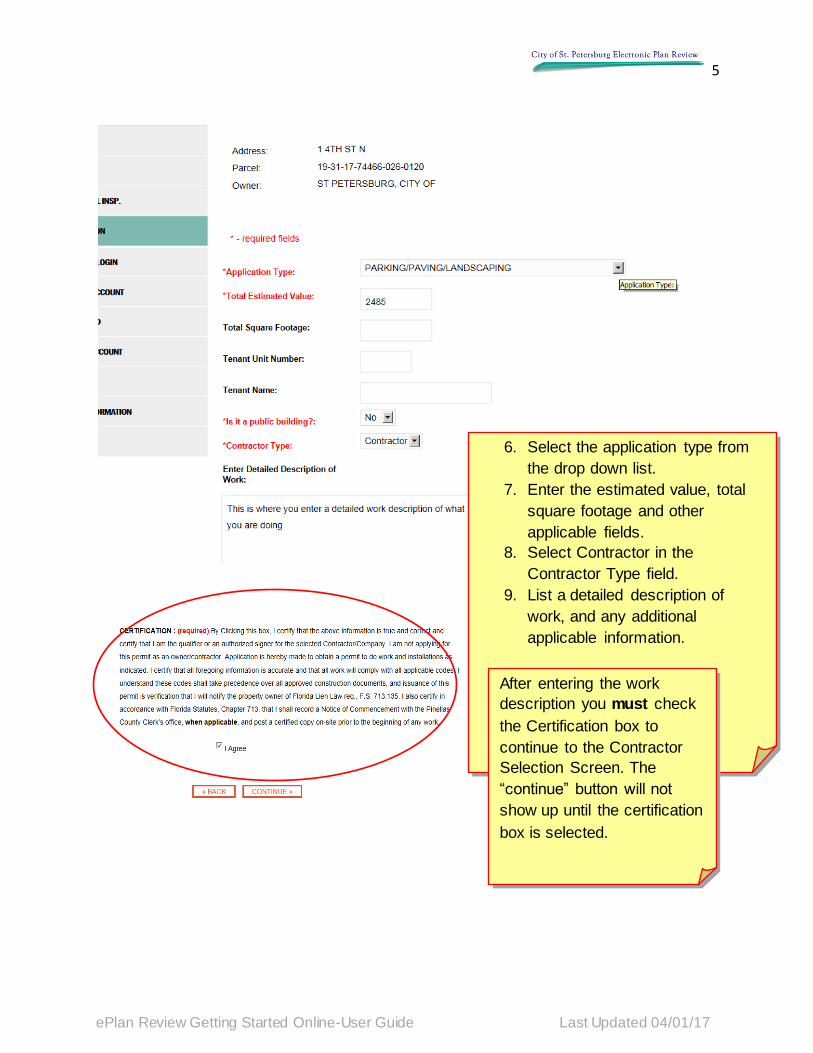
6. Select the application type from
the drop down list.
7. Enter the estimated value, total
square footage and other
applicable fields.
8. Select Contractor in the
Contractor Type field.
9. List a detailed description of
work, and any additional
applicable information.
After entering the work
description you must check
the Certification box to
continue to the Contractor
Selection Screen. The
“continue” button will not
show up until the certification
box is selected.
6
ePlan Review Getting Started Online-User Guide Last Updated 04/01/17
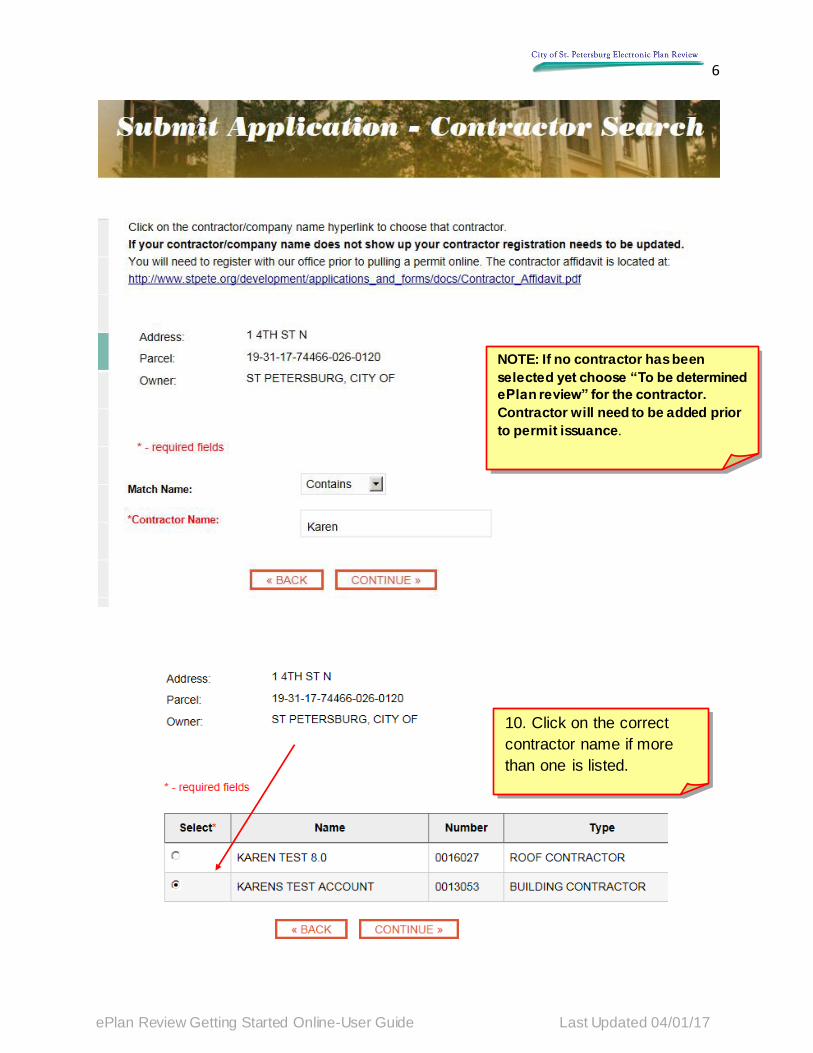
10. Click on the correct
contractor name if more
than one is listed.
NOTE: If no contractor has been
selected yet choose “To be determined
ePlan review” for the contractor.
Contractor will need to be added prior
to permit issuance.
7
ePlan Review Getting Started Online-User Guide Last Updated 04/01/17
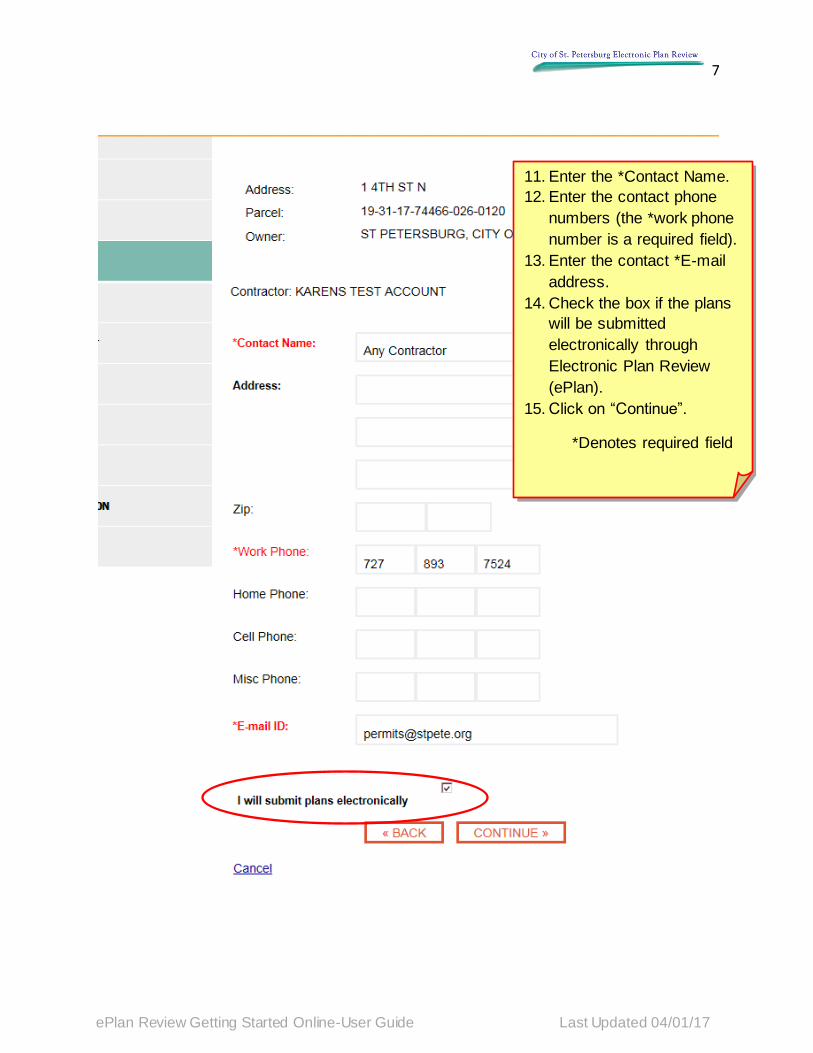
11. Enter the *Contact Name.
12. Enter the contact phone
numbers (the *work phone
number is a required field).
13. Enter the contact *E-mail
address.
14. Check the box if the plans
will be submitted
electronically through
Electronic Plan Review
(ePlan).
15. Click on “Continue”.
*Denotes required field
8
ePlan Review Getting Started Online-User Guide Last Updated 04/01/17
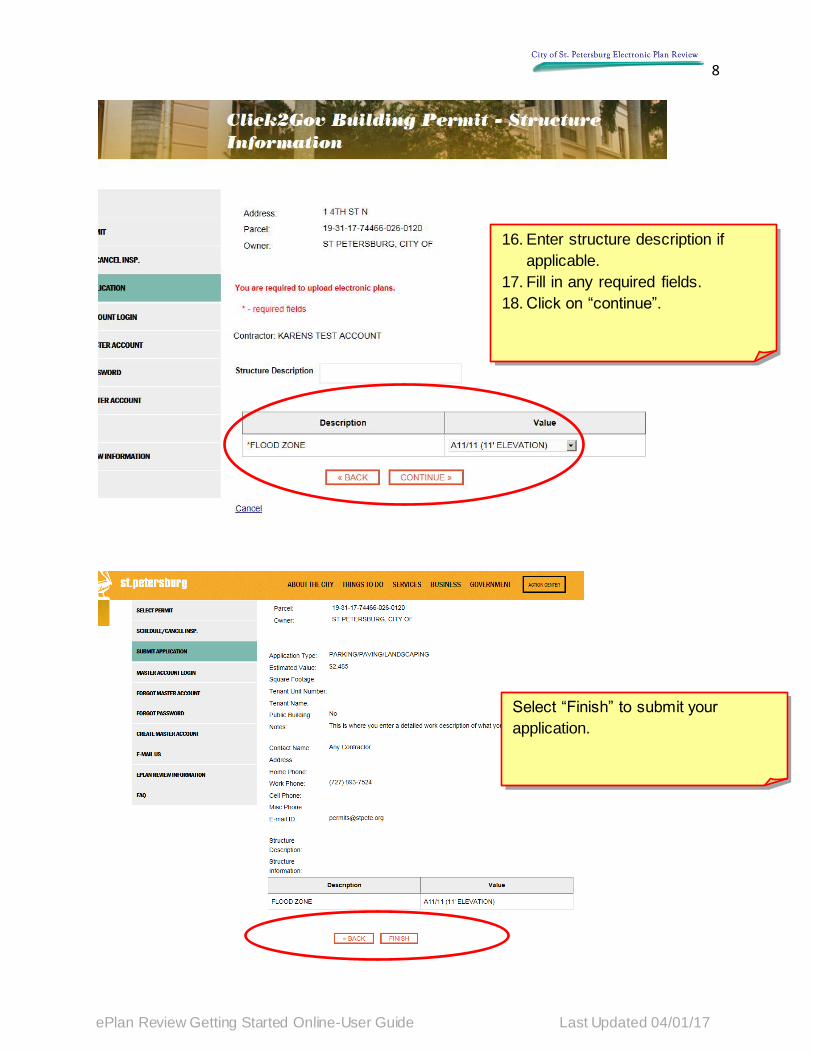
16. Enter structure description if
applicable.
17. Fill in any required fields.
18. Click on “continue”.
Select “Finish” to submit your
application.
9
ePlan Review Getting Started Online-User Guide Last Updated 04/01/17
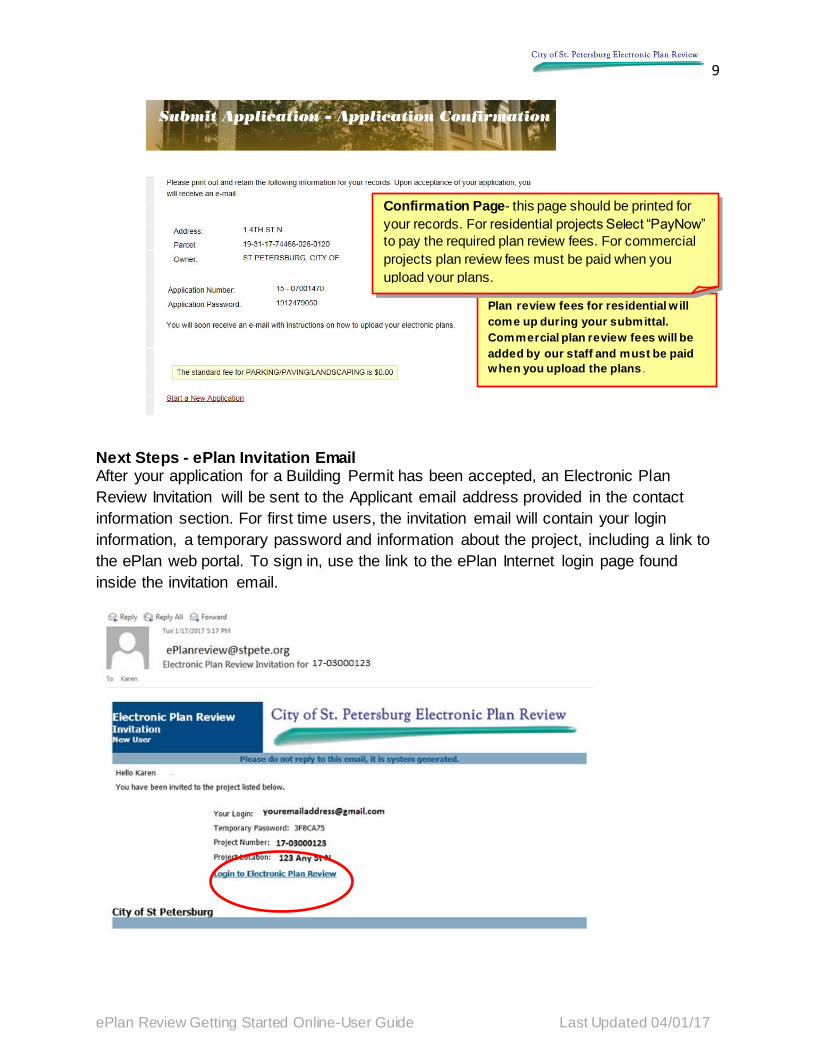
Next Steps - ePlan Invitation Email After your application for a Building Permit has been accepted, an Electronic Plan
Review Invitation will be sent to the Applicant email address provided in the contact
information section. For first time users, the invitation email will contain your login
information, a temporary password and information about the project, including a link to
the ePlan web portal. To sign in, use the link to the ePlan Internet login page found
inside the invitation email.
19. Review and confirm your information is
correct.
20. Select “Back” to change or correct
information.
21. Select “Cancel” to restart the
application process.
22. Select “Finish” to submit your
application.
Plan review fees for residential w ill
come up during your submittal.
Commercial plan review fees will be
added by our staff and must be paid
when you upload the plans .
Confirmation Page- this page should be printed for
your records. For residential projects Select “PayNow”
to pay the required plan review fees. For commercial
projects plan review fees must be paid when you
upload your plans.
10
ePlan Review Getting Started Online-User Guide Last Updated 04/01/17
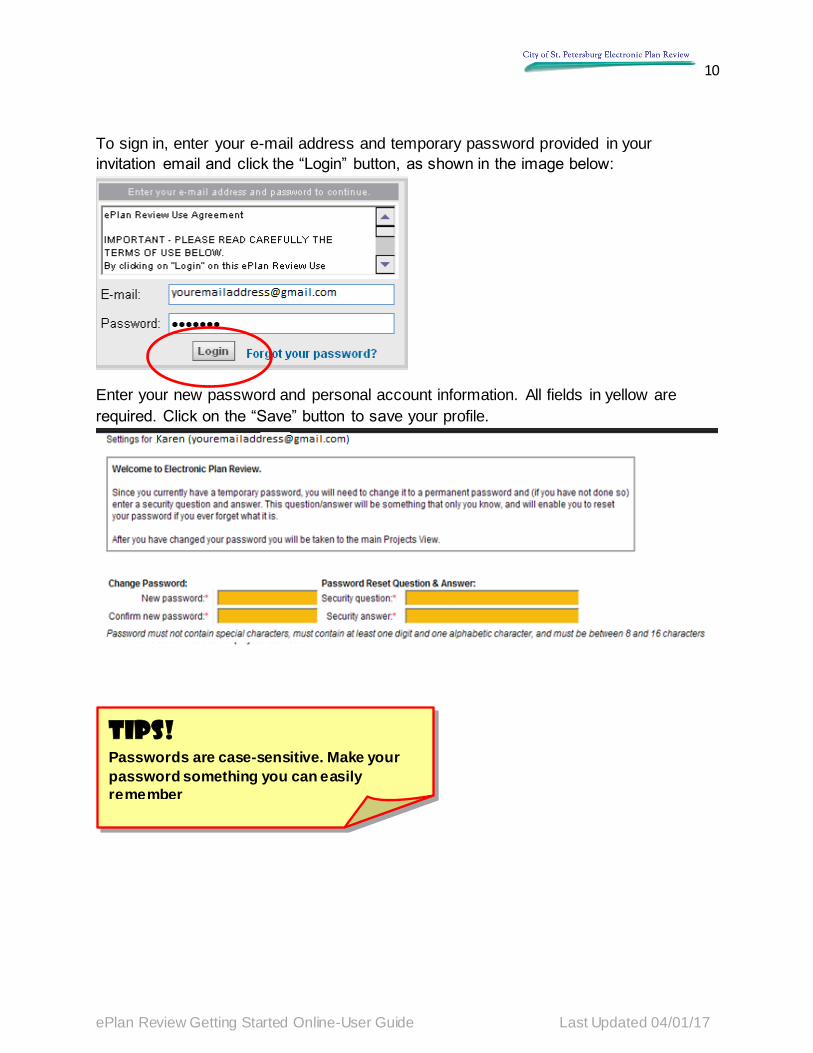
To sign in, enter your e-mail address and temporary password provided in your
invitation email and click the “Login” button, as shown in the image below:
Enter your new password and personal account information. All fields in yellow are
required. Click on the “Save” button to save your profile.
TIPS!
Passwords are case-sensitive. Make your
password something you can easily
remember
11
ePlan Review Getting Started Online-User Guide Last Updated 04/01/17
Existing Users
If you are a returning user, login to ePlan with your full e-mail address and
password.
If you have forgotten your password, click on the “Forgot Password” button so
that you can retrieve it through your security question.
NOTE: No one can see your password or security question answer. If you cannot
access your account after trying to retrieve your account information, contact us
at (727)893-7231 for Building Permits to have our administrator reset your
password. An email will be automatically generated and sent to the account
holder email address with a temporary password.
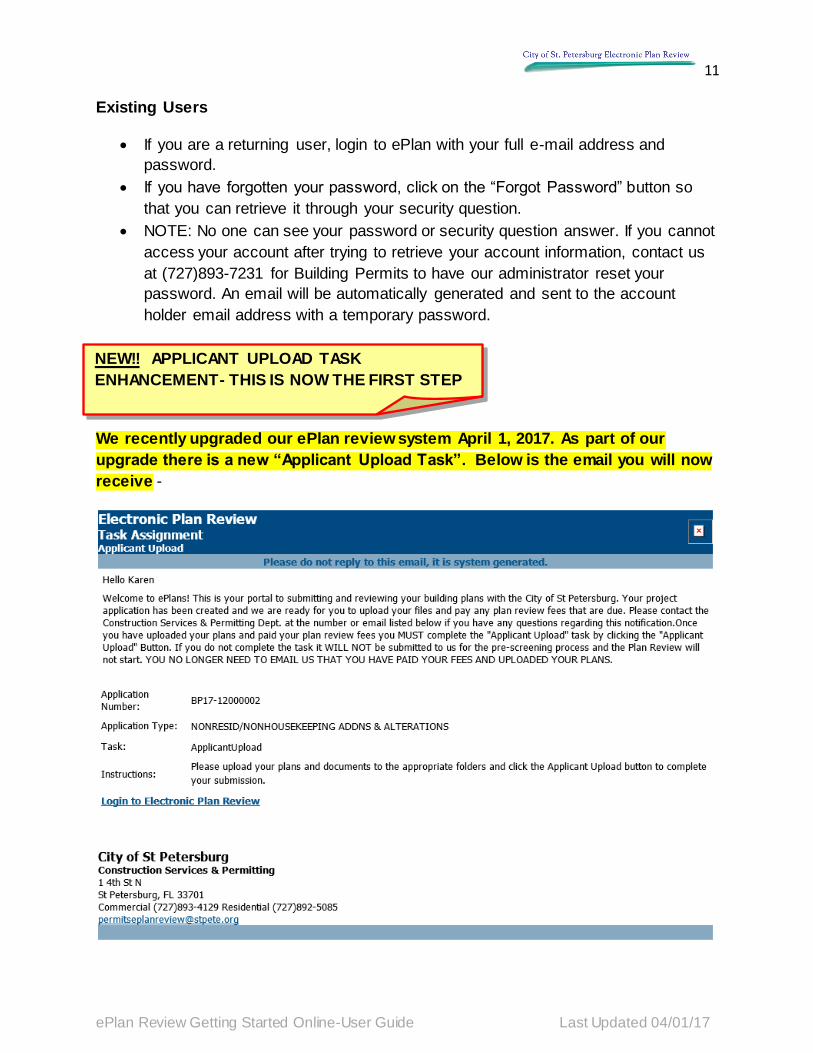
We recently upgraded our ePlan review system April 1, 2017. As part of our
upgrade there is a new “Applicant Upload Task”. Below is the email you will now
receive -
NEW!! APPLICANT UPLOAD TASK
ENHANCEMENT- THIS IS NOW THE FIRST STEP
12
ePlan Review Getting Started Online-User Guide Last Updated 04/01/17
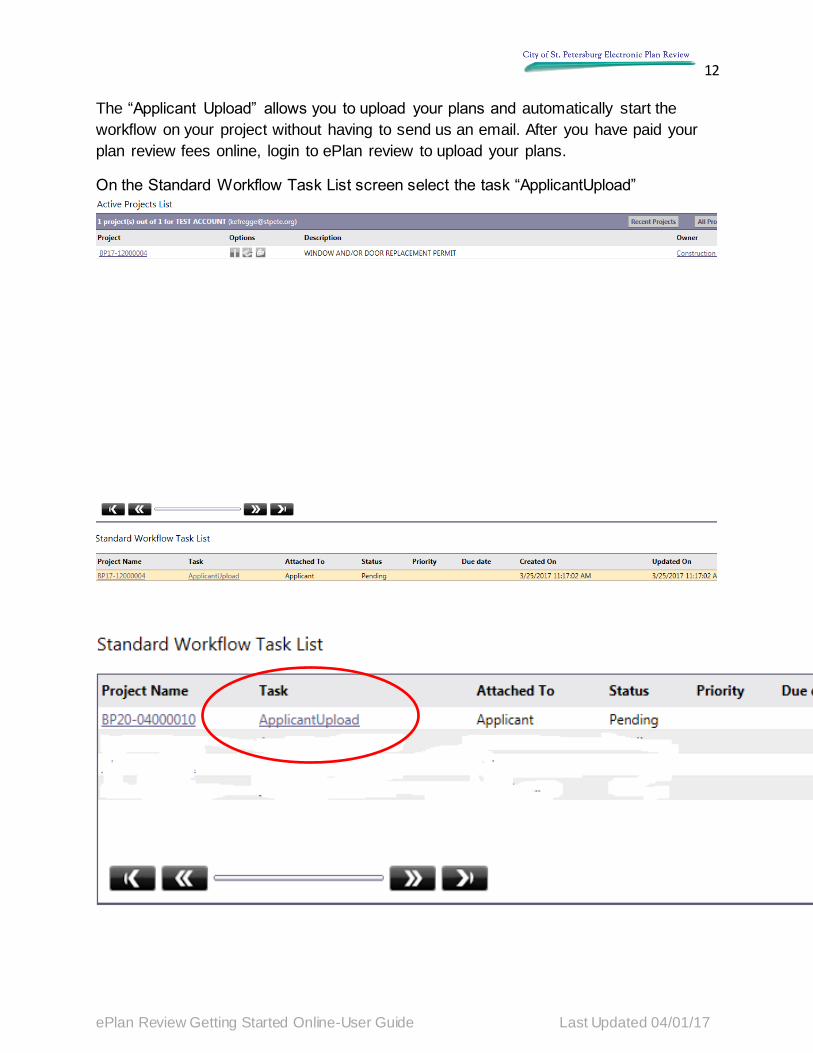
The “Applicant Upload” allows you to upload your plans and automatically start the
workflow on your project without having to send us an email. After you have paid your
plan review fees online, login to ePlan review to upload your plans.
On the Standard Workflow Task List screen select the task “ApplicantUpload”
13
ePlan Review Getting Started Online-User Guide Last Updated 04/01/17
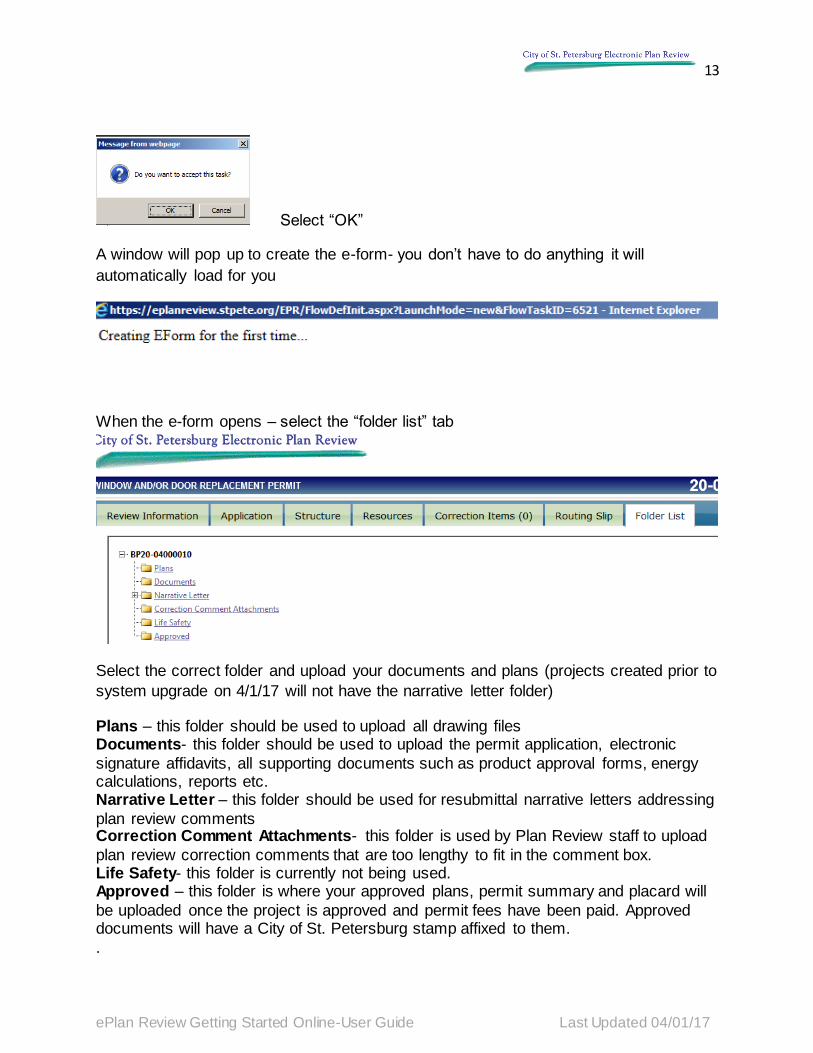
Select “OK”
A window will pop up to create the e-form- you don’t have to do anything it will
automatically load for you
When the e-form opens – select the “folder list” tab
Select the correct folder and upload your documents and plans (projects created prior to
system upgrade on 4/1/17 will not have the narrative letter folder)
Plans – this folder should be used to upload all drawing files Documents- this folder should be used to upload the permit application, electronic
signature affidavits, all supporting documents such as product approval forms, energy calculations, reports etc. Narrative Letter – this folder should be used for resubmittal narrative letters addressing
plan review comments Correction Comment Attachments- this folder is used by Plan Review staff to upload
plan review correction comments that are too lengthy to fit in the comment box. Life Safety- this folder is currently not being used. Approved – this folder is where your approved plans, permit summary and placard will
be uploaded once the project is approved and permit fees have been paid. Approved documents will have a City of St. Petersburg stamp affixed to them.
.
14
ePlan Review Getting Started Online-User Guide Last Updated 04/01/17
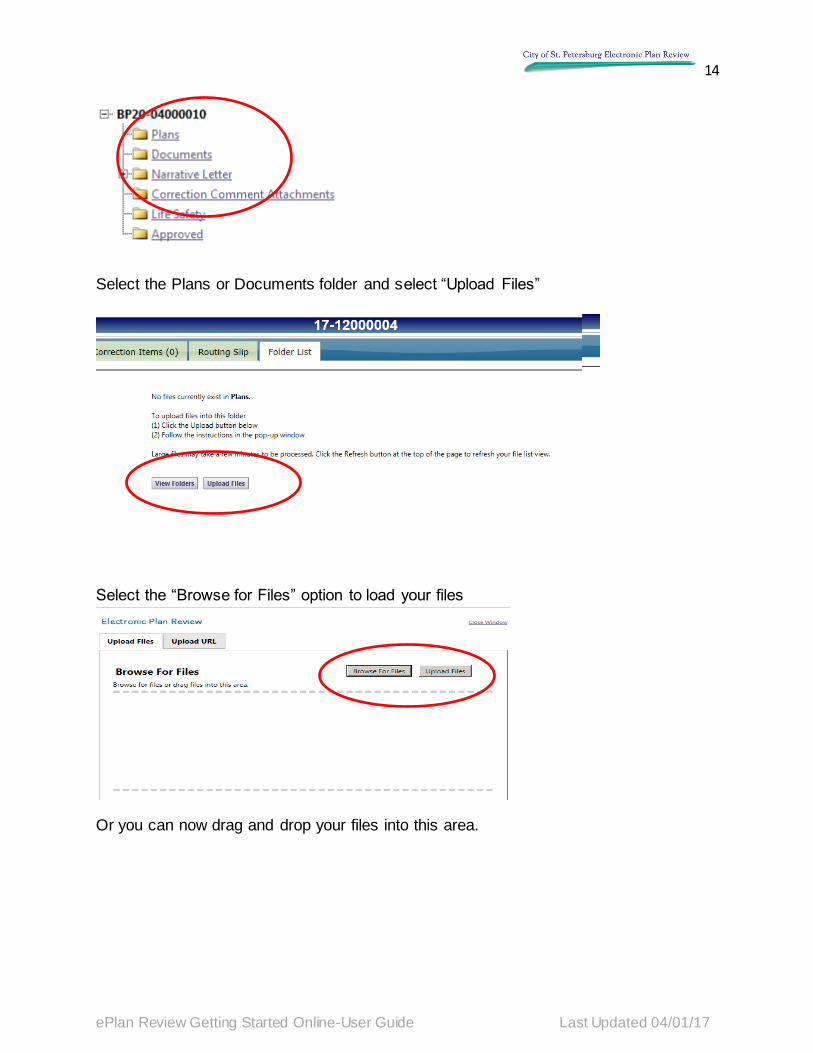
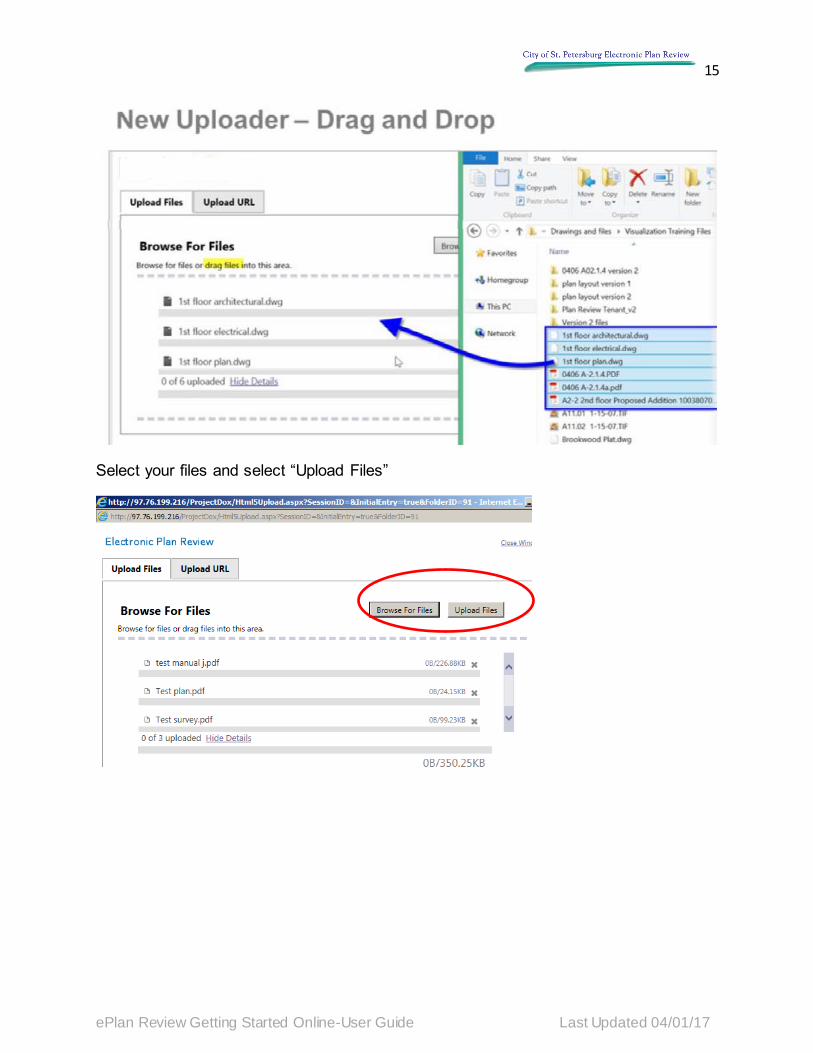
Select the Plans or Documents folder and select “Upload Files”
Select the “Browse for Files” option to load your files
Or you can now drag and drop your files into this area.
15
ePlan Review Getting Started Online-User Guide Last Updated 04/01/17
Select your files and select “Upload Files”
16
ePlan Review Getting Started Online-User Guide Last Updated 04/01/17
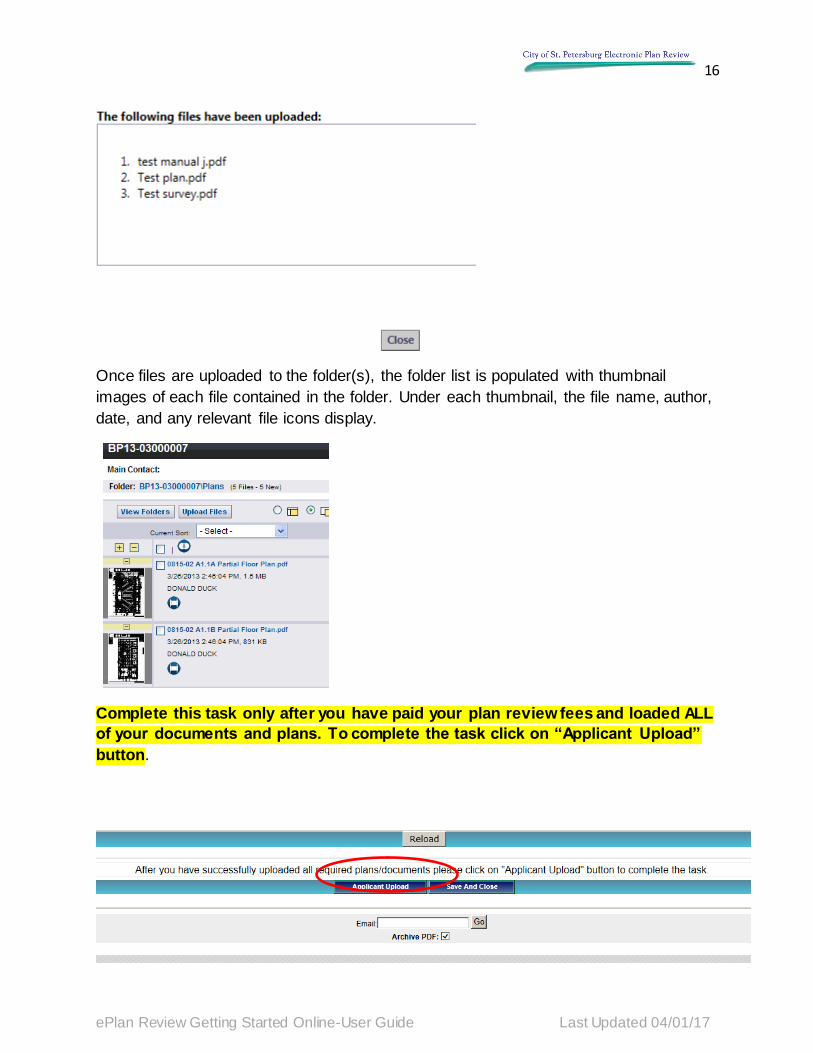
Once files are uploaded to the folder(s), the folder list is populated with thumbnail
images of each file contained in the folder. Under each thumbnail, the file name, author,
date, and any relevant file icons display.
Complete this task only after you have paid your plan review fees and loaded ALL
of your documents and plans. To complete the task click on “Applicant Upload”
button.
17
ePlan Review Getting Started Online-User Guide Last Updated 04/01/17
TIP!
Use a decimal to insert a
plan page into the existing
plans in the order you wish it
to appear.
Example:
001 CS Cover Sheet and Index
001.5 C.5 Inserted Page
002 C1 Site Plan
This will send it to us and the Pre-screening review will start. You no longer need to
email us that you have paid your fees and uploaded the plans.
If you do not complete this task your application stays in the queue and DOES
NOT return to the City of St. Petersburg for processing or review. Once you have
successfully completed your task it should no longer be in your task queue at the
bottom of your screen. If you do not complete the task the system will send you an
email reminder at 3/5/7 days reminding you to upload your plans.
Standards Plan File Naming Standards
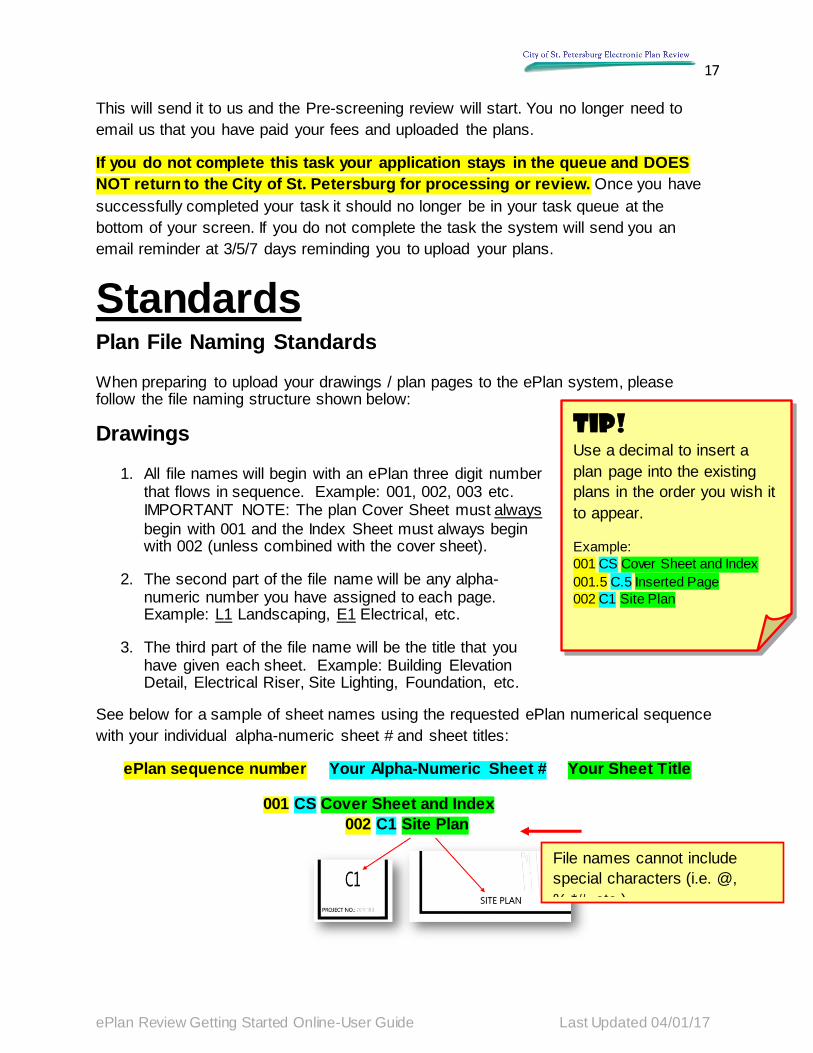
When preparing to upload your drawings / plan pages to the ePlan system, please follow the file naming structure shown below:
Drawings
1. All file names will begin with an ePlan three digit number that flows in sequence. Example: 001, 002, 003 etc. IMPORTANT NOTE: The plan Cover Sheet must always
begin with 001 and the Index Sheet must always begin with 002 (unless combined with the cover sheet).
2. The second part of the file name will be any alpha-numeric number you have assigned to each page. Example: L1 Landscaping, E1 Electrical, etc.
3. The third part of the file name will be the title that you have given each sheet. Example: Building Elevation Detail, Electrical Riser, Site Lighting, Foundation, etc.
See below for a sample of sheet names using the requested ePlan numerical sequence
with your individual alpha-numeric sheet # and sheet titles:
ePlan sequence number Your Alpha-Numeric Sheet # Your Sheet Title
001 CS Cover Sheet and Index
002 C1 Site Plan
File names cannot include
special characters (i.e. @,
%,*#, etc.)
18
ePlan Review Getting Started Online-User Guide Last Updated 04/01/17
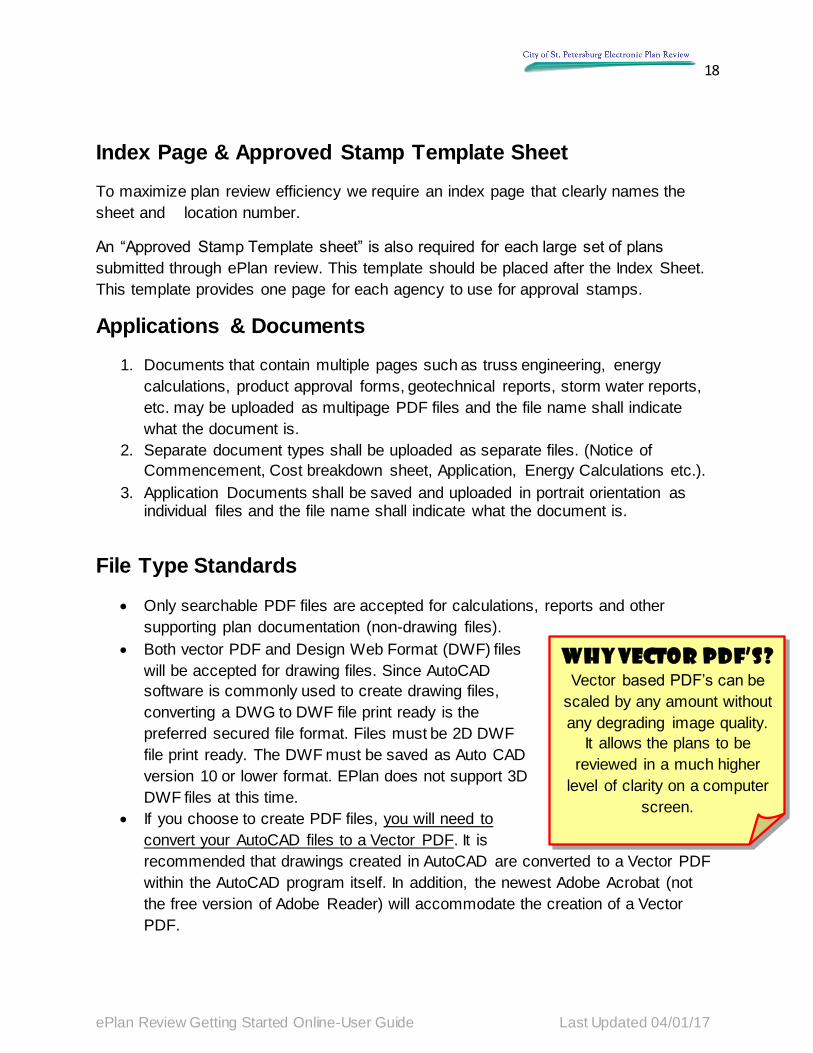
Why Vector PDF’s?
Vector based PDF’s can be
scaled by any amount without
any degrading image quality.
It allows the plans to be
reviewed in a much higher
level of clarity on a computer
screen.
Index Page & Approved Stamp Template Sheet
To maximize plan review efficiency we require an index page that clearly names the
sheet and location number.
An “Approved Stamp Template sheet” is also required for each large set of plans
submitted through ePlan review. This template should be placed after the Index Sheet.
This template provides one page for each agency to use for approval stamps.
Applications & Documents
1. Documents that contain multiple pages such as truss engineering, energy
calculations, product approval forms, geotechnical reports, storm water reports,
etc. may be uploaded as multipage PDF files and the file name shall indicate
what the document is.
2. Separate document types shall be uploaded as separate files. (Notice of
Commencement, Cost breakdown sheet, Application, Energy Calculations etc.).
3. Application Documents shall be saved and uploaded in portrait orientation as individual files and the file name shall indicate what the document is.
File Type Standards
Only searchable PDF files are accepted for calculations, reports and other
supporting plan documentation (non-drawing files).
Both vector PDF and Design Web Format (DWF) files
will be accepted for drawing files. Since AutoCAD
software is commonly used to create drawing files,
converting a DWG to DWF file print ready is the
preferred secured file format. Files must be 2D DWF
file print ready. The DWF must be saved as Auto CAD
version 10 or lower format. EPlan does not support 3D
DWF files at this time.
If you choose to create PDF files, you will need to
convert your AutoCAD files to a Vector PDF. It is
recommended that drawings created in AutoCAD are converted to a Vector PDF
within the AutoCAD program itself. In addition, the newest Adobe Acrobat (not
the free version of Adobe Reader) will accommodate the creation of a Vector
PDF.
19
ePlan Review Getting Started Online-User Guide Last Updated 04/01/17
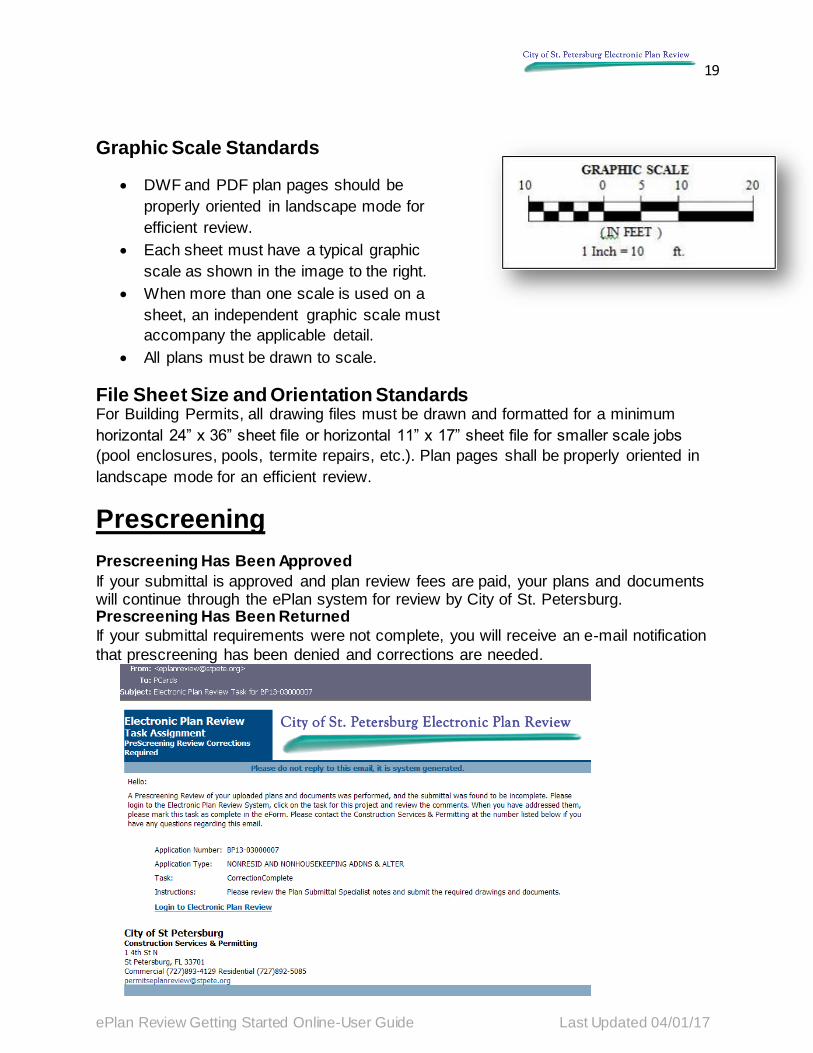
Graphic Scale Standards
DWF and PDF plan pages should be
properly oriented in landscape mode for
efficient review.
Each sheet must have a typical graphic
scale as shown in the image to the right.
When more than one scale is used on a
sheet, an independent graphic scale must
accompany the applicable detail.
All plans must be drawn to scale.
File Sheet Size and Orientation Standards For Building Permits, all drawing files must be drawn and formatted for a minimum
horizontal 24” x 36” sheet file or horizontal 11” x 17” sheet file for smaller scale jobs
(pool enclosures, pools, termite repairs, etc.). Plan pages shall be properly oriented in
landscape mode for an efficient review.
Prescreening
Prescreening Has Been Approved
If your submittal is approved and plan review fees are paid, your plans and documents will continue through the ePlan system for review by City of St. Petersburg. Prescreening Has Been Returned
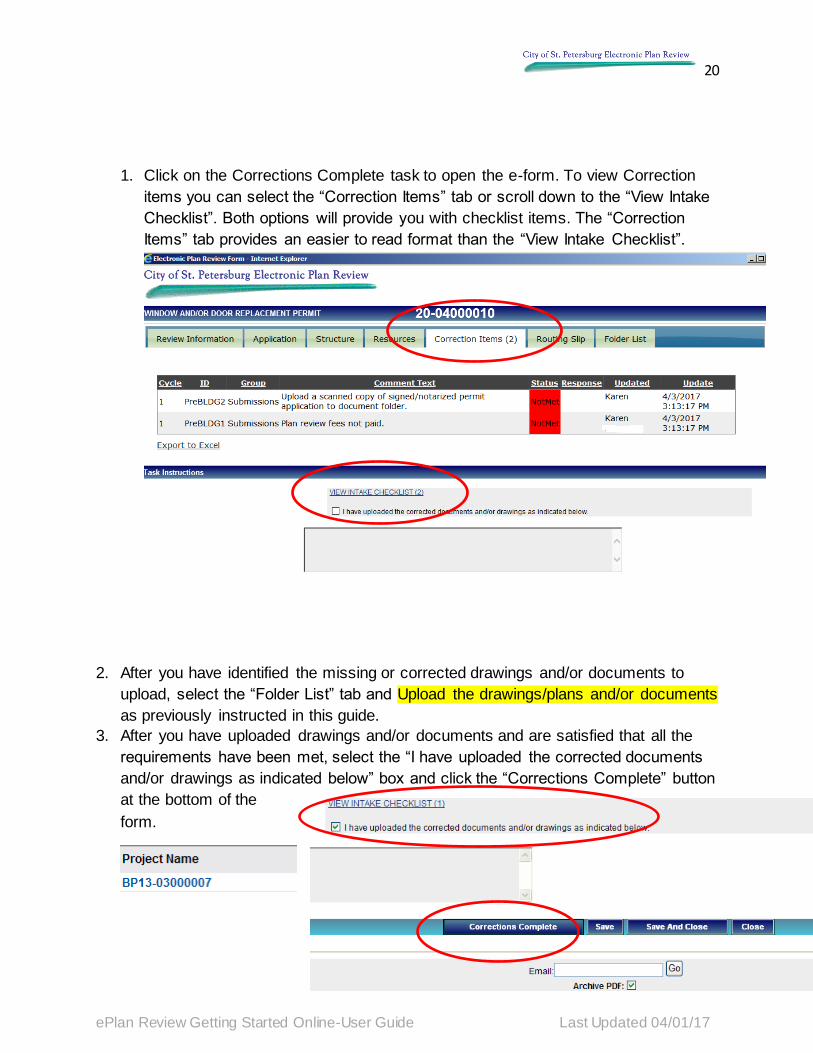
If your submittal requirements were not complete, you will receive an e-mail notification
that prescreening has been denied and corrections are needed.
20
ePlan Review Getting Started Online-User Guide Last Updated 04/01/17
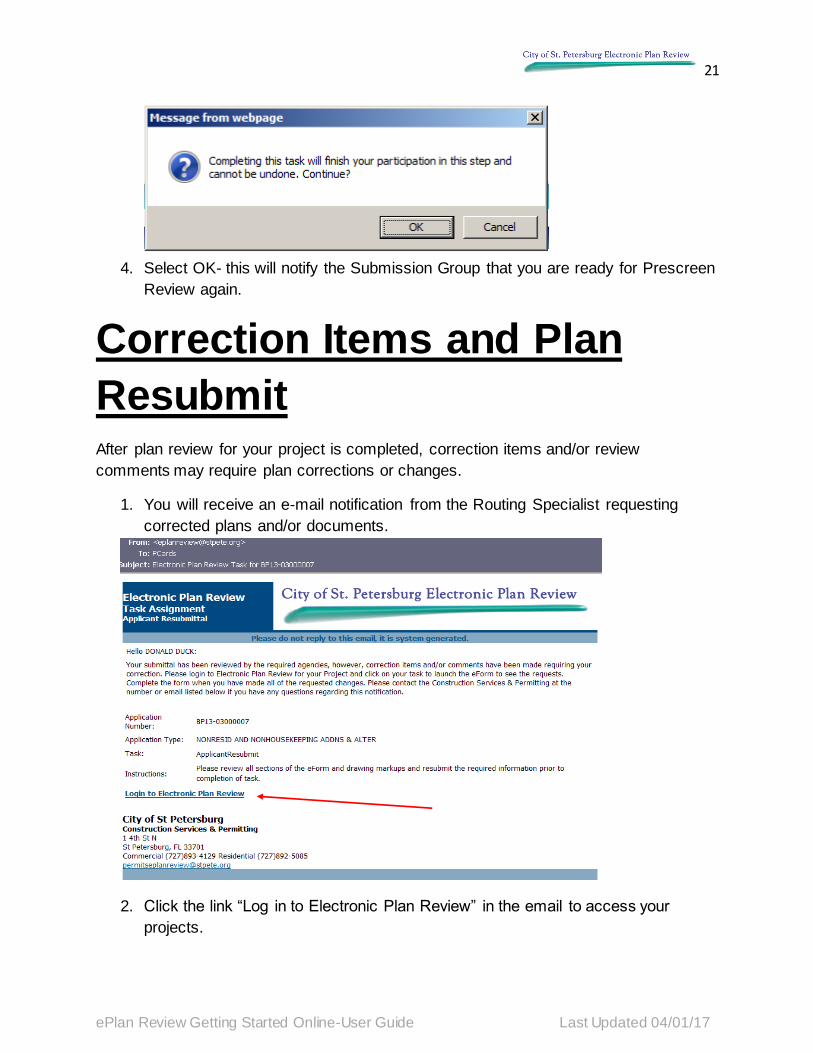
1. Click on the Corrections Complete task to open the e-form. To view Correction
items you can select the “Correction Items” tab or scroll down to the “View Intake
Checklist”. Both options will provide you with checklist items. The “Correction
Items” tab provides an easier to read format than the “View Intake Checklist”.
2. After you have identified the missing or corrected drawings and/or documents to
upload, select the “Folder List” tab and Upload the drawings/plans and/or documents
as previously instructed in this guide.
3. After you have uploaded drawings and/or documents and are satisfied that all the
requirements have been met, select the “I have uploaded the corrected documents
and/or drawings as indicated below” box and click the “Corrections Complete” button
at the bottom of the
form.
21
ePlan Review Getting Started Online-User Guide Last Updated 04/01/17
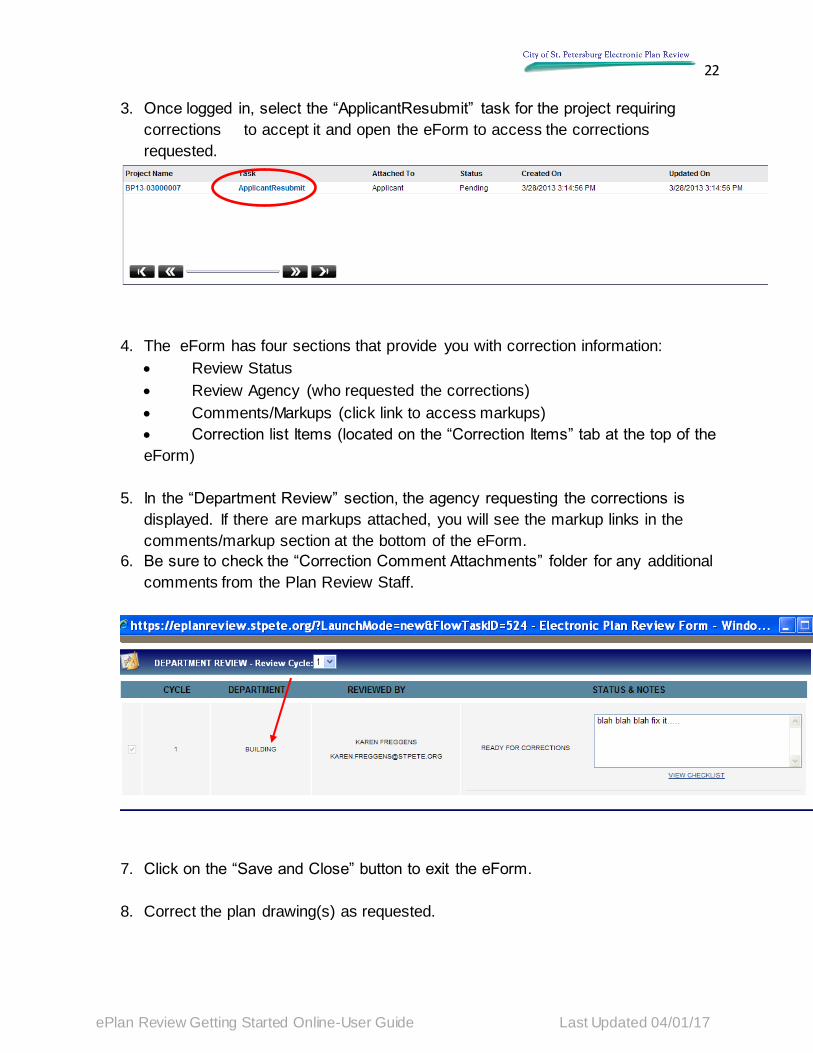
4. Select OK- this will notify the Submission Group that you are ready for Prescreen
Review again.
Correction Items and Plan
Resubmit After plan review for your project is completed, correction items and/or review
comments may require plan corrections or changes.
1. You will receive an e-mail notification from the Routing Specialist requesting
corrected plans and/or documents.
2. Click the link “Log in to Electronic Plan Review” in the email to access your
projects.
22
ePlan Review Getting Started Online-User Guide Last Updated 04/01/17
3. Once logged in, select the “ApplicantResubmit” task for the project requiring
corrections to accept it and open the eForm to access the corrections
requested.
4. The eForm has four sections that provide you with correction information:
Review Status
Review Agency (who requested the corrections)
Comments/Markups (click link to access markups)
Correction list Items (located on the “Correction Items” tab at the top of the
eForm)
5. In the “Department Review” section, the agency requesting the corrections is
displayed. If there are markups attached, you will see the markup links in the
comments/markup section at the bottom of the eForm.
6. Be sure to check the “Correction Comment Attachments” folder for any additional
comments from the Plan Review Staff.
7. Click on the “Save and Close” button to exit the eForm.
8. Correct the plan drawing(s) as requested.
23
ePlan Review Getting Started Online-User Guide Last Updated 04/01/17
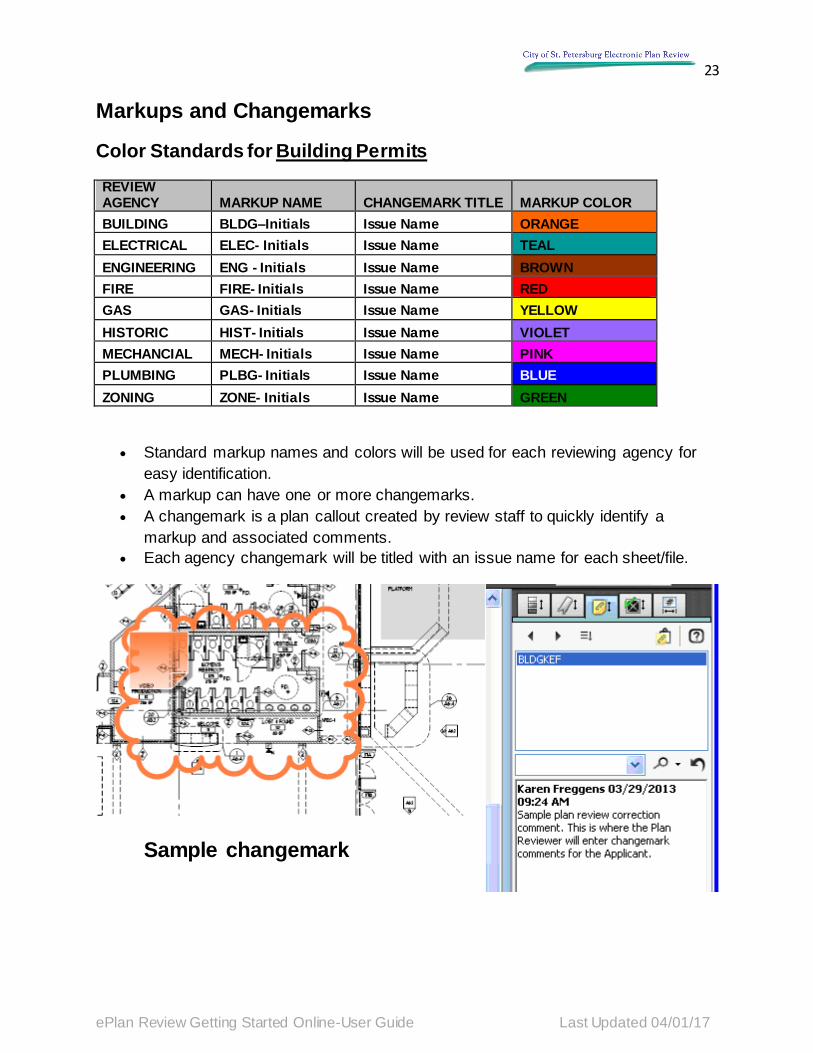
Markups and Changemarks
Color Standards for Building Permits
REVIEW AGENCY MARKUP NAME CHANGEMARK TITLE MARKUP COLOR
BUILDING BLDG–Initials Issue Name ORANGE
ELECTRICAL ELEC- Initials Issue Name TEAL
ENGINEERING ENG - Initials Issue Name BROWN
FIRE FIRE- Initials Issue Name RED
GAS GAS- Initials Issue Name YELLOW
HISTORIC HIST- Initials Issue Name VIOLET
MECHANCIAL MECH- Initials Issue Name PINK
PLUMBING PLBG- Initials Issue Name BLUE
ZONING ZONE- Initials Issue Name GREEN
Standard markup names and colors will be used for each reviewing agency for
easy identification.
A markup can have one or more changemarks.
A changemark is a plan callout created by review staff to quickly identify a
markup and associated comments.
Each agency changemark will be titled with an issue name for each sheet/file.
Sample changemark
24
ePlan Review Getting Started Online-User Guide Last Updated 04/01/17
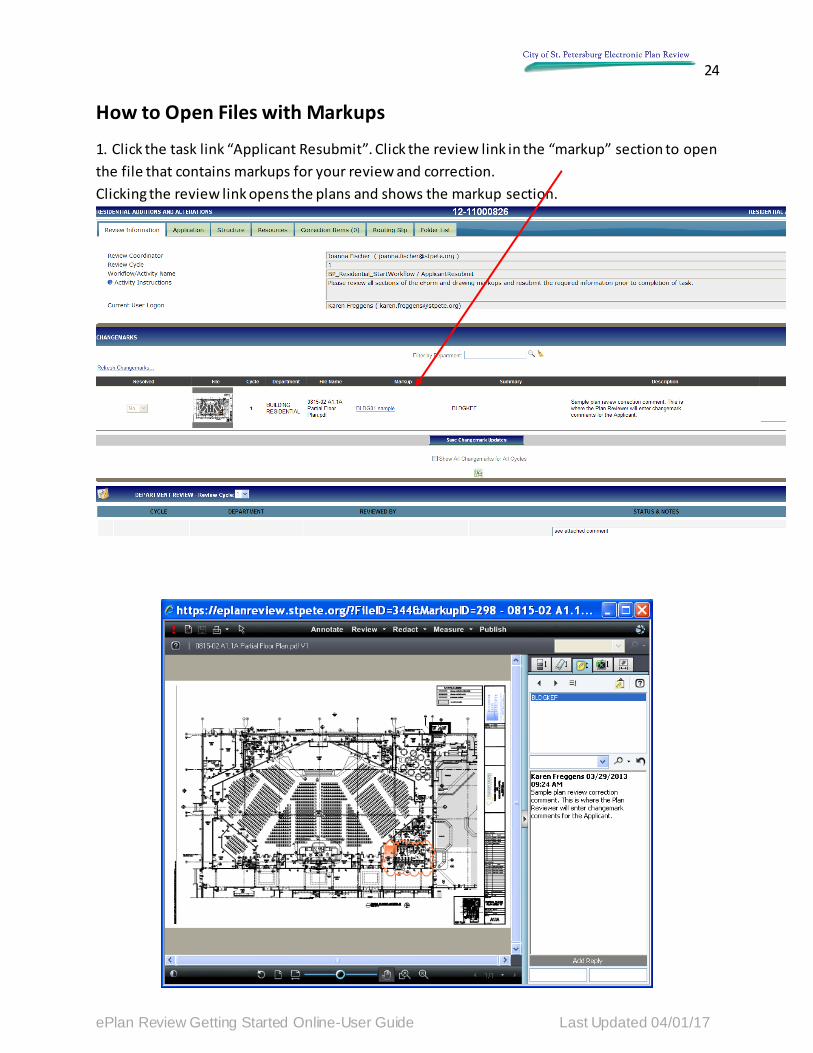
How to Open Files with Markups
1. Click the task link “Applicant Resubmit”. Click the review link in the “markup” section to open
the file that contains markups for your review and correction.
Clicking the review link opens the plans and shows the markup section.
25
ePlan Review Getting Started Online-User Guide Last Updated 04/01/17
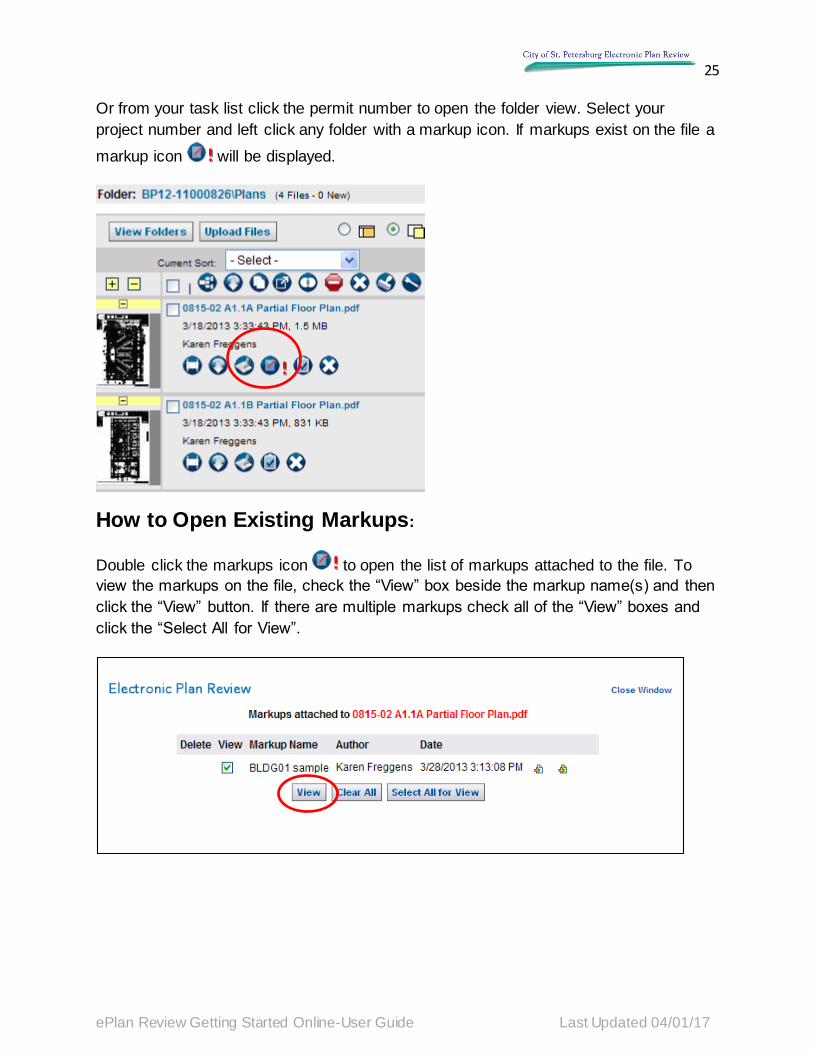
Or from your task list click the permit number to open the folder view. Select your
project number and left click any folder with a markup icon. If markups exist on the file a
markup icon will be displayed.
How to Open Existing Markups:
Double click the markups icon to open the list of markups attached to the file. To
view the markups on the file, check the “View” box beside the markup name(s) and then
click the “View” button. If there are multiple markups check all of the “View” boxes and
click the “Select All for View”.
26
ePlan Review Getting Started Online-User Guide Last Updated 04/01/17
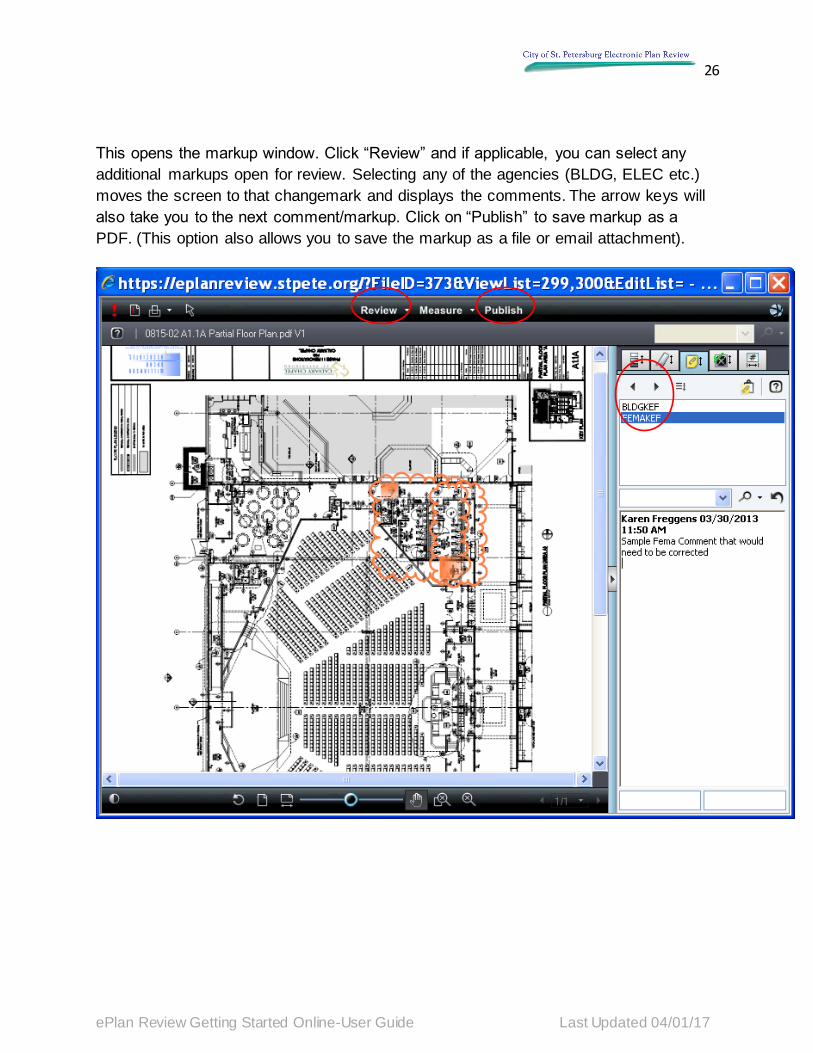
This opens the markup window. Click “Review” and if applicable, you can select any
additional markups open for review. Selecting any of the agencies (BLDG, ELEC etc.)
moves the screen to that changemark and displays the comments. The arrow keys will
also take you to the next comment/markup. Click on “Publish” to save markup as a
PDF. (This option also allows you to save the markup as a file or email attachment).
27
ePlan Review Getting Started Online-User Guide Last Updated 04/01/17
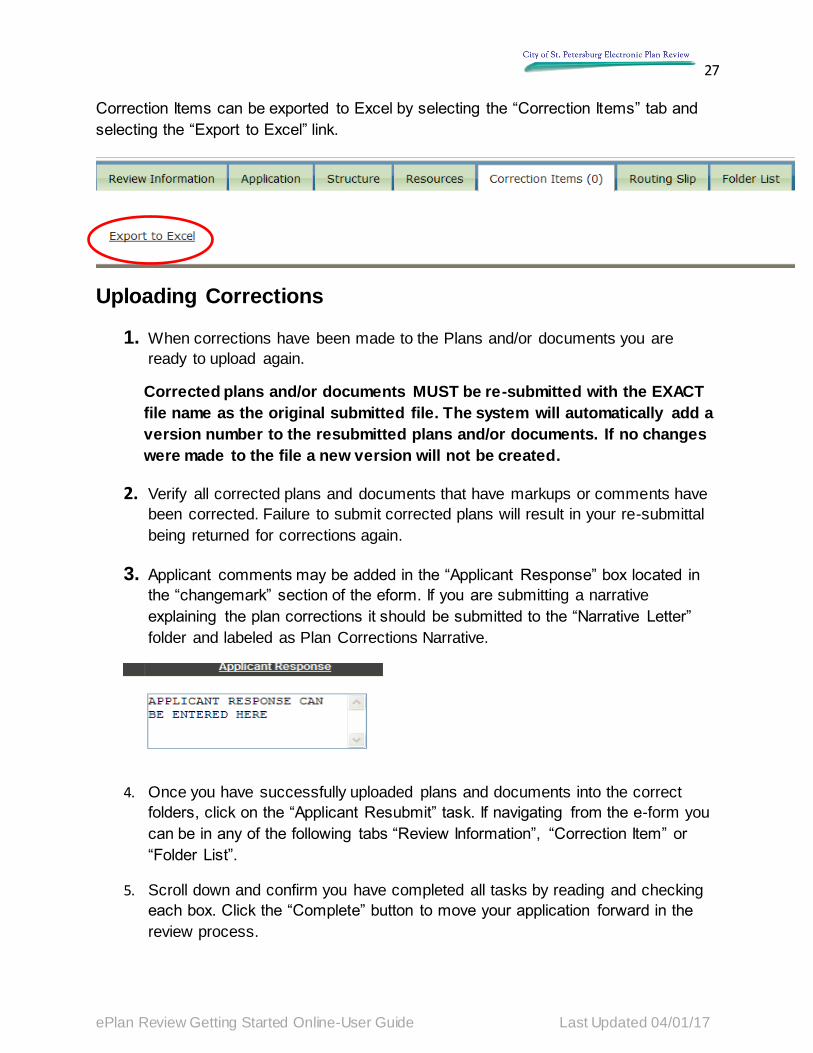
Correction Items can be exported to Excel by selecting the “Correction Items” tab and
selecting the “Export to Excel” link.
Uploading Corrections
1. When corrections have been made to the Plans and/or documents you are
ready to upload again.
Corrected plans and/or documents MUST be re-submitted with the EXACT
file name as the original submitted file. The system will automatically add a
version number to the resubmitted plans and/or documents. If no changes
were made to the file a new version will not be created.
2. Verify all corrected plans and documents that have markups or comments have
been corrected. Failure to submit corrected plans will result in your re-submittal
being returned for corrections again.
3. Applicant comments may be added in the “Applicant Response” box located in
the “changemark” section of the eform. If you are submitting a narrative
explaining the plan corrections it should be submitted to the “Narrative Letter”
folder and labeled as Plan Corrections Narrative.
4. Once you have successfully uploaded plans and documents into the correct
folders, click on the “Applicant Resubmit” task. If navigating from the e-form you
can be in any of the following tabs “Review Information”, “Correction Item” or
“Folder List”.
5. Scroll down and confirm you have completed all tasks by reading and checking
each box. Click the “Complete” button to move your application forward in the
review process.
28
ePlan Review Getting Started Online-User Guide Last Updated 04/01/17
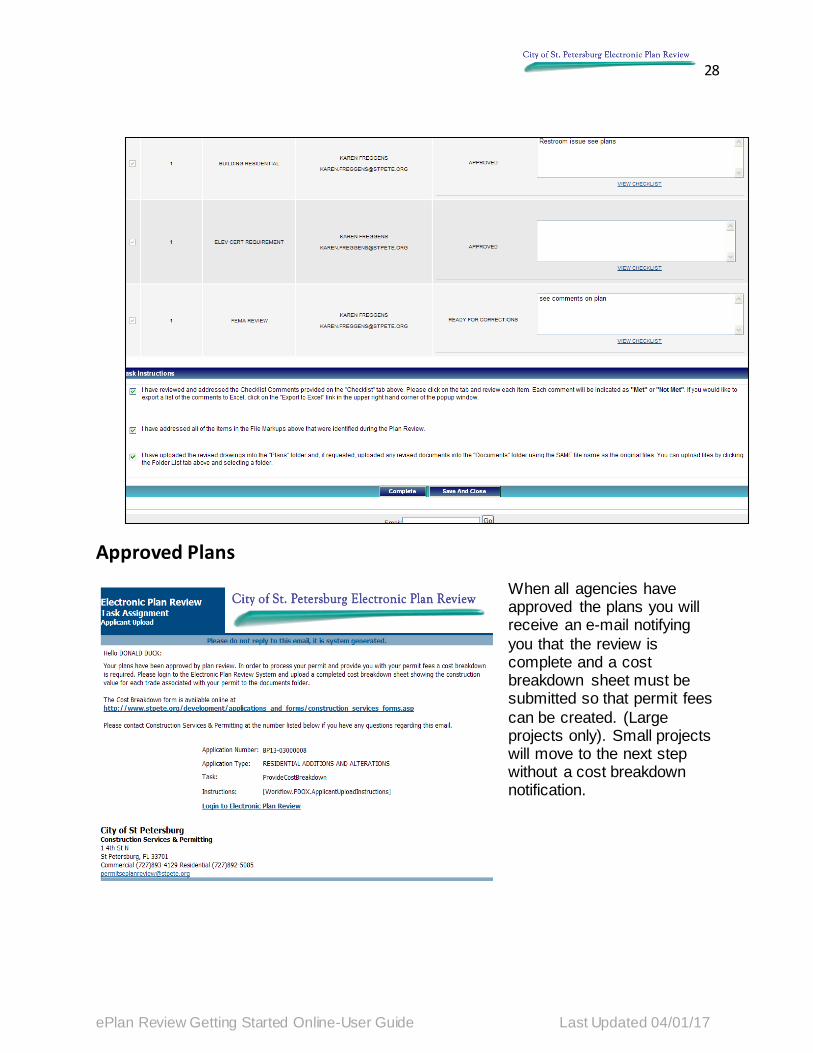
Approved Plans
When all agencies have approved the plans you will receive an e-mail notifying
you that the review is complete and a cost breakdown sheet must be submitted so that permit fees
can be created. (Large projects only). Small projects will move to the next step without a cost breakdown notification.
29
ePlan Review Getting Started Online-User Guide Last Updated 04/01/17
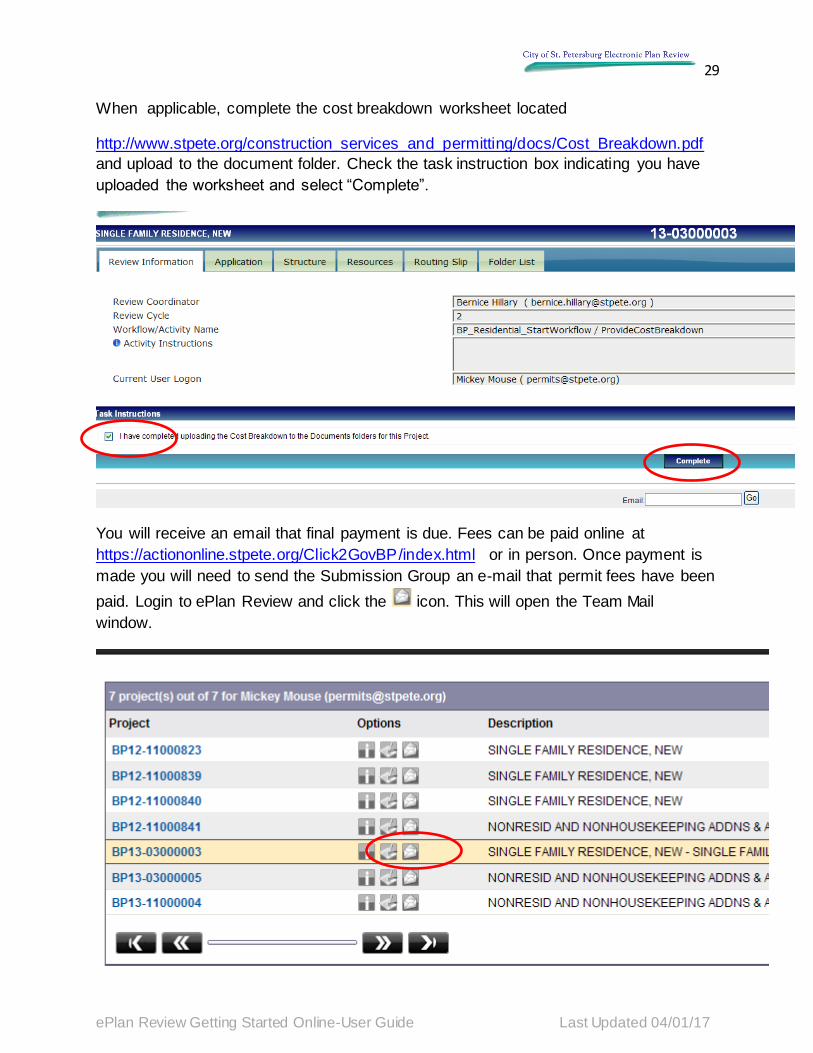
When applicable, complete the cost breakdown worksheet located
http://www.stpete.org/construction_services_and_permitting/docs/Cost_Breakdown.pdf
and upload to the document folder. Check the task instruction box indicating you have
uploaded the worksheet and select “Complete”.
You will receive an email that final payment is due. Fees can be paid online at
https://actiononline.stpete.org/Click2GovBP/index.html or in person. Once payment is
made you will need to send the Submission Group an e-mail that permit fees have been
paid. Login to ePlan Review and click the icon. This will open the Team Mail
window.
30
ePlan Review Getting Started Online-User Guide Last Updated 04/01/17
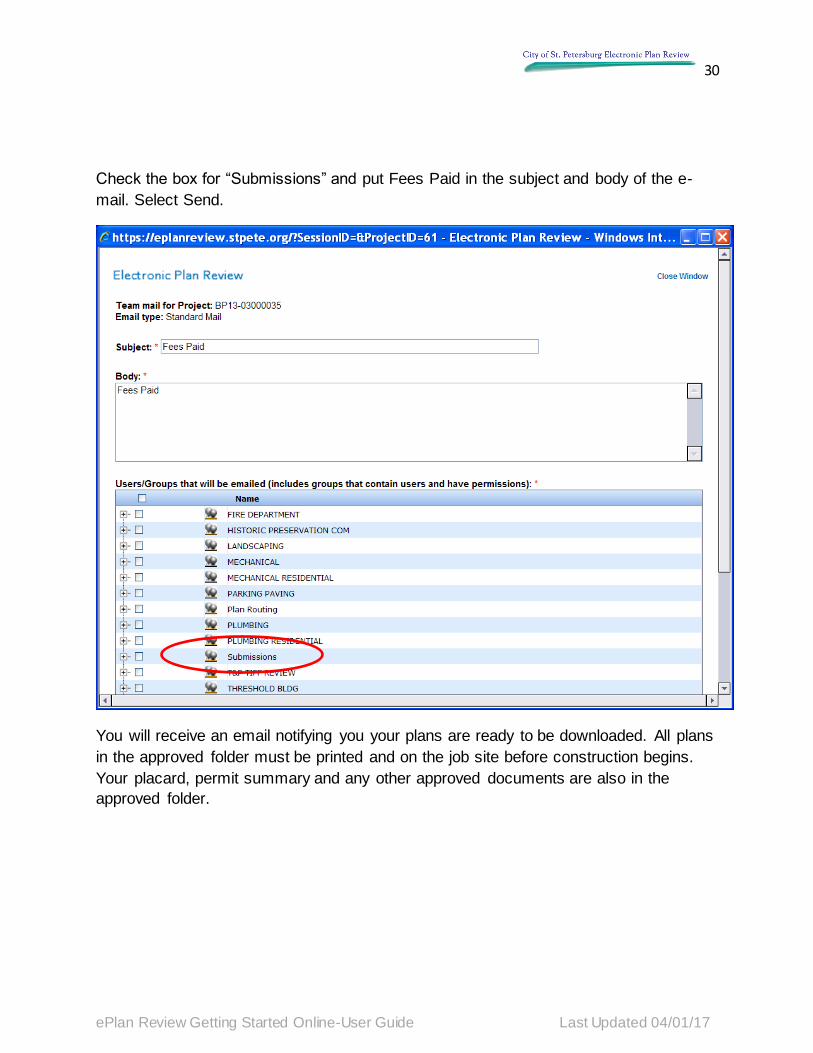
Check the box for “Submissions” and put Fees Paid in the subject and body of the e-
mail. Select Send.
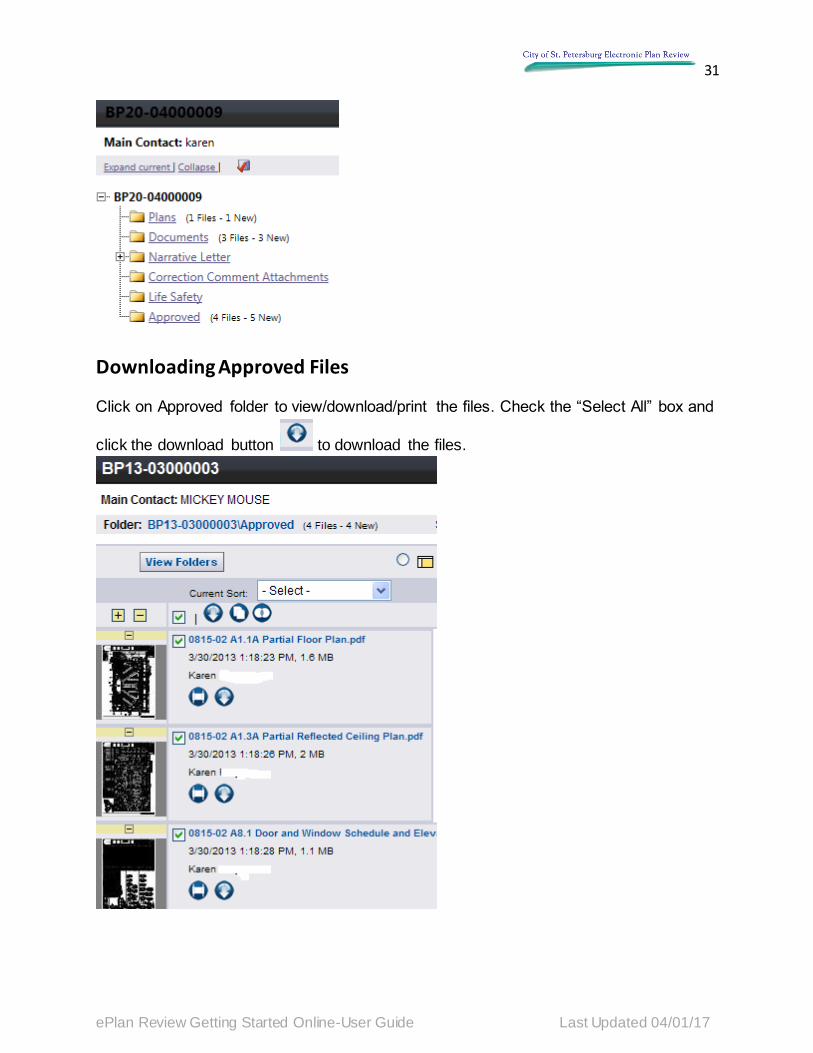
You will receive an email notifying you your plans are ready to be downloaded. All plans
in the approved folder must be printed and on the job site before construction begins.
Your placard, permit summary and any other approved documents are also in the
approved folder.
31
ePlan Review Getting Started Online-User Guide Last Updated 04/01/17
Downloading Approved Files
Click on Approved folder to view/download/print the files. Check the “Select All” box and
click the download button to download the files.