Embed Size (px)
Citation preview
Document Title: HMK eWon Guide Issue Version: V0_1A
Page 1 of 43
HMK
Guide to eWON COSY 141 and 4005CD
Site survey, Setup and Testing
Date 14.01.2013
Issue V0_1B
Shortcuts to the Guide:
Configuring eWON using Ethernet WAN - page 14
Configuring eWON over GSM Network (4005CD 0nly) – page 33
Document Title: HMK eWon Guide Issue Version: V0_1A
Page 2 of 43
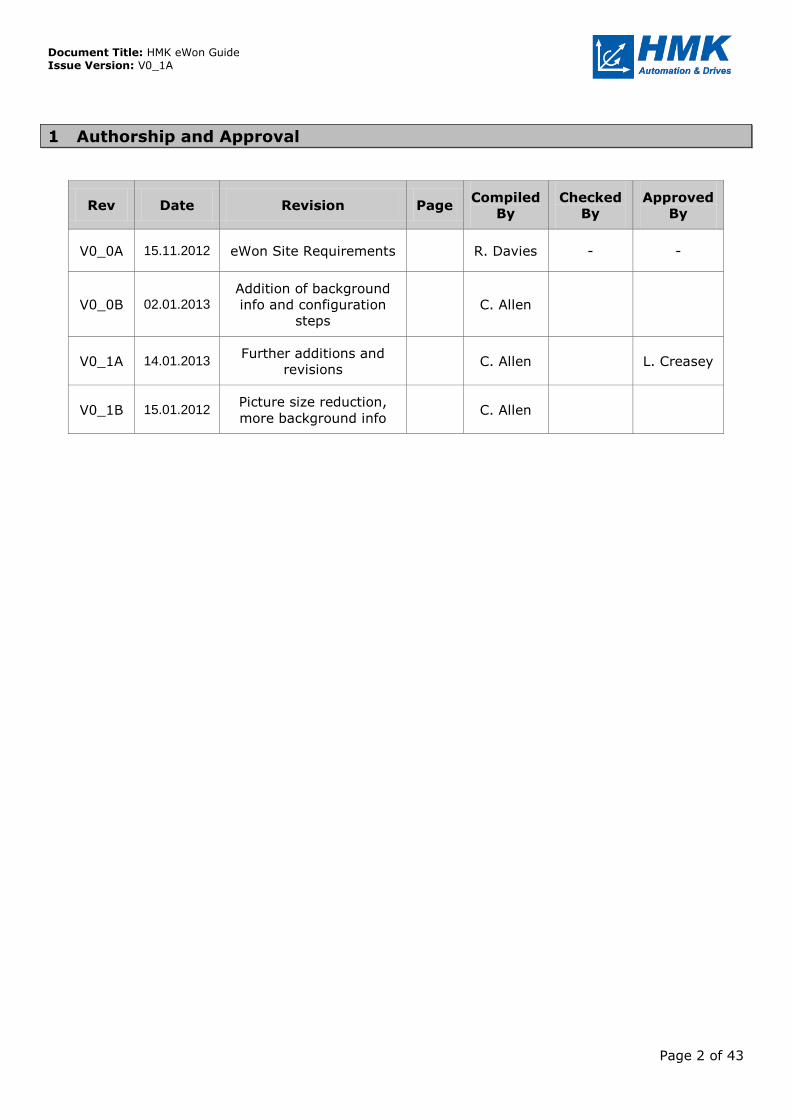
1 Authorship and Approval
Rev Date Revision Page Compiled
By
Checked
By
Approved
By
V0_0A 15.11.2012 eWon Site Requirements R. Davies - -
V0_0B 02.01.2013 Addition of background
info and configuration
steps
C. Allen
V0_1A 14.01.2013 Further additions and
revisions C. Allen L. Creasey
V0_1B 15.01.2012 Picture size reduction,
more background info C. Allen
Document Title: HMK eWon Guide Issue Version: V0_1A
Page 3 of 43
2 Abbreviations
DHCP - Dynamic Host Configuration Protocol
GPRS - General Packet Radio Service
GSM - Global System for Mobile Communications
HSDPA - High-Speed Downlink Packet Access
HSPA - High-Speed Packet Access (amalgamation of above two)
HSUPA - High-Speed Uplink Packet Access
IP - Internet Protocol
ISP - Internet Service Provider
LAN - Local Area Network
NTP - Network Time Protocol
TCP - Transmission Control Protocol
UDP - User Datagram Protocol
UMTS - Universal Mobile Telecommunications System
VPN – Virtual Private Network
WAN - Wide Area Network

Document Title: HMK eWon Guide Issue Version: V0_1A
Page 4 of 43
3 Contents
1 Authorship and Approval .................................................................................................. 2
2 Abbreviations ................................................................................................................... 3
3 Contents ........................................................................................................................... 4
4 Overview .......................................................................................................................... 5
4.1 Purpose of the Document ................................................................................................ 5
5 Background information and tools .................................................................................... 6
5.1 How IP Addresses Work .................................................................................................. 6
5.2 Subnets and Subnet Masks .............................................................................................. 6
5.3 What is a VPN? .............................................................................................................. 6
5.4 HMK Standards .............................................................................................................. 7
5.5 Principle of Operation ..................................................................................................... 7
5.6 Software ....................................................................................................................... 8
5.7 Hardware ...................................................................................................................... 9
6 Site Survey and Customer considerations ....................................................................... 10
6.1 Ethernet Requirements ................................................................................................. 10
6.2 GSM Requirements ....................................................................................................... 11
7 eCatcher Account Management....................................................................................... 12
7.1 Accounts and eWONs .................................................................................................... 12
7.2 Accounts and Users ...................................................................................................... 12
8 Quick Setup Guide .......................................................................................................... 13
9 Connecting your eWON ................................................................................................... 14
9.1 Power Supply .............................................................................................................. 14
9.2 LAN Side Connections ................................................................................................... 14
9.3 WAN Side Connections .................................................................................................. 14
10 Setup and Testing Using Ethernet WAN .......................................................................... 15
10.1 Add the eWON to eCatcher ......................................................................................... 15
10.2 Configure the eWON IP Address in eBuddy ................................................................... 16
10.3 Get online to the eWON ............................................................................................. 18
10.4 eWON COSY 141 Configuration ................................................................................... 19
10.5 eWON 4005CD Configuration ...................................................................................... 25
10.6 Check the Connection ................................................................................................ 30
11 Setup and Testing Using GSM Modem (4005CD Only) ..................................................... 31
11.1 Adding the eWON to eCatcher ..................................................................................... 31
11.2 Changing eWON IP Address in eBuddy ......................................................................... 32
11.3 Get online to the eWON ............................................................................................. 34
11.4 Configuring the eWON ............................................................................................... 34
12 Changing your Computer’s IP Address ........................................................................... 42

Document Title: HMK eWon Guide Issue Version: V0_1A
Page 5 of 43
4 Overview
4.1 Purpose of the Document
This document serves as a guide for setting up your eWON for remote access via a VPN connection.
The two specific devices supported are the eWON COSY 141 and the eWON4005CD. The process is
explained, along with screen shots, for setup with both Ethernet and GSM connections to a WAN.
Although other devices may have very similar setup procedures these are the only two outlined in
detail with a step by step guide along with screen shots of the process.
Background information is given to help understanding of the process as well as a quick guide to all the
tools required.
Document Title: HMK eWon Guide Issue Version: V0_1A
Page 6 of 43
5 Background information and tools
5.1 How IP Addresses Work
An IP address is a unique numerical label that is assigned to each device on a computer network that
uses Internet Protocol as its communication method. This network could be as small as a few devices
on a home/office network up to the World Wide Web.
IP addresses are binary numbers and the most commonly used version is Internet Protocol Version 4
(IPv4) in which IP addresses are 32-bit numbers. This is normally broken down into four separate 8-bit
numbers displayed in decimal format for easier understanding. This leads to the familiar form such as:
192.168.1.1
As each section is 8-bit, the highest decimal number is 255. However, 0 and 255 are reserved for
specific functions and hence the allowable range becomes 1 to 254.
5.1.1 IPv4 Private Addressing
Due to the vast and increasing number of devices connected to the internet, there became a need to
save IP addresses. Devices that communicate on a private network and not directly connected to the
internet need not have a globally unique IP address. This gave rise to the introduction of three private
IPv4 network ranges:
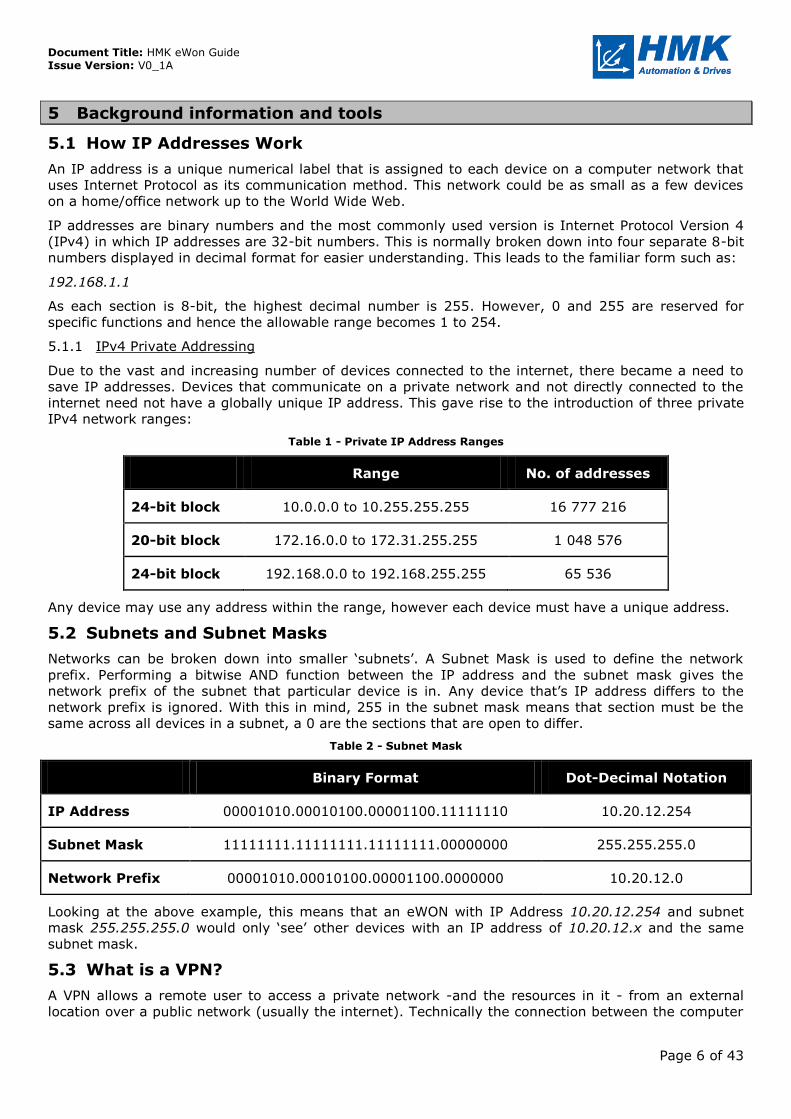
Table 1 - Private IP Address Ranges
Range No. of addresses
24-bit block 10.0.0.0 to 10.255.255.255 16 777 216
20-bit block 172.16.0.0 to 172.31.255.255 1 048 576
24-bit block 192.168.0.0 to 192.168.255.255 65 536
Any device may use any address within the range, however each device must have a unique address.
5.2 Subnets and Subnet Masks
Networks can be broken down into smaller ‘subnets’. A Subnet Mask is used to define the network
prefix. Performing a bitwise AND function between the IP address and the subnet mask gives the
network prefix of the subnet that particular device is in. Any device that’s IP address differs to the
network prefix is ignored. With this in mind, 255 in the subnet mask means that section must be the
same across all devices in a subnet, a 0 are the sections that are open to differ.
Table 2 - Subnet Mask
Binary Format Dot-Decimal Notation
IP Address 00001010.00010100.00001100.11111110 10.20.12.254
Subnet Mask 11111111.11111111.11111111.00000000 255.255.255.0
Network Prefix 00001010.00010100.00001100.0000000 10.20.12.0
Looking at the above example, this means that an eWON with IP Address 10.20.12.254 and subnet
mask 255.255.255.0 would only ‘see’ other devices with an IP address of 10.20.12.x and the same
subnet mask.
5.3 What is a VPN?
A VPN allows a remote user to access a private network -and the resources in it - from an external
location over a public network (usually the internet). Technically the connection between the computer
Document Title: HMK eWon Guide Issue Version: V0_1A
Page 7 of 43
and the network is a WAN link, but it actually appears to the user as if it is a private network link;
hence the name virtual private network.
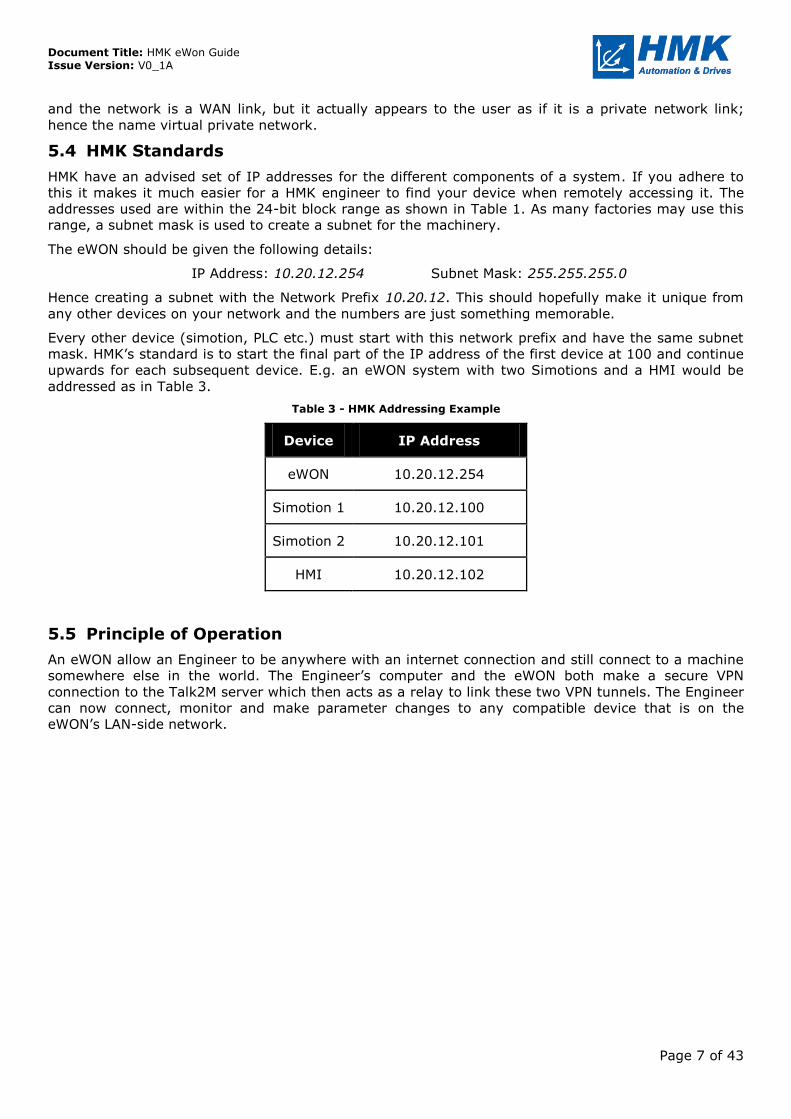
5.4 HMK Standards
HMK have an advised set of IP addresses for the different components of a system. If you adhere to
this it makes it much easier for a HMK engineer to find your device when remotely accessing it. The
addresses used are within the 24-bit block range as shown in Table 1. As many factories may use this
range, a subnet mask is used to create a subnet for the machinery.
The eWON should be given the following details:
IP Address: 10.20.12.254 Subnet Mask: 255.255.255.0
Hence creating a subnet with the Network Prefix 10.20.12. This should hopefully make it unique from
any other devices on your network and the numbers are just something memorable.
Every other device (simotion, PLC etc.) must start with this network prefix and have the same subnet
mask. HMK’s standard is to start the final part of the IP address of the first device at 100 and continue
upwards for each subsequent device. E.g. an eWON system with two Simotions and a HMI would be
addressed as in Table 3.
Table 3 - HMK Addressing Example
Device IP Address
eWON 10.20.12.254
Simotion 1 10.20.12.100
Simotion 2 10.20.12.101
HMI 10.20.12.102
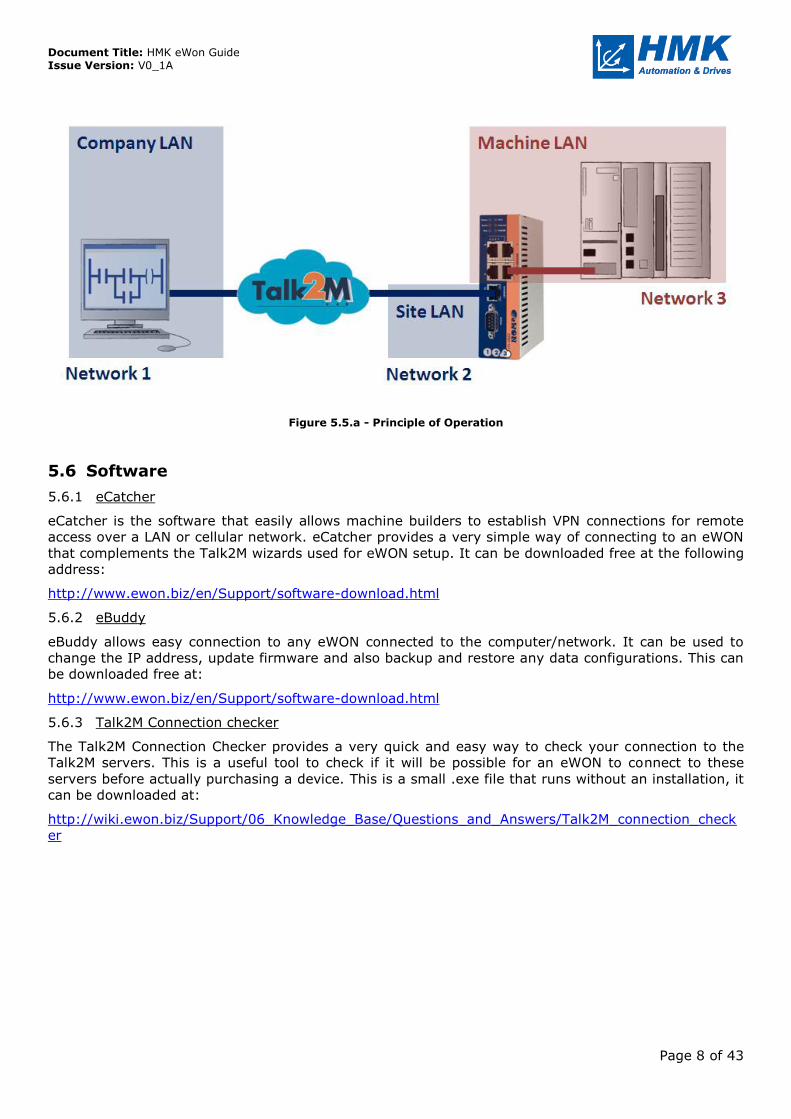
5.5 Principle of Operation
An eWON allow an Engineer to be anywhere with an internet connection and still connect to a machine
somewhere else in the world. The Engineer’s computer and the eWON both make a secure VPN
connection to the Talk2M server which then acts as a relay to link these two VPN tunnels. The Engineer
can now connect, monitor and make parameter changes to any compatible device that is on the
eWON’s LAN-side network.
Document Title: HMK eWon Guide Issue Version: V0_1A
Page 8 of 43
Figure 5.5.a - Principle of Operation
5.6 Software
5.6.1 eCatcher
eCatcher is the software that easily allows machine builders to establish VPN connections for remote
access over a LAN or cellular network. eCatcher provides a very simple way of connecting to an eWON
that complements the Talk2M wizards used for eWON setup. It can be downloaded free at the following
address:
http://www.ewon.biz/en/Support/software-download.html
5.6.2 eBuddy
eBuddy allows easy connection to any eWON connected to the computer/network. It can be used to
change the IP address, update firmware and also backup and restore any data configurations. This can
be downloaded free at:
http://www.ewon.biz/en/Support/software-download.html
5.6.3 Talk2M Connection checker
The Talk2M Connection Checker provides a very quick and easy way to check your connection to the
Talk2M servers. This is a useful tool to check if it will be possible for an eWON to connect to these
servers before actually purchasing a device. This is a small .exe file that runs without an installation, it
can be downloaded at:
http://wiki.ewon.biz/Support/06_Knowledge_Base/Questions_and_Answers/Talk2M_connection_check
er
Document Title: HMK eWon Guide Issue Version: V0_1A
Page 9 of 43
5.7 Hardware
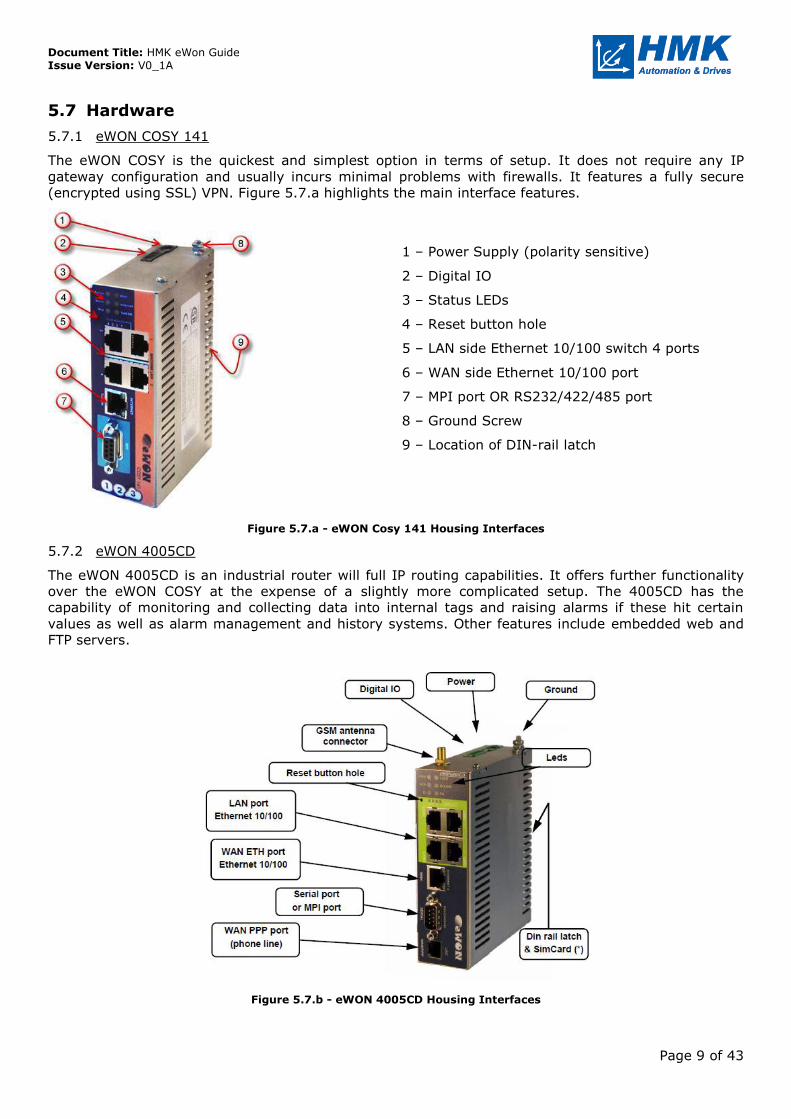
5.7.1 eWON COSY 141
The eWON COSY is the quickest and simplest option in terms of setup. It does not require any IP
gateway configuration and usually incurs minimal problems with firewalls. It features a fully secure
(encrypted using SSL) VPN. Figure 5.7.a highlights the main interface features.
Figure 5.7.a - eWON Cosy 141 Housing Interfaces
5.7.2 eWON 4005CD
The eWON 4005CD is an industrial router will full IP routing capabilities. It offers further functionality
over the eWON COSY at the expense of a slightly more complicated setup. The 4005CD has the
capability of monitoring and collecting data into internal tags and raising alarms if these hit certain
values as well as alarm management and history systems. Other features include embedded web and
FTP servers.
Figure 5.7.b - eWON 4005CD Housing Interfaces
1 – Power Supply (polarity sensitive)
2 – Digital IO
3 – Status LEDs
4 – Reset button hole
5 – LAN side Ethernet 10/100 switch 4 ports
6 – WAN side Ethernet 10/100 port
7 – MPI port OR RS232/422/485 port
8 – Ground Screw
9 – Location of DIN-rail latch
Document Title: HMK eWon Guide Issue Version: V0_1A
Page 10 of 43
6 Site Survey and Customer considerations
6.1 Ethernet Requirements
For the eWON to make an outgoing connection to the Talk2M server via its WAN Ethernet port, the
following requirements must be satisfied:
An Internet Connection;
o Either by a default gateway on your corporate LAN.
o Or by a Proxy router. You need to know the connection parameters to access this proxy:
Proxy Server name or address (e.g. proxy.company.com:8080
Proxy User name
Proxy Password
o Or by a modem connection to an ISP.
Authorisation to access the Talk2M server
o as.pro.talk2m.com (92.52.111.210)
An outgoing open VPN channel
Please ensure your firewall is set to release the following outgoing ports:
o UDP on port 1194
o Or TCP on Port 443
6.1.1 Talk2M Connection Checker
With an eWON connected to the internet via its Ethernet WAN port, the connection to the Talk2M
servers will have to negotiate through the factory server/router. In order to confirm that this is
possible before purchasing an eWON, the Talk2M Connection Checker can be run. This simulates the
connection between the eWON and Talk2M servers. In order for this to be a valid test there are several
requirements:
o The PC running the checker should be connected to the same network connection point that the
eWON would be.
o Ethernet network connection settings of the PC should be set as they are intended to be on the
eWON (i.e. DCHP/fixed IP Address, subnet mask, default gateway, Primary/Secondary DNS)
o The PC must have no specific network privileges that would differ from those of the eWON.
o Any proxy settings can be entered into the connection checker.
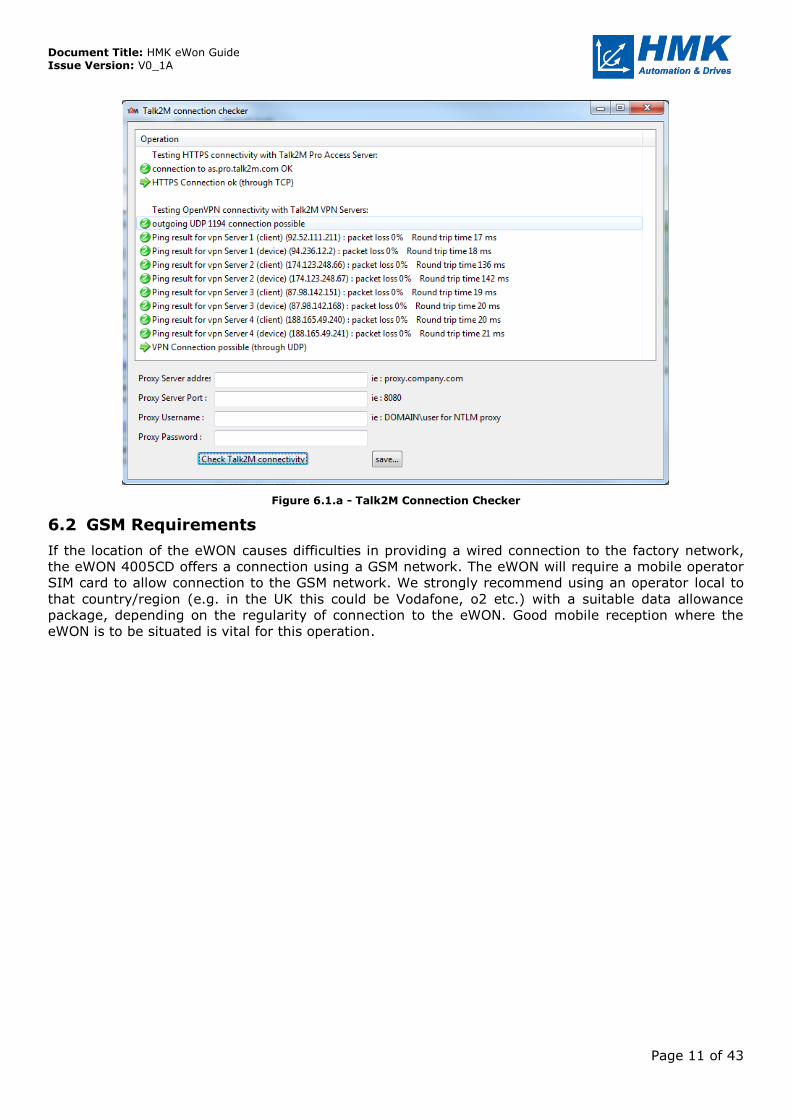
If the Talk2M server cannot be reached during the test for any reason (e.g. firewall blocking ports 1194
or 443 or incorrect proxy settings), the checker will fail and indicate the problem. Figure 6.1.a shows a
screen shot of the Connection Checker having just completed a successful connection test.
Document Title: HMK eWon Guide Issue Version: V0_1A
Page 11 of 43
Figure 6.1.a - Talk2M Connection Checker
6.2 GSM Requirements
If the location of the eWON causes difficulties in providing a wired connection to the factory network,
the eWON 4005CD offers a connection using a GSM network. The eWON will require a mobile operator
SIM card to allow connection to the GSM network. We strongly recommend using an operator local to
that country/region (e.g. in the UK this could be Vodafone, o2 etc.) with a suitable data allowance
package, depending on the regularity of connection to the eWON. Good mobile reception where the
eWON is to be situated is vital for this operation.
Document Title: HMK eWon Guide Issue Version: V0_1A
Page 12 of 43
7 eCatcher Account Management
7.1 Accounts and eWONs
As a company, you will need to decide on how to manage your accounts and the eWONs within them;
there are a few different options. You may choose to make an account per customer or per site and
have a small number of eWONs in each. You may prefer to have one account with all your eWONs in.
Before deciding, you may wish to take the following into account:
Accounts are free, you may have as many as you like.
Once an eWON is configured with an account, it stays with that account (unless you re-
configure it with a new one).
In each account, you can only have an active connection to one eWON at a time.
7.2 Accounts and Users
Within an account, you may have multiple users. The administrator of the group can decide the rights
each user account has (e.g. making changes to other users, adding/deleting eWONs etc.)
Document Title: HMK eWon Guide Issue Version: V0_1A
Page 13 of 43
8 Quick Setup Guide
The steps below offer a quick overview of the process of setting up an eWON COSY 141 or eWON
4005CD and serves as a good reminder to those who have previous knowledge. For newcomers to
eWON setup, Sections 10 and 11 provide fully detailed steps along with screenshots of the process for
Ethernet WAN or GSM Network respectively.
Before you start, you need to know the details of the eCatcher account into which you wish to add the
eWON.
The setup procedure is summarised below;
1. Connect your eWON to a power supply of 12-24V
2. Connect your machine devices (i.e. PLC, Simotion etc.) into the LAN side of the eWON
3. Connect your laptop to the LAN side of the eWON
4. Connect the eWON to a valid internet connection (this may be Ethernet into the WAN port, or
through the GPRS network using a SIM card)
5. Add the eWON into eCatcher, up to the point of getting the activation key.
6. Configure the IP address of the eWON using eBuddy.
7. Configure the eWON by using a web browser to access the internal configuration pages with the
eWON IP address (note: this may require changing your laptop IP address to be within the
same subnet range – see section 12 for instructions on doing so):
a. Configure the eWON name, description and time.
b. Configure the eWON internet connection.
c. Configure the eWON connection to the Talk2M server using the activation key or eWON
name from eCatcher in step 5.
8. Disconnect from the LAN side of the eWON and reconnect your computer to the internet.
9. Open eCatcher and check the status of the eWON is now ‘online’.
Document Title: HMK eWon Guide Issue Version: V0_1A
Page 14 of 43
9 Connecting your eWON
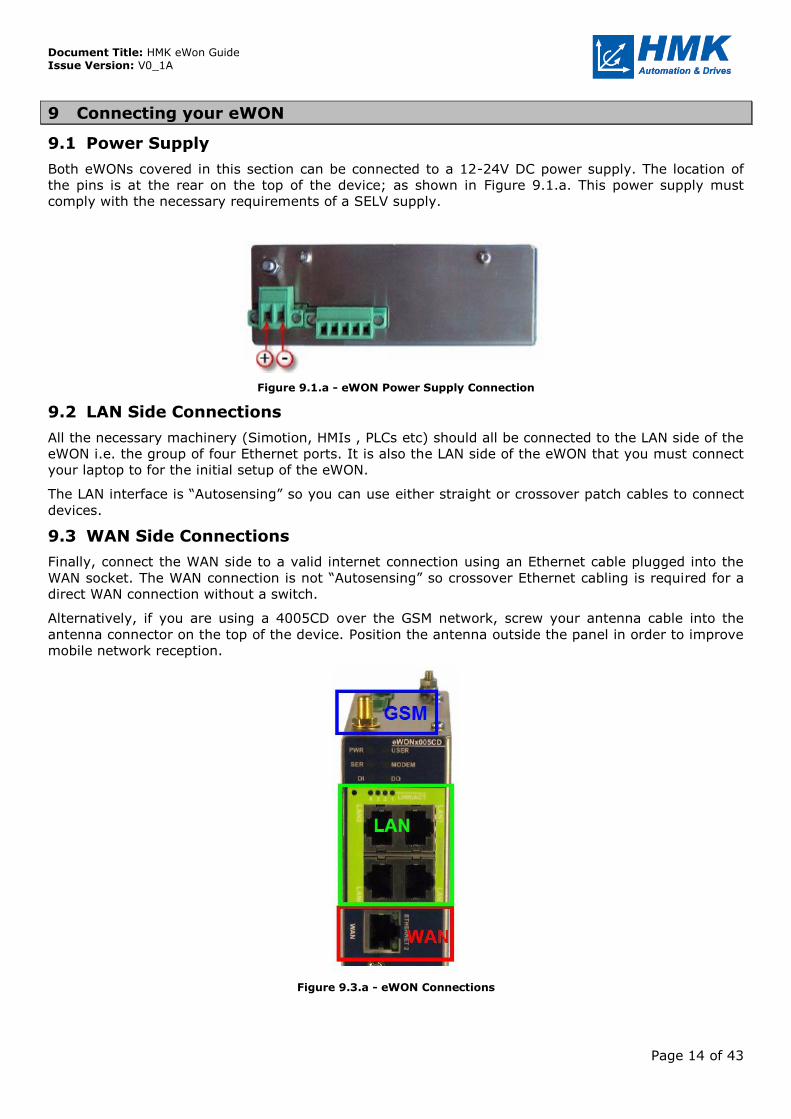
9.1 Power Supply
Both eWONs covered in this section can be connected to a 12-24V DC power supply. The location of
the pins is at the rear on the top of the device; as shown in Figure 9.1.a. This power supply must
comply with the necessary requirements of a SELV supply.
Figure 9.1.a - eWON Power Supply Connection
9.2 LAN Side Connections
All the necessary machinery (Simotion, HMIs , PLCs etc) should all be connected to the LAN side of the
eWON i.e. the group of four Ethernet ports. It is also the LAN side of the eWON that you must connect
your laptop to for the initial setup of the eWON.
The LAN interface is “Autosensing” so you can use either straight or crossover patch cables to connect
devices.
9.3 WAN Side Connections
Finally, connect the WAN side to a valid internet connection using an Ethernet cable plugged into the
WAN socket. The WAN connection is not “Autosensing” so crossover Ethernet cabling is required for a
direct WAN connection without a switch.
Alternatively, if you are using a 4005CD over the GSM network, screw your antenna cable into the
antenna connector on the top of the device. Position the antenna outside the panel in order to improve
mobile network reception.
Figure 9.3.a - eWON Connections
Document Title: HMK eWon Guide Issue Version: V0_1A
Page 15 of 43
10 Setup and Testing Using Ethernet WAN
This section takes you through the step by step instructions to set up an eWON COSY 141 or eWON
4005CD using Ethernet WAN. Screen shots are provided to help you through the process.
This assumes you have followed Section 9 and connected your eWON as necessary. You also need the
details of the eCatcher account into which you want to add the eWON.
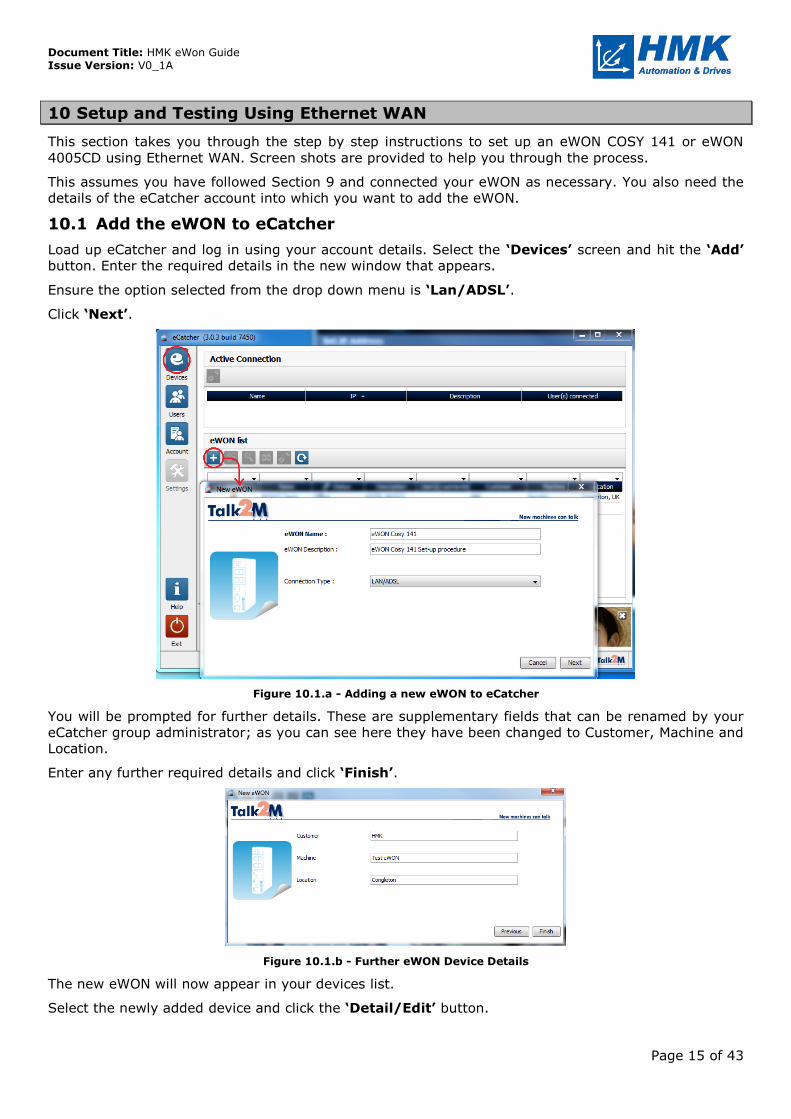
10.1 Add the eWON to eCatcher
Load up eCatcher and log in using your account details. Select the ‘Devices’ screen and hit the ‘Add’
button. Enter the required details in the new window that appears.
Ensure the option selected from the drop down menu is ‘Lan/ADSL’.
Click ‘Next’.
Figure 10.1.a - Adding a new eWON to eCatcher
You will be prompted for further details. These are supplementary fields that can be renamed by your
eCatcher group administrator; as you can see here they have been changed to Customer, Machine and
Location.
Enter any further required details and click ‘Finish’.
Figure 10.1.b - Further eWON Device Details
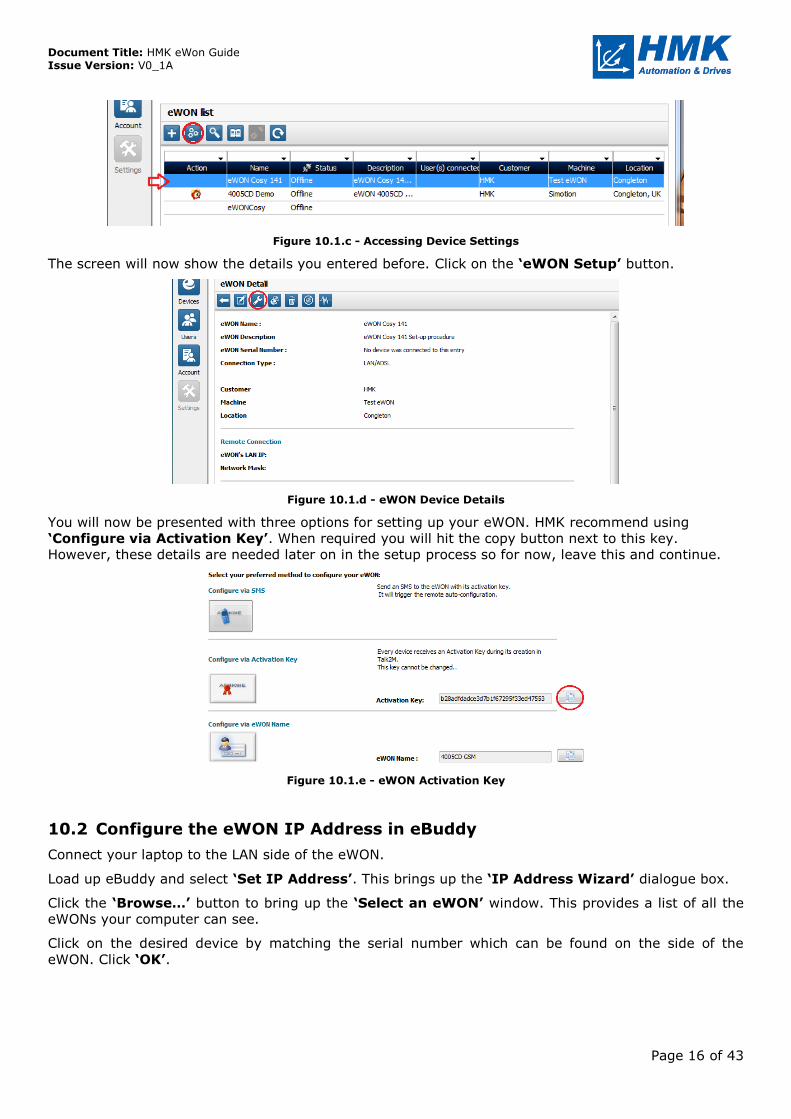
The new eWON will now appear in your devices list.
Select the newly added device and click the ‘Detail/Edit’ button.
Document Title: HMK eWon Guide Issue Version: V0_1A
Page 16 of 43
Figure 10.1.c - Accessing Device Settings
The screen will now show the details you entered before. Click on the ‘eWON Setup’ button.
Figure 10.1.d - eWON Device Details
You will now be presented with three options for setting up your eWON. HMK recommend using
‘Configure via Activation Key’. When required you will hit the copy button next to this key.
However, these details are needed later on in the setup process so for now, leave this and continue.
Figure 10.1.e - eWON Activation Key
10.2 Configure the eWON IP Address in eBuddy
Connect your laptop to the LAN side of the eWON.
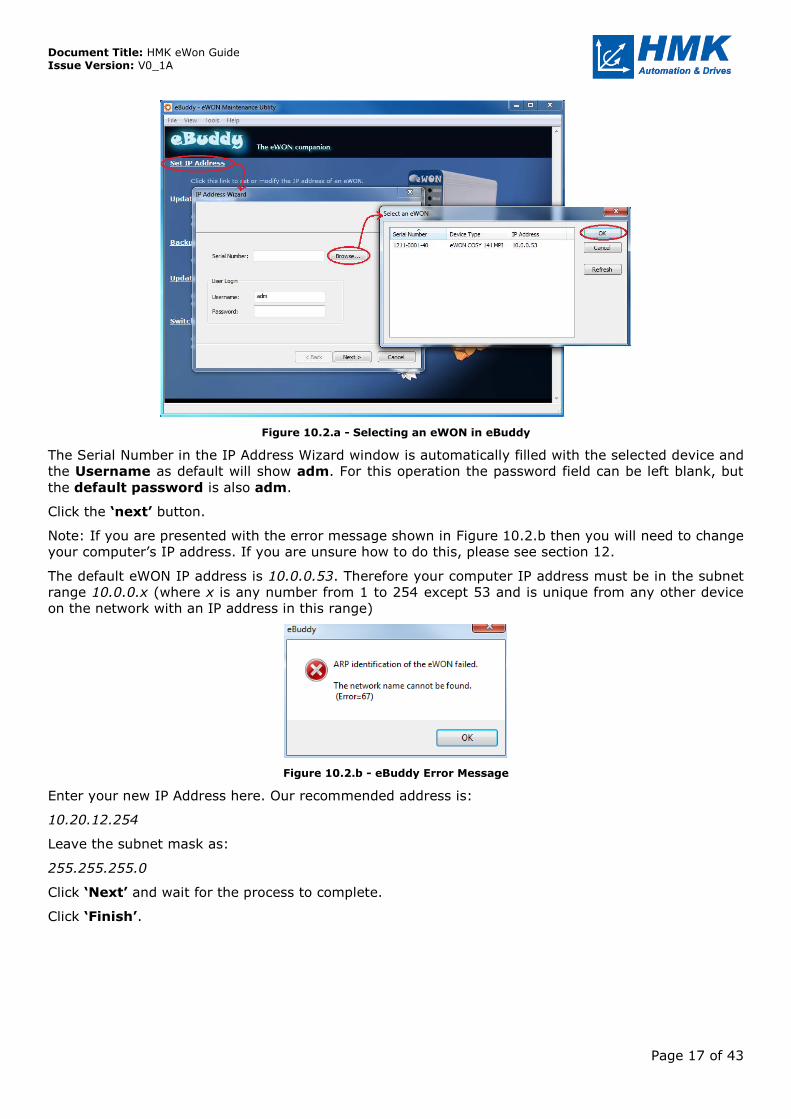
Load up eBuddy and select ‘Set IP Address’. This brings up the ‘IP Address Wizard’ dialogue box.
Click the ‘Browse…’ button to bring up the ‘Select an eWON’ window. This provides a list of all the
eWONs your computer can see.
Click on the desired device by matching the serial number which can be found on the side of the
eWON. Click ‘OK’.
Document Title: HMK eWon Guide Issue Version: V0_1A
Page 17 of 43
Figure 10.2.a - Selecting an eWON in eBuddy
The Serial Number in the IP Address Wizard window is automatically filled with the selected device and
the Username as default will show adm. For this operation the password field can be left blank, but
the default password is also adm.
Click the ‘next’ button.
Note: If you are presented with the error message shown in Figure 10.2.b then you will need to change
your computer’s IP address. If you are unsure how to do this, please see section 12.
The default eWON IP address is 10.0.0.53. Therefore your computer IP address must be in the subnet
range 10.0.0.x (where x is any number from 1 to 254 except 53 and is unique from any other device
on the network with an IP address in this range)
Figure 10.2.b - eBuddy Error Message
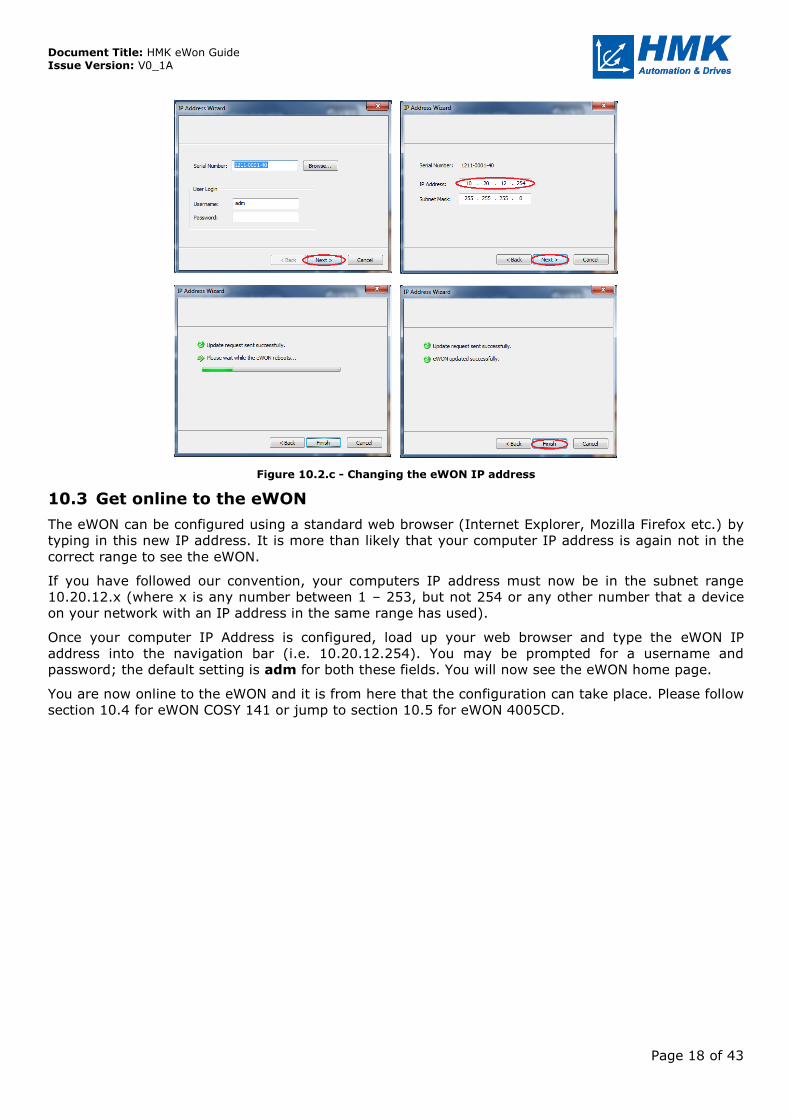
Enter your new IP Address here. Our recommended address is:
10.20.12.254
Leave the subnet mask as:
255.255.255.0
Click ‘Next’ and wait for the process to complete.
Click ‘Finish’.
Document Title: HMK eWon Guide Issue Version: V0_1A
Page 18 of 43
Figure 10.2.c - Changing the eWON IP address
10.3 Get online to the eWON
The eWON can be configured using a standard web browser (Internet Explorer, Mozilla Firefox etc.) by
typing in this new IP address. It is more than likely that your computer IP address is again not in the
correct range to see the eWON.
If you have followed our convention, your computers IP address must now be in the subnet range
10.20.12.x (where x is any number between 1 – 253, but not 254 or any other number that a device
on your network with an IP address in the same range has used).
Once your computer IP Address is configured, load up your web browser and type the eWON IP
address into the navigation bar (i.e. 10.20.12.254). You may be prompted for a username and
password; the default setting is adm for both these fields. You will now see the eWON home page.
You are now online to the eWON and it is from here that the configuration can take place. Please follow
section 10.4 for eWON COSY 141 or jump to section 10.5 for eWON 4005CD.
Document Title: HMK eWon Guide Issue Version: V0_1A
Page 19 of 43
10.4 eWON COSY 141 Configuration
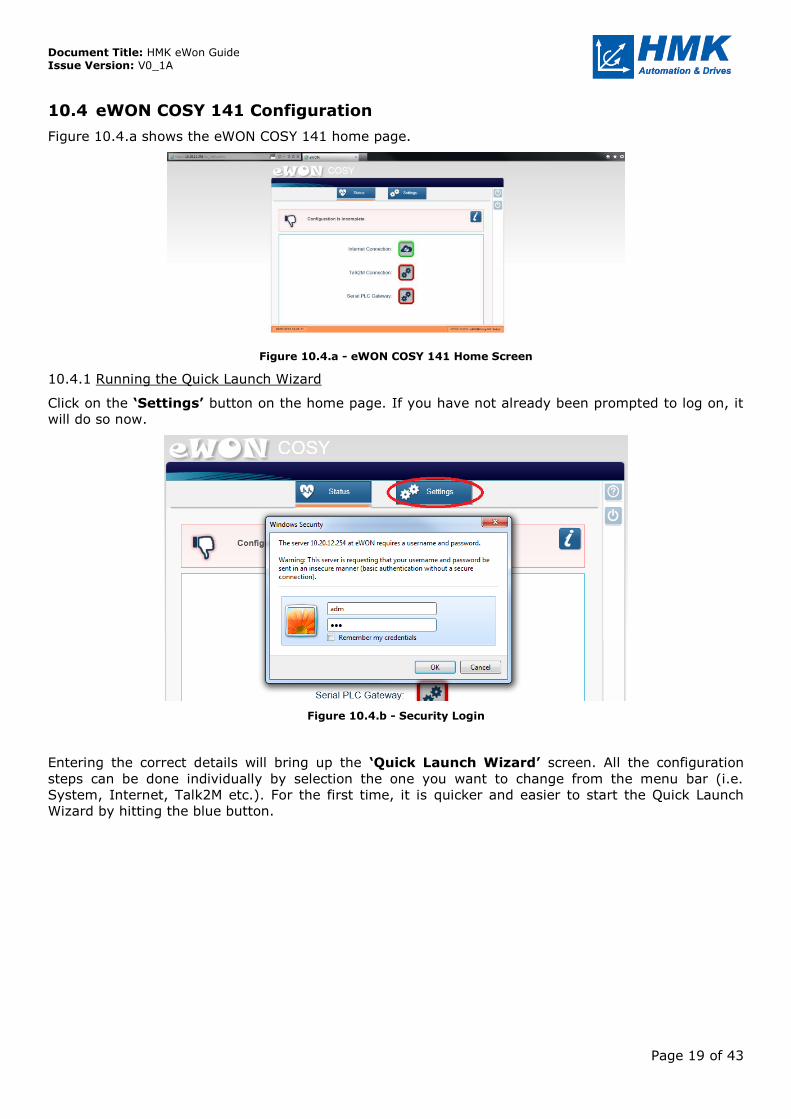
Figure 10.4.a shows the eWON COSY 141 home page.
Figure 10.4.a - eWON COSY 141 Home Screen
10.4.1 Running the Quick Launch Wizard
Click on the ‘Settings’ button on the home page. If you have not already been prompted to log on, it
will do so now.
Figure 10.4.b - Security Login
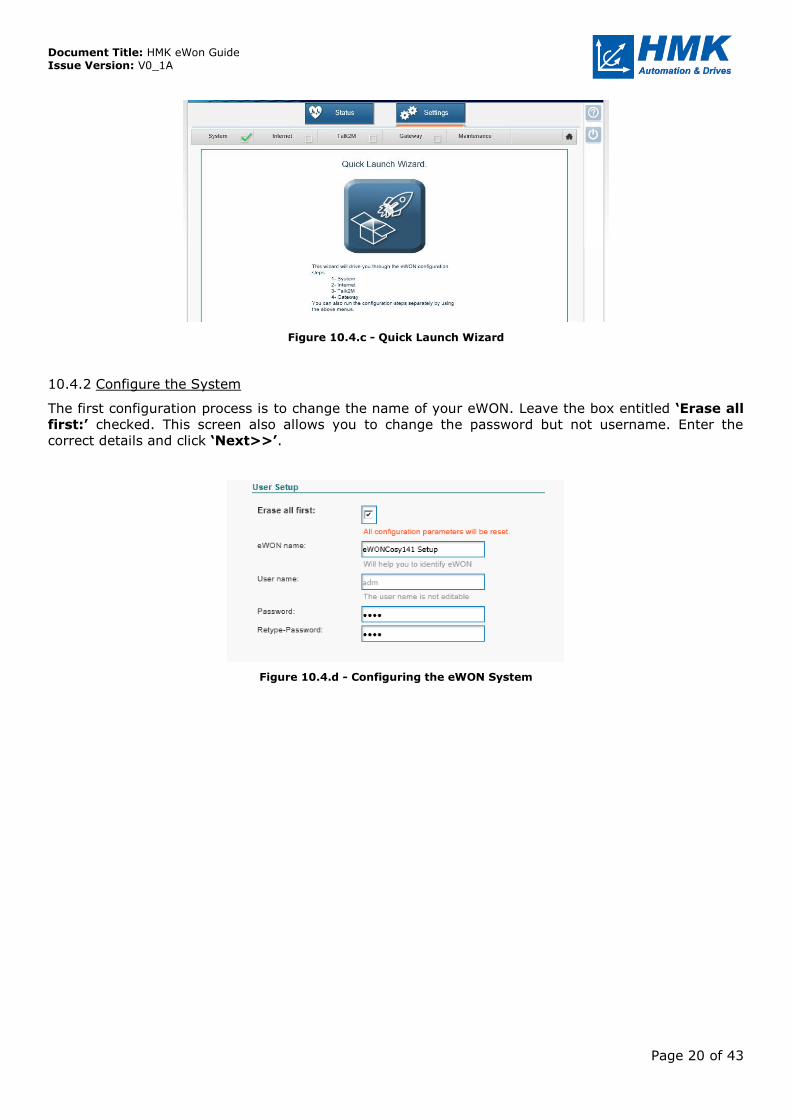
Entering the correct details will bring up the ‘Quick Launch Wizard’ screen. All the configuration
steps can be done individually by selection the one you want to change from the menu bar (i.e.
System, Internet, Talk2M etc.). For the first time, it is quicker and easier to start the Quick Launch
Wizard by hitting the blue button.
Document Title: HMK eWon Guide Issue Version: V0_1A
Page 20 of 43
Figure 10.4.c - Quick Launch Wizard
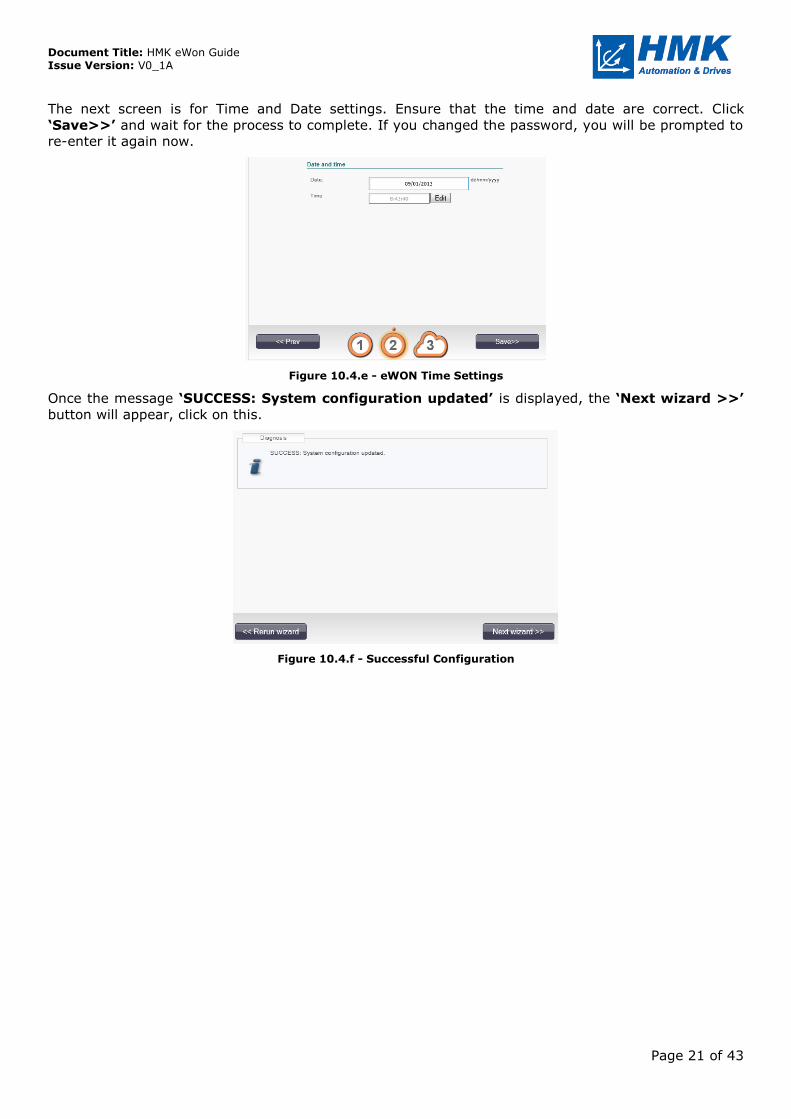
10.4.2 Configure the System
The first configuration process is to change the name of your eWON. Leave the box entitled ‘Erase all
first:’ checked. This screen also allows you to change the password but not username. Enter the
correct details and click ‘Next>>’.
Figure 10.4.d - Configuring the eWON System
Document Title: HMK eWon Guide Issue Version: V0_1A
Page 21 of 43
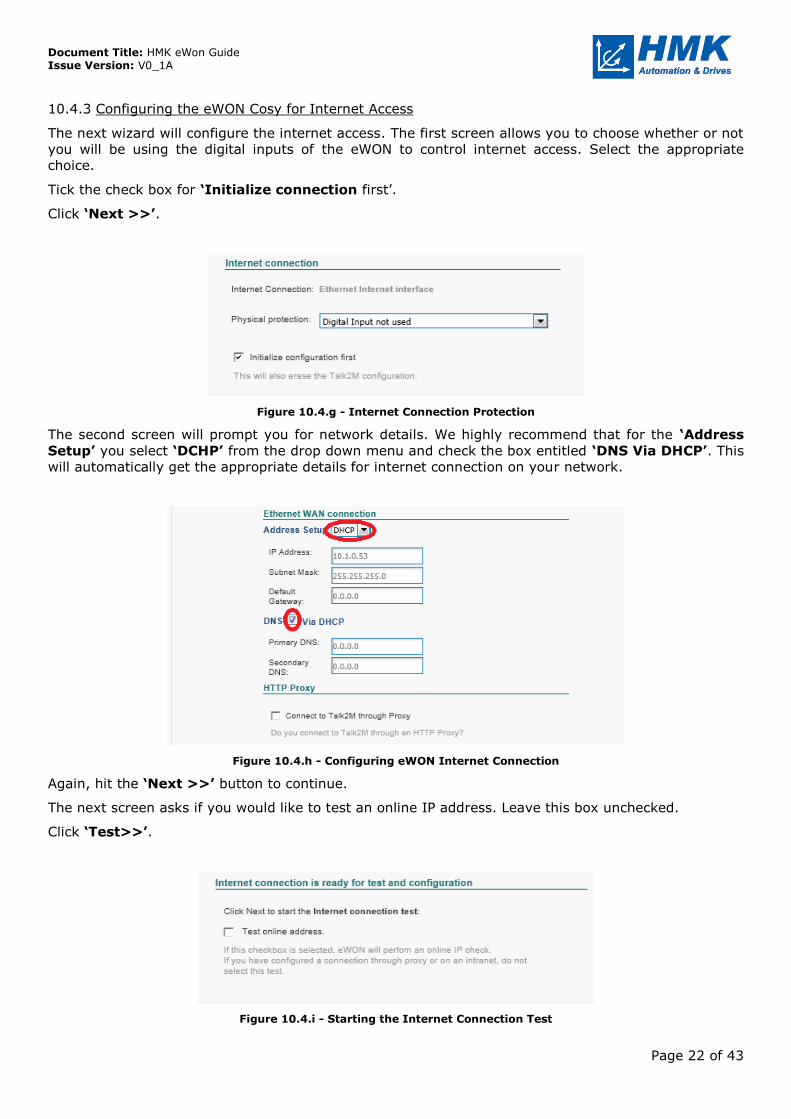
The next screen is for Time and Date settings. Ensure that the time and date are correct. Click
‘Save>>’ and wait for the process to complete. If you changed the password, you will be prompted to
re-enter it again now.
Figure 10.4.e - eWON Time Settings
Once the message ‘SUCCESS: System configuration updated’ is displayed, the ‘Next wizard >>’
button will appear, click on this.
Figure 10.4.f - Successful Configuration
Document Title: HMK eWon Guide Issue Version: V0_1A
Page 22 of 43
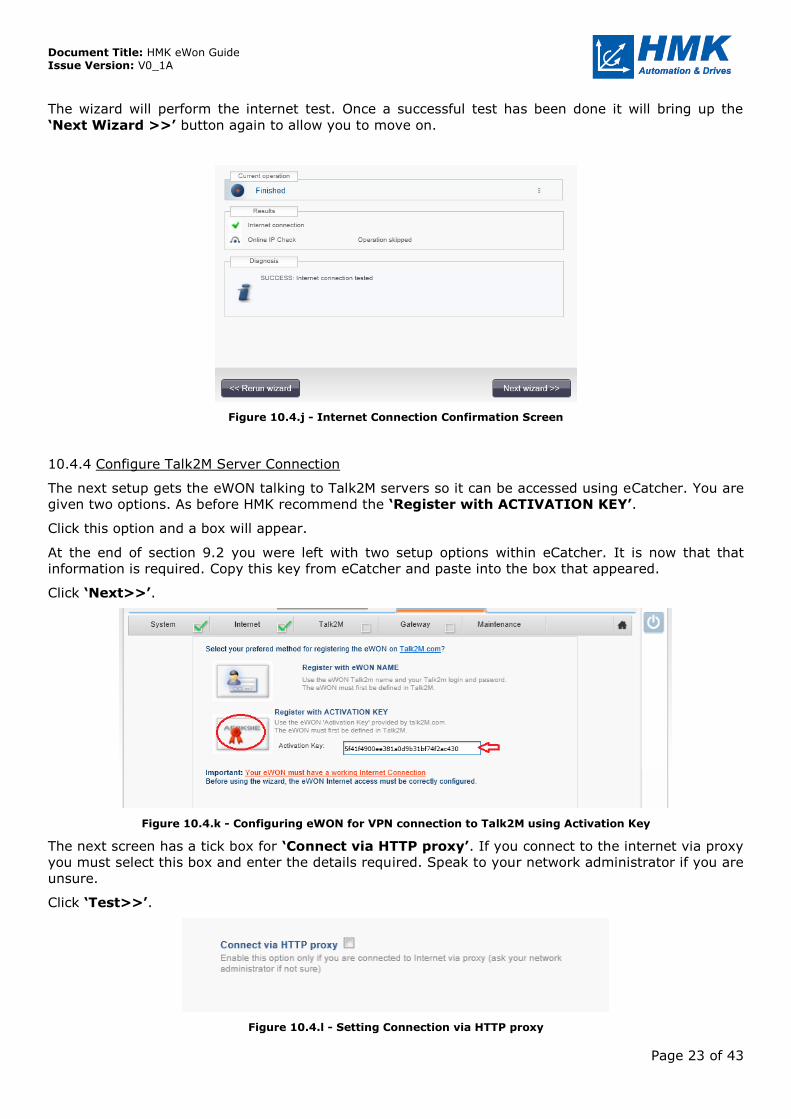
10.4.3 Configuring the eWON Cosy for Internet Access
The next wizard will configure the internet access. The first screen allows you to choose whether or not
you will be using the digital inputs of the eWON to control internet access. Select the appropriate
choice.
Tick the check box for ‘Initialize connection first’.
Click ‘Next >>’.
Figure 10.4.g - Internet Connection Protection
The second screen will prompt you for network details. We highly recommend that for the ‘Address
Setup’ you select ‘DCHP’ from the drop down menu and check the box entitled ‘DNS Via DHCP’. This
will automatically get the appropriate details for internet connection on your network.
Figure 10.4.h - Configuring eWON Internet Connection
Again, hit the ‘Next >>’ button to continue.
The next screen asks if you would like to test an online IP address. Leave this box unchecked.
Click ‘Test>>’.
Figure 10.4.i - Starting the Internet Connection Test
Document Title: HMK eWon Guide Issue Version: V0_1A
Page 23 of 43
The wizard will perform the internet test. Once a successful test has been done it will bring up the
‘Next Wizard >>’ button again to allow you to move on.
Figure 10.4.j - Internet Connection Confirmation Screen
10.4.4 Configure Talk2M Server Connection
The next setup gets the eWON talking to Talk2M servers so it can be accessed using eCatcher. You are
given two options. As before HMK recommend the ‘Register with ACTIVATION KEY’.
Click this option and a box will appear.
At the end of section 9.2 you were left with two setup options within eCatcher. It is now that that
information is required. Copy this key from eCatcher and paste into the box that appeared.
Click ‘Next>>’.
Figure 10.4.k - Configuring eWON for VPN connection to Talk2M using Activation Key
The next screen has a tick box for ‘Connect via HTTP proxy’. If you connect to the internet via proxy
you must select this box and enter the details required. Speak to your network administrator if you are
unsure.
Click ‘Test>>’.
Figure 10.4.l - Setting Connection via HTTP proxy
Document Title: HMK eWon Guide Issue Version: V0_1A
Page 24 of 43
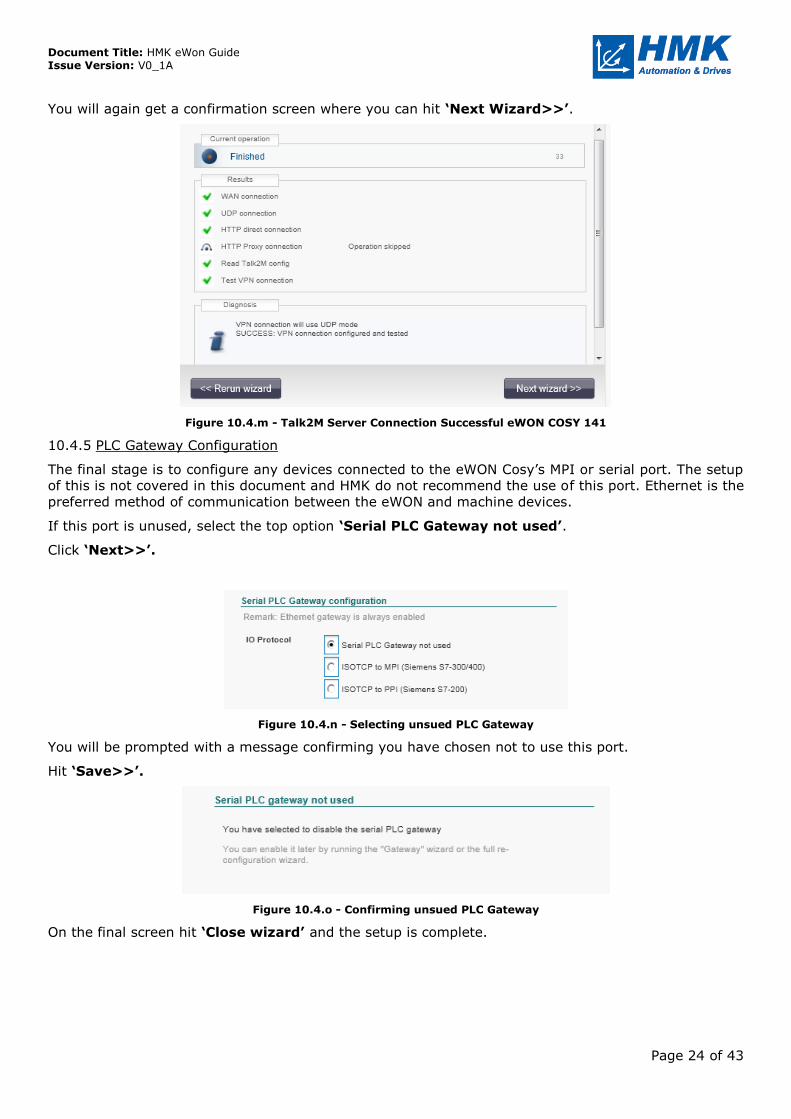
You will again get a confirmation screen where you can hit ‘Next Wizard>>’.
Figure 10.4.m - Talk2M Server Connection Successful eWON COSY 141
10.4.5 PLC Gateway Configuration
The final stage is to configure any devices connected to the eWON Cosy’s MPI or serial port. The setup
of this is not covered in this document and HMK do not recommend the use of this port. Ethernet is the
preferred method of communication between the eWON and machine devices.
If this port is unused, select the top option ‘Serial PLC Gateway not used’.
Click ‘Next>>’.
Figure 10.4.n - Selecting unsued PLC Gateway
You will be prompted with a message confirming you have chosen not to use this port.
Hit ‘Save>>’.
Figure 10.4.o - Confirming unsued PLC Gateway
On the final screen hit ‘Close wizard’ and the setup is complete.
Document Title: HMK eWon Guide Issue Version: V0_1A
Page 25 of 43
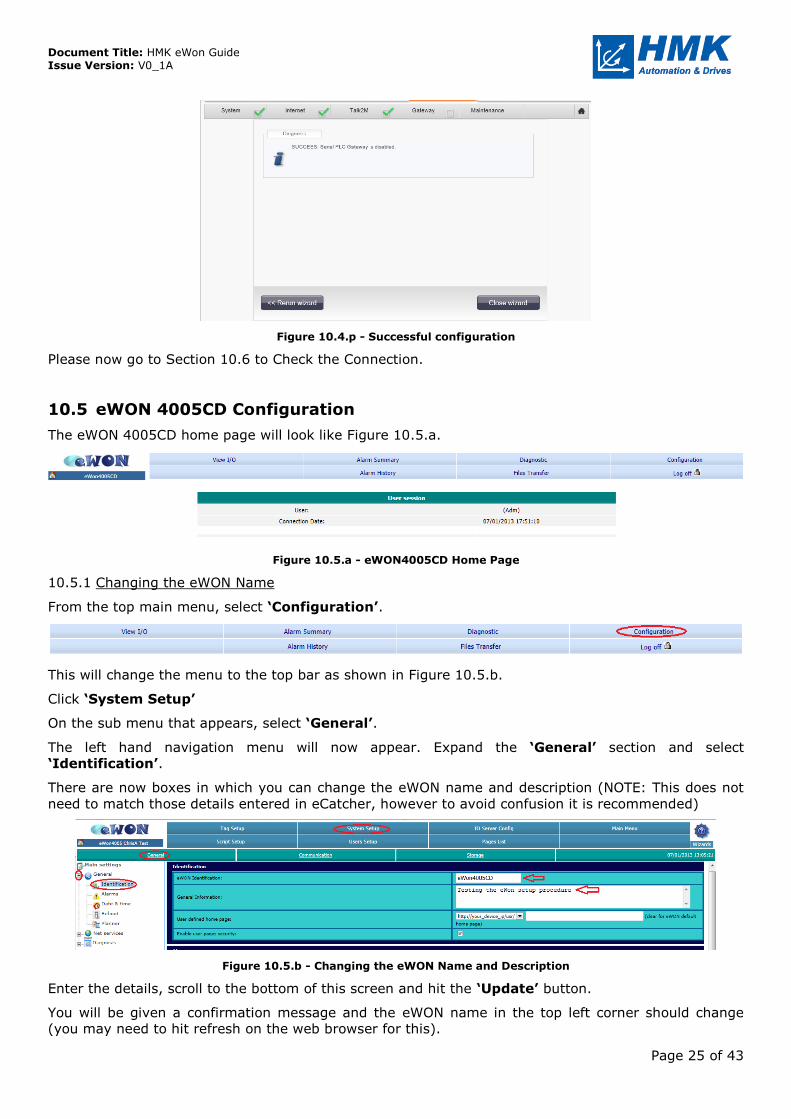
Figure 10.4.p - Successful configuration
Please now go to Section 10.6 to Check the Connection.
10.5 eWON 4005CD Configuration
The eWON 4005CD home page will look like Figure 10.5.a.
Figure 10.5.a - eWON4005CD Home Page
10.5.1 Changing the eWON Name
From the top main menu, select ‘Configuration’.
This will change the menu to the top bar as shown in Figure 10.5.b.
Click ‘System Setup’
On the sub menu that appears, select ‘General’.
The left hand navigation menu will now appear. Expand the ‘General’ section and select
‘Identification’.
There are now boxes in which you can change the eWON name and description (NOTE: This does not
need to match those details entered in eCatcher, however to avoid confusion it is recommended)
Figure 10.5.b - Changing the eWON Name and Description
Enter the details, scroll to the bottom of this screen and hit the ‘Update’ button.
You will be given a confirmation message and the eWON name in the top left corner should change
(you may need to hit refresh on the web browser for this).
Document Title: HMK eWon Guide Issue Version: V0_1A
Page 26 of 43
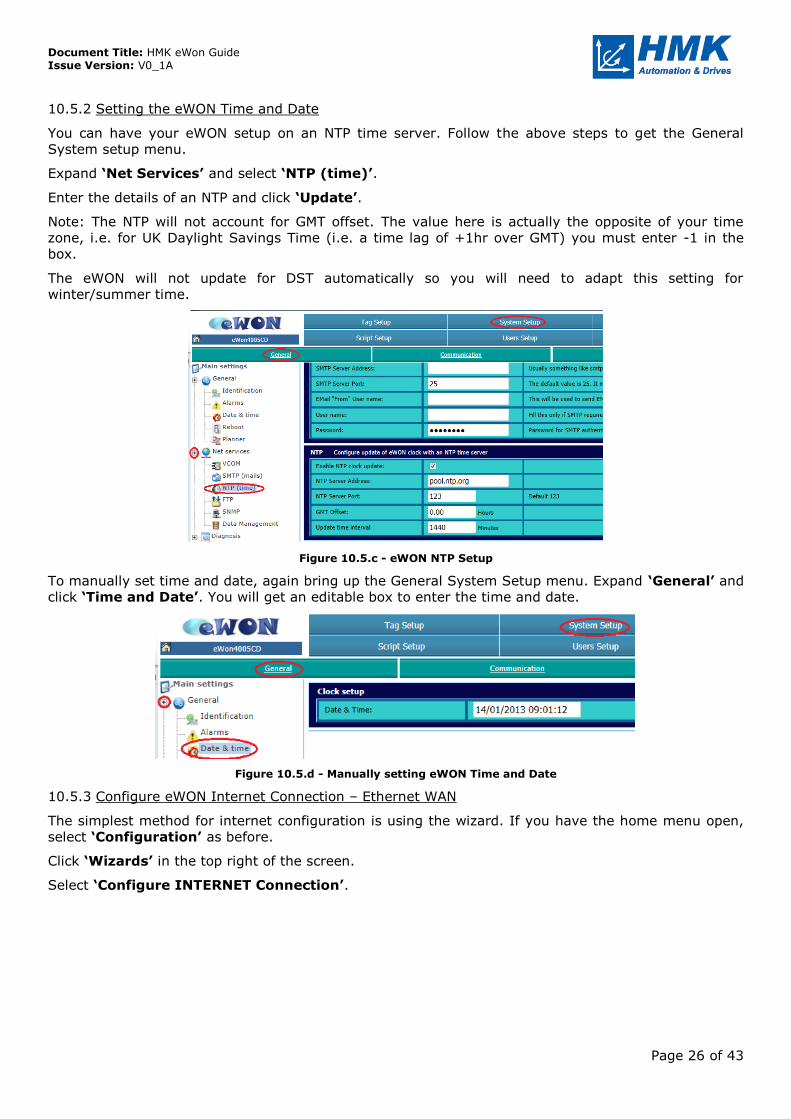
10.5.2 Setting the eWON Time and Date
You can have your eWON setup on an NTP time server. Follow the above steps to get the General
System setup menu.
Expand ‘Net Services’ and select ‘NTP (time)’.
Enter the details of an NTP and click ‘Update’.
Note: The NTP will not account for GMT offset. The value here is actually the opposite of your time
zone, i.e. for UK Daylight Savings Time (i.e. a time lag of +1hr over GMT) you must enter -1 in the
box.
The eWON will not update for DST automatically so you will need to adapt this setting for
winter/summer time.
Figure 10.5.c - eWON NTP Setup
To manually set time and date, again bring up the General System Setup menu. Expand ‘General’ and
click ‘Time and Date’. You will get an editable box to enter the time and date.
Figure 10.5.d - Manually setting eWON Time and Date
10.5.3 Configure eWON Internet Connection – Ethernet WAN
The simplest method for internet configuration is using the wizard. If you have the home menu open,
select ‘Configuration’ as before.
Click ‘Wizards’ in the top right of the screen.
Select ‘Configure INTERNET Connection’.
Document Title: HMK eWon Guide Issue Version: V0_1A
Page 27 of 43
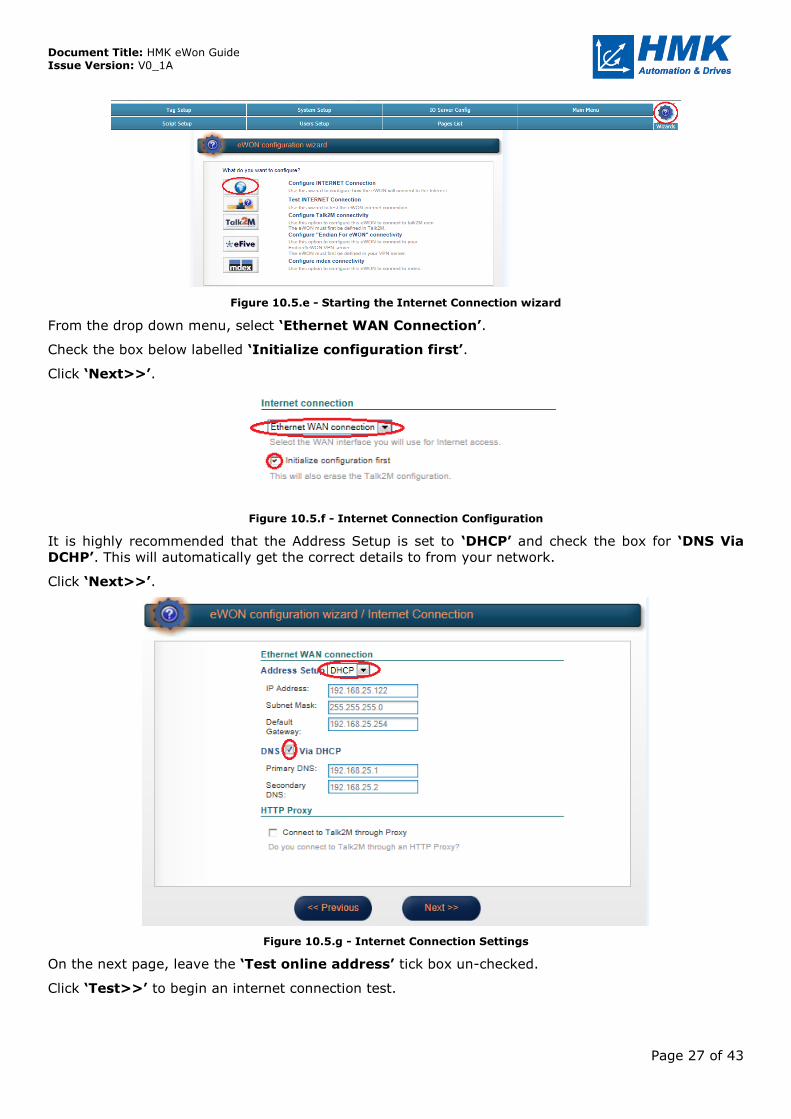
Figure 10.5.e - Starting the Internet Connection wizard
From the drop down menu, select ‘Ethernet WAN Connection’.
Check the box below labelled ‘Initialize configuration first’.
Click ‘Next>>’.
Figure 10.5.f - Internet Connection Configuration
It is highly recommended that the Address Setup is set to ‘DHCP’ and check the box for ‘DNS Via
DCHP’. This will automatically get the correct details to from your network.
Click ‘Next>>’.
Figure 10.5.g - Internet Connection Settings
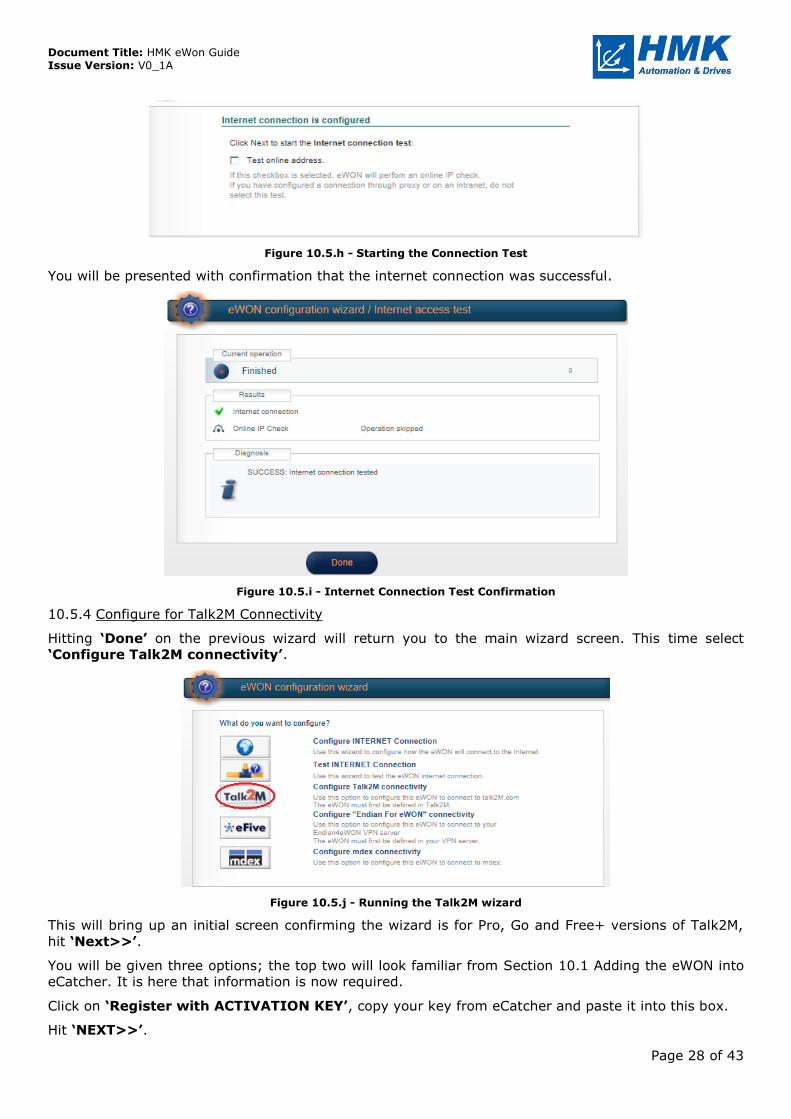
On the next page, leave the ‘Test online address’ tick box un-checked.
Click ‘Test>>’ to begin an internet connection test.
Document Title: HMK eWon Guide Issue Version: V0_1A
Page 28 of 43
Figure 10.5.h - Starting the Connection Test
You will be presented with confirmation that the internet connection was successful.
Figure 10.5.i - Internet Connection Test Confirmation
10.5.4 Configure for Talk2M Connectivity
Hitting ‘Done’ on the previous wizard will return you to the main wizard screen. This time select
‘Configure Talk2M connectivity’.
Figure 10.5.j - Running the Talk2M wizard
This will bring up an initial screen confirming the wizard is for Pro, Go and Free+ versions of Talk2M,
hit ‘Next>>’.
You will be given three options; the top two will look familiar from Section 10.1 Adding the eWON into
eCatcher. It is here that information is now required.
Click on ‘Register with ACTIVATION KEY’, copy your key from eCatcher and paste it into this box.
Hit ‘NEXT>>’.
Document Title: HMK eWon Guide Issue Version: V0_1A
Page 29 of 43
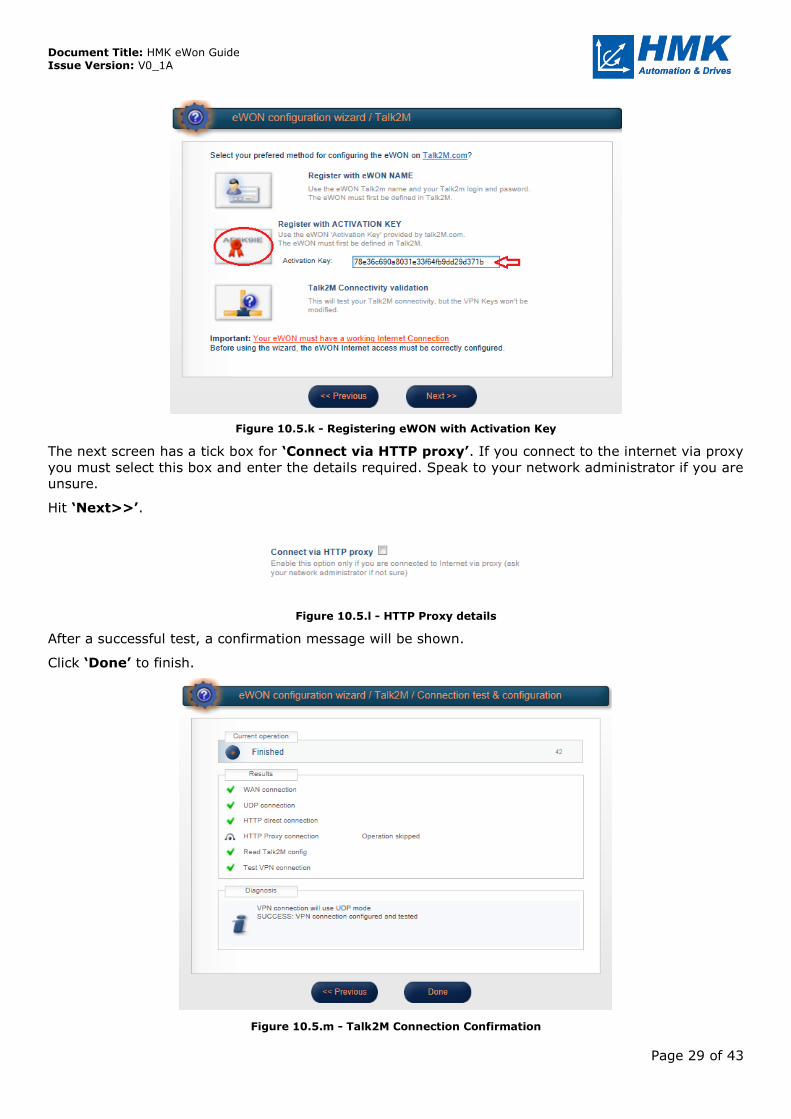
Figure 10.5.k - Registering eWON with Activation Key
The next screen has a tick box for ‘Connect via HTTP proxy’. If you connect to the internet via proxy
you must select this box and enter the details required. Speak to your network administrator if you are
unsure.
Hit ‘Next>>’.
Figure 10.5.l - HTTP Proxy details
After a successful test, a confirmation message will be shown.
Click ‘Done’ to finish.
Figure 10.5.m - Talk2M Connection Confirmation
Document Title: HMK eWon Guide Issue Version: V0_1A
Page 30 of 43
10.6 Check the Connection
Disconnect your laptop from the LAN side of the eWON and return to your normal internet connection
(remember you may need to go through changing back your laptop IP address to get access to your
factory/office network).
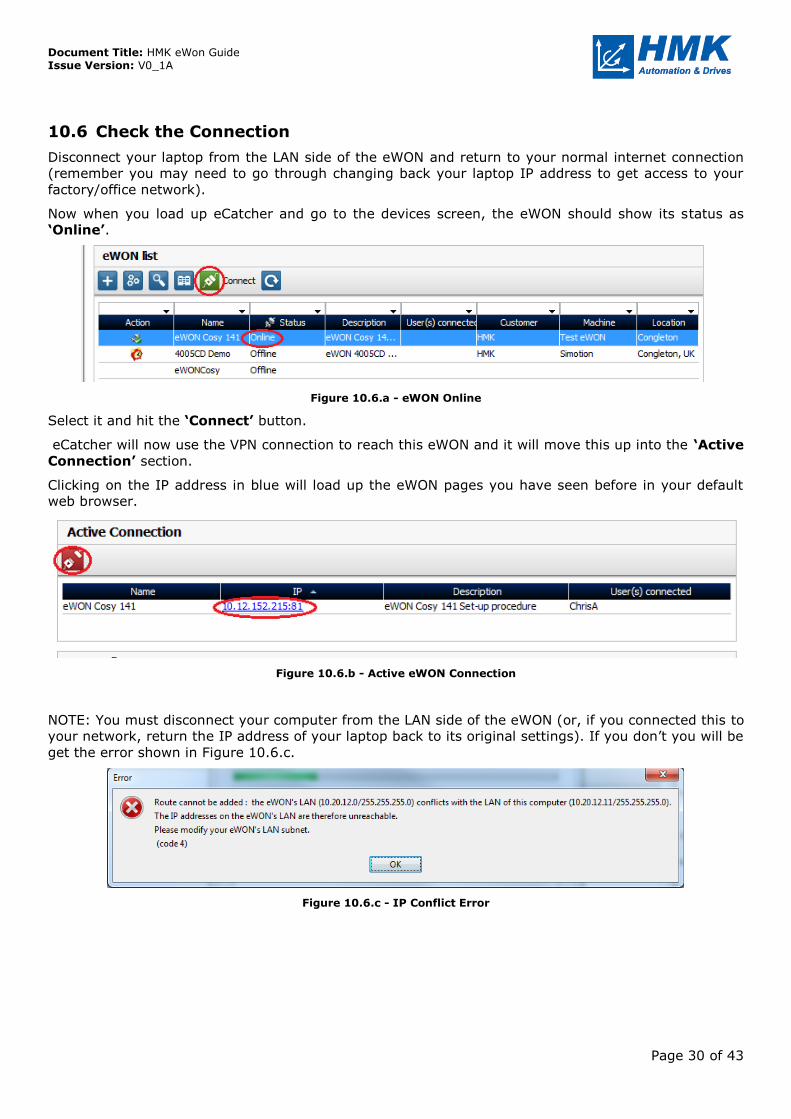
Now when you load up eCatcher and go to the devices screen, the eWON should show its status as
‘Online’.
Figure 10.6.a - eWON Online
Select it and hit the ‘Connect’ button.
eCatcher will now use the VPN connection to reach this eWON and it will move this up into the ‘Active
Connection’ section.
Clicking on the IP address in blue will load up the eWON pages you have seen before in your default
web browser.
Figure 10.6.b - Active eWON Connection
NOTE: You must disconnect your computer from the LAN side of the eWON (or, if you connected this to
your network, return the IP address of your laptop back to its original settings). If you don’t you will be
get the error shown in Figure 10.6.c.
Figure 10.6.c - IP Conflict Error
Document Title: HMK eWon Guide Issue Version: V0_1A
Page 31 of 43
11 Setup and Testing Using GSM Modem (4005CD Only)
This section provides a step by step guide on configuring the eWON 4005CD for use with its inbuilt
GSM modem. This allows remote access over GPRS, EDGE or 3G depending on the quality of mobile
network reception where the eWON is.
This assumes you have followed Section 9 and connected your eWON as necessary. You also need the
details of the eCatcher account into which you want to add the eWON.
Please note: some sections may be very similar/identical to those of section 10. They are repeated for
ease of following the document in a logical manner.
11.1 Adding the eWON to eCatcher
Open eCatcher and log into your account.
On the ‘Devices’ screen, hit the ‘Add’ button.
In the new window, enter a suitable eWON name and description.
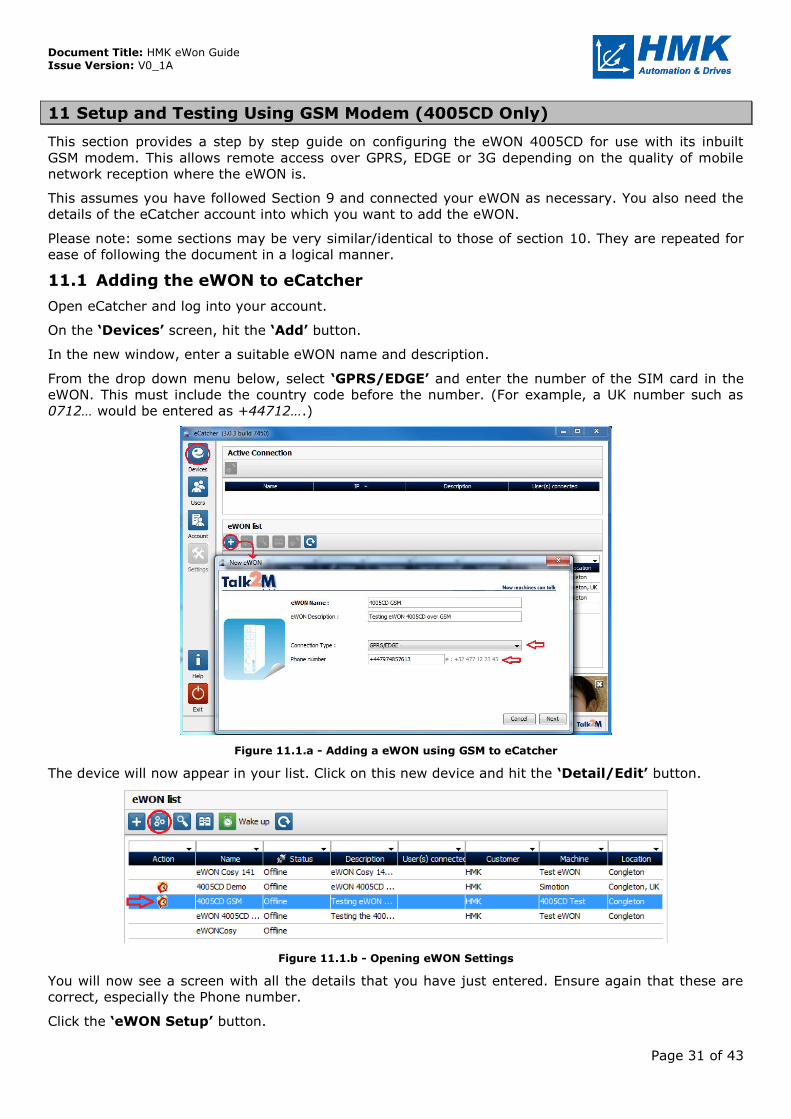
From the drop down menu below, select ‘GPRS/EDGE’ and enter the number of the SIM card in the
eWON. This must include the country code before the number. (For example, a UK number such as
0712… would be entered as +44712….)
Figure 11.1.a - Adding a eWON using GSM to eCatcher
The device will now appear in your list. Click on this new device and hit the ‘Detail/Edit’ button.
Figure 11.1.b - Opening eWON Settings
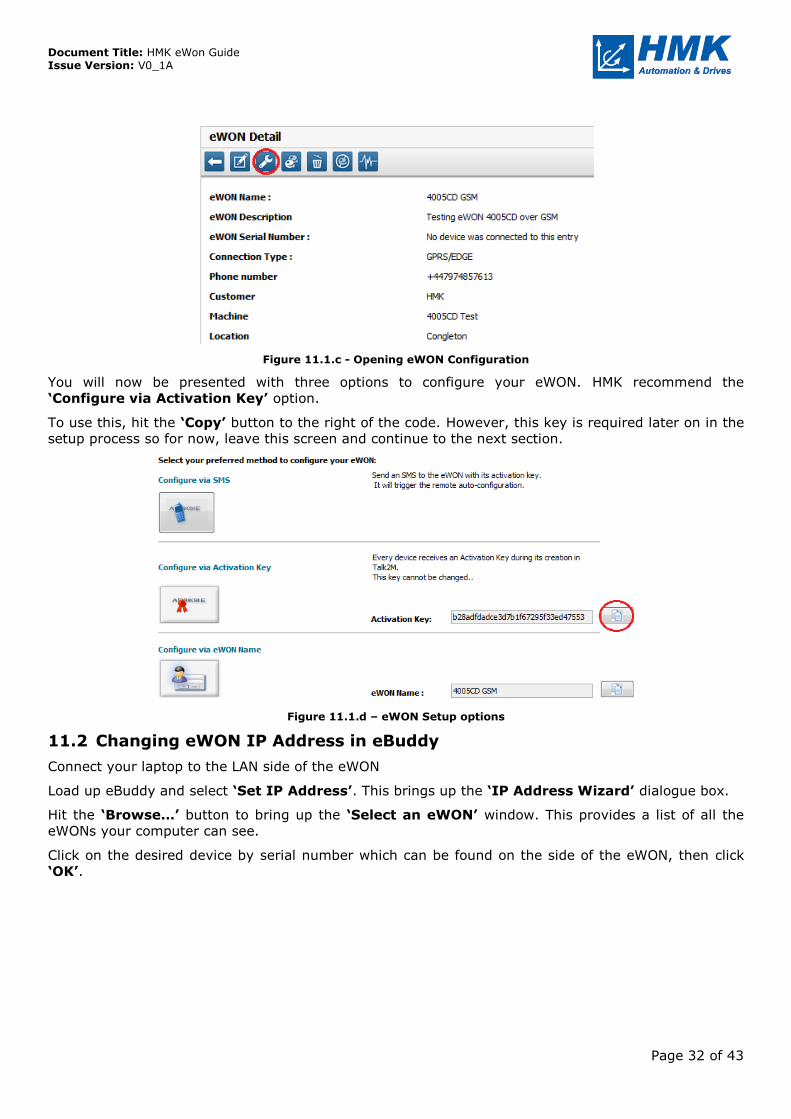
You will now see a screen with all the details that you have just entered. Ensure again that these are
correct, especially the Phone number.
Click the ‘eWON Setup’ button.
Document Title: HMK eWon Guide Issue Version: V0_1A
Page 32 of 43
Figure 11.1.c - Opening eWON Configuration
You will now be presented with three options to configure your eWON. HMK recommend the
‘Configure via Activation Key’ option.
To use this, hit the ‘Copy’ button to the right of the code. However, this key is required later on in the
setup process so for now, leave this screen and continue to the next section.
Figure 11.1.d – eWON Setup options
11.2 Changing eWON IP Address in eBuddy
Connect your laptop to the LAN side of the eWON
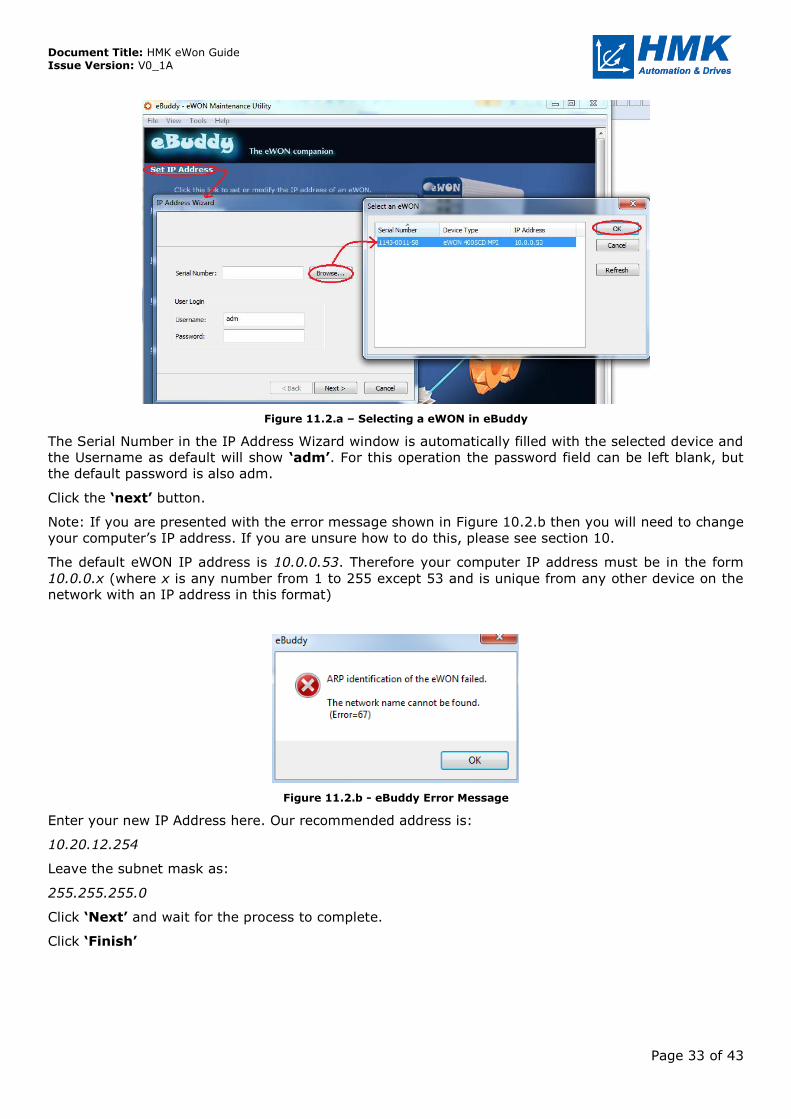
Load up eBuddy and select ‘Set IP Address’. This brings up the ‘IP Address Wizard’ dialogue box.
Hit the ‘Browse…’ button to bring up the ‘Select an eWON’ window. This provides a list of all the
eWONs your computer can see.
Click on the desired device by serial number which can be found on the side of the eWON, then click
‘OK’.
Document Title: HMK eWon Guide Issue Version: V0_1A
Page 33 of 43
Figure 11.2.a – Selecting a eWON in eBuddy
The Serial Number in the IP Address Wizard window is automatically filled with the selected device and
the Username as default will show ‘adm’. For this operation the password field can be left blank, but
the default password is also adm.
Click the ‘next’ button.
Note: If you are presented with the error message shown in Figure 10.2.b then you will need to change
your computer’s IP address. If you are unsure how to do this, please see section 10.
The default eWON IP address is 10.0.0.53. Therefore your computer IP address must be in the form
10.0.0.x (where x is any number from 1 to 255 except 53 and is unique from any other device on the
network with an IP address in this format)
Figure 11.2.b - eBuddy Error Message
Enter your new IP Address here. Our recommended address is:
10.20.12.254
Leave the subnet mask as:
255.255.255.0
Click ‘Next’ and wait for the process to complete.
Click ‘Finish’
Document Title: HMK eWon Guide Issue Version: V0_1A
Page 34 of 43
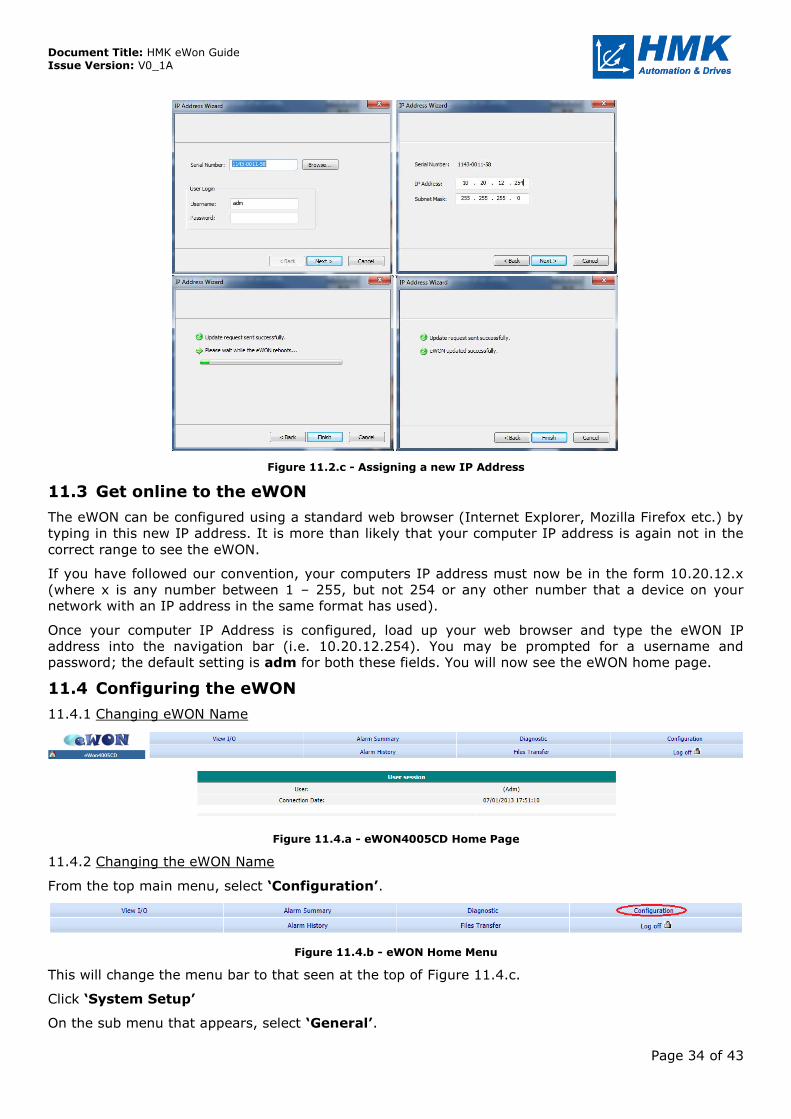
Figure 11.2.c - Assigning a new IP Address
11.3 Get online to the eWON
The eWON can be configured using a standard web browser (Internet Explorer, Mozilla Firefox etc.) by
typing in this new IP address. It is more than likely that your computer IP address is again not in the
correct range to see the eWON.
If you have followed our convention, your computers IP address must now be in the form 10.20.12.x
(where x is any number between 1 – 255, but not 254 or any other number that a device on your
network with an IP address in the same format has used).
Once your computer IP Address is configured, load up your web browser and type the eWON IP
address into the navigation bar (i.e. 10.20.12.254). You may be prompted for a username and
password; the default setting is adm for both these fields. You will now see the eWON home page.
11.4 Configuring the eWON
11.4.1 Changing eWON Name
Figure 11.4.a - eWON4005CD Home Page
11.4.2 Changing the eWON Name
From the top main menu, select ‘Configuration’.
Figure 11.4.b - eWON Home Menu
This will change the menu bar to that seen at the top of Figure 11.4.c.
Click ‘System Setup’
On the sub menu that appears, select ‘General’.
Document Title: HMK eWon Guide Issue Version: V0_1A
Page 35 of 43
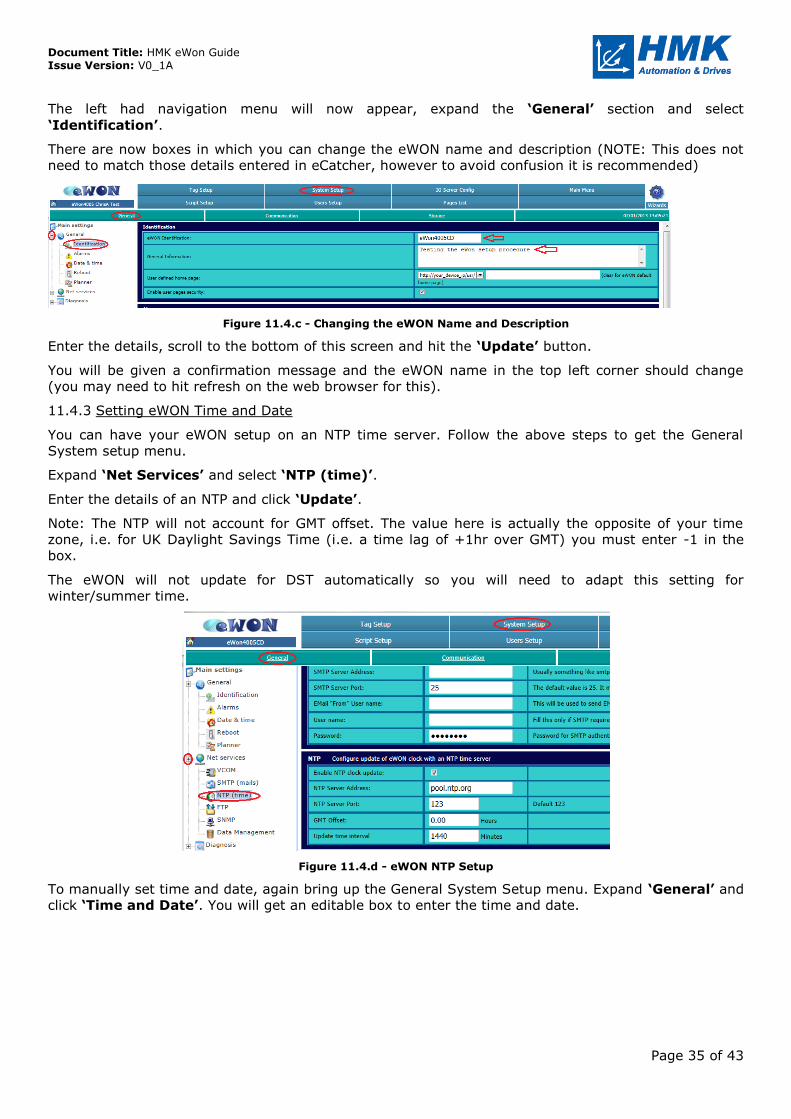
The left had navigation menu will now appear, expand the ‘General’ section and select
‘Identification’.
There are now boxes in which you can change the eWON name and description (NOTE: This does not
need to match those details entered in eCatcher, however to avoid confusion it is recommended)
Figure 11.4.c - Changing the eWON Name and Description
Enter the details, scroll to the bottom of this screen and hit the ‘Update’ button.
You will be given a confirmation message and the eWON name in the top left corner should change
(you may need to hit refresh on the web browser for this).
11.4.3 Setting eWON Time and Date
You can have your eWON setup on an NTP time server. Follow the above steps to get the General
System setup menu.
Expand ‘Net Services’ and select ‘NTP (time)’.
Enter the details of an NTP and click ‘Update’.
Note: The NTP will not account for GMT offset. The value here is actually the opposite of your time
zone, i.e. for UK Daylight Savings Time (i.e. a time lag of +1hr over GMT) you must enter -1 in the
box.
The eWON will not update for DST automatically so you will need to adapt this setting for
winter/summer time.
Figure 11.4.d - eWON NTP Setup
To manually set time and date, again bring up the General System Setup menu. Expand ‘General’ and
click ‘Time and Date’. You will get an editable box to enter the time and date.
Document Title: HMK eWon Guide Issue Version: V0_1A
Page 36 of 43
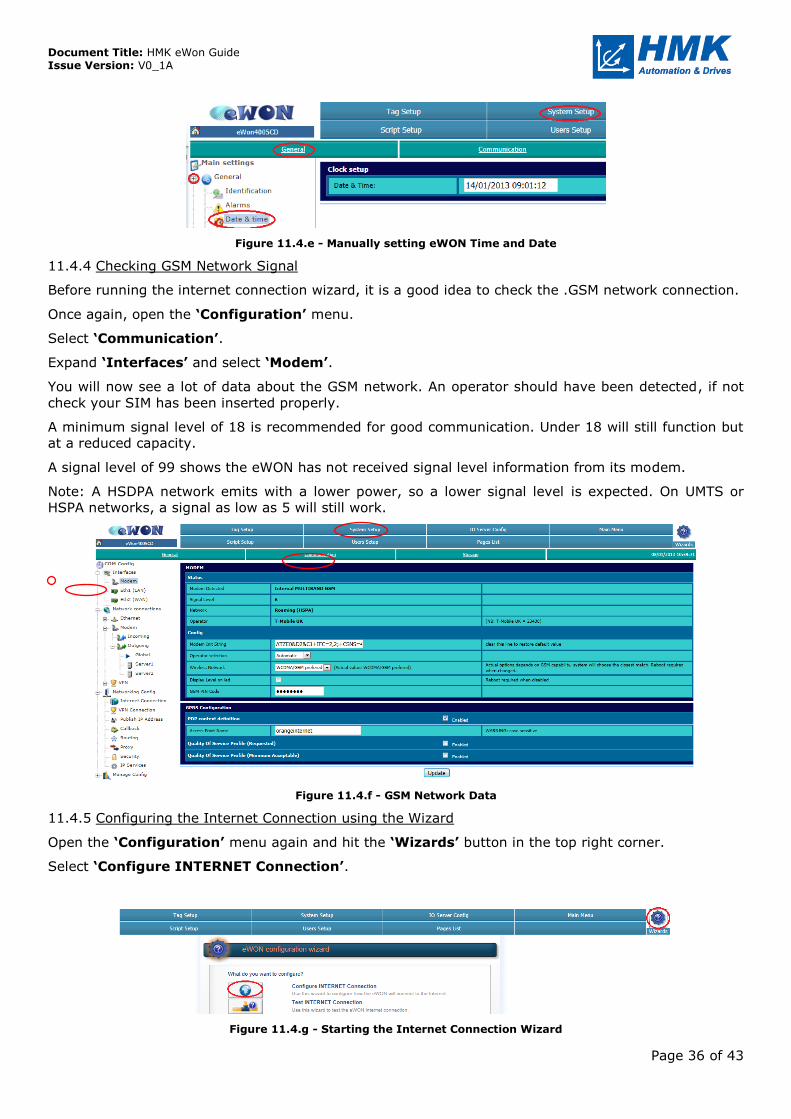
Figure 11.4.e - Manually setting eWON Time and Date
11.4.4 Checking GSM Network Signal
Before running the internet connection wizard, it is a good idea to check the .GSM network connection.
Once again, open the ‘Configuration’ menu.
Select ‘Communication’.
Expand ‘Interfaces’ and select ‘Modem’.
You will now see a lot of data about the GSM network. An operator should have been detected, if not
check your SIM has been inserted properly.
A minimum signal level of 18 is recommended for good communication. Under 18 will still function but
at a reduced capacity.
A signal level of 99 shows the eWON has not received signal level information from its modem.
Note: A HSDPA network emits with a lower power, so a lower signal level is expected. On UMTS or
HSPA networks, a signal as low as 5 will still work.
Figure 11.4.f - GSM Network Data
11.4.5 Configuring the Internet Connection using the Wizard
Open the ‘Configuration’ menu again and hit the ‘Wizards’ button in the top right corner.
Select ‘Configure INTERNET Connection’.
Figure 11.4.g - Starting the Internet Connection Wizard
Document Title: HMK eWon Guide Issue Version: V0_1A
Page 37 of 43
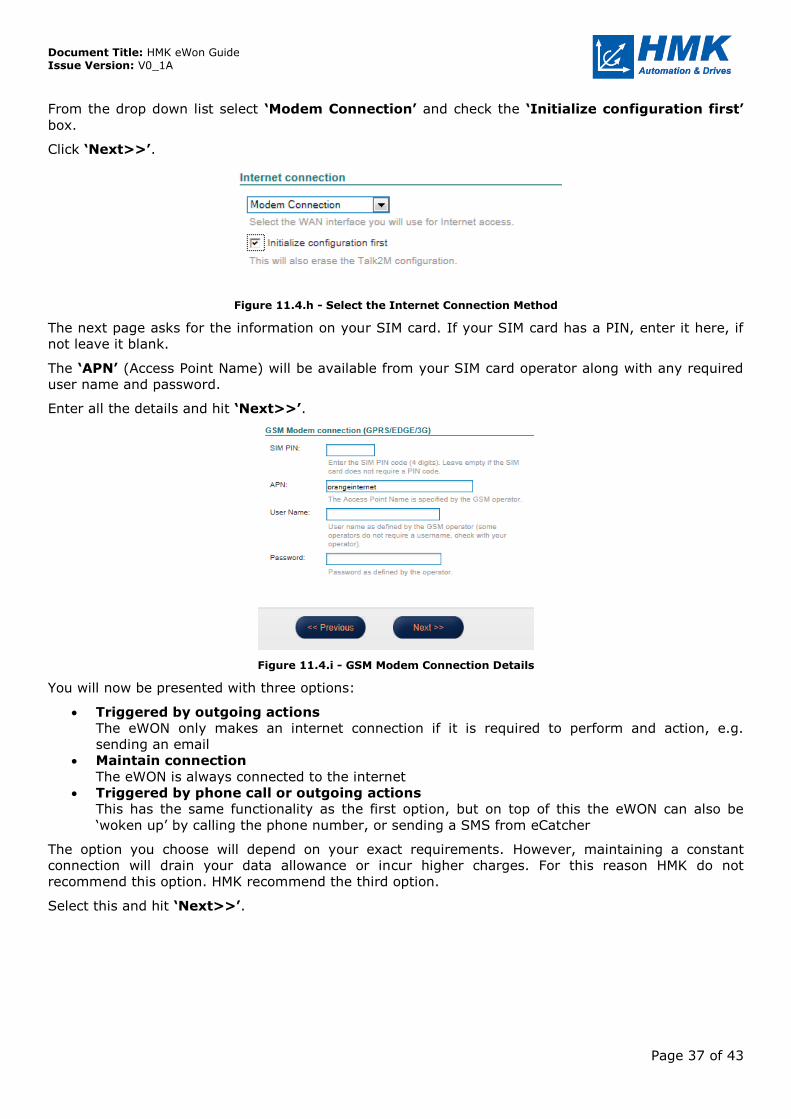
From the drop down list select ‘Modem Connection’ and check the ‘Initialize configuration first’
box.
Click ‘Next>>’.
Figure 11.4.h - Select the Internet Connection Method
The next page asks for the information on your SIM card. If your SIM card has a PIN, enter it here, if
not leave it blank.
The ‘APN’ (Access Point Name) will be available from your SIM card operator along with any required
user name and password.
Enter all the details and hit ‘Next>>’.
Figure 11.4.i - GSM Modem Connection Details
You will now be presented with three options:
Triggered by outgoing actions
The eWON only makes an internet connection if it is required to perform and action, e.g.
sending an email
Maintain connection
The eWON is always connected to the internet
Triggered by phone call or outgoing actions
This has the same functionality as the first option, but on top of this the eWON can also be
‘woken up’ by calling the phone number, or sending a SMS from eCatcher
The option you choose will depend on your exact requirements. However, maintaining a constant
connection will drain your data allowance or incur higher charges. For this reason HMK do not
recommend this option. HMK recommend the third option.
Select this and hit ‘Next>>’.
Document Title: HMK eWon Guide Issue Version: V0_1A
Page 38 of 43
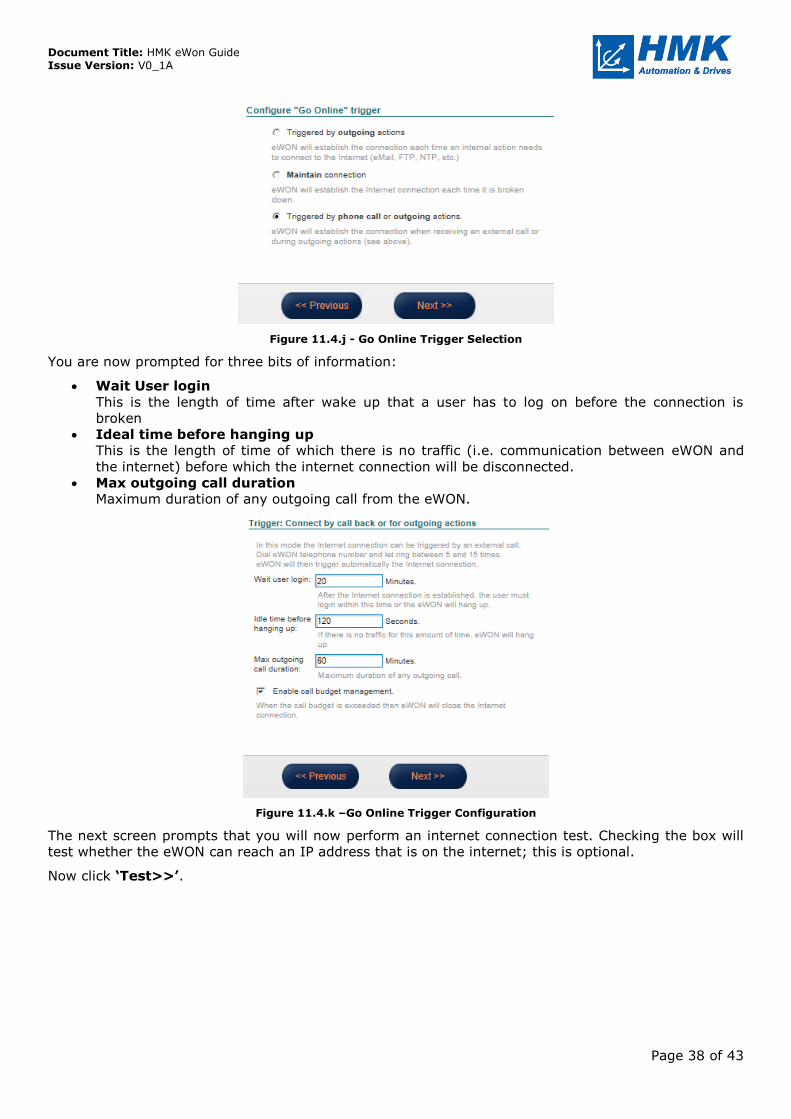
Figure 11.4.j - Go Online Trigger Selection
You are now prompted for three bits of information:
Wait User login
This is the length of time after wake up that a user has to log on before the connection is
broken
Ideal time before hanging up
This is the length of time of which there is no traffic (i.e. communication between eWON and
the internet) before which the internet connection will be disconnected.
Max outgoing call duration
Maximum duration of any outgoing call from the eWON.
Figure 11.4.k –Go Online Trigger Configuration
The next screen prompts that you will now perform an internet connection test. Checking the box will
test whether the eWON can reach an IP address that is on the internet; this is optional.
Now click ‘Test>>’.
Document Title: HMK eWon Guide Issue Version: V0_1A
Page 39 of 43
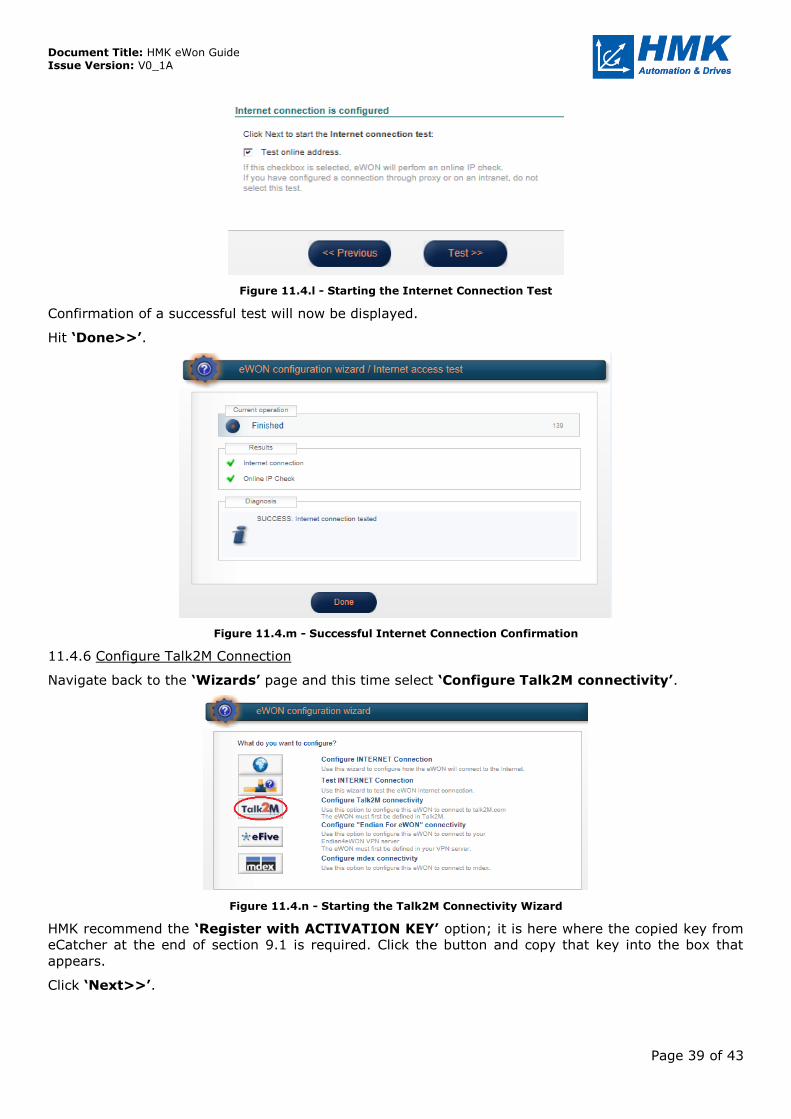
Figure 11.4.l - Starting the Internet Connection Test
Confirmation of a successful test will now be displayed.
Hit ‘Done>>’.
Figure 11.4.m - Successful Internet Connection Confirmation
11.4.6 Configure Talk2M Connection
Navigate back to the ‘Wizards’ page and this time select ‘Configure Talk2M connectivity’.
Figure 11.4.n - Starting the Talk2M Connectivity Wizard
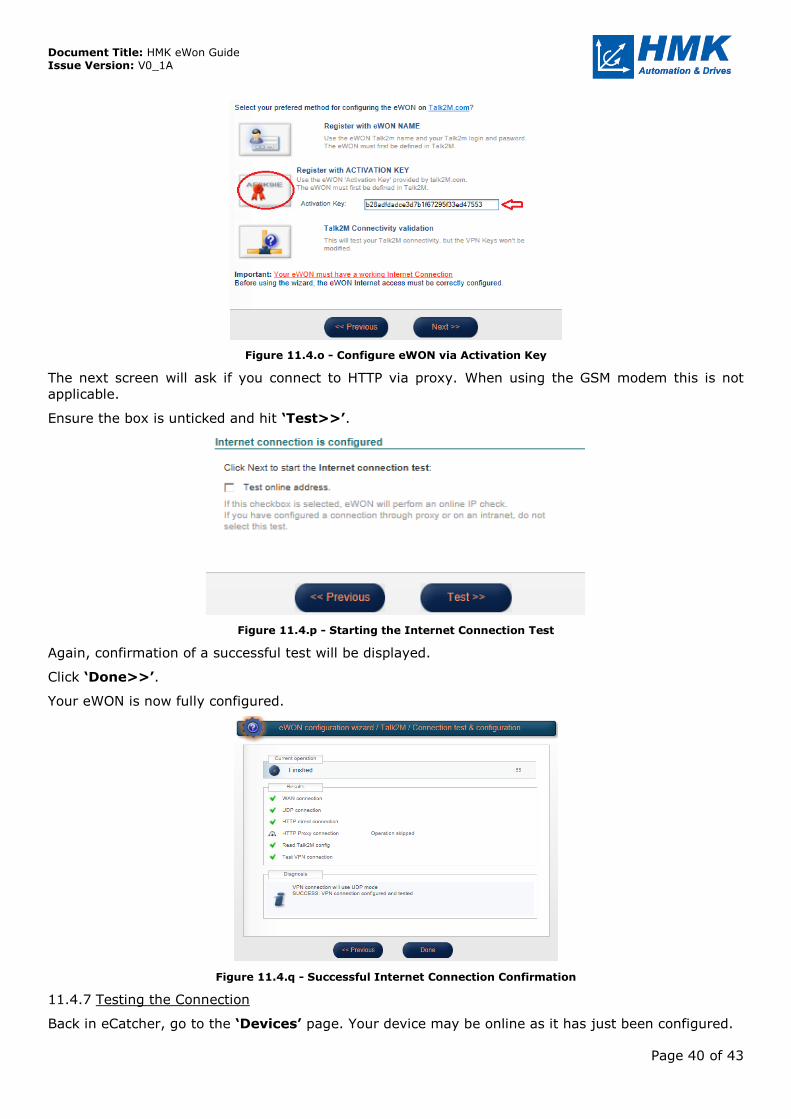
HMK recommend the ‘Register with ACTIVATION KEY’ option; it is here where the copied key from
eCatcher at the end of section 9.1 is required. Click the button and copy that key into the box that
appears.
Click ‘Next>>’.
Document Title: HMK eWon Guide Issue Version: V0_1A
Page 40 of 43
Figure 11.4.o - Configure eWON via Activation Key
The next screen will ask if you connect to HTTP via proxy. When using the GSM modem this is not
applicable.
Ensure the box is unticked and hit ‘Test>>’.
Figure 11.4.p - Starting the Internet Connection Test
Again, confirmation of a successful test will be displayed.
Click ‘Done>>’.
Your eWON is now fully configured.
Figure 11.4.q - Successful Internet Connection Confirmation
11.4.7 Testing the Connection
Back in eCatcher, go to the ‘Devices’ page. Your device may be online as it has just been configured.
Document Title: HMK eWon Guide Issue Version: V0_1A
Page 41 of 43
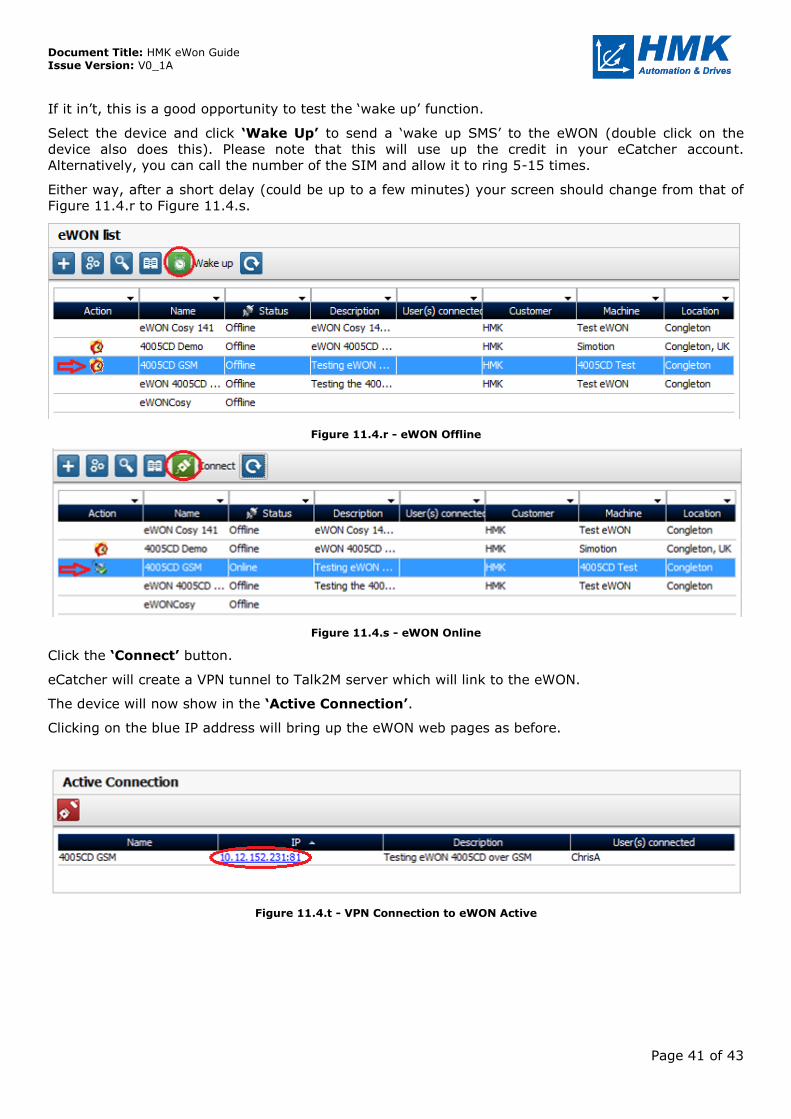
If it in’t, this is a good opportunity to test the ‘wake up’ function.
Select the device and click ‘Wake Up’ to send a ‘wake up SMS’ to the eWON (double click on the
device also does this). Please note that this will use up the credit in your eCatcher account.
Alternatively, you can call the number of the SIM and allow it to ring 5-15 times.
Either way, after a short delay (could be up to a few minutes) your screen should change from that of
Figure 11.4.r to Figure 11.4.s.
Figure 11.4.r - eWON Offline
Figure 11.4.s - eWON Online
Click the ‘Connect’ button.
eCatcher will create a VPN tunnel to Talk2M server which will link to the eWON.
The device will now show in the ‘Active Connection’.
Clicking on the blue IP address will bring up the eWON web pages as before.
Figure 11.4.t - VPN Connection to eWON Active

Document Title: HMK eWon Guide Issue Version: V0_1A
Page 42 of 43
12 Changing your Computer’s IP Address
This appendix will take you through the steps required to manually assign your computer with an IP
address. The exact instructions and screen shots relate to Windows 7, however these will be similar to
both Windows XP and Vista too.
1. Load up the ‘Network and Sharing Centre’.
This can be done by opening the Control Panel, select ‘Network and Internet’ and then select
‘Network and Sharing Centre’.
Alternatively, you can right click on the network symbol in the bottom right of the task bar and select
network and sharing centre.
Figure 11.4.a - Opening Network and Sharing Centre via Task Bar
2. Select ‘Change adapter settings’ from the left hand side
Figure 11.4.b - Open Adaptor Settings from Network and Sharing Centre
3. Open the properties of ‘Local Area Connection’ by right clicking on it and selecting
‘Properties’.
Figure 11.4.c - Opening the properties of a Network Connector
4. From the new window that opens, highlight ‘Internet Protocol Version 4 (TCP/IPv4)’ and
hit the properties button.
Document Title: HMK eWon Guide Issue Version: V0_1A
Page 43 of 43
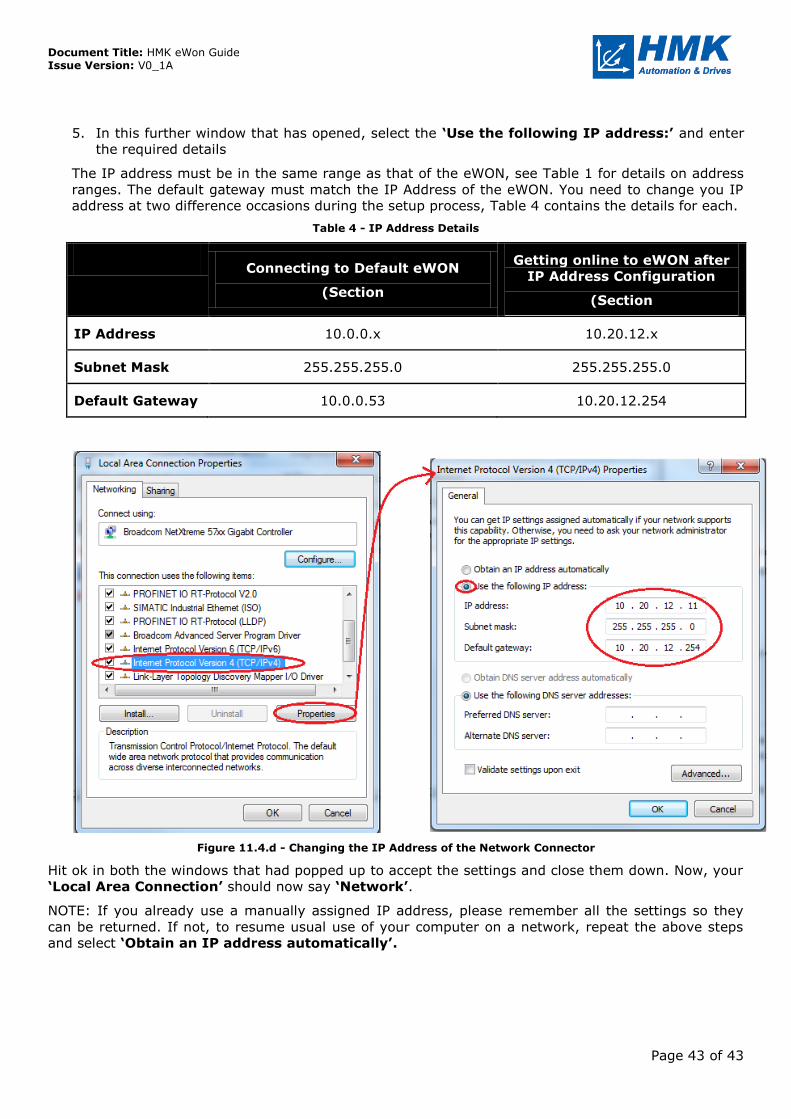
5. In this further window that has opened, select the ‘Use the following IP address:’ and enter
the required details
The IP address must be in the same range as that of the eWON, see Table 1 for details on address
ranges. The default gateway must match the IP Address of the eWON. You need to change you IP
address at two difference occasions during the setup process, Table 4 contains the details for each.
Table 4 - IP Address Details
Connecting to Default eWON
(Section
Getting online to eWON after
IP Address Configuration
(Section
IP Address 10.0.0.x 10.20.12.x
Subnet Mask 255.255.255.0 255.255.255.0
Default Gateway 10.0.0.53 10.20.12.254
Figure 11.4.d - Changing the IP Address of the Network Connector
Hit ok in both the windows that had popped up to accept the settings and close them down. Now, your
‘Local Area Connection’ should now say ‘Network’.
NOTE: If you already use a manually assigned IP address, please remember all the settings so they
can be returned. If not, to resume usual use of your computer on a network, repeat the above steps
and select ‘Obtain an IP address automatically’.