Embed Size (px)
Citation preview
John Still
HMCHMC
The New Console on the The New Console on the Block
2
Console HistoryIntroducing the Hardware Management Console (HMC)Planning for HMC and i5Guided Setup WizardHMC ManagementRemote AccessSystem Manager Security
Objectives
3
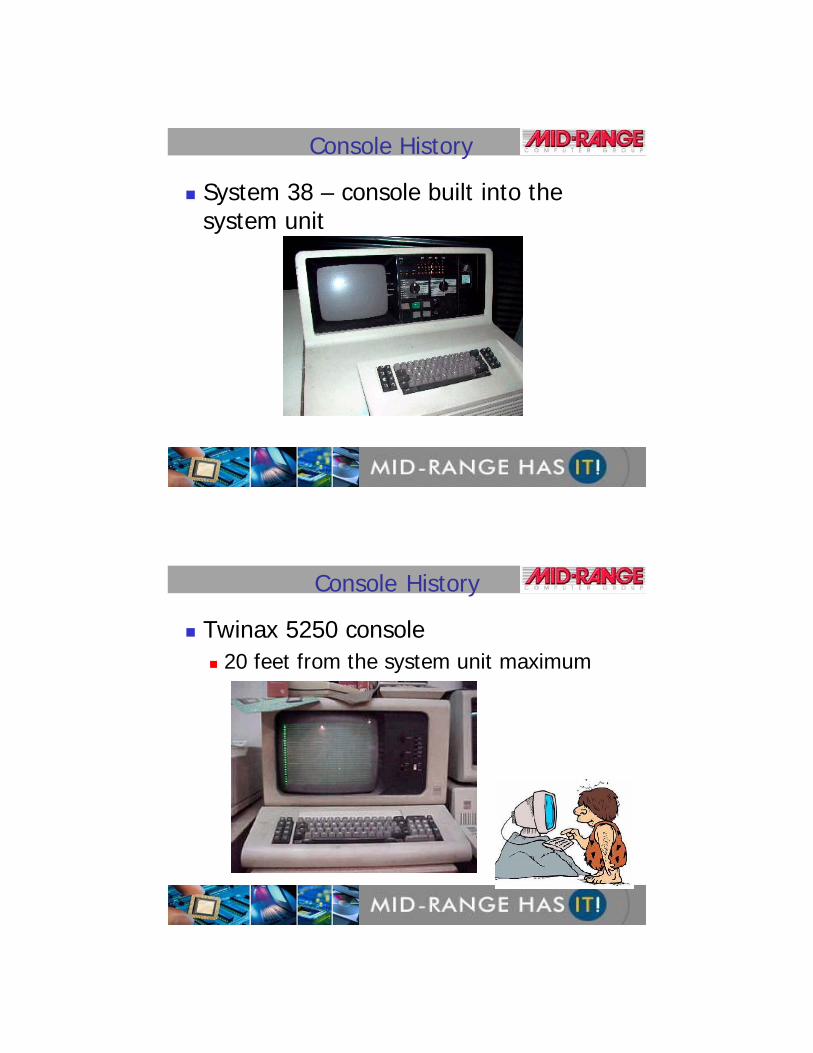
Console History
System 38 – console built into the system unit
4
Console History
Twinax 5250 console20 feet from the system unit maximum

5
Console History
PCs gain momentum5250 emulation card allows PC to become system consoleClient access PC consoleiSeries access operations console & Lan console
6
Introducing the HMC
First introduced on the pSeriesA LINUX based PC appliance for eServer power5Tied to specific PC hardware (xSeries)Ships with embedded OS pre-loadedClosed and dedicated (can’t install other software on it)Required for configuration & management of logical partitioning, capacity on demand and some maintenance functions

7
Introducing the HMCCreate and maintain a LPAR environment.
Display a virtual console session for each i5/OS partition.Display or change control panel settings for each partition.
Detect, report, and store changes in hardware conditions.
Power managed systems on and off.
Act as a service focal point for service representatives to determine an appropriate service strategy and enable service agent to call home to IBM.
Activate additional resources on demand.The HMC can be disconnected, but you cannot perform any of the above functions.
Introducing the HMC •Based on xSeries server technology
–Minimum HMC configuration includes: 1 GB memory, 40 GB disk, DVD-RAM, 10/100/1000 Mbps Ethernet port, diskette drive, etc
–Selectable options for HMC’s display, keyboard, etc (ordered separately)
–HMC connects to POWER5 service processor which has two dedicated HMC ports. The ports are Ethernet ports. (Different from the two generic 10/100/1000Mbps Ethernet LANs.)
•Standard HMC maintenance support is CRU. Suggest upgrading support to IBM On-Site Repair to be more consistent with POWER5 server’s support agreement.
•HMC not used on earlier iSeries servers
•non-HMC i5/OS consoles are still supported
•High availability suggestion: attached two HMCs to critical Power5 servers for redundancy.
7310-C03(desktop)
7310-CR2(rack)
9
HMC Security
• Granular User Access Controls– Define Task and Resource Roles that define accessible lists of user
tasks and resources (systems, partitions, etc)– Assign roles to users to define their access rights– For example, access could be limited to a single partition
• Network Security Firewall Controls– Define which HMC network services should be accessible on which
physical network interfaces– For example, limit remote WebSM or SSH access to a single interface,
or none• Restricted Shell
– Provides access to supported HMC command line functions– Accessible remotely through SSH enabled client– Also accessible as a command prompt window on the HMC itself
Introducing the HMC - Security
10
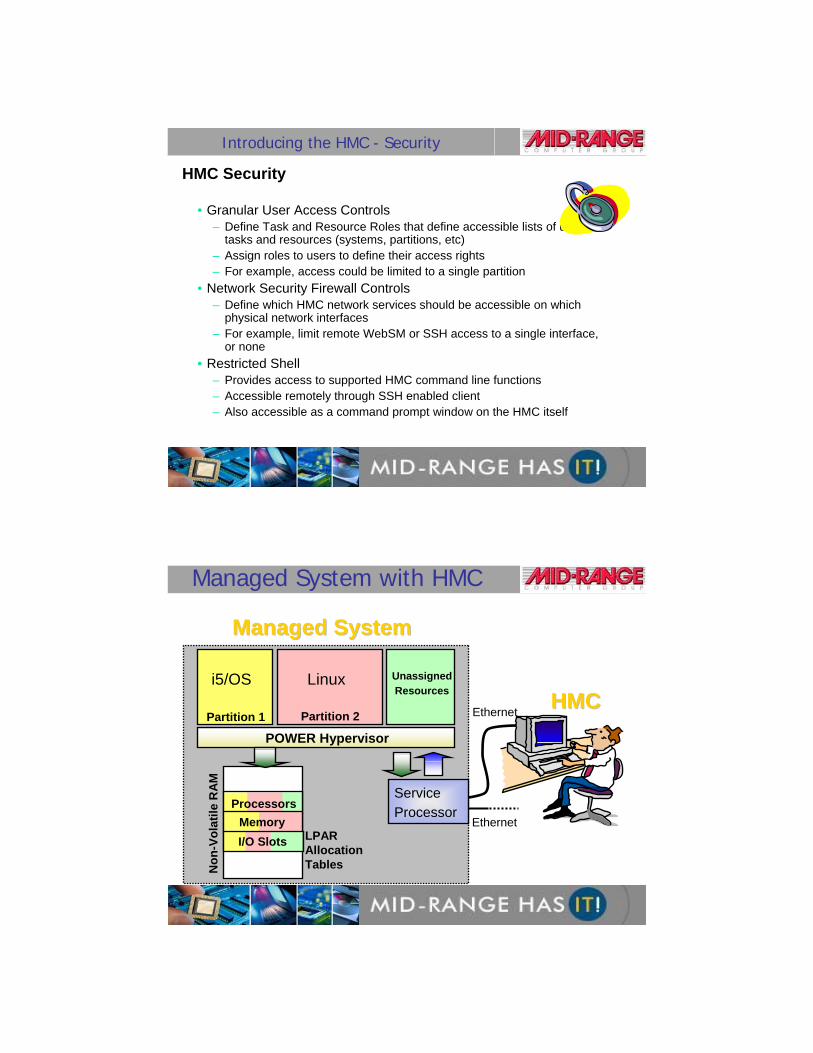
Non
-Vol
atile
RA
M
POWER HypervisorPartition 1
UnassignedResources
LPARAllocation Tables
HMCHMCi5/OS Linux
ServiceProcessorProcessors
MemoryI/O Slots
Partition 2
Managed SystemManaged System
Ethernet
Ethernet
Managed System with HMC
11
Service Processor• SP (Service Processor) or formerly FSP (Flexible Service Processor)
• Description: Controls base operations of the i5 system. Itis powered up immediately when power is supplied.
• Defaults as DHCP client.• Defaults if no address or range assigned within one minute:
https://192.168.2.147 and https://192.168.3.147
• Managed System can operate in the absence of the HMC.
• LPAR configuration resides in HMC and NVRAM.
• Maintenance PTFs required (via HMC or i5 OS Partition)
12
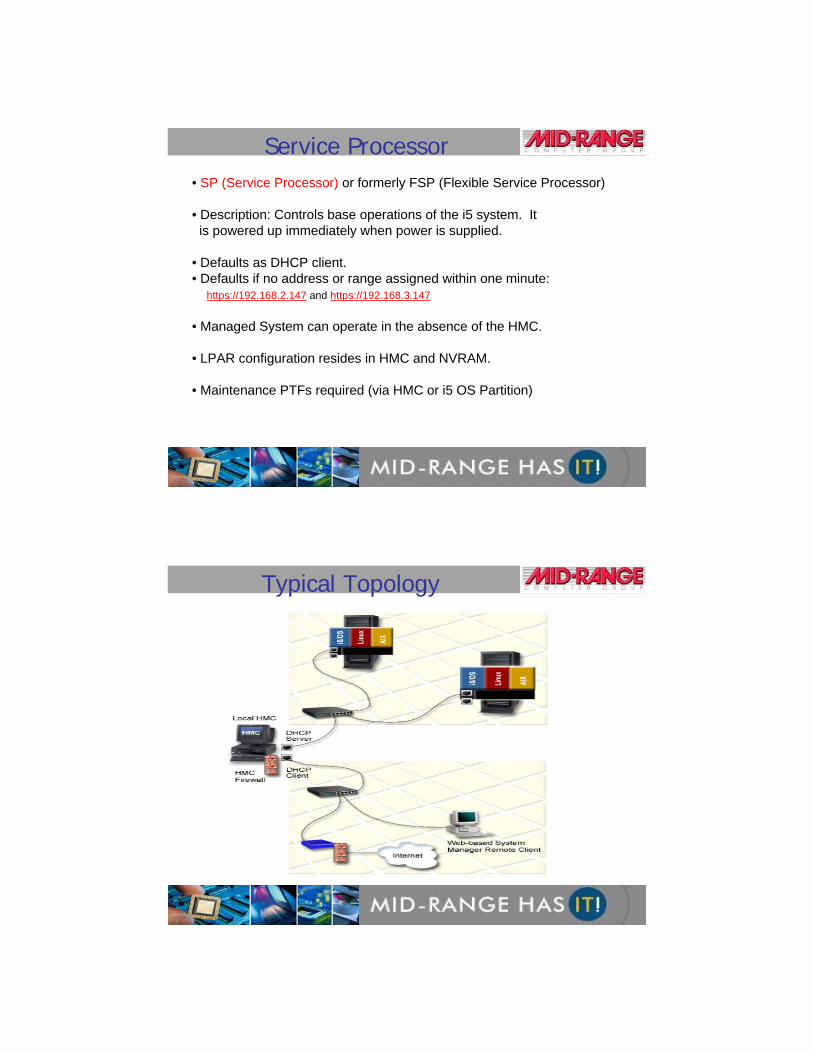
Typical Topology

13
Why the HMC?Already on the pSeries – why not the iSeries
VirtualizationWhy should operating systems have to worry about hardwareA place to host advanced platform management applications regardless of what OS is loadedThe ability to configure a server before the OS is loadedProvide virtual consoles (i5, AIX, LINUX)
A common delivery vehicle – IBM can deliver more functions, more quickly
14
On an 8XX system your Primary Partition cost:
• At least .25 Processing Units recommended• At least 1 DASD bay or ‘sub’ bay• At least 2 Disk drives• At least 512 MB memory• At least 1 IOP and 1 Disk IOA and 1 console IOA
• WAS a single point of failure
Why the HMC ?
P0P0 P2P2P1P1
15
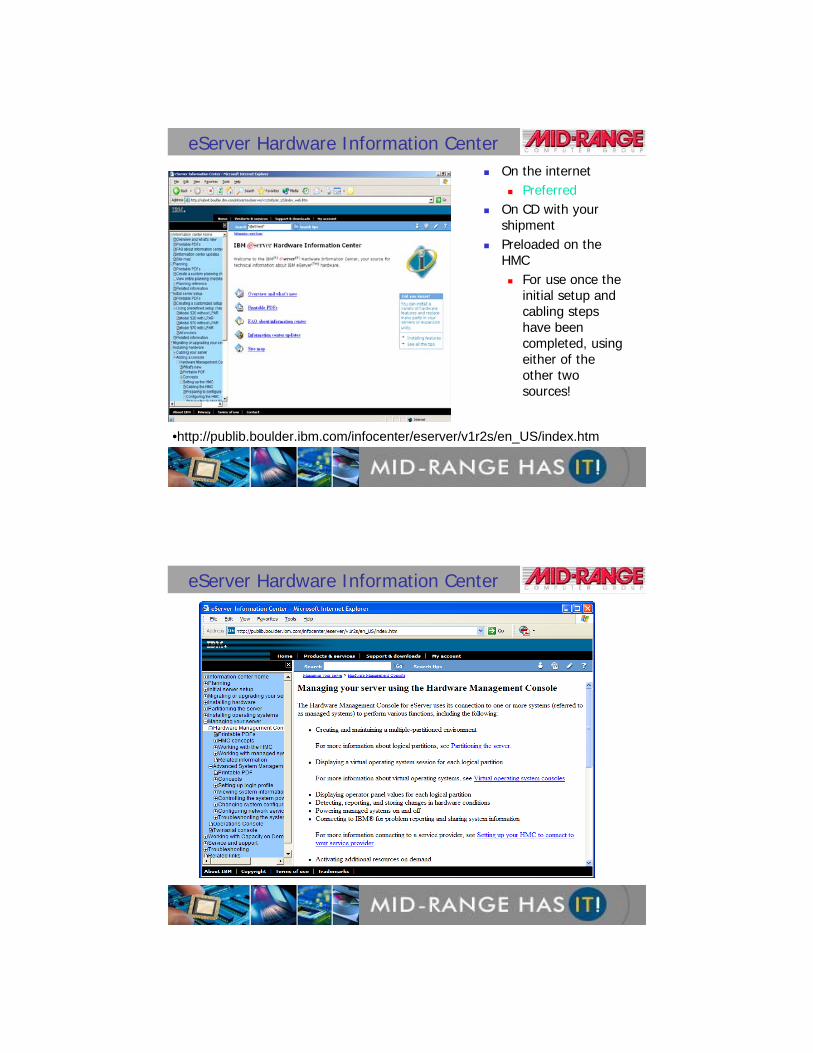
eServer Hardware Information CenterOn the internet
PreferredOn CD with your shipmentPreloaded on the HMC
For use once the initial setup and cabling steps have been completed, using either of the other two sources!
•http://publib.boulder.ibm.com/infocenter/eserver/v1r2s/en_US/index.htm
16
eServer Hardware Information Center
17
eServer Hardware Information Center
Extensive Planning and “How To” documentation
For the HMC, make sure you review these sections:
Planning for the Hardware Management Console (HMC)
Gathering required configuration settings
HMC configuration checklist
Going through these planning steps will make for a much smoother HMC installation – it could save you hours!
18
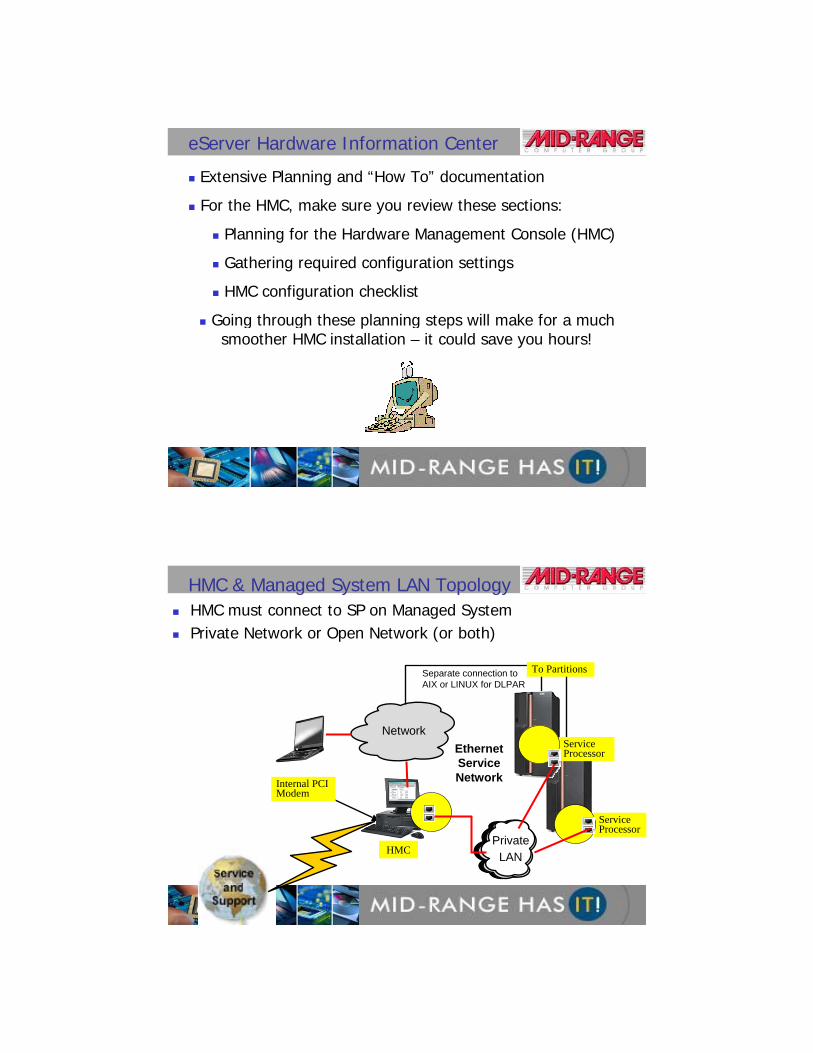
HMC & Managed System LAN Topology
Network
PrivateLAN
EthernetServiceNetwork
Service Processor
HMC
Service Processor
To Partitions
Internal PCI Modem
HMC must connect to SP on Managed SystemPrivate Network or Open Network (or both)
Separate connection toAIX or LINUX for DLPAR
19
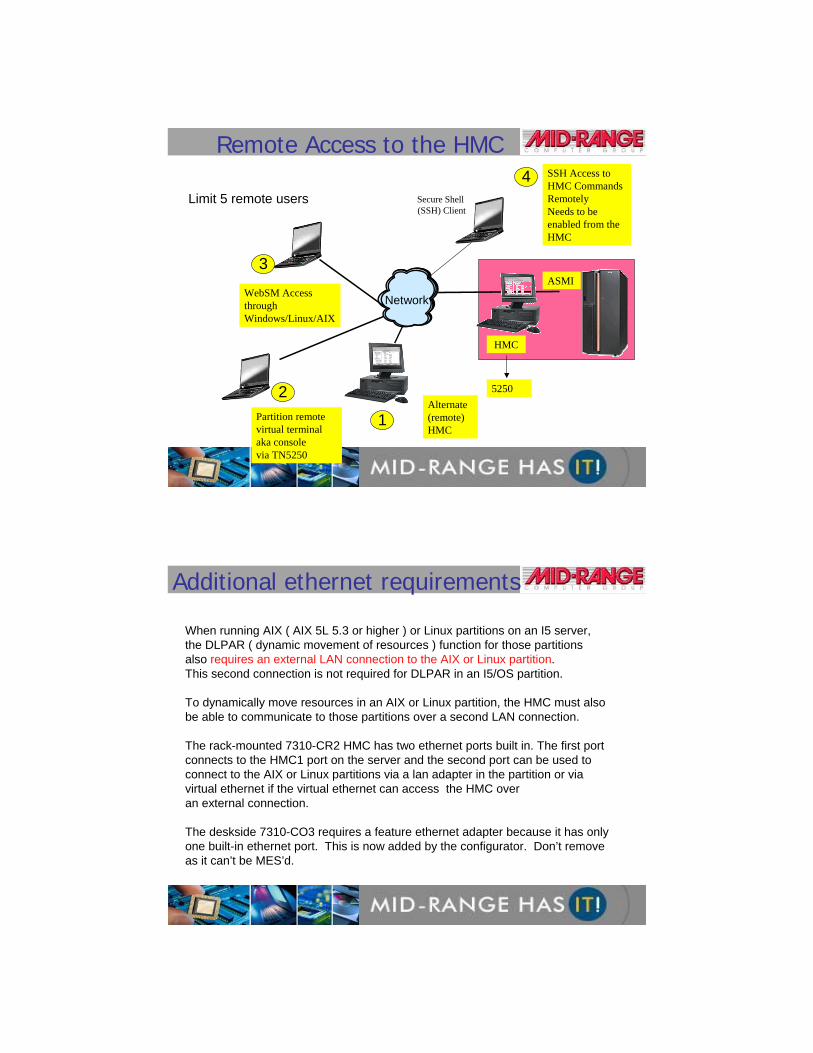
Remote Access to the HMC
Network
3
HMC
Alternate(remote)HMC
SSH Access to HMC CommandsRemotelyNeeds to be enabled from the HMC
WebSM Access through Windows/Linux/AIX
Secure Shell (SSH) Client
Partition remote virtual terminal aka consolevia TN5250
2
1
4
ASMI
Limit 5 remote users
5250
20
Additional ethernet requirements
When running AIX ( AIX 5L 5.3 or higher ) or Linux partitions on an I5 server, the DLPAR ( dynamic movement of resources ) function for those partitions also requires an external LAN connection to the AIX or Linux partition. This second connection is not required for DLPAR in an I5/OS partition.
To dynamically move resources in an AIX or Linux partition, the HMC must also be able to communicate to those partitions over a second LAN connection.
The rack-mounted 7310-CR2 HMC has two ethernet ports built in. The first portconnects to the HMC1 port on the server and the second port can be used to connect to the AIX or Linux partitions via a lan adapter in the partition or via virtual ethernet if the virtual ethernet can access the HMC over an external connection.
The deskside 7310-CO3 requires a feature ethernet adapter because it has only one built-in ethernet port. This is now added by the configurator. Don’t removeas it can’t be MES’d.

21
HMC Setup options“Private Network” port 1 (eth0)
HMC = DHCP server (Managed Systems= DHCP client)
Direct attachSingle Managed System
Attached through hub HMC (can add a 2nd HMC)1 or more Managed Systems (up to 16)Both i5 & p5 @ HMC 4.2
Port 1 & 2 identical
22
HMC Setup options
STRONG Suggestion : Connect the first HMC as a LOCAL HMC!
Redundant HMC:Synchronized withPrimary HMC
FSP is DHCP Client (default)
FSP is DHCP Client (default)
“Private Network” – Port 1
23
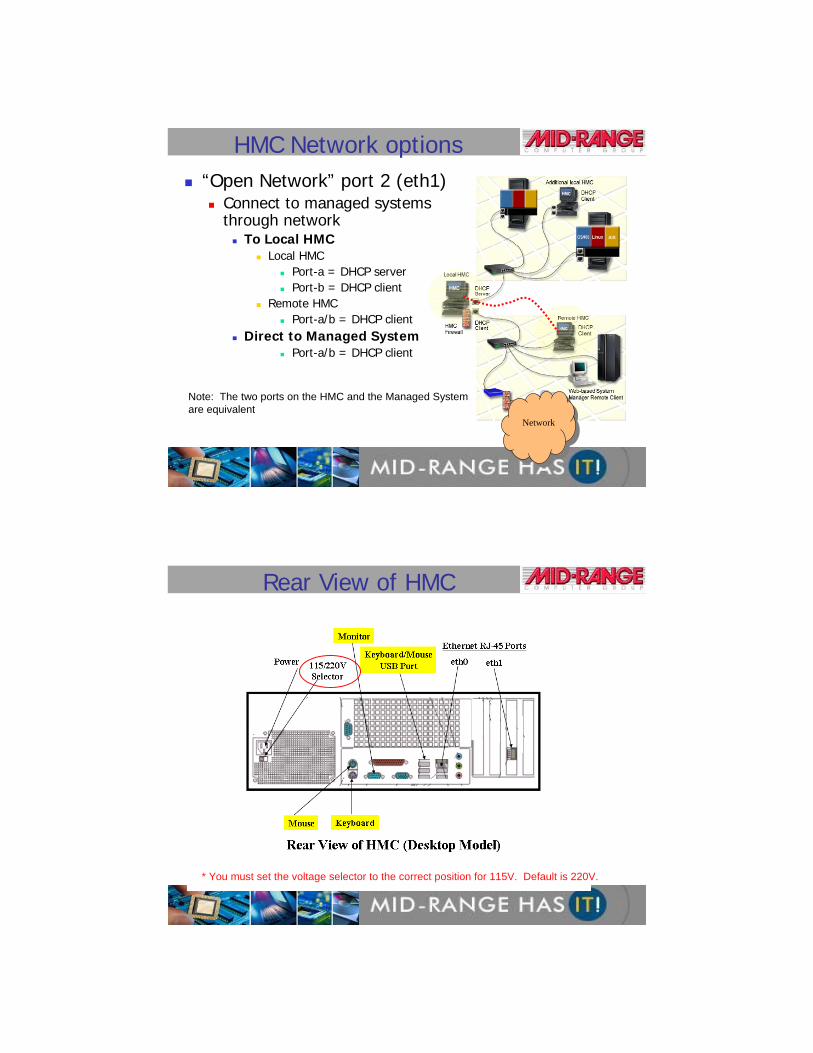
HMC Network options“Open Network” port 2 (eth1)
Connect to managed systems through network
To Local HMCLocal HMC
Port-a = DHCP serverPort-b = DHCP client
Remote HMCPort-a/b = DHCP client
Direct to Managed System Port-a/b = DHCP client
Network
Note: The two ports on the HMC and the Managed System are equivalent
24
Rear View of HMC
* You must set the voltage selector to the correct position for 115V. Default is 220V.
25
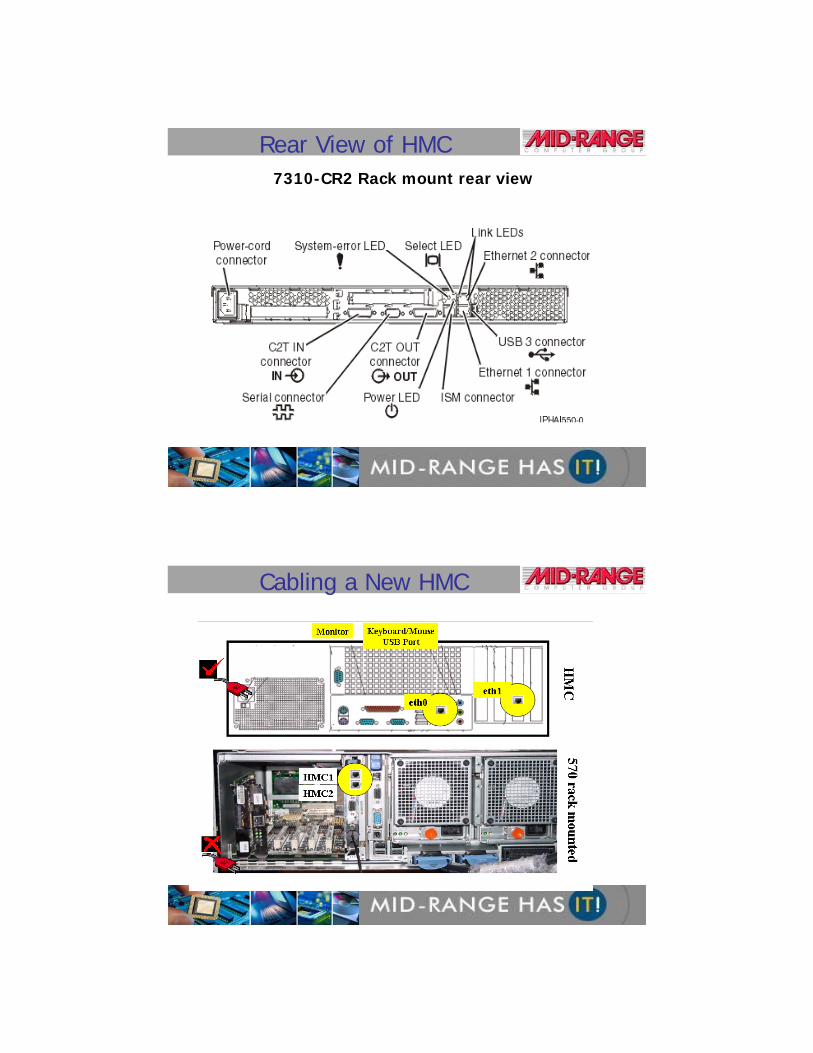
Rear View of HMC7310-CR2 Rack mount rear view
26
Cabling a New HMC
27
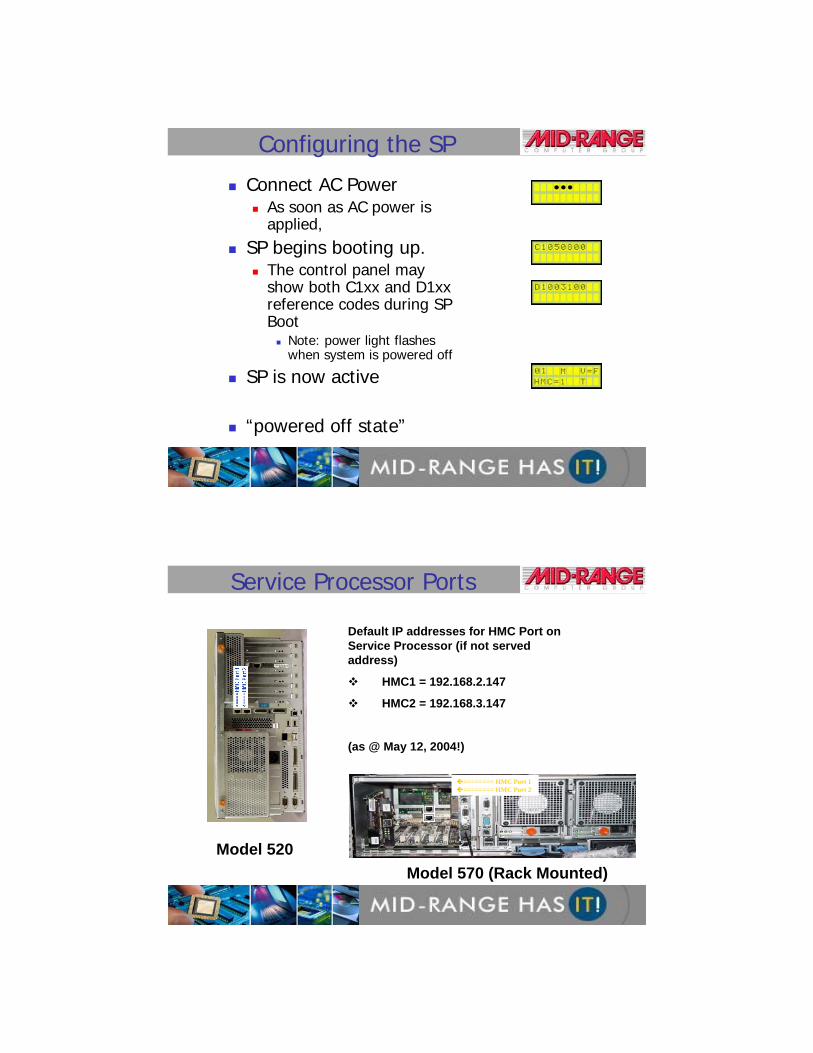
Configuring the SP
Connect AC PowerAs soon as AC power is applied,
SP begins booting up.The control panel may show both C1xx and D1xx reference codes during SP Boot
Note: power light flashes when system is powered off
SP is now active
“powered off state”
28
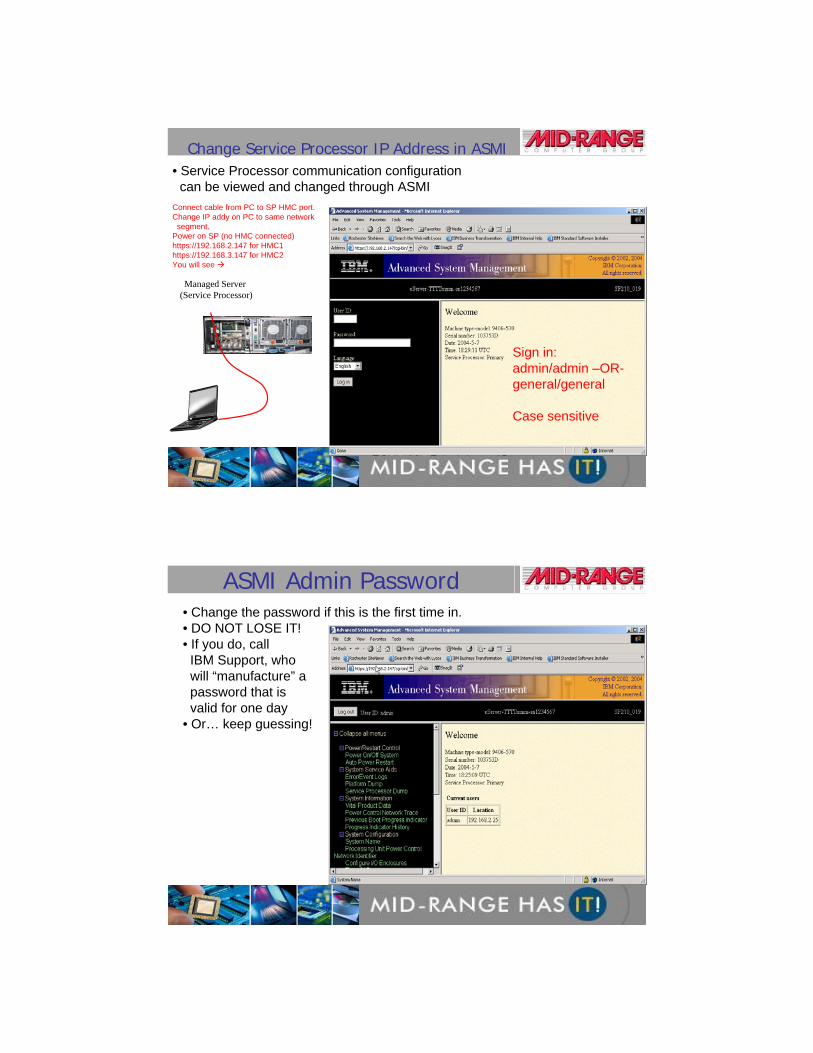
Service Processor Ports
Model 520Model 570 (Rack Mounted)
======== HMC Port 1 ======== HMC Port 2
Default IP addresses for HMC Port on Service Processor (if not served address)
HMC1 = 192.168.2.147
HMC2 = 192.168.3.147
(as @ May 12, 2004!)
29
Managed Server (Service Processor)
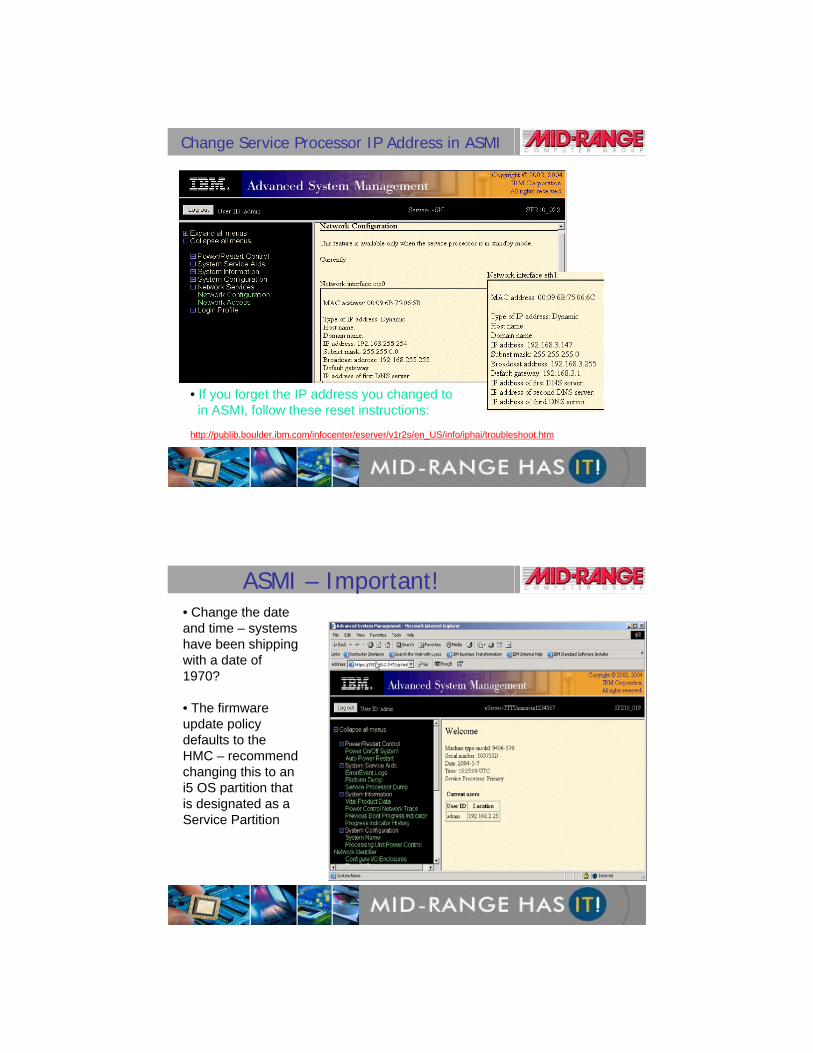
Change Service Processor IP Address in ASMI• Service Processor communication configuration can be viewed and changed through ASMI
Connect cable from PC to SP HMC port.Change IP addy on PC to same network
segment.Power on SP (no HMC connected)https://192.168.2.147 for HMC1https://192.168.3.147 for HMC2You will see
Sign in:admin/admin –OR-general/general
Case sensitive
30
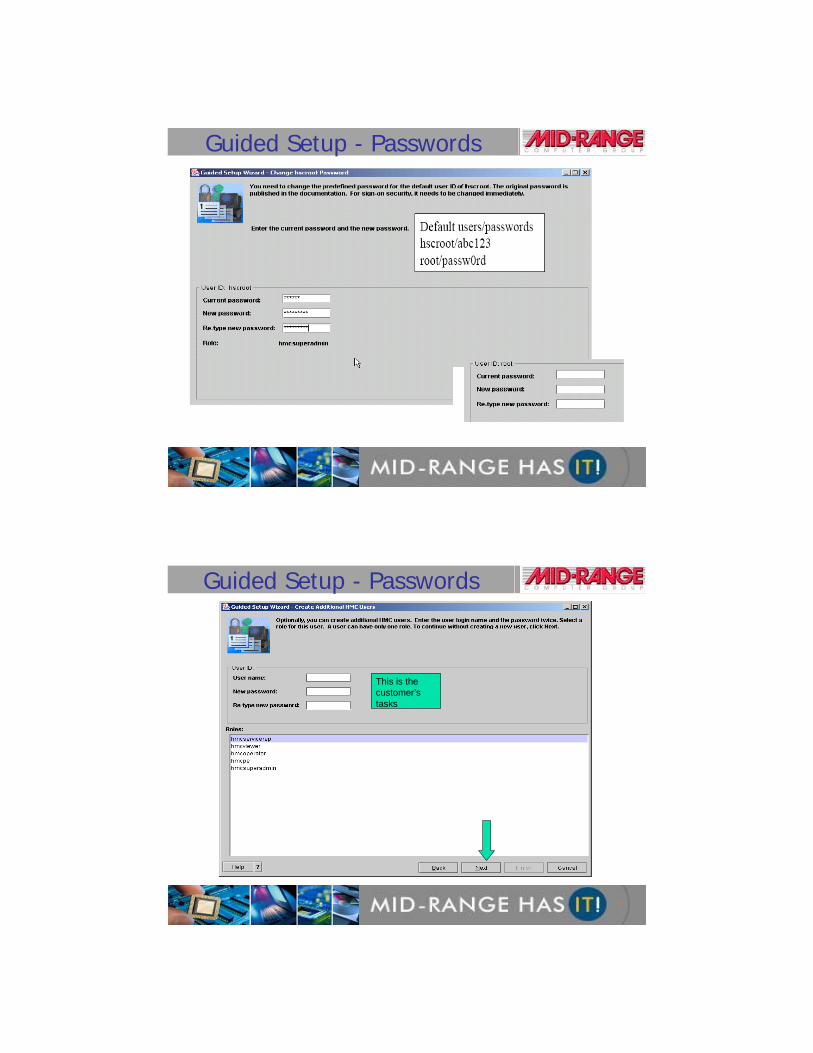
• Change the password if this is the first time in.• DO NOT LOSE IT!• If you do, callIBM Support, whowill “manufacture” apassword that isvalid for one day
• Or… keep guessing!
ASMI Admin Password
31
• If you forget the IP address you changed to in ASMI, follow these reset instructions:
http://publib.boulder.ibm.com/infocenter/eserver/v1r2s/en_US/info/iphai/troubleshoot.htm
Change Service Processor IP Address in ASMI
32
• Change the date and time – systems have been shipping with a date of 1970?
• The firmware update policy defaults to the HMC – recommend changing this to an i5 OS partition that is designated as a Service Partition
ASMI – Important!

33
Procedure to Setup a new HMCFollow instructions in the Information Center:1. Cable and install HMC2. Power on HMC
1. Managed server must remain Powered Off (unplugged)3. Login as hscroot (default password- abc123)4. Guided setup Wizard
1. Set Date & Time2. Change pre-defined password <-- do not bypass
1. Hscroot = abc123, root = passw0rd3. Create additional users (recommended)4. Configure HMC network connections5. Configure HMC to connect to service provider
5. Reboot HMC6. Check HMC Software version
1. (Update if necessary)7. Add Managed systems
The Guided Setup Wizard
34
Accessing the Guided Setup Wizard
Follow instructions in the Information Center:1. Ensure that the managed system is not connected to
a power source. 2. Press the power button on the HMC to turn it on. 3. Accept a license agreement4. Select the locale you want.5. Log in to the HMC using the following default user ID
and password: - ID: hscroot - Password: abc123
6. Guided Setup splash screen appears.
The Guided Setup Wizard

35
Guided Setup – Splash Screen
The customer may opt to deselect having this screen come up after The first use of the wizard.
The Guided Setup Wizard
36
Guided Setup – Launch Point• You can run the wizard as many times as you want
• It is accessible from the main HMC interface.
The Guided Setup Wizard

37
Guided Setup wizardThe Guided Setup Wizard
38
1
2
Guided Setup – Date & Time
39
Guided Setup - Passwords
40
This is the customer’s tasks
Guided Setup - Passwords

41
Guided Setup - Checkpoint
42
Guided Setup –Networking

43
Guided Setup –Networking
44
Guided Setup –Networking
All i5 models are set up by IBM except the 520 (unless the 520 is an upgrade from an 8xx system)
If an HMC is part of the deal, the IBM service rep will only configure the first ethernet port.The service rep will configure the port as a private network and a DHCP serverThe second HMC port will be configured by the customer
45
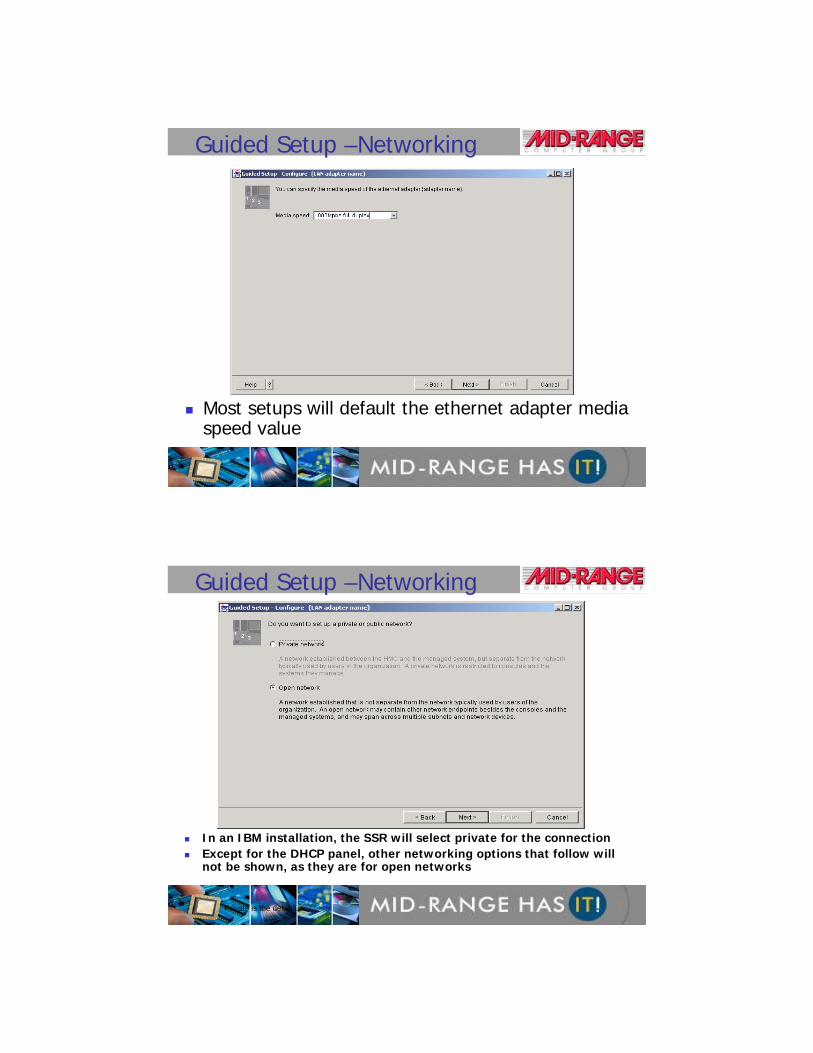
Guided Setup –Networking
Most setups will default the ethernet adapter media speed value
46
Guided Setup –Networking
In an IBM installation, the SSR will select private for the connectionExcept for the DHCP panel, other networking options that follow will not be shown, as they are for open networks
Private is the default.
47
Guided Setup –Networking
Shown for private.
48
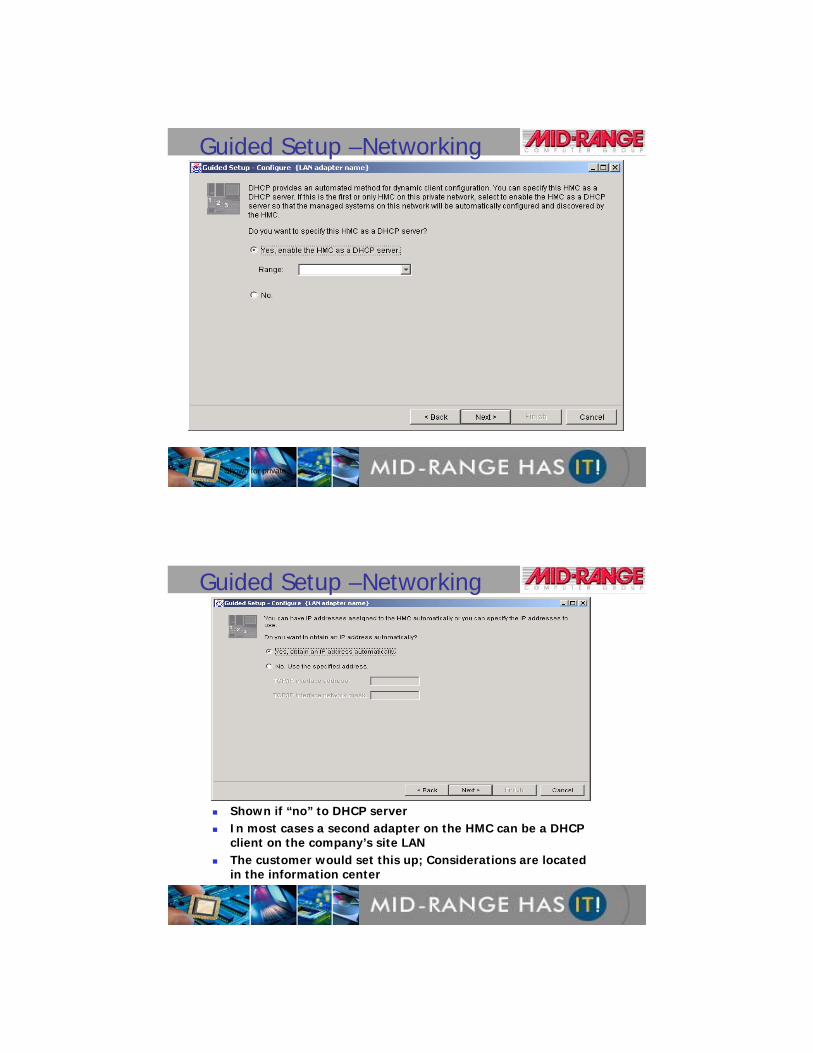
Guided Setup –Networking
Shown if “no” to DHCP serverIn most cases a second adapter on the HMC can be a DHCP client on the company’s site LANThe customer would set this up; Considerations are located in the information center

49
Guided Setup –Networking
The default gateway provides access to the network to which the HMC will be connected
50
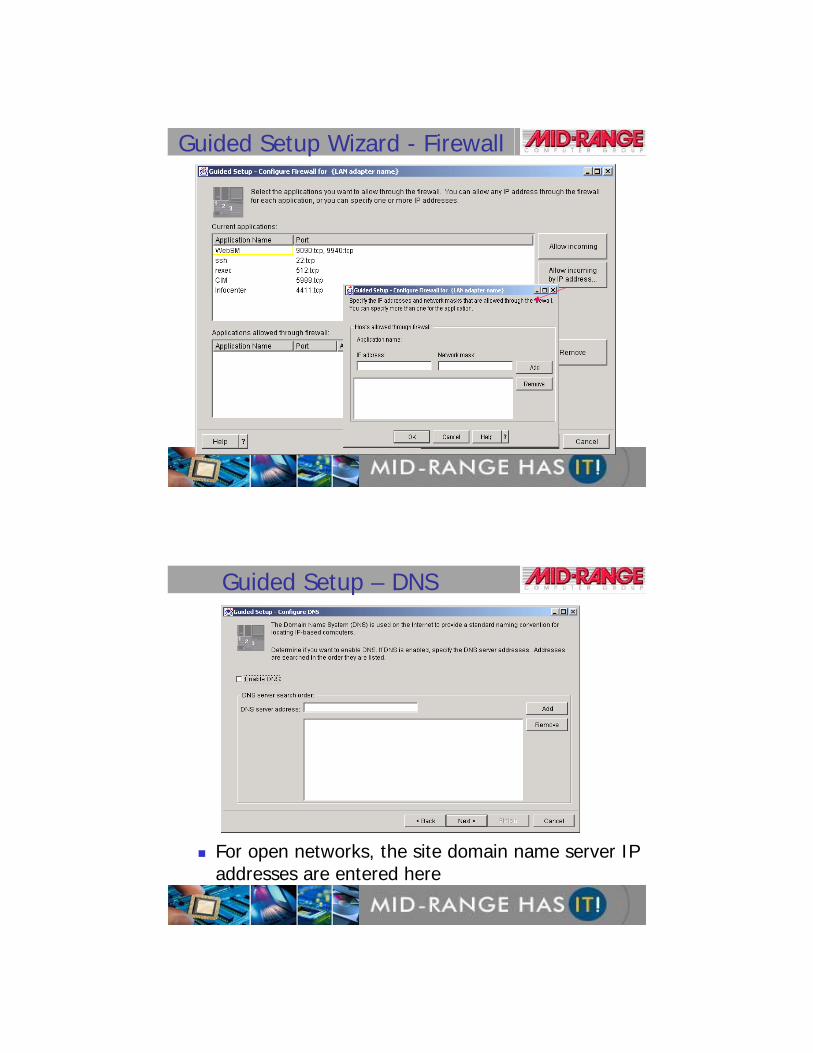
Guided Setup – Networking
On open networks, the customer can select which HMC applications are accessible to hosts or applications on the open networkThe following slide shows how the applications are selected:
51
Guided Setup Wizard - Firewall
52
Guided Setup – DNS
For open networks, the site domain name server IP addresses are entered here

53
Guided Setup – 2nd Ethernet
54
Guided Setup – Domain Suffix
Open networks also require the site domain name suffix if the domain name server is used
55
Guided Setup - Checkpoint
56
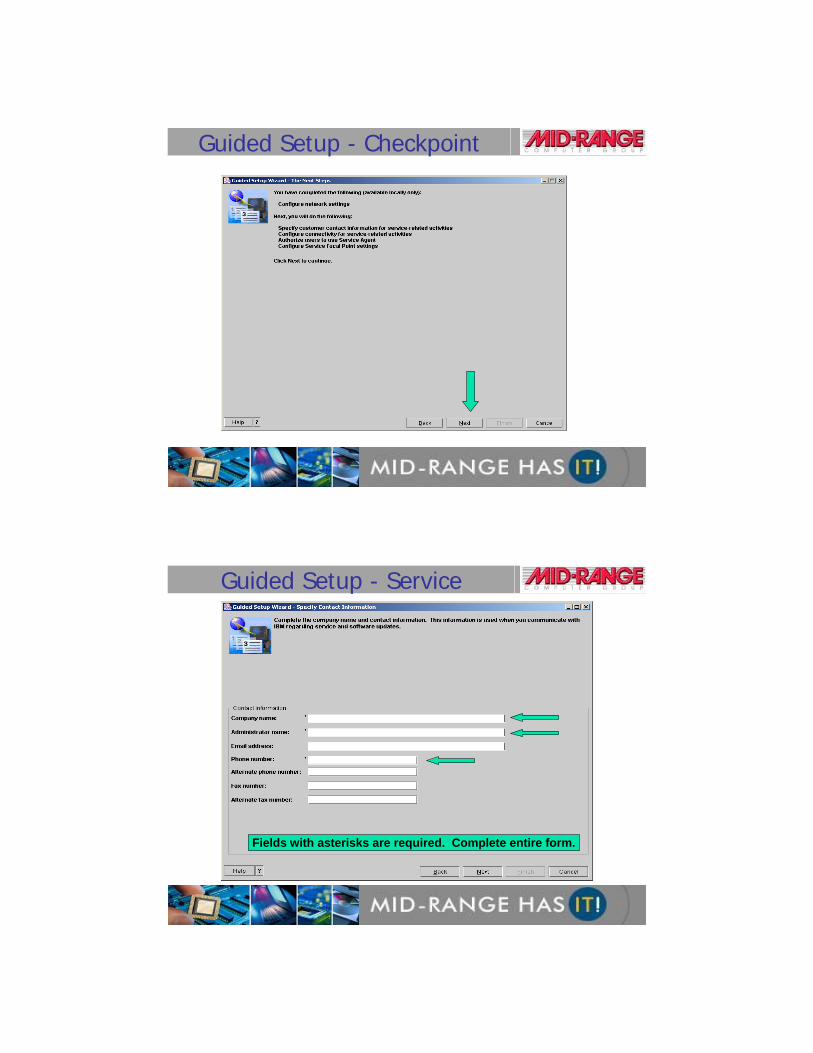
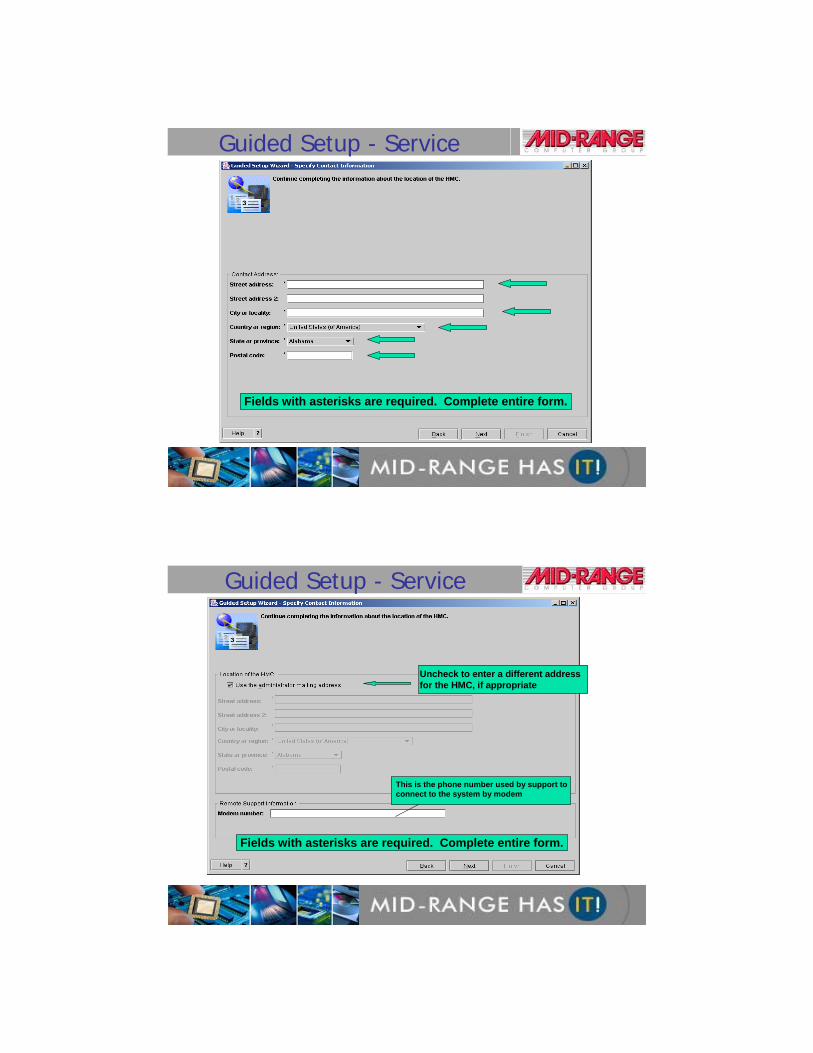
Fields with asterisks are required. Complete entire form.
Guided Setup - Service
57
Fields with asterisks are required. Complete entire form.
Guided Setup - Service
58
Fields with asterisks are required. Complete entire form.
Uncheck to enter a different addressfor the HMC, if appropriate
This is the phone number used by support to connect to the system by modem
Guided Setup - Service
59
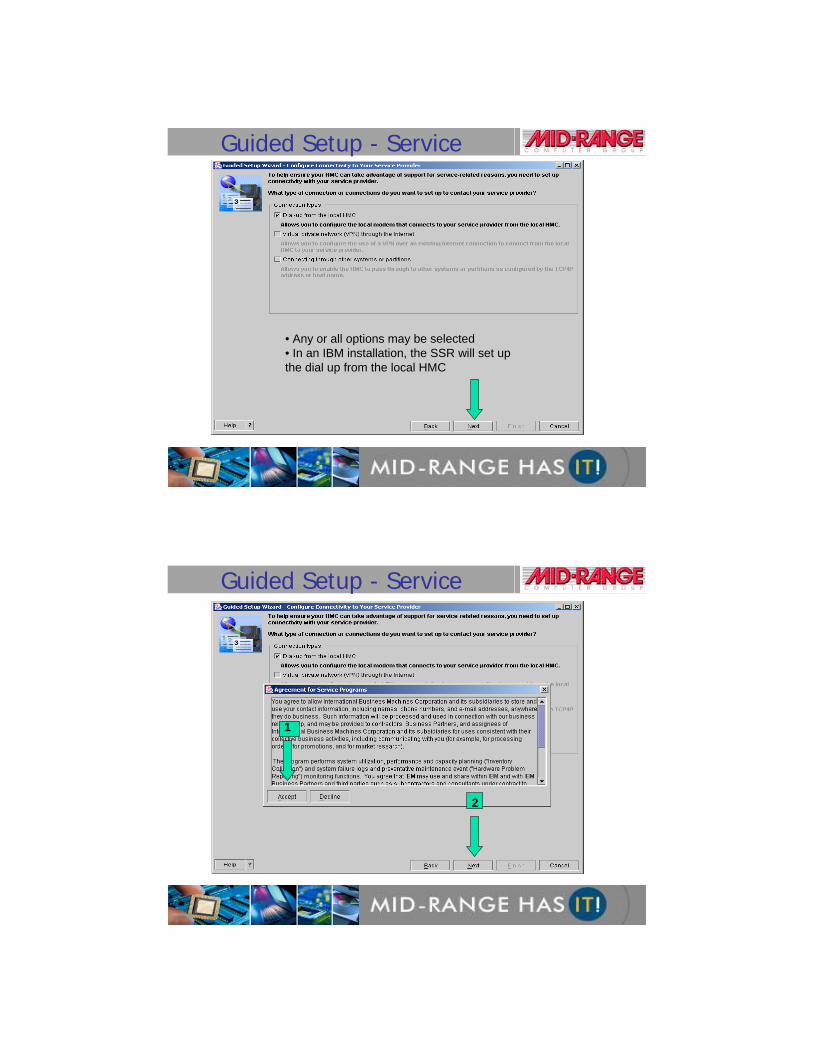
• Any or all options may be selected• In an IBM installation, the SSR will set up the dial up from the local HMC
Guided Setup - Service
60
2
1
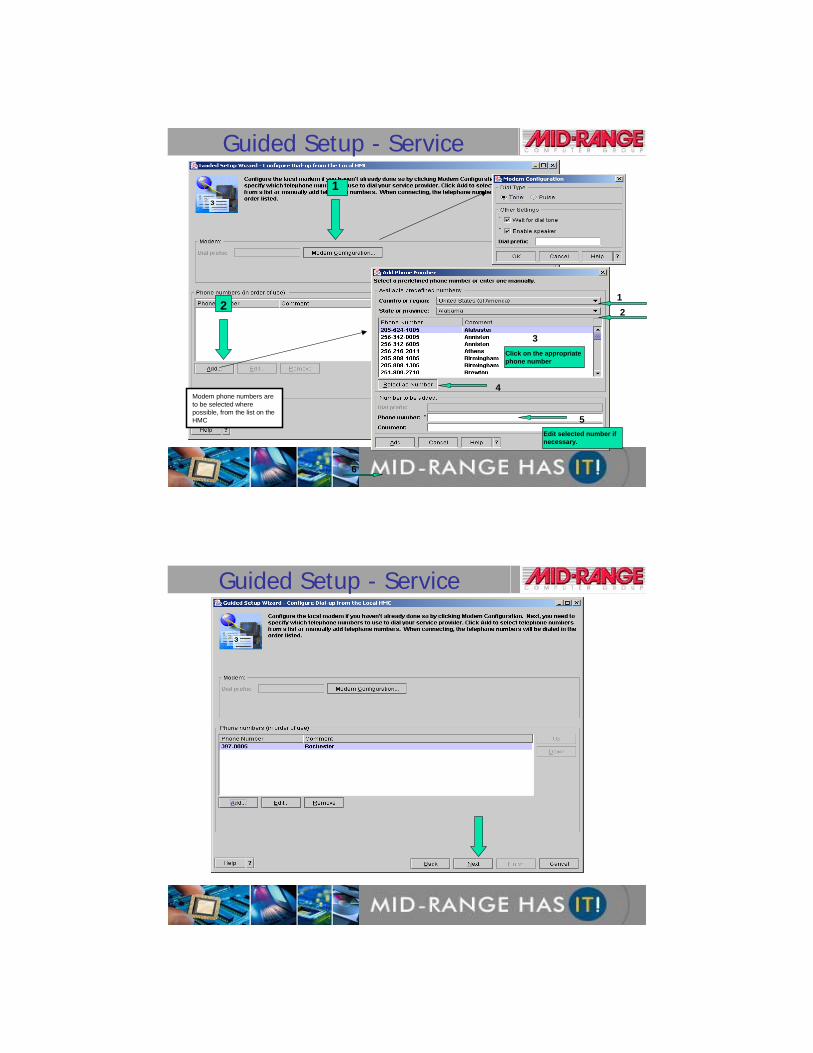
Guided Setup - Service
61
1
2
Edit selected number if necessary.
12
4
5
Click on the appropriate phone number
3
6
Modem phone numbers are to be selected where possible, from the list on the HMC
Guided Setup - Service
62
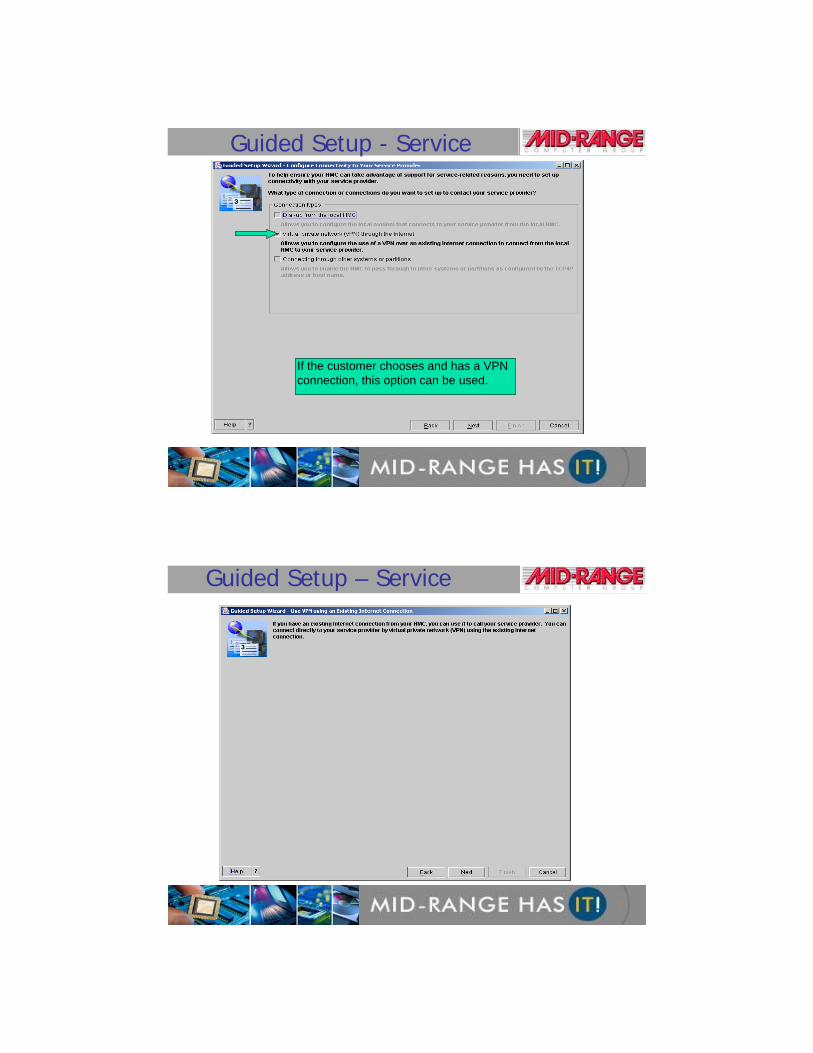
Guided Setup - Service
63
If the customer chooses and has a VPN connection, this option can be used.
Guided Setup - Service
64
Guided Setup – Service
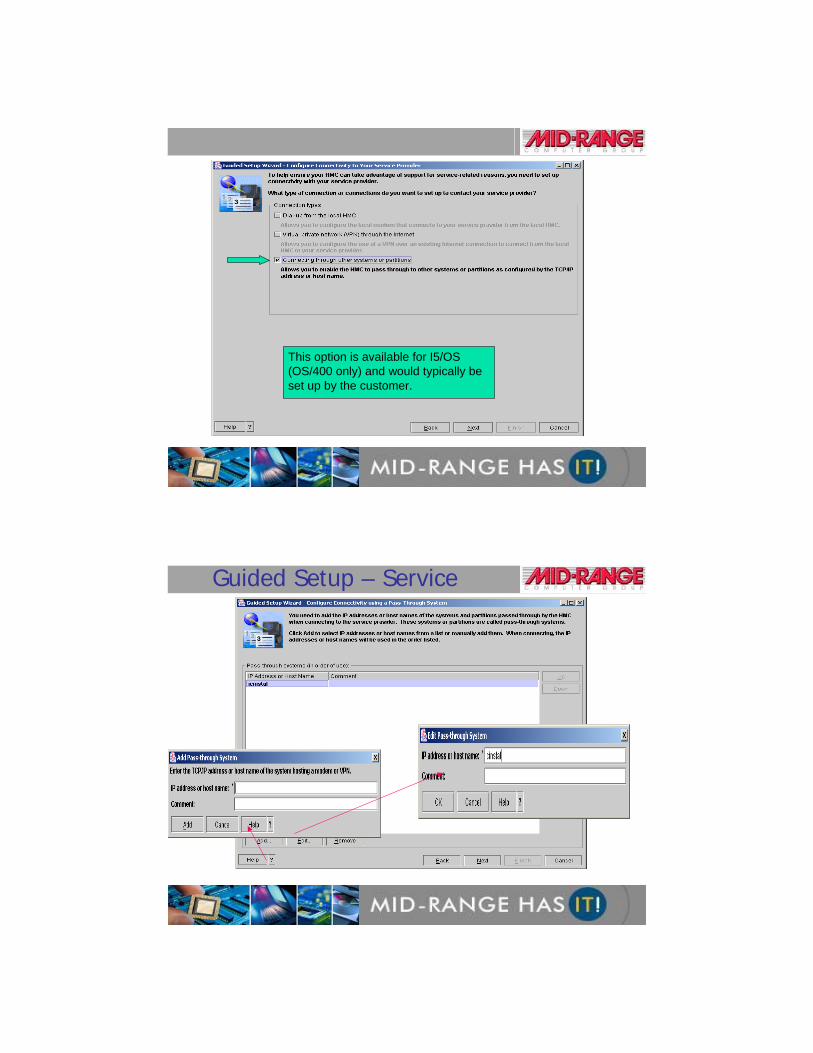
65
This option is available for I5/OS (OS/400 only) and would typically be set up by the customer.
66
Guided Setup – Service
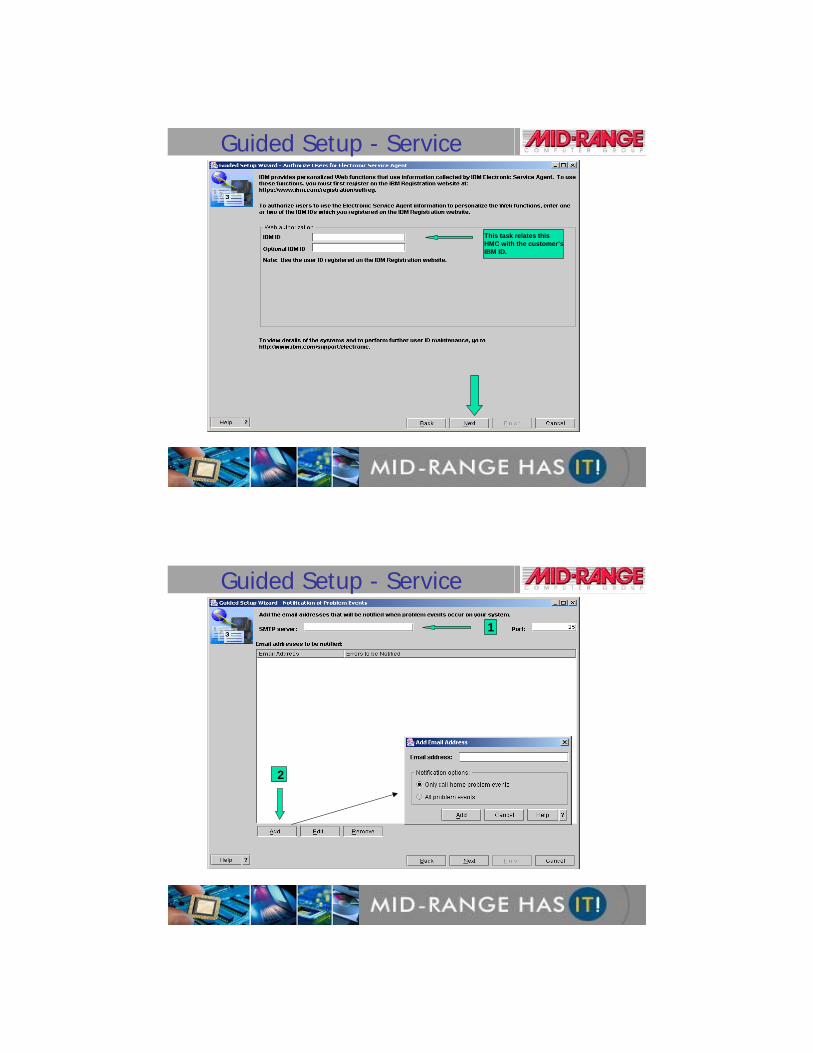
67
This task relates this HMC with the customer’s IBM ID.
Optional, but strongly suggested.Guided Setup - Service
68
1
2
Guided Setup - Service
69
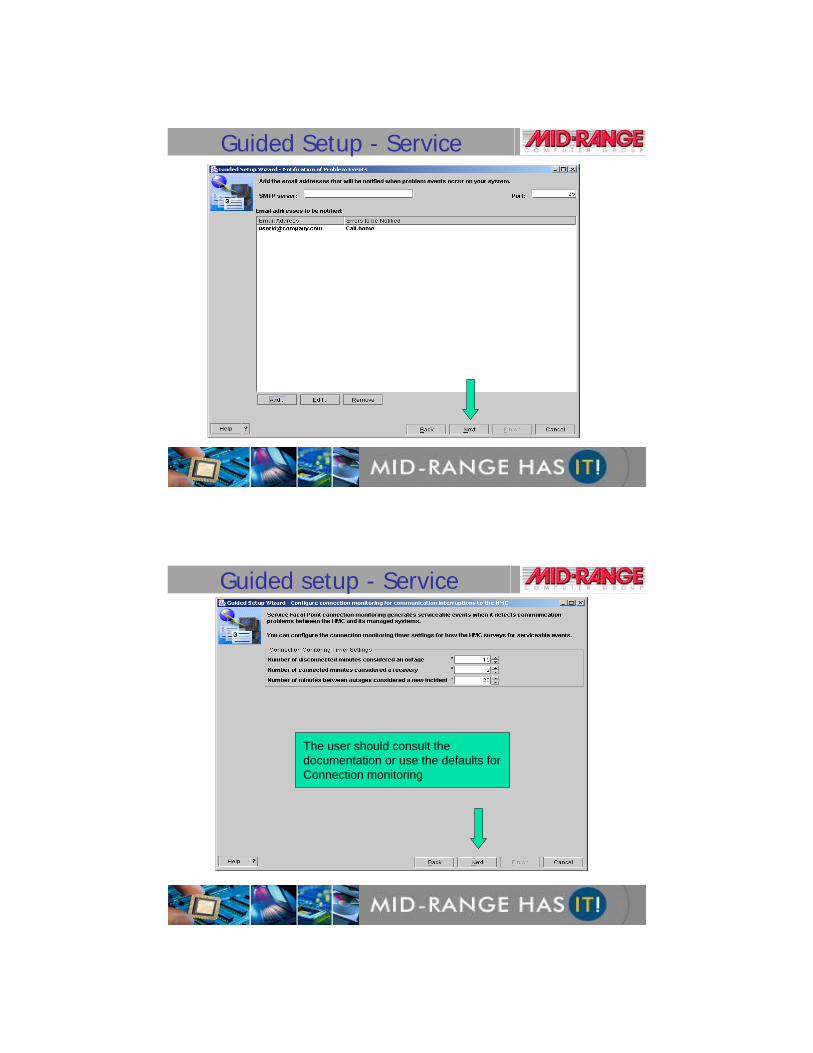
Guided Setup - Service
70
The user should consult the documentation or use the defaults for Connection monitoring
Guided setup - Service
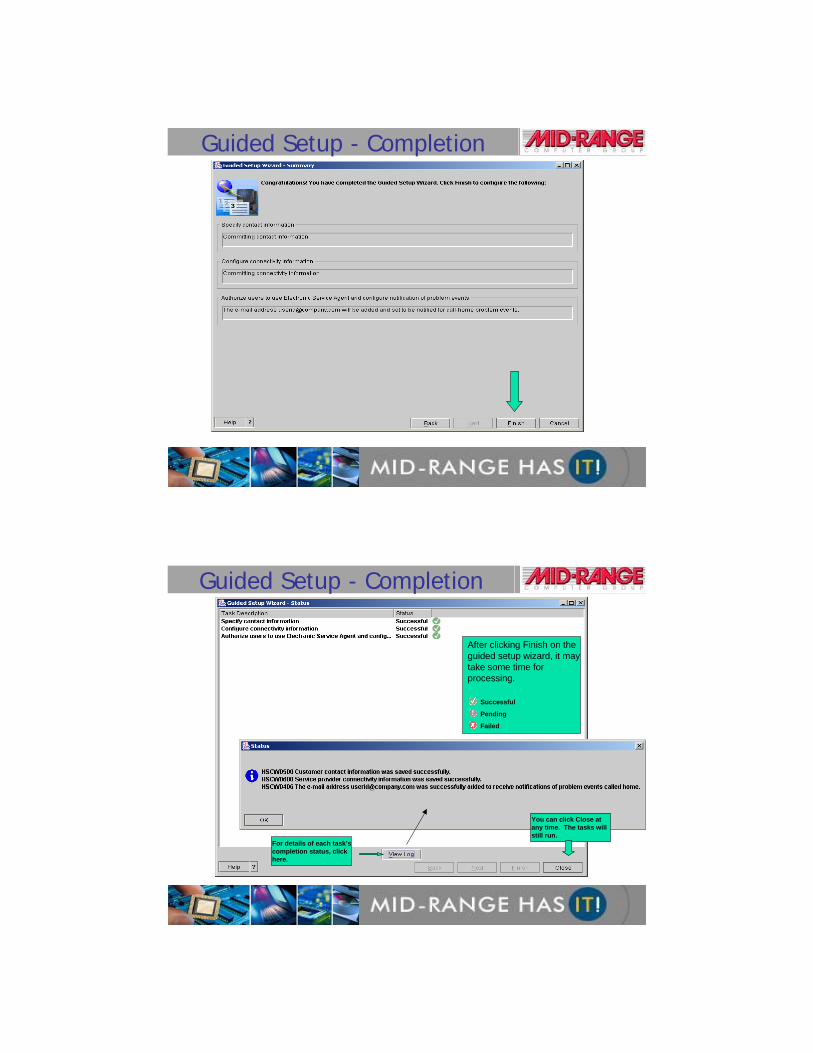
71
Guided Setup - Completion
72
For details of each task’s completion status, click here.
You can click Close at any time. The tasks will still run.
After clicking Finish on the guided setup wizard, it may take some time for processing.
Successful
Pending
Failed
Guided Setup - Completion
73
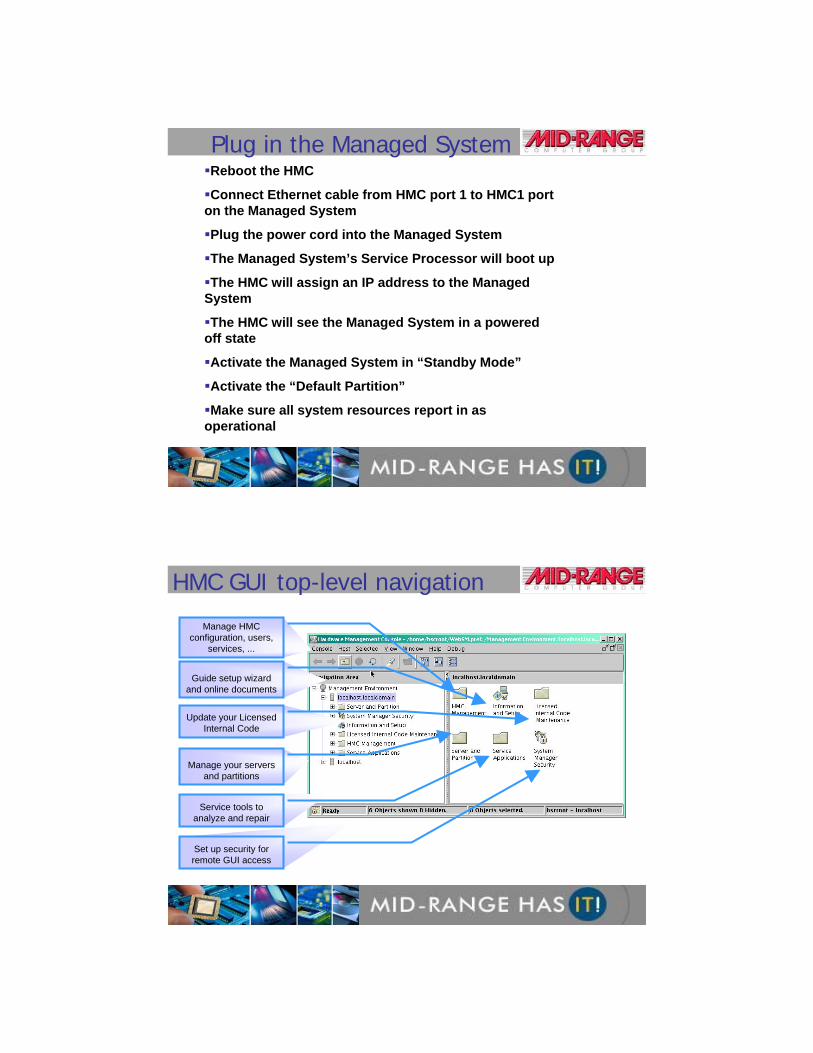
Plug in the Managed SystemReboot the HMC
Connect Ethernet cable from HMC port 1 to HMC1 port on the Managed System
Plug the power cord into the Managed System
The Managed System’s Service Processor will boot up
The HMC will assign an IP address to the Managed System
The HMC will see the Managed System in a powered off state
Activate the Managed System in “Standby Mode”
Activate the “Default Partition”
Make sure all system resources report in as operational
74
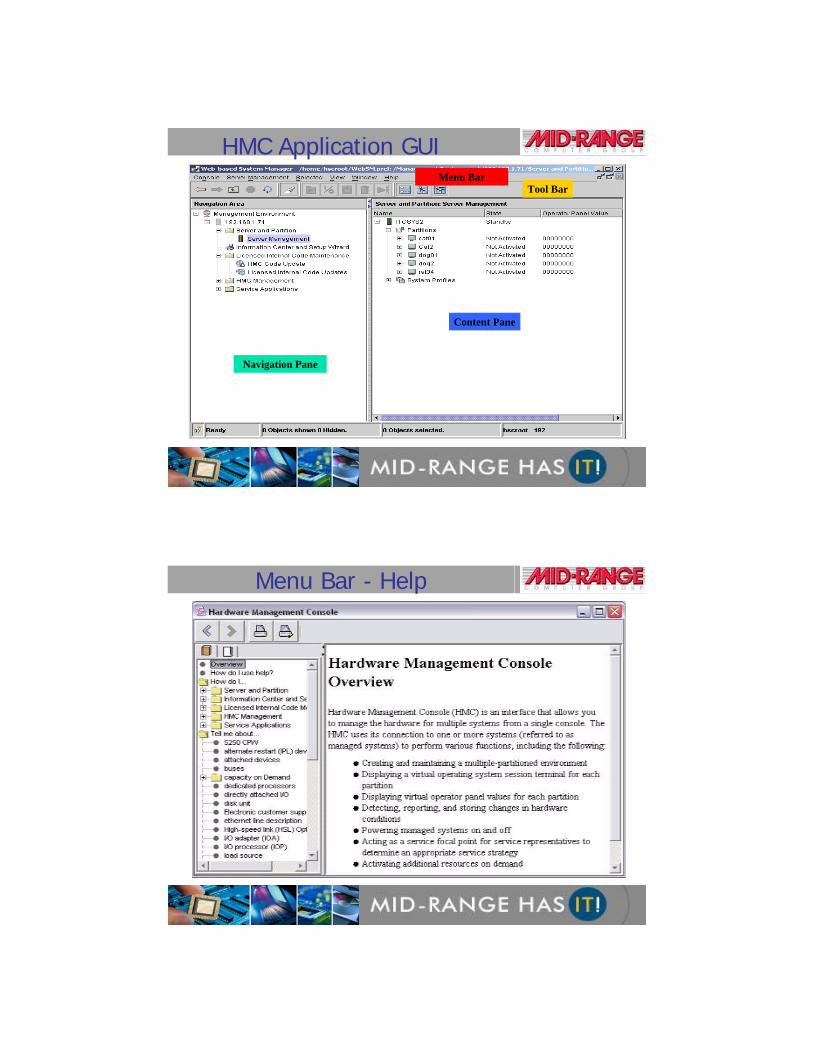
HMC GUI top-level navigation
Manage HMC configuration, users,
services, ...
Guide setup wizard and online documents
Update your Licensed Internal Code
Set up security for remote GUI access
Service tools to analyze and repair
Manage your servers and partitions
75
HMC Application GUIMenu Bar
Navigation Pane
Content Pane
Tool Bar
76
Menu Bar - Help

77
• From ‘Server Management’ you manage your partitions
HMC Application GUI
78
I5/OS V5R3 Logical PartitioningInterface on pre-power5 systems remains (service tools, iSeries navigator)
POWER5: IBM virtualization engine systems technologies include POWERHypervisor™
Supports i5/OS, AIX 5L* and Linux All OS/400 partitions require V5R3
Improve server utilization rates across multiple workloads
Automatic processor balancingwith uncapped partitions
Improve fault tolerance and lower partition management costs
Primary partition replaced by hardware management console (HMC)
79
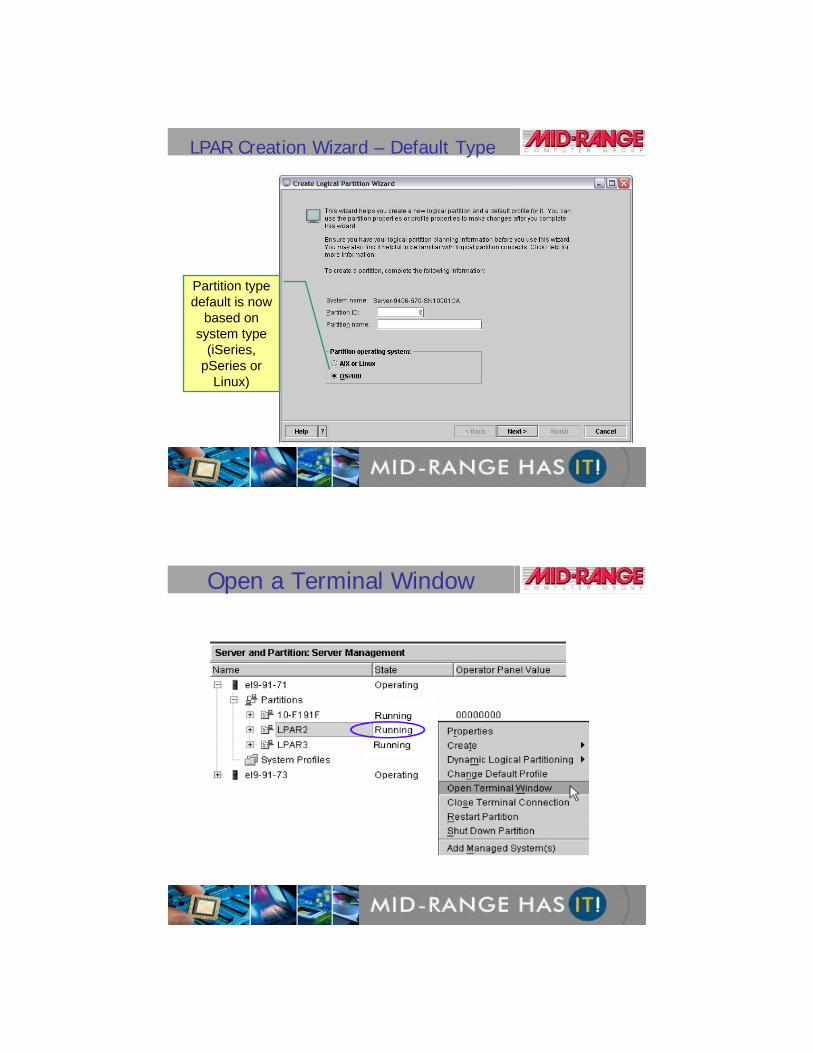
LPAR Creation Wizard – Default Type
Partition type default is now
based on system type
(iSeries, pSeries or
Linux)
80
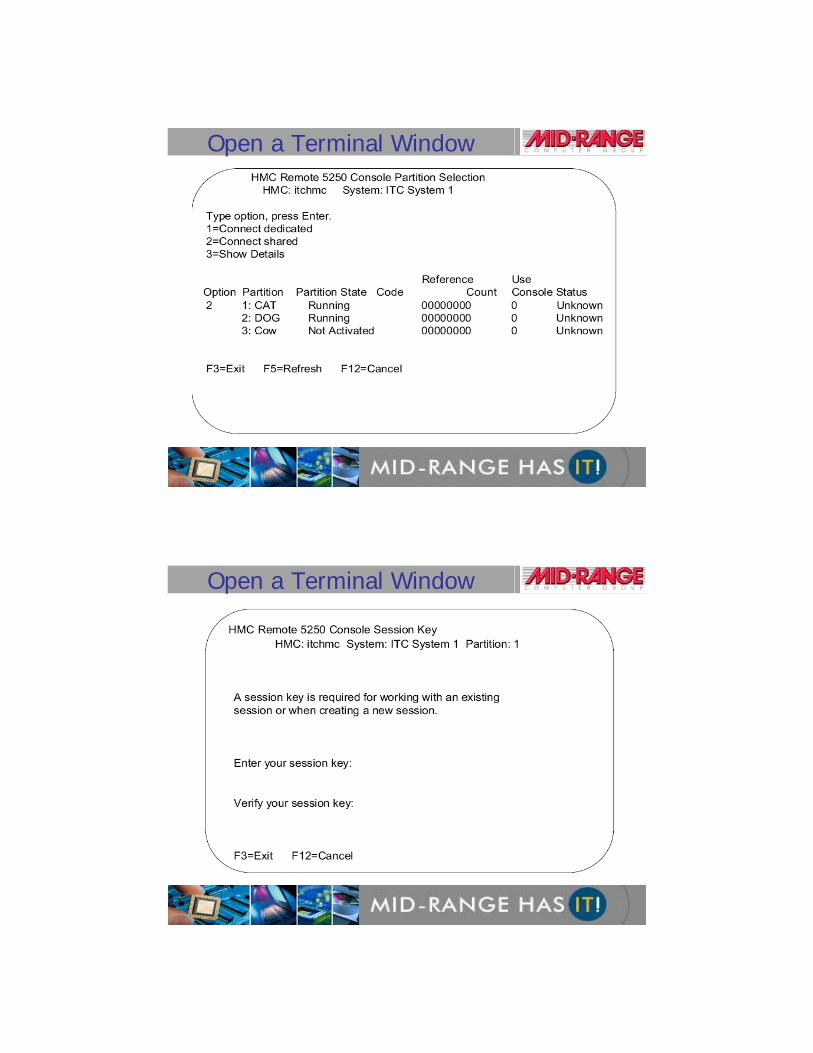
Open a Terminal Window
81
Open a Terminal Window
82
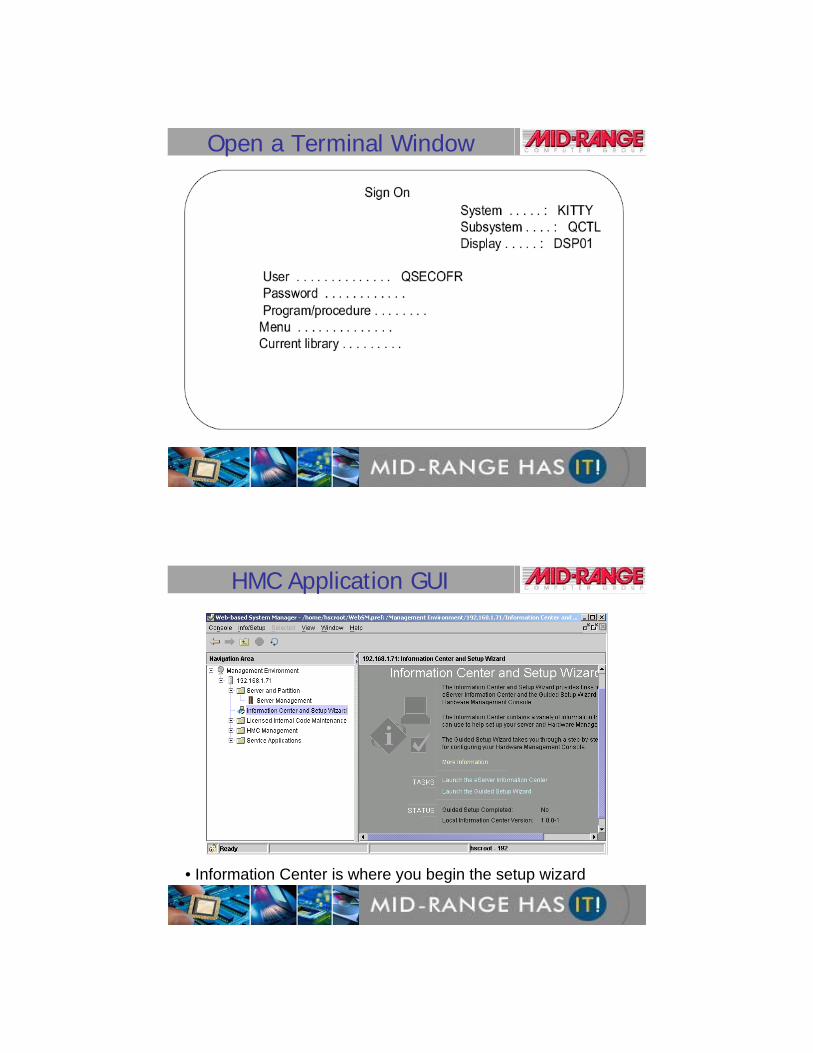
Open a Terminal Window
83
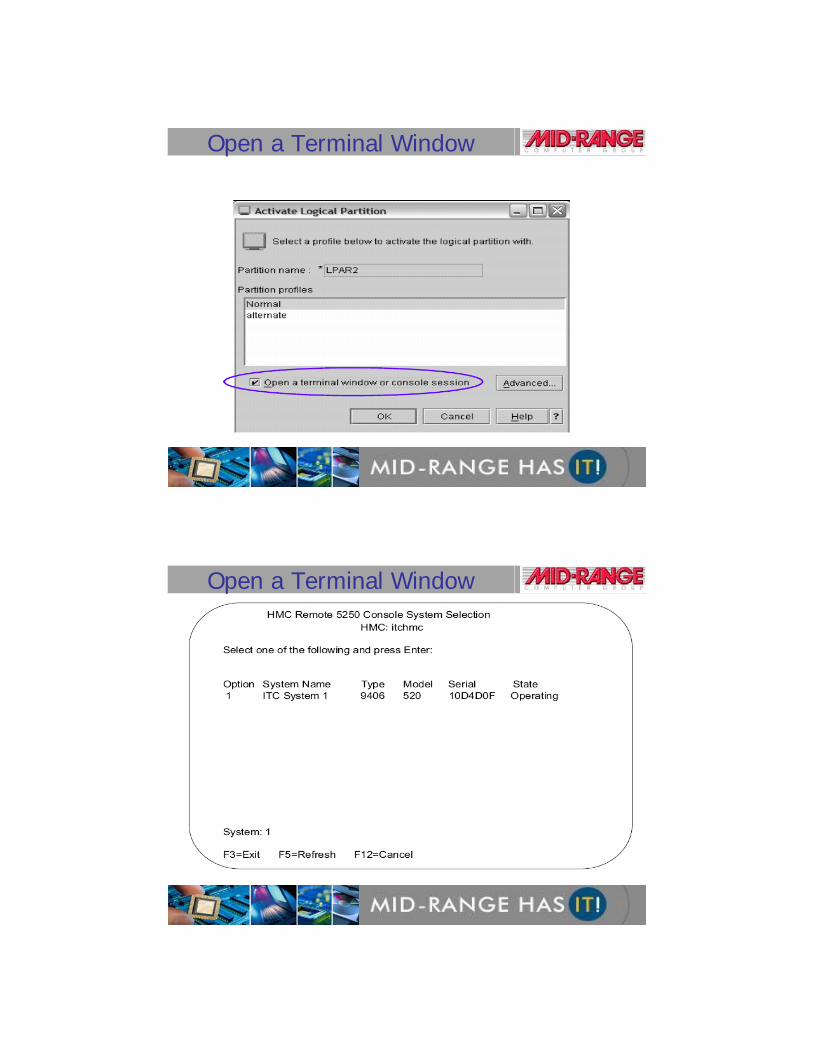
Open a Terminal Window
84
Open a Terminal Window
85
Open a Terminal Window
86
• Information Center is where you begin the setup wizard
HMC Application GUI
87
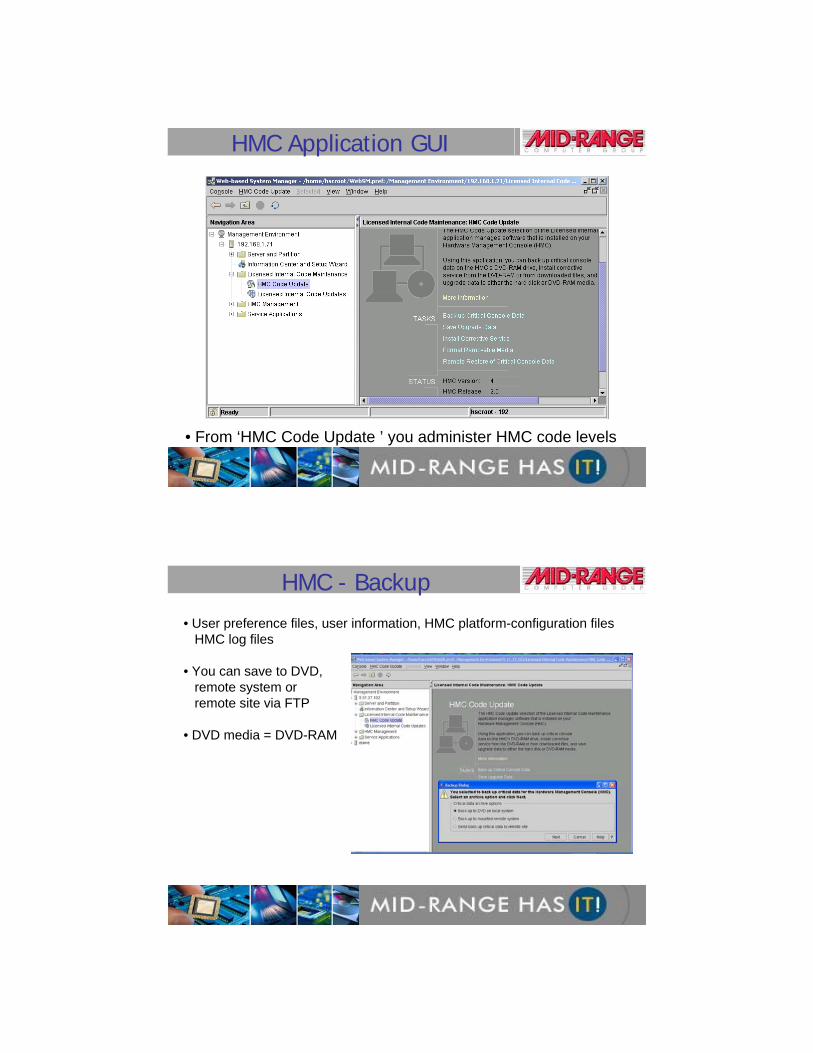
• From ‘HMC Code Update ’ you administer HMC code levels
HMC Application GUI
88
HMC - Backup
• User preference files, user information, HMC platform-configuration filesHMC log files
• You can save to DVD,remote system or remote site via FTP
• DVD media = DVD-RAM
89
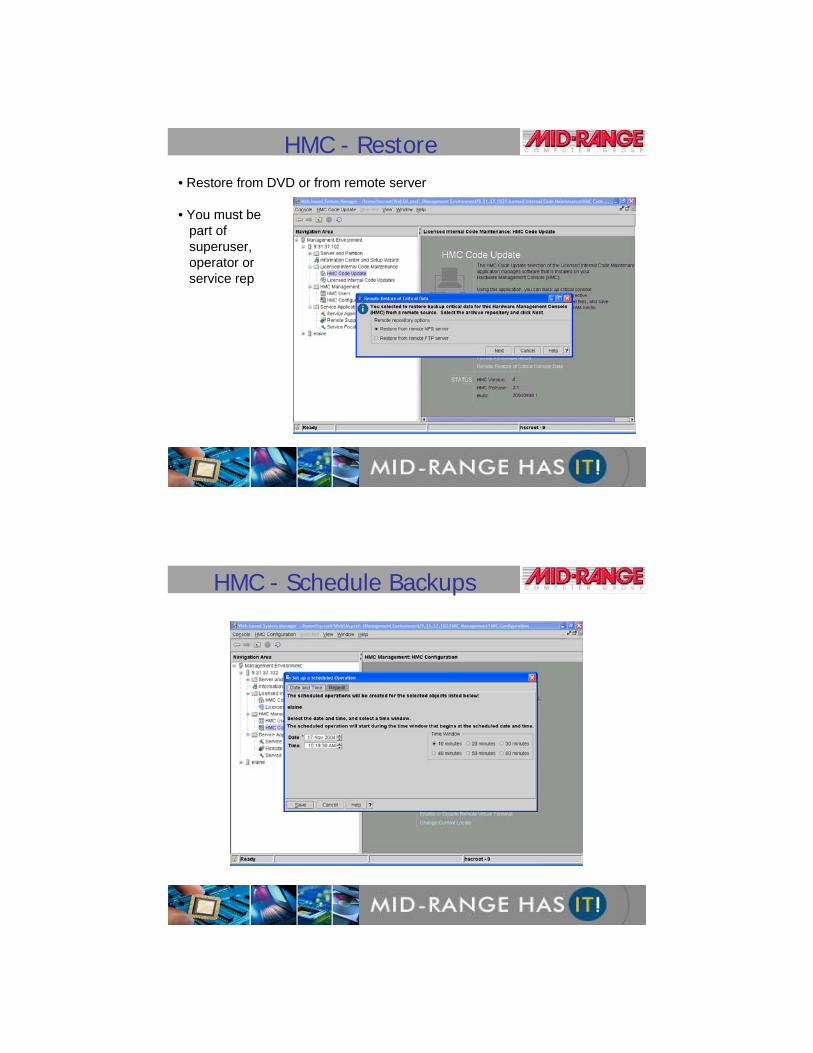
HMC - Restore• Restore from DVD or from remote server
• You must bepart of superuser,operator orservice rep
90
HMC - Schedule Backups
91
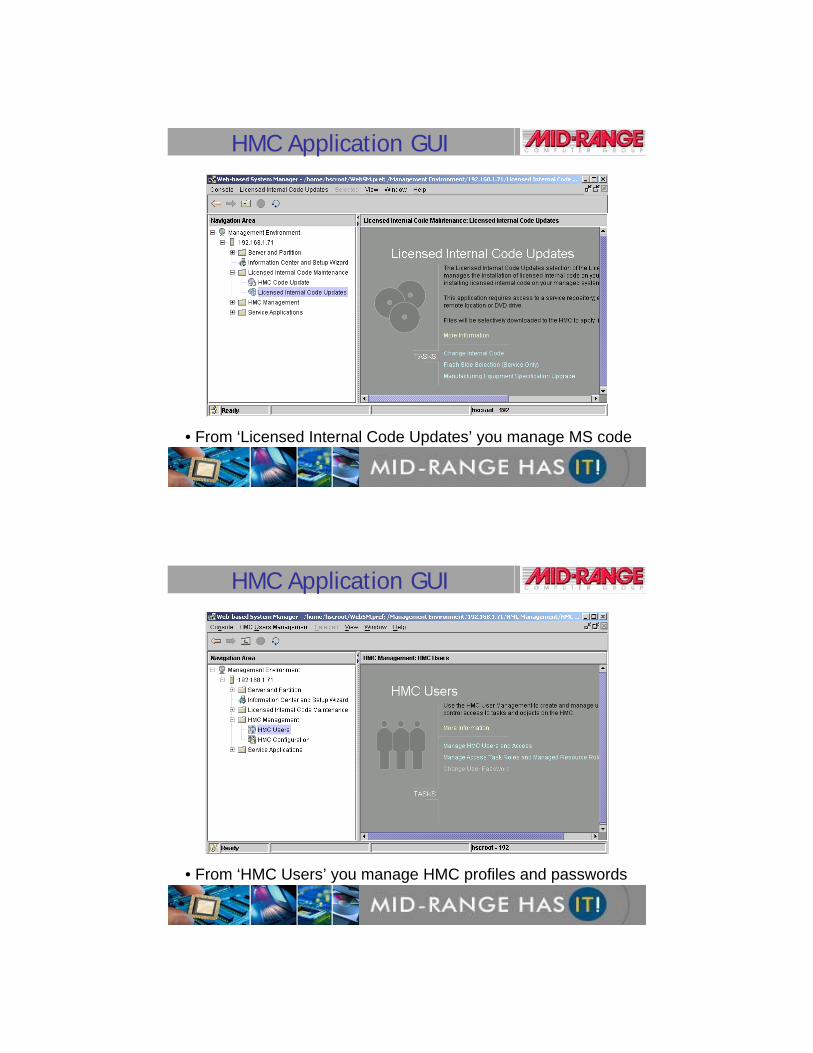
• From ‘Licensed Internal Code Updates’ you manage MS code
HMC Application GUI
92
• From ‘HMC Users’ you manage HMC profiles and passwords
HMC Application GUI
93
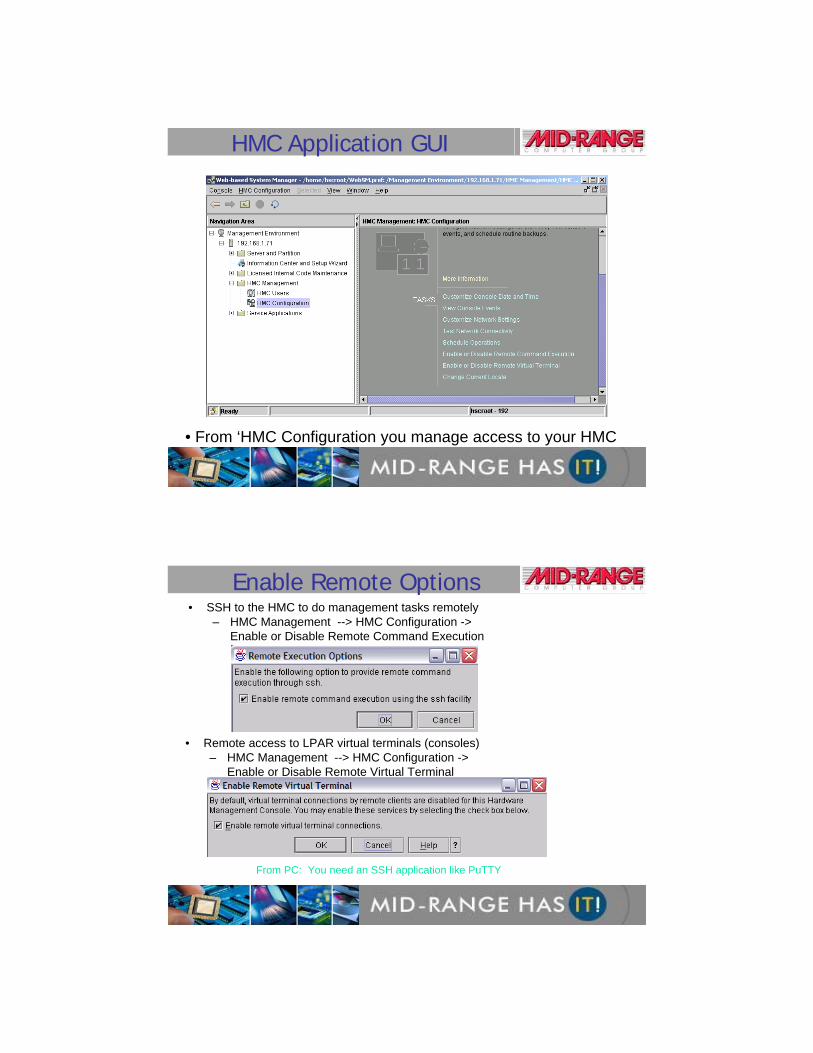
• From ‘HMC Configuration you manage access to your HMC
HMC Application GUI
94
Enable Remote Options• SSH to the HMC to do management tasks remotely
– HMC Management --> HMC Configuration -> Enable or Disable Remote Command Execution
• Remote access to LPAR virtual terminals (consoles)– HMC Management --> HMC Configuration ->
Enable or Disable Remote Virtual Terminal
From PC: You need an SSH application like PuTTY

95
• From ‘Service Agent’ you manage your ET phone home
HMC Application GUI
96
• From ‘Remote Support’ you manage SLINE access to your HMC
HMC Application GUI
97
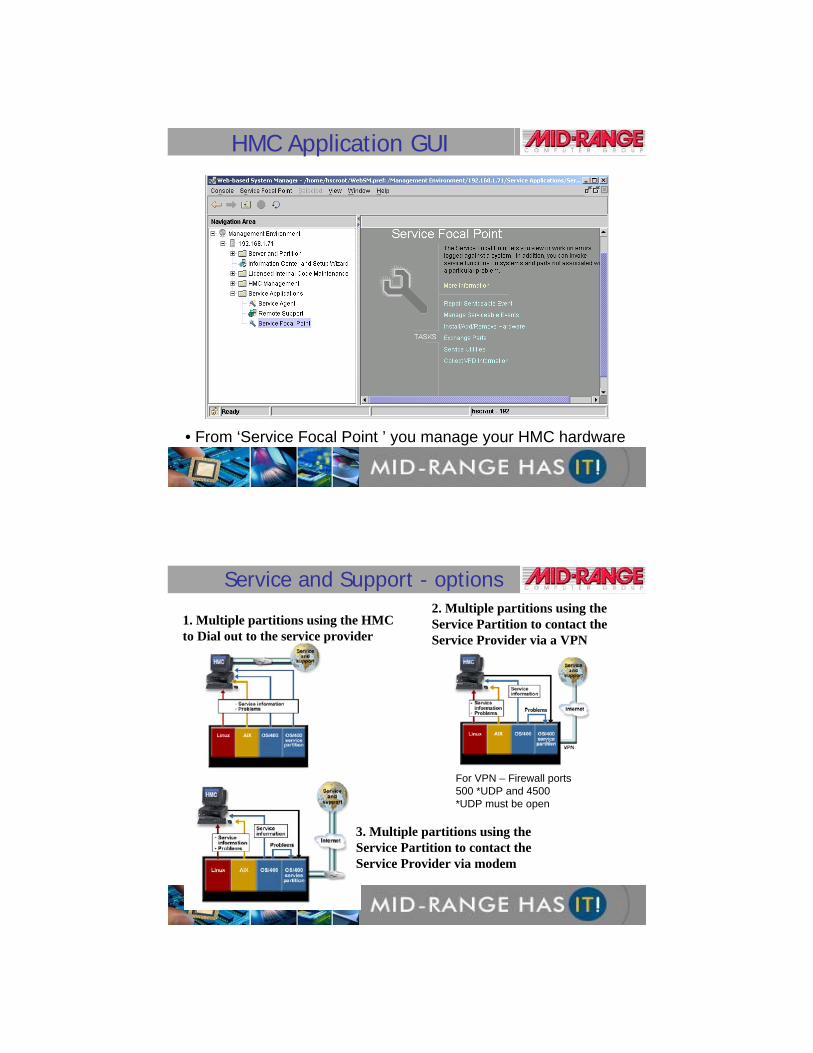
• From ‘Service Focal Point ’ you manage your HMC hardware
HMC Application GUI
98
Service and Support - options
1. Multiple partitions using the HMC to Dial out to the service provider
2. Multiple partitions using the Service Partition to contact theService Provider via a VPN
3. Multiple partitions using the Service Partition to contact the Service Provider via modem
For VPN – Firewall ports 500 *UDP and 4500 *UDP must be open

99
Load WebSM Remote Client
• For Linux /MS Windows clients • Access WebSM Remote Client application from HMC– http://<hmc_hostname.domain>/remote_client.html– http://<IP_addr_of_HMC>/remote_client.html– Login as hscroot– For WebSM Remote Client
–Choose InstallShield–Setup.exe for Windows client–wsmlinuxclient.exe for Linux client
– For WebSM Remote Client for Java Web Start–Choose Java Web Start
• For AIX clients, load standard WebSM – Available on Bonus Pack CD
100
WebSM Remote Client ComparisonWebSM remote client:
Available for Linux and Windows platforms
Updates require that you uninstall the previous version and install the current version
Installs via an InstallShield wizard
You can select the installation loacation
Installs in minutes
101
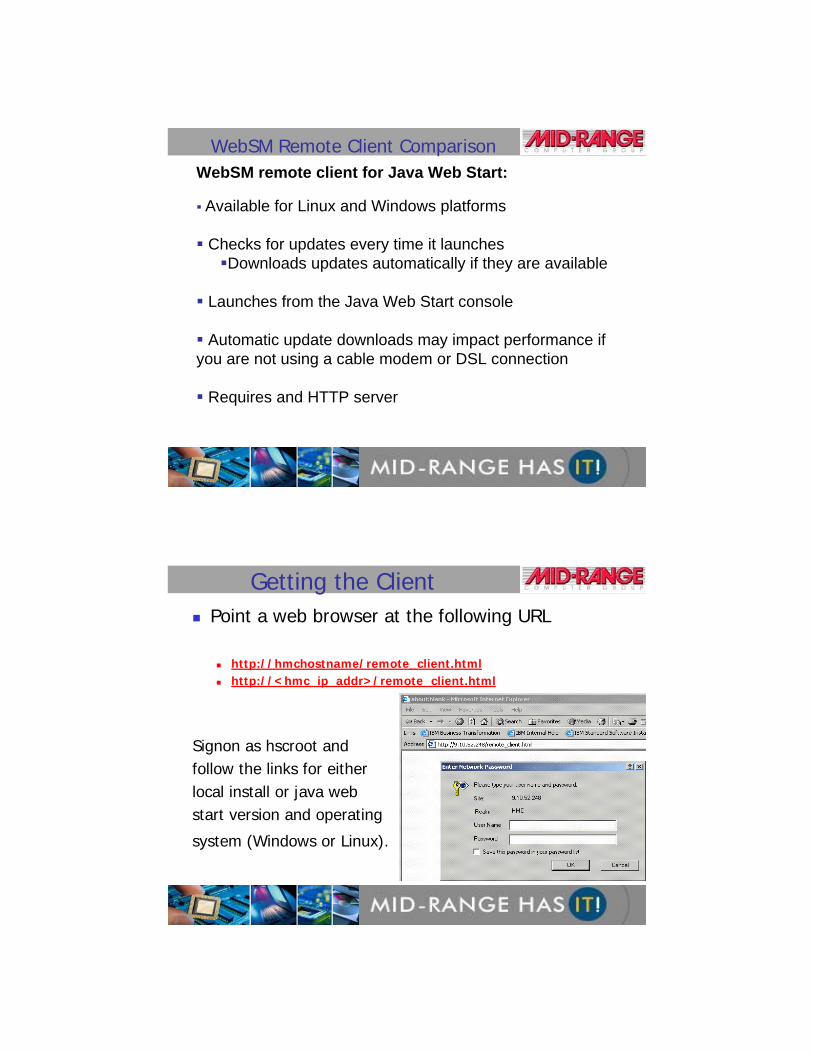
WebSM Remote Client ComparisonWebSM remote client for Java Web Start:
Available for Linux and Windows platforms
Checks for updates every time it launchesDownloads updates automatically if they are available
Launches from the Java Web Start console
Automatic update downloads may impact performance if you are not using a cable modem or DSL connection
Requires and HTTP server
102
Getting the ClientPoint a web browser at the following URL
http://hmchostname/remote_client.htmlhttp://<hmc_ip_addr>/remote_client.html
Signon as hscroot and follow the links for either local install or java web start version and operating
system (Windows or Linux).
103
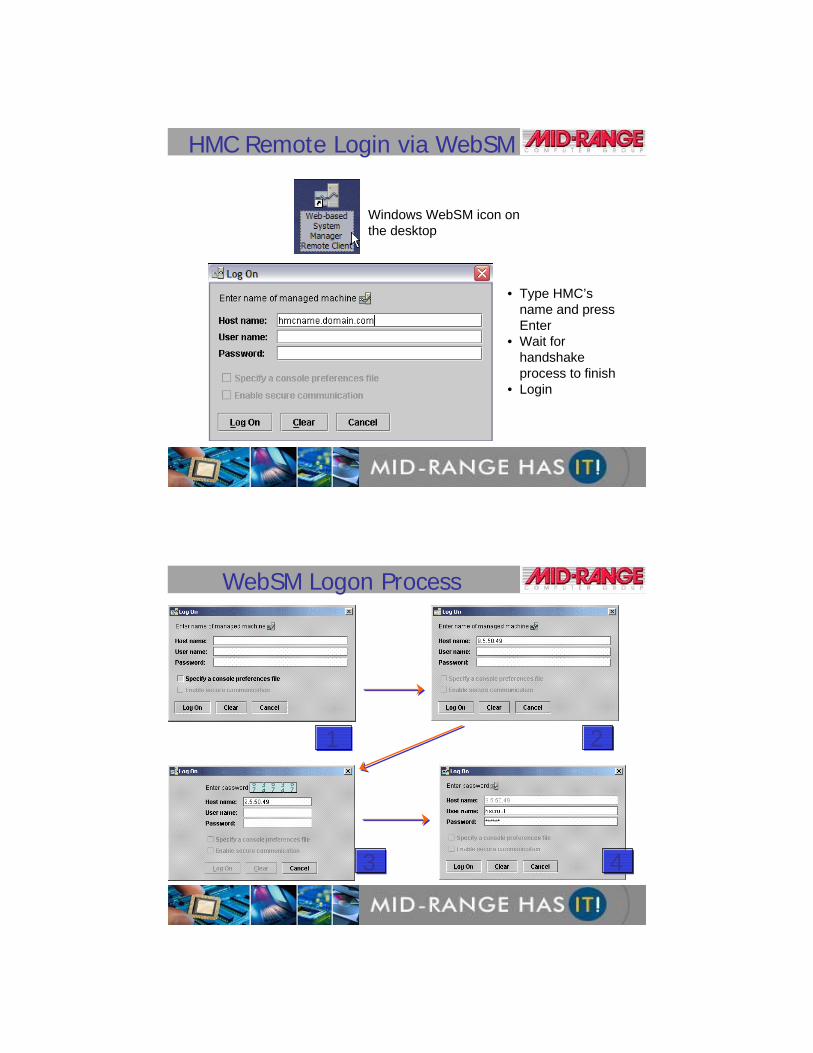
HMC Remote Login via WebSM
• Type HMC’s name and press Enter
• Wait for handshake process to finish
• Login
Windows WebSM icon on the desktop
104
WebSM Logon Process
11 22
33 44
105
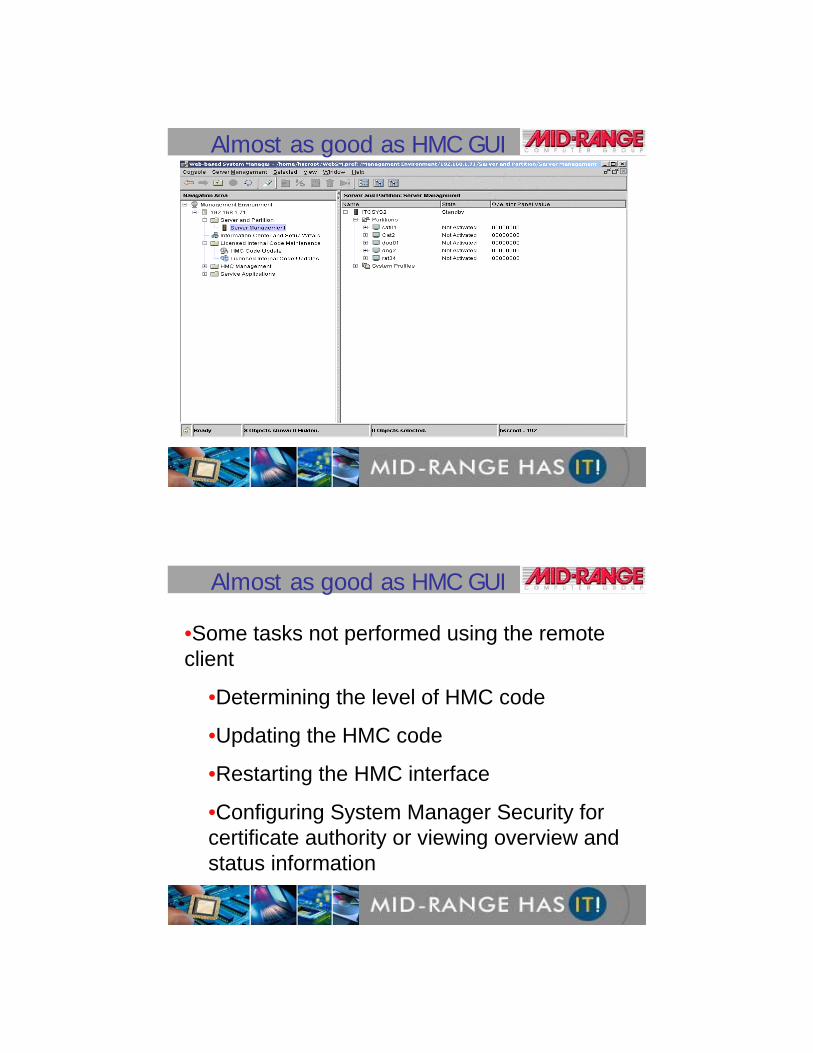
Almost as good as HMC GUI
106
Almost as good as HMC GUI
•Some tasks not performed using the remote client
•Determining the level of HMC code
•Updating the HMC code
•Restarting the HMC interface
•Configuring System Manager Security for certificate authority or viewing overview and status information
107
HMC Command Line InterfaceRestricted to a set of supported HMC commands
Local Command LineLaunched from a right-click menu option on the HMC desktop
Remote Command LineAccessed through encryption-protected Secure Shell (SSH)Install SSH client on workstation
Example: PuTTY (“freeware”)
Command examplelshwres - m “managed system” -r proc -- level sys
108
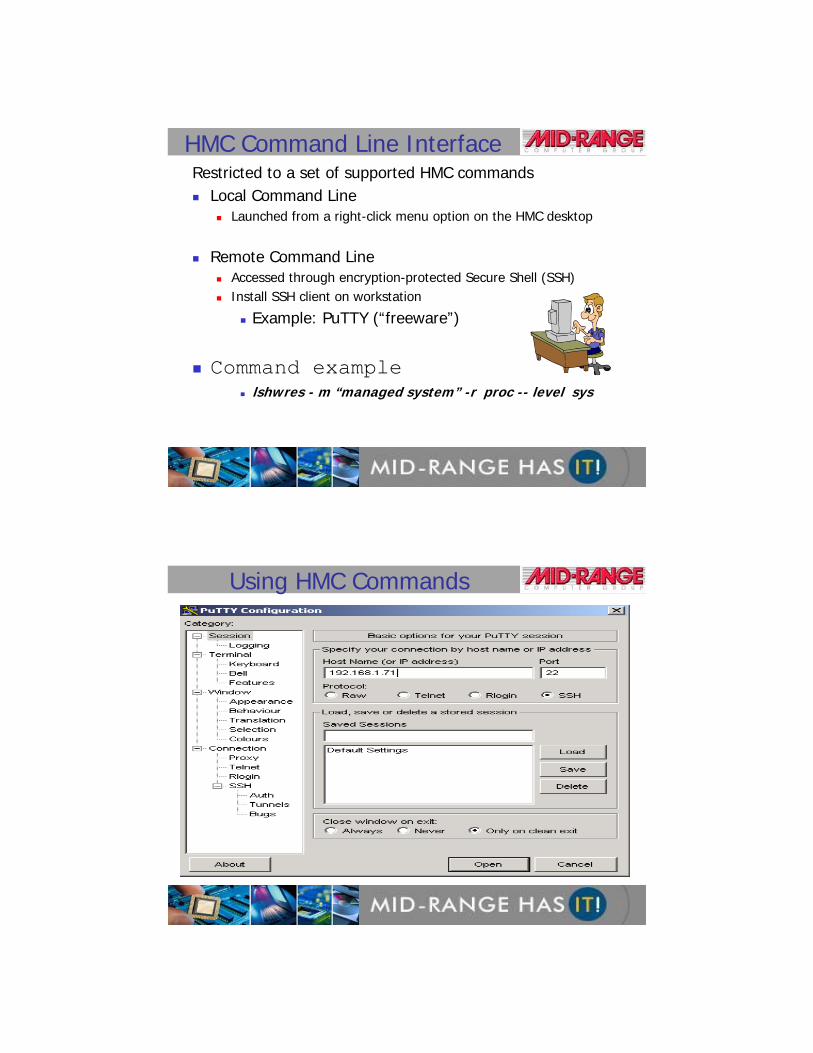
Using HMC Commands
109
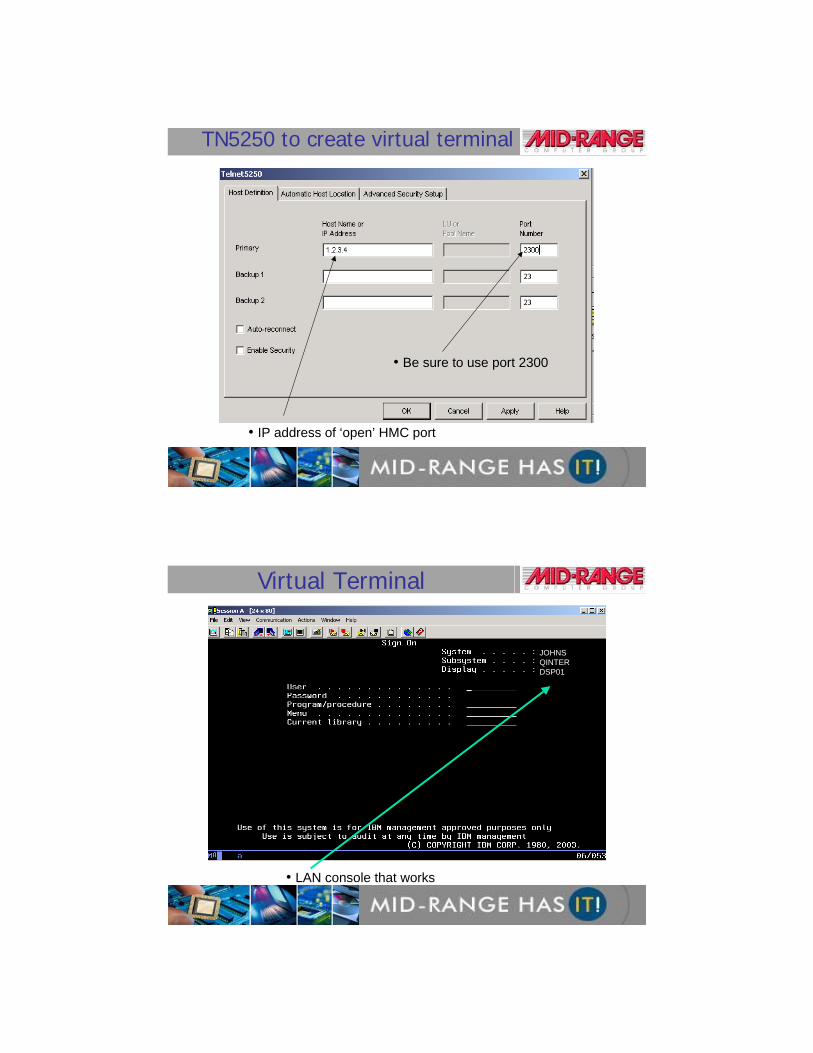
TN5250 to create virtual terminal
• IP address of ‘open’ HMC port
• Be sure to use port 2300
110
JOHNSQINTERDSP01
• LAN console that works
Virtual Terminal
111
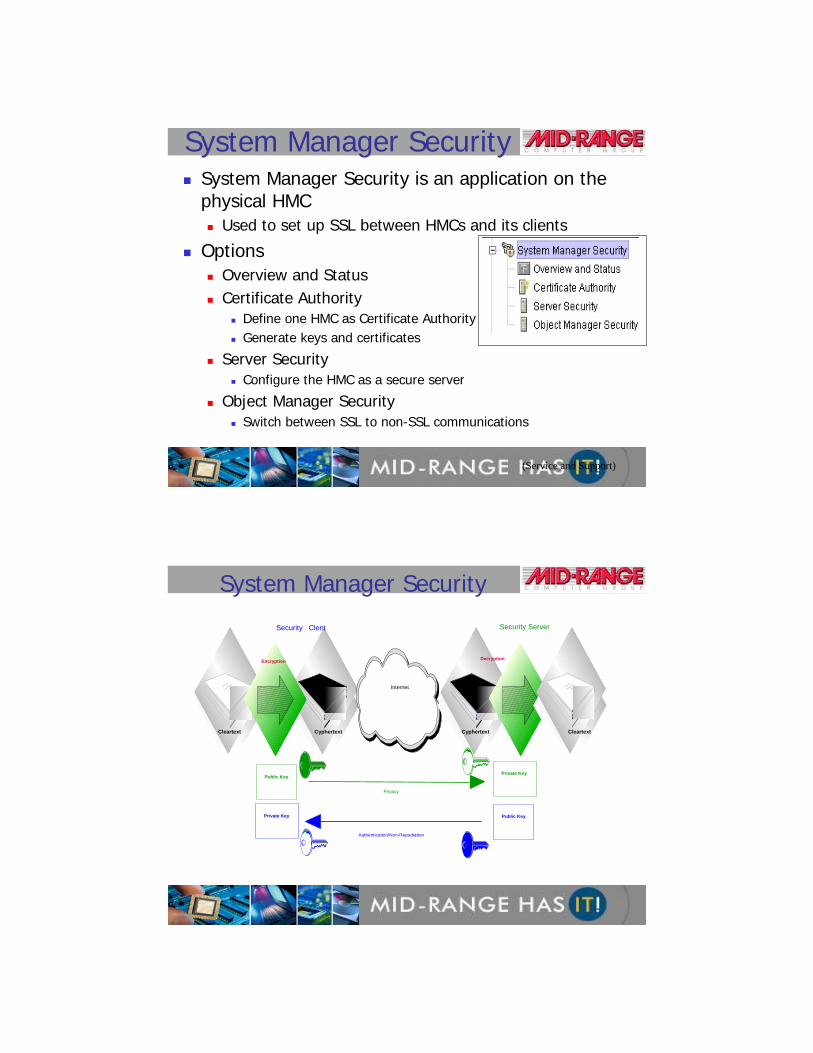
System Manager SecuritySystem Manager Security is an application on the physical HMC
Used to set up SSL between HMCs and its clients
OptionsOverview and StatusCertificate Authority
Define one HMC as Certificate AuthorityGenerate keys and certificates
Server SecurityConfigure the HMC as a secure server
Object Manager SecuritySwitch between SSL to non-SSL communications
(Service and Support)
112
System Manager Security
Cleartext CleartextCyphertextCyphertext
Encryption Decryption
Internet
Security Clent Security Server
Private Key
Authentication/Non-Repudiation
Public KeyPrivate Key
Privacy
Public Key

113
Frame ManagementNew function in the HMC Application GUI (HMC V4R3.2)
The ability to work with hardware frames on Managed Systems
Add framesInitialize framesModify information about the frameUpdate frame informationResetting or removing a frame connection
114
HMC Good Practices
Don’t shutdown the HMC unless required You will not be able to dynamically change any resourcesYou will not be able to log in remotely
Backup the HMC
Create some profiles other than hscroot & root
Document all profiles and passwords
Document Private Network IP addresses
Check for fixes @ Fix Central (at least once a month)http://www-912.ibm.com/eserver/support/fixes/fcgui.jsp
115
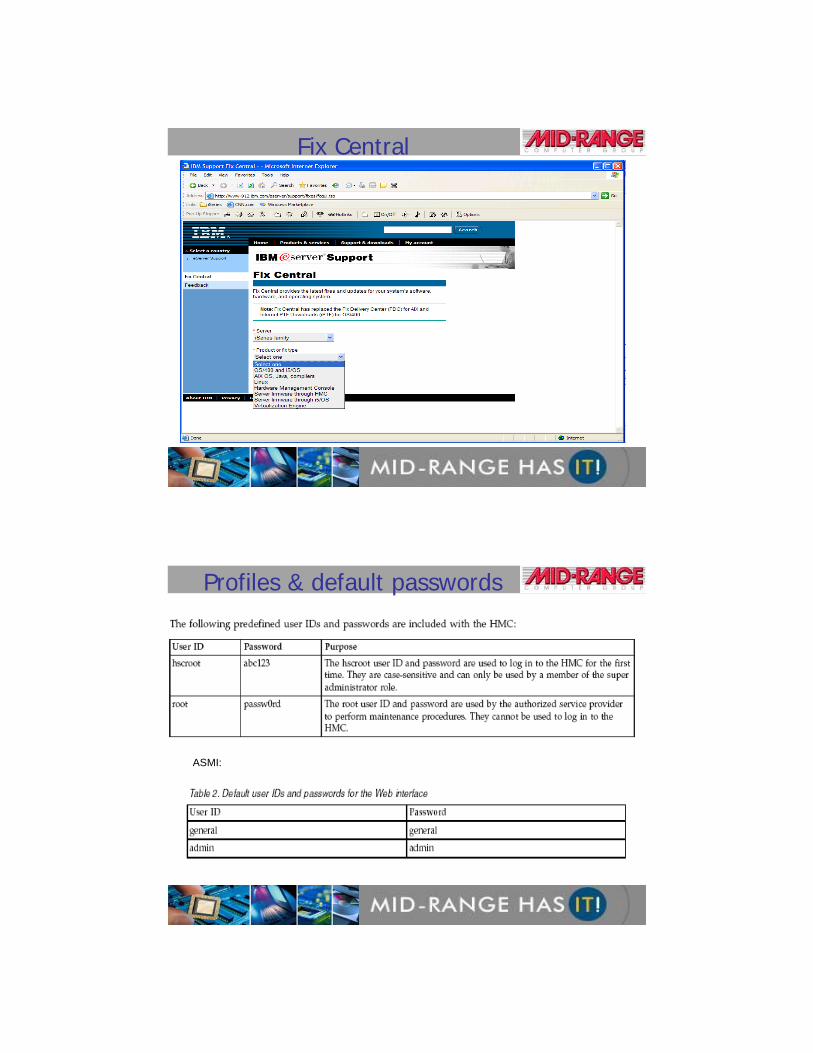
Fix Central
116
Profiles & default passwords
ASMI:

117
Ref: Web-based HMC Education – Resource Linkhttp://app-06.www.ibm.com/servers/resourcelinkPassword setup is required
AS530 LPAR course5 days in Rochester, MN
Education
118
HMC Education

119
HMC Education
120
For more information:For more information:
[email protected]@midrange.ca
(905) 940(905) 940--18141814(800) 668(800) 668--64706470