Embed Size (px)
Citation preview
Owners Manual and Safety Instructions
Hitch Mounted Cargo Carrier Models: XHD/X-LITE/UHD/U-MINI
Read and Save this Manual. Keep this manual for the safety warnings and precautions. Refer to this manual for operating, maintenance and inspection procedures. Log the items serial number on the front of this manual. Keep purchase receipt with this manual in a safe dry location for future reference.
WARNINGREAD THIS MANUAL BEFORE USING THIS
PRODUCT. FAILURE TO DO SO CAN RESULT IN SERIOUS INJURY. SAVE THIS MANUAL
PATENT PENDING
For help with this product please visit our website at www.xrack.us/help or call 888-998-5739 or 516-338-0884 for assistance. Never overload the rated weight of the vehicle’s hitch capacity which may be lower than the rating of the cargo carrier. Tools are not included for installation to the vehicle.
Do not operate with unstable loadsDo not load beyond rated capacityAlways strap load securelyDistribute load evenlyDo NOT sit, Stand or ride onDo NOT exceed 65 MPH with Carrier attachedFollow DOT Guidelines for installation and use
No opere con cargas inestablesNo cargue más allá de la capacidad nominalSiempre cargue la carga de forma seguraDISTRIBUIR carga uniformementeNo se siente, se pare o monteNO exceda 65 MPH con Carrier adjuntoSiga las pautas DOT para instalación y uso
Ne pas utiliser avec des charges instablesNe chargez pas au-delà de la capacité nominaleToujours attacher la charge en toute sécuritéDISTRIBUER charge uniformémentNe pas s'asseoir, se tenir ou monter surNe dépassez PAS 104 kilomètres à l'heure avec le transporteur attachéSuivez les directives des autorités pour l'installation et l'utilisation
X-RACK Bethpage, NY USA [email protected]
! ADVERTENCIA ! ADVERTISSEMENT! WARNING
v1
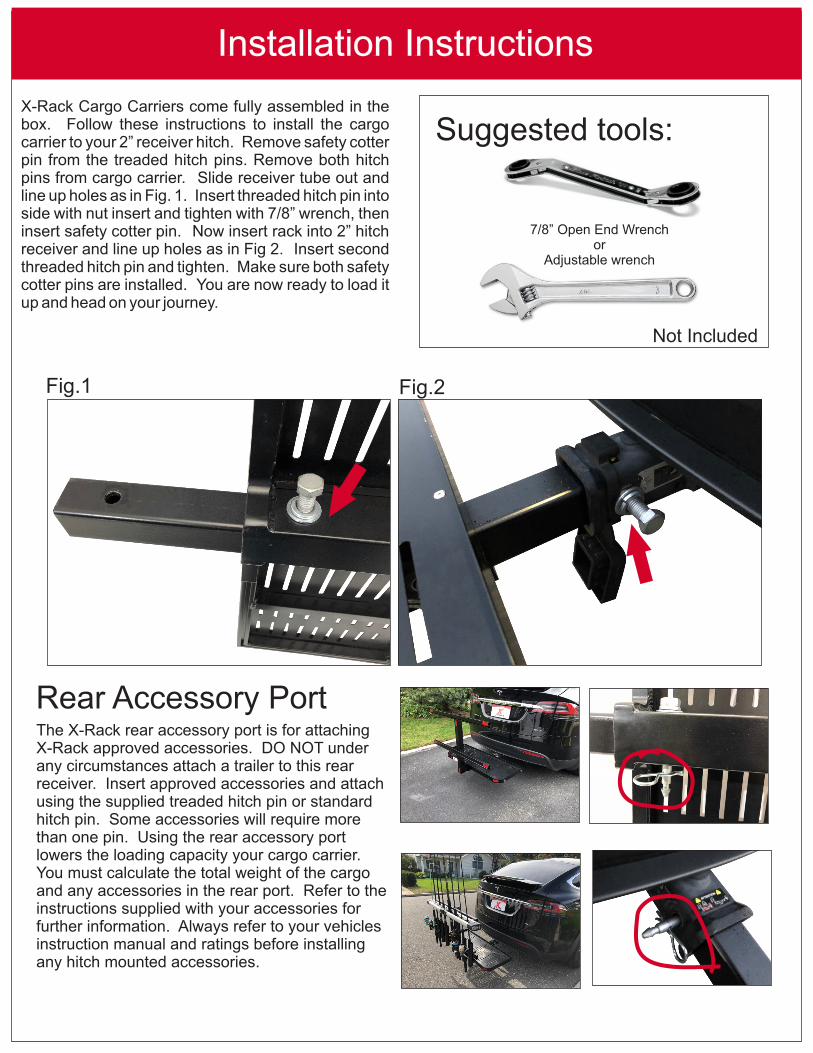
Installation Instructions
X-Rack Cargo Carriers come fully assembled in the box. Follow these instructions to install the cargo carrier to your 2” receiver hitch. Remove safety cotter pin from the treaded hitch pins. Remove both hitch pins from cargo carrier. Slide receiver tube out and line up holes as in Fig. 1. Insert threaded hitch pin into side with nut insert and tighten with 7/8” wrench, then insert safety cotter pin. Now insert rack into 2” hitch receiver and line up holes as in Fig 2. Insert second threaded hitch pin and tighten. Make sure both safety cotter pins are installed. You are now ready to load it up and head on your journey.
Fig.1 Fig.2
Rear Accessory PortThe X-Rack rear accessory port is for attaching X-Rack approved accessories. DO NOT under any circumstances attach a trailer to this rear receiver. Insert approved accessories and attach using the supplied treaded hitch pin or standard hitch pin. Some accessories will require more than one pin. Using the rear accessory port lowers the loading capacity your cargo carrier. You must calculate the total weight of the cargo and any accessories in the rear port. Refer to the instructions supplied with your accessories for further information. Always refer to your vehicles instruction manual and ratings before installing any hitch mounted accessories.
Suggested tools:
7/8” Open End Wrenchor
Adjustable wrench
Not Included

Safety Information
Tie Down Cargo Securely
1. Read all instructions before using this product2. Check for missing or damaged parts3. Do not exceed the Cargo Carriers maximum load capacity as listed above.4. Only use cargo carrier with 2” receiver hitch or Proper X-Rack reducing sleeve ***note when using a reducing sleeve you will be lowering the capacity of the cargo carrier to match the reducing sleeve’s capacity and or the vehicle’s hitch rating. Vehicle hitch ratings may be lower than the cargo carriers load capacity. DO NOT overload your carrier or exceed vehicle hitch ratings.5. Always distribute load evenly.6. Always secure load with proper straps. All straps should be checked after driving a few miles and adjusted accordingly. Make periodic stops to check straps have not loosened or load has shifted or become unstable.7. DO NOT sit, stand or ride on8. DO NOT exceed 65MPH while carrier is attached9. Follow D.O.T. Guidelines for installation and use.10. Only use X-Rack approved accessories in the rear port.11. Be aware of road conditions! Sudden bumps and pot holes can cause an instant dynamic load on the cargo carrier which may result in damage to the equipment. Driving over a bump can create a brief excess load on your carrier and vehicle hitch. Always check your load and hitch connections after going over any large bumps or dips in the road.12. Be aware of your vehicles exhaust and make sure cargo carrier is not blocking or touching any exhaust
! !Failure to comply with these instructions and safety precautionscan result in serious injury or damage to equipment or vehicle
Loop Straps (Recommended method for all carriers)
Hook strapsStretch Cords(Great for short trips with light items)
XHD/UHDX-Lite/U-Mini X-Lite/U-Mini/XHD/UHDX-Lite/U-Mini/XHD/UHDXHD/UHD
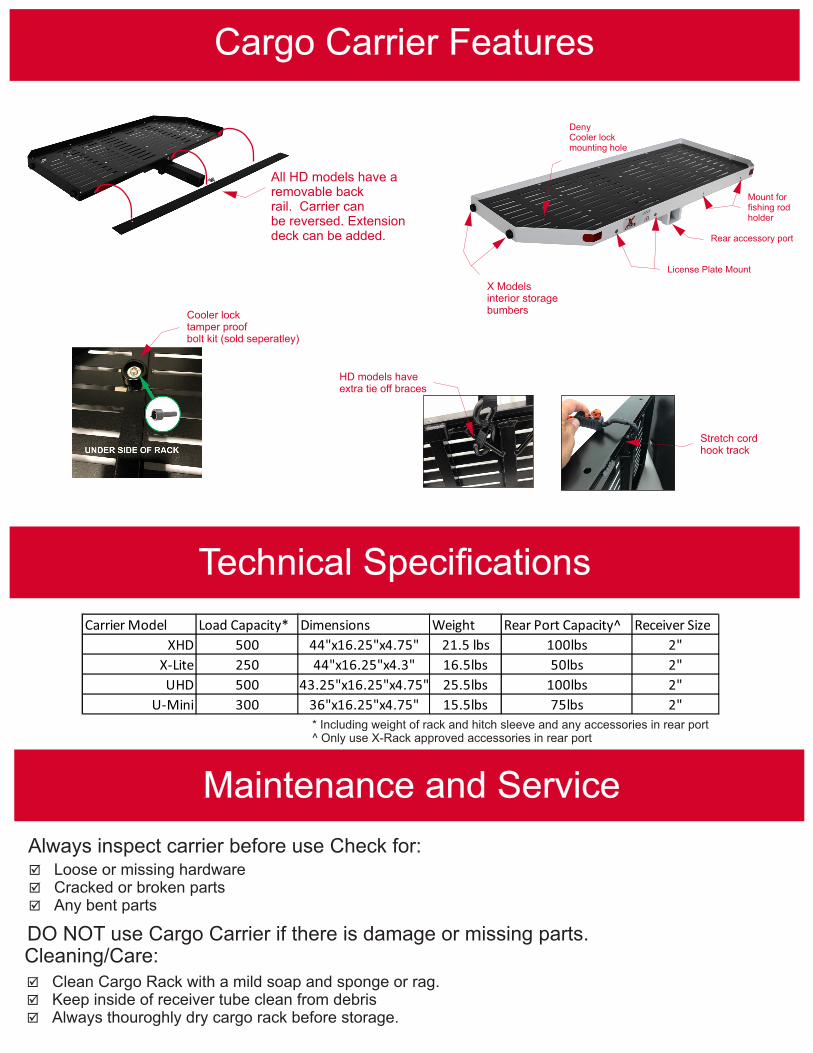
Maintenance and Service
Technical Specifications
Cargo Carrier Features
Always inspect carrier before use Check for:
Cleaning/Care:DO NOT use Cargo Carrier if there is damage or missing parts.
þ Loose or missing hardwareþ Cracked or broken partsþ Any bent parts
þ Clean Cargo Rack with a mild soap and sponge or rag.þ Keep inside of receiver tube clean from debrisþ Always thouroghly dry cargo rack before storage.
* Including weight of rack and hitch sleeve and any accessories in rear port^ Only use X-Rack approved accessories in rear port
Carrier Model Load Capacity* Dimensions Weight Rear Port Capacity^ Receiver Size
XHD 500 44"x16.25"x4.75" 21.5 lbs 100lbs 2"
X-Lite 250 44"x16.25"x4.3" 16.5lbs 50lbs 2"
UHD 500 43.25"x16.25"x4.75" 25.5lbs 100lbs 2"
U-Mini 300 36"x16.25"x4.75" 15.5lbs 75lbs 2"
License Plate Mount
Mount forfishing rod holder
Rear accessory port
DenyCooler lock mounting hole
All HD models have aremovable backrail. Carrier can be reversed. Extensiondeck can be added.
Cooler lock tamper proof bolt kit (sold seperatley)
HD models haveextra tie off braces
Stretch cord hook track
X Models interior storage bumbers
LIMITED WARRANTY
B&R Innovations, LLC (B&R) warrants this product to be free of defects in material and workmanship during the warranty period. Our warranty obligation is to provide a replacement for a defective original part if the part is covered by the warranty, after we receive a proper request from the warrantee (you) for warranty service.
Who may request service? Only a warrantee may request service. You are a warrantee if you purchased the product from B&R or from an authorized distributor AND B&R has been fully paid.
What is an “original part”? An original part is a part used to make the product as shipped to the warrantee.
What is a “proper request”? A request for warranty service is proper if B&R receives: 1) a photocopy of the Customer Invoice that displays the shipping date; AND 2) a written request for warranty service including your name and phone number. Send requests by any of the following methods: Mail, Fax or EmailX-Rack c/o B&R Innovations, [email protected]: 917-677-8449999 S. Oyster Bay Rd, Ste. 401Bethpage, NY 11714In the written request, list the parts believed to be defective and include the address where replacements should be delivered.
What is covered under the warranty?After B&R receives your request for warranty service, an authorized representative will contact you to determine whether your claim is covered by the warranty. Before providing warranty service, B&R may require you to send the entire product, or just the defective part or parts, to its facility in Bethpage, NY. The warranty covers defects in the following original dynamic components: motors, hydraulic pumps, electronic controllers, switches and cylinders. It also covers defects in original parts that wear under normal usage conditions (“wearing parts”), such as bearings, hoses, wheels, seals, brushes, and batteries.
How long is the warranty period?The warranty period for X-Rack Frame and Receiver tube is 1 year. The warranty period begins on the date when B&R ships the product to the warrantee. If the product was purchased from an authorized distributor, the period begins when the distributor ships the product. B&R may extend the warranty period for products shipped from authorized distributors by up to 30 days to account for shipping time.
If a defective part is covered by the warranty, what will B&R do to correct the problem?B&R will provide an appropriate replacement for any covered part. An authorized representative of B&R will contact you to discuss your claim.
What is not covered by the warranty? 1. Labor; 2. Freight; 3. Occurrence of any of the following, which automatically voids the warranty: � Product misuse; � Negligent operation or repair; � Corrosion or use in corrosive conditions; � Inadequate or improper maintenance; � Damage sustained during shipping; � Accidents involving the product; � Unauthorized modifications: DO NOT modify the product IN ANY WAY without first receivingwritten authorization from B&R. Modification(s) might make the product unsafe to use or might cause excessive and/or abnormal wear.4. Hardware 5. Non X-Rack accessories6. Powder coating chips and scratches, and is very difficult to fix or repair. Chips and scratches are a direct result from day to day use and are not covered under warranty.
Do any other warranties apply to the product? B&R makes no other express warranties. All implied warranties are disclaimed to the extent allowed by law. Any implied warranty not disclaimed is limited in scope to the terms of this Limited Warranty.