Embed Size (px)
Citation preview

HInged PAtIo door SyStemS I n S t A l l A t I o n I n S t r u c t I o n S
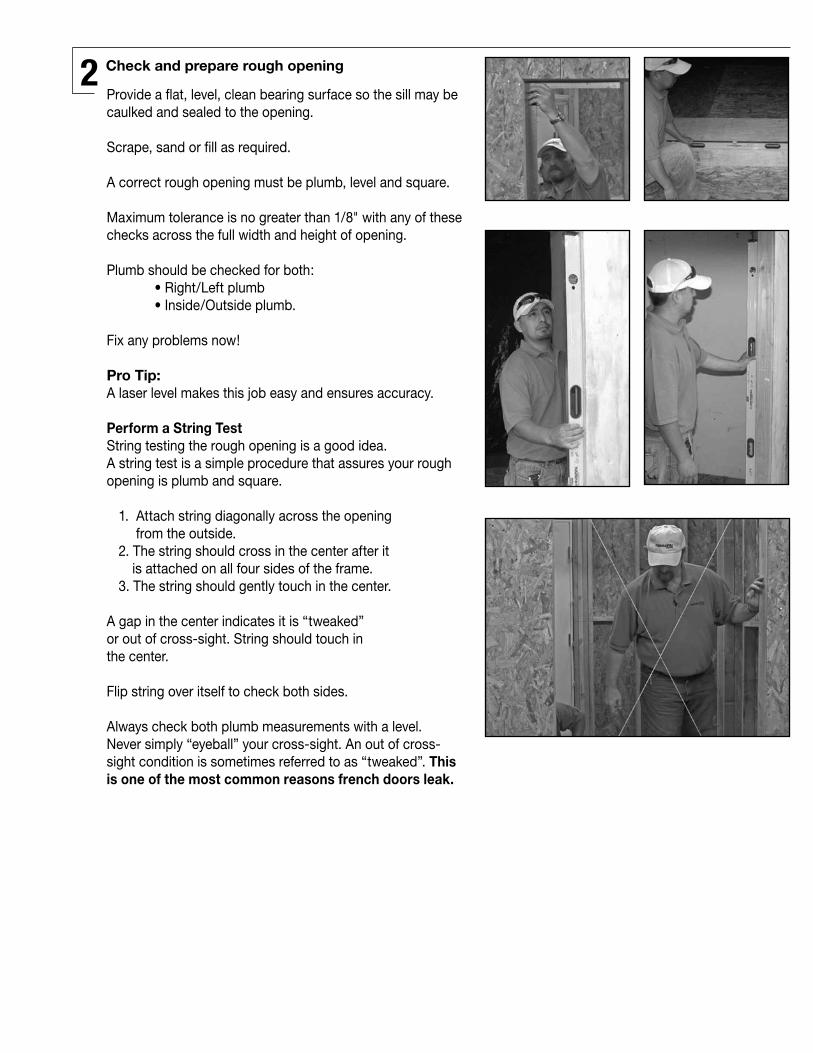
check width and height of door unit. measure size of door frame (width and height), not brickmould.
A correct rough opening is essential. the correct rough opening will be 3/4" greater in width and 1/2" greater in height than the unit dimension of the door.
remove cleats and packaging, but keep door closed with transport clip.
do not remove transport clip or open door until after the door jamb is secured as instructed in step #5.
NOTE: Set multi-point lock handleset aside for trim or finish carpenter to install at a later time. Site hardware pack included with door is required for installation.
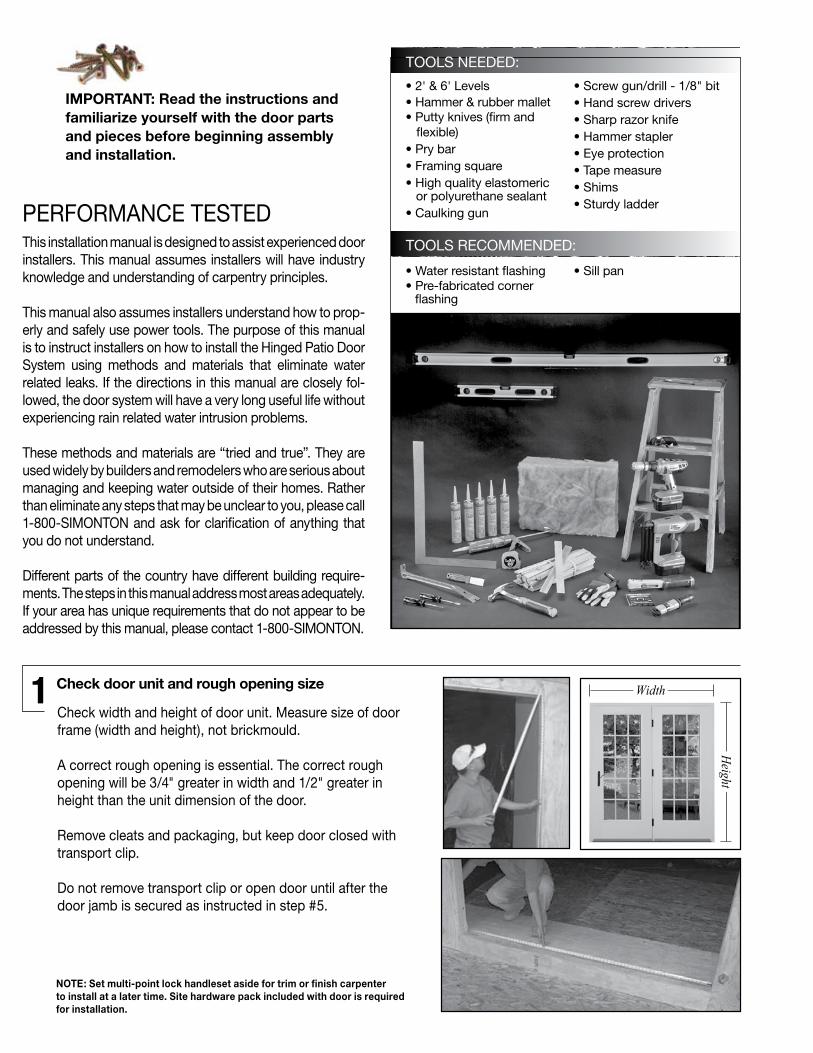
IMPORTANT: Read the instructions and familiarize yourself with the door parts and pieces before beginning assembly and installation.
• 2' & 6' levels• Hammer & rubber mallet• Putty knives (firm and flexible)• Pry bar• Framing square• High quality elastomeric or polyurethane sealant • caulking gun
• Screw gun/drill - 1/8" bit• Hand screw drivers• Sharp razor knife • Hammer stapler• eye protection • tape measure• Shims• Sturdy ladder
toolS needed:
PerFormAnce teSted this installation manual is designed to assist experienced door installers. this manual assumes installers will have industry knowledge and understanding of carpentry principles.
this manual also assumes installers understand how to prop-erly and safely use power tools. the purpose of this manual is to instruct installers on how to install the Hinged Patio door System using methods and materials that eliminate water related leaks. If the directions in this manual are closely fol-lowed, the door system will have a very long useful life without experiencing rain related water intrusion problems.
these methods and materials are “tried and true”. they are used widely by builders and remodelers who are serious about managing and keeping water outside of their homes. rather than eliminate any steps that may be unclear to you, please call 1-800-SImonton and ask for clarification of anything that you do not understand.
different parts of the country have different building require-ments. the steps in this manual address most areas adequately. If your area has unique requirements that do not appear to be addressed by this manual, please contact 1-800-SImonton.
Check door unit and rough opening size1
toolS recommended:
• Water resistant flashing• Pre-fabricated corner flashing
• Sill pan
Width
Height
Provide a flat, level, clean bearing surface so the sill may be caulked and sealed to the opening.
Scrape, sand or fill as required.
A correct rough opening must be plumb, level and square. maximum tolerance is no greater than 1/8" with any of these checks across the full width and height of opening.
Plumb should be checked for both: • right/left plumb • Inside/outside plumb.
Fix any problems now!
Pro Tip: A laser level makes this job easy and ensures accuracy.
Perform a String TestString testing the rough opening is a good idea. A string test is a simple procedure that assures your rough opening is plumb and square.
1. Attach string diagonally across the opening from the outside. 2. the string should cross in the center after it is attached on all four sides of the frame. 3. the string should gently touch in the center.
A gap in the center indicates it is “tweaked” or out of cross-sight. String should touch in the center.
Flip string over itself to check both sides.
Always check both plumb measurements with a level. never simply “eyeball” your cross-sight. An out of cross-sight condition is sometimes referred to as “tweaked”. This is one of the most common reasons french doors leak.
Check and prepare rough opening2
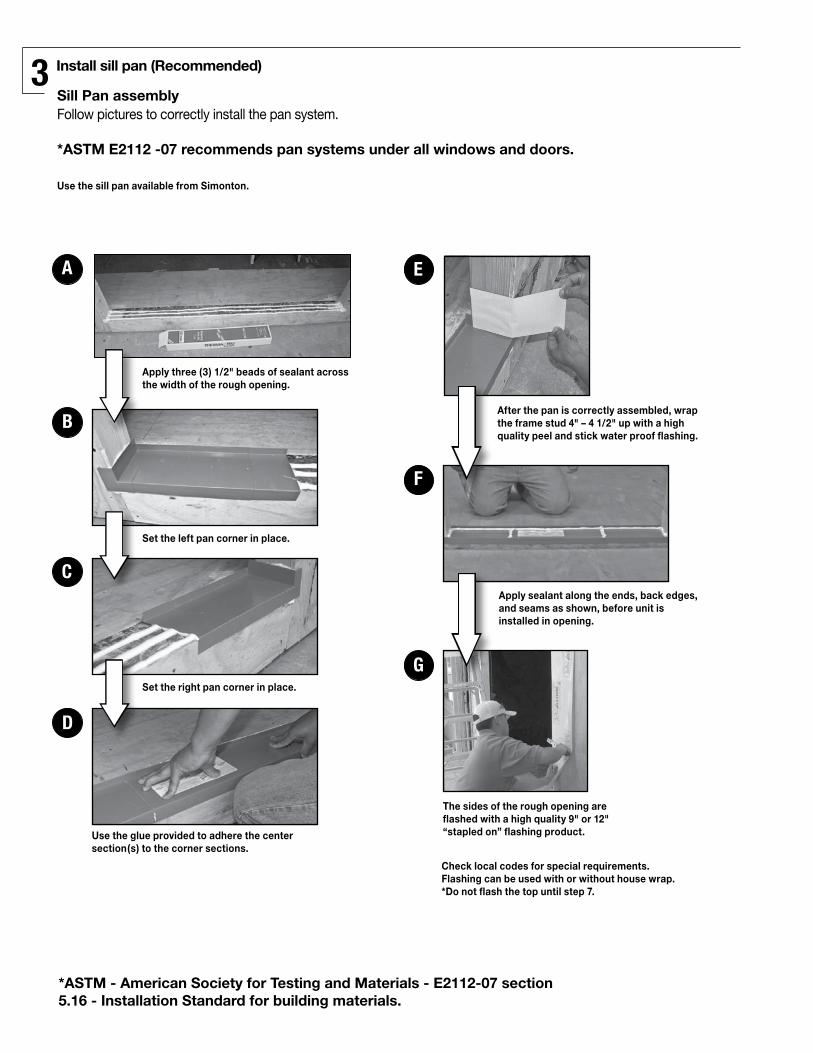
Set the left pan corner in place.
Set the right pan corner in place.
Use the glue provided to adhere the center section(s) to the corner sections.
➡
➡
Check local codes for special requirements.Flashing can be used with or without house wrap.*Do not flash the top until step 7.
After the pan is correctly assembled, wrap the frame stud 4" – 4 1/2" up with a high quality peel and stick water proof flashing.
Apply sealant along the ends, back edges, and seams as shown, before unit is installed in opening.
The sides of the rough opening are flashed with a high quality 9" or 12" “stapled on” flashing product.
B
C
D
E
F
*ASTM - American Society for Testing and Materials - E2112-07 section 5.16 - Installation Standard for building materials.
A
G
Apply three (3) 1/2" beads of sealant across the width of the rough opening.
➡➡
➡
Sill Pan assemblyFollow pictures to correctly install the pan system.
*ASTM E2112 -07 recommends pan systems under all windows and doors.
Use the sill pan available from Simonton.
Install sill pan (Recommended)3
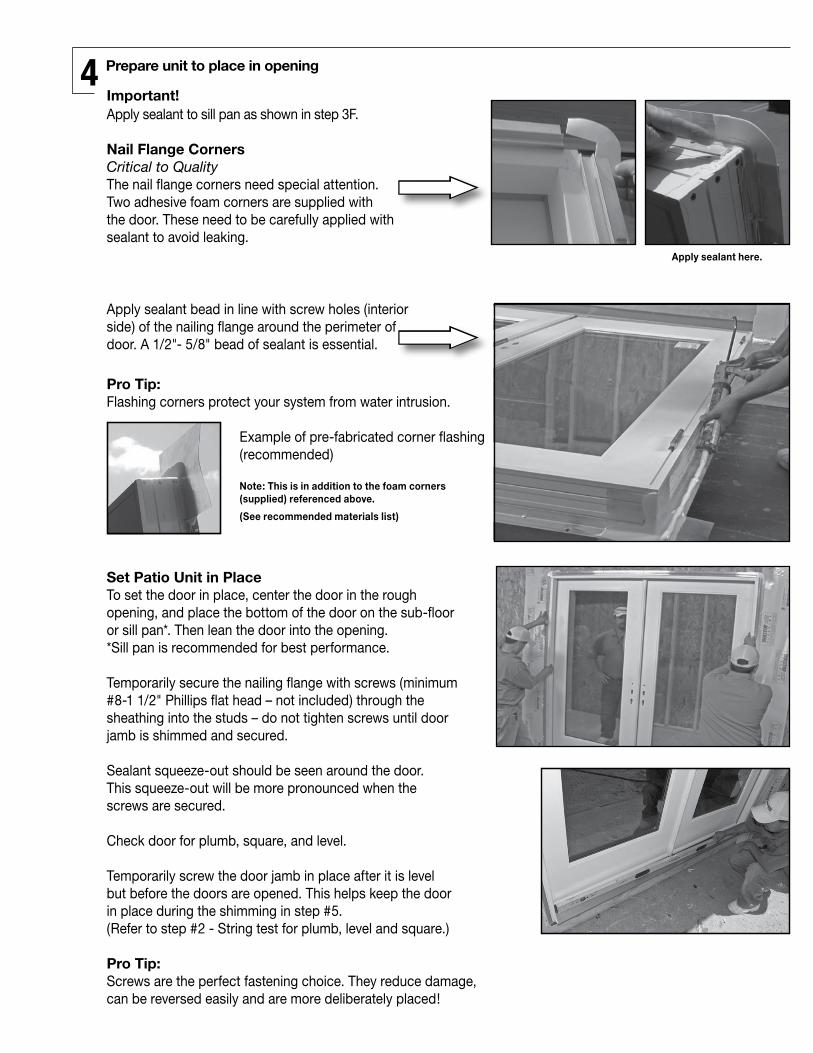
Apply sealant here.
Apply sealant bead in line with screw holes (interior side) of the nailing flange around the perimeter of door. A 1/2"- 5/8" bead of sealant is essential.
Set Patio Unit in Place to set the door in place, center the door in the rough opening, and place the bottom of the door on the sub-floor or sill pan*. then lean the door into the opening. *Sill pan is recommended for best performance.
temporarily secure the nailing flange with screws (minimum #8-1 1/2" Phillips flat head – not included) through the sheathing into the studs – do not tighten screws until door jamb is shimmed and secured.
Sealant squeeze-out should be seen around the door. this squeeze-out will be more pronounced when the screws are secured.
check door for plumb, square, and level.
temporarily screw the door jamb in place after it is level but before the doors are opened. this helps keep the door in place during the shimming in step #5.(refer to step #2 - String test for plumb, level and square.)
Pro Tip: Screws are the perfect fastening choice. they reduce damage, can be reversed easily and are more deliberately placed!
➡
➡Pro Tip: Flashing corners protect your system from water intrusion.
example of pre-fabricated corner flashing (recommended)
Note: This is in addition to the foam corners (supplied) referenced above.
(See recommended materials list)
Important!Apply sealant to sill pan as shown in step 3F.
Nail Flange CornersCritical to Quality the nail flange corners need special attention. two adhesive foam corners are supplied with the door. these need to be carefully applied with sealant to avoid leaking.
Prepare unit to place in opening4
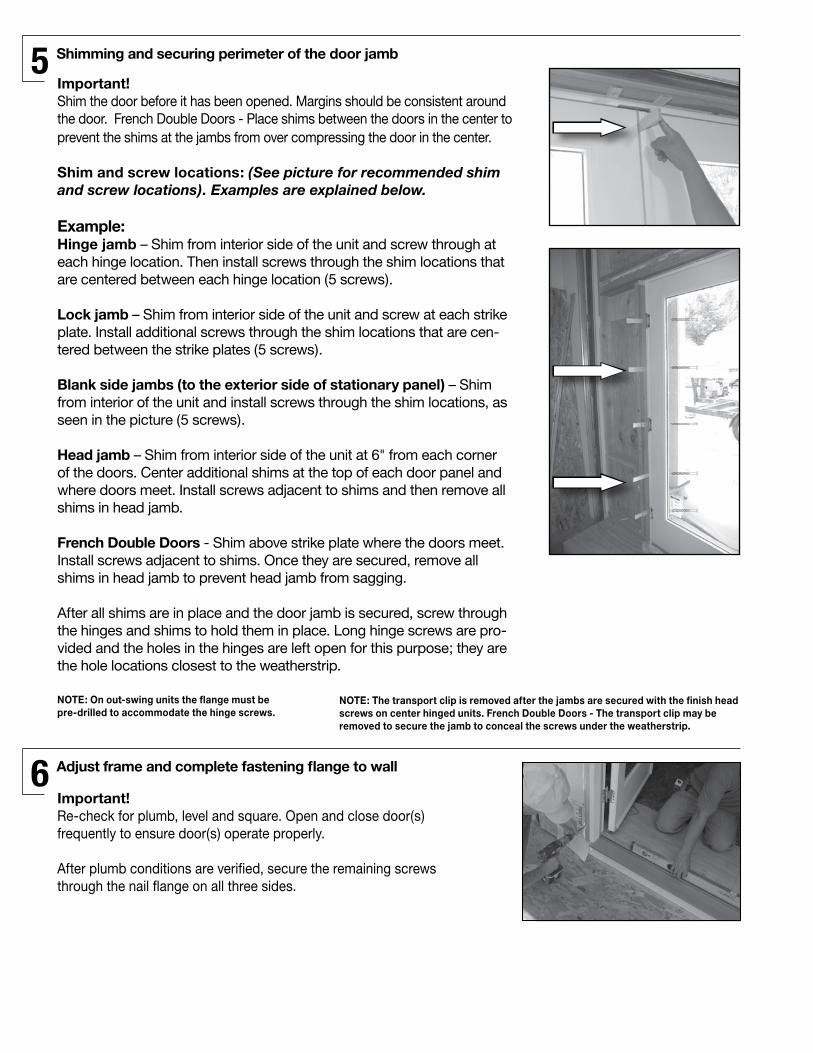
NOTE: On out-swing units the flange must be pre-drilled to accommodate the hinge screws.
NOTE: The transport clip is removed after the jambs are secured with the finish head screws on center hinged units. French Double Doors - The transport clip may be removed to secure the jamb to conceal the screws under the weatherstrip.
Important!Shim the door before it has been opened. margins should be consistent around the door. French double doors - Place shims between the doors in the center to prevent the shims at the jambs from over compressing the door in the center.
Shim and screw locations: (See picture for recommended shim and screw locations). Examples are explained below.
Example:Hinge jamb – Shim from interior side of the unit and screw through at each hinge location. then install screws through the shim locations that are centered between each hinge location (5 screws).
Lock jamb – Shim from interior side of the unit and screw at each strike plate. Install additional screws through the shim locations that are cen-tered between the strike plates (5 screws).
Blank side jambs (to the exterior side of stationary panel) – Shim from interior of the unit and install screws through the shim locations, as seen in the picture (5 screws).
Head jamb – Shim from interior side of the unit at 6" from each corner of the doors. center additional shims at the top of each door panel and where doors meet. Install screws adjacent to shims and then remove all shims in head jamb.
French Double Doors - Shim above strike plate where the doors meet. Install screws adjacent to shims. once they are secured, remove all shims in head jamb to prevent head jamb from sagging.
After all shims are in place and the door jamb is secured, screw through the hinges and shims to hold them in place. long hinge screws are pro-vided and the holes in the hinges are left open for this purpose; they are the hole locations closest to the weatherstrip.
Shimming and securing perimeter of the door jamb5
➡
➡
➡
Adjust frame and complete fastening flange to wall6Important!re-check for plumb, level and square. open and close door(s) frequently to ensure door(s) operate properly.
After plumb conditions are verified, secure the remaining screws through the nail flange on all three sides.
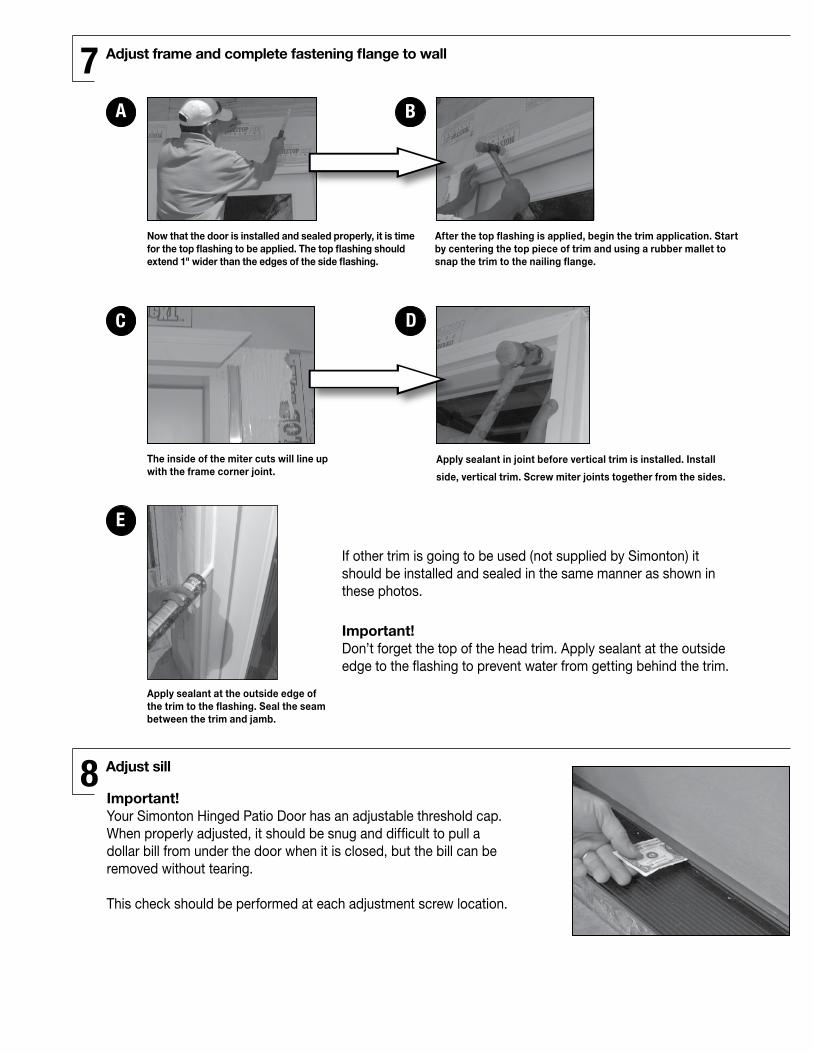
Apply sealant in joint before vertical trim is installed. Install
side, vertical trim. Screw miter joints together from the sides.
After the top flashing is applied, begin the trim application. Start by centering the top piece of trim and using a rubber mallet to snap the trim to the nailing flange.
Now that the door is installed and sealed properly, it is time for the top flashing to be applied. The top flashing should extend 1" wider than the edges of the side flashing.
If other trim is going to be used (not supplied by Simonton) it should be installed and sealed in the same manner as shown in these photos.
Important!don’t forget the top of the head trim. Apply sealant at the outside edge to the flashing to prevent water from getting behind the trim.
Apply sealant at the outside edge of the trim to the flashing. Seal the seam between the trim and jamb.
The inside of the miter cuts will line up with the frame corner joint.
➡
➡
B
C D
E
A
Adjust frame and complete fastening flange to wall7
Adjust sill8Important!your Simonton Hinged Patio door has an adjustable threshold cap. When properly adjusted, it should be snug and difficult to pull a dollar bill from under the door when it is closed, but the bill can be removed without tearing.
this check should be performed at each adjustment screw location.
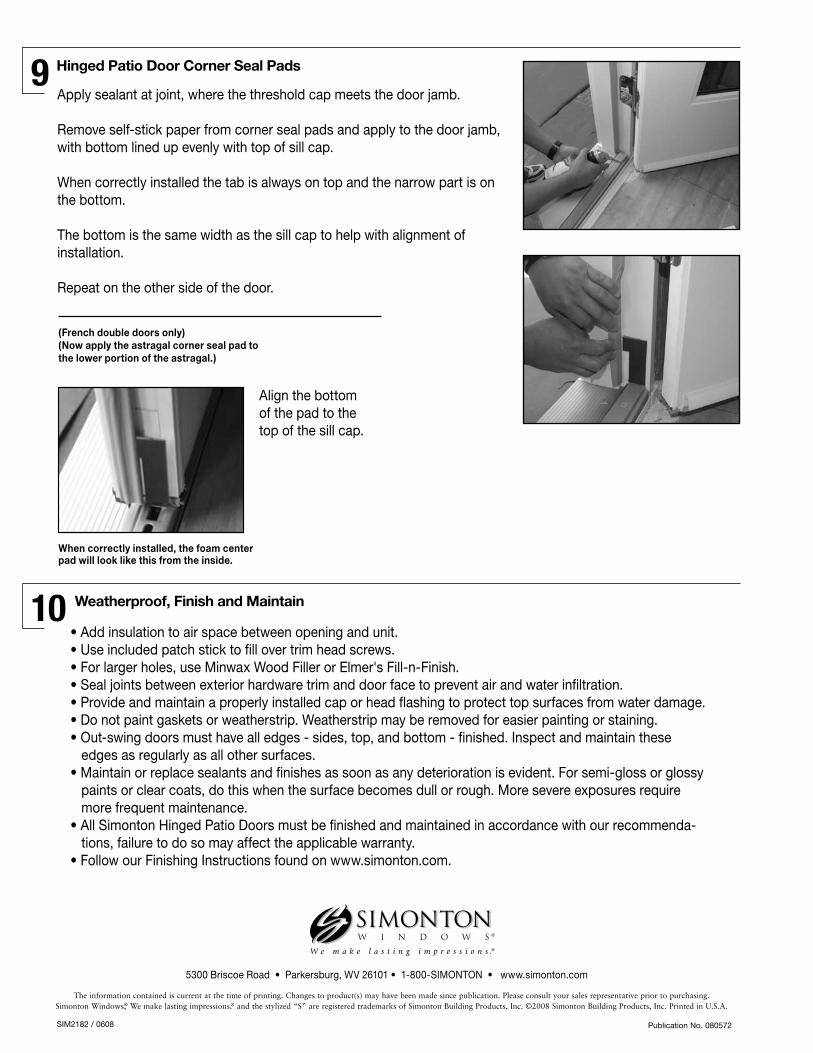
When correctly installed, the foam center pad will look like this from the inside.
Align the bottom of the pad to the top of the sill cap.
• Add insulation to air space between opening and unit.• use included patch stick to fill over trim head screws.• For larger holes, use minwax Wood Filler or elmer's Fill-n-Finish.• Seal joints between exterior hardware trim and door face to prevent air and water infiltration.• Provide and maintain a properly installed cap or head flashing to protect top surfaces from water damage.• do not paint gaskets or weatherstrip. Weatherstrip may be removed for easier painting or staining.• out-swing doors must have all edges - sides, top, and bottom - finished. Inspect and maintain these edges as regularly as all other surfaces.• maintain or replace sealants and finishes as soon as any deterioration is evident. For semi-gloss or glossy paints or clear coats, do this when the surface becomes dull or rough. more severe exposures require more frequent maintenance.• All Simonton Hinged Patio doors must be finished and maintained in accordance with our recommenda- tions, failure to do so may affect the applicable warranty.• Follow our Finishing Instructions found on www.simonton.com.
(French double doors only)(Now apply the astragal corner seal pad to the lower portion of the astragal.)
Apply sealant at joint, where the threshold cap meets the door jamb.
remove self-stick paper from corner seal pads and apply to the door jamb, with bottom lined up evenly with top of sill cap.
When correctly installed the tab is always on top and the narrow part is on the bottom.
the bottom is the same width as the sill cap to help with alignment of installation.
repeat on the other side of the door.
Hinged Patio Door Corner Seal Pads9
Weatherproof, Finish and Maintain10
The information contained is current at the time of printing. Changes to product(s) may have been made since publication. Please consult your sales representative prior to purchasing. Simonton Windows,® We make lasting impressions.® and the stylized “S” are registered trademarks of Simonton Building Products, Inc. ©2008 Simonton Building Products, Inc. Printed in U.S.A.
SIm2182 / 0608 Publication no. 080572
5300 Briscoe road • Parkersburg, WV 26101 • 1-800-SImonton • www.simonton.com