Embed Size (px)
Citation preview

HexMapper
Version 2.2.1
1 Introduction HexMapper is an application for building hex-based maps for RPGs, table-top wargames and other such games. It was written in Java 1.5, and I have tried to make it as native feeling in all operating systems as possible.
Main Screen
The basic idea behind HexMapper is to start with a high level broad scale view of the world to be mapped, and burrow down to finer levels of detail where needed as needed. It's possible to eventually map an entire continent at a tactical map level (although that would require on the order of 10-20Gb of storage). You can at any time decompose a hex

into 49 sub-hexes that are 1/7th the size of the parent hex. After a hex is decomposed, the basic attributes of that hex are no longer directly editable. Instead, they are automatically calculated by averaging the sub-hexes. This happens recursively and automatically.
Why 49 sub-hexes? A single hex naturally decomposes into seven sub-hexes – one at the center, plus one at each vertex. However, these sub-hexes are oriented differently than the parent hex—if the parent hex is “side up”, the sub-hexes are “point-up”. By subdividing the sub-hexes, you end up with 49 sub-hexes that have the same orientation as the parent hex.
2 Using HexMapper 2.1 Menus 2.1.1 File Menu This menu contains options for dealing with map files, such as creating new maps or opening maps.
About Displays the About dialog (OS X -- in the "HexMapper" Menu). Clicking on the website tag should take you to the HexMapper website. If this doesn’t work on your platform, go to: http://www.mentalwasteland.net/HexMapper
New Displays the Create Map dialog. This dialog is used to create a new map. You can specify the size and units (feet or meters) of the smallest size hexes, and how many levels of hexes you want. The dialog will automatically calculate the size of the top level hexes and the entire map for you. You can also specify the increment size you want to use for elevation, and the dialog will automatically calculate the possible range of elevations for you.
Create Map Dialog
When you initially save a map, you create the main file (which has the extension “.hxm”), but in addition a whole hierarchy of sub-directories and files will be created as the map is developed. Because of this, it is highly recommended that a new map be placed in a new directory that holds nothing but that map. Note that only one map can be open at a time, so creating a map will cause an already open map to be closed. You will be prompted to save the old map if needed.
Open This menu item allows you to open an existing map. You select the main file created when the map is created to open the map. Note that only one map can be open at a time, so opening a map will cause an already open map to be closed. You will be prompted to save the old map if needed.
Save This menu item saves all data for the current map. Note that if you work for a long time on the map, an automatic save may occur to conserve memory.
Export as XML This menu item allows the user to create an XML file that describes the currently viewed map. It only contains information for the visible hexes—I didn’t want to try to create a 50 Gb file on someone’s machine. The schema for the XML file is downloadable from the HexMapper website.
Print This menu item allows the user to save an image of the current map view as it is currently rendered. Parts of the map that can be hidden, such as icons and labels on specific layers, and unselected options like contour lines will only be printed if they are currently visible.
2.1.2 Edit Menu This menu controls options for editing the map. Many of the edit operations involve different modes of operations, where mouse clicks on the map or keystrokes will cause different operations.
Undo This menu item undoes the latest edit. The application queues up all edits, so multiple edits can be undone, one at a time. Certain operations cannot be undone. Creating or deleting child hexes and saving the map cannot be undone. These operations clear the current undo queue, so no edits done before them can be undone.
Redo This menu item reverses an immediately previous undo operation. Multiple undoes can be reversed with multiple redoes, and vice versa.
Edit Mode This menu item puts the application in Edit Mode, which is the default mode. See the description of the Map Pane (Section 0) for more details.

Draw Borders Mode This menu item puts the application in Draw Borders mode. Clicking and dragging the mouse in the Map Pane will draw borders. The type of border drawn depends upon the current selection in the Edit Pane.
Draw Rivers Mode This menu item puts the application in Draw Rivers mode. Clicking and dragging the mouse in the Map Pane will draw rivers. The type of river drawn depends upon the current selection in the Edit Pane.
Draw Roads Mode This menu item puts the application in Draw Roads mode. Clicking and dragging the mouse in the Map Pane will draw rivers. The type of road drawn depends upon the current selection in the Edit Pane.
Copy To Children This menu item causes the currently selected hex or hexes to each be decomposed into sub-hexes. Each sub-hex has the same Surface, Terrain, and Elevation attribute as its parent hex. Borders, Rivers and Roads are copied to the sub-hexes to mimic those in the parent hex.
Interpolate To Children This menu item causes the currently selected hex or hexes to each be decomposed into sub-hexes. The Surface and Terrain attributes in general match the parent hex, but will be somewhat varied randomly to blend with the surrounding hexes. The elevation will be randomized, but will blend with the elevation of the surround hexes and have an average elevation that matches the parent hex’s elevation. Roads and Rivers will also be randomized, but will enter and exit on the same sides. Borders will be simply copied down.
Delete Children This menu item causes the child hexes of all selected hexes to be deleted recursively. This operation cannot be undone: the deleted hexes cannot be recovered!
Clear Borders This menu item causes the borders in the currently selected hexes to be erased. Borders in sub-hexes will not be affected.
Clear Rivers This menu item causes all rivers in the currently selected hexes to be erased. Rivers in sub-hexes will not be affected.
Clear Roads This menu item causes all roads in the currently selected hexes to be erased. Roads in sub-hexes will not be affected.

Do Propagate Up This toggle menu item causes changes in the current hexes to be propagated up to their parent hex. It defaults to checked, so propagation occurs by default. Turning upward propagation is useful when changes of scale would cause you to change the way you perceive the map. For example, at a fine enough level of detail, hills become flat hexes and forests become ground with individual trees.
Smooth Elevations This menu item causes all roads in the currently selected hexes to be erased. Roads in sub-hexes will not be affected. A dialog allows you to select the randomness of the elevations. Moving the slider all the way to left causes the hexes to be very smooth in their elevation changes. All the way to the right causes the changes to be fairly “bumpy”.
Smooth Elevations Dialog
After the Smooth… button is pressed, you must select some of the currently selected hexes again as the “anchor” hexes. The elevations of the anchor hexes are not changed. The elevations of the other hexes are smoothed relative to the elevations of the anchor hexes and the other hexes distance from each anchor hex.
Randomize Elevations This menu item causes the elevations of the currently selected hexes to be randomized. A dialog allows you to specify the minimum possible, maximum possible, and average elevation for the hexes.

Randimze Elevations Dialog
2.1.3 Navigate Menu This menu allows you to change the current hex. Note that the shortcuts for these menu items are set so that moving is natural on a keypad.
Down This menu item is active when a single hex with sub-hexes is selected. It moves down one level in the map, making the selected hex the current hex.
Up This menu item takes the display up one level.
Top The menu item takes the display to the top level.
Hex NNW, Hex NNE, Hex West, Hex East, Hex SSW, Hex SSE These menu items are available when a single hex is currently selected in Edit Mode. The selection is moved one hex in the desired direction. If the selection moves to another major hex, then the map view is also moved automatically.
Map NNW, Map NNE, Map West, Map East, Map SSW, Map SSE These menu items move the display laterally one major hex in the given direction.
2.1.4 View Menu This menu allows you to adjust the map display.
Surface, Terrain, Borders, Rivers, Roads, Icons, Text, Hex Borders, Neighboring Hexes, Sub-Hexes, Contour Lines These toggle menu items toggle on/off display of the named parts of the map. All of them except for contour lines default to on.
Note that “neighboring hexes” are the adjacent hexes to the current main hex. They are visible to help understand context, but these hexes are not editable. To edit them, you must first move to the appropriate major hex.
Contour Level This sub-menu allows setting of the contour lines level. Note that a fine level of contour lines can take some time to generate on a large scale map view.
Zoom This sub-menu allows setting of the display zoom.
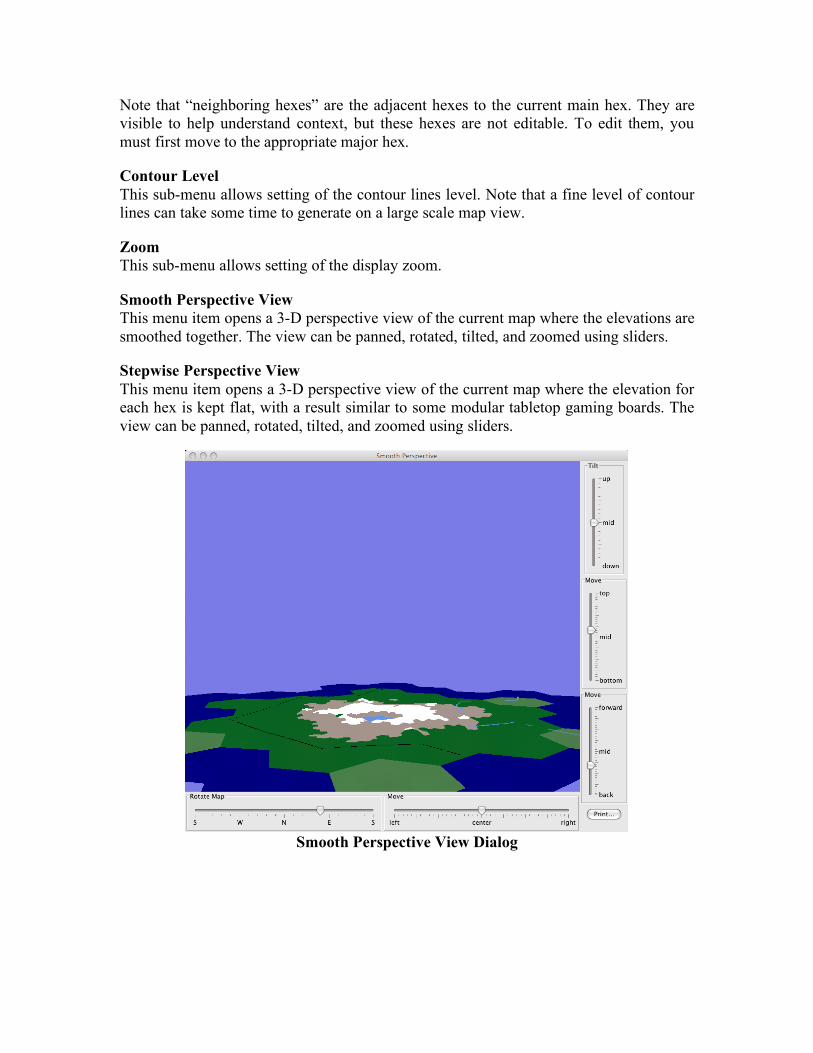
Smooth Perspective View This menu item opens a 3-D perspective view of the current map where the elevations are smoothed together. The view can be panned, rotated, tilted, and zoomed using sliders.
Stepwise Perspective View This menu item opens a 3-D perspective view of the current map where the elevation for each hex is kept flat, with a result similar to some modular tabletop gaming boards. The view can be panned, rotated, tilted, and zoomed using sliders.
Smooth Perspective View Dialog
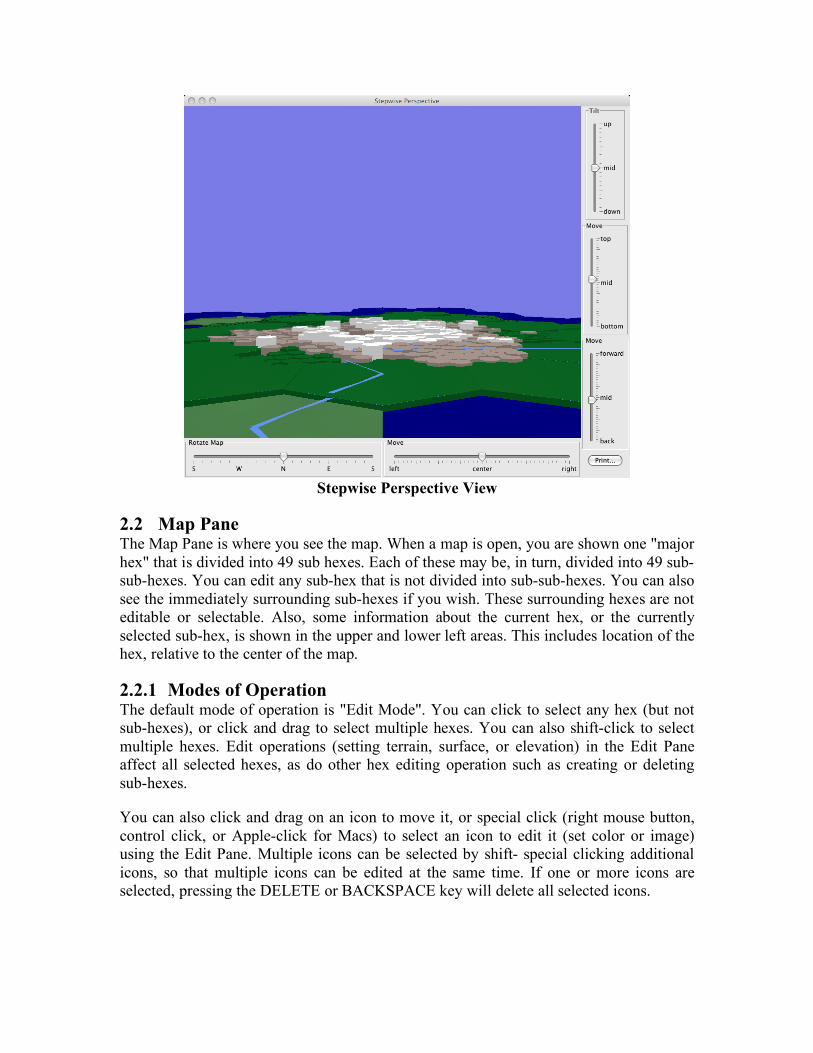
Stepwise Perspective View
2.2 Map Pane The Map Pane is where you see the map. When a map is open, you are shown one "major hex" that is divided into 49 sub hexes. Each of these may be, in turn, divided into 49 sub-sub-hexes. You can edit any sub-hex that is not divided into sub-sub-hexes. You can also see the immediately surrounding sub-hexes if you wish. These surrounding hexes are not editable or selectable. Also, some information about the current hex, or the currently selected sub-hex, is shown in the upper and lower left areas. This includes location of the hex, relative to the center of the map.
2.2.1 Modes of Operation The default mode of operation is "Edit Mode". You can click to select any hex (but not sub-hexes), or click and drag to select multiple hexes. You can also shift-click to select multiple hexes. Edit operations (setting terrain, surface, or elevation) in the Edit Pane affect all selected hexes, as do other hex editing operation such as creating or deleting sub-hexes.
You can also click and drag on an icon to move it, or special click (right mouse button, control click, or Apple-click for Macs) to select an icon to edit it (set color or image) using the Edit Pane. Multiple icons can be selected by shift- special clicking additional icons, so that multiple icons can be edited at the same time. If one or more icons are selected, pressing the DELETE or BACKSPACE key will delete all selected icons.
You can edit labels in a similar fashion. You can click and drag a label, or click on a corner of a label to resize or change the angle of the label. You can select one or more labels and use the Edit Pane to change the font or appearance of the label.
Special modes of operation are selected from the Edit menu or from the Edit Pane. They allow clicking and dragging to edit borders, rivers, or roads, or clicking to add icons.
At any time, pressing the ESC key will change the mode back to Edit Mode and unselect all hexes.
2.2.2 Edit Pane This pane contains all of the controls for editing the basic features of the hexes – Surface, Terrain, and Elevation – plus rivers, roads, borders, labels,and icons.
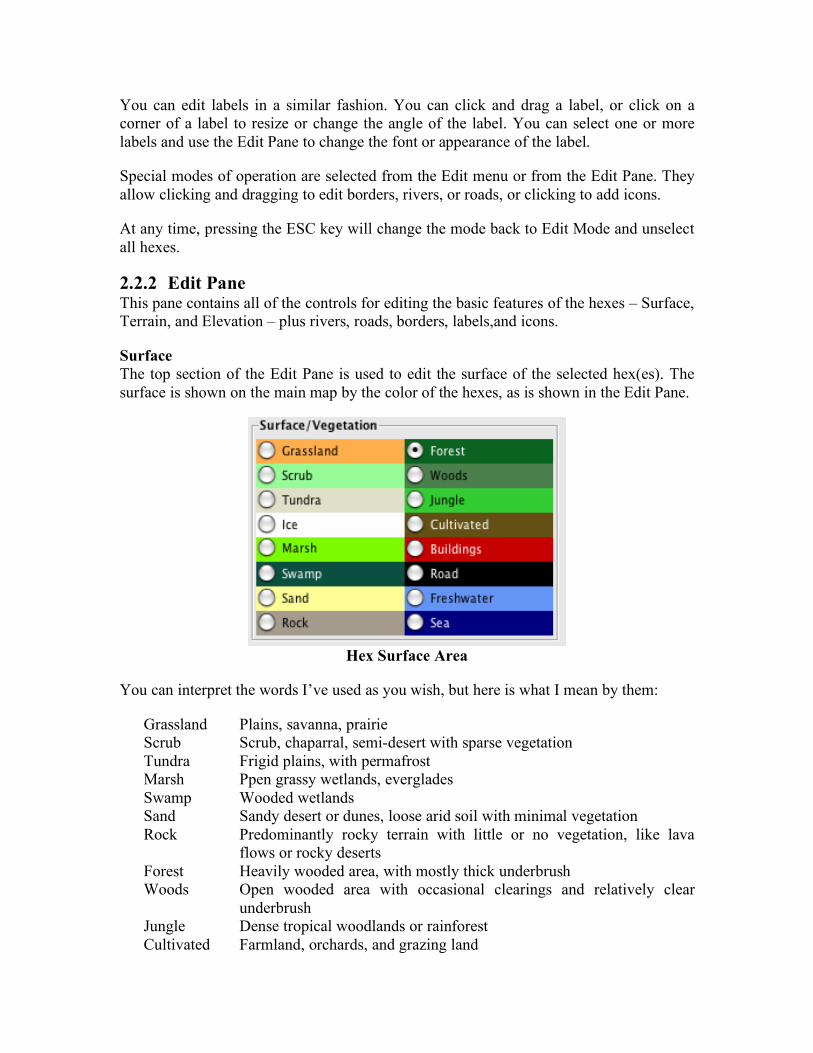
Surface The top section of the Edit Pane is used to edit the surface of the selected hex(es). The surface is shown on the main map by the color of the hexes, as is shown in the Edit Pane.
Hex Surface Area
You can interpret the words I’ve used as you wish, but here is what I mean by them:
Grassland Plains, savanna, prairie Scrub Scrub, chaparral, semi-desert with sparse vegetation Tundra Frigid plains, with permafrost Marsh Ppen grassy wetlands, everglades Swamp Wooded wetlands Sand Sandy desert or dunes, loose arid soil with minimal vegetation Rock Predominantly rocky terrain with little or no vegetation, like lava
flows or rocky deserts Forest Heavily wooded area, with mostly thick underbrush Woods Open wooded area with occasional clearings and relatively clear
underbrush Jungle Dense tropical woodlands or rainforest Cultivated Farmland, orchards, and grazing land
Buildings Cities and towns, used mainly in small scale hexes Roads Roads, used mainly in small scale hexes Freshwater Rvers and lakes Saltwater Seas and oceans
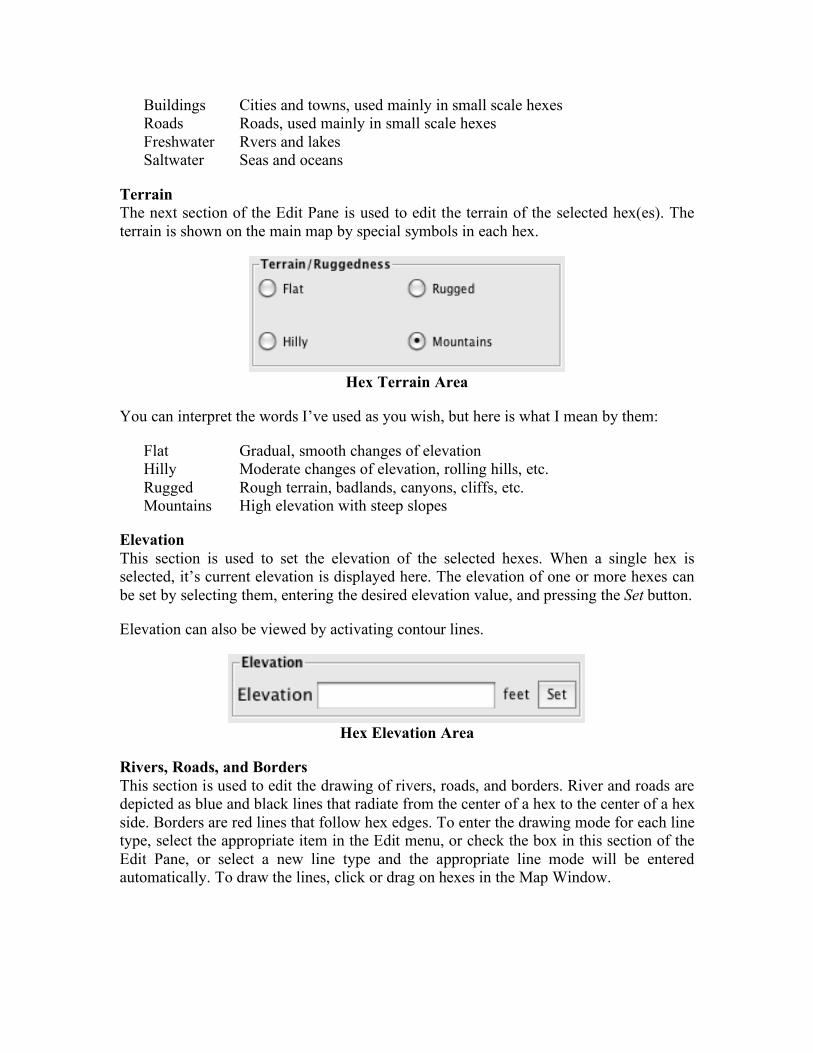
Terrain The next section of the Edit Pane is used to edit the terrain of the selected hex(es). The terrain is shown on the main map by special symbols in each hex.
Hex Terrain Area
You can interpret the words I’ve used as you wish, but here is what I mean by them:
Flat Gradual, smooth changes of elevation Hilly Moderate changes of elevation, rolling hills, etc. Rugged Rough terrain, badlands, canyons, cliffs, etc. Mountains High elevation with steep slopes
Elevation This section is used to set the elevation of the selected hexes. When a single hex is selected, it’s current elevation is displayed here. The elevation of one or more hexes can be set by selecting them, entering the desired elevation value, and pressing the Set button.
Elevation can also be viewed by activating contour lines.
Hex Elevation Area
Rivers, Roads, and Borders This section is used to edit the drawing of rivers, roads, and borders. River and roads are depicted as blue and black lines that radiate from the center of a hex to the center of a hex side. Borders are red lines that follow hex edges. To enter the drawing mode for each line type, select the appropriate item in the Edit menu, or check the box in this section of the Edit Pane, or select a new line type and the appropriate line mode will be entered automatically. To draw the lines, click or drag on hexes in the Map Window.

Line Editing Area
Layers This area sets the current layer. There are five layers, labels “1” to “5”. Any icons or labels that are added are added to the current layer. Different layers can be made visible or invisible as desired with the Edit Menu. Also, if one ore more existing labels or icons are selected, changing the layer will cause those labels or icons to be moved to the selected layer.
Layer Selection Area
Icons This area is used to create new and to edit existing icons. To create an icon, select the desired icon shape and color, add a note if desired, then click on the map to add the icon. You can click repeatedly to add multiple icons. To edit one or more icons, select them while in edit mode (Section 2.2.1), then select the color and/or shape here to change the icons. You can edit the note for an icon if exactly one icon is selected for editing. Edit the note text, then press the Set button to change the text. Select one or more icons then press the delete key to delete them.
Icon Editing Area
Labels This area is used to create new labels and to edit existing labels. To create a label, enter the desired label text, click the Add… button, then click and drag in the Map Pane to position the label.

Label Editing Area
Click the Format… button to select the font, font attributes, and font color of a new label, or to set the appearance of any selected labels. Select one or more labels then press the delete key to delete them.
Font Selection Dialog
Select a single label, edit the text in the text field, then press the Set button to change the label text.


![TOPN Messages - Cisco · %TR-2-PANICINF: Unit [dec], PI [hex] [hex] [hex] [hex] [hex] [hex] Explanation This message is similar to the (Jeanine check source.) Recommended Action Copy](https://img.pdfslide.us/doc/110x75/5f96ea0c176ab92a087a6e14/topn-messages-cisco-tr-2-panicinf-unit-dec-pi-hex-hex-hex-hex-hex.jpg)