Embed Size (px)
Citation preview

Help Guide
Full Airside ID Pass Applications on IDGateway

Introduction
This step by step help guide in conjunction with the Guidelines will help you to complete your Full Airside ID Pass Applications for Aberdeen, Glasgow and
Southampton airports.
Completing your application right first time will enable the ID Security Audit Team to process your application first time, allowing your applicant to receive their
airside pass quickly and efficiently.
If you have any queries or require further assistance, you can contact us on
0141 842 7640 or 7570 or at [email protected]

Useful Links
• Disclosure Scotland (Criminal Record Certificates) - https://www.mygov.scot/basic-disclosure/apply-for-basic-disclosure
• (Overseas Criminal Record Certificates) - http://www.sia.homeoffice.gov.uk/Pages/licensing-overseas-checks.aspx
• CAA (info on Certificate of Disregard and Disqualifying Convictions) - https://www.caa.co.uk/Commercial-industry/Security/Regulation/Criminal-record-checks
• Right to Work - https://www.gov.uk/government/organisations/uk-visas-and-immigration
• Companies House - https://www.gov.uk/get-information-about-a-company
• Glasgow Airport (Reference Templates/Applicants Declaration (security interview)) - http://www.glasgowairport.com/corporate/id-centre/
• Southampton Airport (Reference Templates/Applicants Declaration (security interview)) - http://www.southamptonairport.com/id-centre/id-centre/
• Aberdeen Airport (Reference Templates/Applicants Declaration (security interview)) - https://www.aberdeenairport.com/about-us/doing-business-with-us/id-centre/forms-and-templates/

PASS TYPE
• Under “Pass Type” select Full Airside ID pass from the drop-down box. (Only Full Airside passes are processed by the ID Security Team, all other passes are processed through the ID Centre),
• Under “Applicant Name” type in applicants name, then click the “Continue” button.
Note: If you think your applicant has already been through the IDGateway process for your company then you can type the persons name to enable you access to their previous details.
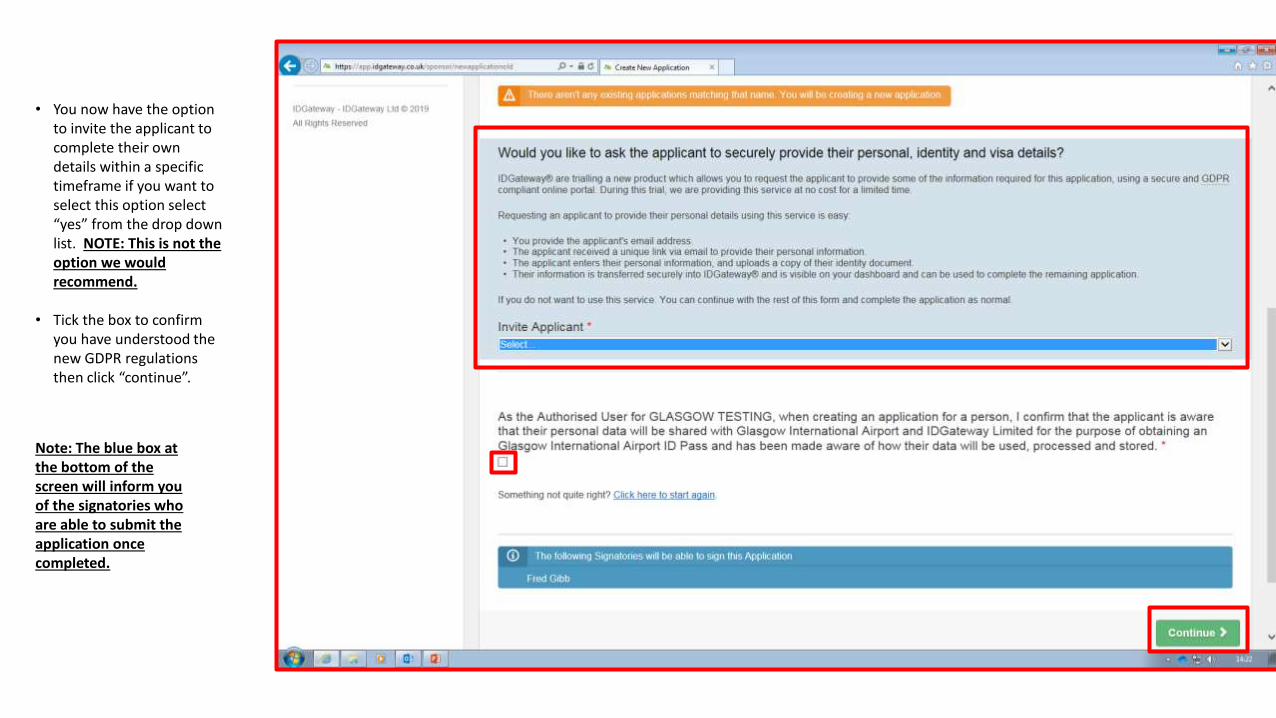
• You now have the option to invite the applicant to complete their own details within a specific timeframe if you want to select this option select “yes” from the drop down list. NOTE: This is not the option we would recommend.
• Tick the box to confirm you have understood the new GDPR regulations then click “continue”.
Note: The blue box at the bottom of the screen will inform you of the signatories who are able to submit the application once completed.

• You now have the option to choose who should have access to each application. You don’t have to make any changes here if happy with access levels.

PRIMARY DETAILS
• Under “Gender” select “Male” or “Female”,
• Ensure that the applicants Forename, Surname and middle name (if applicable) match exactly as per their ID,
• Date of Birth must also match exactly as per the applicants ID,
• Select Country of Birth, as per the applicant’s ID from the drop-down box,

• Under “Nationality” please insert as it appears on the applicants ID, however note that if the ID is from another country e.g. France and the nationality is Francais on the ID, then please ensure this is entered in English i.e. “French”,
• “Daytime Phone Number” –Enter the applicants phone number preferably a mobile number,
• “E-mail Address” this is optional but again enter the applicants e-mail address not the signatories,
• “Security Interview” – Select “yes” from the drop-down box then click “Continue” (if “no” is selected then this will prevent you from submitting the application). NOTE: The security interview must be fully completed and signed by the applicant, and carried out within 60 days of submitting the application and uploaded into the system.

CURRENT ADDRESS
• When you select “United Kingdom and Channel Islands” you will get the option to use the postcode finder, however please note that not all addresses in IDGateway are accurate and this could lead to potential rejections, therefore we would recommend you enter the address manually.

• Complete the “Current Address” fields ensuring that care is taken over the spelling of the full address and that the postcode is accurate. NOTE: If the applicants address is on the CRC then you must ensure that they both match.
• “Resident From Date” is the date that the applicant moved into the current address given. Once completed click “Continue”.

IDENTITY DETAILS
• Use the drop down field to select the Country in which the ID document was issued,
• Use the drop down box to select which type of ID document you are going to use,
• Type in the expiry date of the document and double check this against the ID as this is quite often rejected on as not entered correctly,
• Type in ID Number (i.e. passport number, Driver’s Licence number or National Identity Number) and again double check these details before clicking “Continue”.
Note: Please ensure you only upload ONE copy of the ID that you have checked. A common error is that both the passport and Driver’s Licence are uploaded and as only one ID is permitted on the system and produced at the ID Centre this would have to be rejected.

POSITION DETAILS
• The start date is the date the applicant started/or starts with the company not when they start working at the airport. Once populated this will automatically populate the date field for your first (sponsor company) reference,
• Position is the applicant’s job title, once completed click “Continue”.

REFERENCES DETAILS
Note: Under “Items for Attention on the Right-hand side of the screen you will see how many days you are required to cover with references, each time you add a reference this will reduce. At least 1 reference is required. Also IDGateway will always automatically add a sponsor reference section so no need to add a separate reference for this.
• Click on the sponsor reference and add the details of the reference ensuring that they match what is on your own company reference, i.e. Referee’s Full name, Job Title and Date reference written and click “Continue after each page”,
• To continue adding in all your references click on “Add Another Reference” and choose the type of reference you need to add.

• Entering different types of references onto IDGateway has the same format however you may be asked different questions depending on the type of reference,
• Providing you read and answer all questions accurately then the system will tell you exactly what is required,
• All references must contain the start and end dates (dd/mmm/yy), referee’s full name, a contact number, address and job title of the referee which must be transferred onto the system accurately,
• The most complicated reference to enter onto the system would be if a Company is no longer trading and you are unable to obtain a reference. Screen shots and notes on how to enter this are on the following page.
Note: When entering the dates that the reference is covering please ensure you use the calendar option as this may result in rejection due to dates not being entered correctly and always click “save” before “Continue”.

• If a company is no longer trading/operating then you will not be able to obtain an admissible reference and therefore “no” should be picked from the drop down list,
• The blue box indicates you must also provide evidence that the company is no longer trading for e.g this would be a print out from Companies House website, showing the company is in liquidation, administration or no longer active and this print out needs to be uploaded.
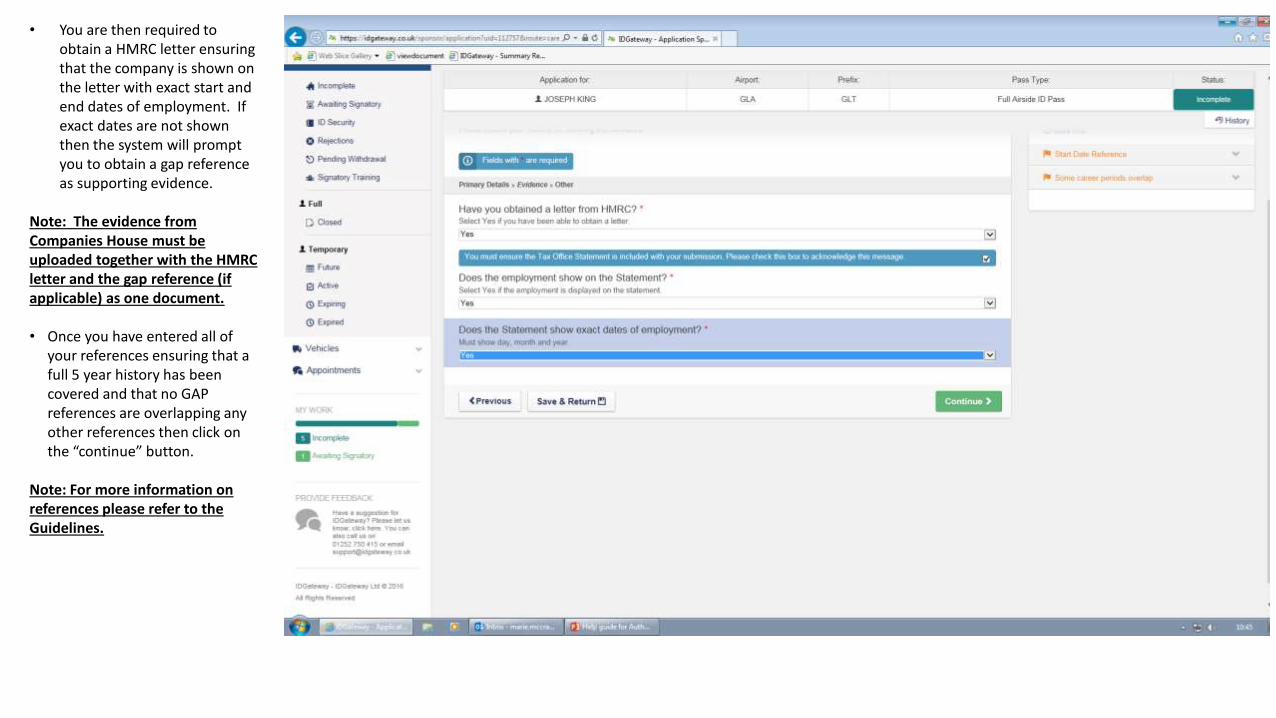
• You are then required to obtain a HMRC letter ensuring that the company is shown on the letter with exact start and end dates of employment. If exact dates are not shown then the system will prompt you to obtain a gap reference as supporting evidence.
Note: The evidence from Companies House must be uploaded together with the HMRC letter and the gap reference (if applicable) as one document.
• Once you have entered all of your references ensuring that a full 5 year history has been covered and that no GAP references are overlapping any other references then click on the “continue” button.
Note: For more information on references please refer to the Guidelines.

CRIMINAL RECORDS
• Once you have entered all the references the system will then tell you which countries you need to obtain Basic CRC’s from, this is taken from the location of employment question at the reference details section, i.e. if you entered Spain and the reference dates are 6 months or more then the system will automatically warn you, that you need a Spanish CRC,
• The system automatically generates a UK CRC therefore to enter the details click on this,
• To add any other CRC click on “Add CRC”
NOTE: If your applicant has worked or resided in another country for 6 months or more in the last 5 years then an Overseas CRC for that country should be obtained and uploaded along with a translation and the translators contact details if applicable.

• Type in all the required details ensuring that these are taken from the original CRC,
• If the CRC lists a conviction you must check if the conviction is disqualifying and to do this use the link as highlighted on the screen shot,
• Once completed click on the “continue” button.
Note: Please double check that the applicants name and DoB are as per their ID. The address given on the CRC can be either, the applicants address, company address, or referencing agency address.
Note: A UK CRC is only valid for 10 weeks from date of issue.

GSAT
• Enter the details taken from the applicants GSAT certificate. The GSAT provider is the name of the company who completed the applicants training,
• Once completed click “continue”.
Note: Certain people are exempt from having a GSAT certificate as they undergo higher/equivalent training i.e. Cabin/Flight Crew, if this is the case then you should choose “Not required” from the first drop down list and provide the details as requested.

ACCESS
• The information to be completed on the access page will come from your own company therefore answer accordingly and click “continue”.

CARD FORMAT
• Select which card format is needed for the applicant and click “continue”.
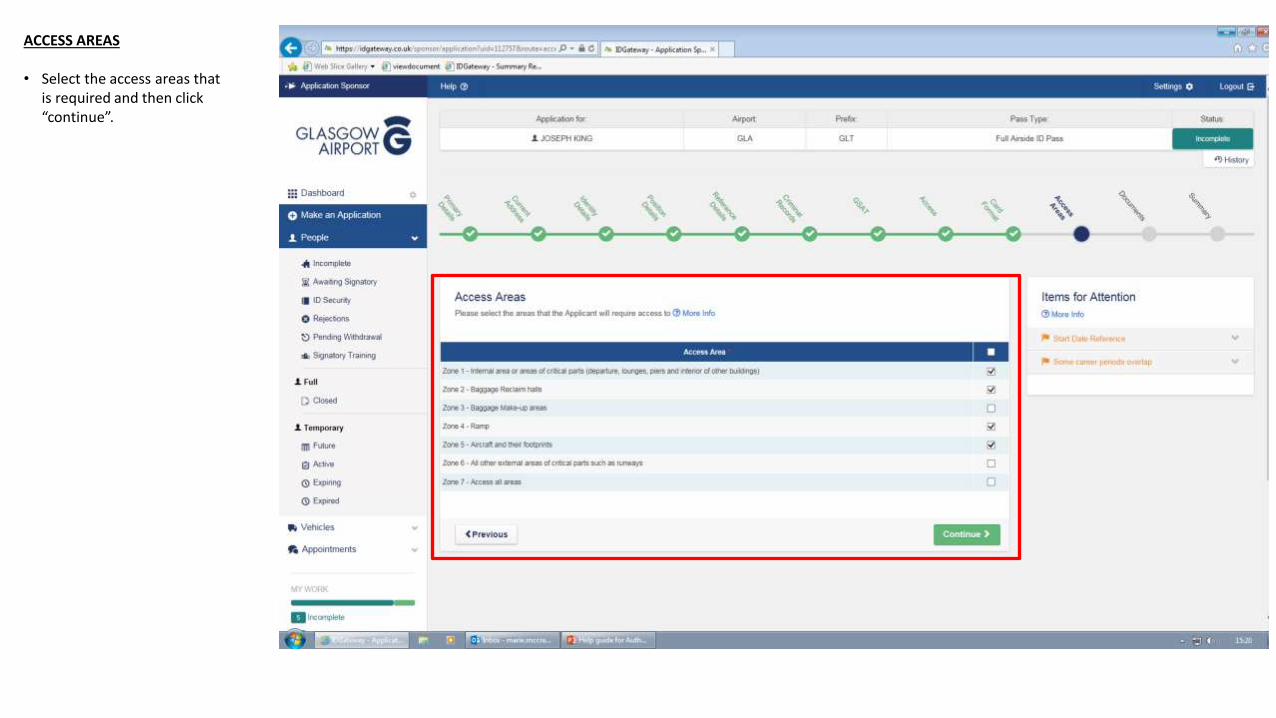
ACCESS AREAS
• Select the access areas that is required and then click “continue”.
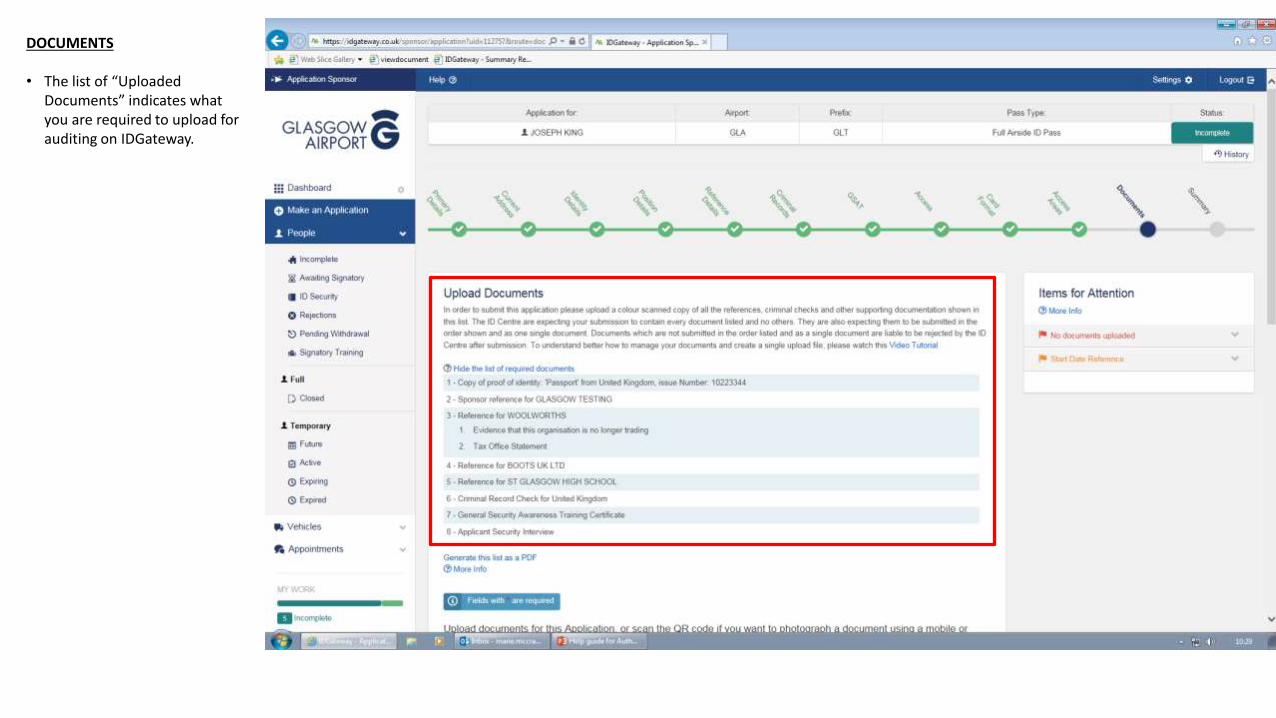
DOCUMENTS
• The list of “Uploaded Documents” indicates what you are required to upload for auditing on IDGateway.

• Uploading documents can be done 3 different ways:-
1. Click on the “Browse” button and this will then take you to your own computer files and you can locate all your scanned references/documents etc. from where you saved them.
2. Drag and drop your files in the drag and drop box, or
3. scan the QR Code if the document is a photograph or on a mobile or tablet.
• Once all documents have been uploaded they will then appear in the list of saved documents below.
Note: All pages for each document should be uploaded as one document using the Merge tool on the left of the screen for e.g. if you have a 3 page reference then this should be scanned as 3 pages and uploaded as one document containing 3 pages.
• On the left hand side of the screen shot you will see that you have the option to Rotate, merge, split and delete the documents, to use any of these functions, select the document you are looking to amend by ticking the select box and then selecting the tool you wish to use on the left hand side.
Once completed click “Continue”
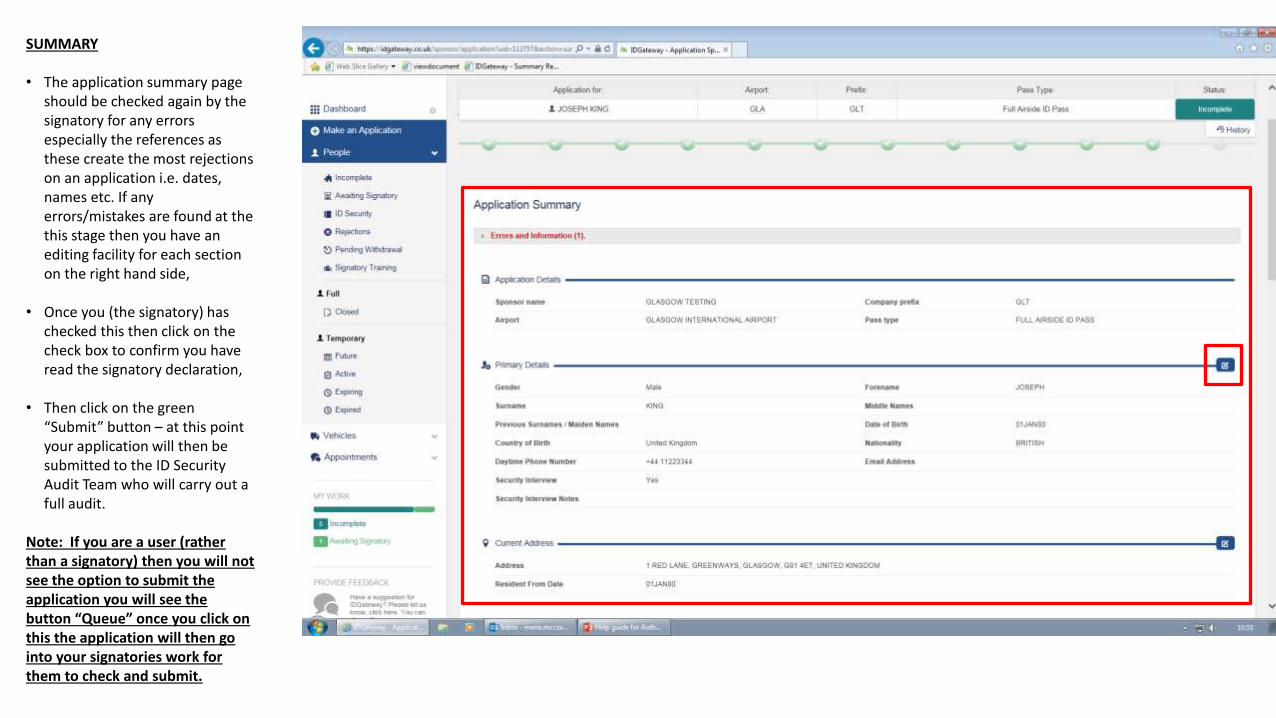
SUMMARY
• The application summary page should be checked again by the signatory for any errors especially the references as these create the most rejections on an application i.e. dates, names etc. If any errors/mistakes are found at the this stage then you have an editing facility for each section on the right hand side,
• Once you (the signatory) has checked this then click on the check box to confirm you have read the signatory declaration,
• Then click on the green “Submit” button – at this point your application will then be submitted to the ID Security Audit Team who will carry out a full audit.
Note: If you are a user (rather than a signatory) then you will not see the option to submit the application you will see the button “Queue” once you click on this the application will then go into your signatories work for them to check and submit.

TIPS
• Read any flag warnings that appear on your application as these could result in a rejected application.• When entering any dates use the calendar option and double check dates before submitting.• Take extra care when entering numbers, e.g passport number, Driver’s Licence number and CRC numbers.• Only upload one ID document.• IDGateway automatically enters a section for your company reference (sponsor reference) therefore no
need to add a separate employment reference for your company.• Ensure you read all the questions and answer accurately when entering all references.• Read the list of documents that are required to be uploaded for your application, you may even wish
to print this off and tick each document as you upload it to ensure you have not missed anything.• Use the “Document Tools” section to rotate, merge, spilt or delete documents.• Take your time, read and double check everything before submitting your application to avoid rejections.