Embed Size (px)
Citation preview
ADOBE® STORYHelp and tutorials
April 2014
Contents
Getting Started 1..............................................................................................................................................Getting Started with Story 2.......................................................................................................................................................
Adobe Story Plus and Adobe StoryFree 6.................................................................................................................................
Working offline with Adobe Story 7............................................................................................................................................
Adobe Story application for iOS-based devices 12...................................................................................................................
Keyboard shortcuts 14...............................................................................................................................................................
New features summary 22.........................................................................................................................................................
Projects 25.......................................................................................................................................................Creating, renaming, and deleting projects 26............................................................................................................................
Organizing projects into categories 28......................................................................................................................................
Archiving projects 30.................................................................................................................................................................
Back up/Restore Story data 31..................................................................................................................................................
Scripts and free form documents 33................................................................................................................Scripts, scenes, and documents 34...........................................................................................................................................
Add annotations to your script 37..............................................................................................................................................
Scene properties panel 38.........................................................................................................................................................
Storyboards 40..........................................................................................................................................................................
Change of template 41..............................................................................................................................................................
Customize template for scripts 42.............................................................................................................................................
Vision beats and bars 46...........................................................................................................................................................
Customized multiple-line headers and footers 47......................................................................................................................
Sound and sound info elements 49...........................................................................................................................................
Act breaks 50.............................................................................................................................................................................
Acts in outline view 51...............................................................................................................................................................
Add images to a character/actor/set 52.....................................................................................................................................
Add scripts to a project 53.........................................................................................................................................................
Assign scene, camera shot, and dialog numbers 58.................................................................................................................
Audio visual (AV) scripts 61.......................................................................................................................................................
Character, actor, and set lists 64...............................................................................................................................................
Copy paste from a report 69......................................................................................................................................................
Cut lines 70................................................................................................................................................................................
Deleting scripts 74.....................................................................................................................................................................
Disable spell check 75...............................................................................................................................................................
Editing scripts 76.......................................................................................................................................................................
From and To in scripts 81..........................................................................................................................................................
Multi-location scenes 82............................................................................................................................................................
Multicolumn scripts 84...............................................................................................................................................................
Pace (Beta) 88...........................................................................................................................................................................
Print scripts 89...........................................................................................................................................................................
Production information 90..........................................................................................................................................................
Saving scripts 92.......................................................................................................................................................................
Shooting scripts 94....................................................................................................................................................................
Shot types 104...........................................................................................................................................................................
Show/hide elements 105...........................................................................................................................................................
Creating document versions 106.....................................................................................................................Save versions of a document 107.............................................................................................................................................
Work with the History panel 108................................................................................................................................................
Work with versions of a document 109......................................................................................................................................
Production revisions 113.................................................................................................................................Revisions and revision styles 114..............................................................................................................................................
Manage production revisions 117..............................................................................................................................................
Export and print production revisions 121.................................................................................................................................
Sharing, commenting, and collaborating 122..................................................................................................Collaborating with other users 123............................................................................................................................................
Share documents 125................................................................................................................................................................
Open shared scripts 126............................................................................................................................................................
Add comments to scripts 127....................................................................................................................................................
Modify assigned roles 128.........................................................................................................................................................
Project sharing 129....................................................................................................................................................................
Delete received scripts 132.......................................................................................................................................................
Notifications 133........................................................................................................................................................................
Stop sharing scripts with a user 136..........................................................................................................................................
Unshare multiple projects from a user 137................................................................................................................................
Track changes 138..........................................................................................................................................Track changes overview 139.....................................................................................................................................................
Manage track changes settings 141..........................................................................................................................................
View tracked changes 143.........................................................................................................................................................
Tagging 146.....................................................................................................................................................Tagging overview 147................................................................................................................................................................
Tag lists and tag item lists 148..................................................................................................................................................
Tagging panel 149.....................................................................................................................................................................
Validate and export tagging information 154.............................................................................................................................
Cross-application workflows 155.....................................................................................................................Metadata in Adobe Story 156....................................................................................................................................................
Linking Adobe Story scripts with movie clips in Prelude 158.....................................................................................................
Working with Adobe Story and Adobe Premiere Pro 160..........................................................................................................
Reports 171.....................................................................................................................................................Production reports 172..............................................................................................................................................................
Breakdown reports 178..............................................................................................................................................................
Scheduling 180................................................................................................................................................Scheduling overview 181...........................................................................................................................................................
Create schedule 182..................................................................................................................................................................
Day breaks 183..........................................................................................................................................................................
Information only banner 185......................................................................................................................................................
Showhide columns 186..............................................................................................................................................................
Drag-and-drop scenes, breaks, day breaks, and banners 187..................................................................................................
Add a color setting 188..............................................................................................................................................................
Add scenes/scripts to a schedule 189.......................................................................................................................................
Auto calculation of shooting time in a schedule 190..................................................................................................................
Compare schedules 191............................................................................................................................................................
Create schedule workspaces 192..............................................................................................................................................
Print schedule 194.....................................................................................................................................................................
Remove a script from the schedule 196....................................................................................................................................
Save schedule to disk as a file 197...........................................................................................................................................
Save versions of a schedule 198...............................................................................................................................................
Schedule notes 200...................................................................................................................................................................
Schedule properties 201............................................................................................................................................................
Share a schedule 202................................................................................................................................................................
Sort schedule 203......................................................................................................................................................................
Split scenes 204........................................................................................................................................................................
Split schedule 205.....................................................................................................................................................................
Sync schedule 206....................................................................................................................................................................
Use color settings to identify rows 207......................................................................................................................................
View or edit schedules in story order 208..................................................................................................................................

Getting Started
1
Getting Started with Story
To the top
Adobe Story workflowWorkspace
Most productions start with a script that serves as the basis for pre-production planning, production, editing, and ultimately the finished project.Adobe® Story, an online service, is a collaborative script development tool for creative professionals, producers, and writers. Adobe Story playsthe starting role in the pre-production phase of a script-to-screen, metadata-driven workflow.
Adobe Story can be launched from a browser as an online application, or installed as a desktop application. The desktop application provides youwith the option of working offline, and syncing up with the online version later.
Adobe Story workflow
Although the order of the tasks can vary depending on your requirement, using Adobe Story involves the following basic tasks:
Log in to Adobe Story
Launch Adobe Story using the URL http://www.adobe.com/go/adobestory. Log in to Adobe Story. If you are using Adobe Story for the first time,Sign Up for Adobe Story and then log in using your ID.
Create a project
Projects are containers for scripts, and documents related to a script such as character biographies and synopses. For more information, seeProjects. Creating projects for your scripts and documents help organize them better. If you do not create a project, a default project is used tostore your scripts and documents.
You can organize projects into categories, and archive projects that you do not access frequently.
Add/edit scripts
Create scripts, or import scripts from other formats such as text, PDF, Microsoft Word, Final Draft®, and Movie Magic® into Adobe Story. For moreinformation, see Scripts and free form documents.
The various tools in Adobe Story help ensure that your script is compliant with industry standards.
Share scripts for collaboration or review
Available for: Adobe Story Plus
Story enables you to co-write and edit as a team. You can assign roles to various production team members, giving you control over who canread, review, or modify the script. For more information, see Sharing, commenting, and collaborating.
Create shooting script
Create a shooting script out of your current script by adding information such as shot elements, shot numbers, and shot duration. For moreinformation, see Shooting scripts.
Tag scripts
2
To the top
Available for: Adobe Story Plus
Tag words and phrases in your document associated with production items such as location, cast, prop, and equipment. You can apply multipletags to such words or phrases. For more information, see Tagging .
Export your script
Export your scripts in various formats such as PDF, Microsoft Excel, and the Adobe Story native format (ASTX).
Integrate your script with Adobe Creative Suite Production Premium
Leverage the metadata in your script in Adobe Creative Suite Production Premium CS6 applications to reduce production time. For moreinformation, see Integration with Creative Suite.
Workspace
The Adobe Story application has three views: Home, Projects, and Authoring.
When you log in to Adobe Story, the home page is displayed first. The home page contains various resources to help you get started, and providefeedback on the application.
To resize the application to fit the entire space on your monitor, click the Full Screen icon.
To exit the full screen mode, press the Escape (Esc) key.
Navigating among the views
To navigate among the three views, use the corresponding links in the top menu bar.
If the Authoring icon is disabled, click Projects. The option is disabled when you do not have a script open for editing/authoring.
Double-click a script in the Projects view to open it in the Authoring view. If there are a number of scripts opening in the Authoring view, their totalnumber is displayed next to the Authoring option.
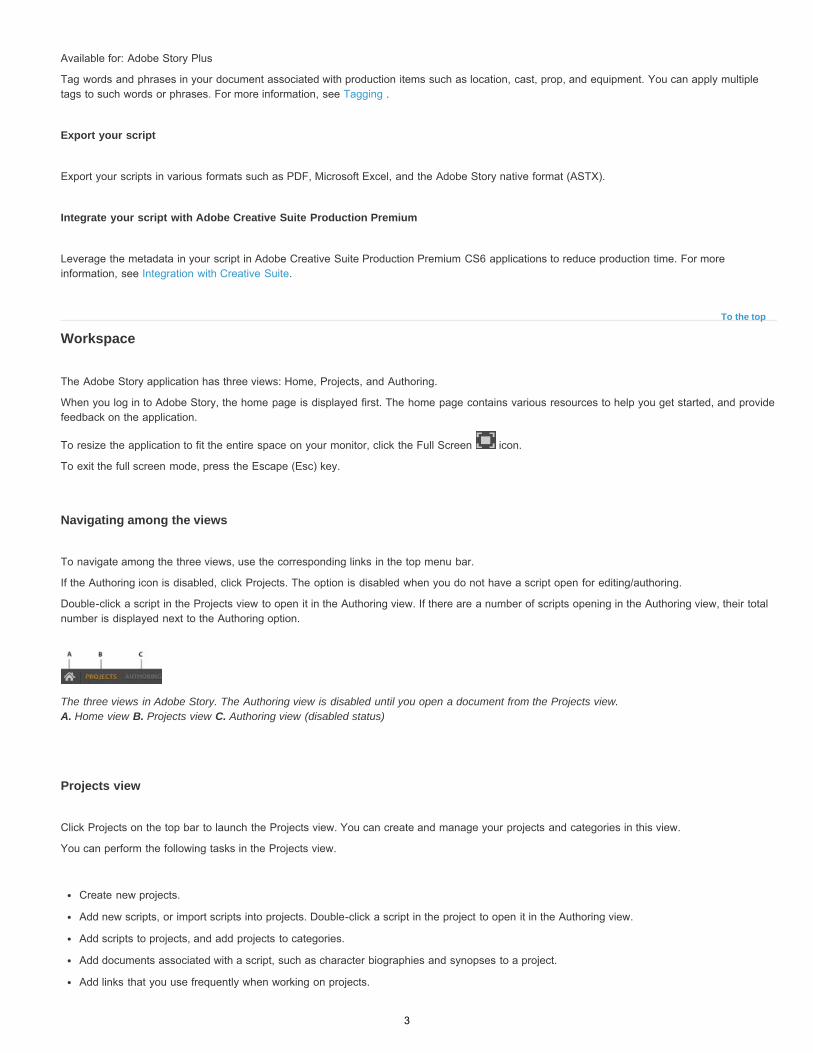
The three views in Adobe Story. The Authoring view is disabled until you open a document from the Projects view. A. Home view B. Projects view C. Authoring view (disabled status)
Projects view
Click Projects on the top bar to launch the Projects view. You can create and manage your projects and categories in this view.
You can perform the following tasks in the Projects view.
Create new projects.
Add new scripts, or import scripts into projects. Double-click a script in the project to open it in the Authoring view.
Add scripts to projects, and add projects to categories.
Add documents associated with a script, such as character biographies and synopses to a project.
Add links that you use frequently when working on projects.
3
Get information about a script, such as the title, the author, and who it's shared with.
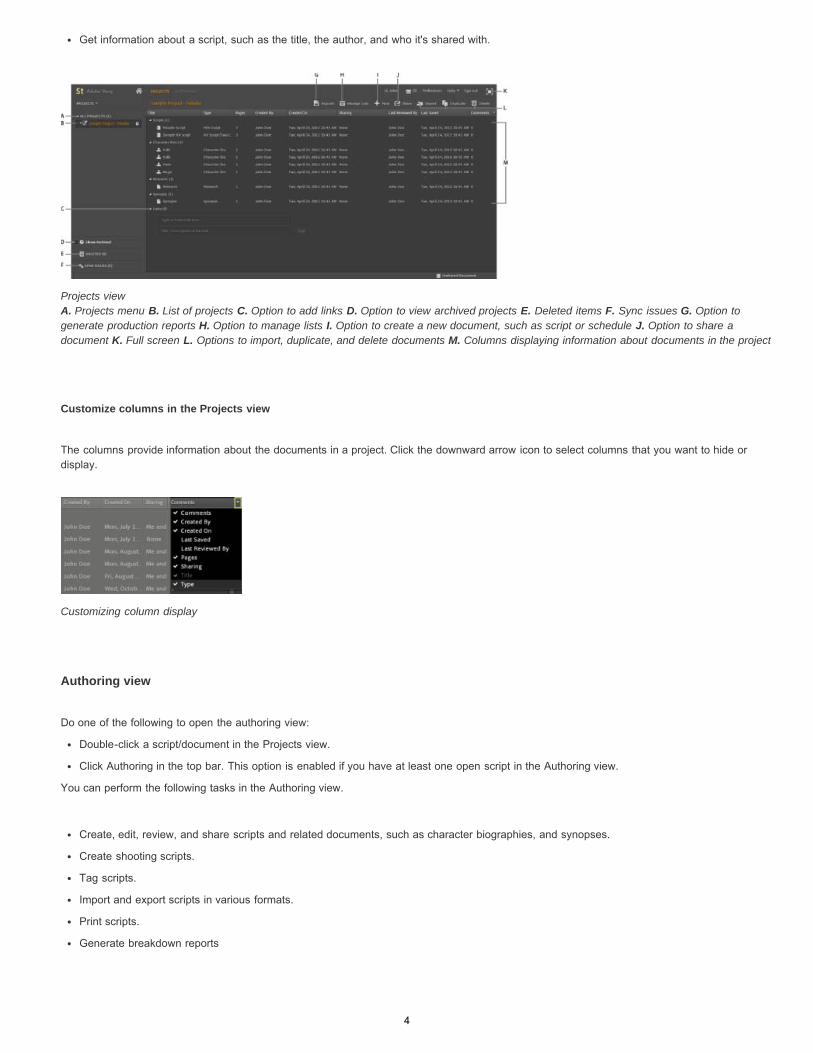
Projects view A. Projects menu B. List of projects C. Option to add links D. Option to view archived projects E. Deleted items F. Sync issues G. Option togenerate production reports H. Option to manage lists I. Option to create a new document, such as script or schedule J. Option to share adocument K. Full screen L. Options to import, duplicate, and delete documents M. Columns displaying information about documents in the project
Customize columns in the Projects view
The columns provide information about the documents in a project. Click the downward arrow icon to select columns that you want to hide ordisplay.
Customizing column display
Authoring view
Do one of the following to open the authoring view:
Double-click a script/document in the Projects view.
Click Authoring in the top bar. This option is enabled if you have at least one open script in the Authoring view.
You can perform the following tasks in the Authoring view.
Create, edit, review, and share scripts and related documents, such as character biographies, and synopses.
Create shooting scripts.
Tag scripts.
Import and export scripts in various formats.
Print scripts.
Generate breakdown reports
4
Twitter™ and Facebook posts are not covered under the terms of Creative Commons.
Legal Notices | Online Privacy Policy
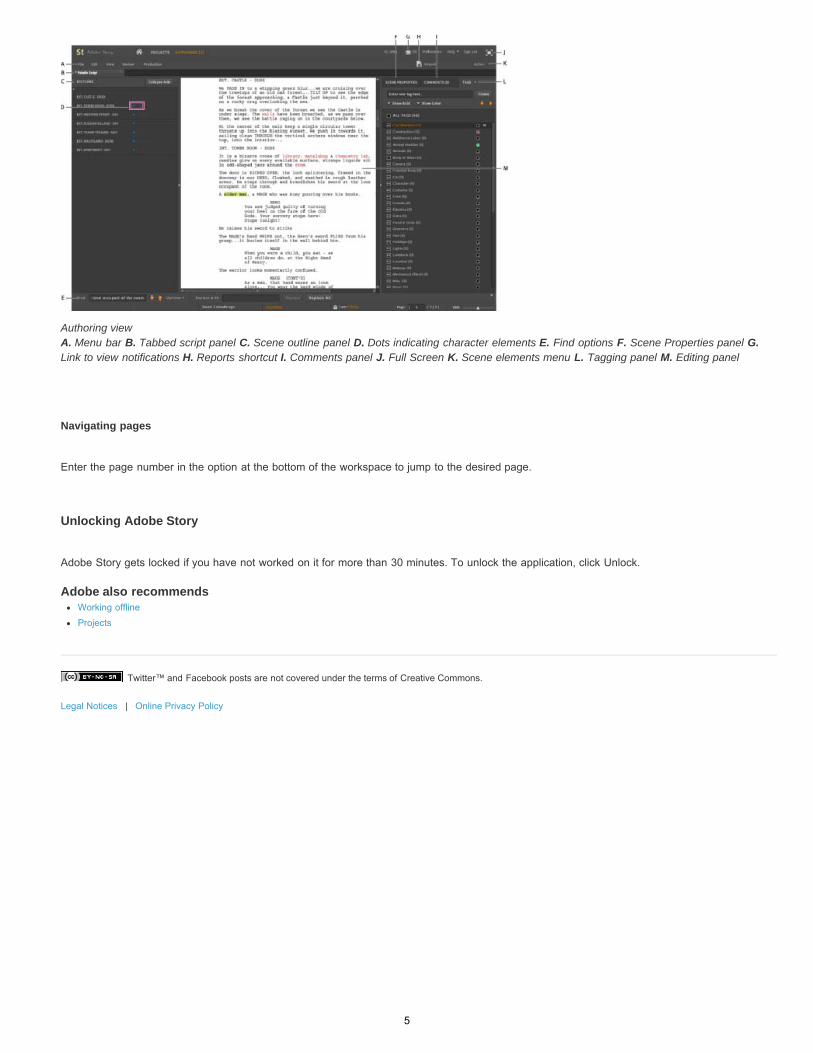
Authoring view A. Menu bar B. Tabbed script panel C. Scene outline panel D. Dots indicating character elements E. Find options F. Scene Properties panel G.Link to view notifications H. Reports shortcut I. Comments panel J. Full Screen K. Scene elements menu L. Tagging panel M. Editing panel
Navigating pages
Enter the page number in the option at the bottom of the workspace to jump to the desired page.
Unlocking Adobe Story
Adobe Story gets locked if you have not worked on it for more than 30 minutes. To unlock the application, click Unlock.
Adobe also recommendsWorking offline
Projects
5
Adobe Story Plus and Adobe StoryFree
Twitter™ and Facebook posts are not covered under the terms of Creative Commons.
Legal Notices | Online Privacy Policy
Adobe Story has two versions:
1. Adobe Story Plus: Adobe Story Plus is available as part of an Adobe Creative Cloud™ membership or is sold separately as a subscription.
2. Adobe Story Free: Adobe Story Free is available for no charge. To subscribe to Adobe Story Plus, once you are logged in, click “UPGRADENOW” at the top-right corner of your screen.
In the documentation, each of the help topics relevant to features not available for any of these versions are marked accordingly. If a feature is notavailable for Adobe Story Free version, it is marked as following:
Available for: Adobe Story Plus
Refer to the table at this URL for a feature comparison between Adobe Story Free and Adobe Story Plus.
6
Working offline with Adobe Story
To the top
To the top
To the top
To the top
OverviewInstall Adobe Story desktop applicationAutomatic updates to desktop applicationLog in to Adobe Story desktop applicationSwitching between online and offline modesLock documents when switching modesView sync status of scriptsAccess Document history while working offlineSyncing online-offline content
Overview
Available for: Adobe Story Plus
You can choose to work offline using the Adobe Story desktop application (Story AIR application)
The content that you changed in the offline mode is automatically updated in the corresponding script on the server when you go online. Forexample, you can work with scripts in the offline mode when you are on an airplane. The script is updated on the server after your computer isreconnected to the Internet.
You cannot share scripts, view shared scripts, or use the full import functionality in the offline mode.
Install Adobe Story desktop application
Available for: Adobe Story Plus
1. In the Projects View, select Projects > Install Desktop Application. You can also download the desktop application from the home page.
2. Select Install Now in the browser that opens.
3. Follow instructions to install the desktop application.
Automatic updates to desktop application
Available for: Adobe Story Plus
Adobe Story updates itself when a new build is available. You can continue using Adobe Story after the update is complete.
Log in to Adobe Story desktop application
Available for: Adobe Story Plus
Ensure that you are online when you launch the desktop application for the first time. The login credentials you provided are authenticated withyour credentials on the server. You can start using the desktop application in the offline mode after your first login.
7
To the top
To the top
To the top
1. If you are logging in for the first time, ensure that you are connected to the Internet.
2. Launch the Adobe Story application that you installed on your desktop.
3. Select a language for your interface.
4. Enter the e-mail address and password that you provided during registration.
5. If you select Remember Me, the current session is available to you for 14 days provided you do not log out of the application. For thesedays, you are taken directly to the Projects view when you use the Adobe Story link. Do not use this option when working on a sharedcomputer.
6. Click Sign In.
Switching between online and offline modes
Available for: Adobe Story Plus
Select Work Online/Work Offline in the top bar of the application to switch between the online and offline modes.
When you go online, Adobe Story tries to automatically update the offline script with the online version. If there is a difference between the twoversions, a copy of the online version is created in the projects folder. You can choose to continue working with the version you were working onwhen you were offline, or work on the online version.
Lock documents when switching modes
Available for: Adobe Story Plus
Locking prevents co-authors from editing shared documents when you are offline.
To lock or unlock documents, do the following:
1. Click Lock in the Lock Document dialog box that appears when you go offline.
2. When you switch back to the online mode, the Unlock Files dialog box appears using which you can unlock your documents.
View sync status of scripts
Available for: Adobe Story Plus
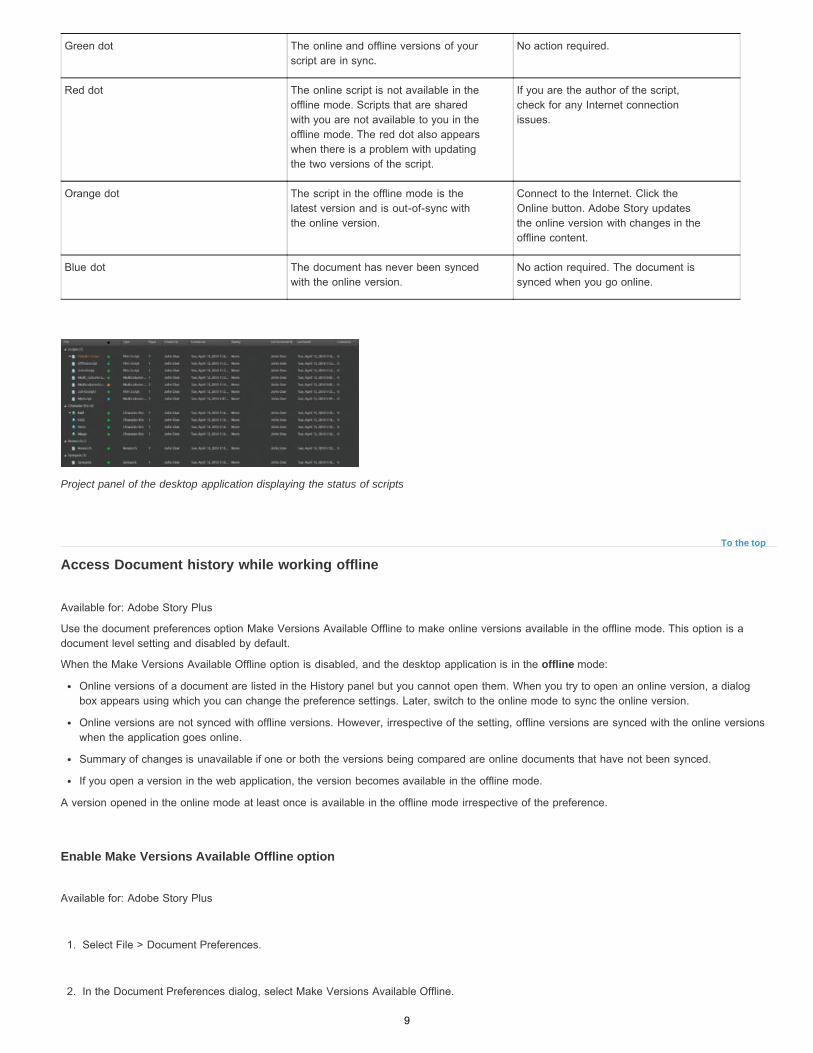
The following icons in the Projects view indicate the sync status of scripts in the desktop application.
Icon Description Action required
8
To the top
Project panel of the desktop application displaying the status of scripts
Access Document history while working offline
Available for: Adobe Story Plus
Use the document preferences option Make Versions Available Offline to make online versions available in the offline mode. This option is adocument level setting and disabled by default.
When the Make Versions Available Offline option is disabled, and the desktop application is in the offline mode:
Online versions of a document are listed in the History panel but you cannot open them. When you try to open an online version, a dialogbox appears using which you can change the preference settings. Later, switch to the online mode to sync the online version.
Online versions are not synced with offline versions. However, irrespective of the setting, offline versions are synced with the online versionswhen the application goes online.
Summary of changes is unavailable if one or both the versions being compared are online documents that have not been synced.
If you open a version in the web application, the version becomes available in the offline mode.
A version opened in the online mode at least once is available in the offline mode irrespective of the preference.
Enable Make Versions Available Offline option
Available for: Adobe Story Plus
1. Select File > Document Preferences.
2. In the Document Preferences dialog, select Make Versions Available Offline.
Green dot The online and offline versions of yourscript are in sync.
No action required.
Red dot The online script is not available in theoffline mode. Scripts that are sharedwith you are not available to you in theoffline mode. The red dot also appearswhen there is a problem with updatingthe two versions of the script.
If you are the author of the script,check for any Internet connectionissues.
Orange dot The script in the offline mode is thelatest version and is out-of-sync withthe online version.
Connect to the Internet. Click theOnline button. Adobe Story updatesthe online version with changes in theoffline content.
Blue dot The document has never been syncedwith the online version.
No action required. The document issynced when you go online.
9
To the top
Syncing online-offline content
Available for: Adobe Story Plus
Adobe Story’s auto-merge feature prevents data loss during online-offline sync when there is data mismatch between the web application and thedesktop application.
Data mismatch can occur in the following cases:
Version conflict resolution during sync
Available for: Adobe Story Plus
Version conflict occurs when there are matching version numbers of a document in the online and offline mode during sync.
The version naming system provides you with the information to distinguish between versions created in the online and offline mode. The namingconvention used is <V+version number>_<Mode>_<document name>. Depending on whether the document was created in the online oroffline mode, the value for Mode is ON or OFF.
The following example describes how a version conflict is handled in Adobe Story.
You create a document version, version 3, in the desktop application-offline mode. In the web application, you create a version of the documentwith the same version number. During online-offline sync, the version conflict is handled in the following manner:
The online version, version 3, retains the version number.
The version number of the offline version, version 3, is changed to version 4.
The current version of the document in the online mode becomes version 5.
The current version of the document in the offline mode is now the current version in the online mode.
Version order in the History panel post sync
Available for: Adobe Story Plus
After sync, document versions are displayed in the following order assuming that there was no version conflict during sync.
All versions that were available in the online mode before you switched to the offline mode.
The latest version containing all updates made to the online version of the document after you switched to the offline mode. For example, thisversion captures all changes through the web application after you switched to the offline mode in the desktop application.
Scenario Behavior
You create categories/projects with different names in theonline and offline mode.
Both the categories/projects are retained when the online andoffline data are synced.
You create categories/projects with the same name in theonline and offline mode.
Both categories/projects are retained post sync. You candelete/rename one of them after the sync.
You create scripts with the same name in the online andoffline mode.
Both the scripts are retained after the sync. You candelete/rename one of them after the sync is complete.
You edit the same file in both the web application, anddesktop application (offline mode).
Edits performed in the online mode get saved as a versionand the offline edits become the new current version of thedocument.
10

Twitter™ and Facebook posts are not covered under the terms of Creative Commons.
Legal Notices | Online Privacy Policy
Offline versions of the document.
11
Adobe Story application for iOS-based devices
Note:
To the top
To the top
To the top
Note:
Note:
To the top
Logging in to the Adobe Story applicationLogging out of the Adobe Story applicationView documents, scene outline, and scenesView notificationsReview scriptsView/Delete comments
The Adobe® Story application for iOS-based devices allows you to read and review Adobe Story scripts and free form documents. The applicationcurrently does not support AV Scripts, Multicolumn scripts, and TV scripts.
The Adobe Story application for iOS-based devices is currently available only in English.
Logging in to the Adobe Story application
Register yourself with Adobe Story using the web or desktop application of Adobe Story before you attempt to log in to the iOS-based application.
Enter the credentials you used when registering yourself with Adobe Story to log in to the application. Accept the TOU before attempting to log in.
Logging out of the Adobe Story application
1. Tap Account.
2. Tap Log Out.
View documents, scene outline, and scenes
When you log in to the Adobe Story application, the ten most recently read files are displayed. To view all the documents, click Categories.
The shared documents are displayed with a shared icon.
To view the scene outline for a script, tap the script in the Recent Files or Categories view.
In the scene outline view, the number of new comments for the scene are displayed.
To view the contents of a scene, tap the scene in the scene outline. Use the arrow icons to move among the scenes in a script.
For documents with tracked changes, the Show Final mode is used to display content. For users with reader permissions, the ShowOriginal mode is used to display content.
View notifications
In the Recent Files view, tap Notifications. A list of notifications is displayed. The new notifications appear highlighted.
When you tap a notification, the document related to the comment or edit is displayed. The number of new comments for a scene are displayed to
12
Twitter™ and Facebook posts are not covered under the terms of Creative Commons.
Legal Notices | Online Privacy Policy
To the top
Note:
To the top
the right of the scene heading.
To view the latest notifications, pull down the notifications list. New notifications appear at the top of the list. For older notifications, pull up the list.The list of notifications is loaded in batches of 10.
Review scripts
You can review a script if you have author, co-author, or reviewer permissions.
1. Open the script, and navigate to the scene.
2. Do one of the following:
Double tap to select the content that you want to comment on. Tap on Comment to enter your comment. Alternatively, tap the AddComment button.
To comment on content that has been previously commented on, enter your comment in Write New Comment.
To navigate among comments, use the arrow icons.
3. Click Post.
Although the entire paragraph appears highlighted for a comment, the comment is applied only to the selected word or phrase.
View/Delete comments
In the scene containing comments, tap Comments. The list of comments is displayed. When you tap a comment in the list, the paragraphcontaining the comment is highlighted.
To delete a comment, tap a comment in the list. Tap Delete.
13
Keyboard shortcuts
To the top
To the top
Note:
Before you begin...WindowsMac
Before you begin...
When there is a conflict between the keyboard shortcuts in Adobe Story and the browser, some of the keyboard shortcuts in Adobe Story might notwork as intended. The keyboard shortcut behavior varies based on the browser, and its versions. If you regularly use keyboard shortcuts, Adoberecommends that you use the desktop version of Adobe Story.
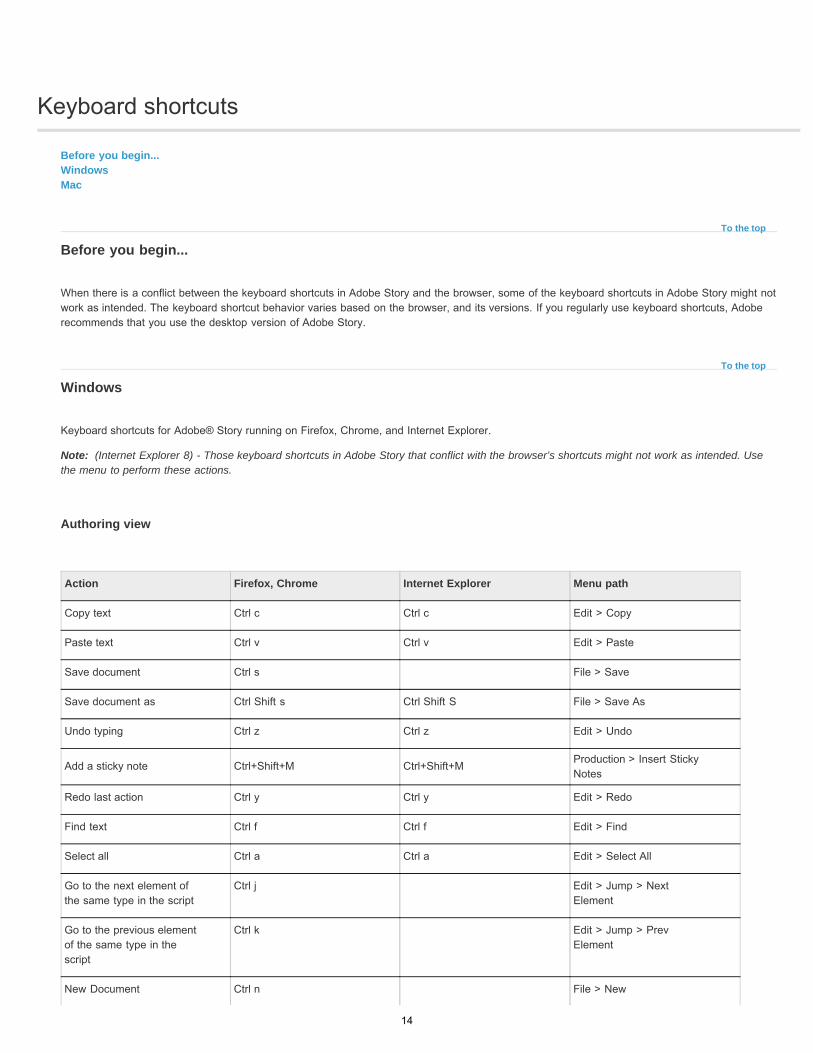
Windows
Keyboard shortcuts for Adobe® Story running on Firefox, Chrome, and Internet Explorer.
(Internet Explorer 8) - Those keyboard shortcuts in Adobe Story that conflict with the browser’s shortcuts might not work as intended. Usethe menu to perform these actions.
Authoring view
Action Firefox, Chrome Internet Explorer Menu path
Copy text Ctrl c Ctrl c Edit > Copy
Paste text Ctrl v Ctrl v Edit > Paste
Save document Ctrl s File > Save
Save document as Ctrl Shift s Ctrl Shift S File > Save As
Undo typing Ctrl z Ctrl z Edit > Undo
Add a sticky note Ctrl+Shift+M Ctrl+Shift+M Production > Insert StickyNotes
Redo last action Ctrl y Ctrl y Edit > Redo
Find text Ctrl f Ctrl f Edit > Find
Select all Ctrl a Ctrl a Edit > Select All
Go to the next element ofthe same type in the script
Ctrl j Edit > Jump > NextElement
Go to the previous elementof the same type in thescript
Ctrl k Edit > Jump > PrevElement
New Document Ctrl n File > New
14
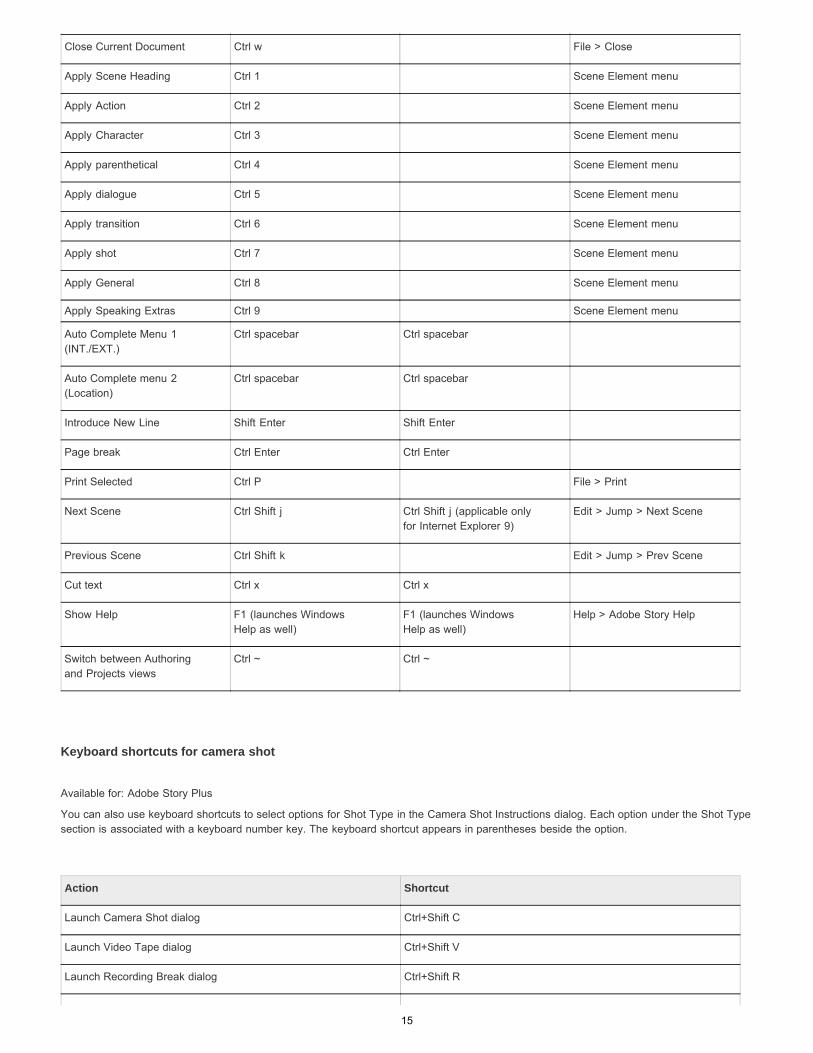
Keyboard shortcuts for camera shot
Available for: Adobe Story Plus
You can also use keyboard shortcuts to select options for Shot Type in the Camera Shot Instructions dialog. Each option under the Shot Typesection is associated with a keyboard number key. The keyboard shortcut appears in parentheses beside the option.
Close Current Document Ctrl w File > Close
Apply Scene Heading Ctrl 1 Scene Element menu
Apply Action Ctrl 2 Scene Element menu
Apply Character Ctrl 3 Scene Element menu
Apply parenthetical Ctrl 4 Scene Element menu
Apply dialogue Ctrl 5 Scene Element menu
Apply transition Ctrl 6 Scene Element menu
Apply shot Ctrl 7 Scene Element menu
Apply General Ctrl 8 Scene Element menu
Apply Speaking Extras Ctrl 9 Scene Element menu
Auto Complete Menu 1(INT./EXT.)
Ctrl spacebar Ctrl spacebar
Auto Complete menu 2(Location)
Ctrl spacebar Ctrl spacebar
Introduce New Line Shift Enter Shift Enter
Page break Ctrl Enter Ctrl Enter
Print Selected Ctrl P File > Print
Next Scene Ctrl Shift j Ctrl Shift j (applicable onlyfor Internet Explorer 9)
Edit > Jump > Next Scene
Previous Scene Ctrl Shift k Edit > Jump > Prev Scene
Cut text Ctrl x Ctrl x
Show Help F1 (launches WindowsHelp as well)
F1 (launches WindowsHelp as well)
Help > Adobe Story Help
Switch between Authoringand Projects views
Ctrl ~ Ctrl ~
Action Shortcut
Launch Camera Shot dialog Ctrl+Shift C
Launch Video Tape dialog Ctrl+Shift V
Launch Recording Break dialog Ctrl+Shift R
15
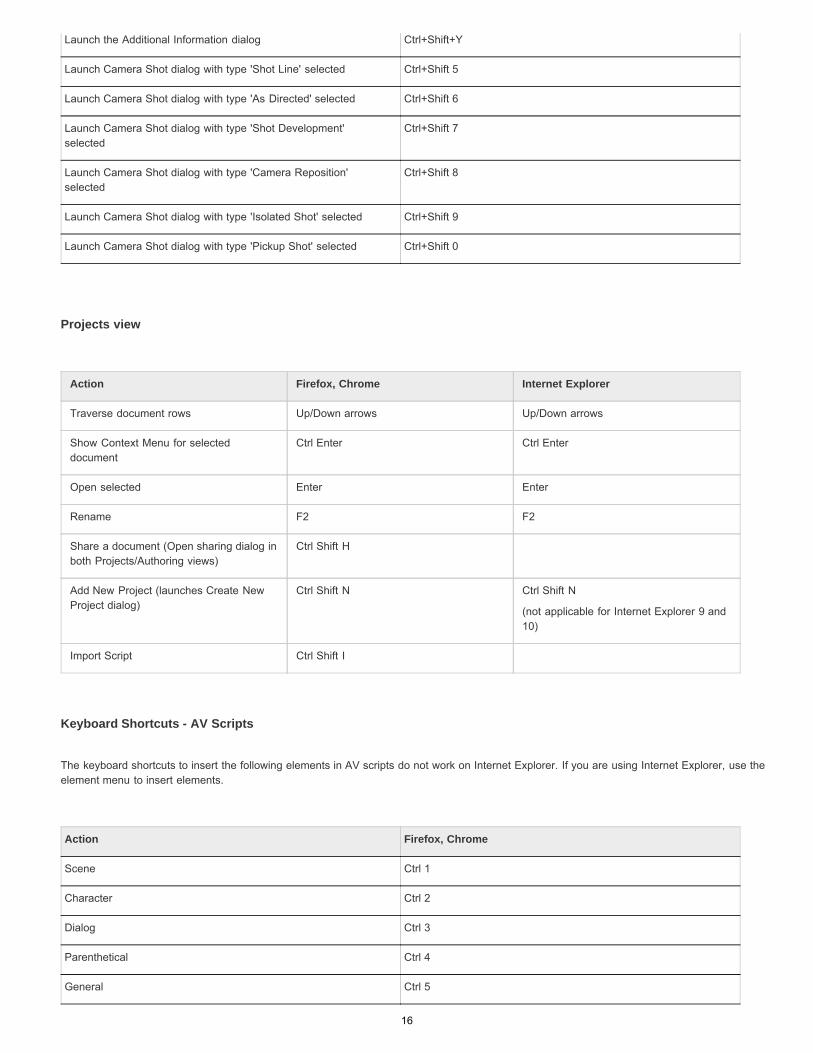
Projects view
Action Firefox, Chrome Internet Explorer
Traverse document rows Up/Down arrows Up/Down arrows
Show Context Menu for selecteddocument
Ctrl Enter Ctrl Enter
Open selected Enter Enter
Rename F2 F2
Share a document (Open sharing dialog inboth Projects/Authoring views)
Ctrl Shift H
Add New Project (launches Create NewProject dialog)
Ctrl Shift N Ctrl Shift N
(not applicable for Internet Explorer 9 and10)
Import Script Ctrl Shift I
Keyboard Shortcuts - AV Scripts
The keyboard shortcuts to insert the following elements in AV scripts do not work on Internet Explorer. If you are using Internet Explorer, use theelement menu to insert elements.
Launch the Additional Information dialog Ctrl+Shift+Y
Launch Camera Shot dialog with type 'Shot Line' selected Ctrl+Shift 5
Launch Camera Shot dialog with type 'As Directed' selected Ctrl+Shift 6
Launch Camera Shot dialog with type 'Shot Development'selected
Ctrl+Shift 7
Launch Camera Shot dialog with type 'Camera Reposition'selected
Ctrl+Shift 8
Launch Camera Shot dialog with type 'Isolated Shot' selected Ctrl+Shift 9
Launch Camera Shot dialog with type 'Pickup Shot' selected Ctrl+Shift 0
Action Firefox, Chrome
Scene Ctrl 1
Character Ctrl 2
Dialog Ctrl 3
Parenthetical Ctrl 4
General Ctrl 5
16

To the top
Keyboard shortcuts for new scene options in AV scripts.
Keyboard shortcuts to insert images in AV scripts.
Keyboard shortcuts - scheduling
Keyboard shortcuts to breaks and banners in schedules:
Mac
Keyboard shortcuts for Adobe Story running on Firefox, Chrome, and Safari.
Authoring view
Action Keyboard shortcut
Scene Ctrl 6
Character Ctrl 7
Dialog Ctrl 8
Action Keyboard shortcut
Insert Image Ctrl 9
Action Keyboard shortcut
Insert Day break Ctrl ,
Insert Banner (no duration) Ctrl .
Action Safari Firefox Chrome Menu path
Copy text Cmd c / Ctrl c Cmd c / Ctrl c Cmd C / Ctrl c Edit > Copy
Paste text Cmd v Cmd v Cmd v Edit > Paste
Save document Ctrl s Ctrl s Cmd s / Ctrl s File > Save
Save document as Ctrl Shift s Cmd Shift s/ CtrlShift s
Cmd Shift s/ CtrlShift s
File > Save As
17
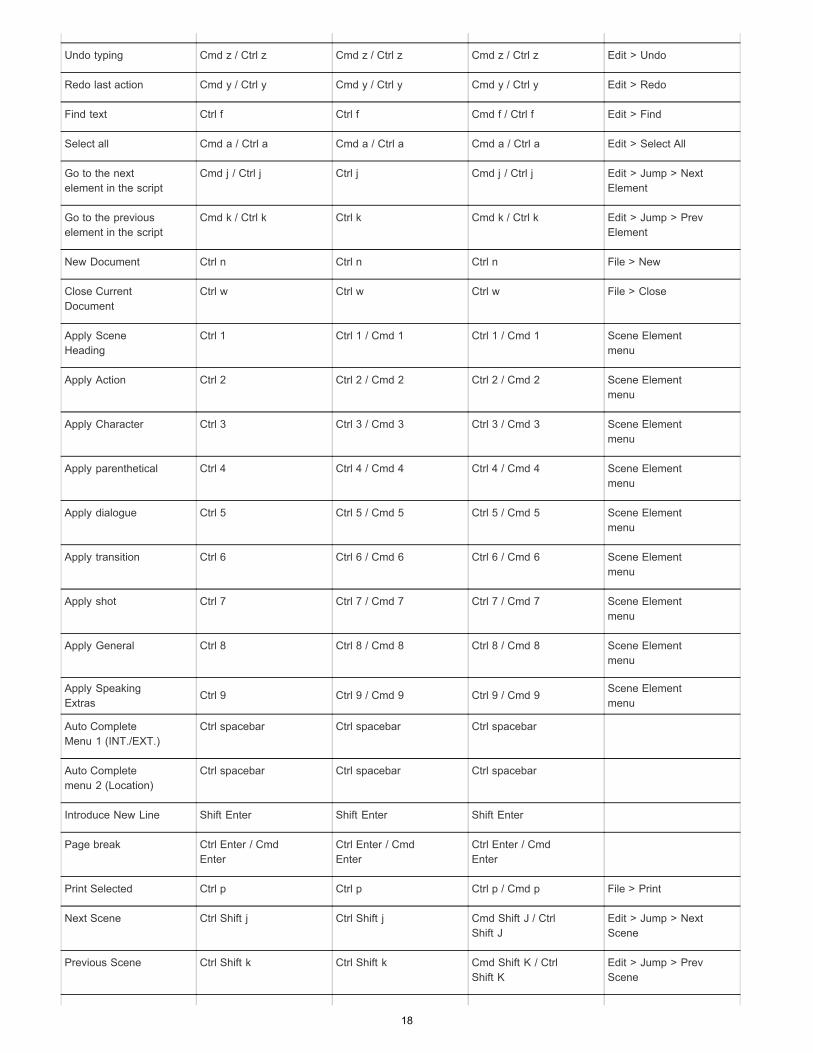
Undo typing Cmd z / Ctrl z Cmd z / Ctrl z Cmd z / Ctrl z Edit > Undo
Redo last action Cmd y / Ctrl y Cmd y / Ctrl y Cmd y / Ctrl y Edit > Redo
Find text Ctrl f Ctrl f Cmd f / Ctrl f Edit > Find
Select all Cmd a / Ctrl a Cmd a / Ctrl a Cmd a / Ctrl a Edit > Select All
Go to the nextelement in the script
Cmd j / Ctrl j Ctrl j Cmd j / Ctrl j Edit > Jump > NextElement
Go to the previouselement in the script
Cmd k / Ctrl k Ctrl k Cmd k / Ctrl k Edit > Jump > PrevElement
New Document Ctrl n Ctrl n Ctrl n File > New
Close CurrentDocument
Ctrl w Ctrl w Ctrl w File > Close
Apply SceneHeading
Ctrl 1 Ctrl 1 / Cmd 1 Ctrl 1 / Cmd 1 Scene Elementmenu
Apply Action Ctrl 2 Ctrl 2 / Cmd 2 Ctrl 2 / Cmd 2 Scene Elementmenu
Apply Character Ctrl 3 Ctrl 3 / Cmd 3 Ctrl 3 / Cmd 3 Scene Elementmenu
Apply parenthetical Ctrl 4 Ctrl 4 / Cmd 4 Ctrl 4 / Cmd 4 Scene Elementmenu
Apply dialogue Ctrl 5 Ctrl 5 / Cmd 5 Ctrl 5 / Cmd 5 Scene Elementmenu
Apply transition Ctrl 6 Ctrl 6 / Cmd 6 Ctrl 6 / Cmd 6 Scene Elementmenu
Apply shot Ctrl 7 Ctrl 7 / Cmd 7 Ctrl 7 / Cmd 7 Scene Elementmenu
Apply General Ctrl 8 Ctrl 8 / Cmd 8 Ctrl 8 / Cmd 8 Scene Elementmenu
Apply SpeakingExtras
Ctrl 9 Ctrl 9 / Cmd 9 Ctrl 9 / Cmd 9 Scene Elementmenu
Auto CompleteMenu 1 (INT./EXT.)
Ctrl spacebar Ctrl spacebar Ctrl spacebar
Auto Completemenu 2 (Location)
Ctrl spacebar Ctrl spacebar Ctrl spacebar
Introduce New Line Shift Enter Shift Enter Shift Enter
Page break Ctrl Enter / CmdEnter
Ctrl Enter / CmdEnter
Ctrl Enter / CmdEnter
Print Selected Ctrl p Ctrl p Ctrl p / Cmd p File > Print
Next Scene Ctrl Shift j Ctrl Shift j Cmd Shift J / CtrlShift J
Edit > Jump > NextScene
Previous Scene Ctrl Shift k Ctrl Shift k Cmd Shift K / CtrlShift K
Edit > Jump > PrevScene
18
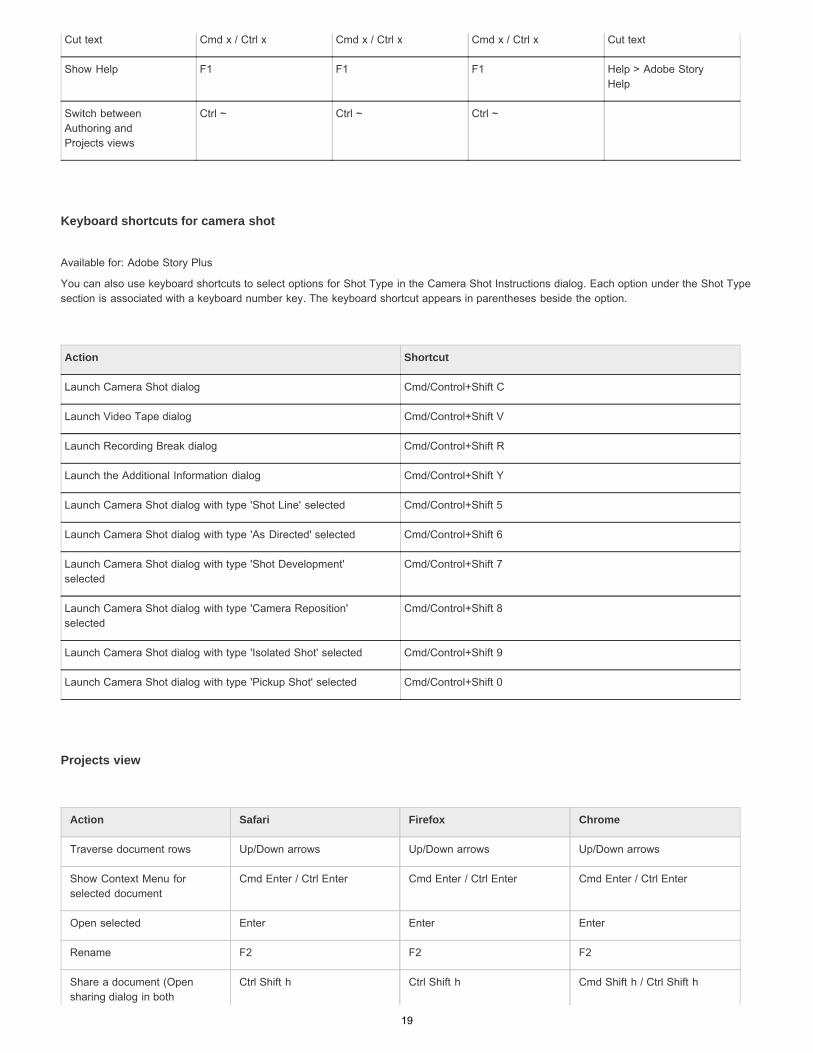
Keyboard shortcuts for camera shot
Available for: Adobe Story Plus
You can also use keyboard shortcuts to select options for Shot Type in the Camera Shot Instructions dialog. Each option under the Shot Typesection is associated with a keyboard number key. The keyboard shortcut appears in parentheses beside the option.
Projects view
Action Safari Firefox Chrome
Traverse document rows Up/Down arrows Up/Down arrows Up/Down arrows
Show Context Menu forselected document
Cmd Enter / Ctrl Enter Cmd Enter / Ctrl Enter Cmd Enter / Ctrl Enter
Open selected Enter Enter Enter
Rename F2 F2 F2
Share a document (Opensharing dialog in both
Ctrl Shift h Ctrl Shift h Cmd Shift h / Ctrl Shift h
Cut text Cmd x / Ctrl x Cmd x / Ctrl x Cmd x / Ctrl x Cut text
Show Help F1 F1 F1 Help > Adobe StoryHelp
Switch betweenAuthoring andProjects views
Ctrl ~ Ctrl ~ Ctrl ~
Action Shortcut
Launch Camera Shot dialog Cmd/Control+Shift C
Launch Video Tape dialog Cmd/Control+Shift V
Launch Recording Break dialog Cmd/Control+Shift R
Launch the Additional Information dialog Cmd/Control+Shift Y
Launch Camera Shot dialog with type 'Shot Line' selected Cmd/Control+Shift 5
Launch Camera Shot dialog with type 'As Directed' selected Cmd/Control+Shift 6
Launch Camera Shot dialog with type 'Shot Development'selected
Cmd/Control+Shift 7
Launch Camera Shot dialog with type 'Camera Reposition'selected
Cmd/Control+Shift 8
Launch Camera Shot dialog with type 'Isolated Shot' selected Cmd/Control+Shift 9
Launch Camera Shot dialog with type 'Pickup Shot' selected Cmd/Control+Shift 0
19

Projects/Authoring views)
Add New Project (launchesCreate New Project dialog)
Ctrl Shift n Cmd Shift n / Ctrl Shift n Ctrl Shift n
Import Script Ctrl Shift i Cmd Shift i / Ctrl Shift i Cmd Shift i / Ctrl Shift i
New Document Ctrl n Ctrl n Ctrl n
Keyboard Shortcuts - AV Scripts
Keyboard shortcuts for new scene options in AV scripts.
Keyboard shortcuts to insert images in AV scripts.
Keyboard shortcuts - scheduling
Keyboard shortcuts to breaks and banners in schedules:
Action Safari Firefox, Chrome
Scene Ctrl 1 Ctrl 1 / Cmd 1
Character Ctrl 2 Ctrl 2 / Cmd 2
Dialog Ctrl 3 Ctrl 3 / Cmd 3
Parenthetical Ctrl 4 Ctrl 4 / Cmd 4
General Ctrl 5 Ctrl 5 / Cmd 5
Action Safari Firefox, chrome
Scene Ctrl 6 Ctrl 6 / Cmd 6
Character Ctrl 7 Ctrl 7 / Cmd 7
Dialog Ctrl 8 Ctrl 8 / Cmd 8
Action Keyboard shortcut
Insert Image Ctrl 9
Action Keyboard shortcut
Insert Day break Ctrl , / Cmd,
20

Twitter™ and Facebook posts are not covered under the terms of Creative Commons.
Legal Notices | Online Privacy Policy
Insert break Ctrl B / Cmd B
Insert Banner (no duration) Ctrl . / Cmd .
21
New features summary
To the top
To the top
To the top
Release timelineNew features | April 2014 releaseNew features | January 2014 updateNew features | September 2013 updateNew features | May 2013 updateFeatures in older updates
Release timeline
This document introduces the latest features and enhancements in Adobe® Story. Click a release milestone on the timeline below to quicklynavigate to a list of key features in that release.
New features | April 2014 release
Vision beats and bars: You can now enter vision beats and bars to cue camera shots or other vision items using a piece of music. Visionbeats and bars are displayed to the left side of the script. See Vision beats and bars.Sound elements: You can now enter sound elements when you want to cue music or sound. A solid vertical line is automatically drawn froma sound InPoint to the sound OutPoint. See Sound and sound info elements.Customized multiple line headers and footers: You can now enter multiple lines in the document header and footer. You can choose whatfields to display in the left, center, and right side of each row for the header/footer, as well as how many rows you want displayed. SeeMultiple-line headers and footers.Ability to rename/add/delete element types from a template: You can now decide to add/remove element types from your script and givethem customized names to which your production crew can relate better.Camera Cards report from the script and the Shooting Order script: In addition to schedules, you can now generate camera cards fromthe shooting order script and from the source scripts. See Production reports.Page setup option in template: Film or TV script templates now store page settings. Any scripts created from the template reflect thesedefault page settings.Part Break Duration: You can now associate duration with a part break. You can also now enter the Opening Title Duration and Closing Titleduration in Film and TV scripts. This information is calculated and the cumulative running time is automatically updated based on thesevalues in the script as well as in the timings report. See Enter the Opening Title, Closing Title, and the Part Break Duration.Script On-Air Time: You can now enter the Script On-Air Time in film and TV scripts. See Enter the Script On-Air Time.
New features | January 2014 update
The following dialogs now provide copy and paste functionality: Camera Shot, Video Tape, and Recording Break.
For example, the Copy Camera option lets you copy shot information. Later, you can use the Paste Camera option to copy this shotinformation to a new camera shot.
You can now hide the disabled characters in the character list by selecting the Hide Disabled Items option in the Character List dialog. Thesehidden characters are ignored in character search results and not displayed. This setting is saved as preference at a user level.While dragging and dropping items in the Projects view, the drop target is visually indicated.
22
To the top
To the top
Usability enhancements to make the Project and Category Rename/Delete options clearer. It is now clearly indicated whether the action isbeing taken on a project or a category.You can now reuse sharing information between projects. Simply launch the Share Project dialog for a project shared with other users andclick Copy Sharing. Now, launch this dialog again for another project and click Paste Sharing to copy the sharing information.Renamed column headers in schedules for enhanced usability:
S. Start to Start Time (Shooting)S. End to End Time (Shooting)S. Dur to Duration (Shooting)
You can now format the text attributes of the text in the From and To fields in a TV script template. In the Authoring view, select Edit >Template. Now, select From And To from the left pane and then open the Text tab.You can selectively display or hide camera shots of different types (View > Camera Shots).You can now add the current date to the script header or footer (Production > Modify Header/Footer). The current date is included when youprint the script.While working with TV script templates, you can now customize the view settings of a scene header to include a user-defined prefix beforescene numbers. You can choose to display the Episode Number/Scene Number combination or just the Scene Number before the sceneheading. For example, SCENE 4509/1 and SCENE 4509/2, where SCENE is user input and 4509 is the episode number. To invoke thisoption, in the Authoring view, select Edit > Template > General.The Manage List and Assign List dialogs have been redesigned for better usability.Depending upon your organization’s production requirements, you can create a custom report list by choosing a report template from the setof factory report templates. Once a custom report list is attached to a project, only the report templates added to the custom report list aredisplayed in the reports dialog.You can now configure Story to recognize Ctrl+number (1-5) key inputs as keyboard shortcuts for entering Camera Shots with cameranumbers 1 through 5. In the Preferences, select Keyboard Shortcuts > Camera Shots. The preference is set only at a user level.
New features | September 2013 update
You can now export or import lists in the XML format. See Character, actor, and set lists for details.
New features | May 2013 update
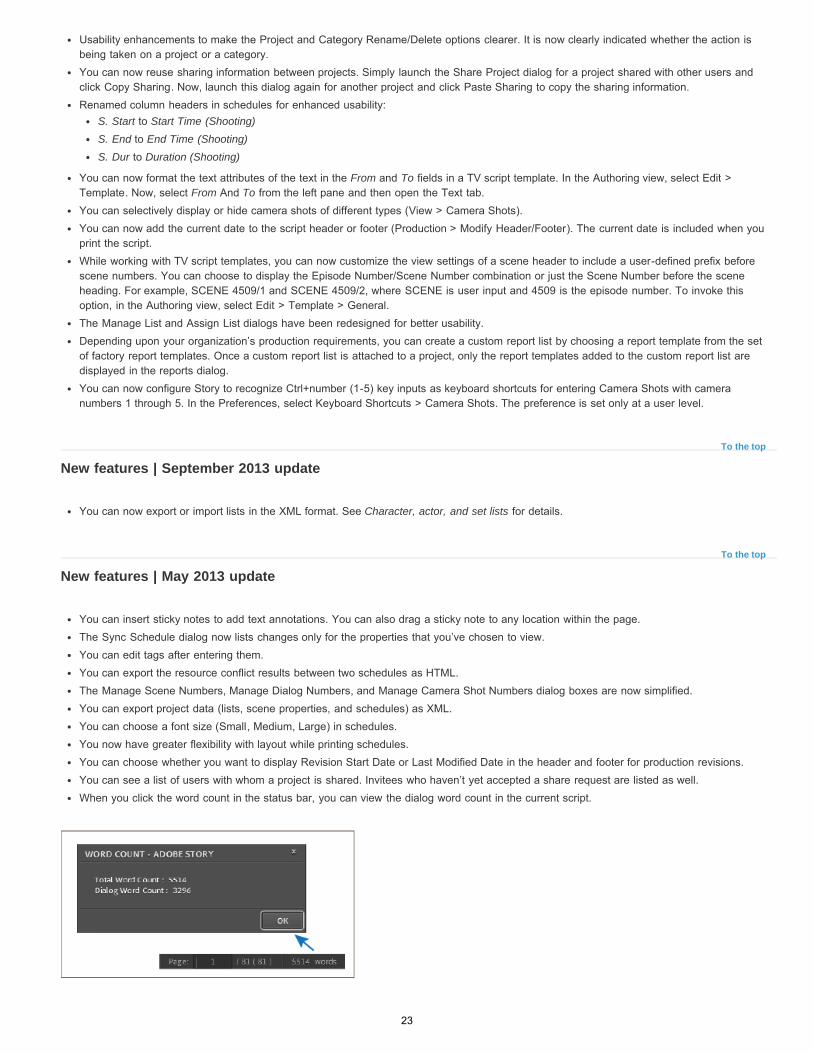
You can insert sticky notes to add text annotations. You can also drag a sticky note to any location within the page.The Sync Schedule dialog now lists changes only for the properties that you’ve chosen to view.You can edit tags after entering them.You can export the resource conflict results between two schedules as HTML.The Manage Scene Numbers, Manage Dialog Numbers, and Manage Camera Shot Numbers dialog boxes are now simplified.You can export project data (lists, scene properties, and schedules) as XML.You can choose a font size (Small, Medium, Large) in schedules.You now have greater flexibility with layout while printing schedules.You can choose whether you want to display Revision Start Date or Last Modified Date in the header and footer for production revisions.You can see a list of users with whom a project is shared. Invitees who haven’t yet accepted a share request are listed as well.When you click the word count in the status bar, you can view the dialog word count in the current script.
23
Twitter™ and Facebook posts are not covered under the terms of Creative Commons.
Legal Notices | Online Privacy Policy
To the top
Several critical bug fixes
Features in older updates
You can now lock camera shot numbers and insert A, B shot numbers.Story now has a new script element—the speaking extra.You can now collapse days in a schedule much like you can collapse acts in the Outline panel of a script.You can now print multiple non-contiguous scenes from a script. For example, you can select and print scenes 5, 8, 23, and 28.You can now filter the schedule view for a particular scene, character, or other relevant attributes.When you return to a project, you find it exactly the way you'd left it:
Visible columnsColumn widthsColumn orderColumn sorting
You can now create scene-level tags directly in a schedule.You now have the option to display scene numbers in headers and footers.The project admin now receives a notification when a Set or Character master list is modified.You can now import .FDR/.FDX files into Story as TV scripts.Several critical bug fixes
24

Projects
25
Creating, renaming, and deleting projects
To the top
To the top
To the top
Note:
About projectsCreate projectsRename projectsDelete projectsRestore deleted documentsAdd frequently used links
About projects
A project can contain the following types of documents:
Scripts
Free form documents related to scripts such as the character biography, logline, and pitch.
In addition, projects can also contain links (URLs) that you commonly use when working with your project.
Create projects
If you do not create a separate project for your scripts, all your scripts and documents are stored in a sample project provided as default. Foreasier management of your scripts, organize your scripts into projects.
1. Do one of the following:
In the Home view, click Create New Project.
In the Projects view, select Projects > New Project.
2. Enter a title for the new project. Ensure that the project name does not contain any special characters.
3. Click Create.
Rename projects
You can rename a project, including the sample project that Adobe® Story creates when you log in for the first time.
1. Select the project in the Projects view. Click the arrow to the left of the project.
2. Select Rename.
You can also select Project > Rename to rename the project.
3. Enter the name of the project.
26

Twitter™ and Facebook posts are not covered under the terms of Creative Commons.
Legal Notices | Online Privacy Policy
To the top
To the top
To the top
Type Or Paste Link Here
Title/Description Of The Link
Delete projects
When you delete a project, the project is deleted permanently but its contents are moved to the Deleted section. When you delete contents fromthe Deleted section, they are deleted permanently from Adobe Story.
1. Select the project in the Projects view.
2. Click the arrow to the left of the project.
3. Select Delete.
Restore deleted documents
When you delete a project, the contents of the project are moved to the Deleted section. The Project itself is permanently deleted. You can laterrestore the contents of the deleted project to any existing project.
If you want to restore the contents to a project with the same name as the deleted project, create a project with that name.
1. In the Projects view, click Deleted in the left panel.
2. Select the item that you want to restore to its project.
3. Click the arrow to the left of the item.
4. Select Restore To Project.
5. Select the project to which you want to restore the item.
Add frequently used links
Add links that you commonly use when working with projects.
In the right pane of the Projects view, enter the following details in the corresponding fields and click Add.
Enter the URL of the website.
Enter a description of the link.
Adobe also recommends
27
Organizing projects into categories
To the top
To the top
To the top
To the top
To the top
Create categoriesAdd projects to categoriesRename categoriesRemove projects from categoriesDelete a category
Organizing projects into categories helps you manage your projects efficiently. For example, you can create a category for each of your clients,and add projects related to them in their respective category.
Create categories
1. In the Projects view, select Projects > New Category.
2. Enter the name of the category.
Add projects to categories
In the Projects view, drag the project from the Project menu to the Category to which you want to add the project.
Rename categories
1. Select Project > Rename, press F2, or double-click the category.
2. Enter a new name for the category.
Remove projects from categories
1. Select the project that you want to delete in the Categories list.
2. Click the arrow to the left of the project.
3. Select Remove From Category.
note: If you delete a project from the All Projects list, the project is deleted from all the categories to which it belongs.
Delete a category
1. Select the category that you want to delete.
28

Twitter™ and Facebook posts are not covered under the terms of Creative Commons.
Legal Notices | Online Privacy Policy
2. Select Projects > Delete.
29
Archiving projects
Twitter™ and Facebook posts are not covered under the terms of Creative Commons.
Legal Notices | Online Privacy Policy
To the top
To the top
To the top
Archive projectsDisplay archived projectsRestore archived projects
Archive projects
You can archive projects that you do not use frequently. The archived projects are hidden from view.
1. Select the project in the Projects view. Click the arrow to the left of the project.
2. Select Archive.
Display archived projects
Select Show Archived to display the archived projects. You can identify archived projects from their icon .
Restore archived projects
1. Select the Show Archived option. The Archived projects are displayed.
2. Select the project in the Projects view.
3. Click the arrow to the left of the project.
4. Select Restore. The icon changes to reflect the new status.
30
Back up/Restore Story data
To the top
Set global back up/restore connection preferences
Available for: Adobe Story Plus
You can back up your data in Adobe Story (such as categories, projects, scripts)on an FTP or SFTP server if you have the required permissionson the server. When required, you can use the backup file created on the server to restore data.
The data that you back up includes all the content in Adobe Story along with their organizational information. When you restore data, the data isrestored using the organizational information in the backup file.
A notification appears after every backup or restore operation informing you whether the backup or restore was successful. The notification alsoprovides information on the location of the data that was backed up or restored.
1. In the Projects, view, click Projects.
2. Select Back Up/Restore.
3. In the Back Up/Restore Account Data:
a. Do one of the following:
To back up projects in Adobe Story, select Back Up.
To restore a project that you have previously backed up, select Restore.
b. Enter the address of the server that contains the data to restore or where you want to back up the data.
c. (Optional) Specify the location of the directory on the server using which you want to back up or restore data.
d. If you are creating a backup, you can choose to change the default name of the backup file (Default name is of the type <Your firstname>_<Date of initiation of the backup>_<Time of initiation the backup>). When restoring data, enter the name of the backup file torestore.
e. Enter your login details for the server.
f. Select the connection type: FTP or SFTP.
4. (Optional) To test your connection, click Test.
5. Click OK to back up or restore data.
Set global back up/restore connection preferences
31
Twitter™ and Facebook posts are not covered under the terms of Creative Commons.
Legal Notices | Online Privacy Policy
Note:
Available for: Adobe Story Plus
If there is one server that you use for backup or restore, you can specify details for the server in the Preferences dialog. This information isreflected in the Back Up/Restore Account Data dialog when you attempt to back up/restore data.
1. In the main toolbar, click Preferences.
2. Select Back Up/Restore.
3. Enter details of the server and location on the server to Back up/restore data. Enter your login user name for the server.
Adobe Story does not save your password.
4. Select the connection type: FTP or SFTP.
32
Scripts and free form documents
33

Scripts, scenes, and documents
To the top
To the top
Script outlineScene elementsNavigate scene elementsNavigate scenesCustomize the script view
With respect to movie scripts, scenes are subdivisions of screenplays. A scene describes an action or a series of actions along with the location,characters involved, and their dialogues.
When you create a script using the various scene elements in Adobe® Story, the industry standard formatting for the element is automaticallyapplied. You can also create documents that do not impose formatting restrictions. In Adobe Story, such documents are called free formdocuments.
Script outline
Script outline
The Outline panel lists the different scenes in the script and their corresponding scene numbers. In the Outline, a scene heading represents ascene. When you click a heading, the contents of the scene are displayed. You can copy content from the outline to the main editing panel.
When you complete a scene and begin the next, the scene is automatically added to the Outline panel. When you double-click a strip in theOutline view, the focus in the editor and the properties panel shifts to the corresponding scene.
To reorder scenes, drag-and-drop scenes within the Outline panel. The corresponding changes are reflected in the editor. To delete a scene, clickthe X button for that scene in the Outline view
The colored dots in the outline represent characters in that scene. The six most commonly occurring characters in the script are listed in theoutline. The first character dot represents the most frequently appearing character across all scenes. To display the name of the characterrepresented by a dot, move your cursor over the dot.
Scene elements
The standard sequence of elements used in a script is listed in the table.
Scene element Description
Scene Heading A script usually opens with the Scene Heading of the first
34
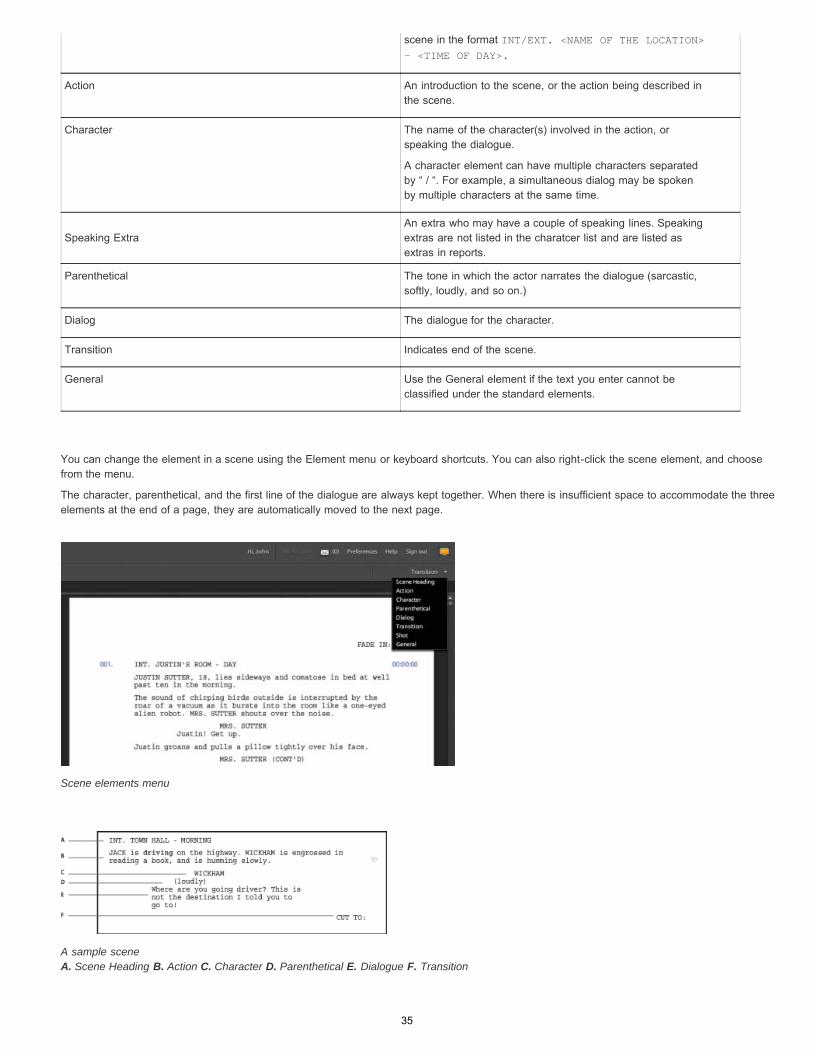
You can change the element in a scene using the Element menu or keyboard shortcuts. You can also right-click the scene element, and choosefrom the menu.
The character, parenthetical, and the first line of the dialogue are always kept together. When there is insufficient space to accommodate the threeelements at the end of a page, they are automatically moved to the next page.
Scene elements menu
A sample scene A. Scene Heading B. Action C. Character D. Parenthetical E. Dialogue F. Transition
scene in the format INT/EXT. <NAME OF THE LOCATION>- <TIME OF DAY>.
Action An introduction to the scene, or the action being described inthe scene.
Character The name of the character(s) involved in the action, orspeaking the dialogue.
A character element can have multiple characters separatedby “ / “. For example, a simultaneous dialog may be spokenby multiple characters at the same time.
Speaking ExtraAn extra who may have a couple of speaking lines. Speakingextras are not listed in the charatcer list and are listed asextras in reports.
Parenthetical The tone in which the actor narrates the dialogue (sarcastic,softly, loudly, and so on.)
Dialog The dialogue for the character.
Transition Indicates end of the scene.
General Use the General element if the text you enter cannot beclassified under the standard elements.
35
Twitter™ and Facebook posts are not covered under the terms of Creative Commons.
To the top
To the top
To the top
Navigate scene elements
You can navigate among similar scene elements in a script using these commands. For example, if you want to navigate scene headings, placeyour cursor on a scene heading, and use the Edit menu commands.
Select Edit > Jump > Next Element to move to the next scene element of the same type in the document. Keyboard shortcut: Ctrl/Cmd J.
Select Edit > Jump > Prev Element to move to the previous scene element of the same type in the document. Keyboard shortcut: Ctrl/CmdK.
Navigate scenes
Select Edit > Jump > Next Scene to move to the next scene in the script.
Select Edit > Jump > Prev Scene to move to the previous scene in the script.
Customize the script view
You can selectively display one or more of the following in the script view:
1. Show outline view
2. Expand scenes in outline view
3. Show scene property panel
Customize script view
1. In the script view, select Review > Preferences.
2. In the Preferences dialog, select script editor.
3. Select/deselect the following options and click OK:
a. Show outline view
b. Expand scenes in outline view
c. Show scene property panel
The new settings take place when you close and open a script again. Until you close and open a script, it does not reflect the newsettings.
Adobe also recommends
36
Add annotations to your script
Twitter™ and Facebook posts are not covered under the terms of Creative Commons.
Legal Notices | Online Privacy Policy
Available for: Adobe Story Plus
1. With a script open, select Production > Insert Sticky Notes. You can also use the shortcut combination Ctrl+Shift+M. Story inserts asticky note at the current cursor location.
2. Type the contents of the sticky note.
You can minimize a sticky note, drag it across the page, or resize it.
37
Scene properties panel
To the top
Note:
Note:
Work with scriptsTC (Time Continuous) suffix with TOD in the TV script
Work with scripts
When working with scripts, you can use the Scene Properties panel to view all the properties of the scene.
The Scene Properties panel is not available for free form documents, AV scripts, and multicolumn scripts.
In the Authoring view, select View > Scene properties panel.
The following properties are populated from the script itself and are not editable in the Scene Properties panel: INT / EXT, Day / Night, Set,and Duration.
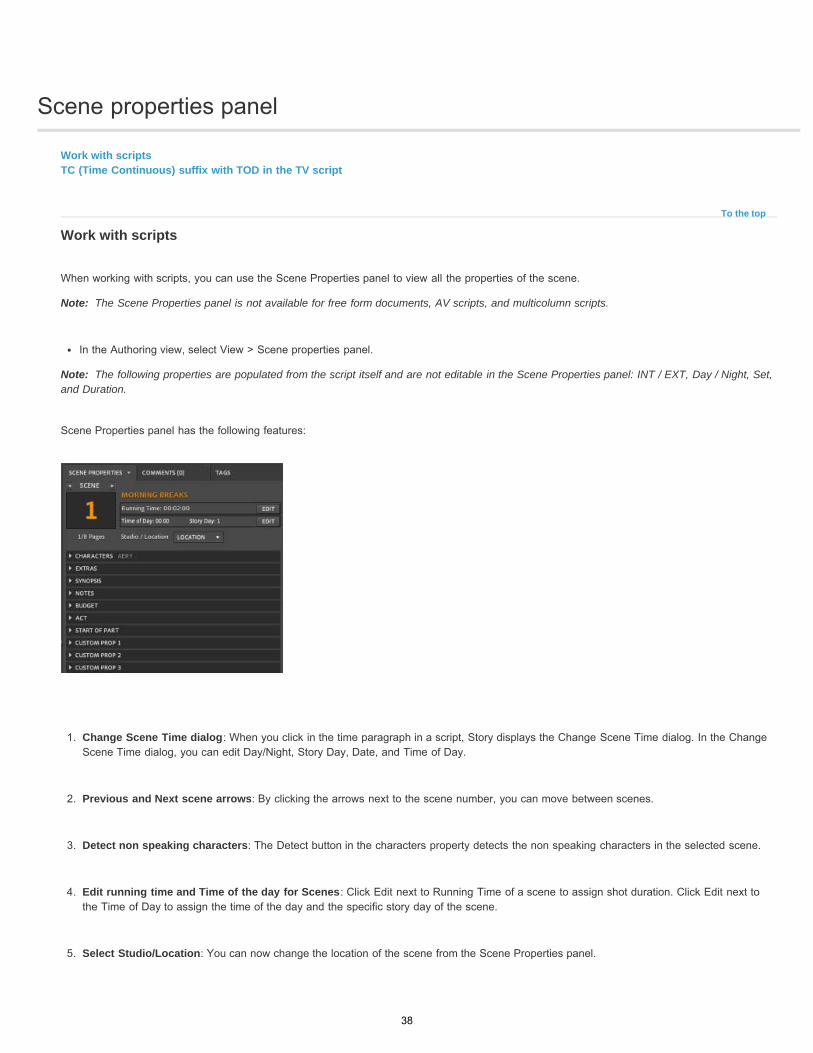
Scene Properties panel has the following features:
1. Change Scene Time dialog: When you click in the time paragraph in a script, Story displays the Change Scene Time dialog. In the ChangeScene Time dialog, you can edit Day/Night, Story Day, Date, and Time of Day.
2. Previous and Next scene arrows: By clicking the arrows next to the scene number, you can move between scenes.
3. Detect non speaking characters: The Detect button in the characters property detects the non speaking characters in the selected scene.
4. Edit running time and Time of the day for Scenes: Click Edit next to Running Time of a scene to assign shot duration. Click Edit next tothe Time of Day to assign the time of the day and the specific story day of the scene.
5. Select Studio/Location: You can now change the location of the scene from the Scene Properties panel.
38
Twitter™ and Facebook posts are not covered under the terms of Creative Commons.
Legal Notices | Online Privacy Policy
To the top
Note:
6. Shot list: The Shots property in the Scene Properties panel displays a list of all the camera shots in the scene. When you double click anentry in the list, the Camera Shot dialog appears with the relevant camera shot’s properties in it. Also the editor scrolls to the place wherethat particular shot is present. You can edit the shot properties in the Camera Shot dialog.
TC (Time Continuous) suffix with TOD in the TV script
Available for: All Story customers
Beginning the April 2014 release of Story, you can append T/C (Time Continuous) after the TOD (time of day) in a TV script to denote that thestory time is continuous from the previous scene.
To append T/C after the TOD, do the following:
1. Click anywhere in the line where the TOD is present to launch the Change Scene Time dialog.2. Select the Time Continuous option.
If you have a FinalDraft script containing T/C in the scene heading, Story recognizes it as a T/C suffix if you import it as a UK Screenplay(TV) 3 [Beta] TV script in Story. The scene heading format to follow in FinalDraft is as follows:
INT. SETNAME - DAY [17.00 T/C]
39

Storyboards
Twitter™ and Facebook posts are not covered under the terms of Creative Commons.
Legal Notices | Online Privacy Policy
To the top
Add storyboard images
Storyboard is a property in scripts. you can view and manage Storyboards from the Scene Properties panel.
In the Storyboards field, you can add one or more storyboard images for a scene.
Storyboard is visible in the schedule also. Any discrepancy between the storyboards in the schedule and the relevant scripts are flagged in thesync dialog.
Add storyboard images
1. Do one of the following:
a. In Scene Properties panel, click the Add Image Link inside the square placeholder under Storyboard.
b. Select a string of text or scene for which you want to add storyboard images. Then right-click and select Storyboard. The ManageImages dialog appears with the selected text string added as the caption.
2. In the Manage Images dialog, click Add Image Link inside the square placeholder.
3. In the Image Link dialog, paste the link to the online image and click OK.
4. Type a caption for the image.
5. To add more images, click Add Image Link (the button) at the bottom of the Manage Images dialog.
40
Change of template
Twitter™ and Facebook posts are not covered under the terms of Creative Commons.
Legal Notices | Online Privacy Policy
To the top
To the top
Change template for a scriptEdit Start of act and End of act text
For TV and film scripts, you can switch to any template available under that particular script format. Such as for a TV script, you can switchbetween UK Screenplay TV Script 1 and UK Screenplay TV Script 2.
You can also change the font used in the template. The option to change the font of the template is in the General tab of the Change Templatedialog.
Change template for a script
You can change templates for film and TV scripts.
1. In the script view, select Edit > Template.
2. In the Change Template dialog, select a template from the Select Template pop up menu.
Edit Start of act and End of act text
You can change templates for film and TV scripts.
1. In the script view, select Edit > Template.
2. In the Change Template dialog, select a template from the Select Template pop up menu.
3. Select General and edit the entries in the Start of act/part and End of act/part. The entries you make in these fields appear as prefixes forStart of act/part and End of act/part labels in the script. For example, if you enter “Start of Part Number: in the Start of act\part field for ascript, the start of first act in the script is marked Start of Part Number: 1.
Hide/display additional information in the template
On the General tab of the Change Template dialog, you can specify whether you want to display the scheduled date as part of the scenetime.
To display the location in the script, click Characters In Scene in the Change Template dialog and then select Show Studio/Location.
41
Customize template for scripts
Note:
To the top
Customize a template for a scriptPage settings stored as part of the template
You can customize the default Story templates according to your requirements and save them as custom templates.
1. Do one of the following based on your current view:
In Projects view, click New.
In Authoring view, select File > New.
You can modify default templates from the authoring view only.
2. In Type, select Film Script or TV Script.
3. In Template, select the template that you want to customize. Click Change.
4. In the Change Template dialog, select an element from the left panel, and customize it using options in the right panel.
Use the options in the Paragraph tab to change the alignment and spacing settings for the element. In Suffix, enter a character toautomatically display at the end of the element.
Use the options in the Text tab to specify the style for the text in the element.
5. For TV scripts, by default, all scenes start from a new page. To create scenes without page breaks, deselect the option Start Scene FromNew Page.
6. The position of the scene number is the distance in inches from the left margin. To change the alignment for the scene number, enter acustom value.
7. Click OK. In the Save Template dialog, enter a name for the template, and click Yes.
Customize a template for a script
You can customize a template for a particular film or TV script. The changes made to the template are relevant only to the script for which youcustomize the template. To use such a template for other documents, you can later save this template to disk.
1. In Authoring view, select Edit > Template.
2. In the Change Template dialog, select an element from the left panel, and customize it using options in the right panel.
42
Note:
Use the options in the Paragraph tab to change the alignment and spacing settings for the element. In Suffix, enter a character toautomatically display at the end of the element.
Use the options in the Text tab to specify the style for the text in the element.
3. For TV scripts, by default, all scenes start from a new page. To create scenes without page breaks, deselect the option Start Scene FromNew Page.
4. The position of the scene number is the distance in inches from the left margin. To change the alignment for the scene number, enter acustom value.
5. Click OK. In the Save Template dialog, enter a name for the template, and click Yes.
Add/delete/rename element types to a template
Available for: Adobe Story Plus customers
Beginning the April 2014 release of Adobe Story, you can decide to add/remove element types in your script and give them customized names towhich your production crew can relate better.
To add/delete element types to a template, do the following:
1. In the Projects view, click New to launch the Create New Document dialog.2. Choose Film or TV Script and then any corresponding template. Click Change.3. To rename any element, choose the element from the list and from the Paragraph tab. Change the Display Name to an appropriate name.4. To remove any element, choose the element from the list and click the – icon.5. To add an element type, click the + icon and then provide an element name. Set appropriate formatting settings for the newly added
element.6. To reorder elements, click and drag elements up and down the list. The same order is maintained in the element list popup in the top right
hand side of the editor as well as the smart types appearing in the script.7. Click the Shortcuts tab to set appropriate shortcuts for the Tab key, Enter key, and Tab key in a new line.8. Click Save As to save the settings as a new template.
The following essential element types cannot be removed from the template:
FromToScene HeadingGeneralStart of PartEnd of Part
43
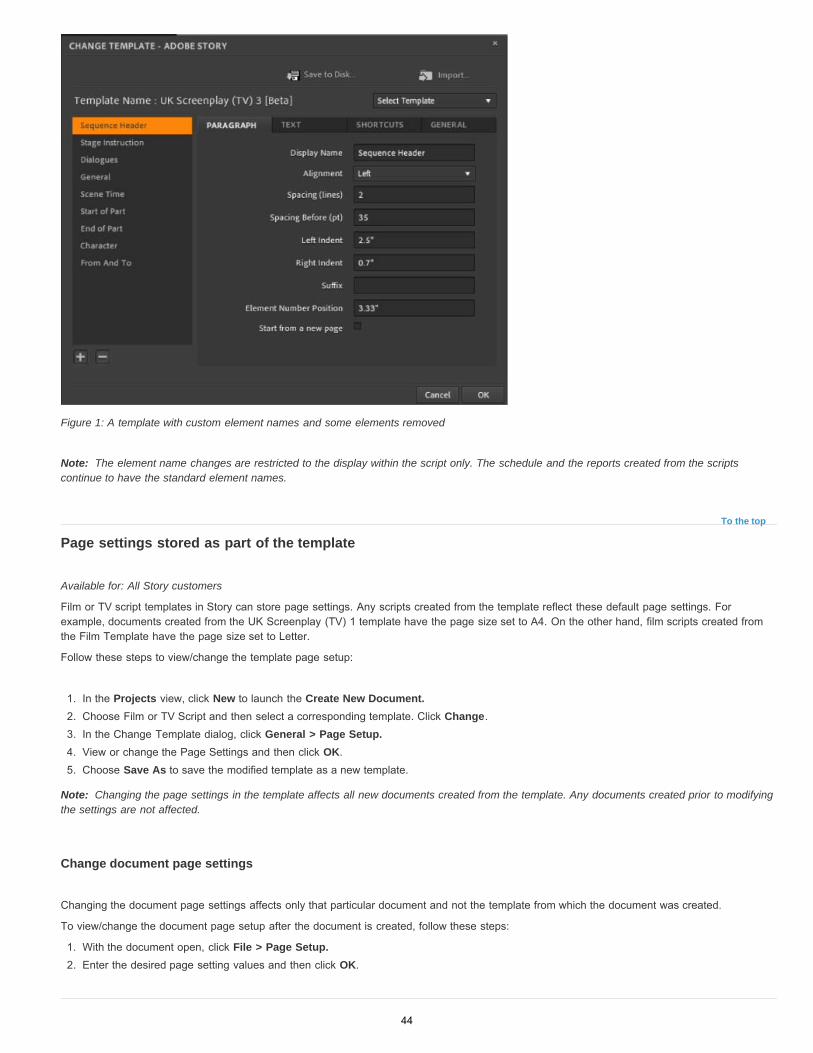
Note:
To the top
Note:
Figure 1: A template with custom element names and some elements removed
The element name changes are restricted to the display within the script only. The schedule and the reports created from the scriptscontinue to have the standard element names.
Page settings stored as part of the template
Available for: All Story customers
Film or TV script templates in Story can store page settings. Any scripts created from the template reflect these default page settings. Forexample, documents created from the UK Screenplay (TV) 1 template have the page size set to A4. On the other hand, film scripts created fromthe Film Template have the page size set to Letter.
Follow these steps to view/change the template page setup:
1. In the Projects view, click New to launch the Create New Document.2. Choose Film or TV Script and then select a corresponding template. Click Change.3. In the Change Template dialog, click General > Page Setup.4. View or change the Page Settings and then click OK.5. Choose Save As to save the modified template as a new template.
Changing the page settings in the template affects all new documents created from the template. Any documents created prior to modifyingthe settings are not affected.
Change document page settings
Changing the document page settings affects only that particular document and not the template from which the document was created.
To view/change the document page setup after the document is created, follow these steps:
1. With the document open, click File > Page Setup.2. Enter the desired page setting values and then click OK.
44

Twitter™ and Facebook posts are not covered under the terms of Creative Commons.
Legal Notices | Online Privacy Policy
45
Vision beats and bars
Twitter™ and Facebook posts are not covered under the terms of Creative Commons.
Legal Notices | Online Privacy Policy
Available for: Adobe Story Plus customers
Vision beats and bars are used when you want to cue camera shots or other vision items using a piece of music. You would normally enter thenumber of beats and/or bars until the next cut or effect. Vision beats and bars appear to the left side of the script.
To insert vision beats and bars into a script, perform the following steps:
1. Place the cursor in the line where you want vision beats and bars to appear.2. Select Production > Vision Beats/Bars. Alternatively use the keyboard shortcut, Ctrl+Shift+X.
Generate Camera Cards report with vision beats and bars
You can generate Camera Cards report with Vision Beats/Bars in a separate column in the report. To generate Camera Cards report with Visionbeats and bars, do the following:
1. In the Projects view, click Reports and then choose one of the following:
Camera Cards [Script]Camera Cards [Schedule]Camera Cards [Shooting Order Script]
2. Select Include Vision Beats/Bars.3. Choose the appropriate source script and then click Generate.
46
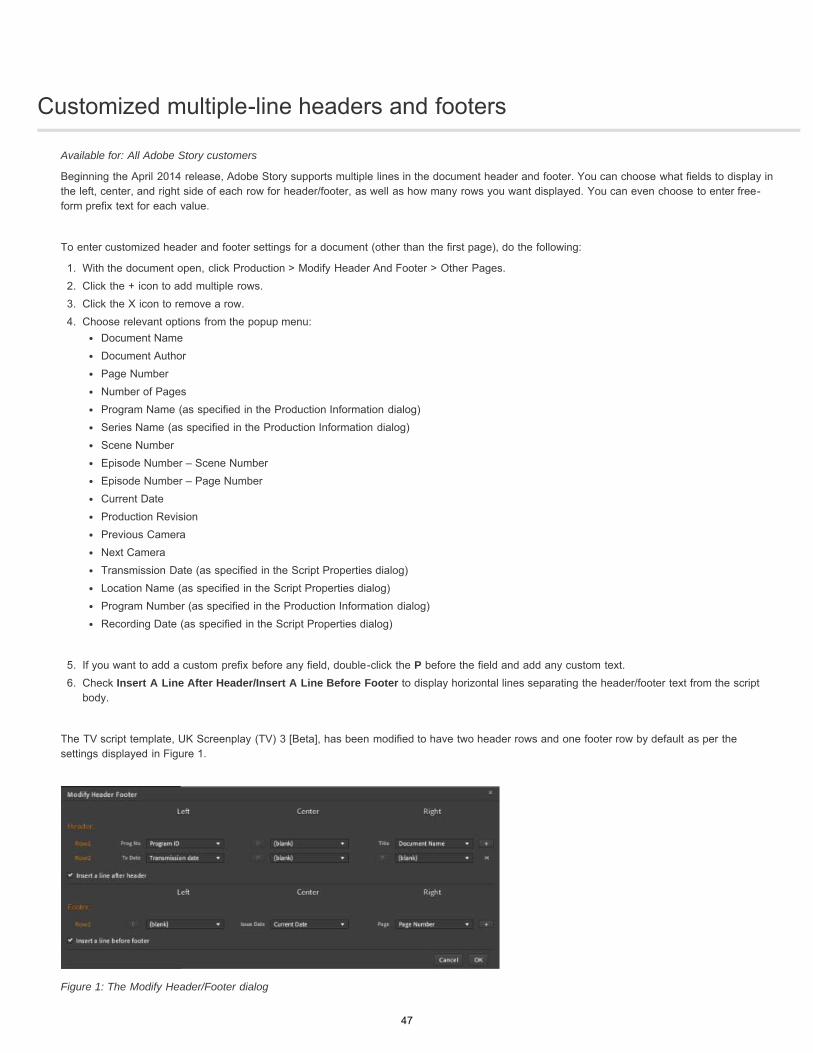
Customized multiple-line headers and footers
Available for: All Adobe Story customers
Beginning the April 2014 release, Adobe Story supports multiple lines in the document header and footer. You can choose what fields to display inthe left, center, and right side of each row for header/footer, as well as how many rows you want displayed. You can even choose to enter free-form prefix text for each value.
To enter customized header and footer settings for a document (other than the first page), do the following:
1. With the document open, click Production > Modify Header And Footer > Other Pages.2. Click the + icon to add multiple rows.3. Click the X icon to remove a row.4. Choose relevant options from the popup menu:
Document NameDocument AuthorPage NumberNumber of PagesProgram Name (as specified in the Production Information dialog)Series Name (as specified in the Production Information dialog)Scene NumberEpisode Number – Scene NumberEpisode Number – Page NumberCurrent DateProduction RevisionPrevious CameraNext CameraTransmission Date (as specified in the Script Properties dialog)Location Name (as specified in the Script Properties dialog)Program Number (as specified in the Production Information dialog)Recording Date (as specified in the Script Properties dialog)
5. If you want to add a custom prefix before any field, double-click the P before the field and add any custom text.6. Check Insert A Line After Header/Insert A Line Before Footer to display horizontal lines separating the header/footer text from the script
body.
The TV script template, UK Screenplay (TV) 3 [Beta], has been modified to have two header rows and one footer row by default as per thesettings displayed in Figure 1.
Figure 1: The Modify Header/Footer dialog
47

Twitter™ and Facebook posts are not covered under the terms of Creative Commons.
Legal Notices | Online Privacy Policy
48
Sound and sound info elements
Twitter™ and Facebook posts are not covered under the terms of Creative Commons.
Legal Notices | Online Privacy Policy
To the top
To the top
Available for: Adobe Story Plus customers
Sound elements
Sound elements are used when you want to cue music or sound. They contain a description field and appear to the right side of the script. A solidvertical line is automatically drawn from a sound InPoint to the sound OutPoint.
To insert only a sound InPoint or sound OutPoint, and not the two together simultaneously, do the following:
1. Place the cursor in the line where you want the sound elements to appear.2. Select Production > Sound Elements. Alternatively, use the keyboard shortcut, Ctrl+Shift+U.3. Enter the appropriate sound description, choose InPoint or OutPoint and click OK.
Notes:
If you enter a sound InPoint, Story tries to find a sound OutPoint later in the script and draws a vertical line between the two boxes. If Storydoes not find any sound OutPoint, the solid vertical line is drawn from the sound InPoint to the end of the script.If you enter a sound OutPoint and no sound InPoint, an inverted T is displayed above the sound OutPoint.
To insert a sound InPoint and a corresponding sound OutPoint simultaneously, do the following:
1. Select the text range between which the sound InPoint/OutPoint boxes need to be cued.2. Select Production > Sound Elements. Alternatively, use the keyboard shortcut, Ctrl+Shift+U.3. Enter the appropriate InPoint and OutPoint sound description and then click OK.
Sound info elements
Sound Info is a type of sound element that does not have an InPoint or OutPoint. It contains a description field and appears to the right side of thescript.
To insert a Sound Info element, do the following:
1. Place the cursor in the line where you want the Sound Info to appear.2. Click Production > Sound Info.3. Enter the appropriate description and then click OK.
49
Act breaks
Twitter™ and Facebook posts are not covered under the terms of Creative Commons.
Legal Notices | Online Privacy Policy
To the top
To the top
Add an act breakDelete an act break
Insert act breaks to establish transitions and plot lines in your story. Using breaks, you can pace your story and establish plot lines.
Add an act break
1. Place your cursor in a scene where you want to insert an act break.
2. Select Edit > Insert Act/Part break.
Delete an act break
1. Place your cursor in a scene from where you want to delete the act break. If you place your cursor on the first scene, Adobe Storydisplays option to delete all scenes.
2. Select Edit > Delete <Act/Part break>.
50

Acts in outline view
Twitter™ and Facebook posts are not covered under the terms of Creative Commons.
Legal Notices | Online Privacy Policy
To the top
To the top
Add actRemove act
You can group the scenes in your script into acts. You can use acts to organize your script into the classic three-act structure. Story does notlimit the number of acts in a script. Your script can have any number of acts.
The outline view of a script displays the acts inserted in a script. You can expand/collapse the acts. You can also use drag-and-drop torearrange the scenes within an act or across the acts. You can also change the default text for Acts/Parts using the template.
Add act
You can insert an act in a scene that is not the first scene of an act.
1. Place cursor in a scene that you want to make the first scene of the act. The end of the act is either the beginning of the next act or theend of script if there are no other acts after the inserted act.
2. Select Edit > Insert Act/Part Break.
Remove act
You can delete an act after placing the cursor in the first scene of the act.
1. Place the cursor in the first scene of the act you want to remove.
2. Select Edit > Remove Act #.
51
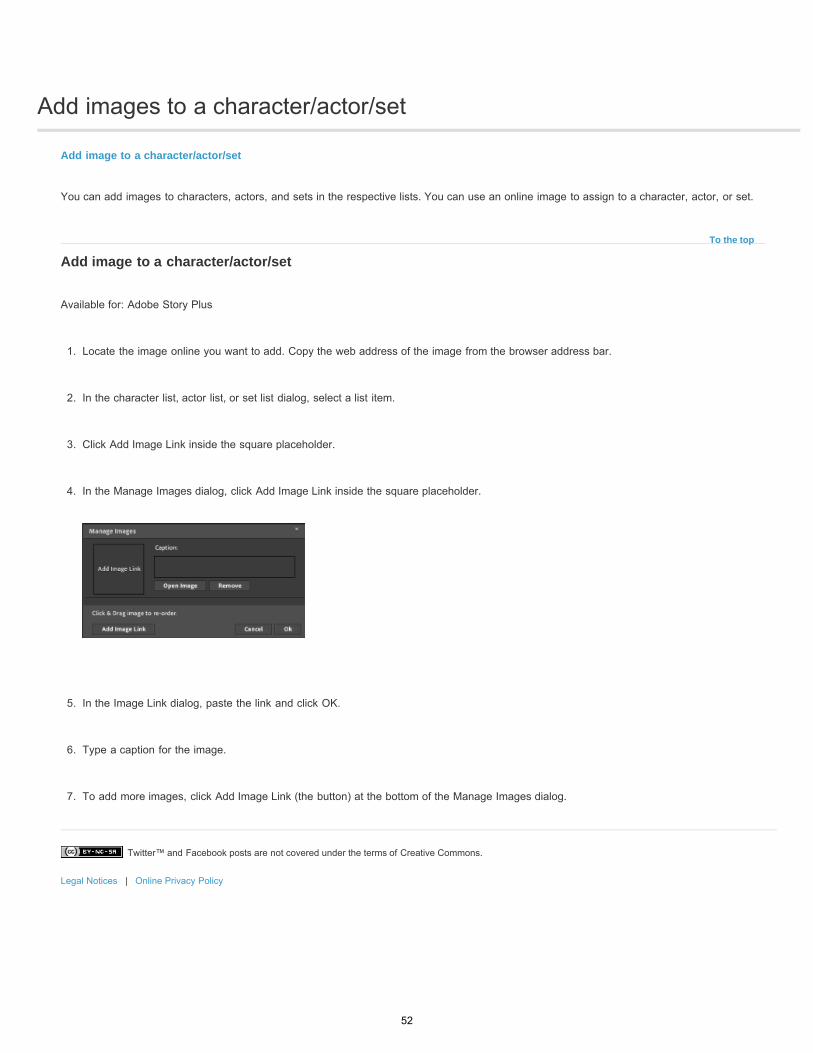
Add images to a character/actor/set
Twitter™ and Facebook posts are not covered under the terms of Creative Commons.
Legal Notices | Online Privacy Policy
To the top
Add image to a character/actor/set
You can add images to characters, actors, and sets in the respective lists. You can use an online image to assign to a character, actor, or set.
Add image to a character/actor/set
Available for: Adobe Story Plus
1. Locate the image online you want to add. Copy the web address of the image from the browser address bar.
2. In the character list, actor list, or set list dialog, select a list item.
3. Click Add Image Link inside the square placeholder.
4. In the Manage Images dialog, click Add Image Link inside the square placeholder.
5. In the Image Link dialog, paste the link and click OK.
6. Type a caption for the image.
7. To add more images, click Add Image Link (the button) at the bottom of the Manage Images dialog.
52
Add scripts to a project
To the top
Note:
Write scriptsParagraph flow
To create a script from the Home view, click Create New Script.
To create a script in the Projects view, select the project and click New. Select the type of script that you want to create, enter a title for thescript, and click Create.
To create a script in the Authoring view, select File > New. Select the type of script that you want to create, enter a title for the script, andclick Create.
To import a script in the Projects view, click Import. Select Script.
To import a script in the Authoring view, select File > Import.
To duplicate a script within a project, in the Projects view, select the script and click Duplicate.
To copy a script from another project, select the script in the Projects view. Drag it to the project in the left panel.
note: If you import a script, Adobe Story formats it and creates a scene outline.
Write scripts
When writing scripts, use the Tab and Enter keys to move among elements in the script. When you press these keys, the focus shifts to the nextlogical element.
Note the changes in the Element menu when you press the Enter and Tab keys.
1. Double-click a script in the Projects view. The script opens in the Authoring view.
2. Adobe Story assigns the Scene Heading element to the first paragraph. Enter the Scene Heading, and press Enter/Tab. The Action elementis automatically inserted.
note: If your script doesn’t begin with a Scene Heading, select a desired option from the Elements menu. Alternatively, press Tab to move tothe next logical element in the menu.
3. Press Tab after the Action element to move to the Character element. Press Enter to move to an Action Element.
4. Press Enter after the Character element. The focus shifts to the Dialog element. For the parenthetical element, press Tab.
5. When you press Enter after the character element or the parenthetical element, the focus shifts to the dialog element.
6. Press Enter after the dialog element. The focus shifts to the character element. Press Tab to move to the next logical element.
7. Continue typing the scene using the required screen elements. Adobe Story assigns the standard formatting for the elements.
8. Use the transition element to indicate end of scene. Press Enter to move to the next scene.
The Action element is automatically converted to Scene Heading when you enter INT, EXT, I/E, or E/I in the beginning. However, auto-
53
Link text
Link URL
Note:
conversion doesn’t happen when you copy content to the Action element.
Insert hyperlinks in scripts
Hyperlinks help provide references to terms in the script. For example, you insert a hyperlink to a web page that contains the description of a termthat you used in the script.
1. Select the text that you want to hyperlink.
2. Select Edit > Insert Link.
3. In the Insert Link dialog, enter the following, and click OK.
Modify the text that you want to display as hyperlinked. You can also choose to retain the text in the field.
Enter the URL of the target.
You can also create a link using the option from the contextual toolbar.
Enable/Disable Continued for repeated character
When you enable the Character Contd option, Adobe Story adds “CONT’D” next to the Character name when a Character is repeated.
When you enable the option for the first time, a message appears using which you can enable cont’ds. However, you can at any time enableor disable the setting throughout the document.
1. Select View > Character Contd.
2. In Character Continued Settings dialog, select or deselect the option Insert CONT’D For Continuous Dialogs.
note: An imported document containing cont’ds retains the cont’ds even after import irrespective of the setting. To disable cont’ds, enablethe option, and then disable it.
To selectively enable/disable cont’ds, do the following:
1. Place your cursor on the character element for which you want to enable or disable this option.
2. Select View > Character Contd.
3. In Character Continued Settings dialog, select or deselect the option Insert CONT’D For This Dialog.
Enable “more” and “continued” for page breaks
When you enable more and continued, the word More appears at the end of the page whenever content in an element overflows to the next page.In the next page containing the overflow text, the word Cont’d appears at the beginning of the page, next to the scene element.
When you export the document as a PDF file with this option enabled, the words “More” and “Cont’d” are displayed in the PDF file as well.
Select View > More & Contd.
Writing aids
54
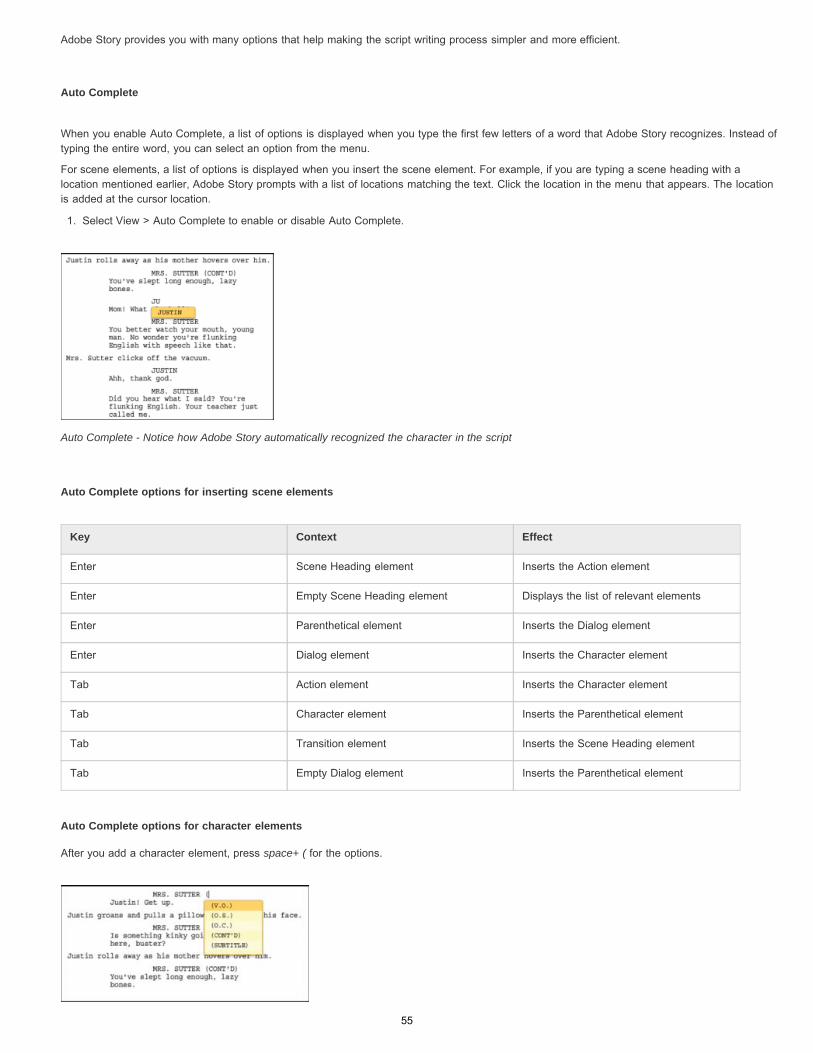
Auto Complete options for inserting scene elements
Auto Complete options for character elements
Adobe Story provides you with many options that help making the script writing process simpler and more efficient.
Auto Complete
When you enable Auto Complete, a list of options is displayed when you type the first few letters of a word that Adobe Story recognizes. Instead oftyping the entire word, you can select an option from the menu.
For scene elements, a list of options is displayed when you insert the scene element. For example, if you are typing a scene heading with alocation mentioned earlier, Adobe Story prompts with a list of locations matching the text. Click the location in the menu that appears. The locationis added at the cursor location.
1. Select View > Auto Complete to enable or disable Auto Complete.
Auto Complete - Notice how Adobe Story automatically recognized the character in the script
Key Context Effect
Enter Scene Heading element Inserts the Action element
Enter Empty Scene Heading element Displays the list of relevant elements
Enter Parenthetical element Inserts the Dialog element
Enter Dialog element Inserts the Character element
Tab Action element Inserts the Character element
Tab Character element Inserts the Parenthetical element
Tab Transition element Inserts the Scene Heading element
Tab Empty Dialog element Inserts the Parenthetical element
After you add a character element, press space+ ( for the options.
55
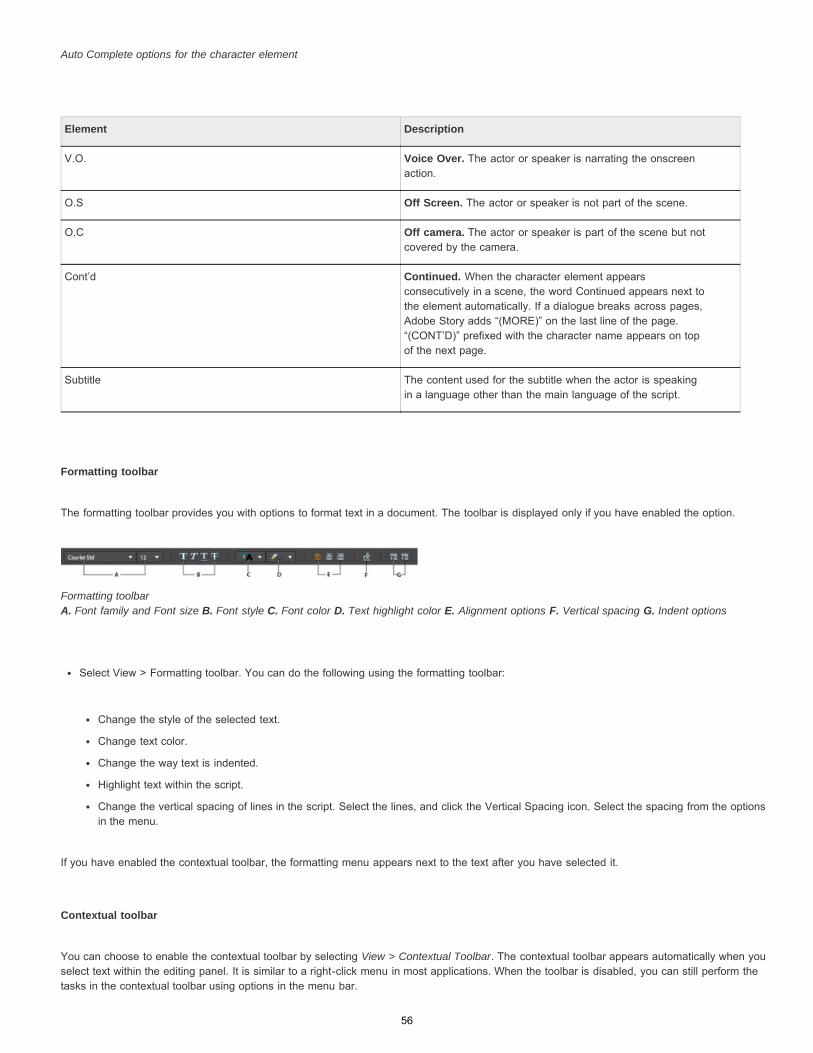
Auto Complete options for the character element
Formatting toolbar
The formatting toolbar provides you with options to format text in a document. The toolbar is displayed only if you have enabled the option.
Formatting toolbar A. Font family and Font size B. Font style C. Font color D. Text highlight color E. Alignment options F. Vertical spacing G. Indent options
Select View > Formatting toolbar. You can do the following using the formatting toolbar:
Change the style of the selected text.
Change text color.
Change the way text is indented.
Highlight text within the script.
Change the vertical spacing of lines in the script. Select the lines, and click the Vertical Spacing icon. Select the spacing from the optionsin the menu.
If you have enabled the contextual toolbar, the formatting menu appears next to the text after you have selected it.
Contextual toolbar
You can choose to enable the contextual toolbar by selecting View > Contextual Toolbar. The contextual toolbar appears automatically when youselect text within the editing panel. It is similar to a right-click menu in most applications. When the toolbar is disabled, you can still perform thetasks in the contextual toolbar using options in the menu bar.
Element Description
V.O. Voice Over. The actor or speaker is narrating the onscreenaction.
O.S Off Screen. The actor or speaker is not part of the scene.
O.C Off camera. The actor or speaker is part of the scene but notcovered by the camera.
Cont’d Continued. When the character element appearsconsecutively in a scene, the word Continued appears next tothe element automatically. If a dialogue breaks across pages,Adobe Story adds “(MORE)” on the last line of the page.“(CONT’D)” prefixed with the character name appears on topof the next page.
Subtitle The content used for the subtitle when the actor is speakingin a language other than the main language of the script.
56
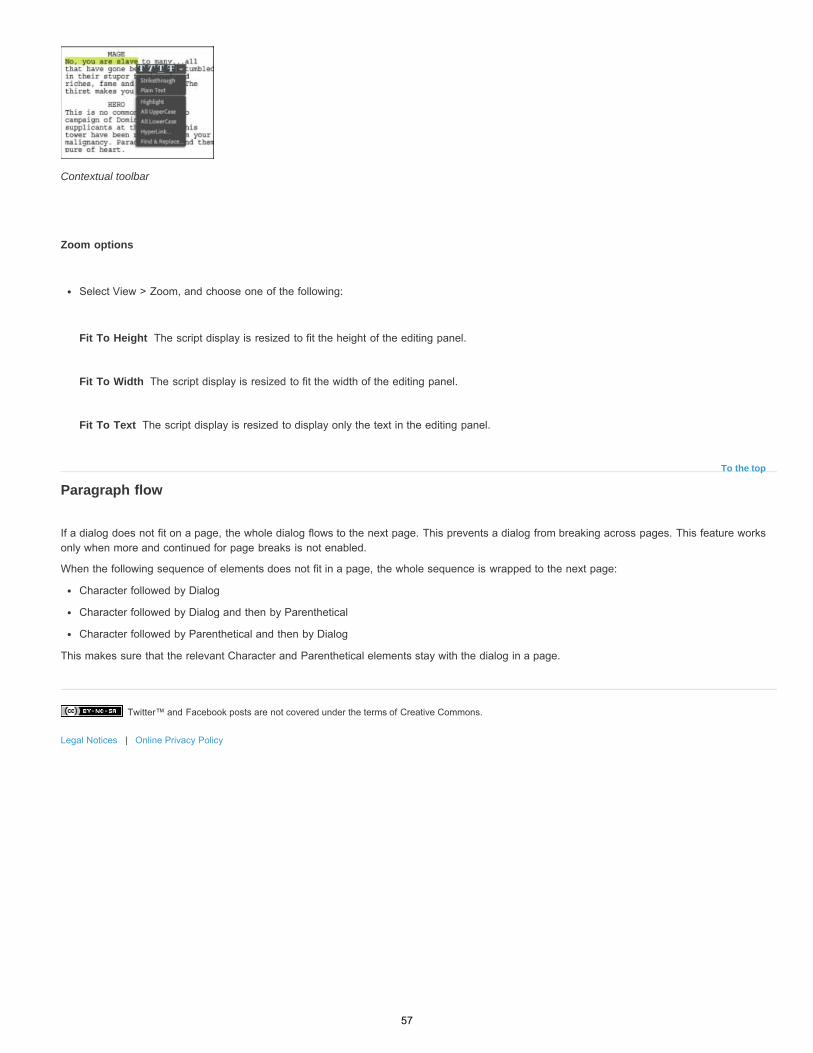
Twitter™ and Facebook posts are not covered under the terms of Creative Commons.
Legal Notices | Online Privacy Policy
Fit To Height
Fit To Width
Fit To Text
To the top
Contextual toolbar
Zoom options
Select View > Zoom, and choose one of the following:
The script display is resized to fit the height of the editing panel.
The script display is resized to fit the width of the editing panel.
The script display is resized to display only the text in the editing panel.
Paragraph flow
If a dialog does not fit on a page, the whole dialog flows to the next page. This prevents a dialog from breaking across pages. This feature worksonly when more and continued for page breaks is not enabled.
When the following sequence of elements does not fit in a page, the whole sequence is wrapped to the next page:
Character followed by Dialog
Character followed by Dialog and then by Parenthetical
Character followed by Parenthetical and then by Dialog
This makes sure that the relevant Character and Parenthetical elements stay with the dialog in a page.
57
Assign scene, camera shot, and dialog numbers
To the top
Automatic scene numbering
Manual scene numbering
Note:
Assign scene numbersAssign camera shot numbersAssign dialog numbers
Assign scene numbers
You can assign scene numbers to the scenes in your script in the following ways:
Scene numbers are assigned serially in the order in which they appear in the script. Use this option for scenes shotin the order in which they appear in the script.
Use this option for scenes that are not shot in the order in which they appear in the script.
Scene numbers are also displayed along with the scene heading in the Outline view.
Camera info
Available for: Adobe Story Plus
In TV scripts, camera information is displayed with the scene headings. This information includes all the camera numbers along with theirpositions, that have been used in that scene. For example if two shots are inserted in a scene with camera number and positions as '1', '2' and'A','B' respectively the information displays "1A,2B".
Assign scene numbers automatically
When you choose to assign scene numbers automatically, Adobe Story uses a numerical sequence for scene numbering. To assign scenenumbers in the alphanumeric format, use the manual method.
1. In the Authoring view, select Production > Manage Scene Numbers.
2. In the Start From field, enter a number from which you want to start numbering the script. If you are numbering the script for the first time,and want to assign numbers sequentially, enter 1.
3. To automatically add the scene number every time you enter a scene heading, select Automatically Assign Number To New Scenes. Whenyou reorder scenes, the scene numbers are automatically renumbered.
4. Click OK.
To renumber scenes in a script, repeat the procedure.
Assign scene numbers manually
58
To the top
To the top
1. Click the scene number that you want to modify.
2. In the Change Scene Number dialog, do one of the following:
Select Custom Number if you want to assign a number other than available through other options.
Select Unused In Script if you want to select from a list of numbers that have not been used in the script.
Select Latest Available if you want to select a number after the last assigned number in the script.
3. Click OK.
1.
2.
Remove all scene numbers
1. Select Production > Manage Scene Numbers.
2. In the Manage Scene Numbers dialog, select Remove Scene Numbers.
Assign camera shot numbers
When you let Story assign camera shot numbers automatically, shot numbers are sequentially assigned to the cut lines in a script. You can chooseto reset the shot numbering on every new page or for every new scene. Follow these steps:
1. In the Authoring view, select Production > Manage Camera Shot Numbers.
2. Select Assign Camera Shot Numbers and then select one of the following options:
Do Not Reset Numbering
Assign sequential camera shot numbers to cut lines and do not reset the numbering.
Reset Numbering on New Page
Reinitialize camera shot numbering to 1 on every new page.
Reset Numbering on New Scene
Reinitialize camera shot numbering to 1 for every new scene.
3. Click OK.
Remove all camera shot numbers
To remove camera shot numbers for all cut lines, do the following:
1. In the Authoring view, select Production > Manage Camera Shot Numbers.
2. Select Remove Camera Shot Numbers.
3. Click OK.
Assign dialog numbers
59
Twitter™ and Facebook posts are not covered under the terms of Creative Commons.
Legal Notices | Online Privacy Policy
When you assign dialog numbers, numbers are sequentially assigned to the dialog elements in a script. You can choose to reset the numberingfor every page so that the dialog numbering begins with 1 for every new page.
1. In the Authoring view, select Production > Manage Dialog Numbers.
2. Select Assign Dialog Numbers.
3. If necessary, choose one of the following:
a. Reset numbering on new page: Story resets the dialog number to 1 on every new page
b. Reset numbering on new scene: Story resets the dialog number to 1 with start of every new scene
4. If you already have scene numbers in the selected script that you want to retain, select Keep Existing Dialog Number. When you select thisoption, the present dialog numbers are left undisturbed even when you insert new dialogs. The new dialogs are numbered alphabeticallyand take the previous existing dialog’s number as a prefix. For example, if you insert two dialogs following scene number 3, they arenumbered as 3A and 3B.
60
Audio visual (AV) scripts
To the top
To the top
Note:
Create AV scriptsWrite AV scriptsView/hide row markersChange row typeInsert images in AV scriptsCopy content from movie scriptsImport AV scriptsExport AV scripts
Audio visual (AV) scripts separate the audio and video components of the script into two columns. The Audio column contains information aboutthe narrator (character) and the dialogue. The Video column describes the scene or shot corresponding to the narration in the audio column.
AV scripts are commonly used in movies with voice overs such as advertising, corporate videos, and documentaries.
Create AV scripts
1. Do one of the following:
In the Projects view, click New.
In the Authoring view, select File > New.
2. In the Create New Document dialog, select AV Script (Two Columns).
3. Type a title for your script, and click Create.
Write AV scripts
Rows in AV scripts can belong to any of the following types:
Rows for scene information containing scene elements
Rows for shot information
Rows that cannot be classified as any of the above types, specified as none
Lines separating rows in AV scripts are called row markers. Row markers for rows specified as scenes, shots, and none are colored black, gray,and light gray.
Only elements relevant to AV scripts are displayed in the elements menu when you open an AV script.
1. In the Video column, type the description of the scene. Press tab or Ctrl 2.
2. Type the name of the character. Press Tab or Ctrl 3.
3. Type the dialogue for the character. Repeat steps 3 and 4 until you want to move to the next shot/scene.
61

To the top
To the top
To the top
To the top
To the top
4. Do one of the following:
To add a row for a scene, select Add > New Scene. Depending upon whether you want to start the new scene from the scene,character, or dialog, choose the corresponding option.
To add a row for a shot, select Add > Row Type > Shot.
A row is inserted below the current active row where you can enter details for the next scene/shot.
Press Shift+tab to move to the previous element in the script.
In addition to the default elements that are enabled when you press Tab, the elements Parenthetical and General are present in the elementsmenu. The elements perform the same function as in single-column movie scripts.
View/hide row markers
To view or hide row markers for scenes/shots, select Add > Row Marker. Select the required option from the submenu.
Change row type
Select Add > Row Type, and choose the desired option.
Insert images in AV scripts
Available for: Adobe Story Plus
The procedure and conditions to import or copy images into AV scripts is the same as that for multicolumn scripts. For more information, seeUsing images in multicolumn scripts.
Copy content from movie scripts
When you copy content from a movie script to an AV script, the formatting is retained. Element information is retained for Character, Dialog, andParenthetical elements. For other copied elements, Adobe Story assigns the General element.
Import AV scripts
You can import Final Draft AV 2.5 scripts into Adobe Story. The element information in the Final Draft AV Script is mapped to elements in AdobeStory.
1. Select File > Import.
2. Navigate to, and select the Final Draft AV 2.5 script that you want to import.
62
Twitter™ and Facebook posts are not covered under the terms of Creative Commons.
Legal Notices | Online Privacy Policy
To the top
Export AV scripts
You can export AV scripts in the following formats:
Adobe Story Interchange Format (ASTX)
Text
The procedure to export AV scripts is the same as that for movie scripts.
63
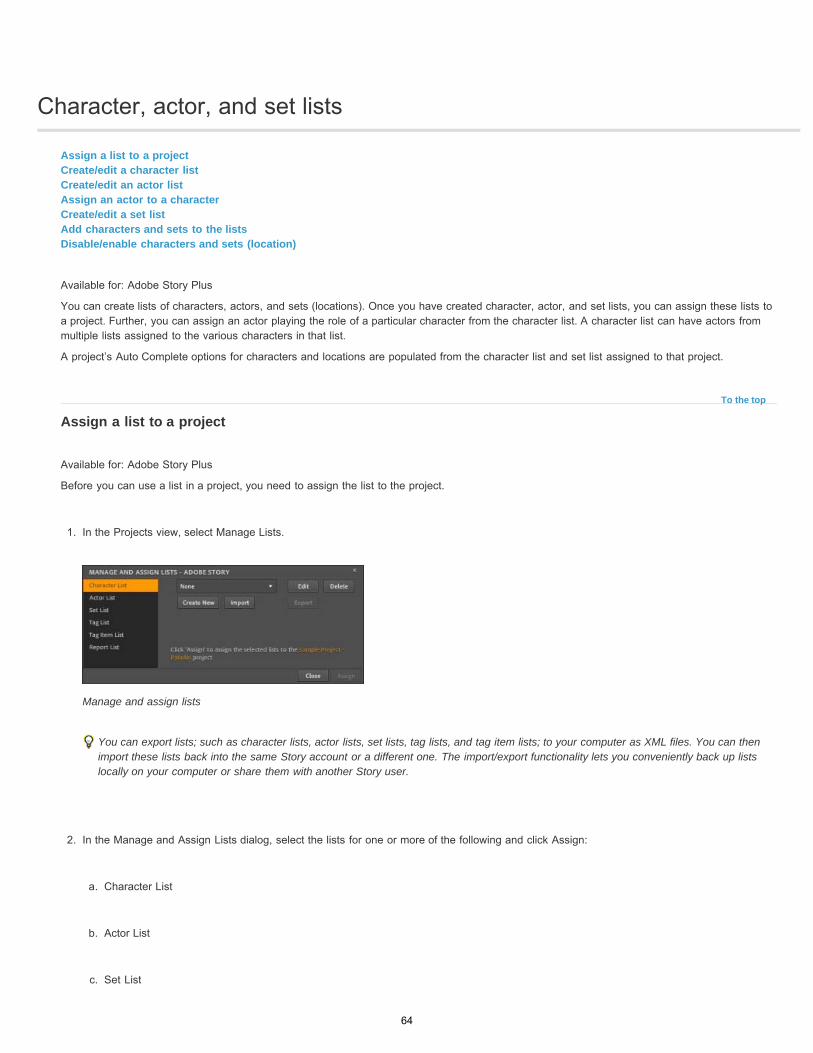
Character, actor, and set lists
To the top
Assign a list to a projectCreate/edit a character listCreate/edit an actor listAssign an actor to a characterCreate/edit a set listAdd characters and sets to the listsDisable/enable characters and sets (location)
Available for: Adobe Story Plus
You can create lists of characters, actors, and sets (locations). Once you have created character, actor, and set lists, you can assign these lists toa project. Further, you can assign an actor playing the role of a particular character from the character list. A character list can have actors frommultiple lists assigned to the various characters in that list.
A project’s Auto Complete options for characters and locations are populated from the character list and set list assigned to that project.
Assign a list to a project
Available for: Adobe Story Plus
Before you can use a list in a project, you need to assign the list to the project.
1. In the Projects view, select Manage Lists.
Manage and assign lists
You can export lists; such as character lists, actor lists, set lists, tag lists, and tag item lists; to your computer as XML files. You can thenimport these lists back into the same Story account or a different one. The import/export functionality lets you conveniently back up listslocally on your computer or share them with another Story user.
2. In the Manage and Assign Lists dialog, select the lists for one or more of the following and click Assign:
a. Character List
b. Actor List
c. Set List
64
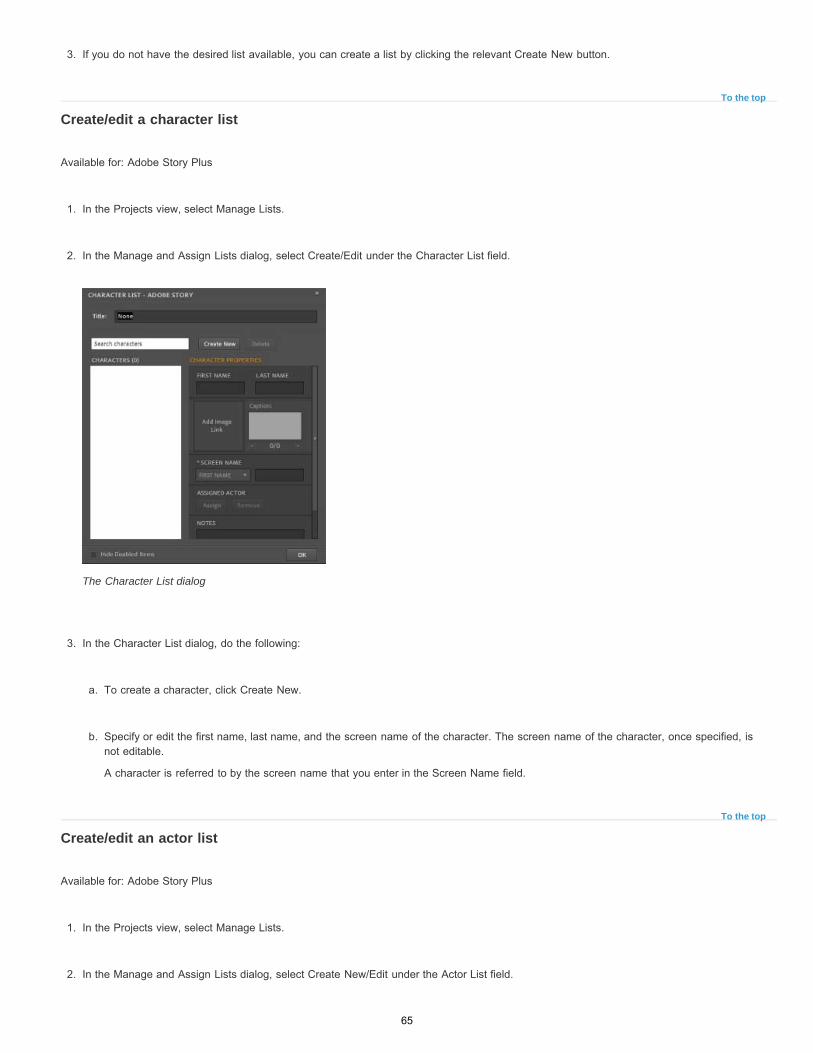
To the top
To the top
3. If you do not have the desired list available, you can create a list by clicking the relevant Create New button.
Create/edit a character list
Available for: Adobe Story Plus
1. In the Projects view, select Manage Lists.
2. In the Manage and Assign Lists dialog, select Create/Edit under the Character List field.
The Character List dialog
3. In the Character List dialog, do the following:
a. To create a character, click Create New.
b. Specify or edit the first name, last name, and the screen name of the character. The screen name of the character, once specified, isnot editable.
A character is referred to by the screen name that you enter in the Screen Name field.
Create/edit an actor list
Available for: Adobe Story Plus
1. In the Projects view, select Manage Lists.
2. In the Manage and Assign Lists dialog, select Create New/Edit under the Actor List field.
65
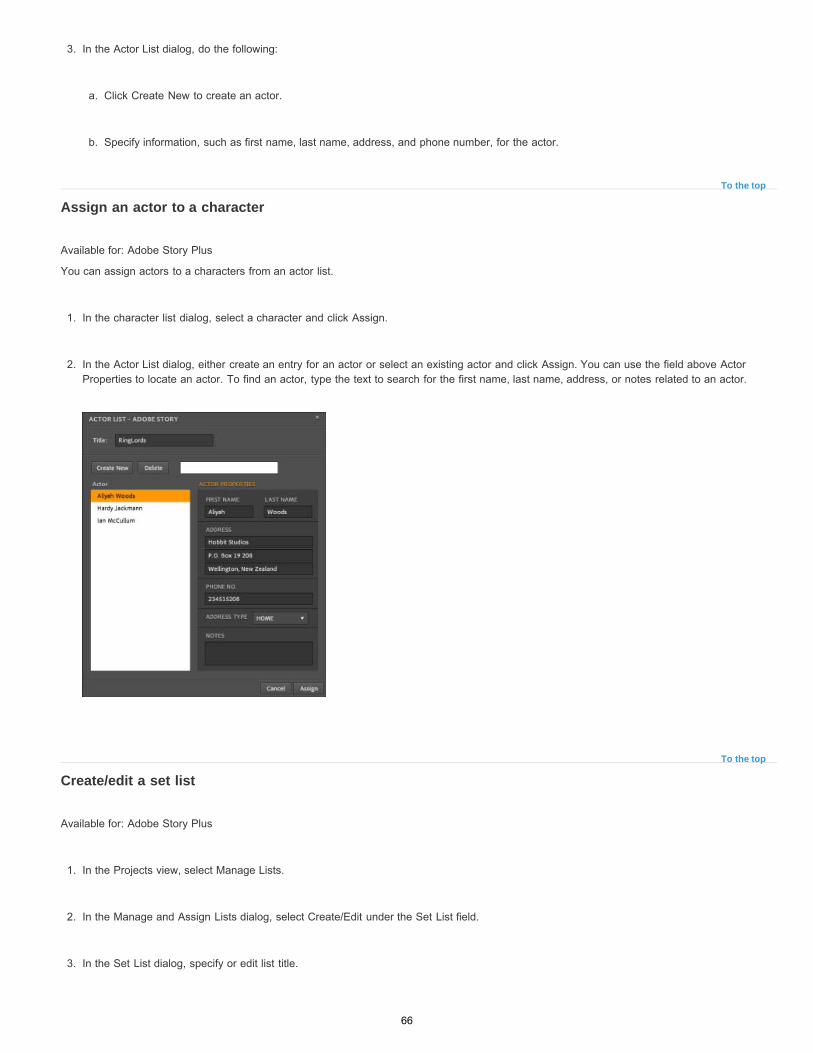
To the top
To the top
3. In the Actor List dialog, do the following:
a. Click Create New to create an actor.
b. Specify information, such as first name, last name, address, and phone number, for the actor.
Assign an actor to a character
Available for: Adobe Story Plus
You can assign actors to a characters from an actor list.
1. In the character list dialog, select a character and click Assign.
2. In the Actor List dialog, either create an entry for an actor or select an existing actor and click Assign. You can use the field above ActorProperties to locate an actor. To find an actor, type the text to search for the first name, last name, address, or notes related to an actor.
Create/edit a set list
Available for: Adobe Story Plus
1. In the Projects view, select Manage Lists.
2. In the Manage and Assign Lists dialog, select Create/Edit under the Set List field.
3. In the Set List dialog, specify or edit list title.
66
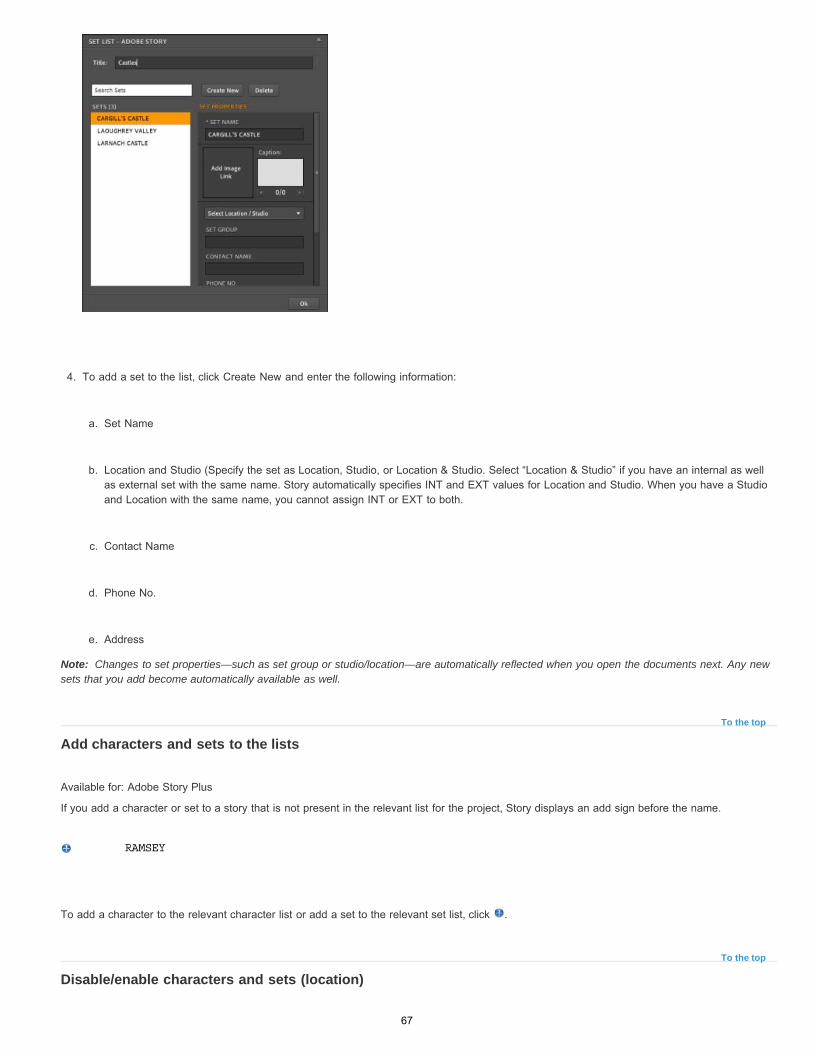
Note:
To the top
To the top
4. To add a set to the list, click Create New and enter the following information:
a. Set Name
b. Location and Studio (Specify the set as Location, Studio, or Location & Studio. Select “Location & Studio” if you have an internal as wellas external set with the same name. Story automatically specifies INT and EXT values for Location and Studio. When you have a Studioand Location with the same name, you cannot assign INT or EXT to both.
c. Contact Name
d. Phone No.
e. Address
Changes to set properties—such as set group or studio/location—are automatically reflected when you open the documents next. Any newsets that you add become automatically available as well.
Add characters and sets to the lists
Available for: Adobe Story Plus
If you add a character or set to a story that is not present in the relevant list for the project, Story displays an add sign before the name.
To add a character to the relevant character list or add a set to the relevant set list, click .
Disable/enable characters and sets (location)
67
Twitter™ and Facebook posts are not covered under the terms of Creative Commons.
Legal Notices | Online Privacy Policy
Available for: Adobe Story Plus
Now you can disable characters and sets in a script’s assigned character/set list. The disabled characters/sets do not appear in the AutoComplete.
Disable characters
Available for: Adobe Story Plus
1. Select Edit > Character List.
2. In the Character List dialog, select the name of the character to disable and select Disable. Repeat to disable more characters. The disabledcharacters do not appear in the Auto Complete menu.
To enable the disabled characters, select the character name and deselect Disable.
68
Copy paste from a report
Twitter™ and Facebook posts are not covered under the terms of Creative Commons.
Legal Notices | Online Privacy Policy
Available for: Adobe Story Plus
You can copy and paste content from a report to another report or to an MS Word® document. Once pasted, the formatting and layout of thecontent is maintained. You can edit the contents of the combined document.
69

Cut lines
To the top
Insert a camera shotManage camera shot numbersAdditional InformationKeyboard shortcuts for camera shotEdit Camera Shot informationInsert a recording break
Available for: Adobe Story Plus
Cut lines let you enter shots on a script and assign them to cameras.
Now you can add the following types of cut lines in a script:
1. Camera Shot: You can add a camera shot in a script along with a solid or dashed line. This information helps studio personnel identify andprepare for changes to camera, camera position, or effects at the specified point in the scene.
2. Video Tape: This break gives information of any videotape to play in between two scenes.
3. Recording Break: Insert a recording break to indicate a break such as a tea break or tape stop.
Insert a camera shot
Available for: Adobe Story Plus
1. Place the cursor where you want to insert a cut line.
2. Select Production > Camera Shot.
The Camera Shot dialog
70
To the top
To the top
3. Select the appropriate shot type.
Shot Line: In the script, a cut mark (cut line) appears at the cursor location and extends as a shot line toward the page margin. ShotInformation is displayed at the end of the shot line. If you do not want Adobe Story to assign a shot number, deselect Shot Number.Enter information for visual effects (Vision FX), camera number (Camera), camera position/location (Position), and description of theshot in the respective options.
As directed: Use this option it is for the Director to decide later how the shot should proceed. When you choose this option, AdobeStory adds the text As Directed in the camera field.
Shot Development: Use this option when you want to change the camera and shot information in the middle of a dialogue. Theoptions for effects and camera position are disabled when you choose this option. For example, you want the camera to zoom out ofthe object when the dialogue is being spoken. Enter the camera number and a description of the shot in the respective options.
Camera Reposition: Use this option when you want to change the camera position in the middle of a shot. Enter the camera numberand description after you select the option.
Isolated shot: When a camera is idle (not filming a scene in the script), the director or camera operator sometimes shoot somethingspontaneously as backup/ interesting alternative. Such a shot is an isolated shot. Isolated shots are prefixed with ISO in description. Ingeneral camera operators tend to film something random when their camera is not required, such as in between two shots.
Pickup Shot: A pick-up shot is a relatively minor shot filmed after the main footage is already shot. A pick-up shot has a dotted line.Pick-up shots do not get numbered. Pick-up shots are prefixed with PICKUP in description.
4. Select Solid Line or Dashed Line as Line Style.
5. Apply a Sub Shot, if required.
A scene shot in one go is called the first pass. If the director wants to move the cameras and shoot the scene again, the scene is called asecond pass. This second pass needs a camera script. The only way to put the second pass on the script again is to put sub shots. Subshots are numbered by using an alphabetic suffix with the previous shot’s number. If the previous shot’s number is 203, the sub shots arenumbered such as 203a, 203b, and 203c.
Story lists details of cameras used in the scene on the upper left of the script page beside the scene heading. Details include the number andposition of the camera used for each shot in a sorted manner. If you make any camera-related change for any shot, Story updates the list atruntime to reflect the changes.
Manage camera shot numbers
When you assign camera shot numbers, numbers are sequentially assigned to the camera shots in a script. You can choose to reset thecamera shot numbering to 1 for every page or every scene.
1. In the Authoring view, select Production > Manage Camera Shot Numbers.2. Select Assign Camera Shot Numbers. 3. As necessary, choose one of the following:
Reset Numbering On New Page: Story resets the camera shot number to 1 on every new page.Reset Numbering On New Scene: Story resets the camera shot number to 1 with start of every new scene.Do Not Reset Numbering: Story does not reset camera shot numbering on new pages or new scenes.
4. If you already have camera shot numbers in the selected script that you want to retain, select Keep Existing Camera Shot Numbers. Whenyou select this option, the present camera shot numbers are left undisturbed even when you insert new camera shots. The new camerashots are numbered alphabetically and take the previous existing camera shot's number as a prefix. For example, if you insert two camerashots following camera shot number 3, they are numbered as 3A and 3B.
Additional Information
Available for: Adobe Story Plus
71
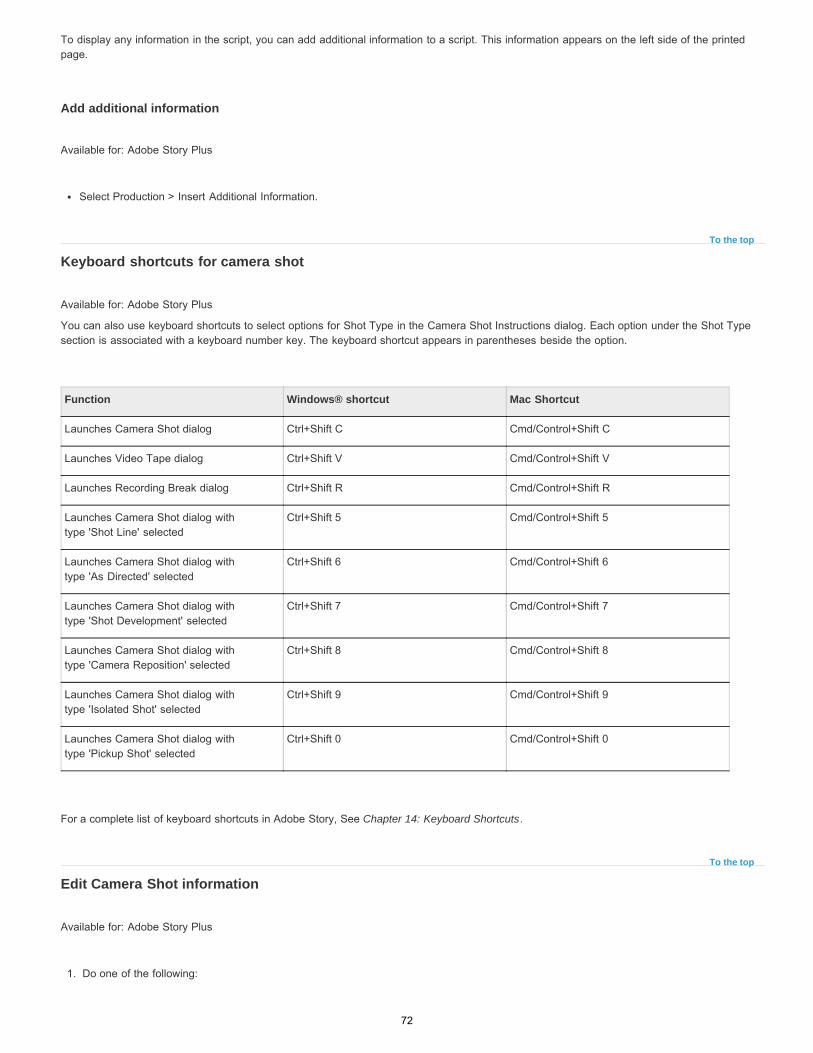
To the top
To the top
To display any information in the script, you can add additional information to a script. This information appears on the left side of the printedpage.
Add additional information
Available for: Adobe Story Plus
Select Production > Insert Additional Information.
Keyboard shortcuts for camera shot
Available for: Adobe Story Plus
You can also use keyboard shortcuts to select options for Shot Type in the Camera Shot Instructions dialog. Each option under the Shot Typesection is associated with a keyboard number key. The keyboard shortcut appears in parentheses beside the option.
For a complete list of keyboard shortcuts in Adobe Story, See Chapter 14: Keyboard Shortcuts.
Edit Camera Shot information
Available for: Adobe Story Plus
1. Do one of the following:
Function Windows® shortcut Mac Shortcut
Launches Camera Shot dialog Ctrl+Shift C Cmd/Control+Shift C
Launches Video Tape dialog Ctrl+Shift V Cmd/Control+Shift V
Launches Recording Break dialog Ctrl+Shift R Cmd/Control+Shift R
Launches Camera Shot dialog withtype 'Shot Line' selected
Ctrl+Shift 5 Cmd/Control+Shift 5
Launches Camera Shot dialog withtype 'As Directed' selected
Ctrl+Shift 6 Cmd/Control+Shift 6
Launches Camera Shot dialog withtype 'Shot Development' selected
Ctrl+Shift 7 Cmd/Control+Shift 7
Launches Camera Shot dialog withtype 'Camera Reposition' selected
Ctrl+Shift 8 Cmd/Control+Shift 8
Launches Camera Shot dialog withtype 'Isolated Shot' selected
Ctrl+Shift 9 Cmd/Control+Shift 9
Launches Camera Shot dialog withtype 'Pickup Shot' selected
Ctrl+Shift 0 Cmd/Control+Shift 0
72
Twitter™ and Facebook posts are not covered under the terms of Creative Commons.
Legal Notices | Online Privacy Policy
To the top
Double-click the cut mark of the cut line in the script.
Click the cut line on the left side (where the shot info is displayed).
2. In the dialog that appears, edit the information.
Insert a recording break
Available for: Adobe Story Plus
1. Place your cursor anywhere in the line after which you want to add the break/tape stop.
2. Select Production > Recording Break.
3. In the Recording Break dialog, enter recording details.
73
Deleting scripts
Twitter™ and Facebook posts are not covered under the terms of Creative Commons.
To the top
Note:
To the top
To the top
Delete scriptsDelete scripts permanentlyRestore deleted scripts
Delete scripts
When you delete a script, the script is moved to the Deleted section. Delete the script from the Deleted section to permanently delete it fromAdobe Story.
In the Projects view, do one of the following:
Select the script, and click Delete in the toolbar.
Click the arrow to the left of the script, and select Delete from the menu.
You cannot delete a script that is open in the Authoring view.
Delete scripts permanently
1. In the Projects view, click Deleted in the left panel.
2. Select the script that you want to delete permanently.
3. Click the arrow next to the script, and select Delete.
Restore deleted scripts
You can restore scripts in the Deleted section to their original project or to other existing projects.
If you want to restore your script to a project that you have deleted, create a project with that name before you restore the script.
1. In the Projects view, click Deleted in the left panel.
2. Select the script that you want to restore.
3. Click the arrow next to the script.
4. Select Restore To Project, and select the project to which you want to restore the script.
74
Disable spell check
Twitter™ and Facebook posts are not covered under the terms of Creative Commons.
Legal Notices | Online Privacy Policy
To the top
Disable spell check
You can disable the Spell Check feature to prevent Adobe Story from identifying incorrectly spelled words within various script elements. Forexample, disable the feature to prevent it from interfering with your typing when you type a dialog in two different languages. The Spell Checkfeature is enabled by default.
Disable spell check
Deselect the Spell Check option from the View menu: View > Spell Check.
75
Editing scripts
To the top
Note:
To the top
Note:
To the top
Insert title pageAdd header and footerAdd a different header and footer for the first pageEdit header and footerAdd page numbersCustomize header or footer for title pageEnter the Script On-Air TimeEnter the Opening Title, Closing Title, and the Part Break DurationFind textReplace textCheck spellingCheck SynonymsImport as a version
Insert title page
A title page is automatically inserted when you create a script in Adobe Story. You can insert title pages for scripts that you have imported intoAdobe Story, or for scripts that do not have a title page.
Title pages are not imported when importing scripts.
1. Select Production > Insert Title Page.
2. Replace placeholder text in the page with the relevant details.
You can remove a title page in a script using Production > Remove Title Page.
Add header and footer
Beginning the April 2014 release, Adobe Story supports multiple lines in the document header and footer. See this Help article.
1. Select Production > Modify Header/Footer.
2. Choose options from the three fields in the order in which you want them to appear. The following options are available:
Document Name
Document Author
Page Number
Number Of Pages.
Program Name (as specified in the Production Information dialog)
Series Name (as specified in the Production Information dialog)
Add a different header and footer for the first page
76
To the top
To the top
To the top
To the top
You can add header and footer applicable for the first page of a script, which is different from the header and footer for the rest of the script.
1. Go to the first page of the script.
2. Select Production > Modify Header or Production > Modify Footer.
3. Select Apply A Different Header On The First Page Of The Document.
4. Choose options from the three fields in the order in which you want them to appear. The following options are available:
Document Name
Document Author
Page Number
Number Of Pages.
Edit header and footer
To edit the content of the header/footer, select the content and edit it. The changes are reflected in the header/footer of all the pages. Changes tothe header/footer of the title page are not reflected across other pages if you selected “Insert A Different Header On The First Page Of TheDocument” when inserting the header/footer.
Add page numbers
1. Select Production > Modify Header/Footer.
2. In the Modify Header dialog, select Page Number from a menu. The page number is added at the corresponding location in the header.
Customize header or footer for title page
1. Select Production > Modify Header/Footer.
2. If you want the content of the header or footer to be different in the title page, check the option Apply A Different <Header/Footer> On TheFirst Page Of The Document.
note: Alternatively, click the title page and select Production > Modify Header/Footer to specify a different header/footer for the first page.
3. Click OK.
Enter the Script On-Air Time
Available for: All Story Customers
77
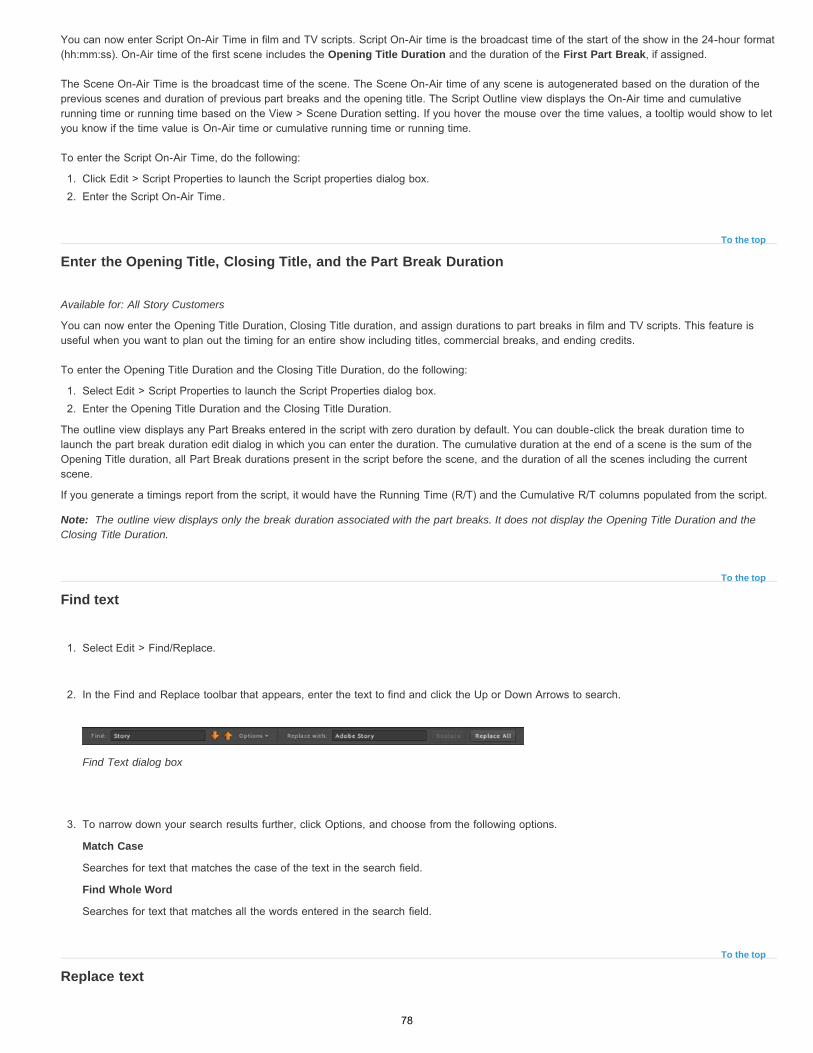
To the top
Note:
To the top
To the top
You can now enter Script On-Air Time in film and TV scripts. Script On-Air time is the broadcast time of the start of the show in the 24-hour format(hh:mm:ss). On-Air time of the first scene includes the Opening Title Duration and the duration of the First Part Break, if assigned.
The Scene On-Air Time is the broadcast time of the scene. The Scene On-Air time of any scene is autogenerated based on the duration of theprevious scenes and duration of previous part breaks and the opening title. The Script Outline view displays the On-Air time and cumulativerunning time or running time based on the View > Scene Duration setting. If you hover the mouse over the time values, a tooltip would show to letyou know if the time value is On-Air time or cumulative running time or running time.
To enter the Script On-Air Time, do the following:
1. Click Edit > Script Properties to launch the Script properties dialog box.2. Enter the Script On-Air Time.
Enter the Opening Title, Closing Title, and the Part Break Duration
Available for: All Story Customers
You can now enter the Opening Title Duration, Closing Title duration, and assign durations to part breaks in film and TV scripts. This feature isuseful when you want to plan out the timing for an entire show including titles, commercial breaks, and ending credits.
To enter the Opening Title Duration and the Closing Title Duration, do the following:
1. Select Edit > Script Properties to launch the Script Properties dialog box.2. Enter the Opening Title Duration and the Closing Title Duration.
The outline view displays any Part Breaks entered in the script with zero duration by default. You can double-click the break duration time tolaunch the part break duration edit dialog in which you can enter the duration. The cumulative duration at the end of a scene is the sum of theOpening Title duration, all Part Break durations present in the script before the scene, and the duration of all the scenes including the currentscene.
If you generate a timings report from the script, it would have the Running Time (R/T) and the Cumulative R/T columns populated from the script.
The outline view displays only the break duration associated with the part breaks. It does not display the Opening Title Duration and theClosing Title Duration.
Find text
1. Select Edit > Find/Replace.
2. In the Find and Replace toolbar that appears, enter the text to find and click the Up or Down Arrows to search.
Find Text dialog box
3. To narrow down your search results further, click Options, and choose from the following options.
Match Case
Searches for text that matches the case of the text in the search field.
Find Whole Word
Searches for text that matches all the words entered in the search field.
Replace text
78
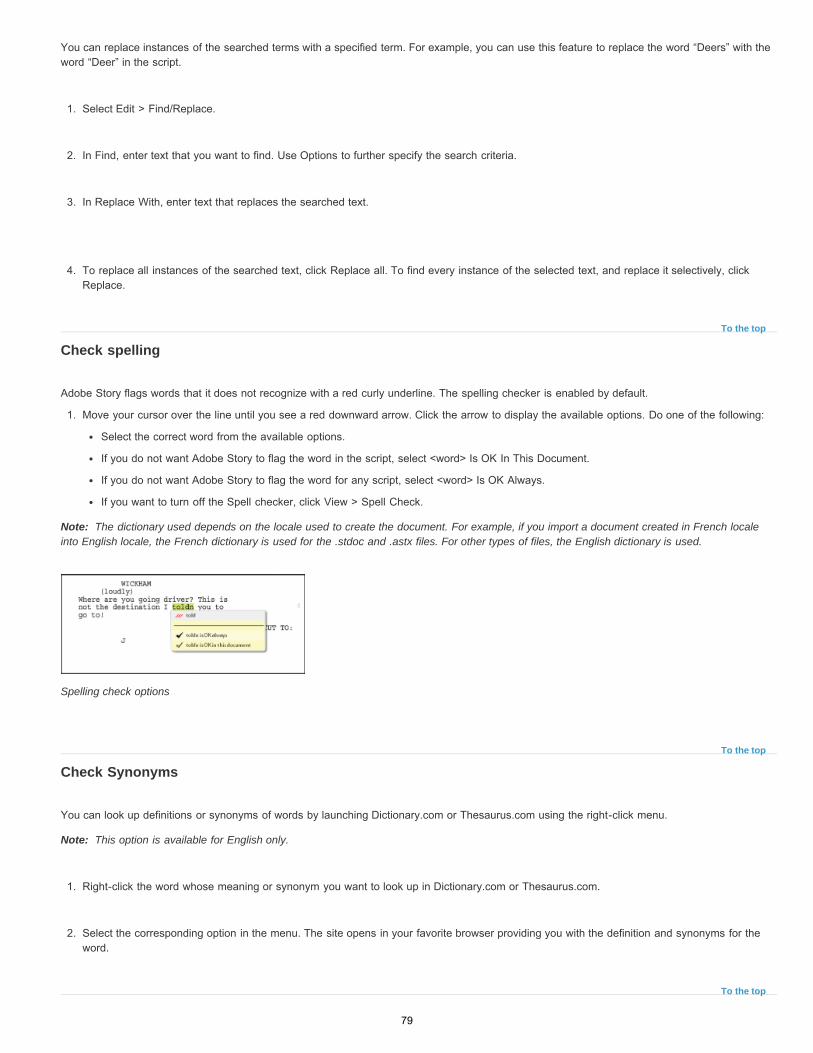
To the top
Note:
To the top
Note:
To the top
You can replace instances of the searched terms with a specified term. For example, you can use this feature to replace the word “Deers” with theword “Deer” in the script.
1. Select Edit > Find/Replace.
2. In Find, enter text that you want to find. Use Options to further specify the search criteria.
3. In Replace With, enter text that replaces the searched text.
4. To replace all instances of the searched text, click Replace all. To find every instance of the selected text, and replace it selectively, clickReplace.
Check spelling
Adobe Story flags words that it does not recognize with a red curly underline. The spelling checker is enabled by default.
1. Move your cursor over the line until you see a red downward arrow. Click the arrow to display the available options. Do one of the following:
Select the correct word from the available options.
If you do not want Adobe Story to flag the word in the script, select <word> Is OK In This Document.
If you do not want Adobe Story to flag the word for any script, select <word> Is OK Always.
If you want to turn off the Spell checker, click View > Spell Check.
The dictionary used depends on the locale used to create the document. For example, if you import a document created in French localeinto English locale, the French dictionary is used for the .stdoc and .astx files. For other types of files, the English dictionary is used.
Spelling check options
Check Synonyms
You can look up definitions or synonyms of words by launching Dictionary.com or Thesaurus.com using the right-click menu.
This option is available for English only.
1. Right-click the word whose meaning or synonym you want to look up in Dictionary.com or Thesaurus.com.
2. Select the corresponding option in the menu. The site opens in your favorite browser providing you with the definition and synonyms for theword.
79
Twitter™ and Facebook posts are not covered under the terms of Creative Commons.
Legal Notices | Online Privacy Policy
Import as a version
When you edit a copy of a script outside Adobe Story, such as with MS® Word, you can import the document as the latest version of the script.This obviates the need to manually incorporate the changes.
For screenplays, film scripts, and TV scripts, you can import a script as the latest version of a script. After the import, the state of the documentbefore the import becomes the previous version of the document. You can import the following document types: TXT, PDF, DOC, DOCX, and RTF.
Import a file as current version of a document
1. In the authoring view, select File > Import > As New Version.
2. Navigate to a supported file type and select it. You can select a script in TXT, PDF, DOC, DOCX, or RTF format. The imported file becomesthe latest version of the document. The document state before the import is saved as the previous version of the document.
80
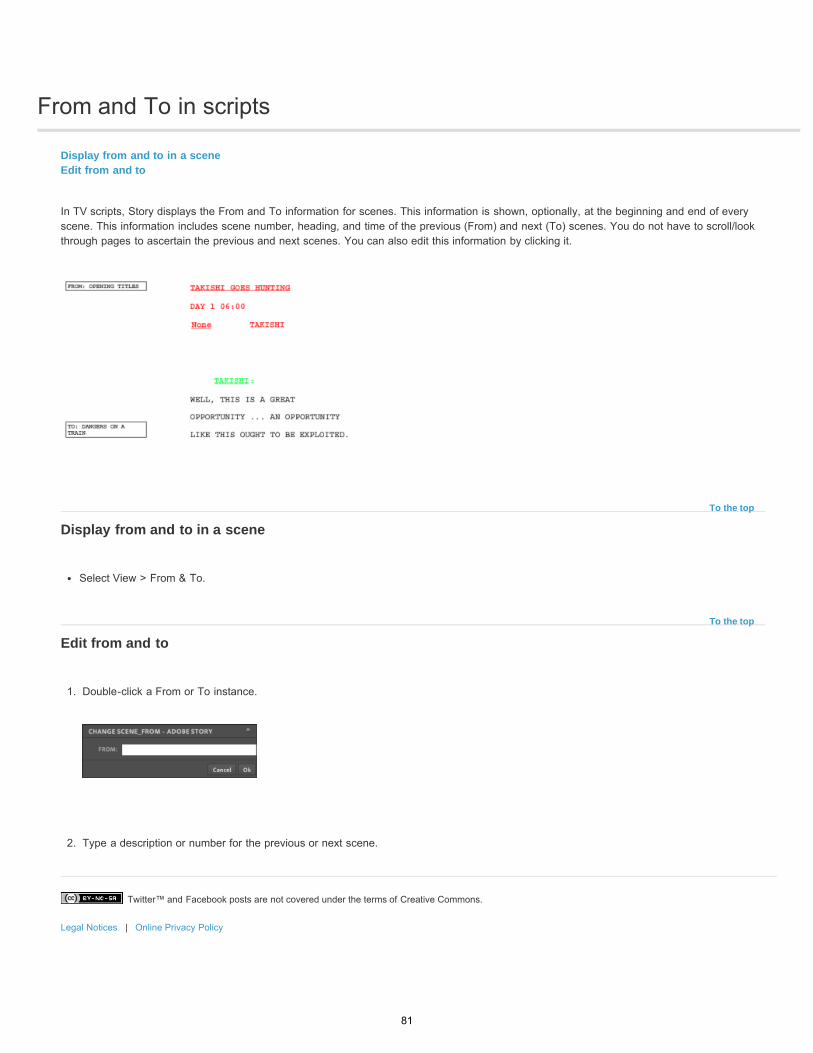
From and To in scripts
Twitter™ and Facebook posts are not covered under the terms of Creative Commons.
Legal Notices | Online Privacy Policy
To the top
To the top
Display from and to in a sceneEdit from and to
In TV scripts, Story displays the From and To information for scenes. This information is shown, optionally, at the beginning and end of everyscene. This information includes scene number, heading, and time of the previous (From) and next (To) scenes. You do not have to scroll/lookthrough pages to ascertain the previous and next scenes. You can also edit this information by clicking it.
Display from and to in a scene
Select View > From & To.
Edit from and to
1. Double-click a From or To instance.
2. Type a description or number for the previous or next scene.
81
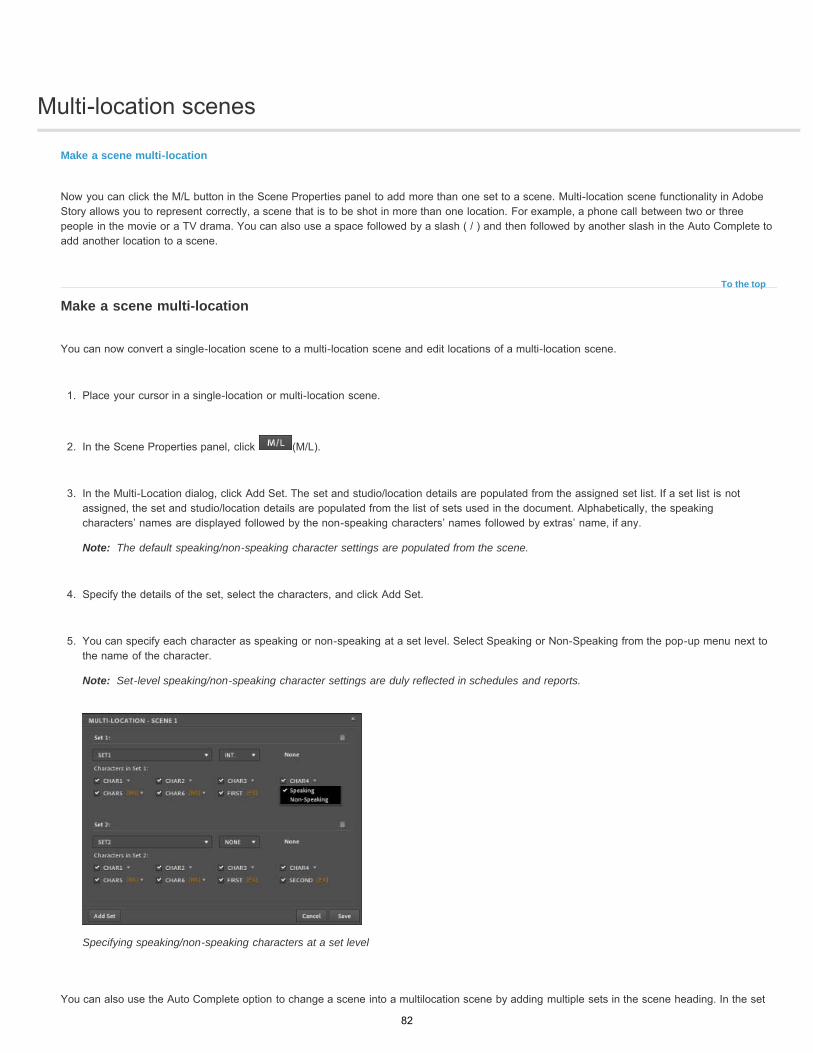
Multi-location scenes
To the top
Note:
Note:
Make a scene multi-location
Now you can click the M/L button in the Scene Properties panel to add more than one set to a scene. Multi-location scene functionality in AdobeStory allows you to represent correctly, a scene that is to be shot in more than one location. For example, a phone call between two or threepeople in the movie or a TV drama. You can also use a space followed by a slash ( / ) and then followed by another slash in the Auto Complete toadd another location to a scene.
Make a scene multi-location
You can now convert a single-location scene to a multi-location scene and edit locations of a multi-location scene.
1. Place your cursor in a single-location or multi-location scene.
2. In the Scene Properties panel, click (M/L).
3. In the Multi-Location dialog, click Add Set. The set and studio/location details are populated from the assigned set list. If a set list is notassigned, the set and studio/location details are populated from the list of sets used in the document. Alphabetically, the speakingcharacters’ names are displayed followed by the non-speaking characters’ names followed by extras’ name, if any.
The default speaking/non-speaking character settings are populated from the scene.
4. Specify the details of the set, select the characters, and click Add Set.
5. You can specify each character as speaking or non-speaking at a set level. Select Speaking or Non-Speaking from the pop-up menu next tothe name of the character.
Set-level speaking/non-speaking character settings are duly reflected in schedules and reports.
Specifying speaking/non-speaking characters at a set level
You can also use the Auto Complete option to change a scene into a multilocation scene by adding multiple sets in the scene heading. In the set
82

Twitter™ and Facebook posts are not covered under the terms of Creative Commons.
Legal Notices | Online Privacy Policy
field, add (/) slash and select a set from the displayed options. The displayed set list is populated from the relevant set list.
83

Multicolumn scripts
Note:
To the top
Note:
To the top
Create a multicolumn scriptEdit table in multicolumn scriptsUsing images in multicolumn scriptsCopy table from Microsoft WordExport multicolumn scripts
In a multicolumn script, the parts of a script are divided across various columns. For example, you can create a script with separate columns forScene Number, Scene, and Audio.
Track changes are disabled for new multicolumn scripts. For multicolumn scripts that you previously created with track changes, you canaccept/reject changes. New changes to these scripts are not tracked.
Ensure that you save your multicolumn scripts in the STDOC format using File >Save To Disk. The formatting of a multicolumn script is lostwhen it is imported as an ASTX file.
Create a multicolumn script
1. Select File > New.
2. In the Create New Document dialog, select Multicolumn Script from the Type options.
3. Enter a title for the multicolumn script, and click Create.
A multicolumn script with a title page is created. By default, a three column table is created in the multicolumn script. The columns in thetable correspond to Shot Number, Visual, and Audio info.
4. To navigate among the cells in the table, press Tab.
The General element is used for all content in a multicolumn script.
Edit table in multicolumn scripts
Options to edit multicolumn script table. A. Option to resize column B. Button providing options to edit rows or columns C. Insert row button D. Insert column button
Edit a column title
84
Note:
To the top
Note:
1. Select the column.
2. Click the arrow icon on the header.
3. Select Edit Header.
Add rows and columns
1. To add columns, select the column adjacent to which you want to insert other columns. Do one of the following:
To insert a single column, click the “+” icon on the column header lines.
To insert multiple columns, click the arrow icon on the column header. Select Insert Columns.
2. To add rows, select the row, and click the arrow icon corresponding to the row. Select Insert Rows.
Copy contents from rows and columns
1. Select the row or column whose contents you want to copy.
2. Click the arrow icon corresponding to the row or column.
3. To copy contents, select Cut/Copy Column, or Cut/Copy Row.
4. Select the row or column into which you want to copy content, click the arrow icon, and select Paste.
You can use the standard keyboard shortcuts Ctrl+x/Cmd+x, Ctrl+c/Cmd+c, and Ctrl+v/Cmd+v for the cut, copy, and pasteoperations.
Delete contents of a table
To delete the contents of a row or column without deleting the row or column itself, select the row or column. Click the arrow icon, and selectClear Contents. Alternatively, press Delete on your keyboard.
To delete a row or column, select the row or column. Click the corresponding arrow icon, and select Delete Row/Delete Column.
Using images in multicolumn scripts
Available for: Adobe Story Plus
When you insert an image into a table cell, the image is resized to fit the dimensions of the cell. If your image is bigger than the cell dimensions,drag the boundaries of the cell to resize the cell. The image expands to fit the new dimensions of the cell.
You can copy an image from one cell to another and across documents. Adobe Story supports images in the following formats: JPEG, GIF, andPNG. When you save the multicolumn script as an STDOC file (File > Save To Disk), and reimport, the images are retained.
In the desktop application, you can insert images in both the online and offline modes. The images added in the offline mode are synced to
85
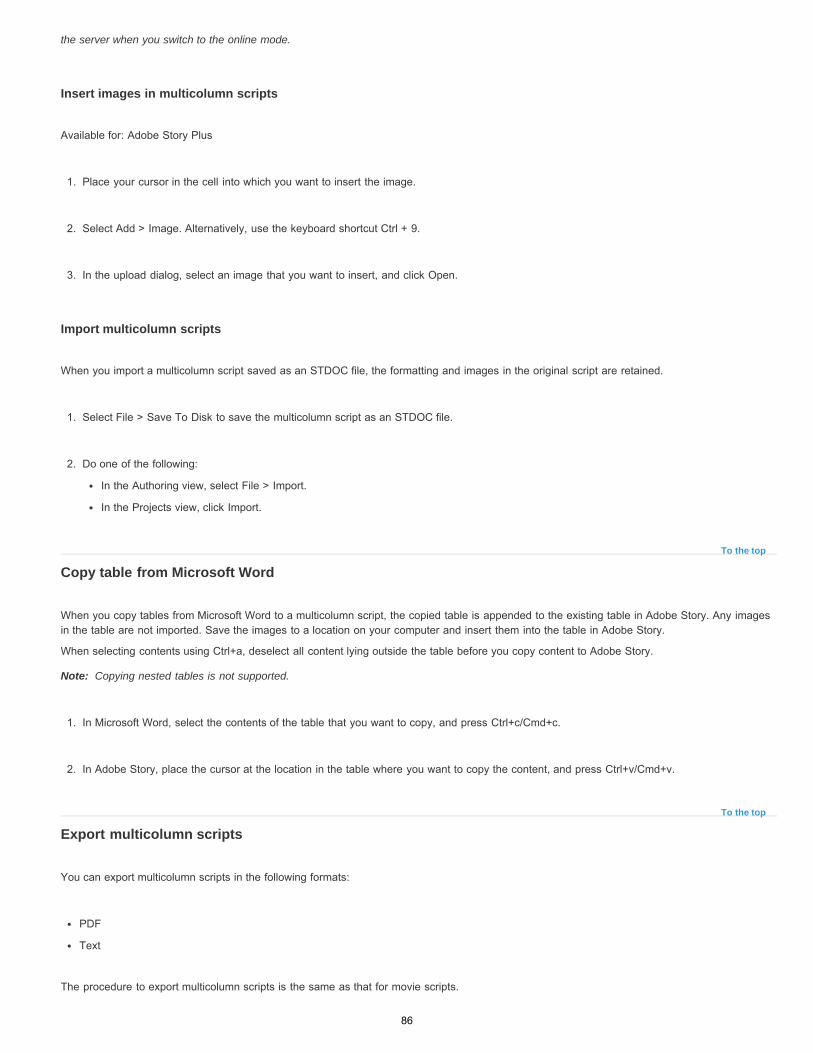
To the top
Note:
To the top
the server when you switch to the online mode.
Insert images in multicolumn scripts
Available for: Adobe Story Plus
1. Place your cursor in the cell into which you want to insert the image.
2. Select Add > Image. Alternatively, use the keyboard shortcut Ctrl + 9.
3. In the upload dialog, select an image that you want to insert, and click Open.
Import multicolumn scripts
When you import a multicolumn script saved as an STDOC file, the formatting and images in the original script are retained.
1. Select File > Save To Disk to save the multicolumn script as an STDOC file.
2. Do one of the following:
In the Authoring view, select File > Import.
In the Projects view, click Import.
Copy table from Microsoft Word
When you copy tables from Microsoft Word to a multicolumn script, the copied table is appended to the existing table in Adobe Story. Any imagesin the table are not imported. Save the images to a location on your computer and insert them into the table in Adobe Story.
When selecting contents using Ctrl+a, deselect all content lying outside the table before you copy content to Adobe Story.
Copying nested tables is not supported.
1. In Microsoft Word, select the contents of the table that you want to copy, and press Ctrl+c/Cmd+c.
2. In Adobe Story, place the cursor at the location in the table where you want to copy the content, and press Ctrl+v/Cmd+v.
Export multicolumn scripts
You can export multicolumn scripts in the following formats:
Text
The procedure to export multicolumn scripts is the same as that for movie scripts.
86

Twitter™ and Facebook posts are not covered under the terms of Creative Commons.
Legal Notices | Online Privacy Policy
Adobe also recommends
87
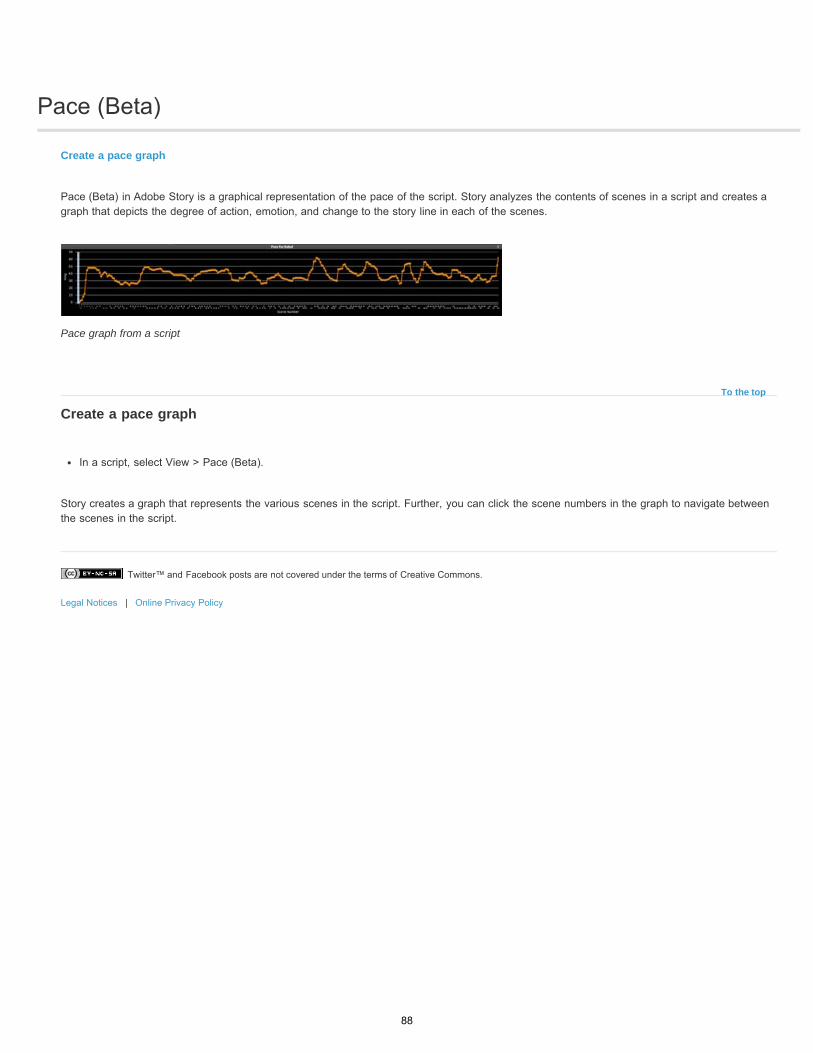
Pace (Beta)
Twitter™ and Facebook posts are not covered under the terms of Creative Commons.
Legal Notices | Online Privacy Policy
To the top
Create a pace graph
Pace (Beta) in Adobe Story is a graphical representation of the pace of the script. Story analyzes the contents of scenes in a script and creates agraph that depicts the degree of action, emotion, and change to the story line in each of the scenes.
Pace graph from a script
Create a pace graph
In a script, select View > Pace (Beta).
Story creates a graph that represents the various scenes in the script. Further, you can click the scene numbers in the graph to navigate betweenthe scenes in the script.
88
Print scripts
Twitter™ and Facebook posts are not covered under the terms of Creative Commons.
Legal Notices | Online Privacy Policy
1. Select File > Print.
2. In the Print dialog, select the following:
a. Paper size in which you want to print the script.
b. Number of pages to print. You can choose to print all pages, or specify a range of pages in the script that you want printed.
c. Select Print Only Changed Pages if you want to print only the pages that have changed since the Track Changes feature was turnedon. For example, if the page range selected for printing is 5-9 and pages 6-7 have changed since tracking was turned on, only pages6-7 are printed.
d. You can now print multiple non-contiguous scenes from a script. For example, you can select and print scenes 5, 8, 23, and 28.
e. Click OK.
f. In the Print dialog, choose from the available options to print the document.
89
Production information
To the top
To the top
Add production informationAdd series informationAssign series information to a projectSeries information and project properties in reports
Available for: Adobe Story Plus
Production information is metadata for a production and for each program of that production. For example, production is a name of a TV serial anda program in a production is an episode within a season of that TV serial. Production information is common for all the programs in a production.This information is used when production reports are created from one or more documents, such as from a script.
Add production information
Available for: Adobe Story Plus
1. Click the downward arrow icon next to the project’s name and select Production Information.
2. In the Production Information dialog, enter the following information and click Save:
a. Project Name
b. Director
c. Script Supervisor
3. Unit Manager
4. Stage Manager
5. Costume Manager
6. Make-up Manager
7. Lighting Director
Add series information
Available for: Adobe Story Plus
90
Twitter™ and Facebook posts are not covered under the terms of Creative Commons.
Legal Notices | Online Privacy Policy
To the top
To the top
1. Click the downward arrow icon next to the project’s name and select Production Information.
2. In the Production Information dialog, click Edit.
3. In the Series Information dialog, enter the following details:
a. Program name
b. Program ID
c. Series Number
d. Series Name
e. Season
Assign series information to a project
Available for: Adobe Story Plus
1. Click the downward arrow icon next to the project’s name and select Production Information.
2. In the Production Information dialog, select name of a program and click OK.
Series information and project properties in reports
Available for: Adobe Story Plus
The program information and project properties are displayed in the report headers. When you add production and program information for aproject, the report headers for the documents in that project display:
Program Name
Program ID
Director
Script supervisor
Unit Manager
Stage Manager
91
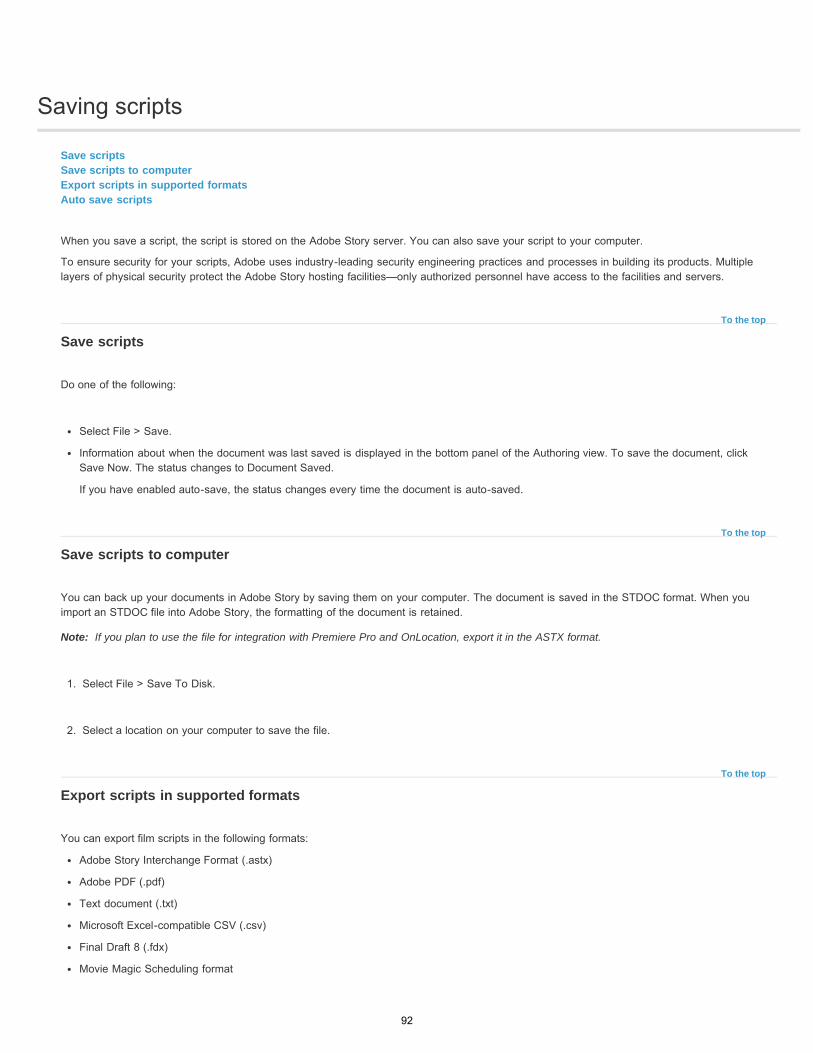
Saving scripts
To the top
To the top
Note:
To the top
Save scriptsSave scripts to computerExport scripts in supported formatsAuto save scripts
When you save a script, the script is stored on the Adobe Story server. You can also save your script to your computer.
To ensure security for your scripts, Adobe uses industry-leading security engineering practices and processes in building its products. Multiplelayers of physical security protect the Adobe Story hosting facilities—only authorized personnel have access to the facilities and servers.
Save scripts
Do one of the following:
Select File > Save.
Information about when the document was last saved is displayed in the bottom panel of the Authoring view. To save the document, clickSave Now. The status changes to Document Saved.
If you have enabled auto-save, the status changes every time the document is auto-saved.
Save scripts to computer
You can back up your documents in Adobe Story by saving them on your computer. The document is saved in the STDOC format. When youimport an STDOC file into Adobe Story, the formatting of the document is retained.
If you plan to use the file for integration with Premiere Pro and OnLocation, export it in the ASTX format.
1. Select File > Save To Disk.
2. Select a location on your computer to save the file.
Export scripts in supported formats
You can export film scripts in the following formats:
Adobe Story Interchange Format (.astx)
Adobe PDF (.pdf)
Text document (.txt)
Microsoft Excel-compatible CSV (.csv)
Final Draft 8 (.fdx)
Movie Magic Scheduling format
92
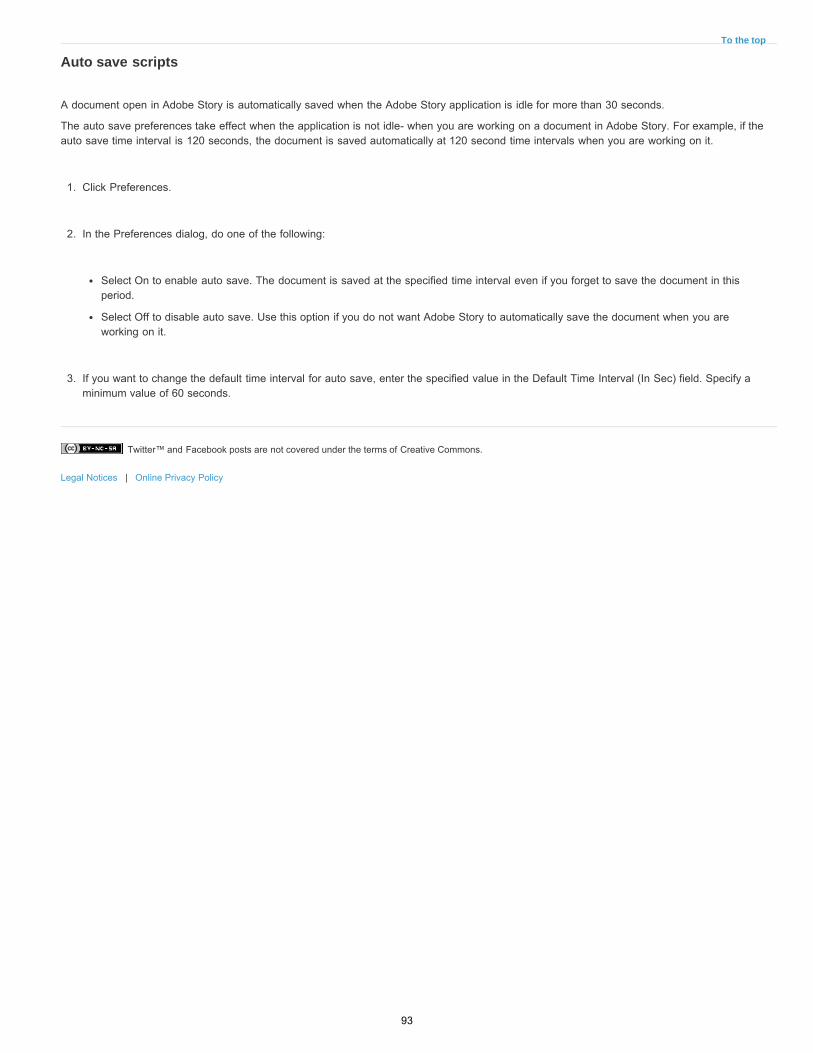
Twitter™ and Facebook posts are not covered under the terms of Creative Commons.
Legal Notices | Online Privacy Policy
To the top
Auto save scripts
A document open in Adobe Story is automatically saved when the Adobe Story application is idle for more than 30 seconds.
The auto save preferences take effect when the application is not idle- when you are working on a document in Adobe Story. For example, if theauto save time interval is 120 seconds, the document is saved automatically at 120 second time intervals when you are working on it.
1. Click Preferences.
2. In the Preferences dialog, do one of the following:
Select On to enable auto save. The document is saved at the specified time interval even if you forget to save the document in thisperiod.
Select Off to disable auto save. Use this option if you do not want Adobe Story to automatically save the document when you areworking on it.
3. If you want to change the default time interval for auto save, enter the specified value in the Default Time Interval (In Sec) field. Specify aminimum value of 60 seconds.
93
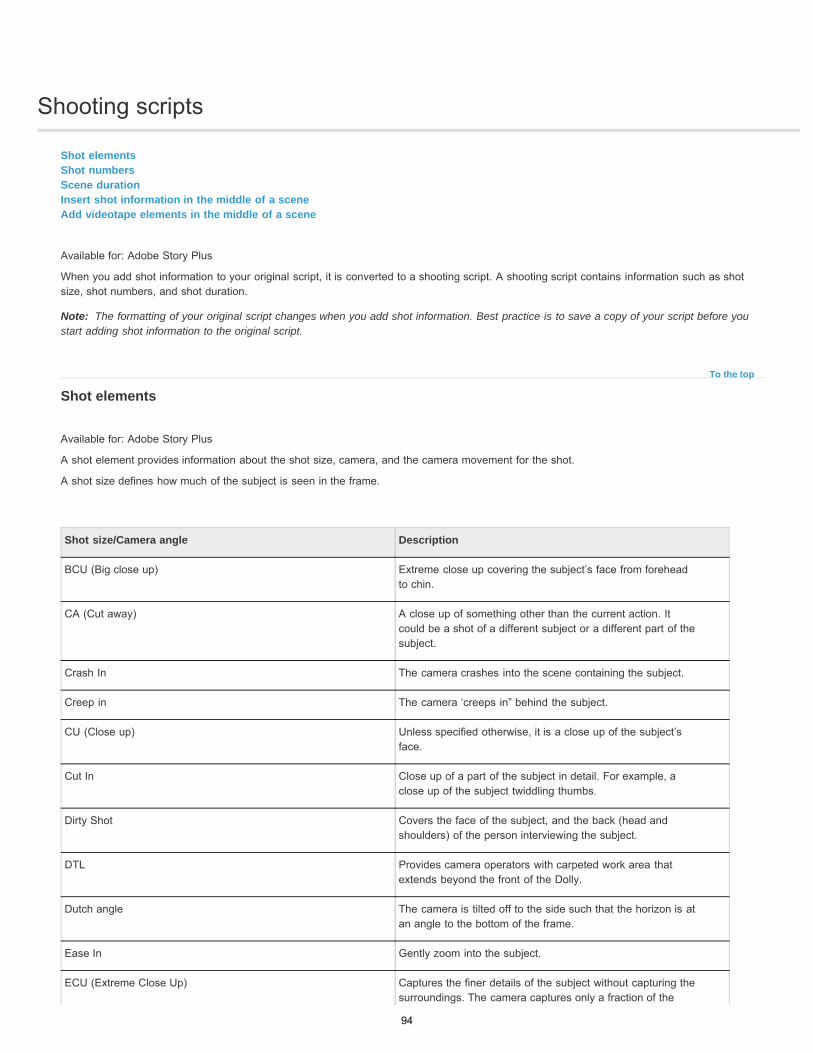
Shooting scripts
Note:
To the top
Shot elementsShot numbersScene durationInsert shot information in the middle of a sceneAdd videotape elements in the middle of a scene
Available for: Adobe Story Plus
When you add shot information to your original script, it is converted to a shooting script. A shooting script contains information such as shotsize, shot numbers, and shot duration.
The formatting of your original script changes when you add shot information. Best practice is to save a copy of your script before youstart adding shot information to the original script.
Shot elements
Available for: Adobe Story Plus
A shot element provides information about the shot size, camera, and the camera movement for the shot.
A shot size defines how much of the subject is seen in the frame.
Shot size/Camera angle Description
BCU (Big close up) Extreme close up covering the subject’s face from foreheadto chin.
CA (Cut away) A close up of something other than the current action. Itcould be a shot of a different subject or a different part of thesubject.
Crash In The camera crashes into the scene containing the subject.
Creep in The camera ‘creeps in” behind the subject.
CU (Close up) Unless specified otherwise, it is a close up of the subject’sface.
Cut In Close up of a part of the subject in detail. For example, aclose up of the subject twiddling thumbs.
Dirty Shot Covers the face of the subject, and the back (head andshoulders) of the person interviewing the subject.
DTL Provides camera operators with carpeted work area thatextends beyond the front of the Dolly.
Dutch angle The camera is tilted off to the side such that the horizon is atan angle to the bottom of the frame.
Ease In Gently zoom into the subject.
ECU (Extreme Close Up) Captures the finer details of the subject without capturing thesurroundings. The camera captures only a fraction of the
94
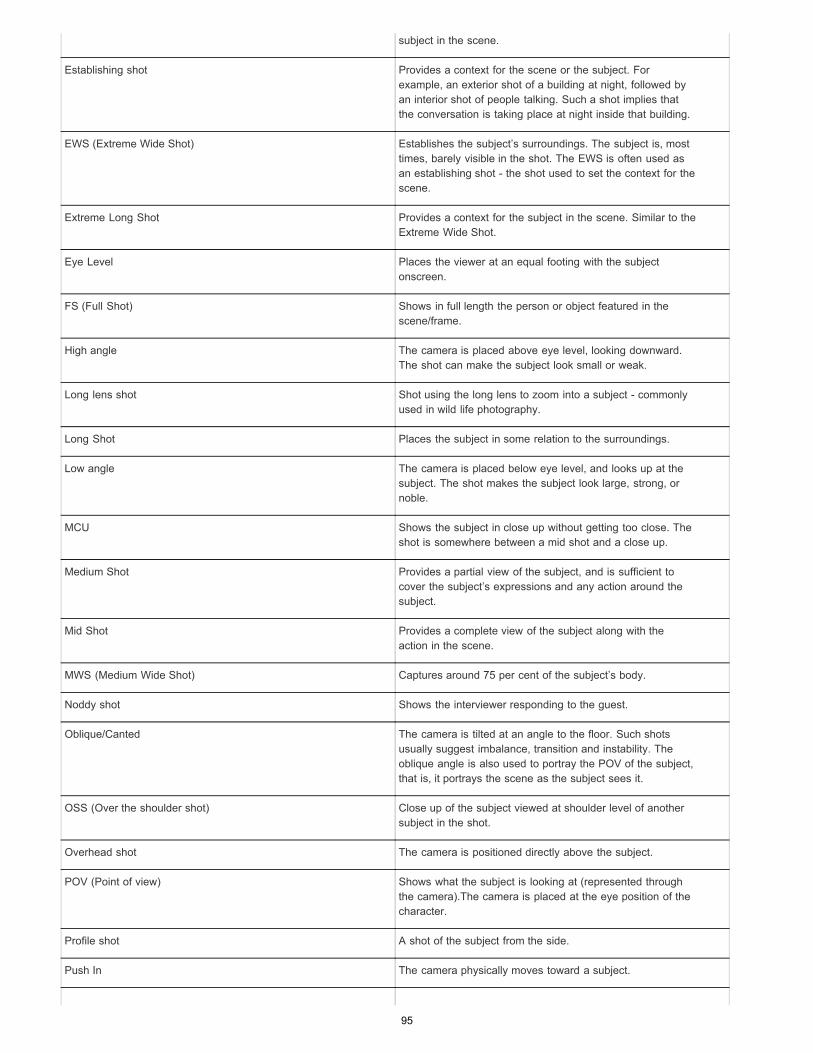
subject in the scene.
Establishing shot Provides a context for the scene or the subject. Forexample, an exterior shot of a building at night, followed byan interior shot of people talking. Such a shot implies thatthe conversation is taking place at night inside that building.
EWS (Extreme Wide Shot) Establishes the subject’s surroundings. The subject is, mosttimes, barely visible in the shot. The EWS is often used asan establishing shot - the shot used to set the context for thescene.
Extreme Long Shot Provides a context for the subject in the scene. Similar to theExtreme Wide Shot.
Eye Level Places the viewer at an equal footing with the subjectonscreen.
FS (Full Shot) Shows in full length the person or object featured in thescene/frame.
High angle The camera is placed above eye level, looking downward.The shot can make the subject look small or weak.
Long lens shot Shot using the long lens to zoom into a subject - commonlyused in wild life photography.
Long Shot Places the subject in some relation to the surroundings.
Low angle The camera is placed below eye level, and looks up at thesubject. The shot makes the subject look large, strong, ornoble.
MCU Shows the subject in close up without getting too close. Theshot is somewhere between a mid shot and a close up.
Medium Shot Provides a partial view of the subject, and is sufficient tocover the subject’s expressions and any action around thesubject.
Mid Shot Provides a complete view of the subject along with theaction in the scene.
MWS (Medium Wide Shot) Captures around 75 per cent of the subject’s body.
Noddy shot Shows the interviewer responding to the guest.
Oblique/Canted The camera is tilted at an angle to the floor. Such shotsusually suggest imbalance, transition and instability. Theoblique angle is also used to portray the POV of the subject,that is, it portrays the scene as the subject sees it.
OSS (Over the shoulder shot) Close up of the subject viewed at shoulder level of anothersubject in the shot.
Overhead shot The camera is positioned directly above the subject.
POV (Point of view) Shows what the subject is looking at (represented throughthe camera).The camera is placed at the eye position of thecharacter.
Profile shot A shot of the subject from the side.
Push In The camera physically moves toward a subject.
95
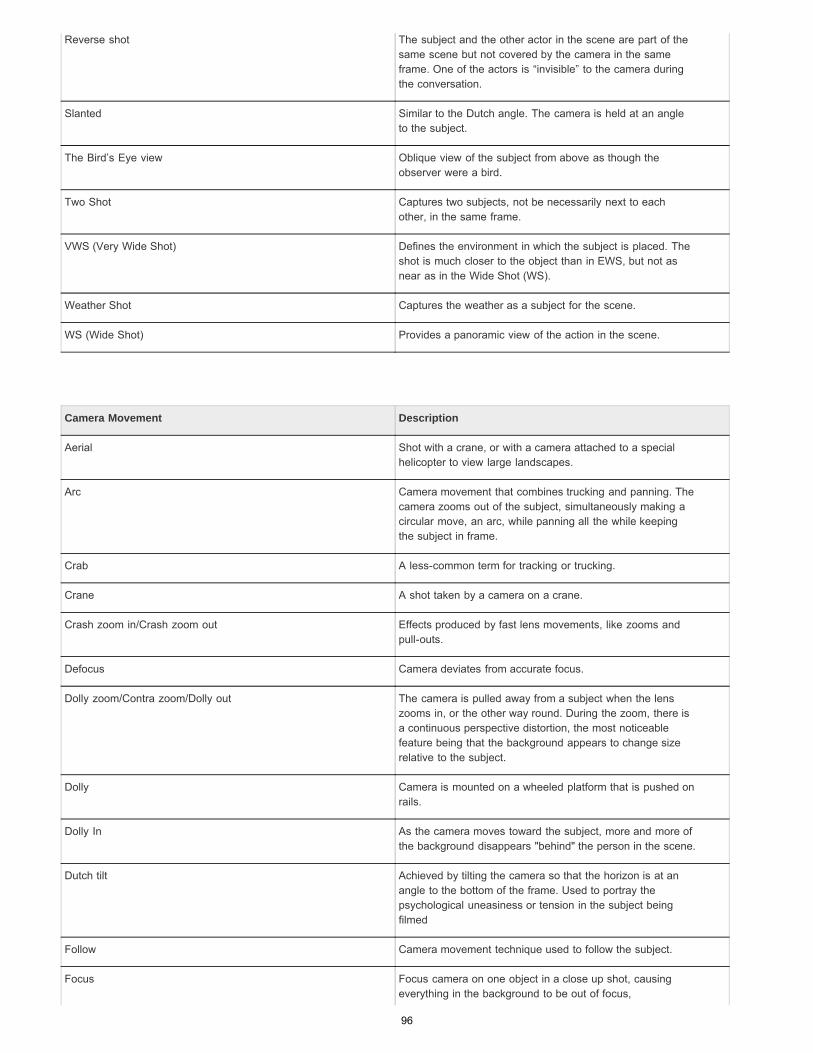
Reverse shot The subject and the other actor in the scene are part of thesame scene but not covered by the camera in the sameframe. One of the actors is “invisible” to the camera duringthe conversation.
Slanted Similar to the Dutch angle. The camera is held at an angleto the subject.
The Bird’s Eye view Oblique view of the subject from above as though theobserver were a bird.
Two Shot Captures two subjects, not be necessarily next to eachother, in the same frame.
VWS (Very Wide Shot) Defines the environment in which the subject is placed. Theshot is much closer to the object than in EWS, but not asnear as in the Wide Shot (WS).
Weather Shot Captures the weather as a subject for the scene.
WS (Wide Shot) Provides a panoramic view of the action in the scene.
Camera Movement Description
Aerial Shot with a crane, or with a camera attached to a specialhelicopter to view large landscapes.
Arc Camera movement that combines trucking and panning. Thecamera zooms out of the subject, simultaneously making acircular move, an arc, while panning all the while keepingthe subject in frame.
Crab A less-common term for tracking or trucking.
Crane A shot taken by a camera on a crane.
Crash zoom in/Crash zoom out Effects produced by fast lens movements, like zooms andpull-outs.
Defocus Camera deviates from accurate focus.
Dolly zoom/Contra zoom/Dolly out The camera is pulled away from a subject when the lenszooms in, or the other way round. During the zoom, there isa continuous perspective distortion, the most noticeablefeature being that the background appears to change sizerelative to the subject.
Dolly Camera is mounted on a wheeled platform that is pushed onrails.
Dolly In As the camera moves toward the subject, more and more ofthe background disappears "behind" the person in the scene.
Dutch tilt Achieved by tilting the camera so that the horizon is at anangle to the bottom of the frame. Used to portray thepsychological uneasiness or tension in the subject beingfilmed
Follow Camera movement technique used to follow the subject.
Focus Focus camera on one object in a close up shot, causingeverything in the background to be out of focus,
96
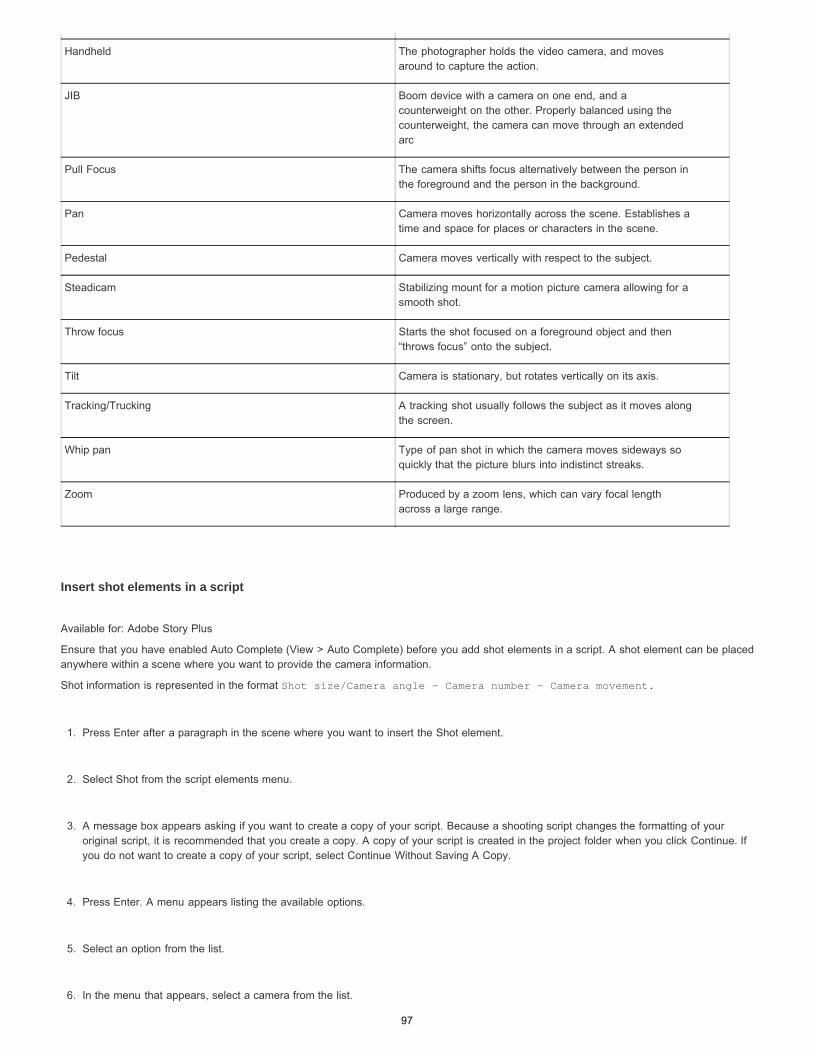
Insert shot elements in a script
Available for: Adobe Story Plus
Ensure that you have enabled Auto Complete (View > Auto Complete) before you add shot elements in a script. A shot element can be placedanywhere within a scene where you want to provide the camera information.
Shot information is represented in the format Shot size/Camera angle - Camera number - Camera movement.
1. Press Enter after a paragraph in the scene where you want to insert the Shot element.
2. Select Shot from the script elements menu.
3. A message box appears asking if you want to create a copy of your script. Because a shooting script changes the formatting of youroriginal script, it is recommended that you create a copy. A copy of your script is created in the project folder when you click Continue. Ifyou do not want to create a copy of your script, select Continue Without Saving A Copy.
4. Press Enter. A menu appears listing the available options.
5. Select an option from the list.
6. In the menu that appears, select a camera from the list.
Handheld The photographer holds the video camera, and movesaround to capture the action.
JIB Boom device with a camera on one end, and acounterweight on the other. Properly balanced using thecounterweight, the camera can move through an extendedarc
Pull Focus The camera shifts focus alternatively between the person inthe foreground and the person in the background.
Pan Camera moves horizontally across the scene. Establishes atime and space for places or characters in the scene.
Pedestal Camera moves vertically with respect to the subject.
Steadicam Stabilizing mount for a motion picture camera allowing for asmooth shot.
Throw focus Starts the shot focused on a foreground object and then“throws focus” onto the subject.
Tilt Camera is stationary, but rotates vertically on its axis.
Tracking/Trucking A tracking shot usually follows the subject as it moves alongthe screen.
Whip pan Type of pan shot in which the camera moves sideways soquickly that the picture blurs into indistinct streaks.
Zoom Produced by a zoom lens, which can vary focal lengthacross a large range.
97
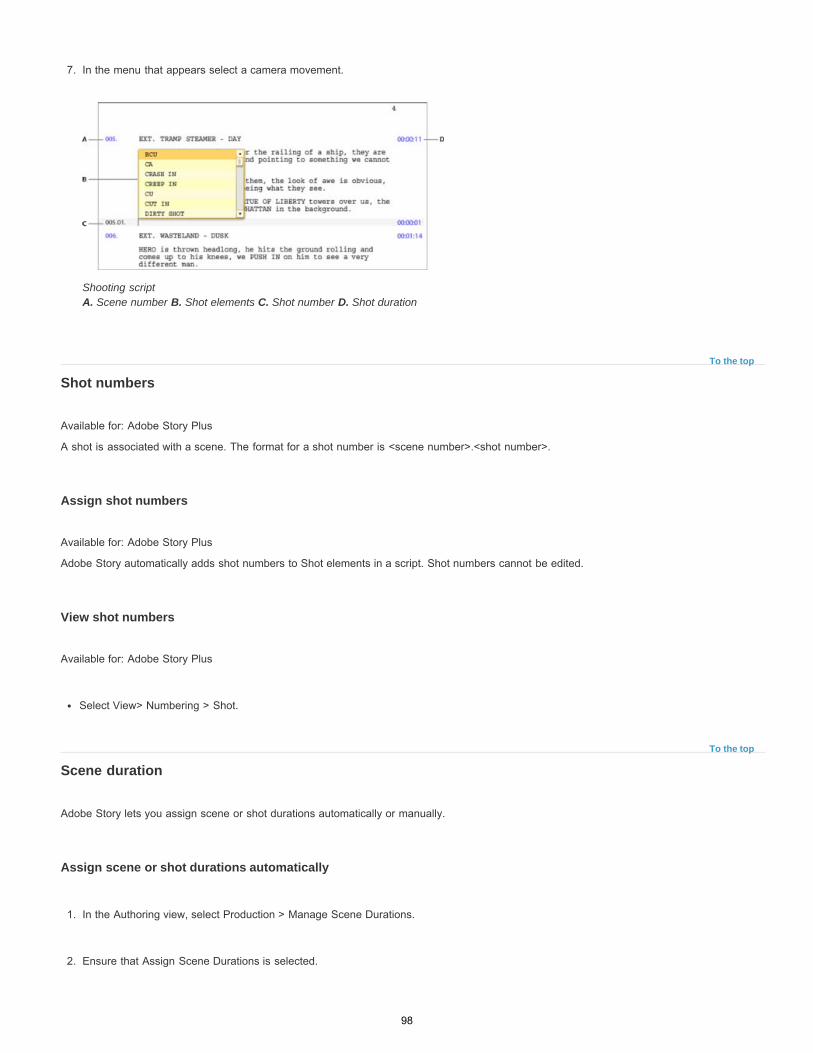
To the top
To the top
7. In the menu that appears select a camera movement.
Shooting script A. Scene number B. Shot elements C. Shot number D. Shot duration
Shot numbers
Available for: Adobe Story Plus
A shot is associated with a scene. The format for a shot number is <scene number>.<shot number>.
Assign shot numbers
Available for: Adobe Story Plus
Adobe Story automatically adds shot numbers to Shot elements in a script. Shot numbers cannot be edited.
View shot numbers
Available for: Adobe Story Plus
Select View> Numbering > Shot.
Scene duration
Adobe Story lets you assign scene or shot durations automatically or manually.
Assign scene or shot durations automatically
1. In the Authoring view, select Production > Manage Scene Durations.
2. Ensure that Assign Scene Durations is selected.
98
Note:
3. Click OK.
If you add a new scene or shot, repeat the procedure to update the duration.
Customize formula for calculating scene/shot durations
When you assign scene/shot durations automatically, Adobe Story determines the duration of a shot using the following assumptions:
A page contains 42 lines.
A page takes 60 seconds of running time of the movie.
You can customize the values according to your requirements when assigning shot/scene numbers automatically.
1. Select Production > Manage Scene Durations.
2. Ensure that Assign Scene Durations is selected.
3. Select Customize Formula To Auto Calculate Duration, and select the following:
a. In One Page Equals, enter the number of lines per page that you want Adobe Story to use when calculation scene/shot duration.
b. In One Page Equals, enter the time in seconds that a page in your movie translates to in terms of running time of the movie.
4. Click OK.
Overwrite manually assigned scene/shot durations
1. Select Production > Manage Scene Durations.
2. Ensure that Assign Scene Durations is selected.
3. Select Also Override Manually Assigned Scene Durations.
Edit shot durations manually
1. Click the shot duration whose time you want to modify.
2. In the Change Scene Durations dialog, select one of the following:
Assign custom duration
Select this option if you want to manually specify the duration for the shot. Enter the time, in the format HH:MM:SS, that the shot usesduring playback.
Assign auto calculated value
Select this option if you want Adobe Story to calculate the shot duration.
99
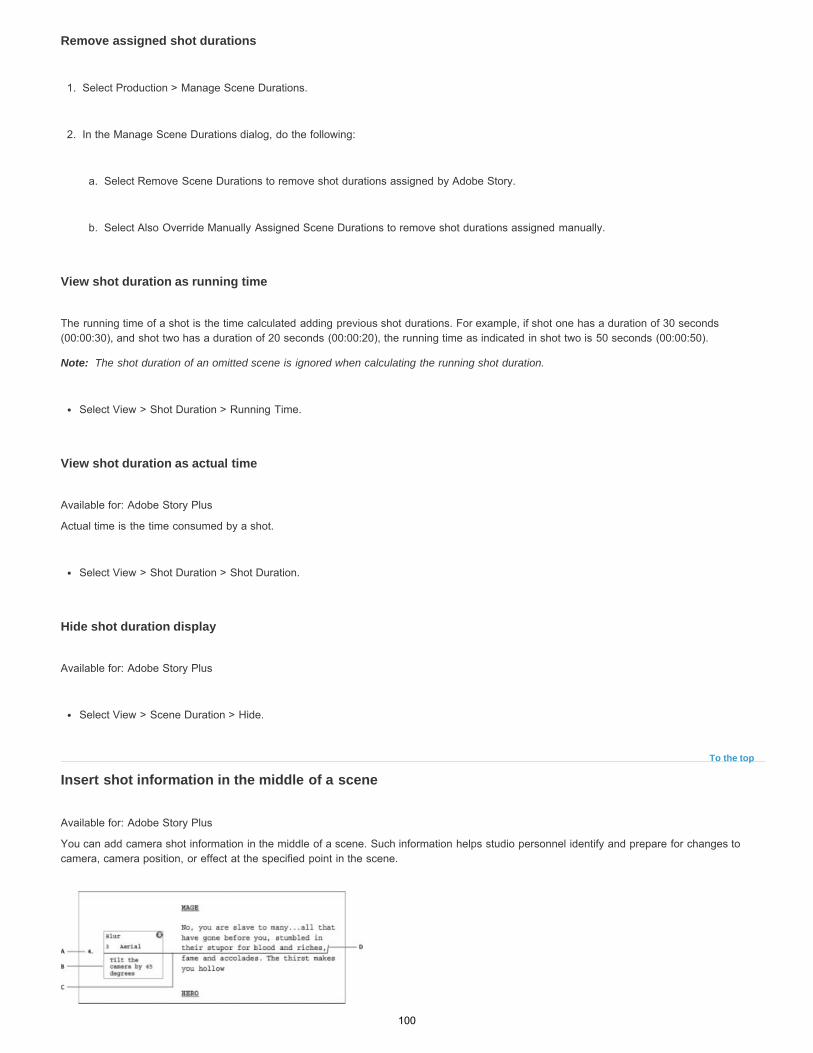
Note:
To the top
Remove assigned shot durations
1. Select Production > Manage Scene Durations.
2. In the Manage Scene Durations dialog, do the following:
a. Select Remove Scene Durations to remove shot durations assigned by Adobe Story.
b. Select Also Override Manually Assigned Scene Durations to remove shot durations assigned manually.
View shot duration as running time
The running time of a shot is the time calculated adding previous shot durations. For example, if shot one has a duration of 30 seconds(00:00:30), and shot two has a duration of 20 seconds (00:00:20), the running time as indicated in shot two is 50 seconds (00:00:50).
The shot duration of an omitted scene is ignored when calculating the running shot duration.
Select View > Shot Duration > Running Time.
View shot duration as actual time
Available for: Adobe Story Plus
Actual time is the time consumed by a shot.
Select View > Shot Duration > Shot Duration.
Hide shot duration display
Available for: Adobe Story Plus
Select View > Scene Duration > Hide.
Insert shot information in the middle of a scene
Available for: Adobe Story Plus
You can add camera shot information in the middle of a scene. Such information helps studio personnel identify and prepare for changes tocamera, camera position, or effect at the specified point in the scene.
100
Note:
Solid Shot Line
Dashed Shot Line
Shot Development
Camera Reposition
To the top
Shot information in the middle of a scene A. Shot number B. Shot info C. Shot line D. Cut line
Adobe Story uses a different template for scripts that contain camera/audio/source information in the middle of a scene. Ensure that youtake a backup of your original file before you allow Adobe Story to reformat your document.
1. Place the cursor at the location where you want to insert the camera information.
2. Select Production > Camera Shot. If you are using this option for the first time, accept the prompt asking you to take a backup of theoriginal file before proceeding.
3. In the Camera dialog, select one of the following options according to your requirements.
In the script, a cut mark (cut line) appears at the cursor location and extends as a shot line toward the page margin.Shot Information is displayed at the end of the shot line. If you do not want Adobe Story to assign a shot number, deselect Shot Number.Enter information for visual effects (Vision FX), camera number (Camera), camera position/location (Position), and description of the shotin the respective options.
Similar to solid shot line except that the style of the line is in the form of continuous dash strokes. It can be used atlocations in your script where you want to include onscreen graphics.
Use this option when you want to change the camera and shot information in the middle of a dialogue. The optionsfor effects and camera position are disabled when you choose this option. For example, you want the camera to zoom out of the objectwhen the dialogue is being spoken. Enter the camera number and a description of the shot in the respective options.
Use this option when you want to change the camera position in the middle of a shot. Enter the camera number anddescription after you select the option.
Edit Camera Shot information
Available for: Adobe Story Plus
1. Double-click the camera shot information in the script.
2. In the dialog that appears, edit the information.
Add videotape elements in the middle of a scene
Available for: Adobe Story Plus
Place videotape (VT) elements at a position in the scene where the source of the content is a videotape.
Add videotape (VT) element with shot number and duration details
Available for: Adobe Story Plus
101
In
Out
Duration
1. Place your cursor at the position where you want to add the videotape element.
2. Select Production > Video Tape.
3. In the Video Tape Instructions dialog, select Shot Line.
4. The Shot Number is added by default. If you do not want to add shot number, deselect the option. For example, deselect this option forshots within shots where there is no change in the source from the current shot.
5. When you select Duration Details, the following options appear in the script. Enter relevant information for the respective options.
Information (dialogue) that introduces the VT shot.
Information (dialogue) that indicates the end of the VT shot.
The duration of the VT shot. There is no specified format. You can enter duration in the format that you desire.
Add Standby VT information
Available for: Adobe Story Plus
Use this option to provide information on videotape in the standby mode.
1. Place your cursor at the position where you want to add the videotape element.
2. Select Production > Video Tape.
3. In the Video Tape Instructions dialog, select Stand By VT.
You can choose to accept the default options, or add information in the Ident option. In Ident, add videotapes you want to use in the standbymode. For multiple videotapes, use the separators;, +, or &. For example, to indicate videotapes 1 and 4, enter 1+4, 1;4, or 1&4.
Add Run VT information
Available for: Adobe Story Plus
Use this option to provide information on videotape that must be played.
1. Place your cursor at the position where you want to add the videotape element.
2. Select Production > Video Tape.
3. In the videotape Instructions dialog, select Run VT.
You can choose to accept the default options, or add information in the Ident option. In Ident, add videotapes that must be played. For multiple
102
Twitter™ and Facebook posts are not covered under the terms of Creative Commons.
Legal Notices | Online Privacy Policy
videotapes, use the separators;, +, or &. For example, to indicate videotapes 1 and 4, enter 1+4, 1;4, or 1&4.
Edit videotape (VT) information
Available for: Adobe Story Plus
1. Double-click the VT information in the script.
2. In the dialog that appears, edit the information.
103
Shot types
Twitter™ and Facebook posts are not covered under the terms of Creative Commons.
Legal Notices | Online Privacy Policy
Available for: Adobe Story Plus
You can now allow users to enter different shot types to create a shooting script for their project. Now you can add the following types of cutlines in a script:
1. Camera Shot: You can add a camera shot in a script along with a solid or dashed line. This information helps studio personnel identify andprepare for changes to camera, camera position, or effects at the specified point in the scene.
EWS (Extreme Wide Shot): EWS is a view far from the subject. The subject is not visible due to the distance. EWS is often used asan establishing shot. For example, a shot showing a river and a mountain with a subject hardly visible.
VWS (Very Wide Shot): A view in which subject is visible. VWS emphasizes on placing the subjects in their environment. For example,a girl standing near the river in which you can make out that a girl is standing.
WS (Wide Shot): The subject takes up the full frame or as much as comfortably possible. For example, a girl in the story is emphasisof the shot.
MS (Mid Shot): MS shows some part of the subject in more detail but still gives an impression of the whole subject. The MS view istypically how you see a person you talk to. While talking, you don’t pay attention to a person’s lower body, so that part is irrelevant inthis scene.
MCU (Medium Close Up): MCU is half way between an MS and a CU.
CU (Close Up): In CU, a certain feature or part of the subject takes up the whole frame. For example, a shot showing just the face of agirl.
ECU (Extreme Close Up): The ECU gets right in and shows extreme detail. For example, close up of a subject’s nose while thesubject is trying to smell something.
Cut-In: Cut in shows some part of the subject in detail. Such as hands of a subject holding a gun and pulling the trigger slowly in ascene.
CA (Cutaway): CA is a shot of something other than the subject. For example, a procession of people passing by.
Two-Shot: A Two-Shot includes two people. The detail/distance is similar to a mid shot (MS).
Over-the-Shoulder Shot (OSS): OSS is a shot of the camera focusing from behind a person at the subject.
Noddy Shot: Noddy shot is someone listening and reacting to the subject.
Point-of-View Shot (POV): POV shows a view from a subject's perspective. For example, a shot in which a race car driver examining arace track and only the race track is shown.
Weather Shot: In this shot, the subject is the weather. This shot is also used for other purposes, such as for background for graphics.
2. Video Tape: This break gives information of any video tape to play in between two scenes.
3. Recording Break: Insert a recording break to indicate a break such as a tea break or tape stop.
104
Show/hide elements
Twitter™ and Facebook posts are not covered under the terms of Creative Commons.
Legal Notices | Online Privacy Policy
To the top
Show/hide the shot element
An author/co-author can selectively display the instances of shot element in a script. The reviewers and readers of the document can see theinstances of the Shot element as displayed but cannot use the option to show/hide the element.
Show/hide the shot element
To show or hide all the instances of the shot element, do the following:
Select View > Show/Hide Elements > Shot.
105
Creating document versions
106
Save versions of a document
Twitter™ and Facebook posts are not covered under the terms of Creative Commons.
Note:
To the top
Auto-versioning of documents
Versioning a document helps create a history for the document, and monitor changes to a document over time.
In the desktop application, the History feature is not available in the offline mode.
Follow these steps to save a document as a separate version:
1. Select File > Save As.
2. In the Save As dialog box, ensure that the Version option is selected. The version number that is assigned is indicated after the VersionNumber.
3. In the Description field, enter information about the content that has changed from the previous version. The description provides informationto future authors about the history of changes.
4. Click Save.
Auto-versioning of documents
Adobe® Story automatically assigns versions to documents in the following cases:
(Session-based) When you edit and save a document for the first time in a session; close the document, reopen it, and then save it again.
(Desktop application) When you update a document in the offline mode, and then switch back to the online mode.
(Collaborative mode) When another user gains control of the document for editing.
(Overwrite) When you click Make Latest in a previous version of the document. The previous version is now treated as the current version ofthe document.
Disable auto-versioning
When you disable auto-versioning, new versions of documents are created only when you version them using the File > Save As option.
1. Select File > Document Preferences.
2. Deselect Enable Auto Versioning.
This preference is a document level setting, and auto-versioning is enabled by default.
107
Work with the History panel
Twitter™ and Facebook posts are not covered under the terms of Creative Commons.
Legal Notices | Online Privacy Policy
To the top
To the top
To the top
Note:
Scrolling the History panelSearch content in the History panelDelete versions in the History panel (author only)
Scrolling the History panel
Scroll through the History panel using the arrows at the ends of the panel. Alternatively, you can drag the versions inside the panel to scroll them.
Search content in the History panel
You can search versions based on their version name, description, cast list, version number, created by, and time stamp. Enter text in the searchbox within the History panel. The relevant versions are displayed.
Delete versions in the History panel (author only)
Click the delete (trash) icon to delete the corresponding version. Version numbers of other versions are unaffected.
You cannot delete the current version of a document.
Adobe also recommends
108
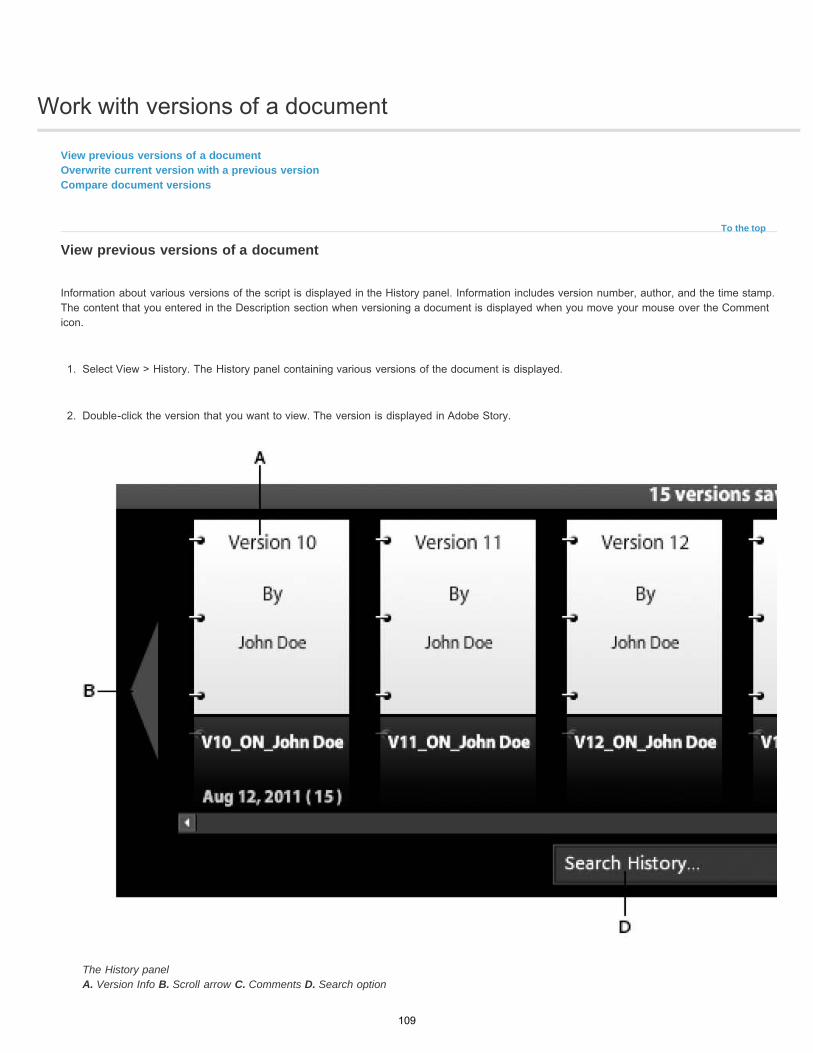
Work with versions of a document
To the top
View previous versions of a documentOverwrite current version with a previous versionCompare document versions
View previous versions of a document
Information about various versions of the script is displayed in the History panel. Information includes version number, author, and the time stamp.The content that you entered in the Description section when versioning a document is displayed when you move your mouse over the Commenticon.
1. Select View > History. The History panel containing various versions of the document is displayed.
2. Double-click the version that you want to view. The version is displayed in Adobe Story.
The History panel A. Version Info B. Scroll arrow C. Comments D. Search option
109
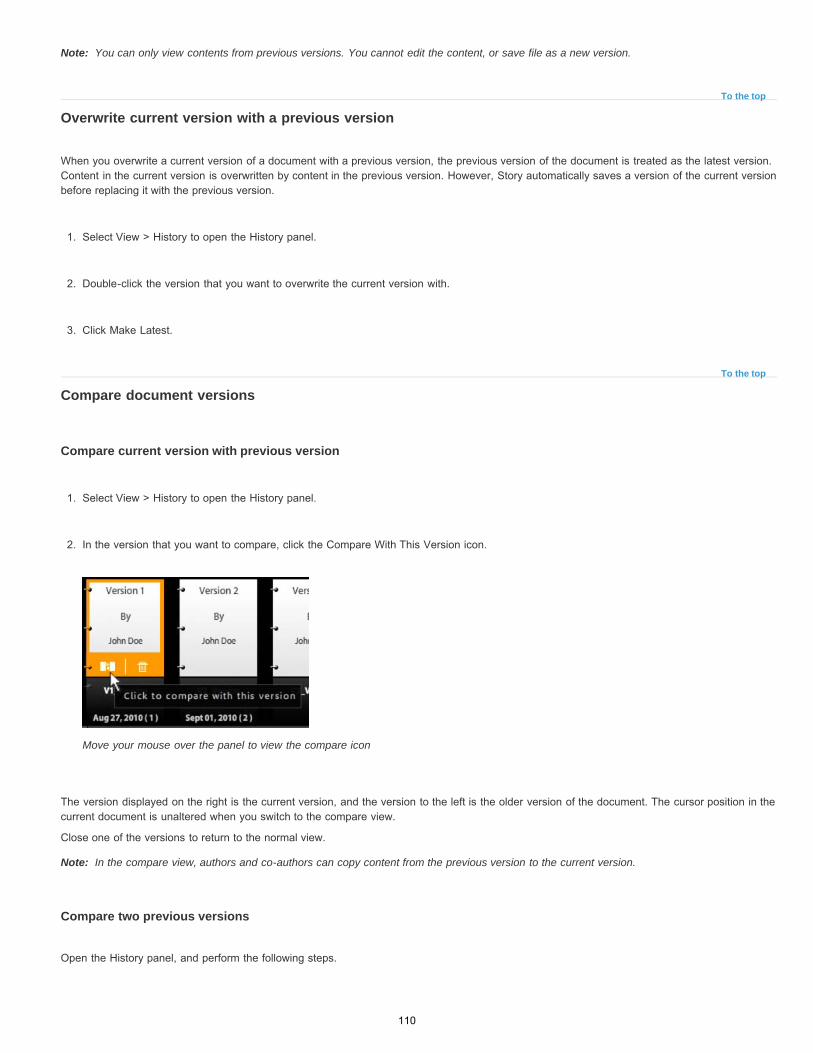
Note:
To the top
To the top
Note:
You can only view contents from previous versions. You cannot edit the content, or save file as a new version.
Overwrite current version with a previous version
When you overwrite a current version of a document with a previous version, the previous version of the document is treated as the latest version.Content in the current version is overwritten by content in the previous version. However, Story automatically saves a version of the current versionbefore replacing it with the previous version.
1. Select View > History to open the History panel.
2. Double-click the version that you want to overwrite the current version with.
3. Click Make Latest.
Compare document versions
Compare current version with previous version
1. Select View > History to open the History panel.
2. In the version that you want to compare, click the Compare With This Version icon.
Move your mouse over the panel to view the compare icon
The version displayed on the right is the current version, and the version to the left is the older version of the document. The cursor position in thecurrent document is unaltered when you switch to the compare view.
Close one of the versions to return to the normal view.
In the compare view, authors and co-authors can copy content from the previous version to the current version.
Compare two previous versions
Open the History panel, and perform the following steps.
110

Note:
Note:
1. Double-click the version that you want to compare.
2. In the version that you want to compare the open document with, click the Compare With This Version icon.
Close one of the versions to return to the normal view.
You cannot copy content across two older versions of a document.
Identify changes using the Outline panel
In the compare view, the Outline panel displays a combined list of scenes available in the versions being compared.
You can identify changes to scenes using the Outline view. A star icon indicates a scene with modified content. A red scene heading in the outlinepanel indicates a deleted scene and a green scene heading indicates a new scene.
When you double-click a scene in the Outline, the focus shifts to the corresponding scene in both the versions being displayed in the editor. If youdouble-click a deleted or added scene, the scene is displayed in the version containing the scene.
In the Outline panel of the compare view, you cannot move scenes or view their contents.
Enable/disable scroll lock in the compare view
When the scroll lock is enabled (on) Adobe Story scrolls both the documents. Disable the scroll lock if you want to scroll through just one of theversions.
View summary of changes between versions
To view a summary of changes between the current version and a previous version, move your mouse over the previous version in the Historypanel. A panel appears containing the summary of changes to scenes and content between the two versions.
note: If the previous version is not synced in the offline mode, the summary of changes is unavailable in the offline mode.
111

Twitter™ and Facebook posts are not covered under the terms of Creative Commons.
Legal Notices | Online Privacy Policy
Comparing a version with the current version of the document. A. Panel containing summary of changes B. Scroll option C. Search field
112

Production revisions
113
Revisions and revision styles
To the top
Note:
To the top
To the top
OverviewCreate a revisionCreate a revision styleModify or delete a revision styleAdd/remove revision marks
Overview
Available for: Adobe Story Plus
Production revisions are changes to content in production scripts. You can use revisions to identify and print only modified pages in productionscripts.
Revisions are tracked using revision styles. Each revision is associated with a unique revision style. The revision style you choose when starting arevision is applied to changed content and pages.
Only authors and co-authors can revision documents.
Create a revision
Available for: Adobe Story Plus
1. Ensure that you have completed the following procedure before you start revisioning a document:
a. Act on all tracked changes in your document by accepting or rejecting them.
b. Disable track changes after you have completed accepting/rejecting tracked changes.
2. Select Production > Start Revision.
3. In Active Revision, select a revision style. The chosen style is used for all markup in the revision. Ensure that you have not used thisrevision style previously for another revision.
4. (Optional) To change the date, color, or formatting options associated with the revision style, click Manage. If you do not specify a date, thecurrent date is used.
5. Click Start Revision.
To create another revision, select Production > New Revision. Repeat the procedure to revision the document.
Create a revision style
114
Revision Color
Mark
Date
Revised Text Style
To the top
To the top
Available for: Adobe Story Plus
Adobe® Story has a list of revision styles that you could use for your revisions. You can also choose to create your own revision style. The newstyle is reflected in the Active Revision menu when you start revisioning a document.
1. Select Production > Manage Revisions.
2. Click “+”.
3. Enter a name for the revision style.
4. Customize the following according to your requirements:
Choose a color from the color menu. The color is applied to revised text, and border of pages containing the revisions. Formultiple revisions, the border color of the latest revision is displayed.
note: The border color of pages is not displayed in a printed or exported document.
The default “*” mark is displayed to the right of revised content. You can choose to customize this identifier using any other symbol ofyour choice.
Indicates the revision date. All revisions to the document on the specified date can be identified using this revision style.
The date is displayed in the header of revised pages if the option to display date in the script header and footer is enabled.
The selected formatting option is used to display revised text.
5. Click Done.
Modify or delete a revision style
Available for: Adobe Story Plus
1. Select Production > Manage Revisions.
2. Select the style that you want to modify or delete.
3. Do one of the following:
Click “-” to delete the style.
To modify the style, edit its values, and click Done.
Add/remove revision marks
115
Twitter™ and Facebook posts are not covered under the terms of Creative Commons.
Legal Notices | Online Privacy Policy
Available for: Adobe Story Plus
1. Select the content from which revision marks must be added or removed.
2. Do one of the following:
To add revision marks, select Production > Add Revision Mark. The current revision style is applied to the selection.
To clear revision marks, select Production > Clear Revision Mark. All revision marks are removed from the selected content.
Adobe also recommends
116
Manage production revisions
To the top
Show Markup For
Mark Position
Show Date in Script Header and Footer
Align
To the top
Note:
To the top
Specify display (viewing) options for revisionsView revision historyIdentify total number of revised pagesLock/unlock production revisionsLock/unlock scene numbersOmit/unomit scenes
Specify display (viewing) options for revisions
Available for: Adobe Story Plus
You can customize how revision indicators are displayed on revised pages.
1. Select Production > Manage Revisions.
2. In Viewing Options, customize the display options according to your requirements:
Select All or Active depending on whether you want markup displayed for all revisions or just the active (current)revision. Select None if you do not want markup displayed for revisions.
The mark you set in Revision Style is, by default, displayed to the right of revised text. You can choose to change thedistance, from the left margin, at which the mark is displayed. To display the mark to the left of the revised text, enter a lesser number suchas 0.5 or 1.
Disable this option if you do not want to display the date specified in the revision style.
Select an alignment for the content in the header and footer.
View revision history
Available for: Adobe Story Plus
Adobe Story automatically adds revision history to the title page of the document. Edit the revision history according to your requirements.
Deleting the title page deletes revision history permanently. Revisions made previous to the creation of the title page are not captured in thetitle page.
Identify total number of revised pages
Available for: Adobe Story Plus
The number of pages in the current revision is displayed in the Adobe Story status bar.
117
To the top
Note:
To the top
1. Select Production > Manage Revisions.
2. In Viewing Options, select All, and click Done.
The total number of revised pages is displayed in the following places:
In the Adobe Story status bar towards the left (when the revision is active)
In the Print dialog box
Lock/unlock production revisions
Available for: Adobe Story Plus
Locking pages in production revisions helps you:
Prevent page renumbering because of deletions or content overflows during revisioning
Identify and print only the revised pages
Lock pages
Available for: Adobe Story Plus
When you lock pages in your script during revision, a new page, with the numbering format nA, is created to accommodate content overflow. ncorresponds to the number of the page causing the content overflow.
For example, after locking, you edited page number 2 to an extent that it caused content overflow. Instead of the content moving to page 3, a newpage 2A is created to accommodate the overflow. Thereafter, new pages created are numbered 2B, 2C, and so on.
1. Select Production > Lock Pages.
Ensure that you have enabled page headers if you want to see the new page numbers displayed in the script.
In a locked page, when a scene with content that overflows to the next page is omitted, a page range is displayed for page numbers.
Unlock production revisions
Available for: Adobe Story Plus
When you unlock pages, the numbering of pages is reset to the natural numbering sequence of the script (1, 2, 3...).
To unlock pages, select Production > Unlock Pages.
Lock/unlock scene numbers
Available for: Adobe Story Plus
Locking scene numbers prevents renumbering of existing scenes when new scenes are added during production revisions.
Similar to production revisions, Adobe Story uses a different numbering format, usually alphanumeric, when renumbering scenes. The format useddepends on the numbering format of the scenes that precede and follow the new scene.
For example, during production, you lock scenes and introduce a new scene between scene numbers 100 and 101. The new scene is assignedthe scene number 100A.
118
Note:
To the top
Lock scene numbers
1. Select Production > Manage Scene Numbers.
2. In the Manage Scene Numbers dialog, select Keep Existing Scene Number. Selecting this option locks all current scene numbers in yourscript.
Ensure that you have enabled Automatically Assign Number To New Scenes.
3. Add a new scene to your script. Notice the new numbering format for the scene number.
Unlock scene numbers
Available for: Adobe Story Plus
When you unlock scene numbers, all the scene numbers are reset to match the original numbering sequence.
1. Select Production > Manage Scene Numbers.
2. In the Manage Scene Numbers dialog, deselect Keep Existing Scene Number.
1.
2.
1.
2.
1.
2.
3.
Omit/unomit scenes
Omitting a scene helps you remove a scene without changing the scene numbers of other scenes. When you omit a scene, the word OMITTEDappears at the location of the omitted scene. You can later, if necessary, unomit a scene to recover omitted content.
The element type for an omitted scene is always set to General and cannot be changed.
To omit scenes, place your cursor on the scene, and select Production > Omit Scene.
To unomit scenes, place your cursor on the omitted scene, and select Production > Unomit Scene.
View contents of an omitted scene
Perform one of the following steps:
Click the omitted scene in the Outline panel.
In the script, move your mouse over the word OMITTED.
119
Twitter™ and Facebook posts are not covered under the terms of Creative Commons.
Legal Notices | Online Privacy Policy
Omitting scenes when track changes is enabled
Available for: Adobe Story Plus
Ensure that you accept/reject all tracked changes in the scene before you omit a scene. If you try to omit a scene with track changes, adialog appears informing you that all tracked changes will be accepted before omitting the scene. Click No if you want to manually accept orreject changes.
Omitting/unomitting scenes are not tracked as changes.
Adobe also recommends
120
Export and print production revisions
Twitter™ and Facebook posts are not covered under the terms of Creative Commons.
Legal Notices | Online Privacy Policy
To the top
To the top
Entire Script
All Changed Pages
Revision
Export revisionsPrint production revisions
Export revisions
Available for: Adobe Story Plus
When you export a document with revisions as a PDF file, the revision style applied to content is displayed in the file. The revision style forborders is not displayed.
Print production revisions
Available for: Adobe Story Plus
1. Select File > Print.
2. Select one of the following options:
Prints the entire script along with the production revisions.
Prints all the Changed pages.
Prints only the selected revision. Select the revision color from the menu.
3. If you want a color printout of the revisions, select Print Revised Text In Color.
121

Sharing, commenting, and collaborating
122
Collaborating with other users
Note:
Note:
Available for: Adobe Story Plus (Adobe Story Free users can work with the scripts shared with them)
Share your scripts with any user. When sharing scripts, specify a role for the people among whom the script is shared. The role determines theactions that a person can perform on the shared script.
You cannot share scripts in the offline mode.
Co-author
Co-authors can add, modify, or delete content from the script. However, they cannot delete the script itself. Co-authors can also, like reviewers,comment on the script.
Writer
This role, usually assigned to freelance writers, gives users access to only the documents that they’re working on. The writer role is assigned at aproject level and is not available for individual document sharing operations. Users in this role have limited permissions and cannot perform thefollowing actions:
See drafts of episodes authored by other writers
Create or view reports and schedules
See the lists assigned to the current project
Share, archive, or rename a project shared with them
See edit notifications for documents created by other users. In particular, users in this role will see the following notifications:
Reviewer
Reviewers cannot edit the content, but can add comments to the script.
Reader
Readers can only read the script but cannot view comments on the script, edit the script, or view the sharing information.
When a script has co-authors, only one of the authors can edit the script at a given time. The message in the status bar provides information onthe author editing the script. The script is available to the other authors for editing only after the author editing the script saves it. Ensure that yousave the script periodically so that other authors working on the script can work on the script too.
It takes a few seconds before the saved script is available to you for editing.
The status bar at the bottom of the application provides information on the status of the document. For example, if a reviewer X is editing the file,the information, “X is editing...” is displayed. The information disappears after the file is saved indicating that you can now edit the file.
Notification Whether available for the writer role
Project shared with a user in the writer role Yes
Role changed to or from writer Yes
Document added to the shared project by another user No
Any document edited in the shared project No
Writer’s own document edited by a co-author Yes
Comment on any document in the shared project No
Comment on a document owned by the writer Yes
123

Twitter™ and Facebook posts are not covered under the terms of Creative Commons.
Legal Notices | Online Privacy Policy
124
Share documents
Twitter™ and Facebook posts are not covered under the terms of Creative Commons.
Legal Notices | Online Privacy Policy
Note:
Available for: Adobe Story Plus
1. In the Authoring view, select File > Share.
2. In the Share Document dialog box, enter the e-mail address of the person with whom you are sharing the file.
3. Select a role for the person.
4. To add another person to the list, click below the current text menu.
5. If you want Adobe® Story to send an e-mail to users with whom you have shared the script, select Send E-mail Notification.
6. Click OK.
The shared documents are displayed with a shared icon. in the Projects view.
125
Open shared scripts
Twitter™ and Facebook posts are not covered under the terms of Creative Commons.
Legal Notices | Online Privacy Policy
Note:
You can add a shared script to a new project or add the script to an existing project. Depending on your permissions, you can edit, review, orread the script.
When you have a script that you must edit or review, a notification appears when you log in to the application.
1. Click the drafts icon in the menu panel. The list of scripts that are shared is displayed.
2. Click Accept.
If, for some reason, you do not want to accept the shared script, click Decline.
3. In the Accept Shared Document dialog box, do one of the following:
To add the script as a part of a new project, select Put In A New Project. Enter a name for the new project.
To add the script to an existing project, select Put In An Existing Project.
4. If you want the script to open in the authoring view after you click Done, select Open Document When I am Done.
5. Click Done.
126
Add comments to scripts
Twitter™ and Facebook posts are not covered under the terms of Creative Commons.
Legal Notices | Online Privacy Policy
Note:
To the top
Comments Panel
You can add comments to both your scripts, and shared scripts. Users assigned the reader role cannot view comments on shared scripts.
Comments added to shared scripts are displayed to other users only after you save the file.
1. Press Enter. A Comment icon appears toward the end of the line.
2. Click the icon to add your comment.
3. Enter the comment, and click outside the edit area.
You can delete a comment by clicking the Delete icon in the comment.
Comments Panel
The comments panel contains a list of all the comments posted on the open document.
To open the Comments panel, select View > Commenting Panel.
To move to the location of a comment in the document, click the Comment in the Comments panel.
To search comments, use the Search box in the Comments panel. Your search can be based on the text in the comment, or the author ofthe comment.
To sort comments by their chronological order, select Options > Sort By Time.
To sort comments in the order in which they appear in the document, select Options > Sort By Page Order.
To view the time the comment was posted, move your cursor over the comment. The timestamp is displayed in the tooltip.
To delete a comment, click the corresponding Delete button. The comment is deleted from the comments panel of all users. Reviewers candelete only those comments that they have posted.
127
Modify assigned roles
Twitter™ and Facebook posts are not covered under the terms of Creative Commons.
Legal Notices | Online Privacy Policy
Available for: Adobe Story Plus
1. Do one of the following:
Click the downward arrow icon next to the script name, and select Share.
In the Authoring view, click the Sharing information on the status bar, and click Share With More.
2. In the Document Sharing dialog box, select the user whose profile you want to modify from the menu.
3. Select a different role for the user from the menu, and click OK.
128
Project sharing
To the top
Share projectOpen documents from a shared projectStop sharing project with a userChange role of a collaboratorRemove sharing of received projects
Available for: Adobe Story Plus (Adobe Story Free users can work with the projects shared with them)
You can share a project with another user as co-author, reviewer, or reader.
1. Co-author: Co-authors can add, modify, or delete content from the script. However, they cannot delete the script itself. Co-authors can also,like reviewers, comment on the script.
2. Reviewer: Reviewers cannot edit the content, but can add comments to the script.
3. Reader: Readers can only read the script but cannot view comments on the script, edit the script, or view the sharing information.
Only an author can delete a document in a shared project, whereas author and co-author can add documents. The author owns any documentcreated in a shared project. Documents added to the shared project are automatically shared. When co-authors/reviewers/readers delete a projectshared with them, the project is unshared with them and removed from their Projects view. In a shared project, Adobe Story notifies collaboratorsabout:
Documents added/deleted
Edits in documents
Comments in the documents
Collaborators can unshare a project. Project-level sharing and document-level sharing do not work together. If you try to share a project that hasshared documents, Story removes all document-level shares for the project. Story replaces them with the share preference for the project.
Share project
Available for: Adobe Story Plus (Adobe Story Free users can work with the scripts shared with them)
1. In the Projects view, select a project and click (Share)
2. In the Share Project dialog box, enter the email address of the person with whom you are sharing the file in Add New Email ID. You can alsochoose from the existing contacts listed in this dialog.
129
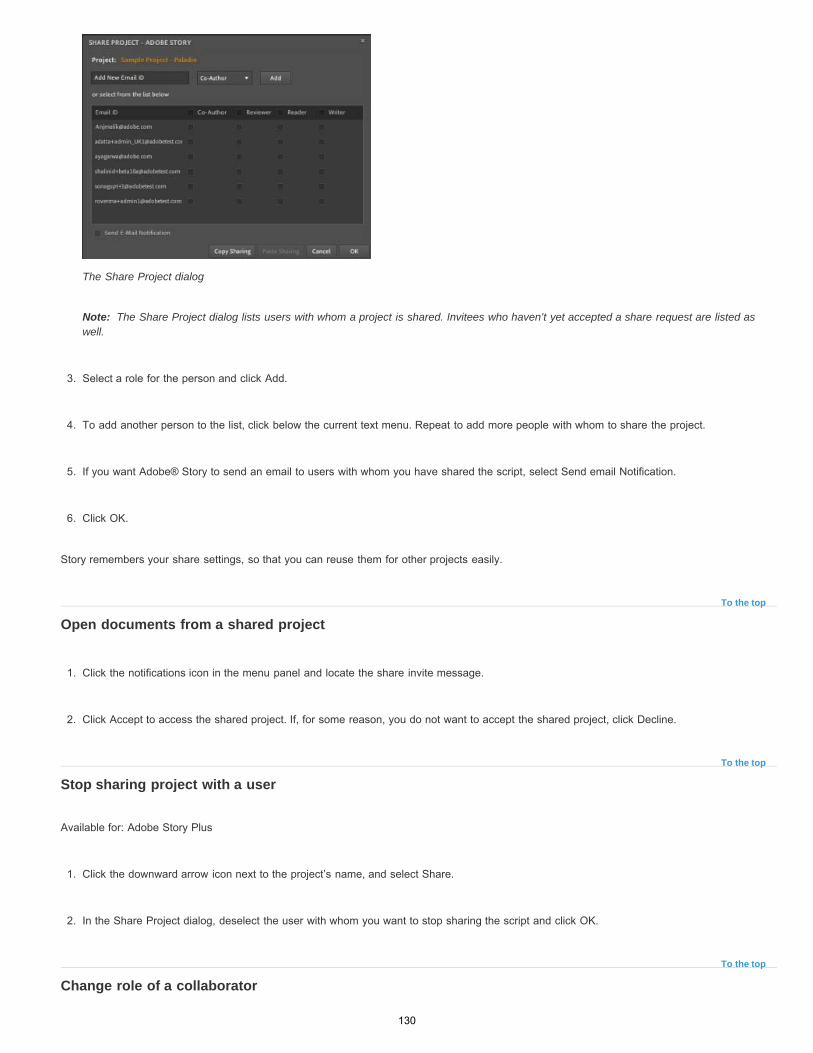
Note:
To the top
To the top
To the top
The Share Project dialog
The Share Project dialog lists users with whom a project is shared. Invitees who haven’t yet accepted a share request are listed aswell.
3. Select a role for the person and click Add.
4. To add another person to the list, click below the current text menu. Repeat to add more people with whom to share the project.
5. If you want Adobe® Story to send an email to users with whom you have shared the script, select Send email Notification.
6. Click OK.
Story remembers your share settings, so that you can reuse them for other projects easily.
Open documents from a shared project
1. Click the notifications icon in the menu panel and locate the share invite message.
2. Click Accept to access the shared project. If, for some reason, you do not want to accept the shared project, click Decline.
Stop sharing project with a user
Available for: Adobe Story Plus
1. Click the downward arrow icon next to the project’s name, and select Share.
2. In the Share Project dialog, deselect the user with whom you want to stop sharing the script and click OK.
Change role of a collaborator
130
Twitter™ and Facebook posts are not covered under the terms of Creative Commons.
Legal Notices | Online Privacy Policy
To the top
Available for: Adobe Story Plus
1. Click the downward arrow icon next to the project’s name, and select Share.
2. In the Share Project dialog, select the appropriate roles for the listed users and click OK.
Remove sharing of received projects
When you delete shared projects, you cannot restore them. Request the author to share the project again in case you deleted a shared projectinadvertently.
Click the downward arrow icon next to the project’s name and select Delete.
131
Delete received scripts
Twitter™ and Facebook posts are not covered under the terms of Creative Commons.
Legal Notices | Online Privacy Policy
When you delete shared scripts, you cannot restore them. Request the author to share the script again in case you deleted a shared scriptinadvertently.
1. In the Projects view, select the shared script that you want to delete from a project.
2. Click the downward arrow icon next to the script name.
3. Select Delete From Project.
132
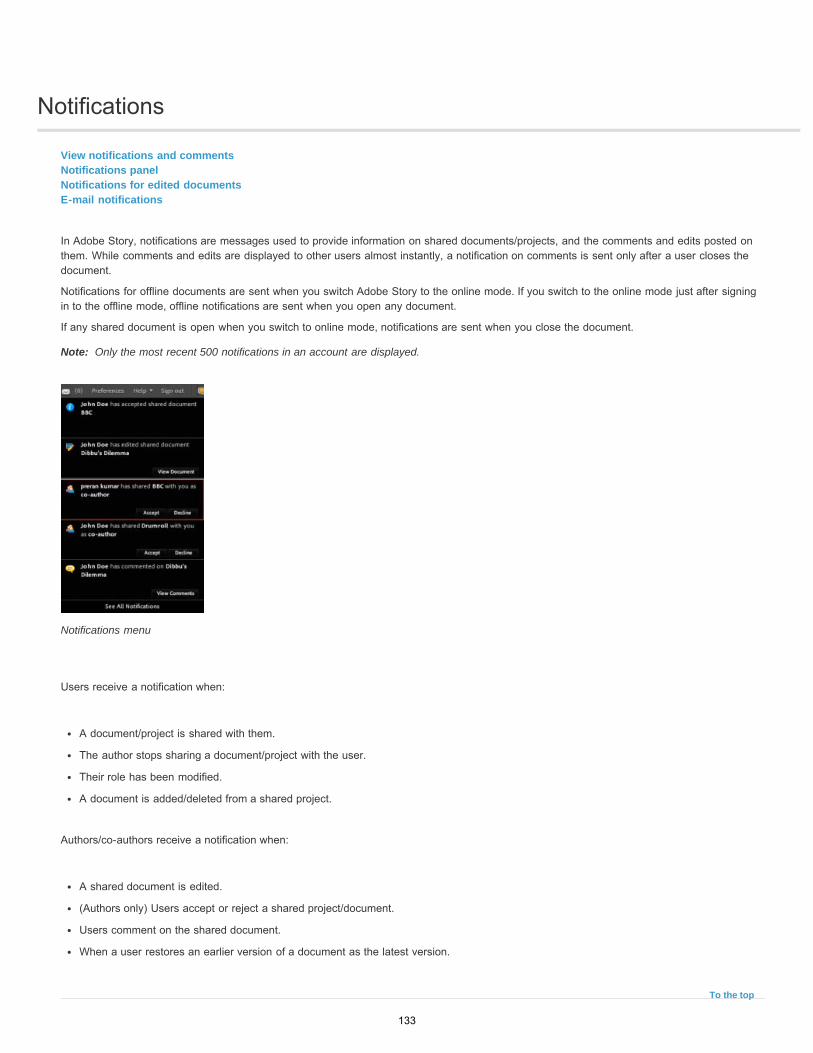
Notifications
Note:
To the top
View notifications and commentsNotifications panelNotifications for edited documentsE-mail notifications
In Adobe Story, notifications are messages used to provide information on shared documents/projects, and the comments and edits posted onthem. While comments and edits are displayed to other users almost instantly, a notification on comments is sent only after a user closes thedocument.
Notifications for offline documents are sent when you switch Adobe Story to the online mode. If you switch to the online mode just after signingin to the offline mode, offline notifications are sent when you open any document.
If any shared document is open when you switch to online mode, notifications are sent when you close the document.
Only the most recent 500 notifications in an account are displayed.
Notifications menu
Users receive a notification when:
A document/project is shared with them.
The author stops sharing a document/project with the user.
Their role has been modified.
A document is added/deleted from a shared project.
Authors/co-authors receive a notification when:
A shared document is edited.
(Authors only) Users accept or reject a shared project/document.
Users comment on the shared document.
When a user restores an earlier version of a document as the latest version.
133
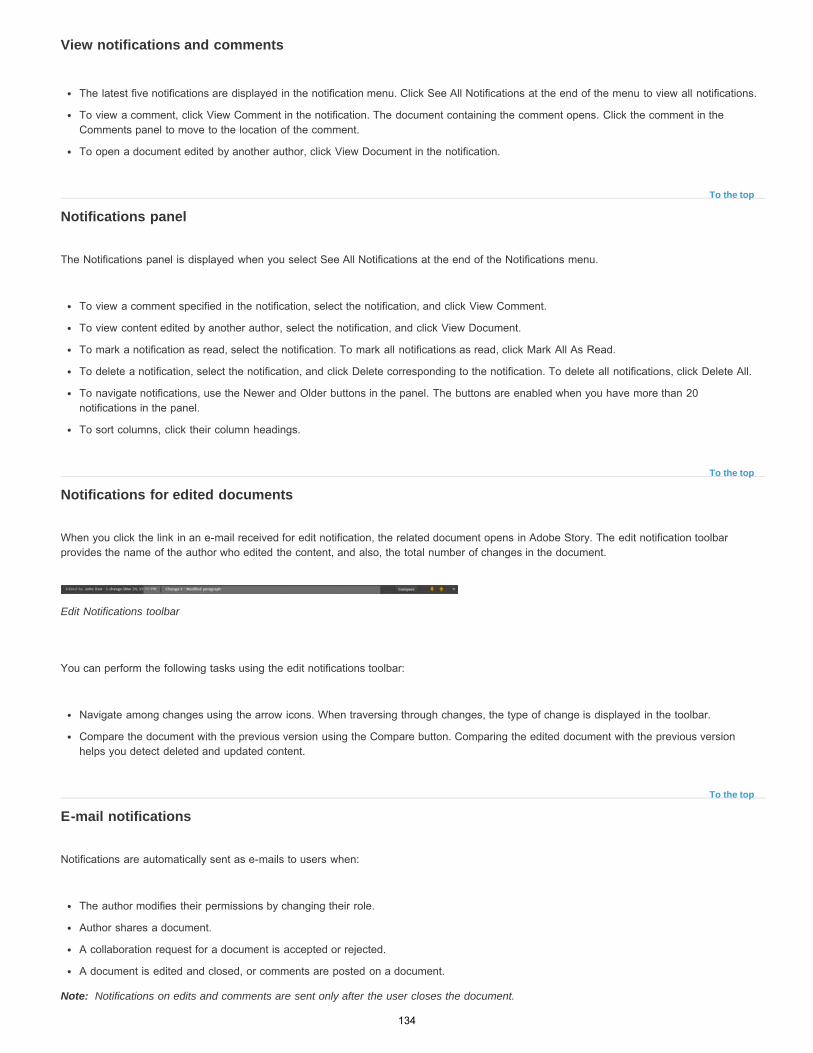
To the top
To the top
To the top
Note:
View notifications and comments
The latest five notifications are displayed in the notification menu. Click See All Notifications at the end of the menu to view all notifications.
To view a comment, click View Comment in the notification. The document containing the comment opens. Click the comment in theComments panel to move to the location of the comment.
To open a document edited by another author, click View Document in the notification.
Notifications panel
The Notifications panel is displayed when you select See All Notifications at the end of the Notifications menu.
To view a comment specified in the notification, select the notification, and click View Comment.
To view content edited by another author, select the notification, and click View Document.
To mark a notification as read, select the notification. To mark all notifications as read, click Mark All As Read.
To delete a notification, select the notification, and click Delete corresponding to the notification. To delete all notifications, click Delete All.
To navigate notifications, use the Newer and Older buttons in the panel. The buttons are enabled when you have more than 20notifications in the panel.
To sort columns, click their column headings.
Notifications for edited documents
When you click the link in an e-mail received for edit notification, the related document opens in Adobe Story. The edit notification toolbarprovides the name of the author who edited the content, and also, the total number of changes in the document.
Edit Notifications toolbar
You can perform the following tasks using the edit notifications toolbar:
Navigate among changes using the arrow icons. When traversing through changes, the type of change is displayed in the toolbar.
Compare the document with the previous version using the Compare button. Comparing the edited document with the previous versionhelps you detect deleted and updated content.
E-mail notifications
Notifications are automatically sent as e-mails to users when:
The author modifies their permissions by changing their role.
Author shares a document.
A collaboration request for a document is accepted or rejected.
A document is edited and closed, or comments are posted on a document.
Notifications on edits and comments are sent only after the user closes the document.
134
Twitter™ and Facebook posts are not covered under the terms of Creative Commons.
Legal Notices | Online Privacy Policy
Note: Ensure that you enable Send e-mail Notification when sharing a document.
For content updates and comments, the e-mail contains a link to the location in the document containing the update or comment.
The language used in the e-mail depends on the locale in which you are logged in. For example, if you have logged into the application in theFrench locale, notifications are sent in French.
Disable e-mail notifications
1. Select Edit > Preferences, or click Preferences in the menu bar.
2. In the Preferences dialog, select Notifications.
3. Select No in the option asking you whether you want to receive e-mails for notifications.
135
Stop sharing scripts with a user
Twitter™ and Facebook posts are not covered under the terms of Creative Commons.
Legal Notices | Online Privacy Policy
Available for: Adobe Story Plus
1. Click the downward arrow icon next to the script’s name, and select Share.
2. In the Share Documents dialog box, select the user with whom you want to stop sharing the script.
3. Click the Delete icon .
Users with whom you have stopped sharing the script are presented with a dialog box. Users can use the option in the dialog box to delete thescript from their project.
136
Unshare multiple projects from a user
Twitter™ and Facebook posts are not covered under the terms of Creative Commons.
Legal Notices | Online Privacy Policy
To the top
Unshare multiple projects from a user
Available for: Adobe Story Plus
You can choose to remove sharing from a user for all or multiple projects shared with that user.
Unshare multiple projects from a user
You can choose to unshare multiple projects shared with a user. You cannot unshare the projects from a user that are created by the userhimself.
1. In the Projects view, click Projects.
2. Select Manage Shared Projects.
3. In the Manage Shared Projects dialog, enter the Email ID of the user with whom you want to unshare the projects and click Find. Thenames of the projects appear in the dialog box.
4. Select the project names to unshare and click Apply.
137

Track changes
138
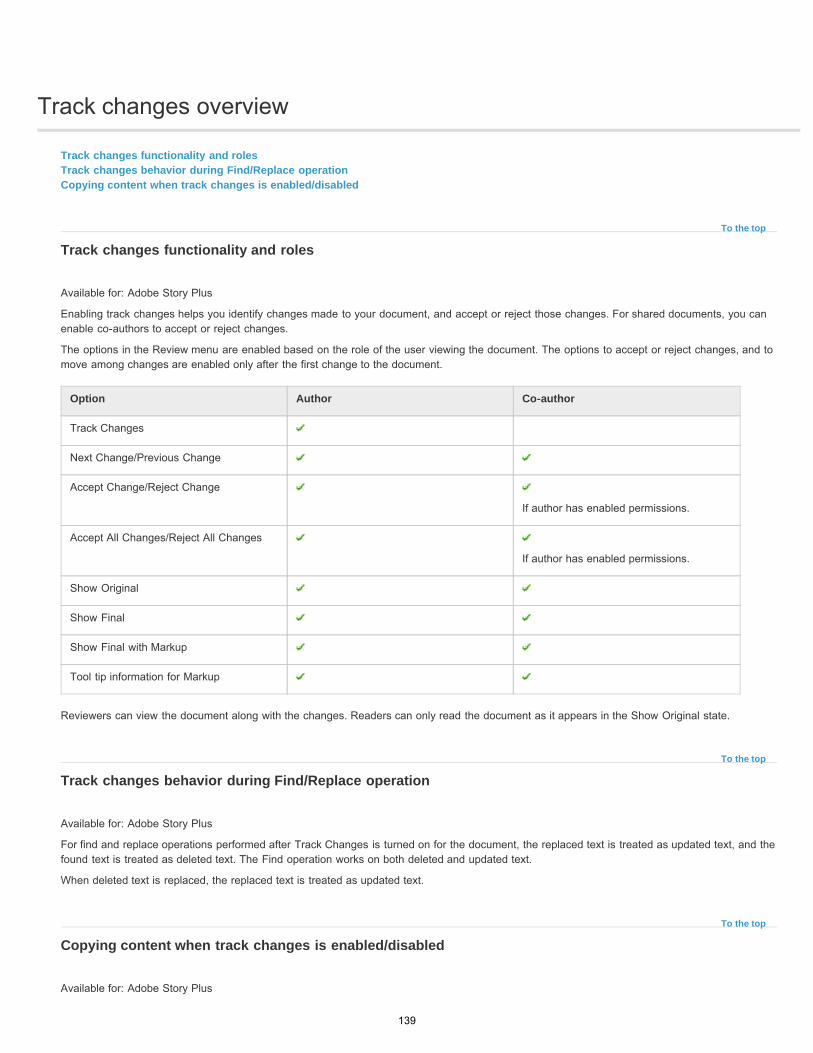
Track changes overview
To the top
To the top
To the top
Track changes functionality and rolesTrack changes behavior during Find/Replace operationCopying content when track changes is enabled/disabled
Track changes functionality and roles
Available for: Adobe Story Plus
Enabling track changes helps you identify changes made to your document, and accept or reject those changes. For shared documents, you canenable co-authors to accept or reject changes.
The options in the Review menu are enabled based on the role of the user viewing the document. The options to accept or reject changes, and tomove among changes are enabled only after the first change to the document.
Option Author Co-author
Track Changes
Next Change/Previous Change
Accept Change/Reject Change
If author has enabled permissions.
Accept All Changes/Reject All Changes
If author has enabled permissions.
Show Original
Show Final
Show Final with Markup
Tool tip information for Markup
Reviewers can view the document along with the changes. Readers can only read the document as it appears in the Show Original state.
Track changes behavior during Find/Replace operation
Available for: Adobe Story Plus
For find and replace operations performed after Track Changes is turned on for the document, the replaced text is treated as updated text, and thefound text is treated as deleted text. The Find operation works on both deleted and updated text.
When deleted text is replaced, the replaced text is treated as updated text.
Copying content when track changes is enabled/disabled
Available for: Adobe Story Plus
139
Twitter™ and Facebook posts are not covered under the terms of Creative Commons.
Legal Notices | Online Privacy Policy
Note:
Copy-paste/cut-paste behavior when track changes is enabled:
Inserted text is copied as new text.
Deleted text is not copied.
Formatted text is copied as new text. The formatting is retained.
Copy-paste/cut-paste behavior when track changes is disabled:
Inserted text is copied without markup, and is not tracked.
Deleted text is copied without markup, and is not tracked.
Formatted text is copied, and the formatting is retained. The copied text is not tracked.
When you move a scene, the scene at the original location is treated as deleted content. The scene at the new location is treated asinserted content. Ensure that you accept/reject changes at both these locations.
The copy-paste behavior works across Adobe Story documents. When you copy to an editor outside Adobe Story, the text is copied withoutmarkup. The copy-paste behavior, however, remains the same.
140
Manage track changes settings
To the top
Note:
To the top
To the top
Enable track changes (author only)Set track changes preferencesEnable co-authors to accept/reject changes (Authors only)Customize color for type of changeCustomize color for collaborators
Enable track changes (author only)
Available for: Adobe Story Plus
Select Review > Track Changes.
Track changes are not supported for multicolumn and AV scripts.
Set track changes preferences
Available for: Adobe Story Plus
The option to use different colors that denote tracked changes made by different collaborators is moved from the Preferences dialog to theDocument Preferences dialog. When you set preferences for track changes, the changes are now applied at a document level. You can choosea different color for the same collaborator in another document.
1. Select File > Document Preferences.
2. In the Document Preferences dialog, click Track Changes.
3. To change the default settings for inserted text and deleted text, do the following:
a. Select Type of Change
b. Specify a color for inserted text and deleted text from the color menus.
4. To change the text color for changes made by other users, do the following:
a. Select Collaborators.
b. Using the color menu, specify the text color for changes made by the collaborator.
Enable co-authors to accept/reject changes (Authors only)
141
Twitter™ and Facebook posts are not covered under the terms of Creative Commons.
Legal Notices | Online Privacy Policy
To the top
Note:
To the top
Note:
Available for: Adobe Story Plus
Select Review > Co-Authors Can Commit Changes. By default, this option is enabled for all new documents.
Co-authors can commit changes to a document even when the Track Changes option is disabled. However, changes to the document are nottracked.
Customize color for type of change
Available for: Adobe Story Plus
You can choose the color used to indicate inserted text, and deleted text.
Each collaborator can have an individual set of preferences.
1. Click File > Document Preferences.
2. In the Document Preferences dialog box, select Track Changes.
3. Select Type Of Change.
4. Select a color for Inserted Text and Deleted Text.
Customize color for collaborators
Available for: Adobe Story Plus
You can choose the color for changes made by other users with whom the document is shared.
Each collaborator can have an individual set of preferences.
1. Click File > Document Preferences.
2. In the Document Preferences dialog box, select Track Changes.
3. Select Collaborators.
4. For each author, select a color that must be used to indicate content changed by the author.
142
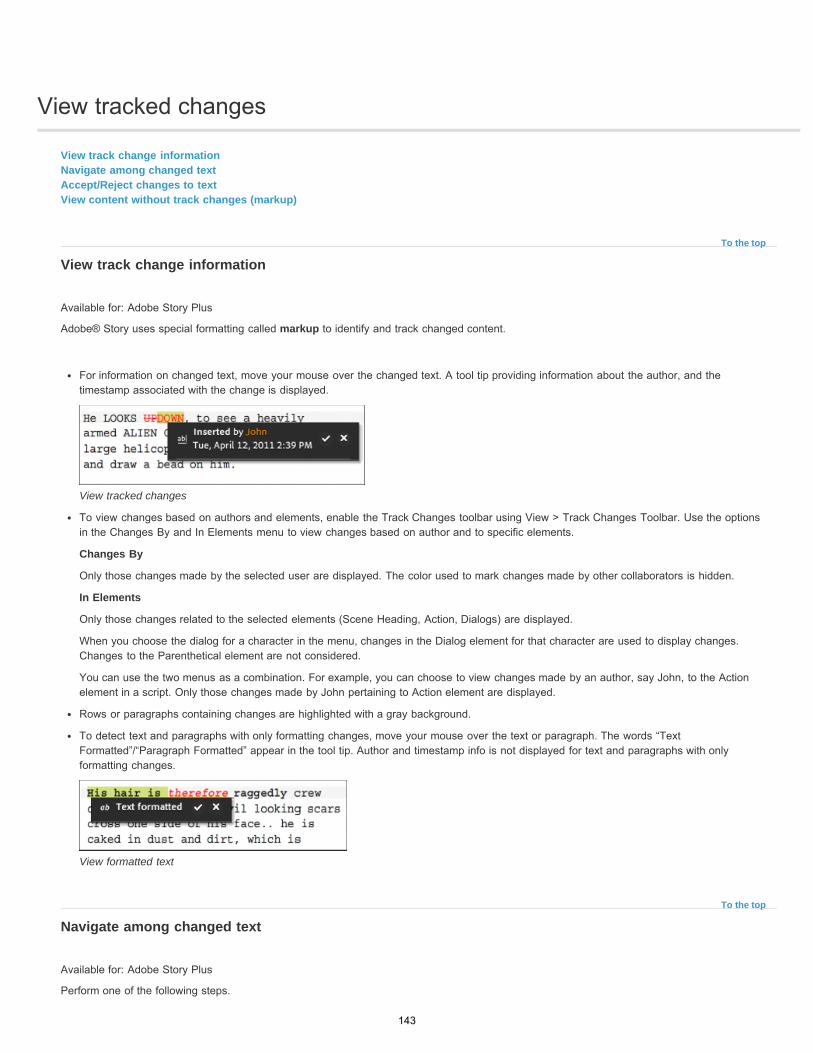
View tracked changes
To the top
To the top
View track change informationNavigate among changed textAccept/Reject changes to textView content without track changes (markup)
View track change information
Available for: Adobe Story Plus
Adobe® Story uses special formatting called markup to identify and track changed content.
For information on changed text, move your mouse over the changed text. A tool tip providing information about the author, and thetimestamp associated with the change is displayed.
View tracked changes
To view changes based on authors and elements, enable the Track Changes toolbar using View > Track Changes Toolbar. Use the optionsin the Changes By and In Elements menu to view changes based on author and to specific elements.
Changes By
Only those changes made by the selected user are displayed. The color used to mark changes made by other collaborators is hidden.
In Elements
Only those changes related to the selected elements (Scene Heading, Action, Dialogs) are displayed.
When you choose the dialog for a character in the menu, changes in the Dialog element for that character are used to display changes.Changes to the Parenthetical element are not considered.
You can use the two menus as a combination. For example, you can choose to view changes made by an author, say John, to the Actionelement in a script. Only those changes made by John pertaining to Action element are displayed.
Rows or paragraphs containing changes are highlighted with a gray background.
To detect text and paragraphs with only formatting changes, move your mouse over the text or paragraph. The words “TextFormatted”/“Paragraph Formatted” appear in the tool tip. Author and timestamp info is not displayed for text and paragraphs with onlyformatting changes.
View formatted text
Navigate among changed text
Available for: Adobe Story Plus
Perform one of the following steps.
143
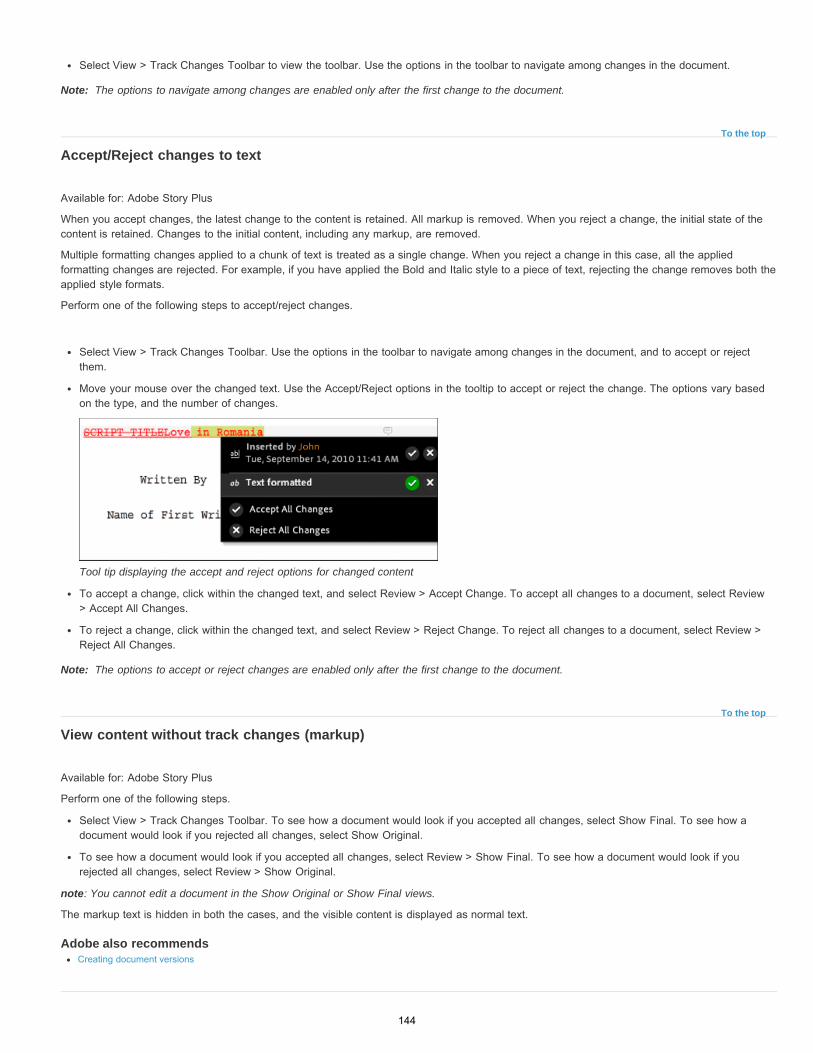
Note:
To the top
Note:
To the top
Select View > Track Changes Toolbar to view the toolbar. Use the options in the toolbar to navigate among changes in the document.
The options to navigate among changes are enabled only after the first change to the document.
Accept/Reject changes to text
Available for: Adobe Story Plus
When you accept changes, the latest change to the content is retained. All markup is removed. When you reject a change, the initial state of thecontent is retained. Changes to the initial content, including any markup, are removed.
Multiple formatting changes applied to a chunk of text is treated as a single change. When you reject a change in this case, all the appliedformatting changes are rejected. For example, if you have applied the Bold and Italic style to a piece of text, rejecting the change removes both theapplied style formats.
Perform one of the following steps to accept/reject changes.
Select View > Track Changes Toolbar. Use the options in the toolbar to navigate among changes in the document, and to accept or rejectthem.
Move your mouse over the changed text. Use the Accept/Reject options in the tooltip to accept or reject the change. The options vary basedon the type, and the number of changes.
Tool tip displaying the accept and reject options for changed content
To accept a change, click within the changed text, and select Review > Accept Change. To accept all changes to a document, select Review> Accept All Changes.
To reject a change, click within the changed text, and select Review > Reject Change. To reject all changes to a document, select Review >Reject All Changes.
The options to accept or reject changes are enabled only after the first change to the document.
View content without track changes (markup)
Available for: Adobe Story Plus
Perform one of the following steps.
Select View > Track Changes Toolbar. To see how a document would look if you accepted all changes, select Show Final. To see how adocument would look if you rejected all changes, select Show Original.
To see how a document would look if you accepted all changes, select Review > Show Final. To see how a document would look if yourejected all changes, select Review > Show Original.
note: You cannot edit a document in the Show Original or Show Final views.
The markup text is hidden in both the cases, and the visible content is displayed as normal text.
Adobe also recommendsCreating document versions
144

Twitter™ and Facebook posts are not covered under the terms of Creative Commons.
Legal Notices | Online Privacy Policy
145

Tagging
146

Tagging overview
Twitter™ and Facebook posts are not covered under the terms of Creative Commons.
Legal Notices | Online Privacy Policy
To the top
To the top
Tagging use casesTagging methods
Scene-level tagging lets you perform effective scene breakdown and leverage the resulting insight for scheduling, budgeting and planning theusage of resources. You can create and manage tags; and then specify tag items, which are the values for those tags. For example, you canspecify typewriter as the tag item for the tag prop.
In addition to managing tags at a scene level, you can also tag words and phrases in your scripts automatically or manually. The selected wordsare automatically added at the scene level as tag items for the tag that you select. Tags and tag items may have one-to-many or many-to-onerelationships. For example, the words typewriter, telephone, and umbrella in a script can be tagged as prop.
Tagging use cases
You can export tagging information from a script in the CSV format. Later, you can work offline on the CSV file.
Tagging information flows into different Story reports, such as Bible, Detailed Running Order, and Shooting Schedule.
Tagging information flows into the schedule, facilitating planning and decision making processes.
Tagging methods
You can tag scripts using one or more of the following approaches:
Scene-level tagging wherein you define tag-items for the available tags
Auto-tagging to let Adobe Story detect essential tag-items in your document and tag them accordingly. Essential elements can include CGI,location, props, music, and so on. Among scene elements, only the action, parenthetical, and general elements are auto tagged.
Autotagging is available only for users working in the EN_US and EN_GB locales.
Manual tagging of words and phrases
Adobe also recommendsReports
147
Tag lists and tag item lists
Twitter™ and Facebook posts are not covered under the terms of Creative Commons.
Legal Notices | Online Privacy Policy
To the top
Create tag lists and tag item lists
You can define tag lists that can be reused across multiple projects. If a document doesn’t have local tags or a tag list associated with it, thedefault list of tags becomes available for your use and customization. If a tag list is applied to a document that already has some script-level localtags, you can validate and add these tags to the tag list.
You can also define and manage tag-item lists for quick reuse across multiple projects. These lists are suggested to you as autocomplete optionswhen you specify tag items for a tag.
Create tag lists and tag item lists
To create a tag list or tag item list, follow these steps:
1. In the Story Projects view, click Manage Lists.
2. Click Create New in the Tag List or Tag Item List area.
3. Enter a list title.
4. Click Create New to add a new tag/tag item.
5. Enter the name of the tag/tag item in the Title box.
6. (Only for tag lists) If necessary, specify a color that you want associated words/phrases in the project to be displayed in.
7. Click OK.
148
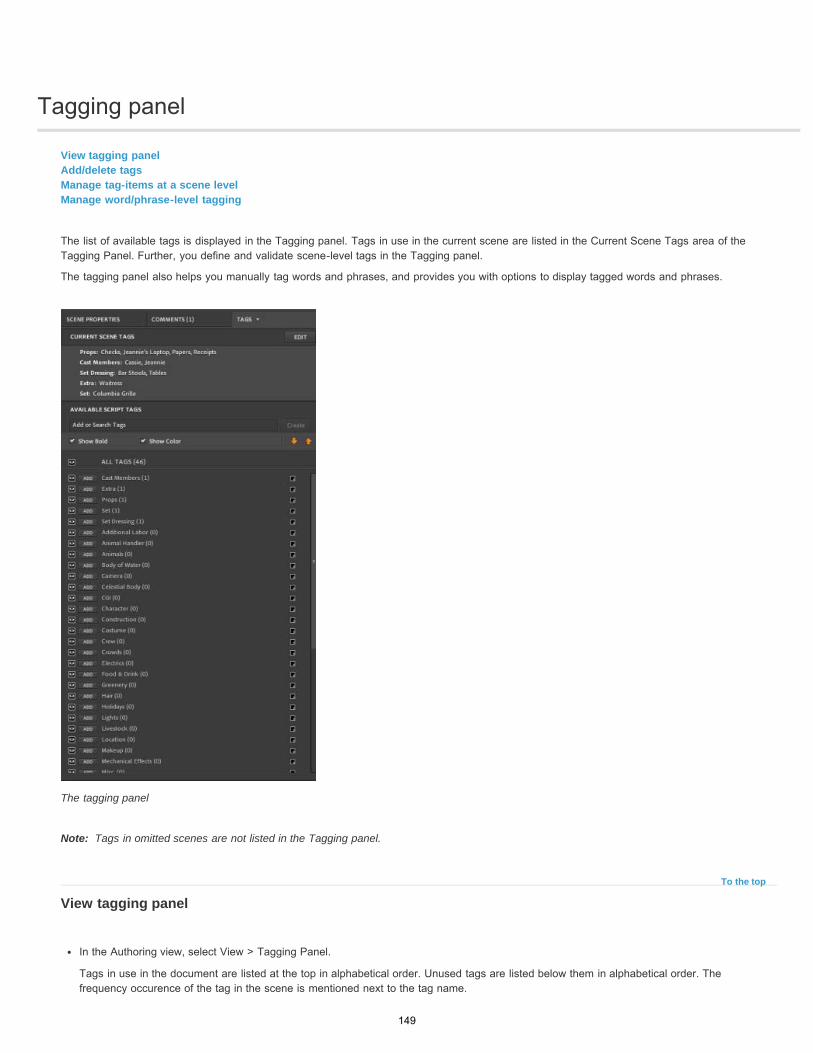
Tagging panel
Note:
To the top
View tagging panelAdd/delete tagsManage tag-items at a scene levelManage word/phrase-level tagging
The list of available tags is displayed in the Tagging panel. Tags in use in the current scene are listed in the Current Scene Tags area of theTagging Panel. Further, you define and validate scene-level tags in the Tagging panel.
The tagging panel also helps you manually tag words and phrases, and provides you with options to display tagged words and phrases.
The tagging panel
Tags in omitted scenes are not listed in the Tagging panel.
View tagging panel
In the Authoring view, select View > Tagging Panel.
Tags in use in the document are listed at the top in alphabetical order. Unused tags are listed below them in alphabetical order. Thefrequency occurence of the tag in the scene is mentioned next to the tag name.
149
To the top
To the top
Add/delete tags
You can add/delete tags directly to the Tagging panel only if a tag list is not assigned to the project. Do the following to create a tag:
1. Enter the name of the tag in the field in the tagging panel.
2. Click Create.
Tip: To remove a tag, simply click the X icon next to it in the All Tags list.
note: When no tag list is associated, changes to the tags in the tagging panel affect only the script being edited. When you open a new script, theoriginal tag list is displayed.
If a tag list is assigned to the project, follow these steps instead:
1. Select Edit > Tag List.
2. Modify the tag list.
3. Click OK.
Manage tag-items at a scene level
Add tag items
1. In the Tagging panel, click Edit.
2. Select a tag from the list. This is the tag to which you’ll add tag items.
3. Start entering tag items in the text field. Story will autocomplete your entries if a tag item list is associated with the project.
4. Click Add.
5. Repeat steps 2-3 to add more tag items.
6. Click Close to dismiss the dialog box.
Remove tag items
1. In the Tagging panel. click Edit.
2. Expand a tag to view the tag items associated with it.
3. Select a tag item and click X next to it.
150
To the top
Note:
Note:
note: To delete all tag items from the current scene, click Remove All Tags.
4. Click Close to dismiss the dialog box.
Manage word/phrase-level tagging
Word- or phrase-level tag items for available tags are automatically added as scene-level tag items.
Perform word/phrase-level autotagging
Autotagging is available only for users working in the EN_US and EN_GB locales.
Ensure that you are online before you auto-tag a script. You cannot auto-tag scripts in the offline mode.
1. Select File > Tagging > Start Autotagging. Alternatively use the options menu in the tagging panel.
2. Click Start Auto Tagging in the Start Autotagging dialog box.
The script is locked, and you cannot edit the script until autotagging is complete. A message appears in the status bar informing you thatautotagging is in progress when you try to edit the document.
Closing or deleting a script for which you have initiated the tagging process does not stop autotagging. When you open the document later,the tags are displayed in the document if autotagging is complete.
A confirmation message appears after auto-tagging is complete. The time to complete auto-tagging depends on the length of the script, and theload on the server.
Words in a document that are tagged appear bold if the Bold option is enabled in the tagging panel. Also, the Current Scene Tags area in theTagging panel is automatically updated. When you hover the mouse over a tagged word or phrase, the tag information is displayed.
After auto tagging, if Adobe Story finds elements in your script that map to the deleted tags, you are prompted to restore the tags. Click Yesin the Add To Taglist dialog if you want Adobe Story to restore the deleted tags and use them for tagging. If you select No, elements correspondingto the deleted tags are not auto tagged.
Manually tag words or phrases
1. In the Authoring view, select View > Tagging Panel.
2. Select the word or phrase that you want to tag. If a word or phrase has been tagged previously, the new tag is appended to the tag list forthe word or phrase.
3. In the Add Tag Items dialog, select the tag to which you want to add the selected word as a tag item.
4. Click Add and then click Close to dismiss the dialog.
5. (Optional) Click the color palette icon, and choose a color for the selected tag. All words and phrases with the tag appear in the specifiedcolor. If you have applied multiple tags to a word or phrase, the color of the last applied tag is used. If you apply a tag to a word in a taggedphrase, the tag color is applied only to the word.
151
Note:
Note:
6. Do one of the following:
Select Show In Bold if you want the tagged words or phrases to be displayed in bold.
Select Show Color if you want Adobe Story to display the selected color for the tagged words or phrases. The color of the last appliedtag is displayed.
You can tag a word or phrase with more than one tag. Repeat the procedure to add multiple tags to a word or phrase.
You can tag a series of words. When you separately tag a word or phrase in group that has already been tagged, the tag is applied to theword only.
Find words/phrases with a specific tag
To search words or phrases with a specific tag, do the following:
1. Disable visibility for all tags using the global visibility icon in the tagging panel. Enable visibility for the tag that you want to search.
For example, to search words/phrases associated with the accessory tag, disable visibility of all tags using the global visibility icon. Thenenable visibility for the accessory tag only.
When you drag a visibility box to other visibility boxes, the visibility status of the box is applied to boxes on which it is dragged.
2. Use the arrow icons in the tagging panel to navigate through the tags in the document. Only the visible tags are traversed.
For a word with multiple tags, the focus stays on the word until all the tags have been traversed. With every click of the arrow button,the focus shifts to the next applied tag in the tagging panel.
View tags associated with a word or phrase
Do one of the following
Select the word or phrase. The tags associated with the word or phrase are highlighted in the Tagging panel. Scroll the tagging panel toview the associated tags.
Move your mouse over the word or phrase. The tag information is displayed in the tool tip.
Move the mouse over the word or phrase, press Control, and double-click (Cmd + double-click Mac OS®).
Remove tags
Remove tags applied to words or phrases
1. Move the mouse over the word or phrase, press Control, and double-click.
2. Click the Remove This Tag icon for the tag that you want to remove.
3. Click Close after you are done.
Alternatively, select the word or phrase that has been tagged. Its associated tags are highlighted in the Tagging panel. Click the tag in the taggingpanel to remove the tag from the word or phrase.
152
Twitter™ and Facebook posts are not covered under the terms of Creative Commons.
Legal Notices | Online Privacy Policy
Remove all tags
Removes all tags associated with words and phrases in a document.
Select File > Tagging > Remove All Tags.
Remove all manual tags
All manual tags applied to words and phrases are removed. Removing manual tags does not affect the list in the tagging panel.
Select File > Tagging > Remove Manual Tags.
Remove all auto tags
Select File > Tagging > Remove Auto Tags.
When you create a schedule from a script containing tags, you can view tagging information by clicking open the Tagging panel in the Scheduleview.
153
Validate and export tagging information
Twitter™ and Facebook posts are not covered under the terms of Creative Commons.
Legal Notices | Online Privacy Policy
To the top
To the top
Validate tags against a tag listExport tagging information as CSV
Validate tags against a tag list
If your script contains some local script-level tags, you can validate these tags against an applied tag list and add them to it. Do the following:
1. Select Edit > Validate Tags.
2. In the New Tags dialog, deselect the tags that you don’t want to merge with the tag list. Click Add.
3. In the Add Tags to <Tag List> dialog, click Add to commit the changes.
Export tagging information as CSV
1. Select Production > Breakdown Reports > Tag.
2. In the Generate Tag Report dialog, deselect the tags that you don’t want to export.
3. Click Generate.
4. Choose the location where you want to save the CSV file and click Save.
154

Integration with Creative Suite
155
Metadata in Adobe Story
To the top
To the top
Note:
To the top
Adding metadataUses of metadata in the workflowExport production metadata to the DPT format
In Adobe Story, metadata implies essential elements in the script's formatting that identify new scenes, characters, production notes, dialogue, andso on. The metadata is captured in the ASTX file during export.
Information in scripts is automatically transformed into relevant metadata when you export a script as an ASTX file. In Premiere® Pro, metadatacan be leveraged to find relevant content, and improve the accuracy of speech-to-text. Other software in the suite such as Adobe® Media Encodercan use metadata to create searchable, engaging experiences for the audience.
Adding metadata
Metadata in the Adobe Story script can be supplemented automatically or manually by other software.
Uses of metadata in the workflow
In the script-to-screen workflow, metadata helps automate a number of time-consuming, yet essential processes.
Production
Manage and locate your media assets throughout the production process. For example, when you search for the word "clap" in Premiere Pro,the movie clips containing clap in their metadata are displayed.
Track crucial details, such as where a clip was shot, and the actors in the scene.
Editing
Locate words in spoken dialogue using speech search in Premiere Pro. Speech Search helps you search within media assets to locate andjump immediately to keywords in spoken dialogue.
You can use this feature for languages supported by Adobe Story.
Post-production
Streamline searching for clips while you edit.
Playback (Flash, DVD, Web-DVD, blu-ray disc)
Search video content quickly.
156
Twitter™ and Facebook posts are not covered under the terms of Creative Commons.
Legal Notices | Online Privacy Policy
Export production metadata to the DPT format
Available for: Adobe Story Plus customers
Beginning the April 2014 release, Story can export production metadata to the DPT format—the metadata file format standardized by The DigitalProduction Partnership.
To export Story production metadata to the DPT format, do the following:
1. In the Projects view, click Reports and from the popup menu, choose Save As DPT > Production Data.2. Select the documents that you would need to include as part of production data and then click Generate.3. Save the DPT file to your computer.
157
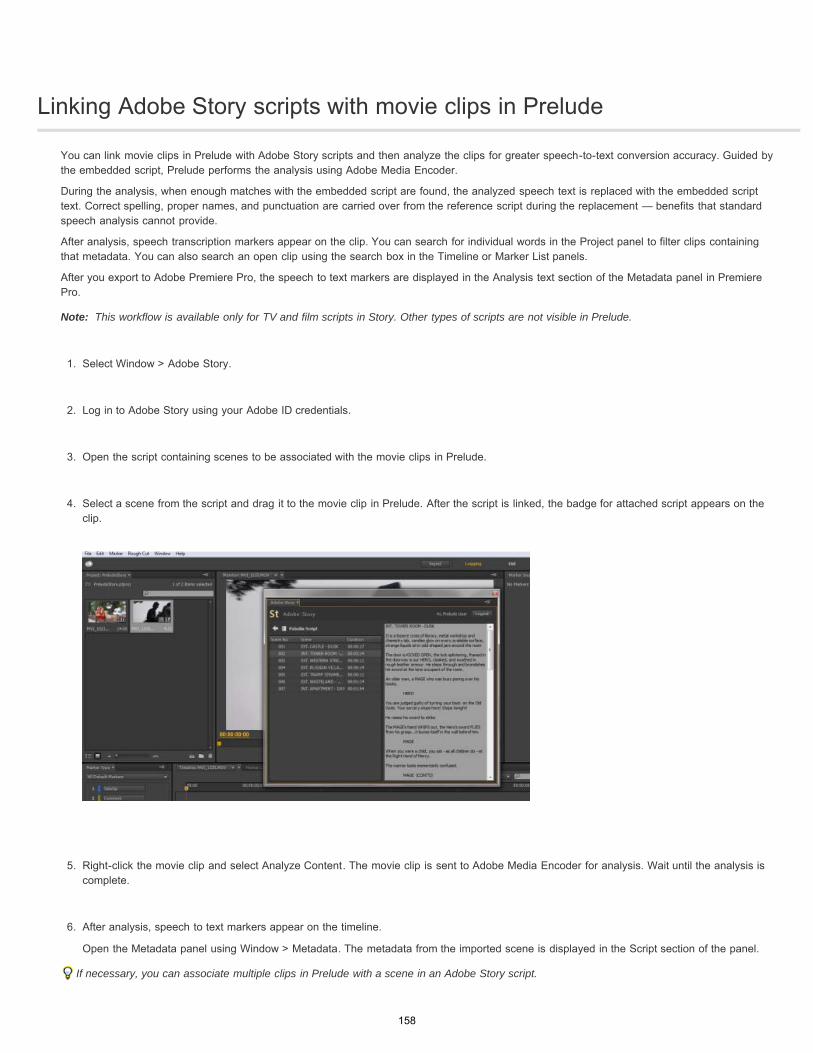
Linking Adobe Story scripts with movie clips in Prelude
Note:
You can link movie clips in Prelude with Adobe Story scripts and then analyze the clips for greater speech-to-text conversion accuracy. Guided bythe embedded script, Prelude performs the analysis using Adobe Media Encoder.
During the analysis, when enough matches with the embedded script are found, the analyzed speech text is replaced with the embedded scripttext. Correct spelling, proper names, and punctuation are carried over from the reference script during the replacement — benefits that standardspeech analysis cannot provide.
After analysis, speech transcription markers appear on the clip. You can search for individual words in the Project panel to filter clips containingthat metadata. You can also search an open clip using the search box in the Timeline or Marker List panels.
After you export to Adobe Premiere Pro, the speech to text markers are displayed in the Analysis text section of the Metadata panel in PremierePro.
This workflow is available only for TV and film scripts in Story. Other types of scripts are not visible in Prelude.
1. Select Window > Adobe Story.
2. Log in to Adobe Story using your Adobe ID credentials.
3. Open the script containing scenes to be associated with the movie clips in Prelude.
4. Select a scene from the script and drag it to the movie clip in Prelude. After the script is linked, the badge for attached script appears on theclip.
5. Right-click the movie clip and select Analyze Content. The movie clip is sent to Adobe Media Encoder for analysis. Wait until the analysis iscomplete.
6. After analysis, speech to text markers appear on the timeline.
Open the Metadata panel using Window > Metadata. The metadata from the imported scene is displayed in the Script section of the panel.
If necessary, you can associate multiple clips in Prelude with a scene in an Adobe Story script.
158

Twitter™ and Facebook posts are not covered under the terms of Creative Commons.
Legal Notices | Online Privacy Policy
Clear script metadata from clips
Right click the movie clip and select Clear Script Data.
159

Adobe Premiere Pro Help / Cross-application workflowsAdobe Community Help
Applies to:Adobe Premiere Pro
Contact support
Give feedback
To the top
To the top
Edit a clip in its original applicationWorking with Photoshop and Premiere ProCopy between After Effects and Premiere ProWorking with Adobe Premiere Pro and Adobe FlashWorking with Adobe Premiere Pro and Adobe SpeedGradeWorking with Adobe Story and Adobe Premiere ProWorking with Encore and Premiere Pro
Show All
You can use various other Adobe applications to enhance or modify the assets used in aPremiere Pro project. Also, you can use Premiere Pro to edit projects begun in otherapplications.
Edit a clip in its original application
In Premiere Pro, the Edit Original command opens clips in the applications associated withtheir file types. You can edit clips in the associated applications. Premiere Pro automaticallyincorporates the changes into the current project without replacing files. Similarly, PremierePro sequences placed in other applications, such as Adobe After Effects can be opened withthe host product’s Edit Original command.
1. Select a clip in either the Project panel or Timeline panel.
2. Choose Edit > Edit Original.
You can export a movie from Premiere Pro with the data necessary for the EditOriginal command. In the Export Movie Settings dialog box, choose Project from theEmbedding options menu.
Working with Photoshop and Premiere Pro
If you use Photoshop to create still images, you can use Premiere Pro to make them moveand change. You can animate an entire image or any of its layers.
You can edit individual frames of video and image sequence files in Photoshop. In addition tousing any Photoshop tool to edit and paint on video, you can also apply filters, masks,transformations, layers styles, and blending modes. You can paint using the Clone Stamp,Pattern Stamp, Healing Brush, or Spot Healing Brush. You can also edit video frames usingthe Patch tool.
In Photoshop, with the Clone Stamp, you can sample a frame from a video layer and paintwith the sampled source onto another video frame. As you move to different target frames,the source frame changes relative to the frame from which you initially sampled.
After making edits, you can save the video as a PSD file, or you can render it as a QuickTimemovie or image sequence. You can import any of these back into Premiere Pro for furtherediting.
Sign in to My AdobeMy cartPrivacy
Products Business solutions Support & Learning Download Company Buy
160
If you use Premiere Pro to create movies, you can use Photoshop to refine the individualframes of those movies. In Photoshop, you can do any of the following:
Remove unwanted visual elements.
Draw on individual frames.
Use the superior selection and masking tools to divide a frame into elements foranimation or compositing.
Online resources for Premiere Pro and Photoshop workflow
Franklin McMahaon provides a video tutorial that demonstrates creating a title inPhotoshop for use in Premiere Pro in this video tutorial from Layers Magazine.
This Premiere Pro tutorial video by Phil Hawkins at Infinite Skills shows how to import filesbetween Photoshop and Premiere Pro.
Jarle Leirpoll shows how to automate production of lower thirds with Photoshop andPremiere Pro in this article on the ProVideo Coalition website.
Comparative advantages for specific tasks
The strengths of Premiere Pro lie in its numerous video editing features. You can use it tocombine Photoshop files with video clips, audio clips, and other assets. You can use thePhotoshop files, for example, as titles, graphics, and masks.
In contrast, Photoshop has excellent tools for painting, drawing, and selecting portions of animage. The Photoshop Quick Selection tool and Magnetic Lasso tool make it easy to create amask from a complex shape. Rather than hand-drawing a mask in Premiere Pro, considerdoing this work in Photoshop. Similarly, if you are applying several paint strokes by hand toget rid of dust, consider using the Photoshop paint tools.
The animation and video features in Photoshop Extended include simple keyframe-basedanimation. Premiere Pro, however, provides quite a bit more keyframe control over variousproperties.
Exchanging still images
Premiere Pro can import and export still images in many formats. For greatest versatility,however, use the native Photoshop PSD format when transferring individual frames or stillimage sequences from Photoshop to Premiere Pro.
When you import a PSD file into Premiere Pro, you can choose whether to import it as aflattened image, or with its layers separate and intact.
It is often a good idea to prepare a still image in Photoshop before importing it into PremierePro. Examples of such preparation include correcting color, scaling, and cropping. It is oftenbetter to change a source image in Photoshop than to have Premiere Pro perform the sameoperation many times per second as it renders each frame for previews or final output.
In Photoshop, you can create a PSD document that is set up correctly for a specific videooutput type. From the New File dialog box, select a Film & Video preset. In Premiere Pro, youcan create a PSD document that matches your composition and sequence settings. ChooseFile > New > Photoshop File.
Exchanging movies
You can no longer exchange PSD video files with Photoshop, however, you can render amovie directly from Photoshop and then import it back into Premiere Pro. For example, youcan create a QuickTime movie from Photoshop that can then be imported into Premiere Pro.
161
To the top
Color
Premiere Pro works internally with colors in an RGB (red, green, blue) color space. If youwant to edit video clips you create in Photoshop in Premiere Pro, create the clips in RGB.
If you want to broadcast the final movie it is best to ensure, in Photoshop, that the colors inyour image are broadcast-safe. Assign the appropriate destination color space—for example,SDTV (Rec. 601)—to the document in Photoshop.
Create and edit Photoshop files
You can create a still Photoshop file that automatically inherits the pixel and frame aspectratio settings of your Premiere Pro project. You can also edit any still image file in a PremierePro project in Photoshop.
Create a Photoshop file in a project
Choose File > New > Photoshop File.
Photoshop opens with a new blank still image. The pixel dimensions match the project’svideo frame size, and image guides show the title-safe and action-safe areas for theproject.
Edit a still image file in Photoshop
From within a project, you can open an image file in most formats that Adobe Photoshopsupports. Premiere Pro does not import files in CMYK or LAB color formats.
1. Select a still-image clip in either the Project panel or Timeline panel.
2. Choose Edit > Edit In Adobe Photoshop.
The file opens in Photoshop. When you save the file, changes are available in thePremiere Pro project.
Copy between After Effects and Premiere Pro
From the After Effects Timeline panel, you can copy layers based on audio or videofootage items (including solids) and paste them into the Adobe Premiere Pro Timelinepanel.
From the Adobe Premiere Pro Timeline panel, you can copy assets (any items in a track)and paste them into the After Effects Timeline panel.
From either After Effects or Adobe Premiere Pro, you can copy and paste footage itemsto the other’s Project panel.
162
Note:
note: You can’t, however, paste footage items from the After Effects Project panel into theAdobe Premiere Pro Timeline panel.
If you want to work with all clips or a single sequence from an Adobe Premiere Pro project,use the Import command instead to import the project into After Effects.
Use Adobe Dynamic Link to create dynamic links, without rendering, between new orexisting compositions in After Effects and Adobe Premiere Pro. For more information, seeAdobe Dynamic Link.
Copy from After Effects to Adobe Premiere Pro
You can copy a layer based on a footage item from an After Effects composition and paste itinto an Adobe Premiere Pro sequence. Adobe Premiere Pro converts these layers to clips inthe sequence and copies the source footage item to its Project panel. If the layer contains aneffect that is also used by Adobe Premiere Pro, Adobe Premiere Pro converts the effect andall of its settings and keyframes.
You can also copy nested compositions, Photoshop layers, solid-color layers, and audiolayers. Adobe Premiere Pro converts nested compositions to nested sequences, and solid-color layers to color mattes. You cannot copy shape, text, camera, light, or adjustment layersto Adobe Premiere Pro.
1. Start Adobe Premiere Pro (you must start Adobe Premiere Pro before you copy the layerin After Effects).
2. Select a layer (or layers) from the After Effects Timeline panel.
If you select multiple layers and the layers don’t overlap in After Effects, they’replaced on the same track in Adobe Premiere Pro. On the other hand, if the layers overlapin After Effects, the order in which you select them determines the order of their trackplacement in Adobe Premiere Pro. Each layer is placed on a separate track, and the lastselected layer appears on Track 1. For example, if you select layers from top to bottom,the layers appear in the reverse order in Adobe Premiere Pro, with the bottom-most layeron Track 1.
3. Choose Edit > Copy.
4. In Adobe Premiere Pro, open a sequence in the Timeline panel.
5. Move the current-time indicator to the desired location, and choose either Edit > Paste orEdit > Paste Insert.
Results of pasting into Premiere Pro
When you paste a layer into an Adobe Premiere Pro sequence, keyframes, effects, and otherproperties in the copied layer are converted as follows:
After Effectsitem
Converted to in AdobePremiere Pro
Notes
163
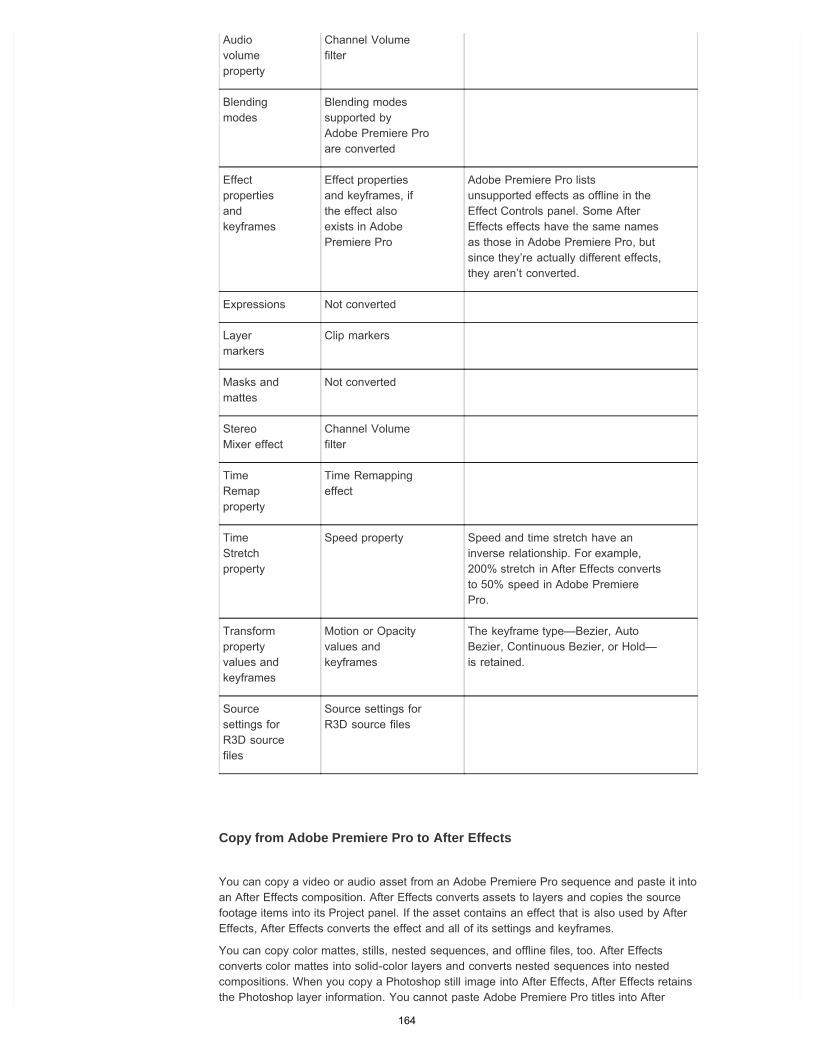
Copy from Adobe Premiere Pro to After Effects
You can copy a video or audio asset from an Adobe Premiere Pro sequence and paste it intoan After Effects composition. After Effects converts assets to layers and copies the sourcefootage items into its Project panel. If the asset contains an effect that is also used by AfterEffects, After Effects converts the effect and all of its settings and keyframes.
You can copy color mattes, stills, nested sequences, and offline files, too. After Effectsconverts color mattes into solid-color layers and converts nested sequences into nestedcompositions. When you copy a Photoshop still image into After Effects, After Effects retainsthe Photoshop layer information. You cannot paste Adobe Premiere Pro titles into After
Audiovolumeproperty
Channel Volumefilter
Blendingmodes
Blending modessupported byAdobe Premiere Proare converted
Effectpropertiesandkeyframes
Effect propertiesand keyframes, ifthe effect alsoexists in AdobePremiere Pro
Adobe Premiere Pro listsunsupported effects as offline in theEffect Controls panel. Some AfterEffects effects have the same namesas those in Adobe Premiere Pro, butsince they’re actually different effects,they aren’t converted.
Expressions Not converted
Layermarkers
Clip markers
Masks andmattes
Not converted
StereoMixer effect
Channel Volumefilter
TimeRemapproperty
Time Remappingeffect
TimeStretchproperty
Speed property Speed and time stretch have aninverse relationship. For example,200% stretch in After Effects convertsto 50% speed in Adobe PremierePro.
Transformpropertyvalues andkeyframes
Motion or Opacityvalues andkeyframes
The keyframe type—Bezier, AutoBezier, Continuous Bezier, or Hold—is retained.
Sourcesettings forR3D sourcefiles
Source settings forR3D source files
164
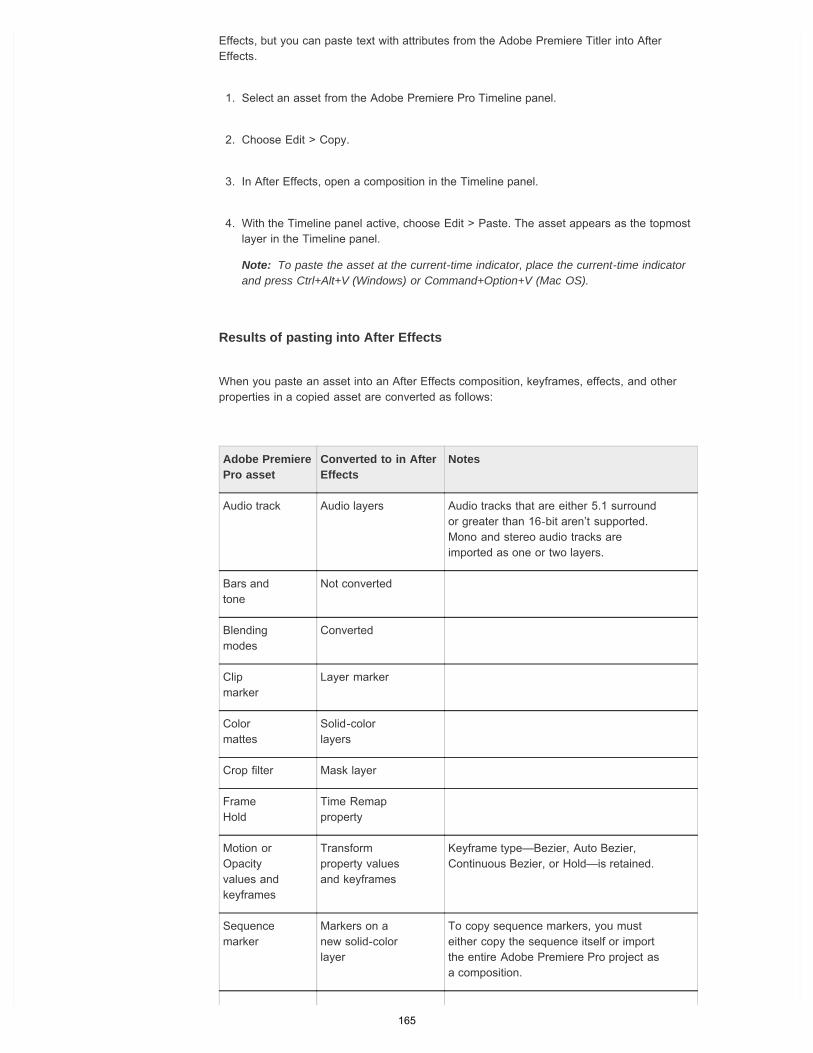
Note:
Effects, but you can paste text with attributes from the Adobe Premiere Titler into AfterEffects.
1. Select an asset from the Adobe Premiere Pro Timeline panel.
2. Choose Edit > Copy.
3. In After Effects, open a composition in the Timeline panel.
4. With the Timeline panel active, choose Edit > Paste. The asset appears as the topmostlayer in the Timeline panel.
To paste the asset at the current-time indicator, place the current-time indicatorand press Ctrl+Alt+V (Windows) or Command+Option+V (Mac OS).
Results of pasting into After Effects
When you paste an asset into an After Effects composition, keyframes, effects, and otherproperties in a copied asset are converted as follows:
Adobe PremierePro asset
Converted to in AfterEffects
Notes
Audio track Audio layers Audio tracks that are either 5.1 surroundor greater than 16-bit aren’t supported.Mono and stereo audio tracks areimported as one or two layers.
Bars andtone
Not converted
Blendingmodes
Converted
Clipmarker
Layer marker
Colormattes
Solid-colorlayers
Crop filter Mask layer
FrameHold
Time Remapproperty
Motion orOpacityvalues andkeyframes
Transformproperty valuesand keyframes
Keyframe type—Bezier, Auto Bezier,Continuous Bezier, or Hold—is retained.
Sequencemarker
Markers on anew solid-colorlayer
To copy sequence markers, you musteither copy the sequence itself or importthe entire Adobe Premiere Pro project asa composition.
165
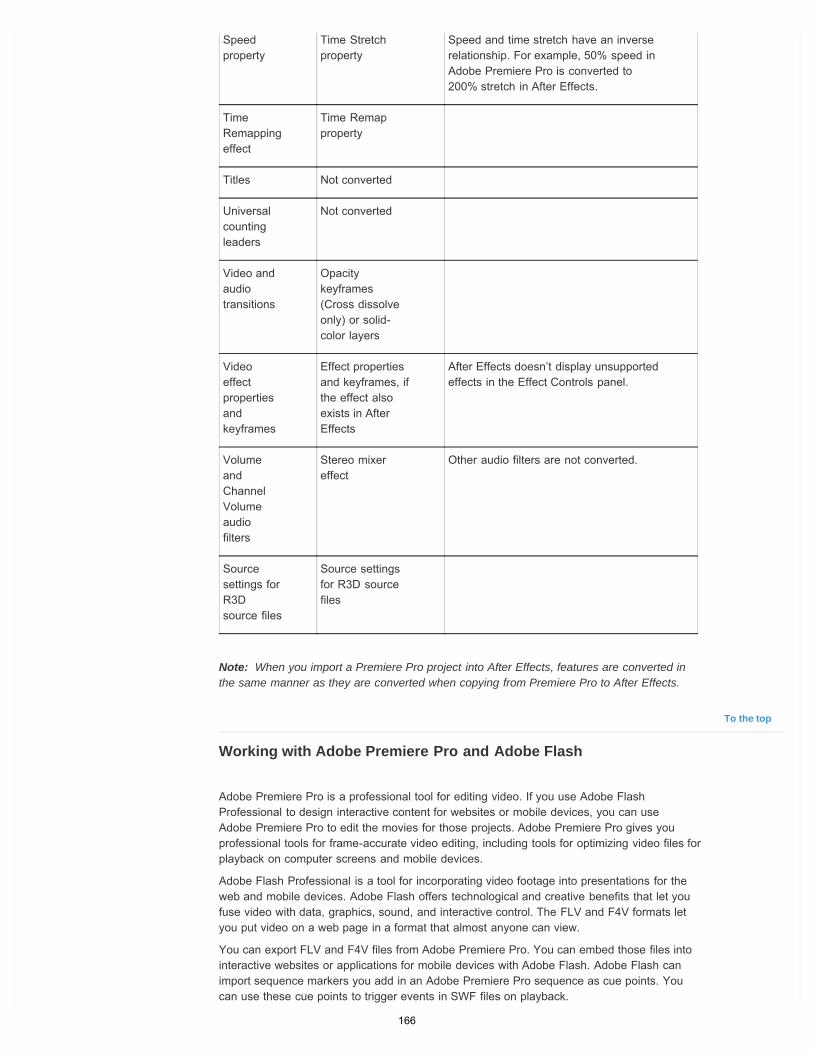
Note:
To the top
When you import a Premiere Pro project into After Effects, features are converted inthe same manner as they are converted when copying from Premiere Pro to After Effects.
Working with Adobe Premiere Pro and Adobe Flash
Adobe Premiere Pro is a professional tool for editing video. If you use Adobe FlashProfessional to design interactive content for websites or mobile devices, you can useAdobe Premiere Pro to edit the movies for those projects. Adobe Premiere Pro gives youprofessional tools for frame-accurate video editing, including tools for optimizing video files forplayback on computer screens and mobile devices.
Adobe Flash Professional is a tool for incorporating video footage into presentations for theweb and mobile devices. Adobe Flash offers technological and creative benefits that let youfuse video with data, graphics, sound, and interactive control. The FLV and F4V formats letyou put video on a web page in a format that almost anyone can view.
You can export FLV and F4V files from Adobe Premiere Pro. You can embed those files intointeractive websites or applications for mobile devices with Adobe Flash. Adobe Flash canimport sequence markers you add in an Adobe Premiere Pro sequence as cue points. Youcan use these cue points to trigger events in SWF files on playback.
Speedproperty
Time Stretchproperty
Speed and time stretch have an inverserelationship. For example, 50% speed inAdobe Premiere Pro is converted to200% stretch in After Effects.
TimeRemappingeffect
Time Remapproperty
Titles Not converted
Universalcountingleaders
Not converted
Video andaudiotransitions
Opacitykeyframes(Cross dissolveonly) or solid-color layers
Videoeffectpropertiesandkeyframes
Effect propertiesand keyframes, ifthe effect alsoexists in AfterEffects
After Effects doesn’t display unsupportedeffects in the Effect Controls panel.
VolumeandChannelVolumeaudiofilters
Stereo mixereffect
Other audio filters are not converted.
Sourcesettings forR3Dsource files
Source settingsfor R3D sourcefiles
166
To the top
To the top
Learn a quick and easy way to connect scripts from Adobe Story withvideo clips using the Adobe Story panel in Premiere Pro.
PLEASE UPGRADE FLASH
To view this content, you need the latest version of theFlash Player. Adobe TV uses the Open Source Media
If you export video files in other standard formats, Adobe Flash can encode your videos withinrich media applications. Adobe Flash uses the latest compression technologies to deliver thegreatest quality possible at small file sizes.
Working with Adobe Premiere Pro and Adobe SpeedGrade
Adobe SpeedGrade is a color grading application that brings advanced color-gradingcapabilities to your footage.
You can color grade a Premiere Pro project directly in SpeedGrade using the Direct-Linkfeature. Or you can use a roundtrip workflow to send your video sequences from PremierePro to SpeedGrade for color grading, and bring them back to Premiere Pro.
For more information, see Working with Adobe SpeedGrade.
Working with Adobe Story and Adobe Premiere Pro
Script-based video editing with Story
The Adobe Story panel in Premiere Pro CC lets you import scripts created in Adobe Story,along with associated metadata to guide your editing.
From within the Adobe Story panel, you can access all the scripts you have in your Storyaccount.
To open the Adobe Story panel from within Premiere Pro, select Window > Adobe Story.
You can quickly navigate to specific scenes, locations, dialogue, and characters as you work.You can use Speech To Text search to find the clips you need and edit the script within thePremiere Pro editing environment.
You can also attach an Adobe Story scene directly to clips in Premiere Pro by following thesesteps:
1. Select Window > Adobe Story to open the Adobe Story panel from within Premiere Pro.
by Maxim Jago http://www.123training.co....
Maxim Jago is an Adobe MasterTrainer, editor, and presenter,specializing in Adobe Digital Videoapplications
Contribute your expertise toAdobe Community Help
167
To the top
Note:
2. Drag the scene that you want to attach from the Adobe Story panel and drop it on therequired clip in the Project panel.
For an overview of all the features in Adobe Story, see this video.
Working with Encore and Premiere Pro
To use Encore CS6 with Premiere Pro CC, see the following resources:
Installing Premiere Pro CC and Encore CS6Using Encore CS6 with Premiere Pro CCEncore CS6 not installed with Creative Cloud
Using Adobe Encore CS6 and Adobe Premiere Pro, you can burn a single sequence to DVDor Blu-ray Disc. You can burn each sequence in your project to a separate DVD or Blu-rayDisc. First, add all the content you want to include on a disc into a sequence. After you editthe sequence, perform the following tasks:
Add Encore chapter markers
You can add Encore chapter markers in a Adobe Premiere Pro sequence. You can send theEncore chapter markers, along with the sequence to Encore.
In Encore, if you create an AutoPlay DVD, the Encore chapter markers become scenemarkers. When viewing the DVD, pressing the Previous button or Next button on the remotecontrol skips backward or forward to the next of these markers. If you create a DVD or Blu-ray Disc with menus, you can link scene buttons on the menus to the Encore chaptermarkers.
Send to Encore or to an MPEG-2 file
You can send a whole sequence, or any portion of a sequence, from Adobe Premiere Pro toEncore. From Encore, you can burn the sequence directly to a DVD without menus, or addmenus and buttons before burning. From Encore, you can export the project in any of thefollowing forms:
you can burn the project to disc,you can save the project to a DVD image file,you can save the project to a set of DVD folders,you can save the project to DVD master files on DLT tape.you can export the project to a SWF file for posting on the web.
Alternatively, using the MPEG2-DVD format, you can export a DVD-compliant MPEG-2 filefrom Adobe Premiere Pro. You can use the MPEG-2 file in most DVD-authoring applications.
Choose a menu template
Encore templates are predesigned menus that come in several styles. Buttons on the
168
Note:
Note:
To the top
Note:
To the top
templates automatically link to chapter markers placed in the sequence. Encore createsadditional submenus as necessary to accommodate all the chapter markers in a sequence.
AutoPlay DVDs do not have menus. Do not choose a template for AutoPlay DVDs.
Customize the menu template
Edit titles, change graphics, or add video for background in Encore. You can also use video inbutton thumbnails by specifying a section of a clip to play in the button.
Preview the disc
Check the functionality and the look of your DVD or Blu-ray Disc menus in the Preview DVDwindow.
Burn the disc
With a DVD or Blu-ray Disc burner installed or connected, you can burn your content to disc.You can save the compressed files to a folder for playback from a computer hard drive. Youcan also save an ISO image to distribute or burn to a DVD.
Encore creates DVDs that conform to DVD-video format. It does not create data oraudio DVDs.
Working with Apple Final Cut Pro and Adobe Premiere Pro
You can import Final Cut Pro project XML files into Premiere Pro. For more information, seeImporting XML project files from Final Cut Pro. You can export Premiere Pro project files asFinal Cut Pro XML files.
For more information, see Export a Final Cut Pro project XML file.
For more information about workflows possible between Final Cut Pro and Premiere Pro, seeOpen workflows with Final Cut Pro and Avid software.
Joost van der Hoeven provides a video tutorial on the Adobe website that demonstratesexchanging information between Final Cut Pro and Premiere Pro using XML projects.
Premiere Pro and Final Cut Pro 7 (and earlier) can share Final Cut Pro XML files for dataexchange. To exchange information between Final Cut Pro X and Premiere Pro, you canuse a third party tool called "Xto7." For more information on using this tool, see here.
See this page for several documents that make the transition from Final Cut Pro to PremierePro easier.
An exported XML file from Premiere Pro can be imported into some versions of FinalCut Express, as well.
Working with Avid Media Composer and Adobe Premiere Pro
For information about the workflows possible between Premiere Pro and Avid Media
169

Twitter™ and Facebook posts are not covered under the terms of Creative Commons.
Legal Notices | Online Privacy Policy
Products DownloadProduct trialsAdobe ReaderAdobe Flash PlayerAdobe AIR
Support & LearningProduct helpForums
BuyFor personal andprofessional useFor students, educators,and staffFor small and mediumbusinessesVolume LicensingSpecial offers
CompanyNews roomPartner programsCorporate responsibilityCareer opportunitiesInvestor RelationsEventsLegalSecurityContact Adobe
Copyright © 2014 Adobe Systems Incorporated. All rights reserved.Terms of Use | Privacy (Updated) | Cookies
Choose your region
Composer, see Open workflows with Final Cut Pro and Avid software.
In this video tutorial, Maxim Jago presents the round-tripping workflow with Avid MediaComposer.
Adobe also recommendsImport 3D layers from Photoshop
Export a still image
Transferring and importing files
Capturing content for DVD
Importing assets from tapeless formats
Exporting to DVD or Blu-ray Disc
Adobe Creative CloudCreative Suite 6Adobe MarketingCloudAcrobatPhotoshopDigital PublishingSuiteElements familySiteCatalystFor education
170

Reports
171
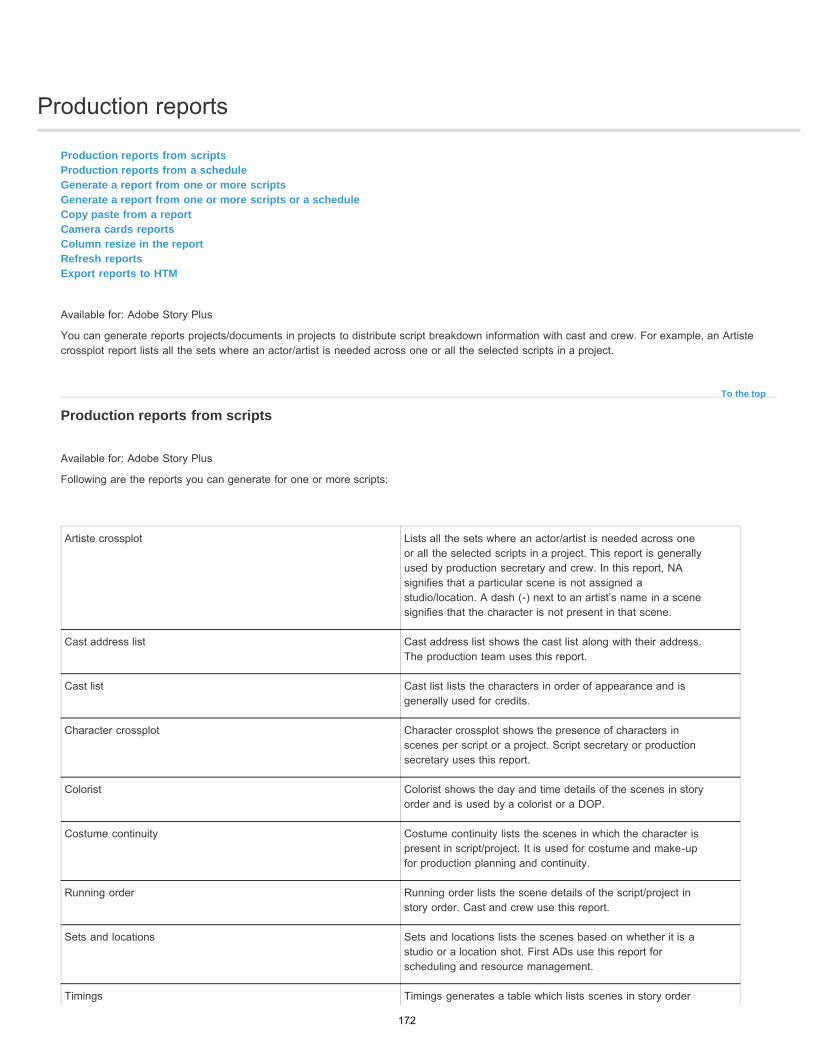
Production reports
To the top
Production reports from scriptsProduction reports from a scheduleGenerate a report from one or more scriptsGenerate a report from one or more scripts or a scheduleCopy paste from a reportCamera cards reportsColumn resize in the reportRefresh reportsExport reports to HTM
Available for: Adobe Story Plus
You can generate reports projects/documents in projects to distribute script breakdown information with cast and crew. For example, an Artistecrossplot report lists all the sets where an actor/artist is needed across one or all the selected scripts in a project.
Production reports from scripts
Available for: Adobe Story Plus
Following are the reports you can generate for one or more scripts:
Artiste crossplot Lists all the sets where an actor/artist is needed across oneor all the selected scripts in a project. This report is generallyused by production secretary and crew. In this report, NAsignifies that a particular scene is not assigned astudio/location. A dash (-) next to an artist’s name in a scenesignifies that the character is not present in that scene.
Cast address list Cast address list shows the cast list along with their address.The production team uses this report.
Cast list Cast list lists the characters in order of appearance and isgenerally used for credits.
Character crossplot Character crossplot shows the presence of characters inscenes per script or a project. Script secretary or productionsecretary uses this report.
Colorist Colorist shows the day and time details of the scenes in storyorder and is used by a colorist or a DOP.
Costume continuity Costume continuity lists the scenes in which the character ispresent in script/project. It is used for costume and make-upfor production planning and continuity.
Running order Running order lists the scene details of the script/project instory order. Cast and crew use this report.
Sets and locations Sets and locations lists the scenes based on whether it is astudio or a location shot. First ADs use this report forscheduling and resource management.
Timings Timings generates a table which lists scenes in story order
172
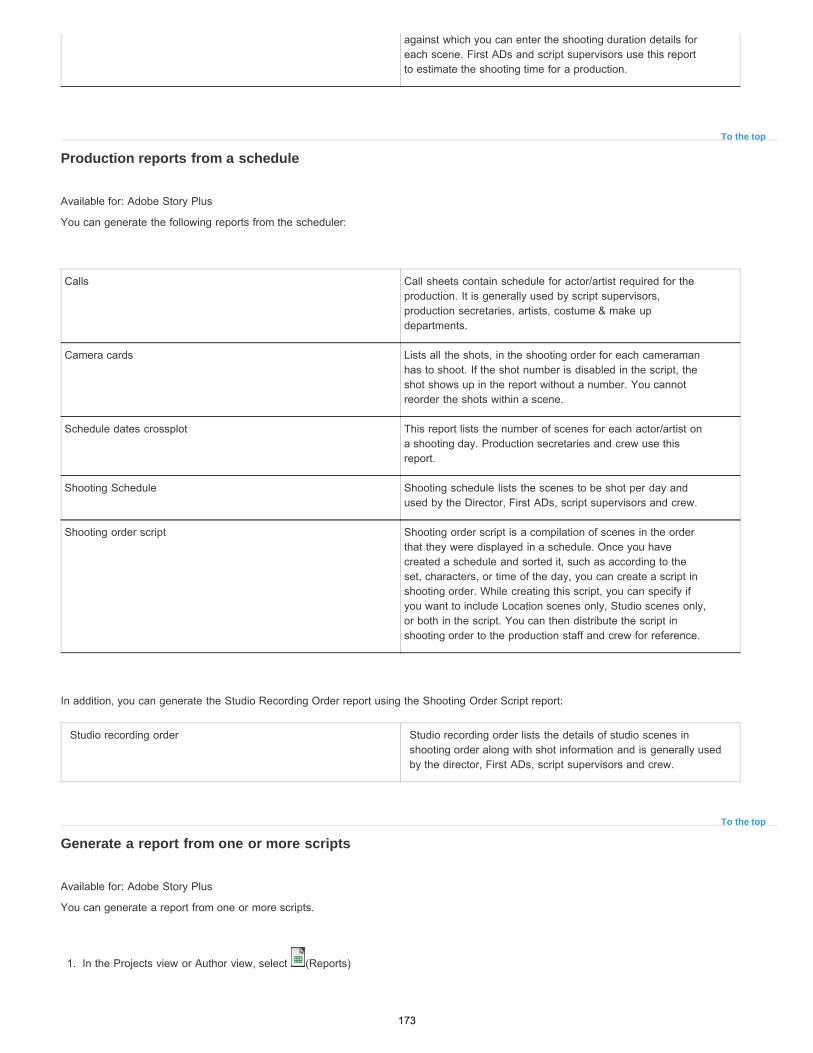
To the top
To the top
Production reports from a schedule
Available for: Adobe Story Plus
You can generate the following reports from the scheduler:
In addition, you can generate the Studio Recording Order report using the Shooting Order Script report:
Studio recording order Studio recording order lists the details of studio scenes inshooting order along with shot information and is generally usedby the director, First ADs, script supervisors and crew.
Generate a report from one or more scripts
Available for: Adobe Story Plus
You can generate a report from one or more scripts.
1. In the Projects view or Author view, select (Reports)
against which you can enter the shooting duration details foreach scene. First ADs and script supervisors use this reportto estimate the shooting time for a production.
Calls Call sheets contain schedule for actor/artist required for theproduction. It is generally used by script supervisors,production secretaries, artists, costume & make updepartments.
Camera cards Lists all the shots, in the shooting order for each cameramanhas to shoot. If the shot number is disabled in the script, theshot shows up in the report without a number. You cannotreorder the shots within a scene.
Schedule dates crossplot This report lists the number of scenes for each actor/artist ona shooting day. Production secretaries and crew use thisreport.
Shooting Schedule Shooting schedule lists the scenes to be shot per day andused by the Director, First ADs, script supervisors and crew.
Shooting order script Shooting order script is a compilation of scenes in the orderthat they were displayed in a schedule. Once you havecreated a schedule and sorted it, such as according to theset, characters, or time of the day, you can create a script inshooting order. While creating this script, you can specify ifyou want to include Location scenes only, Studio scenes only,or both in the script. You can then distribute the script inshooting order to the production staff and crew for reference.
173
To the top
To the top
2. In the Reports dialog, do the following and click Generate:
a. Select the type of the report.
b. If you are generating the report from the Projects view, select the scripts to include in the report.
c. To display the report, select View report on creation.
Generate a report from one or more scripts or a schedule
Available for: Adobe Story Plus
You can generate a report from a script, schedule, or multiple scripts/schedules. When you are generating a report from the Projects view, you caninclude:
One or more scripts for a scripting report
One schedule for a scheduling report
1. Do one of the following:
a. In a schedule, select (Reports).
b. In a script, select .
c. In the Projects view, select .
2. In the Reports dialog, do the following and click Generate:
a. Select the type of the report.
b. If you are generating the report from the Projects view, select the scripts/schedule to be included in the report.
c. If you are generating a report from a schedule, select Location / Studio. Select Location only to include the strips that have locationsspecified for them. Select Studio only to include the strips that are shot in the studio. Select Location & Studio to include all the strips inthe schedule, including scenes for which studio or location is not specified. (These options are available for Calls, Schedule DatesCrossplot, and Shooting Schedule reports.)
d. To display the report, select View report on creation.
Copy paste from a report
Available for: Adobe Story Plus
You can copy and paste content from a report to another report or to an MS Word® document. Once pasted, the formatting and layout of the
174
To the top
Note:
content is maintained. You can edit the contents of the combined document.
Camera cards reports
Available for: Adobe Story Plus
Story can generate Camera Cards report for all the cameras. While generating this report, specify if you want to generate the report for all thecameras or for a particular camera.
Create camera card report
Available for: Adobe Story Plus
1. Do one of the following:
a. In the projects view, click (Reports).
b. In the schedule view, click (Reports).
2. In the Reports dialog, do the following and click Generate:
a. Specify If you want to create report for all the cameras or specify a particular camera number for which to create the report.
b. If you want to include videotape element occurrences in the report, select Include VTs.
c. If you are generating report from the project view, select Select All Documents or one of the schedules. Report cannot be created frommore than one schedule.
d. If you want to generate camera cards only for a specific day in the schedule, set the Day Number or Date options in the Select Dayarea.
e. If you want to create camera cards only for location scenes or studio scenes, select the appropriate option in the Select Location/Studioarea.
You can create Camera Cards report with vision beats/bars as a separate column. See this topic.
Generate the Camera Cards report from a script/Shooting Order script
Available for: Adobe Story Plus customers
In addition to schedules, camera cards can now be generated from the shooting order script and from the source scripts. The shot numberingschemes for the reports are as follows:
Camera Cards [Script]: The camera shot numbers are the same as the camera shot numbers in the source script.Camera Cards [Schedule]: Numbering is sequential and is based on the order of scenes in the schedule. Proper numbering is applied tosub-shots and shots with no camera shot number.Camera Cards [Shooting Order Script]: The camera shot numbers are the same as the camera shot numbers in the shooting order script.
175
To the top
To the top
To the top
Column resize in the report
Available for: Adobe Story Plus
Now you can resize the columns in a report using drag-and-drop.
While you are dragging the column boundary, Story displays the readjusted width of the column in inches. For reports that extend beyond onepage, adjusting the column width in one page changes the column width on all the pages.
Resize columns
Available for: Adobe Story Plus
Hover the mouse over a column boundary. When the cursor changes in shape, right-click and drag the boundary to readjust the columnwidth.
Refresh reports
Available for: Adobe Story Plus
You can refresh your reports to include the changes made to the source documents of a report. When you refresh a report, the pre-refreshcontents of the reports are saved as a version in the history.
Refresh a report
Available for: Adobe Story Plus
After you edit one or more source documents of a report, complete the following steps to update the report.
In the report view, click the Refresh icon.
Export reports to HTM
Available for: Adobe Story Plus
Now you can export the reports to an MS® Word compatible .htm format. Due to template-related changes, you can use this option only for reportsgenerated after this feature is made available.
Export a report to HTM
Available for: Adobe Story Plus
1. In a report, select File > Export As > HTM - MS® Word Compatible (.htm) and save the report to your computer.
2. Right click the file and choose to open the file with MS® Word. For best results, view the report file in the Print Layout mode.
You can manipulate the report just like any other word document. The column resize option works for individual pages only and not for thewhole report.
176

Twitter™ and Facebook posts are not covered under the terms of Creative Commons.
Legal Notices | Online Privacy Policy
177
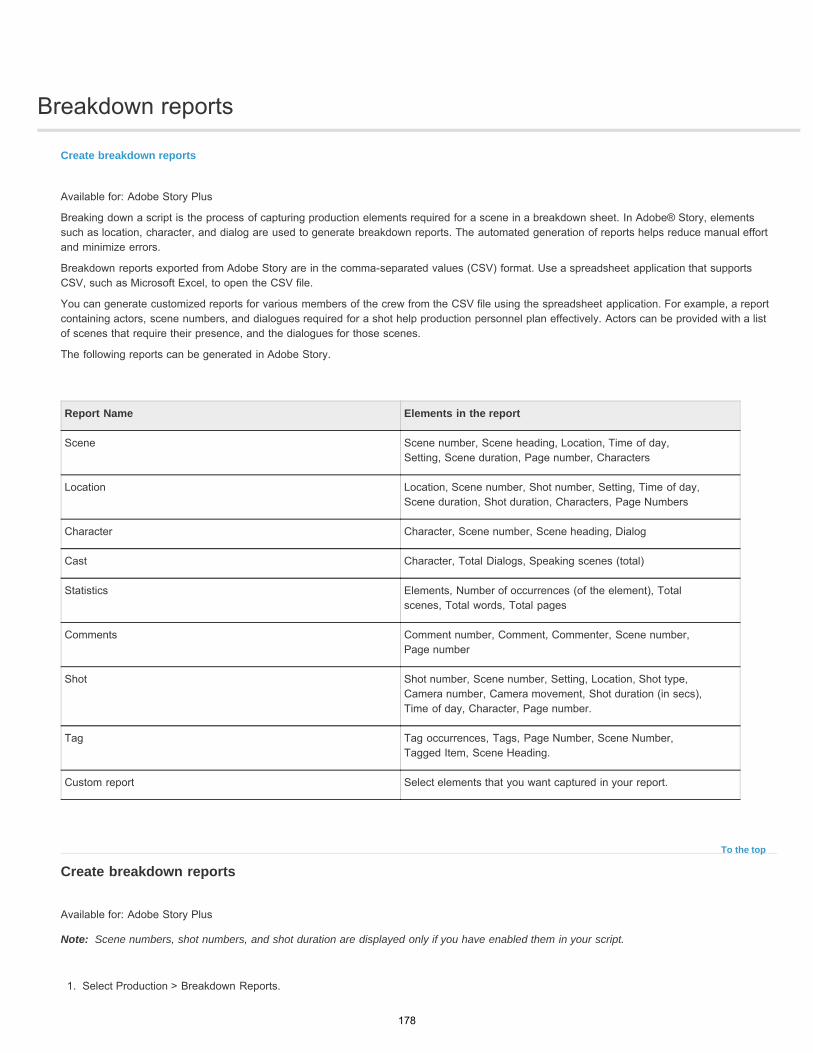
Breakdown reports
To the top
Note:
Create breakdown reports
Available for: Adobe Story Plus
Breaking down a script is the process of capturing production elements required for a scene in a breakdown sheet. In Adobe® Story, elementssuch as location, character, and dialog are used to generate breakdown reports. The automated generation of reports helps reduce manual effortand minimize errors.
Breakdown reports exported from Adobe Story are in the comma-separated values (CSV) format. Use a spreadsheet application that supportsCSV, such as Microsoft Excel, to open the CSV file.
You can generate customized reports for various members of the crew from the CSV file using the spreadsheet application. For example, a reportcontaining actors, scene numbers, and dialogues required for a shot help production personnel plan effectively. Actors can be provided with a listof scenes that require their presence, and the dialogues for those scenes.
The following reports can be generated in Adobe Story.
Create breakdown reports
Available for: Adobe Story Plus
Scene numbers, shot numbers, and shot duration are displayed only if you have enabled them in your script.
1. Select Production > Breakdown Reports.
Report Name Elements in the report
Scene Scene number, Scene heading, Location, Time of day,Setting, Scene duration, Page number, Characters
Location Location, Scene number, Shot number, Setting, Time of day,Scene duration, Shot duration, Characters, Page Numbers
Character Character, Scene number, Scene heading, Dialog
Cast Character, Total Dialogs, Speaking scenes (total)
Statistics Elements, Number of occurrences (of the element), Totalscenes, Total words, Total pages
Comments Comment number, Comment, Commenter, Scene number,Page number
Shot Shot number, Scene number, Setting, Location, Shot type,Camera number, Camera movement, Shot duration (in secs),Time of day, Character, Page number.
Tag Tag occurrences, Tags, Page Number, Scene Number,Tagged Item, Scene Heading.
Custom report Select elements that you want captured in your report.
178
Twitter™ and Facebook posts are not covered under the terms of Creative Commons.
Legal Notices | Online Privacy Policy
2. Select the type of report you want to generate from the menu.
3. Save the report to a location on your computer.
For tracked documents, Adobe Story uses the Show As Final mode when generating breakdown reports.
Create custom breakdown reports
Available for: Adobe Story Plus
You can create a custom report by selecting elements you want listed in your report. Apart from elements, you can also choose special items suchas tags, page number, and word count. The word count corresponds to the total number of words in the document.
1. Select Production > Breakdown Reports > Custom Report.
2. In the Custom Breakdown Report dialog, select the items that you want to capture in the report.
3. Click Create.
If you select Split Scene Heading, Adobe Story captures the three parts of a scene heading (INT/EXT, Location, Time of Day) as separate AdobeColumns in the report.
If you select Shot duration, two columns corresponding to Shot duration and Running time are created in the report.
179

Scheduling
180
Scheduling overview
Twitter™ and Facebook posts are not covered under the terms of Creative Commons.
Legal Notices | Online Privacy Policy
Available for: Adobe Story Plus
Scheduling involves grouping scenes based on the day of their shooting and listing resources required for those scenes. The scenes that youchoose can belong to the same script or different scripts.
When you select scenes or scripts in Adobe Story for scheduling, Adobe Story automatically creates a schedule using information in those scripts.You can later edit the schedule according to your requirements.
Once you have created a schedule, you can do the following and more:
Add breaks\banners to a schedule: You can add one or more day breaks\banners to a schedule. A day break marks the end of the day in aschedule. A day break also collates and displays the total number of pages in the scenes until that break. The number of pages gives you anidea of the volume of the script to be covered before or after the break. A banner is any break apart from an end of day break, such as alunch break.
Color: You can create presets and highlight the scenes that have a particular value/combination of values for Studio/Location, INT/EXT, andDay/ Night. For example, in a schedule, you can create a preset and highlight all scenes to shoot in the studio in the daytime.
Sort schedule: You can sort a schedule based on values in one or more fields of a schedule, such as by Script (A-Z), Studio/Location (A-Z),and Scene (Ascending: 001, 002, etc.).
Split schedule: You can split a schedule into two schedules. You can select a scene where you want to split a schedule and split theschedule into two schedules. Or you can split a schedule based on studio/location.
Show/hide columns: You can selectively display columns in a schedule. Story does not allow you to hide all the columns in a schedule. Atleast one column remains visible.
Save a schedule to disk: You can save a schedule to disk. The saved schedule file takes a .stdoc extension. Also, you can import (open) asaved schedule file.
Export the Schedule as CSV: You can export visible or all columns in a schedule as a CSV (comma-separated values) file. Use aspreadsheet application that supports CSV, such as Microsoft Excel, to open the CSV file.
Save versions of a schedule: You can save one or more versions of a schedule on the server. You can open a saved version of a schedulein the history.
Create a script in shooting order: Script in shooting order is a compilation of scenes in the order that they were displayed in a schedule. Onceyou have created a schedule sorted it, such as according to the set, characters, or time of the day, you can create a script in shooting order.You can then distribute the script in shooting order to the production staff and crew for reference.
181
Create schedule
Twitter™ and Facebook posts are not covered under the terms of Creative Commons.
Legal Notices | Online Privacy Policy
Available for: Adobe Story Plus
1. Do one of the following based on your current view:
In the Projects view, click New.
In the Authoring view, select File > New.
2. In the Create New Document dialog, select Schedule from the type menu.
3. Enter a title for the schedule, and click Create.
4. Select one or more scripts for which you want to create the schedule. Use Shift-click to select scripts in a sequence or Ctrl-click to selectmultiple, non-contiguous scripts.
5. If you have selected just one script, you can select the scenes that you want to schedule. Use Shift-click to select scenes in a sequenceor Ctrl-click to select multiple, non-contiguous scenes. If you select a block of scripts (multiple scripts), Story creates the schedule for allthe scenes in the selected scripts. If you do not select any scenes in a script, Story creates a schedule using all the scenes in the selectedscript.
6. Click OK to generate the schedule.
182
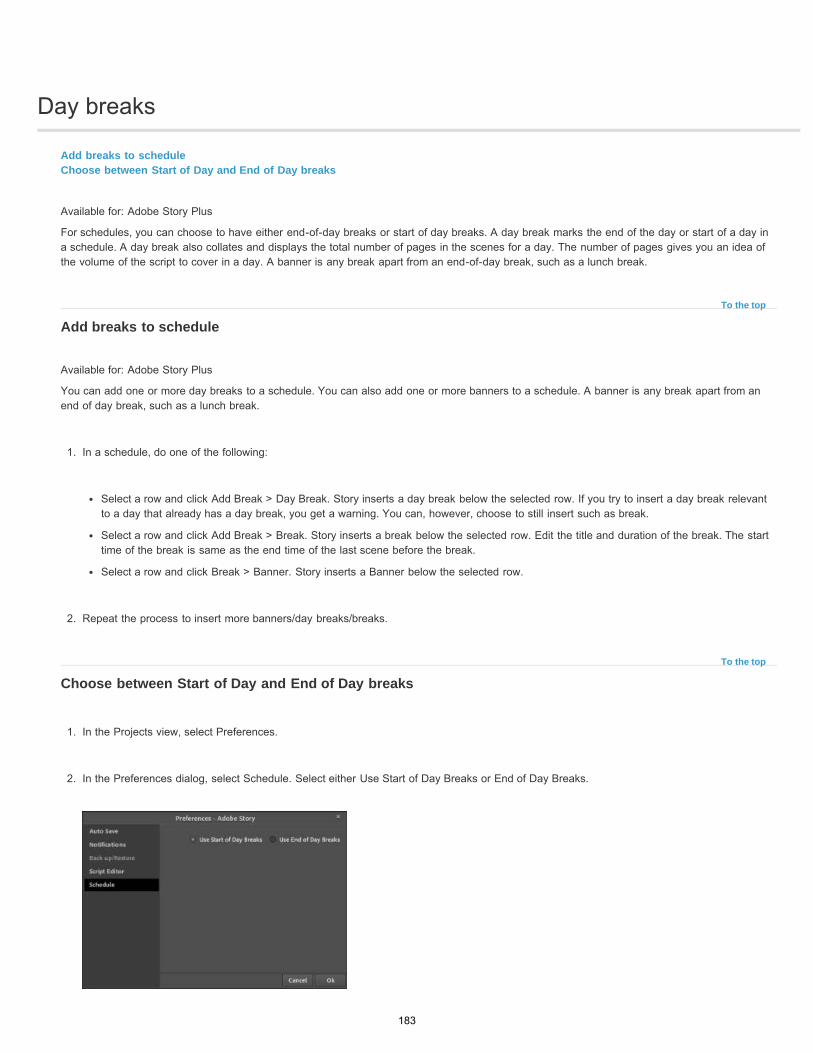
Day breaks
To the top
To the top
Add breaks to scheduleChoose between Start of Day and End of Day breaks
Available for: Adobe Story Plus
For schedules, you can choose to have either end-of-day breaks or start of day breaks. A day break marks the end of the day or start of a day ina schedule. A day break also collates and displays the total number of pages in the scenes for a day. The number of pages gives you an idea ofthe volume of the script to cover in a day. A banner is any break apart from an end-of-day break, such as a lunch break.
Add breaks to schedule
Available for: Adobe Story Plus
You can add one or more day breaks to a schedule. You can also add one or more banners to a schedule. A banner is any break apart from anend of day break, such as a lunch break.
1. In a schedule, do one of the following:
Select a row and click Add Break > Day Break. Story inserts a day break below the selected row. If you try to insert a day break relevantto a day that already has a day break, you get a warning. You can, however, choose to still insert such as break.
Select a row and click Add Break > Break. Story inserts a break below the selected row. Edit the title and duration of the break. The starttime of the break is same as the end time of the last scene before the break.
Select a row and click Break > Banner. Story inserts a Banner below the selected row.
2. Repeat the process to insert more banners/day breaks/breaks.
Choose between Start of Day and End of Day breaks
1. In the Projects view, select Preferences.
2. In the Preferences dialog, select Schedule. Select either Use Start of Day Breaks or End of Day Breaks.
183

Twitter™ and Facebook posts are not covered under the terms of Creative Commons.
Legal Notices | Online Privacy Policy
184
Information only banner
Twitter™ and Facebook posts are not covered under the terms of Creative Commons.
Legal Notices | Online Privacy Policy
To the top
To the top
Add information only bannerRemove information only banner
Available for: Adobe Story Plus
You can add an information-only banner to a schedule to make announcements. An information-only banner supports text, including numeric,values.
Add information only banner
Available for: Adobe Story Plus
1. In a schedule, select the row under which you want to add the banner.
2. Select Edit > Add Banner (No Duration).
3. Edit the banner info to add a message/announcement.
Remove information only banner
Available for: Adobe Story Plus
To remove information only banner, click the cross at the right side in the banner.
185
Showhide columns
Twitter™ and Facebook posts are not covered under the terms of Creative Commons.
Legal Notices | Online Privacy Policy
Available for: Adobe Story Plus
You can selectively display columns in a schedule. Using this feature, you can hide the columns that have no content or are not required in aschedule. Story requires you to have at least one column visible in a schedule.
1. In a schedule, click (Show/Hide columns) at the right corner of the column names.
2. Deselect column names to hide.
3. Select column names to display.
186

Drag-and-drop scenes, breaks, day breaks, and banners
Twitter™ and Facebook posts are not covered under the terms of Creative Commons.
Legal Notices | Online Privacy Policy
Available for: Adobe Story Plus
To rearrange a schedule, you can drag-and-drop the scenes, breaks, and banners in a schedule.
1. In a schedule, select one or more scenes, breaks, and banners. Use Shift-click to select scenes, breaks, and banners in a sequence or Ctrl-click to select multiple, non-contiguous scripts.
2. Drag-and-drop the selected scenes, breaks, and banners to the appropriate place in the schedule. You can also copy/cut and paste scenes,breaks, and banners to the appropriate locations in the schedule.
187
Add a color setting
Twitter™ and Facebook posts are not covered under the terms of Creative Commons.
Legal Notices | Online Privacy Policy
Available for: Adobe Story Plus
1. In a schedule, click Color.
2. In the pop-up menu, click Edit/Add Colors.
3. In the Edit Colors dialog, click Add New Color Setting.
4. Select the check box for the setting.
5. Select a color for the setting.
6. Specify values for Studio/Location, Scene Setting, and Time of day according to your requirements.
7. Click Apply to apply the setting to the schedule.
188
Add scenes/scripts to a schedule
Twitter™ and Facebook posts are not covered under the terms of Creative Commons.
Legal Notices | Online Privacy Policy
1. Open the schedule.
2. Select Edit > Add Scenes/Scripts.
3. Select the desired category and project.
4. Choose the script or scene that you want to add to the schedule. You can select multiple scripts or scenes if necessary.
5. Click OK.
189
Auto calculation of shooting time in a schedule
Twitter™ and Facebook posts are not covered under the terms of Creative Commons.
Legal Notices | Online Privacy Policy
To the top
Remove manual changes in the scene start time
Available for: Adobe Story Plus
Story helps you time the strips and days in a schedule.
When you enter scene start time (S. Start) and scene duration (S. Dur.) for a strip, Story calculates and displays the following:
1. The end time of the strip (S. End)
2. Start time and end time of the subsequent strips in the schedule until a day's break
To rearrange the schedule, you can drag-and-drop the strips up and down. Use Shift+click to select continuous strips. Use Ctrl+click to selectmultiple, non contiguous strips.
Remove manual changes in the scene start time
Available for: Adobe Story Plus
By default, the start time (S. Start) of a strip is same as its previous strip's end time (S. End). You can manually change start time of a strip. Toremove the manual changes, click Recalc.
190
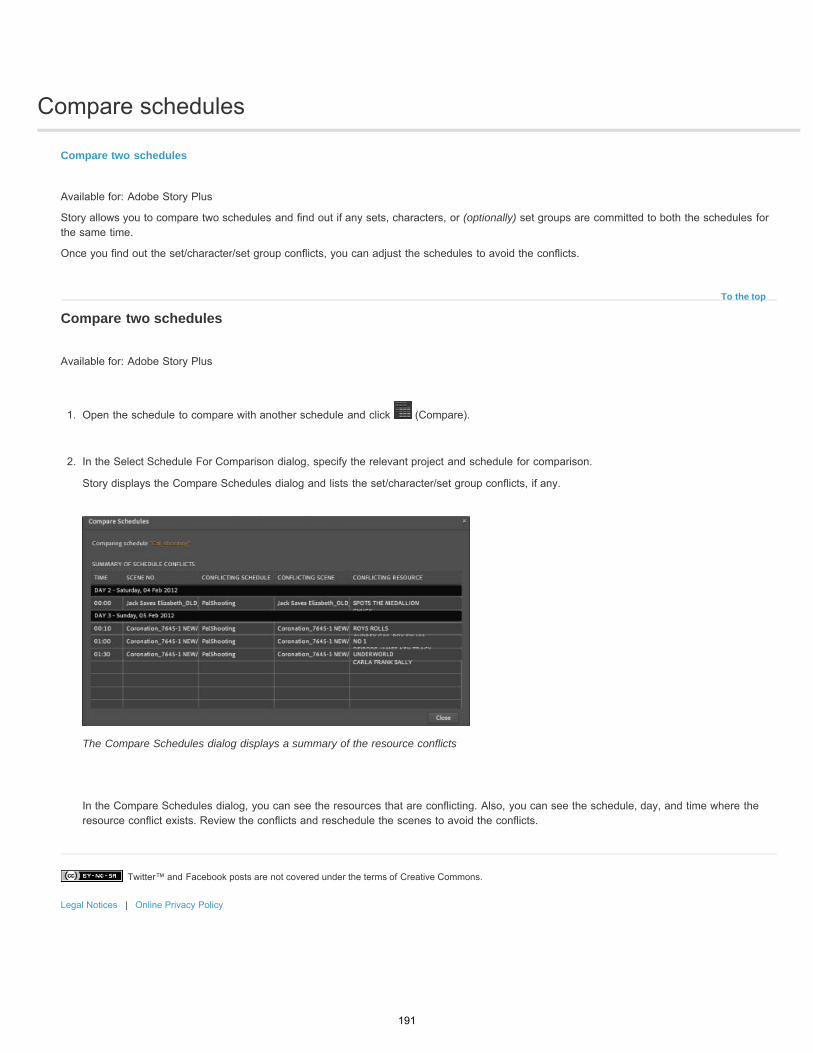
Compare schedules
Twitter™ and Facebook posts are not covered under the terms of Creative Commons.
Legal Notices | Online Privacy Policy
To the top
Compare two schedules
Available for: Adobe Story Plus
Story allows you to compare two schedules and find out if any sets, characters, or (optionally) set groups are committed to both the schedules forthe same time.
Once you find out the set/character/set group conflicts, you can adjust the schedules to avoid the conflicts.
Compare two schedules
Available for: Adobe Story Plus
1. Open the schedule to compare with another schedule and click (Compare).
2. In the Select Schedule For Comparison dialog, specify the relevant project and schedule for comparison.
Story displays the Compare Schedules dialog and lists the set/character/set group conflicts, if any.
The Compare Schedules dialog displays a summary of the resource conflicts
In the Compare Schedules dialog, you can see the resources that are conflicting. Also, you can see the schedule, day, and time where theresource conflict exists. Review the conflicts and reschedule the scenes to avoid the conflicts.
191
Create schedule workspaces
To the top
To the top
To the top
To the top
Save a workspaceApply a workspace to the current scheduleApply document-level view settings to a scheduleSet a default workspaceDelete a schedule workspace
A schedule workspace is a set of view settings that you can reuse across schedules. These settings include:
Column width
Column sequence
Column visibility—whether a column is hidden or visible
Strip colors
Save a workspace
1. In the Schedule view, adjust the column settings and strip colors.
2. Select View > Workspaces > Save Current Workspace.
3. In the Add New Workspace dialog, specify a name for the new workspace.
4. Click Yes.
Apply a workspace to the current schedule
In the Schedule view, select Workspaces > [desired workspace name].
Apply document-level view settings to a schedule
Instead of applying view settings from a workspace, you can also apply the settings saved in the schedule itself. Do the following:
1. Select View > Workspaces > Use Workspace From Document.
While workspaces are user-specific, multiple users can share and view settings stored at a document level.
Set a default workspace
1. Select View > Workspaces > Manage Workspaces.
192
Twitter™ and Facebook posts are not covered under the terms of Creative Commons.
Legal Notices | Online Privacy Policy
Note:
To the top
Note:
2. Select the desired workspace from the pop-up menu, select Default Workspace, and then click OK.
To quickly set the current workspace as the default workspace, select View > Workspaces > Set Selected Workspace As Default.
You can set document-level view settings as default by setting Use Workspace From Document as the default workspace.
Delete a schedule workspace
1. In the Schedule view, select View > Workspaces > Manage Workspaces.
2. Select a workspace from the pop-up menu and click Delete.
3. Click OK.
You cannot delete the default workspace.
193
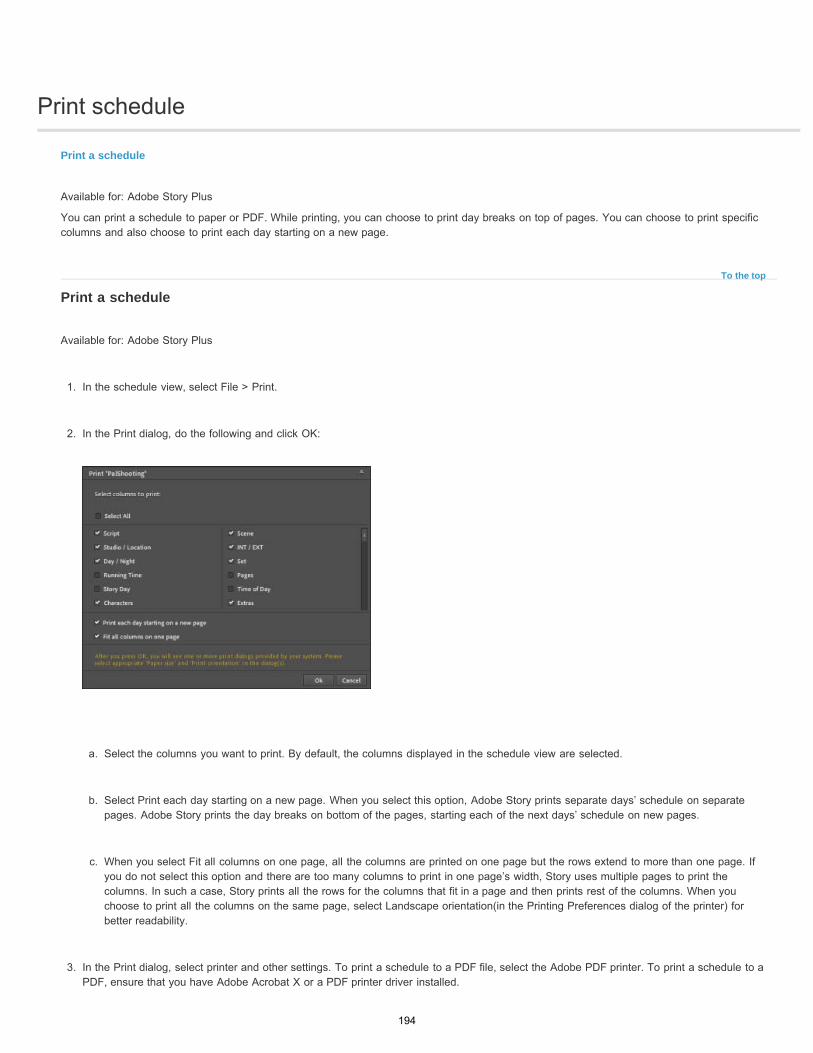
Print schedule
To the top
Print a schedule
Available for: Adobe Story Plus
You can print a schedule to paper or PDF. While printing, you can choose to print day breaks on top of pages. You can choose to print specificcolumns and also choose to print each day starting on a new page.
Print a schedule
Available for: Adobe Story Plus
1. In the schedule view, select File > Print.
2. In the Print dialog, do the following and click OK:
a. Select the columns you want to print. By default, the columns displayed in the schedule view are selected.
b. Select Print each day starting on a new page. When you select this option, Adobe Story prints separate days’ schedule on separatepages. Adobe Story prints the day breaks on bottom of the pages, starting each of the next days’ schedule on new pages.
c. When you select Fit all columns on one page, all the columns are printed on one page but the rows extend to more than one page. Ifyou do not select this option and there are too many columns to print in one page’s width, Story uses multiple pages to print thecolumns. In such a case, Story prints all the rows for the columns that fit in a page and then prints rest of the columns. When youchoose to print all the columns on the same page, select Landscape orientation(in the Printing Preferences dialog of the printer) forbetter readability.
3. In the Print dialog, select printer and other settings. To print a schedule to a PDF file, select the Adobe PDF printer. To print a schedule to aPDF, ensure that you have Adobe Acrobat X or a PDF printer driver installed.
194

Twitter™ and Facebook posts are not covered under the terms of Creative Commons.
Legal Notices | Online Privacy Policy
For best results, print the reports in landscape, especially when you are printing all the columns on one page.
195
Remove a script from the schedule
Twitter™ and Facebook posts are not covered under the terms of Creative Commons.
Legal Notices | Online Privacy Policy
1. With the schedule open, select Edit > Remove Scripts.
2. In the dialog box that appears, select one or more scripts that you want to remove.
3. Click OK.
196
Save schedule to disk as a file
Twitter™ and Facebook posts are not covered under the terms of Creative Commons.
Legal Notices | Online Privacy Policy
To the top
To the top
Save a schedule to diskOpen a schedule saved to disk
Available for: Adobe Story Plus
You can save a schedule to disk as a file with a .stdoc extension. Once you have saved a schedule to disk, you can share the schedule withother users who import it into Adobe Story.
Save a schedule to disk
Available for: Adobe Story Plus
1. In a schedule, select File > Save to Disk.
2. In the dialog box, specify the name and location of the script file and click Save. The file is saved with the extension .stdoc
Open a schedule saved to disk
Available for: Adobe Story Plus
1. Do one of the following based on your current view:
In the Projects view, click Import.
In a Schedule view, click File > Import.
2. In the dialog box, select a schedule that you have saved to disk (.stdoc file).
197
Save versions of a schedule
To the top
To the top
Note:
Note:
Save a version of a scheduleView previous versions of a scheduleSave a copy of a schedule
Available for: Adobe Story Plus
You can save versions of a schedule for backup. If necessary, you can view the available versions of a schedule and open a version forreference.
Save a version of a schedule
Available for: Adobe Story Plus
1. In a schedule, select File > Save As.
2. Specify a title and description for the version.
View previous versions of a schedule
Available for: Adobe Story Plus
Information about various versions of the schedule is displayed in the History panel. Information includes version number, author, and the timestamp. The content that you entered in the Comments section when versioning a document is displayed when you move your mouse over theComment icon.
1. Select View > Show History. The History panel containing various versions of the schedule appears.
2. Double-click the version that you want to view. The version appears in Adobe Story.
You can only view contents from previous versions. You cannot edit the content, or save file as a new version.
Delete schedule versions in the History panel (author only)
Available for: Adobe Story Plus
Click the delete (trash) icon to delete the corresponding schedule version. Version numbers of other versions are unaffected. The History panelis not displayed if you delete all versions of a document.
You cannot delete the current version of a schedule.
Search schedule in the History panel
Available for: Adobe Story Plus
198
Twitter™ and Facebook posts are not covered under the terms of Creative Commons.
Legal Notices | Online Privacy Policy
To the top
You can search schedule versions based on their version name, description, cast list, version number, created by, and time stamp. Enter text inthe search box within the History panel. The relevant versions are displayed.
Save a copy of a schedule
Available for: Adobe Story Plus
You can create a duplicate copy of a schedule.
1. In a schedule, select File > Save As.
2. Select Copy.
3. Specify a title for the copy.
199
Schedule notes
Twitter™ and Facebook posts are not covered under the terms of Creative Commons.
Legal Notices | Online Privacy Policy
Available for: Adobe Story Plus
You can add schedule notes to strip properties of a schedule. These notes are relevant to the strips.
200
Schedule properties
Twitter™ and Facebook posts are not covered under the terms of Creative Commons.
Legal Notices | Online Privacy Policy
To the top
Edit schedule properties
Available for: Adobe Story Plus
Story now has the following properties for schedules:
1. Schedule name
2. Schedule title
3. Week number
The values of these properties are displayed in the scheduling reports. For example:
A shooting schedule report displays the week number in the header.
Studio Recording Order report displays the Schedule name property’s value in the episode number field.
Edit schedule properties
Available for: Adobe Story Plus
1. In a schedule, select Edit > Schedule properties.
2. In the Schedule Properties dialog, enter the values for the following:
a. Schedule name: Enter a name of the schedule. Some reports display the value in this field as Episode number.
b. Schedule title: Enter a description for the schedule.
c. Week number: This is the week number in which the strips in the schedule are shot.
201
Share a schedule
Twitter™ and Facebook posts are not covered under the terms of Creative Commons.
Legal Notices | Online Privacy Policy
Available for: Adobe Story Plus
1. In the schedule, select File > Share.
2. In the Share Document dialog box, enter the e-mail address of the person with whom you are sharing the file.
3. Select a role for the person.
4. To add another person to the list, click below the current text menu.
5. If you want Adobe® Story to send an e-mail to users with whom you have shared the schedule, select Send E-mail Notification.
6. Click OK.
202
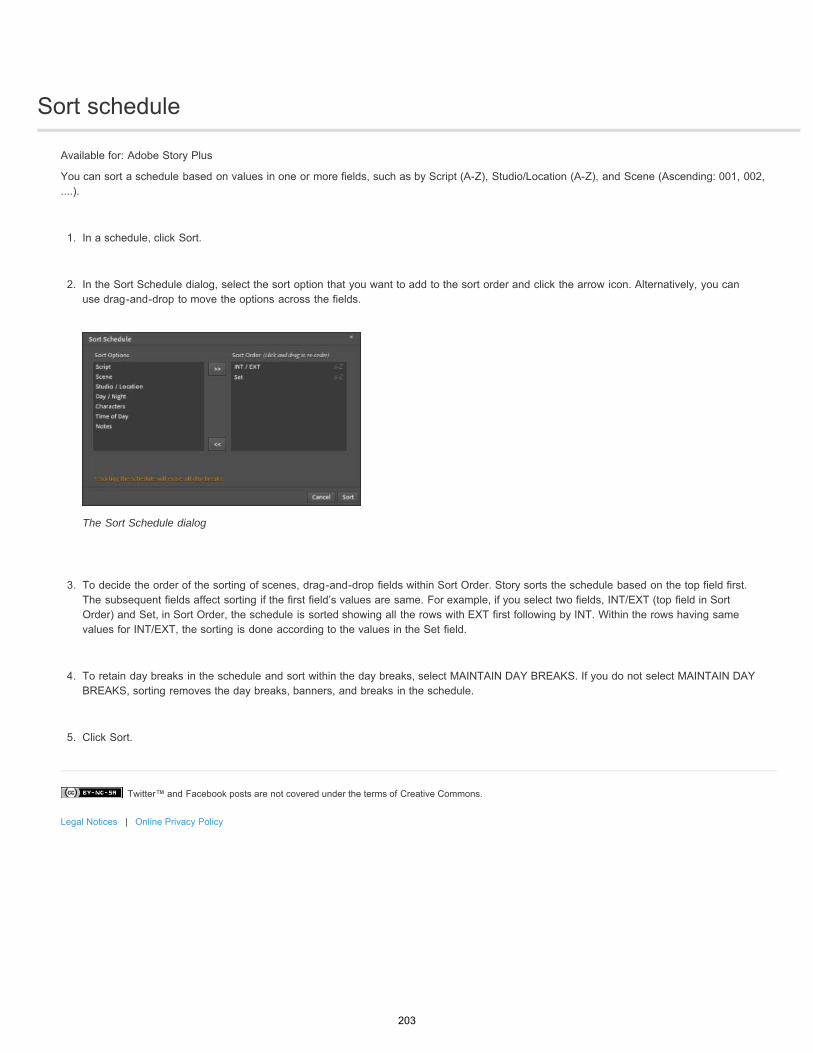
Sort schedule
Twitter™ and Facebook posts are not covered under the terms of Creative Commons.
Legal Notices | Online Privacy Policy
Available for: Adobe Story Plus
You can sort a schedule based on values in one or more fields, such as by Script (A-Z), Studio/Location (A-Z), and Scene (Ascending: 001, 002,....).
1. In a schedule, click Sort.
2. In the Sort Schedule dialog, select the sort option that you want to add to the sort order and click the arrow icon. Alternatively, you canuse drag-and-drop to move the options across the fields.
The Sort Schedule dialog
3. To decide the order of the sorting of scenes, drag-and-drop fields within Sort Order. Story sorts the schedule based on the top field first.The subsequent fields affect sorting if the first field’s values are same. For example, if you select two fields, INT/EXT (top field in SortOrder) and Set, in Sort Order, the schedule is sorted showing all the rows with EXT first following by INT. Within the rows having samevalues for INT/EXT, the sorting is done according to the values in the Set field.
4. To retain day breaks in the schedule and sort within the day breaks, select MAINTAIN DAY BREAKS. If you do not select MAINTAIN DAYBREAKS, sorting removes the day breaks, banners, and breaks in the schedule.
5. Click Sort.
203
Split scenes
Twitter™ and Facebook posts are not covered under the terms of Creative Commons.
Legal Notices | Online Privacy Policy
To the top
Split a scene
Available for: Adobe Story Plus
In a schedule, if a scene is going to be shot across multiple days, you can split the scene.
Split a scene
Available for: Adobe Story Plus
Right-click a scene and from the pop-up menu, select Split Scene. The strip is split into two. You can further add notes, schedule notes toclarify that a scene is getting shot across multiple days.
204
Split schedule
Twitter™ and Facebook posts are not covered under the terms of Creative Commons.
Legal Notices | Online Privacy Policy
To the top
To the top
Split a schedule at selectionSplit a schedule by studio/loc
Available for: Adobe Story Plus
Story allows you to split a schedule into two schedules. For example, when you have sorted a schedule according to Day / Night, you can split theschedule into two schedules, one with all the day scenes and the other with all the night scenes. Also, you can split a schedule by Studio\Locationscenes also.
Split a schedule at selection
Available for: Adobe Story Plus
Split at selection option splits a schedule into two at the selected strip. The selected strip is included in the first schedule.
1. In a schedule, select the scene at which you want to split the schedule.
2. Click Split and select Split At Selection.
3. In the Split Schedule dialog, give the names to the two new schedules.
4. If you want to open the two schedules as new tabs, select Open Split Documents As New Tabs.
5. Click OK.
Split a schedule by studio/loc
Available for: Adobe Story Plus
Split Studio\Loc option splits a schedule into two schedules: one with scenes where set is Studio and another where the set is Location. Thescenes in the original schedule where sets are specified as STU/LOC or none are included in both the schedules.
In a schedule, click Split and select Split Studio/Loc.
You get two schedules with the original schedule’s name suffixed with _Split-A 1 and _Split-B 1. Split-A 1 includes all the scenes with set asStudio and Stu/Loc. Split-B 1 includes all the scenes with set as Location and Stu/Loc.
205
Sync schedule
Twitter™ and Facebook posts are not covered under the terms of Creative Commons.
Legal Notices | Online Privacy Policy
To the top
Sync schedule
Available for: Adobe Story Plus
You can retain some of the data in the schedule during the sync. You can select the properties to sync. The properties you do not select, arenot synced and the data is retained in the schedule.
Sync schedule
Available for: Adobe Story Plus
1. In the schedule, click (Sync). The Sync Schedule dialog appears, listing changes only for the properties that you’ve chosen to view.
2. In the Sync Schedule dialog:
a. Select the appropriate added, deleted, and changed scenes to sync.
b. To sync tags, select Sync Tags.
3. To selectively sync properties of the added, deleted, and changed scenes:
a. Click Select Properties To Update.
b. In the Select Properties To Update dialog, select the appropriate properties.
206
Use color settings to identify rows
Twitter™ and Facebook posts are not covered under the terms of Creative Commons.
Legal Notices | Online Privacy Policy
Available for: Adobe Story Plus
You can identify rows with specific values for Studio/Location, Int./Ext., and Day/Night using color settings. You can also customize values forStudio/Location, Int./Ext., and Day/Night; and assign a color to the set. In addition to the three default color settings, you can add up to threemore settings in the Assign Colors dialog to identify rows. The customized options are reflected in the Color menu. You can also customizecolors for Day Breaks, Breaks, and Banners.
For example, you want to identify all rows that have to be shot outdoors in a studio at night. You create a color setting by setting the valuesStudio, EXT, Night for the options Studio/Location, Scene Setting, and Time of Day. You then choose a color for the preset. When you apply thecolor setting to a schedule, all rows that match the values in the preset are displayed in the specified color.
1. In a schedule, click Color.
2. In the menu, click one or more color settings. The rows with the matching field values get highlighted in the schedule with the selectedcolor.
207
View or edit schedules in story order
Twitter™ and Facebook posts are not covered under the terms of Creative Commons.
Legal Notices | Online Privacy Policy
Note:
Note:
1. Open a schedule.
If you’re prompted to upgrade/synch the schedule with the current version of Story, click Yes.
2. In the Authoring view, select View > Story Order. The schedule is displayed in story order.
While working with the schedule displayed in the story order, you may not be able to edit some of the fields available for editing in theshooting order view. Additionally, some of the operations available in the shooting order view are not available in the story order view.
208