Embed Size (px)
Citation preview
HELiOS Marathon™ H850Portable Oxygen Unit
Home Use Guide

HELiOS is a trademark of CAIRE Inc.To obtain information about a warranty, if any, contact CAIRE Inc.Technical Services Department, or your local representative.
This device is intended only for the delivery of medical grade oxygen as prescribed by your physician.If you have questions about the operation of the equipment, please contact your oxygen supplier.
C o n t e n t s
Safety Information ................................................................... 1Overview .......................................................................................1Warnings .......................................................................................1Cautions ........................................................................................5Notes .............................................................................................6Definition Of Symbols ...................................................................7Portable Oxygen Unit Safety Label ...............................................8Introduction .............................................................................. 9Using Your HELiOS Marathon H850 Portable Oxygen Unit .. 15Overview .....................................................................................15Filling the Portable Oxygen Unit .................................................15Breathing from a Portable Oxygen Unit ......................................23Positioning the Portable Oxygen Unit During Use ......................30Connecting the Portable Oxygen Unit to the HELiOS Reservoir .............................................................31Travelling with the Portable Oxygen Unit ....................................34Maintenance ........................................................................... 37Monitoring Liquid Oxygen Level ..................................................37Cleaning Portable Oxygen Unit Equipment ................................37Emptying the Moisture Container ................................................38Replacing the Reservoir Battery .................................................39Troubleshooting ..................................................................... 41Overview .....................................................................................41Potential Problems ......................................................................41Accessories .............................................................................. 47Product Specifications ........................................................... 51Operating Environmental Specification .......................................51Storage Environmental Specification ..........................................51Important Information RecordAbout Your Prescription ........................................................ 52

Safety Information
1 Safety Information
OverviewThis section contains important safety information related to general use of the HELiOS MARATHON™ H850 portable oxygen system, which consists of the portable oxygen unit and a liquid oxygen reservoir.
Other important safety information appears with its relevant material throughout the manual. Read all text surrounding precautionary information.
Before use, carefully read this manual and all precautionary information in boldface type, as well as the product specifications.
Warnings
Warnings are identified by the WARNING symbol shown above or other relevant symbols, as shown on the following pages.
Warnings alert the user to potential serious outcomes (death, injury, or adverse events) to the patient or user.
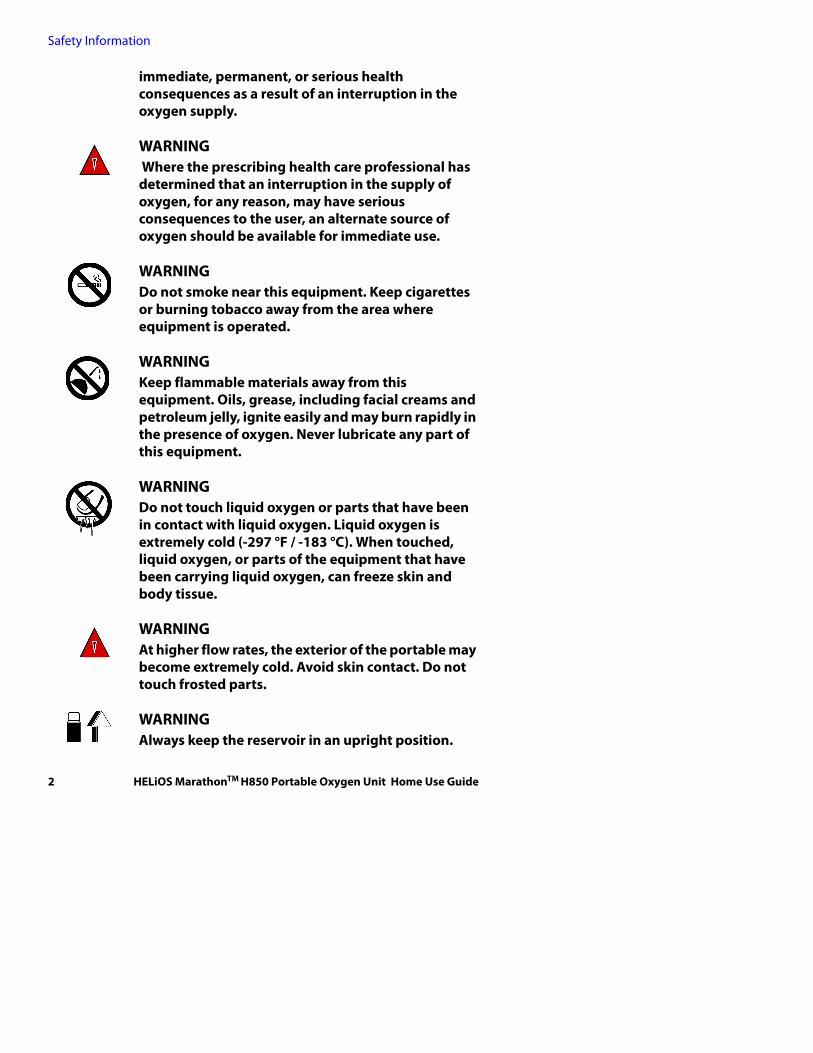
WARNING Oxygen supplied from this equipment is for supplemental use and is not intended to be life supporting or life sustaining. This equipment is not intended for use by patients who would suffer
HELiOS MarathonTM H850 Portable Oxygen Unit Home Use Guide 1
Safety Information
immediate, permanent, or serious health consequences as a result of an interruption in the oxygen supply.
WARNING Where the prescribing health care professional has determined that an interruption in the supply of oxygen, for any reason, may have serious consequences to the user, an alternate source of oxygen should be available for immediate use.
WARNINGDo not smoke near this equipment. Keep cigarettes or burning tobacco away from the area where equipment is operated.
WARNINGKeep flammable materials away from this equipment. Oils, grease, including facial creams and petroleum jelly, ignite easily and may burn rapidly in the presence of oxygen. Never lubricate any part of this equipment.
WARNINGDo not touch liquid oxygen or parts that have been in contact with liquid oxygen. Liquid oxygen is extremely cold (-297 °F / -183 °C). When touched, liquid oxygen, or parts of the equipment that have been carrying liquid oxygen, can freeze skin and body tissue.
WARNING At higher flow rates, the exterior of the portable may become extremely cold. Avoid skin contact. Do not touch frosted parts.
WARNINGAlways keep the reservoir in an upright position.
2 HELiOS MarathonTM H850 Portable Oxygen Unit Home Use Guide
Safety Information
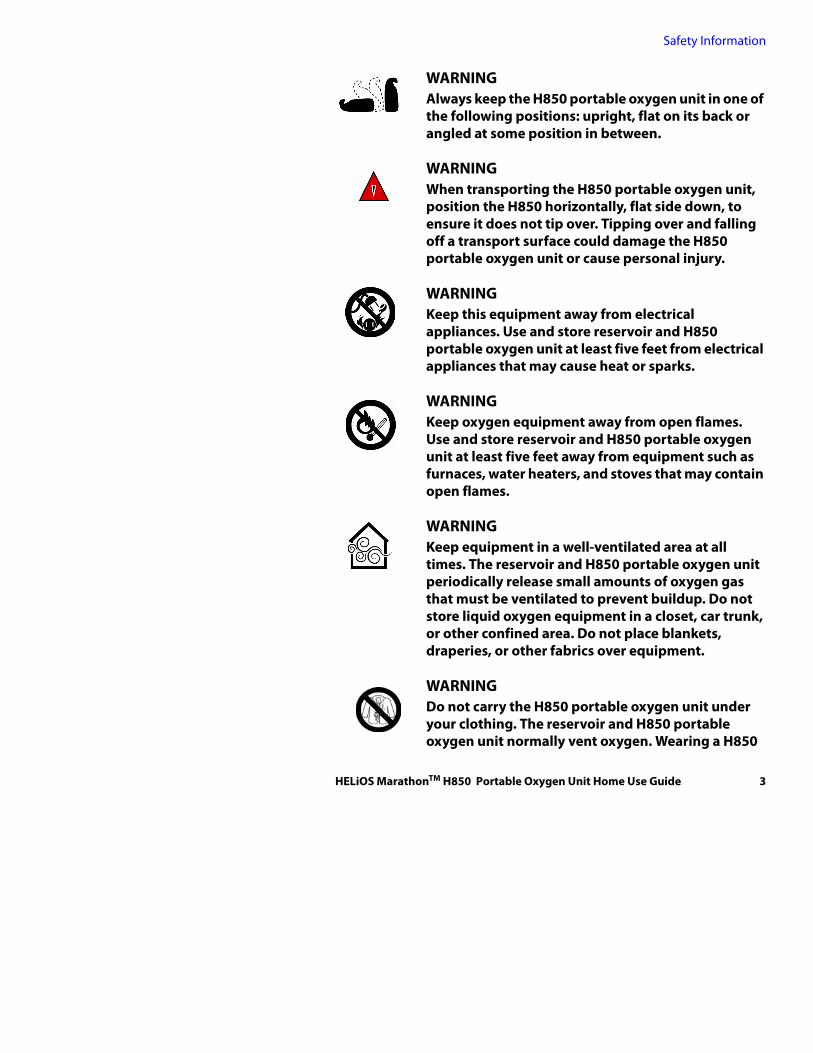
WARNINGAlways keep the H850 portable oxygen unit in one of the following positions: upright, flat on its back or angled at some position in between.
WARNINGWhen transporting the H850 portable oxygen unit, position the H850 horizontally, flat side down, to ensure it does not tip over. Tipping over and falling off a transport surface could damage the H850 portable oxygen unit or cause personal injury.
WARNINGKeep this equipment away from electrical appliances. Use and store reservoir and H850 portable oxygen unit at least five feet from electrical appliances that may cause heat or sparks.
WARNINGKeep oxygen equipment away from open flames. Use and store reservoir and H850 portable oxygen unit at least five feet away from equipment such as furnaces, water heaters, and stoves that may contain open flames.
WARNINGKeep equipment in a well-ventilated area at all times. The reservoir and H850 portable oxygen unit periodically release small amounts of oxygen gas that must be ventilated to prevent buildup. Do not store liquid oxygen equipment in a closet, car trunk, or other confined area. Do not place blankets, draperies, or other fabrics over equipment.
WARNINGDo not carry the H850 portable oxygen unit under your clothing. The reservoir and H850 portable oxygen unit normally vent oxygen. Wearing a H850
HELiOS MarathonTM H850 Portable Oxygen Unit Home Use Guide 3
Safety Information
portable oxygen unit under clothing may saturate fabrics with oxygen and cause them to burn rapidly if exposed to sparks or flame. It may take several hours for oxygen levels in fabric to return to normal.
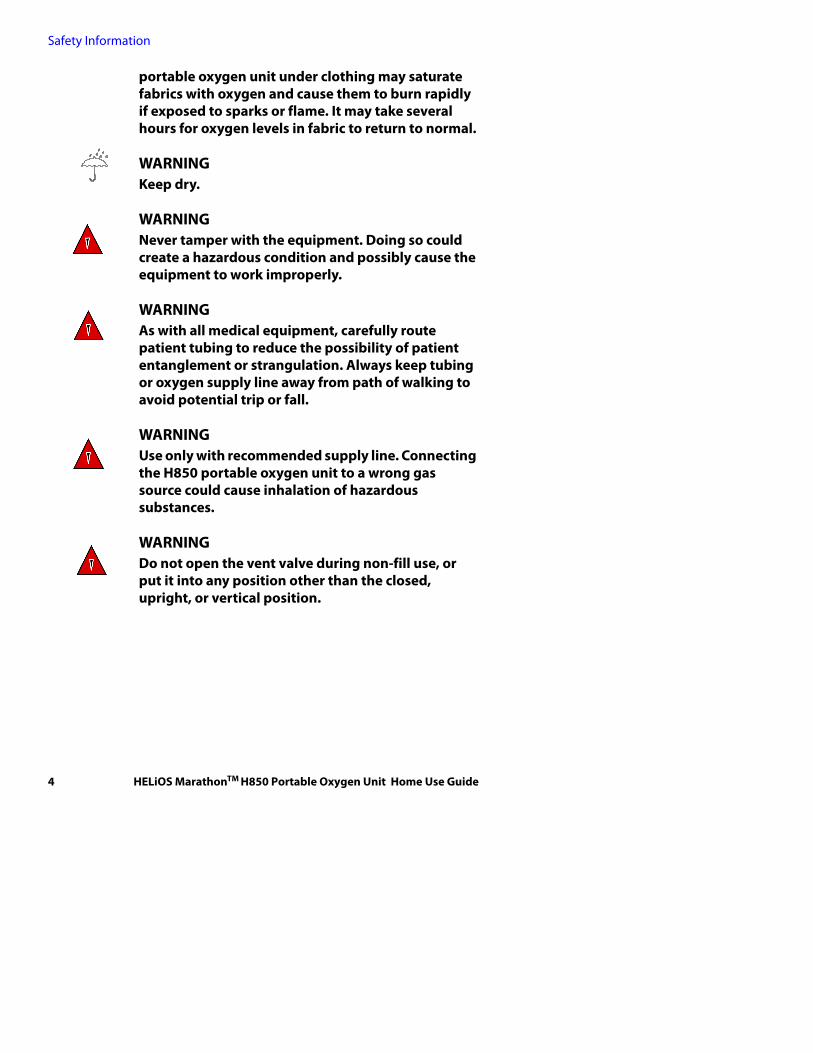
WARNINGKeep dry.
WARNINGNever tamper with the equipment. Doing so could create a hazardous condition and possibly cause the equipment to work improperly.
WARNINGAs with all medical equipment, carefully route patient tubing to reduce the possibility of patient entanglement or strangulation. Always keep tubing or oxygen supply line away from path of walking to avoid potential trip or fall.
WARNINGUse only with recommended supply line. Connecting the H850 portable oxygen unit to a wrong gas source could cause inhalation of hazardous substances.
WARNING Do not open the vent valve during non-fill use, or put it into any position other than the closed, upright, or vertical position.
4 HELiOS MarathonTM H850 Portable Oxygen Unit Home Use Guide
Safety Information
Cautions
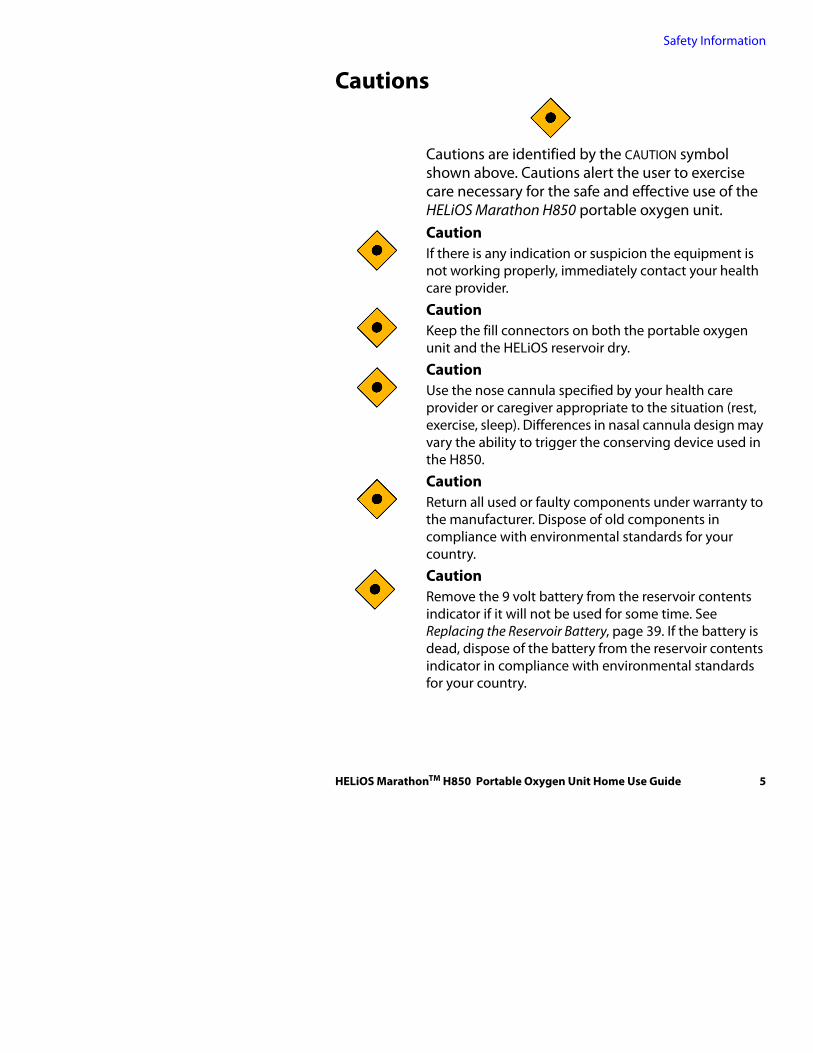
Cautions are identified by the CAUTION symbol shown above. Cautions alert the user to exercise care necessary for the safe and effective use of the HELiOS Marathon H850 portable oxygen unit.CautionIf there is any indication or suspicion the equipment is not working properly, immediately contact your health care provider.
CautionKeep the fill connectors on both the portable oxygen unit and the HELiOS reservoir dry.
CautionUse the nose cannula specified by your health care provider or caregiver appropriate to the situation (rest, exercise, sleep). Differences in nasal cannula design may vary the ability to trigger the conserving device used in the H850.
CautionReturn all used or faulty components under warranty to the manufacturer. Dispose of old components in compliance with environmental standards for your country.
CautionRemove the 9 volt battery from the reservoir contents indicator if it will not be used for some time. See Replacing the Reservoir Battery, page 39. If the battery is dead, dispose of the battery from the reservoir contents indicator in compliance with environmental standards for your country.
HELiOS MarathonTM H850 Portable Oxygen Unit Home Use Guide 5

Safety Information
Notes
Notes are identified by the NOTE symbol shown above. Notes are listed before or after procedural steps or information and provide additional guidelines or information on the subject being described.
6 HELiOS MarathonTM H850 Portable Oxygen Unit Home Use Guide
Safety Information
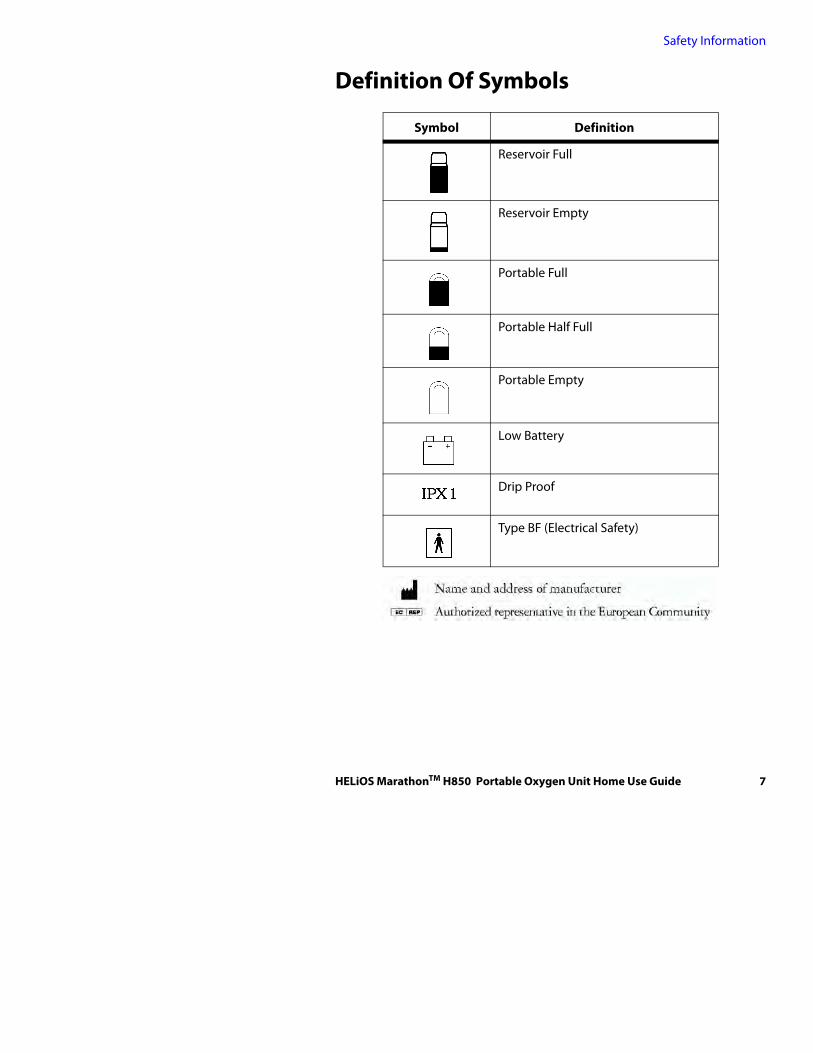
Definition Of Symbols
Symbol Definition
Reservoir Full
Reservoir Empty
Portable Full
Portable Half Full
Portable Empty
Low Battery
Drip Proof
Type BF (Electrical Safety)
HELiOS MarathonTM H850 Portable Oxygen Unit Home Use Guide 7
Safety Information
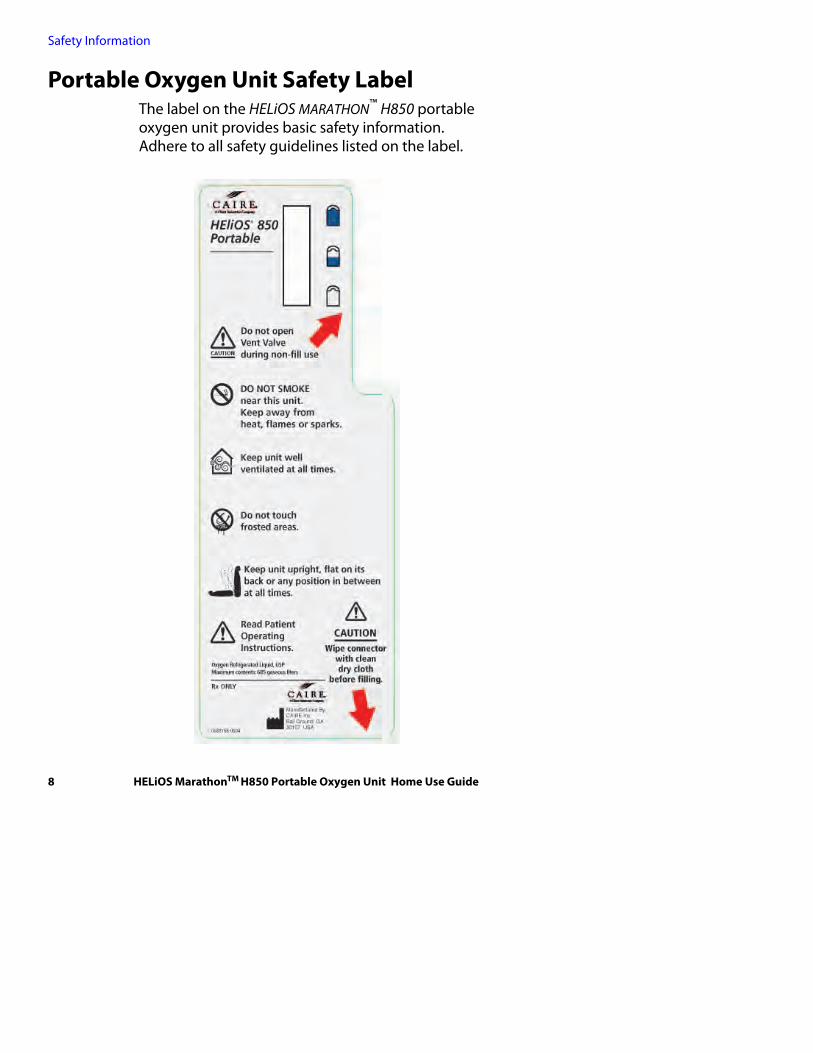
Portable Oxygen Unit Safety Label The label on the HELiOS MARATHON™ H850 portable oxygen unit provides basic safety information. Adhere to all safety guidelines listed on the label.
8 HELiOS MarathonTM H850 Portable Oxygen Unit Home Use Guide
Introduction
2 Introduction
WARNING At higher flow rates, the exterior of the portable may become extremely cold. Avoid skin contact. Do not touch frosted parts.
Your HELiOS MARATHON™ H850 portable oxygen unit is designed to store and deliver oxygen at a prescribed rate. The HELiOS Marathon H850 portable oxygen system is LATEX-FREE and consists of the portable oxygen unit and a reservoir.
The portable oxygen unit delivers continuous flow oxygen, based on the selected flow setting. See Breathing from a Portable Oxygen Unit, page 23, for details on setting flow rates.CautionUse the nose cannula specified by your health care provider or caregiver appropriate to the situation (rest, exercise, sleep). Differences in nasal cannula design may vary the ability to trigger the conserving device used in the H850 portable oxygen unit.
Breathe through your nose and not your mouth, since the HELiOS Marathon H850 portable oxygen unit is designed to sense nasal cannula breathing. Breathe only the prescribed oxygen rate from the portable oxygen unit. There are two different means of obtaining the oxygen you need using the HELiOS Marathon H850 portable oxygen unit.
1. Portable Mode—Fill the portable with liquid oxygen and move freely about your home or leave your home for extended periods. The HELiOS Marathon H850 portable oxygen unit
HELiOS MarathonTM H850 Portable Oxygen Unit Home Use Guide 9
Introduction
was designed to maximize freedom of movement. Fill the portable with liquid oxygen from the reservoir every day to use as far from the reservoir as desired.
2. Tandem Mode—You can connect the portable to the reservoir. See Connecting the Portable Oxygen Unit to the HELiOS Reservoir, page 31. When at home and not moving about, connect the portable oxygen unit to your reservoir with an oxygen supply line. When the HELiOS Marathon H850 portable oxygen unit is connected to a HELiOS reservoir in this manner, the reservoir supplies oxygen, rather than the portable oxygen unit.
CautionThe oxygen supply line should only be used when the H850 flow control knob is set to a demand mode setting.
10 HELiOS MarathonTM H850 Portable Oxygen Unit Home Use Guide
Introduction
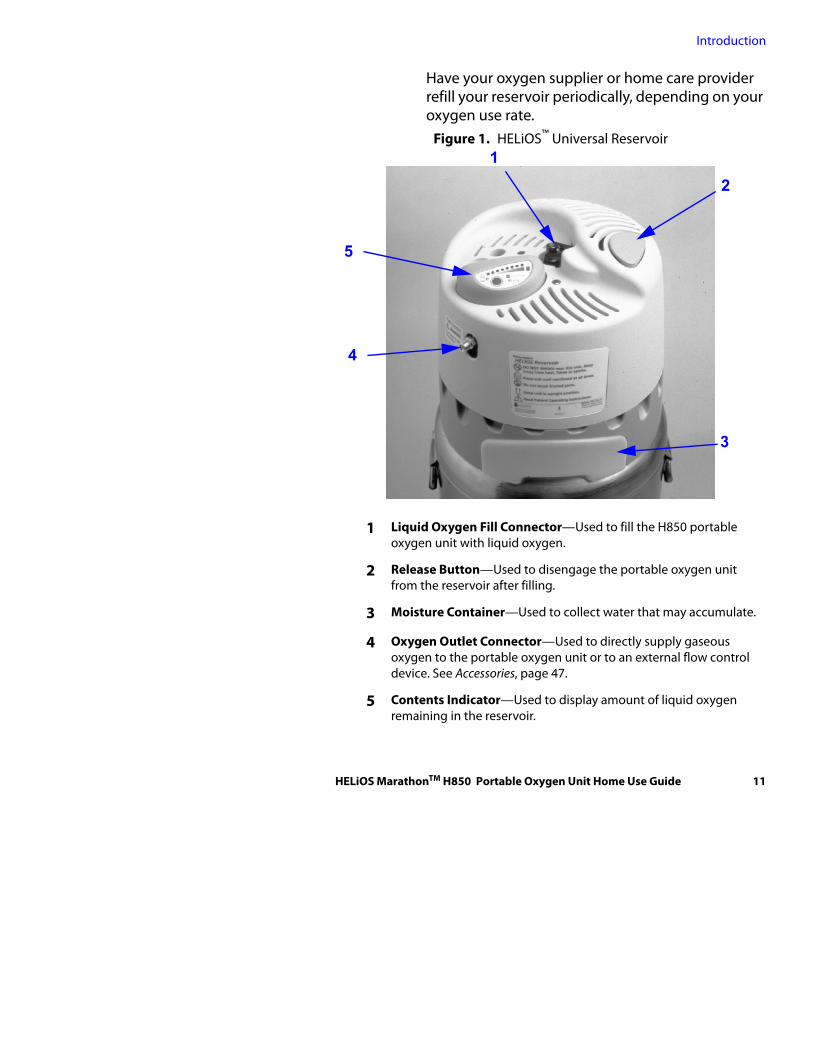
Have your oxygen supplier or home care provider refill your reservoir periodically, depending on your oxygen use rate.
Figure 1. HELiOS™ Universal Reservoir
1 Liquid Oxygen Fill Connector—Used to fill the H850 portable oxygen unit with liquid oxygen.
2 Release Button—Used to disengage the portable oxygen unit from the reservoir after filling.
3 Moisture Container—Used to collect water that may accumulate.
4 Oxygen Outlet Connector—Used to directly supply gaseous oxygen to the portable oxygen unit or to an external flow control device. See Accessories, page 47.
5 Contents Indicator—Used to display amount of liquid oxygen remaining in the reservoir.
1
2
3
4
5
HELiOS MarathonTM H850 Portable Oxygen Unit Home Use Guide 11
Introduction
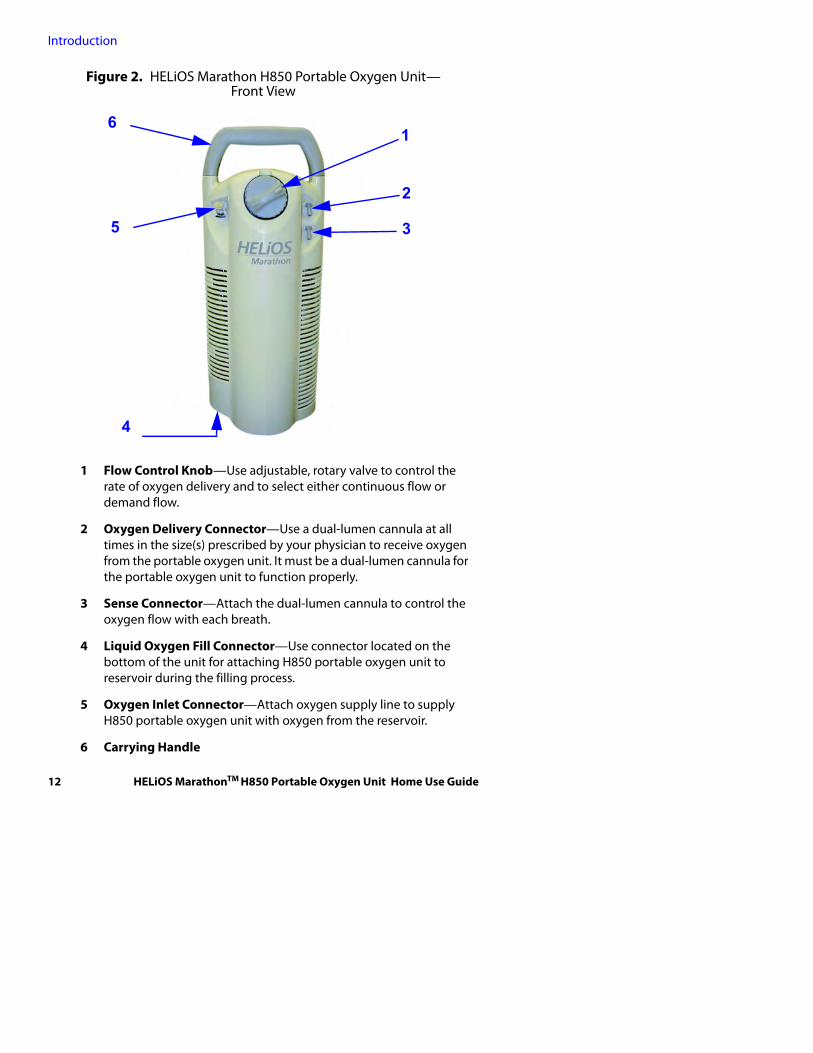
Figure 2. HELiOS Marathon H850 Portable Oxygen Unit—Front View
1 Flow Control Knob—Use adjustable, rotary valve to control the rate of oxygen delivery and to select either continuous flow or demand flow.
2 Oxygen Delivery Connector—Use a dual-lumen cannula at all times in the size(s) prescribed by your physician to receive oxygen from the portable oxygen unit. It must be a dual-lumen cannula for the portable oxygen unit to function properly.
3 Sense Connector—Attach the dual-lumen cannula to control the oxygen flow with each breath.
4 Liquid Oxygen Fill Connector—Use connector located on the bottom of the unit for attaching H850 portable oxygen unit to reservoir during the filling process.
5 Oxygen Inlet Connector—Attach oxygen supply line to supply H850 portable oxygen unit with oxygen from the reservoir.
6 Carrying Handle
2
3
16
5
4
12 HELiOS MarathonTM H850 Portable Oxygen Unit Home Use Guide
Introduction
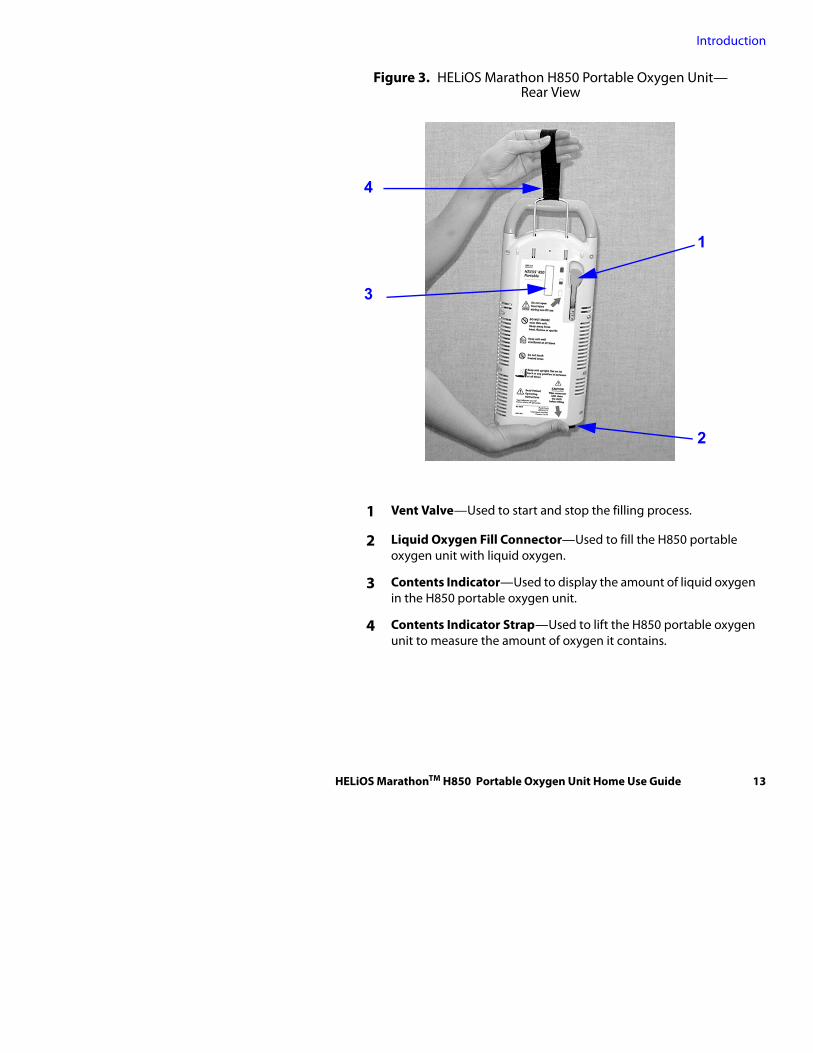
Figure 3. HELiOS Marathon H850 Portable Oxygen Unit—Rear View
1 Vent Valve—Used to start and stop the filling process.
2 Liquid Oxygen Fill Connector—Used to fill the H850 portable oxygen unit with liquid oxygen.
3 Contents Indicator—Used to display the amount of liquid oxygen in the H850 portable oxygen unit.
4 Contents Indicator Strap—Used to lift the H850 portable oxygen unit to measure the amount of oxygen it contains.
1
2
4
3
HELiOS MarathonTM H850 Portable Oxygen Unit Home Use Guide 13
Introduction
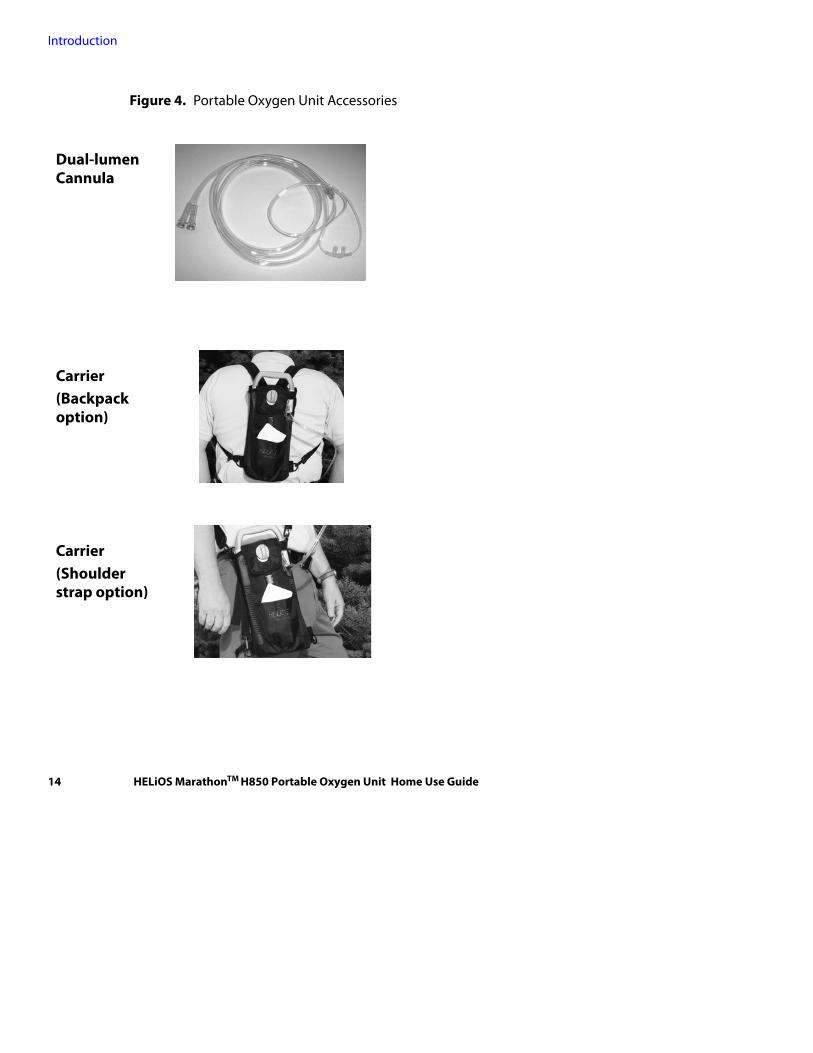
Figure 4. Portable Oxygen Unit Accessories
Dual-lumen Cannula
Carrier(Backpack option)
Carrier(Shoulder strap option)
14 HELiOS MarathonTM H850 Portable Oxygen Unit Home Use Guide
Using Your HELiOS Marathon H850 Portable Oxygen Unit
3 Using Your HELiOS Marathon H850 Portable Oxygen Unit
OverviewThis section contains information on how to use your HELiOS MARATHON™ H850 portable oxygen unit. Read all instructions before using the unit. Pay particular attention to safety and unit position.
Filling the Portable Oxygen Unit
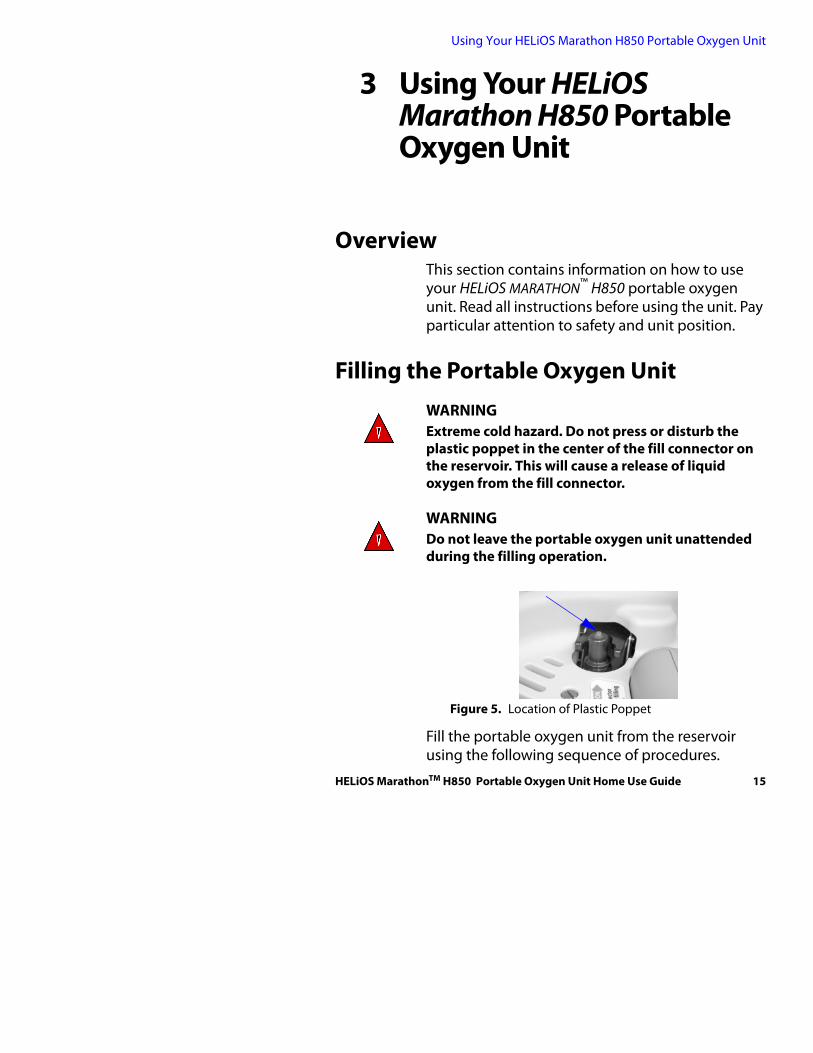
WARNING Extreme cold hazard. Do not press or disturb the plastic poppet in the center of the fill connector on the reservoir. This will cause a release of liquid oxygen from the fill connector.
WARNING Do not leave the portable oxygen unit unattended during the filling operation.
Figure 5. Location of Plastic Poppet
Fill the portable oxygen unit from the reservoir using the following sequence of procedures.
HELiOS MarathonTM H850 Portable Oxygen Unit Home Use Guide 15
Using Your HELiOS Marathon H850 Portable Oxygen Unit
1. Checking reservoir contents—Check the contents indicator on the reservoir by pressing the blue button to ensure there is enough liquid oxygen for filling purposes. If the yellow light comes on, fill the portable oxygen unit, then inform your oxygen supply company your reservoir unit needs refilling.
WARNING Use a clean, dry, lint free cloth to wipe the fill connector dry on both the reservoir and HELiOS Marathon H850 portable oxygen unit before filling to prevent freezing and possible equipment failure.
2. Cleaning and drying connectors—Use a clean, dry, lint free cloth to wipe the fill connectors dry on both the reservoir unit and the portable oxygen unit.
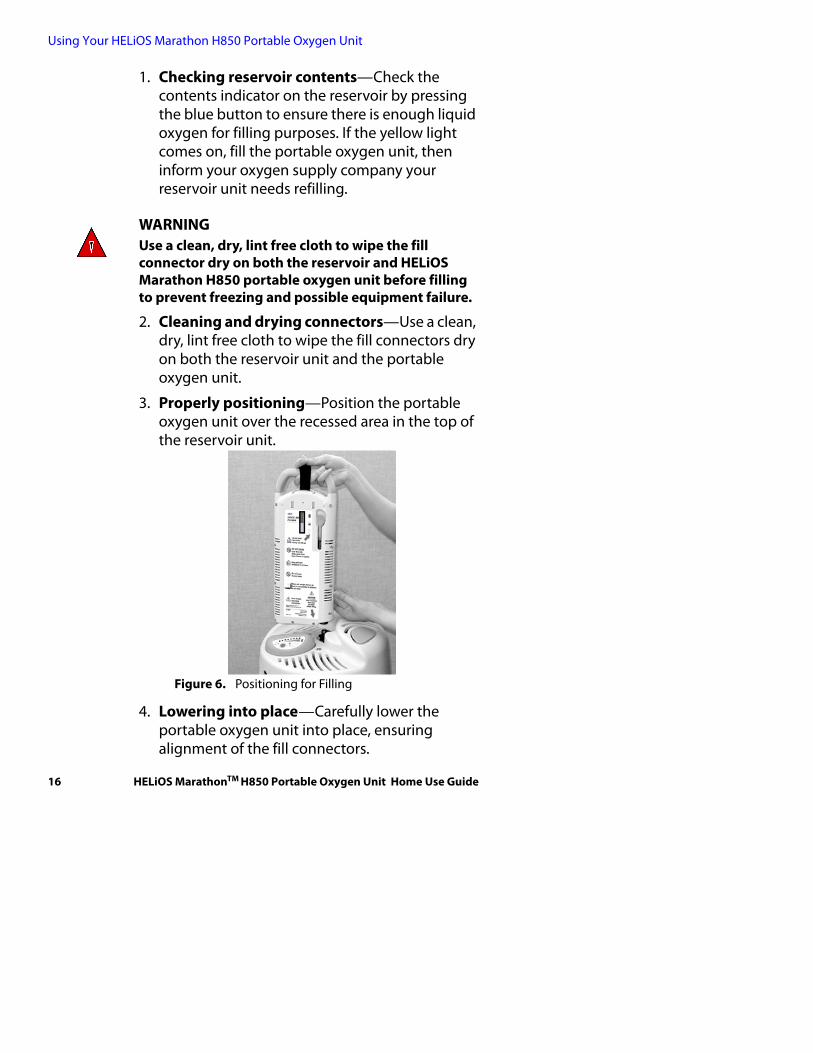
3. Properly positioning—Position the portable oxygen unit over the recessed area in the top of the reservoir unit.
Figure 6. Positioning for Filling
4. Lowering into place—Carefully lower the portable oxygen unit into place, ensuring alignment of the fill connectors.
16 HELiOS MarathonTM H850 Portable Oxygen Unit Home Use Guide
Using Your HELiOS Marathon H850 Portable Oxygen Unit
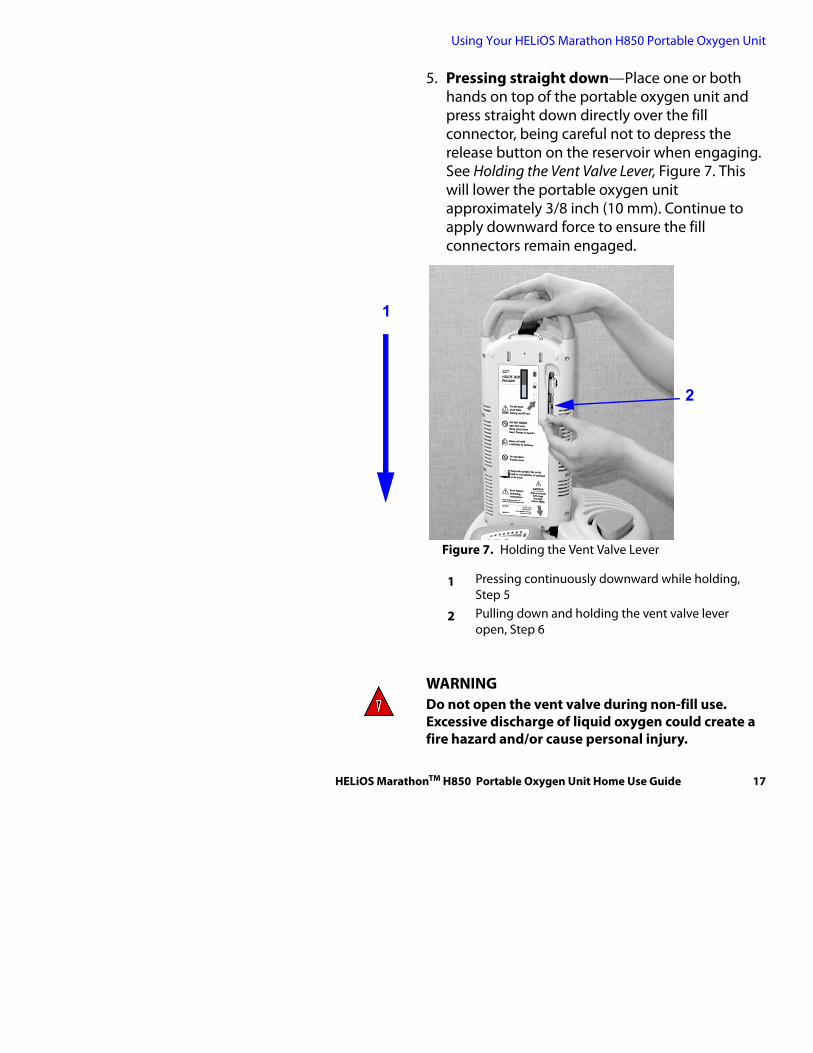
5. Pressing straight down—Place one or both hands on top of the portable oxygen unit and press straight down directly over the fill connector, being careful not to depress the release button on the reservoir when engaging. See Holding the Vent Valve Lever, Figure 7. This will lower the portable oxygen unit approximately 3/8 inch (10 mm). Continue to apply downward force to ensure the fill connectors remain engaged.
Figure 7. Holding the Vent Valve Lever
WARNING Do not open the vent valve during non-fill use. Excessive discharge of liquid oxygen could create a fire hazard and/or cause personal injury.
2
1
1 Pressing continuously downward while holding, Step 5
2 Pulling down and holding the vent valve lever open, Step 6
HELiOS MarathonTM H850 Portable Oxygen Unit Home Use Guide 17
Using Your HELiOS Marathon H850 Portable Oxygen Unit
6. Pulling down and holding vent valve lever—While holding the portable oxygen unit in the fill position, pull down and hold the vent valve lever in the open position (90° from the normal OFF position). Listen for a hissing noise. Maintain a constant downward pressure on the portable oxygen unit with the hand on top to keep the portable oxygen unit steady, and maintain proper filling position. See Holding the Vent Valve Lever, Figure 7.
Caution Do not allow the portable oxygen unit to move upward until fill is complete.
Note: When the portable oxygen unit is empty, it may take as long as four minutes to fill. The amount of time to fill the portable oxygen unit depends on the amount of oxygen remaining in the portable oxygen unit and on the pressure in the reservoir.
7. Closing the valve—When the sound of venting gas changes, and a dense, white vapor begins forming around the reservoir cover, close the portable oxygen unit vent valve by returning the vent lever to the upright position.
Caution If the vent valve fails to close and the hissing continues, remove the portable oxygen unit by pressing the portable oxygen unit release button on the reservoir. Keep the portable oxygen unit upright and do not tip at all during this time. The portable oxygen unit will stop venting in a few minutes. Allow the portable oxygen unit to warm until you can close the vent valve. The portable oxygen unit may require as much as 60 minutes to restore adequate pressure for accurate oxygen flow. If necessary, use an alternate source of oxygen such as an external flow control device, B-701655-00. See Accessories, page 47.
18 HELiOS MarathonTM H850 Portable Oxygen Unit Home Use Guide
Using Your HELiOS Marathon H850 Portable Oxygen Unit
WARNINGDo not touch liquid oxygen or parts that have been in contact with liquid oxygen. Liquid oxygen is extremely cold (-297 °F / -183 °C). When touched, liquid oxygen, or parts of the equipment that have been carrying liquid oxygen, can freeze skin and body tissue.
WARNINGKeep clear. Do not stand so any body parts extend directly over the reservoir fill connector when disengaging the portable oxygen unit. Contact with liquid oxygen can cause personal injury.
WARNING If a major liquid oxygen leak from the reservoir fill connector occurs when you disengage the portable oxygen unit — that is, a steady stream of liquid oxygen — step away from the reservoir and notify your oxygen supplier immediately. Ventilate the room by opening windows and/or doors. Shut off stoves, heaters, and any potential source of heat, flame, or sparks. Stay away from the reservoir until your supplier ensures that it is safe.
8. Disengaging the portable oxygen unit—Disengage from the reservoir by holding the carrying handle and pressing the release button. See Disengaging the Portable Oxygen Unit, Figure 8. Always hold the portable oxygen unit with at least one hand while disengaging it.
HELiOS MarathonTM H850 Portable Oxygen Unit Home Use Guide 19
Using Your HELiOS Marathon H850 Portable Oxygen Unit
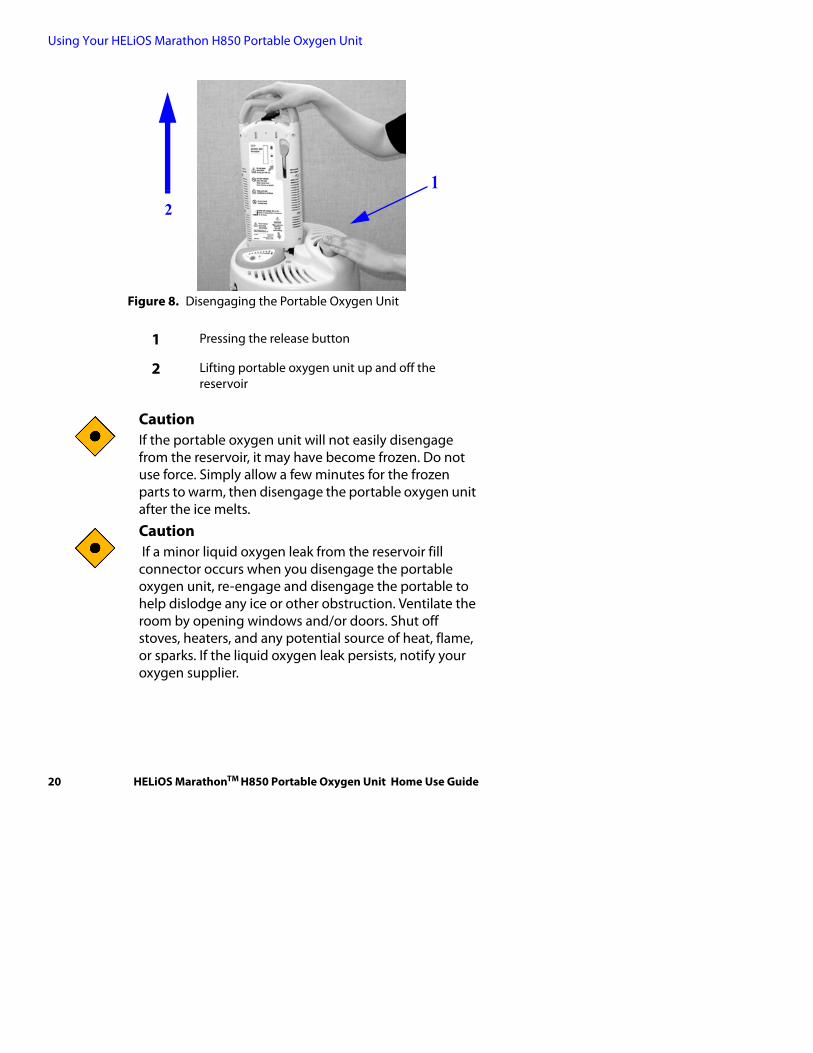
Figure 8. Disengaging the Portable Oxygen Unit
CautionIf the portable oxygen unit will not easily disengage from the reservoir, it may have become frozen. Do not use force. Simply allow a few minutes for the frozen parts to warm, then disengage the portable oxygen unit after the ice melts.
Caution If a minor liquid oxygen leak from the reservoir fill connector occurs when you disengage the portable oxygen unit, re-engage and disengage the portable to help dislodge any ice or other obstruction. Ventilate the room by opening windows and/or doors. Shut off stoves, heaters, and any potential source of heat, flame, or sparks. If the liquid oxygen leak persists, notify your oxygen supplier.
12
1 Pressing the release button
2 Lifting portable oxygen unit up and off the reservoir
20 HELiOS MarathonTM H850 Portable Oxygen Unit Home Use Guide
Using Your HELiOS Marathon H850 Portable Oxygen Unit
Caution If the hissing sound from the portable oxygen unit does not stop within ten minutes after a fill, and excessive visible frosting develops on the portable oxygen unit, see Troubleshooting, page 41.Note:Immediately after filling, you may hear a slight hissing sound from the portable oxygen unit. This is normal and will stop after a few minutes.
9. Checking the oxygen contents indicator—Make sure the portable oxygen unit is full. The amount of liquid oxygen contained in the portable oxygen unit is measured by a built-in internal scale. To operate the contents indicator follow the listed steps.
a. Lift the portable oxygen unit by the contents indicator strap.
b. Push the bottom backside of the portable oxygen unit so that it is straight up and down.
HELiOS MarathonTM H850 Portable Oxygen Unit Home Use Guide 21
Using Your HELiOS Marathon H850 Portable Oxygen Unit
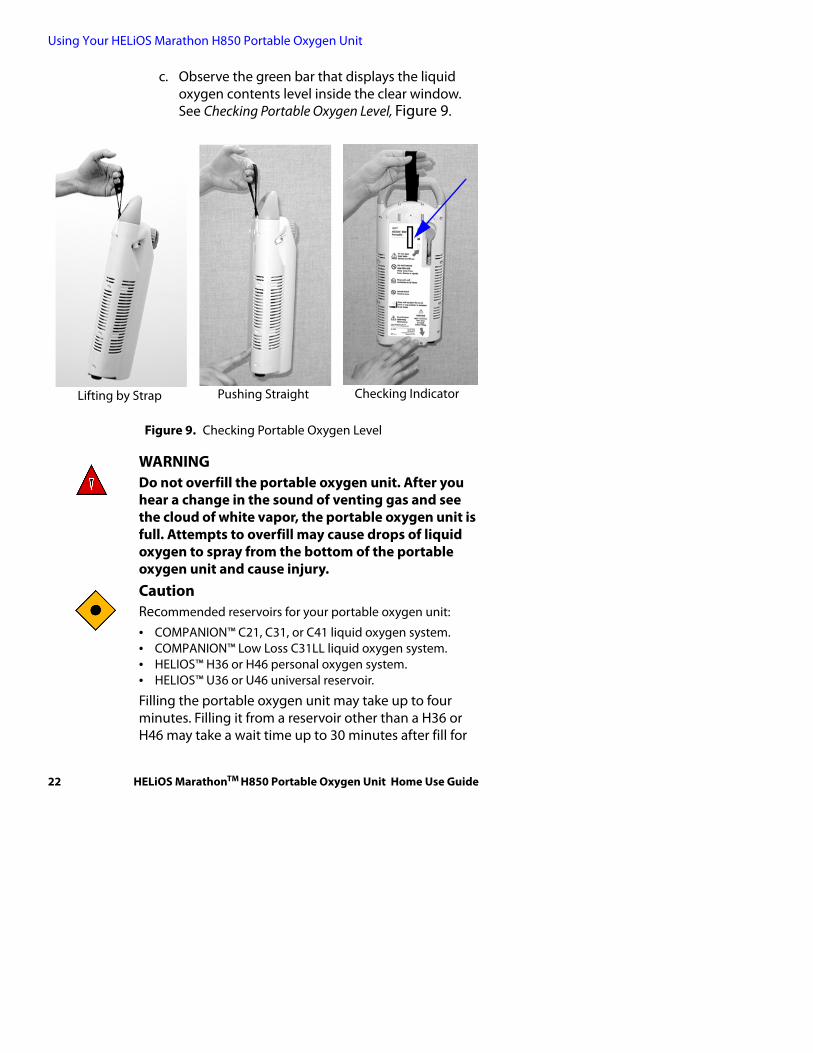
c. Observe the green bar that displays the liquid oxygen contents level inside the clear window. See Checking Portable Oxygen Level, Figure 9.
Figure 9. Checking Portable Oxygen Level
WARNING Do not overfill the portable oxygen unit. After you hear a change in the sound of venting gas and see the cloud of white vapor, the portable oxygen unit is full. Attempts to overfill may cause drops of liquid oxygen to spray from the bottom of the portable oxygen unit and cause injury.CautionRecommended reservoirs for your portable oxygen unit:
• COMPANION™ C21, C31, or C41 liquid oxygen system.• COMPANION™ Low Loss C31LL liquid oxygen system. • HELIOS™ H36 or H46 personal oxygen system.• HELIOS™ U36 or U46 universal reservoir.
Filling the portable oxygen unit may take up to four minutes. Filling it from a reservoir other than a H36 or H46 may take a wait time up to 30 minutes after fill for
Lifting by Strap Pushing Straight Checking Indicator
22 HELiOS MarathonTM H850 Portable Oxygen Unit Home Use Guide
Using Your HELiOS Marathon H850 Portable Oxygen Unit
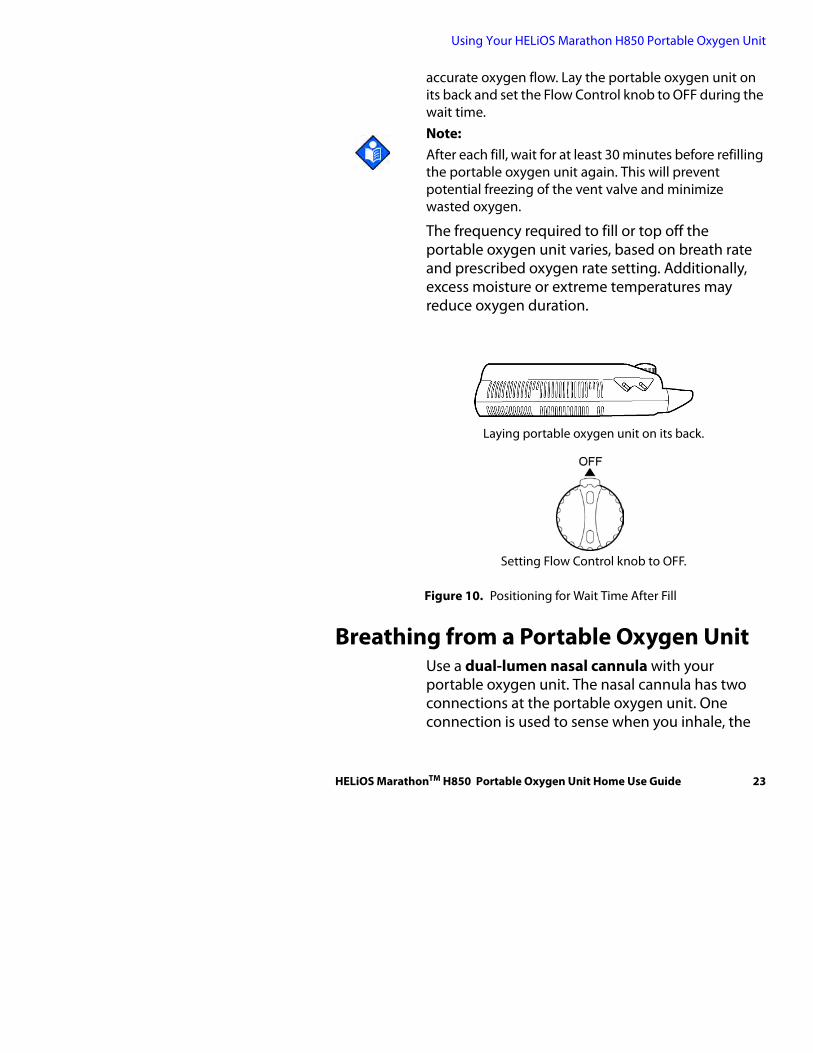
accurate oxygen flow. Lay the portable oxygen unit on its back and set the Flow Control knob to OFF during the wait time. Note:After each fill, wait for at least 30 minutes before refilling the portable oxygen unit again. This will prevent potential freezing of the vent valve and minimize wasted oxygen.
The frequency required to fill or top off the portable oxygen unit varies, based on breath rate and prescribed oxygen rate setting. Additionally, excess moisture or extreme temperatures may reduce oxygen duration.
Figure 10. Positioning for Wait Time After Fill
Breathing from a Portable Oxygen Unit Use a dual-lumen nasal cannula with your portable oxygen unit. The nasal cannula has two connections at the portable oxygen unit. One connection is used to sense when you inhale, the
Laying portable oxygen unit on its back.
Setting Flow Control knob to OFF.
HELiOS MarathonTM H850 Portable Oxygen Unit Home Use Guide 23
Using Your HELiOS Marathon H850 Portable Oxygen Unit
other connection is used to supply oxygen into your nose. Note:Currently, there are two dual-lumen cannula designs available for use with the H850. One cannula provides sensing and delivery of oxygen in each nostril. This is the best one to use with a blocked nasal passage. The other provides oxygen only to one side of the nose and senses when to provide oxygen on the other. Also, the tips are slightly smaller and softer.
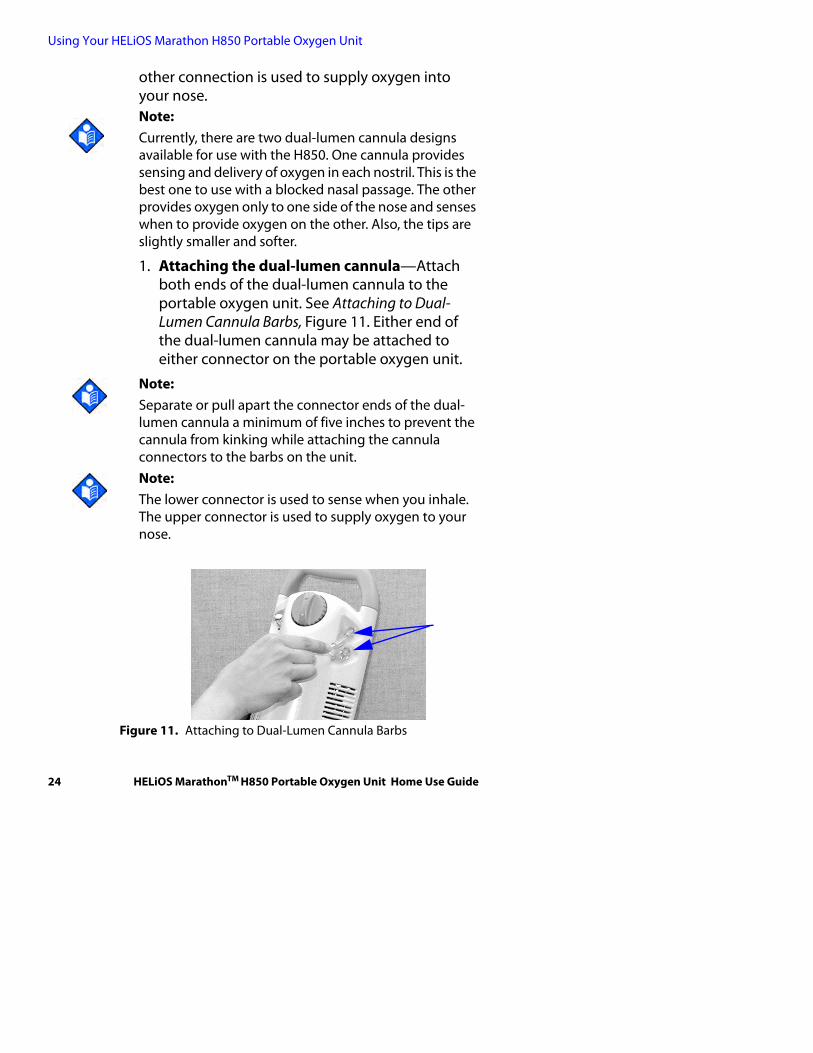
1. Attaching the dual-lumen cannula—Attach both ends of the dual-lumen cannula to the portable oxygen unit. See Attaching to Dual-Lumen Cannula Barbs, Figure 11. Either end of the dual-lumen cannula may be attached to either connector on the portable oxygen unit.
Note:Separate or pull apart the connector ends of the dual-lumen cannula a minimum of five inches to prevent the cannula from kinking while attaching the cannula connectors to the barbs on the unit.Note:The lower connector is used to sense when you inhale. The upper connector is used to supply oxygen to your nose.
Figure 11. Attaching to Dual-Lumen Cannula Barbs
24 HELiOS MarathonTM H850 Portable Oxygen Unit Home Use Guide

Using Your HELiOS Marathon H850 Portable Oxygen Unit
2. Setting the oxygen flow rate—The portable oxygen unit has two delivery modes to help you control the rate of oxygen that flows to you through the dual-lumen nasal cannula: continuous mode and demand mode. The rate of oxygen you need for when you are resting may be different than the rate you need when you are moving about. Set your rate to the setting prescribed by your physician.
a. Continuous Mode—Oxygen will flow at a continuous, steady rate. Turn the flow control knob on the top of the portable oxygen unit counterclockwise for continuous flow rates of 1, 2, 3, 4, 5, 6 liters per minute (lpm) on the `C’ settings from C1 through C6, respectively. See Flow setting options, Figure 12.
b. Demand Mode—Oxygen will flow only while you inhale through your nose. You should notice a small pulse at the beginning of each breath. Oxygen is delivered during this pulse, and continues as long as you inhale. Oxygen flow stops when you stop inhaling. Turn the flow control knob on the top of the portable oxygen unit clockwise for demand flow rates of D1.5, D2, D2.5, D3 and D4. These settings do not necessarily correspond to liters per minute (lpm). Patients who use these settings should do so only after their health care provider determines the appropriate setting. See Flow setting options, Figure 12.
t
Figure 12. Flow setting options
continuous demand
HELiOS MarathonTM H850 Portable Oxygen Unit Home Use Guide 25
Using Your HELiOS Marathon H850 Portable Oxygen Unit
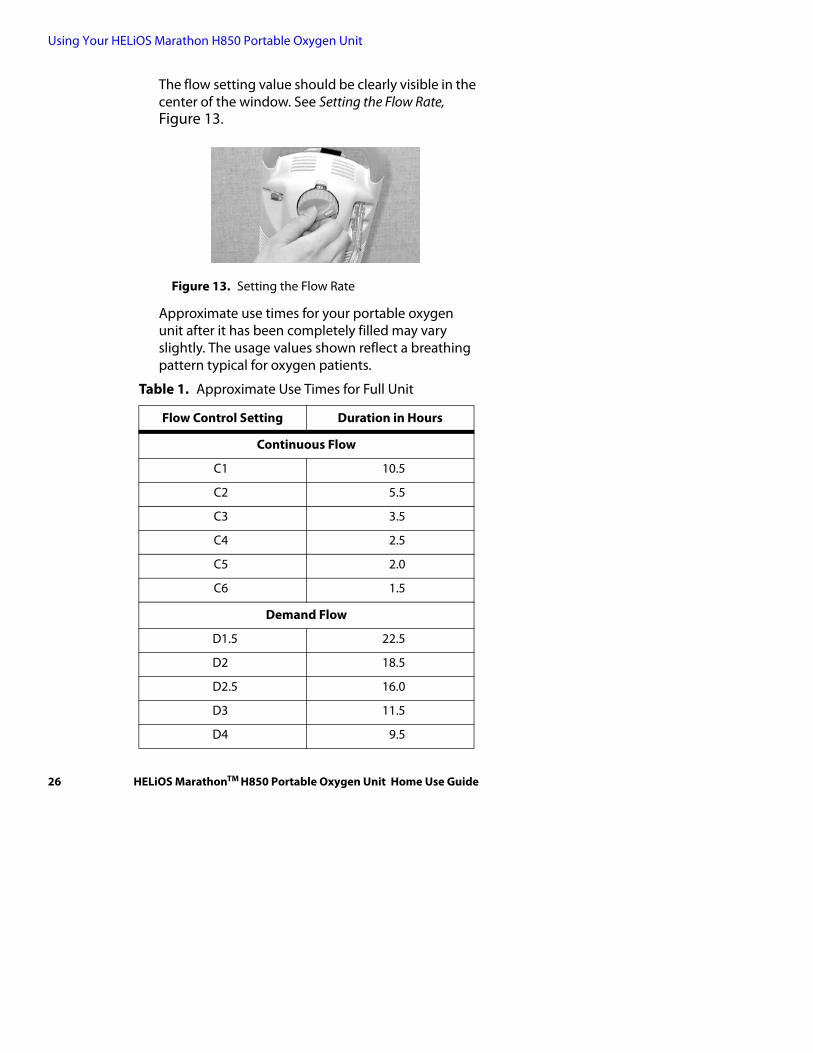
The flow setting value should be clearly visible in the center of the window. See Setting the Flow Rate, Figure 13.
Figure 13. Setting the Flow Rate
Approximate use times for your portable oxygen unit after it has been completely filled may vary slightly. The usage values shown reflect a breathing pattern typical for oxygen patients.
Table 1. Approximate Use Times for Full Unit
Flow Control Setting Duration in Hours
Continuous Flow
C1 10.5
C2 5.5
C3 3.5
C4 2.5
C5 2.0
C6 1.5
Demand Flow
D1.5 22.5
D2 18.5
D2.5 16.0
D3 11.5
D4 9.5
26 HELiOS MarathonTM H850 Portable Oxygen Unit Home Use Guide
Using Your HELiOS Marathon H850 Portable Oxygen Unit
CautionTimes may vary. If you use the portable oxygen unit in the horizontal position on its back, use times may also be reduced.
CautionThe portable oxygen unit will not deliver oxygen to you if the flow control knob is set between flow settings.
CautionYou must use a 7-foot length or shorter dual-lumen cannula to ensure proper oxygen delivery from the portable oxygen unit. See Accessories, page 47. Verify both connections of the dual-lumen cannula are firmly attached to the portable oxygen unit oxygen outlet and sensor connectors.Note:Your use time may vary substantially from the use times listed in the table. You should learn through experience how long the portable oxygen unit will last given your particular breathing patterns and activity level.
3. Positioning the dual-lumen cannula—With the tips of the cannula and lip rest pointing downward and toward you, place the two tips into your nostrils.
a. Standard position—Run the tubing over your ears and then slide the sleeve up under your chin until the cannula feels comfortable. Then breathe normally. See Standard Cannula Placement (Under Chin), Figure 14 on page 28.
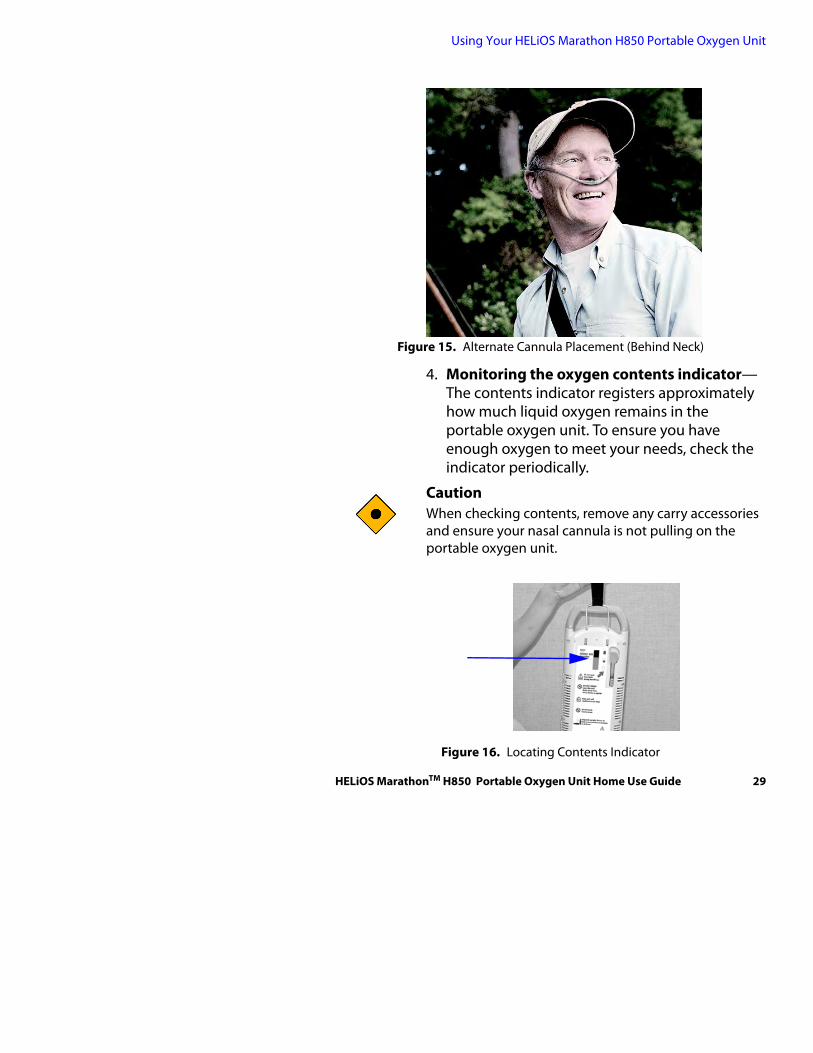
b. Alternate position—Bring the cannula over your head from behind and run the tubing over your ears. Leave the sleeve loose and allow the tubing to fall down your back or over your shoulder and around to the portable oxygen unit. Then breathe normally. See Alternate Cannula Placement (Behind Neck), Figure 15 on page 29.
HELiOS MarathonTM H850 Portable Oxygen Unit Home Use Guide 27

Using Your HELiOS Marathon H850 Portable Oxygen Unit
Note:Make sure that the tips remain in your nostrils and do not slide to one side.Note:Occasionally water droplets from condensed exhalations may accumulate in the cannula. This may disrupt the operation of the oxygen conserving device. If this happens, replace the moist cannula with a dry one. Allow the moist cannula to dry before using it again.
Figure 14. Standard Cannula Placement (Under Chin)
28 HELiOS MarathonTM H850 Portable Oxygen Unit Home Use Guide
Using Your HELiOS Marathon H850 Portable Oxygen Unit
Figure 15. Alternate Cannula Placement (Behind Neck)
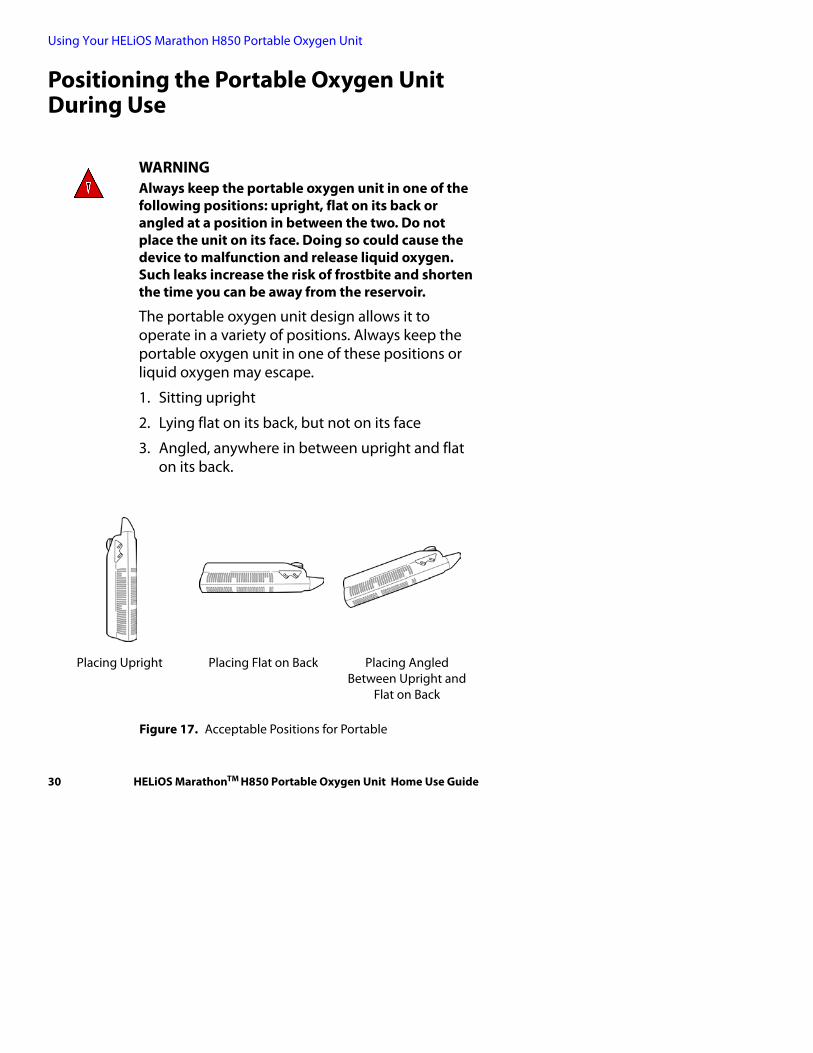
4. Monitoring the oxygen contents indicator—The contents indicator registers approximately how much liquid oxygen remains in the portable oxygen unit. To ensure you have enough oxygen to meet your needs, check the indicator periodically.
CautionWhen checking contents, remove any carry accessories and ensure your nasal cannula is not pulling on the portable oxygen unit.
Figure 16. Locating Contents Indicator
HELiOS MarathonTM H850 Portable Oxygen Unit Home Use Guide 29
Using Your HELiOS Marathon H850 Portable Oxygen Unit
Positioning the Portable Oxygen Unit During Use
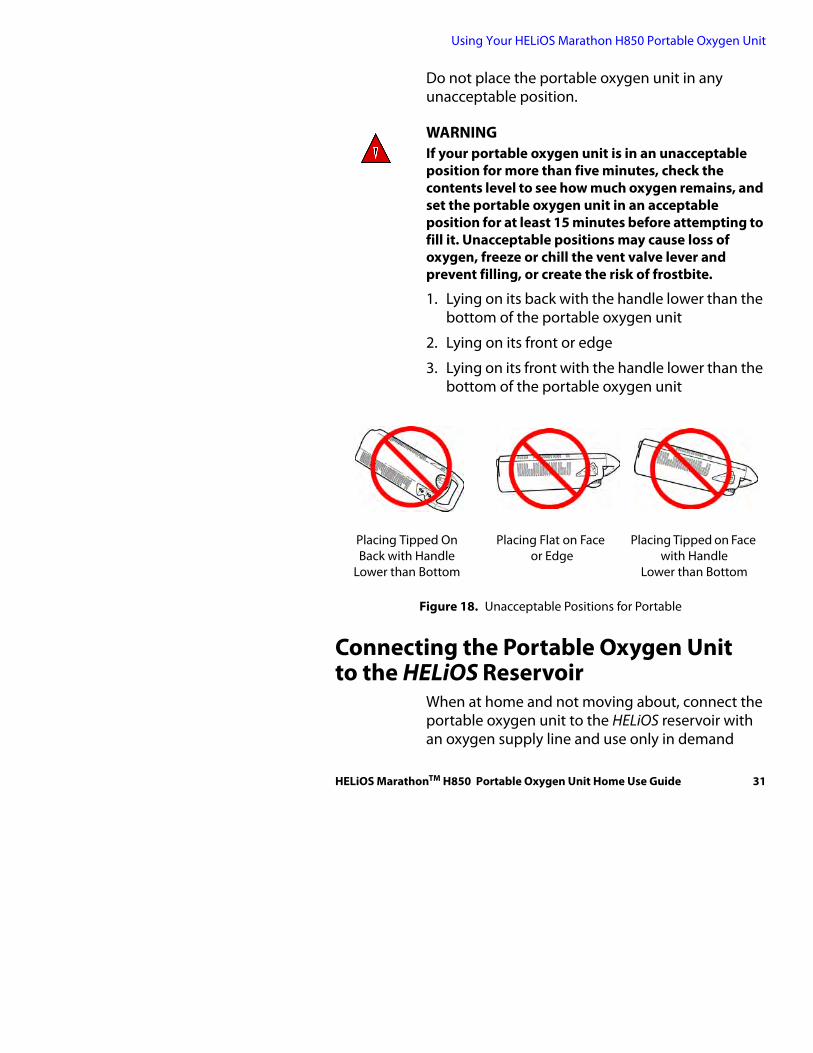
WARNINGAlways keep the portable oxygen unit in one of the following positions: upright, flat on its back or angled at a position in between the two. Do not place the unit on its face. Doing so could cause the device to malfunction and release liquid oxygen. Such leaks increase the risk of frostbite and shorten the time you can be away from the reservoir.
The portable oxygen unit design allows it to operate in a variety of positions. Always keep the portable oxygen unit in one of these positions or liquid oxygen may escape.
1. Sitting upright
2. Lying flat on its back, but not on its face
3. Angled, anywhere in between upright and flat on its back.
Figure 17. Acceptable Positions for Portable
Placing Upright Placing Flat on Back Placing Angled Between Upright and
Flat on Back
30 HELiOS MarathonTM H850 Portable Oxygen Unit Home Use Guide
Using Your HELiOS Marathon H850 Portable Oxygen Unit
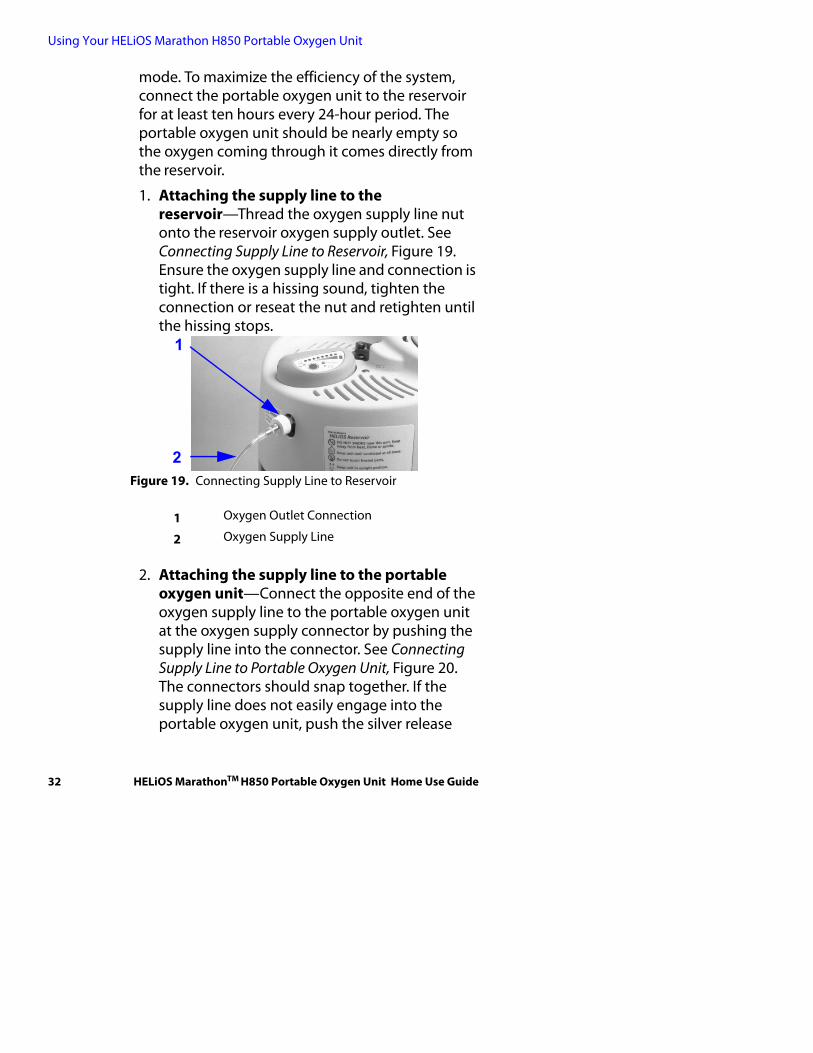
Do not place the portable oxygen unit in any unacceptable position.
WARNINGIf your portable oxygen unit is in an unacceptable position for more than five minutes, check the contents level to see how much oxygen remains, and set the portable oxygen unit in an acceptable position for at least 15 minutes before attempting to fill it. Unacceptable positions may cause loss of oxygen, freeze or chill the vent valve lever and prevent filling, or create the risk of frostbite.
1. Lying on its back with the handle lower than the bottom of the portable oxygen unit
2. Lying on its front or edge
3. Lying on its front with the handle lower than the bottom of the portable oxygen unit
Figure 18. Unacceptable Positions for Portable
Connecting the Portable Oxygen Unit to the HELiOS Reservoir
When at home and not moving about, connect the portable oxygen unit to the HELiOS reservoir with an oxygen supply line and use only in demand
Placing Tipped On Back with Handle
Lower than Bottom
Placing Flat on Face or Edge
Placing Tipped on Face with Handle
Lower than Bottom
HELiOS MarathonTM H850 Portable Oxygen Unit Home Use Guide 31
Using Your HELiOS Marathon H850 Portable Oxygen Unit
mode. To maximize the efficiency of the system, connect the portable oxygen unit to the reservoir for at least ten hours every 24-hour period. The portable oxygen unit should be nearly empty so the oxygen coming through it comes directly from the reservoir.
1. Attaching the supply line to the reservoir—Thread the oxygen supply line nut onto the reservoir oxygen supply outlet. See Connecting Supply Line to Reservoir, Figure 19. Ensure the oxygen supply line and connection is tight. If there is a hissing sound, tighten the connection or reseat the nut and retighten until the hissing stops.
Figure 19. Connecting Supply Line to Reservoir
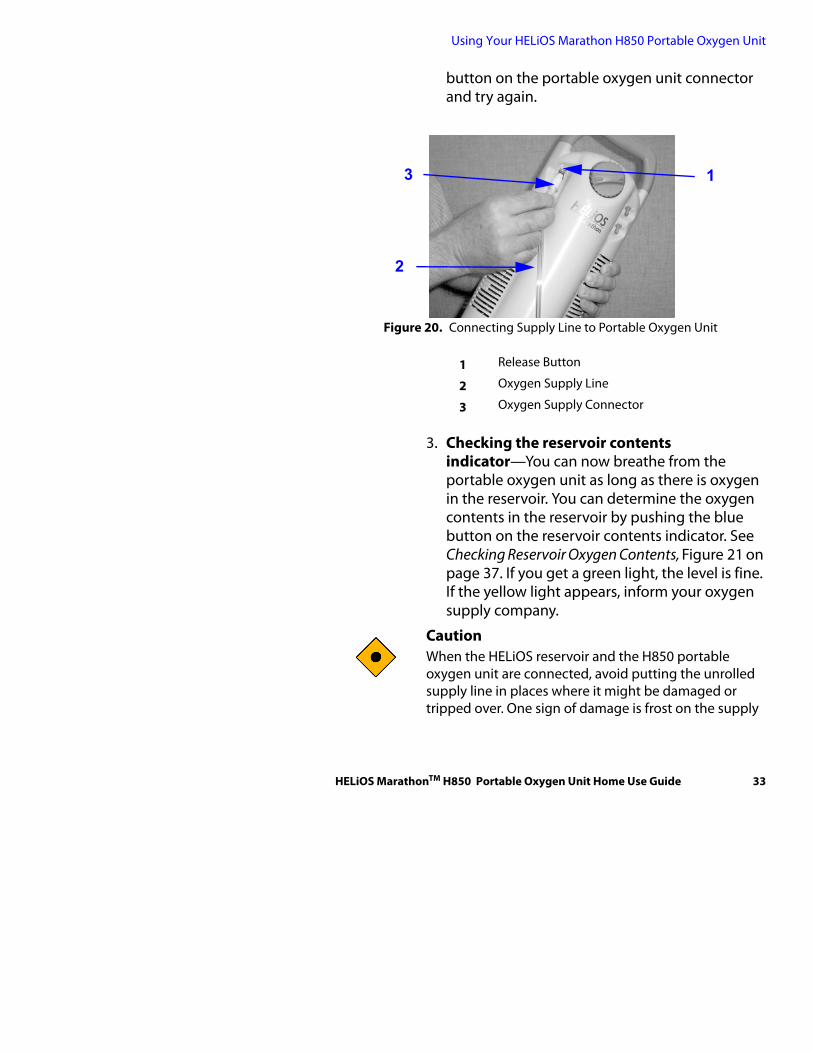
2. Attaching the supply line to the portable oxygen unit—Connect the opposite end of the oxygen supply line to the portable oxygen unit at the oxygen supply connector by pushing the supply line into the connector. See Connecting Supply Line to Portable Oxygen Unit, Figure 20. The connectors should snap together. If the supply line does not easily engage into the portable oxygen unit, push the silver release
1
2
1 Oxygen Outlet Connection
2 Oxygen Supply Line
32 HELiOS MarathonTM H850 Portable Oxygen Unit Home Use Guide
Using Your HELiOS Marathon H850 Portable Oxygen Unit
button on the portable oxygen unit connector and try again.
Figure 20. Connecting Supply Line to Portable Oxygen Unit
3. Checking the reservoir contents indicator—You can now breathe from the portable oxygen unit as long as there is oxygen in the reservoir. You can determine the oxygen contents in the reservoir by pushing the blue button on the reservoir contents indicator. See Checking Reservoir Oxygen Contents, Figure 21 on page 37. If you get a green light, the level is fine. If the yellow light appears, inform your oxygen supply company.
CautionWhen the HELiOS reservoir and the H850 portable oxygen unit are connected, avoid putting the unrolled supply line in places where it might be damaged or tripped over. One sign of damage is frost on the supply
1
2
3
1 Release Button
2 Oxygen Supply Line
3 Oxygen Supply Connector
HELiOS MarathonTM H850 Portable Oxygen Unit Home Use Guide 33
Using Your HELiOS Marathon H850 Portable Oxygen Unit
line, indicating that a puncture or cut is causing an oxygen leak. If this occurs, disconnect the supply line from the reservoir.
4. Removing the portable oxygen unit from the reservoir—To disconnect the supply line from the portable oxygen unit, push the release button and gently remove the supply line from the connector.
Note:If you need continuous flow while breathing from the HELiOS reservoir, use an external flow control device, such as B-701655-00. See Accessories, page 47. Contact your home care provider for further details on setup and use.
Travelling with the Portable Oxygen Unit
Travelling by CarMap out the route you will take before you leave. Determine whether your oxygen supply will suffice. If the distance and time spent on the road is greater than the portable oxygen unit can manage, plan appropriate stops along the way where oxygen services are available to refill it. Contact your oxygen supplier for alternate suppliers along your route or have them contact suppliers and arrange to have the oxygen ready when you arrive.
Travelling by BusContact the bus company ahead of time for restrictions or policies regarding the use of supplemental oxygen on board their bus lines.
34 HELiOS MarathonTM H850 Portable Oxygen Unit Home Use Guide
Using Your HELiOS Marathon H850 Portable Oxygen Unit
Travelling by PlaneMany airlines prevent clientele from using a personal portable oxygen unit. Rather, clientele must use oxygen supplied by the airline and there may be a supplemental charge for this service.
In addition, many airlines require a prescription from your physician before providing oxygen during flight. For this reason, non-stop flights are optimal, since there is no need to arrange for oxygen between flights, for layovers or flight delays.
Contact your oxygen supplier, who may assist you with making appropriate pre-boarding, in-flight, and post-landing arrangements for oxygen.
Travelling by TrainContact the railway line ahead of time for restrictions or policies regarding the use of supplemental oxygen on board their trains.
Travelling by Cruise LineNotify your travel agent or cruise line of your supplemental oxygen needs. Some cruise lines provide oxygen, while others do not. If they do not, provide your oxygen supplier plenty of advance notice to deliver adequate oxygen supply to the ship prior to departure and for refills at ports of call along the way.
HELiOS MarathonTM H850 Portable Oxygen Unit Home Use Guide 35

Using Your HELiOS Marathon H850 Portable Oxygen Unit
36 HELiOS MarathonTM H850 Portable Oxygen Unit Home Use Guide
Maintenance
4 Maintenance
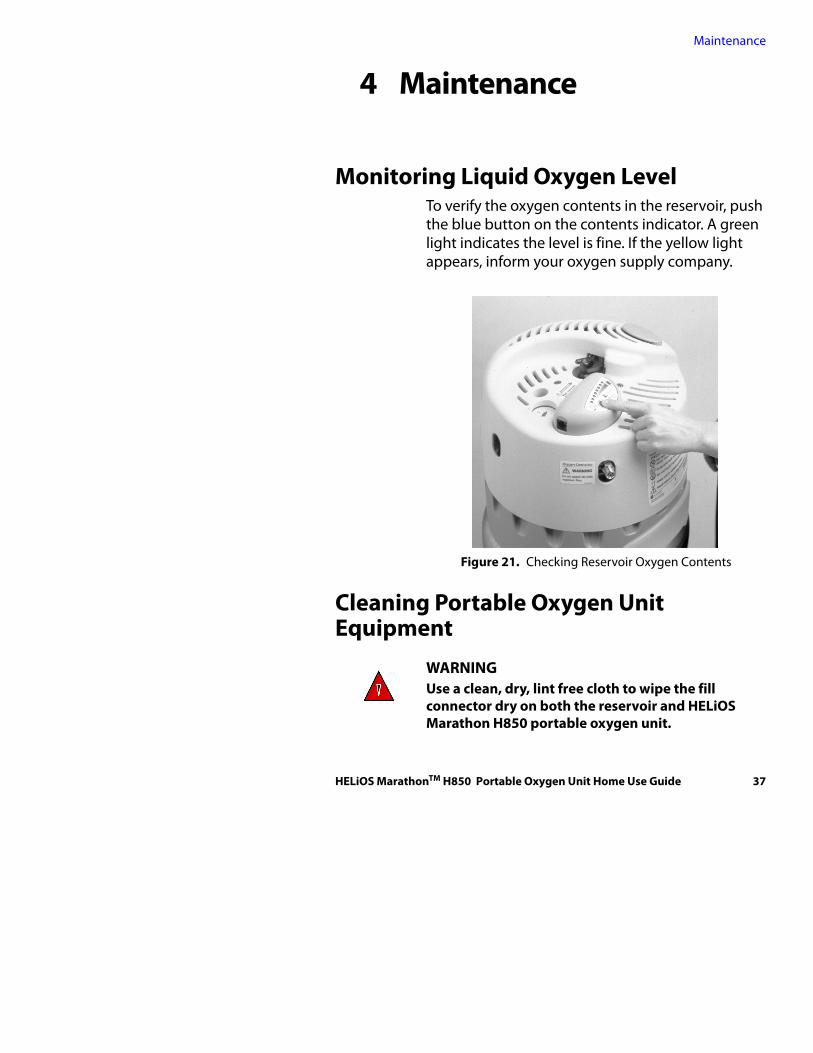
Monitoring Liquid Oxygen LevelTo verify the oxygen contents in the reservoir, push the blue button on the contents indicator. A green light indicates the level is fine. If the yellow light appears, inform your oxygen supply company.
.
Figure 21. Checking Reservoir Oxygen Contents
Cleaning Portable Oxygen Unit Equipment
WARNING Use a clean, dry, lint free cloth to wipe the fill connector dry on both the reservoir and HELiOS Marathon H850 portable oxygen unit.
HELiOS MarathonTM H850 Portable Oxygen Unit Home Use Guide 37
Maintenance
Do not use alcohol, solvents, polishes, or any oily substance on oxygen equipment. To clean, use only warm water and a mild dish washing detergent. Dampen a cloth in the detergent and water solution and wipe the outside surfaces of the equipment until clean. Caution Do not allow water into any of the controls, the fill connector, or the oxygen supply connector.
CautionNever attempt to repair or disassemble this equipment. You could create a hazardous condition or cause equipment failure. If you have problems, questions, or are unsure if equipment is operating properly, call your liquid oxygen supplier.
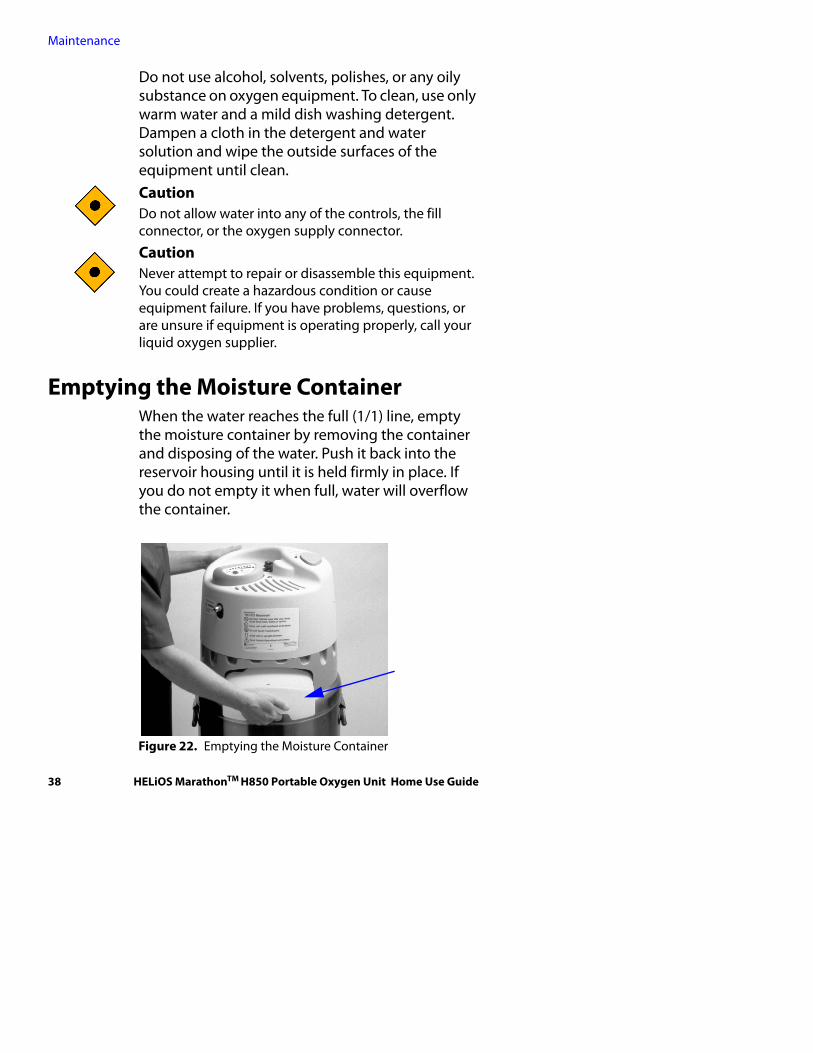
Emptying the Moisture ContainerWhen the water reaches the full (1/1) line, empty the moisture container by removing the container and disposing of the water. Push it back into the reservoir housing until it is held firmly in place. If you do not empty it when full, water will overflow the container.
Figure 22. Emptying the Moisture Container
38 HELiOS MarathonTM H850 Portable Oxygen Unit Home Use Guide
Maintenance
Caution Do not allow water into any of the controls, the fill connector, or the oxygen supply connector.
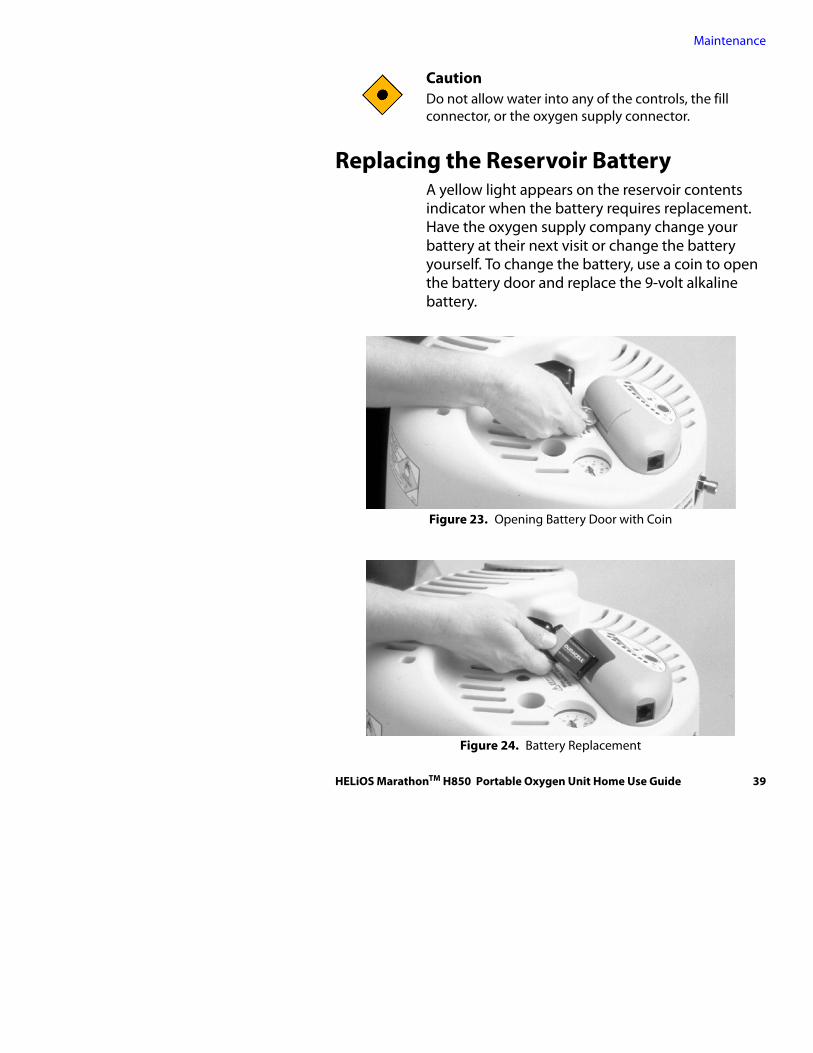
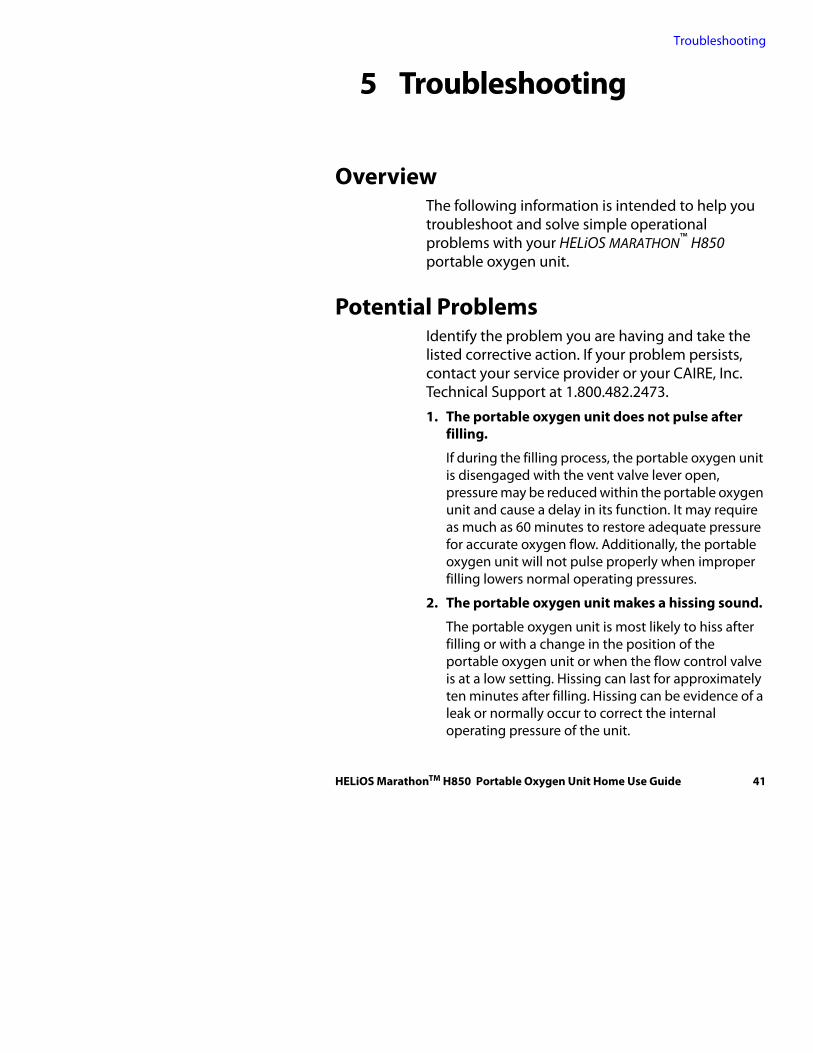
Replacing the Reservoir BatteryA yellow light appears on the reservoir contents indicator when the battery requires replacement. Have the oxygen supply company change your battery at their next visit or change the battery yourself. To change the battery, use a coin to open the battery door and replace the 9-volt alkaline battery.
Figure 23. Opening Battery Door with Coin
Figure 24. Battery Replacement
HELiOS MarathonTM H850 Portable Oxygen Unit Home Use Guide 39

Maintenance
40 HELiOS MarathonTM H850 Portable Oxygen Unit Home Use Guide
Troubleshooting
5 Troubleshooting
OverviewThe following information is intended to help you troubleshoot and solve simple operational problems with your HELiOS MARATHON™ H850 portable oxygen unit.
Potential ProblemsIdentify the problem you are having and take the listed corrective action. If your problem persists, contact your service provider or your CAIRE, Inc. Technical Support at 1.800.482.2473.
1. The portable oxygen unit does not pulse after filling.
If during the filling process, the portable oxygen unit is disengaged with the vent valve lever open, pressure may be reduced within the portable oxygen unit and cause a delay in its function. It may require as much as 60 minutes to restore adequate pressure for accurate oxygen flow. Additionally, the portable oxygen unit will not pulse properly when improper filling lowers normal operating pressures.
2. The portable oxygen unit makes a hissing sound.
The portable oxygen unit is most likely to hiss after filling or with a change in the position of the portable oxygen unit or when the flow control valve is at a low setting. Hissing can last for approximately ten minutes after filling. Hissing can be evidence of a leak or normally occur to correct the internal operating pressure of the unit.
HELiOS MarathonTM H850 Portable Oxygen Unit Home Use Guide 41
Troubleshooting
3. Excessive frost and hissing.
WARNINGDo not touch liquid oxygen or parts that have been in contact with liquid oxygen. Liquid oxygen is extremely cold (-297 °F / -183 °C). When touched, liquid oxygen, or parts of the equipment that have been carrying liquid oxygen, can freeze skin and body tissue.
a. Some hissing and frosting on the portable oxygen unit is normal. If, however, the hissing continues after a fill or anytime during usage and there is excessive frosting on the portable oxygen unit, stop using the portable oxygen unit and contact your homecare provider for service.
b. Excessive frost formation on the portable oxygen unit 30 minutes after a fill while the Flow Control knob is in the OFF position may be a result of possible system malfunction. Stop using the portable oxygen unit and contact your homecare provider for service.
4. Portable oxygen unit stops pulsing during use.
a. Verify there is sufficient oxygen in the portable oxygen unit.
b. Check your flow setting and make sure it is set to a Demand Mode (D1.5 to D4) setting.
c. Ensure both connections of the dual-lumen cannula are firmly attached to the oxygen outlet and sensor connectors.
d. Change the cannula if excessive water droplets are present, since this reduces oxygen flow. Replace the cannula with a dry one, which should enable the portable oxygen unit to pulse.
e. Verify the cannula is not kinked or pinched.
f. Check the cannula. Ensure the cannula tips remain in your nostrils and do not slide to one
42 HELiOS MarathonTM H850 Portable Oxygen Unit Home Use Guide
Troubleshooting
side. With the cannula on, close your mouth and breathe only through your nose to verify that the portable oxygen unit has stopped pulsing.
5. The portable oxygen unit does not fill.
a. Verify there is oxygen in the reservoir. If the reservoir has a pounds-per-square-inch (psi) pressure gauge, make sure it reads between 20 psi and 48 psi.
b. Ensure the portable oxygen unit and reservoir fill connectors are fully engaged throughout the filling process.
6. The portable oxygen unit vent valve does not close properly at the end of the filling process.
WARNINGDo not touch liquid oxygen or parts that have been in contact with liquid oxygen. Liquid oxygen is extremely cold (-297 °F / -183 °C). When touched, liquid oxygen, or parts of the equipment that have been carrying liquid oxygen, can freeze skin and body tissue.
If the vent valve fails to close and the hissing sound and oxygen vapor cloud continue, carefully remove the portable oxygen unit by pressing the release button on the reservoir. Venting from the bottom of the portable oxygen unit should stop in a few minutes. Keep the portable oxygen unit upright, allowing it to warm until you can close the vent valve. The portable oxygen unit may require as much as 60 minutes to restore adequate pressure for accurate oxygen flow. While waiting for the portable oxygen unit, use an alternate source of oxygen such as an external flow control device, B-701655-00. See Accessories, page 47.
HELiOS MarathonTM H850 Portable Oxygen Unit Home Use Guide 43
Troubleshooting
7. Frost forms on the oxygen supply line connected to the reservoir.
WARNINGDo not touch liquid oxygen or parts that have been in contact with liquid oxygen. Liquid oxygen is extremely cold (-297 °F / -183 °C). When touched, liquid oxygen, or parts of the equipment that have been carrying liquid oxygen, can freeze skin and body tissue.
Frost on the supply line is most likely the result of a leaky connection or a split in the line.
a. If the connection at the reservoir outlet is leaking, keep tightening the nut until the leak stops.
b. If the supply line is split or damaged, disconnect the line from the reservoir and contact your home care provider.
8. The portable oxygen unit does not disengage easily from the reservoir after filling.
WARNINGDo not touch liquid oxygen or parts that have been in contact with liquid oxygen. Liquid oxygen is extremely cold (-297 °F / -183 °C). When touched, liquid oxygen, or parts of the equipment that have been carrying liquid oxygen, can freeze skin and body tissue.
WARNINGKeep clear. Do not stand so any body parts extend directly over the reservoir fill connector when disengaging the portable oxygen unit. Contact with liquid oxygen can cause personal injury.
The portable oxygen unit and reservoir fill connectors may have become frozen. Do not use force. Allow a few minutes for the frozen parts to warm. After the ice melts, disengage the portable
44 HELiOS MarathonTM H850 Portable Oxygen Unit Home Use Guide
Troubleshooting
oxygen unit. To prevent the reservoir and portable oxygen unit from freezing together, always wipe the male fill connector on the reservoir and the female fill connector on the portable oxygen unit with a clean, dry, lint-free cloth before filling.
9. The portable has been removed from the reservoir and the reservoir is leaking a large amount of liquid oxygen.
WARNINGDo not touch liquid oxygen or parts that have been in contact with liquid oxygen. Liquid oxygen is extremely cold (-297 °F / -183 °C). When touched, liquid oxygen, or parts of the equipment that have been carrying liquid oxygen, can freeze skin and body tissue.
a. Do not attempt to reconnect the portable oxygen unit to the reservoir.
b. Stay away from the reservoir.
c. Open windows and doors to ventilate the area.
d. Shut off stoves, heaters, and any other potential source of flame or heat.
e. Immediately contact your homecare provider or the company that fills your reservoir.
f. Do not, under any circumstances, use any heat source, such as a hair dryer, to try to melt ice build up on the portable oxygen unit or the reservoir.
g. Do not use hot or cold water to try to melt ice build up. The water may freeze at the site of the leak, holding the valve open and prevent the connector from closing.
h. Do not walk on areas exposed to liquid oxygen for 60 minutes after frost disappears.
HELiOS MarathonTM H850 Portable Oxygen Unit Home Use Guide 45

Troubleshooting
Note:Providers, if a major liquid oxygen discharge (steady stream) occurs, open the vent valve on the reservoir to vent the pressure and halt the flow of liquid oxygen. If unable to safely open the vent valve, remove all persons from the area and ventilate the area by opening windows and doors. Do not walk on areas exposed to liquid oxygen for 60 minutes after frost disappears.
46 HELiOS MarathonTM H850 Portable Oxygen Unit Home Use Guide
Accessories
6 Accessories
The following accessories are available to help you obtain the most benefit from your HELiOS MARATHON™ H850 portable oxygen unit.
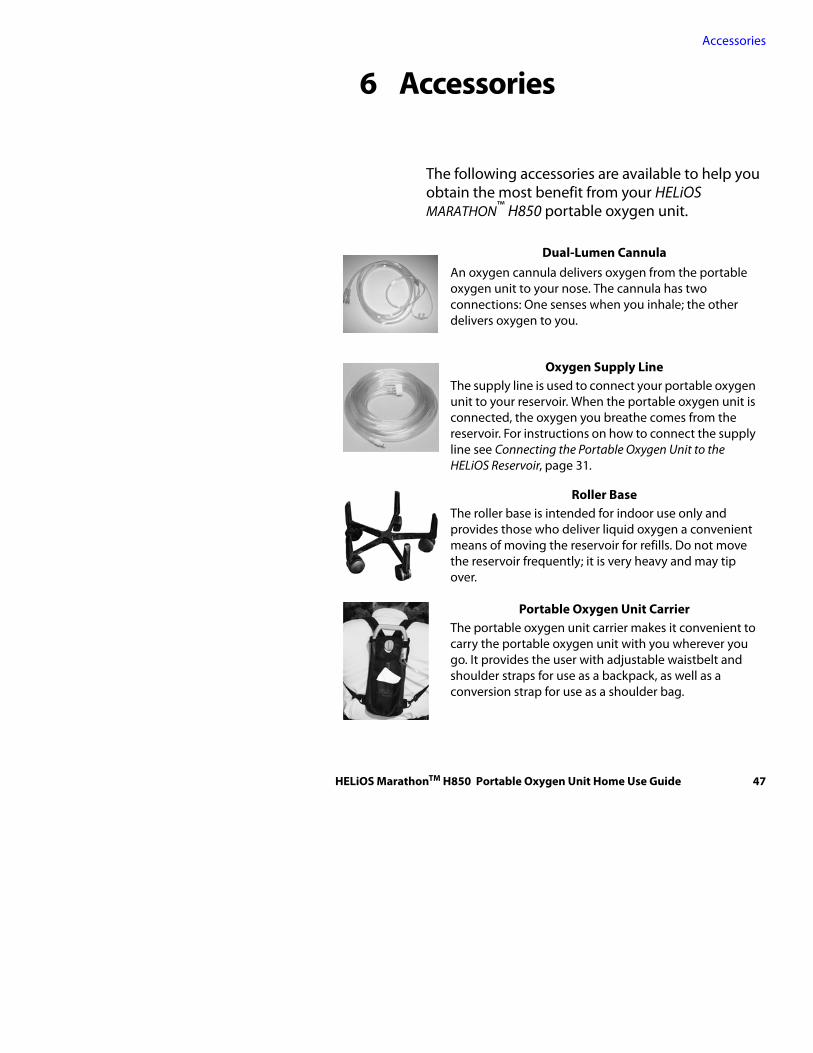
Dual-Lumen CannulaAn oxygen cannula delivers oxygen from the portable oxygen unit to your nose. The cannula has two connections: One senses when you inhale; the other delivers oxygen to you.
Oxygen Supply LineThe supply line is used to connect your portable oxygen unit to your reservoir. When the portable oxygen unit is connected, the oxygen you breathe comes from the reservoir. For instructions on how to connect the supply line see Connecting the Portable Oxygen Unit to the HELiOS Reservoir, page 31.
Roller BaseThe roller base is intended for indoor use only and provides those who deliver liquid oxygen a convenient means of moving the reservoir for refills. Do not move the reservoir frequently; it is very heavy and may tip over.
Portable Oxygen Unit CarrierThe portable oxygen unit carrier makes it convenient to carry the portable oxygen unit with you wherever you go. It provides the user with adjustable waistbelt and shoulder straps for use as a backpack, as well as a conversion strap for use as a shoulder bag.
HELiOS MarathonTM H850 Portable Oxygen Unit Home Use Guide 47
Accessories
WARNING Do not attach an external flow control device that can be set higher than ten liters per minute (lpm) to your HELiOS reservoir.
Note:Do not attach the reservoir oxygen supply line to the external flow control device.
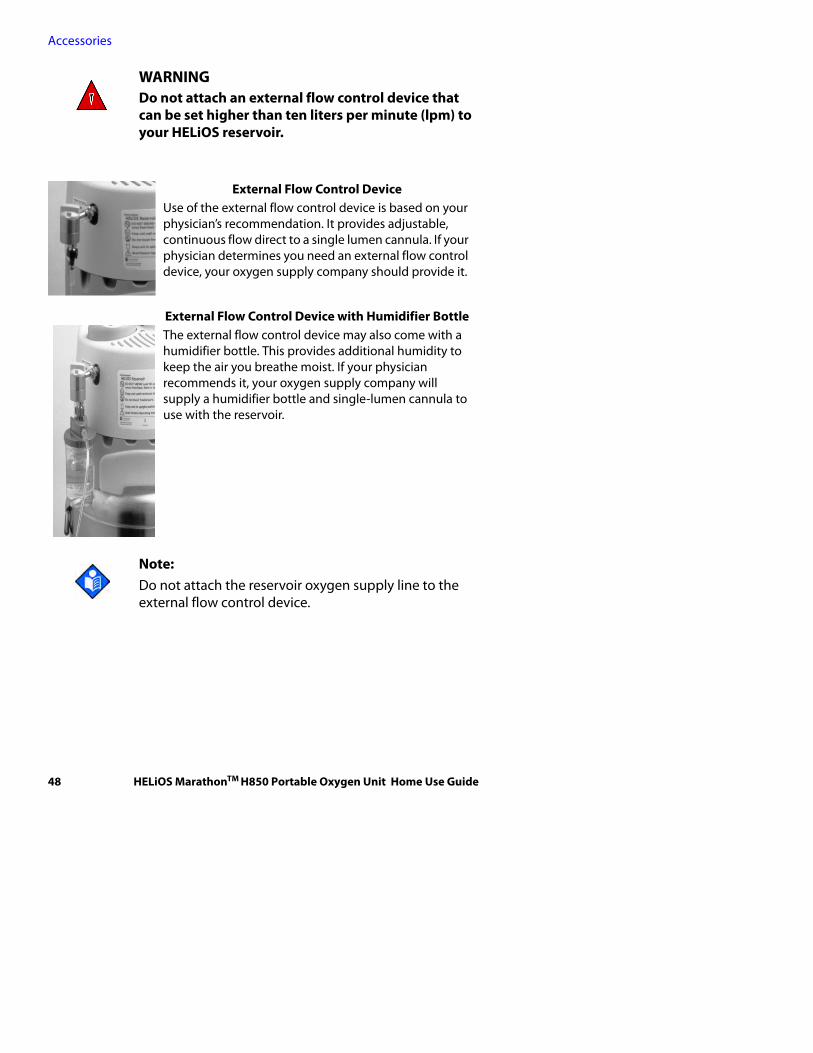
External Flow Control DeviceUse of the external flow control device is based on your physician’s recommendation. It provides adjustable, continuous flow direct to a single lumen cannula. If your physician determines you need an external flow control device, your oxygen supply company should provide it.
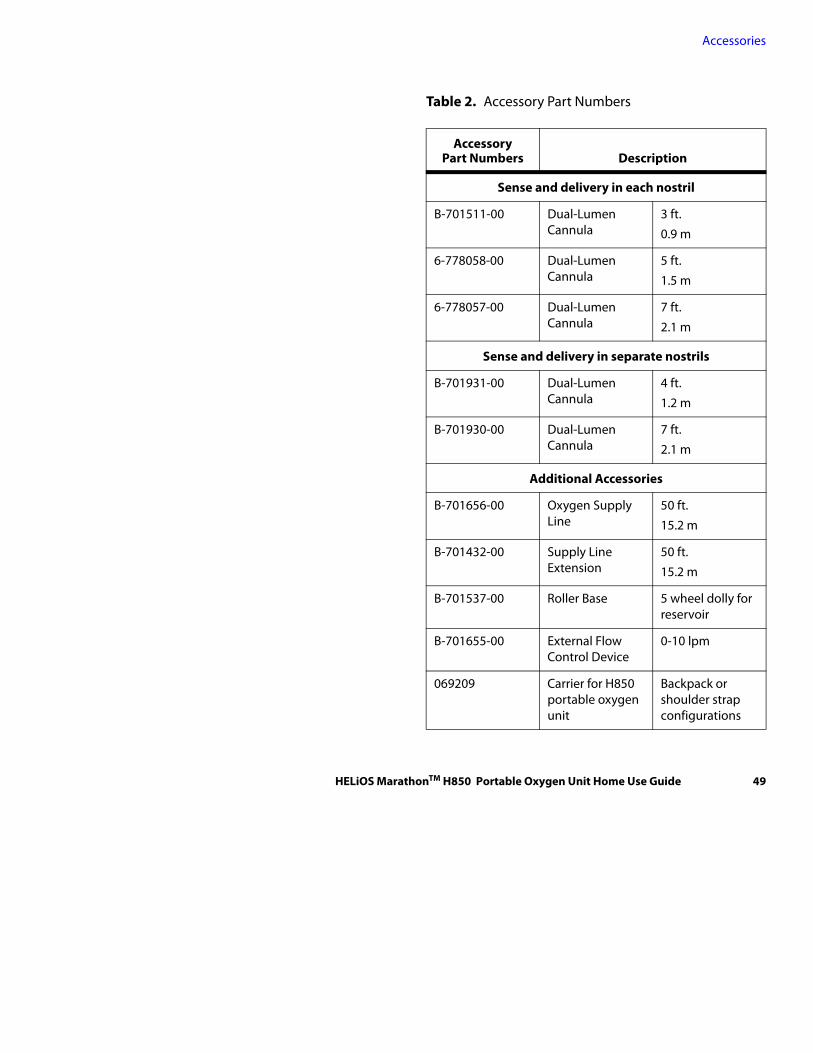
External Flow Control Device with Humidifier BottleThe external flow control device may also come with a humidifier bottle. This provides additional humidity to keep the air you breathe moist. If your physician recommends it, your oxygen supply company will supply a humidifier bottle and single-lumen cannula to use with the reservoir.
48 HELiOS MarathonTM H850 Portable Oxygen Unit Home Use Guide
Accessories
Table 2. Accessory Part Numbers
Accessory Part Numbers Description
Sense and delivery in each nostril
B-701511-00 Dual-Lumen Cannula
3 ft.
0.9 m
6-778058-00 Dual-Lumen Cannula
5 ft.
1.5 m
6-778057-00 Dual-Lumen Cannula
7 ft.
2.1 m
Sense and delivery in separate nostrils
B-701931-00 Dual-Lumen Cannula
4 ft.
1.2 m
B-701930-00 Dual-Lumen Cannula
7 ft.
2.1 m
Additional Accessories
B-701656-00 Oxygen Supply Line
50 ft.
15.2 m
B-701432-00 Supply Line Extension
50 ft.
15.2 m
B-701537-00 Roller Base 5 wheel dolly for reservoir
B-701655-00 External Flow Control Device
0-10 lpm
069209 Carrier for H850 portable oxygen unit
Backpack or shoulder strap configurations
HELiOS MarathonTM H850 Portable Oxygen Unit Home Use Guide 49

Accessories
50 HELiOS MarathonTM H850 Portable Oxygen Unit Home Use Guide
Product Specifications
7 Product Specifications
Operating Environmental Specification-20 °C to 40 °C (-4 °F to 104 °F)
95% maximum relative humidity
Storage Environmental Specification -40 °C to 70 °C (-40 °F to 158 °F)
95% maximum relative humidity
HELiOS MarathonTM H850 Portable Oxygen Unit Home Use Guide 51
Important Information RecordAbout Your PrescriptionYour name:_________________________________________________
Doctor’s name: _____________________________________________
Doctor’s phone number:______________________________________
Date your H850 portable oxygen unit was received: _______________
Prescribed oxygen flow settings________________________________• During sleep ______________________________________________
• At rest ____________________________________________________
• During exercise ____________________________________________
Home care company’s name: __________________________________
Home care company’s phone number: __________________________
Emergency contact’s name: ___________________________________
Emergency contact’s phone number: ___________________________
Special Instructions:
__________________________________________________________
__________________________________________________________
__________________________________________________________
__________________________________________________________
__________________________________________________________
__________________________________________________________
__________________________________________________________
__________________________________________________________
__________________________________________________________
CAIRE Inc. Technical Support 1.800.482.2473
52 HELiOS MarathonTM H850 Portable Oxygen Unit Home Use Guide

© 2009 CAIRE Inc. All rights reserved. 10002321 Rev. C CM1
Rx ONLY
CautionFederal (U.S.A.) law restricts this device to sale by or on the order of a physician. • ATTENTION: La loi fédérale des États-Unis stipule que ce produit ne peut être vendu que sur ordre d’un médicin. • PRECAUCIÓN: La ley federal de EE.UU. establece que este producto sólo puede venderse bajo prescripción médica.


![THE sharpsharpairlines.com/themes/default/img/Sharp_Traveller_4[WEB]5b.pdf · +61 3 5523 2287 stoneba.com.au Suite 4 – McIntyre Arcade, PORTLAND VIC 3305 119 Cecil Street SOUTH](https://img.pdfslide.us/doc/110x75/5f347b7b8a8ceb02651ca628/the-web5bpdf-61-3-5523-2287-stonebacomau-suite-4-a-mcintyre-arcade-portland.jpg)