Embed Size (px)
Citation preview
BBEEFFOORREE YYOOUU BBEEGGIINNRead these instructions and check to be sure all parts and tools are accounted for. Please retain theseinstallation instructions for future reference and parts ordering information.
AAPPPPLLIICCAATTIIOONNVerify accessory fitment at www.indianmotorcycle.com.
RREEQQUUIIRREEDD SSOOLLDD SSEEPPAARRAATTEELLYYOnly parts for installation of the Indian Motorcycle® Heated/Cooled Touring Seat Kit are included. Forcomplete installation, some of the following additional kits may be required (sold separately). Seeaccessory catalog for fitment chart.
• 16 to 2 pin Seat Adapter Harness, P/N 2415036
• 16 to 4 pin Seat Adapter Harness, P/N 2415746
• Quick Release Trunk Harness, 2 pin Seat Connector, P/N 2414641
• Quick Release Trunk Harness, 4 pin Set Connector, P/N 2415332
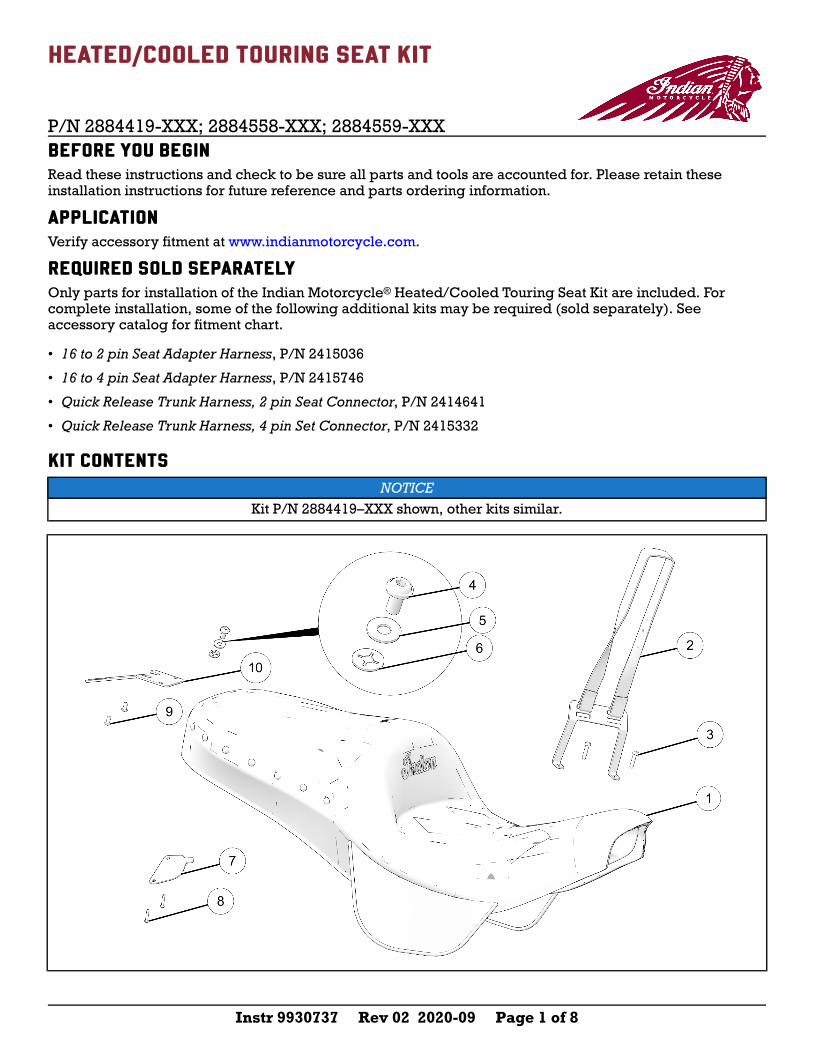
KKIITT CCOONNTTEENNTTSSNOTICE
Kit P/N 2884419–XXX shown, other kits similar.
Instr 9930737 Rev 02 2020-09 Page 1 of 8
P/N 2884419-XXX; 2884558-XXX; 2884559-XXX
HHEEAATTEEDD//CCOOOOLLEEDD TTOOUURRIINNGG SSEEAATT KKIITT
Instr 9930737 Rev 02 2020-09 Page 2 of 8
NOTICEXXX =Indian® color code (For example: VBA = Black)
REF QTY PART DESCRIPTION P/N AVAILABLESEPARATELY
1 1 Seat Assembly, Heat-Cool n/a
2 2 Strap-Seat, Passenger (Black) n/a
3 2 Screw, Hex Flange Head, M6 x 1.0 x 25 7519297
4 1 Screw, Hex Button Head, M8 x 1.25 x 16 7520456
5 1 Washer, 8.4 x 20 x 1.6 7556969
6 1 Washer, M8 x 18.6 x 1.3 Self-Retaining, Nylon, Black 7556884
7 1 Panel, Trunk-Connector, Heat-Cool 5814871
8 2 Screw, Torx® Button Head Flange, M4 x 1.0 x 20 7521153
9 2 Screw, Hex Button Head, M6 x 1.0 x 12 7519000
10 1 Seat Bracket, Rear 5270564-XXX
11 1 Harness, Seat Jumper, 4 to 2 (Not shown) 2415866
NOTICE
Panel, Trunk-Connectoru and Torx® screwsi are only needed for motorcycles with a trunk.
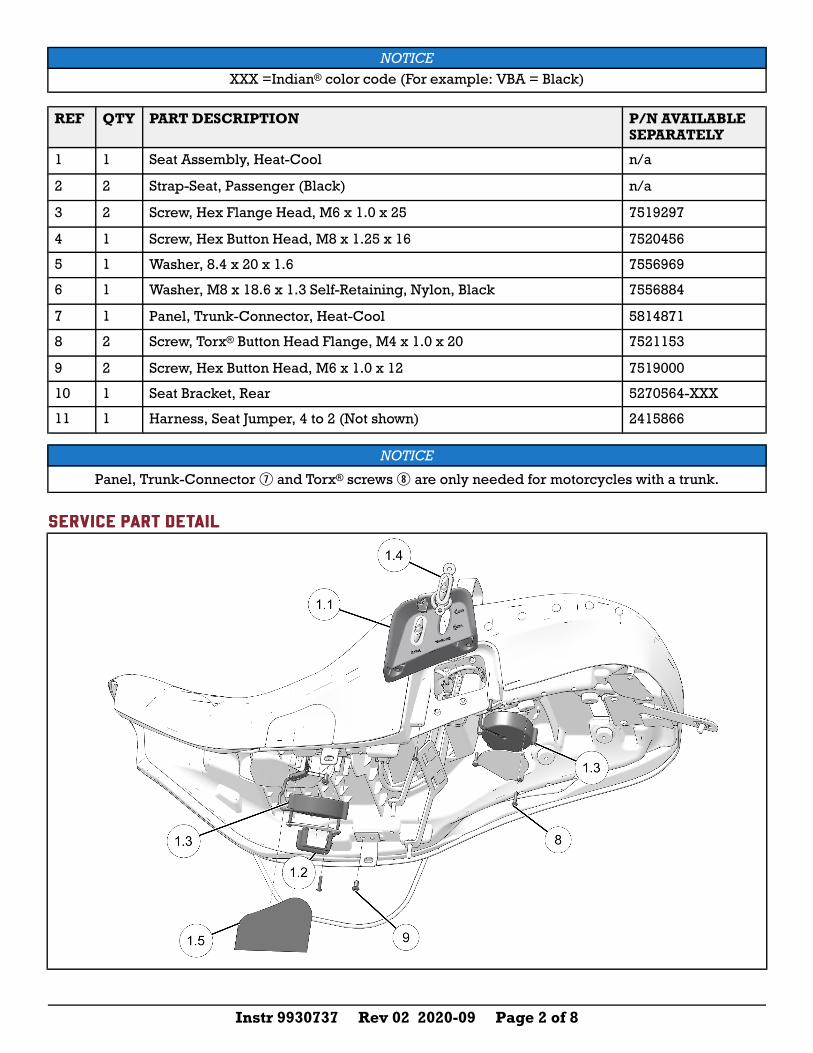
SSEERRVVIICCEE PPAARRTT DDEETTAAIILL

Instr 9930737 Rev 02 2020-09 Page 3 of 8
NOTICESeat flap hidden for clarity of image.
REF QTY PART DESCRIPTION P/N AVAILABLESEPARATELY
1 1 Seat Assembly, Heat-Cool n/a
1.1 1 - Bezel, Switch, Kit PN 2884419 and 2884459- Bezel, Switch, Kit PN 2884458
54561395456779
1.2 1 - Boot-fan, Seat, Heat-Cool 5417070
1.3 1 - Fan-Seat, Heat-Cool 4018574
1.4 1 - Switch-Seat, Heat-Cool 4018572
1.5 1 - FrogZskin®, Heat-Cool 2208277
8 8 Screw, Torx® Button Head Flange, M4 x 1.0 x 20 7521153
9 2 Screw, Hex Button Head, M6 x 1.0 x 12 7519000
10 1 Control Module, Heated and Cooled Seat (not shown) 2208921
TTOOOOLLSS RREEQQUUIIRREEDD• Safety Glasses
• Socket Set, Hex Bit, Metric
• Socket Set, Metric
• Torque Wrench
IIMMPPOORRTTAANNTTYour Indian Motorcycle® Heated/Cooled Touring Seat Kit is exclusively designed for your vehicle. Pleaseread the installation instructions thoroughly before beginning. Installation is easier if the vehicle is cleanand free of debris. For your safety, and to ensure a satisfactory installation, perform all installation stepscorrectly in the sequence shown.
IINNSSTTAALLLLAATTIIOONN IINNSSTTRRUUCCTTIIOONNSSVVEEHHIICCLLEE PPRREEPPAARRAATTIIOONN
GGEENNEERRAALL
1. Turn key or ignition switch toOFF position andremove key. If equipped with keyless fob,remove fob from proximity of vehicle.
2. Park motorcycle on a flat surface, fully extendkickstand, and make sure vehicle is stable priorto installation.
3. If equipped, remove trunk and store in a safelocation.
RREEMMOOVVEE SSIIDDEE CCOOVVEERRSS
1. Remove side covers by grasping firmly andpulling outward. Carefully set aside.
Instr 9930737 Rev 02 2020-09 Page 4 of 8
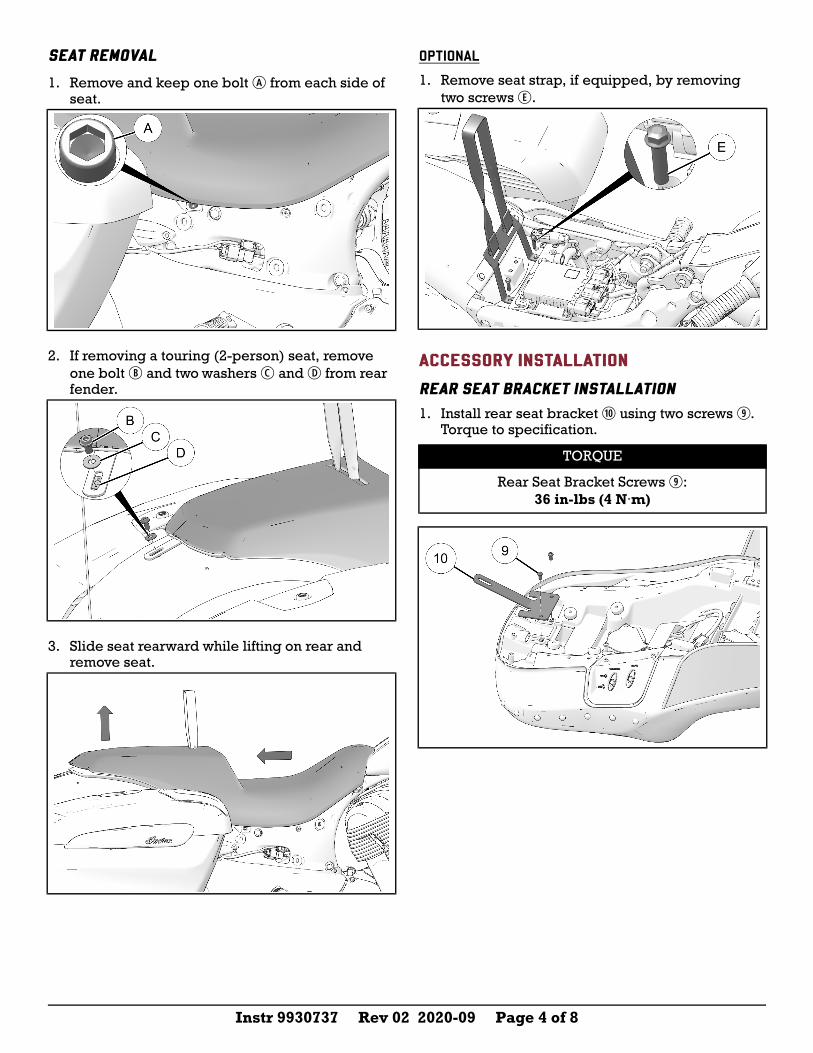
SSEEAATT RREEMMOOVVAALL
1. Remove and keep one boltA from each side ofseat.
2. If removing a touring (2-person) seat, removeone boltB and two washersC andD from rearfender.
3. Slide seat rearward while lifting on rear andremove seat.
OPTIONAL
1. Remove seat strap, if equipped, by removingtwo screwsE.
AACCCCEESSSSOORRYY IINNSSTTAALLLLAATTIIOONN
RREEAARR SSEEAATT BBRRAACCKKEETT IINNSSTTAALLLLAATTIIOONN
1. Install rear seat bracketa using two screwso.Torque to specification.
TORQUE
Rear Seat Bracket Screwso:36 in-lbs (4 N·m)
Instr 9930737 Rev 02 2020-09 Page 5 of 8
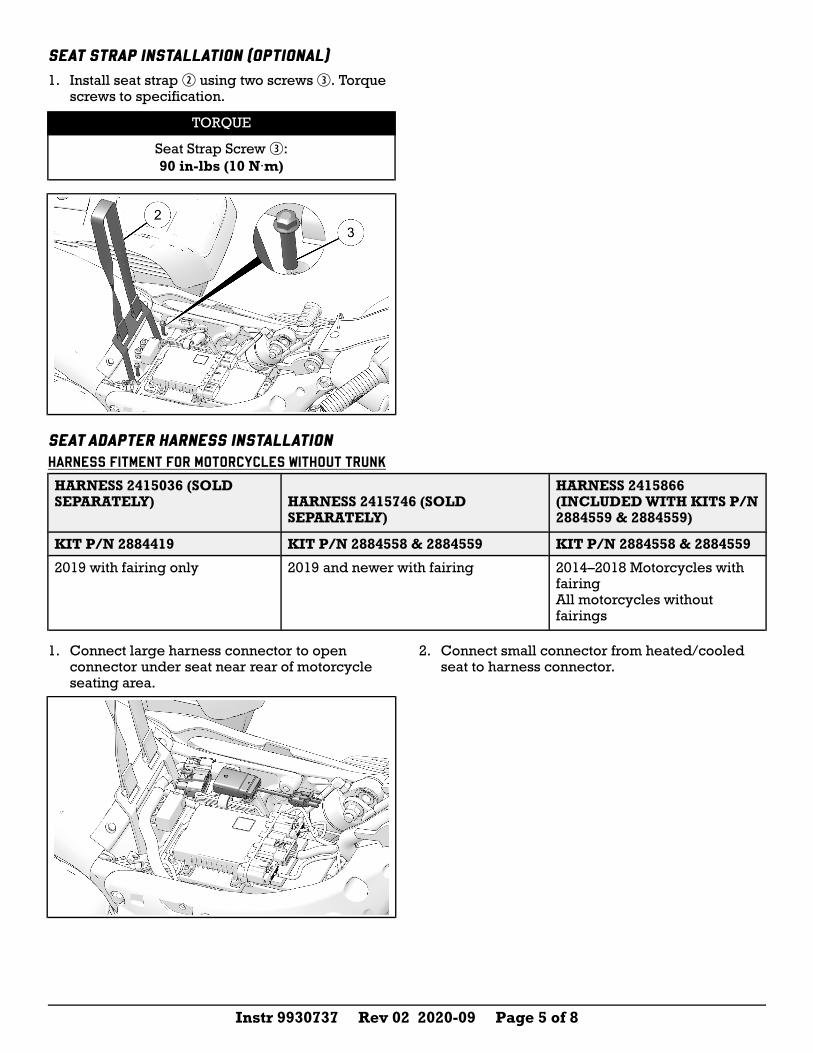
SSEEAATT SSTTRRAAPP IINNSSTTAALLLLAATTIIOONN ((OOPPTTIIOONNAALL))
1. Install seat strapw using two screwse. Torquescrews to specification.
TORQUE
Seat Strap Screwe:90 in-lbs (10 N·m)
SSEEAATT AADDAAPPTTEERR HHAARRNNEESSSS IINNSSTTAALLLLAATTIIOONNHARNESS FITMENT FOR MOTORCYCLES WITHOUT TRUNK
HARNESS 2415036 (SOLDSEPARATELY) HARNESS 2415746 (SOLD
SEPARATELY)
HARNESS 2415866(INCLUDEDWITH KITS P/N2884559 & 2884559)
KIT P/N 2884419 KIT P/N 2884558 & 2884559 KIT P/N 2884558 & 2884559
2019 with fairing only 2019 and newer with fairing 2014–2018 Motorcycles withfairingAll motorcycles withoutfairings
1. Connect large harness connector to openconnector under seat near rear of motorcycleseating area.
2. Connect small connector from heated/cooledseat to harness connector.

Instr 9930737 Rev 02 2020-09 Page 6 of 8
TTRRUUNNKK AADDAAPPTTEERR HHAARRNNEESSSS IINNSSTTAALLLLAATTIIOONN
HARNESS FITMENT FOR MOTORCYCLES WITH TRUNKMODEL YEAR 19 AND NEWER
HARNESS 2414641 HARNESS 2415332
Kit P/N 2884419 Kit P/N 2884558 or2884559
NOTICEModel Year 2014–2018 and all model years without
fairings require using 2 pin connector on thechassis harness to power the seat. Seat kits P/N2884558 & 2884559 require using the 2 to 4 pin
adapter harness to connect the seat to the chassisharness.
1. Connect harness connector to open connectorin bottom of seatq. Install harness as shown inimage.
2. Install trunk-connector panelu with screwsito bottom of seatq. Torque screws tospecification.
TORQUE
Trunk-Connector Panel Screwi:13 in-lbs (1 N·m)
3. Connect harness connector to open connectorunder seat near rear of motorcycle seating area.
NOTICESeat hidden for clarity of image.
HHEEAATTEEDD//CCOOOOLLEEDD SSEEAATT IINNSSTTAALLLLAATTIIOONN
1. Install seat strapw through slot in bottom of seatthrough top of seatq.
Instr 9930737 Rev 02 2020-09 Page 7 of 8
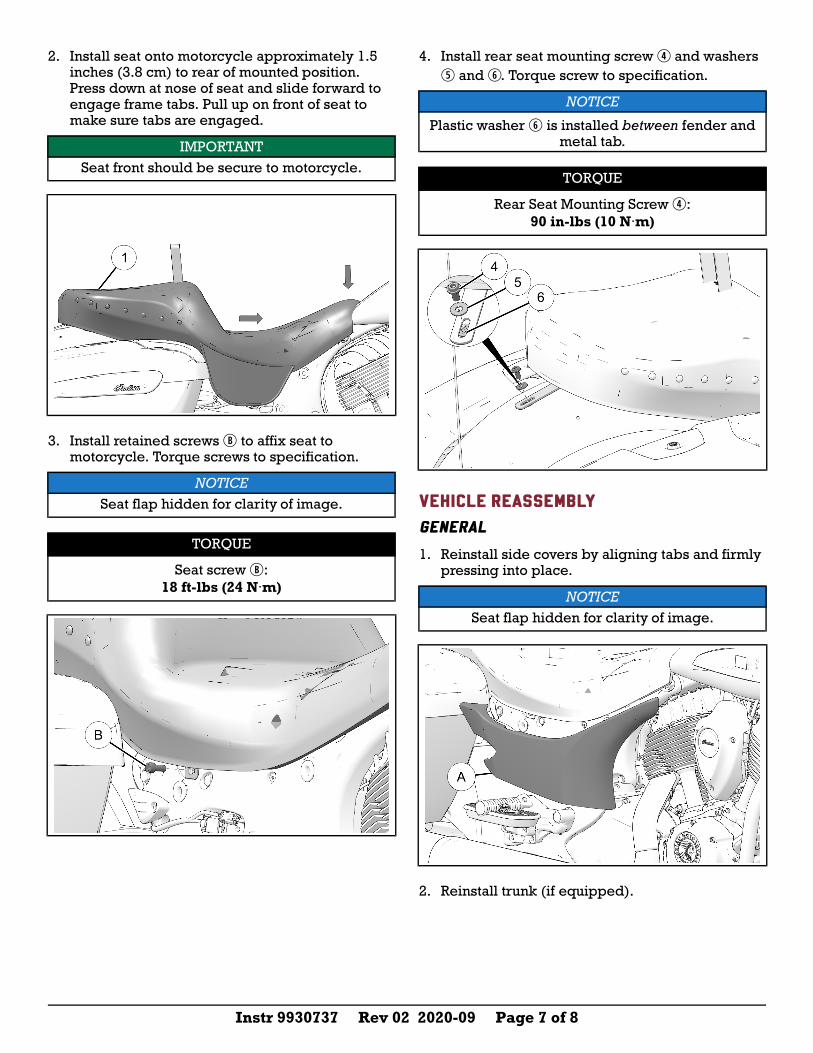
2. Install seat onto motorcycle approximately 1.5inches (3.8 cm) to rear of mounted position.Press down at nose of seat and slide forward toengage frame tabs. Pull up on front of seat tomake sure tabs are engaged.
IMPORTANTSeat front should be secure to motorcycle.
3. Install retained screwsB to affix seat tomotorcycle. Torque screws to specification.
NOTICESeat flap hidden for clarity of image.
TORQUE
Seat screwB:18 ft-lbs (24 N·m)
4. Install rear seat mounting screwr and washerst andy. Torque screw to specification.
NOTICE
Plastic washery is installed between fender andmetal tab.
TORQUE
Rear Seat Mounting Screwr:90 in-lbs (10 N·m)
VVEEHHIICCLLEE RREEAASSSSEEMMBBLLYY
GGEENNEERRAALL
1. Reinstall side covers by aligning tabs and firmlypressing into place.
NOTICESeat flap hidden for clarity of image.
2. Reinstall trunk (if equipped).
Instr 9930737 Rev 02 2020-09 Page 8 of 8
WARNINGSeat must be properly installed for safe operationof motorcycle. Failure to properly install seat maylead to loss of control and result in serious injury
or death.
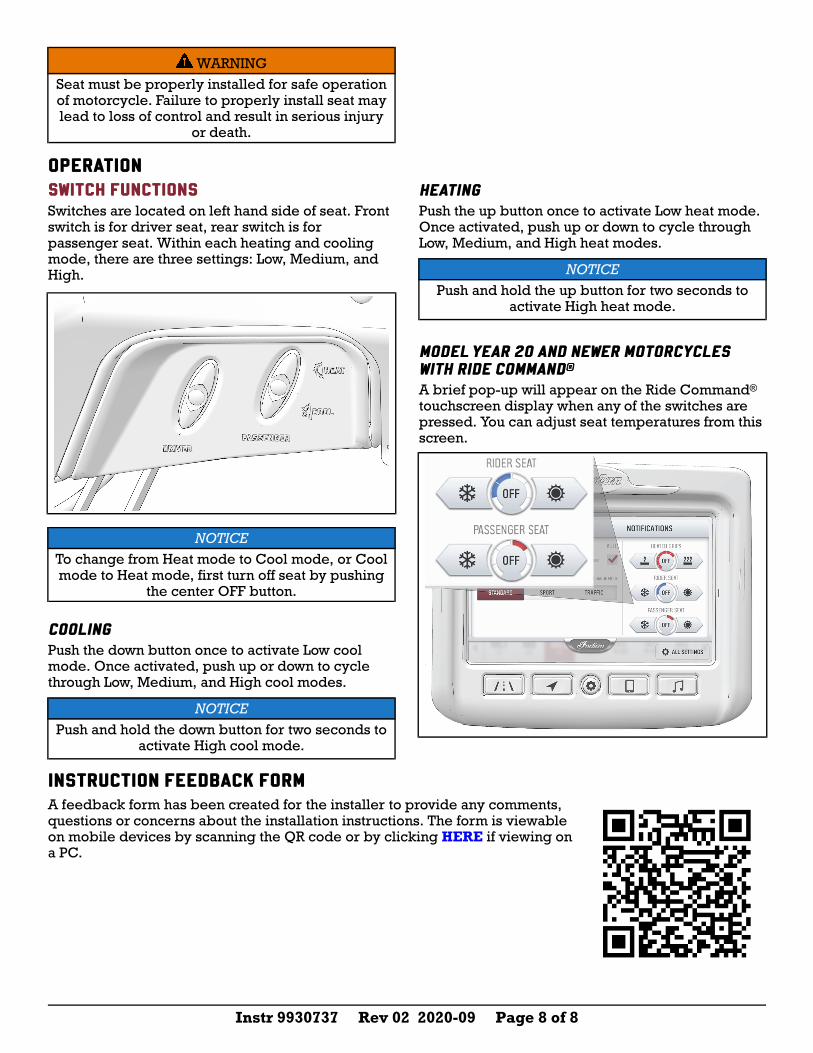
OOPPEERRAATTIIOONNSSWWIITTCCHH FFUUNNCCTTIIOONNSSSwitches are located on left hand side of seat. Frontswitch is for driver seat, rear switch is forpassenger seat. Within each heating and coolingmode, there are three settings: Low, Medium, andHigh.
NOTICETo change from Heat mode to Cool mode, or Coolmode to Heat mode, first turn off seat by pushing
the center OFF button.
CCOOOOLLIINNGGPush the down button once to activate Low coolmode. Once activated, push up or down to cyclethrough Low, Medium, and High cool modes.
NOTICEPush and hold the down button for two seconds to
activate High cool mode.
HHEEAATTIINNGGPush the up button once to activate Low heat mode.Once activated, push up or down to cycle throughLow, Medium, and High heat modes.
NOTICEPush and hold the up button for two seconds to
activate High heat mode.
MMOODDEELLYYEEAARR 2200 AANNDD NNEEWWEERR MMOOTTOORRCCYYCCLLEESSWWIITTHH RRIIDDEE CCOOMMMMAANNDD®®
A brief pop-up will appear on the Ride Command®touchscreen display when any of the switches arepressed. You can adjust seat temperatures from thisscreen.
IINNSSTTRRUUCCTTIIOONN FFEEEEDDBBAACCKK FFOORRMMA feedback form has been created for the installer to provide any comments,questions or concerns about the installation instructions. The form is viewableon mobile devices by scanning the QR code or by clicking HERE if viewing ona PC.