Embed Size (px)
Citation preview
1 Made in U.S.A. www.SmartAVI.com 1-800-AVI-2131
HDN‐4 Quad User Manual
4-Port Quad HDMI KVM Switch with USB 2.0 and Audio Sharing
Access and Control up to 4 Computers from a single Workstation
2
TABLE OF CONTENTS
WHAT'S IN THE BOX? 2 INTRODUCTION 3 FEATURES 3 APPLICATIONS 3 TECHNICAL SPECIFICATIONS 4 HARDWARE INSTALLATION 5 CONTROL 6 ESTABLISHING AN RS-232 CONNECTION 7
LIMITED WARRANTY STATEMENT 8
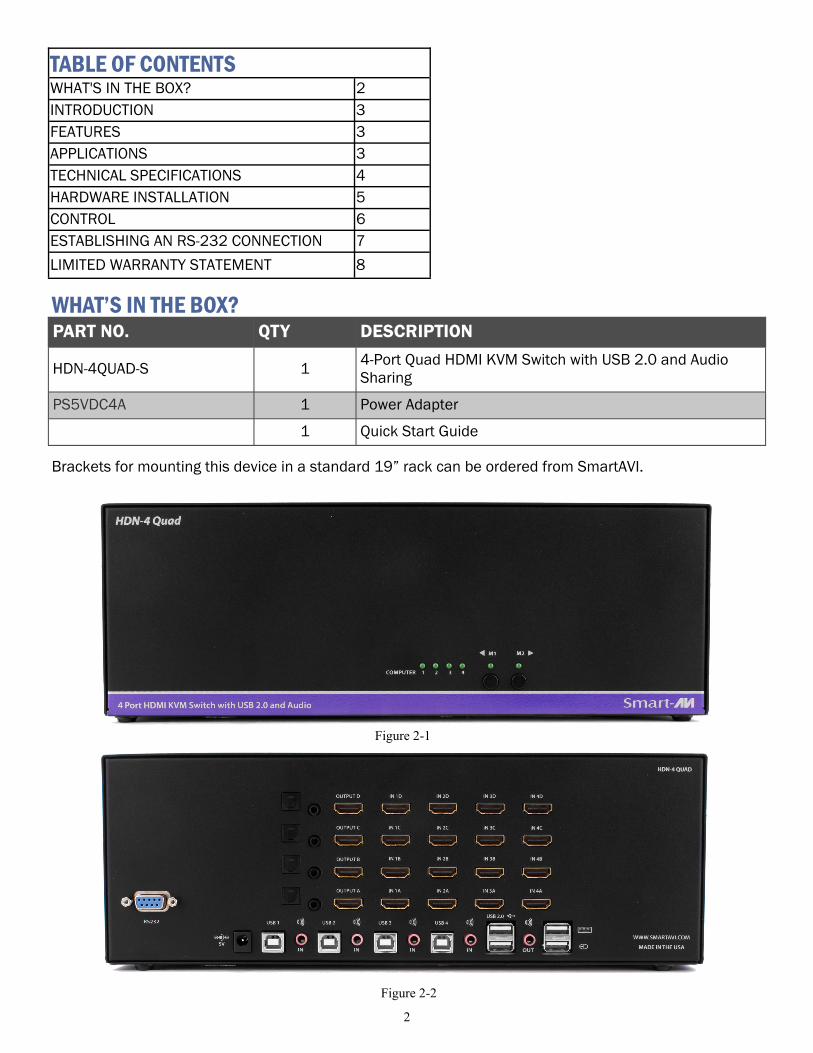
Figure 2-1
Figure 2-2
PART NO. QTY DESCRIPTION
HDN-4QUAD-S 1 4-Port Quad HDMI KVM Switch with USB 2.0 and Audio Sharing
PS5VDC4A 1 Power Adapter
1 Quick Start Guide
WHAT’S IN THE BOX?
Brackets for mounting this device in a standard 19” rack can be ordered from SmartAVI.

3
INTRODUCTION The HDN-4 Quad is a dedicated multi-platform KVM switch capable of managing up to 4 different com-puters through four HDMI monitors and one USB keyboard & mouse. It also supports a single set of speakers and up to 2 USB 2.0 Devices. The USB emulation technology utilized by the HDN-4 Quad en-ables immediate hotkey source switching through a remote USB keyboard and mouse. The HDN-4 Quad uses single link connectors providing high resolutions up to 4K (3840x2160 @ 30Hz) with zero pixel loss from TMDS signal correction. SOURCE SWITCHING MADE EASY The HDN-4 Quad provides a simplified management approach for up to 4 computers with HDMI, stereo audio, and USB 2.0 outputs. This dynamic KVM console can be controlled remotely from easily accessible keyboard hotkeys or RS-232 commands, as well as directly through the console’s easy to read front panel. EDID LEARNING & PROGRAMMING Detection of DDC signals for all attached devices is effortless with the HDN-4 Quad due to its real EDID learning and programming. This is vital in optimizing the resolution of the selected graphics card to prop-erly display on the remote monitor. Furthermore, the EDID learning feature continues to replicate the right DDC for the computer to enable the display card to effectively work when unused ports are not selected. FULL USB KEYBOARD AND MOUSE EMULATION The USB keyboard and mouse emulation utilized by the HDN-4 Quad provides accurate and quick source switching by means of keyboard hotkeys and mouse actions. The HDN-4Quad imitates the presence of a keyboard and mouse for every attached computer through a USB cable. This is essential as it simulates the existence of the keyboard and mouse to all the computers while switching without interruptions.
FEATURES Supports resolutions up to 4K HD (3820x2160 @30Hz) Uses HDMI 1.4 ports Supports all USB 2.0 Devices Supports USB keyboard and mouse emulation for error free booting Offers SmartPreview picture-in-picture technology Front panel buttons with LEDs for local control RS-232 control for additional control Hot key commands for quick channel selection Independent (asynchronous) switching of KVM and peripheral USB ports. Users can scan a document
and save in another computer Supports DVI sources/display with DVI-to-HDMI adaptors (not included)
APPLICATIONS Server Collocation Digital Signage Education Airports Dealer Rooms Control Rooms Audio/Visual Presentations Shopping Centers
4
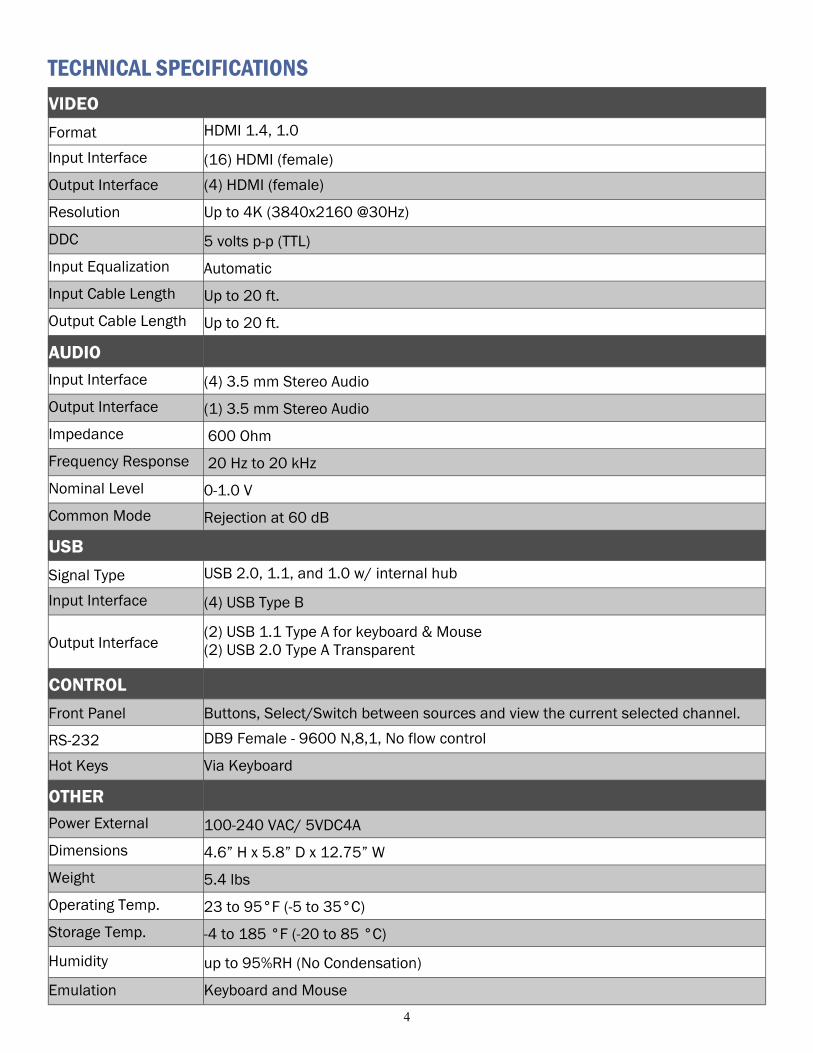
TECHNICAL SPECIFICATIONS
VIDEO
Format HDMI 1.4, 1.0
Input Interface (16) HDMI (female)
Output Interface (4) HDMI (female)
Resolution Up to 4K (3840x2160 @30Hz)
DDC 5 volts p-p (TTL)
Input Equalization Automatic
Input Cable Length Up to 20 ft.
Output Cable Length Up to 20 ft.
AUDIO Input Interface (4) 3.5 mm Stereo Audio
Output Interface (1) 3.5 mm Stereo Audio
Impedance 600 Ohm
Frequency Response 20 Hz to 20 kHz
Nominal Level 0-1.0 V
Common Mode Rejection at 60 dB
USB
Signal Type USB 2.0, 1.1, and 1.0 w/ internal hub
Input Interface (4) USB Type B
Output Interface (2) USB 1.1 Type A for keyboard & Mouse (2) USB 2.0 Type A Transparent
CONTROL
Front Panel Buttons, Select/Switch between sources and view the current selected channel.
RS-232 DB9 Female - 9600 N,8,1, No flow control
Hot Keys Via Keyboard
OTHER
Power External 100-240 VAC/ 5VDC4A
Dimensions 4.6” H x 5.8” D x 12.75” W
Weight 5.4 lbs
Operating Temp. 23 to 95°F (-5 to 35°C)
Storage Temp. -4 to 185 °F (-20 to 85 °C)
Humidity up to 95%RH (No Condensation)
Emulation Keyboard and Mouse
5
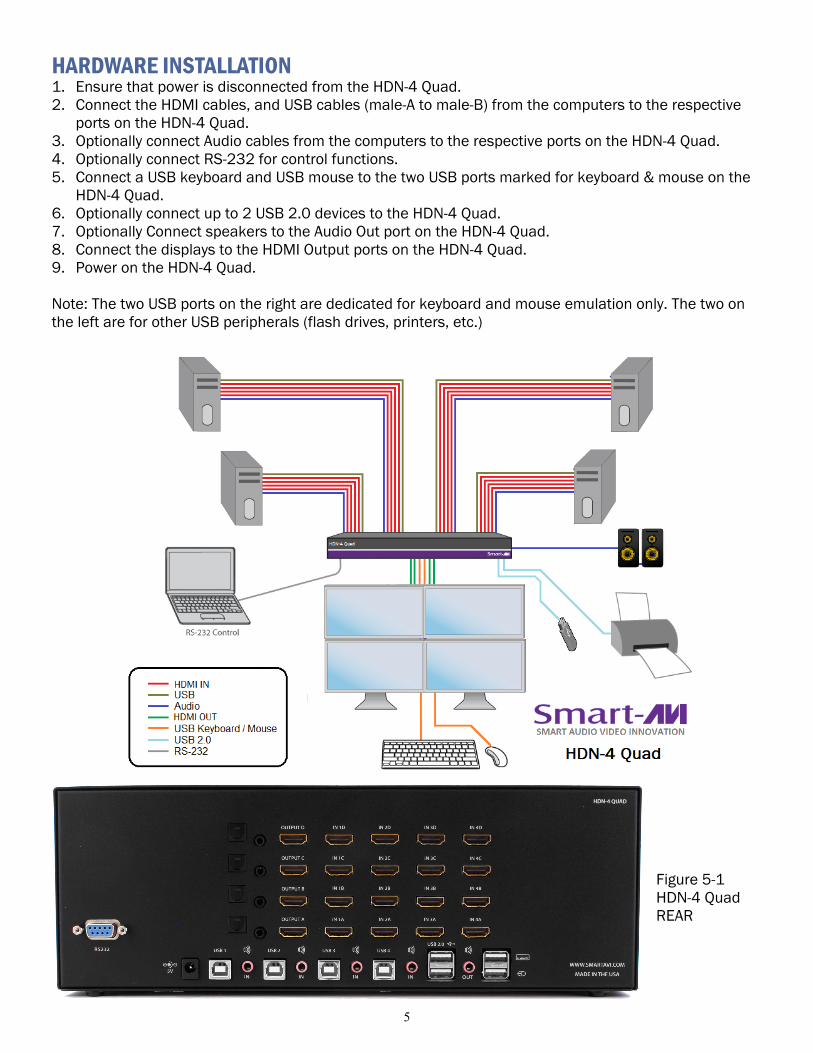
HARDWARE INSTALLATION 1. Ensure that power is disconnected from the HDN-4 Quad. 2. Connect the HDMI cables, and USB cables (male-A to male-B) from the computers to the respective
ports on the HDN-4 Quad. 3. Optionally connect Audio cables from the computers to the respective ports on the HDN-4 Quad. 4. Optionally connect RS-232 for control functions. 5. Connect a USB keyboard and USB mouse to the two USB ports marked for keyboard & mouse on the
HDN-4 Quad. 6. Optionally connect up to 2 USB 2.0 devices to the HDN-4 Quad. 7. Optionally Connect speakers to the Audio Out port on the HDN-4 Quad. 8. Connect the displays to the HDMI Output ports on the HDN-4 Quad. 9. Power on the HDN-4 Quad. Note: The two USB ports on the right are dedicated for keyboard and mouse emulation only. The two on the left are for other USB peripherals (flash drives, printers, etc.)
Figure 5-1 HDN-4 Quad REAR
6
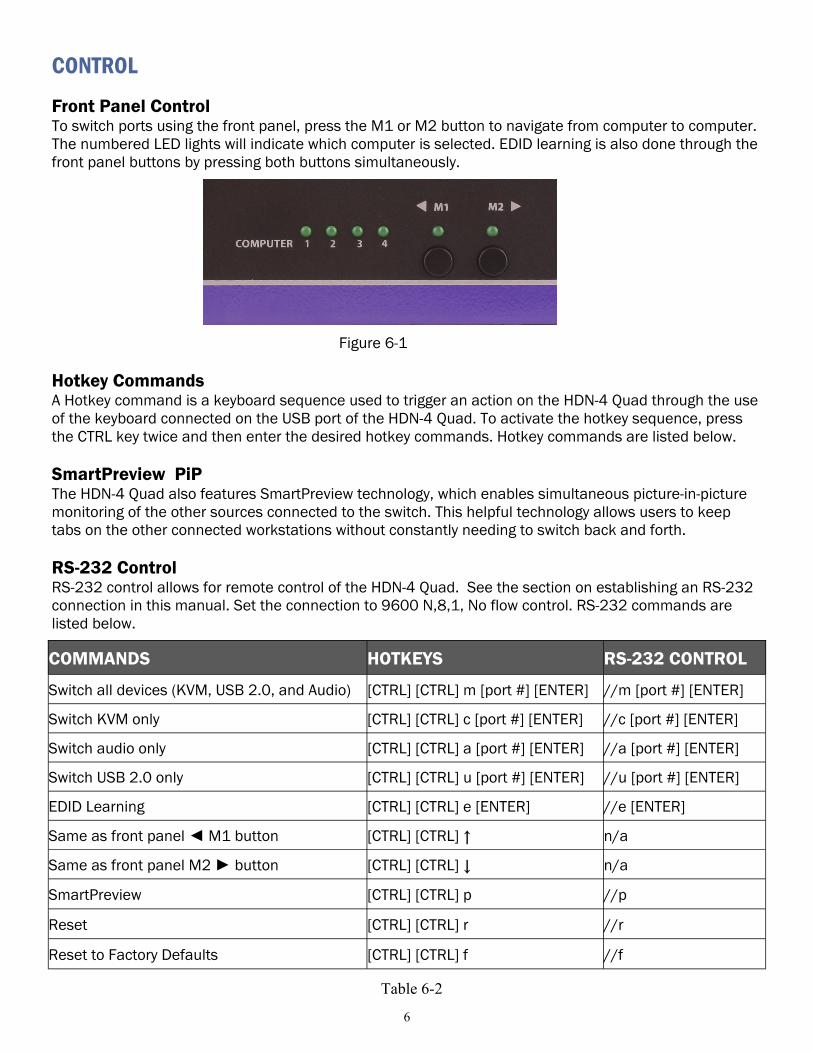
CONTROL Front Panel Control To switch ports using the front panel, press the M1 or M2 button to navigate from computer to computer. The numbered LED lights will indicate which computer is selected. EDID learning is also done through the front panel buttons by pressing both buttons simultaneously. Figure 6-1 Hotkey Commands A Hotkey command is a keyboard sequence used to trigger an action on the HDN-4 Quad through the use of the keyboard connected on the USB port of the HDN-4 Quad. To activate the hotkey sequence, press the CTRL key twice and then enter the desired hotkey commands. Hotkey commands are listed below. SmartPreview PiP The HDN-4 Quad also features SmartPreview technology, which enables simultaneous picture-in-picture monitoring of the other sources connected to the switch. This helpful technology allows users to keep tabs on the other connected workstations without constantly needing to switch back and forth. RS-232 Control RS-232 control allows for remote control of the HDN-4 Quad. See the section on establishing an RS-232 connection in this manual. Set the connection to 9600 N,8,1, No flow control. RS-232 commands are listed below.
Table 6-2
COMMANDS HOTKEYS RS-232 CONTROL
Switch all devices (KVM, USB 2.0, and Audio) [CTRL] [CTRL] m [port #] [ENTER] //m [port #] [ENTER]
Switch KVM only [CTRL] [CTRL] c [port #] [ENTER] //c [port #] [ENTER]
Switch audio only [CTRL] [CTRL] a [port #] [ENTER] //a [port #] [ENTER]
Switch USB 2.0 only [CTRL] [CTRL] u [port #] [ENTER] //u [port #] [ENTER]
EDID Learning [CTRL] [CTRL] e [ENTER] //e [ENTER]
Same as front panel ◄ M1 button [CTRL] [CTRL] ↑ n/a
Same as front panel M2 ► button [CTRL] [CTRL] ↓ n/a
SmartPreview [CTRL] [CTRL] p //p
Reset [CTRL] [CTRL] r //r
Reset to Factory Defaults [CTRL] [CTRL] f //f
7
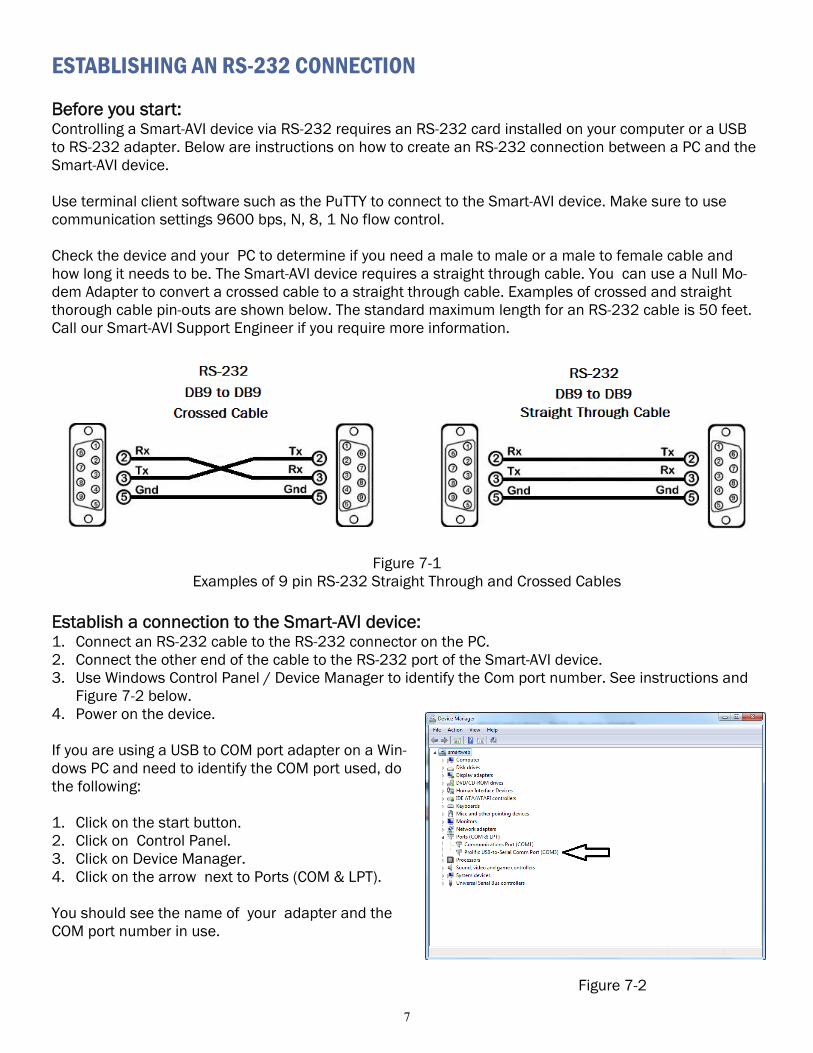
ESTABLISHING AN RS-232 CONNECTION Before you start: Controlling a Smart-AVI device via RS-232 requires an RS-232 card installed on your computer or a USB to RS-232 adapter. Below are instructions on how to create an RS-232 connection between a PC and the Smart-AVI device. Use terminal client software such as the PuTTY to connect to the Smart-AVI device. Make sure to use communication settings 9600 bps, N, 8, 1 No flow control. Check the device and your PC to determine if you need a male to male or a male to female cable and how long it needs to be. The Smart-AVI device requires a straight through cable. You can use a Null Mo-dem Adapter to convert a crossed cable to a straight through cable. Examples of crossed and straight thorough cable pin-outs are shown below. The standard maximum length for an RS-232 cable is 50 feet. Call our Smart-AVI Support Engineer if you require more information.
Figure 7-1 Examples of 9 pin RS-232 Straight Through and Crossed Cables
Establish a connection to the Smart-AVI device: 1. Connect an RS-232 cable to the RS-232 connector on the PC. 2. Connect the other end of the cable to the RS-232 port of the Smart-AVI device. 3. Use Windows Control Panel / Device Manager to identify the Com port number. See instructions and
Figure 7-2 below. 4. Power on the device. If you are using a USB to COM port adapter on a Win-dows PC and need to identify the COM port used, do the following: 1. Click on the start button. 2. Click on Control Panel. 3. Click on Device Manager. 4. Click on the arrow next to Ports (COM & LPT). You should see the name of your adapter and the COM port number in use. Figure 7-2

8
LIMITED WARRANTY STATEMENT
A. Extent of limited warranty Smart‐AVI Technologies, Inc. warrants to the end‐user customers that the Smart‐AVI product specified above will be free from defects in materials and workmanship for the duration of 1 year, which duration begins on the date of purchase by the customer. Customer is responsible for maintaining proof of date of purchase. Smart‐AVI limited warranty covers only those defects which arise as a result of normal use of the product, and do not apply to any: a. Improper or inadequate maintenance or modifications b. Operations outside product specifications c. Mechanical abuse and exposure to severe conditions If Smart‐AVI receives, during applicable warranty period, a notice of defect, Smart‐AVI will at its discretion replace or repair defective product. If Smart‐AVI is unable to replace or repair defective product covered by the Smart‐AVI warranty within reasonable period of time, Smart‐AVI shall refund the cost of the product. Smart‐AVI shall have no obligation to repair, replace or refund unit until customer returns defective product to Smart‐AVI. Any replacement product could be new or like new, provided that it has functionality at least equal to that of the product being replaced. Smart‐AVI limited warranty is valid in any country where the covered product is distributed by Smart‐AVI. B. Limitations of warranty To the extant allowed by local law, neither Smart‐AVI nor its third party suppliers make any other warranty or condition of any kind whether expressed or implied with respect to the Smart‐AVI product, and specifically disclaim implied warranties or conditions of merchantability, satisfactory quality, and fitness for a particular purpose. C. Limitations of liability To the extent allowed by local law the remedies provided in this warranty statement are the cus‐tomers sole and exclusive remedies. To the extant allowed by local law, except for the obligations specifically set forth in this warranty statement, in no event will Smart‐AVI or its third party suppliers be liable for direct, indirect, special, incidental, or con‐sequential damages whether based on contract, tort or any other legal theory and whether advised of the possibility of such damages. D. Local law To the extent that this warranty statement is inconsistent with local law, this warranty statement shall be considered modified to be consistent with such law.

9
NOTICE The information contained in this document is subject to change without notice. SmartAVI makes no war‐ranty of any kind with regard to this material, including but not limited to, implied warranties of merchant‐ability and fitness for particular purpose. SmartAVI will not be liable for errors contained herein or for inci‐dental or consequential damages in connection with the furnishing, performance or use of this material. No part of this document may be photocopied, reproduced, or translated into another language without prior written consent from SmartAVI Technologies, Inc.
20170123