Embed Size (px)
Citation preview
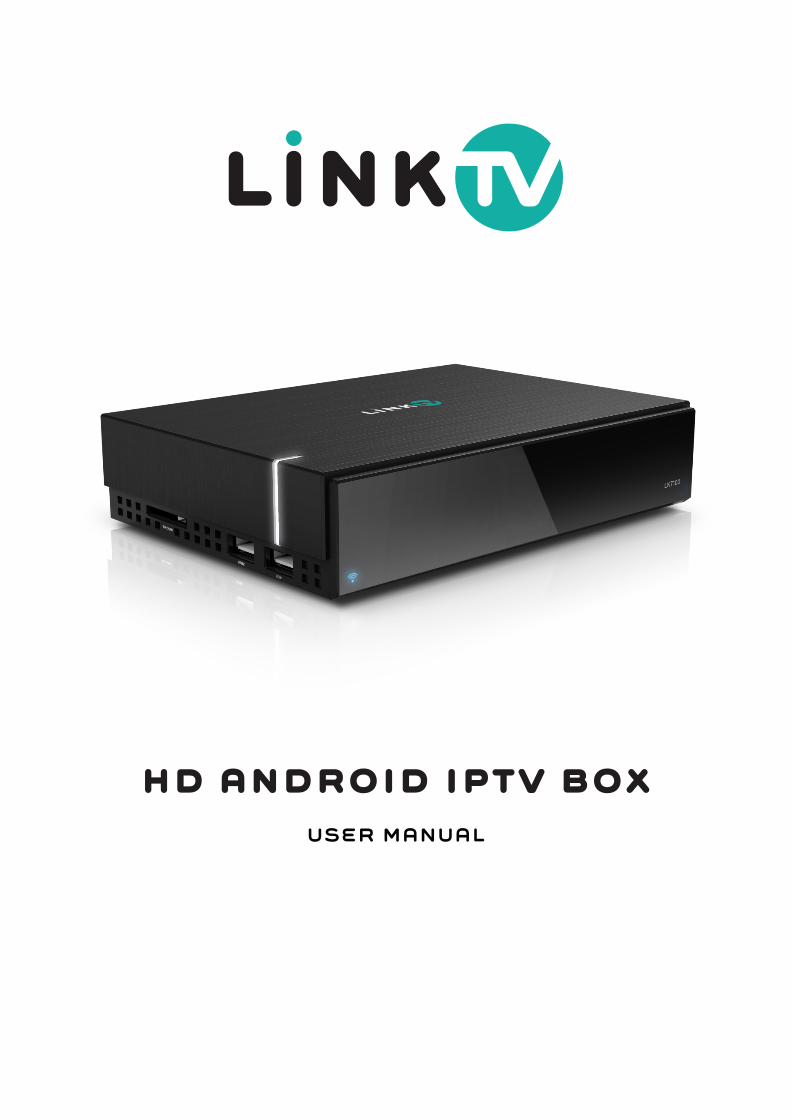
user manual
hd android iptv box
0
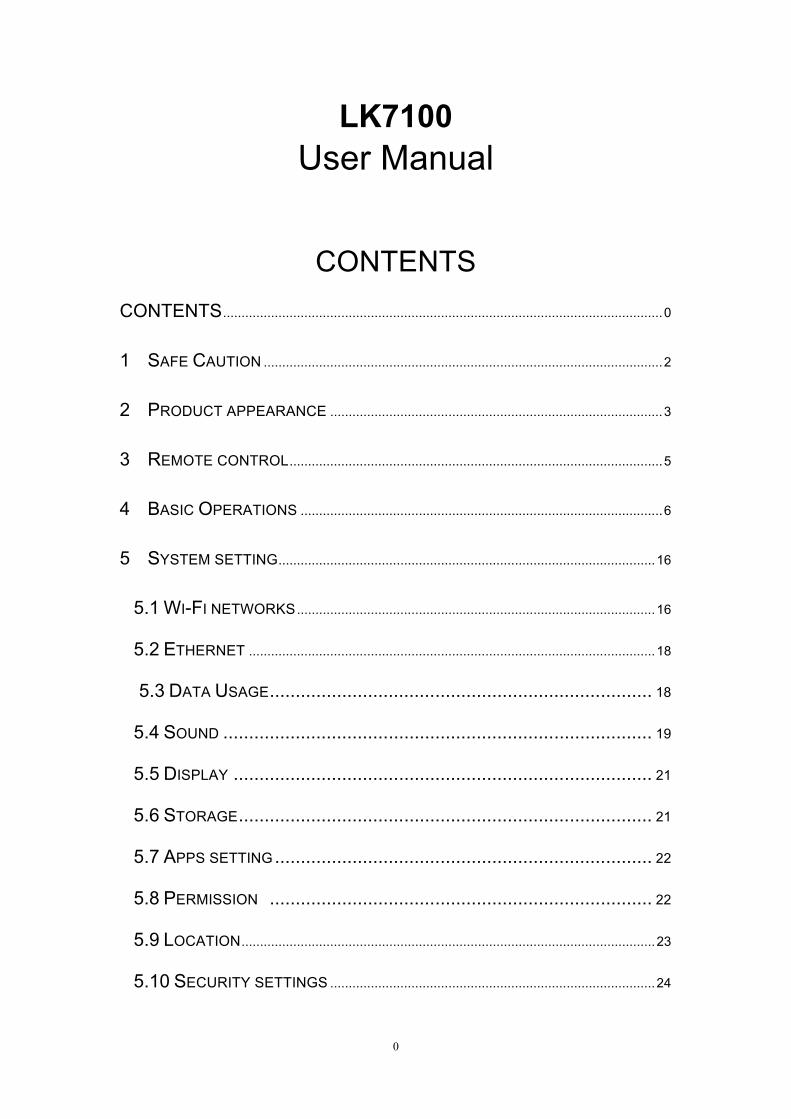
LK7100 User Manual
CONTENTS CONTENTS ....................................................................................................................... 0
1 SAFE CAUTION ............................................................................................................ 2
2 PRODUCT APPEARANCE .......................................................................................... 3
3 REMOTE CONTROL ..................................................................................................... 5
4 BASIC OPERATIONS .................................................................................................. 6
5 SYSTEM SETTING ...................................................................................................... 16
5.1 WI-FI NETWORKS ................................................................................................. 16
5.2 ETHERNET .............................................................................................................. 18
5.3 DATA USAGE .......................................................................... 18
5.4 SOUND ................................................................................... 19
5.5 DISPLAY ................................................................................. 21
5.6 STORAGE ................................................................................ 21
5.7 APPS SETTING ......................................................................... 22
5.8 PERMISSION .......................................................................... 22
5.9 LOCATION ................................................................................................................ 23
5.10 SECURITY SETTINGS ........................................................................................ 24
1
5.11 LANGUAGE & INPUT .......................................................................................... 24
5.12 BACKUP & RESET .................................................................. 25
5.13 ACCOUNT ............................................................................................................. 26
26
5.14 DATA&TIME ..................................................................................................................
5.15 ABOUT THE BOX ................................................................................................ 27
6 TROUBLESHOOTING ............................................................................................................ 28
7 SPECIFICATION ...................................................................................................................... 29
2
1 Safe Caution NOTICE: To prevent fire and electric shock, do not expose this receiver to rain or moisture. In order to avoid any possible risk of electric shock, never attempt to open the unit. In case of the unit breaking down, repair of the unit should be carried out by qualified technicians. No part of this unit should be repaired by users.
WARNING! Ø Presence of live parts inside the unit! Do not open. Risk of electric shock! No part should
be repaired by users. Ø The maintenance of the receiver should be carried out exclusively by qualified persons. Ø If the power cord is damaged, it must be replaced or repaired by the manufacturer, its
after-sales service, qualified electrician or persons of similar qualification in order to avoid possible danger.
Ø The product must be installed in accordance with national regulations. Ø The used batteries must be disposed of safely. Throw them in appropriate rubbish bins in
order to protect the environment.
Proper Installation Ø Place the receiver on a flat, firm and stable surface. Do not put it on a carpet or rug. Ø Do not place the receiver on top of another device, such as an amplifier. This may lead to
overheating. Ø Do not put anything above the unit (for example, CDs or magazines).
Sufficient Ventilation Ø Place the receiver in a well-ventilated location to prevent accumulation of internal heat.
Allow a gap of at least 10cm to the rear and the top of the unit, as well as a space of 5cm to both sides to avoid overheating.
Ø Do not obstruct any ventilation openings with items such as newspapers, tablecloths, curtains, etc.
Protecting the Receiver from High Temperatures, Humidity, Water and Dust Ø The receiver should not be exposed to dripping water or splashing. Ø No objects filled with liquids, such as vases, shall be placed on the unit. Ø Do not place any objects that might damage your unit near it (e.g. liquid filled objects or
candles). Ø Do not place any source of flames such as lit candles on the receiver.
Electricity Supply Ø Please unplug the receiver in case of prolonged non-use. Ø If the power cord is damaged, it must be replaced or repaired by the manufacturer, its
after-sales service, qualified electrician or similar qualifications to those to avoid possible danger.
Ø The plug must remain readily accessible after the installation of the product.
3
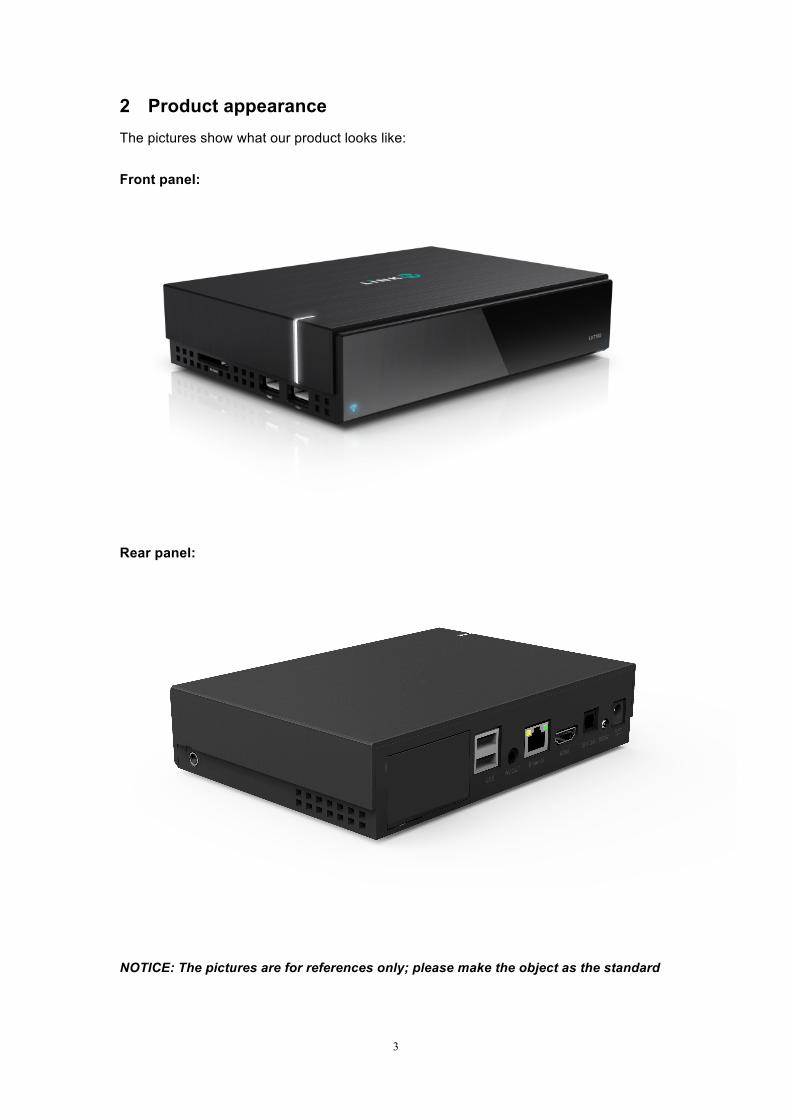
2 Product appearance The pictures show what our product looks like: Front panel:
Rear panel:
NOTICE: The pictures are for references only; please make the object as the standard
4
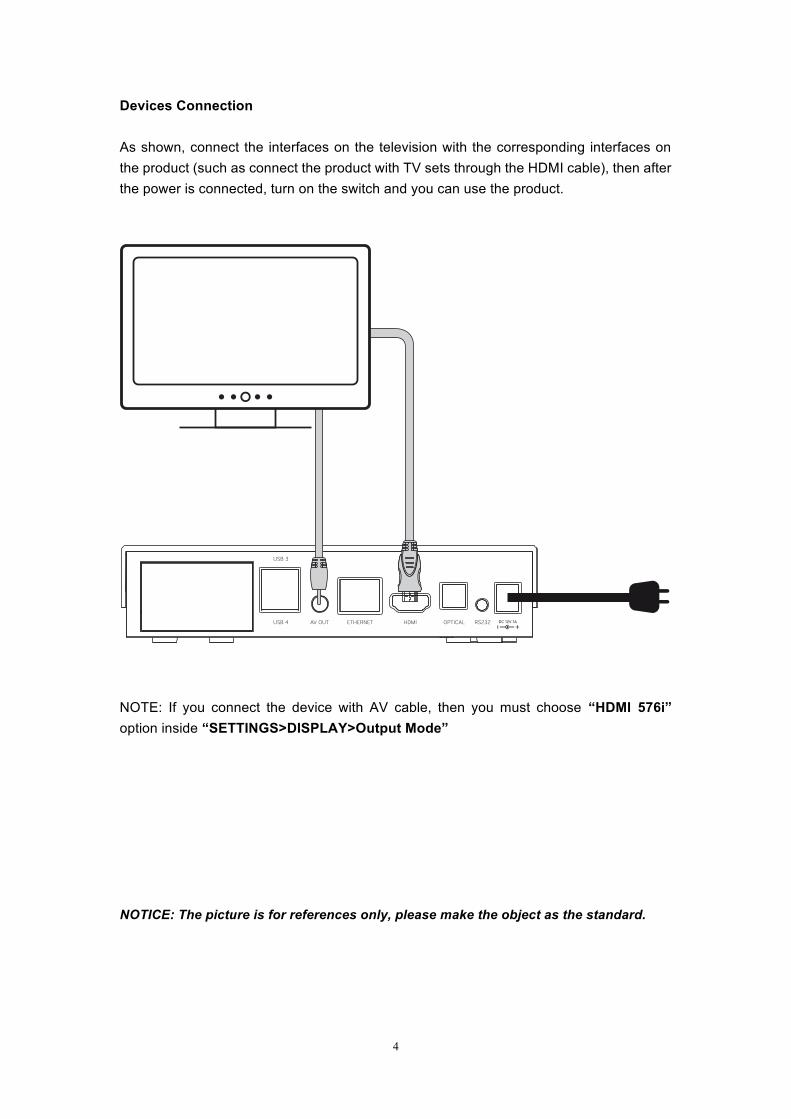
Devices Connection As shown, connect the interfaces on the television with the corresponding interfaces on the product (such as connect the product with TV sets through the HDMI cable), then after the power is connected, turn on the switch and you can use the product.
NOTE: If you connect the device with AV cable, then you must choose “HDMI 576i” option inside “SETTINGS>DISPLAY>Output Mode” NOTICE: The picture is for references only, please make the object as the standard.

5
3 Remote control
NOTICE: The picture is for references only, please make the object as the standard.
6
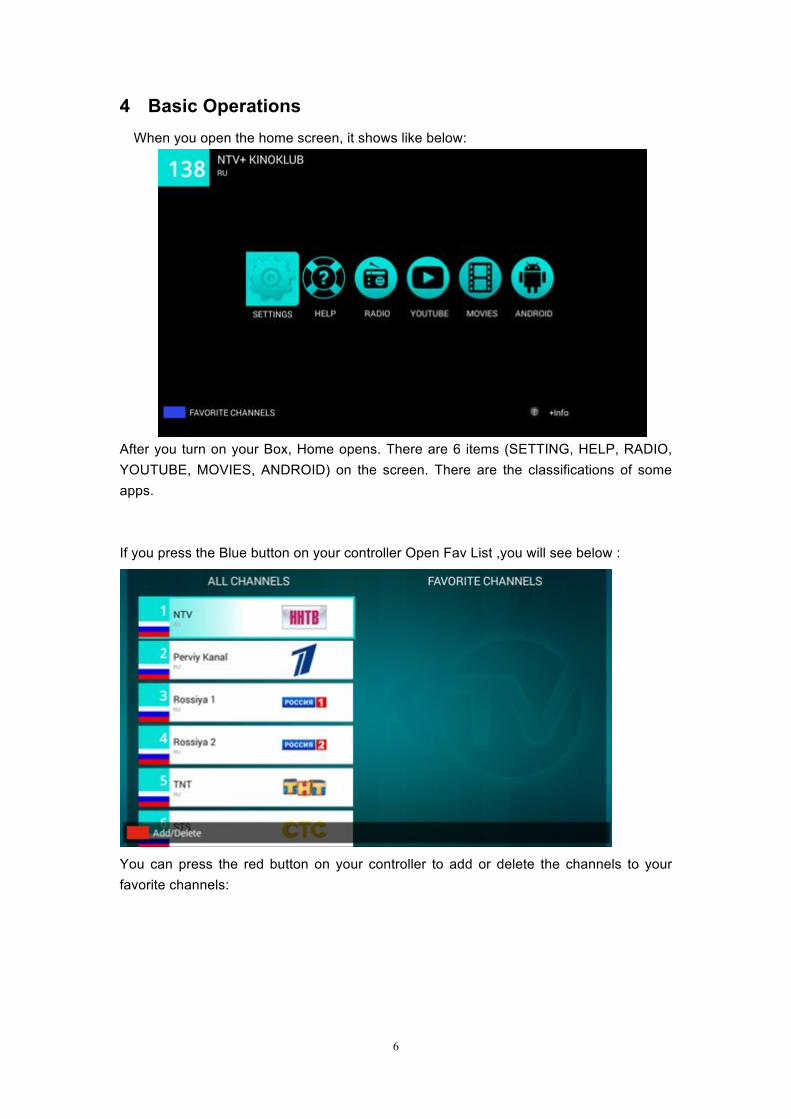
4 Basic Operations When you open the home screen, it shows like below:
After you turn on your Box, Home opens. There are 6 items (SETTING, HELP, RADIO, YOUTUBE, MOVIES, ANDROID) on the screen. There are the classifications of some apps. If you press the Blue button on your controller Open Fav List ,you will see below :
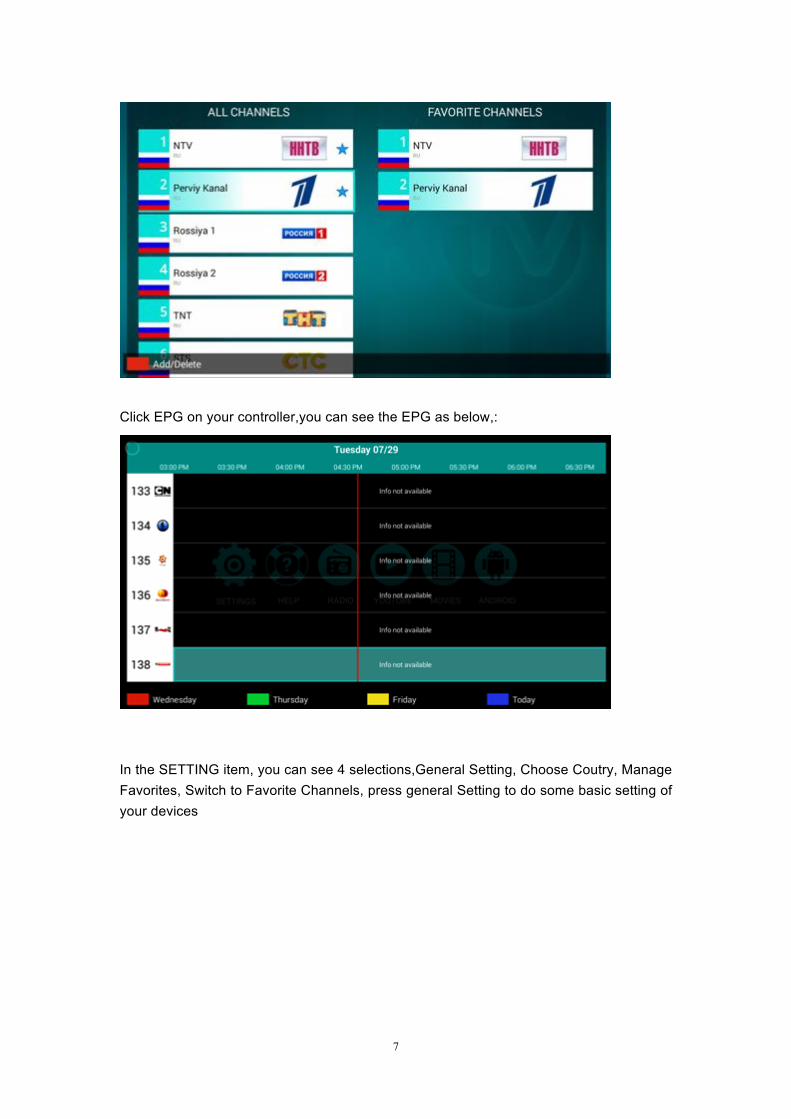
You can press the red button on your controller to add or delete the channels to your favorite channels:
7
Click EPG on your controller,you can see the EPG as below,:
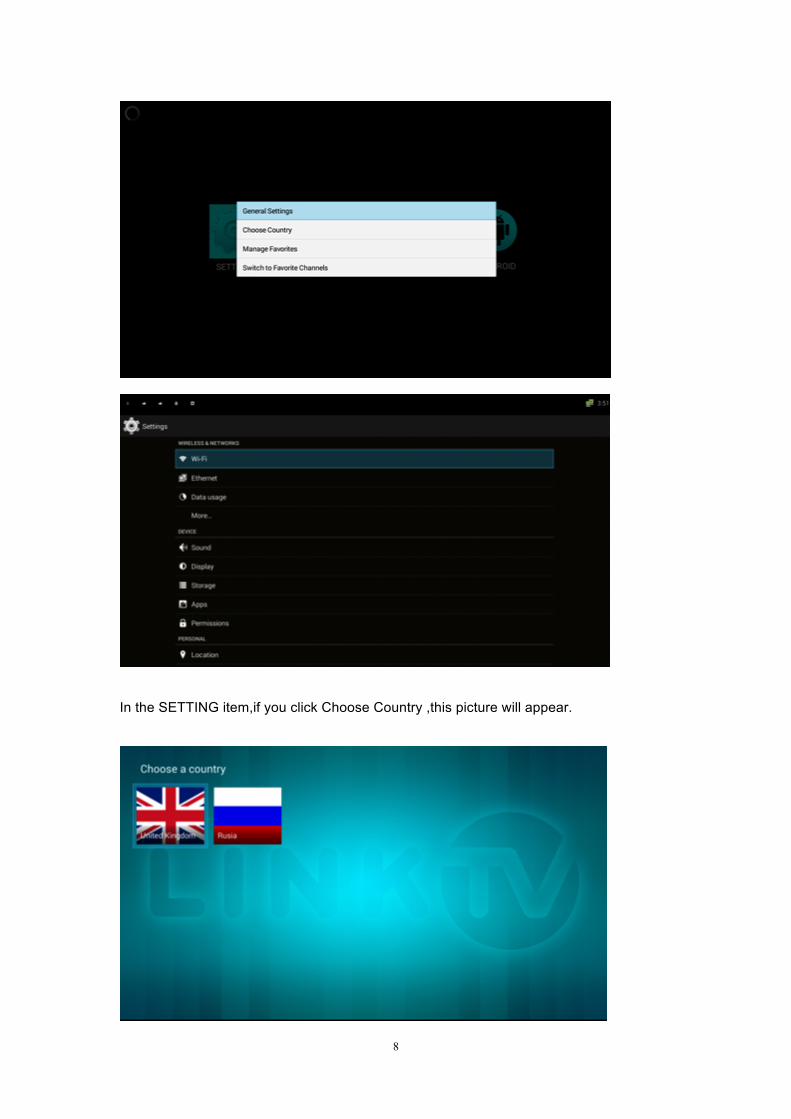
In the SETTING item, you can see 4 selections,General Setting, Choose Coutry, Manage Favorites, Switch to Favorite Channels, press general Setting to do some basic setting of your devices
8
In the SETTING item,if you click Choose Country ,this picture will appear.
9
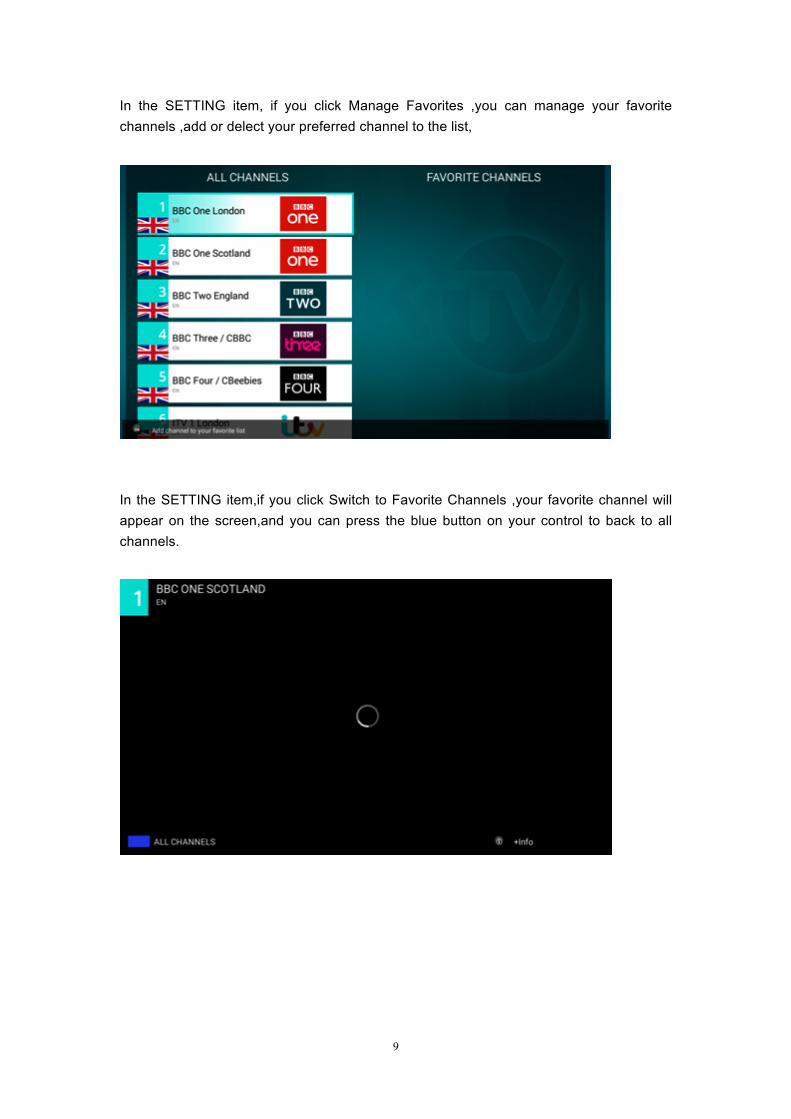
In the SETTING item, if you click Manage Favorites ,you can manage your favorite channels ,add or delect your preferred channel to the list,
In the SETTING item,if you click Switch to Favorite Channels ,your favorite channel will appear on the screen,and you can press the blue button on your control to back to all channels.
10
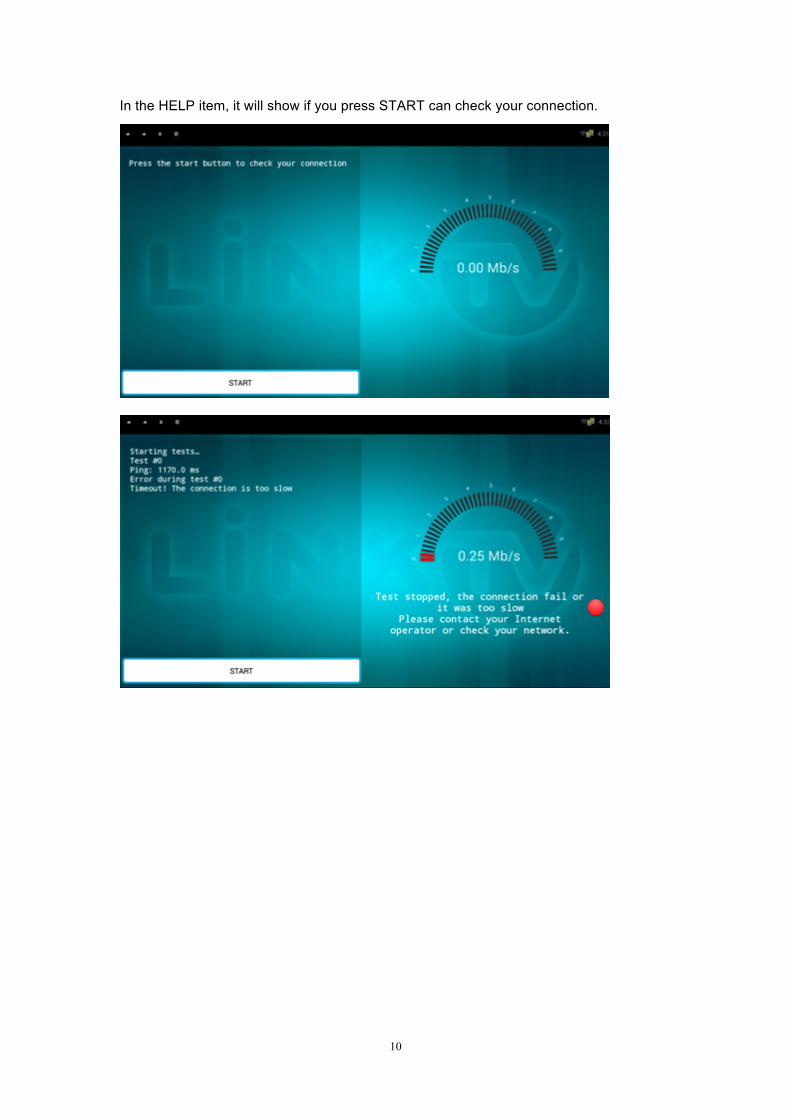
In the HELP item, it will show if you press START can check your connection.
11
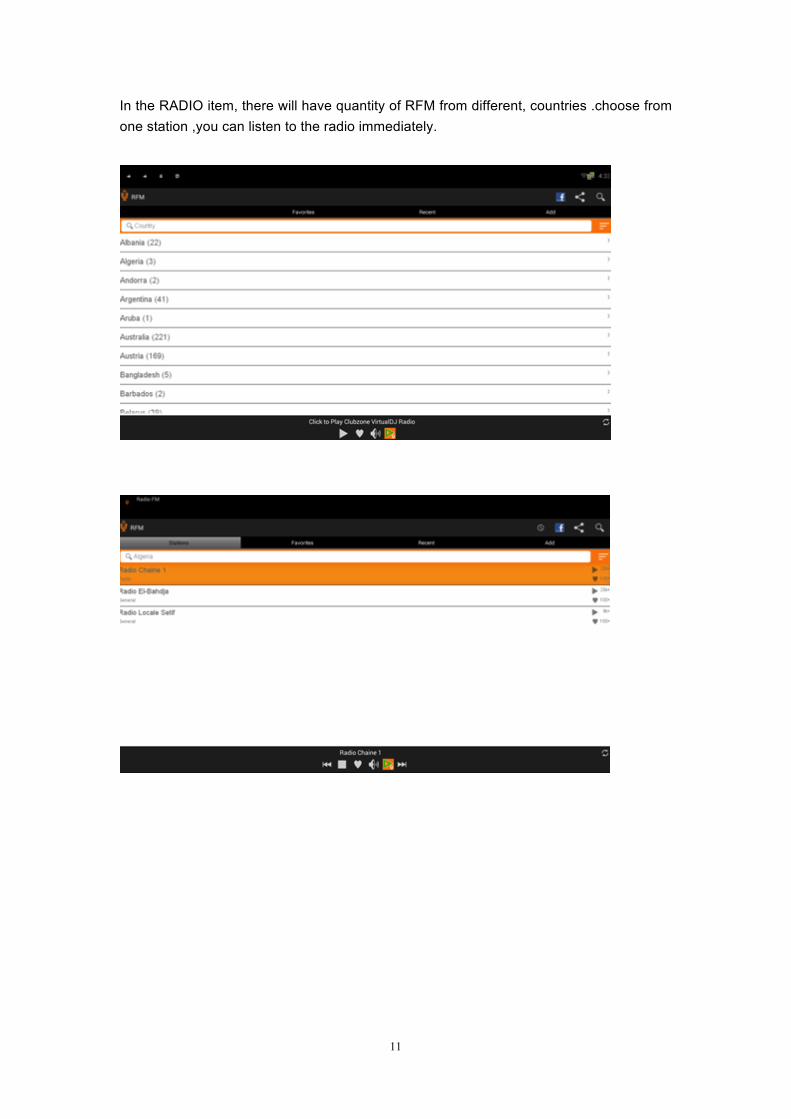
In the RADIO item, there will have quantity of RFM from different, countries .choose from one station ,you can listen to the radio immediately.
12
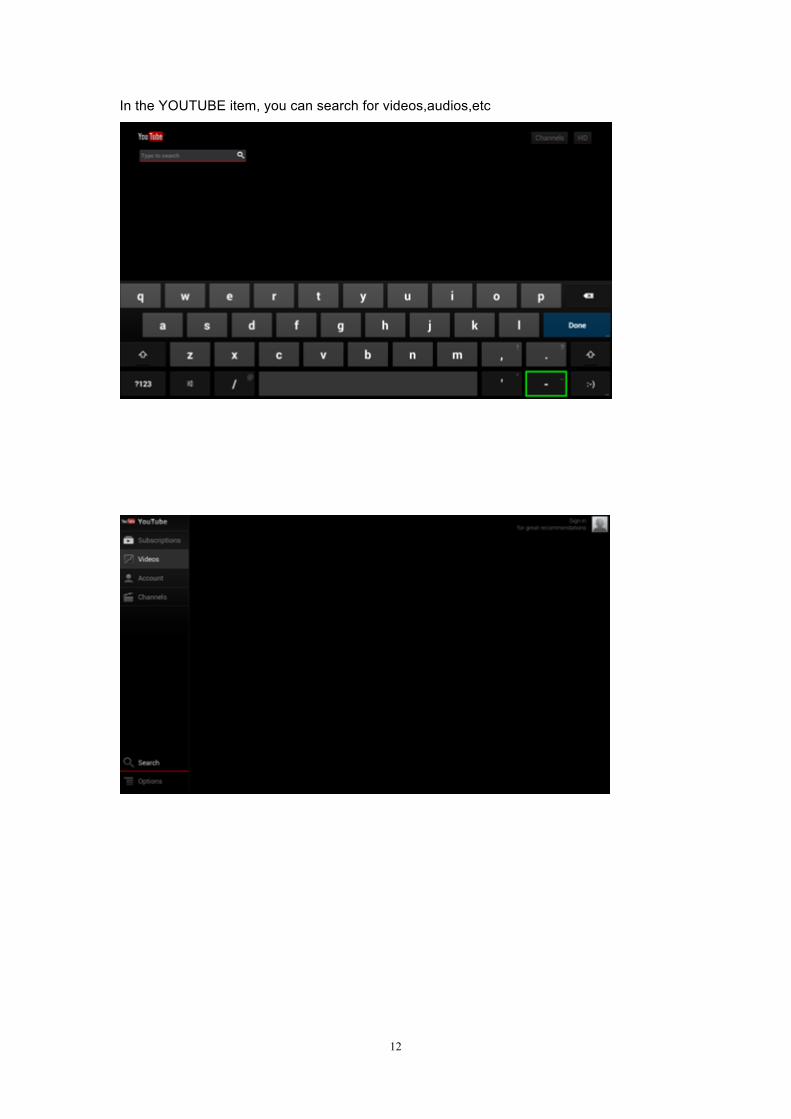
In the YOUTUBE item, you can search for videos,audios,etc
13
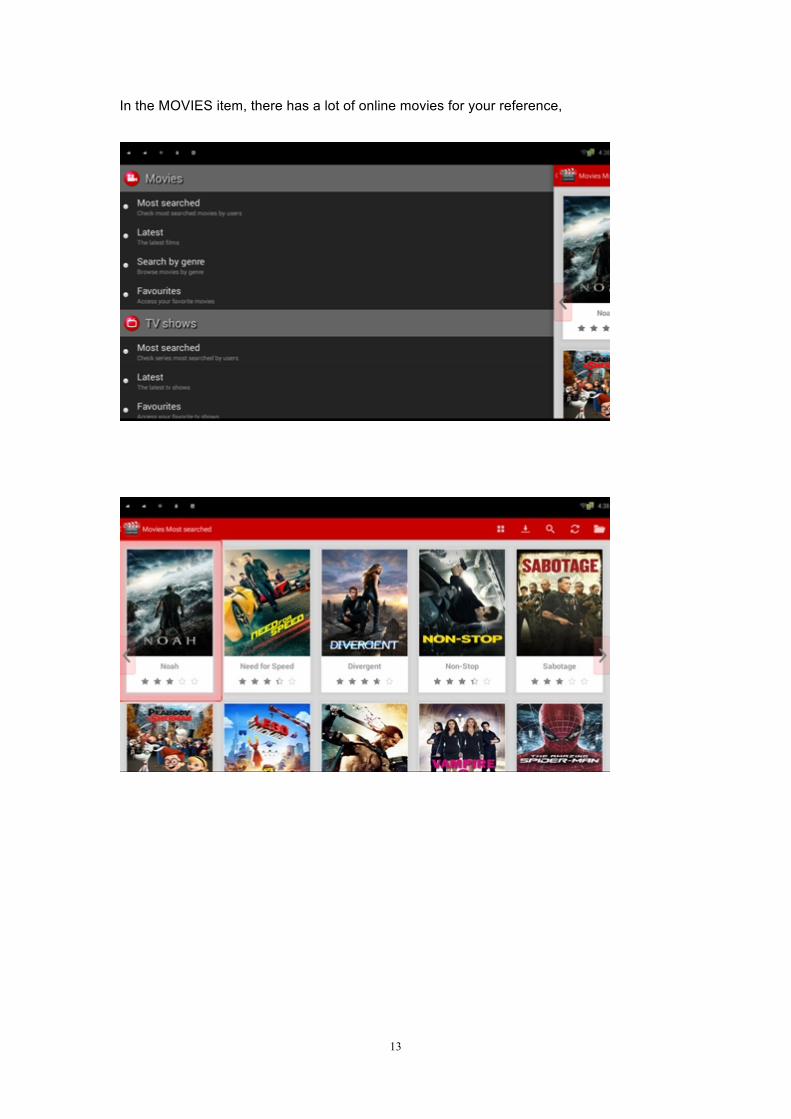
In the MOVIES item, there has a lot of online movies for your reference,
14
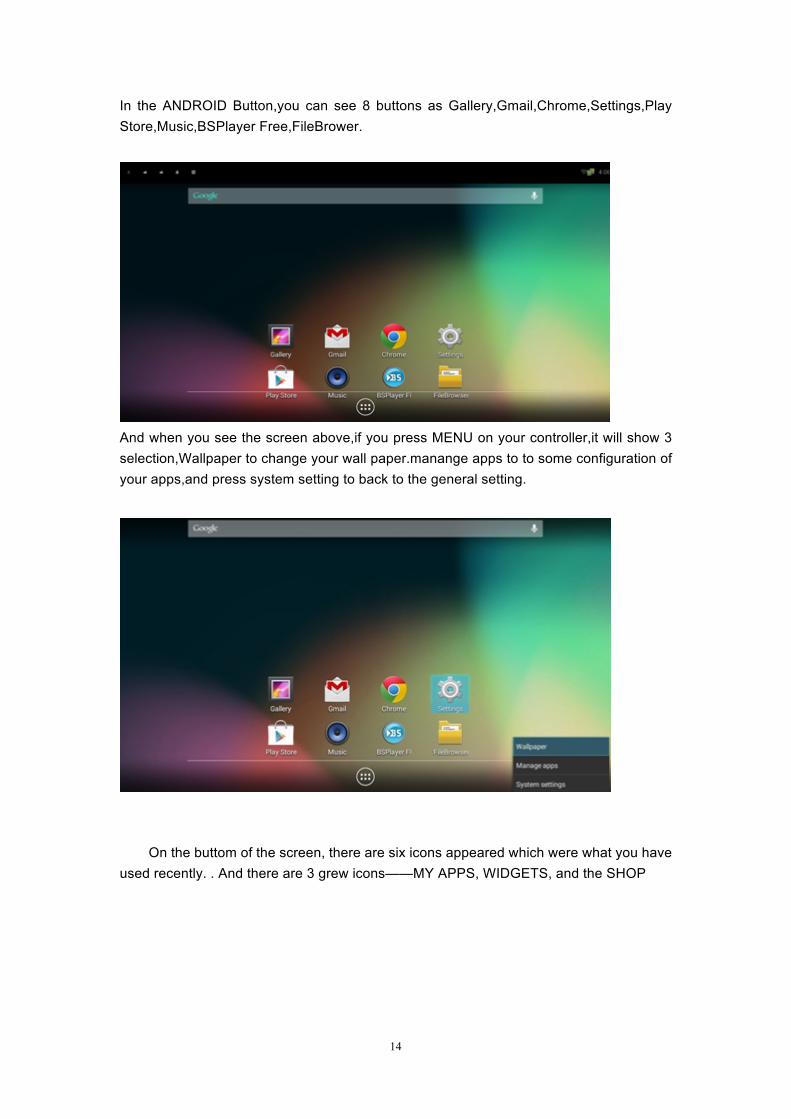
In the ANDROID Button,you can see 8 buttons as Gallery,Gmail,Chrome,Settings,Play Store,Music,BSPlayer Free,FileBrower.
And when you see the screen above,if you press MENU on your controller,it will show 3 selection,Wallpaper to change your wall paper.manange apps to to some configuration of your apps,and press system setting to back to the general setting.
On the buttom of the screen, there are six icons appeared which were what you have used recently. . And there are 3 grew icons——MY APPS, WIDGETS, and the SHOP
15
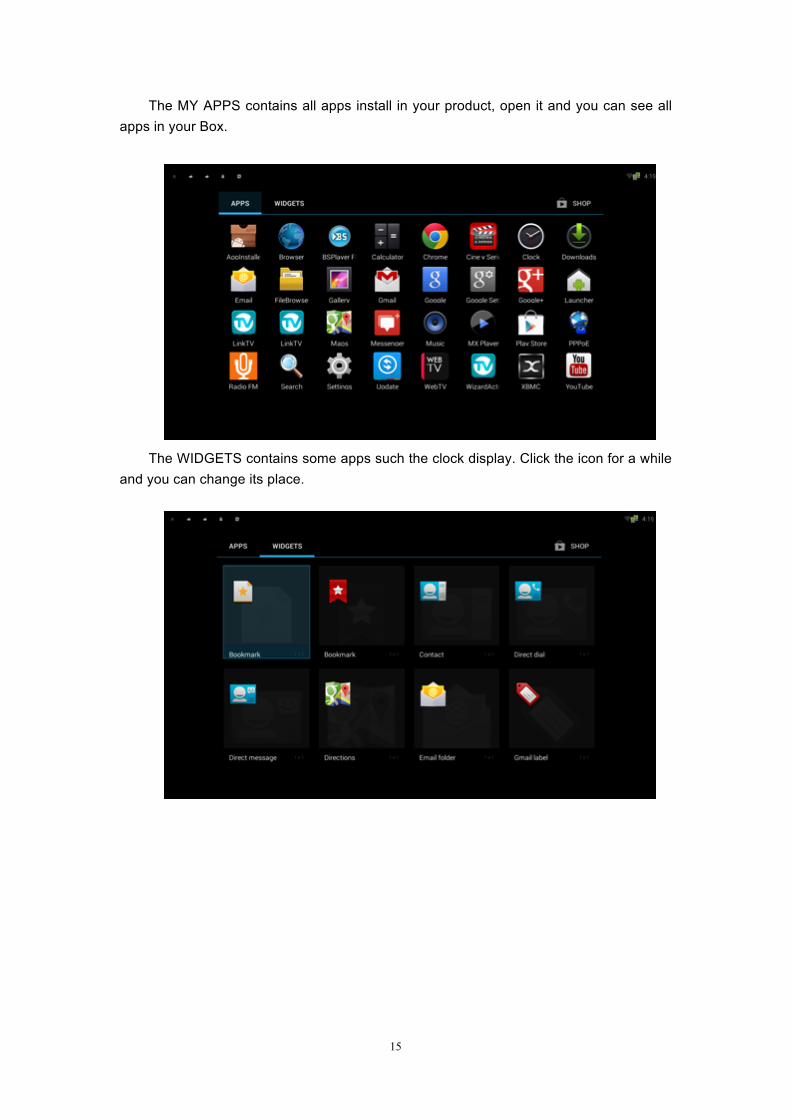
The MY APPS contains all apps install in your product, open it and you can see all apps in your Box.
The WIDGETS contains some apps such the clock display. Click the icon for a while and you can change its place.
16
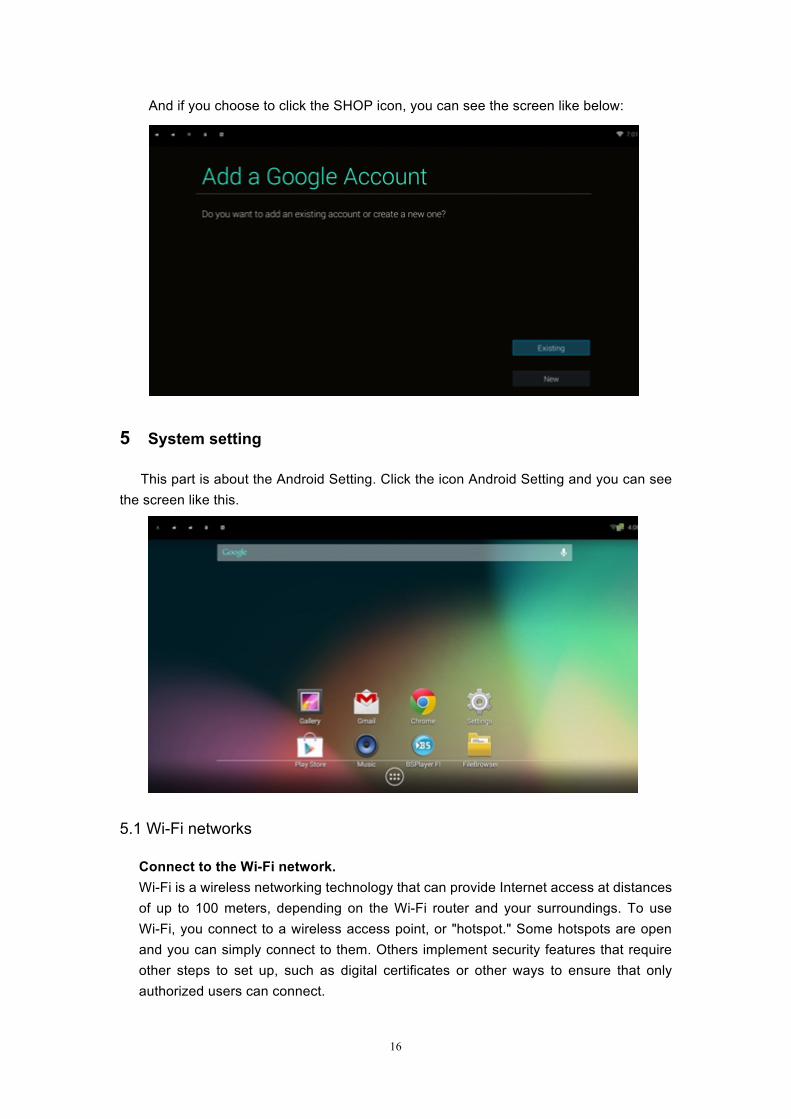
And if you choose to click the SHOP icon, you can see the screen like below:
5 System setting
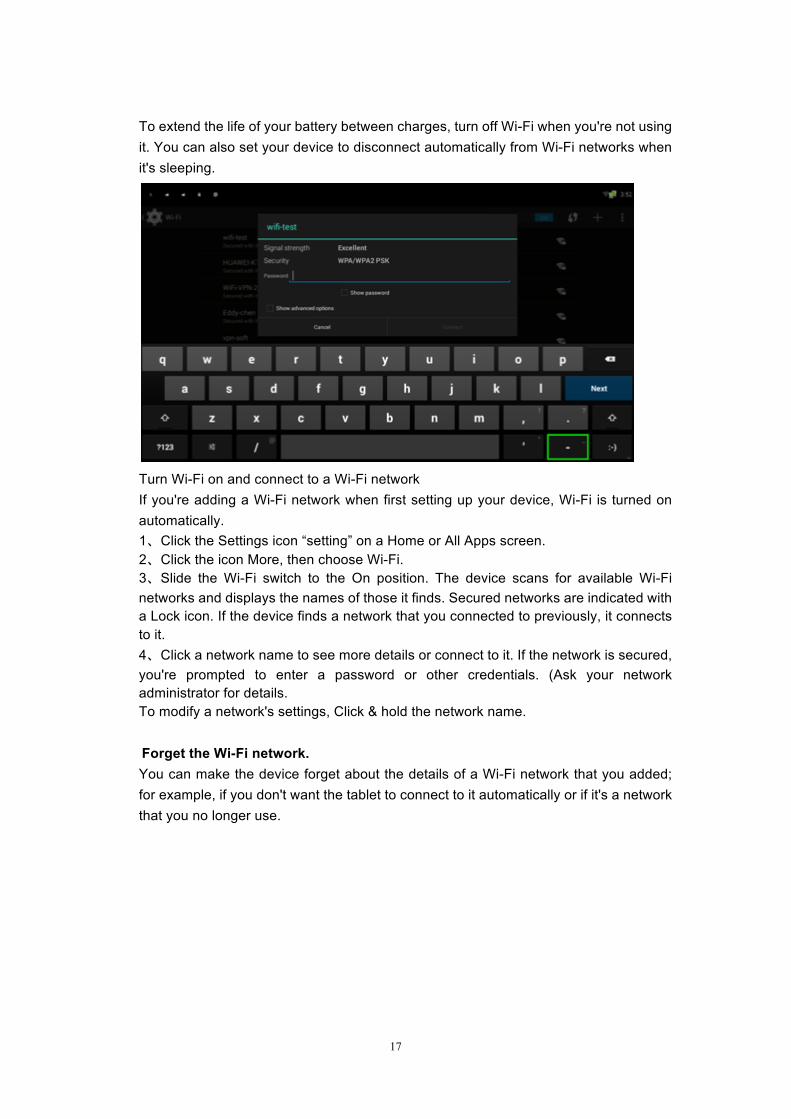
This part is about the Android Setting. Click the icon Android Setting and you can see the screen like this.
5.1 Wi-Fi networks
Connect to the Wi-Fi network. Wi-Fi is a wireless networking technology that can provide Internet access at distances of up to 100 meters, depending on the Wi-Fi router and your surroundings. To use Wi-Fi, you connect to a wireless access point, or "hotspot." Some hotspots are open and you can simply connect to them. Others implement security features that require other steps to set up, such as digital certificates or other ways to ensure that only authorized users can connect.
17
To extend the life of your battery between charges, turn off Wi-Fi when you're not using it. You can also set your device to disconnect automatically from Wi-Fi networks when it's sleeping.
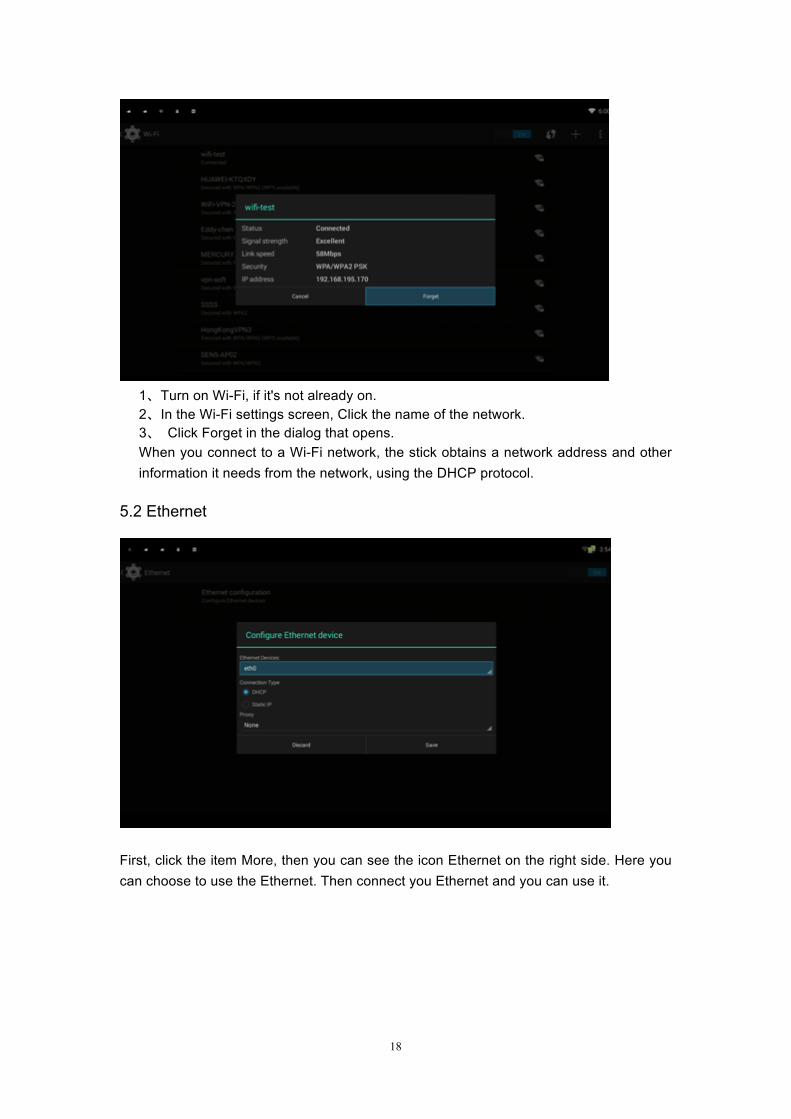
Turn Wi-Fi on and connect to a Wi-Fi network If you're adding a Wi-Fi network when first setting up your device, Wi-Fi is turned on automatically. 1、Click the Settings icon “setting” on a Home or All Apps screen. 2、Click the icon More, then choose Wi-Fi. 3、Slide the Wi-Fi switch to the On position. The device scans for available Wi-Fi networks and displays the names of those it finds. Secured networks are indicated with a Lock icon. If the device finds a network that you connected to previously, it connects to it. 4、Click a network name to see more details or connect to it. If the network is secured, you're prompted to enter a password or other credentials. (Ask your network administrator for details. To modify a network's settings, Click & hold the network name.
Forget the Wi-Fi network.
You can make the device forget about the details of a Wi-Fi network that you added; for example, if you don't want the tablet to connect to it automatically or if it's a network that you no longer use.
18
1、Turn on Wi-Fi, if it's not already on. 2、In the Wi-Fi settings screen, Click the name of the network. 3、 Click Forget in the dialog that opens. When you connect to a Wi-Fi network, the stick obtains a network address and other information it needs from the network, using the DHCP protocol.
5.2 Ethernet
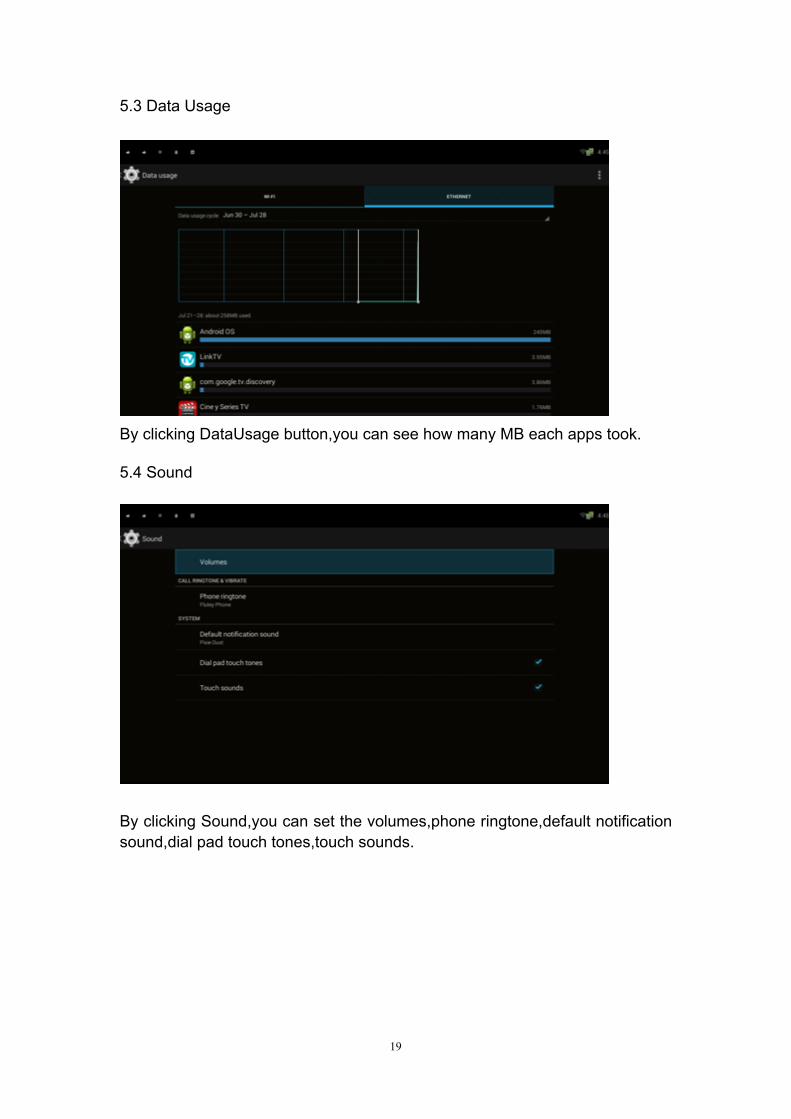
First, click the item More, then you can see the icon Ethernet on the right side. Here you can choose to use the Ethernet. Then connect you Ethernet and you can use it.
19
5.3 Data Usage
By clicking DataUsage button,you can see how many MB each apps took.
5.4 Sound
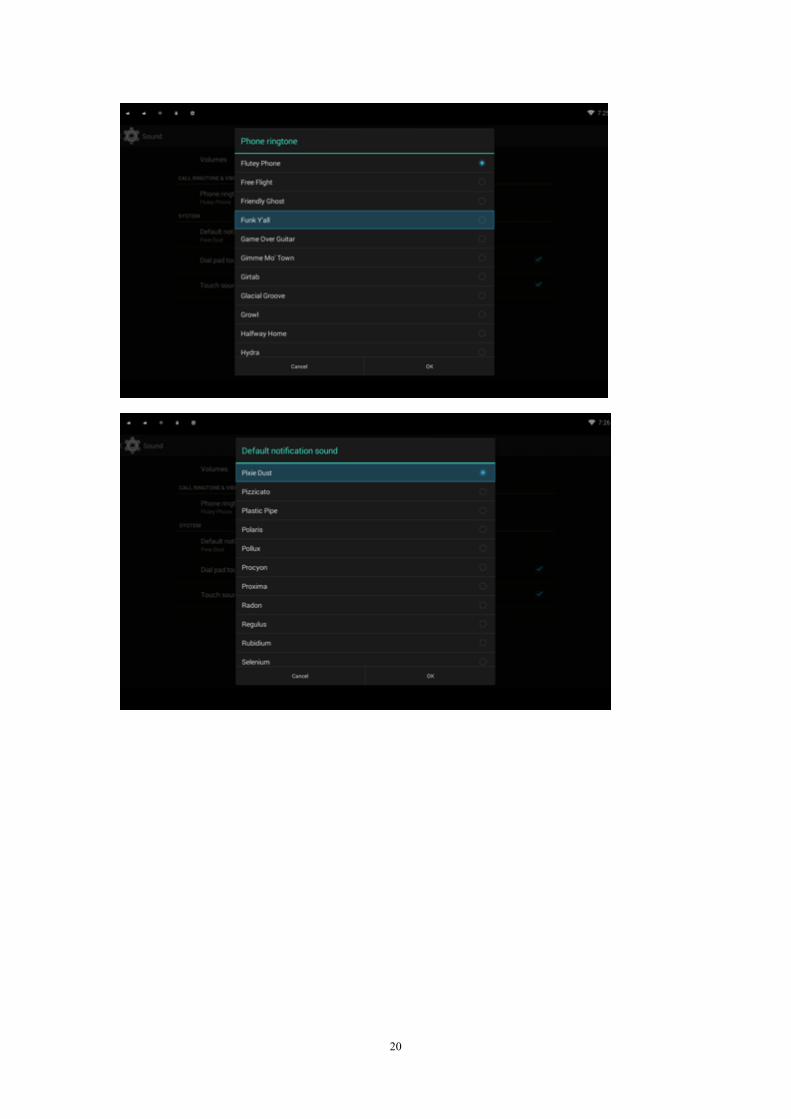
By clicking Sound,you can set the volumes,phone ringtone,default notification sound,dial pad touch tones,touch sounds.
20

21
5.5 Display settings
Use the Display settings you can set your TV mode, HDMI auto output mode, Display position, Font size and Wireless display.
5.6 Storage
In you Click Storage,you can see the internal storage,,SD CARD storage.
22
5.7 Apps setting
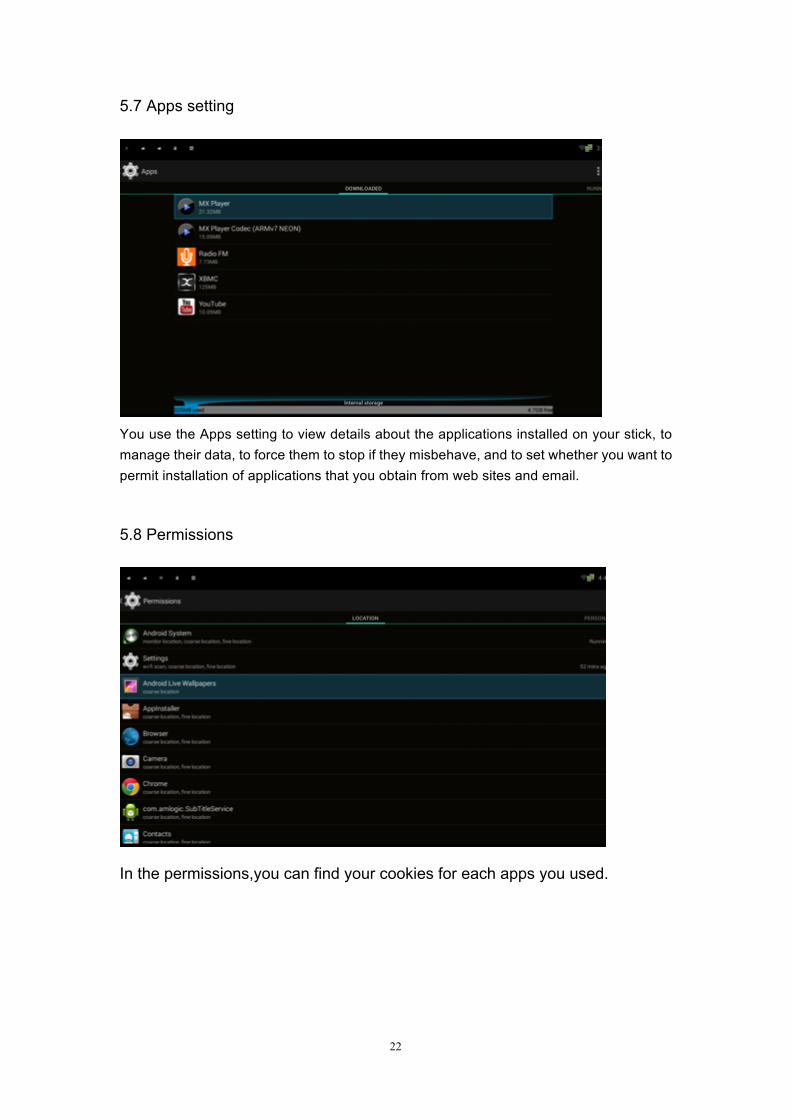
You use the Apps setting to view details about the applications installed on your stick, to manage their data, to force them to stop if they misbehave, and to set whether you want to permit installation of applications that you obtain from web sites and email.
5.8 Permissions
In the permissions,you can find your cookies for each apps you used.
23
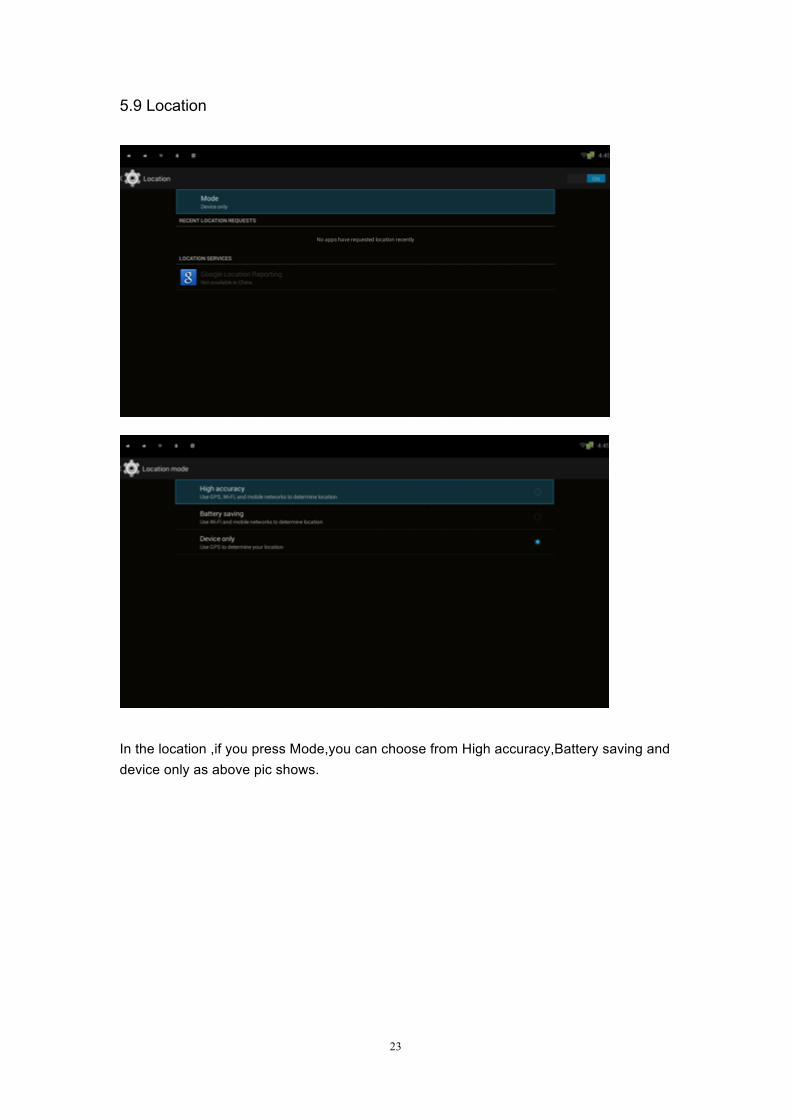
5.9 Location
In the location ,if you press Mode,you can choose from High accuracy,Battery saving and device only as above pic shows.
24
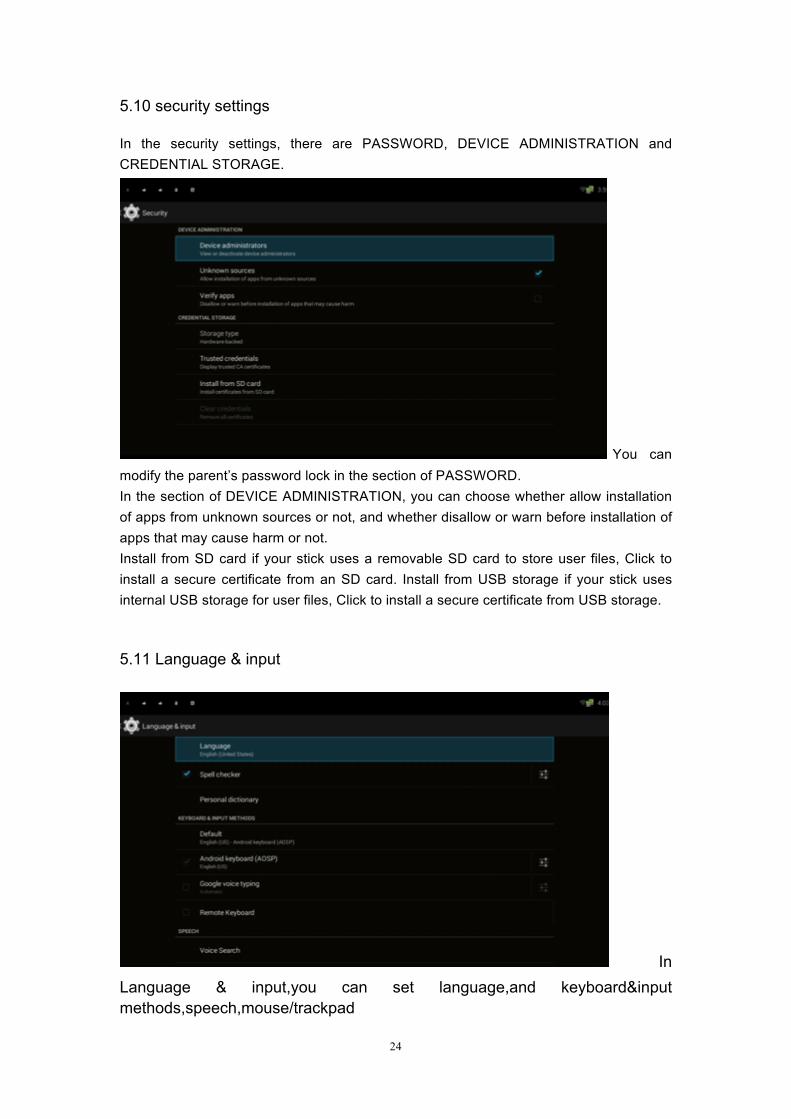
5.10 security settings
In the security settings, there are PASSWORD, DEVICE ADMINISTRATION and CREDENTIAL STORAGE.
You can modify the parent’s password lock in the section of PASSWORD. In the section of DEVICE ADMINISTRATION, you can choose whether allow installation of apps from unknown sources or not, and whether disallow or warn before installation of apps that may cause harm or not. Install from SD card if your stick uses a removable SD card to store user files, Click to install a secure certificate from an SD card. Install from USB storage if your stick uses internal USB storage for user files, Click to install a secure certificate from USB storage.
5.11 Language & input
In Language & input,you can set language,and keyboard&input methods,speech,mouse/trackpad
25
Use the Language & input to select the language for the text on your stick and for configuring the onscreen keyboard, including words that you’ve added to its dictionary. Language & Keyboard screen Select language opens the Language screen, where you can select the language to use for the text on your stick.
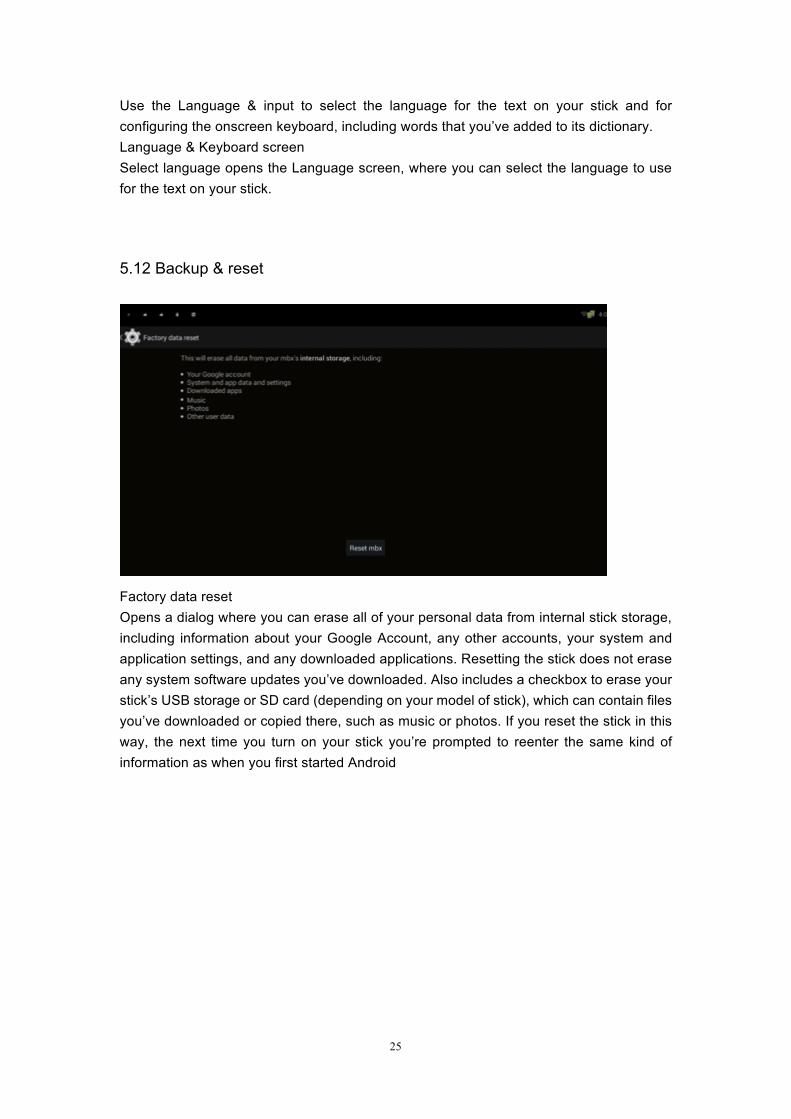
5.12 Backup & reset
Factory data reset Opens a dialog where you can erase all of your personal data from internal stick storage, including information about your Google Account, any other accounts, your system and application settings, and any downloaded applications. Resetting the stick does not erase any system software updates you’ve downloaded. Also includes a checkbox to erase your stick’s USB storage or SD card (depending on your model of stick), which can contain files you’ve downloaded or copied there, such as music or photos. If you reset the stick in this way, the next time you turn on your stick you’re prompted to reenter the same kind of information as when you first started Android
26
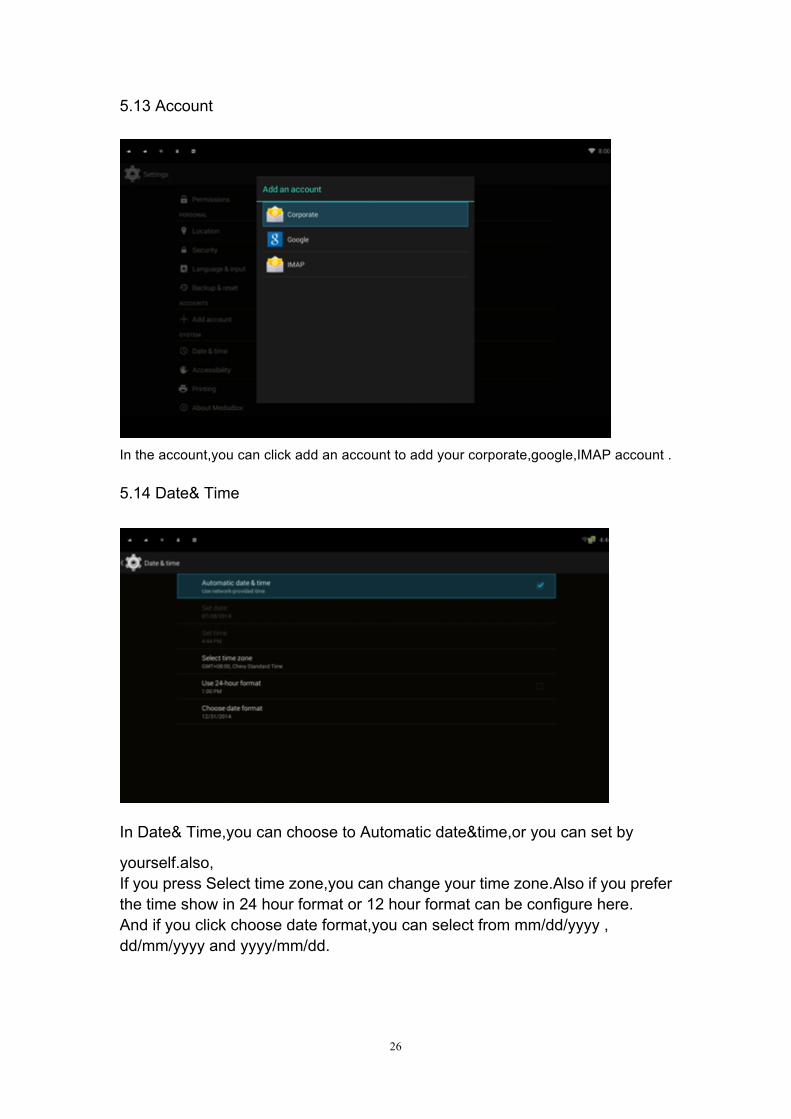
5.13 Account
In the account,you can click add an account to add your corporate,google,IMAP account .
5.14 Date& Time
In Date& Time,you can choose to Automatic date&time,or you can set by
yourself.also, If you press Select time zone,you can change your time zone.Also if you prefer the time show in 24 hour format or 12 hour format can be configure here. And if you click choose date format,you can select from mm/dd/yyyy , dd/mm/yyyy and yyyy/mm/dd.
27
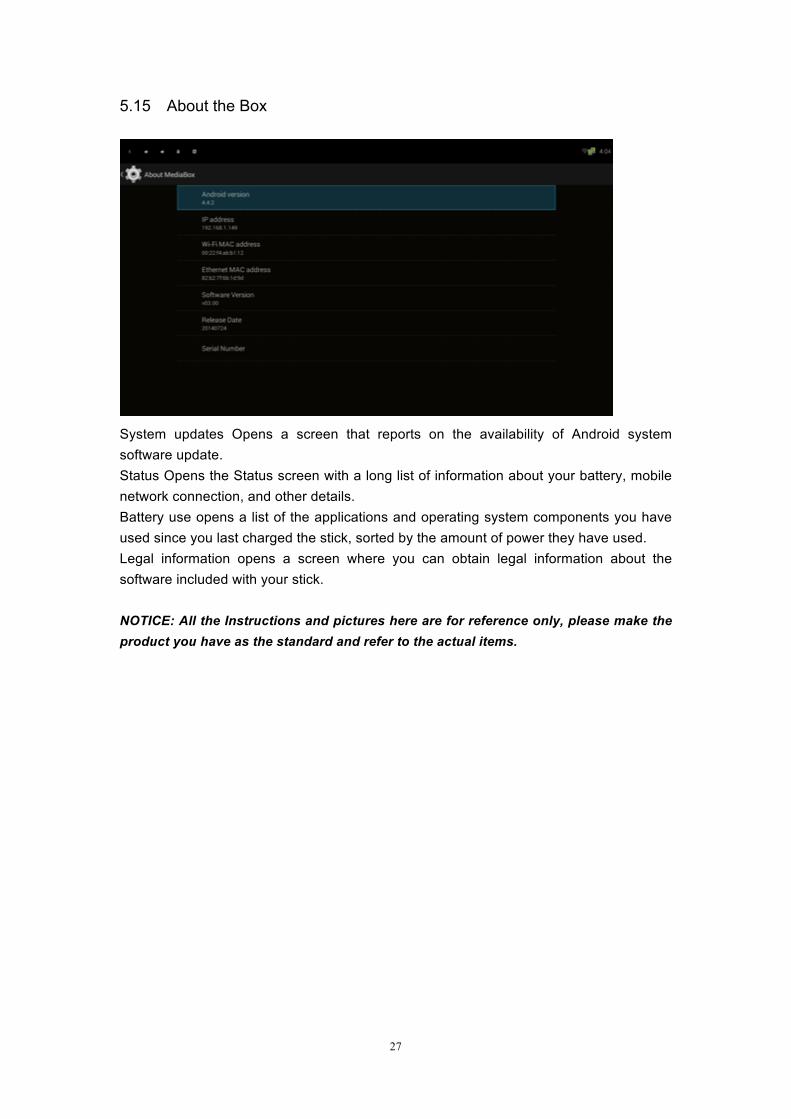
5.15 About the Box
System updates Opens a screen that reports on the availability of Android system software update. Status Opens the Status screen with a long list of information about your battery, mobile network connection, and other details. Battery use opens a list of the applications and operating system components you have used since you last charged the stick, sorted by the amount of power they have used. Legal information opens a screen where you can obtain legal information about the software included with your stick. NOTICE: All the Instructions and pictures here are for reference only, please make the product you have as the standard and refer to the actual items.
28
6 Troubleshooting
1、No signal on the HDTV Ø Check if the HDMI cable is securely connected. Ø Check if you have selected the correct HDMI input on your HDTV. Ø Set the values of the tuner parameters correctly in the installation menu. 2、Cannot turn on your product. Ø Check if the power connector has completely plugged into the DC socket of your TV. Ø Check if the power supply is stable. 3、Cannot connect to network Ø Make sure the network cable is securely connected and he Ethernet work well. Ø Make sure Wi-Fi network is connected and the security key for the encrypted network is
correct. Ø Make sure you select the correct IP address settings.
4、Some HDTVs cannot display the entire picture Ø Setup the screen ratio on your HDTV as automatic. Ø On your HDTV, go to Android Setting >Display >Press Screen percent > adjust the
percentage of the screen size. 5、The remote control does not work Ø Make sure the batteries are good and they are inserted correctly in the remote control. Ø Make sure no objects block the path between the remote control and the signal sensor
area on the product. Ø Make sure the distance between the remote control and the box is no more than using
meters. Ø Check the batteries for power, and if exhausted replace the batteries in the remote
control. 6、No picture or sound Ø Check if the Audio/ Video output connection from the product to TV correctly. Ø Press the MUTE button Turn TV on.
29
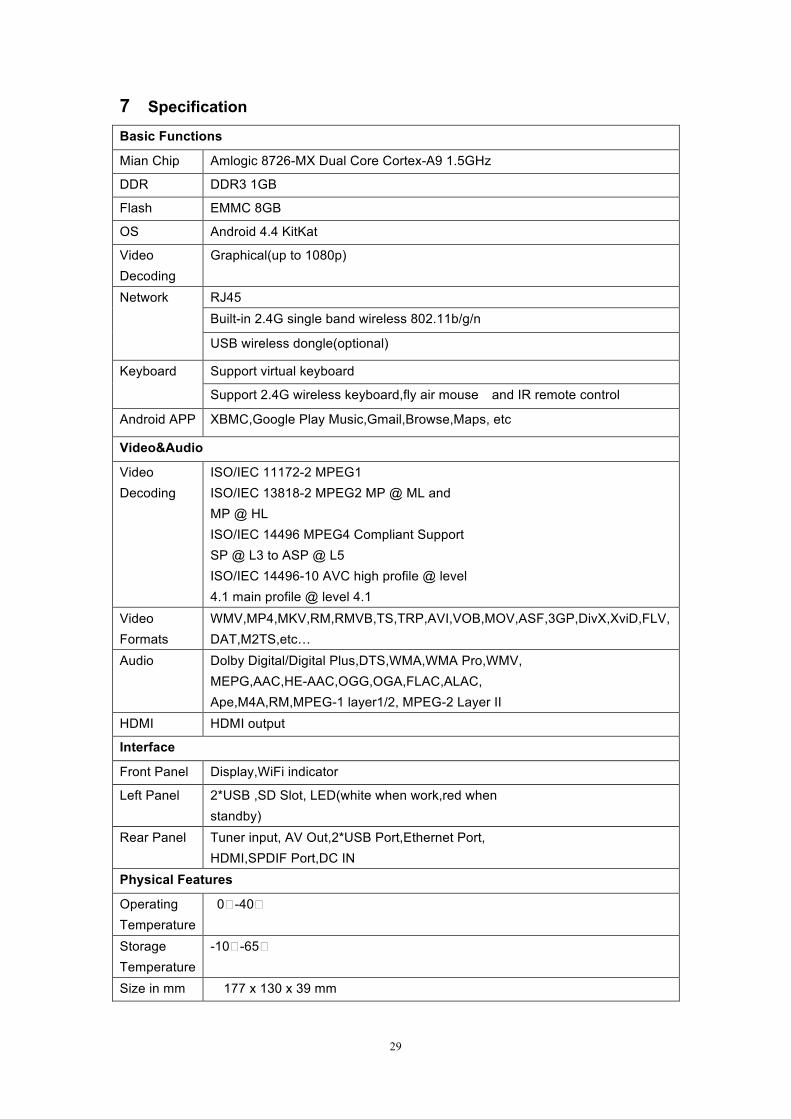
7 Specification
Basic Functions
Mian Chip Amlogic 8726-MX Dual Core Cortex-A9 1.5GHz
DDR DDR3 1GB
Flash EMMC 8GB
OS Android 4.4 KitKat
Video Decoding
Graphical(up to 1080p)
Network RJ45 Built-in 2.4G single band wireless 802.11b/g/n
USB wireless dongle(optional)
Keyboard Support virtual keyboard
Support 2.4G wireless keyboard,fly air mouse and IR remote control
Android APP XBMC,Google Play Music,Gmail,Browse,Maps, etc
Video&Audio
Video Decoding
ISO/IEC 11172-2 MPEG1 ISO/IEC 13818-2 MPEG2 MP @ ML and MP @ HL ISO/IEC 14496 MPEG4 Compliant Support SP @ L3 to ASP @ L5 ISO/IEC 14496-10 AVC high profile @ level 4.1 main profile @ level 4.1
Video Formats
WMV,MP4,MKV,RM,RMVB,TS,TRP,AVI,VOB,MOV,ASF,3GP,DivX,XviD,FLV,DAT,M2TS,etc…
Audio Dolby Digital/Digital Plus,DTS,WMA,WMA Pro,WMV, MEPG,AAC,HE-AAC,OGG,OGA,FLAC,ALAC, Ape,M4A,RM,MPEG-1 layer1/2, MPEG-2 Layer II
HDMI HDMI output
Interface
Front Panel Display,WiFi indicator
Left Panel 2*USB ,SD Slot, LED(white when work,red when standby)
Rear Panel Tuner input, AV Out,2*USB Port,Ethernet Port, HDMI,SPDIF Port,DC IN
Physical Features
Operating Temperature
0�-40�
Storage Temperature
-10�-65�
Size in mm 177 x 130 x 39 mm