Embed Size (px)
Citation preview
HC EXCHANGE MODULE SERVER CONFIGURATION
User Manual
© Hosting Controller 1998 – 2009. All Rights Reserved.
HC Exchange Module Server Configuration – User Manual
© Hosting Controller 2009. All Rights Reserved ‐ 2 ‐
Contents Proprietary Notice ........................................................................................................................ 4 Document Conventions ............................................................................................................... 4 Target Audience ........................................................................................................................... 4 Introduction................................................................................................................................... 5
About HC .................................................................................................................................. 5 HC Installation.......................................................................................................................... 5 HC Pre‐requisites and Working............................................................................................. 5 About Exchange 2007 .............................................................................................................. 6
Key Features ......................................................................................................................... 7 Exchange 2007 Server Roles.................................................................................................... 7 HC Supported Server Roles.................................................................................................... 7
How It Works ....................................................................................................................... 7 HC Supported Modules .......................................................................................................... 8
Post Installation Steps ................................................................................................................ 10 Steps to Follow ....................................................................................................................... 10
Enable Exchange 2007 Server........................................................................................... 10 Add Exchange 2007 Server ............................................................................................... 13
Managing Exchange 2007 Server.............................................................................................. 16 1) Mailboxes ................................................................................................................................ 18
a) Add Mailbox....................................................................................................................... 18 b) Edit Mailbox ....................................................................................................................... 19
General Properties ............................................................................................................. 20 Advance Properties ........................................................................................................... 20 Email Addresses................................................................................................................. 21 Membership........................................................................................................................ 22 Send On Behalf................................................................................................................... 22 Change Password .............................................................................................................. 23
c) Mailbox Settings ................................................................................................................. 23 Forwarding ......................................................................................................................... 23 Permissions......................................................................................................................... 23 Accepted Senders............................................................................................................... 24 Rejected Senders ................................................................................................................ 24
d) User Statistics ..................................................................................................................... 25 e) Disable ................................................................................................................................. 25 f) Delete.................................................................................................................................... 25
2) Distribution Lists.................................................................................................................... 26 a) Add Distribution List ........................................................................................................ 26 b) Edit Members ..................................................................................................................... 26 c) Edit Advance Properties ................................................................................................... 27 d) Edit Email Addresses........................................................................................................ 27
HC Exchange Module Server Configuration – User Manual
© Hosting Controller 2009. All Rights Reserved ‐ 3 ‐
e) Accepted Senders............................................................................................................... 28 f) Rejected Senders ................................................................................................................. 28 g) Delete................................................................................................................................... 28
3) Public Folders ......................................................................................................................... 29 a) Add Public Folder.............................................................................................................. 29 b) Edit General Properties..................................................................................................... 29 c) Edit Advance Properties ................................................................................................... 30 d) Edit Email Addresses........................................................................................................ 30 e) Set Permissions................................................................................................................... 31 f) Accepted Senders ............................................................................................................... 31 g) Rejected Senders ................................................................................................................ 32 h) Mail Disable........................................................................................................................ 32 i) Delete.................................................................................................................................... 33
4) Outlook Anywhere ................................................................................................................ 33 5) Delete ....................................................................................................................................... 33 Contact Us ................................................................................................................................... 33
HC Exchange Module Server Configuration – User Manual
Proprietary Notice © 2009 Hosting Controller. All Rights Reserved. This document is the property of, and contains proprietary information of Hosting Controller. No part of this document may be reproduced or transmitted in any form or by any means, electronic or mechanical, including photocopying or recording, for any purpose other than consideration of the technical contents without the written acquiescence of a duly authorized representative of Hosting Controller.
Document Conventions
TERMS/ SYMBOLS
WHAT THEY MEAN?
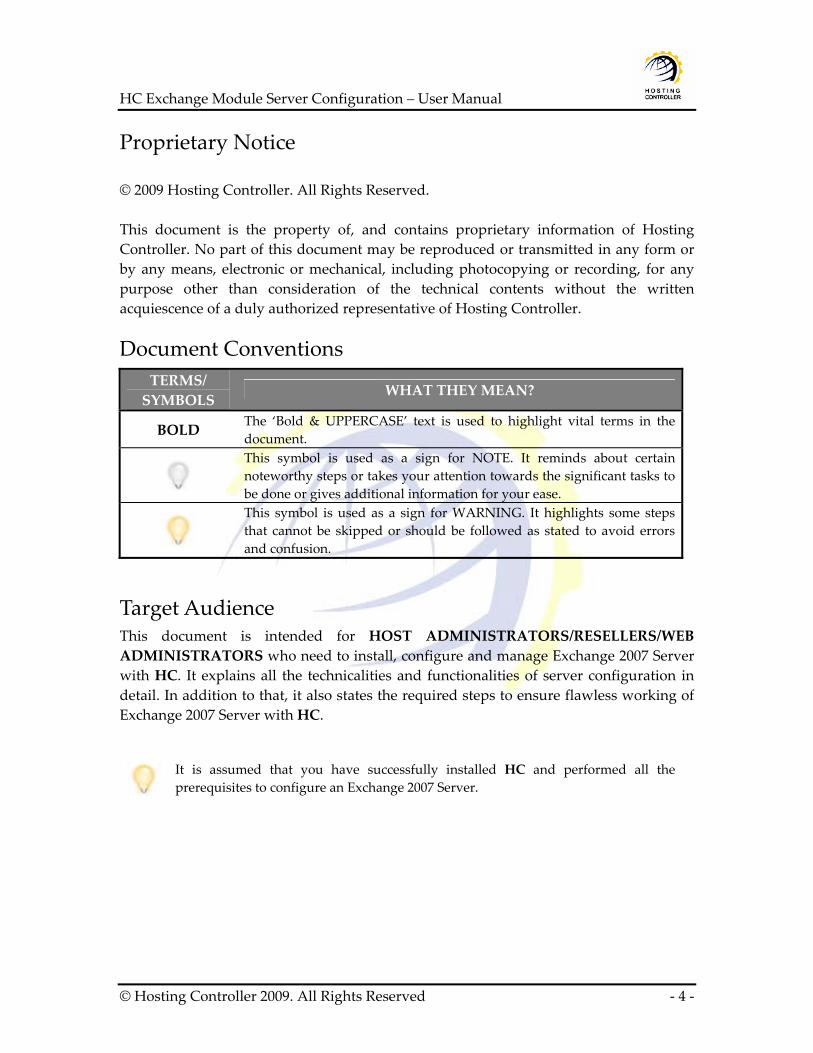
BOLD The ‘Bold & UPPERCASE’ text is used to highlight vital terms in the document.
This symbol is used as a sign for NOTE. It reminds about certain noteworthy steps or takes your attention towards the significant tasks to be done or gives additional information for your ease.
This symbol is used as a sign for WARNING. It highlights some steps that cannot be skipped or should be followed as stated to avoid errors and confusion.
Target Audience This document is intended for HOST ADMINISTRATORS/RESELLERS/WEB ADMINISTRATORS who need to install, configure and manage Exchange 2007 Server with HC. It explains all the technicalities and functionalities of server configuration in detail. In addition to that, it also states the required steps to ensure flawless working of Exchange 2007 Server with HC.
It is assumed that you have successfully installed HC and performed all the prerequisites to configure an Exchange 2007 Server.
© Hosting Controller 2009. All Rights Reserved ‐ 4 ‐
HC Exchange Module Server Configuration – User Manual
© Hosting Controller 2009. All Rights Reserved ‐ 5 ‐
Introduction
About HC It enables web hosting companies to manage all their servers both Windows & Linux through centralized interface. You can add multiple mail servers within a cluster and offer MS‐Exchange & SharePoint hosting. You can expand your business with HC, from one server to cluster of servers. It allows you to add new clusters as per your requirements.
HC Installation You have to first install it on database server having windows operating system. It can be a standalone server and can have other roles such as Web, Mail and DNS as per your requirements. For further assistance, refer to HC Installation Guide.
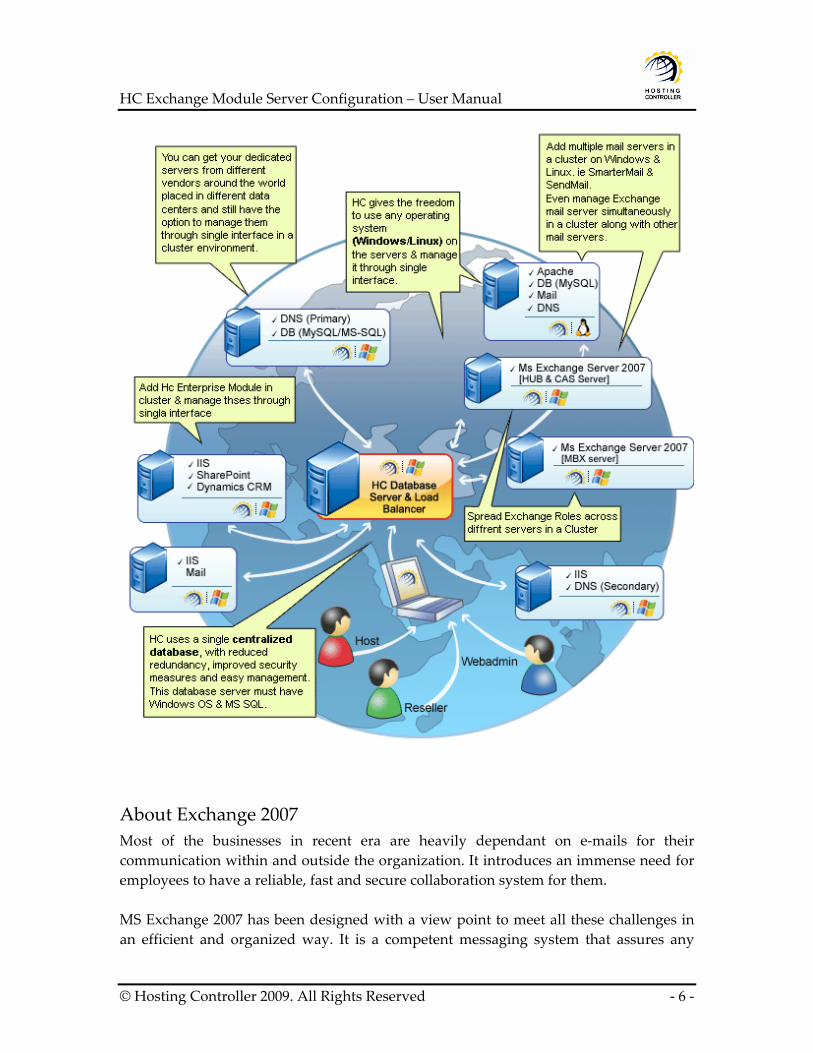
HC Pre‐requisites and Working Before Installation, you should know the pre‐requisites of HC. You have to install Microsoft SQL Server. Instead of this, if you want, you can also download HC installer, in which MSDE is bundled free, depending on your requirements. You have to install Mail Server such as Mail Enable or any other. For websites, you have to install IIS and DNS. Following figure illustrates working of HC in a cluster environment:
HC Exchange Module Server Configuration – User Manual
About Exchange 2007 Most of the businesses in recent era are heavily dependant on e‐mails for their communication within and outside the organization. It introduces an immense need for employees to have a reliable, fast and secure collaboration system for them. MS Exchange 2007 has been designed with a view point to meet all these challenges in an efficient and organized way. It is a competent messaging system that assures any
© Hosting Controller 2009. All Rights Reserved ‐ 6 ‐
HC Exchange Module Server Configuration – User Manual
© Hosting Controller 2009. All Rights Reserved ‐ 7 ‐
where e‐mails access to all. It provides built‐in protective technologies to keep your business moving to the highest level. Moreover, it reduces spam/viruses, enable confidential communications, and thus help your company to be compliant. It can reside on a single server as well as cluster of servers.
Key Features Exchange 2007 is flexible, familiar and fits your business and offers following key features:
Built in Protection Anywhere Access Operational Efficiency The Outlook Experience
Exchange 2007 Server Roles MS Exchange 2007 offers five server roles that you can install and configure on your machine. List of these server roles is stated below:
Client Access Server Role (CAS) Edge Transport Server Role Hub Transport Server Role (HUB) Mailbox Server Role (MBX) Unified Messaging Server Role
HC Supported Server Roles You can install HC and Exchange 2007 on a single server, depending on your business needs and if the server meets the hardware & software requirements for both. HC deals with three Exchange Server roles out of five, namely as:
Client Access Server (CAS) Hub Transport Server (HUB) Mailbox Server (MBX)
How It Works All what you need is to install HC on MS Exchange Server 2007 machine containing the role of HUB Transport Server and HC manages the rest itself. It monitors and handles all the MS Exchange 2007 roles for you in an efficient and organized manner. There is not any long list of steps to install HC with MS Exchange 2007, all you need to do is:
Install HC on Database Server.
HC Exchange Module Server Configuration – User Manual Install Exchange Server 2007 either on the same or another machine. HC facilitates you to install HC and MS Exchange on a single server as well as cluster of servers. If HC is installed on a server other than Database Server then do install HC on it.
After login as Host Admin, in “Global Settings” select Exchange 2007 as Mail Server and add the server (where Exchange 2007 is installed) as a mail server to HC cluster.
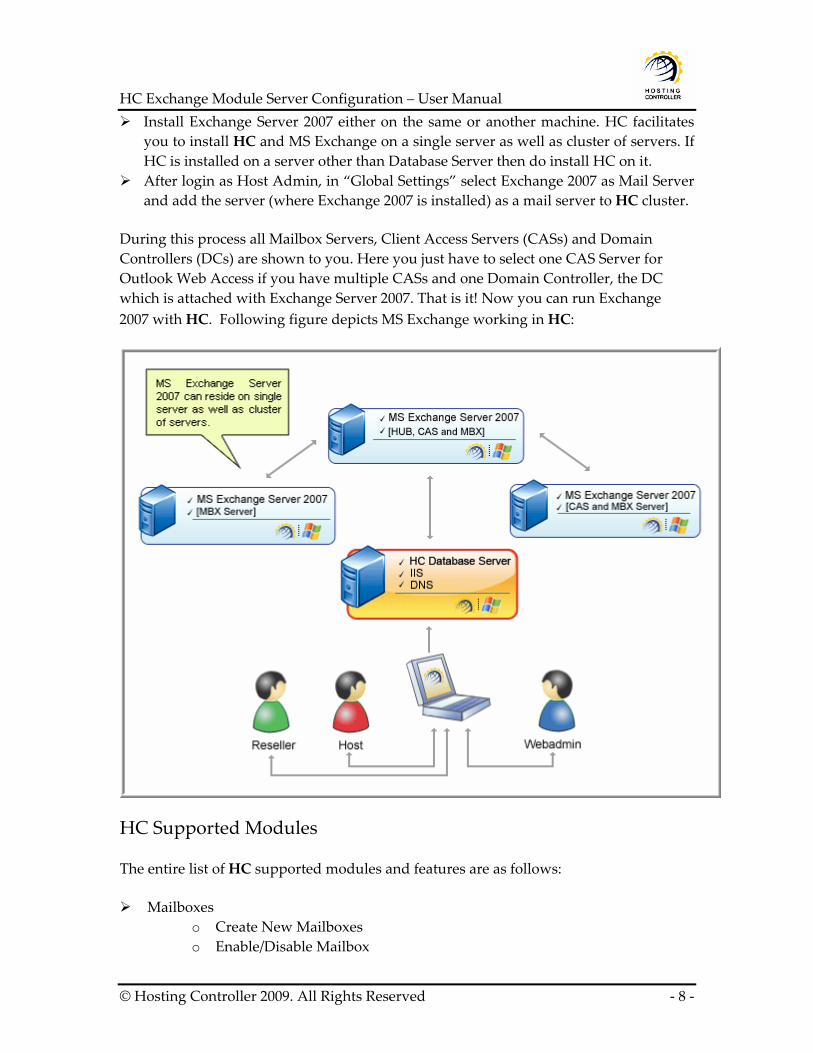
During this process all Mailbox Servers, Client Access Servers (CASs) and Domain Controllers (DCs) are shown to you. Here you just have to select one CAS Server for Outlook Web Access if you have multiple CASs and one Domain Controller, the DC which is attached with Exchange Server 2007. That is it! Now you can run Exchange 2007 with HC. Following figure depicts MS Exchange working in HC:
HC Supported Modules
The entire list of HC supported modules and features are as follows:
Mailboxes o Create New Mailboxes o Enable/Disable Mailbox
© Hosting Controller 2009. All Rights Reserved ‐ 8 ‐
HC Exchange Module Server Configuration – User Manual
© Hosting Controller 2009. All Rights Reserved ‐ 9 ‐
o Define Forwarding Account o Change Mailbox Password o List Membership Management of Mailboxes o General and Advanced Level Properties for Mailboxes o Manage Mailbox Permissions (like SendAs, FullAccess, DeleteItem) o Enable/Disable Protocols (POP3, IMAP, OWA, MAPI) o Manage Mailbox Email Addresses
Select Primary Email Address Add/Remove Additional Email Addresses
Distribution Lists o Create/Remove Distribution Lists o Change General Distribution List Settings
Add/Remove List Members o Change Advanced Distribution List Settings
Display Name Hide Distribution List From Exchange Address Lists Send Out‐Of‐Office Message to Originator Specify Message Size Limit Specify Message Delivery Report
• Send Delivery Report to Manager • Send Delivery Report to Originator • Don’t Send Delivery Report
Manage Distribution List Email Addresses • Add/Remove List Email Addresses • Select Primary Email Address (UPN)
Manage Distribution List Mail Flow Settings • Accepted Senders • Rejected Senders
Public Folder
o Create/Remove Public Folders o Automated Creation of Organization Folder o Concealment of Root Public Folder of one Organization from Users of
other Organization o Mail Enable/Disable Public Folders o Change Mail Properties for Mail Enabled Public Folders
Display Name Hide Public Folder from Exchange Address Lists Specify Incoming/Outgoing Message Size Limit
o Change Advanced Properties Storage Quota
HC Exchange Module Server Configuration – User Manual Deleted Items Retention Age Limits
o Manage Public Folder Email Addresses Add/Remove Public Folder Email Addresses Select Primary Email Address (UPN)
o Manage Public Folder Mail Flow Settings Accepted Senders Rejected Senders
Post Installation Steps Once you have installed HC and Exchange 2007 Server, you need to configure the entire setup. You have to follow these steps as stated, to omit faults & errors during Exchange 2007 configuration.
Steps to Follow Configuration of Exchange 2007 Server comprises of mainly two steps i.e. Enable Exchange 2007 Server and Add Exchange 2007 Server. Later sections of this document describe each of them in detail.
Enable Exchange 2007 Server Follow these steps to enable Exchange 2007 Server for your cluster.
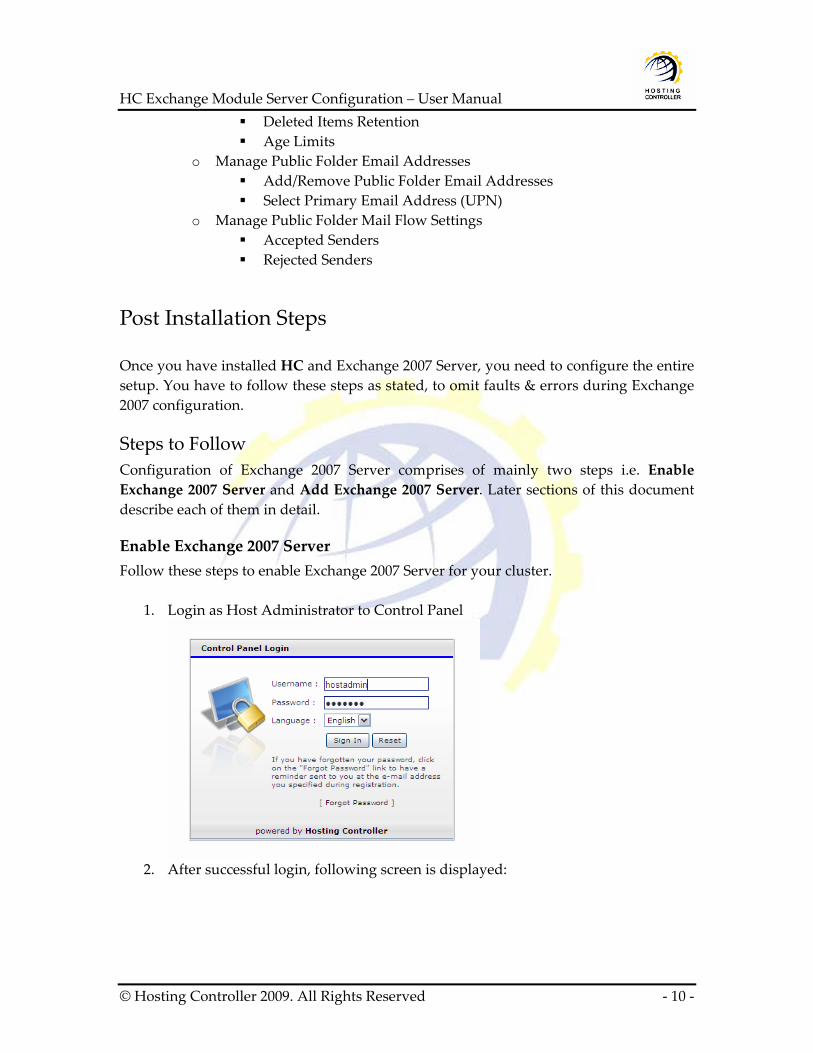
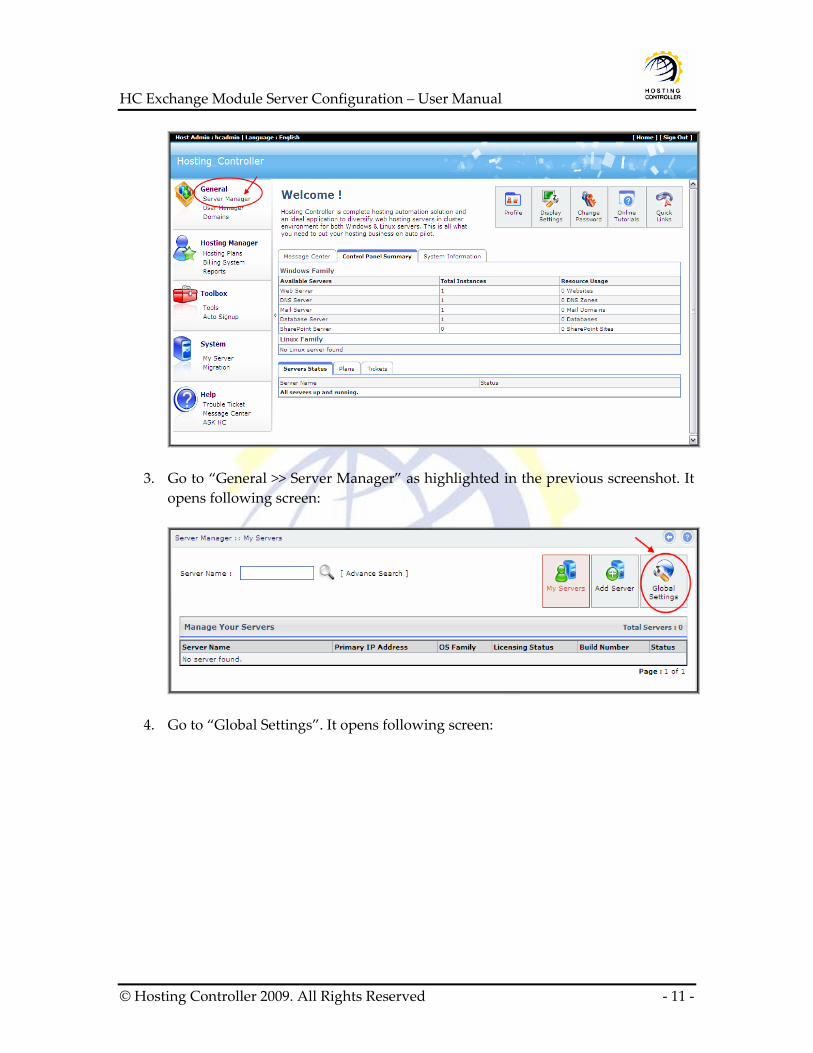
1. Login as Host Administrator to Control Panel
2. After successful login, following screen is displayed:
© Hosting Controller 2009. All Rights Reserved ‐ 10 ‐
HC Exchange Module Server Configuration – User Manual
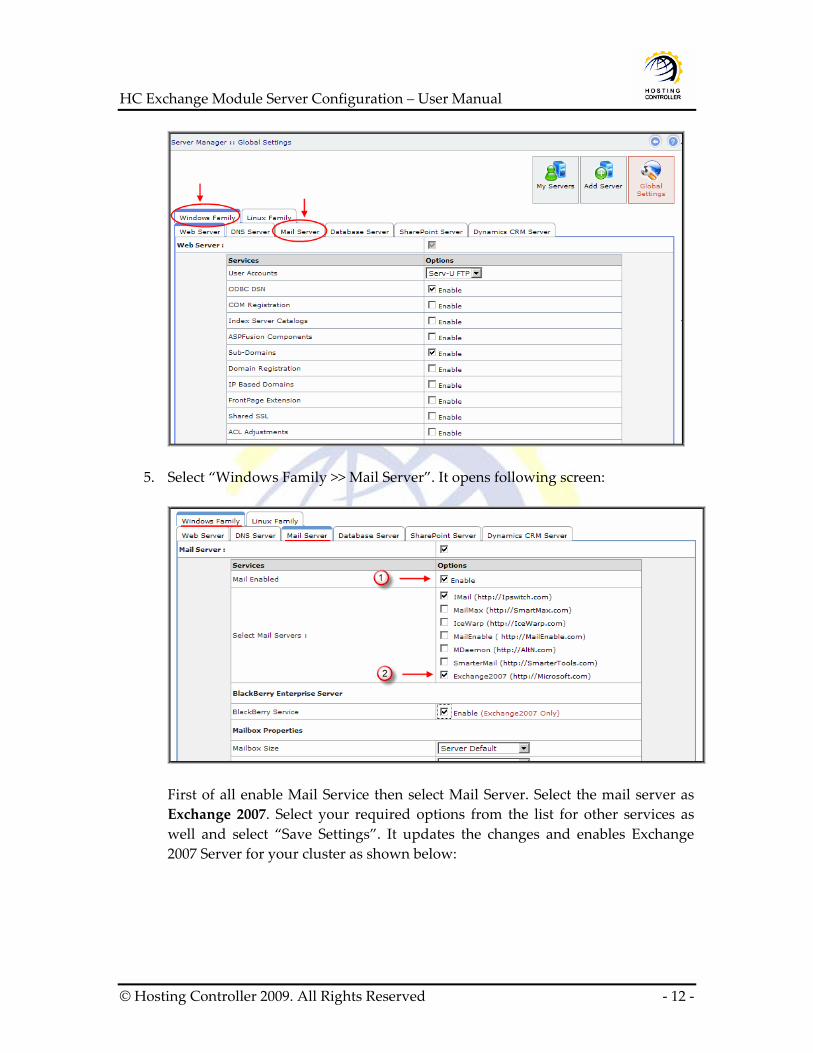
3. Go to “General >> Server Manager” as highlighted in the previous screenshot. It opens following screen:
4. Go to “Global Settings”. It opens following screen:
© Hosting Controller 2009. All Rights Reserved ‐ 11 ‐
HC Exchange Module Server Configuration – User Manual
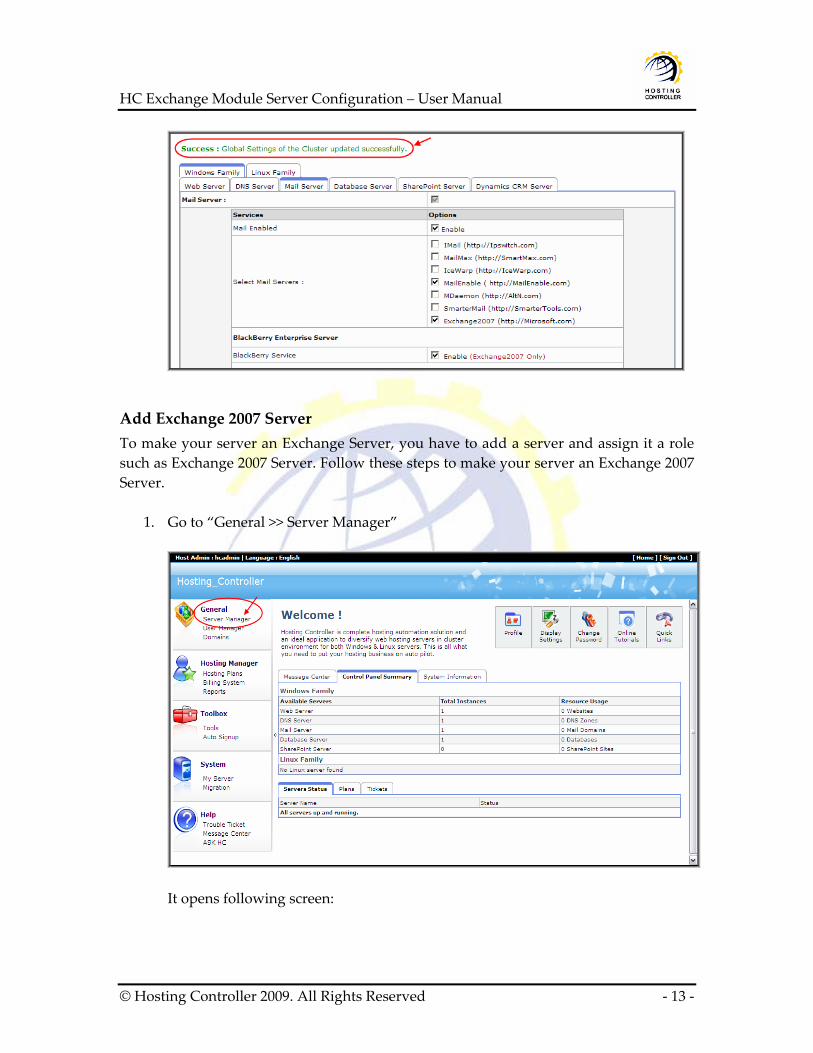
5. Select “Windows Family >> Mail Server”. It opens following screen:
First of all enable Mail Service then select Mail Server. Select the mail server as Exchange 2007. Select your required options from the list for other services as well and select “Save Settings”. It updates the changes and enables Exchange 2007 Server for your cluster as shown below:
© Hosting Controller 2009. All Rights Reserved ‐ 12 ‐
HC Exchange Module Server Configuration – User Manual
Add Exchange 2007 Server To make your server an Exchange Server, you have to add a server and assign it a role such as Exchange 2007 Server. Follow these steps to make your server an Exchange 2007 Server.
1. Go to “General >> Server Manager”
It opens following screen:
© Hosting Controller 2009. All Rights Reserved ‐ 13 ‐
HC Exchange Module Server Configuration – User Manual
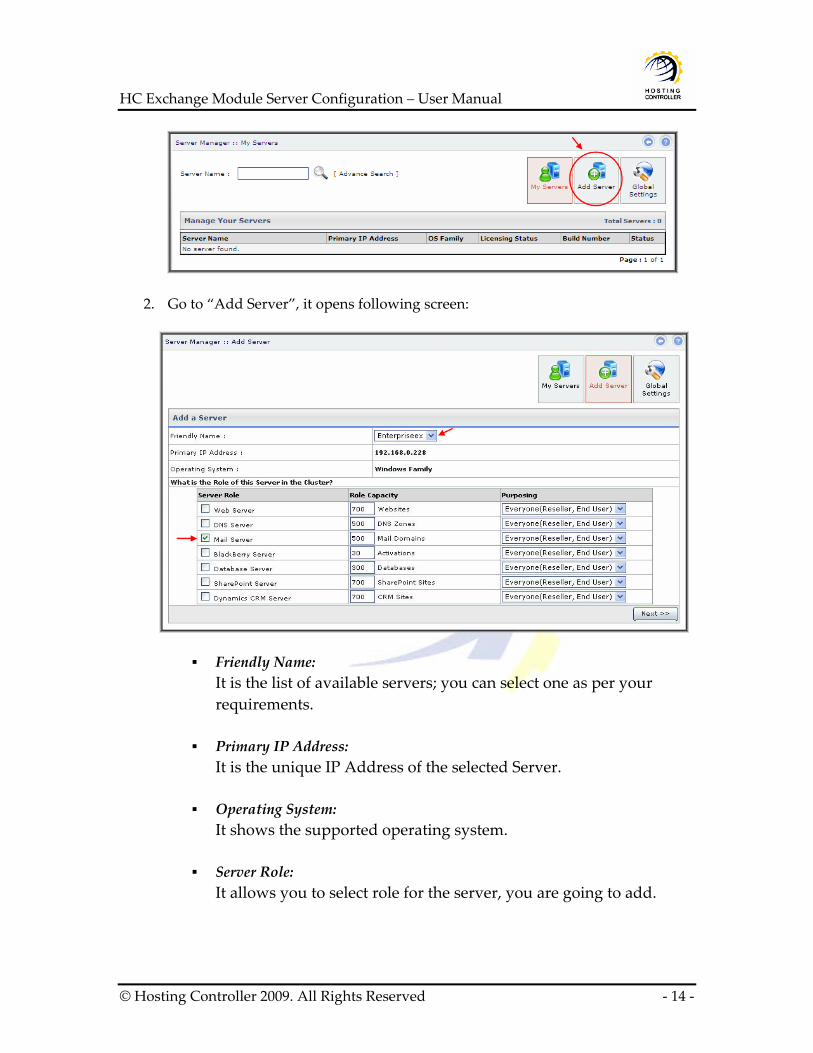
2. Go to “Add Server”, it opens following screen:
Friendly Name: It is the list of available servers; you can select one as per your requirements.
Primary IP Address:
It is the unique IP Address of the selected Server. Operating System:
It shows the supported operating system. Server Role:
It allows you to select role for the server, you are going to add.
© Hosting Controller 2009. All Rights Reserved ‐ 14 ‐
HC Exchange Module Server Configuration – User Manual Role Capacity:
It shows the maximum limit of supported domains/DNS/mail domains/databases/Activations on Web/DNS/Mail/Database/BlackBerry Server respectively.
Purposing:
It allows you to specify end user for the selected server. You can dedicate your server to only resellers as well as to everyone according to your requirements.
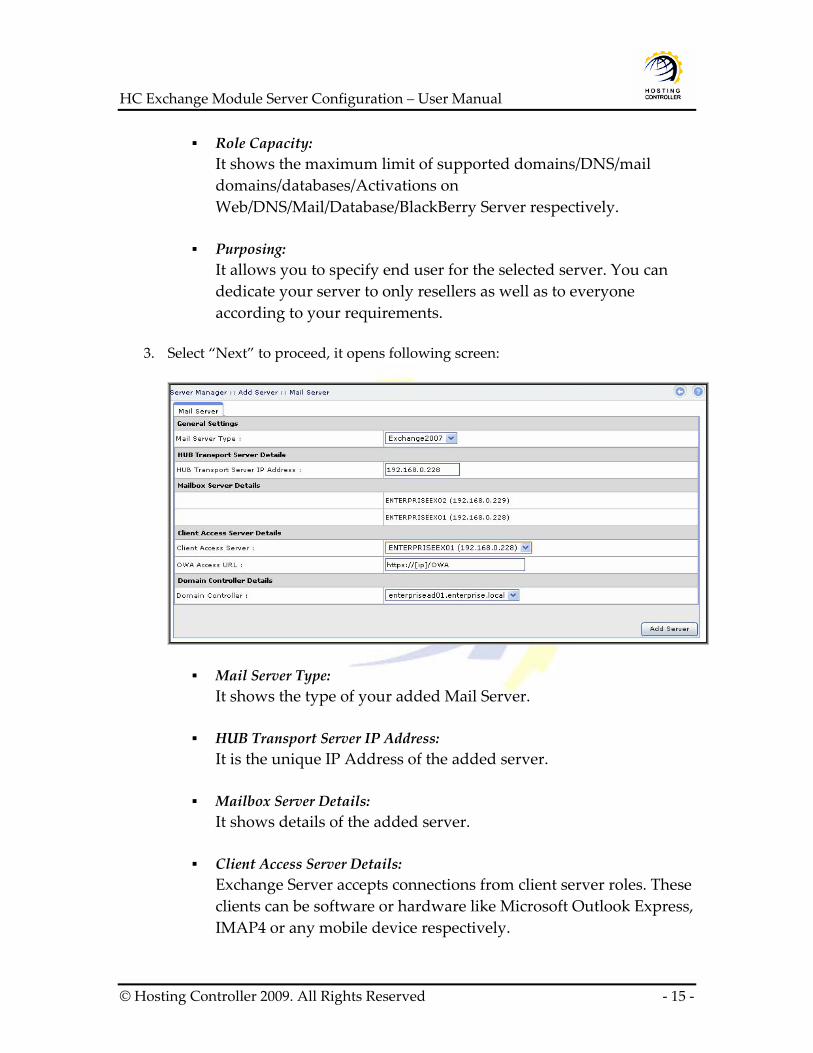
3. Select “Next” to proceed, it opens following screen:
Mail Server Type: It shows the type of your added Mail Server.
HUB Transport Server IP Address: It is the unique IP Address of the added server.
Mailbox Server Details:
It shows details of the added server.
Client Access Server Details: Exchange Server accepts connections from client server roles. These clients can be software or hardware like Microsoft Outlook Express, IMAP4 or any mobile device respectively.
© Hosting Controller 2009. All Rights Reserved ‐ 15 ‐
HC Exchange Module Server Configuration – User Manual i. Client Access Server:
Select the Client Access Server from the list as required. ii. OWA Access URL:
Specify the Outlook Web Access (OWA) URL in this field.
Domain Controller: Select domain controller that is attached with Exchange Server 2007, from the list as required.
Select ʺNextʺ to proceed. It adds the server and displays appropriate message.
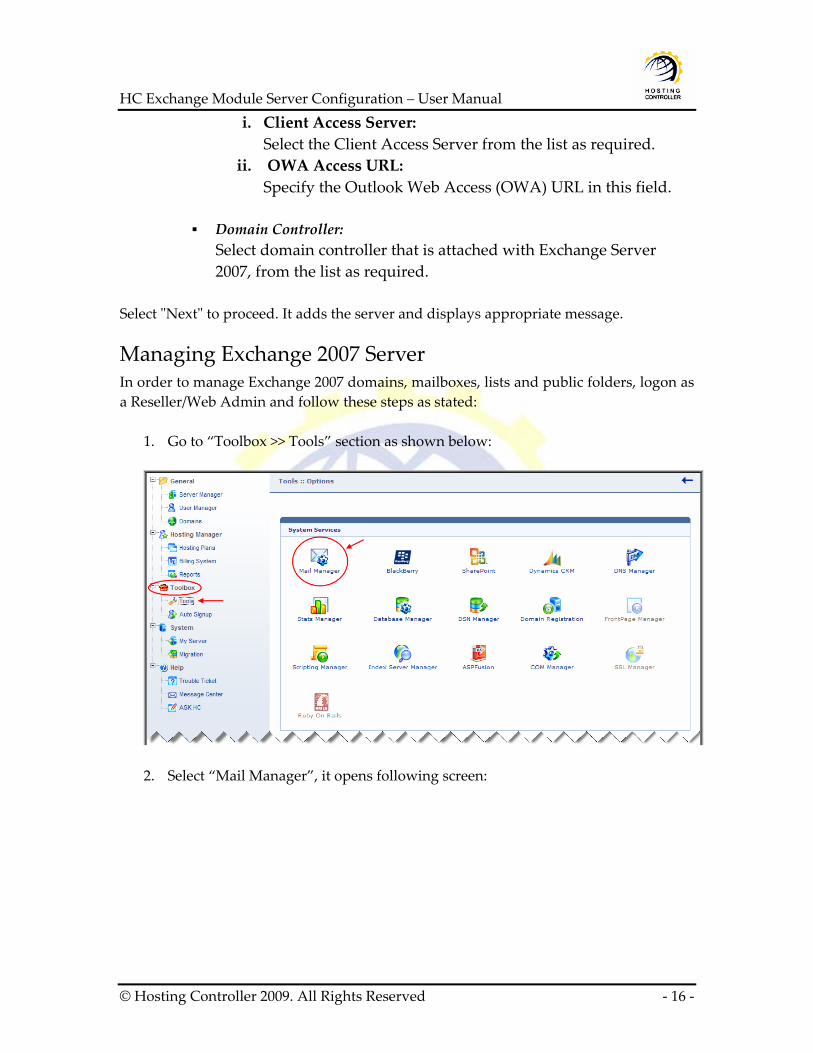
Managing Exchange 2007 Server In order to manage Exchange 2007 domains, mailboxes, lists and public folders, logon as a Reseller/Web Admin and follow these steps as stated:
1. Go to “Toolbox >> Tools” section as shown below:
2. Select “Mail Manager”, it opens following screen:
© Hosting Controller 2009. All Rights Reserved ‐ 16 ‐
HC Exchange Module Server Configuration – User Manual
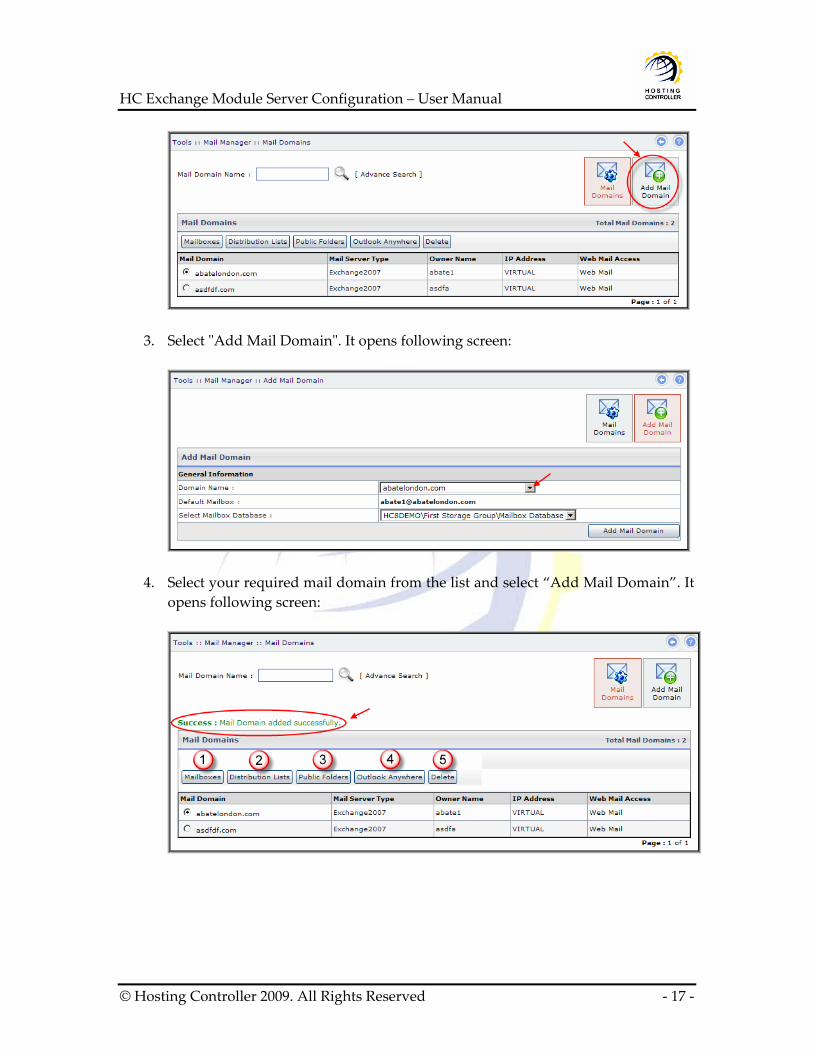
3. Select ʺAdd Mail Domainʺ. It opens following screen:
4. Select your required mail domain from the list and select “Add Mail Domain”. It opens following screen:
© Hosting Controller 2009. All Rights Reserved ‐ 17 ‐
HC Exchange Module Server Configuration – User Manual
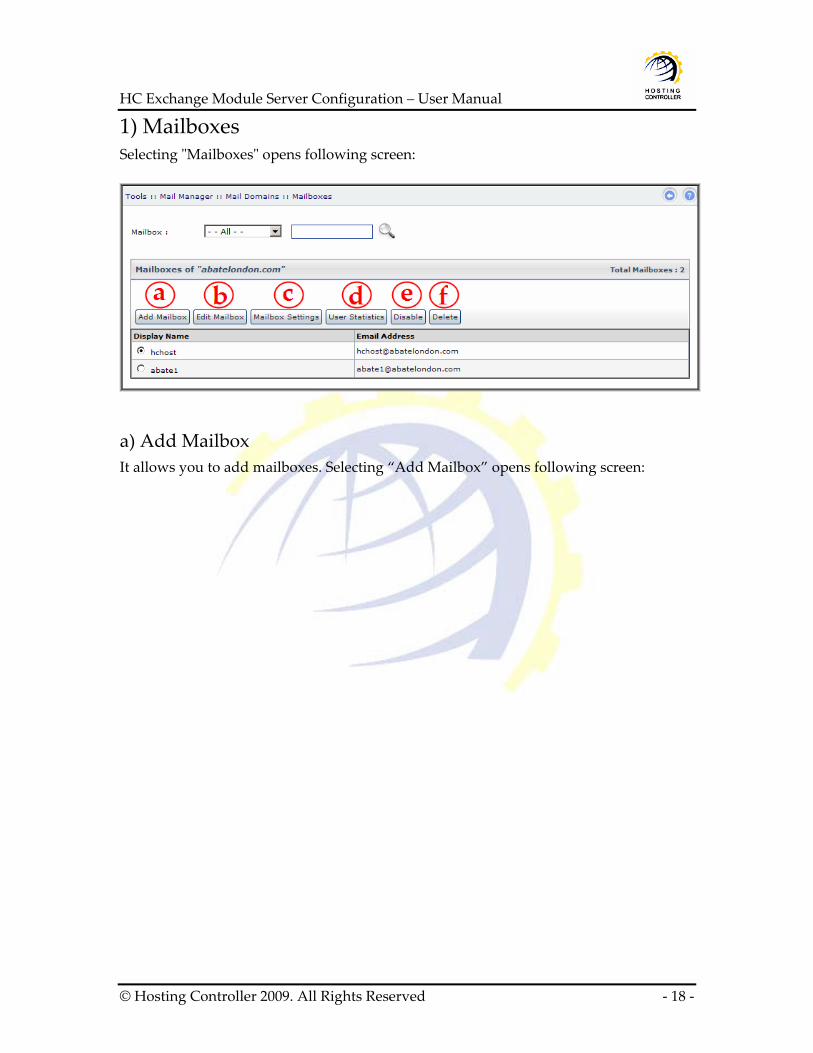
1) Mailboxes Selecting ʺMailboxesʺ opens following screen:
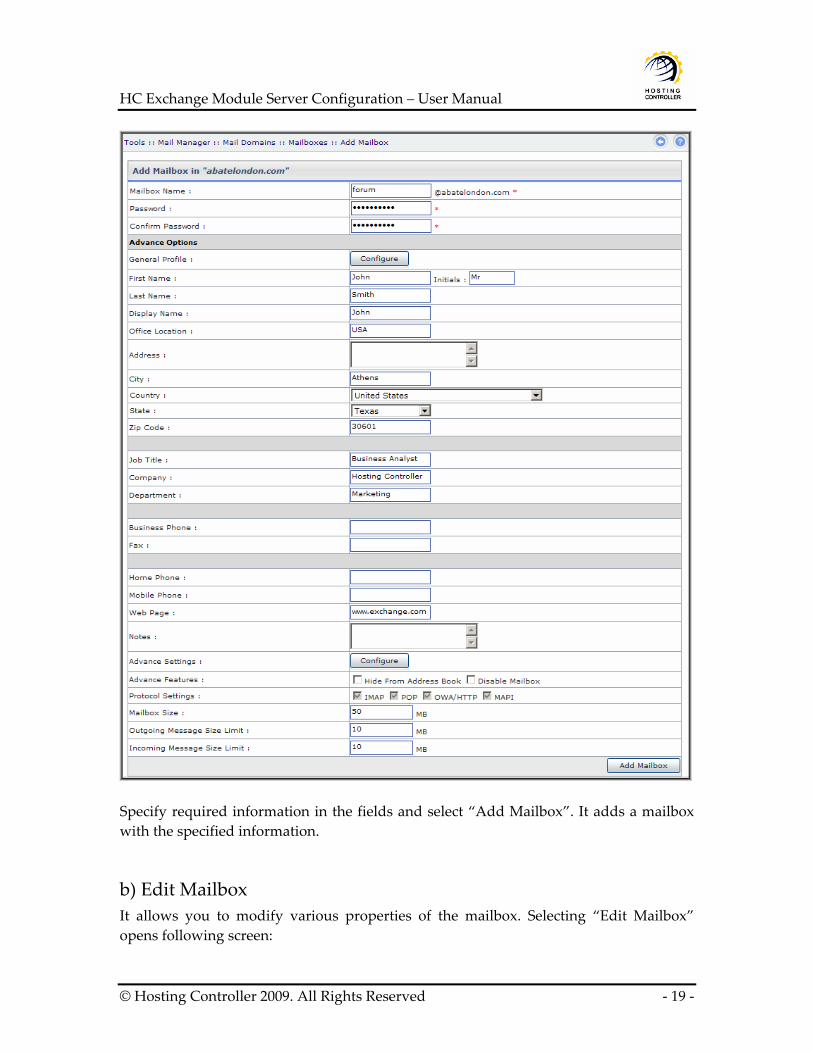
a) Add Mailbox It allows you to add mailboxes. Selecting “Add Mailbox” opens following screen:
© Hosting Controller 2009. All Rights Reserved ‐ 18 ‐
HC Exchange Module Server Configuration – User Manual
Specify required information in the fields and select “Add Mailbox”. It adds a mailbox with the specified information.
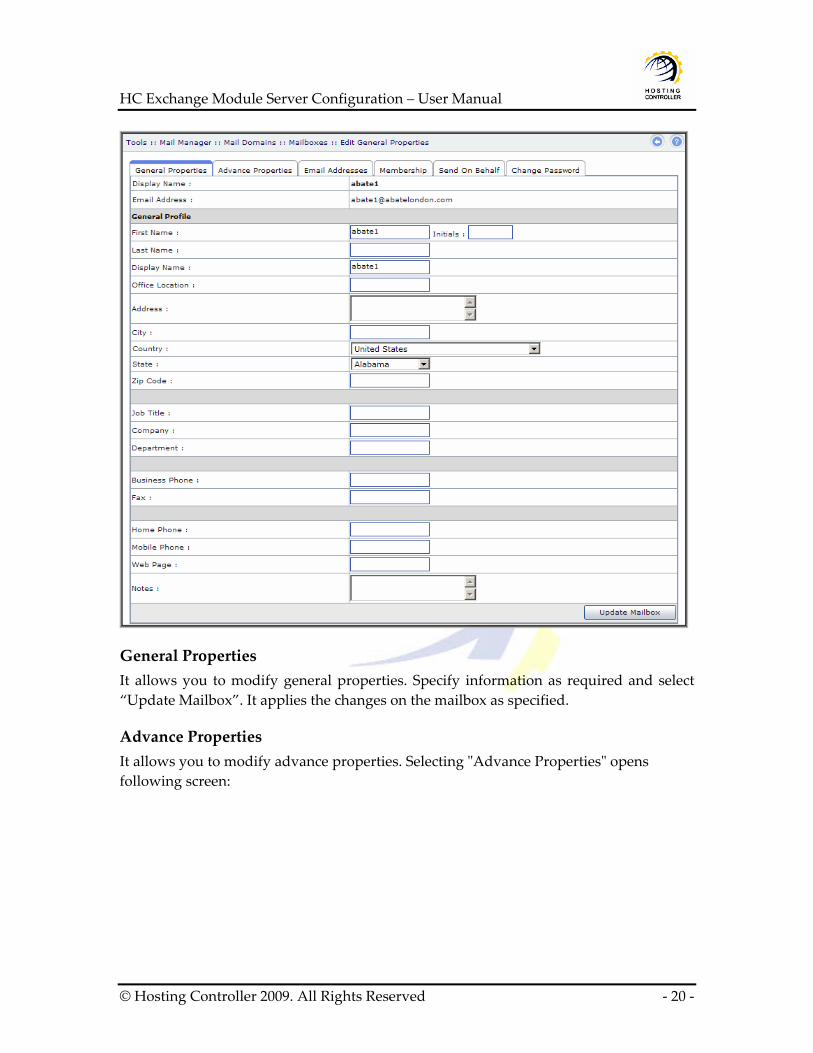
b) Edit Mailbox It allows you to modify various properties of the mailbox. Selecting “Edit Mailbox” opens following screen:
© Hosting Controller 2009. All Rights Reserved ‐ 19 ‐
HC Exchange Module Server Configuration – User Manual
General Properties It allows you to modify general properties. Specify information as required and select “Update Mailbox”. It applies the changes on the mailbox as specified.
Advance Properties It allows you to modify advance properties. Selecting ʺAdvance Propertiesʺ opens following screen:
© Hosting Controller 2009. All Rights Reserved ‐ 20 ‐
HC Exchange Module Server Configuration – User Manual
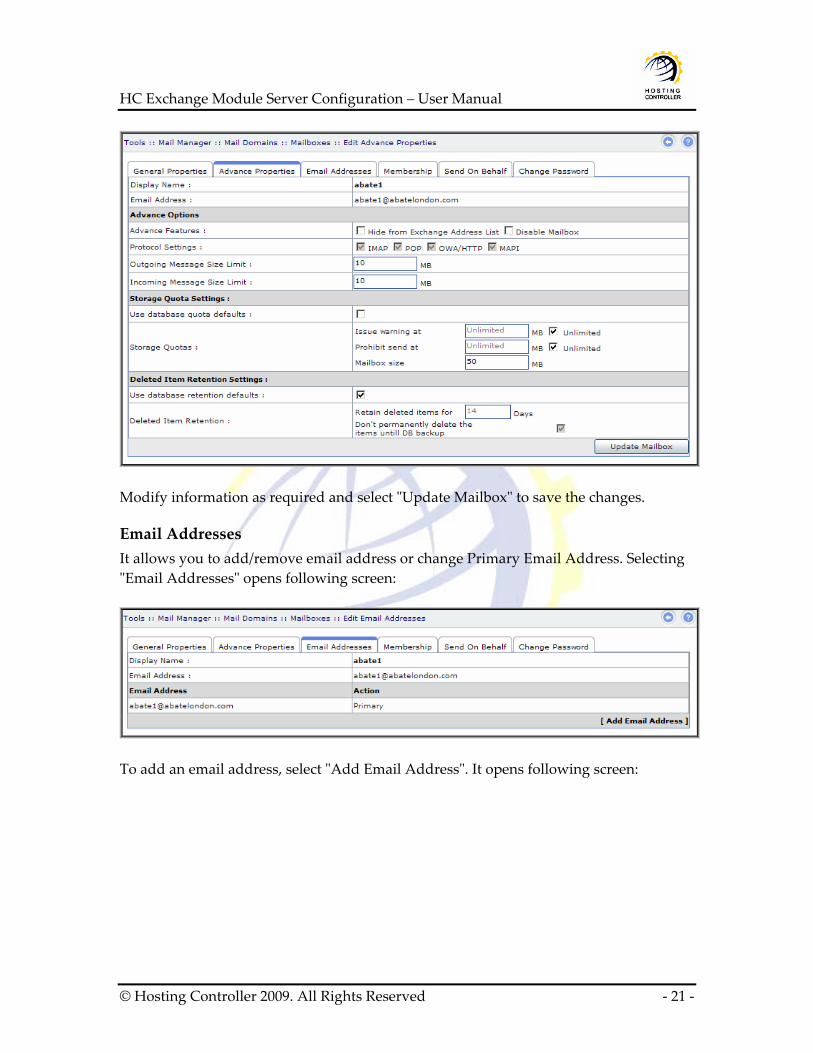
Modify information as required and select ʺUpdate Mailboxʺ to save the changes.
Email Addresses It allows you to add/remove email address or change Primary Email Address. Selecting ʺEmail Addressesʺ opens following screen:
To add an email address, select ʺAdd Email Addressʺ. It opens following screen:
© Hosting Controller 2009. All Rights Reserved ‐ 21 ‐

HC Exchange Module Server Configuration – User Manual
Specify email address to be added and select your required domain from the list. Select ʺAdd Email Addressʺ to apply the changes as specified.
Membership It allows you to modify list membership of the user. You can add/remove this user to/from any list in the domain. Selecting ʺMembershipʺ opens following screen:
Specify list members as required and then select ʺSave Settingsʺ. It updates the membership information as specified.
Send On Behalf It allows you to select mailbox to send email on your behalf. Selecting “Send On Behalf” opens following screen:
Select “Update Mailbox” to save the changes.
© Hosting Controller 2009. All Rights Reserved ‐ 22 ‐
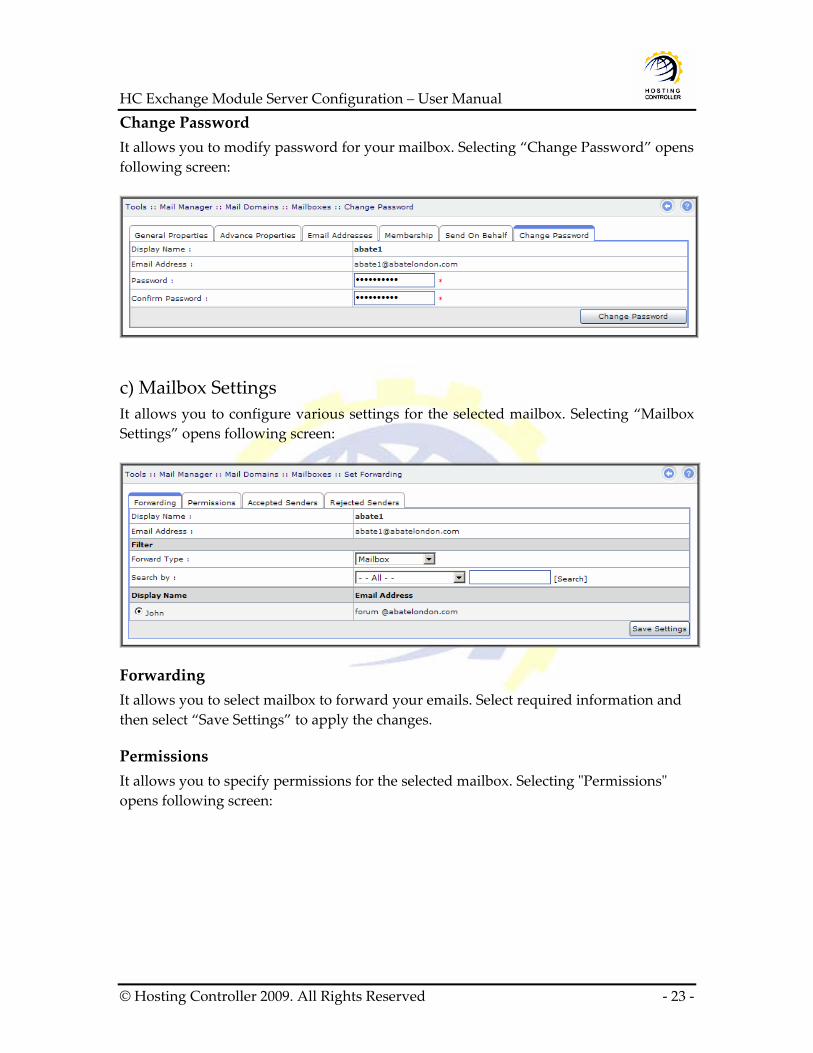
HC Exchange Module Server Configuration – User Manual Change Password It allows you to modify password for your mailbox. Selecting “Change Password” opens following screen:
c) Mailbox Settings It allows you to configure various settings for the selected mailbox. Selecting “Mailbox Settings” opens following screen:
Forwarding It allows you to select mailbox to forward your emails. Select required information and then select “Save Settings” to apply the changes.
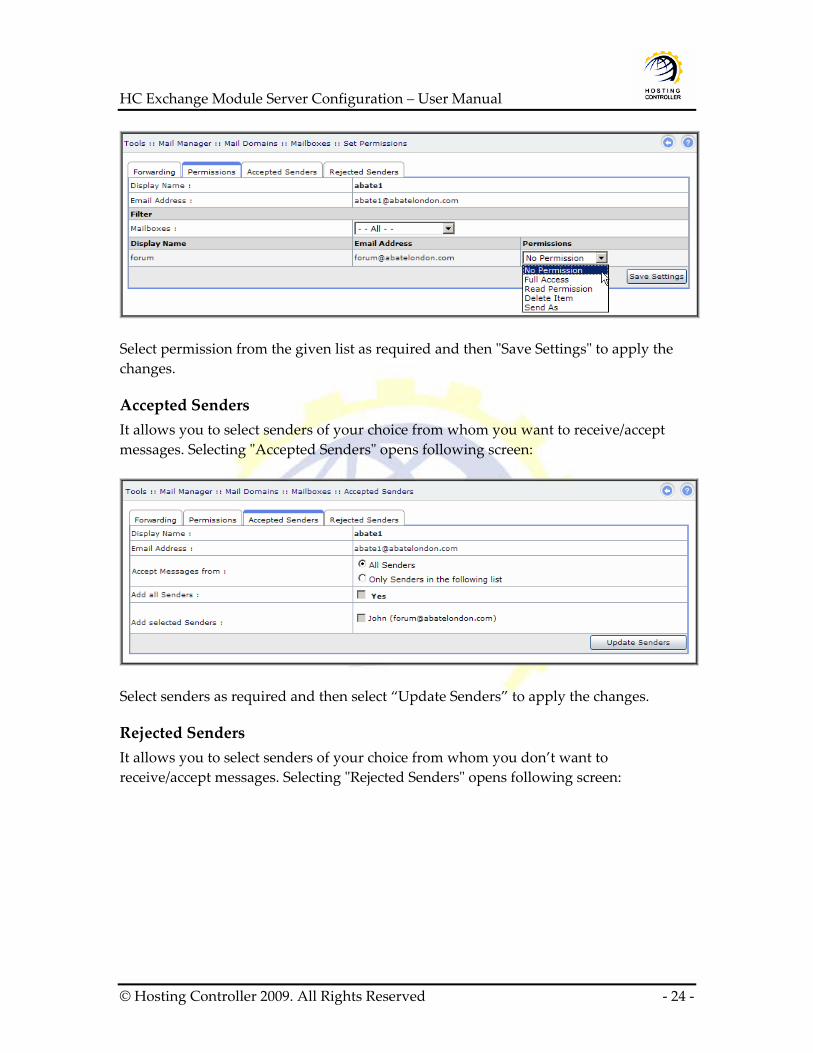
Permissions It allows you to specify permissions for the selected mailbox. Selecting ʺPermissionsʺ opens following screen:
© Hosting Controller 2009. All Rights Reserved ‐ 23 ‐
HC Exchange Module Server Configuration – User Manual
Select permission from the given list as required and then ʺSave Settingsʺ to apply the changes.
Accepted Senders It allows you to select senders of your choice from whom you want to receive/accept messages. Selecting ʺAccepted Sendersʺ opens following screen:
Select senders as required and then select “Update Senders” to apply the changes.
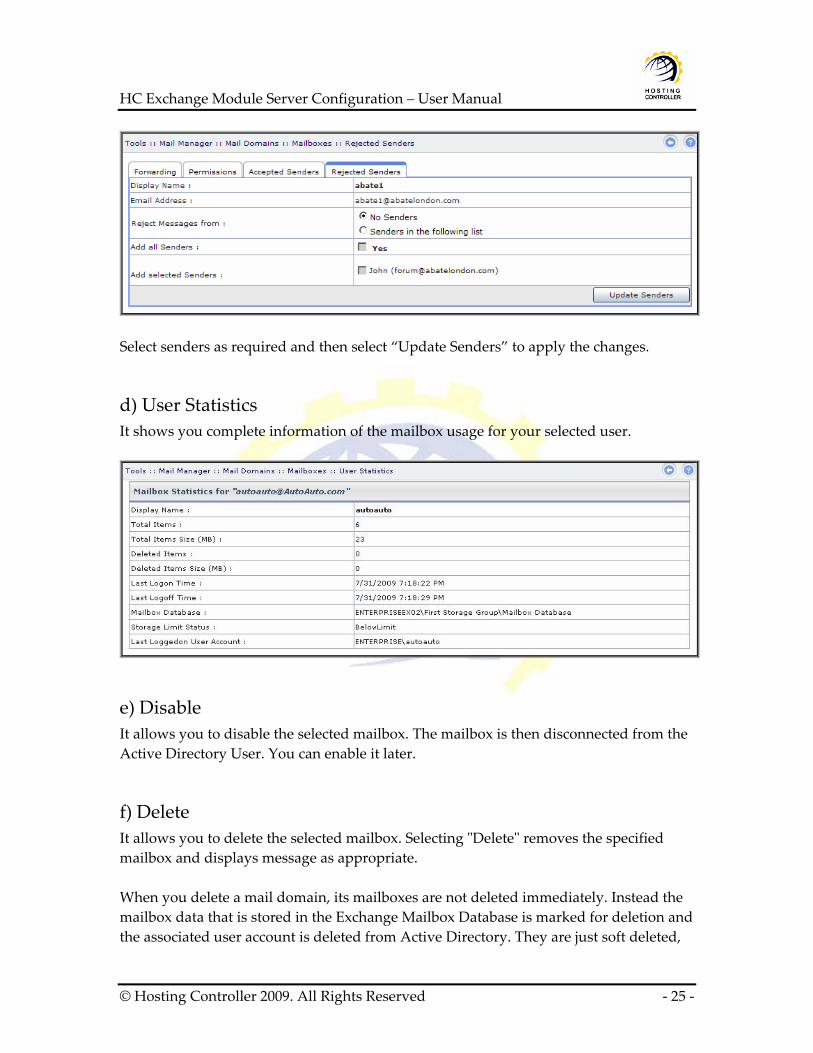
Rejected Senders It allows you to select senders of your choice from whom you don’t want to receive/accept messages. Selecting ʺRejected Sendersʺ opens following screen:
© Hosting Controller 2009. All Rights Reserved ‐ 24 ‐
HC Exchange Module Server Configuration – User Manual
Select senders as required and then select “Update Senders” to apply the changes.
d) User Statistics It shows you complete information of the mailbox usage for your selected user.
e) Disable It allows you to disable the selected mailbox. The mailbox is then disconnected from the Active Directory User. You can enable it later.
f) Delete It allows you to delete the selected mailbox. Selecting ʺDeleteʺ removes the specified mailbox and displays message as appropriate. When you delete a mail domain, its mailboxes are not deleted immediately. Instead the mailbox data that is stored in the Exchange Mailbox Database is marked for deletion and the associated user account is deleted from Active Directory. They are just soft deleted,
© Hosting Controller 2009. All Rights Reserved ‐ 25 ‐
HC Exchange Module Server Configuration – User Manual which means their associated users are deleted form Active Directory and mailboxes exist in Exchange Mailbox Database as disconnected mailboxes. Disconnected mailboxes are deleted automatically by Exchange after some specific time period. By default, Exchange retains a disconnected mailbox for 30 days.
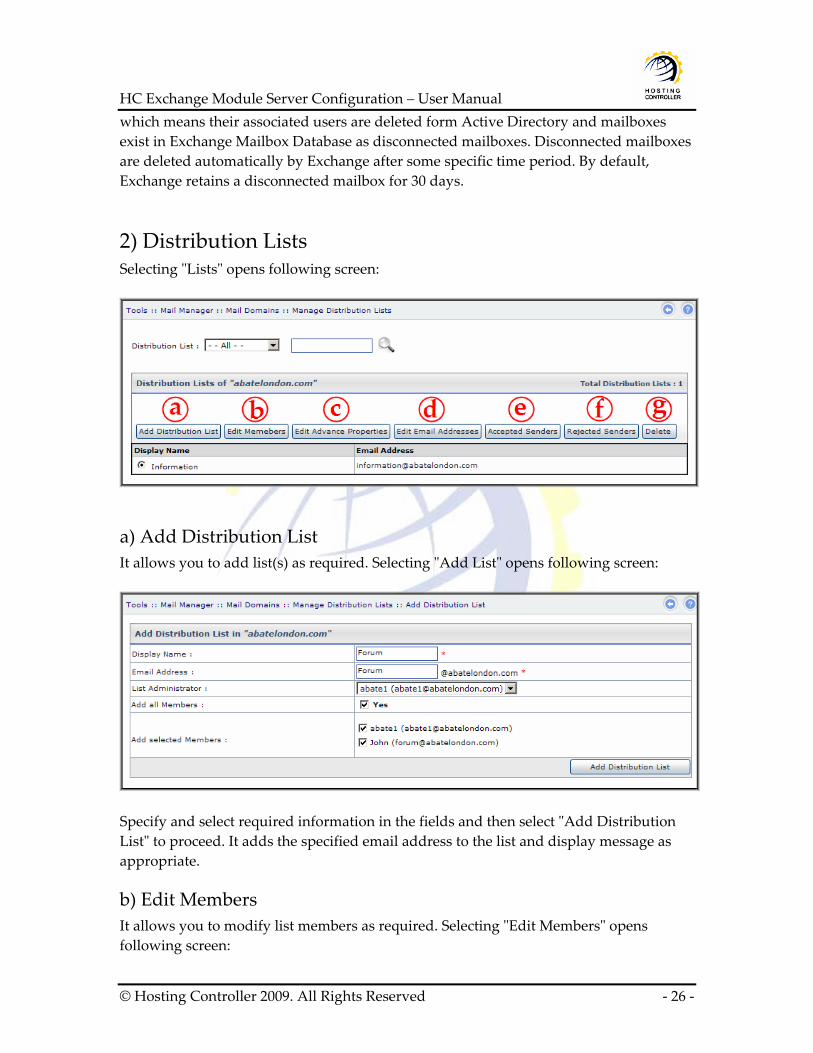
2) Distribution Lists Selecting ʺListsʺ opens following screen:
a) Add Distribution List It allows you to add list(s) as required. Selecting ʺAdd Listʺ opens following screen:
Specify and select required information in the fields and then select ʺAdd Distribution Listʺ to proceed. It adds the specified email address to the list and display message as appropriate.
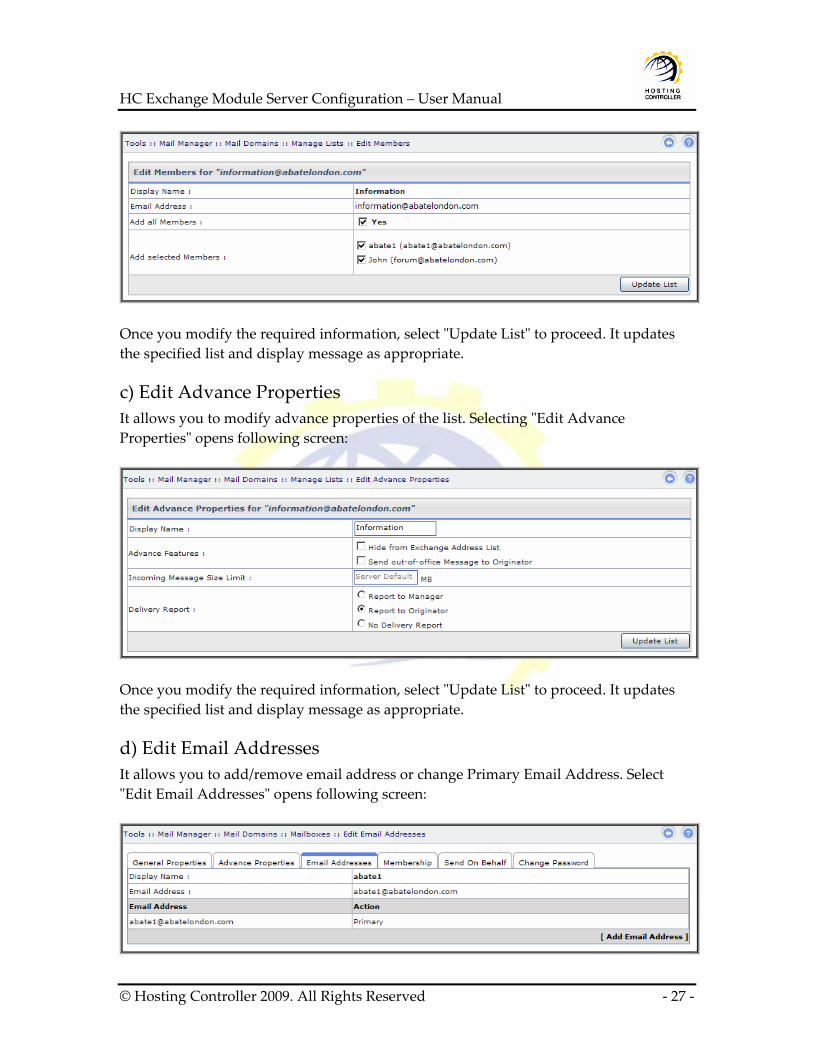
b) Edit Members It allows you to modify list members as required. Selecting ʺEdit Membersʺ opens following screen:
© Hosting Controller 2009. All Rights Reserved ‐ 26 ‐
HC Exchange Module Server Configuration – User Manual
Once you modify the required information, select ʺUpdate Listʺ to proceed. It updates the specified list and display message as appropriate.
c) Edit Advance Properties It allows you to modify advance properties of the list. Selecting ʺEdit Advance Propertiesʺ opens following screen:
Once you modify the required information, select ʺUpdate Listʺ to proceed. It updates the specified list and display message as appropriate.
d) Edit Email Addresses It allows you to add/remove email address or change Primary Email Address. Select ʺEdit Email Addressesʺ opens following screen:
© Hosting Controller 2009. All Rights Reserved ‐ 27 ‐
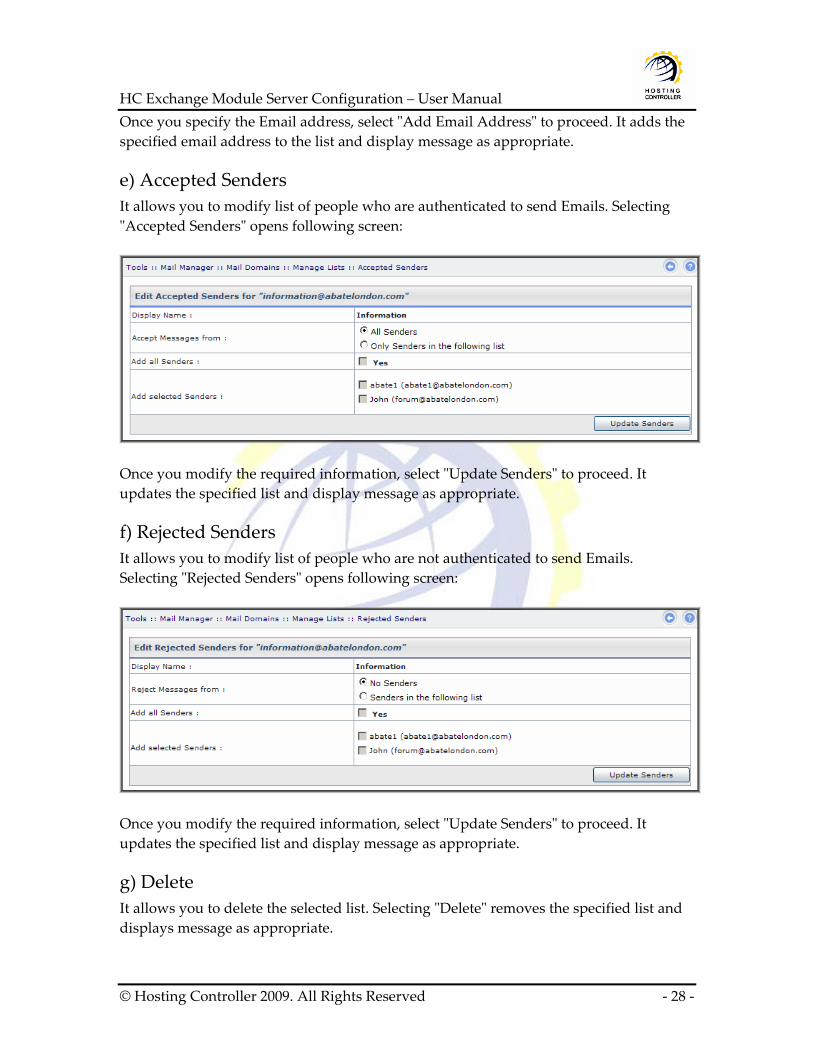
HC Exchange Module Server Configuration – User Manual Once you specify the Email address, select ʺAdd Email Addressʺ to proceed. It adds the specified email address to the list and display message as appropriate.
e) Accepted Senders It allows you to modify list of people who are authenticated to send Emails. Selecting ʺAccepted Sendersʺ opens following screen:
Once you modify the required information, select ʺUpdate Sendersʺ to proceed. It updates the specified list and display message as appropriate.
f) Rejected Senders It allows you to modify list of people who are not authenticated to send Emails. Selecting ʺRejected Sendersʺ opens following screen:
Once you modify the required information, select ʺUpdate Sendersʺ to proceed. It updates the specified list and display message as appropriate.
g) Delete It allows you to delete the selected list. Selecting ʺDeleteʺ removes the specified list and displays message as appropriate.
© Hosting Controller 2009. All Rights Reserved ‐ 28 ‐
HC Exchange Module Server Configuration – User Manual
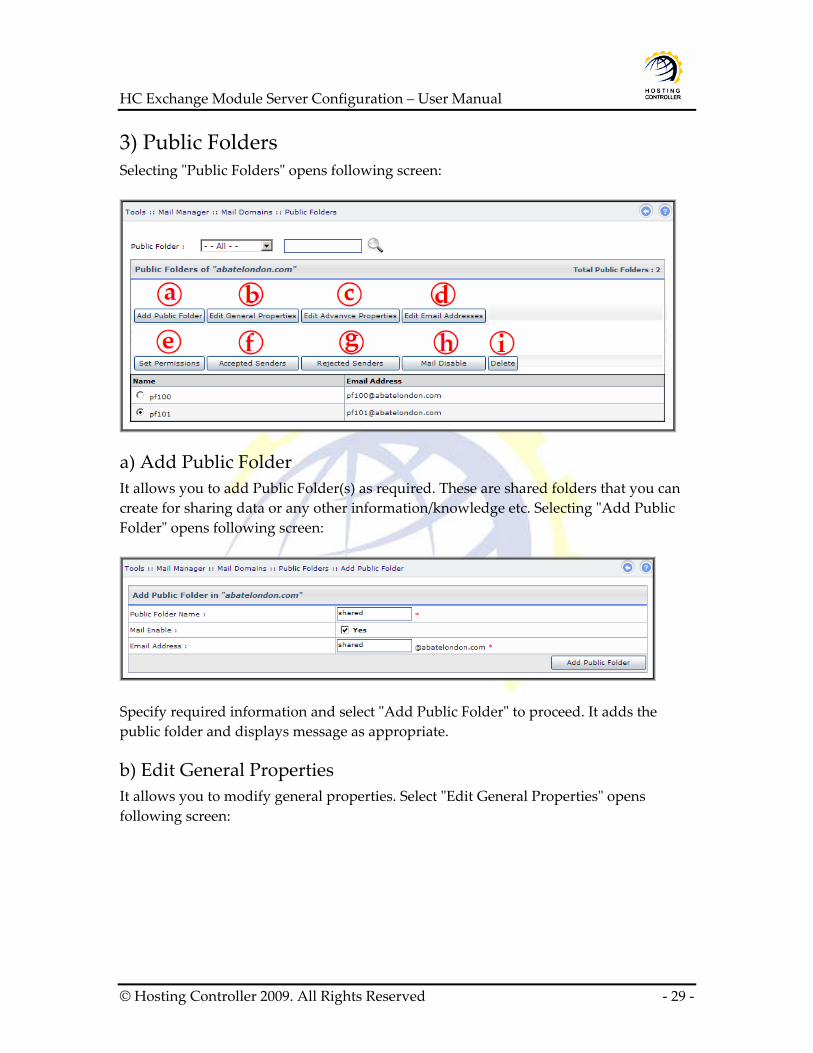
3) Public Folders Selecting ʺPublic Foldersʺ opens following screen:
a) Add Public Folder It allows you to add Public Folder(s) as required. These are shared folders that you can create for sharing data or any other information/knowledge etc. Selecting ʺAdd Public Folderʺ opens following screen:
Specify required information and select ʺAdd Public Folderʺ to proceed. It adds the public folder and displays message as appropriate.
b) Edit General Properties It allows you to modify general properties. Select ʺEdit General Propertiesʺ opens following screen:
© Hosting Controller 2009. All Rights Reserved ‐ 29 ‐
HC Exchange Module Server Configuration – User Manual
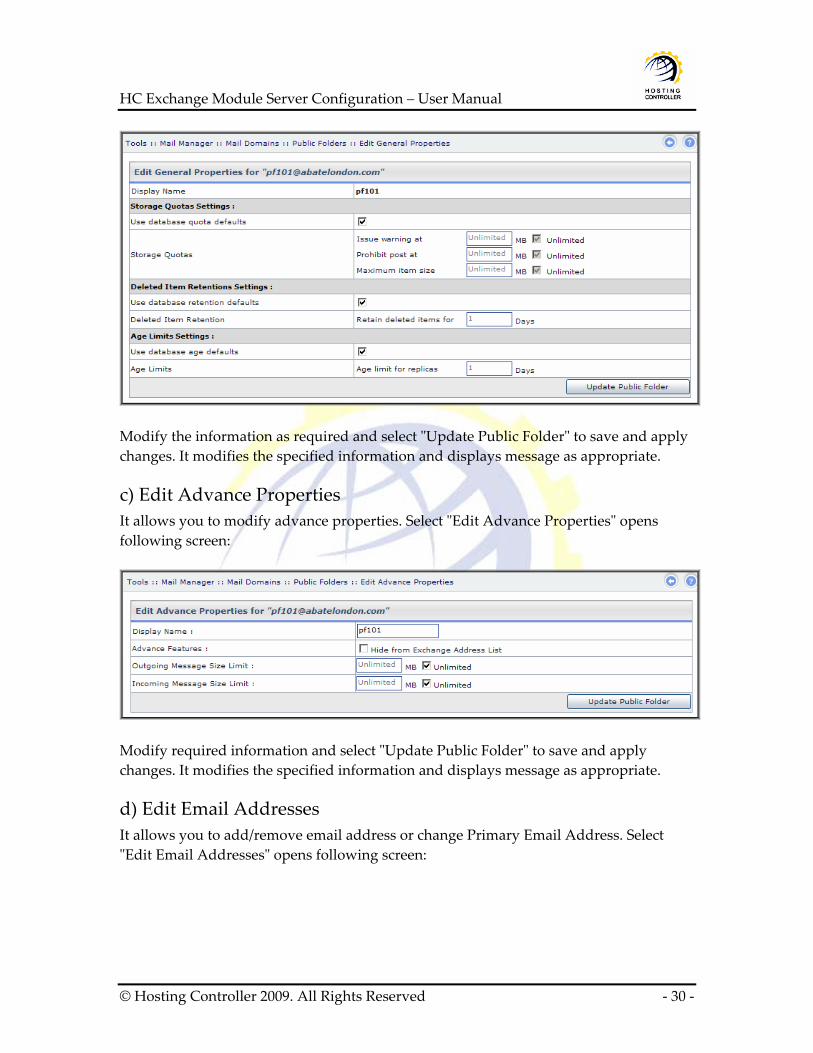
Modify the information as required and select ʺUpdate Public Folderʺ to save and apply changes. It modifies the specified information and displays message as appropriate.
c) Edit Advance Properties It allows you to modify advance properties. Select ʺEdit Advance Propertiesʺ opens following screen:
Modify required information and select ʺUpdate Public Folderʺ to save and apply changes. It modifies the specified information and displays message as appropriate.
d) Edit Email Addresses It allows you to add/remove email address or change Primary Email Address. Select ʺEdit Email Addressesʺ opens following screen:
© Hosting Controller 2009. All Rights Reserved ‐ 30 ‐

HC Exchange Module Server Configuration – User Manual
Select ʺSet As Primaryʺ to modify status of email address as required. To add an email address, select ʺAdd Email Addressʺ. It adds the specified email address and displays message as appropriate.
e) Set Permissions It allows you to specify permissions for the selected Public Folder. Selecting ʺSet Permissionsʺ opens following screen:
Select permission from the given list as required and then ʺUpdate Permissionsʺ to apply the changes.
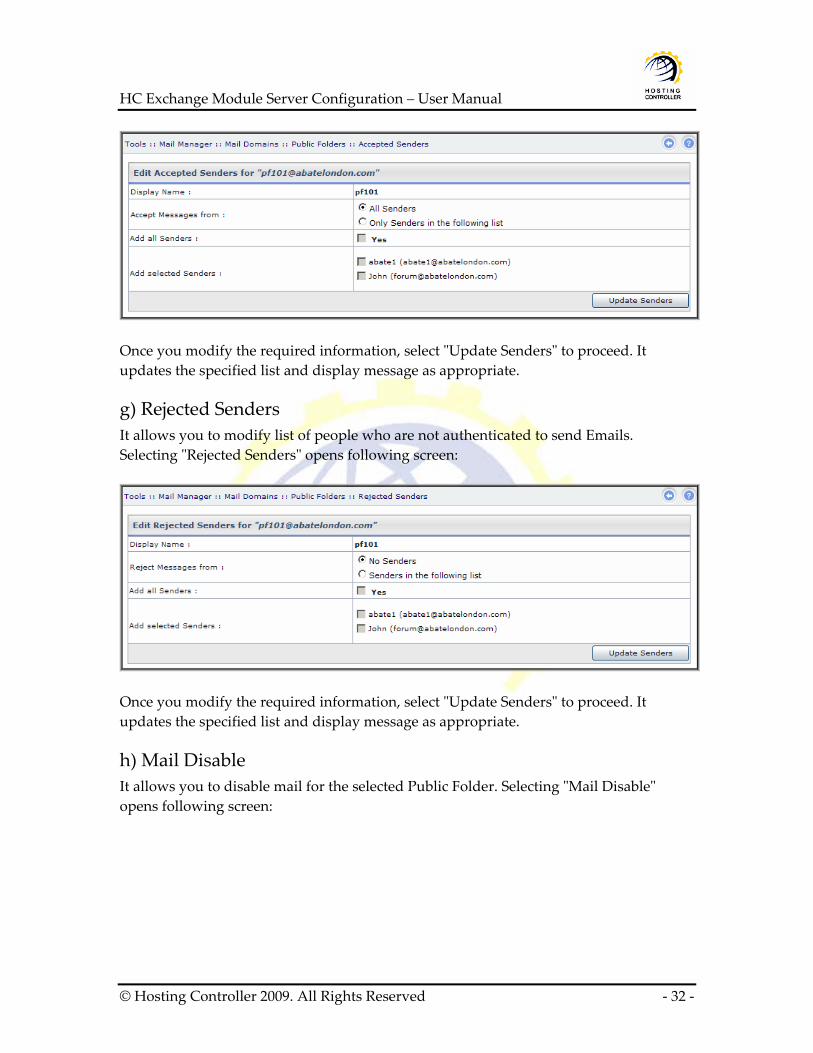
f) Accepted Senders It allows you to modify list of people who are authenticated to send Emails. Selecting ʺAccepted Sendersʺ opens following screen:
© Hosting Controller 2009. All Rights Reserved ‐ 31 ‐
HC Exchange Module Server Configuration – User Manual
Once you modify the required information, select ʺUpdate Sendersʺ to proceed. It updates the specified list and display message as appropriate.
g) Rejected Senders It allows you to modify list of people who are not authenticated to send Emails. Selecting ʺRejected Sendersʺ opens following screen:
Once you modify the required information, select ʺUpdate Sendersʺ to proceed. It updates the specified list and display message as appropriate.
h) Mail Disable It allows you to disable mail for the selected Public Folder. Selecting ʺMail Disableʺ opens following screen:
© Hosting Controller 2009. All Rights Reserved ‐ 32 ‐
HC Exchange Module Server Configuration – User Manual
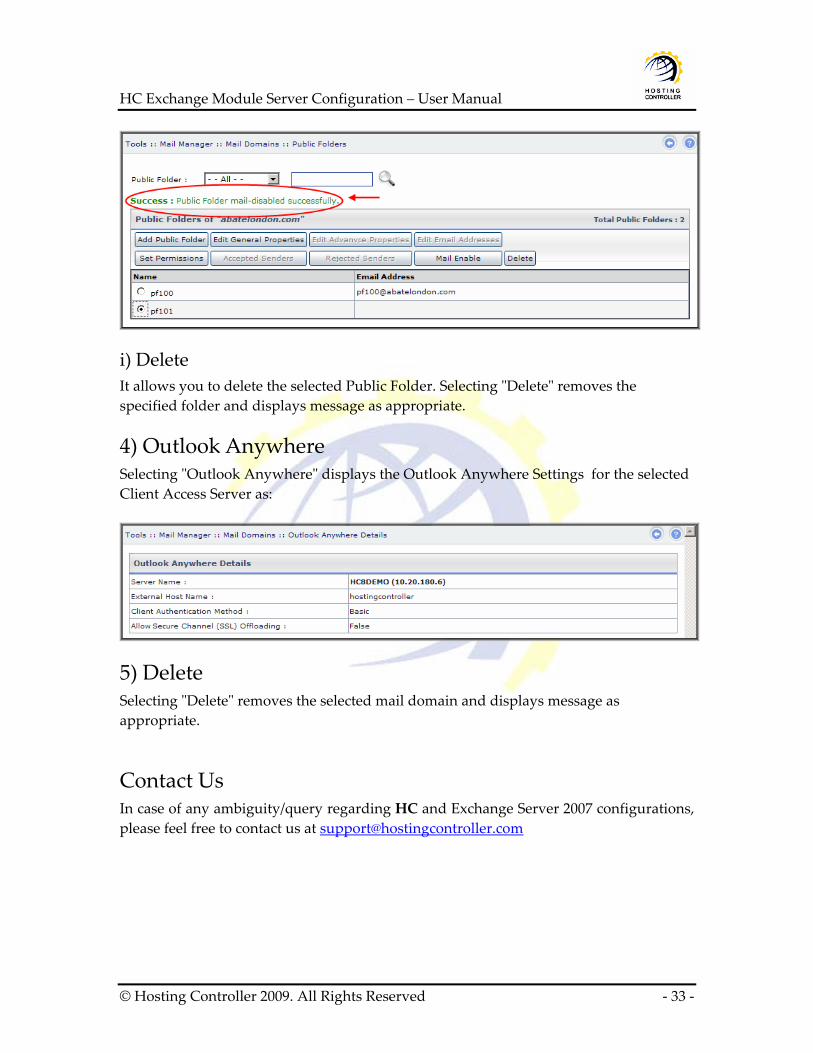
i) Delete It allows you to delete the selected Public Folder. Selecting ʺDeleteʺ removes the specified folder and displays message as appropriate.
4) Outlook Anywhere Selecting ʺOutlook Anywhereʺ displays the Outlook Anywhere Settings for the selected Client Access Server as:
5) Delete Selecting ʺDeleteʺ removes the selected mail domain and displays message as appropriate.
Contact Us In case of any ambiguity/query regarding HC and Exchange Server 2007 configurations, please feel free to contact us at [email protected]
© Hosting Controller 2009. All Rights Reserved ‐ 33 ‐


![[MS-OXGLOS]: Exchange Server Protocols Master Glossary · Exchange Server Protocols Master Glossary ... [MS-OXGLOS]: Exchange Server Protocols Master Glossary ... specifications and](https://img.pdfslide.us/doc/110x75/5c4a7cbe93f3c34aee536fc7/ms-oxglos-exchange-server-protocols-master-glossary-exchange-server-protocols.jpg)