Embed Size (px)
Citation preview
1
HC and KC Model BicyclesBefore using your bicycle for the first time, please take some time to practice proper folding and unfolding procedures. Proper operation of your bicycle is important for your safety and enjoyment. With just a bit of practice, you should be able to fold your bicycle in 15 seconds or less. Be sure to follow the sequence of steps carefully.
Safety.........................................................................................................................................2Bicycle Terms ............................................................................................................................2Unfolding Instructions ..............................................................................................................3Folding Instructions ..................................................................................................................6Adjusting the Frame Latch .......................................................................................................9Adjusting the Steel Telescope & Twist Handlepost Latches ................................................10Adjusting the Aluminum Telescope Handlepost Latch.........................................................11MicroAdjust Stem: Adjusting the Reach and Angle ..............................................................12MicroAdjust Stem: Adjusting the Height................................................................................13MicroAdjust Stem: Folding and Unfolding .............................................................................14
Contents

2
• Before you ride your bike for the first time, make sure it has been checked and adjusted by a bicycle technician. This will validate your warranty and ensure that your bicycle is optimally adjusted for performance and safety.
• Before each ride, check to make sure all latches and quick releases are properly secured. Also check your brake system and tire pressure.
• If your bicycle is damaged and the frame latch or handlepost latch does not secure properly, do not ride your bicycle. Have it serviced immediately by an authorized technician.
• Rider’s weight should not exceed 105 kg or 230 lbs.
• Before your first ride, be sure you know all local traffic regulations.
Safety
Bicycle Terms

3
Unfolding Instructions
STEP 1: Prepare to unfold your bicycle by standing on the side with the chain.
STEP 2: Unfold the frame by swinging the front and rear halves of the frame apart.
STEP 3: The latch bolt should click into the closed position. Be sure the latch bolt is seated properly, flush against the hinge plate and parallel to the frame.
STEP 4: Lock the frame latch lever by pushing it in towards the frame. It should require 6 kg. of force to close.
STEP 5: Move the frame latch safety hook into the closed position.
STEP 6: Swing the handlepost up to its vertical position.

4
STEP 7a: Push the handlepost latch inwards until it snaps closed.
STEP 9a: Adjust the Telescope™ stem to the desired height. If you have a MicroAdjust stem adjust it to your desired riding position.
STEP 7b: Push the handlepost latch inwards until it snaps closed.
STEP 7c: Push the handlepost latch inwards until it snaps closed. Rotate the stopper hook so that it secures the post.
STEP 8c: Open the handlepost stem quick release latch and rotate the handlebar forward until it stops.
STEP 8a: Rotate the stopper hook so that it secures the post latch.
For steps 7-9, we’ve divided them up into 3 different categories for our 3 different types of handlepost. If you have an aluminum telescope handlepost, follow steps 7a, 8a, and 9a. If you have a steel telescope handlepost, follow steps 7b, 8b, and 9b. If you have a steel twist handlepost, follow steps 7c, 8c, and 9c.
STEP 8b: Rotate the stopper hook so that it secures the post latch.
STEP 9b: Adjust the Telescope™ stem to the desired height.
STEP 9c: Close the quick release.

5
STEP 10: Open the seatpost quick release lever and raise the saddle to the desired height. Close the seatpost quick release lever. Be sure not to raise the seatpost beyond the safety line marked on the seatpost.
STEP 11A: Attach or unfold the pedals. If you are attaching your pedals, please note that the right pedal should be screwed in clockwise. The left pedal should be screwed in counter-clockwise.
STEP 11B: If you are unfolding your pedals, flip the pedal into the horizontal position. Be careful not to pinch your fingers.
STEP 12: You are now ready to ride! Have fun and ride safely!
6
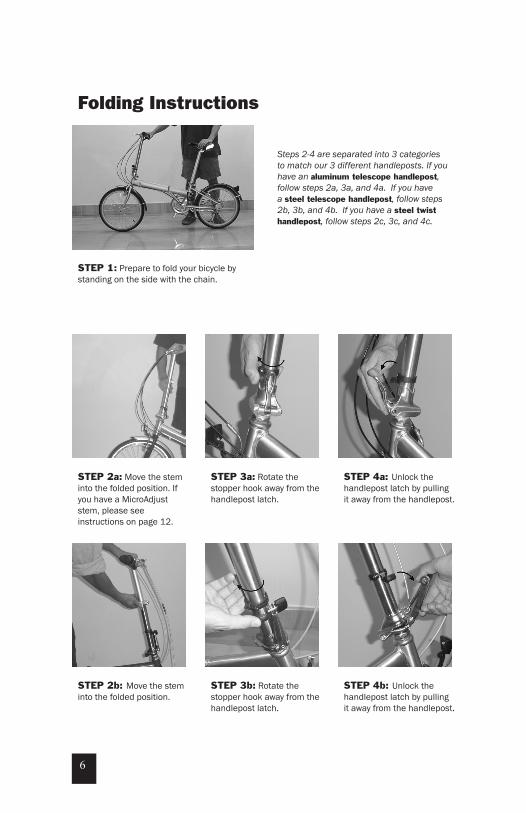
STEP 1: Prepare to fold your bicycle by standing on the side with the chain.
Folding Instructions
STEP 2a: Move the stem into the folded position. If you have a MicroAdjust stem, please see instructions on page 12.
STEP 3a: Rotate the stopper hook away from the handlepost latch.
STEP 2b: Move the stem into the folded position.
STEP 3b: Rotate the stopper hook away from the handlepost latch.
Steps 2-4 are separated into 3 categories to match our 3 different handleposts. If you have an aluminum telescope handlepost, follow steps 2a, 3a, and 4a. If you have a steel telescope handlepost, follow steps 2b, 3b, and 4b. If you have a steel twist handlepost, follow steps 2c, 3c, and 4c.
STEP 4a: Unlock the handlepost latch by pulling it away from the handlepost.
STEP 4b: Unlock the handlepost latch by pulling it away from the handlepost.

7
STEP 2c: Undo the handlepost stem quick release latch and rotate the handlebar so the brake levers are pointed straight up.
STEP 5: Swing the handlepost into the folded position: upside down and flush against the front wheel. Be sure the front wheel stays parallel to the frame. When folded properly, the handlebars should sit just below the wheel axle.
STEP 6: Open the seat post quick release. Lower the seat post. Twist the saddle 45 degrees to the left. Close the quick release.
STEP 7: Rotate the cranks so that the left crank is pointed straight forward.
STEP 8: Move the frame latch safety hook to the open position.
STEP 3c: Close the quick release.
STEP 4c: Rotate the stopper hook away from the handlepost latch. Unlock the handlepost latch by pulling it away from the handlepost.

8
STEP 9: Open the frame latch lever. STEP 10: Fold the frame in half by swinging the front half of the frame back until the two wheels are parallel.
STEP 11: If you have a bicycle equipped with the Magnetix™ latching system, the two magnets (located on the left leg of the front fork and right rear drop out) should be flush against each other. If not, check to make sure that the bike is properly folded.
Incorrect: Saddle is incorrectly positioned and is butting up against the handlepost.
STEP 12: Snap the folding pedal(s) into the folded position by pushing the pedal body inwards and rotating downwards.
STEP 13: Your bicycle is now ready for easy transportation or storage.

9
Adjusting the Frame LatchYour bicycle should arrive with the frame latch properly adjusted. However, the frame latch will need periodic adjustment to keep it functioning optimally. When properly adjusted and with the frame latch bolt properly seated, the frame latch will open and close with 5-6 kg. (11-13.2 lbs.) of force. To adjust the frame latch, take the following steps:
Warning: If you are at all unsure about how to do these adjustments yourself, bring your bike to your dealer for a professional adjustment.
STEP 1: Determine whether the latch mechanism needs to be adjusted by opening and closing the latch a few times. If the latch requires less than 5-6 kg. (11-13.2 lbs.) of force to open and close, it needs to be tightened. If the latch requires more than 5-6 kg. (11-13.2 lbs.) of force to open and close, it needs to be loosened.
STEP 2: To tighten the latch, turn the frame latch bolt clockwise into the threaded nut. To loosen the latch, turn the latch bolt counter-clockwise, backing it out of the threaded nut. Adjust in 1/8 turn increments until the latch is properly adjusted.
STEP 3: Add a drop of Loc-Tite glue to the bolt threads to prevent loosening.
STEP 4: Periodically lubricate the lever to keep it working smoothly.
Warning: Proper adjustment of the frame latch is critical for safety. If adjusted too tightly or too loosely, injury to the rider or permanent damage to the hinges may result. Please check the frame latch before every ride.

10
Your bicycle should arrive with the handlepost latch properly adjusted. However, the handlepost latch will need periodic adjustment to keep it working optimally. When properly adjusted, the handlepost latch will open and close with approximately 10 kg. (22 lbs.) of force. To adjust the handlepost latch, take the following steps:
Warning: If you are at all unsure about how to do these adjustments yourself, bring your bike to your dealer for a professional adjustment.
STEP 1: Open and close the handlepost latch a few times to determine if it needs to be adjusted.
STEP 2: To tighten the handlepost latch, turn the handlepost latch bolt counter-clockwise, backing it out of the threaded nut. To loosen the latch, turn the handlepost latch bolt clockwise. Adjust in 1/8 turn increments until the latch is properly adjusted.
STEP 3: Adjust until the handlepost latch opens and closes with 10 kg. (22 lbs.) of force.
STEP 4: Add a drop of Loc-Tite glue to the bolt threads to prevent loosening.
STEP 5: Lubricate the mechanism periodically.
Warning: Proper adjustment of the handlepost latch is critical for safety. If adjusted too tightly or too loosely, injury to the rider or permanent damage to the hinges may result. Please check the handlepost latch before every ride.
Adjusting the Steel Telescope & Twist Handlepost Latches

11
Your bicycle should arrive with the handlepost latch properly adjusted. However, the handlepost latch will need periodic adjustment to keep it working optimally. When properly adjusted, the handlepost latch will open and close with approximately 3-5 kg. (6-11 lbs.) of force. To adjust the handlepost latch, take the following steps:
Warning: If you are at all unsure about how to do these adjustments yourself, bring your bike to your dealer for a professional adjustment.
STEP 1: Open and close the handlepost latch a few times to determine if it needs to be adjusted.
STEP 2: To tighten the handlepost latch, turn the inner latch bolt counter clockwise. To loosen the latch, turn the inner latch bolt clockwise. Adjust in 1/16 turn increments.
STEP 3: Adjust until the handlepost latch opens and closes with 3-5 kg. (6-11 lbs.) of force.
STEP 4: Add a drop of Loc-Tite glue to the bolt threads to prevent loosening.
STEP 5: Lubricate the mechanism periodically.
Warning: Proper adjustment of the handlepost latch is critical for safety. If adjusted too tightly or too loosely, injury to the rider or permanent damage to the hinges may result. Please check the handlepost latch before every ride.
Adjusting the Aluminum Telescope Handlepost Latch

12
Your MicroAdjust stem allows adjustment of height, reach and angle so you can dial in the perfect riding position. Folding and unfolding your bike is a bit more complicated with the MicroAdjust stem so please carefully read the following instructions.
MicroAdjust Stem Instructions
Adjusting the Reach and AngleSTEP 1: Loosen the angle adjuster bolt.
STEP 2: Adjust the stem to the desired angle.
STEP 3: Retighten the angle adjuster bolt.
STEP 4: Slightly loosen the upper and lower stem face plate bolts.
STEP 5: Reorient the handlebars to the current stem position.
STEP 6: Retighten the upper and lower stem face plate bolts with alternating half turns.

13
STEP 1: Loosen the stem steerer bolt. STEP 2: Open the quick release on the Telescope stem.
STEP 3: Move the MicroAdjust stem up or down to the desired height.
STEP 4: Close the quick release.
STEP 5: Retighten the stem steerer bolt.
Adjusting the Height

14
Folding and Unfolding
STEP 1: Loosen the stem steerer bolt. STEP 2: Open the quick release on the Telescope handle post.
STEP 3: Slide the stem down into the Telescope handlepost.
STEP 4: Close the quick release on the Telescope handlepost.
STEP 5: Loosen the stem angle adjuster bolt.
STEP 6: Raise the stem to a 90 degree upright position.

15
STEP 7: Rotate the stopper hook away from the handlepost latch.
STEP 8: Pull outwards to open the handlepost latch.
STEP 9: Swing the handlepost into the folded position: upside down and flush against the front wheel and frame.
STEP 10: Open the handlepost quick release and pull out the stem so that the handlebars clear the bottom of the fork.
STEP 11: Close the handlepost quick release.
To unfold, simply perform the above steps in reverse.
Note: Before each ride, check to make sure the handlepost latch and stem bolts are securely tightened. If your bicycle is damaged and the handlepost latch or stem bolts do not secure properly, do not ride your bicycle. Have it serviced immediately by an authorized technician.
Warning: Before you ride, make sure that the stem steerer bolt has been completely tightened. Failure to do so could result in serious injury.