Embed Size (px)
Citation preview

Since 2003, when we first introduced our free, techQ&A service “Ask Bavarian Otto”, Otto has answeredthousands of questions submitted by BMW and MINIowners. The only downside – Otto would send hisanswer directly to the questioner: nobody else wouldbenefit. We decided it would be great to make all thatknowledge available. We are now in the process ofmaking those Q&As available to everyone by postingthem on our new blog – blog.BavAuto.com (left). As ofthis writing, several hundred Q&As have already beenposted; more are being added every week. Our goal isto create the largest, free BMW/MINI tech knowledge-base on the worldwide web.
“What’s in it for me,” you ask? The next time you’refaced with a tech task, be it diagnosing a problem orfiguring out how to do an installation yourself, just visitblog.BavAuto.com and type a word or phrase into thesearch box in the upper right. You can also click onyour car’s chassis in the left hand column (e.g. “BMW 5 series 97–03 – E39”) and see all Q&As related tothat chassis. Or click on one of the popular tags on theright hand side (e.g. “brake”) and see all Q&As relatedto that topic; the more popular a tag is, the larger itstype size. (See E23, vs. E30, vs. E46). If you don’t findwhat you need on the blog, you can always click on“Ask Bavarian Otto” (lower right) and perhaps helpother enthusiasts by contributing your own Q&A to thisever-growing, free knowledge-base.
Other cool features of the blog:• “BMW news” keeps you up to date.• Sign up for the RSS feed and receive
alerts when we post something new.• “Share this” lets you pass important
info on to other BMW/MINI owners.
Even if you don’t have a tech questionat the moment, you should go check itout by visiting blog.BavAuto.com. It’sfun, free and informative!
phone 800.535.2002 • fax 800.507.2002 • www.BavAuto.com
the newsletter of Bavarian Autosport Summer 2010
PRSRT STD U.S. POSTAGE
PAID BAVARIAN
AUTOSPORT
Bavarian Autosport275 Constitution Ave.Portsmouth, NH 03801
Have a tech question about your BMW/MINI? The answer might already be on our blog…
Our 2010 charity raffle is underway!Details can be foundon page 2…
Help us fight breastcancer and win upto $2,500 in gear!
Introducing blog.BavAuto.com 1
Komen raffle prizes expanded 2
Product Focus: Exotic floor mats 2
New aFe intake kit for 335i 2
Ask Bavarian Otto 3
Bavarian Profile: Iggy Pelletier 3
D.I.Y.: Replacing belts & pulleys 4–5
D.I.Y.: Replacing kidney grills 5
D.I.Y.: Two methods for spraypainting trim pieces 6–7
Photo contest winner 7
August specials 8
timestable of contents
© 2010 Bavarian Autosport
N310_1:N310_summer2010 7/6/10 1:42 PM Page 1

2 | shop online www.BavAuto.com Very simple installation. Relatively simple; your BMW may need to be raised.
Over the past few years, Bavarian Autosport and its generous vendor-partners have run a charity raffle in support of Susan G. Komen for theCure, an international foundation whose goal is to find a cure for breastcancer. Thus far the raffle has raised more than $20,000.
This year’s raffle tickets are now on sale, and while the price of the tickets hasremained the same ($5 for one; $20 for 5), the number of prizes has increased from13 to 21, with values ranging from $200 to a grand prize worth more than $2,500.
Prizes include: aFe cold-air intake kit and stainless steel exhaust; Billy BoatPerformance Exhaust; Bilstein shocks; Eibach Pro-Kit springs; Cool Carbon S/T brakepads; Power Programmer; Bavarian Autosport high-performance ignition wires andcoils; Infinity Basslink subwoofer kit; Bavarian Autosport Ultimate car cover; $250gasoline card; flat screen color TV and more.
All prizes are donated by Bavarian and its generous vendor-partners, with 100% ofticket sales going to Komen for the Cure. Drawings will be held at our Show & Shineevent on Sunday, October 3, 2010. You do NOT need to be present to win.
To purchase tickets, or for more information, ask your phone rep or visitwww.BavAuto.com/komen. Please join the fight!
Our “Komen for the Cure” rafflenow gives you 21 chances to win!
For more details, give us a call or visit www.BavAuto.com.
aFe cold-air intake fits BMW 335i sedans, coupesand convertibles from 2007 thru 2010.
Producing up to 14 horsepower and 27 ftlb of torque, this radically different, Stage 2 cold-air intake system is engi-neered to let the maximum amount of air in while keeping engine heat out. The innovative design features twouniquely shaped, molded intake ducts that replace the single, stock intake channel. The dual ducts smoothly directincreased air flow from two directions, improving volumetric efficiency and maximizing performance. In fact, this new design is so effective that Intake Air Temperature (IAT) at normal running speeds with this aFe system is 11 degrees lower than the factory intake. (Translation: you get more powerful combustion.)
Complementing the dual intake ducts are two Dynamic Air Scoops (D.A.S.) that, when mounted in the front grill, guide colder, outside air directly into the ducts before it has a chance to circulate under the hood and heat up. A cleanable/reusable conical air filter is enclosed in a molded plastic housing and mounted on an oval intake tube that smoothly supplies maximum air to the twin turbos. The filter is easily accessible under a satin black, powder-coated, aluminum cover. The full effect of this system cannot be felt on a stationary dyno andcan only be fully appreciated on the wide open highway. The entire system weighs just 15 lb and comes with the Dynamic Air Scoops (D.A.S.) and both a Pro5R oiled filter and a ProDryS non-oiled filter. The MSRP on this system is $1243.75 – our price is $994.95, a savings of nearly $250.
NEW! aFe cold-air intake for 335i adds 14 hp and 27 ftlb. of torque.
■ Oriental-style matsfeature a super-dense weave andpattern inspired by carpets fromAsia and the Middle East. Rubberbacking with nibs on the bottom tohold them in place. Three patternsto choose from. Normally $229.95set, they’re now just $199.95 set.
■ Coco matsoriginated inthe Pacific and
are madefrom durablecoco fibers.These updated
versions haverubber backings
to catch dirt and nibs on the bot-tom to hold them in place. Sevencolors/patterns to choose from.Normally $144.95 set, they’re nowjust $129.95 set.
Create an “exotic” interior withour coco or oriental-style mats.ex•ot•ic [ig’zätik] adjective – 1. Originating in or characteristic of adistant, foreign country; 2. Attractive or striking because colorful orout of the ordinary; 3. Certain custom-fit floor mats backed by aLifetime Warranty and on sale at Bavarian Autosport thru August 31.
N310_2_3:N310_summer2010 7/6/10 1:54 PM Page 2
3 series overheating, even after bleeding. Dear Bavarian Otto,My 1989 325i seems to overheat to a boil, even after a decent bleeding.There doesn’t seem to be water flowing through the radiator. The waterpump has been replaced and the radiator seems to be relatively clean (I did athorough vinegar soak). Also, a small tapered shaft “appeared,” left over afterreplacing the water pump – 7cm long with one end narrow-tapered to ablunt point and the other end thicker, with something like a washer with astub. Could this be a thrust shaft of some sort, perhaps for the water pump?Phil D.Otto replies:First, the pin that you have is for the timing belt tensioner. There is aspring that fits over the long end of the pin and this assembly fits betweenthe water pump housing and a tab on the timing belt tensioner bracket. Thespring provides initial tension on the belt prior to bolting down the tension-er. When the water pump was removed, the pin and spring fell out. This isnot a big issue. Just keep the pin (and the spring, if you can find it) andwhen you replace the timing belt, you can re-install it. As for the overheat-ing, jumper the harness plug for the auxiliary fan switch (in the radiator)so that the fan runs on high speed. This will help with your bleeding proce-dure. You won’t be overheating, due to no air flow, while you are trying tobleed the system. Also, make sure that the small passage in the neck of thereservoir, where the radiator vent hose connects (below the cap) is notclogged. If you can see fluid coming from the hole inside the neck it is OK.If not, remove the hose and apply a bit of air pressure to the nipple and seeif an obstruction blows through to open the passage. If the vent is not clear,you will have a large pocket of air in the top of the radiator. When bleed-ing, add fluid as you can, open the bleeder until fluid comes out, rev theengine a bit and watch the temp gauge. If the gauge gets up to the red, shutthe engine off and let it cool for a bit. Work the bleeder screw as it coolsand add fluid once the pressure is relieved in the system (via the bleeder).Keep repeating all of this until it will not take any more fluid, there is nomore air and the gauge stays steady (all with the fan on high).Phil D. replies:Thanks very much, Otto. I found the spring last night and reassembled thetensioner pin and spring. That problem is solved. I also put some radiatorflush into the radiator while it was out. I’m also planning to check the metalwater pipe at the back of the block to see if there might be some sediment inthere. Then, I’ll reassemble the radiator and do the bleeding and checks yousuggested. Thanks for a very clear answer!
call 800.535.2002 | 3Specific tools needed; repair experience recommended. Experienced technicians only.
ask “bavarian otto”from our tech team
5 series heating when it should be cooling. Dear Bavarian Otto,I recently put freon in the A/C system of my 1995 540i and it blows cold onthe driver side and hot on the passenger side. The back vent and the driversside foot vents also blow cold air. It seems like the right vents are not open-ing. There are ten stepper motors in the box controlling the flaps. It would begreat to know which motor is not working. I already tested the individualswitches on the dash and they work, so I’m thinking that one fresh air flapand one a/c flap on the right side are not working, do you know of a diagramthat charts the flow, location and where to get the new stepper motors? A lotof blogs talk about a final stage unit/resistor (FSU) on new models. Does thisE34 have one and could that be the problem?Eric.Otto replies:Your later model E34 (5 series 89 thru 96) has a dual-zone climate controlsystem. Since you said that the passenger side is hot with the A/C on, weshould check the heater/water control valve before going into any furtherdiagnostics. The heater/water control valve may have a stuck valve for thepassenger side (the valve may not be closing). Let’s manually close the flowof coolant through the heater control valve and see if the passenger sidethen gets cold. This would be an applicable “first stage” test for any modelthat is having issues with hot air when the A/C is on. Using a pair of hose-clamping pliers (or a pair of needle-nose vise-grips with multiple layers ofduct tape around both jaws or a piece of rubber tubing slipped over them sothey don’t cut the hose), clamp the inlet hose for the heater/water valveuntil it is closed. Of the three nipples on the heater/water valve, the inlet isthe one closest to the firewall. The hose on this nipple comes from the aux-iliary water pump, located below the valve assembly. If, with the hoseclamped off, the passenger side now blows cold when the A/C is on, you’llneed to replace the heater/ water valve. If the passenger side is still notcold, we’ll have to go to further diagnostics. Let me know what happens.Eric replies:You were right on, Otto – the heater control valve was the problem. Thanks!
Over 240 years of BMW/MINI experience isyours for the asking – free!If you add up all the years the enthusiasts atBavarian Autosport have been working on BMWsand MINIs – and helping people like you work ontheirs – it totals well over 240 years. That’s a
lot of knowledge under one roof. And it’s all yours,free! Have a question? Ask that savvy, BMW and MINI
enthusiast, “Bavarian Otto.” Just call 800.535.2002, e-mail [email protected] or check out his searchable
knowledge-base on our new blog – blog.BavAuto.com.
Gerard R. “Iggy” PelletierIf you’ve ordered anything from Bavarian Autosportthe last 20 years, chances are Iggy had a hand ingetting it to you. As one of the key players in ourwarehouse, Iggy has personally packed and/orshipped more than a million orders. He joined us in1990, when we were located in Newmarket, NH(Iggy’s hometown). In those early days, if we ranout of shipping boxes, Iggy would collect and “re-
cycle” empty corrugated boxes from local businesses. (“Florist boxes wereperfect for spoilers,” says Iggy. “The boxes sinks and toilets are packed inwere great, too – roomy and strong. I was friends with all the plumbers backthen.”) Prior to joining Bavarian Autosport, Iggy spent time in the U.S. AirForce in Texas, Korea and Wyoming, plus 15 years at the Portsmouth (NH)Naval Shipyard. When he’s not slapping UPS labels on boxes or doing mani-fests for international orders, Iggy loves to play golf. A lot! (He even tries toplay once a month during the winter – quite a challenge in NH.) And when heis slapping UPS labels on boxes, if there’s a Red Sox, Patriots, Celtics orBruins game on the radio, Iggy’s listening. (“Go Sox!” adds Iggy. We concur.)
Bavaria
n P
rofi
le
N310_2_3:N310_summer2010 7/6/10 1:54 PM Page 3
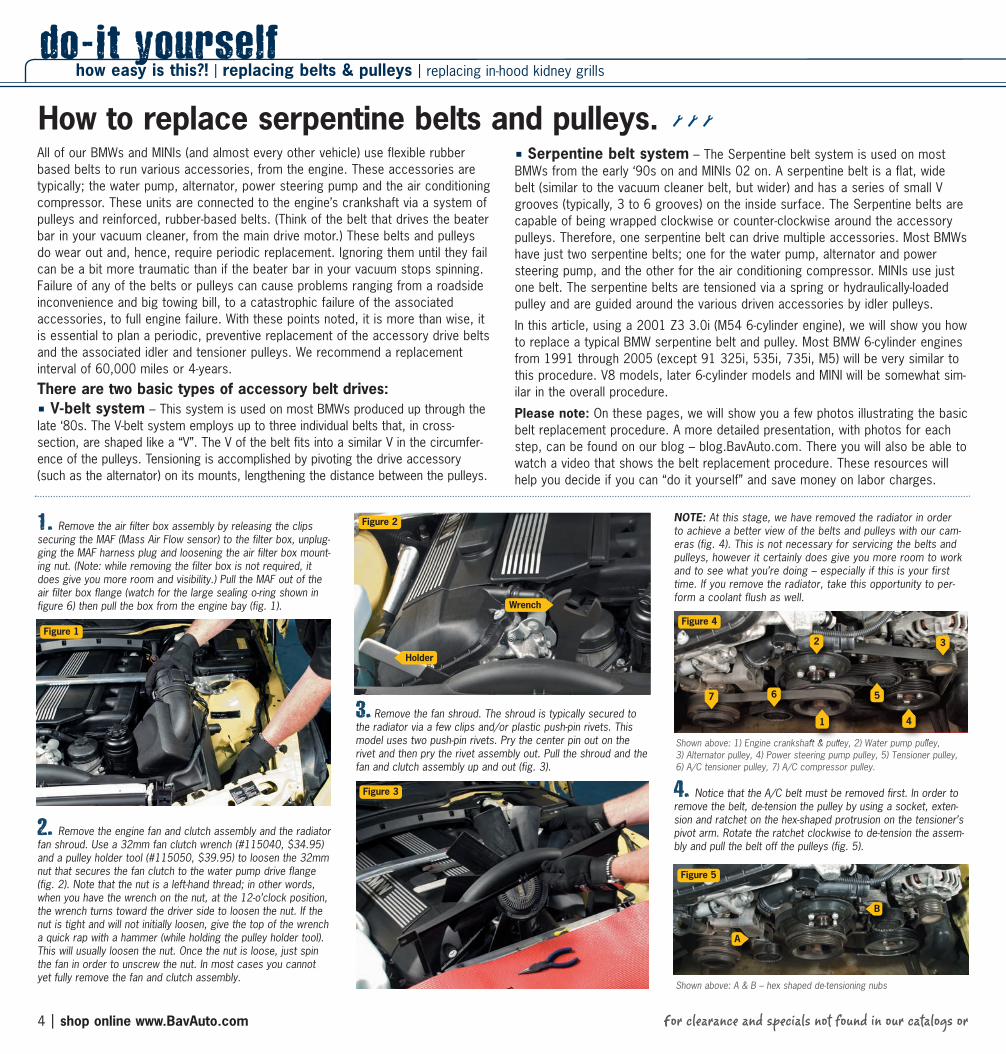
1. Remove the air filter box assembly by releasing the clipssecuring the MAF (Mass Air Flow sensor) to the filter box, unplug-ging the MAF harness plug and loosening the air filter box mount-ing nut. (Note: while removing the filter box is not required, itdoes give you more room and visibility.) Pull the MAF out of theair filter box flange (watch for the large sealing o-ring shown infigure 6) then pull the box from the engine bay (fig. 1).
2. Remove the engine fan and clutch assembly and the radiatorfan shroud. Use a 32mm fan clutch wrench (#115040, $34.95)and a pulley holder tool (#115050, $39.95) to loosen the 32mmnut that secures the fan clutch to the water pump drive flange(fig. 2). Note that the nut is a left-hand thread; in other words,when you have the wrench on the nut, at the 12-o’clock position,the wrench turns toward the driver side to loosen the nut. If thenut is tight and will not initially loosen, give the top of the wrencha quick rap with a hammer (while holding the pulley holder tool).This will usually loosen the nut. Once the nut is loose, just spinthe fan in order to unscrew the nut. In most cases you cannotyet fully remove the fan and clutch assembly.
3. Remove the fan shroud. The shroud is typically secured tothe radiator via a few clips and/or plastic push-pin rivets. Thismodel uses two push-pin rivets. Pry the center pin out on therivet and then pry the rivet assembly out. Pull the shroud and thefan and clutch assembly up and out (fig. 3).
NOTE: At this stage, we have removed the radiator in order to achieve a better view of the belts and pulleys with our cam-eras (fig. 4). This is not necessary for servicing the belts andpulleys, however it certainly does give you more room to workand to see what you’re doing – especially if this is your firsttime. If you remove the radiator, take this opportunity to per-form a coolant flush as well.
4. Notice that the A/C belt must be removed first. In order toremove the belt, de-tension the pulley by using a socket, exten-sion and ratchet on the hex-shaped protrusion on the tensioner’spivot arm. Rotate the ratchet clockwise to de-tension the assem-bly and pull the belt off the pulleys (fig. 5).
Shown above: A & B – hex shaped de-tensioning nubs
Shown above: 1) Engine crankshaft & pulley, 2) Water pump pulley, 3) Alternator pulley, 4) Power steering pump pulley, 5) Tensioner pulley,6) A/C tensioner pulley, 7) A/C compressor pulley.
For clearance and specials not found in our catalogs or 4 | shop online www.BavAuto.com
do-it yourselfHow to replace serpentine belts and pulleys.
Figure 1
Figure 3
All of our BMWs and MINIs (and almost every other vehicle) use flexible rubberbased belts to run various accessories, from the engine. These accessories aretypically; the water pump, alternator, power steering pump and the air conditioningcompressor. These units are connected to the engine’s crankshaft via a system ofpulleys and reinforced, rubber-based belts. (Think of the belt that drives the beaterbar in your vacuum cleaner, from the main drive motor.) These belts and pulleysdo wear out and, hence, require periodic replacement. Ignoring them until they failcan be a bit more traumatic than if the beater bar in your vacuum stops spinning.Failure of any of the belts or pulleys can cause problems ranging from a roadsideinconvenience and big towing bill, to a catastrophic failure of the associatedaccessories, to full engine failure. With these points noted, it is more than wise, itis essential to plan a periodic, preventive replacement of the accessory drive beltsand the associated idler and tensioner pulleys. We recommend a replacementinterval of 60,000 miles or 4-years.
There are two basic types of accessory belt drives:■ V-belt system – This system is used on most BMWs produced up through thelate ‘80s. The V-belt system employs up to three individual belts that, in cross-section, are shaped like a “V”. The V of the belt fits into a similar V in the circumfer-ence of the pulleys. Tensioning is accomplished by pivoting the drive accessory(such as the alternator) on its mounts, lengthening the distance between the pulleys.
■ Serpentine belt system – The Serpentine belt system is used on mostBMWs from the early ‘90s on and MINIs 02 on. A serpentine belt is a flat, widebelt (similar to the vacuum cleaner belt, but wider) and has a series of small Vgrooves (typically, 3 to 6 grooves) on the inside surface. The Serpentine belts arecapable of being wrapped clockwise or counter-clockwise around the accessorypulleys. Therefore, one serpentine belt can drive multiple accessories. Most BMWshave just two serpentine belts; one for the water pump, alternator and powersteering pump, and the other for the air conditioning compressor. MINIs use justone belt. The serpentine belts are tensioned via a spring or hydraulically-loadedpulley and are guided around the various driven accessories by idler pulleys.
In this article, using a 2001 Z3 3.0i (M54 6-cylinder engine), we will show you howto replace a typical BMW serpentine belt and pulley. Most BMW 6-cylinder enginesfrom 1991 through 2005 (except 91 325i, 535i, 735i, M5) will be very similar tothis procedure. V8 models, later 6-cylinder models and MINI will be somewhat sim-ilar in the overall procedure.
Please note: On these pages, we will show you a few photos illustrating the basicbelt replacement procedure. A more detailed presentation, with photos for eachstep, can be found on our blog – blog.BavAuto.com. There you will also be able towatch a video that shows the belt replacement procedure. These resources willhelp you decide if you can “do it yourself” and save money on labor charges.
Figure 2
Figure 4
1 4
7
2 3
Figure 5
A
B
56
Wrench
Holder
how easy is this?! | replacing belts & pulleys | replacing in-hood kidney grills
N310_4_5:N310_summer2010 7/6/10 1:39 PM Page 4
newsletters, visit our web site at www.BavAuto.com… call 800.535.2002 | 5
5. In a similar manner to Step 4, de-tensionthe main belt and remove the belt from the pul-leys. Before removal, note the routing of thebelt – more than one mechanic has been baf-fled by trying to install and properly route anew serpentine belt.
6. Remove the two bolts that secure themain tensioner assembly to the engine andremove the assembly. Install the new tensionerassembly. Notethat the tensionermay have a lockingpin running throughtwo eyelets in thetwo halves of thetensioner body.The pin must be removed after installing thetensioner. Use the ratchet and socket to de-tension the assembly and pull the pin out.Repeat for the A/C tensioner.NOTE: The tensioner and pulley assembliesshown in this application are of the “mechani-cal” type (e.g. they use an internal radial springto apply the tensioning force). Some applica-tions have hydraulic tensioners. Instead of theradial spring in the body of the tensioner, theseuse an external hydraulic piston (looks like ashort, fat shock absorber) to apply tension tothe pulley and belt. The de-tensioning andremoval of these units is a bit different, but theoverall idea is the same. See the Bentley repairmanual for detailed information.
7. Install the new main belt. Wrap the beltaround the various pulleys, leaving the belt offof one of the pulleys (such as the tensioner,water pump or alternator). Use the ratchet andsocket to de-tension the tensioner pulley assem-bly and slip the belt into the final position overall of the pulleys. Double check to assure thatthe belt is fully and properly seated into thegrooves of all of the pulleys.
8. Repeat for the A/C belt.
9. Install the fan assembly and shroud. Aswith the removal, these typically must be slidinto place at the same time. Thread the 32mmnut onto the water pump flange. You may findit easier to hold the fan blades and rotate thefan hand-over-hand or you may find it easier touse the 32mm wrench directly on the nut,while holding the fan. Once the nut has started
to thread, spin the fanto run the nut down.Finish by using thewrench to snug the nut.Torque of the nut is notall that important; sincethe threading is left-
hand, the clockwise engine rotation will actuallykeep the nut securely in place.
10. Slide the shroud into place and installthe securing clips or rivets. The rivets (usedhere) are pushed into place, then the centerpin is pressed in to lock the rivet in place.
11. Install the air filter box. Lubricate theMAF O-ring with silicone grease (fig. 6) orVaseline and work the box into place whileinserting the MAF into the flange on the box.Secure the MAF clips, connect the MAF har-ness plug and tighten the mounting nut.
Figure 6
“If you remove the radiator,take this opportunity to
perform a coolant flush…”
How to replace in-hood kidneygrills on many newer BMWs.Otto regularly receives questions regarding front grill replacement on various BMWmodels. The questions range from, “How do I replace my broken grill?”, to “Howcan I black out my grills?”, to “How can I upgrade my grills to mesh?” (See bluebox below.) For most BMW models, replacing the front grills is relatively easy.Here we’ll show you how to remove and replace the grills on an E46 chassis (3 series 99–05). The procedure shown here will also be applicable to the E39chassis (5 series 97–03), E38 chassis (7 series 95–01), X5 and Z3. For addition-al details and photos, visit blog.BavAuto.com. While you’re there you can alsowatch a video showing these in-hood grills being replaced.
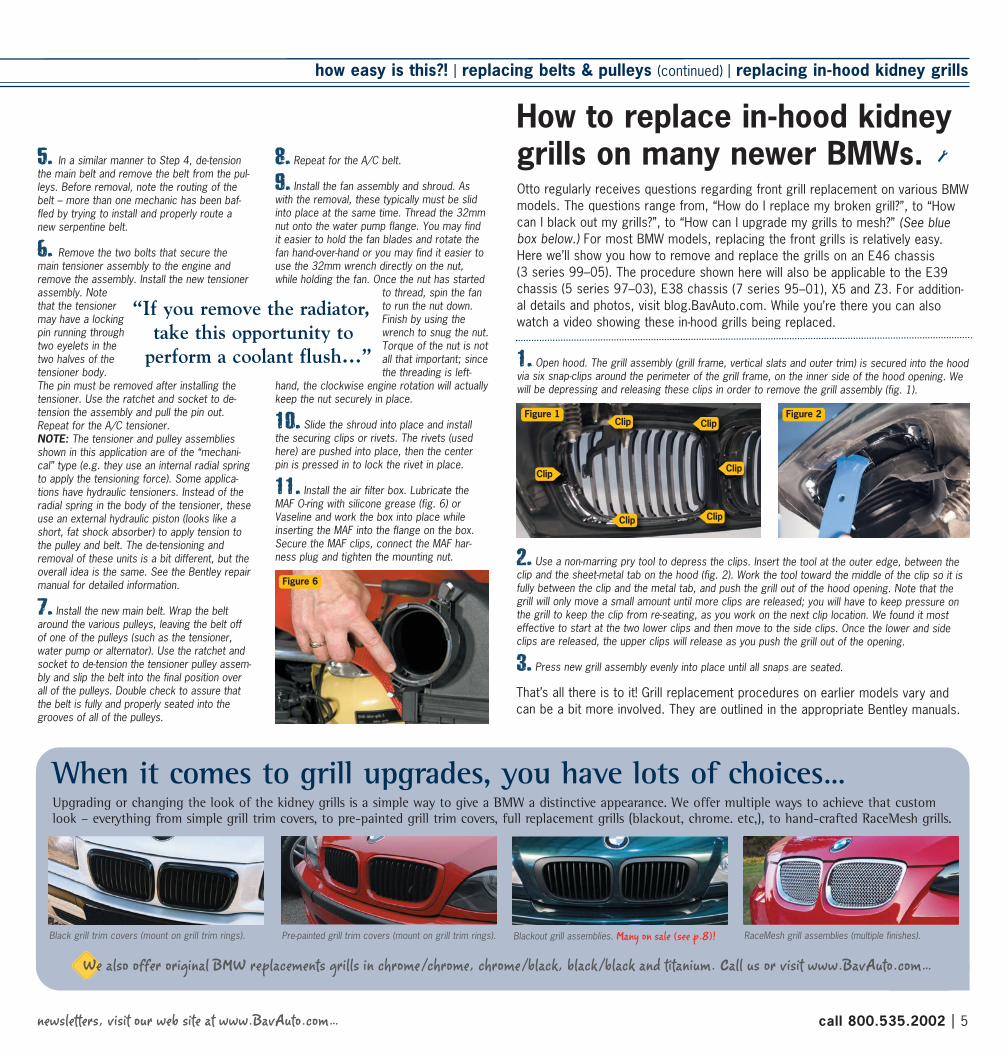
1. Open hood. The grill assembly (grill frame, vertical slats and outer trim) is secured into the hoodvia six snap-clips around the perimeter of the grill frame, on the inner side of the hood opening. Wewill be depressing and releasing these clips in order to remove the grill assembly (fig. 1).
2. Use a non-marring pry tool to depress the clips. Insert the tool at the outer edge, between theclip and the sheet-metal tab on the hood (fig. 2). Work the tool toward the middle of the clip so it isfully between the clip and the metal tab, and push the grill out of the hood opening. Note that thegrill will only move a small amount until more clips are released; you will have to keep pressure onthe grill to keep the clip from re-seating, as you work on the next clip location. We found it mosteffective to start at the two lower clips and then move to the side clips. Once the lower and sideclips are released, the upper clips will release as you push the grill out of the opening.
3. Press new grill assembly evenly into place until all snaps are seated.
That’s all there is to it! Grill replacement procedures on earlier models vary andcan be a bit more involved. They are outlined in the appropriate Bentley manuals.
Figure 1 Figure 2
Clip
Clip Clip
Clip Clip
Clip
When it comes to grill upgrades, you have lots of choices…Upgrading or changing the look of the kidney grills is a simple way to give a BMW a distinctive appearance. We offer multiple ways to achieve that customlook – everything from simple grill trim covers, to pre-painted grill trim covers, full replacement grills (blackout, chrome. etc,), to hand-crafted RaceMesh grills.
Black grill trim covers (mount on grill trim rings). Pre-painted grill trim covers (mount on grill trim rings). RaceMesh grill assemblies (multiple finishes).
We also offer original BMW replacements grills in chrome/chrome, chrome/black, black/black and titanium. Call us or visit www.BavAuto.com…
how easy is this?! | replacing belts & pulleys (continued) | replacing in-hood kidney grills
Blackout grill assemblies. Many on sale (see p.8)!
N310_4_5:N310_summer2010 7/6/10 3:14 PM Page 5
6 | shop online www.BavAuto.com Very simple installation. Relatively simple; your BMW may need to be raised.
In previous issues of Fast Times (Spring 2008 and Special Edition June 2008,available at BavAuto.com/newsletter), we showed you how to repair minor paintchips and scratches using the various touch-up paints and repair kits that we offer.[Ed. note: our Road Rash paint repair kit is on sale thru August 31 – see page 8.]We now offer high-quality spray paints in most BMW and MINI factory colors. Spraypaints are great for larger touch-up projects and for painting new parts that comeprimed or unpainted (e.g. replacement mirror covers, lip spoilers, etc.). Thesespray cans are nothing like your hardware or parts store versions: this is real auto-motive paint made by the same folks who make our popular Paint Pens. And thespray nozzle is of the highest quality, allowing you to lay the paint out almost asevenly as a pro with a spray gun. You may have to practice a bit if you do nothave spray-painting experience, but you can do a good job if you follow the propersteps and procedures. In this article we’re going to discuss two methods of spraypainting. The first is a basic, two-step process which provides acceptable resultsfor many applications: it involves some simple prep, then applying the paint. Thesecond method is a multi-step procedure that will give results rivaling the originalfactory finish; it entails prepping the part, priming (if needed), sanding, paintingand applying a final clear coat. Before we begin, here are some things to consider.
■ Preparation: For both the basic and multi-step methods you will have to fig-ure out how you are going to support the part while painting it. Some parts lendthemselves to simply laying flat on a clean surface. Other parts may require a sup-port structure or need to be hung from a hook or wire. Determine what surfacesof the part need to be painted and then figure out your support fixture. (E.g. ablock of wood that fits inside a mirror cover and holds it up off the work surface.)You want to be able to spray all of the required areas without touching the part.
■ Cleaning: (Make sure you have figured out your support structure, if needed,prior to cleaning the part so you don’t have to handle it after cleaning.) In preppingthe part, it is important to use lint-free cloths such as Sontara for final drying andcleaning. Do not handle the cleaned part with your bare hands: oils from your skin willtransfer to the part and may interfere with proper paint adhesion. Try to work in adust-free area. If you are painting a smaller part, keep it covered with a clean card-board box when you are not spraying it.
■ Spraying: Before spraying the part, practice spraying on a scrap piece or oldpart. Using gentle sweeping strokes, start the spray before hitting the part and endthe spray after going past the part. Cover the part in overlapping strokes. Do notchange your speed or stop in the middle of a stroke. Picture this as mowing the lawnin overlapping passes. These initial coats should produce a lightly misted and evencovering of paint. This will not cover the part completely with color: you will need toapply coats in multiple stages, waiting about 15 minutes in between. After 4 or 5coats, the part will be just about completely covered. At this stage, you will work onthe final coats. These last 2 or 3 coats will be applied just a bit heavier than the prior,misted coats. We want to apply the paint so it looks wet and glossy as it is sprayedon. Overlap the strokes by about 50% and point the spray angle toward the area ofthe next stroke. BE CAREFUL HERE: this is where you can get over-anxious and applytoo much paint, creating a run. Practice this until you can apply a wet, glossy outercoat without runs. Even if you have painting experience, practice with this can so thatyou will know how the sprayer and the paint work with your technique.
Now follow along as we use the two methods to paint a mirror cover for an E39 (5 series 97–03) and a complete replacement mirror for a Z3.
How to spray paint trim pieces, lip spoilers, etc.
do-it yourselfhow easy is this?! | spray painting trim pieces
Basic procedure: mirror coverSupplies:■ “Scotch Bright” pad & dish detergent (grocery/dept store)■ Würth auto-body masking tape ■ Würth part prep/cleaning fluid■ Sontara lint-free cloths On sale!■ Autovisuals spray can of factory-color paint On sale!■ Optional: Polishing compound (SmartPolish or Glacier Polish)
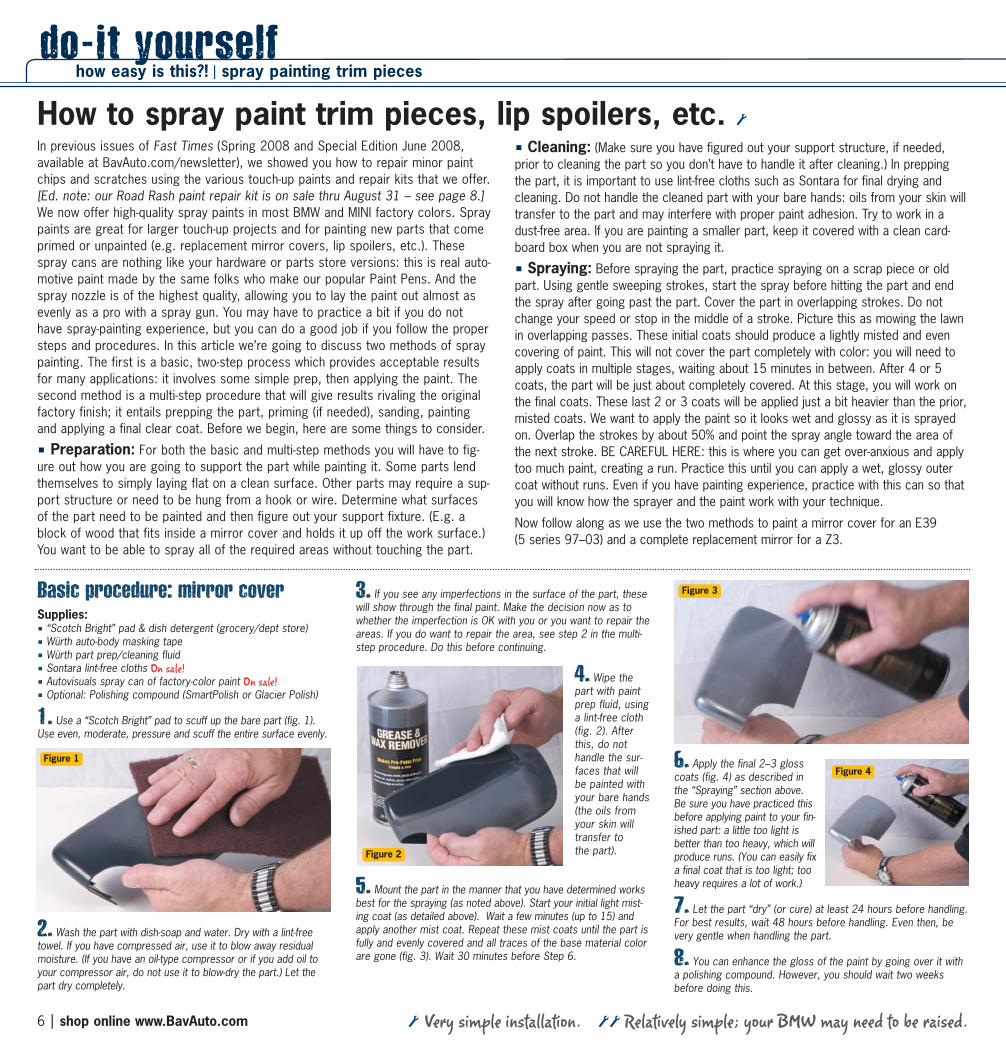
1. Use a “Scotch Bright” pad to scuff up the bare part (fig. 1).Use even, moderate, pressure and scuff the entire surface evenly.
2. Wash the part with dish-soap and water. Dry with a lint-freetowel. If you have compressed air, use it to blow away residualmoisture. (If you have an oil-type compressor or if you add oil toyour compressor air, do not use it to blow-dry the part.) Let thepart dry completely.
3. If you see any imperfections in the surface of the part, thesewill show through the final paint. Make the decision now as towhether the imperfection is OK with you or you want to repair theareas. If you do want to repair the area, see step 2 in the multi-step procedure. Do this before continuing.
4. Wipe thepart with paintprep fluid, usinga lint-free cloth(fig. 2). Afterthis, do not handle the sur-faces that willbe painted withyour bare hands(the oils fromyour skin willtransfer to the part).
5. Mount the part in the manner that you have determined worksbest for the spraying (as noted above). Start your initial light mist-ing coat (as detailed above). Wait a few minutes (up to 15) andapply another mist coat. Repeat these mist coats until the part isfully and evenly covered and all traces of the base material colorare gone (fig. 3). Wait 30 minutes before Step 6.
6. Apply the final 2–3 glosscoats (fig. 4) as described inthe “Spraying” section above.Be sure you have practiced thisbefore applying paint to your fin-ished part: a little too light isbetter than too heavy, which willproduce runs. (You can easily fixa final coat that is too light; tooheavy requires a lot of work.)
7. Let the part “dry” (or cure) at least 24 hours before handling.For best results, wait 48 hours before handling. Even then, bevery gentle when handling the part.
8. You can enhance the gloss of the paint by going over it witha polishing compound. However, you should wait two weeksbefore doing this.
Figure 2
Figure 1
Figure 3
Figure 4
N310_6_7:N310_summer2010 7/6/10 8:12 PM Page 6
Multi-step procedure: complete replacement mirrorSupplies:■ “Scotch Bright” pad & dish detergent (grocery/dept store)■ Würth auto-body masking tape ■ Würth part prep/cleaning fluid■ Sontara lint-free cloths On sale!■ Würth spray can of primer paint■ Autovisuals spray can of factory-color paint On sale!■ Autovisuals spray can of clear coat On sale!■ Polishing compound (SmartPolish or Glacier Polish)■ Würth 400, 600, 1000 & 1500 grit wet/dry emory paper
1. Follow steps 1 & 2 of the basic procedure.
2. If you see any imperfections in the surface of the part, thesewill show through the final paint. Make the decision now as towhether the imperfection is OK with you or you would like torepair the area. If you wish to repair the imperfection (such asmold casting marks in plastic parts), wet-sand with 400-gritemery paper to clean up the imperfection. Wet-sanding acts as alubricant and also flushes away the sanding particles. When wet-sanding, keep the paper and the part wet with water. As theimperfection is removed, lighten the pressure and use plenty ofwater on the emery paper. When satisfied, change to 600-gritand continue wet-sanding and feathering out the repair area intothe surrounding areas. Finish with the Scotch-Bright pad. Youshould not be able to discern any individual sanding marks fromthe original 400-grit wet sand.
3. Using a quality, auto-body masking tape, mask any areasthat are not to be painted.
4. Apply the primer spray paint using the technique described in“Spraying Technique” (previous page). Build up the light coatsuntil you have a full even coverage of the primer. Most primerswill be ready for sanding within a couple hours. If you are unsure,wait until the next day.
5. Lightly wet-sand the primer with 600-grit emery paper (fig. 5).The key word here is “lightly” – we do not want to sand theprimer off, just smooth out the surface. Wash and dry the part asyou did in step 2. Finish with the paint prep fluid.
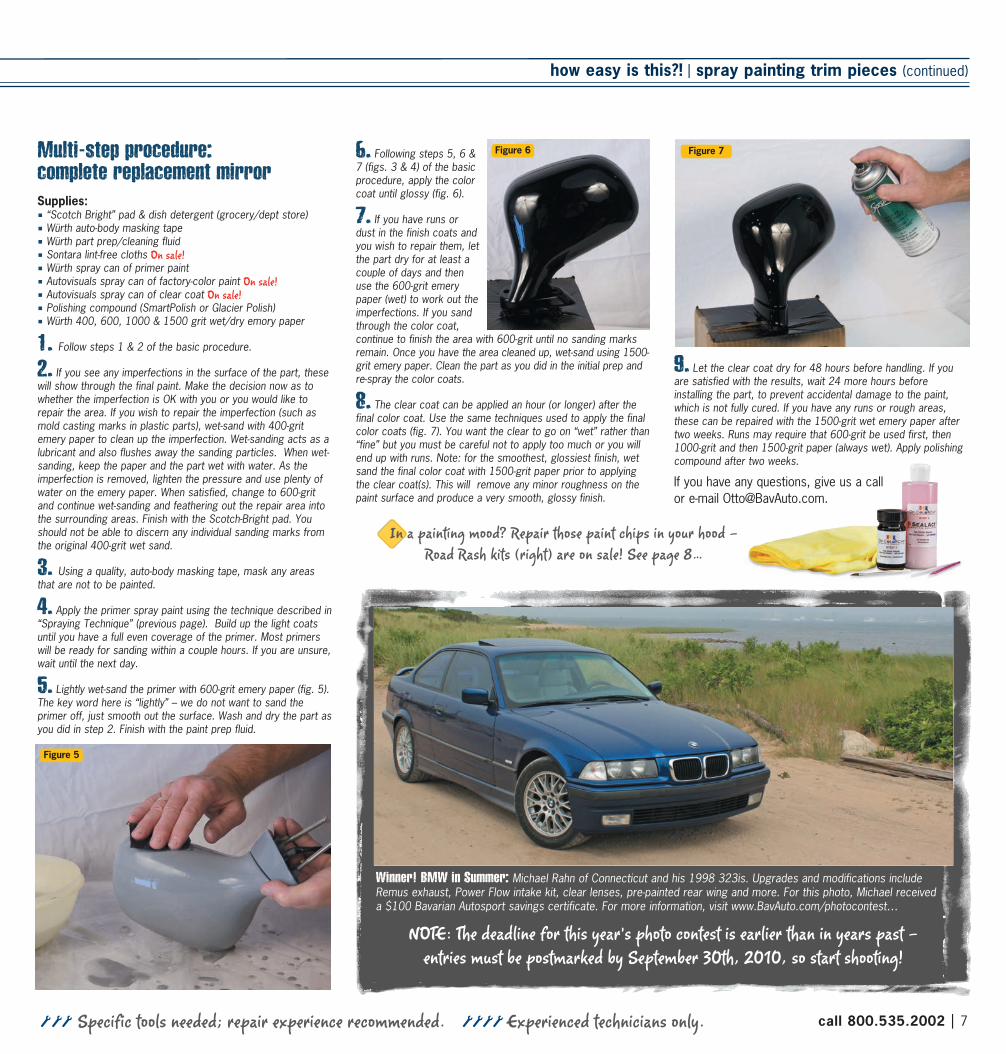
6. Following steps 5, 6 &7 (figs. 3 & 4) of the basicprocedure, apply the colorcoat until glossy (fig. 6).
7. If you have runs ordust in the finish coats andyou wish to repair them, letthe part dry for at least acouple of days and thenuse the 600-grit emerypaper (wet) to work out theimperfections. If you sandthrough the color coat,continue to finish the area with 600-grit until no sanding marksremain. Once you have the area cleaned up, wet-sand using 1500-grit emery paper. Clean the part as you did in the initial prep andre-spray the color coats.
8. The clear coat can be applied an hour (or longer) after thefinal color coat. Use the same techniques used to apply the finalcolor coats (fig. 7). You want the clear to go on “wet” rather than“fine” but you must be careful not to apply too much or you willend up with runs. Note: for the smoothest, glossiest finish, wetsand the final color coat with 1500-grit paper prior to applyingthe clear coat(s). This will remove any minor roughness on thepaint surface and produce a very smooth, glossy finish.
9. Let the clear coat dry for 48 hours before handling. If youare satisfied with the results, wait 24 more hours beforeinstalling the part, to prevent accidental damage to the paint,which is not fully cured. If you have any runs or rough areas,these can be repaired with the 1500-grit wet emery paper aftertwo weeks. Runs may require that 600-grit be used first, then1000-grit and then 1500-grit paper (always wet). Apply polishingcompound after two weeks.
If you have any questions, give us a callor e-mail [email protected].
call 800.535.2002 | 7Specific tools needed; repair experience recommended. Experienced technicians only.
Winner! BMW in Summer: Michael Rahn of Connecticut and his 1998 323is. Upgrades and modifications includeRemus exhaust, Power Flow intake kit, clear lenses, pre-painted rear wing and more. For this photo, Michael received a $100 Bavarian Autosport savings certificate. For more information, visit www.BavAuto.com/photocontest…
NOTE: The deadline for this year’s photo contest is earlier than in years past -entries must be postmarked by September 30th, 2010, so start shooting!
Figure 5
Figure 6 Figure 7
In a painting mood? Repair those paint chips in your hood -Road Rash kits (right) are on sale! See page 8…
how easy is this?! | spray painting trim pieces (continued)
N310_6_7:N310_summer2010 7/6/10 8:06 PM Page 7