Embed Size (px)
Citation preview

35010857 04/2009
3501
0857
.03
www.schneider-electric.com
CANopenHardware Setup Manual
04/2009

Schneider Electric assumes no responsibility for any errors that may appear in this document. If you have any suggestions for improvements or amendments or have found errors in this publication, please notify us.
No part of this document may be reproduced in any form or by any means, electronic or mechanical, including photocopying, without express written permission of Schneider Electric.
All pertinent state, regional, and local safety regulations must be observed when installing and using this product. For reasons of safety and to help ensure compliance with documented system data, only the manufacturer should perform repairs to components.
When devices are used for applications with technical safety requirements, the relevant instructions must be followed.
Failure to use Schneider Electric software or approved software with our hardware products may result in injury, harm, or improper operating results.
Failure to observe this information can result in injury or equipment damage.
© 2009 Schneider Electric. All rights reserved.
2 35010857 04/2009

Table of Contents
Safety Information . . . . . . . . . . . . . . . . . . . . . . . . . . . . . . 5About the Book . . . . . . . . . . . . . . . . . . . . . . . . . . . . . . . . . 7
Chapter 1 CANopen Introduction . . . . . . . . . . . . . . . . . . . . . . . . . . . 9CANopen Principles . . . . . . . . . . . . . . . . . . . . . . . . . . . . . . . . . . . . . . . . . 9
Chapter 2 CANopen Network Topologies . . . . . . . . . . . . . . . . . . . . 11General Architecture of a CANopen Network . . . . . . . . . . . . . . . . . . . . . . 12Basic Topology . . . . . . . . . . . . . . . . . . . . . . . . . . . . . . . . . . . . . . . . . . . . . 13Topology with a Repeater . . . . . . . . . . . . . . . . . . . . . . . . . . . . . . . . . . . . . 14Topology with a Bridge . . . . . . . . . . . . . . . . . . . . . . . . . . . . . . . . . . . . . . . 16Cascading of TAPs . . . . . . . . . . . . . . . . . . . . . . . . . . . . . . . . . . . . . . . . . . 17Topology with External Power Supply. . . . . . . . . . . . . . . . . . . . . . . . . . . . 18
Chapter 3 Network Design. . . . . . . . . . . . . . . . . . . . . . . . . . . . . . . . . 213.1 Installation . . . . . . . . . . . . . . . . . . . . . . . . . . . . . . . . . . . . . . . . . . . . . . . . . 22
Principles. . . . . . . . . . . . . . . . . . . . . . . . . . . . . . . . . . . . . . . . . . . . . . . . . . 23Cable Installation. . . . . . . . . . . . . . . . . . . . . . . . . . . . . . . . . . . . . . . . . . . . 24CANopen In-Cabinet Cabling . . . . . . . . . . . . . . . . . . . . . . . . . . . . . . . . . . 25
3.2 Physical Layer Limitations. . . . . . . . . . . . . . . . . . . . . . . . . . . . . . . . . . . . . 27Transmission Speed and Cable Length . . . . . . . . . . . . . . . . . . . . . . . . . . 28Drop Cable Limitations . . . . . . . . . . . . . . . . . . . . . . . . . . . . . . . . . . . . . . . 30Network with External Power Supply . . . . . . . . . . . . . . . . . . . . . . . . . . . . 32Verifications and Troubleshooting . . . . . . . . . . . . . . . . . . . . . . . . . . . . . . . 34
Chapter 4 CANopen Infrastructure Components . . . . . . . . . . . . . . 354.1 CANopen Cables. . . . . . . . . . . . . . . . . . . . . . . . . . . . . . . . . . . . . . . . . . . . 36
CANopen Cables. . . . . . . . . . . . . . . . . . . . . . . . . . . . . . . . . . . . . . . . . . . . 37Cable Types . . . . . . . . . . . . . . . . . . . . . . . . . . . . . . . . . . . . . . . . . . . . . . . 38
4.2 CANopen Cable Connectors . . . . . . . . . . . . . . . . . . . . . . . . . . . . . . . . . . . 39SUB-D 9 Cable Connectors . . . . . . . . . . . . . . . . . . . . . . . . . . . . . . . . . . . 40Open Style Cable Connectors. . . . . . . . . . . . . . . . . . . . . . . . . . . . . . . . . . 44IP67 M12 Cable Connector . . . . . . . . . . . . . . . . . . . . . . . . . . . . . . . . . . . . 46
4.3 CANopen TAPs. . . . . . . . . . . . . . . . . . . . . . . . . . . . . . . . . . . . . . . . . . . . . 48TSX CAN TDM4 . . . . . . . . . . . . . . . . . . . . . . . . . . . . . . . . . . . . . . . . . . . . 49VW3 CAN TAP2 . . . . . . . . . . . . . . . . . . . . . . . . . . . . . . . . . . . . . . . . . . . . 53
35010857 04/2009 3

4.4 CANopen - Daisy Chain Connector . . . . . . . . . . . . . . . . . . . . . . . . . . . . . 55CANopen - Daisy Chain Connector . . . . . . . . . . . . . . . . . . . . . . . . . . . . . 55
4.5 Preassembled Cord Sets . . . . . . . . . . . . . . . . . . . . . . . . . . . . . . . . . . . . . 57Preassembled Cord Sets . . . . . . . . . . . . . . . . . . . . . . . . . . . . . . . . . . . . . 57
Chapter 5 CANopen - Connectors . . . . . . . . . . . . . . . . . . . . . . . . . . . 59CANopen Device Connector Pinout. . . . . . . . . . . . . . . . . . . . . . . . . . . . . 59
Glossary . . . . . . . . . . . . . . . . . . . . . . . . . . . . . . . . . . . . . . . . . . . 63Index . . . . . . . . . . . . . . . . . . . . . . . . . . . . . . . . . . . . . . . . . . . 65
4 35010857 04/2009

§
Safety InformationImportant Information
NOTICE
Read these instructions carefully, and look at the equipment to become familiar with the device before trying to install, operate, or maintain it. The following special messages may appear throughout this documentation or on the equipment to warn of potential hazards or to call attention to information that clarifies or simplifies a procedure.
35010857 04/2009 5

PLEASE NOTE
Electrical equipment should be installed, operated, serviced, and maintained only by qualified personnel. No responsibility is assumed by Schneider Electric for any consequences arising out of the use of this material.
6 35010857 04/2009

About the Book
At a Glance
Document Scope
This manual provides basic information on CANopen networks as used by Schneider Electric. It additionally describes the CANopen infrastructure components (connectors, cables, TAPs) provided by Schneider Electric for setting up a CANopen network.
Validity Note
This documentation is valid for CANopen networks as used by Schneider Electric.
Related Documents
You can download these technical publications and other technical information from our website at www.schneider-electric.com.
User Comments
We welcome your comments about this document. You can reach us by e-mail at [email protected].
Title of Documentation Reference Number
Electromagnetic Compatibility EMC, Practical Installation Guidelines DEG999
Machines & Installations with Industrial Communications Catalog (Part 4)
MKTED207012EN
35010857 04/2009 7

8 35010857 04/2009

35010857 04/2009
1
CANopen Introduction
35010857 04/2009
CANopen Introduction
CANopen Principles
CAN
The CAN (Controller Area Network) was originally developed for onboard automobile systems, and is now used in a wide range of areas, such as:
transport, mobile equipment, medical equipment, construction,industrial control.
The strong points of the CAN system are:
its bus allocation system,its error detection capability,the reliability of its data exchanges.
CANopen
CANopen specifies the higher layer protocol and is based on CAN.
Master/Slave Structure
The CANopen network has a master/slave bus management structure and consists of 1 master and 1 or more slaves.
The master performs the following functions:
initialization of the slaves, supervision of the slaves,providing status information of the slaves.
9

CANopen Introduction
Media Access and Topology
The CAN protocol authorizes each node to start transmission of a packet when the bus is inactive. If 2 or more nodes start packet transmission at the same time, the access conflict on the bus is resolved by arbitration using the identifier included in the packet.
The sender with the highest priority identifier obtains access to the bus; the packets of other senders will be resent later on.
This arbitration uses a recessive and a dominant status on the bus, and is executed on transmission of each bit. Each sender tests the status of the bus during transmission of its bits; if a recessive bit is transmitted and the bus is in a dominant state, the sender loses place and transmission stops.
As a consequence of this, during transmission of each bit, a signal sent has the time to propagate until the farthest node, and returns to dominant state. This is why the bus has different length limitations according to the transmission rate.
CANopen at Machine and Installation Level
According to the Schneider Electric network strategy, CANopen is mainly intended for the machine and installation level.
10 35010857 04/2009

35010857 04/2009
2
Topologies, Connections with CANopen
35010857 04/2009
CANopen Network Topologies
Subject of This Chapter
This chapter describes the different types of topologies and connections possible on a CANopen bus.
What's in this Chapter?
This chapter contains the following topics:
Topic Page
General Architecture of a CANopen Network 12
Basic Topology 13
Topology with a Repeater 14
Topology with a Bridge 16
Cascading of TAPs 17
Topology with External Power Supply 18
11

Topologies, Connections with CANopen
General Architecture of a CANopen Network
Overview
The CANopen network uses a twisted pair cable to transmit the differential signals, terminated at both physical ends with 120Ω resistors (LT in the figure below). A separate ground signal is used as a common reference for the CANopen nodes.
Graphical Representation
The drawing below illustrates a general CANopen architecture:
Each Schneider Electric CANopen component allows interconnection of the following signals:
NOTE: In addition to the 3 wires noted above, some Schneider Electric cables provide this feature with a fourth wire for remote power supply to devices.
Designation Description
CAN_H CAN_H (CAN High) bus conductor
CAN_L CAN_L (CAN Low) bus conductor
CAN_GND CAN bus ground
12 35010857 04/2009

Topologies, Connections with CANopen
Basic Topology
General
The CANopen network consists of a transmission line that must be terminated at both physical ends with termination resistors.
A TAP in combination with drop cables form a partial star topology. In order to minimize reflections, keep drop cables as short as possible. The maximum length of drop cables depends on the transmission speed. For a list of the cable length allowed refer to the Maximum Cable Length table (see page 28).
Example of a Basic Topology
The diagram below provides an example of a basic topology:
35010857 04/2009 13

Topologies, Connections with CANopen
Topology with a Repeater
General
The CANopen network may be comprised of 1 or several segments, physically linked together via a CAN repeater.
Example of a Topology with Repeater
The figure below provides an example of a topology including a repeater:
Repeater Functions
A repeater:provides a refresh of the CAN signals, thus allowing more than 64 nodes.may provide isolation between the segment. Each of these segments must be terminated.is transparent, from the network point of view, because it simply forwards the CAN signals. This means that the devices connected to the bus participate in the same arbitration.does not allow to increase the total cable length. For the maximum cable lengths allowed refer to the Maximum Cable Length table (see page 28).
14 35010857 04/2009

Topologies, Connections with CANopen
Chaining the Cable
The chaining of the cable from 1 node to the next is performed via the cable connectors in 2 different ways:
by connecting 2 cables to the same cable connector. This widely used chaining technique allows to disconnect the cable connector from the device (i.e. device replacement) without disruption of the network.by connecting the 2 cables to individual cable connectors on devices that provide 2 cable connectors (node 5 in the above example). This chaining technique is used especially on high protection devices (i.e. IP67 devices) or for optimized cabling systems in the cabinet.
35010857 04/2009 15

Topologies, Connections with CANopen
Topology with a Bridge
General
A CANopen overall network can be separated into more or less independent sub-networks via a CAN bridge.
Example of a Topology with Bridge
The figure below provides an example of a topology including a bridge:
Bridge Functions
A bridge:
separates the overall CAN network into more or less independent sub-networks.provides an individual arbitration for each sub-network.provides the possibility for each sub-network to have its own transmission speed.is based on the store- and forward principle, i.e. CAN messages are received by a sub-network and are then forwarded to another sub-network.allows the use of translation and filter rules.allows a protocol adaptation to be carried out between the sub-networks.
In contrast to the CAN repeater, the CAN bridge allows to enlarge the maximum network size.
16 35010857 04/2009

Topologies, Connections with CANopen
Cascading of TAPs
General
In CANopen networks cascading of TAPs is not allowed as this would harm the transmission line characteristic.
Example of Cascaded TAPs
The figure below illustrates that cascaded TAPs are not allowed in CANopen networks:
35010857 04/2009 17

Topologies, Connections with CANopen
Topology with External Power Supply
General
To provide power to nodes of the CANopen network an external power supply can be connected to a TAP.
Example of a Network with External Power Supply
The figure below provides an example of a topology with external power supplies:
Supply TAPs
There are 2 types of power supply TAPs available:
Power Signals
Power is carried by the signals CAN_V+ and CAN_GND. Since these signals are provided on standard CAN cables, no special cables are required for power supply.
TAP Type Function Powered Nodes in the above Example
Supply Multi TAP provides the power to the drop cables 2 and 3
Supply TAP provides the power to the outgoing cable, thus providing power to the following nodes
5 and 6
18 35010857 04/2009

Topologies, Connections with CANopen
Forwarding Power through the Cable
In order to forward the power through the cable, it is required that the CAN_V+ signal is connected in the cable connector of each node, even if the respective node does not use the power itself but forwards it to a following node.
NOTE: Repeaters, bridges and RJ45 cables do not forward the CAN_V+ signal at all.
For more information on power distribution over the network see section Physical Layer Limitations (see page 27).
35010857 04/2009 19

Topologies, Connections with CANopen
20 35010857 04/2009

35010857 04/2009
3
Network Design
35010857 04/2009
Network Design
Subject of This Chapter
This chapter lists references to documents describing the rules of network design, it describes the relation between cable length and transmission speed, the limitations on drop cables as well as specifications applying to networks with external power supplies.
What's in this Chapter?
This chapter contains the following sections:
Section Topic Page
3.1 Installation 22
3.2 Physical Layer Limitations 27
21
Network Design
3.1 Installation
Overview
This section lists basic rules for CANopen networks as well as reference documents that must be considered during installation and includes precautions against EMC.
What's in this Section?
This section contains the following topics:
Topic Page
Principles 23
Cable Installation 24
CANopen In-Cabinet Cabling 25
22 35010857 04/2009

Network Design
Principles
Overview
Carefully document and record the network design with associated calculations because such documentation will be very useful when planning future changes. It will also help maintain bus performance.
Principles of Network Design
Observe the following rules when designing the CANopen bus:assign each node a unique CANopen node address,make sure that the nodes in one network have the same transmission speed,verify the length of the drops and the density of these drops,verify that the segments have a termination resistor connected at each extremity.
In any case take the design of the network into consideration and follow the technical rules described in the following sections.
35010857 04/2009 23

Network Design
Cable Installation
Overview
The CANopen bus is designed for use inside buildings located in a workshop or factory environment. As for any other industrial buses you must nonetheless follow strict rules for installation to achieve full performance of the bus.
Installation Rule References
Pay particular attention to the rules listed in the Electromagnetic Compatibility EMC, Practical Installation Guidelines (see page 7) document.
Shielding and Grounding
To limit common mode disturbances and to achieve a high level of robustness against EMC, take the following precautions:
Wire a common ground (CAN_GND) to the CANopen devices. Together with the electrical isolation this helps to ensure that the CANopen devices are on the same reference level. For devices without electrical isolation (consult the device’s user manual to find out whether it is isolated) take other measures, like a separate equipotential bonding wire, to help to ensure the same reference level.
CANopen uses shielded twisted pair cables. On each device the shield is connected to functional ground. This is for example automatically achieved via the metal housing of the SUB-D 9 cable connector.
24 35010857 04/2009

Network Design
CANopen In-Cabinet Cabling
General
Schneider Electric provides preassembled cord sets to ease the cabling of CANopen devices within a cabinet.
These cord sets, together with the daisy-chain connector, release customer from mounting connectors manually. The in-cabinet cabling is based on RJ45 connectors. If every CANopen device used in the cabinet is equipped with an RJ45 connector, the network topology is a simple daisy chain without TAPs.
Example
The figure below provides an example of a CANopen cabling within a cabinet:
1 VW3 M3 805R0102 VW3 CAN CARR033 TCSCTN023F13M034 VW3 CAN CARR015 TCSCAR013M120
CANopenmaster
LT
LT
CANopenslave
CANopenslave
CANopenslave
53
421
35010857 04/2009 25

Network Design
Infrastructure Elements
The following infrastructure elements are provided for in-cabinet cabling:
Limitations
If you use 1 of these infrastructure elements in the trunk line, the following restrictions apply:
The maximum cable length is reduced by 50% compared to a standard CANopen cable (refer to table Maximum Cable Length (see page 28) and table Maximum Cable Length vs. Number of Nodes (see page 29)).Use this in-cabinet cabling infrastructure elements only inside 1 single cabinet. To spread the CANopen network over several different cabinets, use standard CANopen cable (TSXCANCA•••, TSXCANCB•••, TSXCANCD•••) for connecting the cabinets.RJ45 connectors do not provide CAN_V+ and thus do not provide power distribution.
Catalog No. Element Type Connector Type Cable Length
VW3 CAN CARR03 preassembled cable RJ45 at both ends 0.3 m (0.98 ft)
VW3 CAN CARR01 preassembled cable RJ45 at both ends 1.0 m (3.28 ft)
VW3 M3 805R010 preassembled cable 1 RJ45 and 1 SUB-D9 with termination resistor
1.0 m (3.28 ft)
TCSCTN023F13M03 daisy-chain connector 1 RJ45 plug and 2 RJ45 sockets
–
TCSCAR013M120 – RJ45 termination resistor –
TCS CCN 4F3 M05T preassembled cable 1 RJ45 and 1 SUB-D9 with termination resistor
0.5 m (1.64 ft)
TCS CCN 4F3 M1T preassembled cable 1 RJ45 and 1 SUB-D9 1.0 m (3.28 ft)
TCS CCN 4F3 M3T preassembled cable 1 RJ45 and 1 SUB-D9 3.0 m (9.84 ft)
26 35010857 04/2009

Network Design
3.2 Physical Layer Limitations
Overview
This section lists the restrictions you must obey when setting up a CANopen network and includes a troubleshooting section to assist you in solving problems that may arise during installation.
What's in this Section?
This section contains the following topics:
Topic Page
Transmission Speed and Cable Length 28
Drop Cable Limitations 30
Network with External Power Supply 32
Verifications and Troubleshooting 34
35010857 04/2009 27

Network Design
Transmission Speed and Cable Length
At a Glance
CANopen allows 127 devices (the bus master and 126 remote slaves). Transmission speed depends strictly on the type of used cable.
In the CAN protocol frame priority is managed by collision between dominant and recessive levels of the line. This collision must be resolved during transmission of a bit, which limits the signal propagation delay between 2 nodes.
The following tables specify the maximum trunk cable length based on the CANopen cable provided by Schneider Electric (TSXCANCA•••, TSXCANCB••• and TSXCANCD•••).
Maximum Cable Length
Consequently, the maximum distance between the 2 most distant nodes of a CAN bus depends on the speed and is provided in the following table:
According to the Schneider Electric network strategy, the speeds 1 Mbit/s, 800 kbit/s, 500 kbit/s, 250 kbit/s and 125 kbit/s are recommended for automation solutions at machine and installation level.
NOTE: The maximum length assumes a reasonable device internal propagation delay and bit sampling point. Devices that present long internal propagation delays will effectively reduce the maximum cable length that could otherwise be realized.
The cable lengths of the above table may include a drop cable if it is at the physical end of the trunk cable.
Speed in bit/s Maximum Cable Length
1 Mbit/s 20 m (65 ft)
800 kbit/s 40 m (131 ft)
500 kbit/s 100 m (328 ft)
250 kbit/s 250 m (820 ft)
125 kbit/s 500 m (1640 ft)
50 kbit/s 1000 m (3280 ft)
20 kbit/s 2500 m (8202 ft)
10 kbit/s 5000 m (16404 ft)
28 35010857 04/2009

Network Design
Repeaters Reducing Cable Length
The above values specify the maximum cable length without any repeater. As repeaters add a propagation delay in the bus, this delay reduces the maximum length of the bus. A propagation delay of 5 ns leads to a length reduction of 1 m (3 ft).
Example. A repeater with a propagation delay of 150 ns reduces the maximum cable length by 30 m (98 ft).
Maximum Cable Length vs. Number of Nodes
In addition to the length limitations based on the transmission speed, the maximum cable length is also influenced by the load resistance.
In any case, the maximum number of nodes that may be connected on the same segment is restricted to 64. To connect more nodes to 1 segment, use a repeater.
The table below shows the influence by the number of nodes on the cable length:
Electrical Isolation of CANopen Devices
In documents about CANopen you will often find the value of 40 m (131 ft) maximum value at a transmission speed of 1 Mbit/s. This length is calculated without electrical isolation as used in the Schneider Electric CANopen devices.
With such electrical isolation the minimum network length calculated is 4 m (13 ft) at a transmission speed of 1 Mbit/s. However, the experience shows that 20 m (65 ft) are the practical length that could be shortened by drops or other influences.
Number of Nodes Maximum Cable Length
2 229 m (751.31 ft)
16 210 m (688.97 ft)
32 195 m (639.76 ft)
64 170 m (557.74 ft)
35010857 04/2009 29

Network Design
Drop Cable Limitations
Overview
A drop cable creates a signal reflection on the transmission line characteristic of the trunk cable. In order to limit reflections, drop cables should be as short as possible.
Maximum Drop Cable Length
Respect the values listed in the following table:
Lmax is the maximum length of 1 drop cable.
ΣLmax is the maximum value of the sum of drop cables on the same TAP.
TAP distance is the minimum distance necessary between 2 TAPs, can be calculated for each TAP (must be greater than 60% of the largest of the 2 ΣLmax).
ΣLGmax is the maximum value of the sum of drop cables on the network.
Transmission Rate
Lmax ΣLmax TAP Distance ΣLGmax
1 Mbit/s 0.3 m (0.98 ft) 0.6 m (0.98 ft) 1.5 m (4.92 ft)
800 kbit/s 3 m (9.84 ft) 6 m (19.68 ft) 3.6 m (11.81 ft) 15 m (49.21 ft)
500 kbit/s 5 m (16.4 ft) 10 m (32.8 ft) 6 m (19.68 ft) 30 m (98.42 ft)
250 kbit/s 5 m (16.4 ft) 10 m (32.8 ft) 6 m (19.68 ft) 60 m (196.84 ft)
125 kbit/s 5 m (16.4 ft) 10 m (32.8 ft) 6 m (19.68 ft) 120 m (393.69 ft)
50 kbit/s 60 m (196.84 ft) 120 m (393.69 ft) 72 m (236.21 ft) 300 m (984.24 ft)
20 kbit/s 150 m (492.12 ft)
300 m (984.24 ft) 180 m (590.54 ft) 750 m (2460.62 ft)
10 kbit/s 300 m (984.24 ft)
600 m (1968.49 ft) 360 m (1181.09 ft)
1500 m (4921.24 ft)
30 35010857 04/2009

Network Design
Calculation Example
The figure below provides an example of a TAP distance calculation with 2 junction boxes and 6 devices:
The TAP distance in the above example is calculated as follows:
Respect the TAP distance even if a device is in between.
Step Description Result
1 Calculating the sum of lengths of drop cables for each tap junction.
5 m (16 ft) and 7 m (22 ft)
2 Keeping the longest length. 7 m (22 ft)
3 Calculating the minimum cable length between the 2 TAPs.
60% of 7 m (22 ft)
35010857 04/2009 31

Network Design
Network with External Power Supply
Basic Characteristics
The rated voltage of the power supply shall be 24 V.
The sum current drawn by the powered devices from 1 power supply shall not exceed 1500 mA. This also applies to a single device.
Selecting a Power Supply
The following table lists the requirements the power supply should meet:
It is recommended to use Schneider Electric power supplies from the Phaseo product family such as ABL-7RE2402 or ABL-7CEM24••.
Standard IEC61131-2:2003, PELV or SELV
Initial tolerance 24 V +/- 3% or better (no load voltage)
Line regulation +/- 3% max
Load regulation +/- 3% max
Output ripple 200 mV p-p max
Load capacitance capability 7000 μF max
Isolation output isolated from AC and chassis ground
Minimum output voltage 19.2 V at full load
Current limit 2 A
32 35010857 04/2009

Network Design
Cable Length Limitation
Based on the amount of current, a certain voltage drop over the cable will appear. This voltage drop - and thus the cable length - needs to be limited.
The figure below illustrates the limits you must respect for the recommended cable TSXCANCA••• / TSXCANCB••• / TSXCANCD•••:
35010857 04/2009 33

Network Design
Verifications and Troubleshooting
Overview
For reliable CANopen network communications perform the verifications described in the following.
Verifying the Device Configuration
Perform the following steps to verify the configuration of your devices:
Verifying the Topology
Perform the following steps to verify the topology of your CANopen network:
Verifying the Wiring
Perform the following steps to verify the wiring only with the devices being switched off or being disconnected from the network:
To perform these measurements use a standard multimeter or, more comfortably, an installation tester, e.g. CANcheck from IXXAT.
Step Action
1 Verify that the connected devices are configured to the same transmission speed.
2 Verify that each device has a unique node address.
Step Action
1 Verify the maximum cable length versus transmission speed.
2 Verify the length of the segment and the number of nodes on the segment.
3 Verify the length of drop cables and TAP distance versus transmission speed.
Step Action
1 Verify the resistance between CAN_L and CAN_H:if R > 65 Ω the reason may be a missing termination resistor or a broken wireif R < 50 Ω the reason may be a redundant termination resistor or a short circuit between CAN signals
2 Verify that no short circuits exist between CAN_L or CAN_H signals and CAN_GND, CAN_V+ signals and the shield.
34 35010857 04/2009

35010857 04/2009
4
CANopen Infrastructure Components
35010857 04/2009
CANopen Infrastructure Components
Subject of This Chapter
This chapter describes the standard CANopen infrastructure components provided by Schneider Electric.
For a complete list of all infrastructure components available refer to the Schneider Electric CANopen Catalog (part 4 of the catalog Machines & Installations with industrial communications).
What's in this Chapter?
This chapter contains the following sections:
Section Topic Page
4.1 CANopen Cables 36
4.2 CANopen Cable Connectors 39
4.3 CANopen TAPs 48
4.4 CANopen - Daisy Chain Connector 55
4.5 Preassembled Cord Sets 57
35

CANopen Infrastructure Components
4.1 CANopen Cables
Overview
This section lists the characteristics of CANopen cables.
What's in this Section?
This section contains the following topics:
Topic Page
CANopen Cables 37
Cable Types 38
36 35010857 04/2009

CANopen Infrastructure Components
CANopen Cables
Overview
Schneider Electric provides 1 cable type that performs the following functions:
trunk drop power distribution over the network
The CANopen cable provides 2 twisted pairs. Each pair has a separate shield to reduce the disturbances from the power wires to the CANopen signal wires. Both pairs are shielded with a common tinned copper braid and an additional drain wire.
Wire Pair Characteristics
The following table lists the characteristics of the individual wire pairs of a CANopen cable:
General Cable Characteristics
The following table lists the general characteristics of CANopen cables:
Wire Characteristic Signal Color
Pair A conductor gauge: 0.34 mm2 (AWG 22) CAN_V+ red
Pair A linear resistance: 55 Ω/km CAN_GND black
Pair B conductor gauge: 0.2 mm2 (AWG 24) CAN_H white
Pair B linear resistance: 90 Ω/km CAN_L blue
Pair B characteristic impedance: 120 Ω – –
Shield tinned copper braid and drain wire
Sheath color Magenta RAL 4001
Operating temperature -10° –+80° C (14° –176° F)
Storage temperature -25° –+80° C (-13° –176° F)
Overall diameter 7.4 (0.29 in.) ± 0.2 mm (0.007 in.)
35010857 04/2009 37

CANopen Infrastructure Components
Cable Types
Available Cables
Schneider Electric provides 3 different types of cable that differ in their sheath characteristic:
TSXCANCA••• is dedicated to the European market, LSZH (low smoke zero halogen)TSXCANCB••• is dedicated to the American market, UL and CSA certified, fire retardingTSXCANCD••• is a flexible cable for severe environments, very good chemical resistance to oil and grease, LSZH and ready for mobile applications
Each cable type is available in lengths of 50 m (164 ft), 100 m (328 ft) or 300 m (984 ft).
Specific Cable Characteristics
The Schneider Electric cables have the following characteristics:
Characteristics TSXCANCA TSXCANCB TSXCANCD
Minimum curve radius - fixed applications
67 mm (2.63 in.) 67 mm (2.63 in.) 37 mm (1.45 in.)
Minimum curve radius - mobile applications
– – 74 mm (2.91 in.)
Fire retardant IEC 60332-1 IEC 60332-3 IEC 60332-1
Oil resistant – – VDE 0472 part 803B
Low smoke VDE 0207-24 – VDE 0207-24
Zero halogen EN50290-2-27 – EN50290-2-27
Track chain application
Maximum number of cycles – – 1,000,000
Maximum acceleration – – 5 m/s2 (16.4 ft/s2)
Speed – – 200 m/mn (656 ft/mn)
Alternative flection
Bending angle – – 180°
Maximum cycles – – 30,000
Maximum wheel diameter – – 200 mm (7.87 in.)
38 35010857 04/2009

CANopen Infrastructure Components
4.2 CANopen Cable Connectors
Overview
This section provides an overview of the different CANopen cable connectors.
What's in this Section?
This section contains the following topics:
Topic Page
SUB-D 9 Cable Connectors 40
Open Style Cable Connectors 44
IP67 M12 Cable Connector 46
35010857 04/2009 39

CANopen Infrastructure Components
SUB-D 9 Cable Connectors
Connector Types
Schneider Electric provides the following types of SUB-D 9 cable connectors:
Common Functions
The above mentioned connector types have the following functions in common:
connection of 1 or 2 cables on screw terminals (a wire terminal)shield interconnection of the 2 cables and the connector’s metal housingintegrated termination resistor, switchable with an ON/OFF switch
Chaining Function
The cable connectors may be used for chaining cables between CANopen devices:
Schneider Electric Cable Connector Characteristics
TSXCANKCDF90T 90° cable
TSXCANKCDF180T 180° cable
TSXCANKCDF90TP 90° leadmale connector available for temporary connection of a diagnostic tool
If... Then ...
the device is at the beginning or at the end of the network
the cable is connected on the terminal block 1 (incoming cable) and the line termination switch is ON.
the device is in the middle of the bus 2 cables are interconnected in the connector and line termination switch is OFF.
40 35010857 04/2009

CANopen Infrastructure Components
Wiring
The figure below shows the wiring of TSXCANKCDF90T, TSXCANKCDF180T and TSXCANKCDF90TP:
TSXCANKCDF180T
The figure below shows the TSXCANKCDF180T cable connector:
35010857 04/2009 41

CANopen Infrastructure Components
TSXCANKCDF90T / TSXCANKCDF90TP
The figure below shows the dimensions of the TSXCANKCDF90T / TSXCANKCDF90TP cable connector:
Connections
CAUTIONCANopen NETWORK MALFUNCTION
The CAN_V+ signal (red wire) must only be used for power distribution. The wiring connections must comply with the combinations described in the following table.
Failure to follow these instructions can result in injury or equipment damage.
42 35010857 04/2009

CANopen Infrastructure Components
When you use the Schneider Electric standard CANopen cable (TSXCANCA•••, TSXCANCB••• or TSXCANCD•••) you must comply with the wiring combinations (signal, wire color) described in the table below.
The following table shows terminal block wiring depending on the signal:
Signal Terminal Block 1, Incoming Cable
Terminal Block 2, Outgoing Cable
Wire Color
CAN_H CH1 CH2 white
CAN_L CL1 CL2 blue
CAN_GND CG1 CG2 black
CAN_V+ V+1 V+2 red
35010857 04/2009 43

CANopen Infrastructure Components
Open Style Cable Connectors
Illustration
The figure below shows the open style cable connector:
Wiring Information
CAUTIONCANopen NETWORK MALFUNCTION
The CAN_V+ signal (red wire) must only be used for power distribution. The wiring connections must comply with the combinations described in the following table.
Failure to follow these instructions can result in injury or equipment damage.
Pin Signal Connector Color Marking Wire Color Termination Resistor
1 CAN_GND black black place a 120 Ω 0.25 W 5% resistor between CAN_H and CAN_L if this is the physical end of the trunk cable
2 CAN_L blue blue
3 CAN_Shield bare tinned copper drain wire
4 CAN_H white white
5 CAN_V+ red blue
44 35010857 04/2009

CANopen Infrastructure Components
Cable Preparations
Prepare your cable for connection to an open style connector as follows:
Step Action
1 Strip the sheath from the end of the cable.
2 Remove copper braided shield thereby keeping the drain wire.
3 Wrap the end of the cable with shrink wrap.
35010857 04/2009 45

CANopen Infrastructure Components
IP67 M12 Cable Connector
Connector Types
Schneider Electric provides 2 types of IP67 M12 connectors:
Chaining
Since these connectors allow to connect only 1 cable the chaining of the cable is performed by the device. It provides specific ports for the incoming and outgoing cable.
The incoming cable is connected to the BUS IN port of the device.
The outgoing cable is connected to the BUS OUT port of the device.
Illustration
The figure below shows an IP 67 M12 cable connector:
BUS IN Connector
The figure below shows the 5-pin M12 male BUS IN connector:
BUS OUT Connector
The figure below shows the 5-pin M12 female BUS OUT connector:
male FTX CN 12M5
female FTX CN 12F5
46 35010857 04/2009

CANopen Infrastructure Components
Pin Assignment
The following table shows the pin assignments of the BUS IN and BUS OUT connector pins:
CAUTIONCANopen NETWORK MALFUNCTION
The CAN_V+ signal (red wire) must only be used for power distribution. The wiring connections must comply with the combinations described in the following table.
Failure to follow these instructions can result in injury or equipment damage.
Pin Signal Meaning
1 (CAN_SHLD) optional CAN shielding
2 (CAN_V+) optional positive power supply
3 CAN_GND 0 V
4 CAN_H CAN_H bus line
5 CAN_L CAN_L bus line
35010857 04/2009 47

CANopen Infrastructure Components
4.3 CANopen TAPs
Overview
This section provides an overview of the different CANopen TAPs.
What's in this Section?
This section contains the following topics:
Topic Page
TSX CAN TDM4 49
VW3 CAN TAP2 53
48 35010857 04/2009

CANopen Infrastructure Components
TSX CAN TDM4
Overview
The TSX CAN TDM4 TAP allows connection of 4 devices by branching the drop cable to the four male SUB-D 9 plugs.
35010857 04/2009 49

CANopen Infrastructure Components
Wiring
CAN signals (CAN_H, CAN_L, CAN_GND, and CAN_V+) from incoming and outgoing cables and the four SUB-D 9 are interconnected inside the box. Similarly, the connector shield is connected to the cable shield. Connection to the PE terminal (ground) must use the green-yellow cable.
Attachment
The TSX CAN TDM4 TAP may be screwed onto a plate or snapped on a DIN rail.
Grounding
In addition to using the DIN rail ground, the TSX CAN TDM4 may be grounded using the terminal marked PE in the box by using a short cable (cable cross-section of
2.5 mm2 (AWG13) or more).
Line Termination Switch
A line termination switch is is provided to switch a built-in termination resistor. If the line termination switch is switched OFF, the signals CAN_H and CAN_L of the outgoing cable are disconnected.
50 35010857 04/2009

CANopen Infrastructure Components
View of the TSX CAN TDM4 with line termination switch
Cable preparation template
Wiring
CAUTIONCANopen NETWORK MALFUNCTION
The CAN_V+ signal (red wire) must only be used for power distribution. The wiring connections must comply with the combinations described in the following table.
Failure to follow these instructions can result in injury or equipment damage.
35010857 04/2009 51
CANopen Infrastructure Components
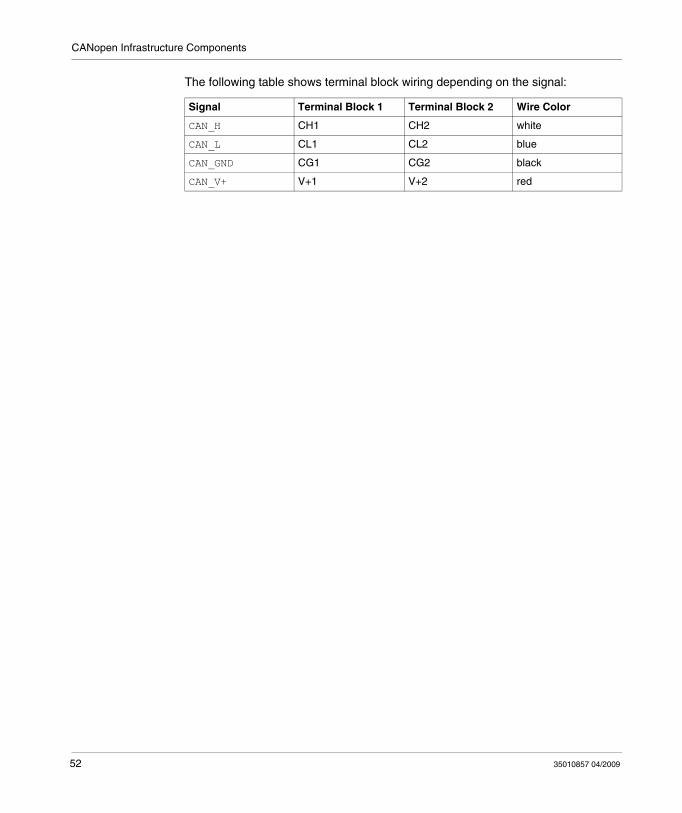
The following table shows terminal block wiring depending on the signal:
Signal Terminal Block 1 Terminal Block 2 Wire Color
CAN_H CH1 CH2 white
CAN_L CL1 CL2 blue
CAN_GND CG1 CG2 black
CAN_V+ V+1 V+2 red
52 35010857 04/2009

CANopen Infrastructure Components
VW3 CAN TAP2
Overview
The VW3 CAN TAP2 allows connection of 2 devices like ATV31, ATV71, Lexium05 by branching the drop cable to the 2 connectors S1 and S2. It additionally allows the connection of a Modbus-based tool on connector S3.
Wiring
CAN signals (CAN_H, CAN_L, and CAN_GND) from incoming and outgoing cables and the 2 RJ45 connectors (S1, S2) are interconnected inside the box. Similarly, connector shield is connected to the cable shield. Connection to the PE terminal (ground) must use the green-yellow cable.
Line Termination Switch
A line termination switch is provided to switch a built-in termination resistor.
View of the VW3 CAN TAP2 with line termination switch
35010857 04/2009 53

CANopen Infrastructure Components
Cable preparation template
1 shielding
Pin Assignment
The figure below shows an S4/S5 connector:
The following table shows pin assignment together with the color of the wire:
CAUTIONCANopen NETWORK MALFUNCTION
The V+ signal (red wire) must only be used for power distribution. The wiring connections must comply with the combinations described in the following table.
Failure to follow these instructions can result in injury or equipment damage.
Pin Signal Wire Color Description
1 GND black ground
2 CAN_L blue CAN_L bus line
3 SHLD (bare cableshield) optional shield
4 CAN_H white CAN_H bus line
5 (V+) red optional positive power supply
54 35010857 04/2009

CANopen Infrastructure Components
4.4 CANopen - Daisy Chain Connector
CANopen - Daisy Chain Connector
Overview
The TCSCTN023F13M03 provides a Y-junction for RJ45 connectors, thus allowing to daisy chain the CAN cable.
Mechanical View
The figure below shows the mechanical view of the daisy chain connector:
1 in connector2 out connector
Even though the visible cable length of this connector is 0.30 m (0.98 ft) you must consider an absolute length of 0.60 m (1.97 ft) when calculating the maximum cable length due to its electrical wiring (see figure below).
35010857 04/2009 55

CANopen Infrastructure Components
Electrical Wiring
The figure below shows the electrical wiring of the daisy chain connector:
1 CAN_H, CAN_L, CAN_GND2 CAN_H, CAN_L, CAN_GND
56 35010857 04/2009

CANopen Infrastructure Components
4.5 Preassembled Cord Sets
Preassembled Cord Sets
Overview
Schneider Electric offers several preassembled cord sets for easy CANopen cabling for IP20 and IP67 environments.
Design
Those cord sets consist of a cable with certain length and ready-mounted connectors. The CAN signals (CAN_H, CAN_L, CAN_GND, CAN_V+) and the cable shield are wired through the cables.
For a complete list of preassembled cord sets refer to the Schneider Electric CANopen catalog.
35010857 04/2009 57

CANopen Infrastructure Components
58 35010857 04/2009

35010857 04/2009
5
CANopen - Connectors
35010857 04/2009
CANopen - Connectors
CANopen Device Connector Pinout
Overview
Schneider Electric devices are equipped with the following types of CANopen connectors:
SUB-D 9open styleIP67 M12RJ45 connector
SUB-D 9 Connector
The figure below shows the male SUB-D 9 connector:
The following table shows the pin assignments of the SUB-D 9 connector:
CAUTIONCANopen NETWORK MALFUNCTION
The CAN_V+ signal (red wire) must only be used for power distribution. The wiring connections must comply with the combinations described in the following tables.
Failure to follow these instructions can result in injury or equipment damage.
Pin Signal Meaning
1 – reserved
2 CAN_L CAN_L bus line
3 CAN_GND CAN ground
59

CANopen - Connectors
Open Style Connector
The figure below shows the open style device connector:
The following table shows the pin assignments of the open style device connector:
IP67 M12 Connector
For the pinout of the IP67 M12 connector refer to IP67 M12 Connector (see page 46).
4 – reserved
5 (CAN_SHLD) optional CAN shield
6 GND ground, connection to pin 3
7 CAN_H CAN_H bus line
8 – reserved
9 (CAN_V+) optional external positive supply
Pin Signal Meaning
Pin Signal Meaning
1 CAN_GND CAN ground
2 CAN_L CAN_L bus line
3 CAN_Shield CAN_Shield
4 CAN_H CAN_H bus line
5 (CAN_V+) optional external positive supply
60 35010857 04/2009

CANopen - Connectors
RJ45 Connector
Schneider Electric provides CANopen devices with 1 RJ45 connector or with 2 RJ45 connectors.
The devices with 2 connectors allow an easy daisy chaining of the CAN, because the 2 connectors are internally connected.
For devices with 1 RJ45 connector (like ATV31, ATV71, Lexium05) the following adapters are required:
The figure below shows the RJ45 connector:
The following table shows the pin assignments of the RJ45 connector:
* These signals are provided by ATV31, ATV71, Lexium05 and VW CAN TAP2 only. Otherwise the according pins are not connected.
Catalog No. Adapter Type
VW3 CAN A71 adapting the ATV71 to SUB-D9
VW3 CAN TAP2 TAP allowing to connect 2 drop cables
TCSCTN023F13M03 daisy chain connector
Pin Signal Meaning
1 CAN_H CAN_H bus line
2 CAN_L CAN_L bus line
3 CAN_GND CAN ground
4 D1* Modbus signal
5 D0* Modbus signal
6 not connected –
7 VP* supply for RS323/RS485 converter or remote terminal
8 Common* Modbus common
35010857 04/2009 61

CANopen - Connectors
62 35010857 04/2009

Glossary
35010857 04/2009
Glossary
C
cable connectorthe part of a connector mounted on the cable. A cable connector may provide the connection of 2 cables for chaining. A cable connector may include the termination resistor.
CANController Area Network: field bus originally developed for automobile applications which is now used in many sectors, from industrial to tertiary
CANopenCANopen specifies the higher layer protocol and is based on CAN
D
drop cableunterminated derivation cord used for connection between TAP and device
L
LTLine Termination: termination of the trunk cable with 120 Ω resistor, the resistor may be integrated in the TAP or in the cable connector
35010857 04/2009 63

Glossary
T
TAPTerminal Access Point: junction box connected to the trunk cable, allows to plug some drop cables
trunk cablethe main cable terminated at both physical ends with line termination resistors.
64 35010857 04/2009

Index
35010857 04/2009
CBA
IndexAarchitecture, 12
Bbridge
architecture, 16
Ccable, 32cable characteristics, 37cable connectors
IP67 M12, 46open style, 44SUB-D 9, 40
cable types, 38cables, 24cabling
in-cabinet, 25CANopen
principles, 9connectors
pinout, 59cord sets, 57
Ddaisy chain connectors, 55device connectors, 59drop cables, 30
35010857 04/2009
Eexternal power supply, 32
Iin-cabinet cabling, 25installing
cables, 24IP67 M12 connectors, 46
MM12 connectors, 46
Oopen style connectors, 44
PPhaseo, 32pinout, 59power supplies, 32
Rrepeater
architecture, 14
65

Index
SSUB-D 9 cable connectors, 40
TTAP
architecture, 17topology, 12
basic, 13bridge, 16cascading TAPs, 17network with external power supply, 18repeater, 14
troubleshooting, 34TSX CAN TDM4, 50
VVW3 CAN TAP2, 53
66
35010857 04/2009


![DESCRIPTION OF SERIES...13 Cable Log (outgoing), December 16-31, 1943 (1)-(3) Cable Log (outgoing), January 1-15, 1944 (1)-(3) Eyes Only Cables Book I [incoming and outgoing] [Nov](https://img.pdfslide.us/doc/110x75/611d2283524f1f522108881d/description-of-series-13-cable-log-outgoing-december-16-31-1943-1-3.jpg)