Embed Size (px)
Citation preview

s
ons
nt
nd
d
Hardware Manual04.04
5. Data and SMDR
1. Installing Cabinet
3. Installing Extensiand Trunks
4. Telephones and Optional Equipme
2. PCB Installation aStartup
6. LAN Connection
7. Specifications anParts
Technical Support Web Site: http://ws1.necii.com (registration is required)

This manual has been developed by NEC Unified Solutions, Inc. It is intended for the use of its customers andservice personnel, and should be read in its entirety before attempting to install or program the system. Anycomments or suggestions for improving this manual would be appreciated. Forward your remarks to:
NEC Unified Solutions, Inc.4 Forest Parkway
Shelton, CT 06484necunifiedsolutions.com
Nothing contained in this manual shall be deemed to be, and this manual does not constitute, a warranty of, orrepresentation with respect to, any of the equipment covered. This manual is subject to change without notice andNEC Unified Solutions, Inc. has no obligation to provide any updates or corrections to this manual. Further, NECUnified Solutions, Inc. also reserves the right, without prior notice, to make changes in equipment design orcomponents as it deems appropriate. No representation is made that this manual is complete or accurate in allrespects and NEC Unified Solutions, Inc. shall not be liable for any errors or omissions. In no event shall NEC UnifiedSolutions, Inc. be liable for any incidental or consequential damages in connection with the use of this manual. Thisdocument contains proprietary information that is protected by copyright. All rights are reserved. No part of thisdocument may be photocopied or reproduced without prior written consent of NEC Unified Solutions, Inc.
©2005 by NEC Unified Solutions, Inc. All Rights Reserved.Printed in U.S.A.

Table of Contents
Table of Contents
Section 1: Installing the Cabinet . . . . . . . . . . . . . . . . . . . . . . . . . . . . . . . . . . . . . . . . . . . . . . . . . . . . . . . 1-1
GENERAL PRECAUTIONS . . . . . . . . . . . . . . . . . . . . . . . . . . . . . . . . . . . . . . . . . . . . . . . . 1-1INSTALLING THE CABINET . . . . . . . . . . . . . . . . . . . . . . . . . . . . . . . . . . . . . . . . . . . . . . 1-1
Unpacking. . . . . . . . . . . . . . . . . . . . . . . . . . . . . . . . . . . . . . . . . . . . . . . . . . . . . . . . . 1-1Before Installing . . . . . . . . . . . . . . . . . . . . . . . . . . . . . . . . . . . . . . . . . . . . . . . . . . . . 1-1Site Requirements. . . . . . . . . . . . . . . . . . . . . . . . . . . . . . . . . . . . . . . . . . . . . . . . . . . 1-2Environmental Requirements . . . . . . . . . . . . . . . . . . . . . . . . . . . . . . . . . . . . . . . . . . 1-2Removing the Front Cover (Figure 1-1). . . . . . . . . . . . . . . . . . . . . . . . . . . . . . . . . . 1-2Securing the Cabinet to the Floor (Figure 1-2 - Figure 1-4) . . . . . . . . . . . . . . . . . . 1-4Securing the Cabinet to the Wall (Figure 1-5 - Figure 1-8) . . . . . . . . . . . . . . . . . . . 1-7Securing the Cabinet to a Rack (Figure 1-9 - Figure 1-12) . . . . . . . . . . . . . . . . . . 1-10
INSTALLING THE PCBS . . . . . . . . . . . . . . . . . . . . . . . . . . . . . . . . . . . . . . . . . . . . . . . . . 1-14PCB Installation (Figure 1-13 - Figure 1-16) . . . . . . . . . . . . . . . . . . . . . . . . . . . . . 1-14
GROUNDING THE CABINETS . . . . . . . . . . . . . . . . . . . . . . . . . . . . . . . . . . . . . . . . . . . . 1-18Connecting the System Ground (Figure 1-17) . . . . . . . . . . . . . . . . . . . . . . . . . . . . 1-18
COMPLETING THE INSTALLATION . . . . . . . . . . . . . . . . . . . . . . . . . . . . . . . . . . . . . . 1-20Setting the Cable Pass-Through (Figure 1-18 - Figure 1-20). . . . . . . . . . . . . . . . . 1-20Reinstalling the Front Cover (Figure 1-21 - Figure 1-22) . . . . . . . . . . . . . . . . . . . 1-22
Section 2: PCB Installation and Startup . . . . . . . . . . . . . . . . . . . . . . . . . . . . . . . . . . . . . . . . . . . . . . . . . . 2-1
PCB LAYOUT . . . . . . . . . . . . . . . . . . . . . . . . . . . . . . . . . . . . . . . . . . . . . . . . . . . . . . . . . . . 2-1PCB Location . . . . . . . . . . . . . . . . . . . . . . . . . . . . . . . . . . . . . . . . . . . . . . . . . . . . . . 2-1
PCB INSTALLATION . . . . . . . . . . . . . . . . . . . . . . . . . . . . . . . . . . . . . . . . . . . . . . . . . . . . . 2-2Handling the PCBs . . . . . . . . . . . . . . . . . . . . . . . . . . . . . . . . . . . . . . . . . . . . . . . . . . 2-2Installing an Extension or Trunk PCB (Figure 2-2) . . . . . . . . . . . . . . . . . . . . . . . . . 2-2
To install an extension/trunk PCB: . . . . . . . . . . . . . . . . . . . . . . . . . . . . . . . 2-2Removing an Extension or Trunk PCB . . . . . . . . . . . . . . . . . . . . . . . . . . . . . . . . . . 2-4
To remove an extension/trunk PCB: . . . . . . . . . . . . . . . . . . . . . . . . . . . . . . 2-4Uninstalling a PCB Slot Through Software . . . . . . . . . . . . . . . . . . . . . . . . . . . . . . . 2-4Where to Install the PCBs . . . . . . . . . . . . . . . . . . . . . . . . . . . . . . . . . . . . . . . . . . . . 2-5Central Processing Unit (CPU) PCB (Figure 2-3) . . . . . . . . . . . . . . . . . . . . . . . . . . 2-6
Resetting the System: . . . . . . . . . . . . . . . . . . . . . . . . . . . . . . . . . . . . . . . . 2-12To Perform a Cold Start: . . . . . . . . . . . . . . . . . . . . . . . . . . . . . . . . . . . . . . 2-12To Perform a Hot Start: . . . . . . . . . . . . . . . . . . . . . . . . . . . . . . . . . . . . . . . 2-12Performing a Software Upgrade: . . . . . . . . . . . . . . . . . . . . . . . . . . . . . . . . 2-12
DSPDB Daughter Board (Figure 2-4, Figure 2-5) . . . . . . . . . . . . . . . . . . . . . . . . . 2-13To Install a DSPDB Daughter Board: . . . . . . . . . . . . . . . . . . . . . . . . . . . . 2-13To Upgrade the DSPDB Compact Flash Card: . . . . . . . . . . . . . . . . . . . . . 2-14
LAN Connection (ENTU) PCB (Figure 2-6) . . . . . . . . . . . . . . . . . . . . . . . . . . . . . 2-15Specifications. . . . . . . . . . . . . . . . . . . . . . . . . . . . . . . . . . . . . . . . . . . . . . . 2-15LED Indications. . . . . . . . . . . . . . . . . . . . . . . . . . . . . . . . . . . . . . . . . . . . . 2-15Installing the ENTU: . . . . . . . . . . . . . . . . . . . . . . . . . . . . . . . . . . . . . . . . . 2-16
Digital Station (8ESIU-S) PCB (Figure 2-7) . . . . . . . . . . . . . . . . . . . . . . . . . . . . . 2-17LED Indications. . . . . . . . . . . . . . . . . . . . . . . . . . . . . . . . . . . . . . . . . . . . . 2-17Connector Pin-Outs on ESIU. . . . . . . . . . . . . . . . . . . . . . . . . . . . . . . . . . . 2-18To install the ESIU PCB:. . . . . . . . . . . . . . . . . . . . . . . . . . . . . . . . . . . . . . 2-19
Aspire S Hardware Manual Table of Contents ◆ i

Table of Contents
Analog Station (4SLIU-S) PCB (Figure 2-8) . . . . . . . . . . . . . . . . . . . . . . . . . . . . . 2-20LED Indications. . . . . . . . . . . . . . . . . . . . . . . . . . . . . . . . . . . . . . . . . . . . . 2-20Connector Pin-Outs on 4SLIU-S . . . . . . . . . . . . . . . . . . . . . . . . . . . . . . . . 2-20Installing an 4SLIU-S PCB: . . . . . . . . . . . . . . . . . . . . . . . . . . . . . . . . . . . 2-21
Analog Station (4SLIDB-S) Daughter Board (Figure 2-9 - Figure 2-10) . . . . . . . 2-22LED Indications. . . . . . . . . . . . . . . . . . . . . . . . . . . . . . . . . . . . . . . . . . . . . 2-22Connector Pin-Outs on 4SLIDB-S . . . . . . . . . . . . . . . . . . . . . . . . . . . . . . 2-22Installing an 4SLIDB-S Daughter Board: . . . . . . . . . . . . . . . . . . . . . . . . . 2-23
Analog Trunk (4COIU-S) PCB (Figure 2-11) . . . . . . . . . . . . . . . . . . . . . . . . . . . . 2-24LED Indications. . . . . . . . . . . . . . . . . . . . . . . . . . . . . . . . . . . . . . . . . . . . . 2-24Connector Pin-Outs on COIU-S PCB . . . . . . . . . . . . . . . . . . . . . . . . . . . . 2-25Installing the Analog Trunk PCB: . . . . . . . . . . . . . . . . . . . . . . . . . . . . . . . 2-26
Direct Inward Dial (DID) (2DIOPU-S) PCB (Figure 2-12). . . . . . . . . . . . . . . . . . 2-27LED Indications. . . . . . . . . . . . . . . . . . . . . . . . . . . . . . . . . . . . . . . . . . . . . 2-28Connector Pin-Outs on DIOPU-S PCB . . . . . . . . . . . . . . . . . . . . . . . . . . . 2-28Installing the Direct Inward Dial PCB: . . . . . . . . . . . . . . . . . . . . . . . . . . . 2-28
BRI (2BRIU-S) Interface PCB (Figure 2-13) . . . . . . . . . . . . . . . . . . . . . . . . . . . . 2-29LED Indications. . . . . . . . . . . . . . . . . . . . . . . . . . . . . . . . . . . . . . . . . . . . . 2-30Connector Pin-Outs on BRIU-S PCB . . . . . . . . . . . . . . . . . . . . . . . . . . . . 2-30To install a BRI Interface PCB:. . . . . . . . . . . . . . . . . . . . . . . . . . . . . . . . . 2-31
Voice Mail - IntraMail (Figure 2-14) . . . . . . . . . . . . . . . . . . . . . . . . . . . . . . . . . . . 2-32Installing an IntraMail Compact Flash Card: . . . . . . . . . . . . . . . . . . . . . . 2-33
VoIP (VOIPU-S) PCB (Figure 2-15) . . . . . . . . . . . . . . . . . . . . . . . . . . . . . . . . . . . 2-34LED Indications. . . . . . . . . . . . . . . . . . . . . . . . . . . . . . . . . . . . . . . . . . . . . 2-35Connector Pin-Outs on VOIPU-S PCB . . . . . . . . . . . . . . . . . . . . . . . . . . . 2-36Installing the VoIP PCB: . . . . . . . . . . . . . . . . . . . . . . . . . . . . . . . . . . . . . . 2-37Upgrading Your VOIPU-S Firmware . . . . . . . . . . . . . . . . . . . . . . . . . . . . 2-38
VoIP (VOIPDB-S) Daughter Board (Figure 2-16) . . . . . . . . . . . . . . . . . . . . . . . . 2-39Installing an VOIPDB-S Daughter Board: . . . . . . . . . . . . . . . . . . . . . . . . 2-39
SYSTEM STARTUP. . . . . . . . . . . . . . . . . . . . . . . . . . . . . . . . . . . . . . . . . . . . . . . . . . . . . . 2-40System Startup . . . . . . . . . . . . . . . . . . . . . . . . . . . . . . . . . . . . . . . . . . . . . . . . . . . . 2-40Powering Up the System . . . . . . . . . . . . . . . . . . . . . . . . . . . . . . . . . . . . . . . . . . . . 2-40
PCB STARTUP. . . . . . . . . . . . . . . . . . . . . . . . . . . . . . . . . . . . . . . . . . . . . . . . . . . . . . . . . . 2-41Initial PCB Installation . . . . . . . . . . . . . . . . . . . . . . . . . . . . . . . . . . . . . . . . . . . . . . 2-41Initial Programming (Figure 2-17) . . . . . . . . . . . . . . . . . . . . . . . . . . . . . . . . . . . . . 2-42
Entering the Programming Mode . . . . . . . . . . . . . . . . . . . . . . . . . . . . . . . 2-42Port Defaults . . . . . . . . . . . . . . . . . . . . . . . . . . . . . . . . . . . . . . . . . . . . . . . 2-42
Making Test Calls. . . . . . . . . . . . . . . . . . . . . . . . . . . . . . . . . . . . . . . . . . . . . . . . . . 2-42Setting Up Extension Circuit Types . . . . . . . . . . . . . . . . . . . . . . . . . . . . . . . . . . . . 2-43Saving Your Configuration . . . . . . . . . . . . . . . . . . . . . . . . . . . . . . . . . . . . . . . . . . 2-44Backing Up/Restoring a Database . . . . . . . . . . . . . . . . . . . . . . . . . . . . . . . . . . . . . 2-44Using Flash Cards for System Software. . . . . . . . . . . . . . . . . . . . . . . . . . . . . . . . . 2-45
Using a Compressed File for System Upgrades . . . . . . . . . . . . . . . . . . . . 2-45Upgrading Software. . . . . . . . . . . . . . . . . . . . . . . . . . . . . . . . . . . . . . . . . . 2-46Upgrading Software From Version 2.0x, 2.1x, or 2.2x to 2.50 or Higher. 2-47
Identifying Port Location . . . . . . . . . . . . . . . . . . . . . . . . . . . . . . . . . . . . . . . . . . . . 2-49
ii ◆ Table of Contents Aspire S Hardware Manual
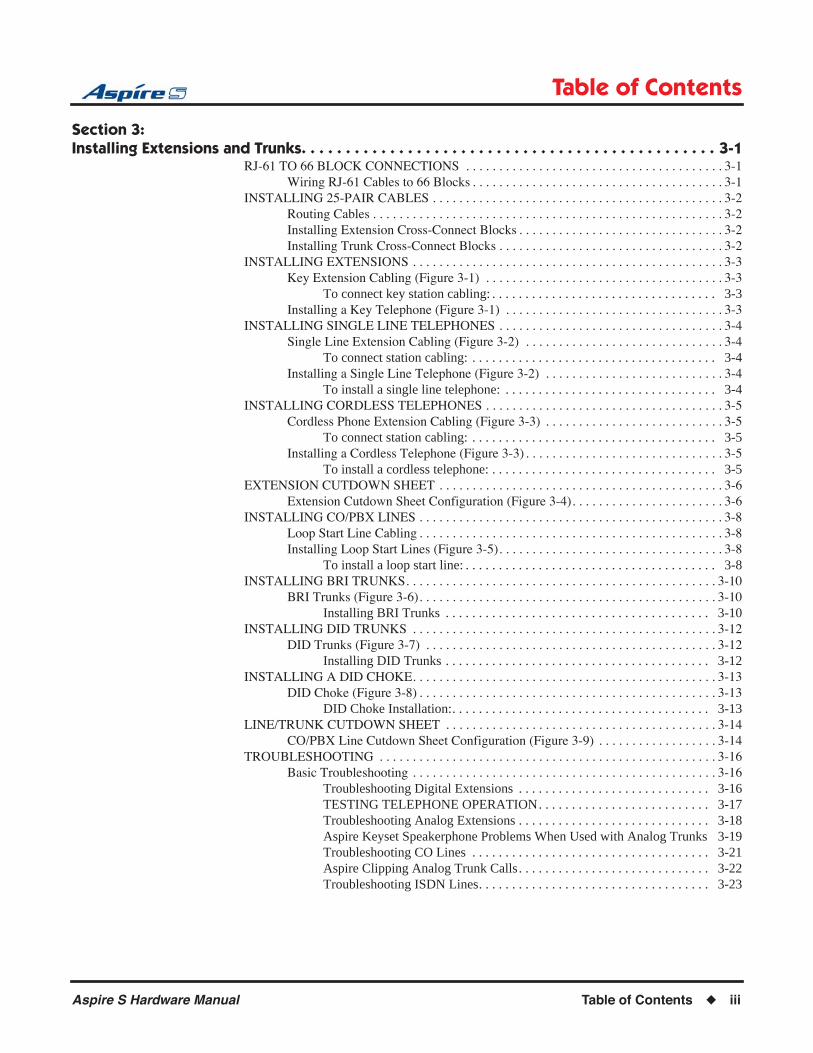
Table of Contents
Section 3: Installing Extensions and Trunks. . . . . . . . . . . . . . . . . . . . . . . . . . . . . . . . . . . . . . . . . . . . . . . 3-1
RJ-61 TO 66 BLOCK CONNECTIONS . . . . . . . . . . . . . . . . . . . . . . . . . . . . . . . . . . . . . . . 3-1Wiring RJ-61 Cables to 66 Blocks . . . . . . . . . . . . . . . . . . . . . . . . . . . . . . . . . . . . . . 3-1
INSTALLING 25-PAIR CABLES . . . . . . . . . . . . . . . . . . . . . . . . . . . . . . . . . . . . . . . . . . . . 3-2Routing Cables . . . . . . . . . . . . . . . . . . . . . . . . . . . . . . . . . . . . . . . . . . . . . . . . . . . . . 3-2Installing Extension Cross-Connect Blocks . . . . . . . . . . . . . . . . . . . . . . . . . . . . . . . 3-2Installing Trunk Cross-Connect Blocks . . . . . . . . . . . . . . . . . . . . . . . . . . . . . . . . . . 3-2
INSTALLING EXTENSIONS . . . . . . . . . . . . . . . . . . . . . . . . . . . . . . . . . . . . . . . . . . . . . . . 3-3Key Extension Cabling (Figure 3-1) . . . . . . . . . . . . . . . . . . . . . . . . . . . . . . . . . . . . 3-3
To connect key station cabling: . . . . . . . . . . . . . . . . . . . . . . . . . . . . . . . . . . 3-3Installing a Key Telephone (Figure 3-1) . . . . . . . . . . . . . . . . . . . . . . . . . . . . . . . . . 3-3
INSTALLING SINGLE LINE TELEPHONES . . . . . . . . . . . . . . . . . . . . . . . . . . . . . . . . . . 3-4Single Line Extension Cabling (Figure 3-2) . . . . . . . . . . . . . . . . . . . . . . . . . . . . . . 3-4
To connect station cabling: . . . . . . . . . . . . . . . . . . . . . . . . . . . . . . . . . . . . . 3-4Installing a Single Line Telephone (Figure 3-2) . . . . . . . . . . . . . . . . . . . . . . . . . . . 3-4
To install a single line telephone: . . . . . . . . . . . . . . . . . . . . . . . . . . . . . . . . 3-4INSTALLING CORDLESS TELEPHONES . . . . . . . . . . . . . . . . . . . . . . . . . . . . . . . . . . . . 3-5
Cordless Phone Extension Cabling (Figure 3-3) . . . . . . . . . . . . . . . . . . . . . . . . . . . 3-5To connect station cabling: . . . . . . . . . . . . . . . . . . . . . . . . . . . . . . . . . . . . . 3-5
Installing a Cordless Telephone (Figure 3-3) . . . . . . . . . . . . . . . . . . . . . . . . . . . . . . 3-5To install a cordless telephone: . . . . . . . . . . . . . . . . . . . . . . . . . . . . . . . . . . 3-5
EXTENSION CUTDOWN SHEET . . . . . . . . . . . . . . . . . . . . . . . . . . . . . . . . . . . . . . . . . . . 3-6Extension Cutdown Sheet Configuration (Figure 3-4). . . . . . . . . . . . . . . . . . . . . . . 3-6
INSTALLING CO/PBX LINES . . . . . . . . . . . . . . . . . . . . . . . . . . . . . . . . . . . . . . . . . . . . . . 3-8Loop Start Line Cabling . . . . . . . . . . . . . . . . . . . . . . . . . . . . . . . . . . . . . . . . . . . . . . 3-8Installing Loop Start Lines (Figure 3-5). . . . . . . . . . . . . . . . . . . . . . . . . . . . . . . . . . 3-8
To install a loop start line: . . . . . . . . . . . . . . . . . . . . . . . . . . . . . . . . . . . . . . 3-8INSTALLING BRI TRUNKS. . . . . . . . . . . . . . . . . . . . . . . . . . . . . . . . . . . . . . . . . . . . . . . 3-10
BRI Trunks (Figure 3-6). . . . . . . . . . . . . . . . . . . . . . . . . . . . . . . . . . . . . . . . . . . . . 3-10Installing BRI Trunks . . . . . . . . . . . . . . . . . . . . . . . . . . . . . . . . . . . . . . . . 3-10
INSTALLING DID TRUNKS . . . . . . . . . . . . . . . . . . . . . . . . . . . . . . . . . . . . . . . . . . . . . . 3-12DID Trunks (Figure 3-7) . . . . . . . . . . . . . . . . . . . . . . . . . . . . . . . . . . . . . . . . . . . . 3-12
Installing DID Trunks . . . . . . . . . . . . . . . . . . . . . . . . . . . . . . . . . . . . . . . . 3-12INSTALLING A DID CHOKE. . . . . . . . . . . . . . . . . . . . . . . . . . . . . . . . . . . . . . . . . . . . . . 3-13
DID Choke (Figure 3-8) . . . . . . . . . . . . . . . . . . . . . . . . . . . . . . . . . . . . . . . . . . . . . 3-13DID Choke Installation:. . . . . . . . . . . . . . . . . . . . . . . . . . . . . . . . . . . . . . . 3-13
LINE/TRUNK CUTDOWN SHEET . . . . . . . . . . . . . . . . . . . . . . . . . . . . . . . . . . . . . . . . . 3-14CO/PBX Line Cutdown Sheet Configuration (Figure 3-9) . . . . . . . . . . . . . . . . . . 3-14
TROUBLESHOOTING . . . . . . . . . . . . . . . . . . . . . . . . . . . . . . . . . . . . . . . . . . . . . . . . . . . 3-16Basic Troubleshooting . . . . . . . . . . . . . . . . . . . . . . . . . . . . . . . . . . . . . . . . . . . . . . 3-16
Troubleshooting Digital Extensions . . . . . . . . . . . . . . . . . . . . . . . . . . . . . 3-16TESTING TELEPHONE OPERATION. . . . . . . . . . . . . . . . . . . . . . . . . . 3-17Troubleshooting Analog Extensions . . . . . . . . . . . . . . . . . . . . . . . . . . . . . 3-18Aspire Keyset Speakerphone Problems When Used with Analog Trunks 3-19Troubleshooting CO Lines . . . . . . . . . . . . . . . . . . . . . . . . . . . . . . . . . . . . 3-21Aspire Clipping Analog Trunk Calls. . . . . . . . . . . . . . . . . . . . . . . . . . . . . 3-22Troubleshooting ISDN Lines. . . . . . . . . . . . . . . . . . . . . . . . . . . . . . . . . . . 3-23
Aspire S Hardware Manual Table of Contents ◆ iii
Table of Contents
Section 4:Telephones and Optional Equipment. . . . . . . . . . . . . . . . . . . . . . . . . . . . . . . . . . . . . . . . . . . 4-1
2PGDAD MODULE . . . . . . . . . . . . . . . . . . . . . . . . . . . . . . . . . . . . . . . . . . . . . . . . . . . . . . . 4-1Using a 2PGDAD Module (Figure 4-1 - Figure 4-8) . . . . . . . . . . . . . . . . . . . . . . . . 4-1LED Indications . . . . . . . . . . . . . . . . . . . . . . . . . . . . . . . . . . . . . . . . . . . . . . . . . . . . 4-2Setting Up 2PGDAD Module Connections . . . . . . . . . . . . . . . . . . . . . . . . . . . . . . . 4-2
BACKGROUND MUSIC . . . . . . . . . . . . . . . . . . . . . . . . . . . . . . . . . . . . . . . . . . . . . . . . . . . 4-7Installing Background Music (Figure 4-9) . . . . . . . . . . . . . . . . . . . . . . . . . . . . . . . . 4-7
DOOR BOX . . . . . . . . . . . . . . . . . . . . . . . . . . . . . . . . . . . . . . . . . . . . . . . . . . . . . . . . . . . . . 4-8Installing a Door Box (Figure 4-10, Figure 4-11) . . . . . . . . . . . . . . . . . . . . . . . . . . 4-8
DSS CONSOLE . . . . . . . . . . . . . . . . . . . . . . . . . . . . . . . . . . . . . . . . . . . . . . . . . . . . . . . . . 4-11Using a DSS Console (Figure 4-12 - Figure 4-14). . . . . . . . . . . . . . . . . . . . . . . . . 4-11
Installing a 110-Button DSS Console . . . . . . . . . . . . . . . . . . . . . . . . . . . . 4-12Installing a 24-Button DLS Console . . . . . . . . . . . . . . . . . . . . . . . . . . . . . 4-13
DTERM VOICE SECURITY RECORDER (VSR) . . . . . . . . . . . . . . . . . . . . . . . . . . . . . . 4-14Dterm Voice Security Recorder (VSR) . . . . . . . . . . . . . . . . . . . . . . . . . . . . . . . . . 4-14
EXTERNAL PAGING . . . . . . . . . . . . . . . . . . . . . . . . . . . . . . . . . . . . . . . . . . . . . . . . . . . . 4-18External Page (Figure 4-15, Figure 4-55) . . . . . . . . . . . . . . . . . . . . . . . . . . . . . . . 4-18
Installing an External Page System . . . . . . . . . . . . . . . . . . . . . . . . . . . . . . 4-18EXTERNAL RECORDING SYSTEM / EXTERNAL RINGER. . . . . . . . . . . . . . . . . . . . 4-20
External Recording System or External Ringer (Figure 4-16) . . . . . . . . . . . . . . . . 4-20Installing an External Recording System or External Ringer . . . . . . . . . . 4-20Programming . . . . . . . . . . . . . . . . . . . . . . . . . . . . . . . . . . . . . . . . . . . . . . . 4-21
HEADSETS. . . . . . . . . . . . . . . . . . . . . . . . . . . . . . . . . . . . . . . . . . . . . . . . . . . . . . . . . . . . . 4-23Connecting a Headset . . . . . . . . . . . . . . . . . . . . . . . . . . . . . . . . . . . . . . . . . . . . . . . 4-23
IN-LINE POWER ADAPTER (ILPA-R) . . . . . . . . . . . . . . . . . . . . . . . . . . . . . . . . . . . . . . 4-24Using the In-Line Power Adapter (Figure 4-17) . . . . . . . . . . . . . . . . . . . . . . . . . . 4-24
Conditions . . . . . . . . . . . . . . . . . . . . . . . . . . . . . . . . . . . . . . . . . . . . . . . . . 4-24Installation . . . . . . . . . . . . . . . . . . . . . . . . . . . . . . . . . . . . . . . . . . . . . . . . . 4-25
KEYSET LABELING. . . . . . . . . . . . . . . . . . . . . . . . . . . . . . . . . . . . . . . . . . . . . . . . . . . . . 4-26Labeling Your Phone (Figure 4-18) . . . . . . . . . . . . . . . . . . . . . . . . . . . . . . . . . . . . 4-26
Removing the Faceplate: . . . . . . . . . . . . . . . . . . . . . . . . . . . . . . . . . . . . . . 4-26Replacing the Faceplate: . . . . . . . . . . . . . . . . . . . . . . . . . . . . . . . . . . . . . . 4-26
MUSIC SOURCES . . . . . . . . . . . . . . . . . . . . . . . . . . . . . . . . . . . . . . . . . . . . . . . . . . . . . . . 4-27Music on Hold (Figure 4-19, Figure 4-20) . . . . . . . . . . . . . . . . . . . . . . . . . . . . . . . 4-27
Installing External Music on Hold. . . . . . . . . . . . . . . . . . . . . . . . . . . . . . . 4-27PHONE ADAPTERS . . . . . . . . . . . . . . . . . . . . . . . . . . . . . . . . . . . . . . . . . . . . . . . . . . . . . 4-29
Using Adapters (Figure 4-21). . . . . . . . . . . . . . . . . . . . . . . . . . . . . . . . . . . . . . . . . 4-29Removing the Adapter Cover (Figure 4-22) . . . . . . . . . . . . . . . . . . . . . . . . . . . . . 4-30Data Communication and Hardware Compatibility . . . . . . . . . . . . . . . . . . . . . . . . 4-31ADA Adapter (Figure 4-23 - Figure 4-30) . . . . . . . . . . . . . . . . . . . . . . . . . . . . . . . 4-32
Installing the ADA Adapter: . . . . . . . . . . . . . . . . . . . . . . . . . . . . . . . . . . . 4-32ADA2 Adapter (Figure 4-31 - Figure 4-38) . . . . . . . . . . . . . . . . . . . . . . . . . . . . . . 4-35
Installing the ADA2 Adapter: . . . . . . . . . . . . . . . . . . . . . . . . . . . . . . . . . . 4-35APA and APR Adapters (Figure 4-39 - Figure 4-40). . . . . . . . . . . . . . . . . . . . . . . 4-38
Installing the APA or APR Adapter: . . . . . . . . . . . . . . . . . . . . . . . . . . . . . 4-38CTA Adapter (Figure 4-39 - Figure 4-40) . . . . . . . . . . . . . . . . . . . . . . . . . . . . . . . 4-41
Installing the CTA Adapter: . . . . . . . . . . . . . . . . . . . . . . . . . . . . . . . . . . . 4-41CTU Adapter (Figure 4-43 - Figure 4-45) . . . . . . . . . . . . . . . . . . . . . . . . . . . . . . . 4-44
Installing the CTU Adapter: . . . . . . . . . . . . . . . . . . . . . . . . . . . . . . . . . . . 4-44
iv ◆ Table of Contents Aspire S Hardware Manual

Table of Contents
PSA-R Adapter (Figure 4-46 - Figure 4-47) . . . . . . . . . . . . . . . . . . . . . . . . . . . . . 4-47Installing the PSA-R Adapter: . . . . . . . . . . . . . . . . . . . . . . . . . . . . . . . . . . 4-47Using the PSA-R Adapter:. . . . . . . . . . . . . . . . . . . . . . . . . . . . . . . . . . . . . 4-48
Speakerphone (HF-R) Adapter (Figure 4-39 - Figure 4-40) . . . . . . . . . . . . . . . . . 4-49Installing the HF-R Adapter: . . . . . . . . . . . . . . . . . . . . . . . . . . . . . . . . . . . 4-49
VoIP Adapter (Figure 4-51 - Figure 4-53) . . . . . . . . . . . . . . . . . . . . . . . . . . . . . . . 4-51Installing the VoIP Adapter: . . . . . . . . . . . . . . . . . . . . . . . . . . . . . . . . . . . 4-51
POWER FAILURE TELEPHONES. . . . . . . . . . . . . . . . . . . . . . . . . . . . . . . . . . . . . . . . . . 4-53Power Failure (Figure 4-54) . . . . . . . . . . . . . . . . . . . . . . . . . . . . . . . . . . . . . . . . . . 4-53
Connector Pin-Outs on COIU PCB for Power Failure Circuits . . . . . . . . 4-53Installing the Power Failure Telephones: . . . . . . . . . . . . . . . . . . . . . . . . . 4-54
RELAYS . . . . . . . . . . . . . . . . . . . . . . . . . . . . . . . . . . . . . . . . . . . . . . . . . . . . . . . . . . . . . . . 4-56Relays - External Page, Door Box, General Purpose (Figure 4-15, Figure 4-55) . 4-56
To connect a dry contact relay device to a Door Box/External Page Relay: . . . . . . . . . . . . . . . . . . . . . . . . . . . . . . . . . . . . . . . . . . . . . 4-56
SLT ADAPTER. . . . . . . . . . . . . . . . . . . . . . . . . . . . . . . . . . . . . . . . . . . . . . . . . . . . . . . . . . 4-58Using the SLT Adapter (Figure 4-56 - Figure 4-58) . . . . . . . . . . . . . . . . . . . . . . . 4-58
Installing the SLT Adapter . . . . . . . . . . . . . . . . . . . . . . . . . . . . . . . . . . . . 4-58Wall-Mounting the SLT Adapter. . . . . . . . . . . . . . . . . . . . . . . . . . . . . . . . 4-59
Telephones. . . . . . . . . . . . . . . . . . . . . . . . . . . . . . . . . . . . . . . . . . . . . . . . . . . . . . . . . . . . . . 4-6034-Button Super Display Telephone – P/Ns 0890049 & 0890050 . . . . . . . . . . . . 4-6034-Button Display Telephone — P/Ns 0890045 & 0890046. . . . . . . . . . . . . . . . . 4-6122-Button Display Telephone — P/Ns 0890043 & 0890044. . . . . . . . . . . . . . . . . 4-6122-Button Standard Telephone — P/Ns 0890041 & 0890042. . . . . . . . . . . . . . . . 4-622-Button Telephone — P/Ns 0890047 & 0890048 . . . . . . . . . . . . . . . . . . . . . . . . 4-62Cordless Single Line Headset Telephone, CT-11 — P/N 730090 . . . . . . . . . . . . . 4-63Cordless Telephone — P/N 730088/730087 . . . . . . . . . . . . . . . . . . . . . . . . . . . . . 4-64
IP Station Equipment. . . . . . . . . . . . . . . . . . . . . . . . . . . . . . . . . . . . . . . . . . . . . . . . . . . . . . 4-7334-Button Aspire IPhone - BK — P/N 0890065 . . . . . . . . . . . . . . . . . . . . . . . . . . 4-73H.323 IP Phone — P/N 780005 . . . . . . . . . . . . . . . . . . . . . . . . . . . . . . . . . . . . . . . 4-73
SUPER DISPLAY LCD . . . . . . . . . . . . . . . . . . . . . . . . . . . . . . . . . . . . . . . . . . . . . . . . . . . 4-76Positioning the Super Display LCD (Figure 4-76, Figure 4-77) . . . . . . . . . . . . . . 4-76
TELEPHONE LEGS. . . . . . . . . . . . . . . . . . . . . . . . . . . . . . . . . . . . . . . . . . . . . . . . . . . . . . 4-77Using the Telephone Legs (Figure 4-78 - Figure 4-82) . . . . . . . . . . . . . . . . . . . . . 4-77Adjusting the Leg Height . . . . . . . . . . . . . . . . . . . . . . . . . . . . . . . . . . . . . . . . . . . . 4-77
WALL-MOUNT BRACKET . . . . . . . . . . . . . . . . . . . . . . . . . . . . . . . . . . . . . . . . . . . . . . . 4-80Using the Wall-Mount Bracket . . . . . . . . . . . . . . . . . . . . . . . . . . . . . . . . . . . . . . . 4-80Installing the Wall-Mount Handset Bracket (Figure 4-83 - Figure 4-89) . . . . . . . 4-80Removing the Phone From a Wall-Mounting Bracket
(Figure 4-90 - Figure 4-91) . . . . . . . . . . . . . . . . . . . . . . . . . . . . . . . . . . . . . . . . . 4-84Installing the 2-Button Phone’s Wall-Mount Bracket
(Figure 4-92 - Figure 4-94) . . . . . . . . . . . . . . . . . . . . . . . . . . . . . . . . . . . . . . . . . 4-86
Aspire S Hardware Manual Table of Contents ◆ v

Table of Contents
Section 5:Data and SMDR . . . . . . . . . . . . . . . . . . . . . . . . . . . . . . . . . . . . . . . . . . . . . . . . . . . . . . . . . . . . 5-1
DATA OVERVIEW . . . . . . . . . . . . . . . . . . . . . . . . . . . . . . . . . . . . . . . . . . . . . . . . . . . . . . . 5-1Data Communications . . . . . . . . . . . . . . . . . . . . . . . . . . . . . . . . . . . . . . . . . . . . . . . 5-1
APA Adapter . . . . . . . . . . . . . . . . . . . . . . . . . . . . . . . . . . . . . . . . . . . . . . . . 5-1APR Adapter . . . . . . . . . . . . . . . . . . . . . . . . . . . . . . . . . . . . . . . . . . . . . . . . 5-1CTA Adapter . . . . . . . . . . . . . . . . . . . . . . . . . . . . . . . . . . . . . . . . . . . . . . . . 5-2CTU Adapter . . . . . . . . . . . . . . . . . . . . . . . . . . . . . . . . . . . . . . . . . . . . . . . . 5-2
Data Communication Availability With Hardware . . . . . . . . . . . . . . . . . . . . . . . . . 5-2Ports for APR Adapter . . . . . . . . . . . . . . . . . . . . . . . . . . . . . . . . . . . . . . . . . . . . . . . 5-3Programming for System and Alarm Reports . . . . . . . . . . . . . . . . . . . . . . . . . . . . . 5-3
SMDR . . . . . . . . . . . . . . . . . . . . . . . . . . . . . . . . . . . . . . . . . . . . . . . . . . . . . . . . . . . . . . . . . . 5-4Using SMDR (Figure 5-1) . . . . . . . . . . . . . . . . . . . . . . . . . . . . . . . . . . . . . . . . . . . . 5-4
Installing SMDR . . . . . . . . . . . . . . . . . . . . . . . . . . . . . . . . . . . . . . . . . . . . . 5-4Programming SMDR . . . . . . . . . . . . . . . . . . . . . . . . . . . . . . . . . . . . . . . . . . . . . . . . 5-6
Section 6:LAN Connection . . . . . . . . . . . . . . . . . . . . . . . . . . . . . . . . . . . . . . . . . . . . . . . . . . . . . . . . . . . 6-1
LAN DEVICES. . . . . . . . . . . . . . . . . . . . . . . . . . . . . . . . . . . . . . . . . . . . . . . . . . . . . . . . . . . 6-1Using LANs . . . . . . . . . . . . . . . . . . . . . . . . . . . . . . . . . . . . . . . . . . . . . . . . . . . . . . . 6-1
PCBs: . . . . . . . . . . . . . . . . . . . . . . . . . . . . . . . . . . . . . . . . . . . . . . . . . . . . . . 6-3Terminals: . . . . . . . . . . . . . . . . . . . . . . . . . . . . . . . . . . . . . . . . . . . . . . . . . . 6-3Hardware: . . . . . . . . . . . . . . . . . . . . . . . . . . . . . . . . . . . . . . . . . . . . . . . . . . 6-4
Installing a LAN Device or VoIP Telephone . . . . . . . . . . . . . . . . . . . . . . . . . . . . . . 6-5
Section 7:Specifications and Parts List. . . . . . . . . . . . . . . . . . . . . . . . . . . . . . . . . . . . . . . . . . . . . . . . . . 7-1
SYSTEM SPECIFICATIONS. . . . . . . . . . . . . . . . . . . . . . . . . . . . . . . . . . . . . . . . . . . . . . . . 7-1Aspire S System Capacities . . . . . . . . . . . . . . . . . . . . . . . . . . . . . . . . . . . . . 7-1Aspire S PCB Capacities . . . . . . . . . . . . . . . . . . . . . . . . . . . . . . . . . . . . . . . 7-2Environmental Requirements . . . . . . . . . . . . . . . . . . . . . . . . . . . . . . . . . . . 7-3Environmental Specifications . . . . . . . . . . . . . . . . . . . . . . . . . . . . . . . . . . . 7-3Power Requirements . . . . . . . . . . . . . . . . . . . . . . . . . . . . . . . . . . . . . . . . . . 7-3Site Requirements . . . . . . . . . . . . . . . . . . . . . . . . . . . . . . . . . . . . . . . . . . . . 7-3Electrical Specifications . . . . . . . . . . . . . . . . . . . . . . . . . . . . . . . . . . . . . . . 7-4Aspire Soft Phone Requirements. . . . . . . . . . . . . . . . . . . . . . . . . . . . . . . . . 7-5CallAnalyst Requirements . . . . . . . . . . . . . . . . . . . . . . . . . . . . . . . . . . . . . . 7-6IP Routers . . . . . . . . . . . . . . . . . . . . . . . . . . . . . . . . . . . . . . . . . . . . . . . . . . 7-7Mechanical Specifications . . . . . . . . . . . . . . . . . . . . . . . . . . . . . . . . . . . . . . 7-82PGDAD Module/CPU Input/Output . . . . . . . . . . . . . . . . . . . . . . . . . . . . . 7-8AC-2R Input/Output . . . . . . . . . . . . . . . . . . . . . . . . . . . . . . . . . . . . . . . . . . 7-8BGM/MOH Music Source Input . . . . . . . . . . . . . . . . . . . . . . . . . . . . . . . . . 7-9Door Box/External Paging. . . . . . . . . . . . . . . . . . . . . . . . . . . . . . . . . . . . . . 7-9LAN Specifications . . . . . . . . . . . . . . . . . . . . . . . . . . . . . . . . . . . . . . . . . . . 7-9Single Line Telephone - DTH-1-1. . . . . . . . . . . . . . . . . . . . . . . . . . . . . . . . 7-9SLT Adapter . . . . . . . . . . . . . . . . . . . . . . . . . . . . . . . . . . . . . . . . . . . . . . . . 7-9SLIU PCB / SLIDB . . . . . . . . . . . . . . . . . . . . . . . . . . . . . . . . . . . . . . . . . . . 7-9Recommended Usage Guidelines for Cordless Phones. . . . . . . . . . . . . . . 7-10Cordless Lite II . . . . . . . . . . . . . . . . . . . . . . . . . . . . . . . . . . . . . . . . . . . . . 7-10Cordless II . . . . . . . . . . . . . . . . . . . . . . . . . . . . . . . . . . . . . . . . . . . . . . . . . 7-11UL Listed System . . . . . . . . . . . . . . . . . . . . . . . . . . . . . . . . . . . . . . . . . . . 7-11
vi ◆ Table of Contents Aspire S Hardware Manual
Table of Contents
FCC Registration Information . . . . . . . . . . . . . . . . . . . . . . . . . . . . . . . . . . 7-12FCC DID Requirements . . . . . . . . . . . . . . . . . . . . . . . . . . . . . . . . . . . . . . 7-12Cabling Requirements . . . . . . . . . . . . . . . . . . . . . . . . . . . . . . . . . . . . . . . . 7-13Cable Requirements. . . . . . . . . . . . . . . . . . . . . . . . . . . . . . . . . . . . . . . . . . 7-13
Aspire S Configuration Guide . . . . . . . . . . . . . . . . . . . . . . . . . . . . . . . . . . . . . . . . . . . . . . . 7-15PARTS LIST . . . . . . . . . . . . . . . . . . . . . . . . . . . . . . . . . . . . . . . . . . . . . . . . . . . . . . . . . . . . 7-16
Station Equipment . . . . . . . . . . . . . . . . . . . . . . . . . . . . . . . . . . . . . . . . . . . 7-16Peripheral Station Equipment . . . . . . . . . . . . . . . . . . . . . . . . . . . . . . . . . . 7-17Aspire Applications . . . . . . . . . . . . . . . . . . . . . . . . . . . . . . . . . . . . . . . . . . 7-18Bluefire . . . . . . . . . . . . . . . . . . . . . . . . . . . . . . . . . . . . . . . . . . . . . . . . . . . 7-18Common Equipment . . . . . . . . . . . . . . . . . . . . . . . . . . . . . . . . . . . . . . . . . 7-19PCBs . . . . . . . . . . . . . . . . . . . . . . . . . . . . . . . . . . . . . . . . . . . . . . . . . . . . . 7-19Desi Labels . . . . . . . . . . . . . . . . . . . . . . . . . . . . . . . . . . . . . . . . . . . . . . . . 7-20Spare Parts . . . . . . . . . . . . . . . . . . . . . . . . . . . . . . . . . . . . . . . . . . . . . . . . . 7-22
Aspire S Hardware Manual Table of Contents ◆ vii

Table of Contents
- For Your Notes -
viii ◆ Table of Contents Aspire S Hardware Manual

Section 1: Installing the Cabinet
1
Section 1:
Installing the Cabinet
Section 1: Installing the Cabinet
GENERAL PRECAUTIONS● To avoid shock or equipment damage, do not plug in or turn the system power on before completing the
installation process.● Avoid working with the equipment during electrical storms.● Use only commercial AC power to prevent shock or fire.● Use the power cord supplied for the cabinet.● Do not bundle AC power cords together to prevent the cords from overheating.● Make sure the cabinet has a proper earth ground.● Install batteries with the correct polarity to prevent damaging equipment.● The cabinet should not be placed on unstable surfaces to avoid damage.
INSTALLING THE CABINET
UnpackingUnpack the equipment and check it against your equipment lists. The cabinet contains a power supply installed by the manufacturer, however, no PCBS are installed. Inspect for physical damage. If you are not sure about a component’s function, review the information for the component within this manual. Contact your Sales Representative if you have additional questions.
Make sure you have appropriate tools for the job, including: a test set, a punch down tool, and a digital voltmeter.
Before InstallingMake sure you have a building plan showing common equipment, extensions, the telco demarcation, and earth ground location. The installation site must meet NEC Unified Solutions specifications in the Standard Practices Manual (P/N N2710STD**).
Aspire S Hardware Manual Section 1: Installing the Cabinet ◆ 1-1

Section 1: Installing the Cabinet
Site RequirementsThe system can be floor-mounted (optional floor mounting brackets required), wall-mounted, or rack-mounted (rack mounting hardware required). Ensure that enough space is available around the cabinet to allow room to work with the cabinet for installation and maintenance.
The system requires a three-prong dedicated 110 VAC 60 Hz circuit (NEMA 5-15 receptacle) located within 6 feet of the AC receptacle. Telco should install the RJ21X to the right of the cabinet. Extension blocks should be installed to the left of the cabinet.
The cabinet is shipped fully assembled. The following is enclosed with the cabinet:● 1 green 14AWG ground wire (installed to the power supply’s backplane)● 1 black three-prong power cord (packed outside the cabinet)
Environmental RequirementsMeeting and maintaining established environmental standards maximizes the life of the system. Be sure that the site selected for the cabinet is not:
1. In direct sunlight or in hot, cold or humid places.2. In dusty areas or in areas where sulfuric gases are produced.3. In places where shocks or vibrations are frequent or strong.4. In places where water or other fluids comes in contact with the main equipment.5. In areas near high-frequency machines or electric welders.6. Near computers, telexes, microwaves, air conditioners, TVs, wireless devices, medical instruments, etc.7. Near radio antennas (including shortwave).
Removing the Front Cover (Figure 1-1)1. Position the cabinet on the floor near the MDF within 6 feet of the dedicated AC outlet. (Do not
secure the cabinet to the wall at this time).2. Loosen the four captive front panel retaining screws.3. Lift up slightly on the bottom of the front cover - then gently slide the cover up over the tabs to
remove it.
1-2 ◆ Section 1: Installing the Cabinet Aspire S Hardware Manual

Section 1: Installing the Cabinet
1
Figure 1-1: REMOVING THE FRONT COVER
Step 1
Step 2
0893130-1
screws
screws
Front Cover
0893130-2
1
2
Aspire S Hardware Manual Section 1: Installing the Cabinet ◆ 1-3

Section 1: Installing the Cabinet
Securing the Cabinet to the Floor (Figure 1-2 - Figure 1-4)1. Install the mounting brackets on the floor providing the appropriate spacing as shown below.
Figure 1-2: INSTALLING THE MOUNTING BRACKETS
0893
130
- 22
Floor
Front
Wall surface
Location of anchor bolts
9 1/2"
8"
12"
12"
11 1/2"
16 7/16"
1-4 ◆ Section 1: Installing the Cabinet Aspire S Hardware Manual

Section 1: Installing the Cabinet
1
2. Attach the floor mounting brackets to the cabinet. Insert the tabs of the brackets into the slots on thebottom of the cabinet.
Figure 1-3: SECURE THE MOUNTING BRACKETS WITH SCREWS
0893130 - 20 Cabinet
Bracket insertion hole
Floor mount bracket
Bracket insertion hole
Tab
Tab
Aspire S Hardware Manual Section 1: Installing the Cabinet ◆ 1-5

Section 1: Installing the Cabinet
3. Secure the brackets to the cabinet with the screws provided with the bracket. Then secure the mounting brackets to the floor using 4 6mm anchor bolts.
Figure 1-4: SECURE THE MOUNTING BRACKET WITH SCREWS
0893130 - 21
Screw
6mmAnchor
Bolt
6mmAnchor
Bolt
Wall surface
Screw
Floor surface
1-6 ◆ Section 1: Installing the Cabinet Aspire S Hardware Manual

Section 1: Installing the Cabinet
1
Securing the Cabinet to the Wall (Figure 1-5 - Figure 1-8)1. Install the two wood screws to the wall providing the appropriate spacing as shown below. The twotop key-hole screws should protrude from the wall about 3/16” to allow the cabinet to slide over the screw heads.
It is suggested that plywood first be installed on the wall where the cabinet will be positioned. This allows for secure anchoring of the screws which will be supporting the weight of the cabinet.
Figure 1-5: CABINET SPACE REQUIREMENTS
0893
130
- 13
Floor surface
Wall surface
Ceiling
Location of wood screws
13 3/16"
12 3/16"
1/4"
12" or more
12" or more
10 1/16"
12 5/8"
16 7/16" 12" or more
Aspire S Hardware Manual Section 1: Installing the Cabinet ◆ 1-7

Section 1: Installing the Cabinet
Figure 1-6: INSTALLING THE WOOD SCREWS
0893130 - 14
Floor surface
Wall surface
A
B
C
D
Gap(approx. 3/16"
WallWood screw
Wood screw
1-8 ◆ Section 1: Installing the Cabinet Aspire S Hardware Manual
Section 1: Installing the Cabinet
1
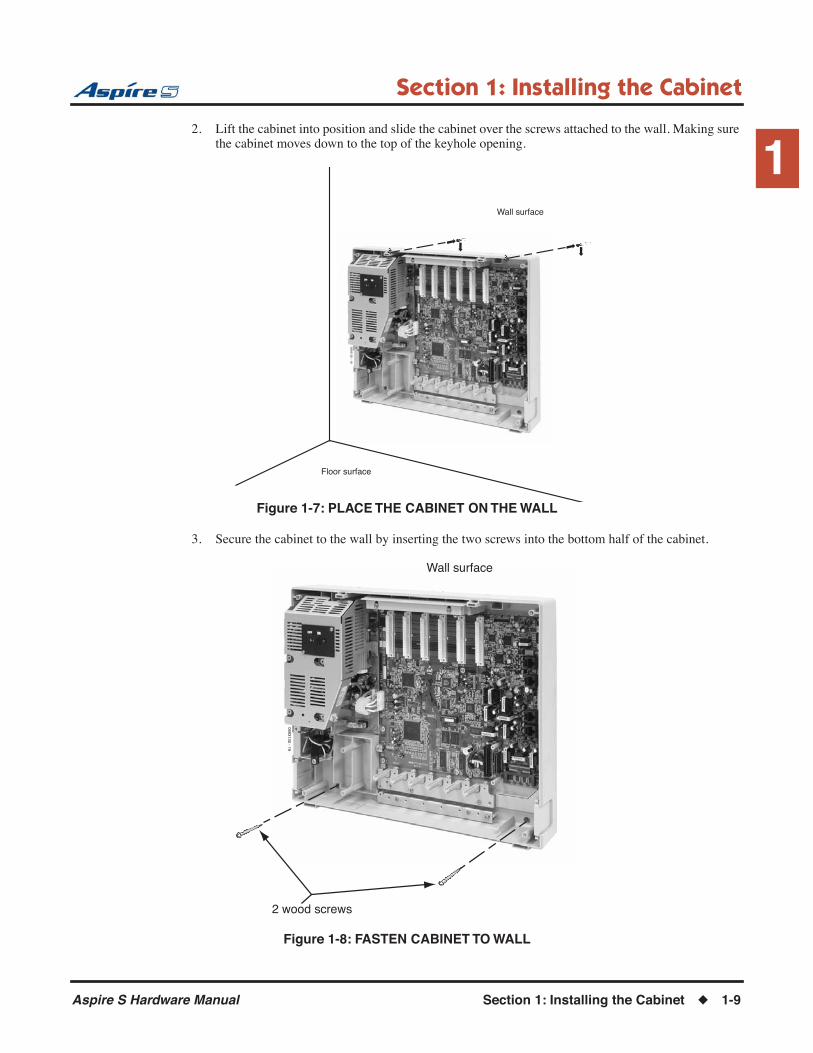
2. Lift the cabinet into position and slide the cabinet over the screws attached to the wall. Making surethe cabinet moves down to the top of the keyhole opening.
Figure 1-7: PLACE THE CABINET ON THE WALL
3. Secure the cabinet to the wall by inserting the two screws into the bottom half of the cabinet.
Figure 1-8: FASTEN CABINET TO WALL
0893130 - 18
Floor surface
Wall surface
0893130 - 19
Wall surface
2 wood screws
Aspire S Hardware Manual Section 1: Installing the Cabinet ◆ 1-9

Section 1: Installing the Cabinet
Securing the Cabinet to a Rack (Figure 1-9 - Figure 1-12)1. Install the 19” rack mount bracket.
Figure 1-9: INSTALLING THE MOUNTING BRACKET ON THE RACK
0893100 - 44
19 inch Rack
Screws attachedto Rack Bracket
19 inch RackBracket
1-10 ◆ Section 1: Installing the Cabinet Aspire S Hardware Manual
Section 1: Installing the Cabinet
1
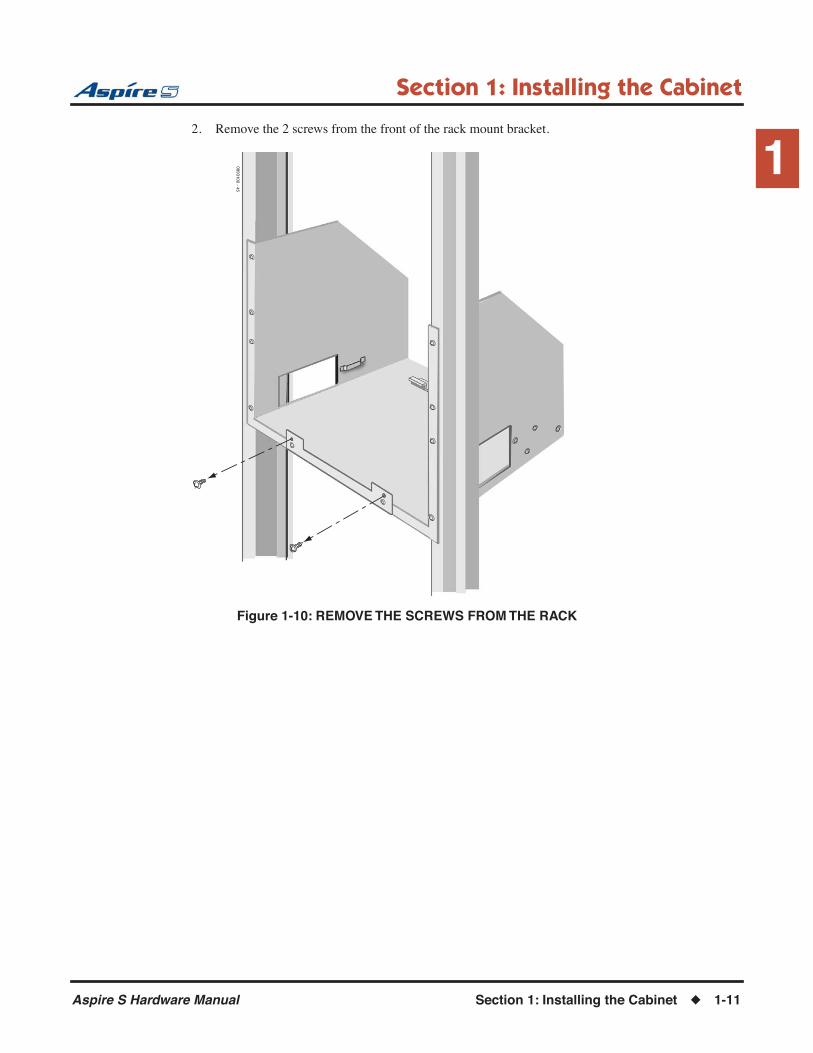
2. Remove the 2 screws from the front of the rack mount bracket.Figure 1-10: REMOVE THE SCREWS FROM THE RACK
0893100 - 45
Aspire S Hardware Manual Section 1: Installing the Cabinet ◆ 1-11
Section 1: Installing the Cabinet
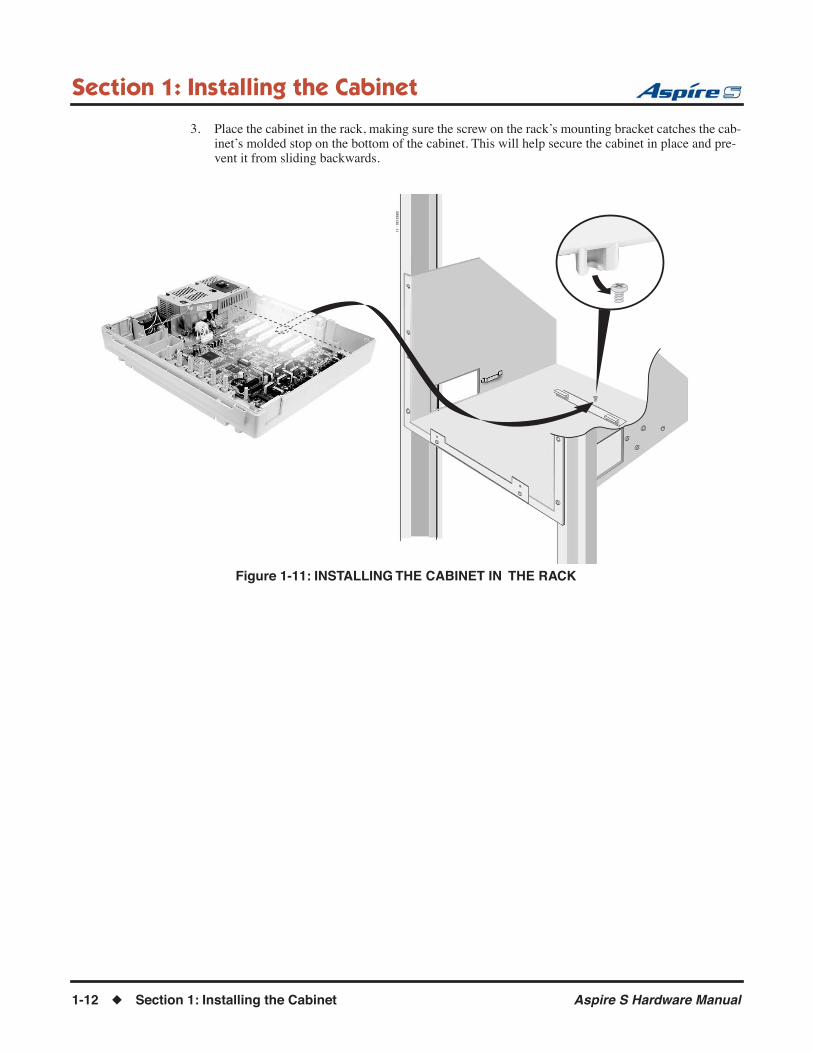
3. Place the cabinet in the rack, making sure the screw on the rack’s mounting bracket catches the cab-inet’s molded stop on the bottom of the cabinet. This will help secure the cabinet in place and pre-vent it from sliding backwards.
Figure 1-11: INSTALLING THE CABINET IN THE RACK
0893130 - 11
1-12 ◆ Section 1: Installing the Cabinet Aspire S Hardware Manual

Section 1: Installing the Cabinet
1
4. Replace the screws in the front of the rack which were removed in step 2.Figure 1-12: SECURING THE CABINET TO THE RACK
0893130 - 12
Aspire S Hardware Manual Section 1: Installing the Cabinet ◆ 1-13
Section 1: Installing the Cabinet
INSTALLING THE PCBS
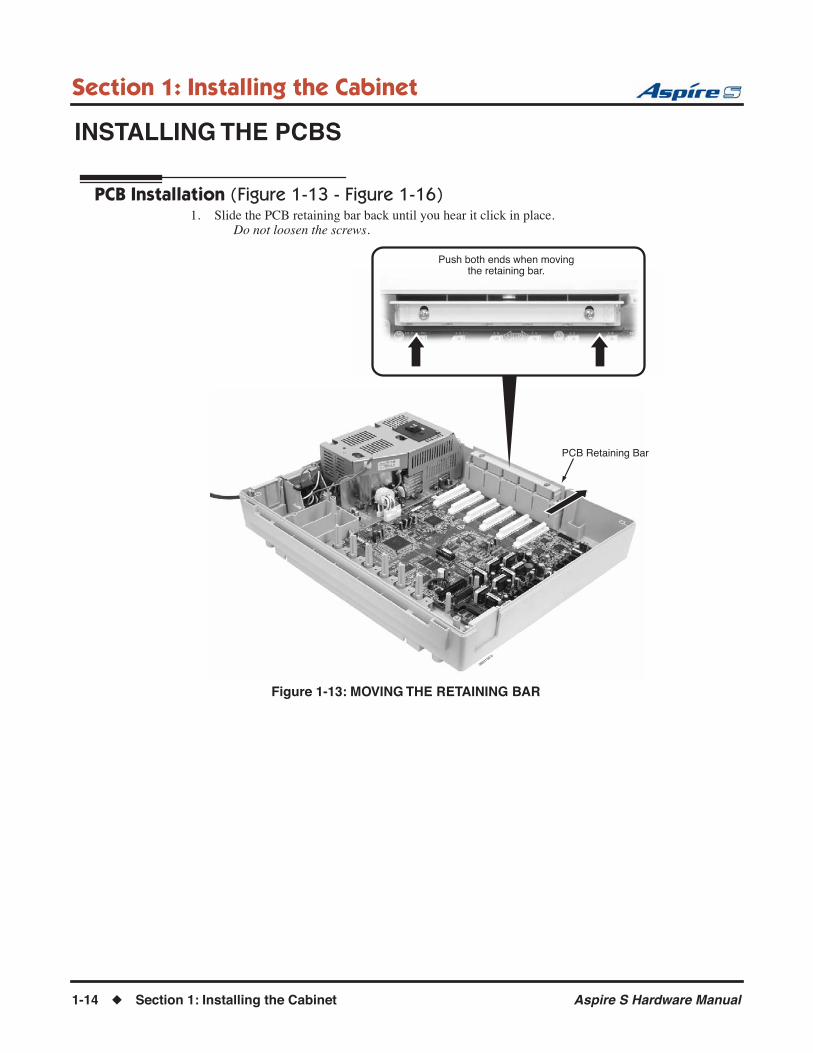
PCB Installation (Figure 1-13 - Figure 1-16)1. Slide the PCB retaining bar back until you hear it click in place.
Do not loosen the screws.
Figure 1-13: MOVING THE RETAINING BAR
0893130-9
PCB Retaining Bar
Push both ends when movingthe retaining bar.
1-14 ◆ Section 1: Installing the Cabinet Aspire S Hardware Manual

Section 1: Installing the Cabinet
1
2. Insert the PCB along the guide rails and firmly plug in the PCB connector to the CPU.Figure 1-14: INSERTING THE PCB
0893130-10
Connector
Guide rail (top)
Guide rail (bottom)
Connector in Cabinet(SLOT3 thru SLOT 8)
PCB
Hold the corner ofboth ends of unit
Aspire S Hardware Manual Section 1: Installing the Cabinet ◆ 1-15

Section 1: Installing the Cabinet
3. Secure the PCB to the CPU by attaching the screw provided on the PCB as shown below.
Figure 1-15: SECURING THE PCB
0893
130-
5
Screw
1-16 ◆ Section 1: Installing the Cabinet Aspire S Hardware Manual

Section 1: Installing the Cabinet
1
4. Move the PCB retaining bar back in place to secure to top of the PCBs.Figure 1-16: MOVING THE RETAINING BAR BACK
0893130-7
PCB
PCB Retaining Bar
Aspire S Hardware Manual Section 1: Installing the Cabinet ◆ 1-17

Section 1: Installing the Cabinet
GROUNDING THE CABINETS
Connecting the System Ground (Figure 1-17)1. Ground the cabinet by connecting a 14 AWG wire from the ETH lug to a known earth ground, such
as a copper plate or grounding rod. Be cautious when using a cold water pipe that it’s completely copper and does not change to
PVC/vinyl chloride pipe.
2. When installing a COIU or DIOPU PCB, connect the grounding wire of the PCB to the PBXG ter-minal plate and then run a grounding wiring from the PBXG terminal plate to a known earth ground using 14 AWG grounding wire.
The ETH and PBXG grounds should be separate - they should not be combined.
3. From the factory, the FG is already connected to the AC power source. No action is required.
Figure 1-17: GROUNDING THE CABINET
0893130-8
PCB
Frame Ground
PBXG ConnectionCable
Grounding Wire
To Known Earth Ground
Grounding WireConnection Terminal
PBXG Terminal Plate
Earth Ground
1-18 ◆ Section 1: Installing the Cabinet Aspire S Hardware Manual

Section 1: Installing the Cabinet
1
The ground lug descriptions are as follows:● PBXG (CO/PBX Ground)The grounding wire from the COIU or DIOPU PCBs are connected to the PBXG terminal plate. A grounding wire should then be connected from the PBXG terminal plate to a known earth ground when these PCBs are installed in the system.
This grounding wire should be separate from the ETH grounding wire.
● ETH (Earth Ground)This ground lug is used for lightning protection. It should always be connected to the earth.
This grounding wire should be separate from the PBXG grounding wire.
● FG (Frame Ground)This ground lug is connected from the power supply cable to the metal frame of the main equipment.
Aspire S Hardware Manual Section 1: Installing the Cabinet ◆ 1-19
Section 1: Installing the Cabinet
COMPLETING THE INSTALLATION
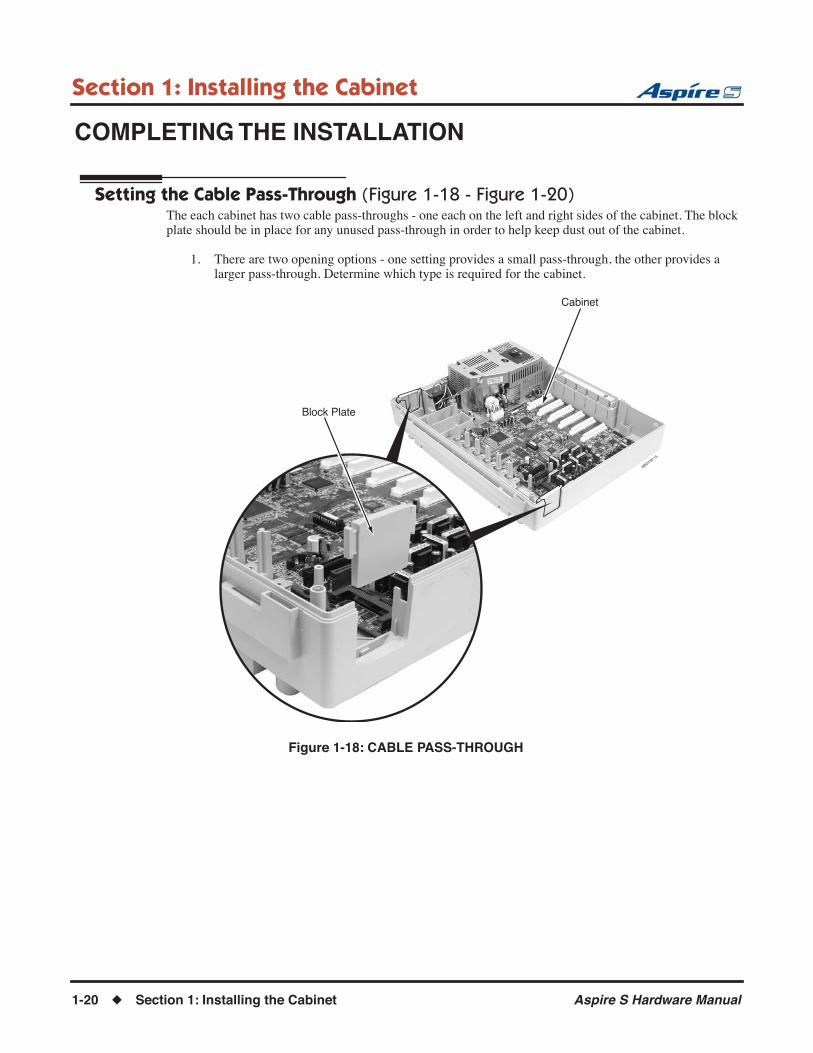
Setting the Cable Pass-Through (Figure 1-18 - Figure 1-20)The each cabinet has two cable pass-throughs - one each on the left and right sides of the cabinet. The block plate should be in place for any unused pass-through in order to help keep dust out of the cabinet.
1. There are two opening options - one setting provides a small pass-through, the other provides a larger pass-through. Determine which type is required for the cabinet.
Figure 1-18: CABLE PASS-THROUGH
0893130-15
Block Plate
Cabinet
1-20 ◆ Section 1: Installing the Cabinet Aspire S Hardware Manual

Section 1: Installing the Cabinet
1
2. For the small pass-through, turn the block plate upside down and replace into the slot.Figure 1-19: SMALL CABLE PASS-THROUGH
3. For the large pass-through, remove the block plate and store it in the bottom-right corner of the cabinet.
Figure 1-20: LARGE CABLE PASS-THROUGH
0893130 - 16
0893130 - 17
Aspire S Hardware Manual Section 1: Installing the Cabinet ◆ 1-21

Section 1: Installing the Cabinet
Reinstalling the Front Cover (Figure 1-21 - Figure 1-22)1. Line up the hooks on the front cover with the slots in the cabinet and insert the cover.
Figure 1-21: RE-INSTALLING THE FRONT COVER
2. Lower the cover.
Figure 1-22: LOWER THE FRONT COVER
3. Tighten the four cover retaining screws.A label is located on the right side of the cabinet which can be used to enter the date when the
battery should be replaced. In case of a power failure, this battery provides back-up of system data and RAM memory for approximately 30 months. Program 90-11-01 can also be set to define an extension to receive an indication on their display when the battery is low.
0893130-3
Hook
Hook
Front Cover
0893130-4
1-22 ◆ Section 1: Installing the Cabinet Aspire S Hardware Manual

Section 2: PCB Installation and Startup
2
Section 2:PCB Installation and Startup
Section 2: PCB Installation and Startup
PCB LAYOUT
PCB LocationDetermine the slot position for each PCB. In the cabinet:● Slots 3 - 8 are universal (any type of PCB can be installed). The only restriction is that an ESIU PCB
can not be placed into slots 7 or 8 as there are not enough conversation channels.
Important Notes
• Make sure to follow the steps indicated in Powering Up the System (page 2-40) for an initial system install. This will ensure that you start the system with the default system settings.
• To delete a PCB from the system, power down the system and then remove the PCB from the sys-tem cabinet. Power the system back up and use Program 90-05-01 to delete the slot definition.
• Whenever powering down the system, check to make sure the only LED flashing on the CPU card itself (in the lower left-hand corner) is the LD2 LED (the LED located farthest right in the line of LEDs). This LED is located in the lower left-hand corner of the CPU. It should be flash-ing 0.5 seconds on/off (a slow flash). If it’s flashing fast or if any other LEDS are flashing on the CPU, wait until they stop or else the system data may be corrupted.
After turning the power on, the user must wait approximately 10 seconds (so that only the LD2 LED is flashing) if the system must be powered down again.
Aspire S Hardware Manual Section 2: PCB Installation and Startup ◆ 2-1

Section 2: PCB Installation and Startup
PCB INSTALLATION
Handling the PCBsThe PCBs are sensitive to static discharge. To minimize static discharge, keep PCBs in static free bags when not installed. Observe the following when installing or removing a PCB:● Ground the cabinet.● Wear a grounded wrist strap to install/remove any PCBs.● Do not touch PCB components. Handle the PCBs in the corners.● All PCBs must be installed with the system power off.
Installing an Extension or Trunk PCB (Figure 2-2)To install an extension/trunk PCB:● Power down the system.
Whenever powering down the system, check to make sure the only LED flashing on the CPU card itself is the LD2 LED (farthest right of the LEDs). This LED is located in the lower left-hand corner of the CPU. If any other LEDS are flashing on the CPU, wait until they stop or else the sys-tem data may be corrupted.
● Push the retaining bar up (or back depending on the cabinet’s position).
Figure 2-1: MOVING THE RETAINING BAR
0893130-9
PCB Retaining Bar
Push both ends when movingthe retaining bar.
2-2 ◆ Section 2: PCB Installation and Startup Aspire S Hardware Manual

Section 2: PCB Installation and Startup
2
● Insert the PCB within the guide rail and push the PCB securely into position. After installing all the PCBs, the PCB retaining bar should be moved back into position and the screws for each of the PCBs should be tightened.
Figure 2-2: INSERTING PCBS0893130-7
PCB
PCB Retaining Bar
0893
130-
5
Screw
0893130-10
Connector
Guide rail (top)
Guide rail (bottom)
Connector in Cabinet(SLOT3 thru SLOT 8)
PCB
Hold the corner ofboth ends of unit
Aspire S Hardware Manual Section 2: PCB Installation and Startup ◆ 2-3
Section 2: PCB Installation and Startup
Removing an Extension or Trunk PCBWhenever powering down the system, check to make sure the only LED flashing on the CPU card itself is the LD2 LED (farthest right). This LED is located in the lower left-hand corner of the CPU. If any other LEDS are flashing on the CPU, wait until they stop or else the system data may be corrupted.
To remove an extension/trunk PCB:● Turn off the system power by pressing the ON/OFF switch on the cabinet.
Whenever powering down the system, check to make sure the only LED flashing on the CPU card itself is the LD2 LED (farthest right of the LEDs). This LED is located in the lower left-hand corner of the CPU. If any other LEDS are flashing on the CPU, wait until they stop or else the sys-tem data may be corrupted.
● All PCBs must be installed with the system power off.
Uninstalling a PCB Slot Through SoftwareThe installer can turn off (busy out) and delete (remove from software) PCB slots in the cabinet in program-ming for port re-numbering purposes or to replace it with a different type of PCB. Deleting a PCB may affect PCB slot programming capability. Refer to Program 90-05 in the Software Manual for further details.
2-4 ◆ Section 2: PCB Installation and Startup Aspire S Hardware Manual

Section 2: PCB Installation and Startup
2
Where to Install the PCBs
Maximum Configuration: With Software 2.08-2.21 Only8 Trunks26 Extensions (24 digital and analog, 2 analog only) - Includes a maximum of 16 IP Extensions24 Virtual Extensions
With Software 2.50 and Higher8 Trunks26 Extensions (24 digital and analog, 2 analog only)16 IP Extensions or APR-B2 Extensions8 Special Terminals - Reserved for Intramail Only (ports 43-50)24 Virtual Extensions
The system’s universal architecture gives you great flexibility when installing PCBs. You can install a PCB in any slot, provided you follow the guidelines in the chart below.
Item Description Max.
CPU (MBU) 32-Bit Central Processing Unit 1
DSPDB DSP Resource - Daughter Board 1 installed on CPUENTU-S LAN CTI Ethernet Interface Board 1 installed on CPU8ESIU-S 8 Digital Stations 2 - Can not be installed in slots
7 or 84SLIU-S 4 Analog Stations 44SLIDB-S 4 Analog Stations - Daughter Board 0 - If 4 4SLIU PCBs installed
1 - If 3 4SLIU PCBs installed2 - If 2 4SLIU PCBs installed
4COIU-S 4 Analog/Loop Start Trunks (no ground start) 22BRIU-S 2 Two-Channel BRI Circuits 2 - When used as T-Point2DIOPU-S 2 DID/OPX Trunks 44VOIPU-S 4 VoIP Media Gateway 34VOIPDB-S 4 VoIP Media Gateway - Daughter Board 3
Aspire S Hardware Manual Section 2: PCB Installation and Startup ◆ 2-5

Section 2: PCB Installation and Startup
Central Processing Unit (CPU) PCB (Figure 2-3)The CPU, which is pre-installed, controls all the functions and operations of the Aspire system using the system software loaded into the CPU memory. One 32-bit CPU is installed in the system cabinet.
The CPU provides the following:● Accomodates up to 34 ports (8 trunks x 26 extensions)● 8 digital station connections
A 2PGDAD module cannot be connected to port 1 or port 2.
● 2 analog station connections (no Message Wait lamping)● 4 diagnostic LEDs which indicate the status of various system functions
During normal operation, the “LD2” LED will be flashing. The remaining LEDs can flash on or off depending on the current system operation.
● Time Switch (383 ch)● Digital Phase Locked Loop (DPLL): digital phase synchronization loop● SFLM Generation● DSP (Digital Signal Processor: provides C-Channel control
● Tone Generation● DTMF Tone Sender/Receiver● System Tone Sender● MFC Tone Sender● MF Signal Sender (Sends caller information to CO for E911)● Call Progress Tone Detector● C-Channel Control● Time Switch control● HDLC (High-Level Data Link Control) Packet Proceessing● Conference; 32 Channels● Caller ID Receiver/Generation; 16 Channels
● A load button which is used for initial system startup or when upgrading system software● One Serial Port (requires null modem/cross-over cable)● One Compact Flash Card Slot● One Audio Input Terminal (external MOH/BGM source)● General Purpose Control Terminal● Hold Tone Transmit● IP● Real Time Clock (tolerance 30 seconds/month)● Internal MOH Generation● One Connector for PAL EPROM● One lithium battery (Sony CR2032 or equivalent) which provides battery back-up of
system data and RAM memory for approximately 30 months● TAPI 1.x / TAPI 2 Support
2-6 ◆ Section 2: PCB Installation and Startup Aspire S Hardware Manual
Section 2: PCB Installation and Startup
2
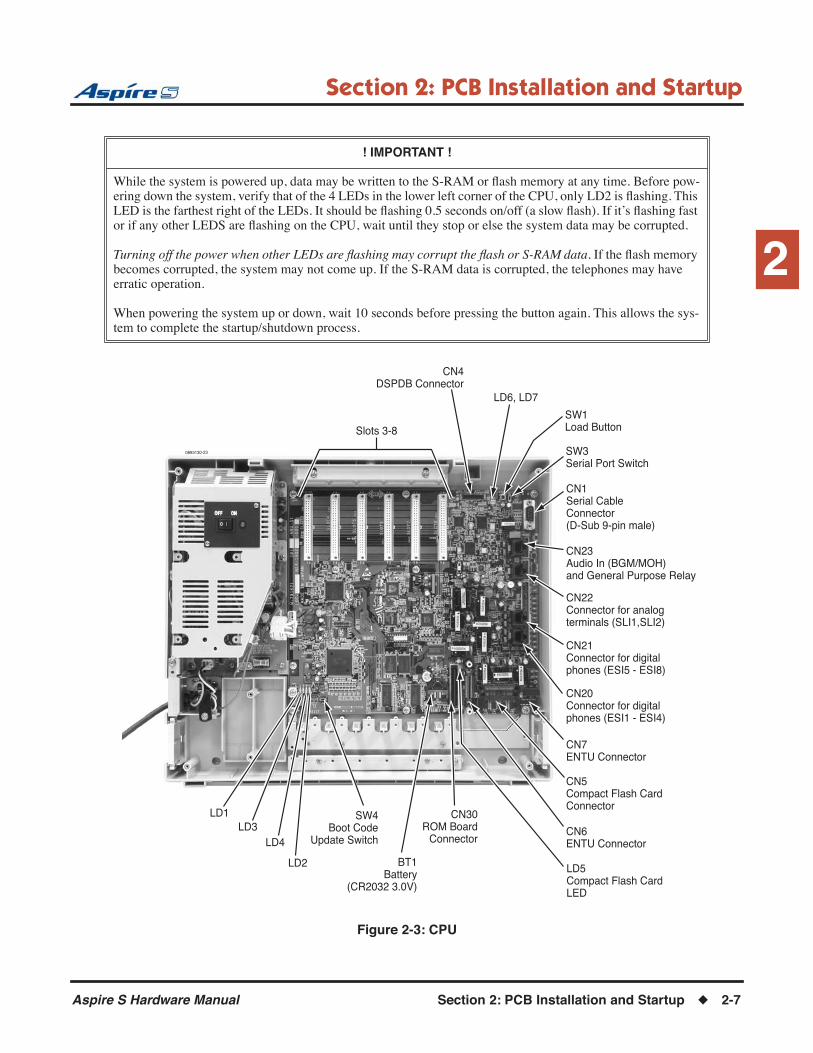
Figure 2-3: CPU
! IMPORTANT !
While the system is powered up, data may be written to the S-RAM or flash memory at any time. Before pow-ering down the system, verify that of the 4 LEDs in the lower left corner of the CPU, only LD2 is flashing. This LED is the farthest right of the LEDs. It should be flashing 0.5 seconds on/off (a slow flash). If it’s flashing fast or if any other LEDS are flashing on the CPU, wait until they stop or else the system data may be corrupted.
Turning off the power when other LEDs are flashing may corrupt the flash or S-RAM data. If the flash memory becomes corrupted, the system may not come up. If the S-RAM data is corrupted, the telephones may have erratic operation.
When powering the system up or down, wait 10 seconds before pressing the button again. This allows the sys-tem to complete the startup/shutdown process.
0893130-23
CN1Serial CableConnector(D-Sub 9-pin male)
Slots 3-8
CN4DSPDB Connector
LD6, LD7
CN23Audio In (BGM/MOH)and General Purpose Relay
CN22Connector for analogterminals (SLI1,SLI2)
CN21Connector for digitalphones (ESI5 - ESI8)
CN20Connector for digitalphones (ESI1 - ESI4)
CN7ENTU Connector
CN5Compact Flash CardConnector
CN6ENTU Connector
LD5Compact Flash CardLED
CN30ROM Board
Connector
BT1Battery
(CR2032 3.0V)
SW4Boot Code
Update Switch
LD2
LD4LD3
LD1
SW1Load Button
SW3Serial Port Switch
Aspire S Hardware Manual Section 2: PCB Installation and Startup ◆ 2-7
Section 2: PCB Installation and Startup
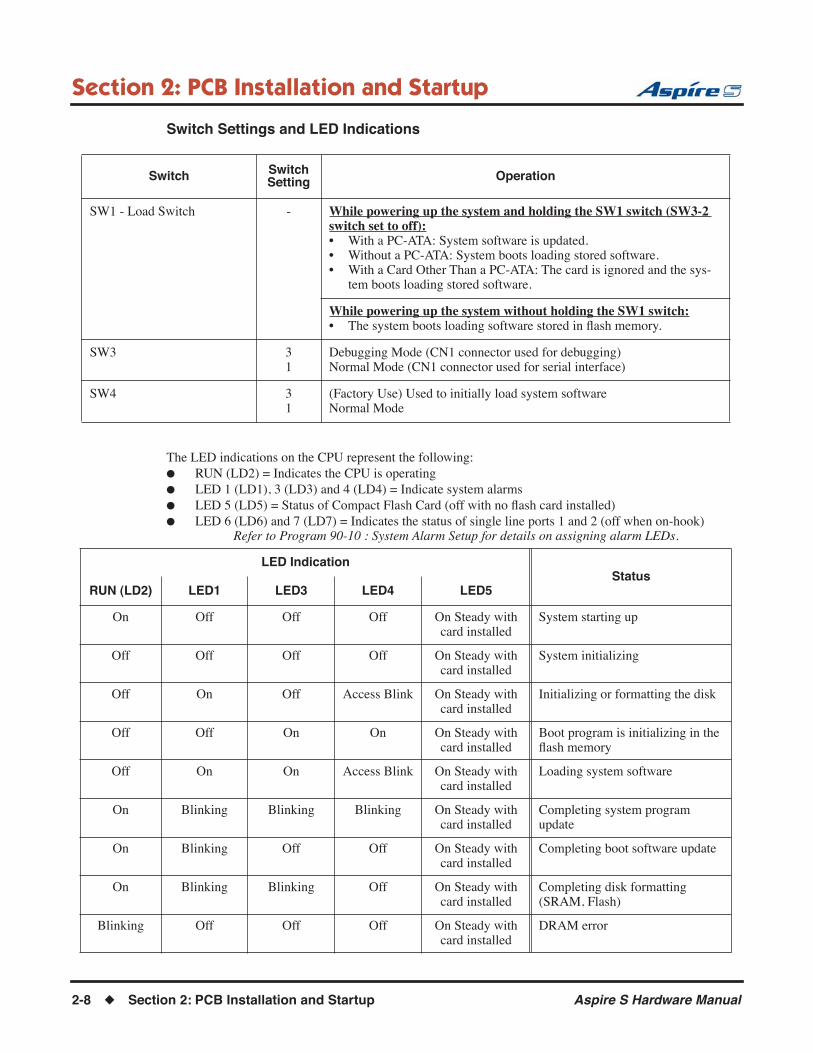
Switch Settings and LED Indications
The LED indications on the CPU represent the following:● RUN (LD2) = Indicates the CPU is operating● LED 1 (LD1), 3 (LD3) and 4 (LD4) = Indicate system alarms● LED 5 (LD5) = Status of Compact Flash Card (off with no flash card installed)● LED 6 (LD6) and 7 (LD7) = Indicates the status of single line ports 1 and 2 (off when on-hook)
Refer to Program 90-10 : System Alarm Setup for details on assigning alarm LEDs.
Switch Switch Setting Operation
SW1 - Load Switch - While powering up the system and holding the SW1 switch (SW3-2 switch set to off):• With a PC-ATA: System software is updated.• Without a PC-ATA: System boots loading stored software.• With a Card Other Than a PC-ATA: The card is ignored and the sys-
tem boots loading stored software.
While powering up the system without holding the SW1 switch:• The system boots loading software stored in flash memory.
SW3 31
Debugging Mode (CN1 connector used for debugging)Normal Mode (CN1 connector used for serial interface)
SW4 31
(Factory Use) Used to initially load system softwareNormal Mode
LED IndicationStatus
RUN (LD2) LED1 LED3 LED4 LED5
On Off Off Off On Steady with card installed
System starting up
Off Off Off Off On Steady with card installed
System initializing
Off On Off Access Blink On Steady with card installed
Initializing or formatting the disk
Off Off On On On Steady with card installed
Boot program is initializing in the flash memory
Off On On Access Blink On Steady with card installed
Loading system software
On Blinking Blinking Blinking On Steady with card installed
Completing system program update
On Blinking Off Off On Steady with card installed
Completing boot software update
On Blinking Blinking Off On Steady with card installed
Completing disk formatting (SRAM, Flash)
Blinking Off Off Off On Steady with card installed
DRAM error
2-8 ◆ Section 2: PCB Installation and Startup Aspire S Hardware Manual

Section 2: PCB Installation and Startup
2
Blinking Off Off On On Steady with card installed
FPGA version error
Blinking Off On Off On Steady with card installed
SRAM error
Blinking Off On On On Steady with card installed
Flash memory booting (start-up) error
Blinking On On On On Steady with card installed
Flash memory data error
Blinking Blinking Blinking Blinking On Steady with card installed
Read error of system program
Blinking Off Off Off On Steady with card installed
Running normally
LED IndicationStatus
RUN (LD2) LED1 LED3 LED4 LED5
Aspire S Hardware Manual Section 2: PCB Installation and Startup ◆ 2-9

Section 2: PCB Installation and Startup
Connector Pin-Outs on CPUSerial Cable Connector - CN1 (D-Sub 9-Pin Male)
(Null Modem/Cross-Over Cable Used)
Pin No. Signal
1 DCD
2 RxD
3 TxD
4 DTR
5 GND
6 DSR
7 RTS
8 CTS
9 -
Digital Station RJ61 Cable Connector - CN20
Pin No. Connection
1 Ring for port 4
2 Ring for port 3
3 Ring for port 2
4 Tip for port 1
5 Ring for port 1
6 Tip for port 2
7 Tip for port 3
8 Tip for port 4
Digital Station RJ61 Cable Connectors - CN21
Pin No. Connection
1 Ring for port 8
2 Ring for port 7
3 Ring for port 6
4 Tip for port 5
5 Ring for port 5
6 Tip for port 6
7 Tip for port 7
8 Tip for port 8
1 2 3 4 5
6 7 8 9
12345678
12345678
2-10 ◆ Section 2: PCB Installation and Startup Aspire S Hardware Manual

Section 2: PCB Installation and Startup
2
CPU Installation1. Install the battery on the CPU. The polarity “+” symbol must be on top.2. Install the DSPDBU daughter board if required. Refer to DSPDB Daughter Board (Figure 2-4,
Figure 2-5) (page 2-13).3. If external BGM or MOH is being installed, plug an RJ61 connector into the CN23 connector on
the CPU. The other end of the cable plugs into the music source. Refer to the PGDAD Module in the Telephones and Optional Equipment section for details on
connecting to a music source.
Note that Message Waiting lamping is not provided on the two analog ports on the CPU.
4. Assign the purpose of the General Purpose Relay in Program 10-21-01.
Analog Station RJ61 Cable Connector - CN22
Pin No. Connection
1
2
3 Ring for port 2
4 Tip for port 1
5 Ring for port 1
6 Tip for port 2
7
8
• Polarity reversal feature available• No Message Wait lamping
External MOH/BGM Source/Relay (External Speaker and Night Mode) RJ61 Cable Connector - CN23
CPU Connector Modular ConnectorPin No. Signal
1 -
2 -
3 EXCNT - Relay
4 EXMOH/BGM Music Source
5 EXMOH/BGM Music Source
6 EXCNT - Relay
7 -
8 -
• Pins 4 and 5: External Music on Hold/BGM Input, Input Impedance 600 ohm/1 kHz
• Pins 3 and 6: Relay = DC Max. 24 VDC, 0.5A - AC Max. 120VAC, 0.25A
12345678
12345678
Aspire S Hardware Manual Section 2: PCB Installation and Startup ◆ 2-11

Section 2: PCB Installation and Startup
● When the system software is upgraded, the flash memory is updated with the new software version. You can use the Hot or Cold start-up methods or upgrade your system software using the steps which follow.
● Customer information is stored in the RAM memory and, in case of a power failure, will be restored. The lithium battery in the system saves the RAM memory when power is lost.
Resetting the System: ! IMPORTANT !
While the system is powered up, data may be written to the S-RAM or flash memory at any time. Before powering down the system, verify that of the 4 LEDs in the lower left corner of the CPU, only LD2 is flashing (this is the LED located farthest right of the LEDs). It should be flashing 0.5 seconds on/off (a slow flash). If it’s flashing fast or if any other LEDS are flashing on the CPU, wait until they stop.
Turning off the power when other LEDs are flashing may corrupt the flash or S-RAM data. If the flash memory becomes corrupted, the system may not come up. If the S-RAM data is corrupted, the telephones may have erratic operation.
To Perform a Cold Start:1. If installed, pull out the compact flash card.
With the compact flash card installed, the system will error and not boot up correctly.
2. Push the power button on the cabinet to power down the system.When powering the system up or down, wait 10 seconds before pressing the button again. This
allows the system to complete the startup/shutdown process.
3. Once the system has powered down, push in and hold the Load button.4. Press the power button to power the system back up. 5. Continue holding the Load button for approximately 3 seconds.6. Release the Load button.7. When the system has completed reloading the software (approximately 2 minutes), the Status LED
(LD2) will be flashing on the CPU.
To Perform a Hot Start:System software loaded from flash memory and the customer data is loaded from RAM memory.
1. Push the power button on the cabinet to power down the system. Once it has powered down, wait 10 seconds then press the button again to power the system back up.
When powering the system up or down, wait 10 seconds before pressing the button again. This allows the system to complete the startup/shutdown process.
2. Wait approximately 2 minutes.3. When the system has completed reloading the software, the Status LED (LD2) will be flashing on the
CPU.
Performing a Software Upgrade: Refer to Saving Your Configuration (page 2-44), Backing Up/Restoring a Database (page 2-44), Using Flash Cards for System Software (page 2-45), and Upgrading Software (page 2-46) for complete details on how to work with the system software with the CPU.
2-12 ◆ Section 2: PCB Installation and Startup Aspire S Hardware Manual
Section 2: PCB Installation and Startup
2
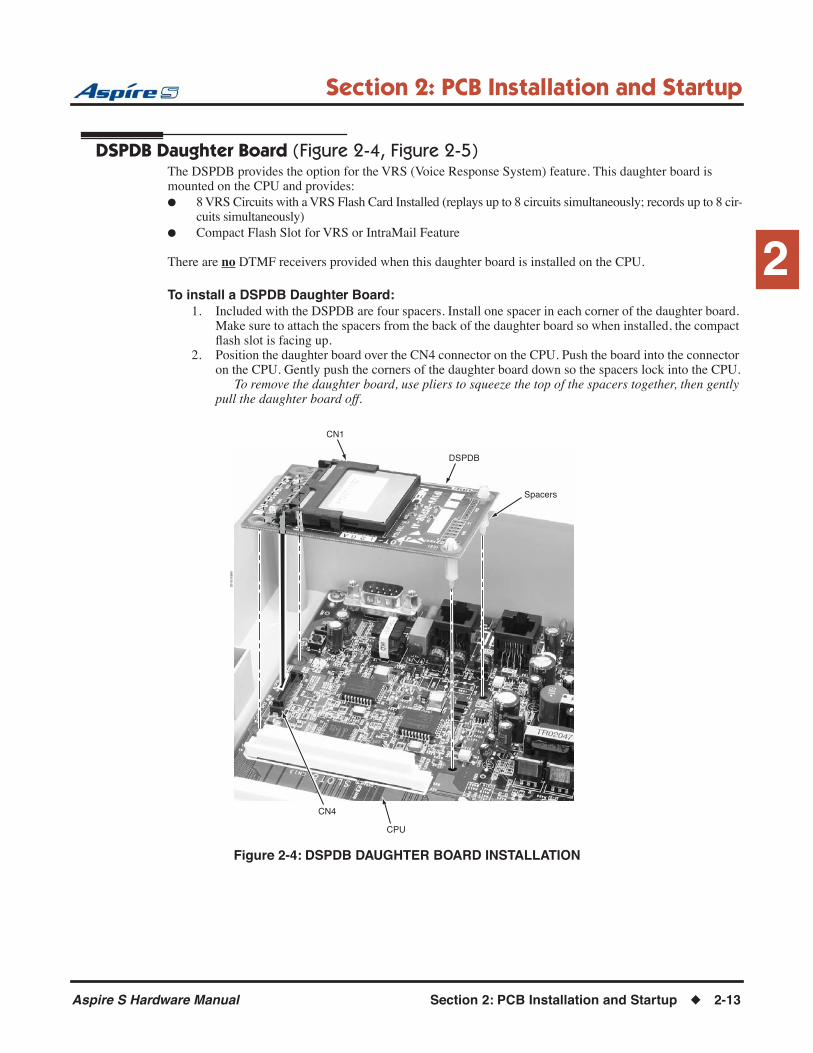
DSPDB Daughter Board (Figure 2-4, Figure 2-5)The DSPDB provides the option for the VRS (Voice Response System) feature. This daughter board is mounted on the CPU and provides:● 8 VRS Circuits with a VRS Flash Card Installed (replays up to 8 circuits simultaneously; records up to 8 cir-
cuits simultaneously)● Compact Flash Slot for VRS or IntraMail Feature
There are no DTMF receivers provided when this daughter board is installed on the CPU.
To install a DSPDB Daughter Board:1. Included with the DSPDB are four spacers. Install one spacer in each corner of the daughter board.
Make sure to attach the spacers from the back of the daughter board so when installed, the compact flash slot is facing up.
2. Position the daughter board over the CN4 connector on the CPU. Push the board into the connector on the CPU. Gently push the corners of the daughter board down so the spacers lock into the CPU.
To remove the daughter board, use pliers to squeeze the top of the spacers together, then gently pull the daughter board off.
Figure 2-4: DSPDB DAUGHTER BOARD INSTALLATION
0893130-25
DSPDB
CN1
CN4
CPU
Spacers
Aspire S Hardware Manual Section 2: PCB Installation and Startup ◆ 2-13
Section 2: PCB Installation and Startup
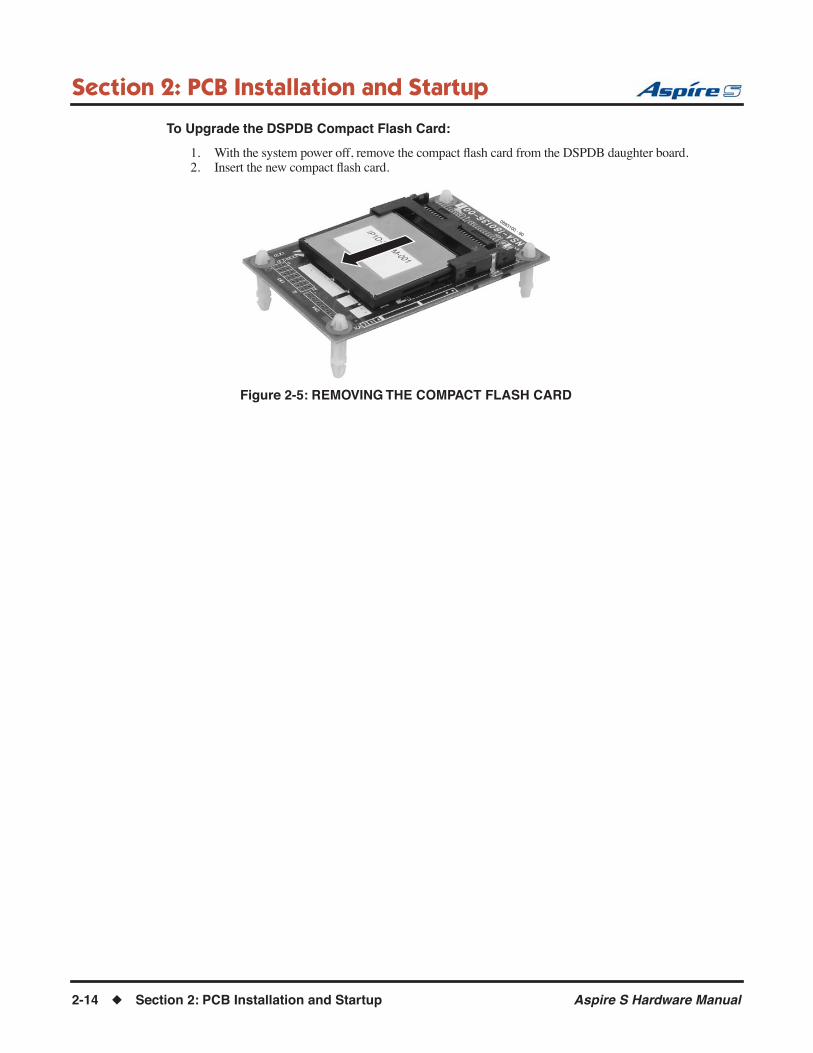
To Upgrade the DSPDB Compact Flash Card:
1. With the system power off, remove the compact flash card from the DSPDB daughter board.2. Insert the new compact flash card.
Figure 2-5: REMOVING THE COMPACT FLASH CARD
0893100 - 90
2-14 ◆ Section 2: PCB Installation and Startup Aspire S Hardware Manual

Section 2: PCB Installation and Startup
2
LAN Connection (ENTU) PCB (Figure 2-6)An ENTU PCB is required when a VoIP PCB is installed. If the ENTU is not installed, the system
will not start up. In addition, an ENTU would be required for a WebPro/PCPro LAN connection.
The ENTU PCB provides a LAN connector which is compatible with 100Base-TX and 10Base-T. This PCB is compatible in LAN applications using 10Mbps and 100Mbps. All ports will automatically identify and switch 100Base-TX, 10Base-T and Full/Half Duplex.
The VoIP PCB, which is required in order for IP telephones to communicate with non-VoIP Aspire phones, as well as to place or receive outside calls, must be connected to an external switching hub.
The PCB plugs into the CN6 and CN7 connectors on the CPU, with a maximum of 1 per system. Each PCB provides an RJ61 port connector. This is used to connect to a LAN terminal or external switching hub. Depending on the type of LAN terminal, the PCB may not be able to detect the difference between straight cable and cross-cable automatically. If auto-crossover is not functioning, use straight cable for that terminal connection.
If PoE (power over ethernet) is to be used to eliminate the separate power adapters, a separate power source is required. It is recommended that you use a power switch and/or power hub which is IEEE 802.3AF com-pliant. For example, the PowerDsine 6xxx series of products is unique in the fact that in addition to offering IEEE 802.3AF support, it also provides for the NEC proprietary detection and, therefore, the ILPA (In Line Power Adapter) is not required. For systems which require layer 2 switching capability and PoE, the NEC BlueFire 200/24 switch is recommended. This unit provides layer 2 switch capability in addition to being able to supply ethernet power to 24 NEC IP terminals. For this unit, power feeding is through the signal pair (1/2, 3/6) or spare pair (4/5, 7/8).
Refer to Section 6: LAN Connection (page 6-1) for additional information on using PoE on the Aspire.
Specifications● LAN Family Standard: Complies with 10Base-T and 100Base-TX (IEEE802.3)● Access Method: CSMA/CD● Transmission Line/Channel Interface: 10Base-T/100Base-TX = 1 port● LAN Family Interface (Layer 1):
Transmission Speed: 10Mbps/100Mbps Auto NegotiationCable: LAN Category 5 or higher - Straight/Cross cable auto negotiation (auto crossover)
LED IndicationsLED Function LED Status Operation Status
LD1ACT
LAN Operation Status Green Flashing Communicating Data
Green Off Not Activated
LD2LINK
LAN Operation Status Red On Link Established
Red Off No Link
Aspire S Hardware Manual Section 2: PCB Installation and Startup ◆ 2-15

Section 2: PCB Installation and Startup
Connector Pin-Outs on ENTU
Installing the ENTU:1. Included with the ENTU is one plastic spacer. Install the spacer in the corner of the daughter board
which will not have a support provided by the CPU. Make sure to attach the spacer from the back of the daughter board so when installed, the connectors are facing up.
2. Position the ENTU PCB over the CN6 connector on the CPU. Push the board into the connector on the CPU. Gently push the corner of the daughter board down so the spacer locks into the CPU.
To remove the daughter board, use pliers to squeeze the top of the spacer together, then gently pull the daughter board off.
3. Using the three screws provided with the ENTU PCB, secure the remaining three corners of the PCB to the CPU.
Once the system has been powered up, with normal operation, the status LED will flash fast. If trouble was found during the self diagnostics routine, the status LED will flash slowly.
4. Using the ferrite core provided with the ENTU PCB, wrap the end of the ethernet cable which is closest to the ENTU’s CN2 connector once around the ferrite core.
5. Plug the ethernet cable into the CN2 connector.6. Refer to the Aspire Software Manual (P/N 0893200) or the VoIP Feature Supplement (P/N
0893204) for required VoIP programming.
Figure 2-6: ENTU INSTALLATION
Ethernet Cable Connector - CN2 (RJ45)(10Base-T/100Base-TX Port)
Pin No. Signal
1 Tx+
2 Tx-
3 Rx+
4 -
5 -
6 Rx-
7 -
8 -
12345678
089313
0-3
2
CN2 - RJ 45 EthernetConnector
CN3CPU Connection
(For earth ground)
LD2 Link/Act LED LD1 10/100 Port Status LED
2-16 ◆ Section 2: PCB Installation and Startup Aspire S Hardware Manual

Section 2: PCB Installation and Startup
2
Digital Station (8ESIU-S) PCB (Figure 2-7)The 8ESIU-S PCB provides:● 8 digital extension circuits (used for digital telephones, DSS consoles, 1SLTAD adapters, 2PGDAD
adapters)The 8ESIU-S is not rated for OPX use. It is recommended that a 2DIOPU-S PCB be used instead (it
supports analog DID and single line telephone interface functions, such as Off-Premise Extensions).
● 1 extension status LED (indicates status for 4 extensions)● 1 PCB status LED
The CN3 and CN4 connectors each provide connection to 4 digital station ports. The ESIU-S requires one universal slot, with a maximum of 2 PCB’s per system. Note that this PCB can not be installed in slot 7 or 8.
The 8ESIU-S consumes 8 ports ranging between ports 01-26. There must be enough available ports in order for the Aspire system to recognize an 8ESIU-S PCB.
LED IndicationsLED Function LED Status Operation Status
LD2(PCB Status)
Indicates the status of the PCB.
Green On Initializing
Green Flashing (slow flash)
Initialization problem occurred during self-check.
Green Flashing (100ms On/Off)
Operating normally
Green Off Downloading
LD1 Indicates the status of terminals 1-8.
Red On Terminal in use
Red Off Terminal idle
Aspire S Hardware Manual Section 2: PCB Installation and Startup ◆ 2-17

Section 2: PCB Installation and Startup
Connector Pin-Outs on ESIU
RJ61 Cable Connector - CN4
Pin No. Connection
1 Ring for port 4
2 Ring for port 3
3 Ring for port 2
4 Tip for port 1
5 Ring for port 1
6 Tip for port 2
7 Tip for port 3
8 Tip for port 4
RJ61 Cable Connector - CN3
Pin No. Connection
1 Ring for port 8
2 Ring for port 7
3 Ring for port 6
4 Tip for port 5
5 Ring for port 5
6 Tip for port 6
7 Tip for port 7
8 Tip for port 8
12345678
12345678
2-18 ◆ Section 2: PCB Installation and Startup Aspire S Hardware Manual

Section 2: PCB Installation and Startup
2
To install the ESIU PCB:1. Install the ESIU into a slot.
Note that this PCB can not be installed in slot 7 or 8.
2. Tighten the screw on the PCB to secure the card to the cabinet.
Figure 2-7: ESIU INSTALLATION
0893
130-
29
CN6
CN7
CN4
CN3
LD2PCB Status LED
LD1Live Status LED
Aspire S Hardware Manual Section 2: PCB Installation and Startup ◆ 2-19
Section 2: PCB Installation and Startup
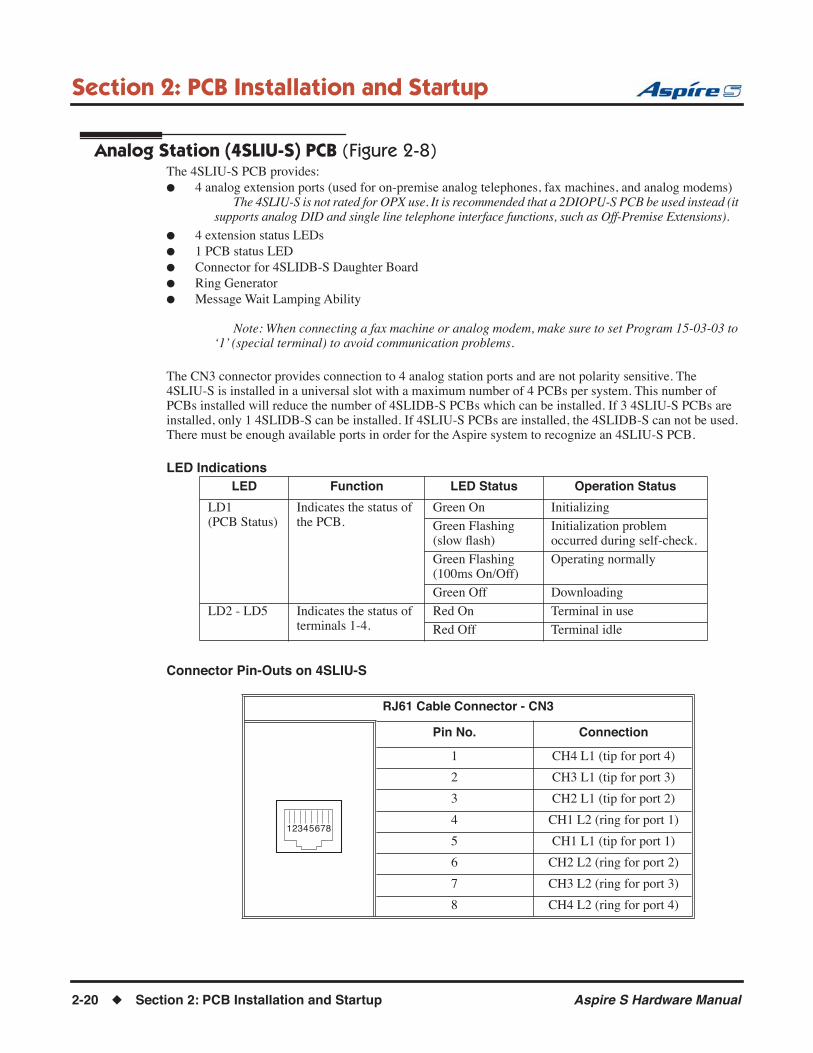
Analog Station (4SLIU-S) PCB (Figure 2-8)The 4SLIU-S PCB provides:● 4 analog extension ports (used for on-premise analog telephones, fax machines, and analog modems)
The 4SLIU-S is not rated for OPX use. It is recommended that a 2DIOPU-S PCB be used instead (it supports analog DID and single line telephone interface functions, such as Off-Premise Extensions).
● 4 extension status LEDs● 1 PCB status LED● Connector for 4SLIDB-S Daughter Board● Ring Generator● Message Wait Lamping Ability
Note: When connecting a fax machine or analog modem, make sure to set Program 15-03-03 to ‘1’ (special terminal) to avoid communication problems.
The CN3 connector provides connection to 4 analog station ports and are not polarity sensitive. The 4SLIU-S is installed in a universal slot with a maximum number of 4 PCBs per system. This number of PCBs installed will reduce the number of 4SLIDB-S PCBs which can be installed. If 3 4SLIU-S PCBs are installed, only 1 4SLIDB-S can be installed. If 4SLIU-S PCBs are installed, the 4SLIDB-S can not be used. There must be enough available ports in order for the Aspire system to recognize an 4SLIU-S PCB.
LED Indications
Connector Pin-Outs on 4SLIU-S
LED Function LED Status Operation Status
LD1(PCB Status)
Indicates the status of the PCB.
Green On Initializing
Green Flashing (slow flash)
Initialization problem occurred during self-check.
Green Flashing (100ms On/Off)
Operating normally
Green Off Downloading
LD2 - LD5 Indicates the status of terminals 1-4.
Red On Terminal in use
Red Off Terminal idle
RJ61 Cable Connector - CN3
Pin No. Connection
1 CH4 L1 (tip for port 4)
2 CH3 L1 (tip for port 3)
3 CH2 L1 (tip for port 2)
4 CH1 L2 (ring for port 1)
5 CH1 L1 (tip for port 1)
6 CH2 L2 (ring for port 2)
7 CH3 L2 (ring for port 3)
8 CH4 L2 (ring for port 4)
12345678
2-20 ◆ Section 2: PCB Installation and Startup Aspire S Hardware Manual

Section 2: PCB Installation and Startup
2
Installing an 4SLIU-S PCB:1. If the 4SLIDB-S is to be used, install this prior to inserting the 4SLIU-S PCB into the cabinet.2. Install the 4SLIU-S into the slot.3. Tighten the screw on the PCB to secure the card to the cabinet.
Figure 2-8: 4SLIU-S INSTALLATION
0893
130-
30
CN5 4SLIDB Connector
LD1 PCB Status LED
LD2 - LD5Line Status LEDs
CN4SLIDB PCB
Earth Ground Connection
CN3
Aspire S Hardware Manual Section 2: PCB Installation and Startup ◆ 2-21
Section 2: PCB Installation and Startup
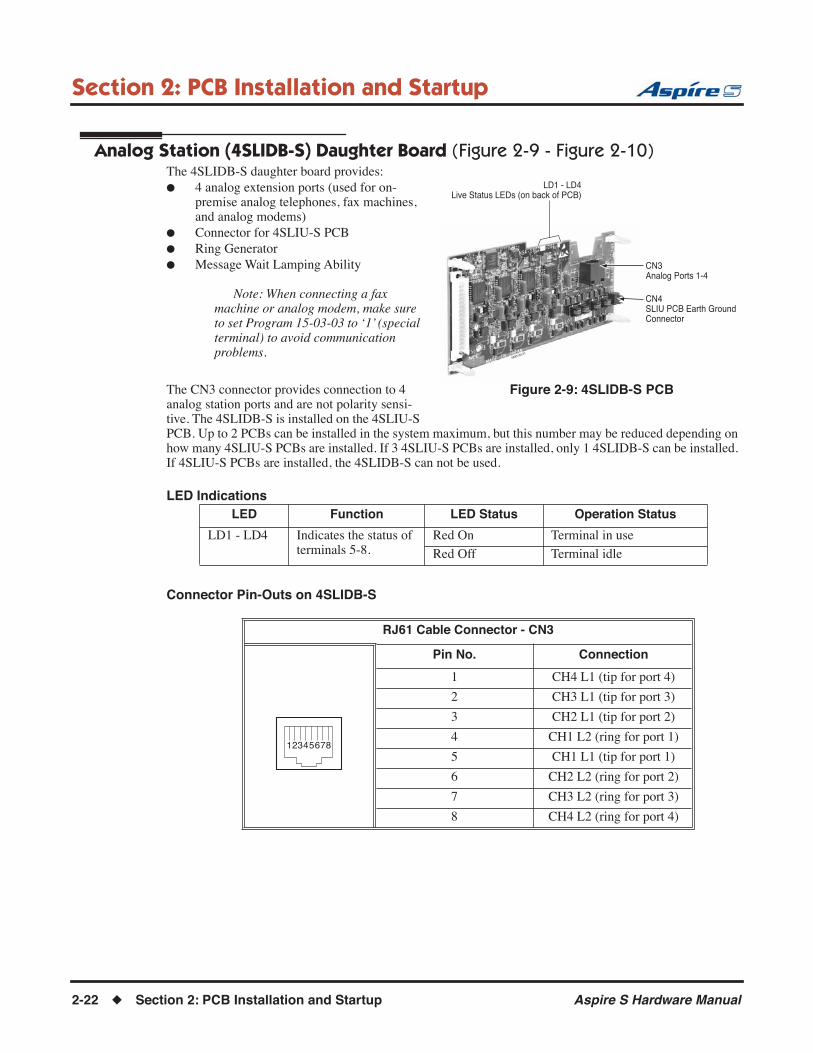
Analog Station (4SLIDB-S) Daughter Board (Figure 2-9 - Figure 2-10)The 4SLIDB-S daughter board provides: ● 4 analog extension ports (used for on-
premise analog telephones, fax machines, and analog modems)
● Connector for 4SLIU-S PCB● Ring Generator● Message Wait Lamping Ability
Note: When connecting a fax machine or analog modem, make sure to set Program 15-03-03 to ‘1’ (special terminal) to avoid communication problems.
The CN3 connector provides connection to 4 analog station ports and are not polarity sensi-tive. The 4SLIDB-S is installed on the 4SLIU-S PCB. Up to 2 PCBs can be installed in the system maximum, but this number may be reduced depending on how many 4SLIU-S PCBs are installed. If 3 4SLIU-S PCBs are installed, only 1 4SLIDB-S can be installed. If 4SLIU-S PCBs are installed, the 4SLIDB-S can not be used.
LED Indications
Connector Pin-Outs on 4SLIDB-S
LED Function LED Status Operation Status
LD1 - LD4 Indicates the status of terminals 5-8.
Red On Terminal in use
Red Off Terminal idle
RJ61 Cable Connector - CN3
Pin No. Connection
1 CH4 L1 (tip for port 4)
2 CH3 L1 (tip for port 3)
3 CH2 L1 (tip for port 2)
4 CH1 L2 (ring for port 1)
5 CH1 L1 (tip for port 1)
6 CH2 L2 (ring for port 2)
7 CH3 L2 (ring for port 3)
8 CH4 L2 (ring for port 4)
0893130-31
LD1 - LD4Live Status LEDs (on back of PCB)
CN3Analog Ports 1-4
CN4SLIU PCB Earth GroundConnector
Figure 2-9: 4SLIDB-S PCB
12345678
2-22 ◆ Section 2: PCB Installation and Startup Aspire S Hardware Manual

Section 2: PCB Installation and Startup
2
Installing an 4SLIDB-S Daughter Board:1. Included with the 4SLIDB-S are four plastic spacers. Place a plastic spacer in each corner of the
PCB. Make sure to attach the spacers on the front of the daughter board so when installed, the com-ponents are facing the 4SLIU-S PCB.
2. Position the 4SLIDB-S’s CN1 connector over the CN5 connector on the 4SLIU-S PCB. Press the boards together, ensuring the plastic spacers lock in place.
3. Install the 4SLIU-S PCB into the slot.
Figure 2-10: 8SLIDB-S INSTALLATION
0893
130-
24
4SLIDBCN1
CN4
CN4
CN5
4SLIU
Spacers
Aspire S Hardware Manual Section 2: PCB Installation and Startup ◆ 2-23

Section 2: PCB Installation and Startup
Analog Trunk (4COIU-S) PCB (Figure 2-11)The Analog Trunk (COIU-S) PCB provides:● 4 analog loop start line/trunk circuits - no ground start is provided● 4 trunk status LEDs● 4 Caller ID Circuits● 1 Power Failure Transfer Circuit● 1 PCB status LED
The CN5 and CN7 connectors each provide connection to 2 analog trunk ports, which are polarity sensitive (tip to tip, ring to ring). The power failure circuit, however, is not polarity sensitive. A maximum of 2 4COIUs per system is allowed.
LED IndicationsLED Function LED Status Operation Status
LD5(PCB Status)
Indicates the status of the PCB.
Green On Initializing
Green Flashing (slow flash)
Initialization problem occurred during self-check.
Green Flashing (100ms On/Off)
Operating normally
Green Off Downloading
LD1 - LD4 Indicates the status of the lines.
Red On Line in use
Red Off Line idle
2-24 ◆ Section 2: PCB Installation and Startup Aspire S Hardware Manual

Section 2: PCB Installation and Startup
2
Connector Pin-Outs on COIU-S PCB
RJ61 Cable Connector - CN5The CN5 and CN7 connectors are polarity sensitive (tip to tip, ring to ring).
Pin No. Connection
1 -
2 SLT InterfacePower Failure Circuit - Tip
3 Circuit 2 - Tip
4 Circuit 1 - Ring
5 Circuit 1 - Tip
6 Circuit 2 - Ring
7 SLT InterfacePower Failure Circuit - Ring
8 -
RJ61 Cable Connector - CN7
Pin No. Connection
1 -
2 -
3 Circuit 4 - Tip
4 Circuit 3 - Ring
5 Circuit 3 - Tip
6 Circuit 4 - Ring
7 -
8 -
12345678
12345678
Aspire S Hardware Manual Section 2: PCB Installation and Startup ◆ 2-25

Section 2: PCB Installation and Startup
Installing the Analog Trunk PCB:
1. Install the COIU-S into a slot.The trunk ports are polarity sensitive (tip to tip, ring to ring). Be sure the wiring is correct.
Once the system is powered up, with normal operation, the status LED will flash fast. If trouble was found during the self diagnostics routine, the status LED will flash slowly.
2. Tighten the screw on the PCB to secure the card to the cabinet..
Figure 2-11: 4COIU-S INSTALLATION
2-26 ◆ Section 2: PCB Installation and Startup Aspire S Hardware Manual
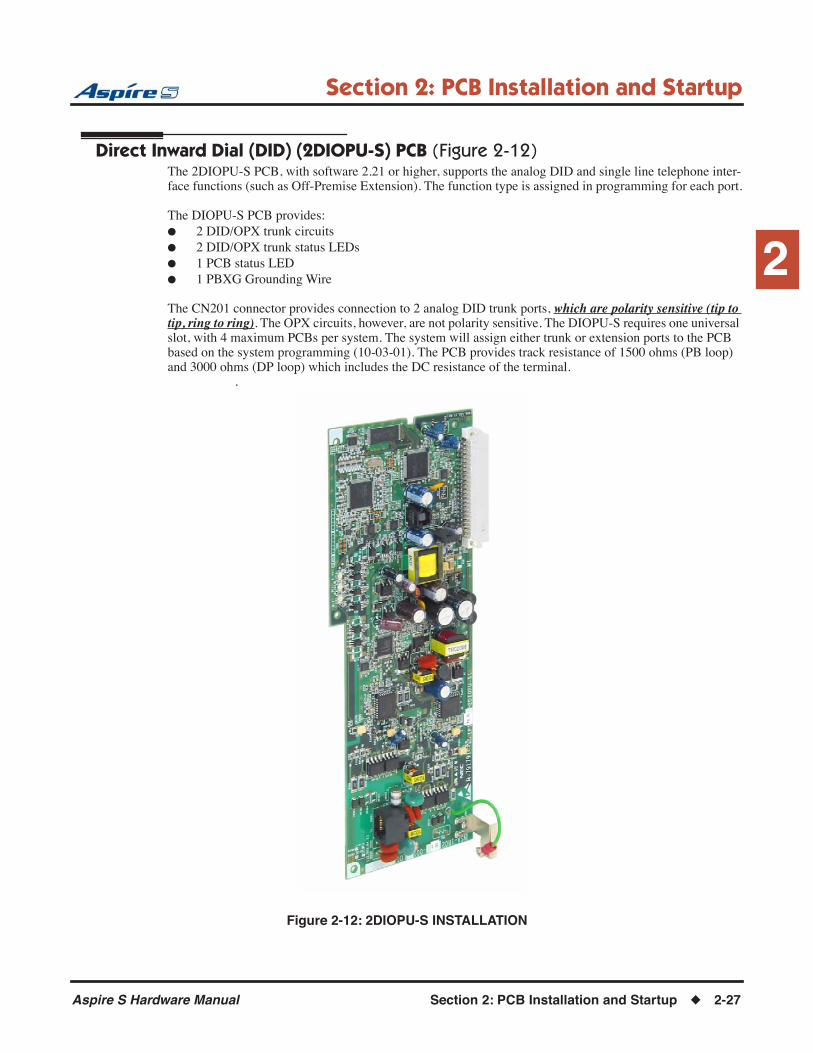
Section 2: PCB Installation and Startup
2
Direct Inward Dial (DID) (2DIOPU-S) PCB (Figure 2-12)The 2DIOPU-S PCB, with software 2.21 or higher, supports the analog DID and single line telephone inter-face functions (such as Off-Premise Extension). The function type is assigned in programming for each port.
The DIOPU-S PCB provides:● 2 DID/OPX trunk circuits● 2 DID/OPX trunk status LEDs● 1 PCB status LED● 1 PBXG Grounding Wire
The CN201 connector provides connection to 2 analog DID trunk ports, which are polarity sensitive (tip to tip, ring to ring). The OPX circuits, however, are not polarity sensitive. The DIOPU-S requires one universal slot, with 4 maximum PCBs per system. The system will assign either trunk or extension ports to the PCB based on the system programming (10-03-01). The PCB provides track resistance of 1500 ohms (PB loop) and 3000 ohms (DP loop) which includes the DC resistance of the terminal.
.
Figure 2-12: 2DIOPU-S INSTALLATION
Aspire S Hardware Manual Section 2: PCB Installation and Startup ◆ 2-27

Section 2: PCB Installation and Startup
LED Indications
Connector Pin-Outs on DIOPU-S PCB
Installing the Direct Inward Dial PCB:1. Install the DIOPU-S PCB into a slot.2. Connect the PBXG grounding wire to the PBXG grounding terminal in the cabinet.
The analog DID trunk ports are polarity sensitive (tip to tip, ring to ring). The OPX circuits, however, are not polarity sensitive. Be sure the wiring is correct for the application.
Once the system is powered up, with normal operation, the status LED will flash fast. If trouble was found during the self diagnostics routine, the status LED will flash slowly.
3. Tighten the screw on the PCB to secure the card to the cabinet.
LED Function LED Status Operation Status
LD1(PCB Status)
Indicates the status of the PCB.
Green On Initializing
Green Flashing (slow flash)
Initialization problem occurred during self-check.
Green Flashing (100ms On/Off)
Operating normally
Green Off Downloading
LD2 - LD3 Indicates the status of the lines.
Red On Line in use
Red Off Line idle
RJ61 Cable Connector - CN201
Pin No. Connection
1 N/A
2 N/A
3 Tip for port 2
4 Ring for port 1
5 Tip for port 1
6 Ring for port 2
7 N/A
8 N/A
• Connect the tip to the ground side and the ring to the -48V side when wiring for analog DID trunk ports.
12345678
2-28 ◆ Section 2: PCB Installation and Startup Aspire S Hardware Manual
Section 2: PCB Installation and Startup
2
BRI (2BRIU-S) Interface PCB (Figure 2-13)Check with your NEC Sales Representative for availability of this PCB.
The BRI PCB provides:● 2 2-Channel Circuits (2B + D) configured as T-Bus● 64 Kb/s Clear B-Channel and 16 Kb/s D-Channel● 4 trunk/extension status LEDs● 1 PCB status LED● 1 run/block switch
The BRI Interface PCB uses a single universal slot. A maximum of 2 BRIU-S PCBs can be installed when used as T-Bus. Each PCB connects to the network via an NTI Network Termination. With the maximum number of PCBs installed, the following can be provided:● The 2BRIU-S, when used as T-Bus, provides 2 BRI circuits and 4 BRI channels. A maximum of 7
ISDN terminals can be connected between an external DSU and the 2BRIU-S PCB.
The trunk circuit can be connected to either an ISDN trunk or ISDN telephone set, depending on the SW102 and SW202 switch settings.
Setting the SW100-SW200 SwitchesIn the following cases, the SW100-SW200 switches should be set to the ON position:● When the channel is assigned as a T-Bus Point-to-Point.● With T-Bus Point-to-Multipoint and if the system is connected at the end of the multipoint.
Otherwise, the SW100-SW200 switches should be set to the OFF position.
Switch Name
Switch Position Result Comments
SW102SW202
T T-Bus Connection
S S-Bus Connection Not currently used.
SW100SW200
ON Termination resistor is ON This switch should be set to ON:1. When T-Bus with Point-to-Point is selected.2. When T-Bus with Point-to-Multipoint is selected and if the connection to the Aspire system at the last port of the Bus connection.
OFF Termination resistor is OFF When T-Bus with Point-to-Multipoint is selected and if the Aspire system is not connected to the last port of the Bus connection, this switch should be OFF.
CN102CN202
ON With S-Bus selected, the Feeding Power is supplied to the terminal.
- Not currently used. -If S-Bus is selected, this switch should be ON.
OFF With S-Bus selected, the Feeding Power is not supplied to the terminal.
- Not currently used. -If T-Bus is selected, this switch should be OFF.
Aspire S Hardware Manual Section 2: PCB Installation and Startup ◆ 2-29
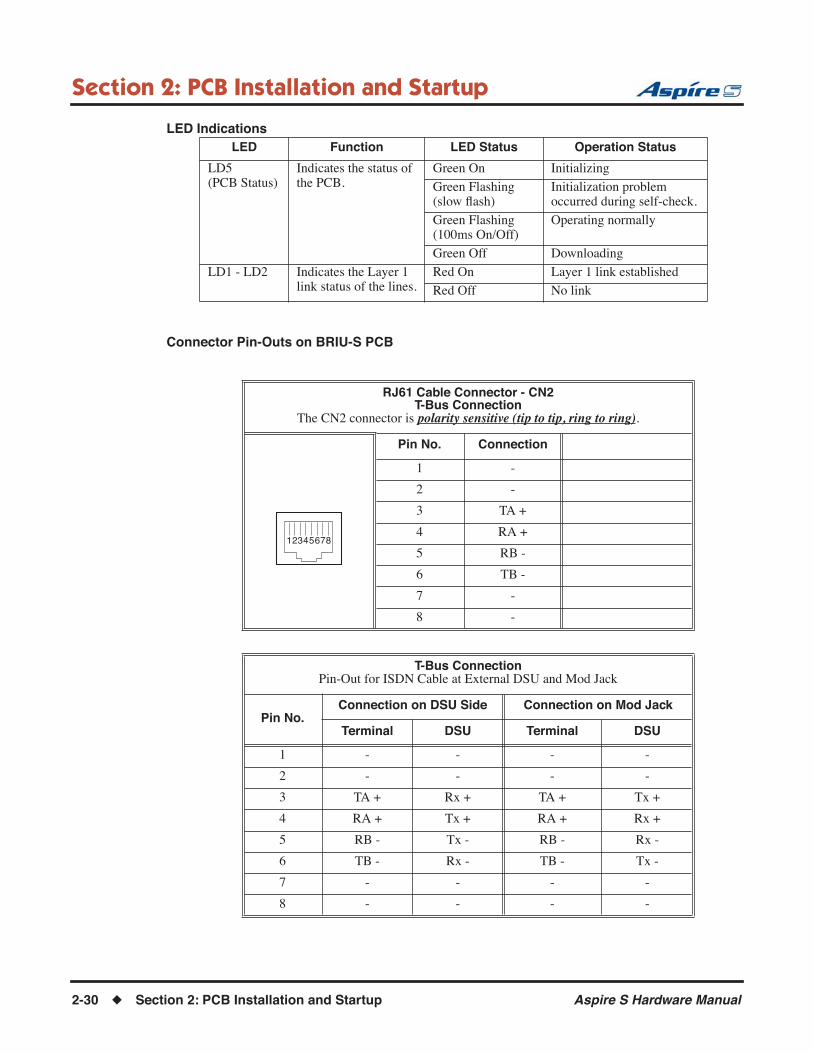
Section 2: PCB Installation and Startup
LED Indications
Connector Pin-Outs on BRIU-S PCB
LED Function LED Status Operation Status
LD5(PCB Status)
Indicates the status of the PCB.
Green On Initializing
Green Flashing (slow flash)
Initialization problem occurred during self-check.
Green Flashing (100ms On/Off)
Operating normally
Green Off Downloading
LD1 - LD2 Indicates the Layer 1 link status of the lines.
Red On Layer 1 link established
Red Off No link
RJ61 Cable Connector - CN2 T-Bus Connection
The CN2 connector is polarity sensitive (tip to tip, ring to ring).
Pin No. Connection
1 -
2 -
3 TA +
4 RA +
5 RB -
6 TB -
7 -
8 -
T-Bus ConnectionPin-Out for ISDN Cable at External DSU and Mod Jack
Pin No.Connection on DSU Side Connection on Mod Jack
Terminal DSU Terminal DSU
1 - - - -
2 - - - -
3 TA + Rx + TA + Tx +
4 RA + Tx + RA + Rx +
5 RB - Tx - RB - Rx -
6 TB - Rx - TB - Tx -
7 - - - -
8 - - - -
12345678
2-30 ◆ Section 2: PCB Installation and Startup Aspire S Hardware Manual

Section 2: PCB Installation and Startup
2
To install a BRI Interface PCB:1. Set the SWn02 jumpers on the BRI PCB for either T-Bus or S-Bus.2. Set the SWn00 jumpers as either terminated or unterminated.3. Set the CNn02 jumpers to either provide power (with S-Bus) or not to supply power (with T-Bus).4. Plug the BRI PCB into the system cabinet.
Once the system is powered up, with normal operation, the status LED will flash fast. If trouble was found during the self diagnostics routine, the status LED will flash slow.
Once connected, the ISDN Layer Link Status LEDs will be on steady when the Layer 1 link is established. If there is no link, the LED will be off.
5. Connect the cable from the NT1 Network Termination cable to the CN2 connector on the BRI PCB.6. Tighten the screw on the PCB to secure the card to the cabinet.
Figure 2-13: BRI PCB INSTALLATION
0893
130-
28
CN102 - Power FeedSelector for Terminal
SW100Sets termination impedance
SW102Selects 'T' or 'S' Bus Interface
SW200Sets termination impedance
SW202Selects 'T' or 'S' Bus Interface
CN202 - Power FeedSelector for Terminal
CN2RJ61 ISDN Trunk Connector(Trunk 2)
CN2RJ61 ISDN Trunk Connector(Trunk 1)
CN8
LD1 - LD2ISDN Layer
Live Status LEDs
PCB Status LED
Aspire S Hardware Manual Section 2: PCB Installation and Startup ◆ 2-31

Section 2: PCB Installation and Startup
Voice Mail - IntraMail (Figure 2-14)A DSPDB daughter board is required for either version of IntraMail.
4 Port IntraMail Compact Flash Card — P/N 0892175The IntraMail is a plug-in “in-skin” full-featured, DSP-based integrated Voice Mail with Automated Attendant for the Aspire S (with software 2.50 or higher). This card is installed on the DSP Resource daughter board.
The 4 port compact flash card provides:● 4 Voice Mail ports, 4 hours of message storage, and up to 160 mailboxes.
It requires a DSPDBU Daughter Board P/N 0891003.
The IntraMail Automated Attendant answers incoming calls and routes them quickly and efficiently. Inte-grated Voice Mail features include Conversation Record, Answering Machine Emulation, and Caller ID with Return Call. Interactive Soft Keys guide the display telephone user through the extensive IntraMail feature set. This feature is available in PCPro software 2.30 or higher.
8 Port IntraMail Compact Flash Card — P/N 0892177The IntraMail is a plug-in “in-skin” full-featured, DSP-based integrated Voice Mail with Automated Attendant for the Aspire S (with software 2.50 or higher). This card is installed on the DSP Resource daughter board.
The 8 port compact flash card provides:● 8 Voice Mail ports, 8 hours of message storage, and up to 160 mailboxes.
It requires a DSPDBU Daughter Board P/N 0891003.
The IntraMail Automated Attendant answers incoming calls and routes them quickly and efficiently. Inte-grated Voice Mail features include Conversation Record, Answering Machine Emulation, and Caller ID with Return Call. Interactive Soft Keys guide the display telephone user through the extensive IntraMail feature set. This feature is available in PCPro software 2.30 or higher.
IntraMail Specifications
P/N 0892175 P/N 0892177
Ports: 4 8Station Mailboxes: 128Routing Mailboxes: 16Master Mailboxes: 16
(Only 8 of the 16 Master mailboxes are accessible in Aspire S.)Total Mailboxes: 160Storage Hours: 4 Hours 8 HoursAnswer Tables: 8Dial Action Tables: 16Programming Interface: Aspire S telephone programming or Aspire PCPro software 2.30+. Remote Programming: Access Via HTML-based Aspire WebPro or using customer-pro-
vided modems with Aspire PCPro.Voice Storage Media: Flash Card (on IntraMail PCB)Languages: 1 (English Mnemonic)
2-32 ◆ Section 2: PCB Installation and Startup Aspire S Hardware Manual

Section 2: PCB Installation and Startup
2
Installing an IntraMail Compact Flash Card:The system must be powered down prior to installing the IntraMail card.
1. If not already installed, install the DSPDB daughter board. Included with the DSPDB are four spac-ers. Install one spacer in each corner of the daughter board. Make sure to attach the spacers from the back of the daughter board so when installed, the compact flash slot is facing up.
2. Position the daughter board over the CN4 connector on the CPU. Push the board into the connector on the CPU. Gently push the corners of the daughter board down so the spacers lock into the CPU.
To remove the daughter board, use pliers to squeeze the top of the spacers together, then gently pull the daughter board off.
3. Insert the IntraMail CompactFlash card into the slot in the DSPDB.
Figure 2-14: INTRAMAIL INSTALLATION
Refer to the Aspire IntraMail System Guide, P/N 0893240, for programming details.
0893100-165
IntraMailCN1
CN4
CPU
Spacers
Aspire S Hardware Manual Section 2: PCB Installation and Startup ◆ 2-33

Section 2: PCB Installation and Startup
VoIP (VOIPU-S) PCB (Figure 2-15)An ENTU-S PCB is required when a VoIP PCB is installed. If the ENTU-S is not installed, the
system will not start up.
The 4VOIPU-S PCB is used for converting the RTP (Real Time Transfer Protocol) packets via the IP net-work and PCM highway. The IP telephones are connected directly to the IP bus. When IP phones need to be connected to a conventional PCM-based digital circuit, this PCB converts the IP packet signal into a PCM signal format and connects to the PCM time division switch.
The VOIPU-S PCB is required in order for IP telephones to communicate with non-VoIP Aspire phones, as well as to place or receive outside calls.
The 4VOIPU-S PCB provides:● 4VOIPU-S PCB provides up to 4 channels● Connector for the 4VOIPDB-S daughter board (providing an additional 4 channels)● 1 PCB status LED● DB status LED● RIP session status LED● PCMCIA slot LED● Reset switch● Load switch● Boot jumper● 1 run/block switch
A maximum of 3 PCBs per system are allowed. This provides 12 channels per system with the 4VOIPU (with the 4VOIPDB-S, 24 channels are available).
Add the VoIP PCB after all other PCBs have been installed and the ports assigned. Otherwise, port number-ing may be off as the VoIP PCB is recognized first (even before the ports on the CPU). This would mean the VoIP is assigned ports 1-4 and the digital and analog ports on the CPU would then follow.
When installing a VoIP PCB, the 4VOIPU-S PCB uses a consecutive block of 4 trunk ports if there are 4 vacant 4 ports available. The 4VOIPU-S with a 4VOIPDB-S PCB uses a consecutive block of 8 trunk ports if there are 8 ports available. If there are not enough trunk ports available, the VOIPU will start up without allocating any trunk ports.
If the PCB is not going to be used for trunks, the logical trunk ports can be set to ‘0’ in Program 10-03-01 : PCB Setup, but the physical trunk ports are still assigned to the PCB and cannot be used for any other PCB unless the PCB is deleted from the slot in Program 90-05 : Slot Control. A maximum of 16 IP extensions or 8 IP trunks are possible with the Aspire S. The VoIP PCB can be plugged into any universal slot.
The separate software hub should be a 100Base/full duplex hub. To avoid network problems and to ensure good voice quality, do not use a Repeater Hub/10Base.
2-34 ◆ Section 2: PCB Installation and Startup Aspire S Hardware Manual
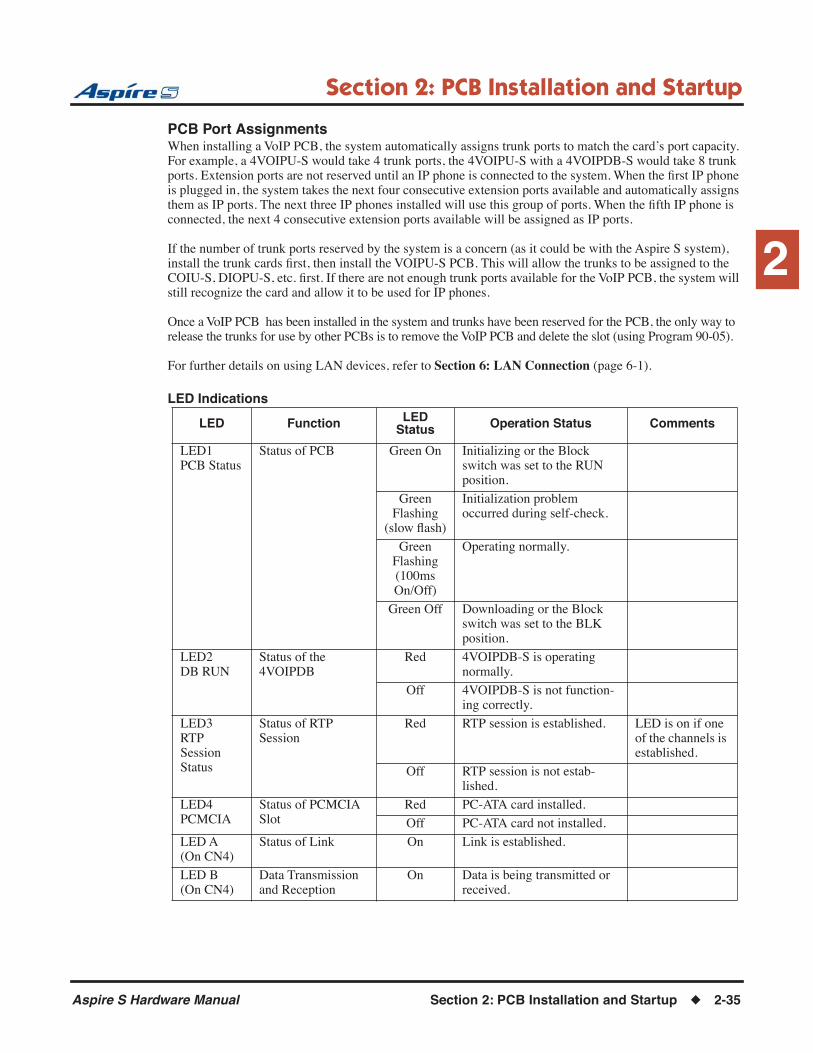
Section 2: PCB Installation and Startup
2
PCB Port AssignmentsWhen installing a VoIP PCB, the system automatically assigns trunk ports to match the card’s port capacity. For example, a 4VOIPU-S would take 4 trunk ports, the 4VOIPU-S with a 4VOIPDB-S would take 8 trunk ports. Extension ports are not reserved until an IP phone is connected to the system. When the first IP phone is plugged in, the system takes the next four consecutive extension ports available and automatically assigns them as IP ports. The next three IP phones installed will use this group of ports. When the fifth IP phone is connected, the next 4 consecutive extension ports available will be assigned as IP ports.
If the number of trunk ports reserved by the system is a concern (as it could be with the Aspire S system), install the trunk cards first, then install the VOIPU-S PCB. This will allow the trunks to be assigned to the COIU-S, DIOPU-S, etc. first. If there are not enough trunk ports available for the VoIP PCB, the system will still recognize the card and allow it to be used for IP phones.
Once a VoIP PCB has been installed in the system and trunks have been reserved for the PCB, the only way to release the trunks for use by other PCBs is to remove the VoIP PCB and delete the slot (using Program 90-05).
For further details on using LAN devices, refer to Section 6: LAN Connection (page 6-1).
LED Indications
LED Function LED Status Operation Status Comments
LED1PCB Status
Status of PCB Green On Initializing or the Block switch was set to the RUN position.
Green Flashing
(slow flash)
Initialization problem occurred during self-check.
Green Flashing (100ms On/Off)
Operating normally.
Green Off Downloading or the Block switch was set to the BLK position.
LED2DB RUN
Status of the 4VOIPDB
Red 4VOIPDB-S is operating normally.
Off 4VOIPDB-S is not function-ing correctly.
LED3RTP Session Status
Status of RTP Session
Red RTP session is established. LED is on if one of the channels is established.
Off RTP session is not estab-lished.
LED4PCMCIA
Status of PCMCIA Slot
Red PC-ATA card installed.
Off PC-ATA card not installed.
LED A (On CN4)
Status of Link On Link is established.
LED B (On CN4)
Data Transmission and Reception
On Data is being transmitted or received.
Aspire S Hardware Manual Section 2: PCB Installation and Startup ◆ 2-35

Section 2: PCB Installation and Startup
Connector Pin-Outs on VOIPU-S PCB
RJ61 Cable Connector - CN4 10Base-T / 100Base-TX Port
Pin No. Connection
1 Tx+
2 Tx-
3 Rx+
4 -
5 -
6 Rx-
7 -
8 -
Serial Cable Connector - CN2 Serial Cross Cable with Mini-Din
(Used only for VOIPU-S PCB maintenance)
Pin No. Connection
1 DCD
2 RTS
3 RxD
4 GND
5 TxD
6 CTS
7 DTR
8 DSR
12345678
12
3
4
5
67
8
2-36 ◆ Section 2: PCB Installation and Startup Aspire S Hardware Manual

Section 2: PCB Installation and Startup
2
Installing the VoIP PCB:To avoid unexpected extension/trunk numbering if the VoIP PCB registers with the system
first, install the VoIP PCB after the other types of extension/trunk PCBs have been installed.1. Set the run/block switch DOWN.
If the VOIPDB-S is to be used, install this prior to inserting the VOIPU-S PCB into the cabinet. Refer to VoIP (VOIPDB-S) Daughter Board (Figure 2-16) (page 2-39) for more details.
2. Install the VOIPU-S PCB into a slot.3. Set the run/block switch UP.
Once the system is powered up, with normal operation, the status LED will flash fast. If trouble was found during the self diagnostics routine, the status LED will flash slowly.
4. Connect the VOIPU-S PCB to an external switching hub using an ethernet cable.5. Tighten the screw on the PCB to secure the card to the cabinet.6. Refer to the Aspire Software Manual (P/N 0893200) for required programming.
Figure 2-15: VOIPU-S PCB INSTALLATION
08
93
13
0-2
6
CN6
CN14PCMCIA
CN11VOIPDB Connector
LED1 PCB Status LED
LED2 DB Run LED
LED3 RIP Session Status LED
LED4 PCMCIA Slot LED
SW2 Reset Switch
SW3 Run/Block Switch
SW1 Load Switch
JP1 Boot Jumper
CN4 LAN InterfaceConnector
LED A [left] andAct LED B [right]
CN2Serial Connector
Load Jumper
Aspire S Hardware Manual Section 2: PCB Installation and Startup ◆ 2-37

Section 2: PCB Installation and Startup
Upgrading Your VOIPU-S Firmware1. Copy the updated firmware file (VoIPU.bin) to the compact flash card.2. Power down the system.3. Insert the CF (compact flash) card into the VOIPU-S PCB’s CN14 slot.4. Move the Load jumper (JP6) to pins 2-3.5. Insert the PCB into the cabinet.6. Power up the system.7. Remove the CF card once the status LED1 on the VOIPU-S PCB starts flashing green.8. Set the Load jumper (JP6) back to pins 1-2.
OR
Using an RS232 Connection:1. Copy the updated firmware file (VoIPU.bin) to the compact flash card.2. Power down the system.3. Connect a PC to the serial connector (CN1) on the Aspire S using an RS232 cross cable.4. Open HyperTerminal on the PC.
The settings for the HyperTerminal session should be:Baud Rate: 38400, Data Bit: 8, Non Parity, Stop Bit: 1
5. Set the SW3 switch on the Aspire S CPU to the “6” side.6. Insert the CF (compact flash) card into the VOIPU-S PCB’s CN14 slot.7. Move the Load jumper (JP6) to pins 2-3.8. Insert the PCB into the cabinet.9. Power up the system.10. Remove the CF card once the status LED1 on the VOIPU-S PCB starts flashing green.11. Enter “slot info x” (x=the slot number) from HyperTerminal.12. Confirm the version number.13. Set the Load jumper (JP6) back to pins 1-2.14. Set the SW3 switch on the Aspire S to the “4” side.
2-38 ◆ Section 2: PCB Installation and Startup Aspire S Hardware Manual

Section 2: PCB Installation and Startup
2
VoIP (VOIPDB-S) Daughter Board (Figure 2-16)The 4VOIPDB-S daughter board provides: ● 4 channels● Connector for the 4VOIPU-S PCB (combination
provides a maximum of 8 channels per slot)
The VOIPDB-S is installed on the VOIPU-S PCB with a maximum of 3 daughter boards per system. This pro-vides a maximum of 24 channels when combining the 4VOIPU-S and 4VOIPDB-S.
When installing a 4VOIPU-S with a 4VOIPDB-S PCB, the system uses a consecutive block of 8 trunk ports if there are 8 ports available. If there are not enough trunk ports available, the VOIPU will start up without allocat-ing any trunk ports.
If the PCB is not going to be used for trunks, the logical trunk ports can be set to ‘0’ in Program 10-03-01 : PCB Setup, but the physical trunk ports are still assigned to the PCB and cannot be used for any other PCB unless the PCB is deleted from the slot in Program 90-05 : Slot Control.
Refer to PCB Port Assignments on page 2-35 for details on the port usage with the VOIPDB-S. For further details on using LAN devices, refer to Section 6: LAN Connection (page 6-1).
Installing an VOIPDB-S Daughter Board:1. Included with the VOIPDB-S are four plastic spacers. These are installed in each of the four corners
of the daughter board. Make sure to attach the spacers on the front of the daughter board so when installed, the components are facing the VOIPU-S PCB.
2. Position the VOIPDB-S’s CN6 connector over the CN11 connector on the VOIPU-S PCB. Press the boards together, ensuring the plastic spacers lock in place.
3. Install the VOIPU-S PCB into the slot.4. Refer to VoIP Feature Supplement (P/N 0893204) for required programming.
Figure 2-16: VOIPDB
Aspire S Hardware Manual Section 2: PCB Installation and Startup ◆ 2-39

Section 2: PCB Installation and Startup
SYSTEM STARTUP
System StartupYou can now power up the system and briefly check its operation. Before proceeding, be sure that:● The common equipment is installed correctly.● All extensions are cabled correctly.● All earth ground and telco connections are installed correctly.● PCBs are configured, equipped, and strapped correctly.
Powering Up the SystemTo avoid unexpected extension/trunk numbering if the VoIP PCB registers with the system
first, install the VoIP PCB after the other types of extension/trunk PCBs have been installed.When powering the system up or down, wait 10 seconds before pressing the button again. This
allows the system to complete the startup/shutdown process.
1. Install all the required PCBs into the system cabinet.2. Plug in all system telephones. A display telephone should be plugged into port 01 (extension 301).3. Plug in the AC power cord for the cabinet into its surge protector.4. When starting the system for the first time, hold the LOAD button on the CPU and turn the AC
power button ON. After approximately 3 seconds, release the LOAD button.This performs a cold start (defaults all program entries) on the Aspire system to make sure
you’re starting with a defaulted system.
When powering up any other time, simply press the power supply’s AC power button. Refer to Switch Settings and LED Indications on page 2-8 for CPU LED status.
5. Wait about two minutes for the system to boot. The telephone display at extension 301 will show the Time/Date and extension number when the boot sequence completes.
Note: Refer to TROUBLESHOOTING (page 3-16) if the system does not boot.
The system will automatically recognize each PCB installed in the system. If a PCB has previously been installed in a slot and another type of PCB is to be installed in that same slot, the PCB must be first be removed from the cabinet and then the slot definition removed using Program 90-05 prior to installing the new PCB.
This same condition applies to extensions and other devices connected to the system. For example, if a port was previously used for a keyset and a DSS Console is to be installed in that same port, it must first be unde-fined in Program 10-03 before the console is connected.
For more information on Cold and Hot system starts, refer to Central Processing Unit (CPU) PCB (Figure 2-3) (page 2-6).
Whenever powering down the system, check to make sure the only LED flashing on the CPU card itself is the LD2 LED (farthest right of the LEDs). This LED is located in the lower left-hand corner of the CPU. If any other LEDs are flashing on the CPU, wait until they stop or else the system data may be corrupted.
2-40 ◆ Section 2: PCB Installation and Startup Aspire S Hardware Manual

Section 2: PCB Installation and Startup
2
PCB STARTUP
Initial PCB InstallationTo avoid unexpected extension/trunk numbering if the VoIP PCB registers with the system
first, install the VoIP PCB after the other types of extension/trunk PCBs have been installed.
The order in which SLIU-S and ESIU-S PCBs are physically inserted determines the numbering plan. The installer must install extension PCBs in order (i.e.; slot 3 first, slot 4 next, etc.) for a sequential number-ing plan.
For example, as the CPU provides 8 digital station ports (ext. 301-308), when 2 more station cards are installed in the following order, the numbering plan below would apply:
Refer to PCB Port Assignments on page 2-35 for details on the port usage with the VOIPU-S PCB and VOIPDB-S. As these cards are assigned trunk ports when initially installed, this could impact the number of ports available for extensions.
Order of Install PCB Slot # PCB Extension Numbers
1 CPU --- 301-308 (digital extensions)
2 CPU --- 309-310 (analog extensions)
3 3 4SLIU-S (with the 4SLIDB-S daughter
board)
311-318
4 4 8ESIU-S 319-326
Aspire S Hardware Manual Section 2: PCB Installation and Startup ◆ 2-41

Section 2: PCB Installation and Startup
Initial Programming (Figure 2-17)The system can be programmed using the following methods:● Through a digital keyset● Web Programming
Refer to the PCPro/WebPro Installation Manual, P/N 0893201, for complete installation details.
Refer to the Aspire Software Manual (P/N 083200) for complete details on programming.
Entering the Programming ModeEnter the system programming mode at extension 301:
1. Press CALL1. (You hear dial tone).2. Dial # * # *.3. Dial the system password.
4. Press HOLD.
Port DefaultsWith the default settings, the ports are assigned as follows:
Making Test CallsIn the initial configuration:● All Programmable Function keys are line keys (e.g., key 1 is line 1).● All trunks are loop start DTMF.
Password Level
12345678 2 (IN)
0000 3 (SA)
9999 4 (SB)
Station Ports: 1-26 (extensions 301-499 and 5000-5312)
Virtual Station Ports: 1-24 (extensions not assigned)
Trunk Ports: 1-8
2-42 ◆ Section 2: PCB Installation and Startup Aspire S Hardware Manual
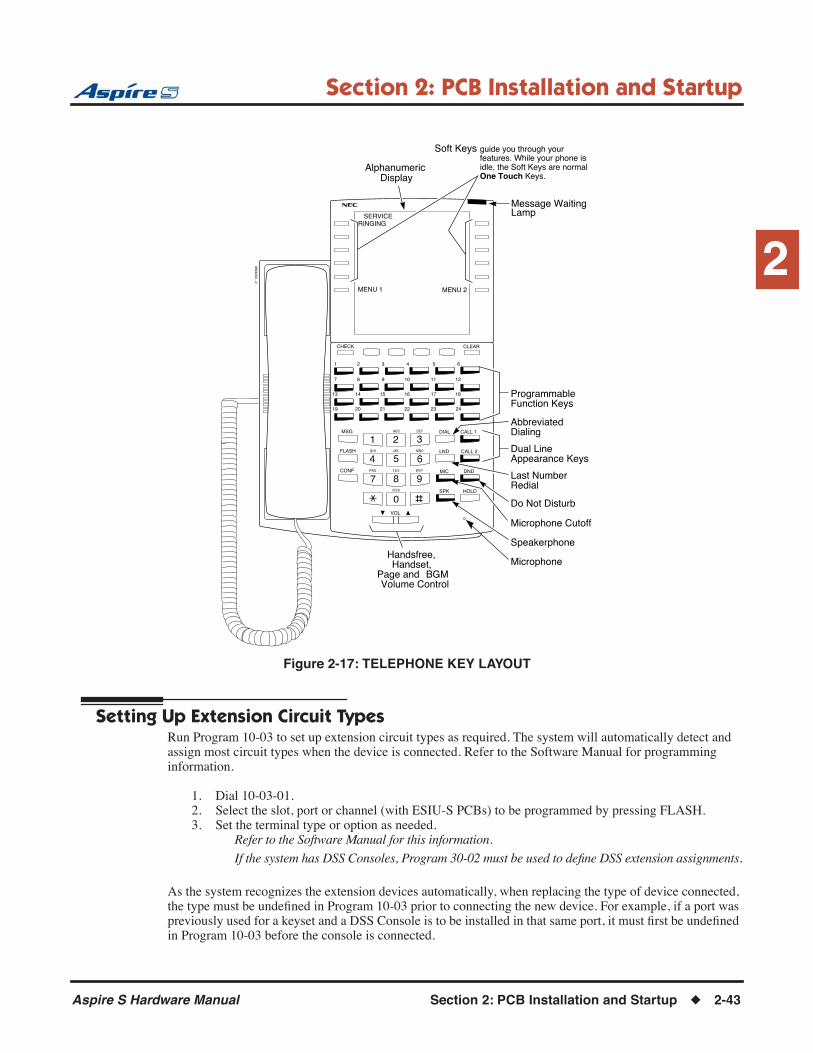
Section 2: PCB Installation and Startup
2
Figure 2-17: TELEPHONE KEY LAYOUT
Setting Up Extension Circuit TypesRun Program 10-03 to set up extension circuit types as required. The system will automatically detect and assign most circuit types when the device is connected. Refer to the Software Manual for programming information.
1. Dial 10-03-01.2. Select the slot, port or channel (with ESIU-S PCBs) to be programmed by pressing FLASH. 3. Set the terminal type or option as needed.
Refer to the Software Manual for this information.
If the system has DSS Consoles, Program 30-02 must be used to define DSS extension assignments.
As the system recognizes the extension devices automatically, when replacing the type of device connected, the type must be undefined in Program 10-03 prior to connecting the new device. For example, if a port was previously used for a keyset and a DSS Console is to be installed in that same port, it must first be undefined in Program 10-03 before the console is connected.
Handsfree, Handset,
Page and BGMVolume Control
Alphanumeric
Soft Keys
Display
1 2 3 4 5 6
7 8 9 10 11 12
13 14 15 16 17 18
19 20 21 22 23 24
2
5
8
0
4
7
3
6
9
CALL 2
CALL 1
DND
HOLD
LND
DIAL
MIC
FLASH
SPK
VOL
CONF
MSG
ProgrammableFunction Keys
AbbreviatedDialing
Dual LineAppearance Keys
Last NumberRedial
Do Not Disturb
Microphone Cutoff
Speakerphone
Microphone0893200 - 2
CLEARCHECK
SERVICERINGING
MENU 2
1
guide you through yourfeatures. While your phone isidle, the Soft Keys are normalOne Touch Keys.
Message WaitingLamp
MENU 1
Aspire S Hardware Manual Section 2: PCB Installation and Startup ◆ 2-43
Section 2: PCB Installation and Startup
Saving Your ConfigurationWhen you are done programming, you must be out of a program’s options to exit (pressing the MSG key will exit the program’s option). Press the SPK key. Any changes made will be saved to the CPU.
1. Press MSG key to exit the program’s options, if needed.2. Press SPK. You see, "Saving System Data" if changes were made to the system’s programming.3. The display shows "Complete Data Save" when completed and will exit the phone to an idle mode.
Backing Up/Restoring a DatabaseDue to database differences, saved customer databases are not interchangeable between the
Aspire S and Aspire systems. The PCPro will prevent the upload of an incorrect database by dis-abling the Upload button when the system database does not match the system to which you are connected. However, when using Program 90-04 : Load Data, the system will not be able to pre-vent an incorrect upload. It is important to make sure you only load data saved from an Aspire S to an Aspire S system and data saved from an Aspire to an Aspire system.
As a precaution for existing systems which have already been programmed, it is recommended that the cus-tomer database be saved prior to updating the system software. There are two methods of saving the database - either using the PCPro application or saving directly to a blank 32 meg CompactFlash card. Using PCPro, download the database and save the file on the PC’s hard drive. To save the database using a blank 32 meg compact flash card (P/N 0891064), insert the card into the CPU and, using Program 90-03, save the soft-ware. Due to the file’s naming structure, note that a compact flash card can only hold one customer database (each database is saved to a directory called DATA - this directory would be overwritten if a second database were saved to the same card). Each database to be saved will require its own separate card (unless you choose to rename the directory after it is saved, then rename it back to DATA when you need to access the database).
If the customer data needs to be reloaded, the method for restoring the database is determined by how the database was saved. Using PCPro, the customer database is uploaded using the Upload option within the application. If the database is stored on a CompactFlash card, use Program 90-04, with the database to be restored installed in the CPU.
When restoring a database file, as the slot definitions may be different, remove all PCBs from the system. After the system has been reset, you can reinstall the PCBs. You can use Program 10-03 or Program 90-13-03 prior to updating to record the current slot definitions. If the PCBs are not removed, the trunk and extension port assignments may be reassigned, depending on which PCB syncs up with the system first.
After reloading the customer data to the system, exit programming mode (this could take a minute or more to save the database), then reset the system by powering down and back up. If the system is not reset, not all the uploaded programming changes will be in effect. Wait a few minutes for the programming to take affect before accessing any lines or special system features. Otherwise some unusual LED indications may be experienced. To prevent the CompactFlash card from possibly being over-written, remove the card after reloading the database.
When restoring a database file, as the slot definitions may be different, remove all PCBs from the system. After the system has been reset, you can power down the system and then reinstall the PCBs. You can use Program 10-03 or Program 90-13-03 prior to updating to record the current slot definitions. If the PCBs are not removed, the trunk and extension port assignments may be reas-signed, depending on which PCB syncs up with the system first.
2-44 ◆ Section 2: PCB Installation and Startup Aspire S Hardware Manual
Section 2: PCB Installation and Startup
2
Using Flash Cards for System SoftwareAs the Aspire S system uses a compact flash card for software upgrades, it is possible to receive or download a compressed file from NEC containing the system software. The following information details the steps required to update the system software using a pre-programmed CompactFlash card containing system soft-ware or when the software is received as a compressed file.
Using a Compressed File for System UpgradesRequirements● Customer Provided: CompactFlash Card Reader OR a PCMCIA Slot in a Laptop with a
CompactFlash AdapterSuggestions:
Readers: Kingston USB 2.0 Hi-Speed PC Card Reader (model FCR-HS2/ATA)SimpleTech FlashLink CompactFlash Type I and II Card USB Reader (model STI-UCF100)SimpleTech FlashLink All-In-One USB Reader (model STI-UMC600)
Adapters: SimpleTech CompactFlash Adapter for Type II PC Card Slots (model STI-CFAD) (accommodates CompactFlash Type 1 cards)SanDisk CompactFlash PC Card Adapter (model SDCF-38) (accommodates CompactFlash Type 1 cards)
● Customer Provided: Two 32MB CompactFlash Cards (1 for system software, 1 for database backup)● Aspire S System Software Zip File● WinZip application
This program can be downloaded from WinZip’s web site: http://www.winzip.com
1. After receiving the compressed system software file from NEC, it must be unzipped using the WinZip application.
If the file was received by EMail, detach the zip file to your computer.
2. Locate the zip file on your computer and double-click on the file.The file opens the WinZip application and displays a list of the compressed files.
3. Click ACTIONS - EXTRACT or click the EXTRACT button on the tool bar.4. In the Extract window that appears, make sure the USE FOLDER NAMES options is checked. This is
required to keep the proper paths for the files as they are extracted.5. Select the location to which the files should be extracted and click the EXTRACT button.
Suggestion: You may want to create a directory in which all Aspire software can be kept (with a sub-directory for the version type - example: Aspire_Software/2_03). This allows you to keep the original source files for future use, if required.
6. Place the compact flash card to be used for the update into the compact flash card reader.7. Double-click on MY COMPUTER and then double-click on the compact flash card reader.
The contents of the compact flash card should be displayed. 8. If there are any existing files on the compact flash card, delete or move any files off the card before pro-
ceeding.9. Open the directory containing the system software files to be used for the system update.10. Select all the files within the folder and copy them to the flash card.
This can be done as follows:- From the software directory window, click: Edit - Select All - Edit - Copy- From the flash card window, click Edit - Paste
The files are then copied from the PC to the CompactFlash card.
Continue by updating the system software using the procedure detailed in the Upgrading Soft-ware on page 2-46 instructions.
Aspire S Hardware Manual Section 2: PCB Installation and Startup ◆ 2-45

Section 2: PCB Installation and Startup
Upgrading SoftwareWhen initially updating your Aspire S to 2.50 or higher, refer to Upgrading Software From
Version 2.0x, 2.1x, or 2.2x to 2.50 or Higher on page 2-47.
Requirements● 32MB CompactFlash Card containing Aspire S System Software (pre-programmed or from an
extracted zip file)Refer to Using a Compressed File for System Upgrades on page 2-45 if the software was
received as a Zip file.
1. If previously powered up, the system must be turned off for upgrading software. Before powering down the system, verify that of the 4 LEDs in the lower left corner of the CPU, only LD2 is flashing (this LED is located farthest right of the LEDs). If any other LEDs are flashing, wait until they stop before proceeding.
Turning off the power when other LEDs are flashing may corrupt the system data.
2. Turn the system power off by pressing the power switch to OFF3. Once the system has completed its powering down cycle (all LEDs are off), insert the CompactFlash
card containing the software upgrade into the CompactFlash card slot (CN5) on the CPU.4. Push in and hold the Load button.5. Turn the system power on by pressing the power button to power the system back up.6. Continue holding the Load button for approximately 10 seconds.7. Release the Load button.8. Wait until the Status LEDs on the CPU have the following indications (approximately 2 minutes):
LD1: Flashing Red, LD3: Flashing Red, LD4: Flashing Red, LD2: Steady Green.9. Turn the system power off by pressing the power button on the cabinet.10. Once the system has completed its powering down cycle (all LEDs are off), remove the CompactFlash
card.11. Turn the system power back on.12. When the system has completed reloading the software, LD2 will begin flashing on the CPU. The
remaining 3 LEDs will now be off.To confirm the new software version has been installed, the system version number can be
viewed by pressing CHECK and then the HOLD key on any display keyset. This can also be con-firmed in Program 90-16-01.
The existing system software in the flash memory is replaced, but the customer data (stored in the RAM) is saved.
It is important to remember that the PCB installation must be done with the system powered down.
! Important !As a precaution, it is recommended that the customer database be saved prior to updating the system software. Refer to Backing Up/Restoring a Database (page 2-44).
2-46 ◆ Section 2: PCB Installation and Startup Aspire S Hardware Manual

Section 2: PCB Installation and Startup
2
Upgrading Software From Version 2.0x, 2.1x, or 2.2x to 2.50 or HigherDue to the port capacity changes in 2.50 software, it is recommended the system be cold started and the cus-tomer database reprogrammed. However, using PCPro 3.00 or higher, you can choose to reload the majority of the customer database using the steps below.
Use the following steps to update your Aspire S with 2.0x, 2.1x, or 2.2x software to 2.50 or higher. This pro-cess is only required to bring the system up to 2.50 or higher. Once the system has been updated to this level, any future software upgrades should follow the instructions indicated Upgrading Software on page 2-46. If the following steps are not used when upgrading to 2.50 or higher, the IntraMail feature will not function correctly.
1. As a precaution, it is recommended that the customer database be saved prior to updating the system software. Refer to Backing Up/Restoring a Database (page 2-44).
2. Set Program 45-01-01 : Voice Mail Integration Options, Voice Mail Department Group Number to “0” (no voice mail).
This could prevent IntraMail from automatically configuring correctly.
3. In Program 16-02-01 : Department Group Assignment for Extensions, make sure there are no extension ports assigned to Department Group 8.
This could prevent IntraMail from automatically configuring correctly.
4. Upgrade the system software to version 2.50 or higher.a. Before powering down the system, verify that of the 4 LEDs in the lower left corner of the CPU,
only LD2 is flashing (this LED is located farthest right of the LEDs). If any other LEDs are flash-ing, wait until they stop before proceeding.
Turning off the power when other LEDs are flashing may corrupt the system data.
b. Turn the system power off by pressing the power switch to OFF.c. Once the system has completed its powering down cycle (all LEDs are off), insert the Compact-
Flash card containing the software upgrade into the CompactFlash card slot (CN5) on the CPU.d. Push in and hold the Load button.e. Turn the system power on by pressing the power button to ON.f. Continue holding the Load button for approximately 10 seconds.g. Release the Load button.h. Wait until the Status LEDs on the CPU have the following indications (approximately 2 min-
utes): LD1: Flashing Red, LD3: Flashing Red, LD4: Flashing Red, LD2: Steady Green.
i. Power down the system and remove the CompactFlash card.j. Power the system back up.
5. Confirm the new software version has been installed by pressing CHECK and then the HOLD key on any display keyset. This can also be confirmed in Program 90-16-01.
6. Connect to the Aspire S system using PCPro software 2.30 or higher then download and save the cus-tomer database from the system.
a. Open PCPro.b. Click FILE - NEW - ASPIRE S.c. Click COMMUNICATIONS - CONNECT. Enter the user name, password, and IP address
required for the Aspire S. Click CONNECT.d. Click COMMUNICATIONS - DOWNLOAD - Select Range should show ALL - Click
START.e. When complete, click CLOSE then click FILE - SAVE AS - Save the database file.f. Disconnect from the system by clicking COMMUNICATIONS - DISCONNECT.
7. Power the system down.8. Once the system has completed its powering down cycle (all LEDs are off), remove all installed PCBs.9. Install the IntraMail CompactFlash card into the DSPDBU and install the daughter board onto the
CPU.
Aspire S Hardware Manual Section 2: PCB Installation and Startup ◆ 2-47

Section 2: PCB Installation and Startup
10. Perform a Cold Start.a. Push in and hold the Load button.b. Power the system back up.c. Continue holding the Load button for approximately 3 seconds.d. Release the Load button.e. Allow the system to completely reload the software (approximately 2 minutes). The Status LED
(LD2) will be flashing on the CPU.11. Reconnect to the system with PCPro and reload the database saved in Step 6 EXCEPT FOR PRO-
GRAMS 16-02, 11-07, 45-01, and all 47-xx. Downloading the complete database will cause prob-lems with the IntraMail programing.
a. Click COMMUNICATIONS - UPLOAD.b. Under the SELECT RANGE drop-down box, select SYSTEM CONFIGURATION and click
START.c. Once that upload is complete, under the SELECT RANGE drop-down box, select SYSTEM
DATA. While holding down the CTRL key, scroll to each program which should not be down-loaded (11-07, 45-01, and all the 47-xx programs) and click to deselect. Click START
d. Once that upload is complete, under the SELECT RANGE drop-down box, select TELE-PHONE DATA. While holding down the CTRL key, scroll to Program 16-02 and click to dese-lect. Click START
e. Once that upload is complete, under the SELECT RANGE drop-down box, select VE DATA and click START.
A screen may appear indicating there is no data to upload. Simply click OK and continue with the next upload.
f. Once that upload is complete, under the SELECT RANGE drop-down box, select TRUNK DATA and click START.
g. Click CLOSE.12. Click COMMUNICATIONS - DISCONNECT to exit system programming.
Exiting programming mode could take a minute or more while it saves the database.
13. Wait until the Status LEDs on the CPU have the following indications (approximately 2 minutes), then power the system down.LD1: Flashing Red, LD3: Flashing Red, LD4: Flashing Red, LD2: Steady Green.
14. Reinstall the PCBs removed in Step 8.15. Turn the system power back on.
Refer to the Aspire IntraMail System Guide, Chapter 1 - Quick Setup (P/N 0893240) for details on programming the IntraMail feature.
2-48 ◆ Section 2: PCB Installation and Startup Aspire S Hardware Manual

Section 2: PCB Installation and Startup
2
Identifying Port LocationPort information such as PCB type, port numbers, PCB status, and individual port status can be obtained from the system. To obtain a System Report containing PCB information, the system must be connected to a PC or terminal using the serial port connector on the CPU.
Running program 90-13-03 in MAINTENANCE PROGRAMS prints a system PCB report. Refer to Pro-gram 90-13-03 : System Information Output in the Software Manual. The following is a typical report:
<<SYSTEM INFORMATION>> 011/03/03 09:49
slot location type assign port condition note
1 1-1 ESIU 1- 8 Running ****---- -------- Connect:*
2 1-2 SLIU 9- 10 Running
3 1-3 ESIU 11- 18 Running
4 1-4 SLIU 19- 26 Running
5 1-5 COIU 1- 4 Running
6 1-6 DIOPU 5- 6 Not Install
7 1-7 - none -
8 1-8 - none -
9 2-1 - none -
10 2-2 - none -
11 2-3 - none -
12 2-4 - none -
13 2-5 - none -
14 2-6 - none -
15 2-7 - none -
16 2-8 - none -
Aspire S Hardware Manual Section 2: PCB Installation and Startup ◆ 2-49

Section 2: PCB Installation and Startup
- For Your Notes -
2-50 ◆ Section 2: PCB Installation and Startup Aspire S Hardware Manual

Section 3: Installing Extensions and Trunks
3
Section 3:
Installing Extensions
and Trunks
Section 3: Installing Extensions and Trunks
RJ-61 TO 66 BLOCK CONNECTIONS
Wiring RJ-61 Cables to 66 BlocksWhen not using a 25-pair amphenol cable to connect extensions or trunks, use the following pin information for the RJ-61 connector to connect your cables to the 66 blocks.
!! Important !!
Install telephones as on-premise extensions only. (Otherwise, the telephones are highly susceptible to lightning strikes.)
66 Block RJ-61 Connector
Block Termination 1: WHT-BLU Pin 5
Block Termination 2: BLU-WHT Pin 4
Block Termination 3: WHT-ORN Pin 3
Block Termination 4: ORN-WHT Pin 6
Block Termination 5: WHT-GRN Pin 2
Block Termination 6: GRN-WHT Pin 7
Block Termination 7: WHT-BRN Pin 1
Block Termination 8: BRN-WHT Pin 8
12345678
Aspire S Hardware Manual Section 3: Installing Extensions and Trunks ◆ 3-1

Section 3: Installing Extensions and Trunks
INSTALLING 25-PAIR CABLES
Routing CablesIt is recommended to install extension blocks to the left of the cabinet. The trunk blocks can then be installed to the right of the cabinet. Run the 25-pair cable from the extension block and from the trunk block through the cable pass-throughs on either side of the cabinet.
Installing Extension Cross-Connect BlocksIt is also recommended to install cross-connect blocks for each of the system's major extension port device groups. Cross-connect blocks provide an easy way to troubleshoot, determine port identification numeri-cally, and determine port utilization.
Install cross-connect blocks for the following interfaces:● All digital extension circuits● CPU functions (i.e.; BGM, MOH, General Purpose Control Relay)● External page● External alarms● Data devices
Installing Trunk Cross-Connect BlocksIt is also recommended to install cross-connect blocks for each of the system's major trunk device groups. Cross-connect blocks provide an easy way to troubleshoot, determine port identification numerically, and determine trunk port utilization.
Install cross-connect from telco’s RJ21X to the trunk cross-connect blocks for the following:● analog loop start lines● DID trunks
3-2 ◆ Section 3: Installing Extensions and Trunks Aspire S Hardware Manual
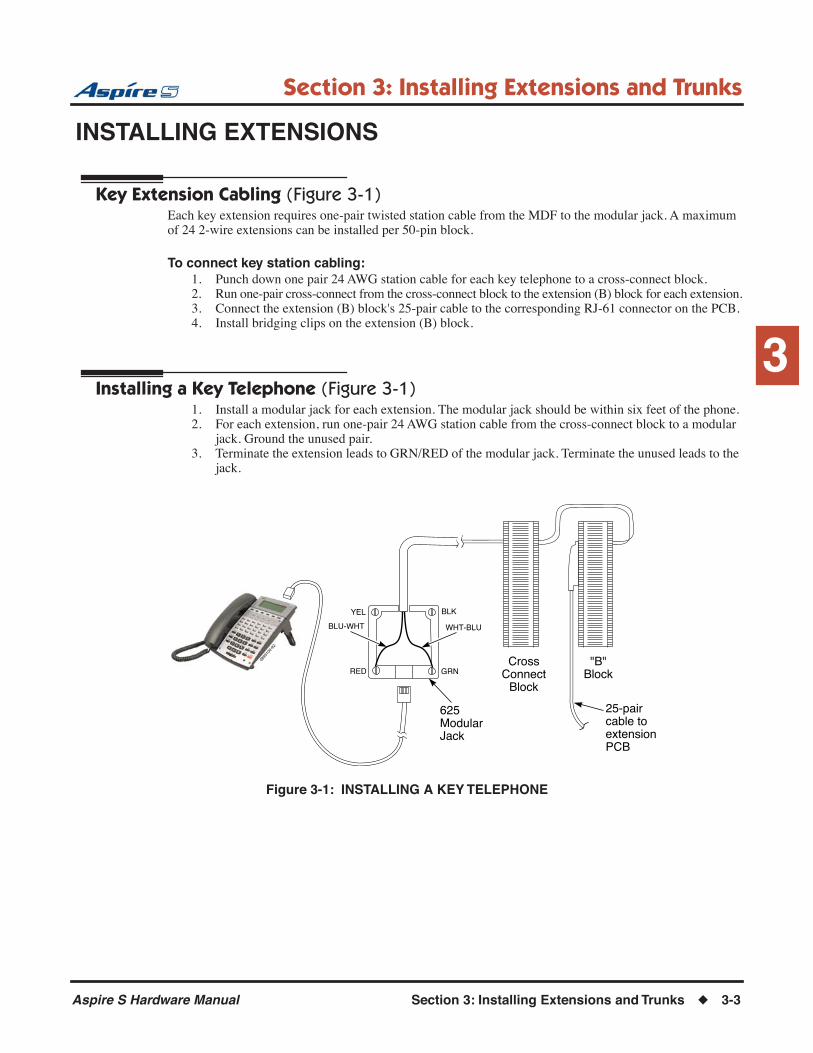
Section 3: Installing Extensions and Trunks
3
INSTALLING EXTENSIONS
Key Extension Cabling (Figure 3-1)Each key extension requires one-pair twisted station cable from the MDF to the modular jack. A maximum of 24 2-wire extensions can be installed per 50-pin block.
To connect key station cabling:1. Punch down one pair 24 AWG station cable for each key telephone to a cross-connect block.2. Run one-pair cross-connect from the cross-connect block to the extension (B) block for each extension.3. Connect the extension (B) block's 25-pair cable to the corresponding RJ-61 connector on the PCB.4. Install bridging clips on the extension (B) block.
Installing a Key Telephone (Figure 3-1)1. Install a modular jack for each extension. The modular jack should be within six feet of the phone.2. For each extension, run one-pair 24 AWG station cable from the cross-connect block to a modular
jack. Ground the unused pair.3. Terminate the extension leads to GRN/RED of the modular jack. Terminate the unused leads to the
jack.
Figure 3-1: INSTALLING A KEY TELEPHONE
625ModularJack
25-paircable toextensionPCB
BLKYEL
RED GRN
BLU-WHT WHT-BLU
CrossConnect
Block
"B"Block
0893
100-
92
Aspire S Hardware Manual Section 3: Installing Extensions and Trunks ◆ 3-3

Section 3: Installing Extensions and Trunks
INSTALLING SINGLE LINE TELEPHONES
Single Line Extension Cabling (Figure 3-2)Each single line extension requires one-pair twisted station cable from the MDF to the modular jack. A max-imum of 24 2-wire extensions can be installed per 50-pin 66 block.
To connect station cabling:1. Punch down one pair 24 AWG station cable for each single line telephone to a cross-connect block.2. Punch down cross-connect from the clips on the cross-connect block to their corresponding clips on
the extension (B) block.3. Connect the extension (B) block's 25-pair cable to the corresponding RJ-61 connector on the PCB.4. Install bridging clips on the extension (B) block.
Installing a Single Line Telephone (Figure 3-2)To install a single line telephone:
1. Install a modular jack for each single line telephone. The modular jack should be within six feet of the phone.
2. For each extension, run one-pair 24 AWG station cable from the cross-connect block to a modular jack.
3. Terminate the extension leads to GRN/RED of the modular jack. Terminate the unused leads to the jack.
Figure 3-2: INSTALLING A SINGLE LINE TELEPHONE
625ModularJack
25-paircable toextensionPCB
BLKYEL
RED GRN
BLU-WHT WHT-BLU
0893
100-
93
CrossConnect
Block
"B"Block
3-4 ◆ Section 3: Installing Extensions and Trunks Aspire S Hardware Manual

Section 3: Installing Extensions and Trunks
3
INSTALLING CORDLESS TELEPHONESThe Cordless Lite II/Cordless II phone allows for the connection of an optional keyset phone. The base unit allows the user to switch between the Cordless Lite II/Cordless II phone and an Aspire keyset. Whichever phone is activated at the base unit is the telephone which will ring. This allows you to have a keyset phone to use while at your desk, and when you need to be away from your desk, you can carry the cordless phone with you. Refer to Cordless Telephone — P/N 730088/730087 (page 4-64) for more details on setting up the phone and its optional equipment.
Cordless Phone Extension Cabling (Figure 3-3)Each cordless phone extension requires a digital extension port with one-pair twisted station cable from the MDF to the modular jack.
To connect station cabling:1. Punch down one-pair 24 AWG station cable
for each cordless telephone to a cross-con-nect block.
2. Punch down cross-connect from the clips on the cross-connect block to their correspond-ing clips on the extension (B) block.
3. Connect the extension (B) block's 25-pair cable to the corresponding RJ-61 connector on the PCB.
4. Install bridging clips on the extension (B) block.
Installing a Cordless Telephone (Figure 3-3)To install a cordless telephone:
1. Install a modular jack for each cordless tele-phone. The modular jack should be within six feet of the base unit.
2. For each extension, run one-pair 24 AWG station cable from the cross-connect block to a modular jack.
3. Terminate the extension leads to GRN/RED of the modular jack.
ImportantIn some cases, when testing the operation of an exten-sion port when connecting to a Cordless II, Cordless Lite II, or 2PGDAD module, a technician may con-nect a line cord directly from an extension port on the Aspire/Aspire S ESIU PCB or Aspire S CPU. Though this is not the recommended connection, it can be used to check if the extension has dial tone.
Should a direct connection of this type be made to the base station of the Cordless II or Cordless Lite II, or to a 2PGDAD module, the line cord must be 2-wire (1-pair). If a 2-pair wire is used, the system will provide power to the unused pair. This can prevent the cordless telephone from acquiring a link with the base station or it can damage the 2PGDAD module or the Aspire station card.
The recommended connection is to punch down 2 wires to the cross-connect block, then connect the exten-sion block to the RJ61 connector on the PCB or CPU.
25-Pair StationCable to CEU
TelcoRJ21X
"B" Block
One PairCross Connect
73
00
82
-1
BLK
RED GRN
BLU-WHT WHT-BLU
YEL
625Modular
JackTo OptionalAspire Keyset
Cordless
Power
Desk
Figure 3-3: INSTALLING A CORDLESS PHONE
Aspire S Hardware Manual Section 3: Installing Extensions and Trunks ◆ 3-5
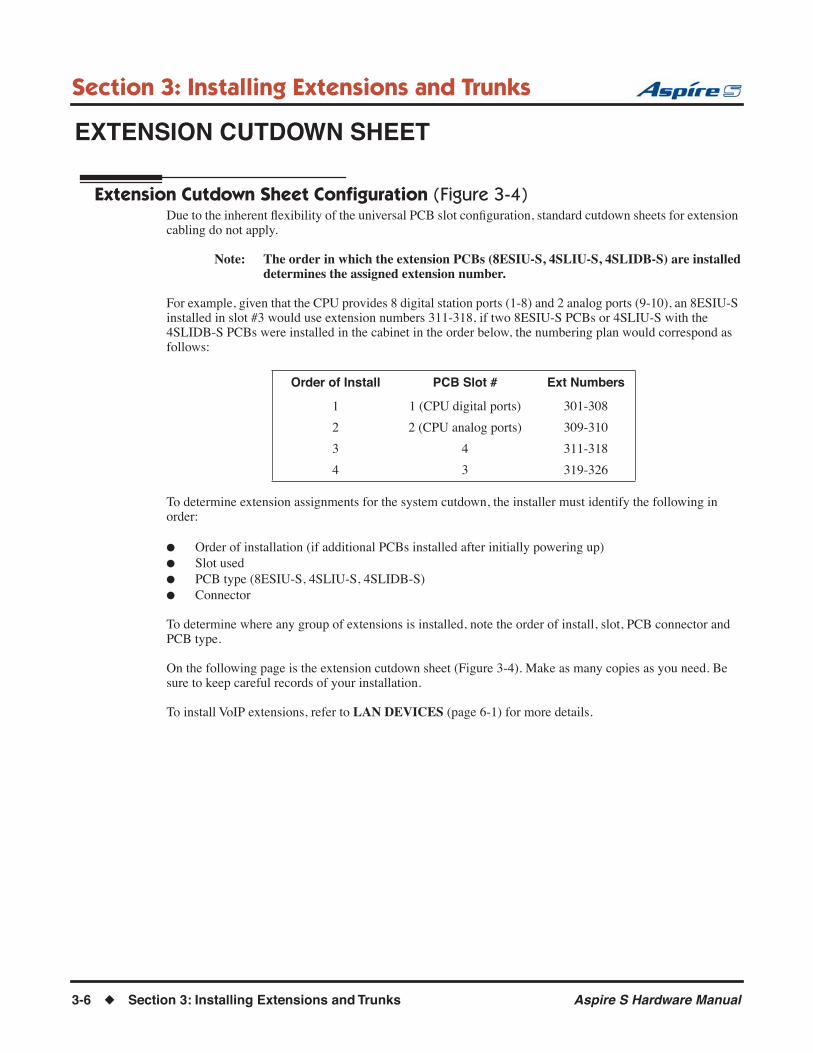
Section 3: Installing Extensions and Trunks
EXTENSION CUTDOWN SHEET
Extension Cutdown Sheet Configuration (Figure 3-4)Due to the inherent flexibility of the universal PCB slot configuration, standard cutdown sheets for extension cabling do not apply.
Note: The order in which the extension PCBs (8ESIU-S, 4SLIU-S, 4SLIDB-S) are installeddetermines the assigned extension number.
For example, given that the CPU provides 8 digital station ports (1-8) and 2 analog ports (9-10), an 8ESIU-S installed in slot #3 would use extension numbers 311-318, if two 8ESIU-S PCBs or 4SLIU-S with the 4SLIDB-S PCBs were installed in the cabinet in the order below, the numbering plan would correspond as follows:
To determine extension assignments for the system cutdown, the installer must identify the following in order:
● Order of installation (if additional PCBs installed after initially powering up)● Slot used● PCB type (8ESIU-S, 4SLIU-S, 4SLIDB-S)● Connector
To determine where any group of extensions is installed, note the order of install, slot, PCB connector and PCB type.
On the following page is the extension cutdown sheet (Figure 3-4). Make as many copies as you need. Be sure to keep careful records of your installation.
To install VoIP extensions, refer to LAN DEVICES (page 6-1) for more details.
Order of Install PCB Slot # Ext Numbers
1 1 (CPU digital ports) 301-308
2 2 (CPU analog ports) 309-310
3 4 311-318
4 3 319-326
3-6 ◆ Section 3: Installing Extensions and Trunks Aspire S Hardware Manual
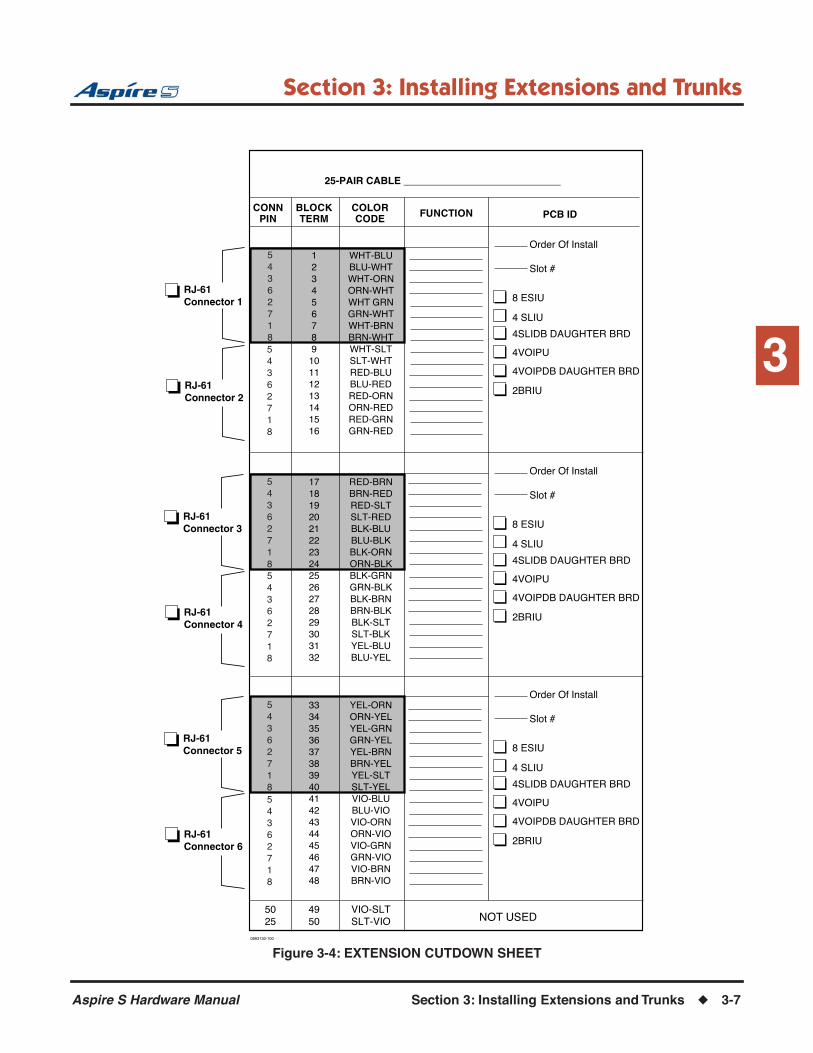
Section 3: Installing Extensions and Trunks
3
Figure 3-4: EXTENSION CUTDOWN SHEET
CONNPIN
BLOCKTERM
COLORCODE PCB IDFUNCTION
0893130-100
5025
123456789
10111213141516
17181920212223242526272829303132
33343536373839404142434445464748
4950
WHT-BLUBLU-WHTWHT-ORNORN-WHTWHT GRNGRN-WHTWHT-BRNBRN-WHTWHT-SLTSLT-WHTRED-BLUBLU-REDRED-ORNORN-REDRED-GRNGRN-RED
RED-BRNBRN-REDRED-SLTSLT-REDBLK-BLUBLU-BLKBLK-ORNORN-BLKBLK-GRNGRN-BLKBLK-BRNBRN-BLKBLK-SLTSLT-BLKYEL-BLUBLU-YEL
YEL-ORNORN-YELYEL-GRNGRN-YELYEL-BRNBRN-YELYEL-SLTSLT-YELVIO-BLUBLU-VIOVIO-ORNORN-VIOVIO-GRNGRN-VIOVIO-BRNBRN-VIO
VIO-SLTSLT-VIO NOT USED
RJ-61Connector 1
Order Of Install
Slot #
8 ESIU
4 SLIU
4SLIDB DAUGHTER BRD
2BRIU
4VOIPU
4VOIPDB DAUGHTER BRDRJ-61Connector 2
RJ-61Connector 3
RJ-61Connector 4
RJ-61Connector 5
RJ-61Connector 6
54�3�6�2�7�1�854�3�6�2�7�1�8
54�3�6�2�7�1�854�3�6�2�7�1�8
54�3�6�2�7�1�854�3�6�2�7�1�8
25-PAIR CABLE ____________________________
Order Of Install
Slot #
8 ESIU
4 SLIU
4SLIDB DAUGHTER BRD
2BRIU
4VOIPU
4VOIPDB DAUGHTER BRD
Order Of Install
Slot #
8 ESIU
4 SLIU
4SLIDB DAUGHTER BRD
2BRIU
4VOIPU
4VOIPDB DAUGHTER BRD
Aspire S Hardware Manual Section 3: Installing Extensions and Trunks ◆ 3-7

Section 3: Installing Extensions and Trunks
INSTALLING CO/PBX LINES
Loop Start Line CablingLoop start lines must be bridged from the telco RJ21X to a line cross-connect block (A). Each loop start CO/PBX line requires one-pair cross-connect cable from the RJ21X to the line (A) block.
The A block connects to the trunk PCB with a 24 pair cable. The line (A) block(s) should be arranged in groups of 4 (8 pins) to correspond to the COIU PCB slots.
The CN2 and CN4 connectors each provide connection to 4 analog trunk ports, which are polarity sensitive (tip to tip, ring to ring). The power failure circuits, however, are not polarity sensitive.
Installing Loop Start Lines (Figure 3-5)To install a loop start line:
1. Punch down one pair cross-connect to the tip and ring leads for each line on the telco RJ21X CPE (customer) side of the block.
The CN2 and CN4 connectors are polarity sensitive (tip to tip, ring to ring).2. Punch down the other end of the cross-connect to the line (A) block (in groups of 4 lines of the
same line type).3. Punch down a 25-pair cable to the opposite side of the line (A) block.4. Plug in the corresponding RJ-61 connector to the COIU PCB connector (Figure 3-5).5. Install bridging clips on the A block.
Note: Repeat steps 1-5 for each loop start line. Label cross-connect blocks A2, A3, etc.
3-8 ◆ Section 3: Installing Extensions and Trunks Aspire S Hardware Manual

Section 3: Installing Extensions and Trunks
3
Figure 3-5: INSTALLING LOOP START LINES
Bridging Clips
4 LoopStartLines
4 LoopStartLines
One-PairXconnect
4COUI
4COUI
Line"A" Block
TelcoRJ21X
25-PairCable
Loop Start Lines 1-4
Loop StartLines 5-8
0893
130-
101
Aspire S Hardware Manual Section 3: Installing Extensions and Trunks ◆ 3-9

Section 3: Installing Extensions and Trunks
INSTALLING BRI TRUNKS
BRI Trunks (Figure 3-6)BRI trunks must be bridged from the telco RJ21X to a line cross-connect (A) block. Each BRI Trunk requires one-pair cross-connect from the RJ21X to the line (A) block.
The A block connects to the BRI PCB with a 25-pair cable and an RJ-61 jack. The line (A) block should be arranged in groups of 2 BRI trunks (4 pins) to correspond with the cabinet slot equipped with a 2BRI PCB.
Installing BRI Trunks1. For each T-Bus or S-Bus line, run cross-connect wires between the pins on the cross-connect block
and the station block.2. Install bridging clips as required.3. From the cross-connect block, connect 2 pairs of wires.
For T-Bus: The opposite end is an 8-pin modular connector which is plugged into the NT1 Termi-nation. Connect a line cord from the NT1 Network Line Termination to the telco BRI line. Connect the power cord to the NT1 Network Termination unit.
4. Plug in the corresponding RJ-61 connector to the BRI PCB connector.
Note: Repeat steps 1-4 for each BRI trunk. Label cross-connect blocks A2, A3, etc.
RJ45 Cable Connector - CN2 T-Bus Connection
Pin No. Connection
1 -
2 -
3 TA
4 RA
5 RB
6 TB
7 -
8 -
12345678
3-10 ◆ Section 3: Installing Extensions and Trunks Aspire S Hardware Manual

Section 3: Installing Extensions and Trunks
3
Figure 3-6: BRI Interface T-Bus Point-to-Point
0893
130-
102
Termination Termination
NT1 Termination
To Telco BRI Line
Cross-Connect
BlockStationBlock
TelcoMod Jack
Line
S-Bus connectionNot Currently Available
T-Bus connection
RJ61Jack
RJ61Jack
(ISDN Terminal)
(ISDN Terminal)
BRI PCB
Aspire S Hardware Manual Section 3: Installing Extensions and Trunks ◆ 3-11
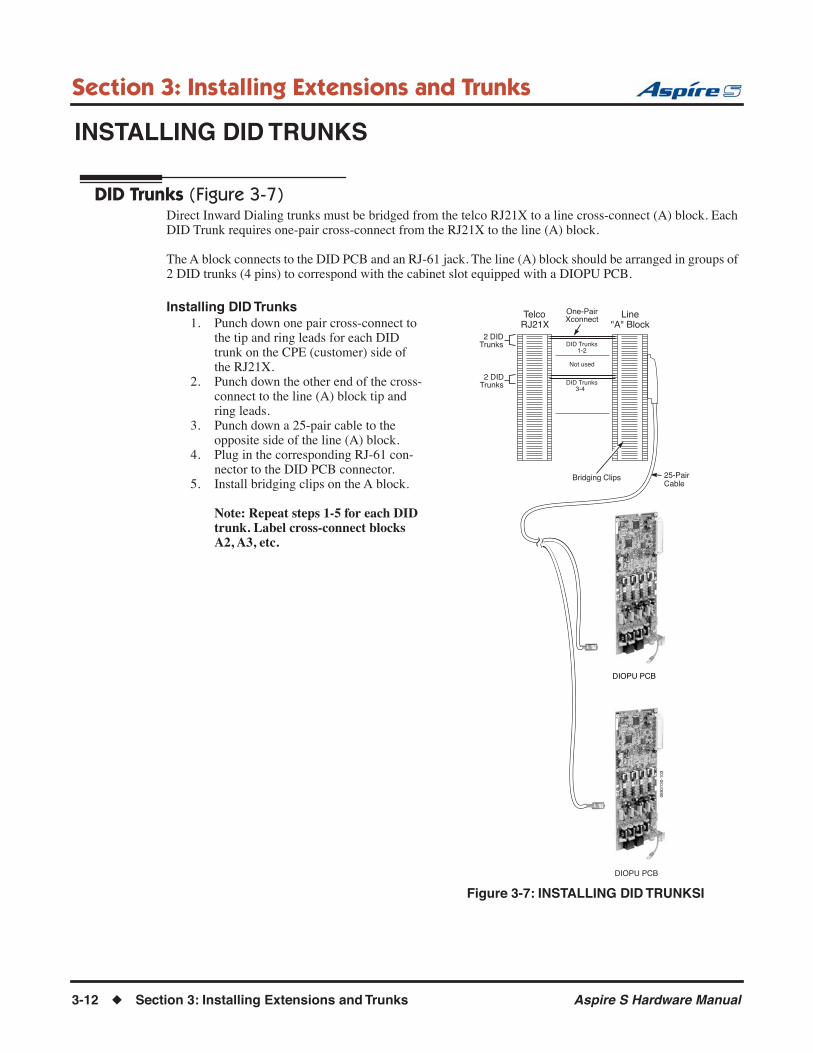
Section 3: Installing Extensions and Trunks
INSTALLING DID TRUNKS
DID Trunks (Figure 3-7)Direct Inward Dialing trunks must be bridged from the telco RJ21X to a line cross-connect (A) block. Each DID Trunk requires one-pair cross-connect from the RJ21X to the line (A) block.
The A block connects to the DID PCB and an RJ-61 jack. The line (A) block should be arranged in groups of 2 DID trunks (4 pins) to correspond with the cabinet slot equipped with a DIOPU PCB.
Installing DID Trunks 1. Punch down one pair cross-connect to
the tip and ring leads for each DID trunk on the CPE (customer) side of the RJ21X.
2. Punch down the other end of the cross-connect to the line (A) block tip and ring leads.
3. Punch down a 25-pair cable to the opposite side of the line (A) block.
4. Plug in the corresponding RJ-61 con-nector to the DID PCB connector.
5. Install bridging clips on the A block.
Note: Repeat steps 1-5 for each DID trunk. Label cross-connect blocks A2, A3, etc.
Bridging Clips
2 DIDTrunks
2 DIDTrunks
One-PairXconnect
DID Trunks3-4
Not used
DID Trunks1-2
DIOPU PCB
Line"A" Block
TelcoRJ21X
25-PairCable
DIOPU PCB
0893
130-
103
Figure 3-7: INSTALLING DID TRUNKSI
3-12 ◆ Section 3: Installing Extensions and Trunks Aspire S Hardware Manual

Section 3: Installing Extensions and Trunks
3
INSTALLING A DID CHOKE
DID Choke (Figure 3-8)If your central office has a high level of AC noise or if your site is experiencing excessive hum on the DID lines, a customer-provided isolation transformer can be installed between the Aspire S and telco blocks to help to suppress the hum.
DID trunks must be bridged from the telco RJ21X to a line cross-connect (A) block. The choke is installed between these two blocks.
DID Choke Installation:1. Remove the bridging
clips on the (A) block and telco block for the DID lines.
2. From the telco block, solder the Tip lead to the “3” con-nector on the choke.
3. From the telco block, take the Ring lead and solder it to the “1” connector on the choke.
4. From the (A) block, take the Tip 1 lead and solder it to the “4” connector on the choke.
5. Solder the Ring 1 lead from the (A) block to the “2” con-nector on the choke.
6. Reinstall the bridg-ing clips as required.
Bridging Clips
2 DIDTrunks
2 DIDTrunks
One-PairXconnect
DID Trunks3-4
Not used
DID Trunks1-2
Line"A" Block
TelcoRJ21X
25-PairCable
3 41 2
T T1
R R1
DIOPU PCB
Not used
0893
130-
104
Figure 3-8: DID CHOKE INSTALLATION
Aspire S Hardware Manual Section 3: Installing Extensions and Trunks ◆ 3-13

Section 3: Installing Extensions and Trunks
LINE/TRUNK CUTDOWN SHEET
CO/PBX Line Cutdown Sheet Configuration (Figure 3-9)Due to the flexibility of the system’s universal PCB slot configuration, standard cutdown sheets for CO/PBX line cabling do not apply.
Note: The order in which the trunk PCBs are installed determines the assigned line circuit number.
For example, if three PCBs are installed in the cabinet in the following order (powering down between the PCB installation), the following numbering plan would be in effect:
To determine trunk assignments for the system cutdown, the installer must identify the following in order:
● Order of installation● Slot used● PCB type (4COIU-S, 2BRIU-S, 2DIOPU-S, 4VOIPU-S, 4VOIPU-S with 4VOIPDB-S)● Amphenol connector
To determine where any group of lines are installed, note the order of install and slot.
On the following page is the line cutdown sheet (Figure 3-9). Make as many copies as you need. Be sure to keep careful records of your installation.
Order of Install PCB Slot # PCB Line Circuits
1 4 2DIOPU-S 1-2
2 5 4COIU-S 3-6
3 6 2DIOPU-S 7-8
3-14 ◆ Section 3: Installing Extensions and Trunks Aspire S Hardware Manual
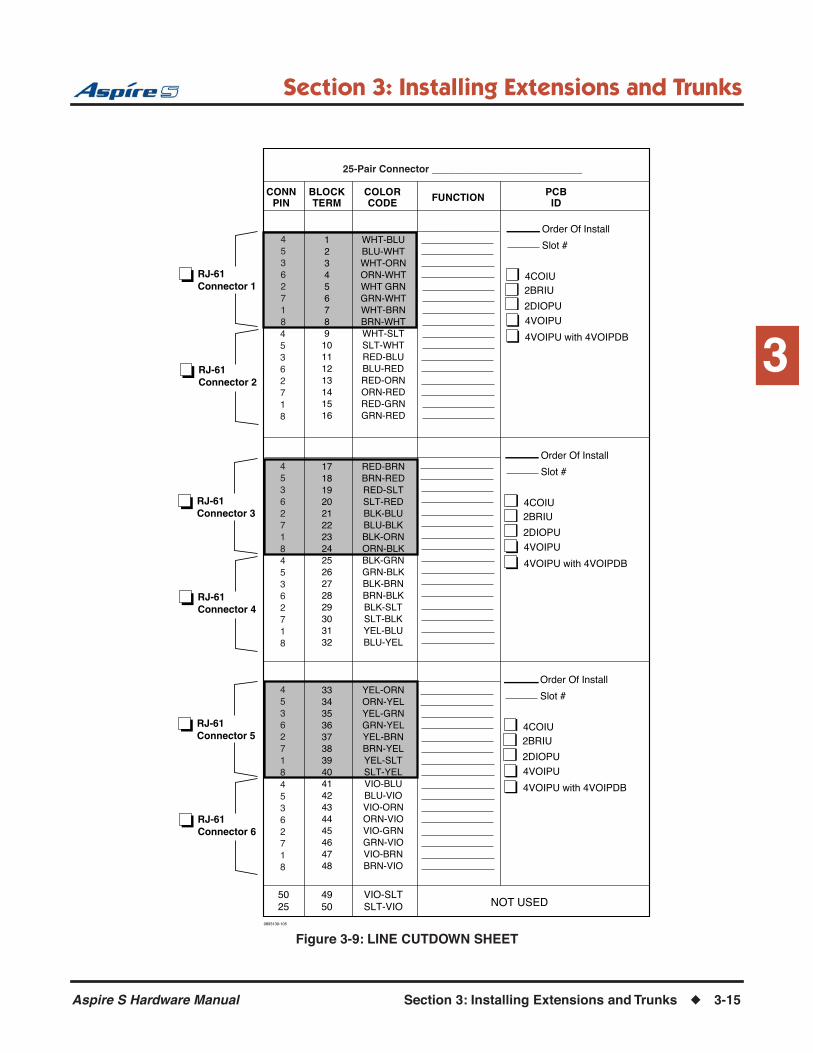
Section 3: Installing Extensions and Trunks
3
Figure 3-9: LINE CUTDOWN SHEET
CONNPIN
BLOCKTERM
COLORCODE
PCBIDFUNCTION
0893130-105
5025
123456789
10111213141516
17181920212223242526272829303132
33343536373839404142434445464748
4950
WHT-BLUBLU-WHTWHT-ORNORN-WHTWHT GRNGRN-WHTWHT-BRNBRN-WHTWHT-SLTSLT-WHTRED-BLUBLU-REDRED-ORNORN-REDRED-GRNGRN-RED
RED-BRNBRN-REDRED-SLTSLT-REDBLK-BLUBLU-BLKBLK-ORNORN-BLKBLK-GRNGRN-BLKBLK-BRNBRN-BLKBLK-SLTSLT-BLKYEL-BLUBLU-YEL
YEL-ORNORN-YELYEL-GRNGRN-YELYEL-BRNBRN-YELYEL-SLTSLT-YELVIO-BLUBLU-VIOVIO-ORNORN-VIOVIO-GRNGRN-VIOVIO-BRNBRN-VIO
VIO-SLTSLT-VIO NOT USED
RJ-61Connector 1
RJ-61Connector 2
RJ-61Connector 3
RJ-61Connector 4
RJ-61Connector 5
RJ-61Connector 6
45�3�6�2�7�1�845�3�6�2�7�1�8
45�3�6�2�7�1�845�3�6�2�7�1�8
45�3�6�2�7�1�845�3�6�2�7�1�8
Order Of Install
Slot #
4COIU
4VOIPU
4VOIPU with 4VOIPDB
2DIOPU
2BRIU
25-Pair Connector ___________________________
Order Of Install
Slot #
4COIU
4VOIPU
4VOIPU with 4VOIPDB
2DIOPU
2BRIU
Order Of Install
Slot #
4COIU
4VOIPU
4VOIPU with 4VOIPDB
2DIOPU
2BRIU
Aspire S Hardware Manual Section 3: Installing Extensions and Trunks ◆ 3-15

Section 3: Installing Extensions and Trunks
TROUBLESHOOTING
Basic TroubleshootingTroubleshooting Digital Extensions
Start
Verify the ESIU PCBis functioning.
Is the LiveStatus LED onthe ESIU PCBflashing green?
Verify whether a digitalkeyset works.
Connect a testtelephone to a port
using anothermodular jack. Does
the phone work?
Redo the wires betweenthe main equipment and
the modular jack.
Verify the wiringbetween the cabinet and
the keyset.
Connect the phonedirectly to the
connector on theESIU. Does it work?
Redo the wires betweenthe main equipment and
the telephone.
The telephone mayneed repair.
Yes
No
No
Yes
Yes
* If it still does not work,replace the cable(s) and/
or connectors.
Connect anothertelephone to thesame port on the
ESIU. Does it work?
The ESIU PCB mayneed repair.
* If it still does not work,replace the cable(s) and/
or connectors.
Yes
No
Check systemprogramming for the
extension. Refer to theAspire Software
Manual if necessary.
Connect thephone directly tothe connector onthe ESIU. Does it
work?
No
Stop
Yes
Remove the PCB andinsert another ESIU
PCB into the same slot.Does it work?
The ESIU PCB mayneed repair.
Main equipment(cabinet/CPU) may
need repair.
Yes
No
Is the LiveStatus LEDsolid green?
Main equipment(cabinet/CPU) may
need repair.
Yes
No
Move the Run/Blockswitch on the PCB to
the RUN position.
NoNo
3-16 ◆ Section 3: Installing Extensions and Trunks Aspire S Hardware Manual

Section 3: Installing Extensions and Trunks
3
TESTING TELEPHONE OPERATIONThe following procedure will help you determine if a problem being experienced is due to the telephone or the system. Testing the operation of a keyset allows you to check the lamping of each key, the display, and tones. Follow the procedure below to determine if the phone is operating correctly.
Key Matrix and LED Test1. Unplug the phone.2. While holding down dial pad digits 1, 2 and 3, plug the phone back in.3. Hold down the 1, 2 and 3 digits for approximately 10 seconds then release them.
If the phone doesn’t show “TEST PUSH=” on the display, then repeat Steps 1-3 and hold the keys down a few seconds longer.
4. Press any key and its Logical Name should be displayed.The following chart indicates the Logical Name for each key.
Quitting Test Mode1. Lift the handset and then replace it.2. The phone returns to an idle condition.
Logical Name Table
KeysLogicalName Keys
LogicalName
KEYPAD 0 - 9 D 0 - D 9 CALL2 F 8
KEYPAD * D * MIC F 9
KEYPAD # D # MSG F 10
Line Keys 1 - 24 1 L 1 - L 24 DIAL F 11
DSS Keys 1 - 10 O 1 - O 10 CLEAR F 12
LND F 1 CHECK F 13
CONF F 2 SOFT KEY 1-4 S 1 - S 4
HOLD F 3 MENU1 2 011
FLASH F 4 MENU2 2 012
DND F 5 VOL. UP
CALL1 F 6 VOL. DOWN
SPK F 7
1 Keys 1, 2 and 3 will also check tones.2 34-Button Super Display telephone only.
Aspire S Hardware Manual Section 3: Installing Extensions and Trunks ◆ 3-17

Section 3: Installing Extensions and Trunks
Troubleshooting Analog Extensions
Start
Verify the SLIU/SLIDBPCB is functioning.
Is the Live StatusLED on the SLIU/
SLIDB PCBflashing green?
Remove the PCB andinsert another SLIU/SLIDB PCB into the
same slot. Does it work?
Verify whether aanalog phone works.
The SLIU/SLIDB PCBmay need repair.
Main equipment(cabinet/CPU) may
need repair.
Connect a testtelephone to a port
using anothermodular jack. Does
the phone work?
Redo the wires betweenthe main equipment and
the modular jack.
Verify the wiringbetween the cabinet and
the analog telephone.
Connect the phonedirectly to the connector
on the SLIU/SLIDB. Doesit work?
Redo the wires betweenthe main equipment and
the telephone.
The telephone mayneed repair.
Yes
No
No
Yes
Yes
No
Yes
No
* If it still does not work,replace the cable(s) and/
or connectors.
Connect anothertelephone to the same
port on the SLIU/SLIDB. Does it work?
The SLIU/SLIDB PCBmay need repair.
* If it still does not work,replace the cable(s) and/
or connectors.
Yes
No
Check systemprogramming for the
extension. Refer to theAspire Software
Manual if necessary.
Connect thephone directly tothe connector onthe SLIU/SLIDB.
Does it work?
No
Stop
Yes
Is the LiveStatus LEDsolid green?
Main equipment(cabinet/CPU) may
need repair.
Yes
No
Move the Run/Blockswitch on the PCB to
the RUN position.
No
3-18 ◆ Section 3: Installing Extensions and Trunks Aspire S Hardware Manual

Section 3: Installing Extensions and Trunks
3
Aspire Keyset Speakerphone Problems When Used with Analog TrunksSome customers may be experiencing squealing/howling-related feedback when making a handsfree inter-com call to another Aspire keyset. This is caused by the handsfree microphone element and/or rubber micro-phone holder not being seated properly.
To resolve this problem:● Disassemble the phone using the steps below and inspect/reseat the handsfree microphone element to
ensure that it is bottomed out within the rubber mic holder and that the rubber mic holder is seated prop-erly within the plastic circular well. Check to make sure the small PCB that holds the mic holder in place is properly secured. 1. Remove the four screws that hold the base plastic to the top panel and remove the base from the
phone.2. Turn the phone so that the dial pad and keys are facing down.3. Locate the handsfree mic assembly in the lower left corner of the phone.4. Make sure the mic element is seated all the way down inside the white rubber mic holder and reseat
the rubber mic holder so that it is seated at the very bottom of the round plastic mic housing.There are two possible phone styles for the mic assembly area - each one is pictured below.
5. Using a small flat screwdriver, carefully press the mic element down inside the rubber mic holder. Do not press on the solder joints of the two wires connected to the mic element.
Aspire S Hardware Manual Section 3: Installing Extensions and Trunks ◆ 3-19

Section 3: Installing Extensions and Trunks
6. If the phone style has two black clips holding the small PCB in place over the mic assembly and it does not have a tie-wrap as indicated in the picture below, one should be added. Install a small, ordinary tie-wrap as shown below to properly retain the mic holder and element in place.
7. Re-install the base to the phone and secure with 4 screws.
3-20 ◆ Section 3: Installing Extensions and Trunks Aspire S Hardware Manual
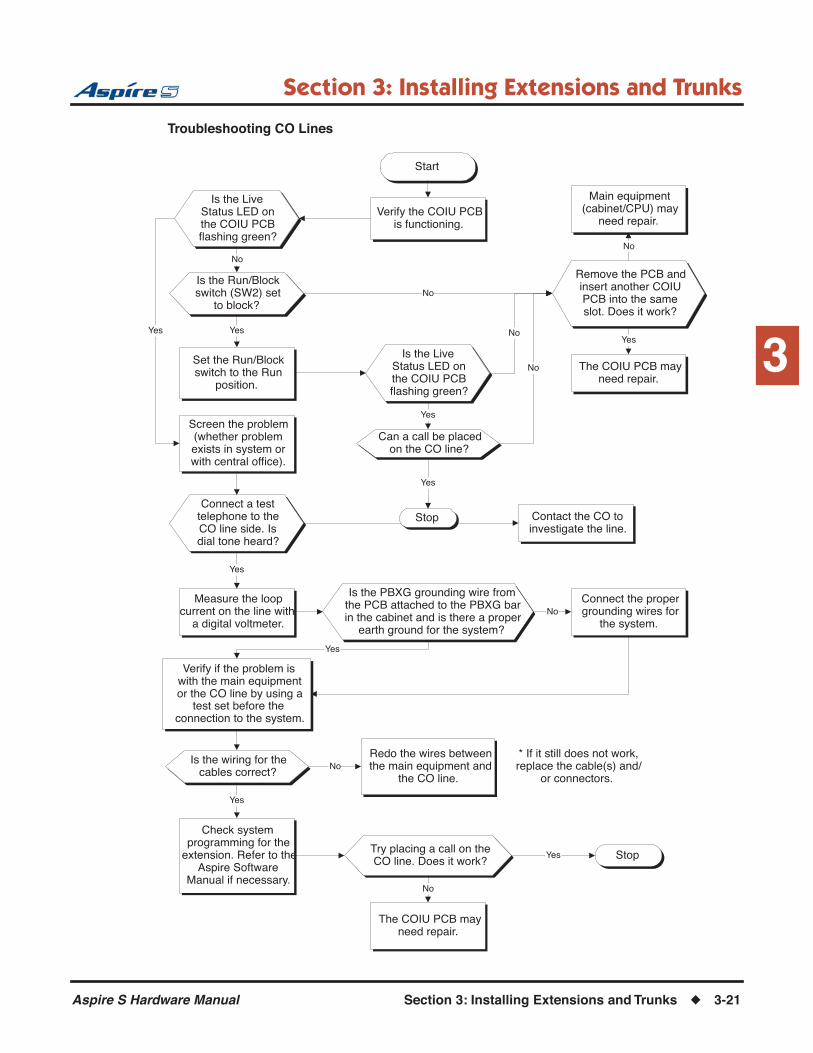
Section 3: Installing Extensions and Trunks
3
Troubleshooting CO Lines
Start
Verify the COIU PCBis functioning.
Is the LiveStatus LED onthe COIU PCBflashing green?
Remove the PCB andinsert another COIUPCB into the sameslot. Does it work?
Screen the problem(whether problemexists in system orwith central office).
The COIU PCB mayneed repair.
Main equipment(cabinet/CPU) may
need repair.
Connect a testtelephone to theCO line side. Isdial tone heard?
Contact the CO toinvestigate the line.
Verify if the problem iswith the main equipmentor the CO line by using a
test set before theconnection to the system.
Is the wiring for thecables correct?
Redo the wires betweenthe main equipment and
the CO line.
The COIU PCB mayneed repair.
Yes
Yes
Yes
No
No
No
Yes
No
* If it still does not work,replace the cable(s) and/
or connectors.
Check systemprogramming for the
extension. Refer to theAspire Software
Manual if necessary.
Try placing a call on theCO line. Does it work? StopYes
No
Is the Run/Blockswitch (SW2) set
to block?No
Is the LiveStatus LED onthe COIU PCBflashing green?
Yes No
Set the Run/Blockswitch to the Run
position.
Stop
Can a call be placedon the CO line?
Yes
Yes
No
Measure the loopcurrent on the line with
a digital voltmeter.
Is the PBXG grounding wire fromthe PCB attached to the PBXG barin the cabinet and is there a proper
earth ground for the system?
Yes
Connect the propergrounding wires for
the system.No
Aspire S Hardware Manual Section 3: Installing Extensions and Trunks ◆ 3-21

Section 3: Installing Extensions and Trunks
Aspire Clipping Analog Trunk CallsSome customers may be experiencing problems with analog trunk calls on the Aspire S systems being clipped. The Aspire speakerphone switching results in clipping/chopping when making/receiving external calls with analog trunk-based systems. This is caused by apparent "hot" trunks. If overall volume levels of dial tone are found to be extremely loud, this can cause the speaker area of the phone to vibrate. In addition, high sidetone levels when using the handset can cause a problem. Both of these conditions result in an imbalance of the switching between the handsfree microphone and speaker.
To resolve the clipping/chopping problem on analog trunk calls perform each of the following steps - one at a time - trying the next step only if the problem still occurs.
● Set the following programs back to the default entries for all analog trunks:Program 14-01-02 : Basic Trunk Data Setup - Transmit CODEC Gain Type = 32Program 14-01-03 : Basic Trunk Data Setup - Receive CODEC Gain Type = 32Program 81-07-01 : CODEC Filter Setup for Analog Trunk Ports = 2 (Program 81-07-01 may take up to 20 seconds before the change takes affect.)
● Adjust Program 81-07-01 : CODEC Filter Setup for Analog Trunk Ports to make the trunk side tone the minimum for all analog trunks. Usually, an entry of "1" or "0" would have the best result, but the final setting may vary for each trunk.
● In Program 14-01-02 : Basic Trunk Data Setup - Transmit CODEC Gain Type and Program 14-01-03 : Basic Trunk Data Setup - Receive CODEC Gain Type, change the default values for the analog trunk transmit and receive gains to reflect a -5dB reduction. The entry in each program should be changed from the default setting of 32 (0dB) to 22 (-5dB). This programming change is required on a trunk by trunk basis and the value may vary for each trunk as the setting may be too low for some trunks. New settings will not take affect until the trunks become idle.
With these changes,1. Dial tone volume levels appear more normal with little affect on the maximum volume settings. 2. Speakerphone switching becomes properly balanced with no clipping/chopping present. 3. Sidetone levels in the handset appear normal.
If, after performing the above steps, the problem still exists, please contact NEC Field Engineering for further investigation.
Should you be experiencing a squealing or howling-related feedback problem when making a handsfree intercom call, refer to Aspire Keyset Speakerphone Problems When Used with Analog Trunks (page 3-19). After following the recommendations on page 3-19, update the system software to version 4.01 or higher. If the problem still exists, please contact NEC Field Engineering for further investigation.
3-22 ◆ Section 3: Installing Extensions and Trunks Aspire S Hardware Manual

Section 3: Installing Extensions and Trunks
3
Troubleshooting ISDN Lines
Start
Verify the BRIU PCBis functioning.
Is the Live StatusLED on the BRIU
PCB flashing green?
Remove the PCB andinsert another BRIU
PCB into the same slot.Does it work?
Verify wiring betweenmain equipment and
CO line.
The BRIU PCB mayneed repair.
Main equipment(cabinet/CPU) may
need repair.
Is the cablewiring correct?
DSU may need repair.
Insert another BRIU PCBinto the same slot in the
CPU. Does it work?
T-Point portion of the externalDSU may need repair.
The BRIU PCB mayneed repair.
Yes
Yes
No
Yes
No
Yes
No
The main equipment(cabinet/CPU) may
need repair.
* If it still does not work,replace the cable(s) and/
or connectors.
Yes
No
Is the ISDN Layer1link established
(LD2, LD3 flashing)on the BRIU PCB?
No
Redo the wirescorrectly.
No
Request the COperform a
loopback test ofthe DSU. Any
problems found?
Yes
If an external DSU isused, connect the
ISDN terminal to theT-Point. Is it possible
to make a call?
No
Yes
Check system programmingfor the extension. Refer to the
Aspire Software Manual ifnecessary. Is it possible to
make a call?
No
Stop
Yes
Aspire S Hardware Manual Section 3: Installing Extensions and Trunks ◆ 3-23

Section 3: Installing Extensions and Trunks
- For Your Notes -
3-24 ◆ Section 3: Installing Extensions and Trunks Aspire S Hardware Manual

Section 4: Telephones and Optional Equipment
4
Section 4:
Telephones and
Optional Equipment
Section 4: Telephones and Optional Equipment
2PGDAD MODULE
Using a 2PGDAD Module (Figure 4-1 - Figure 4-8)The 2PGDAD module provides two circuits which allow connection to external terminals such as:● Door Box (4 maximum per system)● External Speaker with Amplifier (8 maximum per system)● External Music Source (external MOH) (8 maximum per system)● External Recording System (8 maximum per system)● External Ringer
The system allows for a maximum of 10 2PGDAD modules to be installed (4 for ACI ports for external music source or recording system, 2 for Door Boxes, and 4 for Paging). The 2PGDAD module also provides multi-purpose controls. These control relays can be used for controlling the external amplifier, external music source and door lock control with the use of a Door Box. The system allows for up 8 general purpose relays with the 2PGDAD modules.
The 2PGDAD module connects to any available digital extension port, except ports 1 or port 2 on the CPU. The terminal connections made within the PGDAD module and the jumper settings determine what features are used for each circuit.
Figure 4-1: 2PGDAD MODULE
Channel 1Status LED Channel 2
Status LED
Aspire S Hardware Manual Section 4: Telephones and Optional Equipment ◆ 4-1

Section 4: Telephones and Optional Equipment
LED Indications
Setting Up 2PGDAD Module ConnectionsIf the 2PGDAD Module is to be wall mounted, it is recommended that all the cable connections
be made first.
In order for the module to ID correctly after setting the jumpers, set the circuit type to “0” for the module’s port in Program 10-03-01 prior to connecting the line cord to the 2PGDAD Module.
1. Remove the screw from the front of the 2PGDAD module.
Figure 4-2: REMOVE COVER FROM 2PGDAD MODULE
2. Using a screwdriver, break out the plastic piece covering the cable hole.
Figure 4-3: REMOVE PLASTIC COVER FROM CABLE HOLE
LED Indication Note
LED 1 Green LED when CH1 in use.
Flashing green LED indicates dipswitch setting and programming for CH1 is conflicting.
LED 2 Green LED when CH2 in use.
Flashing green LED indicates dipswitch setting and programming for CH2 is conflicting.
0893
100
- 55
Module
0893100 - 58
Breakout plasticfor cable access
4-2 ◆ Section 4: Telephones and Optional Equipment Aspire S Hardware Manual
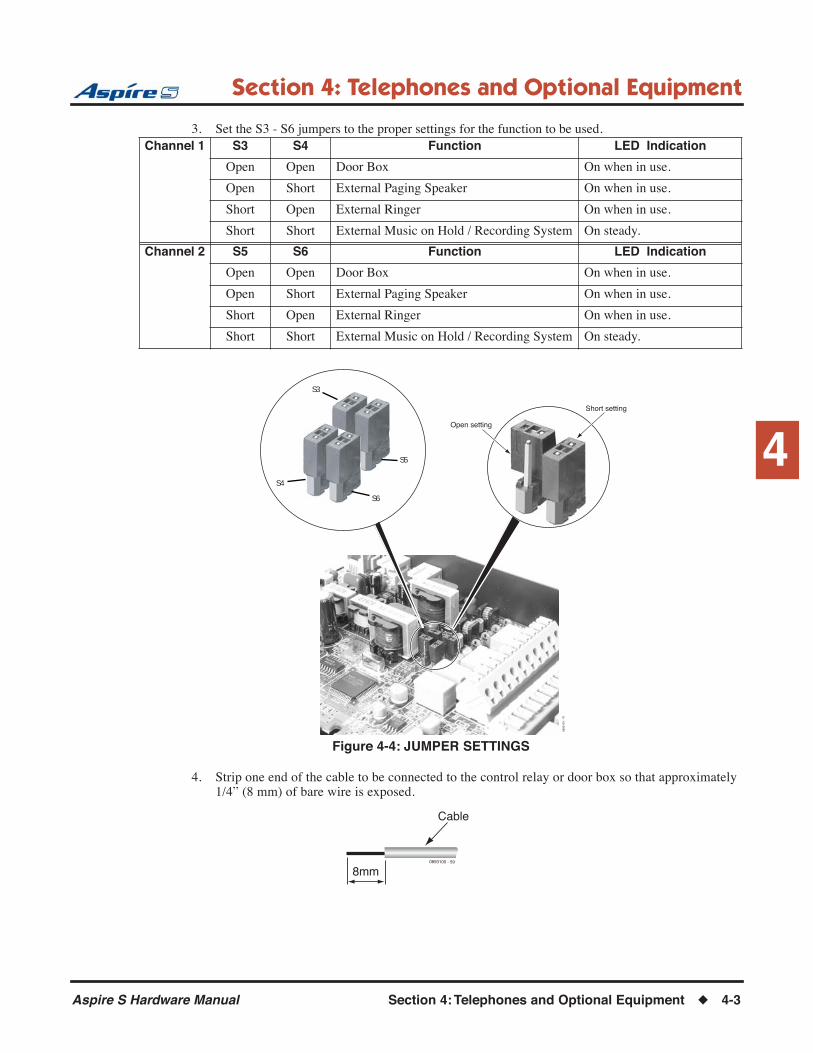
Section 4: Telephones and Optional Equipment
4
3. Set the S3 - S6 jumpers to the proper settings for the function to be used.
Figure 4-4: JUMPER SETTINGS
4. Strip one end of the cable to be connected to the control relay or door box so that approximately 1/4” (8 mm) of bare wire is exposed.
Channel 1 S3 S4 Function LED Indication
Open Open Door Box On when in use.
Open Short External Paging Speaker On when in use.
Short Open External Ringer On when in use.
Short Short External Music on Hold / Recording System On steady.
Channel 2 S5 S6 Function LED Indication
Open Open Door Box On when in use.
Open Short External Paging Speaker On when in use.
Short Open External Ringer On when in use.
Short Short External Music on Hold / Recording System On steady.
S3
S5
S4
S6
0893
100
- 76
Open setting
Short setting
0893100 - 59
Cable
8mm
Aspire S Hardware Manual Section 4: Telephones and Optional Equipment ◆ 4-3

Section 4: Telephones and Optional Equipment
5. Insert the cable into the proper CN4 or CN5 location while holding down the lock button (holding down this lock button is easiest with a flat-head screwdriver). Once the cable is in place, release the lock button.
Refer to the specific function being connected for more detail on 2PGDAD connections.
Figure 4-5: CONNECTING CABLE TO THE 2PGDAD MODULE
6. Repeat Steps 4 and 5 for any additional connections required.7. Replace the cover and tighten the screw to hold the cover in place.8. If required for the function being used, insert the RCA connectors into the CN2 (Channel 1) and
CN3 (Channel 2) connectors on the back of the 2PGDAD module.
Figure 4-6: 2PGDAD MODULE CONNECTIONS
0893100 - 57
Press down
CN4, CN5
Flat-head screwdriver
Cable
0893100 - 56
CN3Channel 2 CN2
Channel 1CN1
(to ESIU port)
RCA Plugs
4-4 ◆ Section 4: Telephones and Optional Equipment Aspire S Hardware Manual

Section 4: Telephones and Optional Equipment
4
9. Install a modular jack for each 2PGDAD module. For each module, run one-pair 24 AWG station cable from the cross-connect block to a modular jack. Ground the unused pair.
10. Terminate the extension leads to GRN/RED of the modular jack. Terminate the unused leads to the jack.
11. Install bridging clips as required.In order for the module to ID correctly, set the circuit type to “0” for the port in Program
10-03-01 prior to connecting the line cord.
12. Plug a modular line cord from the mod jack to the CN1 connector on the 2PGDAD module.
ImportantIn some cases, when testing the operation of an extension port when connecting to a Cordless II, Cordless Lite II, or 2PGDAD module, a technician may connect a line cord directly from an extension port on the Aspire/Aspire S ESIU PCB or Aspire S CPU. Though this is not the recommended connection, it can be used to check if the extension has dial tone.
Should a direct connection of this type be made to the base station of the Cordless II or Cordless Lite II, or to a 2PGDAD module, the line cord must be 2-wire (1-pair). If a 2-pair wire is used, the system will provide power to the unused pair. This can prevent the cordless telephone from acquiring a link with the base station or it can damage the 2PGDAD module or the Aspire station card.
The recommended connection is to punch down 2 wires to the cross-connect block, then connect the exten-sion block to the RJ61 connector on the PCB or CPU.
1. Optional:To wall mount the 2PGDAD module, insert two wood screws 100mm apart (3 15/16”). Leave 3mm (1/8”) of the screw exposed. The screws can be installed either vertical or horizontal, depending on which position fits best for your location.
Figure 4-7: INSTALLING THE SCREWS
0893100 - 62
4mm
100mm
100mm
3mm
Aspire S Hardware Manual Section 4: Telephones and Optional Equipment ◆ 4-5
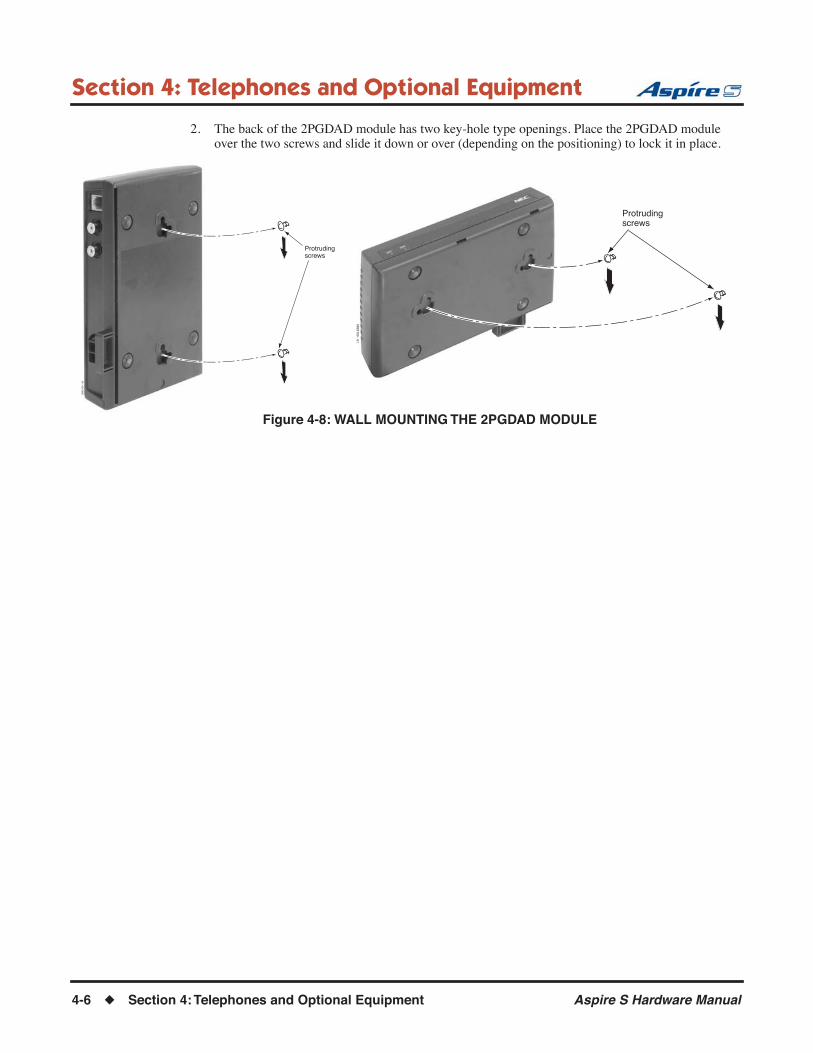
Section 4: Telephones and Optional Equipment
2. The back of the 2PGDAD module has two key-hole type openings. Place the 2PGDAD module over the two screws and slide it down or over (depending on the positioning) to lock it in place.
Figure 4-8: WALL MOUNTING THE 2PGDAD MODULE
0893
100
- 60
Protrudingscrews
0893100 - 61
Protrudingscrews
4-6 ◆ Section 4: Telephones and Optional Equipment Aspire S Hardware Manual

Section 4: Telephones and Optional Equipment
4
BACKGROUND MUSIC
Installing Background Music (Figure 4-9)Background Music (BGM) sends music from a customer-provided music source to speakers in keysets. If an extension user activates it, BGM plays whenever the user’s extension is idle.
1. Connect an RJ61 modular line cord from the CN23 connector on the CPU to the appropriate loca-tion on the extension cross-connect block.
2. Connect the two-conductor station cable from the cross-connect block to the external music source.3. Install bridging clips as required.
Figure 4-9: CPU CONNECTIONS
Refer to Background Music in the software manual for additional information.
0893130 - 112
MusicInput
CPU PCB
CN23
CrossConnect
Block
Music Source
Aspire S Hardware Manual Section 4: Telephones and Optional Equipment ◆ 4-7

Section 4: Telephones and Optional Equipment
DOOR BOX
Installing a Door Box (Figure 4-10, Figure 4-11)
The Door Box is a self-contained, water-resistant, Intercom unit typically used to monitor an entrance door. A visitor at the door can press the Door Box call button (like a door bell). The Door Box then sends chime tones to all extensions programmed to receive chimes. The system can have up to four Door Boxes.
Each 2PGDAD module audio output can optionally support two analog Door Boxes. In addition, you can connect each circuit’s control relay to an electric door strike. This allows an extension user to remotely acti-vate the door strike while talking to a visitor at the Door Box. The control relays are normally open. The CPU also provides 1 relay. This relay is defined as relay “0” in programming. When the relays on the 2PGDAD are used, there is no need to assign the relay to the Door Box - simply connect the relay as detailed in the steps below for the Door Box used. The relays on the 2PGDAD modules are numbered 5-8 in system programming.
The relay closes when the Door Box/external page zone is called. The maximum applied voltage is 24vDC at .5A for each contact.
NOTE: A 2PGDAD circuit used for an analog Door Box cannot also be used for External Paging.
1. Make sure the jumper in the 2PGDAD module for the associated Door Box is set correctly. (Refer to Figure 4-4 JUMPER SETTINGS on page 4-3).
2. If a line cord was not previously connected to the 2PGDAD, complete Steps 3-6. Otherwise, skip to Step 7.
3. Install a modular jack for each 2PGDAD module. For each module, run one-pair 24 AWG station cable from the cross-connect block to a modular jack. Ground the unused pair.
4. Terminate the extension leads to GRN/RED of the modular jack. Terminate the unused leads to the jack.
5. Install bridging clips as required.6. Plug a modular line cord from the mod jack to the CN1 connector on the 2PGDAD module.7. If wall mounting the Door Box, remove the screw on the front of the Door Box.8. Remove the back half of the Door Box and attach this mounting bracket to the wall with the two
screws provided.9. Connect the two-conductor station cable from the CN4 connectors within the 2PGDAD module to
the Door Box terminals. These wires must be routed through the opening in the bottom of the Door Box mounting bracket.
Be sure to maintain the proper polarity.
10. Replace the front half of the Door Box and reattach the screw to secure it in place.11. To connect a Door Box to an external relay for an unlock device, for example, connect one-pair 24
AWG station cable from the Relay 5 (for Door Box 1) or Relay 6 (for Door Box 2) connectors (CN5) in the 2PGDAD module. Connect the opposite end to the unlock device.
Refer to Relays - External Page, Door Box, General Purpose (Figure 4-15, Figure 4-55) (page 4-56) for information on connecting the Door Box to a relay.
Refer to Door Box in the Software Manual for additional details.
A 2PGDAD Module is required for this feature.
4-8 ◆ Section 4: Telephones and Optional Equipment Aspire S Hardware Manual
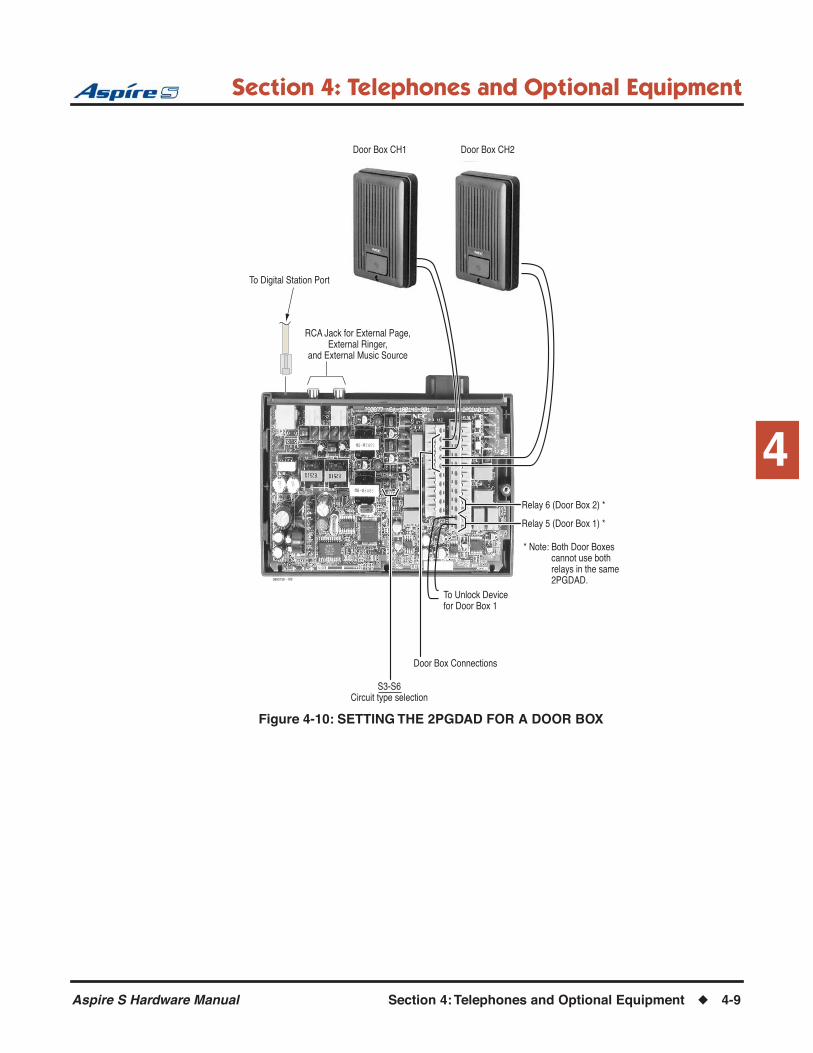
Section 4: Telephones and Optional Equipment
4
Figure 4-10: SETTING THE 2PGDAD FOR A DOOR BOX
0893130 - 109
Door Box Connections
S3-S6Circuit type selection
Relay 5 (Door Box 1) *
Relay 6 (Door Box 2) *
Door Box CH1 Door Box CH2
To Digital Station Port
RCA Jack for External Page,External Ringer,
and External Music Source
* Note: Both Door Boxes cannot use both relays in the same 2PGDAD.
To Unlock Devicefor Door Box 1
Aspire S Hardware Manual Section 4: Telephones and Optional Equipment ◆ 4-9
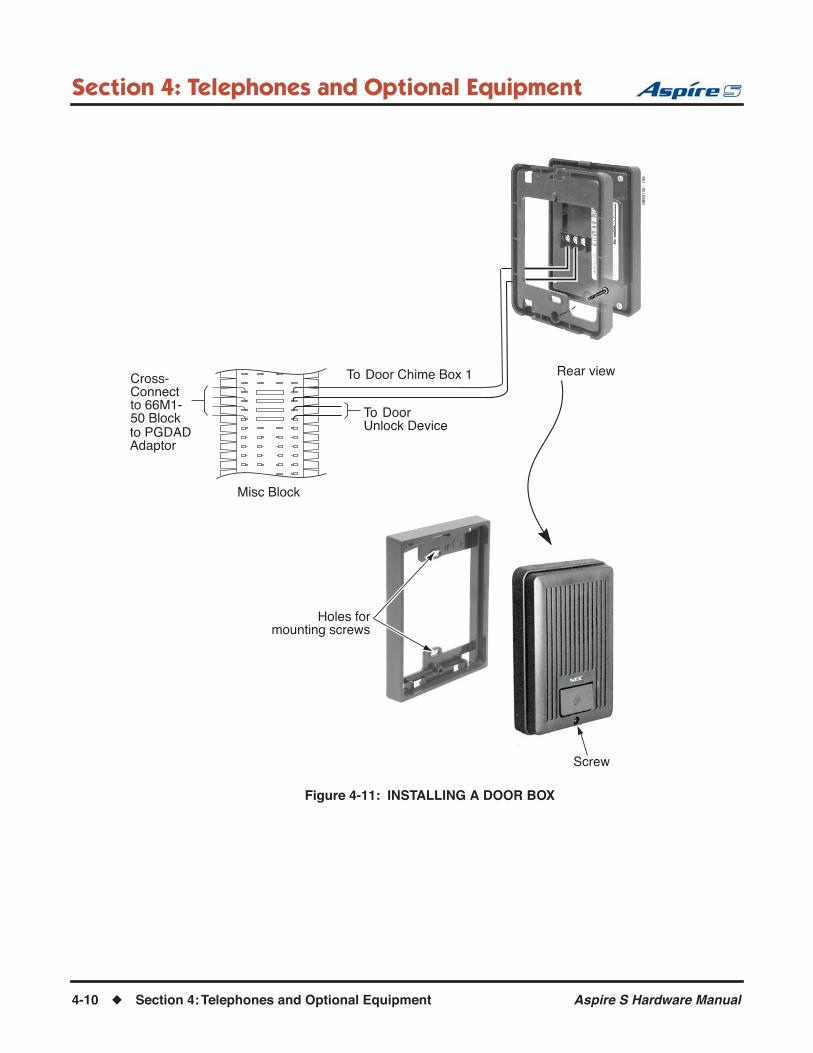
Section 4: Telephones and Optional Equipment
Figure 4-11: INSTALLING A DOOR BOX
To Door Chime Box 1 Rear view
To DoorUnlock Device
Misc Block
Holes formounting screws
Screw
Cross-Connectto 66M1-50 Blockto PGDADAdaptor
0893
130
- 10
8
4-10 ◆ Section 4: Telephones and Optional Equipment Aspire S Hardware Manual

Section 4: Telephones and Optional Equipment
4
DSS CONSOLE
Using a DSS Console (Figure 4-12 - Figure 4-14)The DSS Console gives a keyset user a Busy Lamp Field (BLF) and one-button access to extensions, trunks and system features. The 110-Button DSS Console provides an additional 100 programmable keys, while the 24-Button DLS Console provides 24 programmable keys. The 110-Button DSS also has 10 fixed feature keys for Paging, calling Door Boxes, activating Night Service and enabling DSS Console Alternate Answer. There are also two keys that allow “shifting” between the first and second set of 100 extensions.
Keep the following in mind when installing DSS Consoles:
● A 24-Button DLS Console does not require a separate digital station port.● A 110-Button DSS Console requires a separate digital station port.● The system allows for a maximum of 4 110-Button DSS Consoles. One extension can have a maxi-
mum of 4 110-Button DSS Consoles. As the 24-Button DLS Console is connected to the bottom of the phone, an extension can only have one 24-button DLS Console installed. An extension can have either a 24-Button DLS Console and 4 110-Button DSS Consoles installed/assigned.
● By default, the 24-Button DLS Console has no keys defined. These keys can be programmed as line keys, extension DSS keys, or programmable function keys using Program 15-07. To program the keys, use the extension number to which the DLS is installed and, regardless of the type of keyset connected, start programming the DLS keys at key number 25. Service codes 851 and 852 can also be used to program these keys if allowed by an extension’s Class of Service.
● By default, the 110-Button DSS Console has extension DSS keys defined. These keys can be pro-grammed as line keys, extension DSS keys, or programmable function keys using Program 30-03-01. Service codes 851 and 852 can also be used to program these keys if allowed by an extension’s Class of Service.
● A 24-Button DLS Console cannot be installed on an IPhone.
For additional information, refer to Direct Station Selection (DSS) Console in the Software Manual.
Aspire S Hardware Manual Section 4: Telephones and Optional Equipment ◆ 4-11

Section 4: Telephones and Optional Equipment
Installing a 110-Button DSS Console1. Install a modular jack for each 110-Button DSS Console. The modular jack should be within six
feet of the phone.2. For each 110-Button DSS Console, run one-pair 24 AWG station cable from the cross-connect
block to a modular jack. Ground the unused pair.3. Terminate the extension leads to GRN/RED of the modular jack. Terminate the unused leads to the
jack.4. Connect a line cord from the modular jack to the connector on the bottom of the DSS console.
Figure 4-12: INSTALLING A DSS CONSOLE
5. To program a DSS Console . . . With the default settings, there are no DSS Consoles assigned. 10-03-01 : PCB SetupThe system automatically assigns the terminal type (10) for the port which has a DSS console installed.
When installing a DSS, the system must auto-detect the console in order for the LEDS to function correctly. When connecting the DSS to a extension previously defined with anothercircuit type, undefine the circuit type (enter 00 in Program 10-03 for the extension number),then connect the DSS Console.
30-02-01 : DSS Console Extension AssignmentDesignate the extensions that have DSS Consoles connected to them.30-03-01 : DSS Console Key AssignmentCustomize the functions of the DSS Console keys.30-04-01 : Alternate DSS Console Key AssignmentIf the console should have Alternate Answering, use this program to assign the Alternate Answering Destination.
625ModularJack
25-paircable toextensionPCB
BLKYEL
RED GRN
BLU-WHT WHT-BLU
CrossConnect
Block
"B"Block
0893
100-
111
4-12 ◆ Section 4: Telephones and Optional Equipment Aspire S Hardware Manual
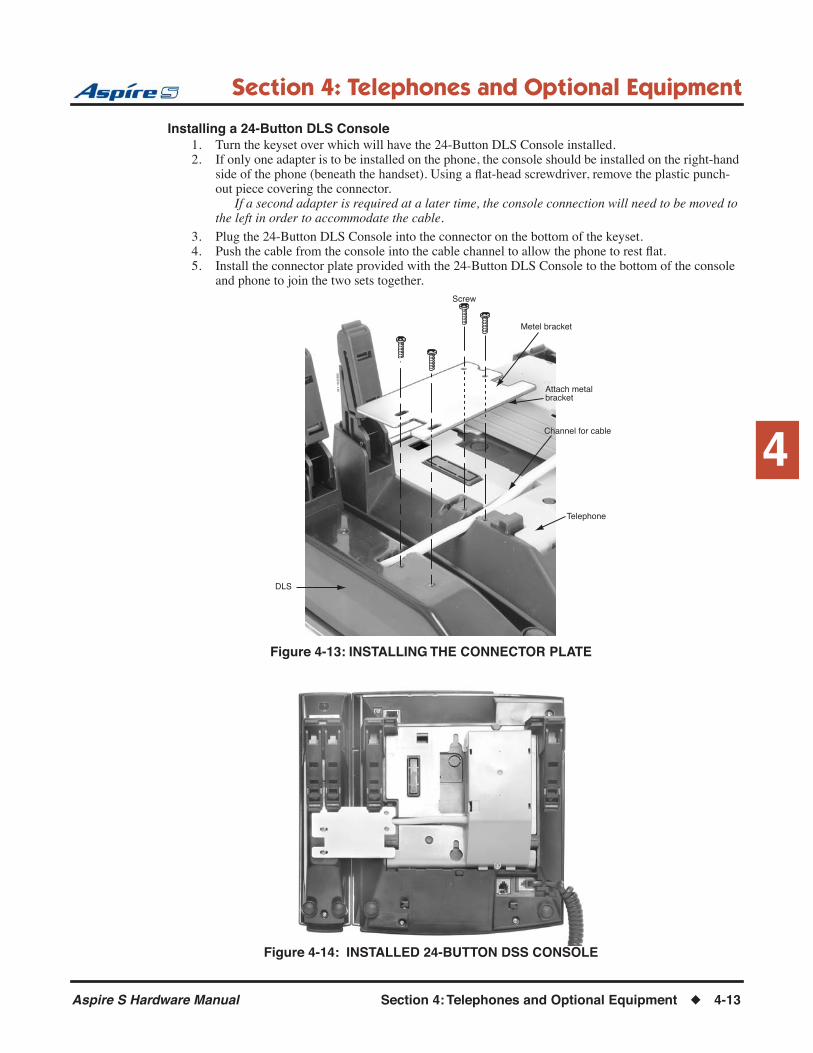
Section 4: Telephones and Optional Equipment
4
Installing a 24-Button DLS Console1. Turn the keyset over which will have the 24-Button DLS Console installed.2. If only one adapter is to be installed on the phone, the console should be installed on the right-hand
side of the phone (beneath the handset). Using a flat-head screwdriver, remove the plastic punch-out piece covering the connector.
If a second adapter is required at a later time, the console connection will need to be moved to the left in order to accommodate the cable.
3. Plug the 24-Button DLS Console into the connector on the bottom of the keyset.4. Push the cable from the console into the cable channel to allow the phone to rest flat.5. Install the connector plate provided with the 24-Button DLS Console to the bottom of the console
and phone to join the two sets together.
Figure 4-13: INSTALLING THE CONNECTOR PLATE
Figure 4-14: INSTALLED 24-BUTTON DSS CONSOLE
0893100 - 145
Screw
Attach metalbracket
Channel for cable
DLS
Telephone
Metel bracket
Aspire S Hardware Manual Section 4: Telephones and Optional Equipment ◆ 4-13

Section 4: Telephones and Optional Equipment
DTERM VOICE SECURITY RECORDER (VSR)
Dterm Voice Security Recorder (VSR)The Dterm® Voice Security Recorder (P/N 780275) is a USB device that taps across the digital extension pair of the NEC telephone system allowing digital recording of the keyset user’s conversation. The file created is saved either to the local PC or to a network location, depending on the application’s setup. This adapter is for use with digital keysets. It cannot be used with analog, VoIP or i-Series phones.
The 2.0.7 software version for the VSR does not support Caller ID with the Aspire S system.
PC CompatibilityThe Dterm® Voice Security Recorder application supports Microsoft operating systems which support USB devices such as Windows 98SE, Windows ME, Windows 2000, and Windows XP. Note that Windows 95 and below, Windows NT and Macintosh operating systems are not supported.
Installation
For Windows 98 or ME1. Run the Setup.exe program file from the NEC installation CD BEFORE connecting the telephone
interface unit to your PC.2. Using the USB cable provided, connect the USB interface of the NEC VSR unit to an available USB
port on your PC.3. Unplug the line cord from your telephone and connect it to either port on the Dterm VSR unit.4. Connect the NEC telephone system to the remaining port on the Dterm VSR unit. You are now ready to
record.
For Windows 2000 or XP1. Using the USB cable provided, connect the USB interface on the Dterm VSR unit to your PC. Windows
will automatically detect the new hardware and will start the New Hardware Wizard. This will display a dialog box similar to the one shown below. Select the second option, "Install from a list or specific location", then press Next>.
CAUTIONThe use of monitoring, recording, or listening devices to eavesdrop, monitor, retrieve, or record telephone conversation or other sound activities, whether or not contemporaneous with transmission, may be illegal in certain circumstances under federal or state laws. Legal advice should be sought prior to implementing any practice that monitors or records any telephone conversation. Some federal and state laws require some form of notification to all parties to a telephone conversation, such as using a beep tone or other notification methods or requiring the consent of all parties to the telephone conversation, prior to monitoring or recording the telephone conversation. Some of these laws incorporate strict penalties.
4-14 ◆ Section 4: Telephones and Optional Equipment Aspire S Hardware Manual

Section 4: Telephones and Optional Equipment
4
2. Insert the NEC Installation CD in your CD drive and press Next>.Aspire S Hardware Manual Section 4: Telephones and Optional Equipment ◆ 4-15

Section 4: Telephones and Optional Equipment
3. If you downloaded the files from the internet, uncheck the "Search removable media box", select the "Include this location…" box and type the location where you stored the downloaded files (e.g. C:\My Documents). Press Next>.
4. The software has been fully tested, but has not yet been submitted to Microsoft for approval. Press "Continue Anyway".
5. Press Finish to close the dialog box.6. Run Setup.exe on your NEC Installation CD to install the Dterm® Voice Security Recorder application software on
your PC. 7. Using the USB cable provided, connect the USB interface of the NEC VSR unit to an available USB port on your PC.8. Unplug the line cord from your telephone and connect the phone to either port on the Dterm VSR unit.9. Connect the NEC telephone system to the remaining port on the Dterm VSR unit.
4-16 ◆ Section 4: Telephones and Optional Equipment Aspire S Hardware Manual
Section 4: Telephones and Optional Equipment
4
Operation NoteUse the Options and File Management tabs within the Dterm® Voice Security Recorder application to adjust the program settings as required (directory for storing messages, message deletion, file format, etc.).
It is recommended that after the initial installation of the Dterm® Voice Security Recorder application, that the audio balance of the remote side be changed to approximately 100%. 1. Open the Dterm® Voice Security Recorder application.2. Click the Options tab.3. Using the up arrow button, change the Remote Boost (%) setting to 100%.
Excessive boost can distort audio.
Aspire S Hardware Manual Section 4: Telephones and Optional Equipment ◆ 4-17
Section 4: Telephones and Optional Equipment
EXTERNAL PAGING
External Page (Figure 4-15, Figure 4-55)Two external page zone/door box circuits are provided by each 2PGDAD installed. Each Door Box/external page circuit also provides a dry relay contact. In programming, the external page speakers provided by the 2PGDAD modules are numbered 1-8 - the relays on the 2PGDAD modules are numbered 1-8. Refer to Pag-ing, External in the Software Manual for additional details.
The 2PGDAD module can be used for talkback with External Page, as can a CO trunk port with the proper external page equipment (ex: Valcom) - set Program 31-06-03 to “0” for talkback.
NOTE: A 2PGDAD circuit used for External Paging cannot also be used for an analog DoorBox.
Installing an External Page System1. Connecting to the 2PGDAD Module:
Make sure the jumper in the 2PGDAD module for the channel is set correctly. (Refer to Figure 4-4 JUMPER SETTINGS on page 4-3).
2. If a line cord was not previously connected to the 2PGDAD, complete Steps 3-6. Otherwise, skip to Step 7.
3. Install a modular jack for each 2PGDAD module. For each module, run one-pair 24 AWG station cable from the cross-connect block to a modular jack. Ground the unused pair(s).
4. Terminate the extension leads to GRN/RED of the modular jack. Terminate the unused leads to the jack.
5. Install bridging clips as required.6. Plug a modular line cord from the mod jack to the CN1 connector on the 2PGDAD module.7. Connect the two-conductor station cable from the CN5 connectors within the 2PGDAD module to
the external relay/external page.Refer to RELAYS (page 4-56) for further details on relays.
4-18 ◆ Section 4: Telephones and Optional Equipment Aspire S Hardware Manual

Section 4: Telephones and Optional Equipment
4
Figure 4-15: 2PGDAD CABLE CONNECTION
Note: The 2PGDAD module provides amplifiers for each page output port (for a maximumof +8 dBM, 600 ohms at 1KHz). No additional page amplification is provided by the2PGDAD module and, if required, an external page amplifier can be used for additional amplification .
0893100 - 78
PGDAD Module
External Relay
Page Control
Paging AmplifierMute Circuit
External Page
To ESIU PCB
CN2 or CN3
CN1
CN2
CN3
Relay 6
Relay 5
Aspire S Hardware Manual Section 4: Telephones and Optional Equipment ◆ 4-19

Section 4: Telephones and Optional Equipment
EXTERNAL RECORDING SYSTEM / EXTERNAL RINGER
External Recording System or External Ringer (Figure 4-16)The 2PGDAD allows for the connection of an external recording system or external ringer. With a customer-pro-vided tape recorder, when an extension user dials the ACI analog port extension number, they can automatically start the recorder and activate the record function. When the user hangs up, the recording stops and the tape recorder turns off. For tape recording, connect the tape recorder AUX input jack to the PGDAD jack. Connect the recorder control leads (if available) to the CTL (control relay) jack. By using Department Calling, you can arrange multiple tape recorders into a pool. When an extension user dials the Department Group pilot number, they reach the first available tape recorder in the pool.
The relays in the 2PGDAD module can optionally control customer-provided external ringers (loud bells) and buzzers. When an extension user dials the ACI analog port extension number, the associated PGDAD relay closes and activates the ringer. You could use this capability to control an emergency buzzer for a noisy machine shop floor, for example. In addition, if programmed for ringing, an incoming trunk call can activate the ringer/buzzer.
Installing an External Recording System or External Ringer1. Connecting to the 2PGDAD Module:
Make sure the jumper in the 2PGDAD module for the channel is set correctly. (Refer to Figure 4-4 JUMPER SETTINGS on page 4-3).
2. If a line cord was not previously connected to the 2PGDAD, complete Steps 3-6. Otherwise, skip to Step 7.
3. Install a modular jack for each 2PGDAD module. For each module, run one-pair 24 AWG station cable from the cross-connect block to a modular jack. Ground the unused pair.
4. Terminate the extension leads to GRN/RED of the modular jack. Terminate the unused leads to the jack.
5. Install bridging clips as required.6. Plug a modular line cord from the mod jack to the CN1 connector on the 2PGDAD module.7. Connect an RCA jack to the audio output(s) on the back of the 2PGDAD module. 8. The opposite end of this cable is connected to the external recording system or external ringer
either directly or by connecting to the cross-connect block where the item is connected.
4-20 ◆ Section 4: Telephones and Optional Equipment Aspire S Hardware Manual

Section 4: Telephones and Optional Equipment
4
Figure 4-16: 2PGDAD CABLE CONNECTION
Programming
➻ 10-03-01 : PCB Setup - Terminal Type (Circuit 1)10-03-06 : PCB Setup - Terminal Type (Circuit 2)Confirm that the 2PGDAD has defined the circuit types as either type “7” for External Ringer or “9” for ACIs. (If the 2PGDAD circuit had previously been defined for another type of cir-cuit, unplug the 2PGDAD and plug it back in order to reset the circuit types.)
➻ 10-05-01 : General Purpose Relay SetupDefine which relay circuits (5-8) on the 2PGDAD Module are used for General Purpose Relays.
➻ 11-06-01 : ACI Extension NumberingAssign extension numbers to ACI software ports. Select a number outside of the normal extension number range. Aspire S: ACI Ports 1-8Aspire: ACI Ports 1-96
➻ 11-08-01 : ACI Group Pilot NumberAssign pilot numbers to ACI groups. When a user dials the pilot number, they reach an avail-able ACI software port within the group. Aspire S: ACI Groups 1-4Aspire: ACI Groups 1-16
0893100 - 160
PGDAD Module
To ESIU PCB
CN2 or CN3
CN1
CN2
CN3
External Ringer ORExternal Recording System
Aspire S Hardware Manual Section 4: Telephones and Optional Equipment ◆ 4-21

Section 4: Telephones and Optional Equipment
➻ 11-12-50 : Service Code Setup (For Service Access)Specify the service code to be used for toggling the relay open and closed (Default: 880).
➻ 33-01-01 : ACI Port Type SetupSet each ACI software port for input (1) or input/output (2). Use input ports for Music on Hold sources. Use output ports for External Paging/ringer control.Aspire S: ACI Ports1-8Aspire: ACI Ports 1-96
➻ 33-02-01 : ACI Department Calling GroupAssign ACI software ports to ACI Department Groups. This lets ACI callers connect to ACI software ports by dialing the group’s pilot number (set in Program 11-08).Aspire S: ACI Ports 1-8, ACI Groups 1-4Aspire: ACI Ports 1-8, ACI Groups 1-16
ACI Recording
➻ 10-07-01 : Conversation Record CircuitsAssign the number of conversation record circuits.
➻ 14-09-01 : ACI Conversation Recording Destination for Trunks - ACI Recording Destination Extension NumberUse this option to assign the ACI Call Recording destination on a per trunk basis. The destina-tion can be an ACI port’s extension number (assigned in Program 11-06-01) or an ACI Depart-ment Group pilot number (assigned in Program 11-08-01). If destinations are assigned in Programs 14-09 and 15-12, the destination in Program 15-12 will be followed.
➻ 14-09-02 : ACI Conversation Recording Destination for Trunks - ACI Automatic Recording for Incoming CallDetermine whether a trunk should be automatically recorded when an incoming call is received (0=off, 1=on).
➻ 14-09-04 : ACI Conversation Recording Destination for Trunks - ACI Automatic Recording for Outgoing CallDetermine whether a trunk should be automatically recorded when an outgoing call is initiated (0=off, 1=on).
➻ 15-07-01 : Programmable Function KeysIf required, program an ACI Conversation Record Key (code 69 + 0). This key allows an extension user to press the key to manually record a call to the ACI.
➻ 15-12-01 : Conversation Recording Destination for Extensions - ACI Recording Destination Extension NumberUse this option to assign the ACI Call Recording destination on a per extension basis. The destination can be an ACI port’s extension number (assigned in Program 11-06) or an ACI Department Group pilot number (assigned in Program 11-08). If destinations are assigned in Programs 14-09 and 15-12, the destination in Program 15-12 will be followed.
➻ 15-12-02 : Conversation Recording Destination for Extensions - ACI Automatic Recording for Incoming CallDetermine whether an extension should be automatically recorded when an incoming call is received (0=off, 1=on).
➻ 15-12-04 : Conversation Recording Destination for Extensions - ACI Automatic Recording for Outgoing CallDetermine whether an extension should be automatically recorded when an outgoing call is received (0=off, 1=on).
External Ringer
➻ 31-05-01 : Universal Night Answer/Ring Over PagingFor each trunk port which should ring the external ringer, enter “1”.
4-22 ◆ Section 4: Telephones and Optional Equipment Aspire S Hardware Manual

Section 4: Telephones and Optional Equipment
4
HEADSETS
Connecting a HeadsetA keyset user can utilize a customer-provided headset in place of the handset. Like using Handsfree, using the headset frees up the user’s hands for other work. However, Headset Operation provides privacy not avail-able from handsfree.
The headset plugs into a separate jack on the bottom of the phone. This allows the use of the handset or headset - whichever is convenient at the time.
Simply connect the headset into the headset jack located on the bottom of the keyset. (This jack is located right next to the handset jack, so make sure to connect to the proper jack.)
Examples of compatible headsets are the:● NEC Polaris Supra Monaural Noise Cancelling, P/N 750036● NEC Polaris Supra Binaural Noise Cancelling, P/N 750033● NEC Polaris Encore Binaural Noise Cancelling, P/N 750035
Aspire S Hardware Manual Section 4: Telephones and Optional Equipment ◆ 4-23

Section 4: Telephones and Optional Equipment
IN-LINE POWER ADAPTER (ILPA-R)
Using the In-Line Power Adapter (Figure 4-17)The In-Line Power Adapter (ILPA-R), P/N 780122, which is IEEE 802.3af compliant, detects power from a PoE-compatible ethernet switch and passes it to the IP terminal. The ILPA does the negotiation and detec-tion with the switch and then relays the power to the IP terminal device. This provides an additional way to power the NEC IP terminals (Aspire IPhone or Aspire Keyset with IP Adapter). With this adapter, the IP ter-minals on the Aspire can be powered using:● Local power connecting the IP terminal to a local AC wall outlet using the AC-R Adapter (P/N 780135)● NEC power supply PoE-managed switch (BlueFire 200/24) (in-line and spare pair detection)● Cisco Data Switch - CDP supported (in-line and spare pair detection)● In-Line Power Adapter
Conditions● Only IP telephones supported by center feed can be used.● This adapter can not be used with the H.323 telephones.● When center feed is used, first unplug the adapter from the ethernet switch before changing the
SW1 setting on the back of the adapter.● Please note that the ILPA-R adapter is intended for use with the Aspire IPhones (P/N 0890065)
and IP Adapters (P/N 0890060). Installing any other device into the telephone port of the ILPA-R may result in damage to the device.
When using center feed, set the SW1 switch located on the back of the adapter as follows:
Center Feed Hub System
SW1 Setting
IEEE802.3af STD System 1
Cisco Discovery Protocol System
1
NEC BlueFire 200/24 Switch
2
4-24 ◆ Section 4: Telephones and Optional Equipment Aspire S Hardware Manual

Section 4: Telephones and Optional Equipment
4
Installation1. Set the SW1 switch on the ILPA-R adapter to the correct setting for the ethernet switch to which it
is to be connected.
2. Set the switch setting on the NEC IPhone or IP adapter to the correct position.
3. Connect the NEC VoIP telephone (IPhone or keyset with an IP adapter) to the TEL connector on the ILPA-R adapter with the LAN cable provided with the adapter.
If a customer-provided cable is used, the total length from the switch to the telephone should be less than 328 feet.
The adapter can be positioned either closer to the keyset or switch - it does not matter.
4. Connect a cross-over LAN cable to the LAN connector on the ILPA-R adapter. Plug the opposite end into the switch which is to provide power to the telephone.
If a straight-through cable is used, NIC Auto Detection must be enabled in Programs 10-12-05 (NTCPU) or 84-05-02 (VOIPU).
Figure 4-17: NEC TERMINAL CONNECTION TO AN IEEE 802.3af PoE SWITCH
Center Feed Hub System SW1 Setting
IEEE802.3af STD System 1
Cisco Discovery Protocol System 1
NEC BlueFire 200/24 Switch 2
IPhone (SW2) or IP Adapter (SW1) SW Setting
NEC Power Patch Panel(12 port NEC SN1604 PWRMS, 24 port NEC BlueFire 200/24)
1
Cisco Catalyst Power Patch PanelCisco Catalyst PRW Series
2
802.3af Compliant Switch
Line Cord
Cross-OverCable
Aspire S Hardware Manual Section 4: Telephones and Optional Equipment ◆ 4-25

Section 4: Telephones and Optional Equipment
KEYSET LABELING
Labeling Your Phone (Figure 4-18)The Aspire keysets can be easily labeled by removing the clear plastic faceplate on the keysets. These labels can be printed by hand, typewriter, or by using the Aspire Labelmaker program. Labels for this are on 8 1/2 x 11” paper, which allows for easy printing by any printer - dot matrix, laser, etc.
Removing the Faceplate:
1. At the lower right-hand corner of the telephone, you’ll notice a small notch in the faceplate plastic. Use this notch to help lift the faceplate up.
Each corner has a plastic locking pin which releases as the faceplate is lifted up.
If the faceplate is dropped, these pins may pop out of place. Be careful not to lose the pins.
Figure 4-18: REMOVING THE FACEPLATE
Replacing the Faceplate:
1. Place the faceplate back on the phone.2. At each corner, press the locking pin back into place.
4-26 ◆ Section 4: Telephones and Optional Equipment Aspire S Hardware Manual
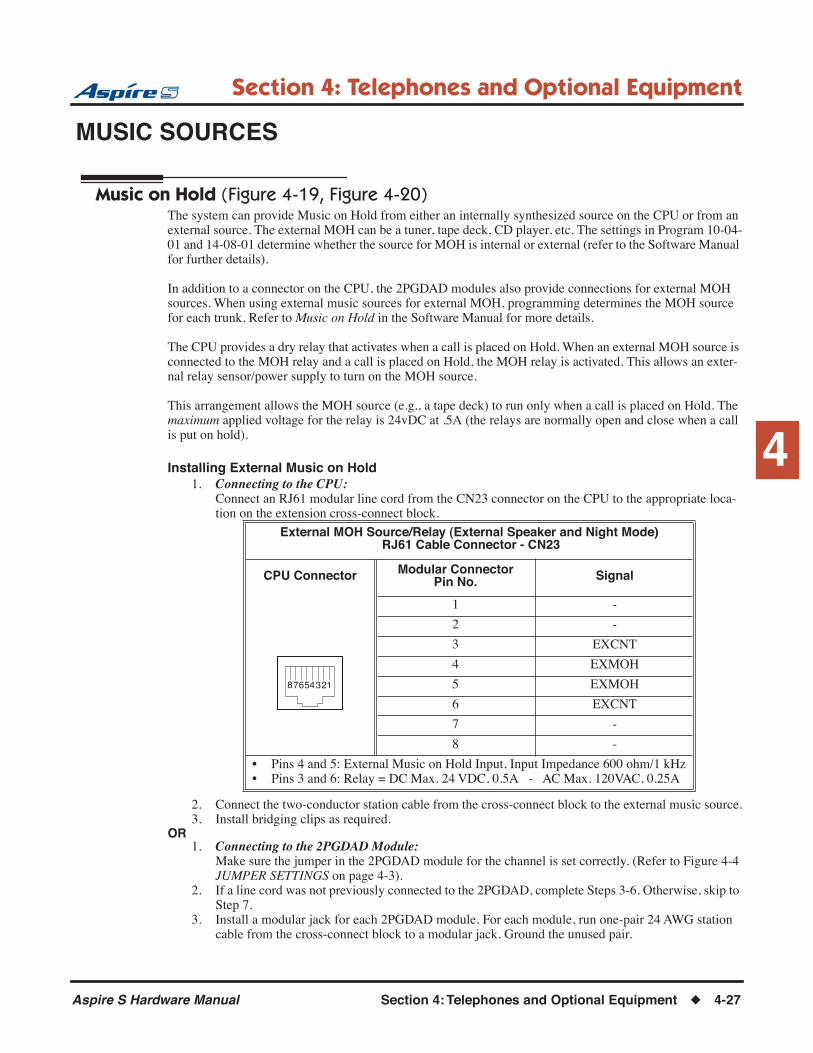
Section 4: Telephones and Optional Equipment
4
MUSIC SOURCES
Music on Hold (Figure 4-19, Figure 4-20)The system can provide Music on Hold from either an internally synthesized source on the CPU or from an external source. The external MOH can be a tuner, tape deck, CD player, etc. The settings in Program 10-04-01 and 14-08-01 determine whether the source for MOH is internal or external (refer to the Software Manual for further details).
In addition to a connector on the CPU, the 2PGDAD modules also provide connections for external MOH sources. When using external music sources for external MOH, programming determines the MOH source for each trunk. Refer to Music on Hold in the Software Manual for more details.
The CPU provides a dry relay that activates when a call is placed on Hold. When an external MOH source is connected to the MOH relay and a call is placed on Hold, the MOH relay is activated. This allows an exter-nal relay sensor/power supply to turn on the MOH source.
This arrangement allows the MOH source (e.g., a tape deck) to run only when a call is placed on Hold. The maximum applied voltage for the relay is 24vDC at .5A (the relays are normally open and close when a call is put on hold).
Installing External Music on Hold1. Connecting to the CPU:
Connect an RJ61 modular line cord from the CN23 connector on the CPU to the appropriate loca-tion on the extension cross-connect block.
2. Connect the two-conductor station cable from the cross-connect block to the external music source.3. Install bridging clips as required.
OR1. Connecting to the 2PGDAD Module:
Make sure the jumper in the 2PGDAD module for the channel is set correctly. (Refer to Figure 4-4 JUMPER SETTINGS on page 4-3).
2. If a line cord was not previously connected to the 2PGDAD, complete Steps 3-6. Otherwise, skip to Step 7.
3. Install a modular jack for each 2PGDAD module. For each module, run one-pair 24 AWG station cable from the cross-connect block to a modular jack. Ground the unused pair.
External MOH Source/Relay (External Speaker and Night Mode) RJ61 Cable Connector - CN23
CPU Connector Modular ConnectorPin No. Signal
1 -
2 -
3 EXCNT
4 EXMOH
5 EXMOH
6 EXCNT
7 -
8 -
• Pins 4 and 5: External Music on Hold Input, Input Impedance 600 ohm/1 kHz• Pins 3 and 6: Relay = DC Max. 24 VDC, 0.5A - AC Max. 120VAC, 0.25A
12345678
Aspire S Hardware Manual Section 4: Telephones and Optional Equipment ◆ 4-27

Section 4: Telephones and Optional Equipment
4. Terminate the extension leads to GRN/RED of the modular jack. Terminate the unused leads to the jack.
5. Install bridging clips as required.6. Plug a modular line cord from the mod jack to the CN1 connector on the 2PGDAD module.7. Connect an RCA jack to the audio output(s) on the back of the 2PGDAD module. 8. The opposite end of this cable is connected to the external music source either directly or by con-
necting to the cross-connect block where the music source is connected.
Figure 4-19: CPRU CONNECTIONS
Figure 4-20: 2PGDAD CONNECTIONS
0893130 - 106
MusicInput
Music�Relays
CPU PCB
CN23
CrossConnect
Block
Music Source
0893100 - 109
PGDAD Module
To ESIU PCB
CN2 or CN3
CN1
CN2
CN3
Music SourceRCA Plug
4-28 ◆ Section 4: Telephones and Optional Equipment Aspire S Hardware Manual

Section 4: Telephones and Optional Equipment
4
PHONE ADAPTERS
Using Adapters (Figure 4-21)Each Aspire keyset can have two optional adapters installed (unless an IP adapter is used). These adapters provide the keyset different capabilities, depending on the adapters installed.
These optional adapters cannot be installed on an Aspire 2-button phone.
The IP Adapter cannot be installed on a super display phone.
Only the ADA2 and PSA Adapters can be used on the Aspire IPhone.
● ADA - Conversation Recording● ADA2 - Aspire IPhone Conversation Recording● APA - Analog Port Adapter Without Ringer● APR - Analog Port Adapter with Ringer● CTA - Serial Interface (RS-232C)● CTU - USB Interface● HF-R - Speakerphone Adapter● PSA - Aspire IPhone Power Failure● IP - VoIP Connection● 24-Button DLS Console (refer to page 4-11
for complete details on connecting the DLS)
The following chart indicates if there are restric-tions when combining certain adapters. Select the adapter in the column and then select the adapter in the row to see if there are any restrictions. For example, using an APA and APR adapter refers you to restriction 3 (only one voice path provided - adapters can not be used together).
Adapter Compatibility Chart
24DLS IP CTU CTA APR APA ADA ADA2 HF-R PSA
ADA - 1 - - - - 2 5 - 5
ADA2 5 5 5 5 5 5 5 5 5 5
APA - 1 - - 3 2 - 5 - 5
APR - 1 6 - 2 3 - 5 6 5
CTA - 1 4 2 - - - 5 - 5
CTU - 1 2 4 6 - - 5 6 5
IP 1 2 1 1 1 1 1 5 - 5
HF-R - 1 6 - 6 - - 5 2 5
PSA 5 5 5 5 5 5 5 5 5 5
24DLS 2 1 - - - - - 5 - 5
Figure 4-21: INSTALLING ADAPTERS
Aspire S Hardware Manual Section 4: Telephones and Optional Equipment ◆ 4-29
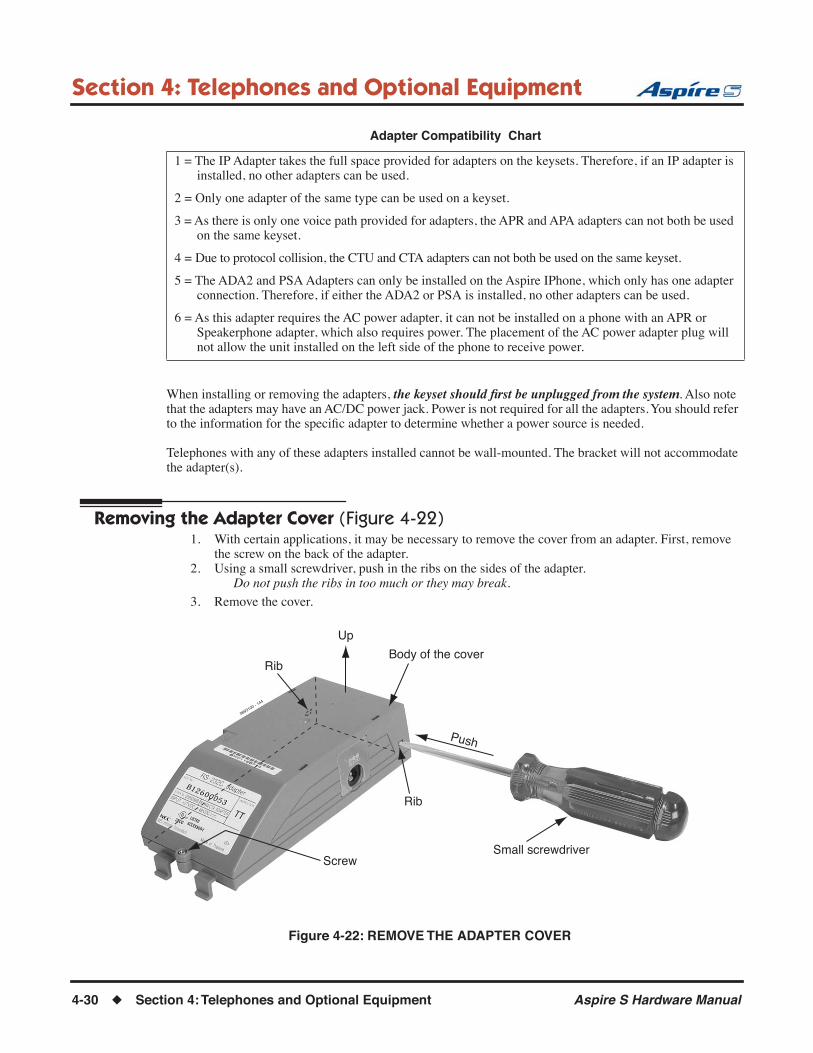
Section 4: Telephones and Optional Equipment
When installing or removing the adapters, the keyset should first be unplugged from the system. Also note that the adapters may have an AC/DC power jack. Power is not required for all the adapters. You should refer to the information for the specific adapter to determine whether a power source is needed.
Telephones with any of these adapters installed cannot be wall-mounted. The bracket will not accommodate the adapter(s).
Removing the Adapter Cover (Figure 4-22)1. With certain applications, it may be necessary to remove the cover from an adapter. First, remove
the screw on the back of the adapter.2. Using a small screwdriver, push in the ribs on the sides of the adapter.
Do not push the ribs in too much or they may break.
3. Remove the cover.
Figure 4-22: REMOVE THE ADAPTER COVER
1 = The IP Adapter takes the full space provided for adapters on the keysets. Therefore, if an IP adapter is installed, no other adapters can be used.
2 = Only one adapter of the same type can be used on a keyset.
3 = As there is only one voice path provided for adapters, the APR and APA adapters can not both be used on the same keyset.
4 = Due to protocol collision, the CTU and CTA adapters can not both be used on the same keyset.
5 = The ADA2 and PSA Adapters can only be installed on the Aspire IPhone, which only has one adapter connection. Therefore, if either the ADA2 or PSA is installed, no other adapters can be used.
6 = As this adapter requires the AC power adapter, it can not be installed on a phone with an APR or Speakerphone adapter, which also requires power. The placement of the AC power adapter plug will not allow the unit installed on the left side of the phone to receive power.
Adapter Compatibility Chart
0893100 - 144
Rib
Body of the cover
Push
Up
Small screwdriverScrew
Rib
4-30 ◆ Section 4: Telephones and Optional Equipment Aspire S Hardware Manual
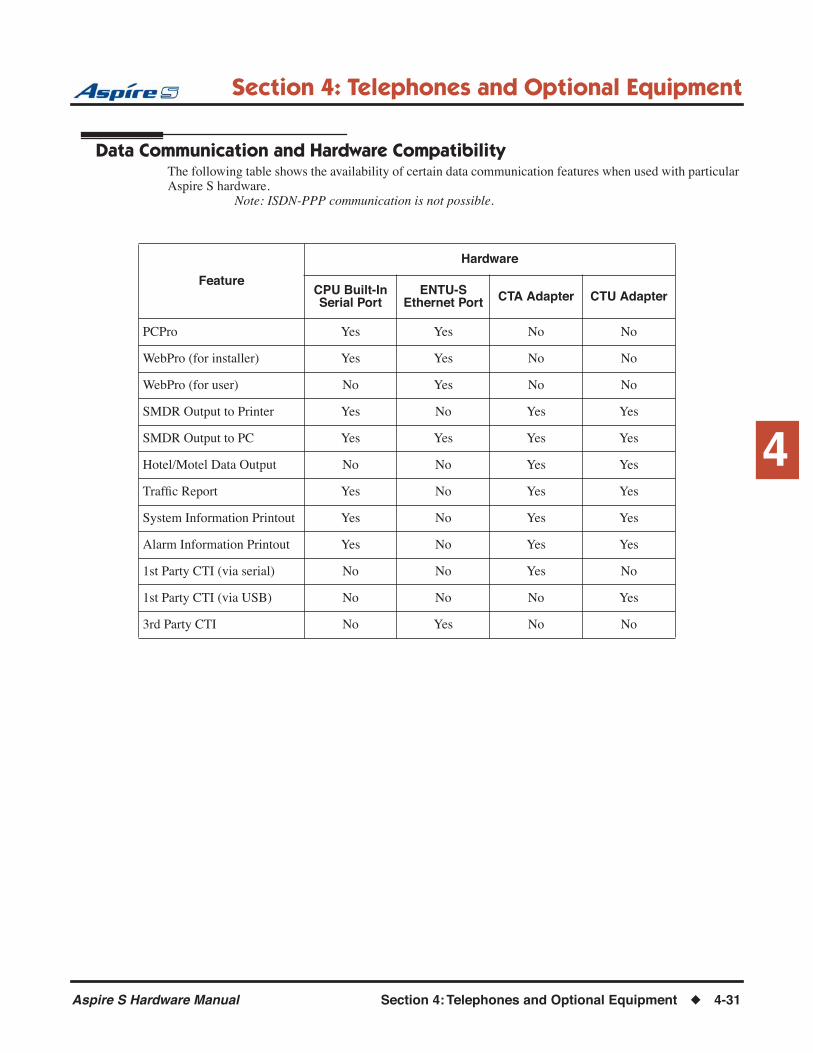
Section 4: Telephones and Optional Equipment
4
Data Communication and Hardware CompatibilityThe following table shows the availability of certain data communication features when used with particular Aspire S hardware.
Note: ISDN-PPP communication is not possible.
Feature
Hardware
CPU Built-In Serial Port
ENTU-S Ethernet Port CTA Adapter CTU Adapter
PCPro Yes Yes No No
WebPro (for installer) Yes Yes No No
WebPro (for user) No Yes No No
SMDR Output to Printer Yes No Yes Yes
SMDR Output to PC Yes Yes Yes Yes
Hotel/Motel Data Output No No Yes Yes
Traffic Report Yes No Yes Yes
System Information Printout Yes No Yes Yes
Alarm Information Printout Yes No Yes Yes
1st Party CTI (via serial) No No Yes No
1st Party CTI (via USB) No No No Yes
3rd Party CTI No Yes No No
Aspire S Hardware Manual Section 4: Telephones and Optional Equipment ◆ 4-31

Section 4: Telephones and Optional Equipment
ADA Adapter (Figure 4-23 - Figure 4-30)Using the ADA Adapter provides a recording jack connection which provides a connection from a telephone to an external tape recorder or speaker. Both sides of the conversation are recorded. The adapter output is a 1/8” audio (mono) jack which you can connect directly to an AUX level input on a recorder or page ampli-fier. The recorder input can also be wired directly to the terminals on the inside of the adapter.
This optional adapter cannot be installed on an Aspire 2-button phone or IPhone.
When installing or removing the adapters, the keyset should first be unplugged from the system. Telephones with any adapters installed cannot be wall-mounted. The bracket will not accommodate the adapter(s).
Installing the ADA Adapter:1. Unplug the line cord from the keyset.2. If only one adapter is to be installed on the phone, the adapter should be installed on the right-hand
side of the phone (beneath the handset). Using a flat-head screwdriver, remove the plastic punch-out piece covering the connector.
3. Set the dip switches on the ADA adapter to the required position. The SW1 and SW2 switches should be set to “1” for either application.
CAUTION
Be sure the connected audio device provides a standard AUX level input.
The use of monitoring, recording, or listening devices to eavesdrop, monitor, retrieve, or record telephone conversation or other sound activities, whether or not contemporaneous with transmission, may be illegal in certain circumstances under federal or state laws. Legal advice should be sought prior to implementing any practice that monitors or records any telephone conversation. Some federal and state laws require some form of notification to all parties to a telephone conversation, such as using a beep tone or other notification methods or requiring the consent of all parties to the telephone conversation, prior to monitoring or recording the telephone conversation. Some of these laws incorporate strict penalties.
The handset only records when a call is placed or answered.
0893
100
- 69
ADA Module
SW1, SW2
1
ON
2 3 4 5 6 7 8
Figure 4-23: RECORDING DIP SWITCH SETTINGS
0893
100
- 71
ADA Module
SW1, SW2
1
ON
2 3 4 5 6 7 8
Figure 4-24: PLAYBACK DIP SWITCH SETTINGS
4-32 ◆ Section 4: Telephones and Optional Equipment Aspire S Hardware Manual

Section 4: Telephones and Optional Equipment
4
4. If using the mono audio jack to connect to the recorder or audio input, plug the audio jack into the REC connector on the ADA and then skip to Step 9. If wiring directly to the terminals inside the adapter, remove the screw on the back of the adapter. Using a small screwdriver, push the ribs on the sides of the adapter in and remove the cover.
Do not push the ribs in too much or they may break.
Figure 4-25: REMOVE THE SCREW FROM THE ADA ADAPTER
5. Determine which terminals should be connected. Terminals T3 and T4 are used for wiring to a recorder.
T6 and T7 are used to activate a relay. T his relay will turn on a recorder when a call is placed ore received. The dip switch “1” must be set to the “on” position.
6. Run the cable to the ADA adapter through the opening near the audio jac.
Figure 4-26: RUNNING THE CABLE TO THE ADA
7. Insert the cable into the terminal. Place the cap over the terminal and push down to secure the cable.
Figure 4-27: WIRING TO THE ADA TERMINAL
0893
100
- 67
Remove screw
ADA Module
0893
100
- 68
0893
100
- 66
Cap
Cable
Aspire S Hardware Manual Section 4: Telephones and Optional Equipment ◆ 4-33
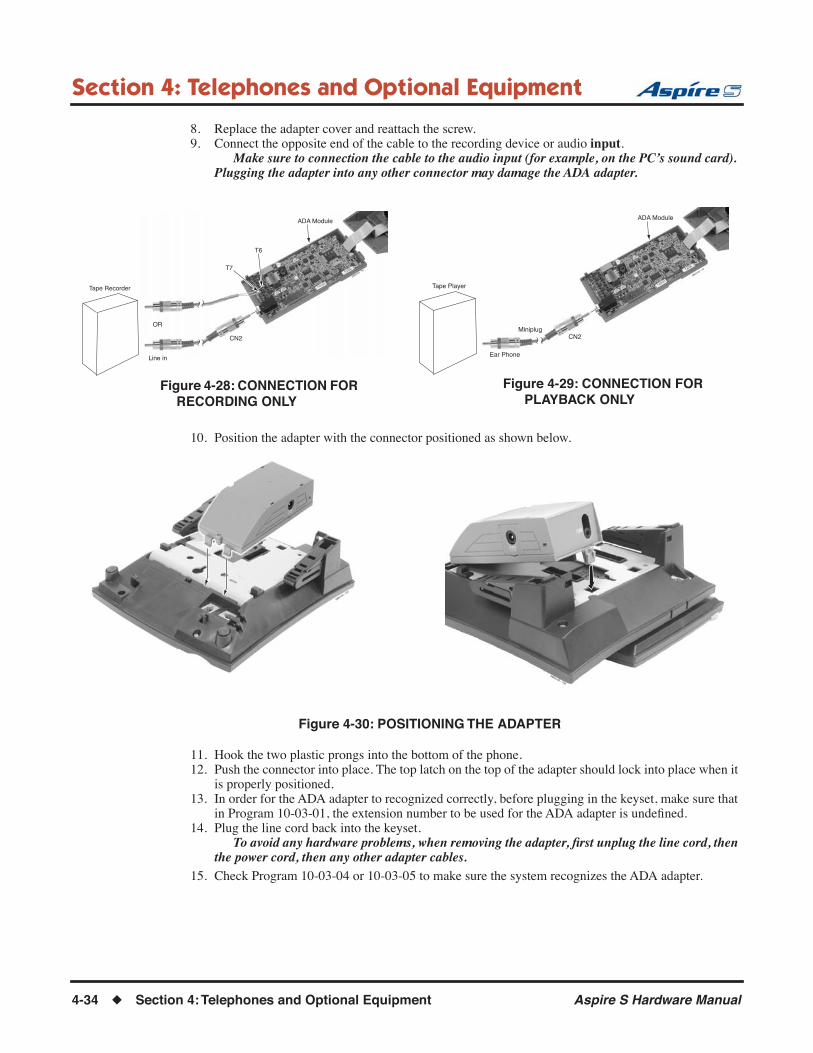
Section 4: Telephones and Optional Equipment
8. Replace the adapter cover and reattach the screw.9. Connect the opposite end of the cable to the recording device or audio input.
Make sure to connection the cable to the audio input (for example, on the PC’s sound card). Plugging the adapter into any other connector may damage the ADA adapter.
10. Position the adapter with the connector positioned as shown below.
Figure 4-30: POSITIONING THE ADAPTER
11. Hook the two plastic prongs into the bottom of the phone.12. Push the connector into place. The top latch on the top of the adapter should lock into place when it
is properly positioned.13. In order for the ADA adapter to recognized correctly, before plugging in the keyset, make sure that
in Program 10-03-01, the extension number to be used for the ADA adapter is undefined.14. Plug the line cord back into the keyset.
To avoid any hardware problems, when removing the adapter, first unplug the line cord, then the power cord, then any other adapter cables.
15. Check Program 10-03-04 or 10-03-05 to make sure the system recognizes the ADA adapter.
0893100 - 70
T6
T7
ADA Module
Line in
CN2
Tape Recorder
OR
Figure 4-28: CONNECTION FOR RECORDING ONLY
0893100 - 72
ADA Module
Ear Phone
MiniplugCN2
Tape Player
Figure 4-29: CONNECTION FOR PLAYBACK ONLY
0893100 - 106
0893100 - 143
4-34 ◆ Section 4: Telephones and Optional Equipment Aspire S Hardware Manual

Section 4: Telephones and Optional Equipment
4
ADA2 Adapter (Figure 4-31 - Figure 4-38)Using the ADA2 Adapter provides a recording jack connection which provides a connection from an Aspire IPhone to an external tape recorder or speaker. The adapter output is a 1/8” audio jack which you can con-nect directly to an AUX level input on a recorder or page amplifier. The recorder input can also be wired directly to the terminals on the inside of the adapter. As the IPhone only has one connector available for additional adapters, if this adapter is connected, no other adapter can be installed on the phone.
When installing or removing the adapters, the keyset should first be unplugged from the system. Telephones with any adapters installed cannot be wall-mounted. The bracket will not accommodate the adapter(s).
Installing the ADA2 Adapter:1. Unplug the LAN cable and AC adapter cable from the keyset if previously installed.2. The adapter should be installed on the right-hand side of the phone (beneath the handset). Using a
flat-head screwdriver, remove the plastic punch-out piece covering the connector.3. Set the dip switches on the ADA2 adapter to the required position. The SW1 switch should be set to
“2” and the SW2 switch should be set to “1”.The SW1 indicates the type of adapter (2=ADA2) and the SW2 switch sets the impedance
(1=620 Ohms, 2=30 Ohms). The SW2 switch should remain in the “1” position.
CAUTION
Be sure the connected audio device provides a standard AUX level input.
The use of monitoring, recording, or listening devices to eavesdrop, monitor, retrieve, or record telephone conversation or other sound activities, whether or not contemporaneous with transmission, may be illegal in certain circumstances under federal or state laws. Legal advice should be sought prior to implementing any practice that monitors or records any telephone conversation. Some federal and state laws require some form of notification to all parties to a telephone conversation, such as using a beep tone or other notification methods or requiring the consent of all parties to the telephone conversation, prior to monitoring or recording the telephone conversation. Some of these laws incorporate strict penalties.
The handset only records when a call is placed or answered.
0893
100
- 154
ADA2 Module
SW1, SW2
1
ON
2 3 4 5 6 7 8
Figure 4-31: RECORDING DIP SWITCH SETTINGS
0893
100
- 156
ADA2 Module
SW1, SW2
1
ON
2 3 4 5 6 7 8
Figure 4-32: PLAYBACK DIP SWITCH SETTINGS
Aspire S Hardware Manual Section 4: Telephones and Optional Equipment ◆ 4-35
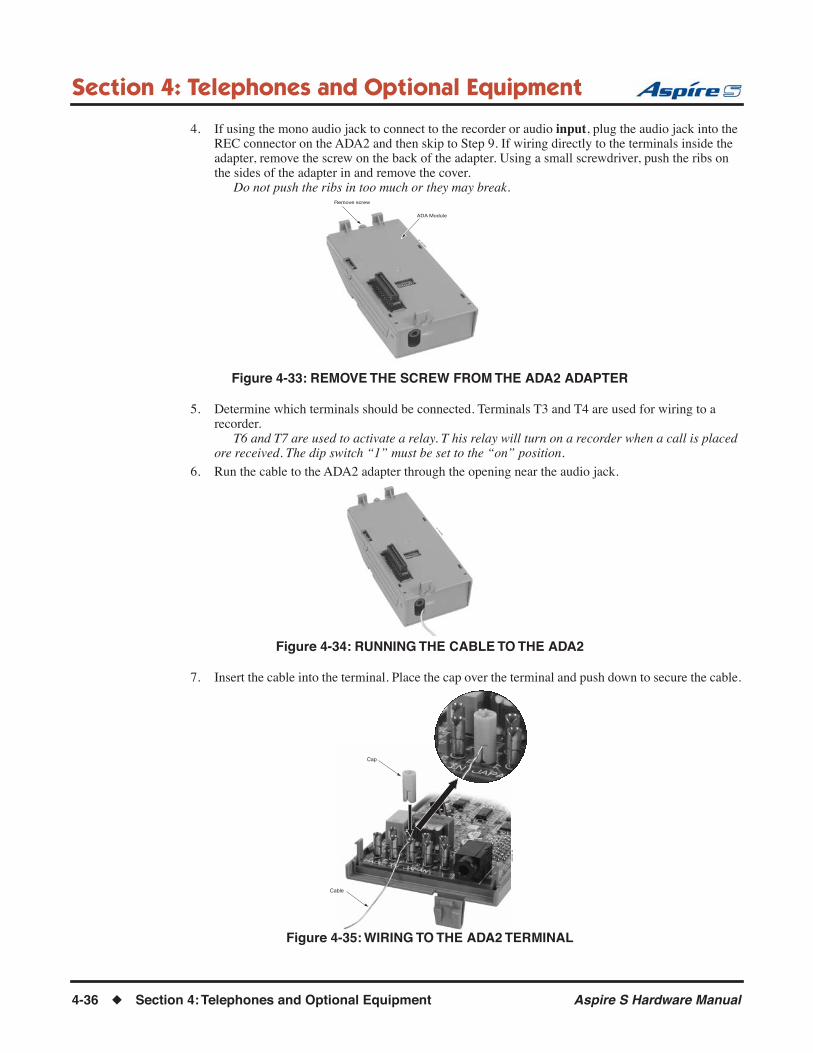
Section 4: Telephones and Optional Equipment
4. If using the mono audio jack to connect to the recorder or audio input, plug the audio jack into the REC connector on the ADA2 and then skip to Step 9. If wiring directly to the terminals inside the adapter, remove the screw on the back of the adapter. Using a small screwdriver, push the ribs on the sides of the adapter in and remove the cover.
Do not push the ribs in too much or they may break.
Figure 4-33: REMOVE THE SCREW FROM THE ADA2 ADAPTER
5. Determine which terminals should be connected. Terminals T3 and T4 are used for wiring to a recorder.
T6 and T7 are used to activate a relay. T his relay will turn on a recorder when a call is placed ore received. The dip switch “1” must be set to the “on” position.
6. Run the cable to the ADA2 adapter through the opening near the audio jack.
Figure 4-34: RUNNING THE CABLE TO THE ADA2
7. Insert the cable into the terminal. Place the cap over the terminal and push down to secure the cable.
Figure 4-35: WIRING TO THE ADA2 TERMINAL
0893
100
- 67
Remove screw
ADA Module
0893
100
- 68
0893
100
- 66
Cap
Cable
4-36 ◆ Section 4: Telephones and Optional Equipment Aspire S Hardware Manual
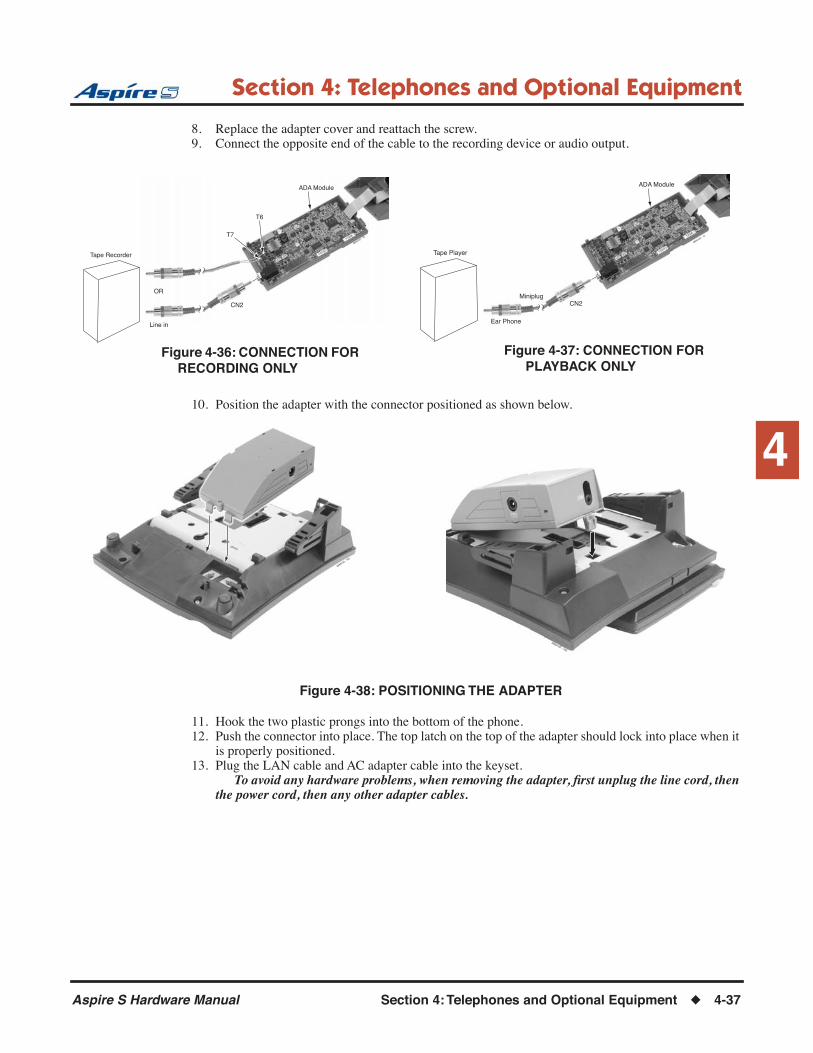
Section 4: Telephones and Optional Equipment
4
8. Replace the adapter cover and reattach the screw.9. Connect the opposite end of the cable to the recording device or audio output.
10. Position the adapter with the connector positioned as shown below.
Figure 4-38: POSITIONING THE ADAPTER
11. Hook the two plastic prongs into the bottom of the phone.12. Push the connector into place. The top latch on the top of the adapter should lock into place when it
is properly positioned.13. Plug the LAN cable and AC adapter cable into the keyset.
To avoid any hardware problems, when removing the adapter, first unplug the line cord, then the power cord, then any other adapter cables.
0893100 - 70
T6
T7
ADA Module
Line in
CN2
Tape Recorder
OR
Figure 4-36: CONNECTION FOR RECORDING ONLY
0893100 - 72
ADA Module
Ear Phone
MiniplugCN2
Tape Player
Figure 4-37: CONNECTION FOR PLAYBACK ONLY
0893100 - 106
0893100 - 143
Aspire S Hardware Manual Section 4: Telephones and Optional Equipment ◆ 4-37

Section 4: Telephones and Optional Equipment
APA and APR Adapters (Figure 4-39 - Figure 4-40)The APA and APR Adapters provide an analog interface for the keyset. The APR Adapter provides ringing which allows the connected device to be used for incoming and outgoing calls. This adapter also provides a separate extension number for the analog device, which allows both devices to be used at the same time (this can be removed in system programming if you wish). The APA Adapter does not provide ringing, so the con-nected device is used for outgoing calls only (for example, when using a modem). One keyset can have either an APA or an APR Adapter. Both adapters cannot be installed on the same keyset as only one voice path is provided by the keyset for the adapters. When installing the APR Adapter, an AC-R AC/DC adapter (P/N 780135) is required for power. As this adapter requires the AC power adapter, it can not be installed on a phone with an CTU or Speakerphone adapter, which also require power. The placement of the AC power adapter plug will not allow the unit placed on the left of the phone to receive power.
The maximum distance between the APA or APR Adapter and the analog terminal is 49’.
With the APA adapter installed, when the analog device attached to the adapter is in use, the keyset cannot be used as there is only one physical port number assigned to the phone. If both the analog device and keyset are picked up at the same time, the analog device takes priority. If the keyset is on a call and the single line telephone is picked up, the single line telephone will take the call from the keyset.
When installing the APR adapter, there must be an extension port available for the adapter or it will function like an APA adapter (only one physical port assigned to the phone so only one phone can be used at a time).
When installing or removing the adapters, the keyset should first be unplugged from the system. Telephones with any adapters installed cannot be wall-mounted. The bracket will not accommodate the adapter(s).
Neither the APA or APR Adapter supports reverse-polarity, message waiting lamping, or Caller ID.These optional adapters cannot be installed on an Aspire 2-button phone or IPhone.
Installing the APA or APR Adapter:1. Unplug the line cord from the keyset.2. If only one adapter is to be installed on the phone, the adapter should be installed on the right-hand
side of the phone (beneath the handset). Using a flat-head screwdriver, remove the plastic punch-out piece covering the connector.
3. Set the dip switches on the APA/APR adapter to the required position.● The SW3 switch is used to set the terminating impedance. Setting to position “1” is for a pure
resistance of 600 ohms; position “2” is used for complex impedance (factory setting is set to “1”).
● The SW1 switch should be left at its factory setting of “1”. This also applies to the dip switch settings (1 and 5 = on; 2-4, 6-8 = off).
4-38 ◆ Section 4: Telephones and Optional Equipment Aspire S Hardware Manual

Section 4: Telephones and Optional Equipment
4
Figure 4-39: DIP SWITCH SETTINGS4. If using an APR Adapter, plug the AC-R AC/DC adapter into the AC jack on the side of the adapter.The AC/DC adapter is not required when using the APA Adapter.
5. Position the adapter with the connector positioned as shown below. You may wish to remove the wall-mount bracket to allow for easier adapter installation.
Figure 4-40: POSITIONING THE ADAPTER
6. Hook the two plastic prongs into the bottom of the phone.7. Push the connector into place. The top latch on the top of the adapter should lock into place when it
is properly positioned.8. In order for the APD/APR adapter to recognized correctly, before plugging in the keyset, make sure
that in Program 10-03-01, the extension number to be used for the adapter is undefined.9. Plug the line cord back into the keyset.
0893100 - 73
SW31 2
1
ON
2 3 4 5 6 7 8
SW11 2
0893100 - 143
Aspire S Hardware Manual Section 4: Telephones and Optional Equipment ◆ 4-39
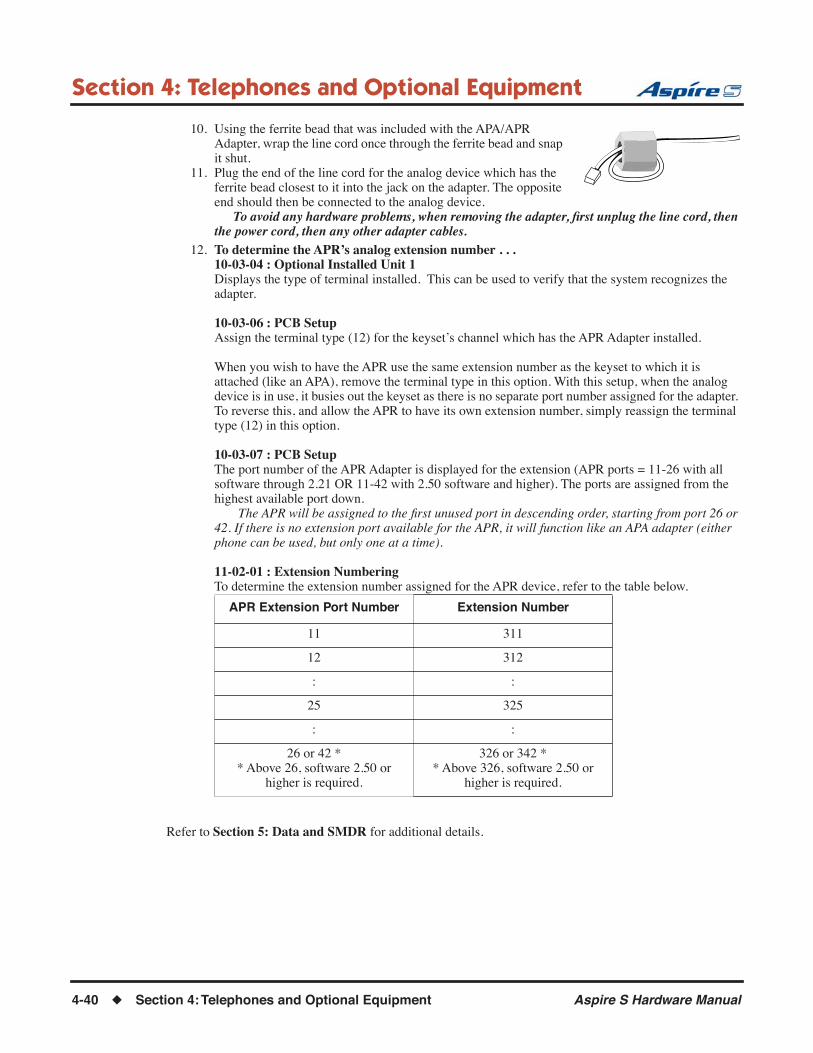
Section 4: Telephones and Optional Equipment
10. Using the ferrite bead that was included with the APA/APR Adapter, wrap the line cord once through the ferrite bead and snap it shut.
11. Plug the end of the line cord for the analog device which has the ferrite bead closest to it into the jack on the adapter. The opposite end should then be connected to the analog device.
To avoid any hardware problems, when removing the adapter, first unplug the line cord, then the power cord, then any other adapter cables.
12. To determine the APR’s analog extension number . . . 10-03-04 : Optional Installed Unit 1Displays the type of terminal installed. This can be used to verify that the system recognizes the adapter.
10-03-06 : PCB SetupAssign the terminal type (12) for the keyset’s channel which has the APR Adapter installed.
When you wish to have the APR use the same extension number as the keyset to which it is attached (like an APA), remove the terminal type in this option. With this setup, when the analog device is in use, it busies out the keyset as there is no separate port number assigned for the adapter. To reverse this, and allow the APR to have its own extension number, simply reassign the terminal type (12) in this option.
10-03-07 : PCB SetupThe port number of the APR Adapter is displayed for the extension (APR ports = 11-26 with all software through 2.21 OR 11-42 with 2.50 software and higher). The ports are assigned from the highest available port down.
The APR will be assigned to the first unused port in descending order, starting from port 26 or 42. If there is no extension port available for the APR, it will function like an APA adapter (either phone can be used, but only one at a time).
11-02-01 : Extension NumberingTo determine the extension number assigned for the APR device, refer to the table below.
Refer to Section 5: Data and SMDR for additional details.
APR Extension Port Number Extension Number
11 311
12 312
: :
25 325
: :
26 or 42 ** Above 26, software 2.50 or
higher is required.
326 or 342 ** Above 326, software 2.50 or
higher is required.
4-40 ◆ Section 4: Telephones and Optional Equipment Aspire S Hardware Manual

Section 4: Telephones and Optional Equipment
4
CTA Adapter (Figure 4-39 - Figure 4-40)The CTA Adapter provides a serial interface (RS-232C) connector. This can be used for SMDR, TAPI (1.4), or system reporting. TAPI requires a CTA driver installation. This driver can be downloaded from the NEC Technical Support web site (http://ws1.necii.com). Refer to the CTI Installation Manual, P/N 0893102, for details on installing the driver. A maximum of 24 CTA Adapters can be installed in a system. When using the adapter for printing, the following printers are recommended:● Citizen CBM CBM1000-RJ100S Thermal Printer● Star Precision SP2520MD-J1 Impact Dot Printer
This optional adapter cannot be installed on an Aspire 2-button phone or IPhone.
No AC-R AC/DC Adapter is required for this unit.
When installing or removing the adapters, the keyset should first be unplugged from the system. Telephones with any adapters installed cannot be wall-mounted. The bracket will not accommodate the adapter(s).
Installing the CTA Adapter:Be sure to follow these steps in order to allow the system to properly recognize the CTA Adapter!
1. Unplug the line cord from the keyset.2. If only one adapter is to be installed on the phone, the adapter should be installed on the right-hand
side of the phone (beneath the handset). Using a flat-head screwdriver, remove the plastic punch-out piece covering the connector.
3. Set the dip switches on the CTA adapter to the required position.● The DSW settings are 1 = on, 2-8 = off for a PC connection or 1 and 2 = on, 3-8 = off for a
printer/SMDR connection (factory setting is for a PC connection).
Figure 4-41: DIP SWITCH SETTINGS
4. Position the adapter with the connector positioned as shown below. You may wish to remove the wall-mount bracket to allow for easier adapter installation
Figure 4-42: POSITIONING THE ADAPTER
1
ON
2 3 4 5 6 7 8
PC Connection
1
ON
2 3 4 5 6 7 8
Printer/SMDR Connection
0893
100-
150
0893100 - 143
Aspire S Hardware Manual Section 4: Telephones and Optional Equipment ◆ 4-41
Section 4: Telephones and Optional Equipment
5. Hook the two plastic prongs into the bottom of the phone.6. Push the connector into place. The latch on the top of the adapter should lock into place when it is
properly positioned.7. Connect an RS-232C straight-thru cable from the adapter to the printer or PC.8. Change system programming (15-02-19) to match the CTA module dip switch settings.9. Change system programming (15-02-20) to the correct baud rate.10. Change remaining system programming (see below) as required.11. In order for the CTA adapter to recognized correctly, before plugging in the keyset, make sure that
in Program 10-03-01, the extension number using the adapter is undefined.12. Plug the line cord back into the keyset. This should only be done once the system has been pro-
grammed as indicated in steps 8-10 above.To avoid any hardware problems, when removing the adapter, first unplug the line cord, then
the power cord, then any other adapter cables.13. Wait approximately 1 minute for the adapter to be recognized by the system.14. Check Program 10-03-04 or 10-03-06 to make sure the system recognizes the CTA adapter. If not,
unplug the phone, undefine the port in Program 10-03-01 and repeat the installation steps.15. Install the CTA Adapter driver (downloaded from the NEC Technical Support web site
(http://ws1.necii.com).16. Connect the serial cable from the PC to the CTA Adapter.
System Programming
SMDR
➻ Program 14-01-06 : Basic Trunk Data Setup - SMDR Print OutUse this option to have the system include/exclude the trunk you are programming form the SMDR printout. See Program 35-01 and 35-02 for SMDR printout options (0=No print out, 1=Prints out).
➻ Program 15-02-19 : Multi-Line Telephone Basic Data Setup - CTA Data Communication ModeSelect ‘0’ if the dip switch settings are set to PC connection or select ‘1’ if printer/SMDR con-nection is selected on the CTA adapter.
➻ Program 15-02-20 : Multi-Line Telephone Basic Data Setup - Baud Rate for CTA PortSet the baud rate to be used by the CTA (0=4800, 1=9600, 2=19200).
➻ Program 35-01-01 : SMDR Options - Output Port TypeThis option specifies the type of connection used for SMDR (0=No setting, 1=COM (NTCPU), 2=USB (NTCPU), 4=CTA/CTU).
➻ Program 35-01-02 : SMDR Options - Output Destination NumberThis option specifies the extension number which has the CTA/CTU installed for the SMDR printer output.
Refer to Section 5: Data and SMDR and the Aspire Software Manual (P/N 0893200) for additional details on programming for SMDR.
System Alarms
➻ Program 90-12-01 : System Alarm Output - Output Port TypeDefine the output port to be used as the output for system alarm report (0=no setting, 1=NTCPU COM port, 2=NTCPU USB port, 4=CTA/CTU adapter). Set the baud rate for the COM port in Program 10-21-02. The system can have up to 50 reports.
➻ Program 90-12-02 : System Alarm Output - Destination Extension NumberIf the output port type (90-12-01) is a CTA, enter the extension number with the CTA connection.
4-42 ◆ Section 4: Telephones and Optional Equipment Aspire S Hardware Manual

Section 4: Telephones and Optional Equipment
4
System Information Reports
➻ Program 90-13-01 : System Information Output - Output Port TypeDefine the output port to be used as the output for system information report (0=no setting, 1=NTCPU COM port, 2=NTCPU USB port, 4=CTA/CTU adapter). Set the baud rate for the COM port in Program 10-21-02. The system can have up to 50 reports.
➻ Program 90-13-02 : System Information Output - Destination Extension NumberIf the output port type (90-13-01) is a CTA, enter the extension number with the CTA connection.
For TAPI setup, refer to the Aspire CTI Manual (P/N 0893102) for complete details.
Aspire S Hardware Manual Section 4: Telephones and Optional Equipment ◆ 4-43

Section 4: Telephones and Optional Equipment
CTU Adapter (Figure 4-43 - Figure 4-45)The CTU Adapter provides a USB connector. This can be used for TAPI (1.4) applications, SMDR, or sys-tem reporting. The CTU requires a driver installation. This driver can be downloaded from the NEC Techni-cal Support web site (http://ws1.necii.com). Refer to the CTI Installation Manual, P/N 0893102, for details on installing the driver. A maximum of 24 CTU Adapters can be installed in a system. An AC-R AC/DC adapter (P/N 780135) is required for power for each CTU Adapter installed. As this adapter requires the AC power adapter, it can not be installed on a phone with an APR or Speakerphone adapter, which also require power. The placement of the AC power adapter plug will not allow the unit placed on the left of the phone to receive power.
This optional adapter cannot be installed on an Aspire 2-button phone or IPhone.
When installing or removing the adapters, the keyset should first be unplugged from the system. Telephones with any adapters installed cannot be wall-mounted. The bracket will not accommodate the adapter(s).
Installing the CTU Adapter:1. Unplug the line cord from the keyset.2. If the keyset on which the CTU adapter is to be connected was previously installed, undefine the
circuit type in Program 10-03-01 for the extension (enter 0 as the circuit type). 3. If only one adapter is to be installed on the phone, the adapter should be installed on the right-hand
side of the phone (beneath the handset). Using a flat-head screwdriver, remove the plastic punch-out piece covering the connector.
4. Set the dip switches on the CTU adapter to the required position.● The DSW settings are
For CTI connection: 2, 3, 5, 6 = on / 1, 4, 7, 8 = off (default factory setting)For non-procedure (SMDR) mode: 2, 5, 6 = on / 1, 3, 4, 7, 8 = off.
Figure 4-43: DIP SWITCH SETTINGS
5. Program the system for the feature to be used with the adapter.For SMDR:● 15-02-19 : Multi-Line Telephone Basic Data Setup - CTA/CTU Data Communication Mode
Set to "1" (non-procedure mode). (When using PCPro or WebPro, select "Direct Print Mode".)● 15-02-20 : Multi-Line Telephone Basic Data Setup - Baud Rate for CTA/CTU
Set the baud rate (for USB connections, this setting should not matter).● 14-01-06 : Basic Trunk Data Setup - SMDR Print Out
Set to "1" for each trunk to be included in SMDR.● 15-01-03 : Basic Extension Data Setup - SMDR Print Out
Set to "1" for each extension to be included in SMDR.● 35-01-01 : SMDR Options - Output Port Type
Set to "4" (CTU) as the output type.● 35-01-02 : SMDR Options - Output Destination Number
Enter the CTU extension number.
1
ON
2 3 4 5 6 7 8
CTI Mode
1
ON
2 3 4 5 6 7 8
Non-Procedure Mode
0893
100-
108
4-44 ◆ Section 4: Telephones and Optional Equipment Aspire S Hardware Manual
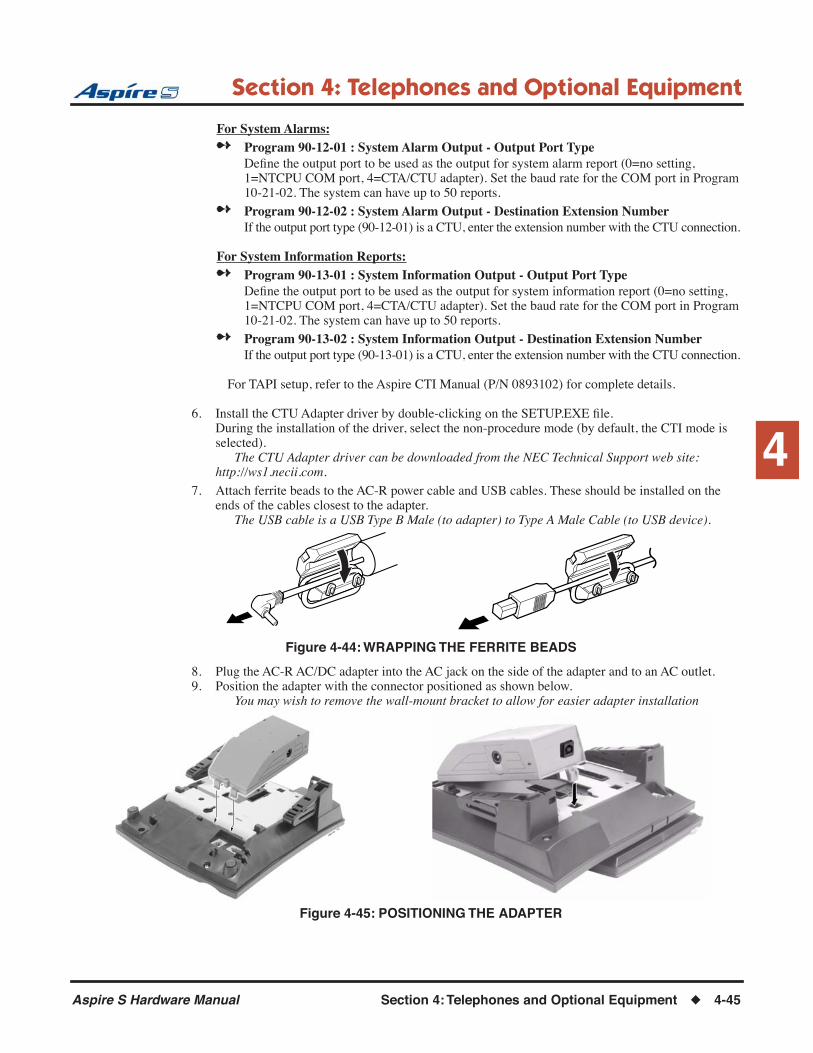
Section 4: Telephones and Optional Equipment
4
For System Alarms:➻ Program 90-12-01 : System Alarm Output - Output Port Type
Define the output port to be used as the output for system alarm report (0=no setting, 1=NTCPU COM port, 4=CTA/CTU adapter). Set the baud rate for the COM port in Program 10-21-02. The system can have up to 50 reports.
➻ Program 90-12-02 : System Alarm Output - Destination Extension NumberIf the output port type (90-12-01) is a CTU, enter the extension number with the CTU connection.
For System Information Reports:➻ Program 90-13-01 : System Information Output - Output Port Type
Define the output port to be used as the output for system information report (0=no setting, 1=NTCPU COM port, 4=CTA/CTU adapter). Set the baud rate for the COM port in Program 10-21-02. The system can have up to 50 reports.
➻ Program 90-13-02 : System Information Output - Destination Extension NumberIf the output port type (90-13-01) is a CTU, enter the extension number with the CTU connection.
For TAPI setup, refer to the Aspire CTI Manual (P/N 0893102) for complete details.
6. Install the CTU Adapter driver by double-clicking on the SETUP.EXE file. During the installation of the driver, select the non-procedure mode (by default, the CTI mode is selected).
The CTU Adapter driver can be downloaded from the NEC Technical Support web site:http://ws1.necii.com.
7. Attach ferrite beads to the AC-R power cable and USB cables. These should be installed on the ends of the cables closest to the adapter.
The USB cable is a USB Type B Male (to adapter) to Type A Male Cable (to USB device).
Figure 4-44: WRAPPING THE FERRITE BEADS
8. Plug the AC-R AC/DC adapter into the AC jack on the side of the adapter and to an AC outlet.9. Position the adapter with the connector positioned as shown below.
You may wish to remove the wall-mount bracket to allow for easier adapter installation
Figure 4-45: POSITIONING THE ADAPTER
0893100 - 143
Aspire S Hardware Manual Section 4: Telephones and Optional Equipment ◆ 4-45

Section 4: Telephones and Optional Equipment
10. Hook the two plastic prongs into the bottom of the phone.11. Push the connector into place. The top latch on the top of the adapter should lock into place when it
is properly positioned.12. Plug the line cord back into the keyset.13. Connect the USB cable from the adapter to the USB device to be connected.
To avoid any hardware problems, when removing the adapter, first unplug the line cord, then the power cord, then any other adapter cables.
To print from the CTU to a printer, you must connect the CTU to a PC, with the printer then connected to the PC (you can not have a direct CTU-to-printer connection).
14. Confirm in Program 10-03-04 that the CTU adapter is recognized for the keyset's port.15. You can now confirm the port assignment using the Windows Device Manager (click Start - Set-
tings - Control Panel - System - Hardware - Device Manager). Under the Ports (COM & LPT) section should be displayed NEC-I CTU Communications Port (Com x). Use the port number displayed here when connecting via your communications program (such as HyperTerminal). Note that the baud rate in HyperTerminal does not matter when connecting via USB.
4-46 ◆ Section 4: Telephones and Optional Equipment Aspire S Hardware Manual

Section 4: Telephones and Optional Equipment
4
PSA-R Adapter (Figure 4-46 - Figure 4-47)Using the PSA-R Adapter provides power failure capability for the IPhone IP keysets. This allows a user to make or receive an outside call using the central office if an IP keyset is unable to make or receive a call using the LAN, if for instance, there was a power failure. In this case, the connection of the keyset would automatically be changed from LAN to PSTN (public switched telephone network). This allows the dial pad keys (0-9, * and #) to be used for placing and receiving calls - no other keyset functions are available. As the IPhone only has one connector available for additional adapters, if this adapter is connected, no other adapter can be installed on the phone.
The change from LAN to PSTN occurs in the following instances:● No power supplied to the keyset● PSTN is selected using the LAN/PSTN Change Switch on the adapter
With this switch set to PSTN, a call cannot be made using the LAN, even if the LAN is function-ing correctly and power is available.
● If the initial software operation for the IP keyset has not yet been completed before the IP keyset is powered up
When installing or removing the adapters, the keyset should first be unplugged from the system. Telephones with any adapters installed cannot be wall-mounted. The bracket will not accommodate the adapter(s).
Installing the PSA-R Adapter:1. Unplug the line cord from the keyset.2. The adapter should be installed on the right-hand side of the phone (beneath the handset). Using a
flat-head screwdriver, remove the plastic punch-out piece covering the connector.3. Set the dip switches on the PSA-R adapter to the required position.
SW3 Setting 1 = DP (dial pulse) 2 = DTMF (dual tone multi-frequency)
SW1 Pulse Rate Setting 1 = 20 pps 2 = 10 pps N/A N/A
SW2 Making Rate Setting 1 = 33% 2 = 40% N/A N/A
Figure 4-46: PSA-R SETTINGS
Aspire S Hardware Manual Section 4: Telephones and Optional Equipment ◆ 4-47

Section 4: Telephones and Optional Equipment
4. Position the adapter with the connector positioned as shown below.
Figure 4-47: POSITIONING THE ADAPTER
5. Hook the two plastic prongs into the bottom of the phone.6. Push the connector into place. The top latch on the top of the adapter should lock into place when it
is properly positioned.7. Connect the line cord to the adapter.
This should be a PSTN, dedicated CO trunk.
8. Plug the LAN cable into the keyset.9. If used, connect the AC adapter into the keyset.
This should always be done after connecting the LAN cable.
10. Move the handset cord from the keyset to the handset connector on the adapter.
Using the PSA-R Adapter:1. Placing Calls:
When the PSTN line has been activated either manually by the switch or due to a power failure, use the dial pad buttons (0-9, *, #) to place an outside call.
Other than receiving calls, no other keyset functions are available.
2. Answering Calls:When a call is received, the PSA-R adapter rings. If the LAN/PSTN Change Switch is set to PSTN, answer the call by pickup up the handset. If the switch is set to the LAN position, answer the call by changing the switch to PSTN and then pickup up the handset.
If you receive a call via PSTN during a conversation via LAN, answer the call by completing the LAN call and placing the handset back into the cradle. Change the LAN/PSTN Change Switch to PSTN and then lift the handset to answer the call. If you change the LAN/PSTN Change Switch to the PSTN position while talking via LAN, the LAN call is disconnected.
Other than receiving calls, no other keyset functions are available.
3. Adjusting the Ring VolumeUse the Volume Control Switch located on the PSA-R adapter to adjust through the three available volume levels.
Other than receiving calls, no other keyset functions are available.
4. When Power is RestoredThe IP keyset restarts and reconnects to the network LAN. However, if you are on a PSTN call when the power is restored, your conversation will continue until the handset is placed into the cra-dle. Once this occurs, the IP keyset will restart and reconnect to the LAN.
Other than receiving calls, no other keyset functions are available.
CAUTION: Before installing or removing the PSA-R adapter, be sure to first remove the line cord, LAN cable, and then AC adapter from the outlet.
0893100 - 106
0893100 - 143
4-48 ◆ Section 4: Telephones and Optional Equipment Aspire S Hardware Manual

Section 4: Telephones and Optional Equipment
4
Speakerphone (HF-R) Adapter (Figure 4-39 - Figure 4-40)The Speakerphone (HF-R) adapter (P/N 0890062 [black] / 0890063 [white]) offers 22-Button, 34-Button, and Super Display keysets high quality speakerphone capability. With the 6’ cord, the microphone can be conveniently placed to provide the best transmit and receive quality. This could be useful, for example, when a group of people are participating in a handsfree call. The microphone can be centrally placed so that all comments can be heard. When installing the HF-R Adapter, an AC-2R AC/DC adapter (P/N 780135) is required for power. As this adapter requires the AC power adapter, it can not be installed on a phone with an APR or CTU adapter, which also require power. The placement of the AC power adapter plug will not allow the unit placed on the left of the phone to receive power.
These optional adapters cannot be installed on an Aspire 2-button phone or IPhone.
When installing or removing the adapters, the keyset should first be unplugged from the system. Telephones with any adapters installed cannot be wall-mounted. The bracket will not accommodate the adapter(s).
Installing the HF-R Adapter:1. Unplug the line cord from the keyset.2. If only one adapter is to be installed on the phone, the adapter should be installed on the right-hand
side of the phone (beneath the handset). Using a flat-head screwdriver, remove the plastic punch-out piece covering the connector.
3. Position the adapter with the connector positioned as shown below.4. Hook the two plastic prongs into the bottom of the phone.5. Push the connector into place. The top latch on the top of the adapter should lock into place when it
is properly positioned.
Figure 4-48: POSITIONING THE ADAPTER
6. Plug the AC-2R AC/DC adapter into the AC jack on the side of the adapter.7. Plug the line cord back into the keyset.8. Using the ferrite bead that was included with the HF-R
Adapter, wrap the mic cord supplied with the adapter once through the ferrite bead and snap it shut.
0893100 - 143
Figure 4-49: WRAPPING THE FERRITE BEAD
Aspire S Hardware Manual Section 4: Telephones and Optional Equipment ◆ 4-49

Section 4: Telephones and Optional Equipment
9. Plug the end of the mic cord which has the ferrite bead closest to it into the jack on the adapter. The opposite end should then be connected to the microphone.
To avoid any hardware problems, when removing the adapter, first unplug the line cord, then the power cord, then any other adapter cables.
FCC Registration: UL60950, FCC Part 15, Class B.
10. To allow the phone to sit properly with an adapter installed, extend the legs to the highest position.
System Programming15-02-16 : Multi-Line Telephone Basic Data Setup - Handsfree OperationEnable (1) an extension’s ability to use the speakerphone.
Using the Adapter● The HF-R adapter requires approximately 20 seconds to start up after first powering up the adapter.
The microphone’s LED will remain off during this period. When the microphone is activated, the LED will light (as long as the microphone switch on the adapter is enabled).
● The microphone’s sound can be muted using the switch on the microphone.
● The microphone cable provides 6’ of cable. The placement of the microphone unit can be anywhere within this 6’ distance. For the best voice quality, it is recommended that the microphone unit be positioned with either the front or the side of the microphone facing the user. The back end (with the line cord) should not be facing the user.
If the microphone is placed to the right of the phone and the volume is set to the maximum, when the user presses the CALL1 key, the ICM dial tone may modulate. Turning down the volume or moving the microphone should clear this problem.
When confirmation tones are enabled or when placing a call on an outside trunk, the user will hear double tones as the keys are pressed.
● If confirmation tones are enabled (service code 824), when a call is placed on a trunk, the user will hear double confirmation tones as the keys are pressed. The call, however, will complete normally.
Figure 4-50: PLACEMENT OF THE HANDSFREE UNIT
Switch Microphone LED
Unlock Talk ON
Lock Mute OFF
4-50 ◆ Section 4: Telephones and Optional Equipment Aspire S Hardware Manual

Section 4: Telephones and Optional Equipment
4
VoIP Adapter (Figure 4-51 - Figure 4-53)The VoIP Adapter provides the ability to communicate through a LAN which is connected to an 4VOIPU-S PCB. The VOIPU PCB is required in order to communicate with non-VoIP Aspire phones, as well as to place or receive outside calls.
This feature requires the use of a display keyset. As the VoIP Adapter is double the width of the other phone adapters, only the VoIP Adapter can be used on a keyset. No other space is available for any additional adapter.
This optional adapter cannot be installed on an Aspire 2-button, IPhone or super display telephone.
When installing the VoIP Adapter, an AC/DC adapter is required for local power or, for central power, one of the following must be used:● Power Supply Patch Panel (SN1604 PWRMS - NEC standard product)● Power Patch Panel (Cisco)● Catalyst PWR Series (Cisco)
The separate ethernet switch should be a 100Base/full duplex switch. To avoid network problems and to ensure good voice quality, do not use a Repeater Hub/10Base.
When installing or removing the adapters, the keyset should first be unplugged from the system. Telephones with any adapters installed cannot be wall-mounted. The bracket will not accommodate the adapter(s).
Installing the VoIP Adapter:1. Unplug the line cord from the keyset.
The line cord will not be needed with the VoIP Adapter as the system connection will be made through the LAN connection.
2. Using a flat-head screwdriver, remove the plastic punch-out piece covering the connector.Note the position of the connector on the VoIP Adapter in order to remove the correct piece (the
adapter uses the connection on the side of the phone which has the line cord connection.
3. Set the dip switches on the top of the VoIP adapter to the required position. The setting is dependent upon the type of power supply being used.● The SW1 settings are “1” when using an AC/DC adapter or SN1604 PWRMS, “2’ when using
Cisco’s Power Patch Panel or Catalyst PWR panel.
Figure 4-51: SETTING THE DIP SWITCHES
0893100 - 16
12
Aspire S Hardware Manual Section 4: Telephones and Optional Equipment ◆ 4-51

Section 4: Telephones and Optional Equipment
4. Position the adapter with the connector positioned as shown below.
Figure 4-52: POSITIONING THE ADAPTER
5. Hook the two plastic prongs into the bottom of the phone.6. Push the connector into place. The top latch on the top of the adapter should lock into place when it
is properly positioned.7. Plug an AC/DC adapter into the AC jack on the adapter if power is not supplied by the LAN.8. Plug in the LAN straight-thru cable from the 4VOIPU-S PCB LAN connector for the phone opera-
tion. If needed, connect the PC cross cable to the VoIP Adapter.9. Refer to the Aspire Software Manual (P/N 0893200) for required programming.
To avoid any hardware problems, when removing the adapter, first unplug the line cord, then the power cord, then any other adapter cables.
Figure 4-53: WIRING LAYOUT FOR VOIP
0893100 - 146
0893100 - 147
Ethernet PC
Aspire IPhone,Aspire Keyset with IP Adapter or
H.323 Terminal
AC Adaptor(Not needed if power
supplied by LAN)
LAN
PC ConnectionStraight-Thru
Cable
EthernetStraight-Thru
Cable Aspire Cabinet
CPU4VOIPU4VOIPDBENTU
0893
130-
110
4-52 ◆ Section 4: Telephones and Optional Equipment Aspire S Hardware Manual

Section 4: Telephones and Optional Equipment
4
POWER FAILURE TELEPHONES
Power Failure (Figure 4-54)The system allows connection for basic telephone service during a power failure. The power failure opera-tion occurs during a commercial power failure, and is not affected by PCB failure. Power Failure Transfer is provided by connecting to the COIU PCB.
The 4COIU-S PCB provides 1 Power Failure Transfer circuit.
The CN5 connector provides connection to 4 analog trunk ports, which are polarity sensitive (tip to tip, ring to ring). The power failure circuits, however, are not polarity sensitive. A maximum of 2 4COIU-S PCBs per system is allowed.
Connector Pin-Outs on COIU PCB for Power Failure Circuits
RJ61 Cable Connector - CN5The CN5 and CN7 connectors are polarity sensitive (tip to tip, ring to ring).
Pin No. Connection
1 -
2 SLT InterfacePower Failure Circuit - Tip
3 Circuit 2 - Tip
4 Circuit 1 - Ring
5 Circuit 1 - Tip
6 Circuit 2 - Ring
7 SLT InterfacePower Failure Circuit - Ring
8 -
12345678
Aspire S Hardware Manual Section 4: Telephones and Optional Equipment ◆ 4-53

Section 4: Telephones and Optional Equipment
Installing the Power Failure Telephones:
1. Connect an RJ-61 connector to the CN5 connector on the COIU PCB installed in the Aspire S.2. Install a modular jack for the single line telephone supporting PF operation. The modular jack
should be within six feet of the phone.3. Run one-pair 24 AWG station cable from the cross-connect block to a modular jack.4. Terminate the extension leads to GRN/RED of the modular jack. Terminate the unused leads to the
jack.
RJ61 Cable Connector - CN5The CN5 connector is polarity sensitive (tip to tip, ring to ring).
Pin No. Connection
1 -
2 SLT InterfacePower Failure Circuit - Tip
3 Circuit 2 - Tip
4 Circuit 1 - Ring
5 Circuit 1 - Tip
6 Circuit 2 - Ring
7 SLT InterfacePower Failure Circuit - Ring
8 -
12345678
4-54 ◆ Section 4: Telephones and Optional Equipment Aspire S Hardware Manual
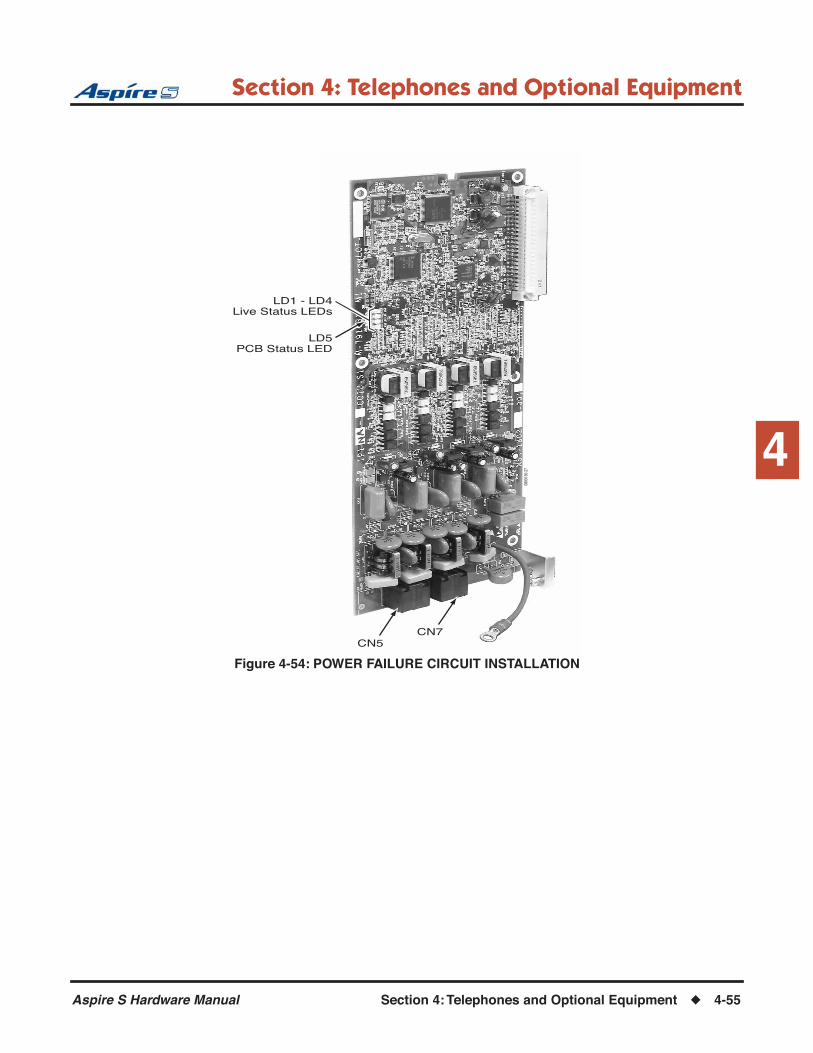
Section 4: Telephones and Optional Equipment
4
Figure 4-54: POWER FAILURE CIRCUIT INSTALLATION
0893
130-
27
CN5CN7
LD5PCB Status LED
LD1 - LD4Live Status LEDs
Aspire S Hardware Manual Section 4: Telephones and Optional Equipment ◆ 4-55

Section 4: Telephones and Optional Equipment
RELAYS
Relays - External Page, Door Box, General Purpose (Figure 4-15, Figure 4-55)Two external dry contact relays are available when a 2PGDAD is installed which can be used to activate ancil-lary devices (i.e. door unlock devices). The CPU provides one relay - this relay is number 0 in programming. In programming, the 2PGDAD module relays are numbered 1-8. Each Door Box/external page circuit provides a dry relay contact.
To connect a dry contact relay device to a Door Box/External Page Relay:1. Connecting to the CPU (External MOH, BGM, General Purpose Relays Only) :
Connect an RJ61 modular line cord from the CN23 connector on the CPU to the appropriate loca-tion on the extension cross-connect block. Use the pin-out information for the CPU’s connector.
2. Connect the two-conductor station cable from the cross-connect block to the external relay.3. Install bridging clips as required.4. Program 10-21-01 sets the relay switch on the CPU. If set to ‘3” (General Purpose Relay), service
code 880+0 toggles the relay open or closed.The service codes indicated are the default codes. Refer to Program 11-12-50 to redefine the
code as needed.
OR1. Connecting to the 2PGDAD Module:
Make sure the jumper in the 2PGDAD module for the channel is set correctly. (Refer to Figure 4-4 JUMPER SETTINGS on page 4-3).
2. If a line cord was not previously connected to the 2PGDAD, complete Steps 3-6. Otherwise, skip to Step 7.
3. Install a modular jack for each 2PGDAD module. For each module, run one-pair 24 AWG station cable from the cross-connect block to a modular jack. Ground the unused pair.
4. Terminate the extension leads to GRN/RED of the modular jack. Terminate the unused leads to the jack.
5. Install bridging clips as required.6. Plug a modular line cord from the mod jack to the CN1 connector on the 2PGDAD module.7. Connect the two-conductor station cable from the CN5 connectors within the 2PGDAD module to
the external relay.
External MOH Source/Relay (External Speaker and Night Mode) RJ61 Cable Connector - CN23
CPU Connector Modular ConnectorPin No. Signal
1 -
2 -
3 EXCNT - Relay
4 EXMOH
5 EXMOH
6 EXCNT - Relay
7 -
8 -
• Pins 4 and 5: External Music on Hold Input, Input Impedance 600 ohm/1 kHz• Pins 3 and 6: Relay = DC Max. 24 VDC, 0.5A - AC Max. 120VAC, 0.25A
12345678
4-56 ◆ Section 4: Telephones and Optional Equipment Aspire S Hardware Manual

Section 4: Telephones and Optional Equipment
4
Note: The relay closes when the Door Box contact is activated using the FLASH key orwhen the external page zone is called. The maximum applied voltage is 24vDC at .5Afor each contact.
Figure 4-55: 2PGDAD PAGE CONNECTIONS
0893100 - 78
PGDAD Module
External Relay
Page Control
Paging AmplifierMute Circuit
External Page
To ESIU PCB
CN2 or CN3
CN1
CN2
CN3
Relay 6
Relay 5
Aspire S Hardware Manual Section 4: Telephones and Optional Equipment ◆ 4-57
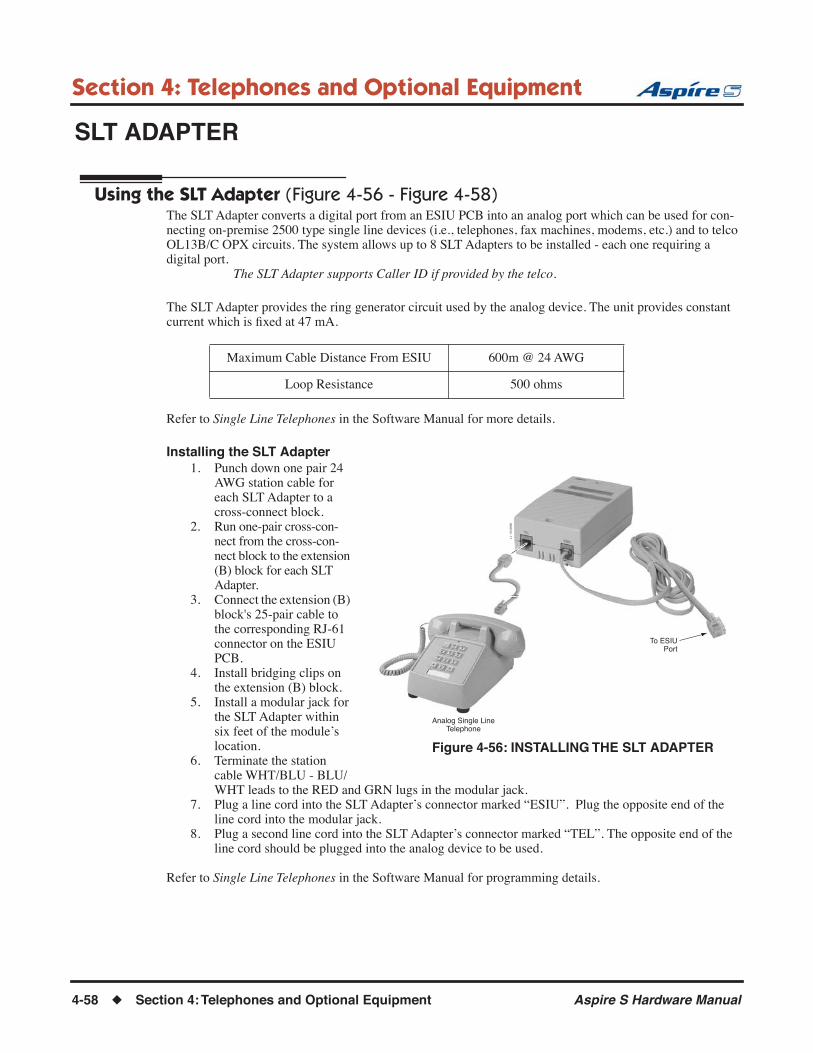
Section 4: Telephones and Optional Equipment
SLT ADAPTER
Using the SLT Adapter (Figure 4-56 - Figure 4-58)The SLT Adapter converts a digital port from an ESIU PCB into an analog port which can be used for con-necting on-premise 2500 type single line devices (i.e., telephones, fax machines, modems, etc.) and to telco OL13B/C OPX circuits. The system allows up to 8 SLT Adapters to be installed - each one requiring a digital port.
The SLT Adapter supports Caller ID if provided by the telco.
The SLT Adapter provides the ring generator circuit used by the analog device. The unit provides constant current which is fixed at 47 mA.
Refer to Single Line Telephones in the Software Manual for more details.
Installing the SLT Adapter1. Punch down one pair 24
AWG station cable for each SLT Adapter to a cross-connect block.
2. Run one-pair cross-con-nect from the cross-con-nect block to the extension (B) block for each SLT Adapter.
3. Connect the extension (B) block's 25-pair cable to the corresponding RJ-61 connector on the ESIU PCB.
4. Install bridging clips on the extension (B) block.
5. Install a modular jack for the SLT Adapter within six feet of the module’s location.
6. Terminate the station cable WHT/BLU - BLU/WHT leads to the RED and GRN lugs in the modular jack.
7. Plug a line cord into the SLT Adapter’s connector marked “ESIU”. Plug the opposite end of the line cord into the modular jack.
8. Plug a second line cord into the SLT Adapter’s connector marked “TEL”. The opposite end of the line cord should be plugged into the analog device to be used.
Refer to Single Line Telephones in the Software Manual for programming details.
Maximum Cable Distance From ESIU 600m @ 24 AWG
Loop Resistance 500 ohms
0893100 - 17
Analog Single LineTelephone
To ESIUPort
Figure 4-56: INSTALLING THE SLT ADAPTER
4-58 ◆ Section 4: Telephones and Optional Equipment Aspire S Hardware Manual

Section 4: Telephones and Optional Equipment
4
Wall-Mounting the SLT Adapter1. Unplug the two line cords from the SLT Adapter.2. Remove the two screws from the front of the SLT Adapter.3. Lift the cover off the adapter.4. Using the two screws provided with the
SLT Adapter, attach the back cover to the desired location.
5. Replace the front cover and the two screws removed in Step 2.6. Plug the two modular line cords back into the SLT Adapter which were removed in Step 1.
0893
100
- 65
Figure 4-57: REMOVING THE COVER
0893
100
- 64
Tighten two screws
Figure 4-58: ATTACHING THE UNIT
Aspire S Hardware Manual Section 4: Telephones and Optional Equipment ◆ 4-59

Section 4: Telephones and Optional Equipment
Telephones
34-Button Super Display Telephone – P/Ns 0890049 & 0890050The Super Display Telephone is the system's premier tele-phone instrument, featuring an interactive 9-line, 24-charac-ter display with 12 associated interactive keys. As the Super Display Telephone user processes calls, the interactive key functions change to provide intuitive access to the system's most sophisticated features. Every Super Display Telephone has a built-in speakerphone for full Handsfree operation. Handsfree Answerback and Intercom voice-announce capa-bility is also standard.
The telephone's 24 programmable function keys can be cus-tomized by the user for one-button access to co-workers, fea-
tures like Paging or Park or specific outside lines. The Dual LEDs in each programmable key help the user see which calls are for them and which features are active. Access to other commonly used features is sim-plified by 15 fixed feature keys.
In addition, the Super Display Telephone provides a built-in wall-mount bracket, as well as adjustable legs which allow each phone to be angled at a height which best suits the user.
The IP adapters (IP, ADA2 and PSA) do not work on super display phones.
✍ At a glance
Super Display Telephone - Part Numbers 0890049 & 0890050Function Keys: ✔ Accepts 110-Button DSS: ✔ Accepts 24-Button DLS: ✔Handsfree (Speakerphone): ✔ Dual LEDs: ✔ ADA Adapter: ✔ADA2 Adapter: No APA Adapter: ✔ APR Adapter: ✔CTA Adapter: ✔ CTU Adapter: ✔ IP Adapter: NoPSA Adapter: No
4-60 ◆ Section 4: Telephones and Optional Equipment Aspire S Hardware Manual

Section 4: Telephones and Optional Equipment
4
34-Button Display Telephone — P/Ns 0890045 & 0890046The 34-Button Display Telephone has a 3-line, 24-character display with four interactive soft keys for intuitive feature access. In addition, the 34-Button Display Telephone has 24 user-programmable function keys (with Dual LEDs) for one-button access to co-workers, features and outside lines. The telephone also provides 10 user-programmable One-Touch (Personal Speed Dial) keys and 15 additional fixed feature keys.
The 34-Button Display Telephone has a built-in speakerphone and can accept optional adapters. You can also assign 110-But-ton DSS Consoles or connect 24-Button DLS Consoles to these phones. Like the Super Display, the 34-Button Display provides Handsfree Answerback, Intercom voice-announcements. In addition, the 34-Button Display provides a built-in wall-mount bracket, as well as adjustable legs which allow each phone to be angled at a height which best suits the user.
✍ At a glance
22-Button Display Telephone — P/Ns 0890043 & 0890044The 22-Button Display Telephone features a 3-line, 24-char-acter display with 4 interactive soft keys for intuitive feature access, in addition to 12 function keys with Dual LEDs. The function keys are user-programmable and can provide 1-but-ton access to co-workers, features and outside lines. The tele-phone additionally provides 10 user-programmable One-Touch (Personal Speed Dial) keys and 15 additional fixed feature keys.
The 22-Button Display Telephone has a built-in speaker-phone, provides Handsfree Answerback, Intercom voice-announcements. In addition, the 22-Button Display provides a built-in wall-mount bracket, as well as adjustable legs which allow each phone to be angled at a height which best suits the user.
✍ At a glance
34-Button Display Telephone - Part Numbers 0890045 & 0890046Function Keys: ✔ Accepts 110-Button DSS: ✔ Accepts 24-Button DLS: ✔Handsfree (Speakerphone): ✔ Dual LEDs: ✔ ADA Adapter: ✔ADA2 Adapter: No APA Adapter: ✔ APR Adapter: ✔CTA Adapter: ✔ CTU Adapter: ✔ IP Adapter: ✔PSA Adapter: No
22-Button Display Telephone - Part Numbers 0890043 & 0890044Function Keys: ✔ Accepts 110-Button DSS: ✔ Accepts 24-Button DLS: ✔Handsfree (Speakerphone): ✔ Dual LEDs: ✔ ADA Adapter: ✔ADA2 Adapter: No APA Adapter: ✔ APR Adapter: ✔CTA Adapter: ✔ CTU Adapter: ✔ IP Adapter: ✔PSA Adapter: No
Aspire S Hardware Manual Section 4: Telephones and Optional Equipment ◆ 4-61
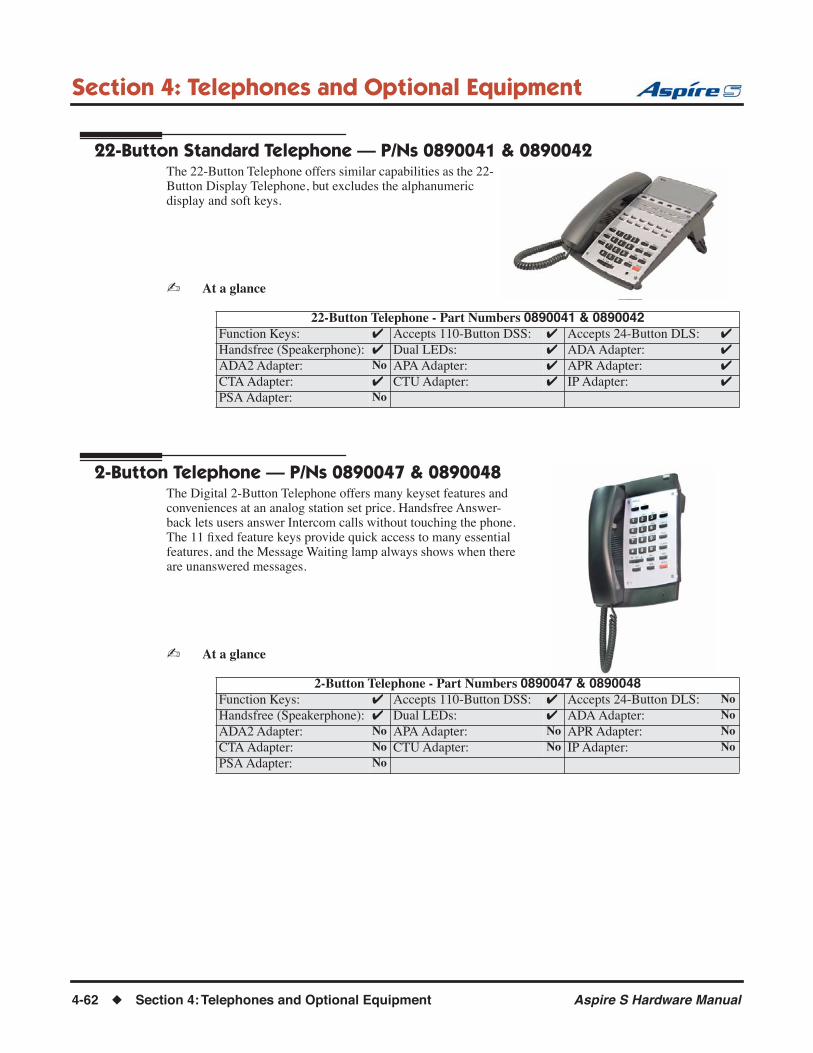
Section 4: Telephones and Optional Equipment
22-Button Standard Telephone — P/Ns 0890041 & 0890042The 22-Button Telephone offers similar capabilities as the 22-Button Display Telephone, but excludes the alphanumeric display and soft keys.
✍ At a glance
2-Button Telephone — P/Ns 0890047 & 0890048The Digital 2-Button Telephone offers many keyset features and conveniences at an analog station set price. Handsfree Answer-back lets users answer Intercom calls without touching the phone. The 11 fixed feature keys provide quick access to many essential features, and the Message Waiting lamp always shows when there are unanswered messages.
✍ At a glance
22-Button Telephone - Part Numbers 0890041 & 0890042Function Keys: ✔ Accepts 110-Button DSS: ✔ Accepts 24-Button DLS: ✔Handsfree (Speakerphone): ✔ Dual LEDs: ✔ ADA Adapter: ✔ADA2 Adapter: No APA Adapter: ✔ APR Adapter: ✔CTA Adapter: ✔ CTU Adapter: ✔ IP Adapter: ✔PSA Adapter: No
2-Button Telephone - Part Numbers 0890047 & 0890048Function Keys: ✔ Accepts 110-Button DSS: ✔ Accepts 24-Button DLS: NoHandsfree (Speakerphone): ✔ Dual LEDs: ✔ ADA Adapter: NoADA2 Adapter: No APA Adapter: No APR Adapter: NoCTA Adapter: No CTU Adapter: No IP Adapter: NoPSA Adapter: No
4-62 ◆ Section 4: Telephones and Optional Equipment Aspire S Hardware Manual

Section 4: Telephones and Optional Equipment
4
Cordless Single Line Headset Telephone, CT-11 — P/N 730090The CT-11 is a 2.4GHz cordless headset which connects to an analog port or an analog telephone line as a stand-alone unit or to an analog port adapter (APR, P/N 0890056). When the APR is set up as the same extension of the telephone, you can use the headset to answer and make calls using the cordless headset. The CT-11 offers Caller ID, but only if it is connected to an analog port on an analog station card. The CT-11 will not receive Caller ID if it is connected to an APA or APR adapter (these adapters do not output Caller ID).
The number of units which can be used on the system is greatly affected by the environment. The closer or smaller the area, the smaller the number of units which can be used. It is recommended to start with 3 or less. If there are no conflicts between the telephones, you can try adding additional units (up to 5 would be the recommended maximum).
When using wireless LAN, keep in mind that although there should not be a problem with interfer-ence from WLAN’s, 802.11b and 802.11g both share the same frequency as the CT-11 telephone. In theory, the CT-11 is a narrow band high power device where as the 802.11b and 802.11g are both wide band low power technologies. Therefore, the higher power CT-11 could disrupt the low power device and slow the data network. There are, however, many exceptions to this (for example, if the WLAN uses highly directional antennas, higher power relays between buildings, etc.). The CT-11 can not lock down channels, unlike the 802.11b and 802.11g.
The CT-11 features include:● 2.4 GHz Cordless Headset Phone● Range of Up to 150’● 6 Hours of Talk Time, 80 Hours Standby Time● Audible Low Battery Indicator● Single Line Operation● Ultra-Compact Remote Unit with Belt Clip● Variable Range Volume Control● 10 Speed Dial Numbers● Page/Find Feature● Redial/Flash● Mute with Audible Reminder● Talk/Charge/Power Indicator Lights● Built-in Headset Stand
✍ At a glance
Analog Single Line Telephone, CT-11 - Part Number 730090Function Keys: No Accepts 110-Button DSS: No Accepts 24-Button DLS: NoHandsfree:(only through headset)
✔ Dual LEDs: No ADA Adapter: No
ADA2 Adapter: No APA Adapter: No APR Adapter: NoCTA Adapter: No CTU Adapter: No IP Adapter: NoPSA Adapter: No
Aspire S Hardware Manual Section 4: Telephones and Optional Equipment ◆ 4-63

Section 4: Telephones and Optional Equipment
Cordless Telephone — P/N 730088/730087The Aspire S System supports a Cordless Telephone. The DTR-4R-2 Cord-less II (P/N 730088) is a 900 MHz spread-spectrum digital cordless tele-phone that provides mobility, flexibility and convenience for those who spend much of the workday away from their desk. Fully integrated with the telephone system, the DTR-4R-2 Cordless II offers many standard features such as Park, Do Not Disturb, Hotline, Voice Over and Voice Mail. Normally paired with a companion keyset for improved 1-button call coverage capabil-ities, the DTR-4R-2 Cordless II will also work as a stand-alone telephone.
Complemented by 4 fully programmable function keys (with LEDs), the DTR-4R-2 Cordless II achieves a whole new level of convenience and mobility. An easy-to-read LCD display, volume controls, a rechargeable nickel-cadmium battery pack and a handy belt clip round out the elegant and affordable DTR-4R-2 Cordless II Phone.
A second Cordless Phone is also available: the Cordless Lite II. The Cordless Lite II offers the same features as the DTR-4R-2 Cordless II except that it uses a NiMH battery and has FM modulation (single chan-nel) instead of the spread spectrum modulation.
Recommended Usage Guidelines for Cordless PhonesIn ideal conditions, multiple spread spectrum type cordless phones (Cordless II can be utilized in the same environment. However, due to the possible interference problems caused by the bases being placed in close proximity to each other, we recommend the following:
Spread Spectrum Phones (Cordless II P /N 730088)Where users require greater range on the cordless phones and 3 or less cordless phones are being used at a specific site, we recommend using the spread spectrum cordless phone.
FM Modulation Phones (Cordless Lite II P /N 730087)Where more than 3 cordless phones are to be used at one specific site, we recommend using the FM modula-tion cordless phones which have 30-channel capability.
Note: The range of the phones depends largely on the environmental factors, such as the building structure, the size of the room, RF interference and other electronic equipment installed in the same area. For optimum range and performance, we suggest the following:
1. Place the base units at least 15 feet apart. The performance of the phones become more stable when the distance between the bases is greater.
2. Place the base unit in the center of the coverage area.If the phone will also be used in an outdoor area, like a parking lot, install the base unit in an area close to the window.
3. If a phone experiences interference and noise, press the channel key to select another channel.
4-64 ◆ Section 4: Telephones and Optional Equipment Aspire S Hardware Manual

Section 4: Telephones and Optional Equipment
4
Selecting the Installation LocationSelect a location for the phone that avoids excessive heat or humidity. The base unit can be placed on a desk or tabletop near a standard 120V AC outlet and telephone line jack. The base unit can also be mounted on a standard AT&T or GTE wall plate using the Wall Mount Adaptor. If the phone is to be paired with a keyset, place both phones in the same area. Keep the base unit and handset away from sources of electrical noise (motors, fluorescent lighting, computers). Each Cordless Telephone unit should be at least 5 feet away from any other Cordless Telephone or Aspire keyset to avoid interference.
With multiple cordless phones installed, each handset should have its channel button changed to a different channel if possible (10 channels are available on the Cordless II, 30 channels on the Cordless Lite II). This will help avoid any problems with interference between handsets when going off hook.
Connecting the Telephone LineThere are two types of phone outlets:
1) Modular JackPlug the telephone line cord from the base unit into a standard modular telephone jack.
2) Hardwired JackA modular jack converter (not included) is required. You may need to rewire when connecting the converter (making color-coded connections).
Distance Installation Distance
Cordless Telephones Normal Mode (Factory Setting)
High Power Mode
Between Digital Telephones Minimum 3.28 ft. (1 meter) Minimum 9.84 ft. (3 meters)
From Base Unit (CS) Minimum 16.40 ft. (5 meters) Minimum 16.40 ft. (5 meters)
From Cordless Telephone (PS) Minimum 3.28 ft. (1 meter) Minimum 6.56 ft. (2 meters)
Base Unit (CS)
Between Base Units (CS) Minimum 3.28 ft. (1 meter)
From Cordless Telephone (PS) Minimum 3.28 ft. (1 meter)
From Digital Telephones Minimum 18.04 ft. (5.5 meter)
Cordless Telephones (PS)
Between Cordless Telephone (PS) Minimum 1.64 ft. (0.5 meter)
From Base Units (CS) Minimum 3.28 ft. (1 meter)
From Digital Telephones Minimum 3.28 ft. (1 meter)
Aspire S Hardware Manual Section 4: Telephones and Optional Equipment ◆ 4-65

Section 4: Telephones and Optional Equipment
Applying Power to the Base UnitUse the supplied 10V adaptor.
Figure 4-59: POWERING THE BASE UNIT
Applying Power to the Desktop ChargerUse the supplied 9V AC adaptor. Wrap the power cord around the convenient notch on the bottom.
Figure 4-60: POWERING THE DESKTOP CHARGER
IMPORTANT! Route the power cord where it will not create a trip hazard, or where it could become chafed and create a fire or other electrical hazard.
Note: The AC adaptors furnished with this phone may be equipped with a polarized line plug (a plug having one blade wider than the other). This plug will fit into the power outlet only one way. If you are unable to insert the plug fully into the outlet, try reversing the plug. Do not alter the shape of the blades of the polar-ized plug.
Note: If you cannot plug the AC adaptors into the outlet, contact someone about replacing the outlet.
Before using your phone, be sure to raise the antenna to the vertical position.
Figure 4-61: ANTENNA POSITION
4-66 ◆ Section 4: Telephones and Optional Equipment Aspire S Hardware Manual
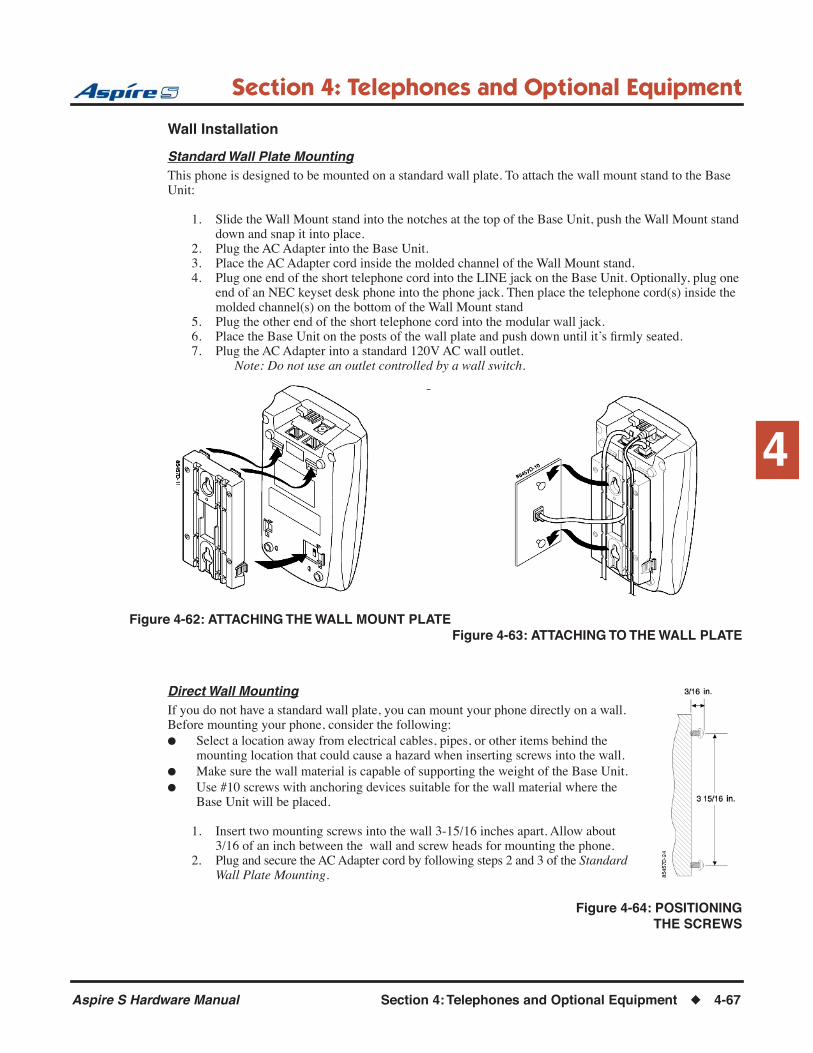
Section 4: Telephones and Optional Equipment
4
Wall Installation
Standard Wall Plate MountingThis phone is designed to be mounted on a standard wall plate. To attach the wall mount stand to the Base Unit:
1. Slide the Wall Mount stand into the notches at the top of the Base Unit, push the Wall Mount stand down and snap it into place.
2. Plug the AC Adapter into the Base Unit.3. Place the AC Adapter cord inside the molded channel of the Wall Mount stand.4. Plug one end of the short telephone cord into the LINE jack on the Base Unit. Optionally, plug one
end of an NEC keyset desk phone into the phone jack. Then place the telephone cord(s) inside the molded channel(s) on the bottom of the Wall Mount stand
5. Plug the other end of the short telephone cord into the modular wall jack.6. Place the Base Unit on the posts of the wall plate and push down until it’s firmly seated.7. Plug the AC Adapter into a standard 120V AC wall outlet.
Note: Do not use an outlet controlled by a wall switch.
Figure 4-62: ATTACHING THE WALL MOUNT PLATEFigure 4-63: ATTACHING TO THE WALL PLATE
Direct Wall MountingIf you do not have a standard wall plate, you can mount your phone directly on a wall. Before mounting your phone, consider the following:● Select a location away from electrical cables, pipes, or other items behind the
mounting location that could cause a hazard when inserting screws into the wall.● Make sure the wall material is capable of supporting the weight of the Base Unit.● Use #10 screws with anchoring devices suitable for the wall material where the
Base Unit will be placed.
1. Insert two mounting screws into the wall 3-15/16 inches apart. Allow about 3/16 of an inch between the wall and screw heads for mounting the phone.
2. Plug and secure the AC Adapter cord by following steps 2 and 3 of the Standard Wall Plate Mounting.
Figure 4-64: POSITIONINGTHE SCREWS
Aspire S Hardware Manual Section 4: Telephones and Optional Equipment ◆ 4-67
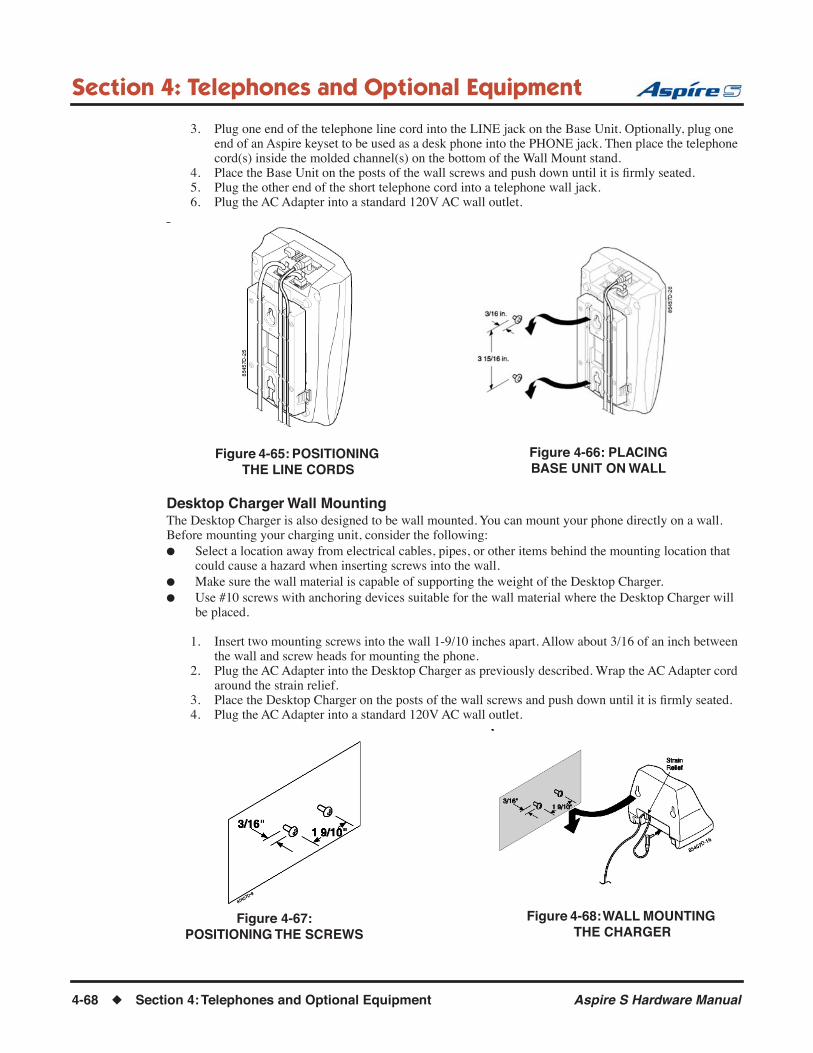
Section 4: Telephones and Optional Equipment
3. Plug one end of the telephone line cord into the LINE jack on the Base Unit. Optionally, plug one end of an Aspire keyset to be used as a desk phone into the PHONE jack. Then place the telephone cord(s) inside the molded channel(s) on the bottom of the Wall Mount stand.
4. Place the Base Unit on the posts of the wall screws and push down until it is firmly seated.5. Plug the other end of the short telephone cord into a telephone wall jack.6. Plug the AC Adapter into a standard 120V AC wall outlet.
Desktop Charger Wall MountingThe Desktop Charger is also designed to be wall mounted. You can mount your phone directly on a wall. Before mounting your charging unit, consider the following:● Select a location away from electrical cables, pipes, or other items behind the mounting location that
could cause a hazard when inserting screws into the wall.● Make sure the wall material is capable of supporting the weight of the Desktop Charger.● Use #10 screws with anchoring devices suitable for the wall material where the Desktop Charger will
be placed.
1. Insert two mounting screws into the wall 1-9/10 inches apart. Allow about 3/16 of an inch between the wall and screw heads for mounting the phone.
2. Plug the AC Adapter into the Desktop Charger as previously described. Wrap the AC Adapter cord around the strain relief.
3. Place the Desktop Charger on the posts of the wall screws and push down until it is firmly seated.4. Plug the AC Adapter into a standard 120V AC wall outlet.
Figure 4-66: PLACING BASE UNIT ON WALL
Figure 4-65: POSITIONING THE LINE CORDS
Figure 4-68: WALL MOUNTING THE CHARGER
Figure 4-67: POSITIONING THE SCREWS
4-68 ◆ Section 4: Telephones and Optional Equipment Aspire S Hardware Manual

Section 4: Telephones and Optional Equipment
4
Attaching the Belt Clip to the HandsetYou can use the Belt Clip to attach the handset to your belt or pocket for convenient portability.
1. Slide the clip into the tab slot.CAUTION: The Belt Clip is designed to fit snugly onto the handset.
2. Press firmly until it snaps into place.3. To remove, simply press the retaining clip in toward the Belt Clip and slide the clip up at the same
time.
Figure 4-69: ATTACHING THE BELT CLIP
Installing the Handset Battery1. Remove the battery cover from the handset by pressing the latch and sliding the cover down
until it comes off the handset.2. Slide the top of the battery into position, then lower the bottom portion into place. Note that the bat-
tery has positive and negative indications. With the Cordless II phone, make sure to place the bat-tery in the handset so the negative is on the left and positive is on the right (the metal contacts should face down toward the phone). With the Cordless Lite II phones, the battery pack cable must be plugged into the handset.
3. Securely close the battery compartment cover by sliding it up until it snaps into place.
Figure 4-70: INSTALLING THE BATTERY
Charging the Handset BatteryThe rechargeable battery pack must be fully charged before using your phone for the first time. Charge the battery without interruption for 5 hours. The unique design of the telephone and charger allows you to place the handset in the Desktop Charger with or without the Belt Clip attached.
1. Place the phone in the front slot of the desktop charger. The dial pad should be facing out in order for the battery contacts to connect.
2. Make sure the CHARGE 1 LED lights. If the LED doesn’t light, check to see that the AC adapter is plugged in, and that the handset is making good contact with the battery contacts.
Aspire S Hardware Manual Section 4: Telephones and Optional Equipment ◆ 4-69
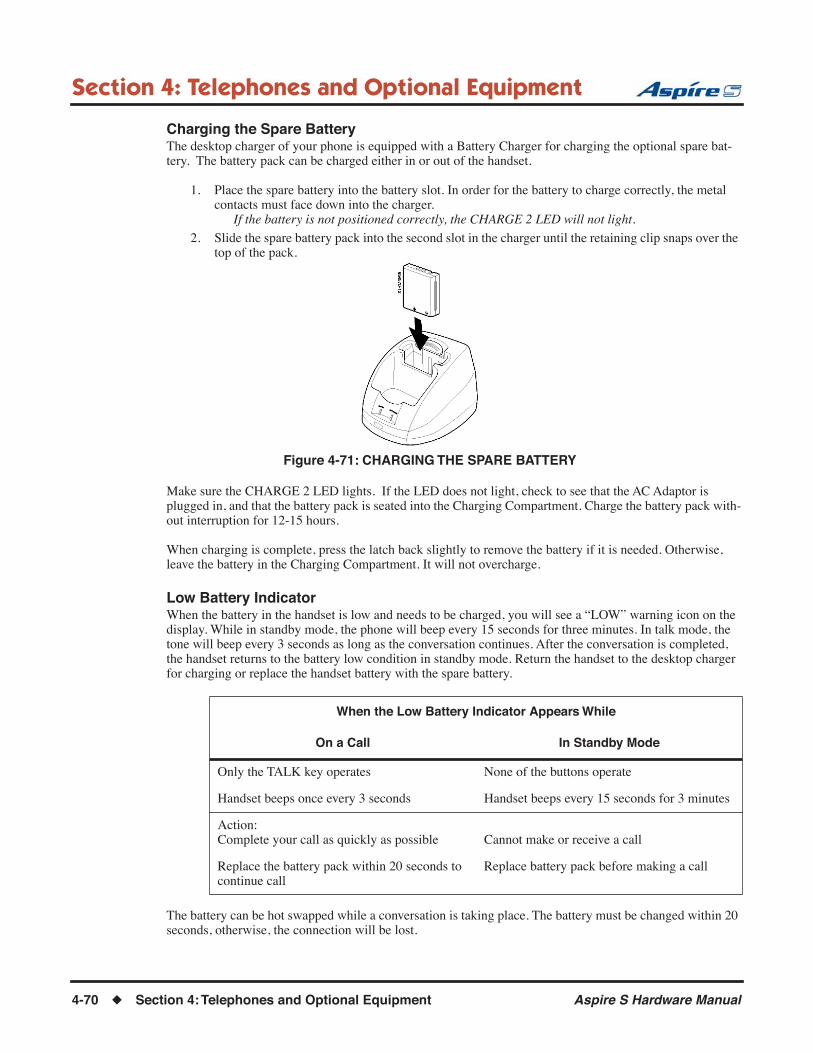
Section 4: Telephones and Optional Equipment
Charging the Spare BatteryThe desktop charger of your phone is equipped with a Battery Charger for charging the optional spare bat-tery. The battery pack can be charged either in or out of the handset.
1. Place the spare battery into the battery slot. In order for the battery to charge correctly, the metal contacts must face down into the charger.
If the battery is not positioned correctly, the CHARGE 2 LED will not light.
2. Slide the spare battery pack into the second slot in the charger until the retaining clip snaps over the top of the pack.
Figure 4-71: CHARGING THE SPARE BATTERY
Make sure the CHARGE 2 LED lights. If the LED does not light, check to see that the AC Adaptor is plugged in, and that the battery pack is seated into the Charging Compartment. Charge the battery pack with-out interruption for 12-15 hours.
When charging is complete, press the latch back slightly to remove the battery if it is needed. Otherwise, leave the battery in the Charging Compartment. It will not overcharge.
Low Battery IndicatorWhen the battery in the handset is low and needs to be charged, you will see a “LOW” warning icon on the display. While in standby mode, the phone will beep every 15 seconds for three minutes. In talk mode, the tone will beep every 3 seconds as long as the conversation continues. After the conversation is completed, the handset returns to the battery low condition in standby mode. Return the handset to the desktop charger for charging or replace the handset battery with the spare battery.
The battery can be hot swapped while a conversation is taking place. The battery must be changed within 20 seconds, otherwise, the connection will be lost.
When the Low Battery Indicator Appears While
On a Call In Standby Mode
Only the TALK key operates None of the buttons operate
Handset beeps once every 3 seconds Handset beeps every 15 seconds for 3 minutes
Action:Complete your call as quickly as possible Cannot make or receive a call
Replace the battery pack within 20 seconds to continue call
Replace battery pack before making a call
4-70 ◆ Section 4: Telephones and Optional Equipment Aspire S Hardware Manual

Section 4: Telephones and Optional Equipment
4
Cleaning the Battery ContactsTo maintain a good charge, it is important to clean all charging contacts on the handset, desktop charger, and spare battery pack about once a month. Use a pencil eraser or soft dry cloth. Do not use any liquids or solvents.
Figure 4-72: BATTERY CONTACTS
Desk PhoneThe cordless phone allows for the connection of an optional Aspire keyset phone. The system can be pro-grammed so that the keyset and/or the Cordless Telephone rings. If there is no answer, it can then transfer to voice mail. This allows you to have a keyset phone to use while at your desk, and when you need to be away from your desk, you can carry the cordless phone with you. Refer to Installing a Cordless Telephone (Fig-ure 3-3) (page 3-5) for details on connecting the phones.
HeadsetThe optional headset provides a handsfree option for your convenience. With the headset installed, you can use the belt clip to carry the handset and conduct a conversation using the headset.
To install the optional headset, open the cover over the HEADSET jack and plug the headset in. (The headset jack should be 2.5mm.) No other settings are required.
Figure 4-73: CONNECTING THE HEADSET
Operation of the phone is exactly the same as using the handset. However, you will hear through the headset earphone and talk through the headset microphone. The handset ear piece and microphone/mouthpiece are disconnected.
Contacts
Contacts
85
45
7D
- 2
9
2 abc
5 jkl 6 mno4 ghi
8 tuv 9 wxyz7pqrs
0 oper #
3 def1
85457D-17
Aspire S Hardware Manual Section 4: Telephones and Optional Equipment ◆ 4-71

Section 4: Telephones and Optional Equipment
Troubleshooting ProceduresIf your phone is not performing to your expectations, please try these simple steps. If you are still unable to resolve the problem, contact your communications manager.
Problem Suggestion
Charge light won’t come on when the handset is placed in the desktop charger.
• Make sure the AC Adaptor is plugged into the desktop charger and wall outlet.
• Make sure the handset is properly seated in the desktop charger.
• Make sure the battery pack is properly placed in the handset.
• Make sure that the charging contacts on the handset and desktop charger are clean.
Conversation inter-rupted frequently.
• Make sure that the base unit’s antenna is fully vertical.
• Move closer to the base unit.
Warning tone and NO SERVICE message.
• Move closer to the base unit.
Handset doesn’t ring. • The battery pack may be weak. Charge the battery for 5-6 hours.
• Make sure the base unit antenna is fully vertical.
• The handset may be too far away from the base unit.
• Ensure the Ringer ON/OFF switch is in the ON position.
Interference from other cordless phone users.
• Press the Channel (CH) key to switch channels.The channel can be changed while you are on an active call, but not when you are dialing a telephone number. There are 10 chan-nels on the Cordless Lite and 30 channels on the Cordless Lite II from which you can select.
Interference or noise in the handset.
• Make sure the base unit is at least 3’ away from any computer fax machine, printer, or TV (they generate radio waves)
• Make sure the antenna is in the upright position
4-72 ◆ Section 4: Telephones and Optional Equipment Aspire S Hardware Manual

Section 4: Telephones and Optional Equipment
4
IP Station Equipment
34-Button Aspire IPhone - BK — P/N 0890065This keyset provides a network connector which allows it to be used with the VoIP feature. The 34-Button Aspire IPhone has a 3-line, 24-character display with four interactive soft keys for intuitive feature access. In addition, it has 24 user-programmable function keys (with Dual LEDs) for one-button access to co-workers, features and out-side lines. The telephone also provides 10 user-programmable One-Touch (Personal Speed Dial) keys and 15 additional fixed feature keys.
The 34-Button Aspire IPhone has a built-in speakerphone and can accept optional IP adapters (PSA, ADA2). You can also assign 110-Button DSS Consoles to these phones, but they must be on site (not networked). It provides Handsfree Answerback, Intercom voice-announcements. In addition, the telephone provides a built-in wall-mount bracket, as well as adjustable legs which allow each phone to be angled at a height which best suits the user.
✍ At a glance
H.323 IP Phone — P/N 780005This UIP300 H.323 IP phone is a business IP phone in enterprise LAN environment and will be connected to IP PBX systems via RJ45 network cable.
Standard Telephone Features: ● Alphanumeric LCD display with 2 lines of 24 characters● 10 LED indicators (Line 1 / Line 21 / Status / Mute / Speaker
(Headset) / 5 Function keys)● 12 Key Dial Pad ● 20 Specific Keys (5 Function keys, Menu, Select, Cancel/Del, Transfer, Mute, Redial, Hold, Confer-
ence (not available with Aspire), Speaker, Line 1 and 2 keys, Volume Up and Down keys, Menu Up and Down keys)
● Local Date and Time● Call Duration Display● Volume Control for Speaker, Handset, Headset, and Ringer● Phone Book, Speed Dial, Dial from Call Logs (30 Outgoing Calls, 30 Incoming Calls and 15 Missed Calls)
34-Button Aspire IPhone Telephone - Part Numbers 0890065Function Keys: ✔ Accepts 110-Button DSS: ✔ Accepts 24-Button DLS: NoHandsfree (Speakerphone): ✔ Dual LEDs: ✔ ADA Adapter: NoADA2 Adapter: ✔ APA Adapter: No APR Adapter: NoCTA Adapter: No CTU Adapter: No IP Adapter: NoPSA Adapter: ✔
1. Only one phone number will be assigned to this IP phone. Line 2 is not available for a gateway system.
Aspire S Hardware Manual Section 4: Telephones and Optional Equipment ◆ 4-73
Section 4: Telephones and Optional Equipment
● Redial, Hold1, Mute● Call Waiting, Call Forward, Call Transfer, Do Not Disturb (DND)● Display Caller ID (Name & Number)● On-hook Dialing, Handsfree Talking (Full Duplex)● DTMF Generation● 8 Ringer Tones
VoIP Specific Features:● H.323 v1, 2 Standard Compliant● Gatekeeper Routed and Direct Routed Call Models● Voice Codec: G.711 (64kbit/s, u-Law and A-law), G723.1, G729AB● E.164 Dialing● Acoustic Echo Cancellation (G.167)● Rapid Configuration with DHCP or Statically Configured IP Address● Voice Activity Detection (VAD)● QoS (IEEE 802.1 p/q Based and DiffServ)● Jitter Compensation● 10/100 Base-T Ethernet Interface
When installing an Aspire IP phone (IPhone, Aspire keyset with IP adapter, or H.323 phone), an AC/DC adapter is required for local power or, for central power, one of the following must be used:● 24-Port Power PoE-Managed Switch (BF200/24 - NEC standard product)● 12-Port Power Supply Patch Panel (SN1604 PWRMS - NEC standard product)● Power Patch Panel (Cisco)● Catalyst PWR Series (Cisco)
When a separate ethernet switch is used, it should be a 100Base/full duplex switch. To avoid network prob-lems and to ensure good voice quality, do not use a Repeater Hub/10Base.
1. Hold, Transfer, Call Forward and Conference will not be available in the IP address call mode but in the phone number dial mode only.
4-74 ◆ Section 4: Telephones and Optional Equipment Aspire S Hardware Manual
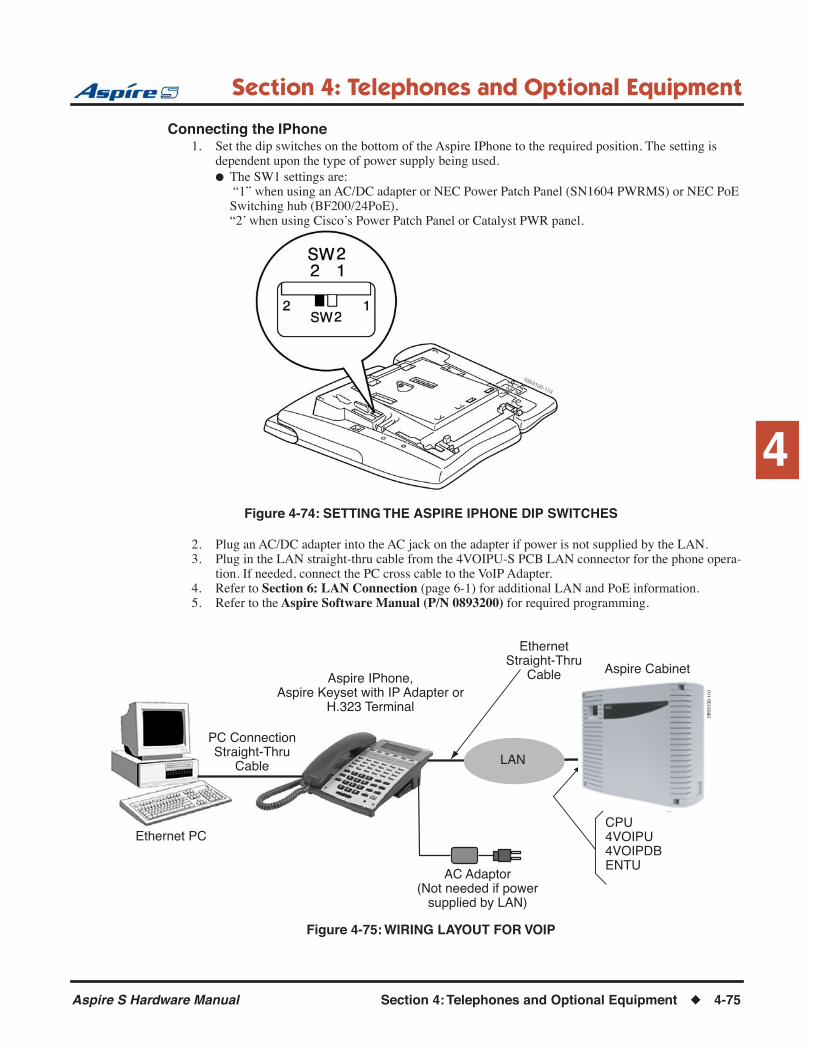
Section 4: Telephones and Optional Equipment
4
Connecting the IPhone1. Set the dip switches on the bottom of the Aspire IPhone to the required position. The setting is
dependent upon the type of power supply being used.● The SW1 settings are:
“1” when using an AC/DC adapter or NEC Power Patch Panel (SN1604 PWRMS) or NEC PoE Switching hub (BF200/24PoE), “2’ when using Cisco’s Power Patch Panel or Catalyst PWR panel.
Figure 4-74: SETTING THE ASPIRE IPHONE DIP SWITCHES
2. Plug an AC/DC adapter into the AC jack on the adapter if power is not supplied by the LAN.3. Plug in the LAN straight-thru cable from the 4VOIPU-S PCB LAN connector for the phone opera-
tion. If needed, connect the PC cross cable to the VoIP Adapter.4. Refer to Section 6: LAN Connection (page 6-1) for additional LAN and PoE information.5. Refer to the Aspire Software Manual (P/N 0893200) for required programming.
Figure 4-75: WIRING LAYOUT FOR VOIP
Ethernet PC
Aspire IPhone,Aspire Keyset with IP Adapter or
H.323 Terminal
AC Adaptor(Not needed if power
supplied by LAN)
LAN
PC ConnectionStraight-Thru
Cable
EthernetStraight-Thru
Cable Aspire Cabinet
CPU4VOIPU4VOIPDBENTU
0893
130-
110
Aspire S Hardware Manual Section 4: Telephones and Optional Equipment ◆ 4-75
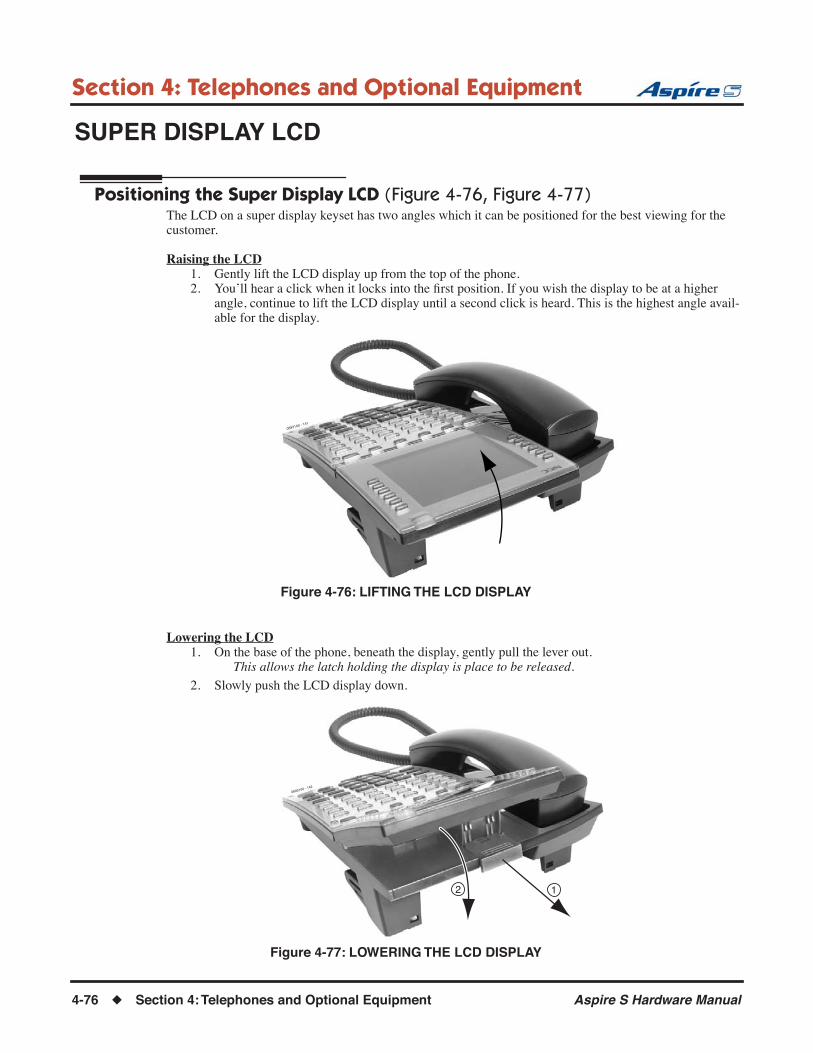
Section 4: Telephones and Optional Equipment
SUPER DISPLAY LCD
Positioning the Super Display LCD (Figure 4-76, Figure 4-77)The LCD on a super display keyset has two angles which it can be positioned for the best viewing for the customer.
Raising the LCD1. Gently lift the LCD display up from the top of the phone.2. You’ll hear a click when it locks into the first position. If you wish the display to be at a higher
angle, continue to lift the LCD display until a second click is heard. This is the highest angle avail-able for the display.
Figure 4-76: LIFTING THE LCD DISPLAY
Lowering the LCD1. On the base of the phone, beneath the display, gently pull the lever out.
This allows the latch holding the display is place to be released.
2. Slowly push the LCD display down.
Figure 4-77: LOWERING THE LCD DISPLAY
0893100 - 141
0893100 - 142
2 1
4-76 ◆ Section 4: Telephones and Optional Equipment Aspire S Hardware Manual
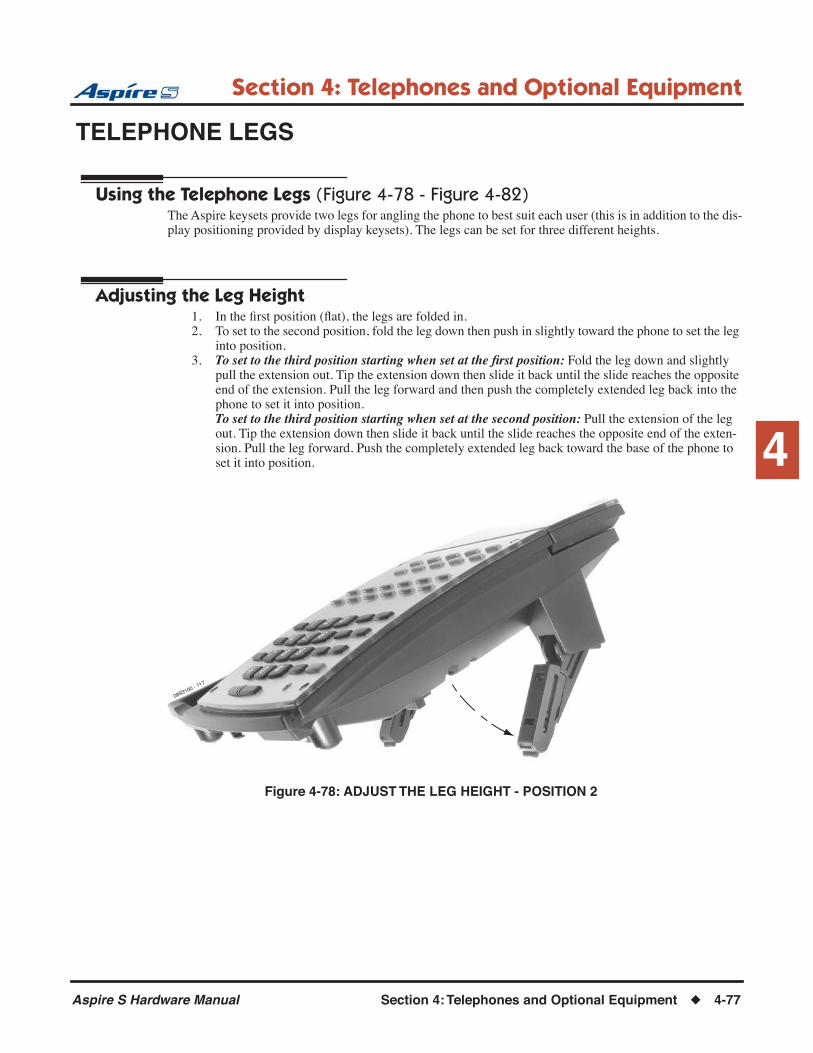
Section 4: Telephones and Optional Equipment
4
TELEPHONE LEGS
Using the Telephone Legs (Figure 4-78 - Figure 4-82)The Aspire keysets provide two legs for angling the phone to best suit each user (this is in addition to the dis-play positioning provided by display keysets). The legs can be set for three different heights.
Adjusting the Leg Height1. In the first position (flat), the legs are folded in.2. To set to the second position, fold the leg down then push in slightly toward the phone to set the leg
into position.3. To set to the third position starting when set at the first position: Fold the leg down and slightly
pull the extension out. Tip the extension down then slide it back until the slide reaches the opposite end of the extension. Pull the leg forward and then push the completely extended leg back into the phone to set it into position.To set to the third position starting when set at the second position: Pull the extension of the leg out. Tip the extension down then slide it back until the slide reaches the opposite end of the exten-sion. Pull the leg forward. Push the completely extended leg back toward the base of the phone to set it into position.
Figure 4-78: ADJUST THE LEG HEIGHT - POSITION 2
0893100 - 117
Aspire S Hardware Manual Section 4: Telephones and Optional Equipment ◆ 4-77
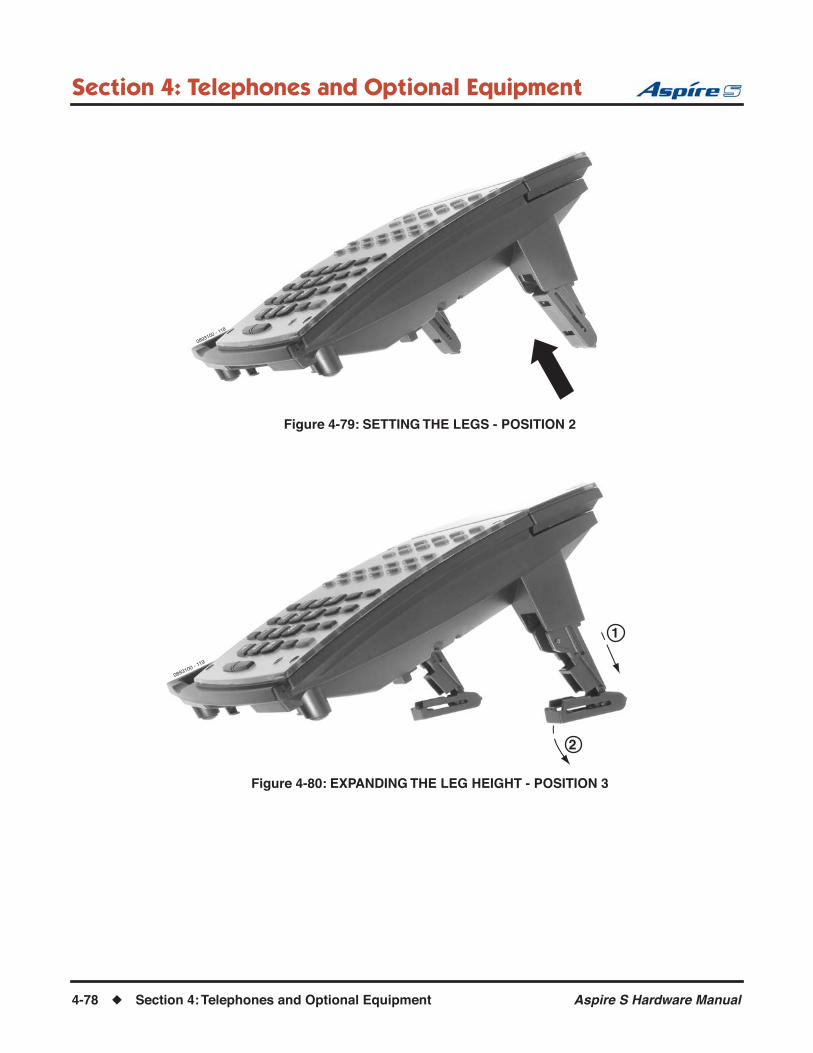
Section 4: Telephones and Optional Equipment
Figure 4-79: SETTING THE LEGS - POSITION 2
Figure 4-80: EXPANDING THE LEG HEIGHT - POSITION 3
0893100 - 118
0893100 - 119
1
2
4-78 ◆ Section 4: Telephones and Optional Equipment Aspire S Hardware Manual
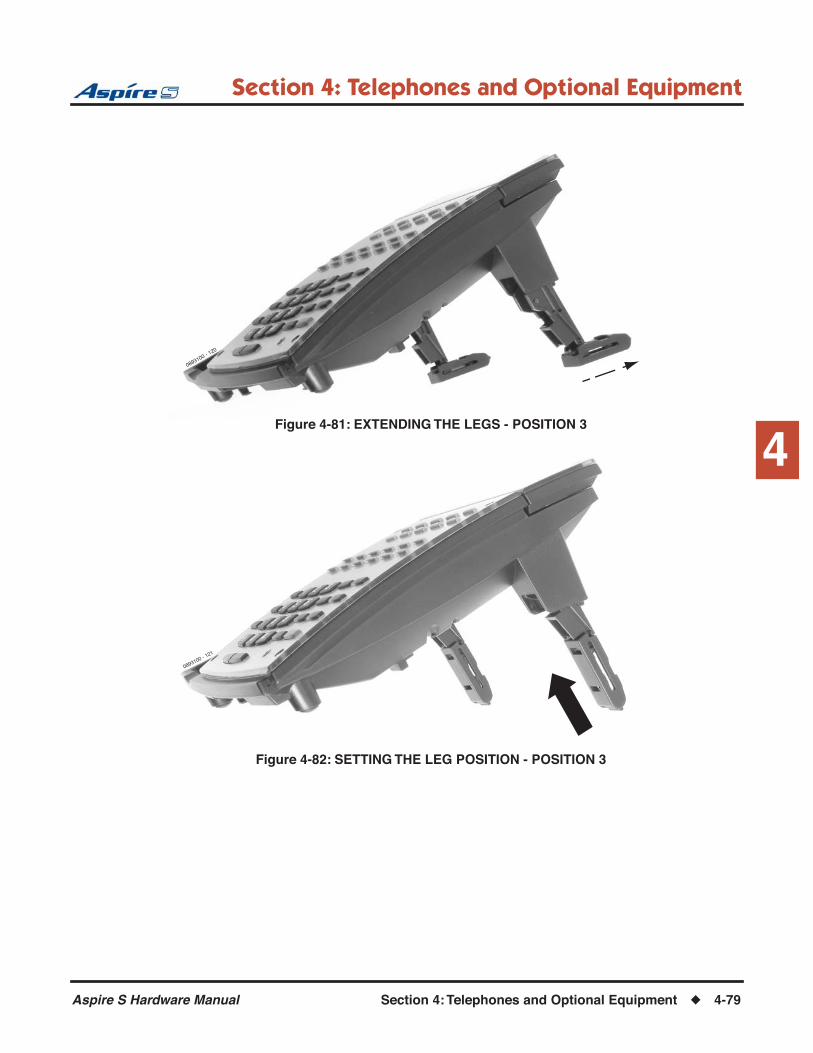
Section 4: Telephones and Optional Equipment
4
Figure 4-81: EXTENDING THE LEGS - POSITION 3Figure 4-82: SETTING THE LEG POSITION - POSITION 3
0893100 - 120
0893100 - 121
Aspire S Hardware Manual Section 4: Telephones and Optional Equipment ◆ 4-79

Section 4: Telephones and Optional Equipment
WALL-MOUNT BRACKET
Using the Wall-Mount BracketEach Aspire phone has an integrated wall-mounting bracket. This allows the phone to be mounted to a wall at a convenient location.
Telephones with any optional adapters installed cannot be wall-mounted. The bracket will not accommodate the adapter(s).
There are two types of mounting brackets - one for the multi-line keysets and one for the 2-button telephone.
Installing the Wall-Mount Handset Bracket (Figure 4-83 - Figure 4-89)1. Remove the integrated wall bracket from the bottom of the phone. Refer to Figure 4-83.
- From the center cut-out, pull the bracket up and out.2. Remove the wall-mount hookswitch tab located on the bracket by gently pulling the locking lever
down slightly while lifting the tab out (Figure 4-84).3. Insert the wall-mount hookswitch tab in the slot below the hookswitch (Figure 4-85).
Figure 4-83: REMOVING THE WALL-MOUNT BRACKET
0893100 - 113
4-80 ◆ Section 4: Telephones and Optional Equipment Aspire S Hardware Manual

Section 4: Telephones and Optional Equipment
4
Figure 4-84: REMOVING THE HOOKSWITCH HANGERFigure 4-85: INSTALLING THE HOOKSWITCH HANGER
0893100 - 115
2
1
0893100 - 114
Aspire S Hardware Manual Section 4: Telephones and Optional Equipment ◆ 4-81
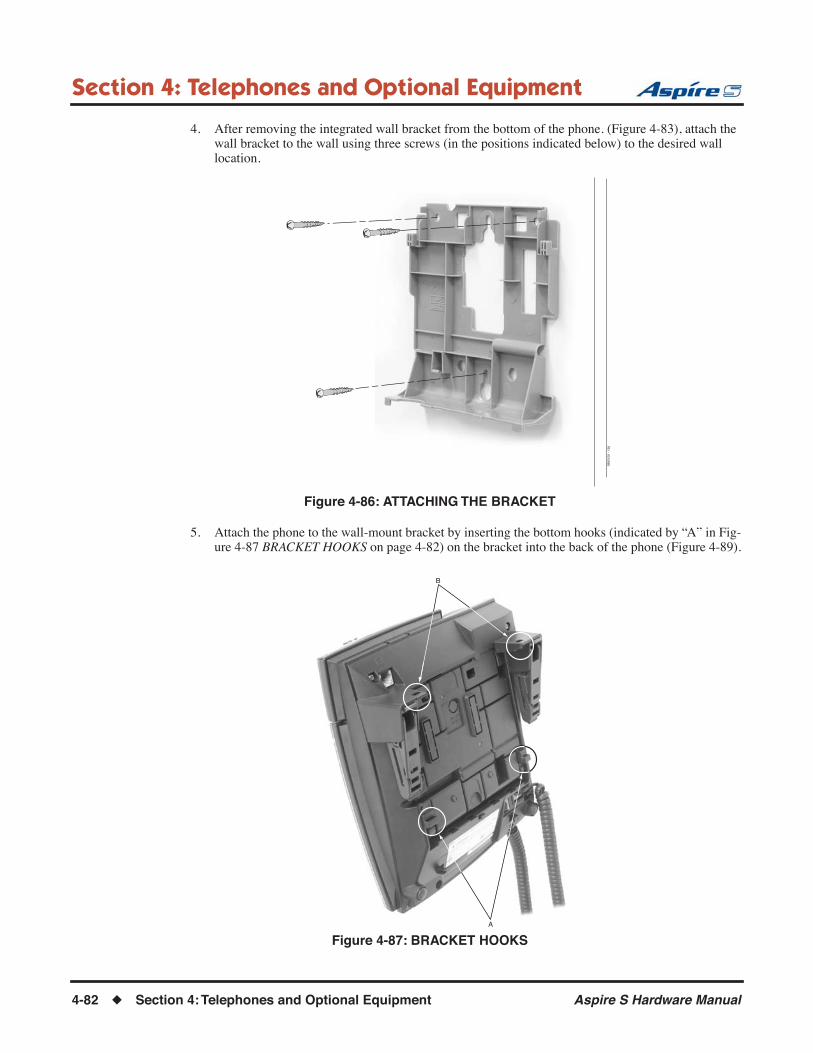
Section 4: Telephones and Optional Equipment
4. After removing the integrated wall bracket from the bottom of the phone. (Figure 4-83), attach the wall bracket to the wall using three screws (in the positions indicated below) to the desired wall location.
Figure 4-86: ATTACHING THE BRACKET
5. Attach the phone to the wall-mount bracket by inserting the bottom hooks (indicated by “A” in Fig-ure 4-87 BRACKET HOOKS on page 4-82) on the bracket into the back of the phone (Figure 4-89).
Figure 4-87: BRACKET HOOKS
0893
100
- 13
8
0893100 - 135
B
A
4-82 ◆ Section 4: Telephones and Optional Equipment Aspire S Hardware Manual
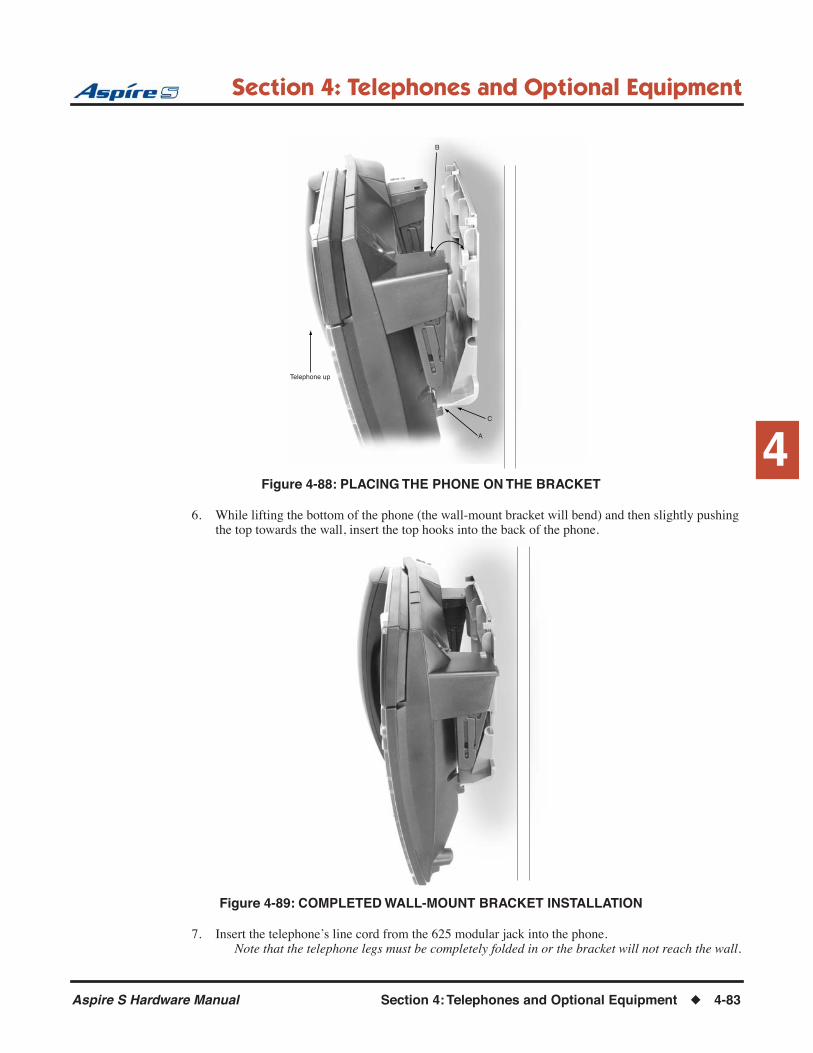
Section 4: Telephones and Optional Equipment
4
Figure 4-88: PLACING THE PHONE ON THE BRACKET
6. While lifting the bottom of the phone (the wall-mount bracket will bend) and then slightly pushing the top towards the wall, insert the top hooks into the back of the phone.
Figure 4-89: COMPLETED WALL-MOUNT BRACKET INSTALLATION
7. Insert the telephone’s line cord from the 625 modular jack into the phone.Note that the telephone legs must be completely folded in or the bracket will not reach the wall.
0893100 - 136
B
A
C
Telephone up
0893100 - 137
Aspire S Hardware Manual Section 4: Telephones and Optional Equipment ◆ 4-83

Section 4: Telephones and Optional Equipment
Removing the Phone From a Wall-Mounting Bracket (Figure 4-90 - Figure 4-91)1. Grip the keyset on both sides in the location shown below by “A”.
Figure 4-90: GRIP THE KEYSET
2. Lift the phone up. The wall-mount bracket will bend slightly (at location “B”).
0893100 - 139
B
A
Push telephone up
4-84 ◆ Section 4: Telephones and Optional Equipment Aspire S Hardware Manual
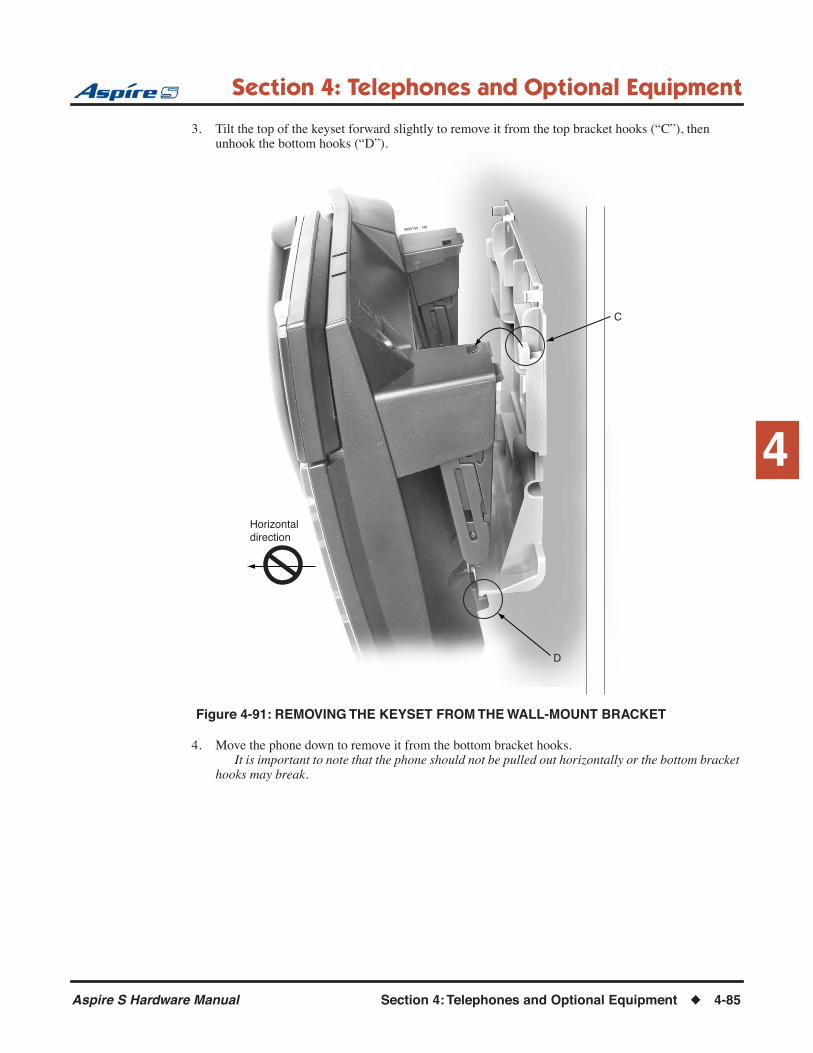
Section 4: Telephones and Optional Equipment
4
3. Tilt the top of the keyset forward slightly to remove it from the top bracket hooks (“C”), then unhook the bottom hooks (“D”).
Figure 4-91: REMOVING THE KEYSET FROM THE WALL-MOUNT BRACKET
4. Move the phone down to remove it from the bottom bracket hooks.It is important to note that the phone should not be pulled out horizontally or the bottom bracket
hooks may break.
0893100 - 140
C
D
Horizontaldirection
Aspire S Hardware Manual Section 4: Telephones and Optional Equipment ◆ 4-85

Section 4: Telephones and Optional Equipment
Installing the 2-Button Phone’s Wall-Mount Bracket (Figure 4-92 - Figure 4-94)
1. Unscrew the two screws securing the bracket to the bottom of the 2-button phone and remove the bracket. Refer to Figure 4-92.
Figure 4-92: REMOVING THE WALL-MOUNT BRACKET
2. Remove the wall-mount hookswitch tab located on the bracket by gently pulling the locking lever down slightly while lifting the tab out.
0893100 - 177 HookswitchBracket
4-86 ◆ Section 4: Telephones and Optional Equipment Aspire S Hardware Manual

Section 4: Telephones and Optional Equipment
4
3. Insert the wall-mount hookswitch tab in the slot below the hookswitch (Figure 4-93).
Figure 4-93: INSTALLING THE HOOKSWITCH HANGER
4. After removing the integrated wall bracket from the bottom of the 2-button telephone (Figure 4-92), position the bracket as shown below - the legs of the bracket should slide into the slots located near the bottom edge of the phone, then be pushed up slightly to secure the bottom of the bracket.
5. Attach the wall-mount bracket to the phone using the two screws which initially held the bracket to the phone. The screws should be positioned at the top of the bracket.
Figure 4-94: ATTACHING THE BRACKET
0893100 - 176
0893
100
- 17
8
Aspire S Hardware Manual Section 4: Telephones and Optional Equipment ◆ 4-87

Section 4: Telephones and Optional Equipment
- For Your Notes -
4-88 ◆ Section 4: Telephones and Optional Equipment Aspire S Hardware Manual

Section 5: Data and SMDR
5
Section 5:
Data and SMDR
Section 5: Data and SMDR
DATA OVERVIEW
Data CommunicationsThe system provides up to 24 data device interfaces for data communications. Using data devices allows a network to share a limited number of business resources such as modems, printers, and PC's. The system's data devices can switch asynchronous RS-232-C data at speeds from 300 to 19.2K.
In addition to the CPU’s serial port connection and the ENTU-S’s ethernet connection, there are four types of data devices available: APA, APR, CTA and CTU.
APA AdapterThe APA Adapter provides an analog interface for the keyset. The APA Adapter does not provide ringing, so the connected device is used for outgoing calls only (for example, when using a modem). One keyset can have either an APA or an APR Adapter. Both adapters cannot be installed on the same keyset as only one voice path is provided by the keyset for the adapters. The maximum distance between the APA Adapter and the analog terminal is 49’.
The APA Adapter does not support reverse-polarity, message waiting lamping, or Caller ID.
APR AdapterThe APR Adapter provides an analog interface for the keyset. The APR Adapter provides ringing which allows the connected device to be used for incoming and outgoing calls. One keyset can have either an APA or an APR Adapter. Both adapters cannot be installed on the same keyset as only one voice path is provided by the keyset for the adapters. When installing the APR Adapter, an AC-2R AC/DC adapter (P/N 780135) is required for power. The maximum distance between the APR Adapter and the analog terminal is 49’.
The APR Adapter does not support reverse-polarity, message waiting lamping, or Caller ID.
When installing the APR adapter, there must be an extension port available for the adapter or it will function like an APA adapter (only one physical port assigned to the phone so only one phone can be used at a time).
Aspire S Hardware Manual Section 5: Data and SMDR ◆ 5-1
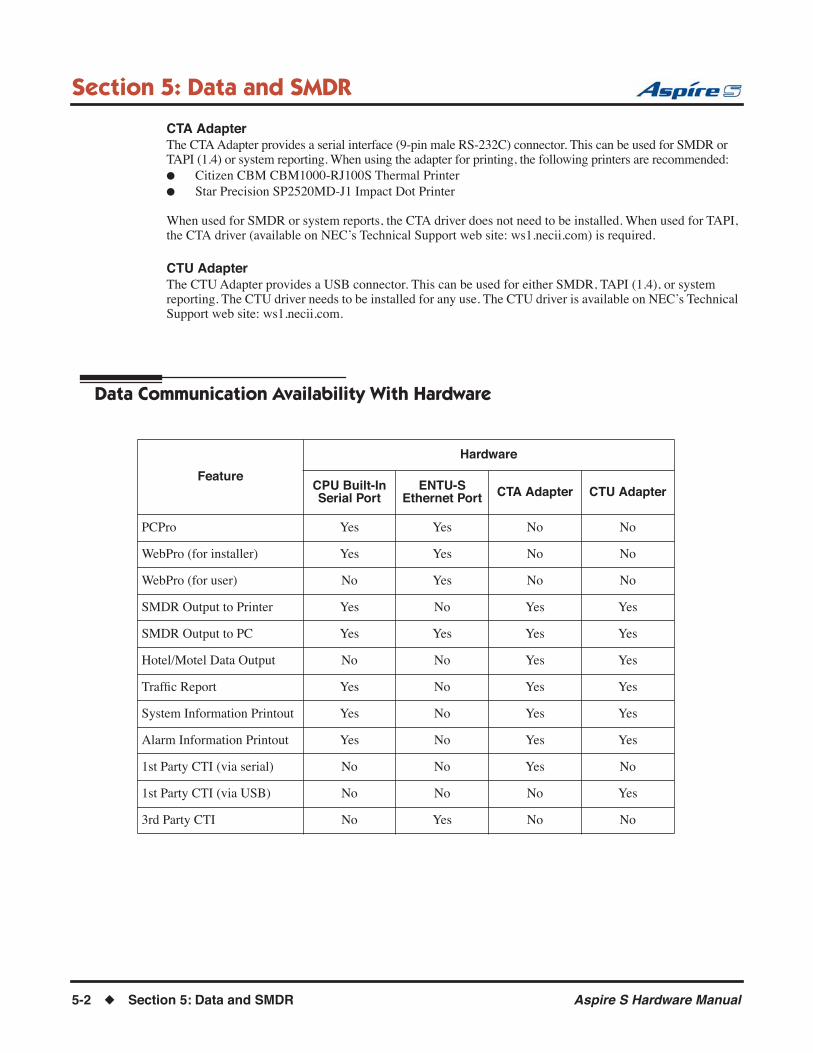
Section 5: Data and SMDR
CTA AdapterThe CTA Adapter provides a serial interface (9-pin male RS-232C) connector. This can be used for SMDR or TAPI (1.4) or system reporting. When using the adapter for printing, the following printers are recommended:● Citizen CBM CBM1000-RJ100S Thermal Printer● Star Precision SP2520MD-J1 Impact Dot Printer
When used for SMDR or system reports, the CTA driver does not need to be installed. When used for TAPI, the CTA driver (available on NEC’s Technical Support web site: ws1.necii.com) is required.
CTU AdapterThe CTU Adapter provides a USB connector. This can be used for either SMDR, TAPI (1.4), or system reporting. The CTU driver needs to be installed for any use. The CTU driver is available on NEC’s Technical Support web site: ws1.necii.com.
Data Communication Availability With Hardware
Feature
Hardware
CPU Built-In Serial Port
ENTU-S Ethernet Port CTA Adapter CTU Adapter
PCPro Yes Yes No No
WebPro (for installer) Yes Yes No No
WebPro (for user) No Yes No No
SMDR Output to Printer Yes No Yes Yes
SMDR Output to PC Yes Yes Yes Yes
Hotel/Motel Data Output No No Yes Yes
Traffic Report Yes No Yes Yes
System Information Printout Yes No Yes Yes
Alarm Information Printout Yes No Yes Yes
1st Party CTI (via serial) No No Yes No
1st Party CTI (via USB) No No No Yes
3rd Party CTI No Yes No No
5-2 ◆ Section 5: Data and SMDR Aspire S Hardware Manual

Section 5: Data and SMDR
5
Ports for APR AdapterThe APR Adapter’s extension number is determined when the adapter is connected to the keyset. After assigning the APR Adapter a circuit type of ‘12’ in Program 10-03-06, the system automatically selects the next available port within the APR’s range (11-26). The system assigns the ports numbers from highest to lowest (26, 25, 24, etc.). Program 10-03-07 indicates which port is assigned for the APR Adapter. You can reassign the extension number for the port using Program 11-02-01. When installing the APR adapter, there must be an extension port available for the adapter or it will function like an APA adapter (only one physical port assigned to the phone so only one phone can be used at a time).
Use the table below to determine the extension number associated with the port number.
Programming for System and Alarm Reports➻ 90-12-01 : System Alarm Output - Output Port Type
Indicate the type of connection used for the System Alarms. The baud rate for the COM port should be set in Program 10-21-02 (0=No setting, 1=COM port (CPU), 4=CTA/CTU).
➻ 90-12-02 : System Alarm Output - Destination Extension NumberIf the output port type (item 1) is set to CTA, enter the extension number with the CTA connection.
➻ 90-12-06 : System Alarm Output - Output ModeIndicate if the output for the alarms should be manual (0) or automatic (1).
➻ 90-13-01 : System Information Output - Output Port TypeIndicate the type of connection used for the SMDR (0=No setting, 1=COM port (CPU), 4= CTA/CTU).
➻ 90-13-02 : System Information Output - Destination Extension NumberIf the output port type (item 1) is set to CTA, enter the extension number with the CTA connection.
➻ 90-13-03 : System Information Output - Output CommandDialing 1 from this program sends the system report to the connected device.
Use the following programs for outputting or clearing the alarm reports:
➻ 90-12-03 : System Alarm Output - Output All Alarm Reports
➻ 90-12-04 : System Alarm Output - Printout New Alarm Reports
➻ 90-12-06 : System Alarm Output - Clear All Alarm Reports
Refer to Data Communications in the Software Manual for additional details.
APR Extension Port Number Extension Number
11 311
12 312
: :
25 325
26 326
Aspire S Hardware Manual Section 5: Data and SMDR ◆ 5-3
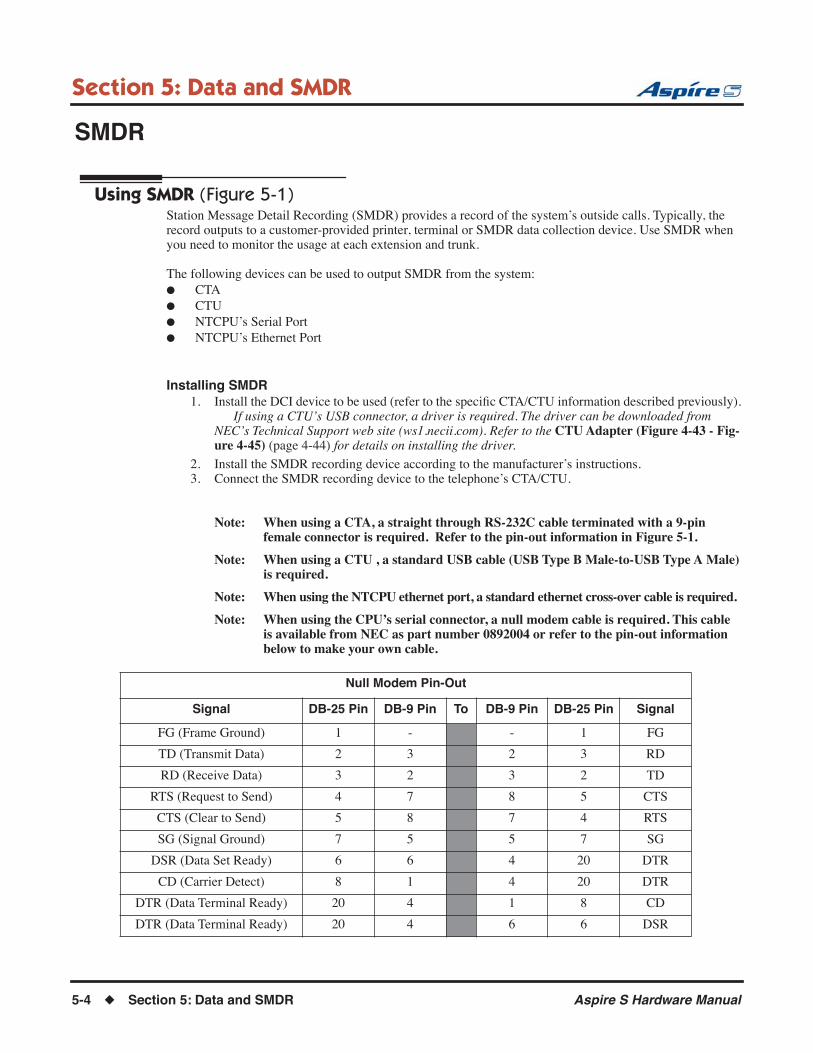
Section 5: Data and SMDR
SMDR
Using SMDR (Figure 5-1)Station Message Detail Recording (SMDR) provides a record of the system’s outside calls. Typically, the record outputs to a customer-provided printer, terminal or SMDR data collection device. Use SMDR when you need to monitor the usage at each extension and trunk.
The following devices can be used to output SMDR from the system:● CTA● CTU● NTCPU’s Serial Port● NTCPU’s Ethernet Port
Installing SMDR1. Install the DCI device to be used (refer to the specific CTA/CTU information described previously).
If using a CTU’s USB connector, a driver is required. The driver can be downloaded from NEC’s Technical Support web site (ws1.necii.com). Refer to the CTU Adapter (Figure 4-43 - Fig-ure 4-45) (page 4-44) for details on installing the driver.
2. Install the SMDR recording device according to the manufacturer’s instructions.3. Connect the SMDR recording device to the telephone’s CTA/CTU.
Note: When using a CTA, a straight through RS-232C cable terminated with a 9-pinfemale connector is required. Refer to the pin-out information in Figure 5-1.
Note: When using a CTU , a standard USB cable (USB Type B Male-to-USB Type A Male)is required.
Note: When using the NTCPU ethernet port, a standard ethernet cross-over cable is required.
Note: When using the CPU’s serial connector, a null modem cable is required. This cableis available from NEC as part number 0892004 or refer to the pin-out informationbelow to make your own cable.
Null Modem Pin-Out
Signal DB-25 Pin DB-9 Pin To DB-9 Pin DB-25 Pin Signal
FG (Frame Ground) 1 - - 1 FG
TD (Transmit Data) 2 3 2 3 RD
RD (Receive Data) 3 2 3 2 TD
RTS (Request to Send) 4 7 8 5 CTS
CTS (Clear to Send) 5 8 7 4 RTS
SG (Signal Ground) 7 5 5 7 SG
DSR (Data Set Ready) 6 6 4 20 DTR
CD (Carrier Detect) 8 1 4 20 DTR
DTR (Data Terminal Ready) 20 4 1 8 CD
DTR (Data Terminal Ready) 20 4 6 6 DSR
5-4 ◆ Section 5: Data and SMDR Aspire S Hardware Manual
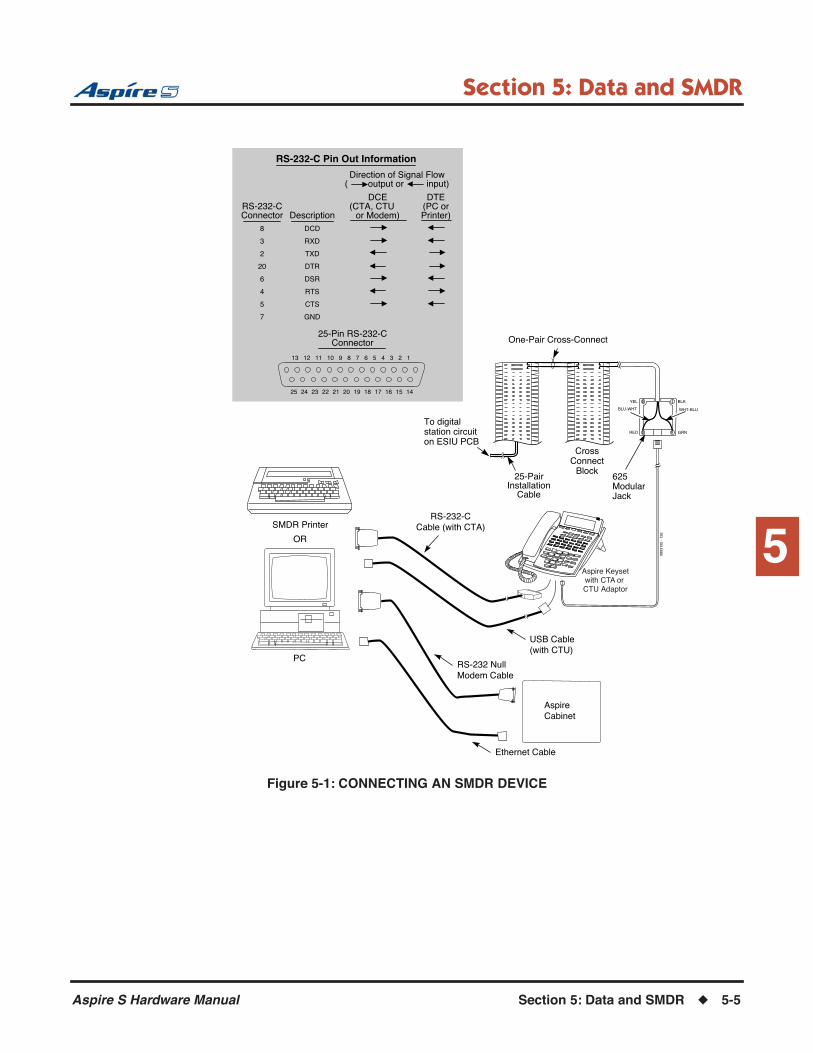
Section 5: Data and SMDR
5
Figure 5-1: CONNECTING AN SMDR DEVICE
25-Pin RS-232-CConnector
13 12 11 10 9 8 7 6 5 4 3 2 1
25 24 23 22 21 20 19 18 17 16 15 14
DCE(CTA, CTU
or Modem)
Direction of Signal Flow( output or input)
DTE(PC orPrinter)Description
RS-232-C Pin Out Information
RS-232-CConnector
DCD
RXD
TXD
DTR
DSR
RTS
CTS
GND
8
3
2
20
6
4
5
7
RS-232-CCable (with CTA)
OR
PC
SMDR Printer
625ModularJack
BLKYEL
RED GRN
BLU-WHT WHT-BLU
One-Pair Cross-Connect
To digitalstation circuiton ESIU PCB
25-PairInstallation
Cable
CrossConnect
Block
Aspire Keysetwith CTA or CTU Adaptor
0893
100
- 12
6
USB Cable(with CTU)
AspireCabinet
Ethernet Cable
RS-232 NullModem Cable
Aspire S Hardware Manual Section 5: Data and SMDR ◆ 5-5

Section 5: Data and SMDR
Programming SMDR➻ 10-12-01 : NTCPU Network Setup - IP Address
When using an IP connection from the CPU’s ethernet port, set up the IP address used to connect from the PC to the Aspire system (Default: 172.16.0.10).
➻ 10-21-02 : NTCPU Hardware Setup - Baud Rate for COM PortIf the SMDR connection is made using the COM port on the CPU, define the baud rate (0=4800, 1=9600, 2=19200, 3=38400).
➻ 10-20-01 : LAN Setup for External EquipmentDefine the TCP port (0-65535) when communicating to the SMDR (type 5).
➻ 10-21-02 : NTCPU Hardware Setup - Baud Rate for COM PortIf the SMDR connection is made using the COM port on the CPU, define the baud rate (0=4800, 1=9600, 2=19200, 3=38400).
➻ 14-01-06 : Basic Trunk Data Setup - SMDR Print OutFor each trunk, enter 1 if trunk’s calls should appear on SMDR report. Enter 0 if trunk’s calls should not appear on SMDR report.
➻ 15-01-03 : Basic Extension Data Setup - SMDR PrintoutFor each extension, enter 1 if extension’s calls should appear on SMDR report. Enter 0 if extension’s calls should not appear on SMDR report.
➻ 15-02-19 : Multi-Line Telephone Basic Data Setup - CTA/CTU Data Communication ModeSelect ‘0’ if the dip switch settings are set to PC connection or select ‘1’ if printer/SMDR connection is selected on the CTA/CTU adapter.
➻ 15-02-20 : Multi-Line Telephone Basic Data Setup - Baud Rate for CTA PortSet the baud rate to be used by the CTA (0=4800, 1=9600, 2=19200).
➻ 35-01-01 : SMDR Options - Output Port TypeSpecify the type of connection used for SMDR (0=No setting, 1=COM(NTCPU), 3=LAN, 4=CTA/CTU). The baud rate for the COM port should be set in Program 10-21-02 or 15-02-20.
➻ 35-01-02 : SMDR Options - Output Destination NumberSpecify the SMDR printer output port (CTA/CTU port number).
➻ 35-01-03 : SMDR Options - Header LanguageSpecify the language in which he SMDR header should be printed (0=English, 1=German, 2=French, 3=Italian, 4=Spanish).
➻ 35-01-04 : SMDR Options - Omit (Mask) DigitsEnter the number of digits (1-24) you want SMDR to block (i.e., “X” out). Enter 0 not to block any digits.
➻ 35-01-05 : SMDR Options - Minimum Number of SMDR DigitsEnter the minimum number of digits a user must dial (1-24) before the system includes a call on the SMDR report. Enter 0 to include all outgoing calls, regardless of the number of digits dialed.
➻ 35-01-06 : SMDR Options - Minimum Call DurationEnter the minimum duration of a call (1-65535) that will print on the SMDR report. Enter 0 to have calls of any duration print.
➻ 35-01-07 : SMDR Options - Minimum Ringing TimeEnter how long an unanswered call must ring (1-65535) before SMDR logs it as “No Answer”. Enter 0 to allow all “No Answer” calls to print.
➻ 35-01-08 : SMDR Options - SMDR FormatDo not change:This option is added to allow an increased account code field from 8 to 16 when used in the U.K. This allows 16 characters of the Caller ID name to be displayed. For the U.S., this option is set to "0" and should remain at this setting as 16 characters are already provided for the account code field.
5-6 ◆ Section 5: Data and SMDR Aspire S Hardware Manual

Section 5: Data and SMDR
5
➻ 35-02-01 : SMDR Output Options - Toll Restricted CallEnter 1 if you want the SMDR report to include calls blocked by Toll Restriction. Enter 0 to exclude blocked calls.
➻ 35-02-02 : SMDR Output Options - PBX CallsIf system is behind a PBX, enter 1 to have SMDR include all calls to the PBX. Enter 0 to have SMDR include only calls dialed using PBX trunk access code.
➻ 35-02-03 : SMDR Output Options - Display Trunk Name or NumberSelect whether the system should display the trunk name (0) or the number (1) on SMDR reports. If this option is set to “1”, Program 35-02-14 must be set to “0”.
➻ 35-02-04 : SMDR Output Options - Daily Summary35-02-05 : Weekly Summary and35-02-06 : Monthly SummaryEnter 1 to enable a summary report. Enter 0 to disable a summary report. The daily report prints every day at midnight. The weekly report prints every Sunday night at midnight. The monthly report prints at midnight on the last day of the month.
➻ 35-02-08 : SMDR Output Options - Incoming CallsEnter 0 if you want the SMDR report to include incoming calls. Enter 1 if you want the SMDR report to exclude incoming calls.
➻ 35-02-09 : SMDR Output Options - Print Name or NumberEnter 0 if you want the SMDR report to include the extension’s name. Enter 1 if you want the SMDR report to include the extension’s number.
➻ 35-02-10 : SMDR Output Options - All Lines Busy (ALB) OutputEnter 1 to report information when all lines in a group are busy and an extension user tries to access the group. Enter 0 if this information should not be included.
➻ 35-02-12 : SMDR Output Options - DID Table Name OutputDetermine if the DID table name should be displayed for incoming DID calls (0=Not Displayed, 1=Displayed).
➻ 35-02-13 : SMDR Output Options - CLI Output When DID to TrunkDetermine if the Caller ID should be displayed when the incoming DID number is transferred to an outgoing trunk (0=Not Displayed, 1=Displayed).
➻ 35-02-14 : SMDR Output Options - DateDetermine whether the date should be displayed on SMDR reports (0=not displayed, 1=displayed). This option must be set to “0” if the trunk name is set to be displayed in Program 35-02-03.
➻ 35-02-15 : SMDR Output Options - CLI/DID Number SwitchingEnter 0 to display the Caller ID number. Currently, option “1” for the DID number is not available. With software 4.0E+, determine if the Caller ID number (0), DID number (1) or Caller ID name (2) should be displayed in the SMDR output.
➻ 35-02-16 : SMDR Output Options - Print Trunk Name or Received Dialed NumberDetermine how the SMDR should print incoming calls on ANI/DNIS or DID trunks. If set to (1), ANI/DNIS trunks can print DNIS digits. For DID trunks, if the received number is not defined in Program 22-11-01, then no number will be printed. If set to (0) trunk names are printed instead (as assigned in Program 14-01-01).
➻ 35-02-17 : SMDR Output Options - Print Account Code or Caller ID NameDetermine whether the Account Code (0) or Caller ID name (1) should appear in the SMDR record. By default, the Account Code will be displayed.Note: Program 35-01-08 must be set to "0" for this entry to be followed.
Aspire S Hardware Manual Section 5: Data and SMDR ◆ 5-7

Section 5: Data and SMDR
➻ 35-02-18 : SMDR Output Options - Caller ID Name Output MethodSelect whether to display up to 16 characters of the Caller ID Name on the same line as the call record (0) or if a line feed should be added and up to 24 characters of the Caller ID Name will be displayed on the following line (1). If the line feed option is selected, the Caller ID Name will be displayed on the next line as : NEXT "Caller ID Name". The default entry for this option is "0".This setting will work regardless of the setting in Program 35-02-15.Note: With this option set to "1", if your communications program (such as HyperTerminal) has the line wrap option enabled in the ASCII setup, an additional line break may appear above the Caller ID name line.
➻ 35-03-01 : SMDR Port Assignment for TrunksFor each trunk group, select the SMDR port to which the incoming information should be sent.
➻ 35-04-01 : SMDR Port Assignment for Department GroupsAssign the SMDR port for each Department Group. For each Department Group, select the SMDR port to which the outgoing SMDR information should be sent.
➻ 80-05-01 : Date Format for SMDR and System ReportsSet the date format for SMDR (0=American, 1=Japanese or 2=European).
Refer to Station Message Detail Recording in the Software Manual for additional details.
5-8 ◆ Section 5: Data and SMDR Aspire S Hardware Manual

Section 6: LAN Connection
6
Section 6:
LAN Connection
Section 6: LAN Connection
LAN DEVICES
Using LANsUsing a LAN setup (local area network) with the Aspire S system complies with the ethernet standard (10Base-T/100Base-TX).
To connect a telephone to a LAN connection, the system allows the use of an Aspire digital IP 34-button keyset (referred to as Aspire IPhone), an Aspire digital keyset with an IP Adapter installed or an H.323 IP digital telephone. For details on installing the IP Adapter, refer to VoIP Adapter (Figure 4-51 - Figure 4-53) (page 4-51).
If connecting a LAN to a WAN (wide area network), follow the instructions included with the ADSL modem or gateway device.
CPU
VOIPU/VOIPDB PCB
Ethernet Switch10Base-T/100Base-TX
PC
IP Telephone
Aspire Cabinet
0893
130-
107
ENTU PCB
Aspire S Hardware Manual Section 6: LAN Connection ◆ 6-1
Section 6: LAN Connection
IP AddressEquipment/devices used in the Aspire LAN setup must have an IP address assignment. An IP address assigns a unique address for each device. There are two types of IP addresses: Private and Global. A Private IP Address is not accessible through the internet - a Global IP Address can be accessed through the internet.
With a Private IP Address, with equipment that does not access the internet directly, addresses can be assigned to the equipment within Class A, B or C by assigning a number within the class’s range of numbers.
With a Global IP Address, connected equipment can be accessed through the internet, so each address must be unique. To avoid a conflict, the addresses are controlled by ARIN (American Registry for Internet Num-bers). To obtain a Global IP Address, contact ARIN or apply with your local ISP (internet service provider).
The first one to three groups of numbers (depending on the subnet mask) identify the network on which your computer is located. The remaining group(s) of numbers identify your computer on that network.
Subnet MaskAs the IP Address includes information to identify both the network and the final destination, the Subnet Mask is used to set apart the network and destination information.
The default subnet masks are:
In the above table, you’ll see that the Subnet Mask is made up of four groups of numbers. When a group con-tains the number ‘255’, this is telling the router to ignore or mask that group of numbers in the IP address as it is defining the network location of the final destination. So, for example, if the IP Address were: 172.16.0.10 and the Subnet Mask used was Class B (255.255.0.0), the first two groups of numbers (172.16) would be ignored once they reached the proper network location. The next two groups (0.10) would be the final destination within the LAN to which the connection is to be made.
DHCPDHCP (Dynamic Host Configuration Protocol) is a protocol which assigns a dynamic IP Address. Network control may be easier with DHCP as there is no need to assign and program individual IP Addresses for the LAN equipment. To use a dynamic IP Address, a DHCP server must be provided. The Aspire S system pro-vides the ability to use DHCP.
When equipment which is connected to the LAN (the DHCP client) is requesting an IP Address, it searches the DHCP server. When the request for an address is recognized, the DHCP server assigns an IP Address, Subnet definition, and the IP Address of the router, etc., based upon the system programming.
Note that the CPU must always have a static IP address. This address is set in Program 10-12-01 : NTCPU Network Setup - IP Address (default: 172.16.0.10).
Class Allowed IP Address Recommended Environment
A 10.0.0.0 ---10.22.255.255 Large Scale Network
B 172.16.0.0 --- 172.31.255.255 Mid Scale Network
C 192.168.0.0 --- 192.168.255.255 Small Scale Network
Class Default Subnet Mask
A 255.0.0.0
B 255.255.0.0
C 255.255.255.0
6-2 ◆ Section 6: LAN Connection Aspire S Hardware Manual

Section 6: LAN Connection
6
GatekeeperWhenever an H.323 terminal activates, a check is made of the network to see if there are any gatekeepers available. When a gatekeeper is present, it provides users with:
● Address TranslationUsers typically do not know the IP addresses of other terminals. When a user makes a call, the gate-keeper translates an alias address (name or number) to the destination address.
● Admissions Control
Users will not all be able to access the network at the same time because of limited shared resources. Gatekeepers may restrict network access based on call authorization, bandwidth usage, or some other criteria. It is important to note that Admissions Control is a way to preserve the integrity of the calls (provide QoS guarantees) that are already up and operating when a user requests access.
● Bandwidth Control
Besides network access control, the gatekeeper offers network managers the ability to restrict or assign bandwidth to different applications along certain protocol conventions. This is another place network managers can enforce QoS guarantees and other enterprise-wide usage policies.
With the Aspire S system, a separate external gatekeeper is not required unless connecting to an outside H.323 endpoint/gateway which requires an outer gatekeeper or if over 50 outer addresses must be registered. Otherwise, the Aspire S provides tables within the system programming for address resolution.
IP HardwarePCBs:● CPU - Signals the gateway with VoIP communication● 4VOIPU-S - The 4VOIPU-S PCB provides a 4-channel voice packet gateway unit and works as a
media gateway for VoIP communication. This PCB is required for either VoIP trunks or when using VoIP keysets which talk to non-IP keysets. VoIP keyset-to-VoIP keyset can talk without a media gate-way and without using any DSP resources using the Peer-to-Peer feature. Refer to the VoIP feature in the Aspire Software Manual for more detail on the Peer-to-Peer feature.
● 4VOIPDB-S - The 4VOIPDB-S daughter board provides an additional 4 channels when attached to the 4VOIPU-S PCB
Refer to PCB Port Assignments on page 2-35 for details on the port usage with the VOIPU PCB and VOIPDB. As these cards are assigned trunk ports when initially installed, this could impact the number of ports available for extensions.
Terminals:● IPhone - Aspire 34-button multi-line IP phone● IP Adapter - IP adapter connects an Aspire keyset to the VoIP network● ITR-2D-1 - H.323 IP phone
Power must be supplied to the IPhone, the Aspire keyset with an IP adapter, or ITR-2D1 phone using either a local or central power supply. If there is a power outage, the VoIP phones will not work unless the phones are plugged into a UPS (Uninterruptable power supply). ● Local Power Supply
The AC-2R Unit is an AC adapter for Aspire IPhone or the IP adapter. The ITR-2D1 has an AC adapter included that should be used for power.
● Central Power Supply: • 24-port power supply PoE-managed switch (NEC BlueFire 200/24)
Power feeding through signal pair (1/2, 3/6) or spare pair (4/5, 7/8)
● Cisco Data Switch - CDP Supported
Note that the Aspire IP phones are not IEEE 802.3af compliant.
Aspire S Hardware Manual Section 6: LAN Connection ◆ 6-3

Section 6: LAN Connection
Aspire S VoIP Specifications
LAN ConnectionsHardware:
● 24-Port Power Supply PoE-managed switch (NEC BlueFire 200/24)
● PoE (Power over Ethernet) to the Aspire IP/H.323 Phone● Spare Pair (4/5, 7/8) / Signal Pair (1/2, 3/6) Selection
Category Feature Note
IP Address DHCP Server CPU
DHCP Client VOIPU PCB or IP Phone
QoS 802.1p/1q
L3 QoS (ToS) Diffserv/IP Precedence
Maintenance HTTP Server NTCPU
Server H.323 Gatekeeper For H.323 Phone Registration and Routing
VLAN Tag and port-based VLAN
VoCoder G.711 µ-law/A-law
G.729a
G.723.1
Fax Relay
Jitter Buffer Size Set by system programming
RTP Length Set by system programming
Echo Canceller Tail Size Set by system programming
Level Adjustment Set by system programming
Protocol H.323
NGT
IP Phone H.323 Phone ITR-2D1 H.323 Phone
NGT Phone Maximum 16 Phones
IP Trunk H.323 Trunk Maximum 8 Trunks
6-4 ◆ Section 6: LAN Connection Aspire S Hardware Manual

Section 6: LAN Connection
6
Installing a LAN Device or VoIP TelephoneActual installation will vary depending on each customer’s installed Aspire S and networking hardware.
1. Plug a cable with an RJ-45 modular jack into the system’s VoIP PCB.2. Connect the RJ-45 modular connector on the opposite end of the cable to the IP telephone or PC’s
network interface card (NIC).When connecting an IP telephone, a connection can then be made to a network PC using the PC connector on the back of the phone.
3. If local power is to be provided to the IP telephones, connect the AC adapter to the phone.When using the IPhone (P/N 0890065), set the SW2 dip switch on the bottom of the phone to the appropriate setting shown below:
4. Plug the AC adapter into an outlet.
Feeding Method Power Source Setting of SW2
Local Feeding AC Adapter 1(48 volts to phone)Center Feeding NEC Power Patch Panel
(12 port NEC SN1604 PWRMS - 24-port NEC BlueFire 200/24)
Center Feeding Cisco Catalyst Power Patch Panel 2(data pairs)Cisco Catalyst PRW Series
Aspire S Hardware Manual Section 6: LAN Connection ◆ 6-5
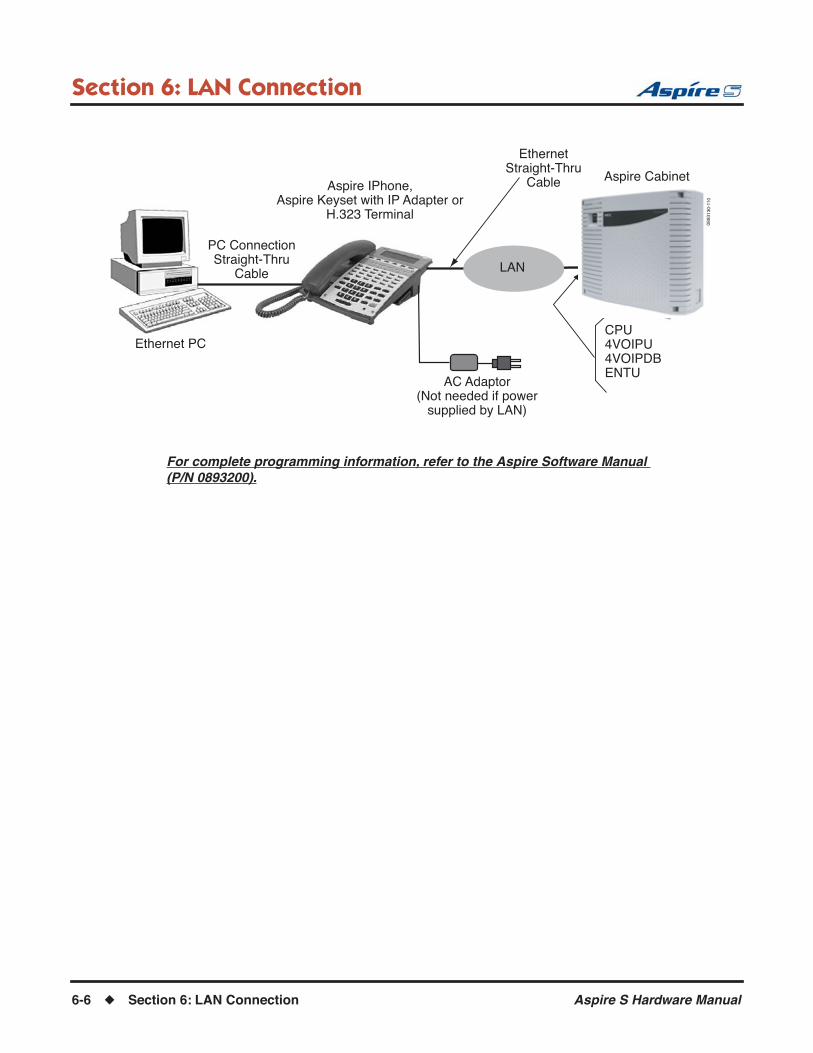
Section 6: LAN Connection
For complete programming information, refer to the Aspire Software Manual (P/N 0893200).
Ethernet PC
Aspire IPhone,Aspire Keyset with IP Adapter or
H.323 Terminal
AC Adaptor(Not needed if power
supplied by LAN)
LAN
PC ConnectionStraight-Thru
Cable
EthernetStraight-Thru
Cable Aspire Cabinet
CPU4VOIPU4VOIPDBENTU
0893
130-
110
6-6 ◆ Section 6: LAN Connection Aspire S Hardware Manual

Section 7: Specifications and Parts List
7
Section 7:
Specifications and
Parts List
Section 7: Specifications and Parts List
SYSTEM SPECIFICATIONSAspire S System Capacities
Cabinets 1
Analog Trunks (CO/PBX lines) 8
Digital Key TelephonesAnalog Single Line TelephonesIP TelephonesVirtual Extensions
24*18*16 ** 24
* Combined total to 26 (includes extension ports provided on the CPU)** Prior to 2.50 software, this is a combined total of 26 digital/ analog extensions. With software 2.50+, these are in addition to the 26 total digital or analog ports
24-Button DLS Consoles110-Button DSS Consoles
244
1 maximum per extension4 maximum per extension.
Conference Circuits 32 (32-parties max per Conference)
2PGDAD Modules 10 (4 for ACI ports, 4 for Door Boxes, 4 for Pages)
combined total to 10
ADA Adapter 24 installs on a keyset
ADA2 Adapter 16 installs on an IP keyset
APA Adapters 24 installs on a keyset
Aspire S Hardware Manual Section 7: Specifications and Parts List ◆ 7-1

Section 7: Specifications and Parts List
APR Adapters B1 = 24B2 = 8 with software through 2.21 16 with software 2.50 or higher
- installs on a keyset- If more than 26 digital and analog extensions are installed, IP ports can be used for B2 (this will reduce the number of available IP extensions.
CTA Adapter 24 installs on a keyset
CTU Adapter 24 installs on a keyset
Dial Tone Detector CircuitsDTMF Receiver Circuits
16*16*
combined total to 16
Door Box/Door Unlock Contacts 4
IP Adapter 16 installs on a keyset
IP Power Failure Adapter (PSA) 16 installs on an IP keyset
Handsfree Adapter (HF-R) 24 installs on a keyset
Paging: Internal Page ZonesPaging: External Page Zones
88
Power Failure Telephones 2 provided by COIU PCBs
SLT Adapter 8
Universal PCB slots 6
Voice Mail: IntraMail, 4 ports/4 hours IntraMail, 8 ports/8 hours
1 OR1
one IntraMail card installs on DSPDB
* NOTE: Maximum capacities above are determined by maximum PCB configuration allowed. When installing single line sets or DISA, CPU circuits must be allocated for DTMF receivers. To install single line sets with CO/PBX line access, CPU circuits must be allocated for dial tone detection.
Aspire S PCB CapacitiesCPU Central Processing Unit 1
DSPDB Daughter Board 1
ENTU-S LAN CTI 1
8ESIU-S 8 Digital Stations 2
4SLIU-S 4 Analog Stations 4
4SLIDB-S 4 Analog Stations Daughter Board (installs on 4SLIU-S)
0 - If 4 4SLIU-S PCBs installed1 - If 3 4SLIU-S PCBs installed2 - If 2 4SLIU-S PCBs installed
4COIU-S 4 Analog/Loop Start Trunks (no ground start) 2
2BRIU-S 2 Two-Channel BRI Circuits As T-Bus: 2As S-Bus: 4
2DIOPU-S 2 DID/OPX Trunks 4
4VOIPU-S 4 VoIP Media Gateway 3
4VOIPDB-S 4 VoIP Media Gateway Daughter Board (installs on 4VOIPU-S)
3
Aspire S System Capacities
7-2 ◆ Section 7: Specifications and Parts List Aspire S Hardware Manual
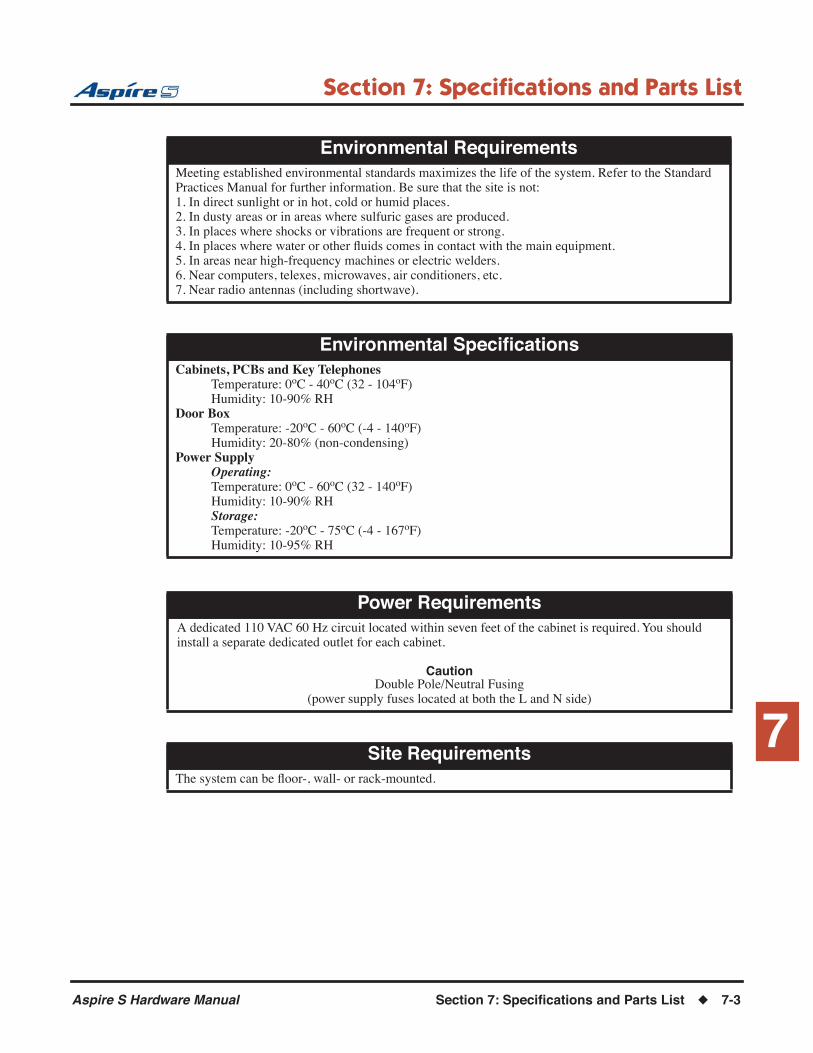
Section 7: Specifications and Parts List
7
Environmental RequirementsMeeting established environmental standards maximizes the life of the system. Refer to the Standard Practices Manual for further information. Be sure that the site is not:1. In direct sunlight or in hot, cold or humid places.2. In dusty areas or in areas where sulfuric gases are produced.3. In places where shocks or vibrations are frequent or strong.4. In places where water or other fluids comes in contact with the main equipment.5. In areas near high-frequency machines or electric welders.6. Near computers, telexes, microwaves, air conditioners, etc.7. Near radio antennas (including shortwave).
Environmental SpecificationsCabinets, PCBs and Key Telephones
Temperature: 0oC - 40oC (32 - 104oF)Humidity: 10-90% RH
Door BoxTemperature: -20oC - 60oC (-4 - 140oF)Humidity: 20-80% (non-condensing)
Power SupplyOperating:Temperature: 0oC - 60oC (32 - 140oF)Humidity: 10-90% RHStorage:Temperature: -20oC - 75oC (-4 - 167oF)Humidity: 10-95% RH
Power RequirementsA dedicated 110 VAC 60 Hz circuit located within seven feet of the cabinet is required. You should install a separate dedicated outlet for each cabinet.
CautionDouble Pole/Neutral Fusing
(power supply fuses located at both the L and N side)
Site RequirementsThe system can be floor-, wall- or rack-mounted.
Aspire S Hardware Manual Section 7: Specifications and Parts List ◆ 7-3
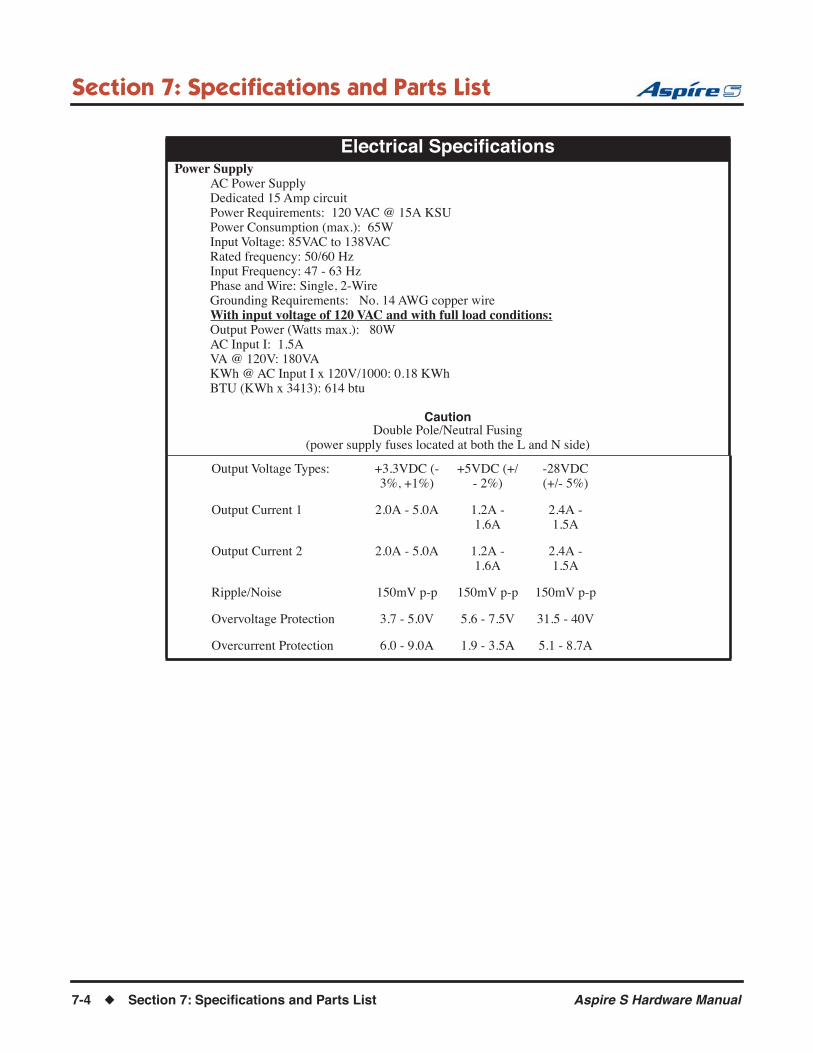
Section 7: Specifications and Parts List
Electrical SpecificationsPower Supply
AC Power SupplyDedicated 15 Amp circuitPower Requirements: 120 VAC @ 15A KSUPower Consumption (max.): 65WInput Voltage: 85VAC to 138VACRated frequency: 50/60 HzInput Frequency: 47 - 63 HzPhase and Wire: Single, 2-WireGrounding Requirements: No. 14 AWG copper wireWith input voltage of 120 VAC and with full load conditions:Output Power (Watts max.): 80WAC Input I: 1.5AVA @ 120V: 180VAKWh @ AC Input I x 120V/1000: 0.18 KWhBTU (KWh x 3413): 614 btu
CautionDouble Pole/Neutral Fusing
(power supply fuses located at both the L and N side)
Output Voltage Types: +3.3VDC (-3%, +1%)
+5VDC (+/- 2%)
-28VDC (+/- 5%)
Output Current 1 2.0A - 5.0A 1.2A - 1.6A
2.4A - 1.5A
Output Current 2 2.0A - 5.0A 1.2A - 1.6A
2.4A - 1.5A
Ripple/Noise 150mV p-p 150mV p-p 150mV p-p
Overvoltage Protection 3.7 - 5.0V 5.6 - 7.5V 31.5 - 40V
Overcurrent Protection 6.0 - 9.0A 1.9 - 3.5A 5.1 - 8.7A
7-4 ◆ Section 7: Specifications and Parts List Aspire S Hardware Manual
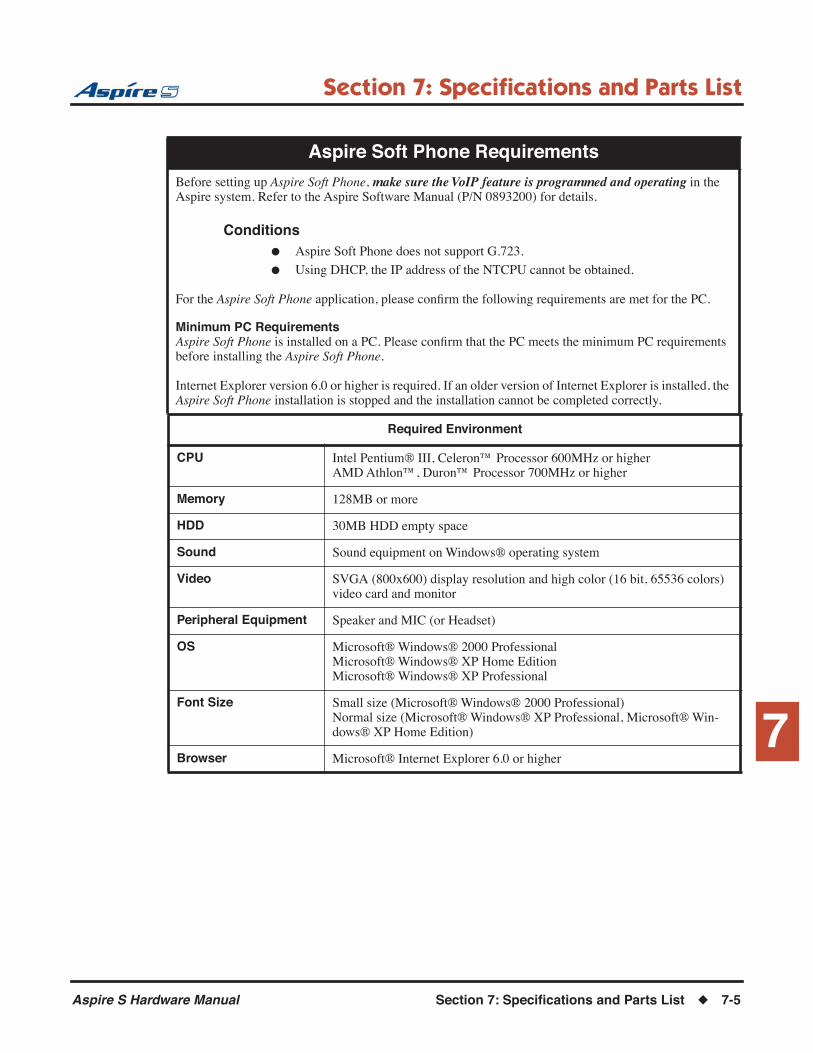
Section 7: Specifications and Parts List
7
Aspire Soft Phone Requirements
Before setting up Aspire Soft Phone, make sure the VoIP feature is programmed and operating in the Aspire system. Refer to the Aspire Software Manual (P/N 0893200) for details.
Conditions● Aspire Soft Phone does not support G.723.
● Using DHCP, the IP address of the NTCPU cannot be obtained.
For the Aspire Soft Phone application, please confirm the following requirements are met for the PC.
Minimum PC RequirementsAspire Soft Phone is installed on a PC. Please confirm that the PC meets the minimum PC requirements before installing the Aspire Soft Phone.
Internet Explorer version 6.0 or higher is required. If an older version of Internet Explorer is installed, the Aspire Soft Phone installation is stopped and the installation cannot be completed correctly.
Required Environment
CPU Intel Pentium® III, Celeron™ Processor 600MHz or higherAMD Athlon™, Duron™ Processor 700MHz or higher
Memory 128MB or more
HDD 30MB HDD empty space
Sound Sound equipment on Windows® operating system
Video SVGA (800x600) display resolution and high color (16 bit, 65536 colors) video card and monitor
Peripheral Equipment Speaker and MIC (or Headset)
OS Microsoft® Windows® 2000 ProfessionalMicrosoft® Windows® XP Home EditionMicrosoft® Windows® XP Professional
Font Size Small size (Microsoft® Windows® 2000 Professional)Normal size (Microsoft® Windows® XP Professional, Microsoft® Win-dows® XP Home Edition)
Browser Microsoft® Internet Explorer 6.0 or higher
Aspire S Hardware Manual Section 7: Specifications and Parts List ◆ 7-5
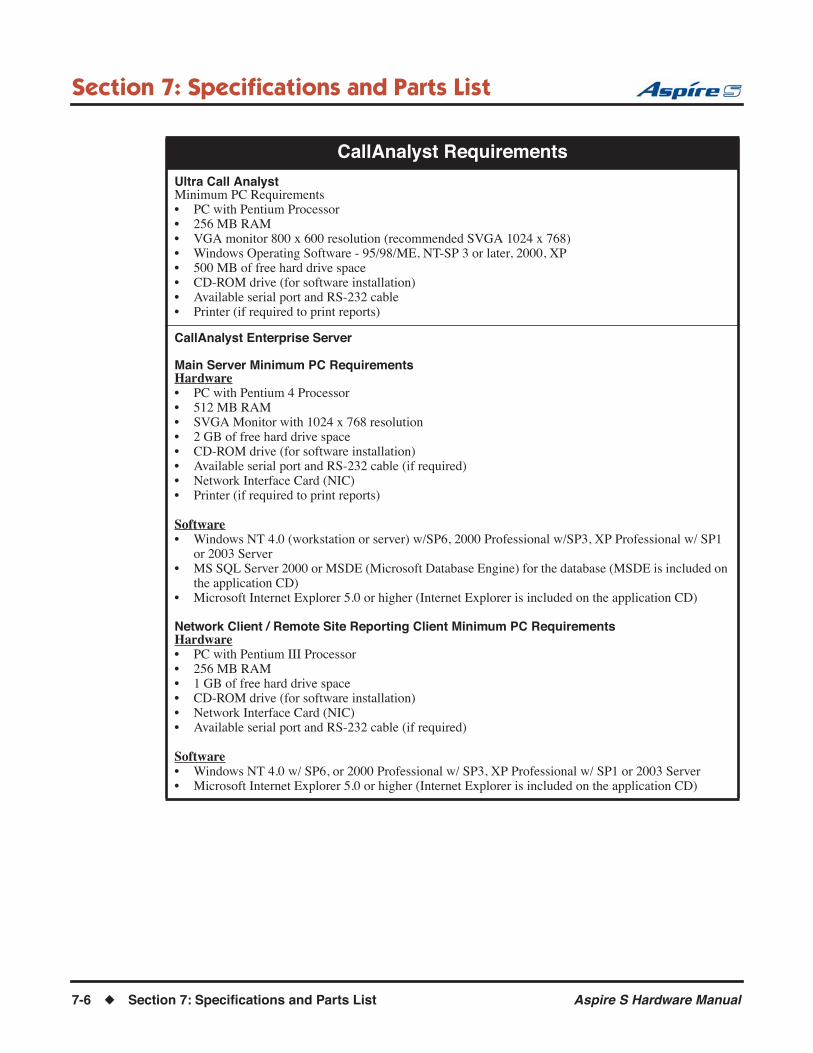
Section 7: Specifications and Parts List
CallAnalyst Requirements
Ultra Call AnalystMinimum PC Requirements• PC with Pentium Processor• 256 MB RAM• VGA monitor 800 x 600 resolution (recommended SVGA 1024 x 768)• Windows Operating Software - 95/98/ME, NT-SP 3 or later, 2000, XP• 500 MB of free hard drive space• CD-ROM drive (for software installation)• Available serial port and RS-232 cable• Printer (if required to print reports)
CallAnalyst Enterprise Server
Main Server Minimum PC RequirementsHardware• PC with Pentium 4 Processor• 512 MB RAM• SVGA Monitor with 1024 x 768 resolution• 2 GB of free hard drive space• CD-ROM drive (for software installation)• Available serial port and RS-232 cable (if required)• Network Interface Card (NIC)• Printer (if required to print reports)
Software• Windows NT 4.0 (workstation or server) w/SP6, 2000 Professional w/SP3, XP Professional w/ SP1
or 2003 Server• MS SQL Server 2000 or MSDE (Microsoft Database Engine) for the database (MSDE is included on
the application CD)• Microsoft Internet Explorer 5.0 or higher (Internet Explorer is included on the application CD)
Network Client / Remote Site Reporting Client Minimum PC RequirementsHardware• PC with Pentium III Processor• 256 MB RAM• 1 GB of free hard drive space• CD-ROM drive (for software installation)• Network Interface Card (NIC)• Available serial port and RS-232 cable (if required)
Software• Windows NT 4.0 w/ SP6, or 2000 Professional w/ SP3, XP Professional w/ SP1 or 2003 Server• Microsoft Internet Explorer 5.0 or higher (Internet Explorer is included on the application CD)
7-6 ◆ Section 7: Specifications and Parts List Aspire S Hardware Manual

Section 7: Specifications and Parts List
7
IP RoutersWhen purchasing a router for use with the Aspire IP feature, the minimum requirements would be that it provide VPN and QoS. Current VoIP protocols for the Aspire, NGT and H.323 telephones can not com-municate over NAT. Therefore, when communications is required over NAT, the router must support VPN. Note that a router which supports ‘VPN Pass Through’ requires a VPN server.
The priority control feature is required to prevent RTP packet loss. If a WAN is used for VoIP only and the bandwidth is wide enough for the VoIP channel, then the QoS feature might not be required.
The following are available routers which provide VPN and QoS:• NEC IX1000 / 2000 Series• Yamaha RT105, RTX1000 / 2000• Cisco 800 Series• Furukawa FITELnet - F40• Fujitsu SiR-170, SiR-150
The following routers provide VPN but no priority control (QoS):• Linksys BEFSX41, DEFVP41• OMRON MR104DV, MR104FH• Allied Telesis AR410
Aspire S Hardware Manual Section 7: Specifications and Parts List ◆ 7-7
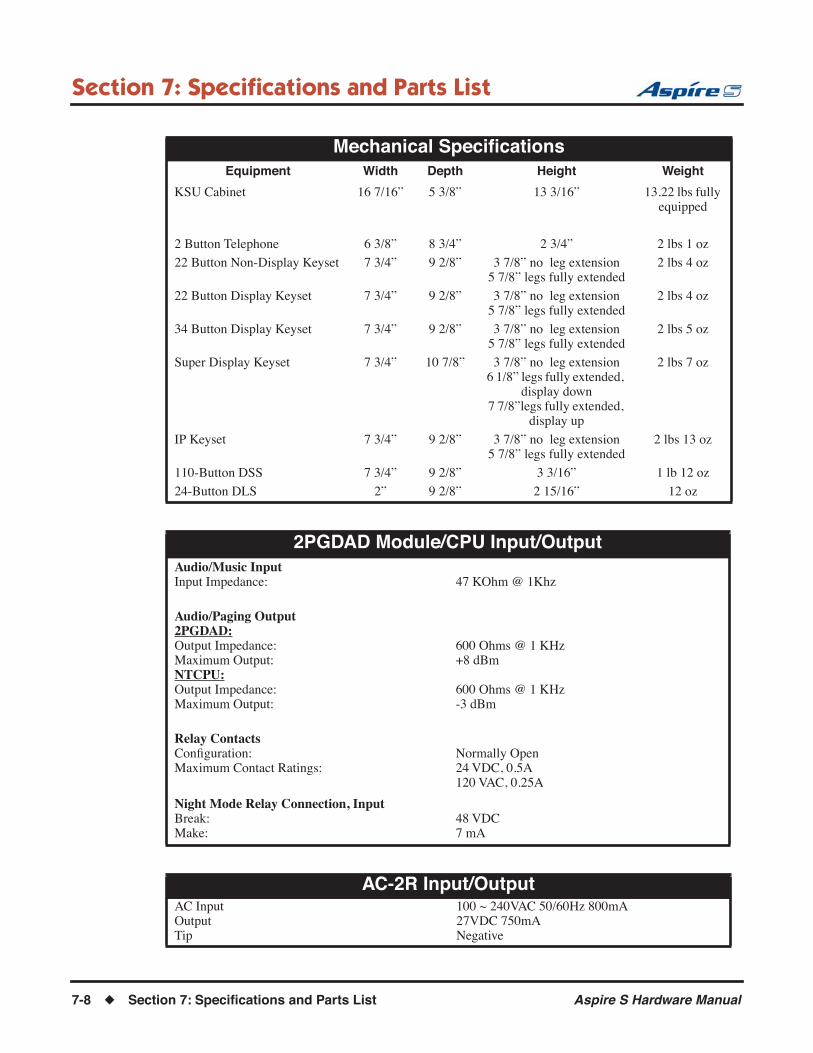
Section 7: Specifications and Parts List
Mechanical SpecificationsEquipment Width Depth Height Weight
KSU Cabinet 16 7/16” 5 3/8” 13 3/16” 13.22 lbs fully equipped
2 Button Telephone 6 3/8” 8 3/4” 2 3/4” 2 lbs 1 oz
22 Button Non-Display Keyset 7 3/4” 9 2/8” 3 7/8” no leg extension5 7/8” legs fully extended
2 lbs 4 oz
22 Button Display Keyset 7 3/4” 9 2/8” 3 7/8” no leg extension5 7/8” legs fully extended
2 lbs 4 oz
34 Button Display Keyset 7 3/4” 9 2/8” 3 7/8” no leg extension5 7/8” legs fully extended
2 lbs 5 oz
Super Display Keyset 7 3/4” 10 7/8” 3 7/8” no leg extension6 1/8” legs fully extended,
display down7 7/8”legs fully extended,
display up
2 lbs 7 oz
IP Keyset 7 3/4” 9 2/8” 3 7/8” no leg extension5 7/8” legs fully extended
2 lbs 13 oz
110-Button DSS 7 3/4” 9 2/8” 3 3/16” 1 lb 12 oz
24-Button DLS 2” 9 2/8” 2 15/16” 12 oz
2PGDAD Module/CPU Input/OutputAudio/Music InputInput Impedance: 47 KOhm @ 1Khz
Audio/Paging Output2PGDAD:Output Impedance:Maximum Output:NTCPU:Output Impedance:Maximum Output:
600 Ohms @ 1 KHz+8 dBm
600 Ohms @ 1 KHz-3 dBm
Relay ContactsConfiguration:Maximum Contact Ratings:
Normally Open24 VDC, 0.5A120 VAC, 0.25A
Night Mode Relay Connection, InputBreak:Make:
48 VDC7 mA
AC-2R Input/OutputAC InputOutputTip
100 ~ 240VAC 50/60Hz 800mA27VDC 750mANegative
7-8 ◆ Section 7: Specifications and Parts List Aspire S Hardware Manual
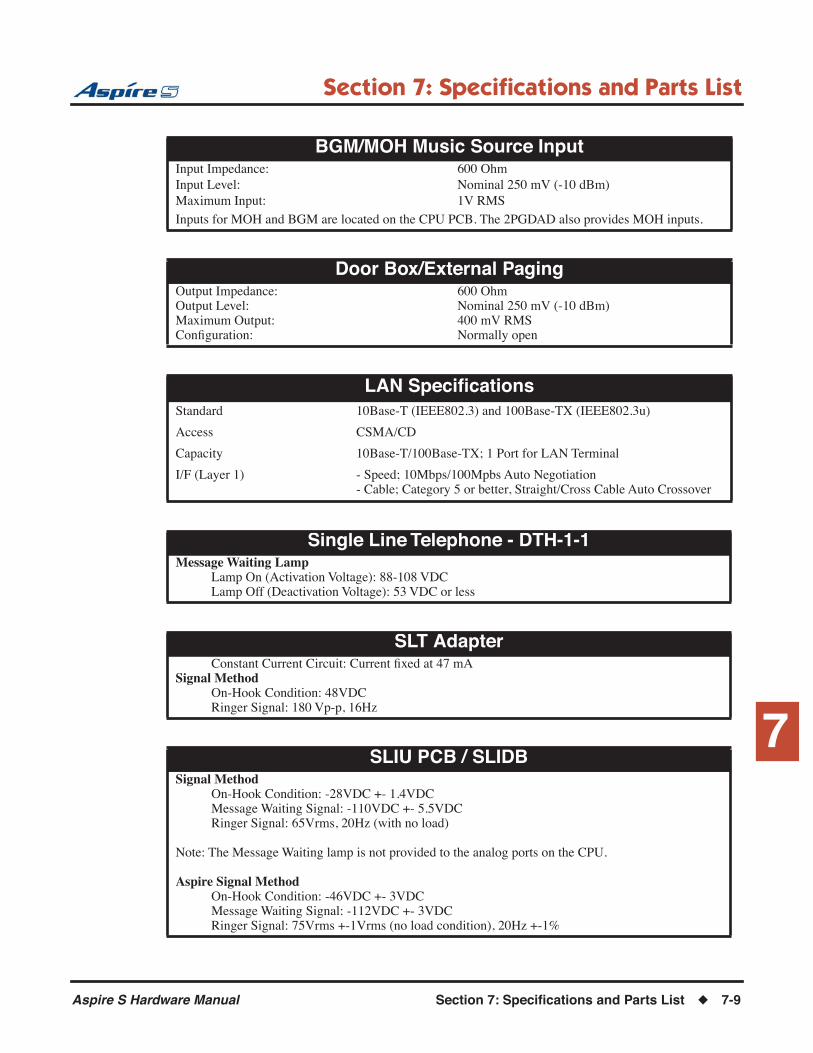
Section 7: Specifications and Parts List
7
BGM/MOH Music Source InputInput Impedance:Input Level:Maximum Input:
600 OhmNominal 250 mV (-10 dBm)1V RMS
Inputs for MOH and BGM are located on the CPU PCB. The 2PGDAD also provides MOH inputs.
Door Box/External PagingOutput Impedance:Output Level:Maximum Output:Configuration:
600 OhmNominal 250 mV (-10 dBm)400 mV RMSNormally open
LAN SpecificationsStandard 10Base-T (IEEE802.3) and 100Base-TX (IEEE802.3u)
Access CSMA/CD
Capacity 10Base-T/100Base-TX; 1 Port for LAN Terminal
I/F (Layer 1) - Speed; 10Mbps/100Mpbs Auto Negotiation- Cable; Category 5 or better, Straight/Cross Cable Auto Crossover
Single Line Telephone - DTH-1-1Message Waiting Lamp
Lamp On (Activation Voltage): 88-108 VDCLamp Off (Deactivation Voltage): 53 VDC or less
SLT AdapterConstant Current Circuit: Current fixed at 47 mA
Signal MethodOn-Hook Condition: 48VDCRinger Signal: 180 Vp-p, 16Hz
SLIU PCB / SLIDBSignal Method
On-Hook Condition: -28VDC +- 1.4VDCMessage Waiting Signal: -110VDC +- 5.5VDCRinger Signal: 65Vrms, 20Hz (with no load)
Note: The Message Waiting lamp is not provided to the analog ports on the CPU.
Aspire Signal MethodOn-Hook Condition: -46VDC +- 3VDCMessage Waiting Signal: -112VDC +- 3VDCRinger Signal: 75Vrms +-1Vrms (no load condition), 20Hz +-1%
Aspire S Hardware Manual Section 7: Specifications and Parts List ◆ 7-9

Section 7: Specifications and Parts List
Recommended Usage Guidelines for Cordless PhonesIn ideal conditions, multiple spread spectrum type cordless phones (Cordless II can be utilized in the same environment. However, due to the possible interference problems caused by the bases being placed in close proximity to each other, we recommend the following:
Spread Spectrum Phones (Cordless II P /N 730088)Where users require greater range on the cordless phones and 3 or less cordless phones are being used at a specific site, we recommend using the spread spectrum cordless phone.
FM Modulation Phones (Cordless Lite II P /N 730087)Where more than 3 cordless phones are to be used at one specific site, we recommend using the FM modulation cordless phones which have 30-channel capability.
Note: The range of the phones depends largely on the environmental factors, such as the building structure, the size of the room, RF interference and other electronic equipment installed in the same area. For optimum range and performance, we suggest the following:• Place the base units at least 15 feet apart. The performance of the phones become more stable when
the distance between the bases is greater.• Place the base unit in the center of the coverage area.• If the phone will also be used in an outdoor area, like a parking lot, install the base unit in an area
close to the window.• If a phone experiences interference and noise, press the channel key to select another channel.
Cordless Lite IIGeneral
Frequency ControlModulation
Operating TemperatureBandwidthData Transmission SpeedChannels
Phase Lock Loop900 MHz Narrow Band FM with ADPMC
(digital)0oC - +50oC (+32oF to +122oF)50 kHz688 bps30 Channels
Base UnitReceive/Transmit FrequencyPower RequirementsSizeWeight
902 MHz - 928 MHz10V DC from supplied AC adapter4 1/4” W x 7 5/8” D x 2 1/4” HApproximately 13.7 oz.
HandsetReceive/Transmit FrequencyPower RequirementsSizeWeightBatteryTalk ModeStandby Mode
902 MHz - 928 MHzNiMH Battery2” W x 1 1/4” D x 5 1/2” H (with antenna)8.7 oz. with batteryCapacity 700 mAh, 3.6V5 hours (typical)40 hours (typical)
Specifications shown are typical and subject to change without notice.
Battery ChargerPower RequirementsSize
9V DC from supplied AC adapter1 3/8” W x 1 1/2” D x 2 1/4” H
RangeRange 350’ (depending on environmental
conditions)
7-10 ◆ Section 7: Specifications and Parts List Aspire S Hardware Manual
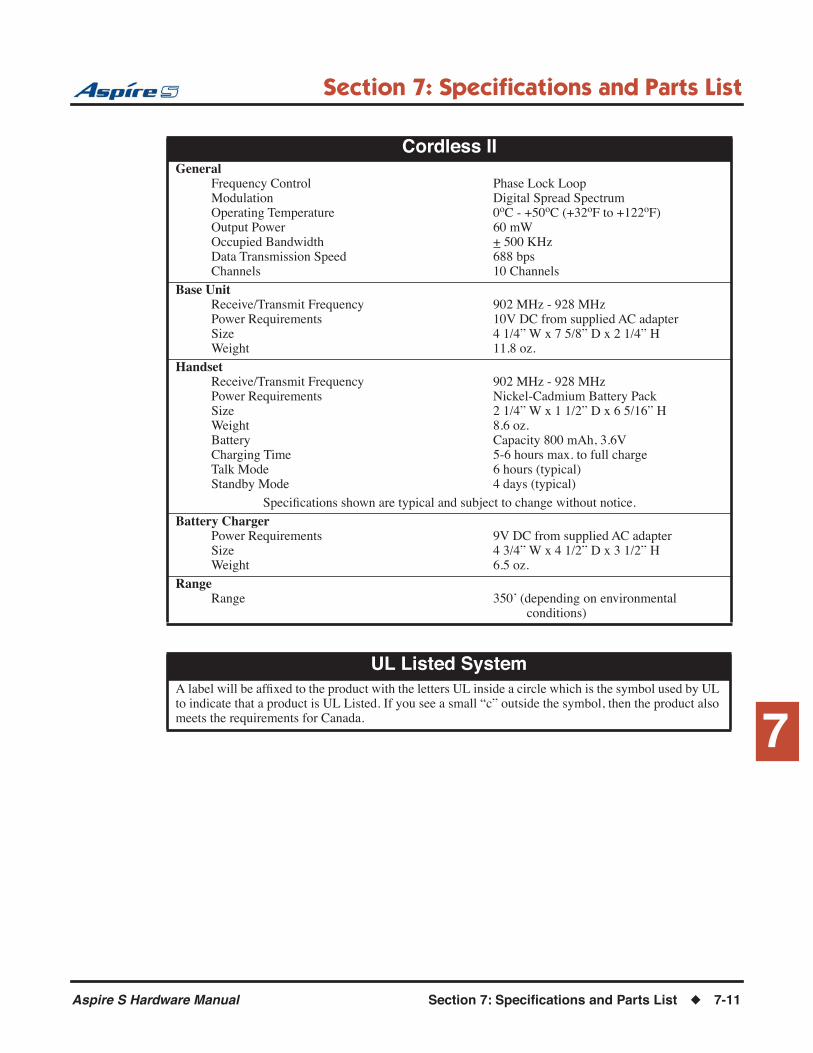
Section 7: Specifications and Parts List
7
Cordless IIGeneral
Frequency ControlModulationOperating TemperatureOutput PowerOccupied BandwidthData Transmission SpeedChannels
Phase Lock LoopDigital Spread Spectrum0oC - +50oC (+32oF to +122oF)60 mW+ 500 KHz688 bps10 Channels
Base UnitReceive/Transmit FrequencyPower RequirementsSizeWeight
902 MHz - 928 MHz10V DC from supplied AC adapter4 1/4” W x 7 5/8” D x 2 1/4” H11.8 oz.
HandsetReceive/Transmit FrequencyPower RequirementsSizeWeightBatteryCharging TimeTalk ModeStandby Mode
902 MHz - 928 MHzNickel-Cadmium Battery Pack2 1/4” W x 1 1/2” D x 6 5/16” H8.6 oz.Capacity 800 mAh, 3.6V5-6 hours max. to full charge6 hours (typical)4 days (typical)
Specifications shown are typical and subject to change without notice.
Battery ChargerPower RequirementsSizeWeight
9V DC from supplied AC adapter4 3/4” W x 4 1/2” D x 3 1/2” H6.5 oz.
RangeRange 350’ (depending on environmental
conditions)
UL Listed SystemA label will be affixed to the product with the letters UL inside a circle which is the symbol used by UL to indicate that a product is UL Listed. If you see a small “c” outside the symbol, then the product also meets the requirements for Canada.
Aspire S Hardware Manual Section 7: Specifications and Parts List ◆ 7-11
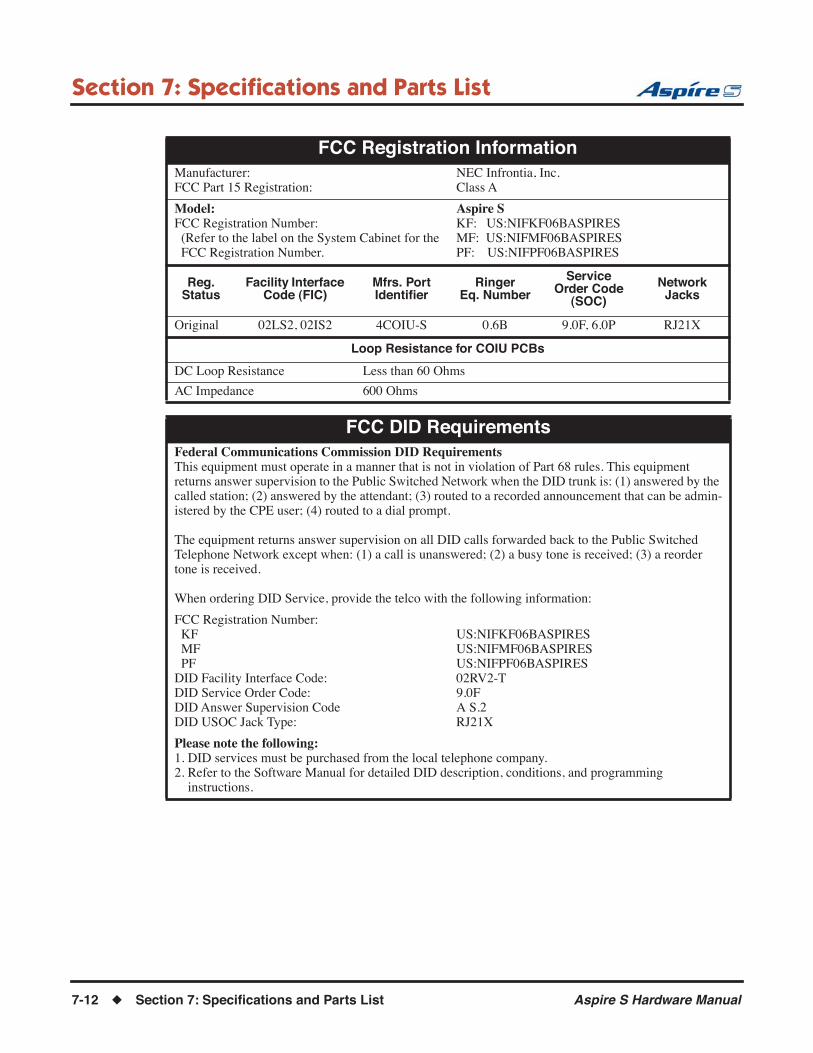
Section 7: Specifications and Parts List
FCC Registration InformationManufacturer:FCC Part 15 Registration:
NEC Infrontia, Inc.Class A
Model:FCC Registration Number: (Refer to the label on the System Cabinet for the FCC Registration Number.
Aspire SKF: US:NIFKF06BASPIRESMF: US:NIFMF06BASPIRESPF: US:NIFPF06BASPIRES
Reg.Status
Facility Interface Code (FIC)
Mfrs. PortIdentifier
RingerEq. Number
Service Order Code
(SOC)
NetworkJacks
Original 02LS2, 02IS2 4COIU-S 0.6B 9.0F, 6.0P RJ21X
Loop Resistance for COIU PCBs
DC Loop Resistance Less than 60 Ohms
AC Impedance 600 Ohms
FCC DID RequirementsFederal Communications Commission DID RequirementsThis equipment must operate in a manner that is not in violation of Part 68 rules. This equipment returns answer supervision to the Public Switched Network when the DID trunk is: (1) answered by the called station; (2) answered by the attendant; (3) routed to a recorded announcement that can be admin-istered by the CPE user; (4) routed to a dial prompt.
The equipment returns answer supervision on all DID calls forwarded back to the Public Switched Telephone Network except when: (1) a call is unanswered; (2) a busy tone is received; (3) a reorder tone is received.
When ordering DID Service, provide the telco with the following information:
FCC Registration Number: KF MF PFDID Facility Interface Code:DID Service Order Code:DID Answer Supervision CodeDID USOC Jack Type:
US:NIFKF06BASPIRESUS:NIFMF06BASPIRESUS:NIFPF06BASPIRES02RV2-T9.0FA S.2RJ21X
Please note the following:1. DID services must be purchased from the local telephone company.2. Refer to the Software Manual for detailed DID description, conditions, and programming instructions.
7-12 ◆ Section 7: Specifications and Parts List Aspire S Hardware Manual

Section 7: Specifications and Parts List
7
Cabling Requirements1. Do not run station cable in parallel with the AC source, telex or computer, etc. If the cables are near cable runs to those devices, use shielded cable with grounded shields or install the cable in conduit.2. When cables must be run on the floor, use cable protectors.3. Cable runs for key telephones, single line telephones, Door Boxes, CTA or CTU adapters, and 2PGDAD Modules must be a dedicated, isolated cable pair.4. The Telco RJ21X and cross-connect blocks should install to the right of the cabinet. Extension blocks and cross-connect blocks should be installed to the left of the cabinet.
Cable RequirementsDevice Cable Type Cable Run Length (ft) Notes
Key Telephone, DSS Console:
ICT 2-wire 26 AWGICT 2-wire 24 AWGICT 2-wire 22 AWG
656 (200 meters)984 (300 meters)1640 (500 meters)
Single Line Telephone, Analog Terminals:
20mA Setting:35mA Setting:
ICT 2-wire 26 AWGICT 2-wire 24 AWGICT 2-wire 22 AWG
1,500 ohm loop resistance900 ohm loop resistance
6,561 (2000 meters)10,498 (3200 meters)17,388 (5300 meters)
Includes resistance of telephone
SLT Adapter:
SLTAD to SLT:
ICT 2-wire 26 AWGICT 2-wire 24 AWGICT 2-wire 22 AWG
500 ohm loop resistance(including phone’s DC
termination)
656 (200 meters)984 (300 meters)1640 (500 meters)
2PGDAD Adapter: ICT 2-wire 26 AWGICT 2-wire 24 AWGICT 2-wire 22 AWG
656 (200 meters)984 (300 meters)1640 (500 meters)
Door Box to 2PGDAD: ICT 2-wire 26 AWGICT 2-wire 24 AWGICT 2-wire 22 AWG
200 ohm loop resistance(excluding internal resis-
tance of Door Box)
656 (200 meters)984 (300 meters)1640 (500 meters)
Using Under Carpet Cable:The cable is not twisted, but flat parallel wire. Good impedance balance cannot be expected and reduces the cable length to no more than 300m when using the flat cable.
PC to CTA Serial Straight Thru Cable
49.21 (15 meters D-Sub 9-Pin Female (PC) to D-Sub 9-Pin Male (CTA)
CTA to Printer Serial straight cable 49.21 (15 meters) D-Sub 9-Pin Female (Printer) to D-Sub 9-Pin Male (CTA)
Aspire S Hardware Manual Section 7: Specifications and Parts List ◆ 7-13
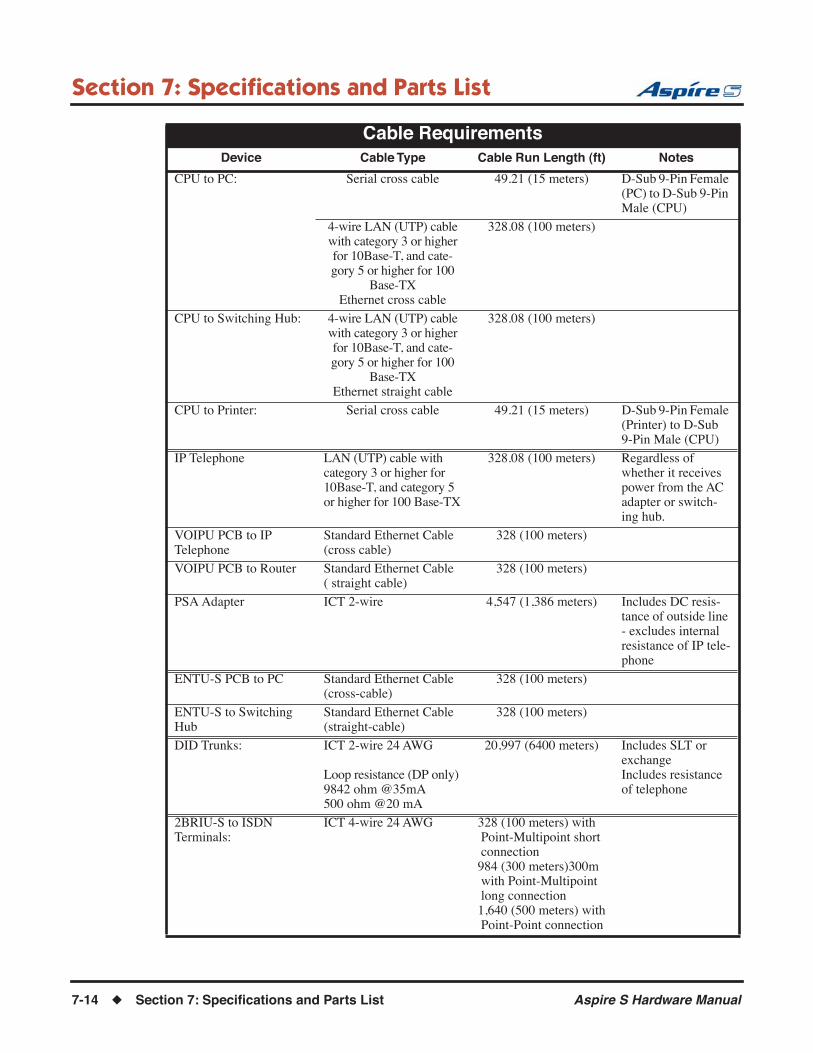
Section 7: Specifications and Parts List
CPU to PC: Serial cross cable 49.21 (15 meters) D-Sub 9-Pin Female (PC) to D-Sub 9-Pin Male (CPU)
4-wire LAN (UTP) cable with category 3 or higher for 10Base-T, and cate-gory 5 or higher for 100
Base-TXEthernet cross cable
328.08 (100 meters)
CPU to Switching Hub: 4-wire LAN (UTP) cable with category 3 or higher for 10Base-T, and cate-gory 5 or higher for 100
Base-TXEthernet straight cable
328.08 (100 meters)
CPU to Printer: Serial cross cable 49.21 (15 meters) D-Sub 9-Pin Female (Printer) to D-Sub 9-Pin Male (CPU)
IP Telephone LAN (UTP) cable with category 3 or higher for 10Base-T, and category 5 or higher for 100 Base-TX
328.08 (100 meters) Regardless of whether it receives power from the AC adapter or switch-ing hub.
VOIPU PCB to IP Telephone
Standard Ethernet Cable (cross cable)
328 (100 meters)
VOIPU PCB to Router Standard Ethernet Cable( straight cable)
328 (100 meters)
PSA Adapter ICT 2-wire 4,547 (1,386 meters) Includes DC resis-tance of outside line - excludes internal resistance of IP tele-phone
ENTU-S PCB to PC Standard Ethernet Cable (cross-cable)
328 (100 meters)
ENTU-S to Switching Hub
Standard Ethernet Cable(straight-cable)
328 (100 meters)
DID Trunks: ICT 2-wire 24 AWG
Loop resistance (DP only)9842 ohm @35mA500 ohm @20 mA
20,997 (6400 meters) Includes SLT or exchangeIncludes resistance of telephone
2BRIU-S to ISDN Terminals:
ICT 4-wire 24 AWG 328 (100 meters) with Point-Multipoint short connection984 (300 meters)300m with Point-Multipoint long connection1,640 (500 meters) with Point-Point connection
Cable RequirementsDevice Cable Type Cable Run Length (ft) Notes
7-14 ◆ Section 7: Specifications and Parts List Aspire S Hardware Manual
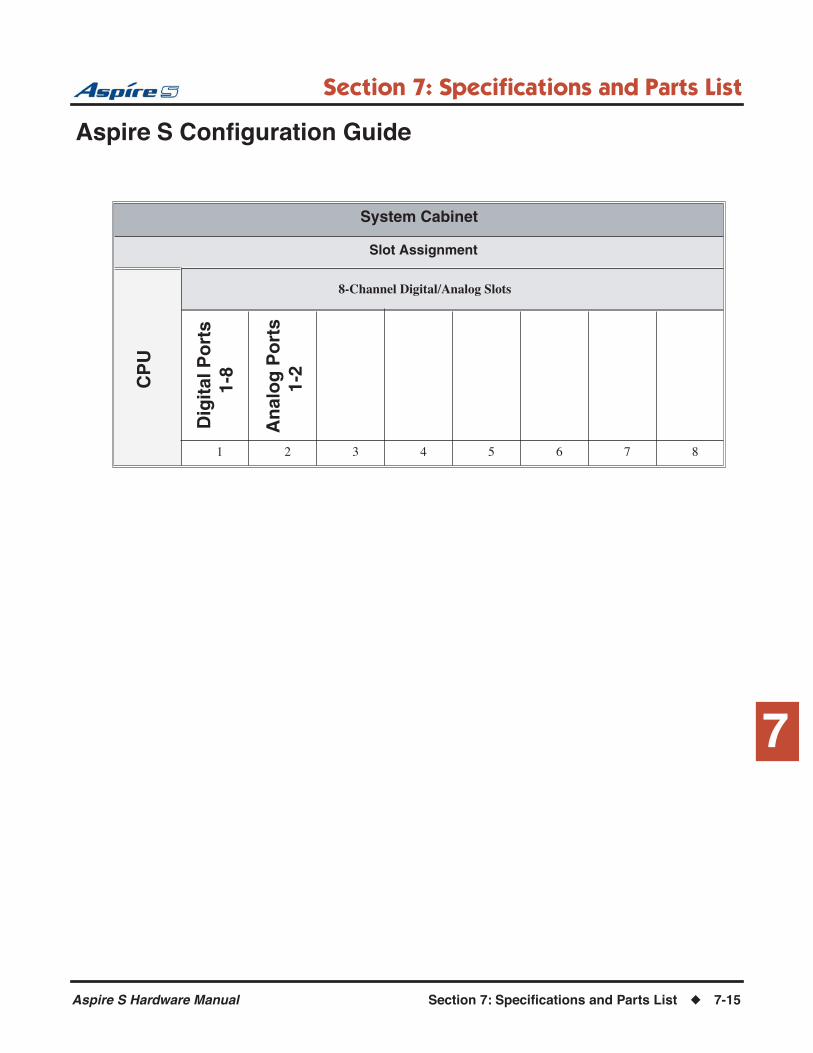
Section 7: Specifications and Parts List
7
Aspire S Configuration Guide
System Cabinet
Slot Assignment
CP
U
1 2 3 4 5 6 7 8
8-Channel Digital/Analog Slots
Dig
ital
Po
rts
1-8
An
alo
g P
ort
s
1
-2
Aspire S Hardware Manual Section 7: Specifications and Parts List ◆ 7-15
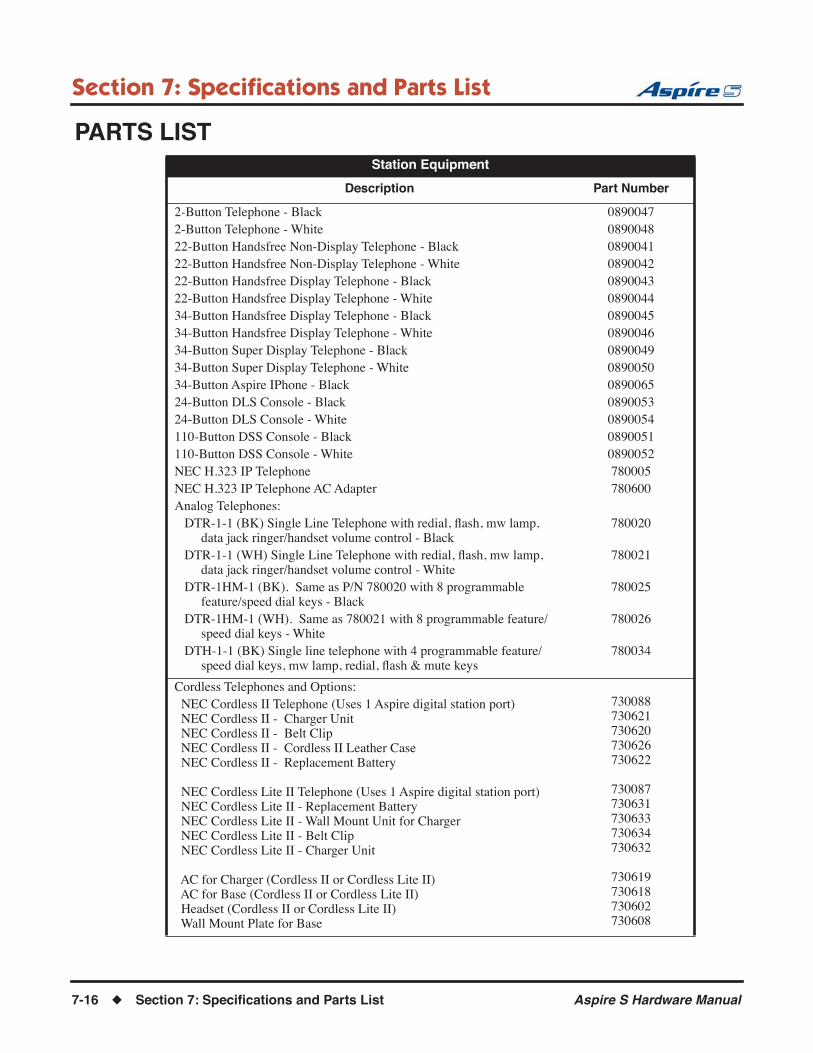
Section 7: Specifications and Parts List
PARTS LISTStation Equipment
Description Part Number
2-Button Telephone - Black2-Button Telephone - White22-Button Handsfree Non-Display Telephone - Black22-Button Handsfree Non-Display Telephone - White22-Button Handsfree Display Telephone - Black22-Button Handsfree Display Telephone - White34-Button Handsfree Display Telephone - Black34-Button Handsfree Display Telephone - White34-Button Super Display Telephone - Black34-Button Super Display Telephone - White34-Button Aspire IPhone - Black24-Button DLS Console - Black24-Button DLS Console - White110-Button DSS Console - Black110-Button DSS Console - WhiteNEC H.323 IP TelephoneNEC H.323 IP Telephone AC AdapterAnalog Telephones: DTR-1-1 (BK) Single Line Telephone with redial, flash, mw lamp, data jack ringer/handset volume control - Black DTR-1-1 (WH) Single Line Telephone with redial, flash, mw lamp, data jack ringer/handset volume control - White DTR-1HM-1 (BK). Same as P/N 780020 with 8 programmable feature/speed dial keys - Black DTR-1HM-1 (WH). Same as 780021 with 8 programmable feature/ speed dial keys - White DTH-1-1 (BK) Single line telephone with 4 programmable feature/ speed dial keys, mw lamp, redial, flash & mute keys
089004708900480890041089004208900430890044089004508900460890049089005008900650890053089005408900510890052780005780600
780020
780021
780025
780026
780034
Cordless Telephones and Options: NEC Cordless II Telephone (Uses 1 Aspire digital station port) NEC Cordless II - Charger Unit NEC Cordless II - Belt Clip NEC Cordless II - Cordless II Leather Case NEC Cordless II - Replacement Battery
NEC Cordless Lite II Telephone (Uses 1 Aspire digital station port) NEC Cordless Lite II - Replacement Battery NEC Cordless Lite II - Wall Mount Unit for Charger NEC Cordless Lite II - Belt Clip NEC Cordless Lite II - Charger Unit
AC for Charger (Cordless II or Cordless Lite II) AC for Base (Cordless II or Cordless Lite II) Headset (Cordless II or Cordless Lite II) Wall Mount Plate for Base
730088730621730620730626730622
730087730631730633730634730632
730619730618730602730608
7-16 ◆ Section 7: Specifications and Parts List Aspire S Hardware Manual
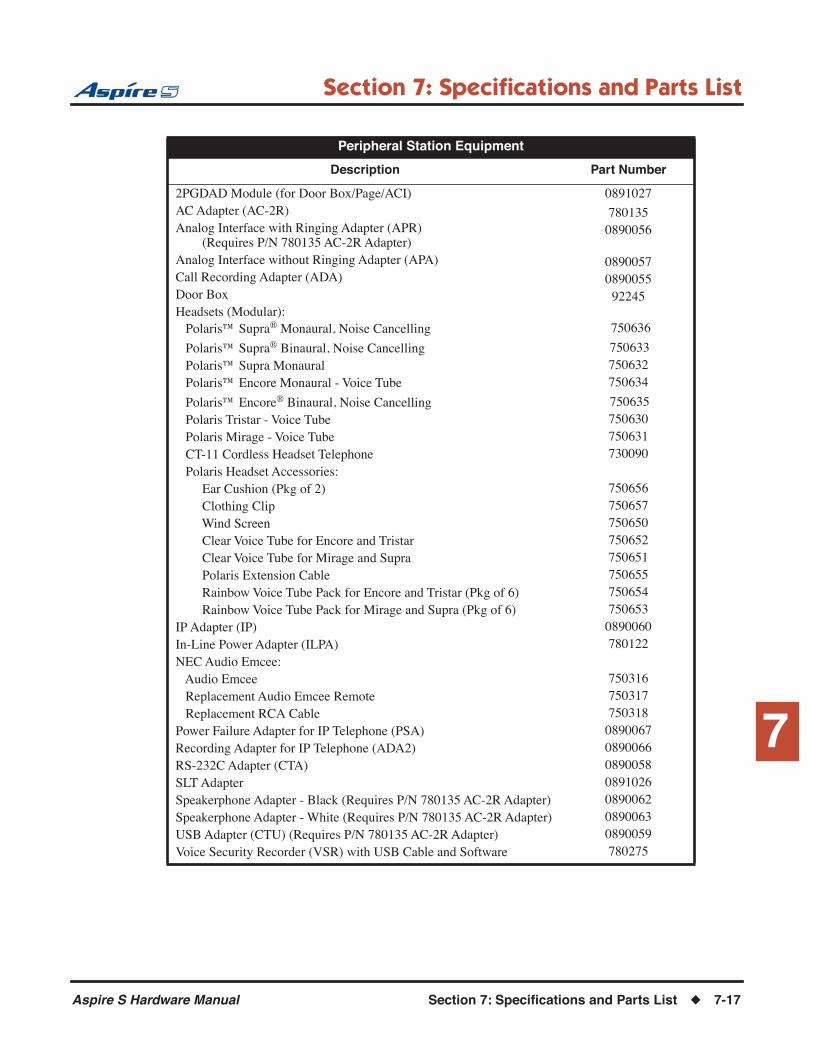
Section 7: Specifications and Parts List
7
Peripheral Station Equipment
Description Part Number
2PGDAD Module (for Door Box/Page/ACI)AC Adapter (AC-2R)Analog Interface with Ringing Adapter (APR) (Requires P/N 780135 AC-2R Adapter)Analog Interface without Ringing Adapter (APA)Call Recording Adapter (ADA)Door BoxHeadsets (Modular): Polaris™ Supra® Monaural, Noise Cancelling
Polaris™ Supra® Binaural, Noise Cancelling Polaris™ Supra Monaural Polaris™ Encore Monaural - Voice Tube
Polaris™ Encore® Binaural, Noise Cancelling Polaris Tristar - Voice Tube Polaris Mirage - Voice Tube CT-11 Cordless Headset Telephone Polaris Headset Accessories: Ear Cushion (Pkg of 2) Clothing Clip Wind Screen Clear Voice Tube for Encore and Tristar Clear Voice Tube for Mirage and Supra Polaris Extension Cable Rainbow Voice Tube Pack for Encore and Tristar (Pkg of 6) Rainbow Voice Tube Pack for Mirage and Supra (Pkg of 6)IP Adapter (IP)In-Line Power Adapter (ILPA)NEC Audio Emcee: Audio Emcee Replacement Audio Emcee Remote Replacement RCA CablePower Failure Adapter for IP Telephone (PSA)Recording Adapter for IP Telephone (ADA2)RS-232C Adapter (CTA)SLT AdapterSpeakerphone Adapter - Black (Requires P/N 780135 AC-2R Adapter)Speakerphone Adapter - White (Requires P/N 780135 AC-2R Adapter)USB Adapter (CTU) (Requires P/N 780135 AC-2R Adapter)Voice Security Recorder (VSR) with USB Cable and Software
0891027
7801350890056
0890057089005592245
750636 750633750632750634 750635750630750631730090
7506567506577506507506527506517506557506547506530890060780122
7503167503177503180890067089006608900580891026089006208900630890059780275
Aspire S Hardware Manual Section 7: Specifications and Parts List ◆ 7-17

Section 7: Specifications and Parts List
Aspire Applications
Description Part Number
Aspire Soft Phone Software on CD NEC USB HandsetNEC USB Headset
0893641780094750638
Ultra CallAnalyst Ultra CallAnalyst Lite Ultra CallAnalyst Lite - to - Full Upgrade Ultra CallAnalyst Full Ultra CallAnalyst Full + 1 Client Ultra CallAnalyst Additional 1 Client Ultra CallAnalyst Enterprise Additional Remote Site License Requires 0891095. Ultra CallAnalyst Enterprise Server & 120 Ports Ultra CallAnalyst Enterprise Remote Site License (with no Ports) Requires 0891095. Ultra CallAnalyst Enterprise Additional Port License Requires 0891095. Ultra CallAnalyst Enterprise Additional Network Client License Requires 0891095. Ultra CallAnalyst Enterprise Site Reporting Thin Client Requires 0891095.
089108108910820891083089108408910850891094
08910950891096
0891097
0891098
0891099
Bluefire
Description Part Number
Aspire S 4VOIP/Bluefire IX2010 Bundle (IP Card and Router)Aspire S 4VOIP/Bluefire IX1035 Bundle (IP Card and Router)Aspire IP Telephone/Bluefire IX2010 Bundle (Contains 2 0890065 IPhones and Router)Aspire IP Telephone/Bluefire IX1035 Bundle (Contains 2 0890065 IPhones and Router)
089203308920340892029
0892030
7-18 ◆ Section 7: Specifications and Parts List Aspire S Hardware Manual

Section 7: Specifications and Parts List
7
Common EquipmentDescription Part Number
Aspire S 8 Slot KSUCPU BatteryFloor/Desk Stand Mounting BracketMod 8 to 25 Pair (Unterminated) Installation CableModem - 56KBPSNull Modem Cable for PCPro32 MB Compact Flash Card with System Software32 MB Compact Flash Card - Blank
0890005EX054-0040
089130380892
85862D089200408910650891064
PCBsDescription Part Number
Common CardsEthernet Option Daughter BoardDSP Resource Daughter BoardIntraMail Voice Mail Compact Flash Card, 4 Port-4 HourIntraMail Voice Mail Compact Flash Card, 8 Port-8 HourVRS Compact Flash Card
Trunk Interfaces4 CO Loop Start Trunk PCB2 DID/OPX PCB2 BRI PCB
Station Interfaces8 Aspire S Digital Station PCB4 Analog Station PCB4 Analog Station Expansion Daughter Board4 Channel VoIP Media Gateway PCB4 Channel VoIP Media Gateway Expansion Daughter BoardSLT Adapter2PGDAD Module (for Door Box/Page/ACI)
08910530891003089217608921780891040
089104608910470891050
089105108910480891049
0891054B0891055B08910260891027
Aspire S Hardware Manual Section 7: Specifications and Parts List ◆ 7-19

Section 7: Specifications and Parts List
Desi Labels
Description Part Number
Analog Telephones: Desi Labels for 780020/780021 - Black, Package of 25 Desi Labels for 780020/780021 - Green, Package of 25 Desi Labels for 780020/780021 - Silver, Package of 25 Desi Labels for 780020/780021 - White, Package of 25 Desi Labels for 780025/780026 - Black, Package of 25 Desi Labels for 780025/780026 - Green, Package of 25 Desi Labels for 780025/780026 - Silver, Package of 25 Desi Labels for 780025/780026 - White, Package of 25 Desi Labels for 780034 - Metal Silver, Package of 252-Button Telephones: Desi Label for 2BTN Tel-Silver (25-pkg), For Laser Jet printers only Desi Label for 2BTN Tel-Solid Silver (25-pkg), For Ink Jet and Laser Jet printers - solid silver Desi Label-2BTN Tel-Black (25-pkg), For Ink Jet and Laser Jet printers with light striping Desi Label for 2BTN Tel-White (25-pkg), For Ink Jet and Laser Jet printers with light striping Desi Label for 2BTN Tel-Silver (25-pkg), For Ink Jet and Laser Jet printers with light striping Desi Label for 2BTN Tel-Silver (25-pkg), No labels on fixed feature keys, used for other languages Desi Labels for 2BTN Tel (25-pkg) - Blank, Used with Desi Pre-Print Software for printing large pictures22-Button Non-Display Telephones: Desi Label for 22BTN Tel-Silver (25-pkg), For Laser Jet printers only Desi Label for 223BTN Tel-Solid Silver (25-pkg), For Ink Jet and Laser Jet printers - solid silver Desi Label for 22BTN Tel-Black (25-pkg), For Ink Jet and Laser Jet printers with light striping Desi Label for 22BTN Tel-White (25-pkg), For Ink Jet and Laser Jet printers with light striping Desi Label for 22BTN Tel-Silver (25-pkg), For Ink Jet and Laser Jet printers with light striping Desi Label for 22BTN Tel-Silver (25-pkg), No labels on fixed feature keys, used for other languages Desi Labels for 22BTN Tel (25-pkg) - Blank, Used with Desi Pre-Print Software for printing large pictures
780400780401780402780403780404780405780406780407780450
08937040893764
0893724
0893734
0893744
0893774
0893784
08937000893760
0893720
0893730
0893740
0893770
0893780
7-20 ◆ Section 7: Specifications and Parts List Aspire S Hardware Manual
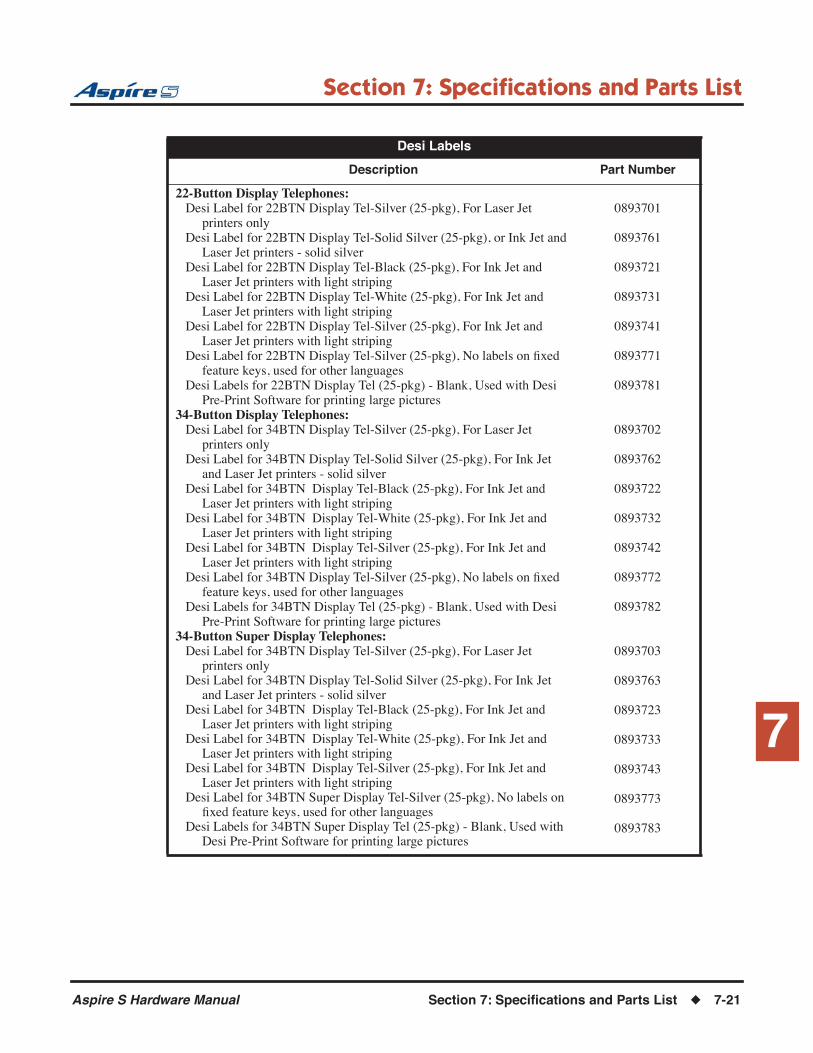
Section 7: Specifications and Parts List
7
Desi Labels
Description Part Number
22-Button Display Telephones: Desi Label for 22BTN Display Tel-Silver (25-pkg), For Laser Jet printers only Desi Label for 22BTN Display Tel-Solid Silver (25-pkg), or Ink Jet and Laser Jet printers - solid silver Desi Label for 22BTN Display Tel-Black (25-pkg), For Ink Jet and Laser Jet printers with light striping Desi Label for 22BTN Display Tel-White (25-pkg), For Ink Jet and Laser Jet printers with light striping Desi Label for 22BTN Display Tel-Silver (25-pkg), For Ink Jet and Laser Jet printers with light striping Desi Label for 22BTN Display Tel-Silver (25-pkg), No labels on fixed feature keys, used for other languages Desi Labels for 22BTN Display Tel (25-pkg) - Blank, Used with Desi Pre-Print Software for printing large pictures34-Button Display Telephones: Desi Label for 34BTN Display Tel-Silver (25-pkg), For Laser Jet printers only Desi Label for 34BTN Display Tel-Solid Silver (25-pkg), For Ink Jet and Laser Jet printers - solid silver Desi Label for 34BTN Display Tel-Black (25-pkg), For Ink Jet and Laser Jet printers with light striping Desi Label for 34BTN Display Tel-White (25-pkg), For Ink Jet and Laser Jet printers with light striping Desi Label for 34BTN Display Tel-Silver (25-pkg), For Ink Jet and Laser Jet printers with light striping Desi Label for 34BTN Display Tel-Silver (25-pkg), No labels on fixed feature keys, used for other languages Desi Labels for 34BTN Display Tel (25-pkg) - Blank, Used with Desi Pre-Print Software for printing large pictures34-Button Super Display Telephones: Desi Label for 34BTN Display Tel-Silver (25-pkg), For Laser Jet printers only Desi Label for 34BTN Display Tel-Solid Silver (25-pkg), For Ink Jet and Laser Jet printers - solid silver Desi Label for 34BTN Display Tel-Black (25-pkg), For Ink Jet and Laser Jet printers with light striping Desi Label for 34BTN Display Tel-White (25-pkg), For Ink Jet and Laser Jet printers with light striping Desi Label for 34BTN Display Tel-Silver (25-pkg), For Ink Jet and Laser Jet printers with light striping Desi Label for 34BTN Super Display Tel-Silver (25-pkg), No labels on fixed feature keys, used for other languages Desi Labels for 34BTN Super Display Tel (25-pkg) - Blank, Used with Desi Pre-Print Software for printing large pictures
0893701
0893761
0893721
0893731
0893741
0893771
0893781
0893702
0893762
0893722
0893732
0893742
0893772
0893782
0893703
0893763
0893723
0893733
0893743
0893773
0893783
Aspire S Hardware Manual Section 7: Specifications and Parts List ◆ 7-21

Section 7: Specifications and Parts List
Desi Labels
Description Part Number
110-Button DSS Consoles: Desi Label for 110 DSS-Silver (25-pkg), For Laser Jet printers only Desi Label for 110 DSS-Solid Silver (25-pkg), For Ink Jet and Laser Jet printers - solid silver Desi Label for 110 DSS-Black (25-pkg), For Ink Jet and Laser Jet printer with light striping Desi Label for 110 DSS-White (25-pkg), For Ink Jet and Laser Jet printers with light striping Desi Label for 110 DSS-Silver (25-pkg), For Ink Jet and Laser Jet printers with light striping Desi Label for 110 DSS-Silver (25-pkg), No labels on fixed feature keys, used for other languages Desi Label for 110 DSS-Silver (25-pkg) - Blank, Used with Desi Pre-Print Software for printing large pictures24-Button DLS: Desi Label for 24 DLS-Silver (25-pkg), For Laser Jet printers only Desi Label for 24 DLS-Solid Silver (25-pkg), For Ink Jet and Laser Jet printers - solid silver Desi Label for 24 DLS-Black (25-pkg), For Ink Jet and Laser Jet printers with light striping Desi Label for 24 DLS-White (25-pkg), For Ink Jet and Laser Jet printers with light striping Desi Label for 24 DLS-Silver (25-pkg), For Ink Jet and Laser Jet printers with light striping Desi Label for 24 DLS-Silver (25-pkg), No labels on fixed feature keys, used for other languages Desi Label for 24 DLS-Silver (25-pkg) - Blank, Used with Desi Pre-Print Software for printing large pictures
08937050893765
0893725
0893735
0893745
0893775
0893785
08937060893766
0893726
0893736
0893746
0893776
0893786
Spare Parts
Description Part Number
Aspire Handset without cord - WhiteAspire Handset without cord - BlackAspire Faceplate Kit - 22B Non-Display Telephone, Package of 10 with 40 RivetsAspire Faceplate Kit - 22B Display Telephone, Package of 10 with 40 RivetsAspire Faceplate Kit - 34B Display Telephone, Package of 10 with 40 RivetsAspire Faceplate Kit - 34B Super Display Telephone, Package of 10 with 40 RivetsAspire Faceplate Rivets, Package of 25Aspire Plastic Wall Mount Plate, Package of 10 Aspire Wall Mount Hooks-All Telephones, Package of 10Aspire 2B DSLT Metal Wall Plates, Package of 5Bottom Directory Tray (Dial card)Flying Directory Plastic Clip, Package of 10Flying Directory Card Kit (10 Directory cards for 780525)
NSG-170108-001NSG-170108-002
0892000
0892001
0892002
0892003
0892005089200708920080892009
M-790526780525770626
7-22 ◆ Section 7: Specifications and Parts List Aspire S Hardware Manual
Index
IndexNumerics22-Button Display Telephone . . . 4-6122-Button Standard Telephone . . . 4-6225-Pair Cables, Installing . . . 3-22BRI . . . 2-292BRIU-S
Pin-Outs . . . 2-302-Button Telephone . . . 4-622DIOPU-S . . . 2-272PGDAD Module Input/Output . . . 7-834-Button Aspire IPhone . . . 4-7334-Button Display Telephone . . . 4-6134-Button Super Display Telephone . . . 4-604SLIDB-S . . . 2-22
Pin-Outs . . . 2-224SLIU-S . . . 2-204VOIPU-S . . . 2-34
Pin-Outs . . . 2-3666 Block Wiring . . . 3-18ESIU-S . . . 2-178SLIDB . . . 2-398SLIU
Pin-Outs . . . 2-20
AAC-2R Specifications . . . 7-8ADA Adapter . . . 4-32ADA2 Adapter . . . 4-35Adapter
ADA . . . 4-32ADA2 . . . 4-35APA . . . 4-38APR . . . 4-38CTA . . . 4-41CTU . . . 4-44HF-R . . . 4-49PSA-R . . . 4-47Removing the Cover . . . 4-30VoIP . . . 4-51
Adapters . . . 4-29Adjusting the Leg Height . . . 4-77Alarm and System Reports, Programming . . . 5-3Analog Extensions
Troubleshooting . . . 3-18Analog Station (4SLIDB-S) PCB . . . 2-22Analog Station (4SLIU-S) PCB . . . 2-20Analog Station (8SLIDB) PCB . . . 2-39Analog Trunk (4COIU-S) PCB . . . 2-24APA Adapter . . . 4-38APR Adapter . . . 4-38
APR Adapter Ports . . . 5-3Aspire Applications . . . 7-18Aspire S PCB Capacities . . . 7-2Aspire S System Capacities . . . 7-1Aspire Soft Phone Requirements . . . 7-5
BBackground Music, Installing . . . 4-7Backing Up Your Configuration . . . 2-44Basic Troubleshooting . . . 3-16Before Installing . . . 1-1BGM/MOH Music Source Input . . . 7-9BRI (2BRIU-S) Interface PCB . . . 2-29BRI Lines
Troubleshooting . . . 3-23BRI Trunks
Installing . . . 3-10
CCabinet Installation . . . 1-1Cabinets
Grounding . . . 1-18Cable Requirements . . . 7-13Cables
25-Pair Cable Installation . . . 3-2Cables, Routing . . . 3-2Cabling
Cordless Phone . . . 3-5Extension . . . 3-3Loop Start . . . 3-8Single Line . . . 3-4
Cabling Requirements . . . 7-13CallAnalyst Enterprise Server Requirements . . . 7-6CallAnalyst Requirements . . . 7-6Capacities
Aspire S . . . 7-1Aspire S PCBs . . . 7-2
Central Processing Unit (CPU) PCB . . . 2-6Choke
DID . . . 3-13Circuit Types, Extension . . . 2-43CO Lines
Troubleshooting . . . 3-21CO/PBX Line Cutdown Sheet Configuration . . . 3-14CO/PBX Lines, Installing . . . 3-8COIU PCBs
Pin-Outs . . . 2-25, 4-53Cold Start, Performing . . . 2-12Common Equipment Part Numbers . . . 7-19Completing the Installation . . . 1-20
Aspire S Hardware Manual Index ◆ 1

Index
Configuration . . . 2-5CO/PBX Line Cutdown Sheet . . . 3-14Extension Cutdown Sheet . . . 3-6Saving and Backing Up . . . 2-44
Connecting a Dry Contact Relay . . . 4-56Connecting a Headset . . . 4-23Connector Pin-Outs on 4SLIDB-S . . . 2-22Connector Pin-Outs on 4VOIPU-S PCB . . . 2-36Connector Pin-Outs on 8SLIU . . . 2-20Connector Pin-Outs on BRIU-S PCB . . . 2-30Connector Pin-Outs on COIU PCBs . . . 2-25, 4-53Connector Pin-Outs on CPU . . . 2-10Connector Pin-Outs on DIOPU PCBs . . . 2-28Connector Pin-Outs on ENTU-S . . . 2-16Connector Pin-Outs on ESIU . . . 2-18Contact Relay, Connecting . . . 4-56Cordless II Specifications . . . 7-11Cordless Lite II Specifications . . . 7-10Cordless Phone Extension Cabling . . . 3-5Cordless Phone Guidelines . . . 7-10Cordless Telephone . . . 4-64Cordless Telephone, CT-11 . . . 4-63CPU . . . 2-6
Pin-Outs . . . 2-10CPU Input/Output . . . 7-8CPU Installation . . . 2-11Cross-Connect Blocks, Extension . . . 3-2Cross-Connect Blocks, Trunks . . . 3-2CT-11 Cordless Telephone . . . 4-63CTA Adapter . . . 4-41CTU Adapter . . . 4-44Cutdown Sheet . . . 3-6
Extension . . . 3-6Line/Trunk . . . 3-14
DData and SMDR . . . 5-1Data Communications . . . 5-1Data Overview . . . 5-1Defaults
Ports . . . 2-42Designation Labels . . . 4-26DID Choke
Installing . . . 3-13DID FCC Requirements . . . 7-12DID Trunks
Installing . . . 3-12Digital Extensions
Troubleshooting . . . 3-16Digital Station (8ESIU-S) PCB . . . 2-17DIOPU PCBs
Pin-Outs . . . 2-28
Direct Inward Dial (DID) (2DIOPU-S) PCB . . . 2-27Door Box . . . 4-8Door Box Relays . . . 4-56Door Box/External Paging Specifications . . . 7-9Dry Contact Relay, Connecting . . . 4-56DSPDB Daughter Board . . . 2-13DSS Console . . . 4-11
Installing 110-Button DSS . . . 4-12Installing 24-Button DSS . . . 4-13
Dterm Voice Security Recorder (VSR) . . . 4-14
EElectrical Specifications . . . 7-4Entering the Programming Mode . . . 2-42ENTU-S
Pin-Outs . . . 2-16Environmental Requirements . . . 1-2, 7-3Environmental Specifications . . . 7-3ESIU
Pin-Outs . . . 2-18Extension
Cabling . . . 3-3Cabling, Cordless Phone . . . 3-5Cabling, Single Line . . . 3-4
Extension Circuit Types . . . 2-43Extension Cross-Connect Blocks . . . 3-2Extension Cutdown Sheet Configuration . . . 3-6Extensions
Installing . . . 3-3External Page . . . 4-18
Installing . . . 4-18External Paging/Door Box
Specifications . . . 7-9External Recording System . . . 4-20
Installing . . . 4-20External Ringer . . . 4-20
Installing . . . 4-20
FFCC DID Requirements . . . 7-12FCC Registration Information . . . 7-12Firmware, Upgrading VOIPU . . . 2-38
GGeneral Precautions . . . 1-1General Purpose Relays . . . 4-56Grounding the Cabinets . . . 1-18
HH.323 IP Phone . . . 4-73
2 ◆ Index Aspire S Hardware Manual
Index
Handling the PCBs . . . 2-2Hardware, IP . . . 6-3Headsets . . . 4-23HF-R Adapter . . . 4-49Hot Start . . . 2-12
IIdentifying Port Location . . . 2-49ILPA-R . . . 4-24Initial PCB Installation . . . 2-41Initial Programming . . . 2-42In-Line Power Adapter . . . 4-24Installation
CPU . . . 2-11PCBs . . . 2-2
Installing25-Pair Cables . . . 3-22BRI Interface PCB . . . 2-312-Button Phone’s Wall-Mount Bracket . . . 4-864COIU-S PCB . . . 2-244SLIDB-S Daughter Board . . . 2-234SLIU-S PCB . . . 2-21ADA Adapter . . . 4-32, 4-47ADA2 Adapter . . . 4-35Analog Trunk PCB . . . 2-26APA or APR Adapter . . . 4-38Background Music . . . 4-7BRI Trunks . . . 3-10CO/PBX Lines . . . 3-8Cordless Telephones . . . 3-5CTA Adapter . . . 4-41CTU Adapter . . . 4-44DID Choke . . . 3-13DID Trunks . . . 3-12Direct Inward Dial PCB . . . 2-28Door Box . . . 4-8DSPDBU Daughter Board . . . 2-13DSS Console (110 Button) . . . 4-12DSS Console (24 Button) . . . 4-13ENTU-S . . . 2-16ESIU PCB . . . 2-19Ethernet Interface PCB . . . 2-16Extension Cross-Connect Blocks . . . 3-2Extension or Trunk PCB . . . 2-2Extensions . . . 3-3Extensions and Trunks . . . 3-1External Page System . . . 4-18External Recording System . . . 4-20External Ringer . . . 4-20HF-R Adapter . . . 4-49Initial PCB Installation . . . 2-41Key Telephone . . . 3-3, 6-5
Power Failure Telephones . . . 4-54Single Line Telephones . . . 3-4SMDR . . . 5-4Trunk Cross-Connect Blocks . . . 3-2VoIP Adapter . . . 4-51VoIP PCB . . . 2-37VOIPDB Daughter Board . . . 2-33, 2-39Wall-Mount Handset Bracket . . . 4-80Wall-Mounting the Phone . . . 4-84
Installing an Extension or Trunk PCB . . . 2-2Installing the Cabinet . . . 1-1Installing the PCBs . . . 1-14Installing the SLT Adapter . . . 4-58IntraMail . . . 2-32IP Routers
Specifications . . . 7-7IP Soft Phone Requirements . . . 7-5IP Station Equipment . . . 4-73IP Telephone
H.323 . . . 4-73IPhone . . . 4-73
IPhone . . . 4-73ISDN Lines
Troubleshooting . . . 3-23
KKey Extension Cabling . . . 3-3Key Matrix and LED Test . . . 3-17, 4-76Key Telephone
Installing . . . 3-3, 6-5Keyset
Positioning the Super Display LCD . . . 4-76Keyset Adapters . . . 4-29Keyset Labeling . . . 4-26
LLabeling . . . 4-26Labeling Your Phone . . . 4-26LAN Connection . . . 6-1LAN Connection (ENTU-S) PCB . . . 2-15LAN Devices . . . 6-1LAN Specifications . . . 7-9LANs, Using . . . 6-1LED Indications and Switch Settings . . . 2-8LED Test and Key Matrix . . . 3-17, 4-76Legs
Telephone . . . 4-77Line/Trunk Cutdown Sheet . . . 3-14Loop Start Line Cabling . . . 3-8
Aspire S Hardware Manual Index ◆ 3
Index
MMaking Test Calls . . . 2-42Mechanical Specifications . . . 7-8Modules
Using . . . 4-29MOH . . . 4-27MOH/BGM Source Input Specifications . . . 7-9Music on Hold . . . 4-27
OOff-Premise Extension PCB, SLT . . . 2-27Optional Equipment . . . 4-1Optional Modules . . . 4-29
PPage Relays . . . 4-56Page, External . . . 4-18Part Numbers . . . 7-16Parts List . . . 7-16Parts List and Specifications . . . 7-1PCB
2BRI . . . 2-294COIU-S . . . 2-24Analog Station . . . 2-20Analog Station Daughter Board . . . 2-22, 2-39Digital Station . . . 2-17Direct Inward Dial (DID) . . . 2-27DSPDB Daughter Board . . . 2-13LAN Connection (ENTU-S) . . . 2-15Removing an Extension or Trunk PCB . . . 2-4Uninstalling Slot Through Software . . . 2-4VoIP . . . 2-34
PCB CapacitiesAspire S . . . 7-2
PCB Installation . . . 1-14, 2-2, 2-41PCB Layout . . . 2-1PCB Location . . . 2-1PCB Part Numbers . . . 7-19PCB Startup . . . 2-41PCBs
Installing . . . 1-14Where to Install the PCBs . . . 2-5
Perform a Software Upgrade . . . 2-12Performing a Cold Start . . . 2-12Performing a Hot Start . . . 2-12Peripheral Station Equipment Part Numbers . . . 7-17Phone Adapters . . . 4-29Pin-Outs . . . 2-10, 2-16, 2-18, 2-20, 2-22, 2-25, 2-28,
2-36, 4-532BRIU-S . . . 2-30
Port Defaults . . . 2-42
Port Location, Identifying . . . 2-49Ports for APR Adapter . . . 5-3Positioning the Phone Legs . . . 4-77Power Failure Telephones . . . 4-53Power Requirements . . . 7-3Powering up the System . . . 2-40Precautions . . . 1-1Programming
Entering . . . 2-42Programming for System and Alarm Reports . . . 5-3Programming SMDR . . . 5-6Programming, Initial . . . 2-42PSA-R Adapter . . . 4-47PSA-R Adapter, Using . . . 4-48
QQuitting Test Mode . . . 3-17
RRecording System, External . . . 4-20Reinstalling the Front Cover . . . 1-22Relays . . . 4-56Removing an Extension or Trunk PCB . . . 2-4Removing the Adapter Cover . . . 4-30Removing the Faceplate . . . 4-26Removing the Front Cover . . . 1-2Replacing the Faceplate . . . 4-26Requirements
Environmental . . . 7-3Power . . . 7-3Site . . . 7-3
Requirements, Environmental . . . 1-2Requirements, Site . . . 1-2Resetting the System . . . 2-12Ringer, External . . . 4-20RJ-61 to 66 Block Connections . . . 3-1RJ-61 Wiring . . . 3-1Routing Cables . . . 3-2
SSaving and Backing Up Your Configuration . . . 2-44Securing the Cabinet to a Rack . . . 1-10Securing the Cabinet to the Floor . . . 1-4Securing the Cabinet to the Wall . . . 1-7Setting Up Extension Circuit Types . . . 2-43Single Line Extension Cabling . . . 3-4Single Line Telephone (DTH-1-1) Specifications . . .
7-9Site Requirements . . . 1-2, 7-3SLIU PCB / SLIDB Specifications . . . 7-9
4 ◆ Index Aspire S Hardware Manual

Index
Slots . . . 2-1SLT ADAPTER . . . 4-58SLT Adapter
Installing . . . 4-58Wall-Mounting . . . 4-59
SLT Adapter Specifications . . . 7-9SLT Off-Premise Extension PCB . . . 2-27SMDR . . . 5-4
Installing . . . 5-4Programming . . . 5-6
SMDR and Data . . . 5-1Soft Phone Requirements . . . 7-5Software
Using Flash Cards . . . 2-45Software, Upgrading . . . 2-45Spare Parts . . . 7-22Specifications
2PGDAD Module/CPU Input/Output . . . 7-8AC-2R
Specifications . . . 7-8Aspire Soft Phone . . . 7-5BGM/MOH Source Input . . . 7-9Cable Requirements . . . 7-13Cabling Requirements . . . 7-13CallAnalyst . . . 7-6Cordless II . . . 7-11Cordless Lite II . . . 7-10Cordless Phone Guidelines . . . 7-10Door Box/External Paging . . . 7-9Electrical . . . 7-4Environmental . . . 7-3IP Routers . . . 7-7LAN . . . 7-9Mechanical . . . 7-8Single Line Telephone (DTH-1-1) . . . 7-9SLIU PCB / SLIDB . . . 7-9SLT Adapter . . . 7-9
Specifications and Parts List . . . 7-1Startup . . . 2-40Station Equipment Part Numbers . . . 7-16Super Display
Positioning the Super Display LCD . . . 4-76Super Display Telephone . . . 4-60Switch Settings and LED Indications . . . 2-8System and Alarm Reports, Programming . . . 5-3System Capacities
Aspire S . . . 7-1System Reset . . . 2-12System Specifications . . . 7-1System Startup . . . 2-40
TTelephone
22-Button Display Telephone . . . 4-6122-Button Standard Telephone . . . 4-622-Button Telephone . . . 4-6234-Button Aspire IPhone . . . 4-7334-Button Display Telephone . . . 4-6134-Button Super Display Telephone . . . 4-60Cordless Telephone . . . 4-64CT-11 Cordless Telephone . . . 4-63Installing . . . 3-3, 6-5IP Telephone, H.323 . . . 4-73Troubleshooting . . . 3-17
Telephone Legs . . . 4-77Telephone Operation
Positioning the Super Display LCD . . . 4-76Telephones . . . 4-1Test Calls . . . 2-42Test Mode
Quitting . . . 3-17Testing Telephone Operation . . . 3-17Troubleshooting . . . 3-16
Telephone Operation . . . 3-17Troubleshooting Analog Extensions . . . 3-18Troubleshooting CO Lines . . . 3-21Troubleshooting Digital Extensions . . . 3-16Troubleshooting ISDN Lines . . . 3-23Trunk Cross-Connect Blocks . . . 3-2Trunk/Line Cutdown Sheet . . . 3-14
UUL Listed System . . . 7-11Ultra CallAnalyst Requirements . . . 7-6Uninstalling a PCB Slot Through Software . . . 2-4Unpacking . . . 1-1Upgrade Your Software . . . 2-12Upgrading System Software . . . 2-45Upgrading Your VOIPU Firmware . . . 2-38Using
PSA-R Adapter . . . 4-48Using a DSS Console . . . 4-11Using Flash Cards for System Software . . . 2-45Using LANs . . . 6-1Using Modules . . . 4-29Using SMDR . . . 5-4Using the In-Line Power Adapter . . . 4-24Using the SLT Adapter . . . 4-58Using the Telephone Legs . . . 4-77Using the Wall-Mount Bracket . . . 4-80
Aspire S Hardware Manual Index ◆ 5

Index
VVoice Mail . . . 2-32VoIP (4VOIPU-S) PCB . . . 2-34VoIP Adapter . . . 4-51VoIP Hardware . . . 6-3VSR . . . 4-14
WWall Mount
Installing the 2-Button Phone’s Bracket . . . 4-86Installing the Handset Bracket . . . 4-80
Wall-Mount Bracket . . . 4-80Wall-Mounting the Phone . . . 4-84Wall-Mounting the SLT Adapter . . . 4-59Where to Install the PCBs . . . 2-5Wiring RJ-61 Cables to 66 Blocks . . . 3-1
6 ◆ Index Aspire S Hardware Manual

NEC Unified Solutions, Inc.4 Forest Parkway, Shelton, CT 06484
Tel: 800-365-1928 Fax: 203-926-5458www.necunifiedsolutions.com
Other Important Telephone Numbers
Sales: . . . . . . . . . . . . . . . . . . . . . . . . . . . . . . . . . . . .203-926-5450Customer Service: . . . . . . . . . . . . . . . . . . . . . . . . . . .203-926-5444Customer Service FAX: . . . . . . . . . . . . . . . . . . . . . . .203-926-5454Technical Service: . . . . . . . . . . . . . . . . . . . . . . . . . . .203-925-8801Discontinued Product Service: . . . . . . . . . . . . . . . . . .900-990-2541Technical Training: . . . . . . . . . . . . . . . . . . . . . . . . . . .203-926-5430Emergency Technical Service (After Hours) . . . . . . . .203-929-7920
(Excludes discontinued products)

NEC Unified Solutions, Inc.4 Forest Parkway, Shelton, CT 06484
*0893130*0893130
July 20, 2005Printed in U.S.A.
TEL: 203-926-5400 FAX: 203-929-0535www.necunifiedsolutions.com