Embed Size (px)
Citation preview
December 2014Version 8.0, Windows
Standard ERPCheques
Table of ContentsCHEQUE MODULE OVERVIEW.....................................................................................3SETUP.............................................................................................................................4
Account Usage, Cheques......................................................................................................4Cheque Control Accounts......................................................................................................4Cheque Settings.....................................................................................................................6Clearing Days.........................................................................................................................6Credit Card Types..................................................................................................................6Number Series – Batch Deposits, Own Cheques, Received Cheques................................7Payment Modes.....................................................................................................................7Nominal Ledger >> Settings>> Subsystems ....................................................................8
CHEQUES – WORKFLOW..............................................................................................9REGISTERS...................................................................................................................10
Cheques ..............................................................................................................................10All Cheques..................................................................................................................................................... 10Open Cheques................................................................................................................................................ 10 Deposit ......................................................................................................................................................... 11 Deposited Cheques ...................................................................................................................................... 11 Reconcile ....................................................................................................................................................... 11Cheque: Inspect Window................................................................................................................................ 11Header ............................................................................................................................................................ 11
Comment Card.....................................................................................................................12Clearing Card.......................................................................................................................13
Operations Menu from the Inspect window................................................................................................... 13 Create Menu .............................................................................................................................................. 14
Batch Deposit.......................................................................................................................15Batch Deposit: Inspect window...................................................................................................................... 15Operations Menu............................................................................................................................................. 16
OWN CHEQUES – WORKFLOW ................................................................................17Own Cheques.......................................................................................................................17
All Own Cheques............................................................................................................................................. 17Issued Own Cheques...................................................................................................................................... 17Own Cheques: Inspect window...................................................................................................................... 17
Credit Cards.........................................................................................................................19Credit Card Slips..................................................................................................................20
ROUTINES – MAINTENANCE ......................................................................................21Create Own Cheques...........................................................................................................21Create Slips N/L Transactions..............................................................................................21
REPORTS......................................................................................................................23Batch Deposit Journal .........................................................................................................23Cheque History....................................................................................................................24Cheques List.........................................................................................................................25Cheques to be deposited....................................................................................................26Own Cheques History .........................................................................................................26Own Cheques List................................................................................................................27
MODULES INTEGRATED WITH CHEQUES................................................................29EXPENSES ..........................................................................................................................29
Personnel Payments....................................................................................................................................... 29CASH BOOK........................................................................................................................30
Cash In............................................................................................................................................................ 30PURCHASE LEDGER...........................................................................................................32
Payments......................................................................................................................................................... 32SALES LEDGER...................................................................................................................34
Receipts........................................................................................................................................................... 34
EXERCISES...................................................................................................................36
Standard ERP – Cheques 1/38

Theory Questions.................................................................................................................36Practical Exercises...............................................................................................................36
APPENDIX ....................................................................................................................38Terminology between different versions of English language............................................38
Standard ERP – Cheques 2/38
CHEQUE MODULE OVERVIEW
The Cheque module has been designed for using and supporting the Cheques workflow inside of a company.
It allows the use of the companies Own Cheques and Cheques Received from Customers. It also allows for the use of Credit Cards.
The Cheque module is integrated with the Cash Book, Purchase Ledger, Sales Ledger and Expenses modules.
Standard ERP – Cheques 3/38

SETUP
To start working with the Cheques module you should first set it up. The setup will include Cheques and Credit Card payment settings (if required).
Account Usage, Cheques
The Account Usage setting is used to specify the default NL accounts that would be used in the Bounce (Cheques not honoured) transactions – when the cheque status is set as Bounced – for Own Cheques and Cheques received from Customers. In this setting is also possible to define if the VAT should be booked in the Bounced transactions.
In Bounce A/C: Use Paste/Special to enter the NL Account that would be used when a Cheque (received from a Customer) is bounced.
Out Bounce A/C: Use Paste/Special to enter the NL Account that would be used when a Cheque received from a Customer and used in a Payment for a Supplier is later bounced by the bank. If you don’t use the cheques received from your customers as payment method, you can leave this field empty.
Own Bounce A/C: Use Paste/Special to enter the NL Account that would be used when an Own Cheque has been bounced.
Bounce Charge A/C: This setting is used to enter the NL Account that would be used for booking the bank charges for processing the bounced cheques.
Post VAT from Bounced Cheque: Select this checkbox to post the VAT value from the Bounced Cheques (The transaction will reverse the VAT account credited when the Cheque was deposited)
Post VAT from Bounced Own Cheque: Select this checkbox to post the VAT value from the Bounced Own Cheque (The transaction will reverse the VAT account credited when the own cheque was cleared)
Reconcile cleared cheques: Select this checkbox to automatically reconcile the cheques which have been cleared. For own cheques it will reconcile both temporary accounts and target accounts, in the NL transaction.
Cheque Control Accounts
This setting is used to enable the specific Accounts that are going to be used when working with Cheques and Own Cheques. Set up all the accounts involved here.
Each Account is entered defining the Type it would be used with (for example, if this would be a Target, Origin or Temporary Account).
Standard ERP – Cheques 4/38
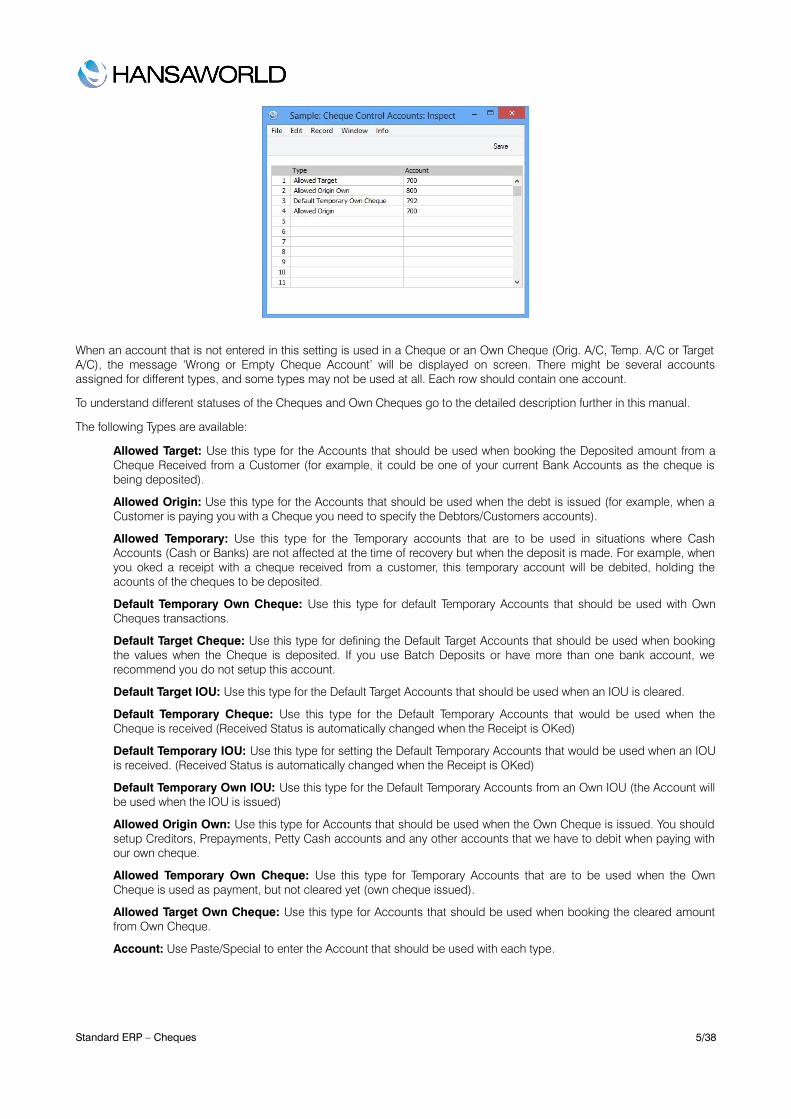
When an account that is not entered in this setting is used in a Cheque or an Own Cheque (Orig. A/C, Temp. A/C or Target A/C), the message ‘Wrong or Empty Cheque Account’ will be displayed on screen. There might be several accounts assigned for different types, and some types may not be used at all. Each row should contain one account.
To understand different statuses of the Cheques and Own Cheques go to the detailed description further in this manual.
The following Types are available:
Allowed Target: Use this type for the Accounts that should be used when booking the Deposited amount from a Cheque Received from a Customer (for example, it could be one of your current Bank Accounts as the cheque is being deposited).
Allowed Origin: Use this type for the Accounts that should be used when the debt is issued (for example, when a Customer is paying you with a Cheque you need to specify the Debtors/Customers accounts).
Allowed Temporary: Use this type for the Temporary accounts that are to be used in situations where Cash Accounts (Cash or Banks) are not affected at the time of recovery but when the deposit is made. For example, when you oked a receipt with a cheque received from a customer, this temporary account will be debited, holding the acounts of the cheques to be deposited.
Default Temporary Own Cheque: Use this type for default Temporary Accounts that should be used with Own Cheques transactions.
Default Target Cheque: Use this type for defining the Default Target Accounts that should be used when booking the values when the Cheque is deposited. If you use Batch Deposits or have more than one bank account, we recommend you do not setup this account.
Default Target IOU: Use this type for the Default Target Accounts that should be used when an IOU is cleared.
Default Temporary Cheque: Use this type for the Default Temporary Accounts that would be used when the Cheque is received (Received Status is automatically changed when the Receipt is OKed)
Default Temporary IOU: Use this type for setting the Default Temporary Accounts that would be used when an IOU is received. (Received Status is automatically changed when the Receipt is OKed)
Default Temporary Own IOU: Use this type for the Default Temporary Accounts from an Own IOU (the Account will be used when the IOU is issued)
Allowed Origin Own: Use this type for Accounts that should be used when the Own Cheque is issued. You should setup Creditors, Prepayments, Petty Cash accounts and any other accounts that we have to debit when paying with our own cheque.
Allowed Temporary Own Cheque: Use this type for Temporary Accounts that are to be used when the Own Cheque is used as payment, but not cleared yet (own cheque issued).
Allowed Target Own Cheque: Use this type for Accounts that should be used when booking the cleared amount from Own Cheque.
Account: Use Paste/Special to enter the Account that should be used with each type.
Standard ERP – Cheques 5/38
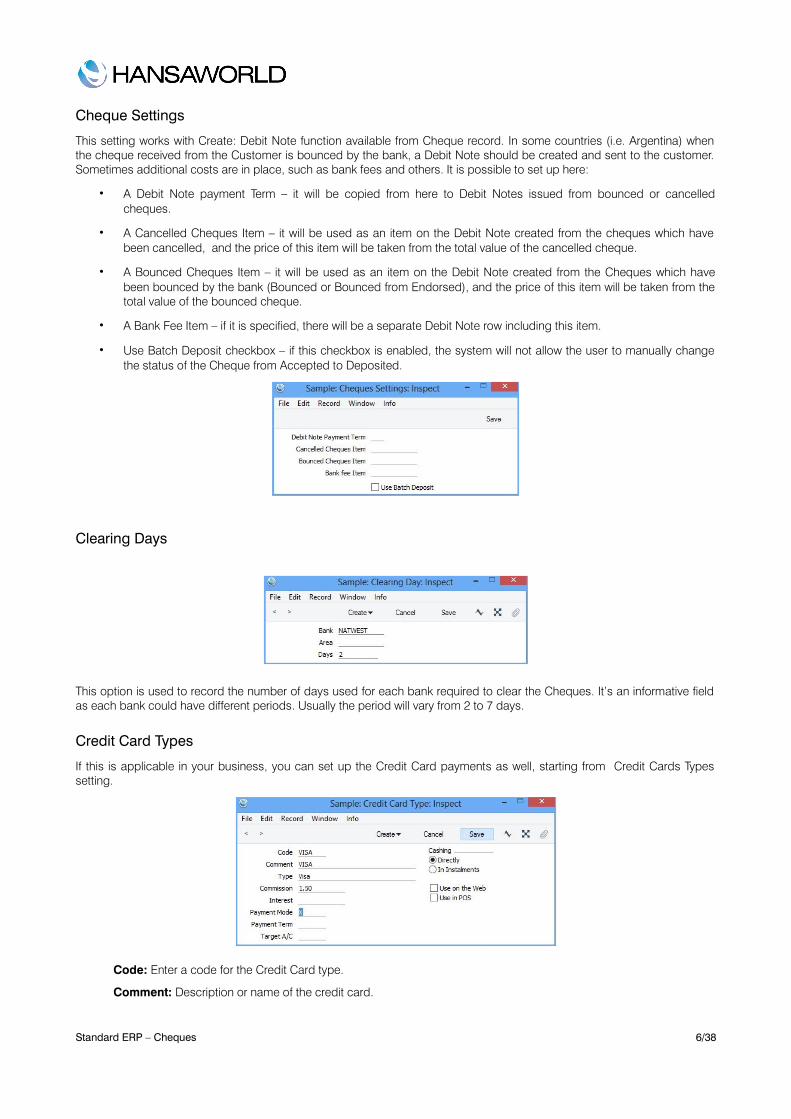
Cheque Settings
This setting works with Create: Debit Note function available from Cheque record. In some countries (i.e. Argentina) when the cheque received from the Customer is bounced by the bank, a Debit Note should be created and sent to the customer. Sometimes additional costs are in place, such as bank fees and others. It is possible to set up here:
• A Debit Note payment Term – it will be copied from here to Debit Notes issued from bounced or cancelled cheques.
• A Cancelled Cheques Item – it will be used as an item on the Debit Note created from the cheques which have been cancelled, and the price of this item will be taken from the total value of the cancelled cheque.
• A Bounced Cheques Item – it will be used as an item on the Debit Note created from the Cheques which have been bounced by the bank (Bounced or Bounced from Endorsed), and the price of this item will be taken from the total value of the bounced cheque.
• A Bank Fee Item – if it is specified, there will be a separate Debit Note row including this item.
• Use Batch Deposit checkbox – if this checkbox is enabled, the system will not allow the user to manually change the status of the Cheque from Accepted to Deposited.
Clearing Days
This option is used to record the number of days used for each bank required to clear the Cheques. It’s an informative field as each bank could have different periods. Usually the period will vary from 2 to 7 days.
Credit Card Types
If this is applicable in your business, you can set up the Credit Card payments as well, starting from Credit Cards Types setting.
Code: Enter a code for the Credit Card type.
Comment: Description or name of the credit card.
Standard ERP – Cheques 6/38

Type: Use Paste/Special to enter the type of Credit Card to be used. Available options include: Visa, MasterCard, American Express, Diners, Maestro/Switch, Visa Electron, Discover, and others.
Commission: Type the Commission percentage that will be charged for the use of this Credit Card type (Information field only).
Interest: Enter the Interest rate that will be charged for the use of this Credit Card type.
Payment Mode: Use Paste/Special to enter the Payment Mode to be used with this Credit Card Type. The Payment Mode Type has to be Credit Card.
Payment Terms: The selected option will be used by default when this type or credit card is used.
Target A/C: Enter the Account that will be debited in the NL transaction created from the Credit Card Slips (Create Slips N/L Trans. Maintenance)
Cashing: Choose one of the two available options for Cashing. This selection is only informative.
Use on the Web: By using HAL customisation and if this checkbox is activated, the Credit Card Type entered in this setting would be available for purchases made through the website.
Use in POS: It this checkbox is activated, this type of Credit Card could be used to make purchases by using the POS module.
Number Series – Batch Deposits, Own Cheques, Received Cheques
Enter the number series that will be used for different records. You may leave these settings blank and the system will start the count from number “1”.
Payment Modes
The different payment methods are entered in the Payment Modes setting. These will be used for registering payments from your Customers and to your Suppliers.
You can enter different Payment Modes by using the matrix on the Payment Mode window, for example Cash, Cheques, Own cheques, etc.
HansaWorld allows each Payment Mode to debit a different NL Account, and to be paid into different bank accounts.
When working with the Cheque Module it would be necessary to set the Payment Modes specific for Cheques payments as follows:
In Flip A, enter a Code for the Payment Mode, and choose the Account that will be used. Enter a brief description for this Payment mode. If you are going to use this Payment Mode for Cheques you could also enter the Bank Name.
Standard ERP – Cheques 7/38

Move to flip B, use Paste/Special in the Type column and enter the Type of Payment that will be used. For using the Cheques module you have the following options:
Received Cheques: This Type is used in order to enable the use of Cheques in the register where you may get paid with Cheques (Cash Ins, Receipts). When using a Payment Mode with the Received Cheques Type, the Cheques Window will be available from the Cheques No. Column and will display all the Cheques Received from the Customers.
The Received Cheques payment mode may also be used in those registers where you pay your suppliers. In this situation you will only be able to pay with those Cheques which are in Deposited status.
Own Cheques: This type is used in order to enable the use of Own Cheques in the register where you may pay your suppliers with Cheques (Cash Out, Payment, Expenses). When using a Payment Mode with the Own Cheques Type, the Own Cheques window will be available from the Cheques No. column and will display all the Own Cheques entered.
Supplier Cheque Name
This register links a Supplier Code with a name different the one stored in the Contact register for this Supplier. If a supplier requires that a cheque is issued to a specific name, different from the one entered in the Contact record, then that name should be entered in this setting. This setting is usually defined at the time when there is a need for it.
Nominal Ledger >> Settings>> Subsystems
Open the tab “Cash and Other” and select the options “Cheques” and “Own Cheques”. This ensures that Nominal Ledger transactions will be generated from Cheques.
Standard ERP – Cheques 8/38
CHEQUES – WORKFLOW
When you receive a cheque as a payment from your customer, you need to register that cheque in the system. You can do this in the following ways:
• In Sales Ledger module with a Receipt – to find out how to do it refer to the Sales Ledger section of this manual.
• Manually in the Cheques module in one of the following registers: All Cheques, Open Cheques or Deposited Cheques.
If you create a New Cheque Record manually in the Cheque module make sure you fill in:- Cheque No., Amount, Effect date and Customer. Leave the fields Orig. A/C, Temp. A/C and Target A/C blank. These fields will be filled in automatically according with the payment mode when you OK the receipt. Save the record. It will have the status of Registered, and is listed in the All Cheques register.
If you want to use this cheque now in a Receipt, go to the relevant register, and as a Payment Mode put a Received Cheques type. You will now be able to choose your cheque from a Paste/Special list in Cheque field. If the cheque was created from Receipt in the first place, it will already be added to it. After the record is OK'ed and saved, your cheque will get a new status: Accepted, and will appear in the Open Cheques register.
The Nominal Ledger transaction will be generated from the receipt: Debit Temporary account (Values to be deposited) and credit Origin Account (Debtors). These accounts are copied to the Cheque record.
The received cheque can now be deposited in the bank, or used as a payment to your suppliers.
When you deposit the cheque (cheques) in your bank account, you can register this event with a Batch Deposit record. Create a new record and fill in the following fields:- Payment Mode (usually bank type), and Paste/Special to Open Cheques in the matrix part. Once the Batch Deposit record is OK'ed and saved, the cheque will change its status to Deposited and move from the Open Cheques to the Deposited Cheques register.
The Nominal Ledger transaction will be generated from the Batch Deposit if you are using this feature: Debit payment mode account used in the Batch Deposit and Credit Temporary Account. The target account in the Cheque record will be filled in automatically according with the payment mode used in the Batch Deposit.
If a Batch Deposit is not used, then the Nominal Ledger transaction will be generated from the Cheque record when the status is changed to deposited. In this case you will need to fill in the target account (bank account) in the cheque before change the status to Deposited.
When you decide to use this check as payment method, i.e. to your suppliers, you should use a Received Cheques type Payment Mode in the relevant register (such as Purchase Ledger Payment) and Paste/Special to the Open Cheques register for the Cheque number. After OK'ing the record, the cheque will change its status to Endorsed and disappear from Open Cheques register.
No matter if you deposit or endorse a cheque, it can still be bounced by the bank. Should this occur, you need to change the cheque’s status to Bounced or Bounced from Endorsed.
The Nominal Ledger transaction will be generated from the Cheque record when the status is updated: Debit Bounced Cheques account and Credit Target account (bank account).
From the Create menu of the cheque record, select the option “Debit Note”. A new invoice type debit note is created in the sales ledger module. When ok'ed, the Nominal Ledger transaction will Debit the Debtors account and credit the Bounced Cheques account.
When everything is fine, the deposited or endorsed cheques should be reconciled against the bank statement – change their status to Reconciled or Endorsed and Reconciled using the Operations menu function.
Find bellow the details of the registers used in this workflow.
Standard ERP – Cheques 9/38
REGISTERS
The Registers in Cheques module include received cheques, own cheques and others.
Cheques
Cheques received from customers are presented in three registers: Open Cheques, Deposited Cheques and All Cheques. All the records within these registers look exactly the same, the only difference between them is the status. One more important register connected with cheques received from Customers is the Batch Deposit register.
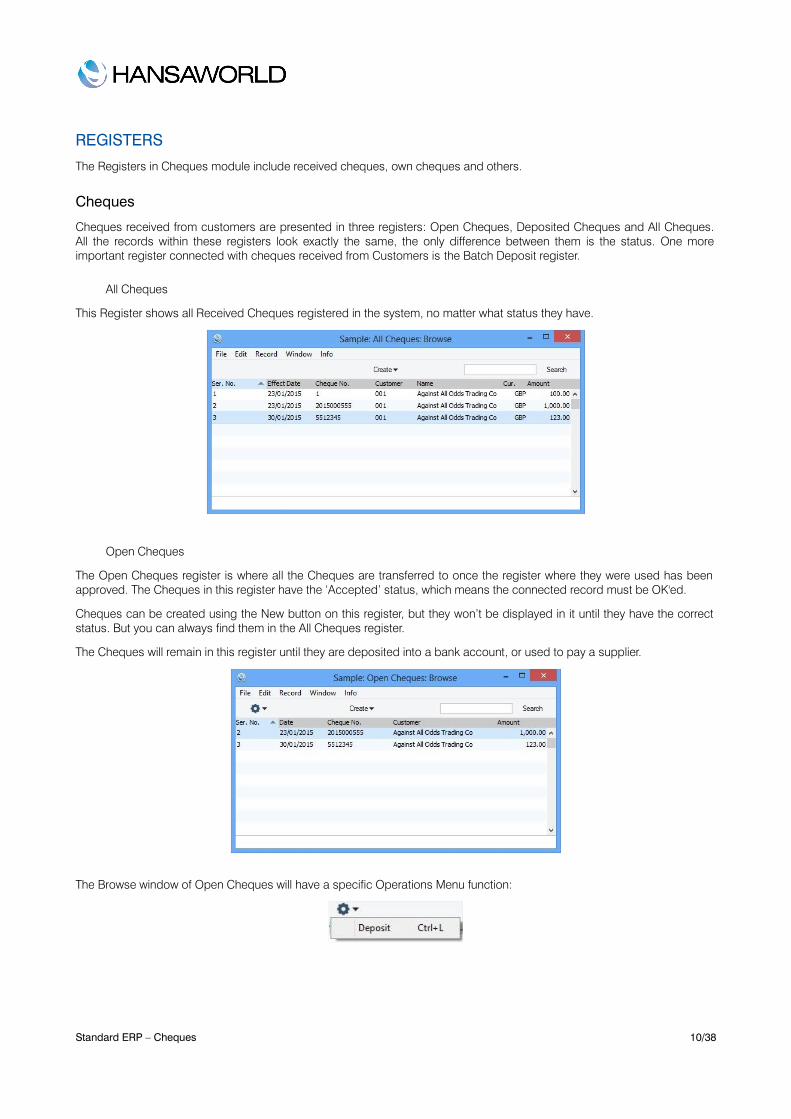
All Cheques
This Register shows all Received Cheques registered in the system, no matter what status they have.
Open Cheques
The Open Cheques register is where all the Cheques are transferred to once the register where they were used has been approved. The Cheques in this register have the ‘Accepted’ status, which means the connected record must be OK'ed.
Cheques can be created using the New button on this register, but they won’t be displayed in it until they have the correct status. But you can always find them in the All Cheques register.
The Cheques will remain in this register until they are deposited into a bank account, or used to pay a supplier.
The Browse window of Open Cheques will have a specific Operations Menu function:
Standard ERP – Cheques 10/38
Deposit
Before using this option, make sure that in the cheque record the target account is filled in with the bank account. The option “Use Batch Deposits” in the Cheque Settings should be off.
This option allows you to select one or several Cheques and deposit them automatically. It will change the cheque status to Deposited. These cheques will disappear from the Open Cheques register, and appear in Deposited Cheques register.
The Nominal Ledger transaction will be generated.
Deposited Cheques
This register will show all the received cheques that were deposited previously (Deposited from a Batch Deposit or from the option Deposit in the Operations Menu). All Deposited cheques can also always be found in the All Cheques register.
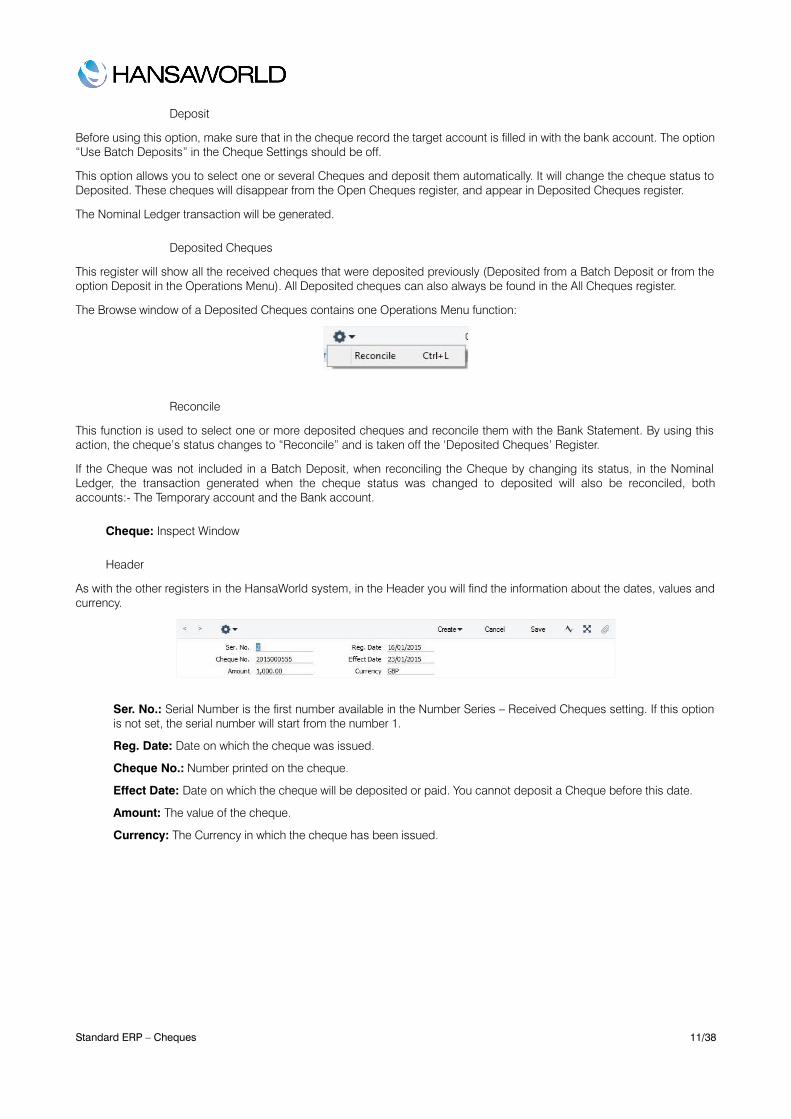
The Browse window of a Deposited Cheques contains one Operations Menu function:
Reconcile
This function is used to select one or more deposited cheques and reconcile them with the Bank Statement. By using this action, the cheque’s status changes to “Reconcile” and is taken off the ‘Deposited Cheques’ Register.
If the Cheque was not included in a Batch Deposit, when reconciling the Cheque by changing its status, in the Nominal Ledger, the transaction generated when the cheque status was changed to deposited will also be reconciled, both accounts:- The Temporary account and the Bank account.
Cheque: Inspect Window
Header
As with the other registers in the HansaWorld system, in the Header you will find the information about the dates, values and currency.
Ser. No.: Serial Number is the first number available in the Number Series – Received Cheques setting. If this option is not set, the serial number will start from the number 1.
Reg. Date: Date on which the cheque was issued.
Cheque No.: Number printed on the cheque.
Effect Date: Date on which the cheque will be deposited or paid. You cannot deposit a Cheque before this date.
Amount: The value of the cheque.
Currency: The Currency in which the cheque has been issued.
Standard ERP – Cheques 11/38

Comment Card
Bank / Name: Paste/Special to enter the Bank from where the cheque has been issued.
Customer / Name: Paste/Special to enter the Customer Code from whom the Cheque was received.
Emission Date: Enter the Date on which the cheque was delivered. This date may be very important in cases where the cheques are only valid for a certain period of time.
Estimated Cl. Date: Enter the Estimated Date when the Cheque is expected to be cleared.
Accepted Date: The Date of the cheque being accepted, is filled in automatically when the Receipt or Cash In where the Cheque is used, is Ok'ed.
Bounced Date: Date in which the cheque was bounced by the bank, this can be entered manually.
Endorsed Date: Date of the cheque being endorsed, filled automatically when the record where the Cheque is being endorsed is Oked.
Cancelled Date: Date of the cheque being cancelled, can be entered manually.
VAT Reg. No.: This field is entered automatically if the Customer selected before has a VAT Registration Number. If this is not the case, this number can be entered manually.
Comment: In this field you can enter free text with any description regarding the Cheque.
Cheque Status: Registered, is the initial status, before the Cheque has been used in a Receipt or Cash In. The cheque will remain with this status until the register where it was used is approved (when the OK checkbox has been selected).
Accepted: is the next status, and is updated automatically once the register where the Cheque is being used is approved (the OK Checkbox is ON).
Deposited: is the status of the cheque once it has been included in a Deposit Register and OK'd, or when the “Deposit” option has been selected from the Operations menu. It means that the cheque has been deposited into a bank account.
Endorsed: A Cheque that has been Received can then be used in a Payment to a Supplier, the Cheque Status will be changed to Endorsed.
Cancelled: this status can be set manually if the cheque is cancelled.
Reconciled: this is the status of the cheque once it has been reconciled with the Bank statement.
Bounced: is the status set if the Bank rejects the cheque for any reason. The NL account specified in the setting Account Usage will be used.
Bounced from Endorsed: status of the cheque once it has been endorsed and then rejected. The account specified in the setting Account Usage will be used.
Endorsed and Reconciled: this is the status of the cheque once it has been endorsed and then reconciled with the Bank Statement.
Standard ERP – Cheques 12/38

Clearing Card
Deposit Date: Is the Date when the cheque was deposited.
Bank Account: You can enter the bank account number.
Orig. A/C: This is entered in accordance with the accounts specified in the setting Cheque Control Accounts. It’s the account where the debt originated.
Temp. A/C: Temporary account set in Cheque Control Accounts. It’s the account to be assigned temporarily to the amount of the check that is cashed, deposited or endorsed.
Target A/C : This is entered in accordance with the accounts specified in the setting Cheque Control Accounts. It’s the account that will be updated with the amount of the cheque. (Usually is a bank account).
Bank Fee: This field can be used to register the bank commission/fee.
Cleared Amount: Amount credited to the bank account. This field is updated automatically when the register where it was entered, is approved (OK box checked).
Type: The options are defined according to the type of Document. The options are Own Cheque, 3rd Cheque, Own IOU, 3rd IOU.
Operations Menu from the Inspect window
The Operations Menu is available from the “Cheque: Inspect” window and the options are:
Open NL Transaction: This allows you to open the Nominal Ledger Transaction created when the cheque was deposited.
Open Receipt: This allows you to open the Receipt record where the cheque was entered.
Open Connected Register: The function allows the user to open the connected registers where the Own Cheque was used:
•If the Cheque is in a Deposited status, the Batch Deposit record will be opened
•If the Cheque is in Endorsed status, the connected Receipt, Cash In or Personnel Payment will be opened.
Invalidate Cheque: This option cancels the cheque. This option should be used when printing a Cheque from the payment ordered and not OK'ed, and some problem occurs with the printing requiring that a new Cheque needs to be created. Invalidate the current one.
Standard ERP – Cheques 13/38

Create Menu
Debit Note: If the Cheque has been bounced and it’s status is Bounced or Bounced from Endorsed, or when it’s Cancelled, it is possible to create a Debit Note. This way the debtor's account can be restored to the position it was in before the cheques was bounced. When this feature is used:
•There will be a new Invoice created for the customer
•The Invoice will have a Debit Note payment term copied from the Cheques Settings setting
•The quantity on the invoice will be ’1’ and the unit price equal to total amount of the bounced cheque.
Standard ERP – Cheques 14/38

Batch Deposit
The Batch Deposit register allows one or a group of cheques to be deposited into a specific Bank Account.
Batch Deposit: Inspect window
No.: Number of the Deposit Register. This number comes from “Number Series – Batch Deposits” Setting.
Comment: In this field you can enter a text with any description pertaining to the deposit.
Date: Date on which the deposit was made.
Pay. Mode: The selection of the payment mode will define the target account that will be used in the N/L transaction created from the Batch Deposit Register. You will not be able to use a Cheque or Own Cheque payment mode here.
Cash: If Cash is also being deposited, the amount of cash should be entered here.
Cash Type: The selection of the cash type will define the target account which will be used in the N/L transaction created from the Batch Deposit Register.
Total: Total amount being deposited.
Currency: Currency of the deposit.
Base Cur. 1, Base Cur. 2: These fields are completed automatically. The information is taken from the system module, “Base currency rates”.
Temp. Acct.: Temporary account used in cheques.
Commission: In this field you can enter the amount of the commission that will be charged for the deposit.
Reference: This free-text field allows putting some additional information such as Deposit Bank no. or reference record number.
Objects: You can enter the object that you want to be included in the Nominal Ledger transaction generated from this deposit (use Paste/Special to add the Object).
OK: Mark the OK checkbox to create the Nominal Ledger Transaction for the Deposit’s total amount using the accounts defined in Temp. Acc. and in the Cash Type.
In the Matrix, you can open the Paste Open Cheques window, from where you can choose the cheques you want to deposit.
Standard ERP – Cheques 15/38

Operations Menu
Print Deposit: If there is a document set up for deposits, you can print the deposit using this option.
Open NL Transaction: This option allows you to open and view the Nominal Transaction record created when the deposit was approved.
Standard ERP – Cheques 16/38
OWN CHEQUES – WORKFLOW
To use Own Cheques as a payment method, it is necessary to create them first. You can do this in the following ways:
• With Routines – Maintenance: Create Own Cheques (described further in the manual)
• Manually in the Cheques module in one of the following registers: Issued Own Cheques, All Own Cheques.
When you use the second option, make sure you fill in: Cheque No Amount and Effect date. The Orig. A/C, Temp. A/C and Target A/C can be blank,wWill be filled in automatically when OK'ing the payment, or any other record where the own cheque is used. Save the record. It has the status Unused, and is listed in the All Own Cheques register.
If you want to use this cheque now in a Payment or another record, go to the relevant register and as a Payment Mode put an Own Cheques type. You will now be able to choose your cheque from Paste/Special list in the Cheque field. After the record is OK'ed and saved, your cheque will get a new status: Issued, and will appear in the Issued Own Cheques register.
The own cheque can now be cleared, which means it has been accepted by the bank, or bounced. In either situation the status should be changed accordingly so that the cheque will disappear from the Issued Own Cheques register.
Own Cheques
Cheques issued by you to pay to your suppliers are presented in two registers: Issued Own Cheques and All Own Cheques. All the records within both registers look exactly the same, the only difference between them is the status.
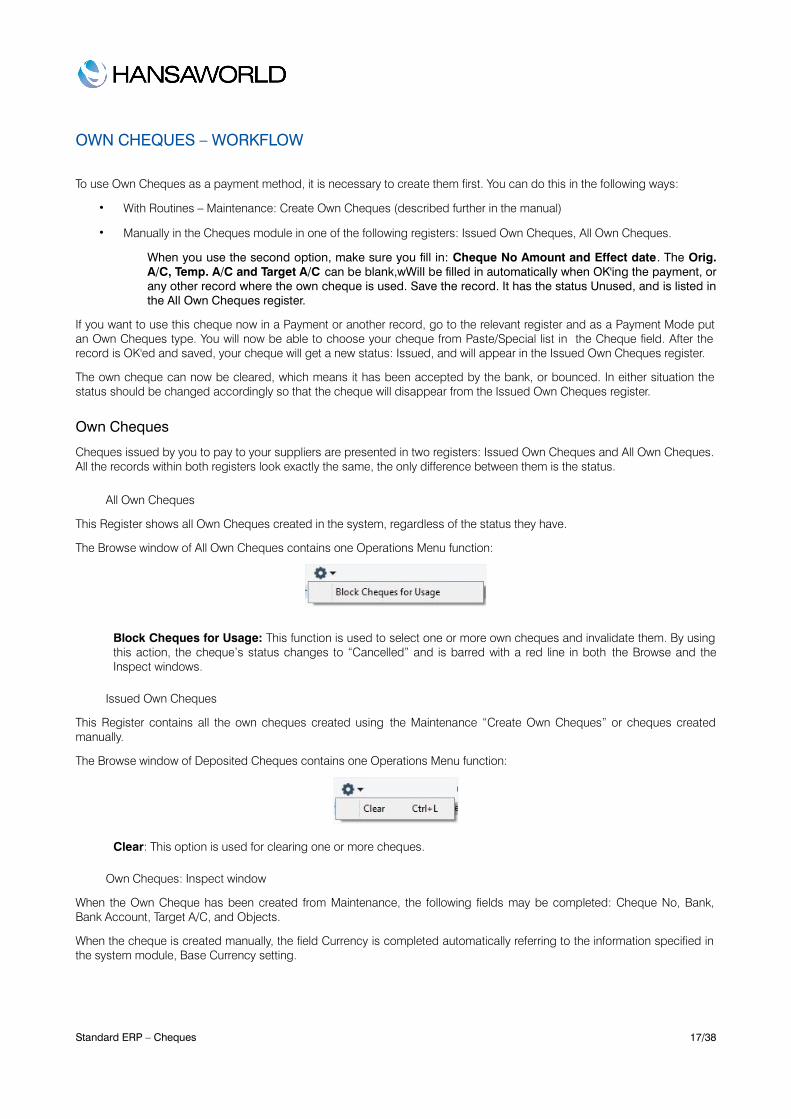
All Own Cheques
This Register shows all Own Cheques created in the system, regardless of the status they have.
The Browse window of All Own Cheques contains one Operations Menu function:
Block Cheques for Usage: This function is used to select one or more own cheques and invalidate them. By using this action, the cheque’s status changes to “Cancelled” and is barred with a red line in both the Browse and the Inspect windows.
Issued Own Cheques
This Register contains all the own cheques created using the Maintenance “Create Own Cheques” or cheques created manually.
The Browse window of Deposited Cheques contains one Operations Menu function:
Clear: This option is used for clearing one or more cheques.
Own Cheques: Inspect window
When the Own Cheque has been created from Maintenance, the following fields may be completed: Cheque No, Bank, Bank Account, Target A/C, and Objects.
When the cheque is created manually, the field Currency is completed automatically referring to the information specified in the system module, Base Currency setting.
Standard ERP – Cheques 17/38
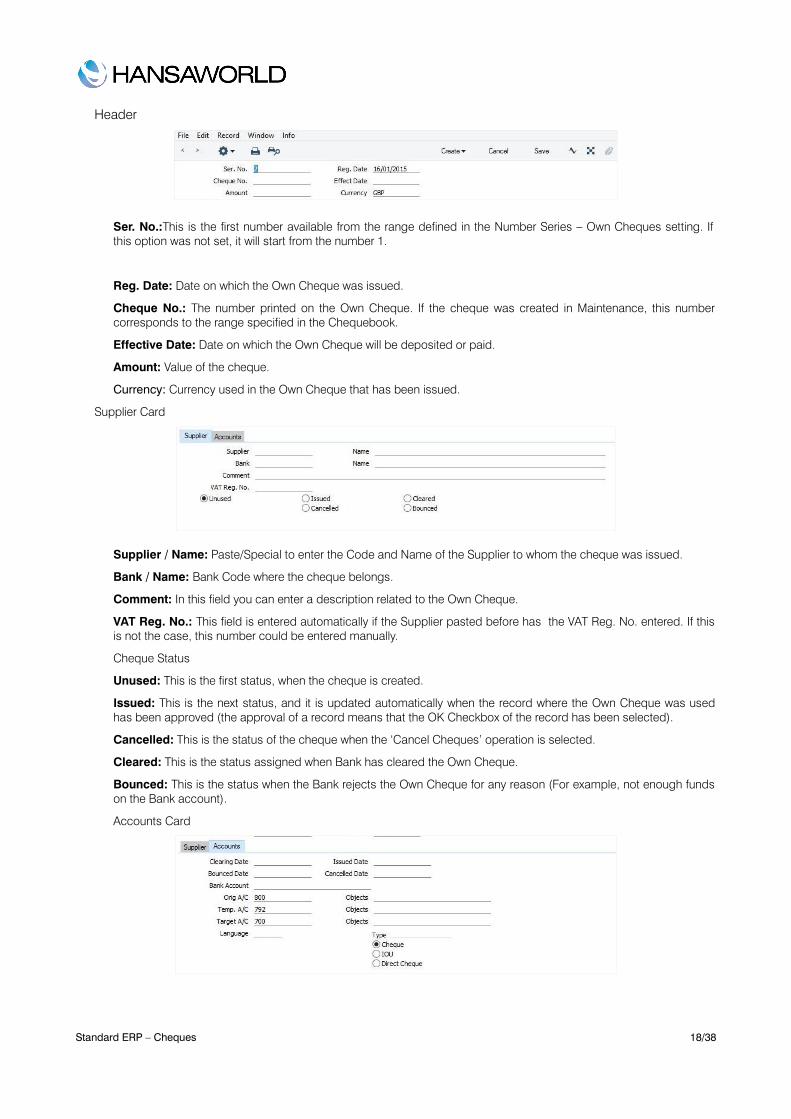
Header
Ser. No.:This is the first number available from the range defined in the Number Series – Own Cheques setting. If this option was not set, it will start from the number 1.
Reg. Date: Date on which the Own Cheque was issued.
Cheque No.: The number printed on the Own Cheque. If the cheque was created in Maintenance, this number corresponds to the range specified in the Chequebook.
Effective Date: Date on which the Own Cheque will be deposited or paid.
Amount: Value of the cheque.
Currency: Currency used in the Own Cheque that has been issued.
Supplier Card
Supplier / Name: Paste/Special to enter the Code and Name of the Supplier to whom the cheque was issued.
Bank / Name: Bank Code where the cheque belongs.
Comment: In this field you can enter a description related to the Own Cheque.
VAT Reg. No.: This field is entered automatically if the Supplier pasted before has the VAT Reg. No. entered. If this is not the case, this number could be entered manually.
Cheque Status
Unused: This is the first status, when the cheque is created.
Issued: This is the next status, and it is updated automatically when the record where the Own Cheque was used has been approved (the approval of a record means that the OK Checkbox of the record has been selected).
Cancelled: This is the status of the cheque when the ‘Cancel Cheques’ operation is selected.
Cleared: This is the status assigned when Bank has cleared the Own Cheque.
Bounced: This is the status when the Bank rejects the Own Cheque for any reason (For example, not enough funds on the Bank account).
Accounts Card
Standard ERP – Cheques 18/38
Clearing Date: Is the Date on which the Own Cheque is cleared. This field may be completed manually.
Issued Date: Is filled in automatically when the Payment, Cash Out or Personnel Payment record where the Cheque is used is OK'ed.
Bounced Date: Date when the cheque was bounced by the bank. This is filled in manually.
Cancelled Date: Date when the cheque was cancelled. This is filled in manually.
Bank Account: In this field you can enter the bank account number. If an Own Cheque was created from Maintenance, and the Bank Account field has been completed, then this field would be automatically completed.
Orig A/C / Objects: This Account is entered automatically depending on the Accounts specified in the Cheques Control Accounts setting. This is the NL account from where the money will be debited. This NL account may be related to an object, the Object should be entered in the Objects field.
Temp A/C / Objects: This is the Temporary Account that has been set in the Cheque Control Accounts setting. This Account has been assigned for temporarily booking the amount of the Cheque once the payment has been OK'd, if the type is cheque (the type Direct Cheque does not use this account).
An object can be assigned to this Account if it’s specified in the Objects field.
Target A/C / Objects: This is the Target Account, only the Accounts entered for the Target type in the Cheque Control Accounts setting could be used.
An object can be assigned to this Account if it has been specified in the Objects field.
Type: The options are defined according to the type of document. The options are Cheque, IOU, Direct Cheque.
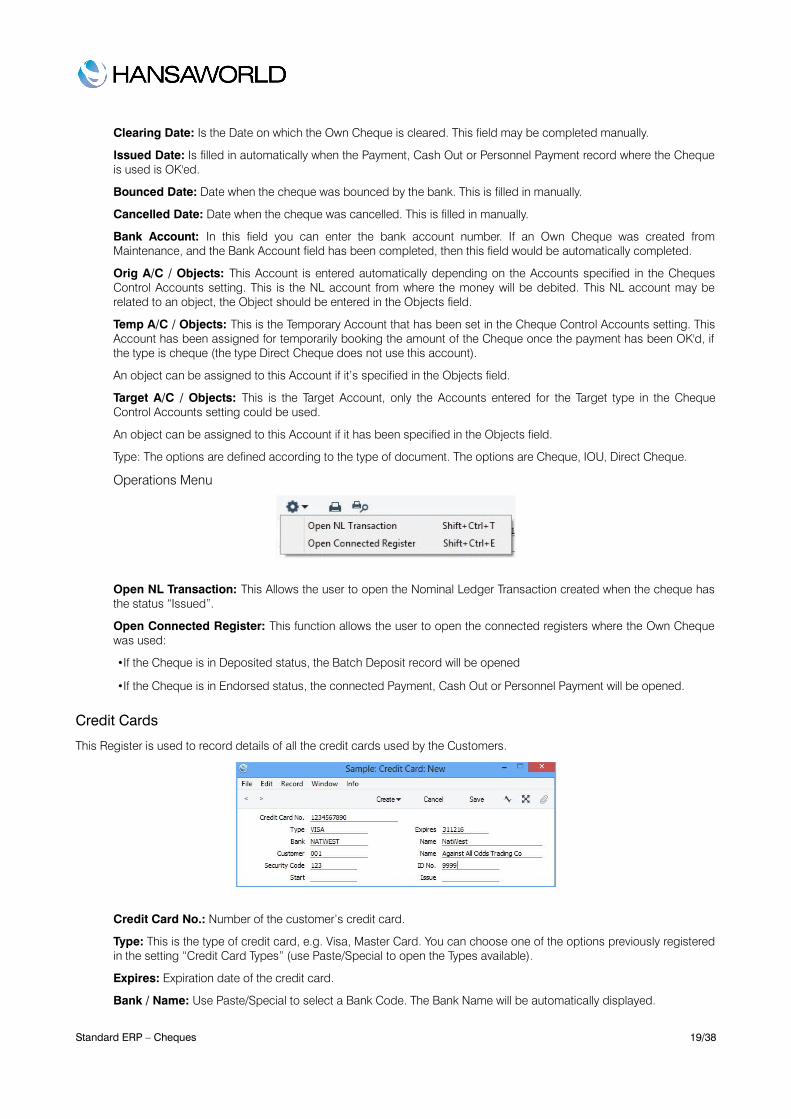
Operations Menu
Open NL Transaction: This Allows the user to open the Nominal Ledger Transaction created when the cheque has the status “Issued”.
Open Connected Register: This function allows the user to open the connected registers where the Own Cheque was used:
•If the Cheque is in Deposited status, the Batch Deposit record will be opened
•If the Cheque is in Endorsed status, the connected Payment, Cash Out or Personnel Payment will be opened.
Credit Cards
This Register is used to record details of all the credit cards used by the Customers.
Credit Card No.: Number of the customer’s credit card.
Type: This is the type of credit card, e.g. Visa, Master Card. You can choose one of the options previously registered in the setting “Credit Card Types” (use Paste/Special to open the Types available).
Expires: Expiration date of the credit card.
Bank / Name: Use Paste/Special to select a Bank Code. The Bank Name will be automatically displayed.
Standard ERP – Cheques 19/38
Customer / Name: Enter the name of the Customer that owns the credit card.
Security Code: Enter the security code of the credit card. This is an informative field only (usually the last 3 digits on the back of the card).
ID No.: Enter the ID code of the credit card.
Start: Initial validity date of the credit card.
Issue: Date on which the credit card was issued.
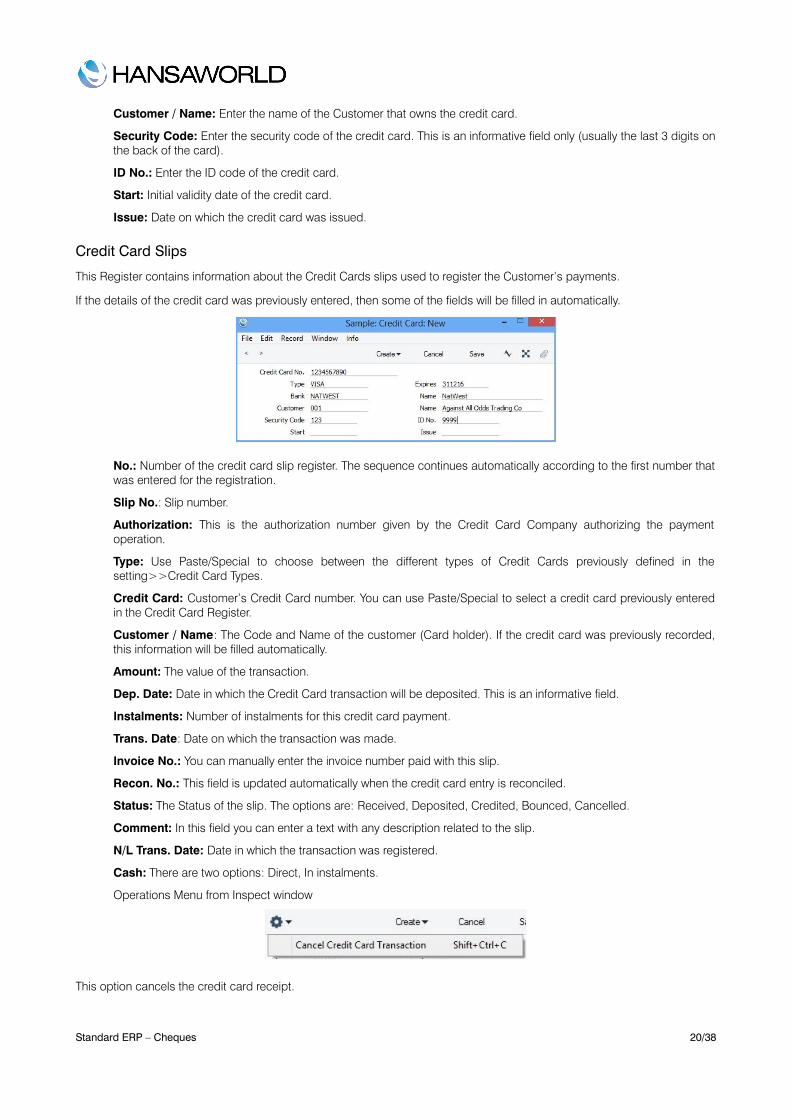
Credit Card Slips
This Register contains information about the Credit Cards slips used to register the Customer’s payments.
If the details of the credit card was previously entered, then some of the fields will be filled in automatically.
No.: Number of the credit card slip register. The sequence continues automatically according to the first number that was entered for the registration.
Slip No.: Slip number.
Authorization: This is the authorization number given by the Credit Card Company authorizing the payment operation.
Type: Use Paste/Special to choose between the different types of Credit Cards previously defined in the setting>>Credit Card Types.
Credit Card: Customer’s Credit Card number. You can use Paste/Special to select a credit card previously entered in the Credit Card Register.
Customer / Name: The Code and Name of the customer (Card holder). If the credit card was previously recorded, this information will be filled automatically.
Amount: The value of the transaction.
Dep. Date: Date in which the Credit Card transaction will be deposited. This is an informative field.
Instalments: Number of instalments for this credit card payment.
Trans. Date: Date on which the transaction was made.
Invoice No.: You can manually enter the invoice number paid with this slip.
Recon. No.: This field is updated automatically when the credit card entry is reconciled.
Status: The Status of the slip. The options are: Received, Deposited, Credited, Bounced, Cancelled.
Comment: In this field you can enter a text with any description related to the slip.
N/L Trans. Date: Date in which the transaction was registered.
Cash: There are two options: Direct, In instalments.
Operations Menu from Inspect window
This option cancels the credit card receipt.
Standard ERP – Cheques 20/38
ROUTINES – MAINTENANCE
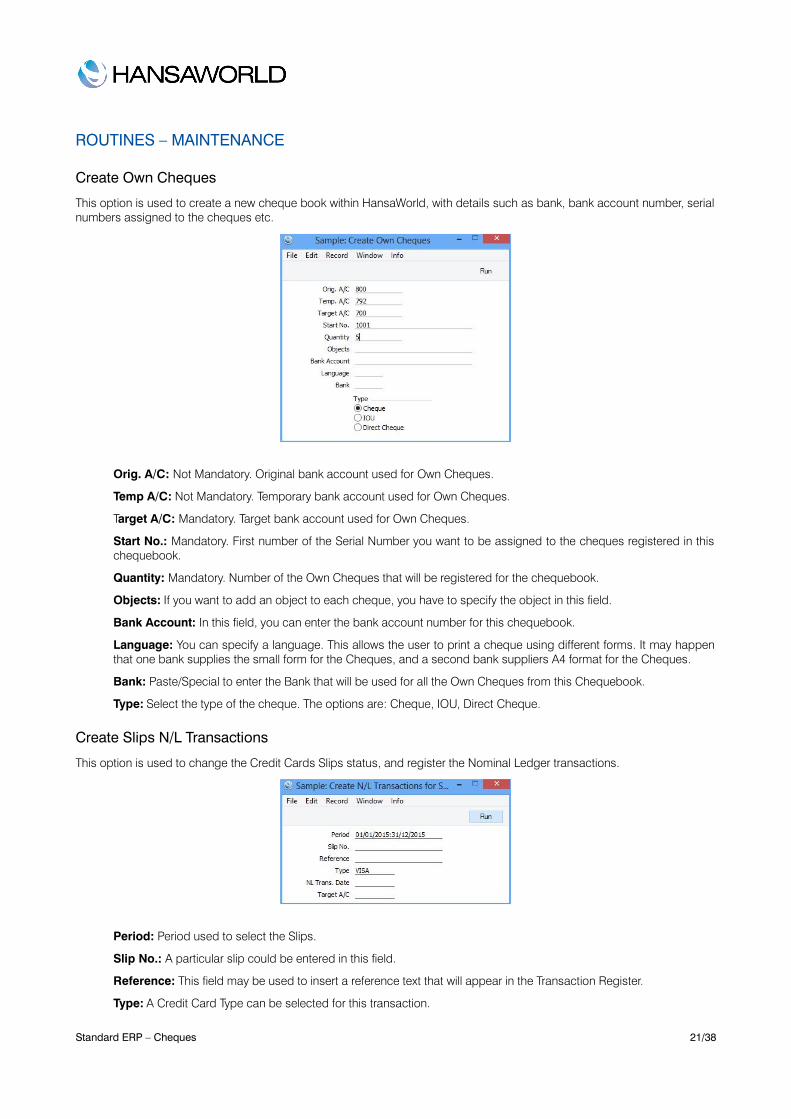
Create Own Cheques
This option is used to create a new cheque book within HansaWorld, with details such as bank, bank account number, serial numbers assigned to the cheques etc.
Orig. A/C: Not Mandatory. Original bank account used for Own Cheques.
Temp A/C: Not Mandatory. Temporary bank account used for Own Cheques.
Target A/C: Mandatory. Target bank account used for Own Cheques.
Start No.: Mandatory. First number of the Serial Number you want to be assigned to the cheques registered in this chequebook.
Quantity: Mandatory. Number of the Own Cheques that will be registered for the chequebook.
Objects: If you want to add an object to each cheque, you have to specify the object in this field.
Bank Account: In this field, you can enter the bank account number for this chequebook.
Language: You can specify a language. This allows the user to print a cheque using different forms. It may happen that one bank supplies the small form for the Cheques, and a second bank suppliers A4 format for the Cheques.
Bank: Paste/Special to enter the Bank that will be used for all the Own Cheques from this Chequebook.
Type: Select the type of the cheque. The options are: Cheque, IOU, Direct Cheque.
Create Slips N/L Transactions
This option is used to change the Credit Cards Slips status, and register the Nominal Ledger transactions.
Period: Period used to select the Slips.
Slip No.: A particular slip could be entered in this field.
Reference: This field may be used to insert a reference text that will appear in the Transaction Register.
Type: A Credit Card Type can be selected for this transaction.
Standard ERP – Cheques 21/38

NL Trans. Date: You can specify a date for the transaction.
Target A/C: Bank Account used for this transaction.
Standard ERP – Cheques 22/38
REPORTS
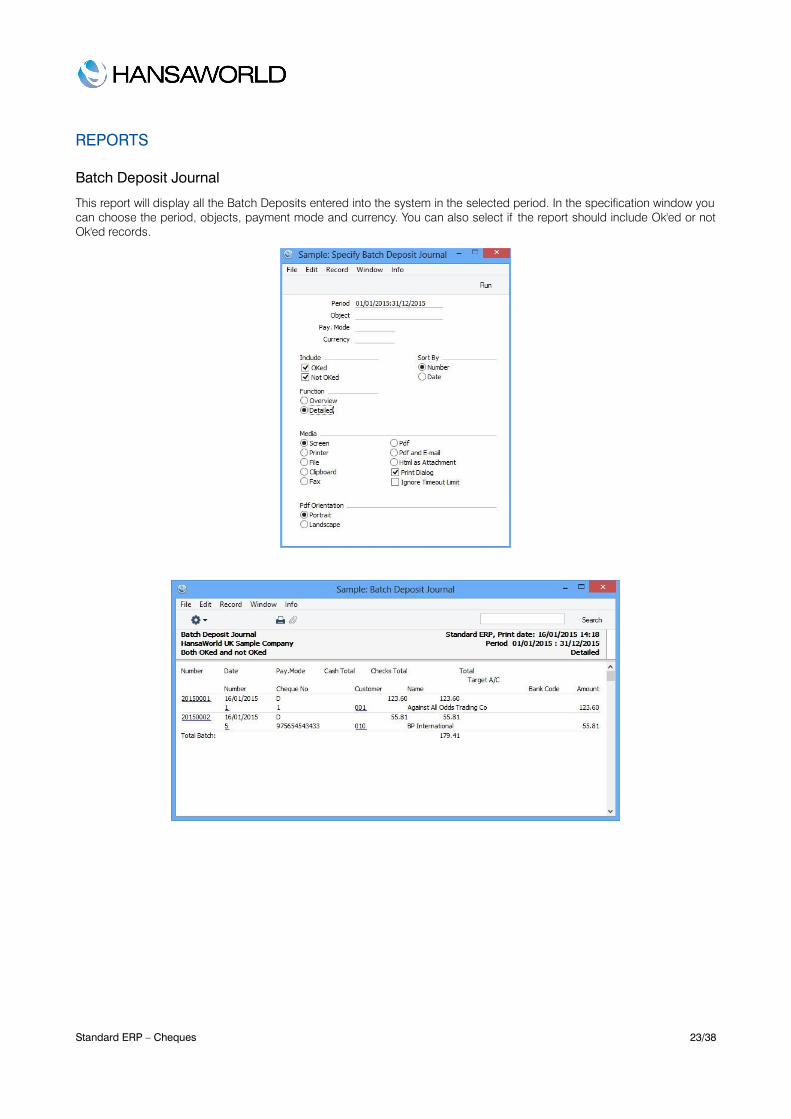
Batch Deposit Journal
This report will display all the Batch Deposits entered into the system in the selected period. In the specification window you can choose the period, objects, payment mode and currency. You can also select if the report should include Ok'ed or not Ok'ed records.
Standard ERP – Cheques 23/38

Cheque History
This report will display the different dates on which the Cheque was updated, i.e. the Registration Date, Effective Date, Deposit Date, etc.
In the specification window you will be able to choose a period, a specific customer and/or a minimum amount for printing.
Standard ERP – Cheques 24/38

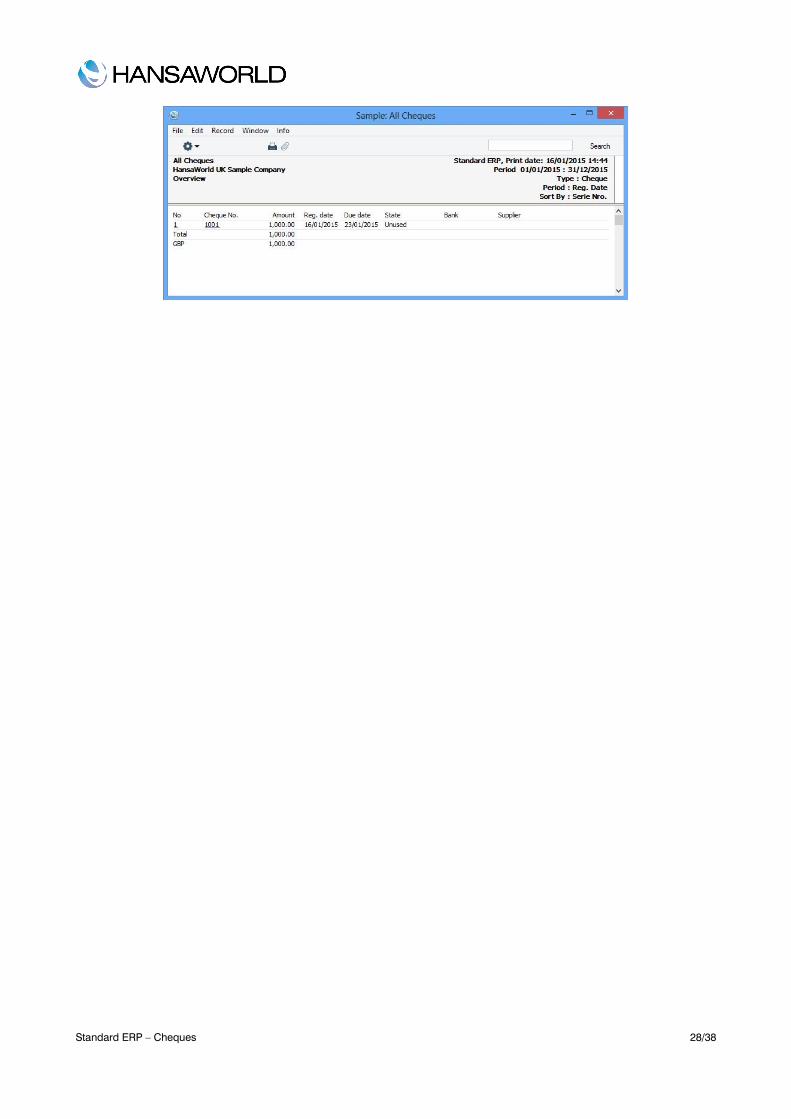
Cheques List
This report lists the Cheques received from the Customer, depending on the Status, Type, Date, etc..
You can filter the information by specifyng a specific Status for the Cheque, for example: registered, accepted, endorsed, etc. It is also possible to select the type of the cheque (own cheques, endorsed, all).
Another option includes the oportunity to show the Target A/C or the Cheque Status. The period of the report can use either the Registration Date or the Effect Date.
The report can be sorted by Number, Effect Date, Emitter (Person issuing the cheque) or Registration Date.
Standard ERP – Cheques 25/38
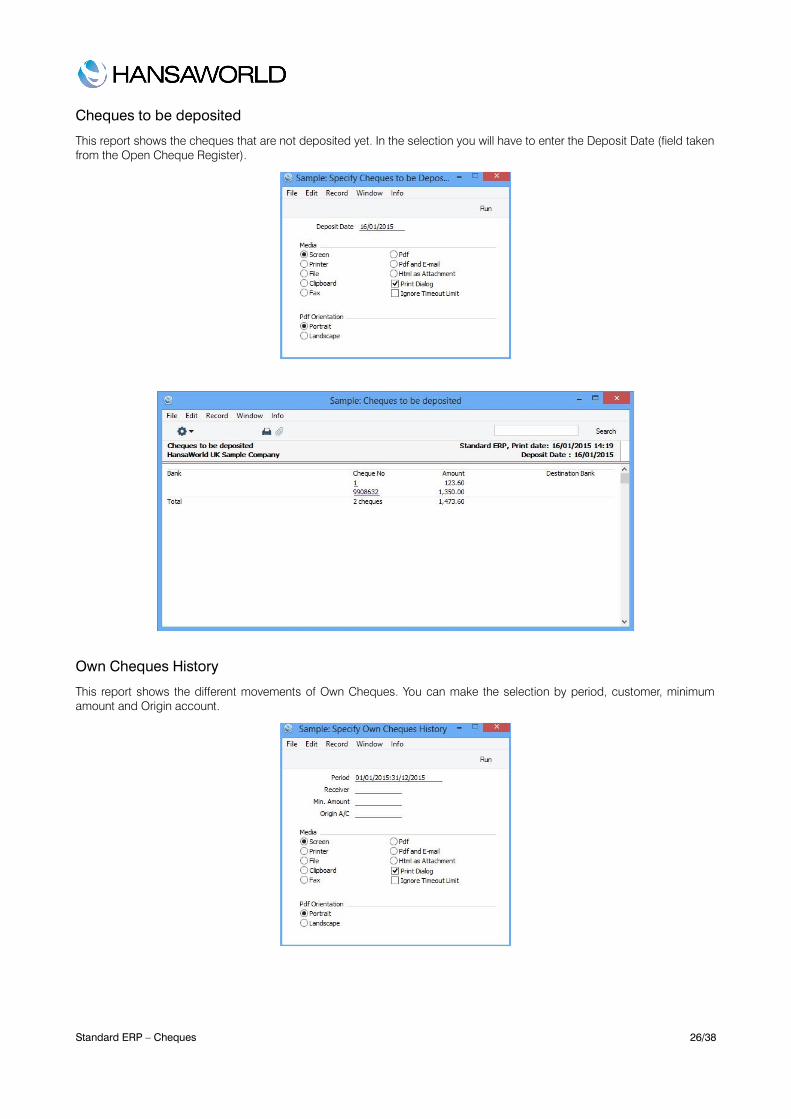
Cheques to be deposited
This report shows the cheques that are not deposited yet. In the selection you will have to enter the Deposit Date (field taken from the Open Cheque Register).
Own Cheques History
This report shows the different movements of Own Cheques. You can make the selection by period, customer, minimum amount and Origin account.
Standard ERP – Cheques 26/38
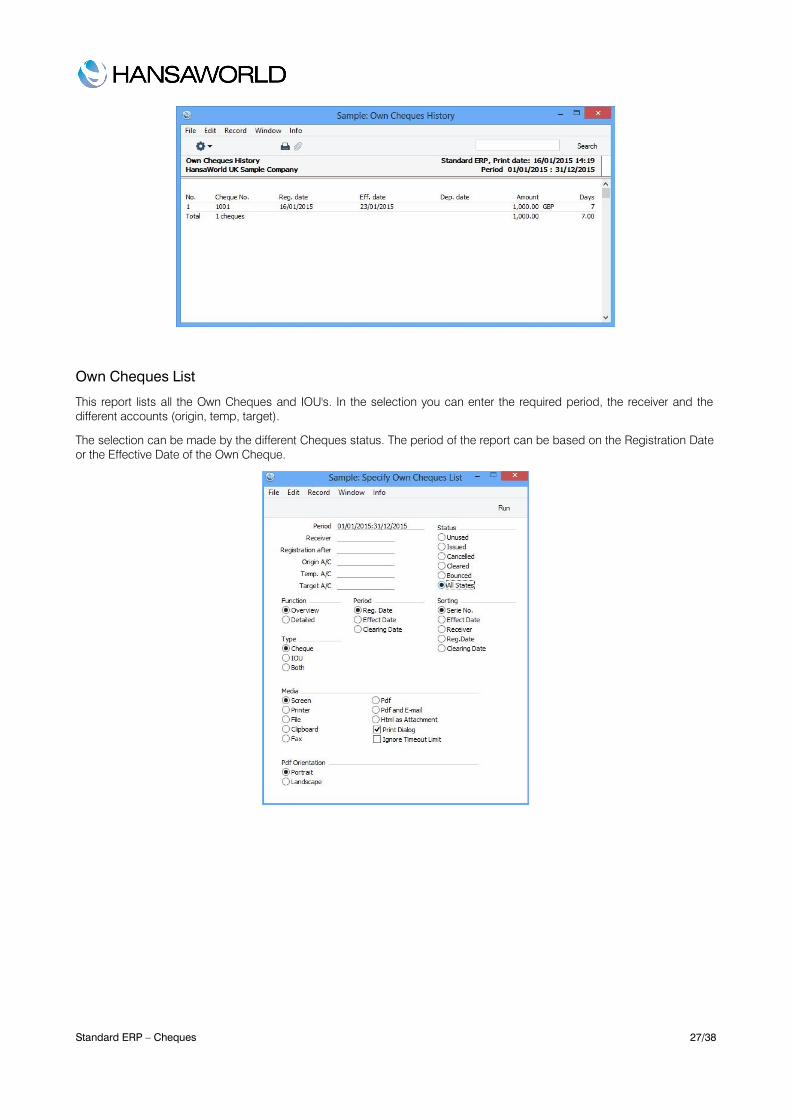
Own Cheques List
This report lists all the Own Cheques and IOU's. In the selection you can enter the required period, the receiver and the different accounts (origin, temp, target).
The selection can be made by the different Cheques status. The period of the report can be based on the Registration Date or the Effective Date of the Own Cheque.
Standard ERP – Cheques 27/38
Standard ERP – Cheques 28/38
MODULES INTEGRATED WITH CHEQUES
EXPENSES
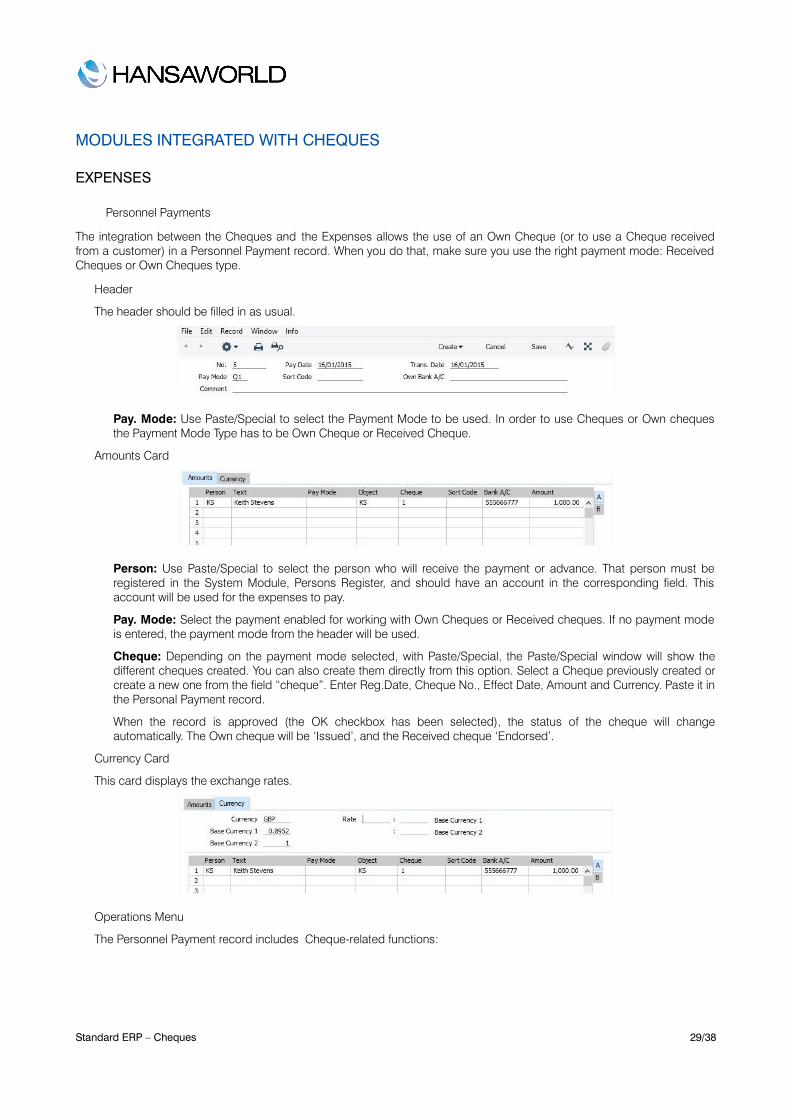
Personnel Payments
The integration between the Cheques and the Expenses allows the use of an Own Cheque (or to use a Cheque received from a customer) in a Personnel Payment record. When you do that, make sure you use the right payment mode: Received Cheques or Own Cheques type.
Header
The header should be filled in as usual.
Pay. Mode: Use Paste/Special to select the Payment Mode to be used. In order to use Cheques or Own cheques the Payment Mode Type has to be Own Cheque or Received Cheque.
Amounts Card
Person: Use Paste/Special to select the person who will receive the payment or advance. That person must be registered in the System Module, Persons Register, and should have an account in the corresponding field. This account will be used for the expenses to pay.
Pay. Mode: Select the payment enabled for working with Own Cheques or Received cheques. If no payment mode is entered, the payment mode from the header will be used.
Cheque: Depending on the payment mode selected, with Paste/Special, the Paste/Special window will show the different cheques created. You can also create them directly from this option. Select a Cheque previously created or create a new one from the field “cheque”. Enter Reg.Date, Cheque No., Effect Date, Amount and Currency. Paste it in the Personal Payment record.
When the record is approved (the OK checkbox has been selected), the status of the cheque will change automatically. The Own cheque will be ‘Issued’, and the Received cheque ‘Endorsed’.
Currency Card
This card displays the exchange rates.
Operations Menu
The Personnel Payment record includes Cheque-related functions:
Standard ERP – Cheques 29/38

Prepare Cheque: You can create a new Own Cheque with this option. Create the new Personal Payment record, enter the payment mode, Pay Date, Person, Amount and save the record. Then select this option. The amount will be copied from the Personnel Payment.
You can use this option when all the own cheques are from the same bank, since the system always picks the next free cheque.
Print Cheques: When this function is executed, the cheques used in that record will be printed.
CASH BOOK
Cheques could be used in the following registers: Cash In, Cash Out.
Cash In
Cheques can be used in this Register when a Customer pays an invoice with a Payment Mode with the type Received Cheques specified.
Amounts Card
Pay. Mode: Select the payment mode using Paste/Special. The payment mode has to be set as Received Cheques.
Customer: This field will be filled in automatically once you fill in the card Payments.
Standard ERP – Cheques 30/38

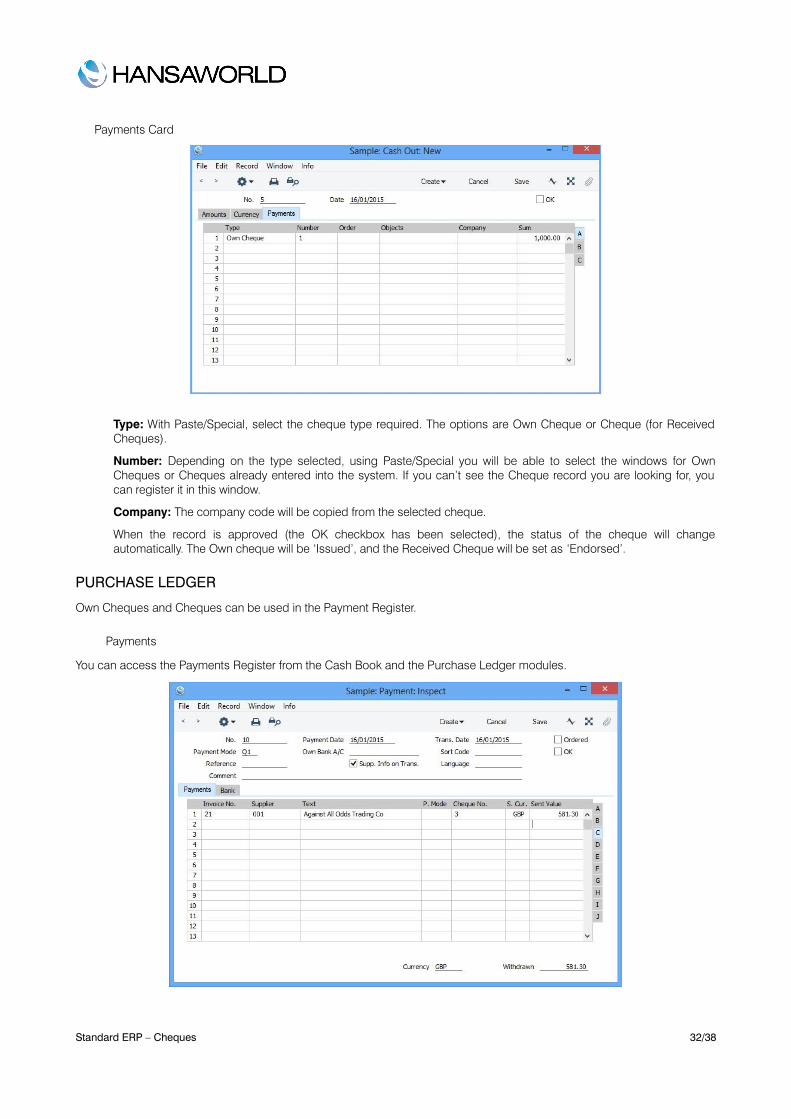
Payments Card
Type: With Paste/Special, select the Cheque type.
Number: If the Cheque was previously registered, use Paste/Special to select it. If not, you must first register the received cheque.
When the record is approved (the OK checkbox has been selected), the status of the cheque will change automatically to ‘Accepted’.
Cash Out: An Own Cheque could be used in this register when a Suppliers Invoice is paid with a Payment Mode that enables Own Cheques use.
Amounts Card
Pay. Mode: Select the required payment mode using Paste/Special, the Pay. Mode has to be set as Own Cheques or Received cheques.
Standard ERP – Cheques 31/38
Payments Card
Type: With Paste/Special, select the cheque type required. The options are Own Cheque or Cheque (for Received Cheques).
Number: Depending on the type selected, using Paste/Special you will be able to select the windows for Own Cheques or Cheques already entered into the system. If you can’t see the Cheque record you are looking for, you can register it in this window.
Company: The company code will be copied from the selected cheque.
When the record is approved (the OK checkbox has been selected), the status of the cheque will change automatically. The Own cheque will be ‘Issued’, and the Received Cheque will be set as ‘Endorsed’.
PURCHASE LEDGER
Own Cheques and Cheques can be used in the Payment Register.
Payments
You can access the Payments Register from the Cash Book and the Purchase Ledger modules.
Standard ERP – Cheques 32/38
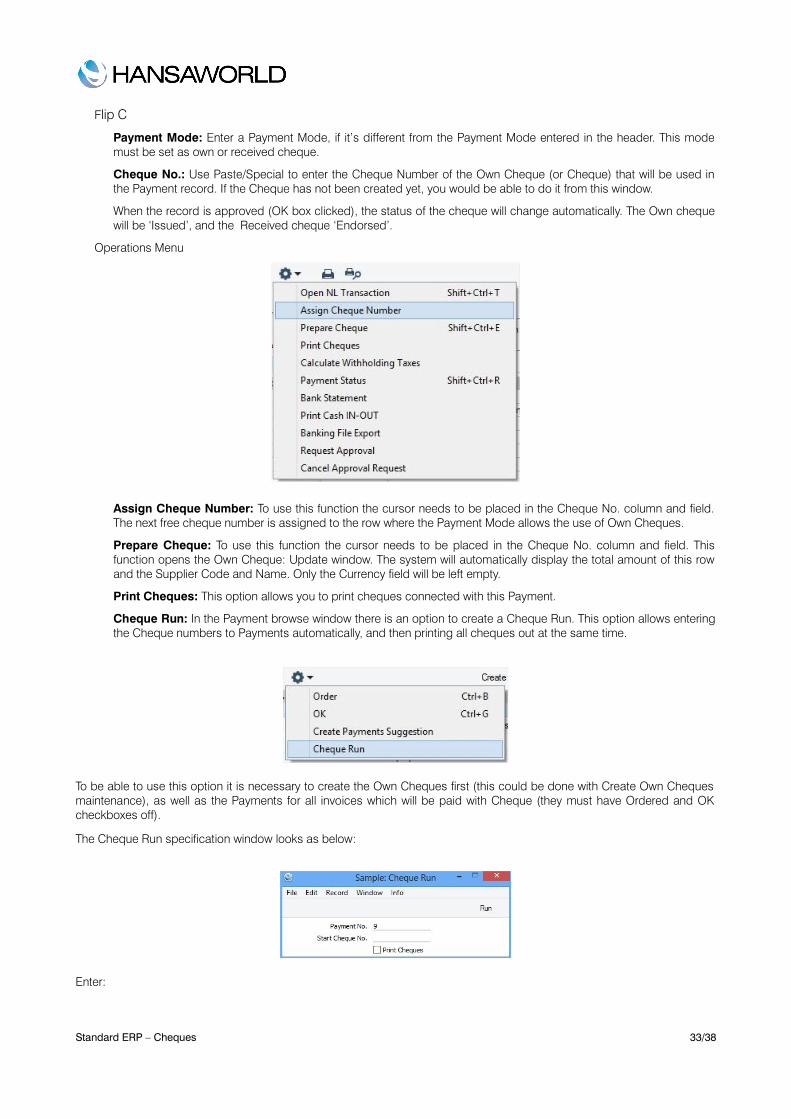
Flip C
Payment Mode: Enter a Payment Mode, if it’s different from the Payment Mode entered in the header. This mode must be set as own or received cheque.
Cheque No.: Use Paste/Special to enter the Cheque Number of the Own Cheque (or Cheque) that will be used in the Payment record. If the Cheque has not been created yet, you would be able to do it from this window.
When the record is approved (OK box clicked), the status of the cheque will change automatically. The Own cheque will be ‘Issued’, and the Received cheque ‘Endorsed’.
Operations Menu
Assign Cheque Number: To use this function the cursor needs to be placed in the Cheque No. column and field. The next free cheque number is assigned to the row where the Payment Mode allows the use of Own Cheques.
Prepare Cheque: To use this function the cursor needs to be placed in the Cheque No. column and field. This function opens the Own Cheque: Update window. The system will automatically display the total amount of this row and the Supplier Code and Name. Only the Currency field will be left empty.
Print Cheques: This option allows you to print cheques connected with this Payment.
Cheque Run: In the Payment browse window there is an option to create a Cheque Run. This option allows entering the Cheque numbers to Payments automatically, and then printing all cheques out at the same time.
To be able to use this option it is necessary to create the Own Cheques first (this could be done with Create Own Cheques maintenance), as well as the Payments for all invoices which will be paid with Cheque (they must have Ordered and OK checkboxes off).
The Cheque Run specification window looks as below:
Enter:
Standard ERP – Cheques 33/38
• The payment or the range of payments separated with colon (:)
• The first cheque no. (can be selected with Paste/Special)
• Tick Print Cheques if you want the cheques to be printed automatically as well.
Run.
After the function is finished, you can OK all payments (one by one or select a range and use the browse window OK function).
OK-ing the payment will generate NL transaction that will Debit Creditors and Credit the Bank/Cheque account and all Cheques will get a status of Issued.
If for some reason the payment row must be invalidated (i.e. paper stuck in the printer), do it with backspace key. After the payment gets Ok'ed, this particular cheque record will be in status Cancelled.
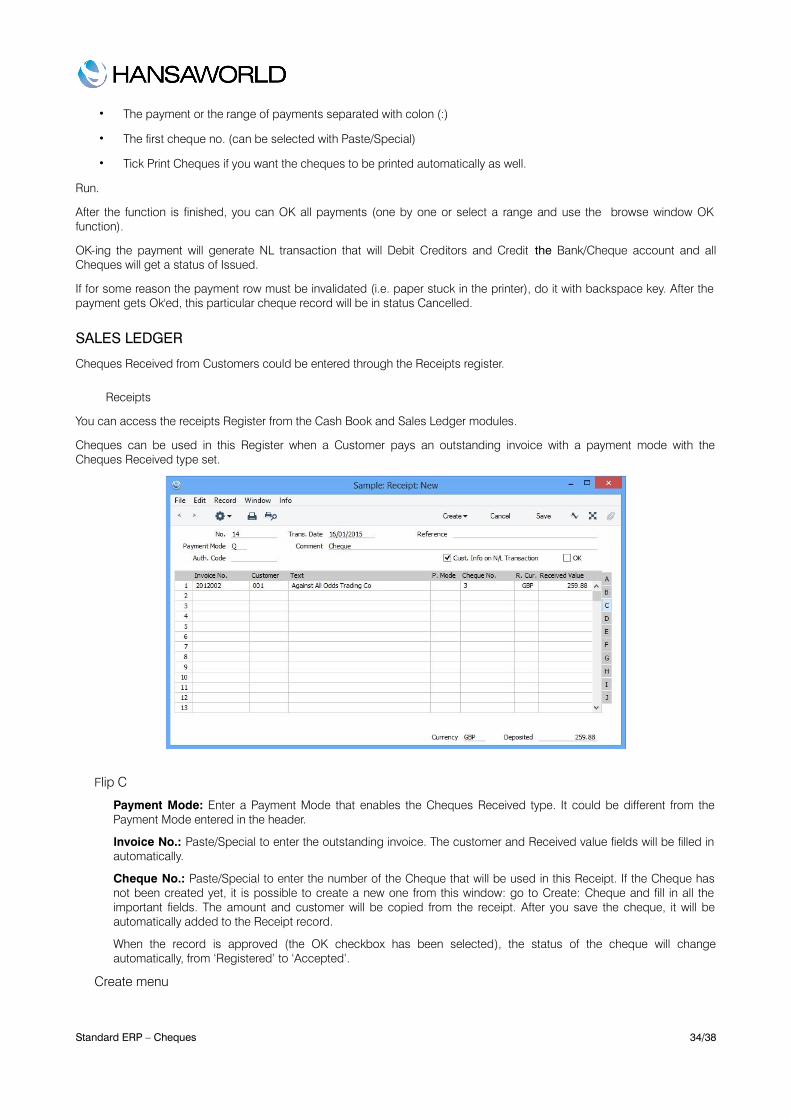
SALES LEDGER
Cheques Received from Customers could be entered through the Receipts register.
Receipts
You can access the receipts Register from the Cash Book and Sales Ledger modules.
Cheques can be used in this Register when a Customer pays an outstanding invoice with a payment mode with the Cheques Received type set.
Flip C
Payment Mode: Enter a Payment Mode that enables the Cheques Received type. It could be different from the Payment Mode entered in the header.
Invoice No.: Paste/Special to enter the outstanding invoice. The customer and Received value fields will be filled in automatically.
Cheque No.: Paste/Special to enter the number of the Cheque that will be used in this Receipt. If the Cheque has not been created yet, it is possible to create a new one from this window: go to Create: Cheque and fill in all the important fields. The amount and customer will be copied from the receipt. After you save the cheque, it will be automatically added to the Receipt record.
When the record is approved (the OK checkbox has been selected), the status of the cheque will change automatically, from ‘Registered’ to ‘Accepted’.
Create menu
Standard ERP – Cheques 34/38
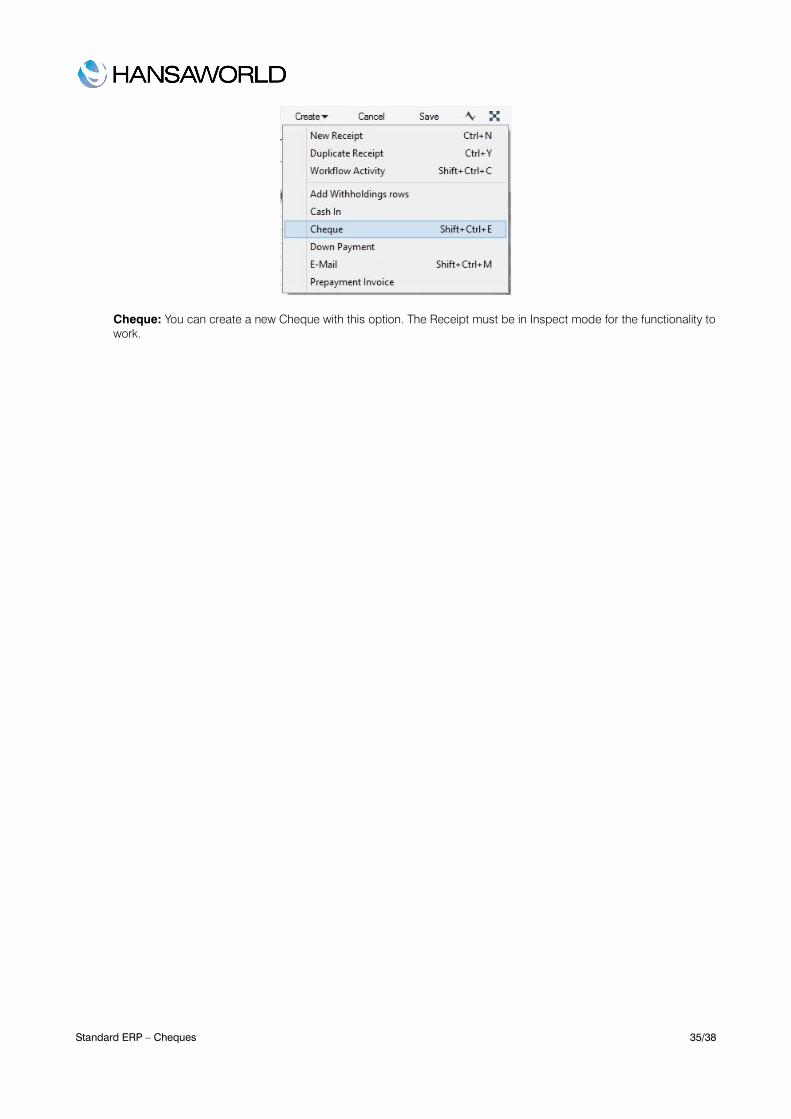
Cheque: You can create a new Cheque with this option. The Receipt must be in Inspect mode for the functionality to work.
Standard ERP – Cheques 35/38
EXERCISES
Theory Questions
1. Explain the difference between a received cheque and an own cheque.
2. Give the examples of modules where the received cheques can be used. What are the registers?
3. Give the examples of modules where the own cheques can be used. What are the registers?
4. What does the Bounced status of the cheque mean?
5. What is the Batch Deposit register, what is it used for?
6. Explain the difference between the Open Cheques register and the Deposited Cheques register.
7. What is important about creating Payment Modes for Cheques payments?
Practical Exercises
Preparation: download British version of Standard ERP and import the Sample database. Use SJ login, no password.
1. Go to Cheques>>Settings>>Cheque Control Accounts
2. Set up the following:
◦ Allowed Target – account 700
◦ Allowed Origin Own – account 800
◦ Default Temporary Origin Own – create a new account and add it here
◦ Allowed Origin – account 700
3. Go to Cheques>>Settings>>Payment Modes and set up the payment modes for received cheques and for own cheques.
4. Go to Cheques>>Routines>>Maintenance>>Create Own Cheques and Create 10 new cheques starting from number 1001. Use the same accounts as you set up in pt. 2. (tip: for Origin A/C you should use account 800)
5. Go to Expenses>>Registers>>Personnel Payments>Create: New
6. In the header put the correct own cheques payment mode, and in the matrix – paste the person and enter the quantity 100.00. Put the Cursor onto the Cheque field and choose Operations Menu option – Prepare Cheque.
7. Question: What is the Cheque’s status? What is the register(s) name in the Cheques module this record could be found in?
8. Save the Cheque.
9. Order and OK the Personnel Payment and save it.
10. Highlight the cheque number and press F2 to open the record on the screen.
11. Question: What is the Cheque’s status now? What is the register(s) name in the Cheques module that this record can be found in now?
12. Go to the Sales Ledger module>>Registers>>Receipts>>Create: New
13. In the header put the correct received cheques payment mode and in the matrix Paste/Special an invoice number into the Invoice No. field.
14. Go to flip C and put the cursor in the Cheques field.
Standard ERP – Cheques 36/38
15. Question: How can you add a new cheque now? Do it.
16. Fill in all the necessary fields and save.
17. Question: What is going to happen with the cheque if you OK the Receipt? How can you find it in the system? Can this cheque be used to pay your supplier?
Standard ERP – Cheques 37/38

APPENDIX
Terminology between different versions of English language
The language used in this material is British English. There can be slight differences between other versions of the English language, which can lead to confusions. This table should help to clear these up. Sorted alphabetically
British USA Canada Australia + New Zealand
Singapore
Cheque Check Cheque Cheque Cheque
Colour/coloured Color/colored Colour/coloured Colour/coloured Colour/coloured
Credit Note(CN) Credit Memo (CN) Credit Memo (CM) Credit Note (CN) Credit Note
Dialogue Dialog
Instalment Installment
Jewellery Jewelry Jewellery Jewellery Jewellery
Licence (noun) License Licence Licence Licence
Mileage Claim Miles Way Lists Mileage Claim Mileage Claim
Miles Miles KM KM KM
Mobile Cell Mobile Mobile Mobile
Nominal Ledger (NL) General Ledger (GL) General Ledger (GL) General Ledger (GL) General Ledger (GL)
Post Code ZIP Code Post Code Post Code Post Code
Profit and Loss Statement
Income Statement Income Statement Statement of Profit or Loss
Statement of Profit or Loss
Purchase Ledger Payable (PL = AP) Payable (PL = AP) Purchase Ledger Purchase Ledger
Sales Ledger Receivable (SL=AR) Receivable (SL=AR) Sales Ledger Sales Ledger
Salesman Salesperson Salesperson Salesman Salesperson
Stock Inventory Inventory Stock Inventory
Stocktake Inventory Count Inventory Count Stocktake Inventory Count
Stock Depreciation Inventory Adjustment Inventory Adjustment Stock Depreciation Inventory Adjustment
Supplier Vendor Vendor Supplier Vendor
Turnover Revenue Revenue Revenue Revenue
VAT Sales Tax or Tax Tax (or GST/PST) GST GST/SST/HST
Standard ERP – Cheques page 38/38