Embed Size (px)
Citation preview

1
Designed and colored by Terrie Kygar. Quilted by Linda Perry. Finished quilt size: 14¾" x 20¼".
Hanging Out

Hanging Out 2
Growing up in Oregon’s Willamette Valley, I enjoyed an abundance of local fruit, including pears, apples, grapes, and berries—especially berries! As a teenager, I would pick strawberries in the summer. Lots of the kids did. Can you picture it—teenagers, picking strawberries, eating strawberries—throwing strawberries? We had fun. Another good memory built around summertime fruit in the Willamette Valley.
MaterialsYardage is based on 42"-wide fabric. Amounts given are generous to allow for trimming and do-overs and so you won’t have to piece the borders.
½ yard of fabric for outer border1 fat quarter of fabric for background1 fat quarter of light-yellow batik for appliqués ⅛ yard of fabric for inner border⅛ yard of fabric for middle border⅓ yard of fabric for bindingScrap of white fabric, at least 3" x 3", for butterfly appliqué ⅝ yard of fabric for backing19" x 24" piece of batting½ yard of 12"-wide fusible webDark-brown colored pencil Black Pigma pen, size .02Brown Pigma pen, size .02General coloring supplies (page 5 of Creative Quilts from Your Crayon Box)
Cutting From the background fabric, cut:1 rectangle, 7½" x 13"
From the inner-border fabric, cut:2 strips, ⅝" x 42"; cut into 4 strips, ⅝" x 21"
From the middle-border fabric, cut:2 strips, 1" x 42"; cut into 4 strips, 1" x 21"
From the outer-border fabric, cut:4 strips, 3½" x 42"
From the binding fabric, cut:3 strips, 2¾" x 42"
From the backing fabric, cut:1 rectangle, 19" x 24"
Pear Coloring RecipeUse the basic Melt-n-Blend technique (page 13 of the book). 1. Prepare the pear appliqués
(page 4) using fusible web and the light-yellow batik.
2. Melt-n-Blend the crayon colors as described below:• Dandelion over the entire
area of each pear• Bittersweet along the right
side of each pear• Mahogany along the left
side of each pear• Wild Strawberry over the
middle, lower half of each pear
3. Shade and outline each pear using a brown pencil.
4. Use a black Pigma pen to draw the details on each pear.

Hanging Out 3
Apple Coloring RecipeUse the basic Melt-n-Blend technique. 1. Prepare the apple appliqués
(page 4) using fusible web and the light-yellow batik.
2. Melt-n-Blend the crayon colors as described below:• Dandelion over the entire
area of each apple• Yellow-Orange along the
right side• Wild Strawberry along the
left side, along the bottom, and halfway up the right side of each apple
• Brick Red along the left side and along the bottom of each apple, partially overlapping the Wild Strawberry
• Yellow-Green over the upper-right area of each apple
3. Shade and outline each apple using a brown pencil.
4. Use a black Pigma pen to draw the details on each apple.
Grape-Leaf Coloring RecipeUse the basic Melt-n-Blend technique. 1. Prepare the leaf appliqués
(page 4) using fusible web and the light-yellow batik.
2. Melt-n-Blend the crayon colors as described below:• Dandelion along the verti-
cal center of each leaf
• Yellow-Green along the right and left sides of each leaf
• Tropical Rainforest Green over small random areas on each leaf
• Wild Strawberry over small random areas on two leaves
3. Shade and outline each leaf using a brown pencil.
4. Use a black Pigma pen to draw the veins on each leaf.
5. Use a brown Pigma pen to draw the stems on each leaf.
Grape Coloring RecipeUse the basic Melt-n-Blend technique. 1. Prepare the grape appliqués
(page 4) using fusible web and the light-yellow batik.
2. Melt-n-Blend the crayon colors as described below:• Magenta over the entire
area of each grape• Royal Purple along the left
side of each grape
3. Shade and outline each grape using a brown pencil.
Butterfly Coloring RecipeUse the Trace-n-Color tech-nique (page 19 of the book). 1. Prepare the butterfly (page
4) using fusible web and the white fabric.
2. Melt-n-Blend the crayon colors as described below:• Inchworm to the inner
area of each wing• Blue-Green to the middle
area of each wing• Royal Purple to the outer
area of each wing
3. Color the butterfly body using a brown pencil.
4. After fusing the butterfly to the background, use a black Pigma pen to draw the antennae on the butterfly.
Finishing Your QuiltSee “Assembling and Finishing Your Quilt” (page 23 of the book) for detailed information, as needed. 1. Referring to the photo (page
1) for placement guidance, arrange the appliqués on the background rectangle and fuse them in place.
2. Refer to “Borders with Butted Corners” (page 23 of the book) to measure and cut the inner-border strips, and then the middle-border strips. Stitch the borders to the quilt top and press.
3. Refer to “Borders with Mitered Corners” (page 24 of the book) to sew the outer-border strips to your quilt top.
4. Assemble the quilt sand-wich, baste the layers together, and quilt as desired.
5. Using the 2¾"-wide binding strips, make and attach the binding to your quilt.

Hanging Out 4
Patterns are reversed forfusible appliqué and do not
include seam allowances.
PearMake 3.
AppleMake 2.
ButterflyMake 1.
Make 2.
GrapeMake 21.
Make 1.
Make 1.
Leaves

1
Sunny Shade
Designed and colored by Terrie Kygar. Quilted by Linda Perry. Finished quilt size: 20½" x 23½".

Sunny Shade 2
During my coloring classes, students frequently ask if I have plans for designing a pattern around this or that particular theme. Several of the most requested were pumpkins, sunflowers, and birds—cardinals in particular. I managed to squeeze all three into this sunny quilt—as well as some more fruit for me.
MaterialsYardage is based on 42"-wide fabric. Amounts given are generous to allow for trimming and do-overs and so you won’t have to piece the borders.
¾ yard of light-yellow batik for appliqués⅜ yard of fabric for outer border¼ yard of fabric for middle border1 fat quarter of fabric for background⅛ yard of fabric for inner borderScrap of white fabric, at least 8" x 9", for grapes and cardinal⅜ yard of fabric for binding1 yard of fabric for backing25" x 28" piece of batting1½ yards of 12"-wide fusible webBrown and yellow-orange colored pencilsBlack Pigma pen, size .02Brown Pigma pen, size .02General coloring supplies (page 5 of Creative Quilts from Your Crayon Box)
Cutting From the background fabric, cut:1 rectangle, 14" x 17"
From the inner-border fabric, cut:2 strips, ¾" x 42"; cut into 4 strips, ¾" x 21"
From the middle-border fabric, cut:4 strips, 1½" x 42"
From the outer-border fabric, cut:4 strips, 2½" x 42"
From the binding fabric, cut:3 strips, 2¾" x 42"
From the backing fabric, cut:1 rectangle, 25" x 28"
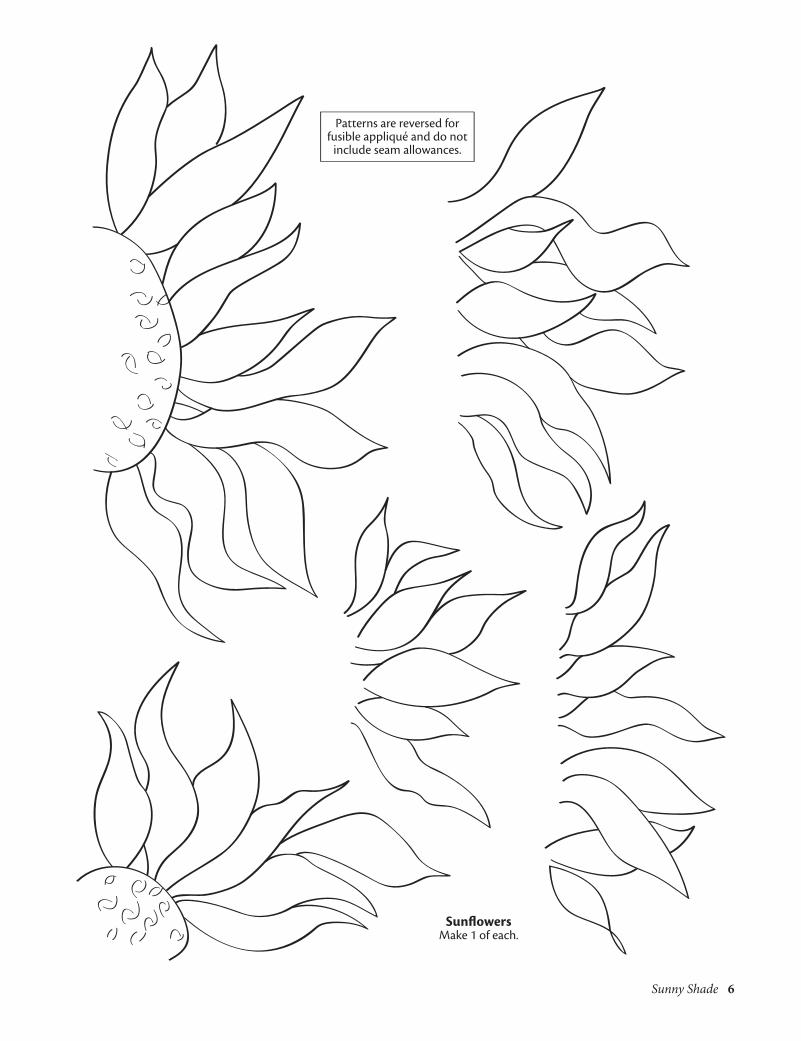
Sunflower Coloring RecipeUse the Build-n-Color tech-nique (page 18 of the book). 1. Prepare the sunflower
appliqués (pages 6–9) using fusible web and the light-yellow batik. As you trace the petals, add a scant ¼" seam allowance to each petal edge that needs to be tucked under neighboring petals.
2. Build the sunflowers, including the centers.
3. Melt-n-Blend the crayon colors as described below:• Mahogany over the entire
area of each flower center• Brown around the edges
of each center, partially overlapping the Mahogany
• Dandelion over the entire area of each petal
• Yellow-Green, Yellow-Orange, and Wild Strawberry over small random areas of the petals
4. Lightly outline around the edge of each flower petal using a brown pencil.
5. Use a black Pigma pen to draw the details on each flower center.

Sunny Shade 3
Pear Coloring RecipeUse the basic Melt-n-Blend technique (page 13 of the book). 1. Prepare the pear appliqué
(page 5) using fusible web and the light-yellow batik.
2. Melt-n-Blend the crayon colors as described below:• Dandelion over the entire
pear• Bittersweet along the right
side of the pear• Mahogany along the left
side of the pear• Brick Red along the
bottom edge and slightly up the left side, partially overlapping the Mahogany
• Yellow-Green over a small area in the upper half of the pear
• Wild Strawberry over a small area in the lower half of the pear
3. Use a black Pigma pen to draw the detail at the bottom of the pear.
4. Shade and outline the pear using a brown pencil.
Yellow-Apple Coloring RecipeUse the basic Melt-n-Blend technique. 1. Prepare the apple appliqué
(page 5) using fusible web and the light-yellow batik.
2. Melt-n-Blend the crayon colors as described below:• Dandelion over the entire
area of the apple• Brick Red along the right
side of the apple
• Maroon along the left side of the apple
• Yellow-Green over a small area in the upper half of the apple
3. Use a black Pigma pen to draw the detail on top of the apple.
4. Shade and outline the apple using a brown pencil.
Red-Apple Coloring RecipeUse the basic Melt-n-Blend technique. 1. Prepare the apple appliqué
(page 5) using fusible web and the light-yellow batik.
2. Melt-n-Blend the crayon colors as described below:• Wild Strawberry over the
entire area of the apple• Brick Red along the right
side of the apple• Plum along the left side,
the bottom edge, and half-way up the right side, par-tially overlapping the Brick Red and Wild Strawberry
• Maroon along the left side and the bottom edge, par-tially overlapping the Plum
• A very light coat of Brown over the entire apple
3. Use a black Pigma pen to draw the detail on the top of the apple.
4. Shade and outline the apple using a brown pencil.
Purple-Plum Coloring RecipeUse the basic Melt-n-Blend technique. 1. Prepare the plum appliqués
(page 5) using fusible web and the light-yellow batik.
2. Melt-n-Blend the crayon colors as described below:• Dandelion over the entire
area of each plum• Magenta along the left side
of each plum• Wild Strawberry along the
right side of each plum• Royal Purple along the
bottom edge and slightly up the left side, partially overlapping the Magenta
3. Outline along the edges of each plum using a brown pencil.
4. Use a brown Pigma pen to lightly draw the center crease on each plum.
5. Lightly shade over the crease using a brown pencil.
Green-Apple Coloring RecipeUse the basic Melt-n-Blend technique. 1. Prepare the apple appliqué
(page 5) using fusible web and the light-yellow batik.
2. Melt-n-Blend the crayon colors as described below:• Dandelion over the entire
area of each apple• Yellow-Green along the
right side of each apple• Forest Green along the left
side of each apple

Sunny Shade 4
3. Use a black Pigma pen to draw in the details on each apple.
4. Shade and outline each apple using a brown pencil.
Grape-Cluster Coloring RecipeUse the Trace-n-Color tech-nique (page 19 of the book). 1. Prepare the grape-cluster
appliqués (page 12) using fusible web and the white fabric
2. Melt-n-Blend the crayon colors as described below:• Wild Strawberry over the
entire area of the grape cluster
• Magenta along the left side of the grape cluster
• Royal Purple along the left side of the grape cluster, partially overlapping the Magenta
3. Shade each grape along the left side using a brown pencil.
4. Use a black Pigma pen to add a tiny dot to each grape.
Grape-Leaf Coloring RecipeUse the basic Melt-n-Blend technique. 1. Prepare the grape-leaf appli-
qués (page 12) using fusible web and the light-yellow batik.
2. Melt-n-Blend the crayon colors as described below:• Dandelion along the verti-
cal center of each leaf
• Tropical Rainforest Green along the right side of each leaf
• Yellow-Green along the left side of each leaf
• Wild Strawberry and Royal Purple over small random areas of each leaf
3. Use a black Pigma pen to draw the veins on each leaf. Trace lightly over the veins with the brown pencil.
4. Outline along the edge of each leaf using a brown pencil.
Oak-Leaf Coloring RecipeUse the basic Melt-n-Blend technique. 1. Prepare the oak-leaf appli-
qués (page 11) using fusible web and the light-yellow batik.
2. Melt-n-Blend the crayon colors as described below:• Dandelion over the verti-
cal center of each leaf• Yellow Green along the
right and left sides of each leaf
• Tropical Rainforest Green over small random areas on each leaf
• Wild Strawberry over small random areas on several leaves
3. Outline the edge of each leaf using a brown pencil.
4. Use a black Pigma pen to draw the veins on each leaf.
Pumpkin Coloring RecipeUse the Color-n-Build tech-nique (page 17 of the book). 1. Prepare the pumpkin pieces
(page 10) using fusible web and the light-yellow batik. As you trace the sections, add a scant ¼" seam allow-ance to each edge that needs to be tucked under a neigh-boring section.
2. Melt-n-Blend the crayon colors as described below:• Dandelion over the entire
area of each piece• Yellow-Orange along the
left side of pieces A, B, and C, the right side of pieces E, F, and G, and both sides of piece D.
• Burnt-Orange partially overlapping the Yellow-Orange on each piece
3. Outline along the edge of each piece using a brown pencil.
4. Build the pumpkin and fuse the pieces together.
Cardinal Coloring Recipe Use the Trace-n-Color technique. 1. Prepare the cardinal appli-
qué (page 11) using fusible web and the white fabric.
2. Melt-n-Blend the crayon colors as described below:• Scarlet over the entire bird,
avoiding the front area of the head and the beak

Sunny Shade 5
• Red along the outer edges of the bird and under the lower edge of each layer of feathers. Look closely at the photo (page 1) for placement of this color.
3. Shade very lightly on the top of the red crayon using a brown pencil.
4. Use a black Pigma pen to color the black area on front of the head and the eye, leaving a tiny circle of white in the center of the eye.
5. Color the beak with a yellow-orange pencil.
6. Outline along the edge of the cardinal using a brown pencil.
Finishing Your QuiltSee “Assembling and Finishing Your Quilt” (page 23 of the book) for detailed information, as needed. 1. Referring to the photo (page
1) for placement guidance, arrange the appliqués on the background rectangle and fuse them in place.
2. Refer to “Borders with Butted Corners” (page 23 of the book) to measure and cut the inner-border, middle-border, and then the outer-border strips. Stitch the borders to the quilt top and press.
3. Assemble the quilt sand-wich, baste the layers together, and quilt as desired.
4. Using the 2¾"-wide binding strips, make and attach the binding to your quilt.
PlumMake 1 and1 reversed.
PearMake 1.
Green appleMake 3.
Red appleMake 1.
Yellow appleMake 1.
Patterns are reversed forfusible appliqué and do not
include seam allowances.
Sunny Shade 6
SunflowersMake 1 of each.
Patterns are reversed forfusible appliqué and do not
include seam allowances.

Sunny Shade 7
SunflowerMake 1.
Patterns are reversed forfusible appliqué and do not
include seam allowances.

Sunny Shade 8
SunflowerMake 1.
Patterns are reversed forfusible appliqué and do not
include seam allowances.

Sunny Shade 9
SunflowerMake 1.
Patterns are reversed forfusible appliqué and do not
include seam allowances.

Sunny Shade 10
PumpkinMake 1 of each piece.
Patterns are reversed forfusible appliqué and do not
include seam allowances.
A
B
C
D
E
F
G

Sunny Shade 11
CardinalMake 1.
Oak leaves
Patterns are reversed forfusible appliqué and do not
include seam allowances.
Make 1.
Make 2.
Make 1.
Make 1.
Make 1.Make 1.
Make 1.Make 1.

Sunny Shade 12
Grape clustersMake 1 of each.
Grape leavesMake 1 of each.
Patterns are reversed forfusible appliqué and do not
include seam allowances.