Embed Size (px)
Citation preview

Hands-On Lab
Introduction to SQL Azure
Lab version: 2.0.0
Last updated: 11/16/2010
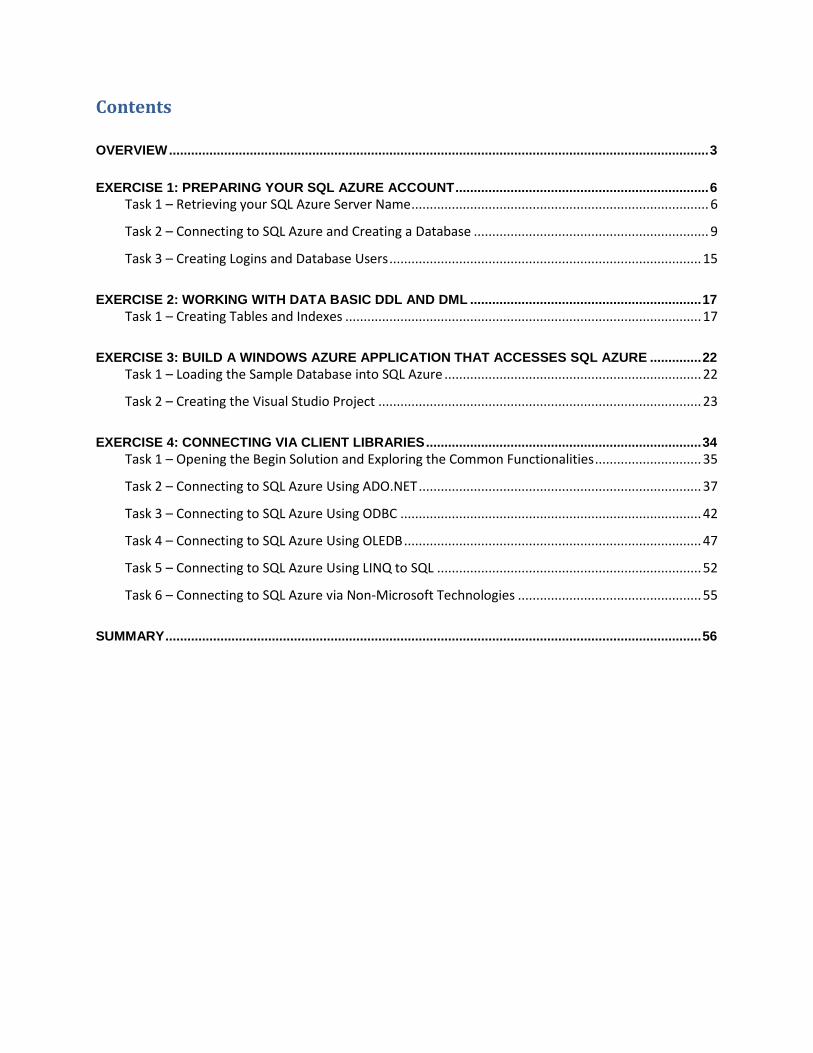
Contents
OVERVIEW ................................................................................................................................................... 3
EXERCISE 1: PREPARING YOUR SQL AZURE ACCOUNT ..................................................................... 6 Task 1 – Retrieving your SQL Azure Server Name ................................................................................. 6
Task 2 – Connecting to SQL Azure and Creating a Database ................................................................ 9
Task 3 – Creating Logins and Database Users ..................................................................................... 15
EXERCISE 2: WORKING WITH DATA BASIC DDL AND DML ............................................................... 17 Task 1 – Creating Tables and Indexes ................................................................................................. 17
EXERCISE 3: BUILD A WINDOWS AZURE APPLICATION THAT ACCESSES SQL AZURE .............. 22 Task 1 – Loading the Sample Database into SQL Azure ...................................................................... 22
Task 2 – Creating the Visual Studio Project ........................................................................................ 23
EXERCISE 4: CONNECTING VIA CLIENT LIBRARIES ........................................................................... 34 Task 1 – Opening the Begin Solution and Exploring the Common Functionalities ............................. 35
Task 2 – Connecting to SQL Azure Using ADO.NET ............................................................................. 37
Task 3 – Connecting to SQL Azure Using ODBC .................................................................................. 42
Task 4 – Connecting to SQL Azure Using OLEDB ................................................................................. 47
Task 5 – Connecting to SQL Azure Using LINQ to SQL ........................................................................ 52
Task 6 – Connecting to SQL Azure via Non-Microsoft Technologies .................................................. 55
SUMMARY .................................................................................................................................................. 56

Overview
SQL Azure makes the power of Microsoft SQL Server available in a Cloud Hosted offering. Working with
SQL Azure should be a familiar experience for most developers because, for the most part, it supports
the same tooling and development practices currently used for on premise SQL Server applications.
However, there are some small differences between working with SQL Azure and working with on-
premise SQL Server. Some of these differences are inherent in the way that SQL Azure has been
architected and some will only apply during the Community Technical Preview phase.
This hands-on lab will walk through a series of simple use cases for SQL Azure such as provisioning your
account, creating, and using a database. You will create a simple Windows Azure application to allow
you to manipulate the data in the Customer table of a database running in SQL Azure.
Objectives
In this hands-on lab, you will:
Use SQL Azure as a cloud hosted database platform for your applications.
Learn how to:
◦ Provision a new account in SQL Azure
◦ Create new databases within the context of your account
◦ Create new users and grant them appropriate permissions
Work with SQL Azure to:
◦ Execute Data Definition Language statements to create tables and indexes
◦ Execute Data Manipulation Language to insert and query rows
Build a simple data driven ASP.NET page using the graphical controls in Visual Studio.
Connect to SQL Azure Database via Client Libraries.
Prerequisites
The following is required to complete this hands-on lab:
Microsoft .NET Framework 4.0
Microsoft Visual Studio 2010
SQL Server Management Studio 2008 R2 Express Edition
Windows Azure Tools for Microsoft Visual Studio 1.2 (June 2010)
Note: To complete this hands-on lab, you need to have a SQL Azure account. To sign up, visit
http://www.microsoft.com/windowsazure/sqlazure/.
Setup
For convenience, much of the code used in this hands-on lab is available as Visual Studio code snippets.
To check the prerequisites of the lab and install the code snippets:
1. Open a Windows Explorer window and browse to the lab’s Source\Setup folder.
2. Double-click the Dependencies.dep file in this folder to launch the Dependency Checker tool
and install any missing prerequisites and the Visual Studio code snippets.
3. If the User Account Control dialog is shown, confirm the action to proceed.
Note: This process may require elevation. The .dep extension is associated with the
Dependency Checker tool during its installation. For additional information about
the setup procedure and how to install the Dependency Checker tool, refer to the Setup.docx
document in the Assets folder of the training kit.
Using the Code Snippets
Throughout the lab document, you will be instructed to insert code blocks. For your convenience, most
of that code is provided as Visual Studio Code Snippets, which you can use from within Visual Studio
2010 to avoid having to add it manually.
If you are not familiar with the Visual Studio Code Snippets, and want to learn how to use them, you can
refer to the Setup.docx document in the Assets folder of the training kit, which contains a section
describing how to use them.
Exercises
This hands-on lab includes the following exercises:
1. Preparing Your SQL Azure Account
2. Basic DDL and DML - Creating Tables and Indexes
3. Build a Windows Azure Application that Accesses SQL Azure
4. Connecting via Client Libraires

Estimated time to complete this lab: 60 minutes.

Note: When you first start Visual Studio, you must select one of the predefined settings collections.
Every predefined collection is designed to match a particular development style and determines
window layouts, editor behavior, IntelliSense code snippets, and dialog box options. The procedures in
this lab describe the actions necessary to accomplish a given task in Visual Studio when using the
General Development Settings collection. If you choose a different settings collection for your
development environment, there may be differences in these procedures that you need to take into
account.
Exercise 1: Preparing Your SQL Azure
Account
In this exercise, you will connect to your SQL Azure account and create a database, add a new user and
then reconnect to SQL Azure so that you can begin working with your new database.
Task 1 – Retrieving your SQL Azure Server Name
In this exercise, you will log into the SQL Azure portal to obtain the name of the SQL Azure server
assigned to your account.
1. Go to the website at https://sql.azure.com.
2. Log in to your Windows Live account.
Figure 1
Logging into the Azure Services Portal

3. If you have not previously created a server, you will need to do so now; otherwise, you may skip
to the next step. To create a server, enter an administrator account name and password, select
a region from the location drop down list, and then click Create Server. The location determines
which datacenter the database will reside in.
Figure 2
Creating a server and administrator credentials
Note: An administrator account is a master account used to manage the new server. You
should avoid using this account in connection strings where the username and password may
be exposed.
The password policy requires that this password contain at least one number, one character
and one letter and one symbol. In addition, the password cannot be less than six characters
nor contain three consecutive characters from the username.
4. In the list of projects, select the project associated with your SQL Azure account to view the
databases on the virtual server.
Figure 3
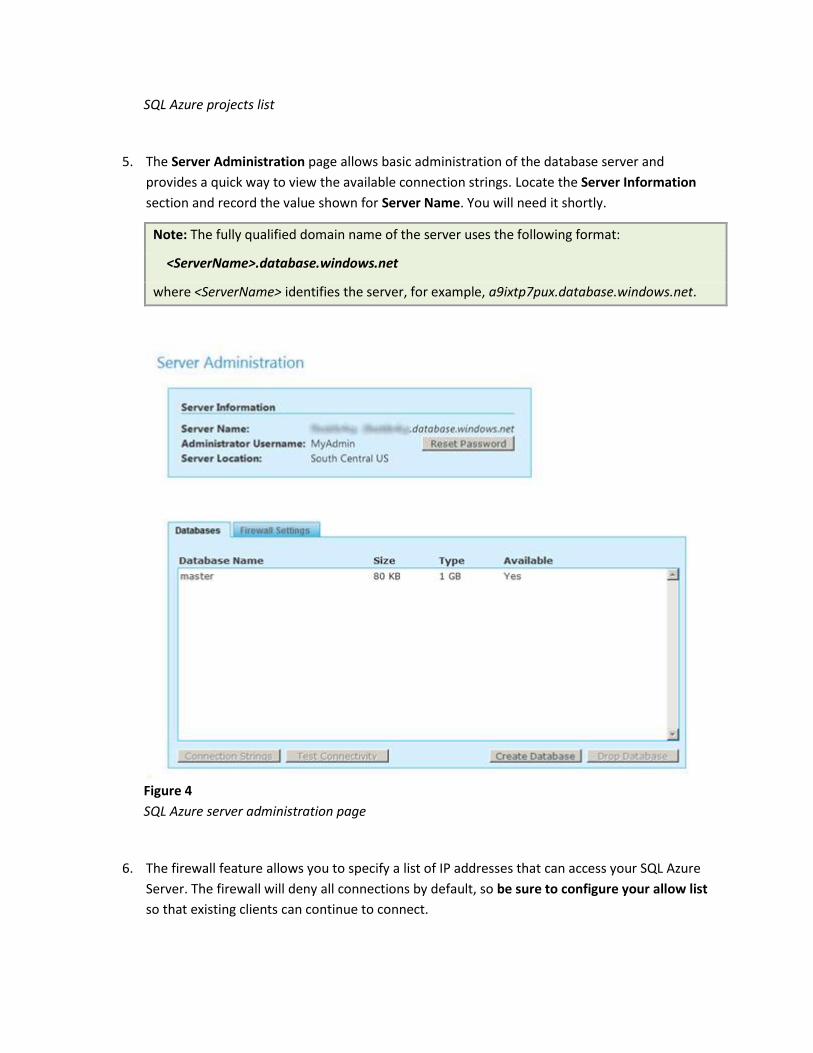
SQL Azure projects list
5. The Server Administration page allows basic administration of the database server and
provides a quick way to view the available connection strings. Locate the Server Information
section and record the value shown for Server Name. You will need it shortly.
Note: The fully qualified domain name of the server uses the following format:
<ServerName>.database.windows.net
where <ServerName> identifies the server, for example, a9ixtp7pux.database.windows.net.
Figure 4
SQL Azure server administration page
6. The firewall feature allows you to specify a list of IP addresses that can access your SQL Azure
Server. The firewall will deny all connections by default, so be sure to configure your allow list
so that existing clients can continue to connect.

Figure 5
Configuring the firewall settings for SQL Azure
Note: Changes to your firewall settings can take a few moments to become effective.
You now have a database server created and ready for the next steps in this lab. This database
can be connected to from anywhere in the world.
Task 2 – Connecting to SQL Azure and Creating a Database
1. Open SQL Server Management Studio from Start > All Programs > Microsoft SQL Server 2008
R2 > SQL Server Management Studio. You will be presented with a logon dialog.
2. Enter your login information ensuring that you select SQL Server Authentication. SQL Azure
currently only supports SQL Server Authentication.
Note: Please replace server name with your assigned server, which you recorded earlier when
you visited the SQL Azure portal (e.g. REPLACE_SERVER_NAME.database.windows.net.)

Figure 6
Connecting to SQL Azure with SQL Server Management Studio
3. Click Options to show additional connection settings. Then, click Connection Properties and
type the database to connect to as master.

Figure 7
Connecting to the master database
4. Click Connect.
5. You should now see in your Object Explorer the structure of your database. Notice that your
SQL Azure database is no different to an on-premise relational database.
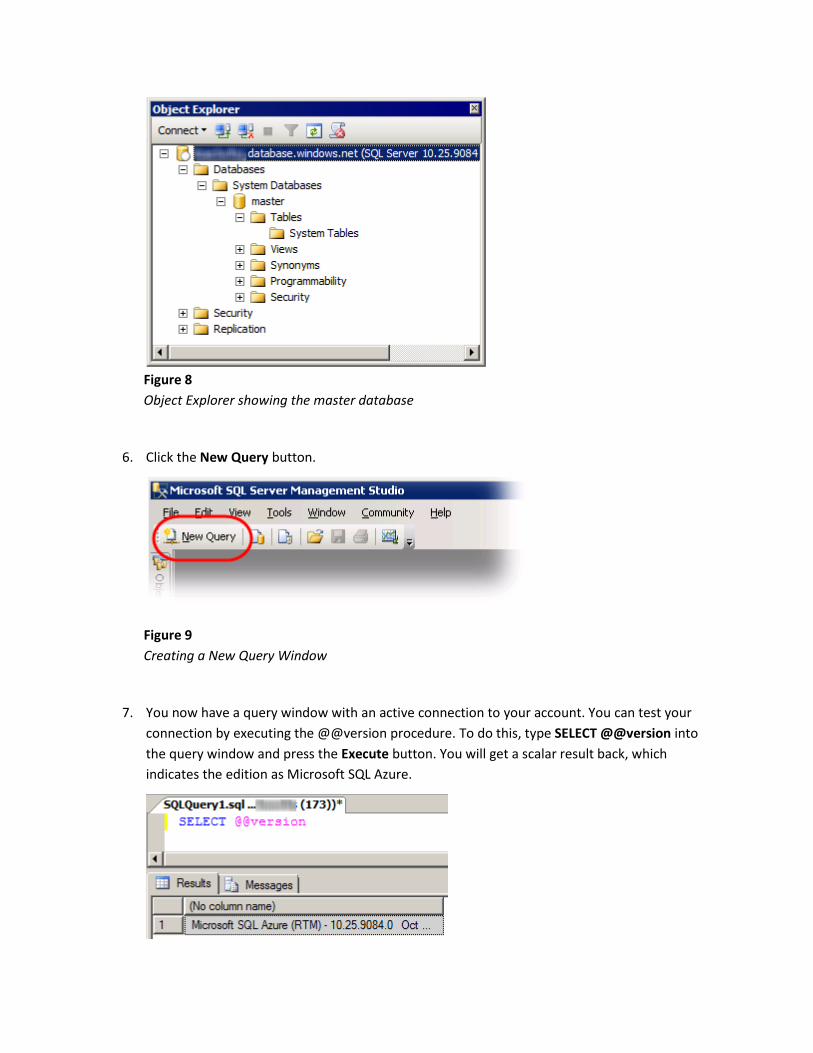
Figure 8
Object Explorer showing the master database
6. Click the New Query button.
Figure 9
Creating a New Query Window
7. You now have a query window with an active connection to your account. You can test your
connection by executing the @@version procedure. To do this, type SELECT @@version into
the query window and press the Execute button. You will get a scalar result back, which
indicates the edition as Microsoft SQL Azure.

Figure 10
Retrieving the SQL Azure version
8. Replace the previous query with a new query SELECT * FROM sys.databases and click Execute.
Figure 11
Query results showing just the master database
9. Next, you will create a new database. One of the good things about SQL Azure is that it takes
care of much of the management of the database for you, including how to manage the
underlying data files. This means that your Create Database statement can be very simple. Type
Create Database HoLTestDB and click Execute.
Figure 12
Creating a New Database
Note: You can select which SQL Azure Database edition (Web or Business) is created during
the database provisioning process. This is surfaced both in the SQL Azure Portal and in the T-
SQL Create Database statement. For example, to create a Business Edition database the T-SQL
command would be as follows: CREATE DATABASE HolTestDB (MAXSIZE = 10GB). Once a
database has been created, its size cannot be changed.
10. Remembering previous in this chapter that there is a system view called sys.databases, execute
the query SELECT * FROM sys.databases.
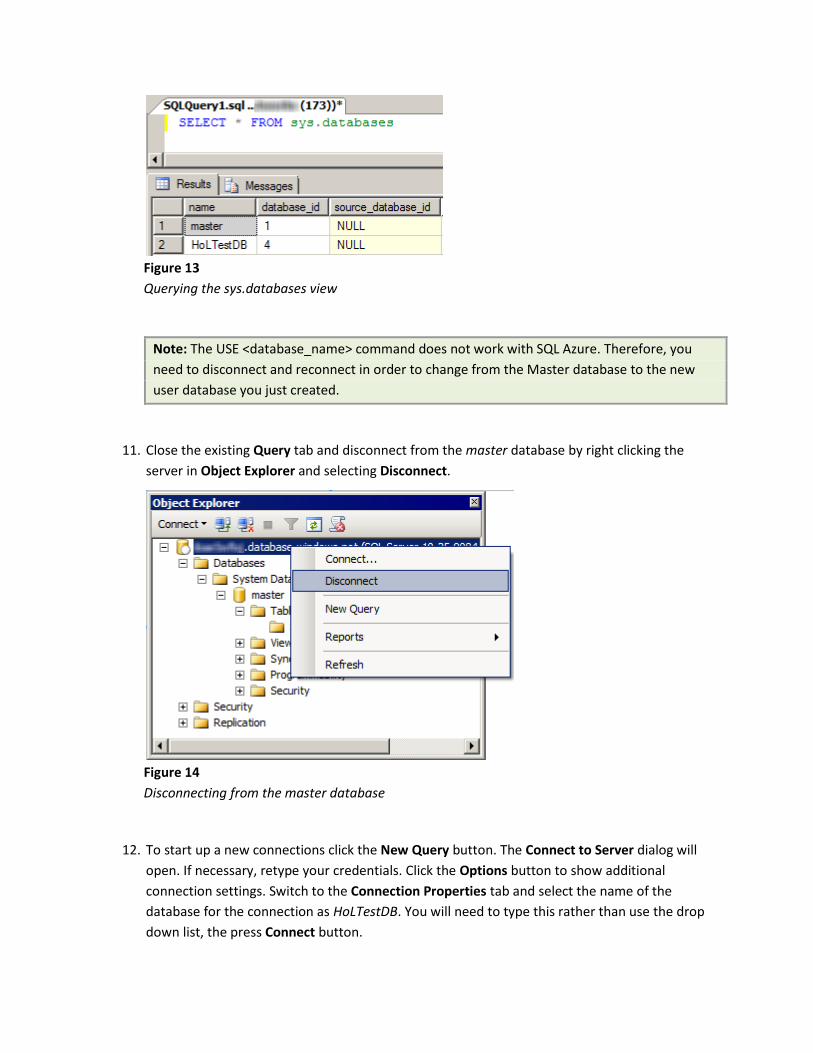
Figure 13
Querying the sys.databases view
Note: The USE <database_name> command does not work with SQL Azure. Therefore, you
need to disconnect and reconnect in order to change from the Master database to the new
user database you just created.
11. Close the existing Query tab and disconnect from the master database by right clicking the
server in Object Explorer and selecting Disconnect.
Figure 14
Disconnecting from the master database
12. To start up a new connections click the New Query button. The Connect to Server dialog will
open. If necessary, retype your credentials. Click the Options button to show additional
connection settings. Switch to the Connection Properties tab and select the name of the
database for the connection as HoLTestDB. You will need to type this rather than use the drop
down list, the press Connect button.

Figure 15
Connecting to a specific database
13. You can check that you are now in the context of your user database by executing the query
select db_name().
Figure 16
Querying the database currently in use
Task 3 – Creating Logins and Database Users
Much like SQL Server, SQL Azure allows you to create additional logins and then assign those logins as
users with permissions on a database. In this task, you will create a new login and then create a user
that uses the new login in your HoLTestDB database.
1. Connect to the master database again. You may need to clear the Connect to database combo
box in the Options tab.
2. Create a new Login executing the following:
T-SQL

CREATE LOGIN HoLUser WITH password='Password1'
GO
Note: You should choose your own password for this login account and use it where
appropriate throughout the lab. If you do not choose a unique password, you should ensure
that you DROP Login HoLUser when you finish the lab.
3. Disconnect the master database by right clicking your server in the Object Explorer and
selecting Disconnect.
4. Reconnect to the HoLTestDB database by clicking Connect->Database Engine in the Object
Explorer. Enter your admin credentials and type the database name in the Connection
Properties tab.
5. In a New Query window, execute the following to create a user from the login HoLUser.
T-SQL
-- Create a new user from the login and execute
CREATE USER HoLTestUser FROM LOGIN HoLUser
GO
6. Add the user to the db_owner role of your HoLTestDB database by executing the following:
T-SQL
-- Add the new user to the db_owner role and execute
EXEC sp_addrolemember 'db_owner', 'HoLTestUser'
GO
Note: By making your user a member of the db_owner role, you have granted a very extensive
permission set to the user. In a real world scenario, you should be careful to ensure that you
grant users only the smallest privilege set possible.
7. Close the Query window.
8. Reconnect to the HoLTestDB database but this time using your new HoLUser login. You will be
using this login for the rest of the lab.
9. Execute the following query:
T-SQL
SELECT @@version
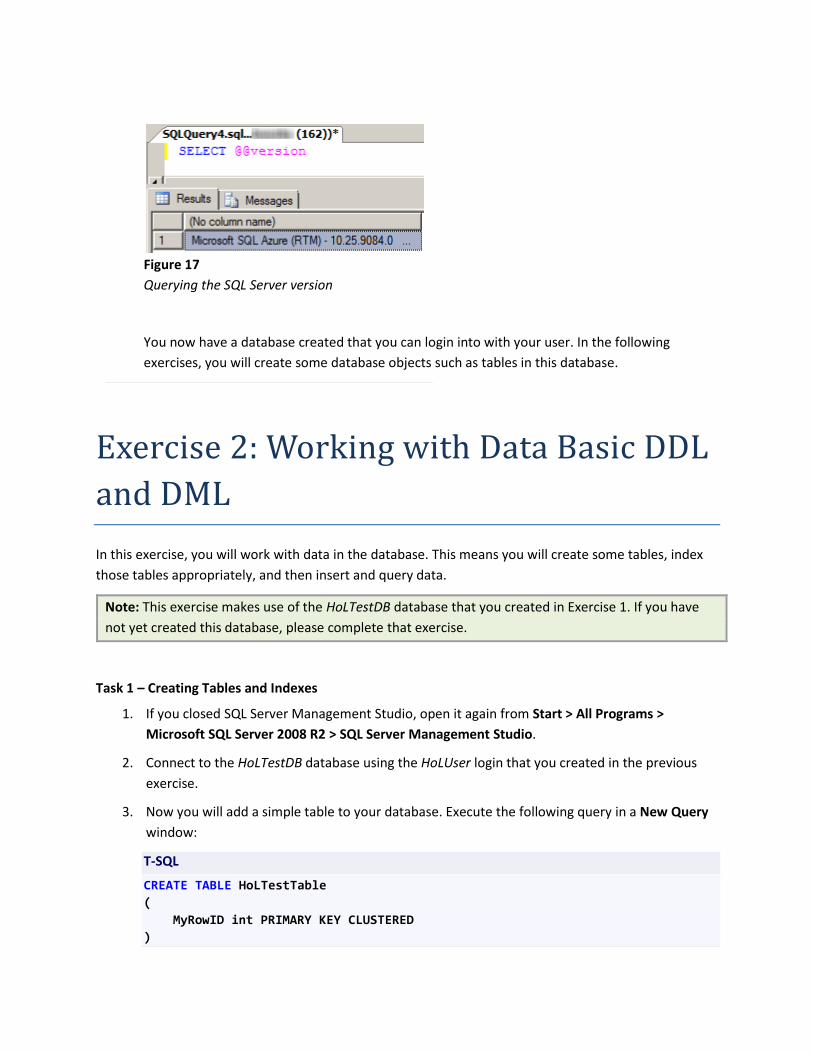
Figure 17
Querying the SQL Server version
You now have a database created that you can login into with your user. In the following
exercises, you will create some database objects such as tables in this database.
Exercise 2: Working with Data Basic DDL
and DML
In this exercise, you will work with data in the database. This means you will create some tables, index
those tables appropriately, and then insert and query data.
Note: This exercise makes use of the HoLTestDB database that you created in Exercise 1. If you have
not yet created this database, please complete that exercise.
Task 1 – Creating Tables and Indexes
1. If you closed SQL Server Management Studio, open it again from Start > All Programs >
Microsoft SQL Server 2008 R2 > SQL Server Management Studio.
2. Connect to the HoLTestDB database using the HoLUser login that you created in the previous
exercise.
3. Now you will add a simple table to your database. Execute the following query in a New Query
window:
T-SQL
CREATE TABLE HoLTestTable
(
MyRowID int PRIMARY KEY CLUSTERED
)

Note: SQL Azure requires that every table have a clustered index. If you create a table without
a clustered index, you will not be able to insert rows into the table until you have created one.
Because the clustered index determines the order of rows on disk, and thus affects certain
queries, you may choose to place the clustered index on a column other than the primary key
column.
4. You will test your table by inserting some rows. Execute the following query:
T-SQL
INSERT INTO HoLTestTable VALUES (1)
GO
INSERT INTO HoLTestTable VALUES (2)
GO
INSERT INTO HoLTestTable VALUES (3)
GO
5. Now query the rows back out of the database. Execute the following the query:
T-SQL
SELECT * FROM HoLTestTable
Figure 18
Querying simple data from SQL Azure
6. Now, drop the HolTestTable table and create something more sophisticated. Execute the
following query:
T-SQL

DROP TABLE HoLTestTable
7. Create a Customer table by Executing the following SQL Query:
T-SQL
CREATE TABLE [Customer](
[CustomerID] [int] IDENTITY(1,1) NOT NULL PRIMARY KEY CLUSTERED,
[Title] [nvarchar](8) NULL,
[FirstName] [nvarchar](50) NOT NULL,
[LastName] [nvarchar](50) NOT NULL,
[EmailAddress] [nvarchar](50) NULL,
[Phone] [nvarchar](30) NULL,
[Timestamp] [timestamp] NOT NULL
)
8. You will add an index on the EmailAddress field. To do this, execute the following query:
T-SQL
CREATE INDEX IX_Customer_EmailAddress
ON Customer(EmailAddress)
9. Execute the following query to add a row to the new Customer table:
T-SQL
INSERT INTO [Customer]
([Title],[FirstName],[LastName],[EmailAddress],[Phone])
VALUES
('Mr','David','Alexander','[email protected]','555-1234-5555')
10. Now, query the data back out, but start by enabling the SHOWPLAN_ALL option to show the
execution plan. To do that, execute the following query:
T-SQL
SET SHOWPLAN_ALL ON
GO
SELECT * FROM Customer WHERE EmailAddress ='[email protected]'
GO
SET SHOWPLAN_ALL OFF

Figure 19
Query execution plan for a small set
11. Add a whole bunch more rows to the database and then look at the query plan again. To do
this, execute the following query to add a stored procedure named AddData. This stored
procedure will loop incrementing a counter each time through and add a new record with an
email address with the pattern [Counter][email protected]:
T-SQL
CREATE PROCEDURE AddData
@NumRows int
AS
DECLARE @counter int
SELECT @counter = 1
WHILE (@counter < @NumRows)
BEGIN
INSERT INTO [Customer]
([Title],[FirstName],[LastName],[EmailAddress],[Phone])
VALUES
('Mr','David','Alexander',CAST(@counter as
nvarchar)+'[email protected]','555-1234-5555')
SELECT @counter = @counter + 1
END
12. Now add 10,000 rows into the database by running the new stored procedure. Each row will
have a unique email address. Execute the following query:
T-SQL
EXEC AddData 10000
Note: It may take some time to generate the 10,000 rows.

13. Execute the following query again.
T-SQL
SET SHOWPLAN_ALL ON
GO
SELECT * FROM Customer WHERE EmailAddress ='[email protected]'
GO
SET SHOWPLAN_ALL OFF
Figure 20
Query execution plan for a large set
Note: Notice that the second time around the query optimizer is likely to use the index that
you defined: This is the Index Seek line in the query plan.
14. For the most part, you can use any tool that you might have previously used with SQL Server on-
premise. For an example of this, look at the query plan graphically. In SQL Server Management
Studio press Ctrl-L to display the Estimated Execution Plan.
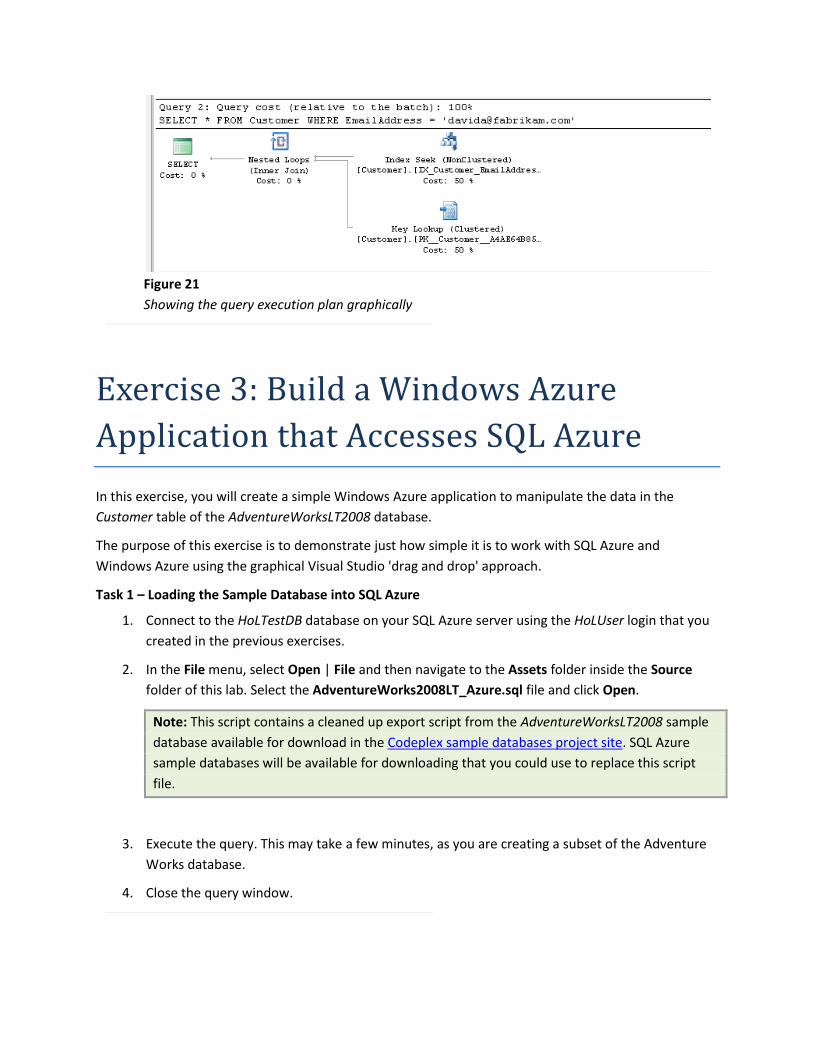
Figure 21
Showing the query execution plan graphically
Exercise 3: Build a Windows Azure
Application that Accesses SQL Azure
In this exercise, you will create a simple Windows Azure application to manipulate the data in the
Customer table of the AdventureWorksLT2008 database.
The purpose of this exercise is to demonstrate just how simple it is to work with SQL Azure and
Windows Azure using the graphical Visual Studio 'drag and drop' approach.
Task 1 – Loading the Sample Database into SQL Azure
1. Connect to the HoLTestDB database on your SQL Azure server using the HoLUser login that you
created in the previous exercises.
2. In the File menu, select Open | File and then navigate to the Assets folder inside the Source
folder of this lab. Select the AdventureWorks2008LT_Azure.sql file and click Open.
Note: This script contains a cleaned up export script from the AdventureWorksLT2008 sample
database available for download in the Codeplex sample databases project site. SQL Azure
sample databases will be available for downloading that you could use to replace this script
file.
3. Execute the query. This may take a few minutes, as you are creating a subset of the Adventure
Works database.
4. Close the query window.
Task 2 – Creating the Visual Studio Project
In this task, you create a new Visual Studio project for a Windows Azure Web Site.
1. Open Microsoft Visual Studio 2010 in elevated administrator mode. To do this, in Start | All
Programs | Microsoft Visual Studio 2010, right-click the Microsoft Visual Studio 2010 shortcut
and choose Run as Administrator.
2. If the User Account Control dialog appears, click Continue.
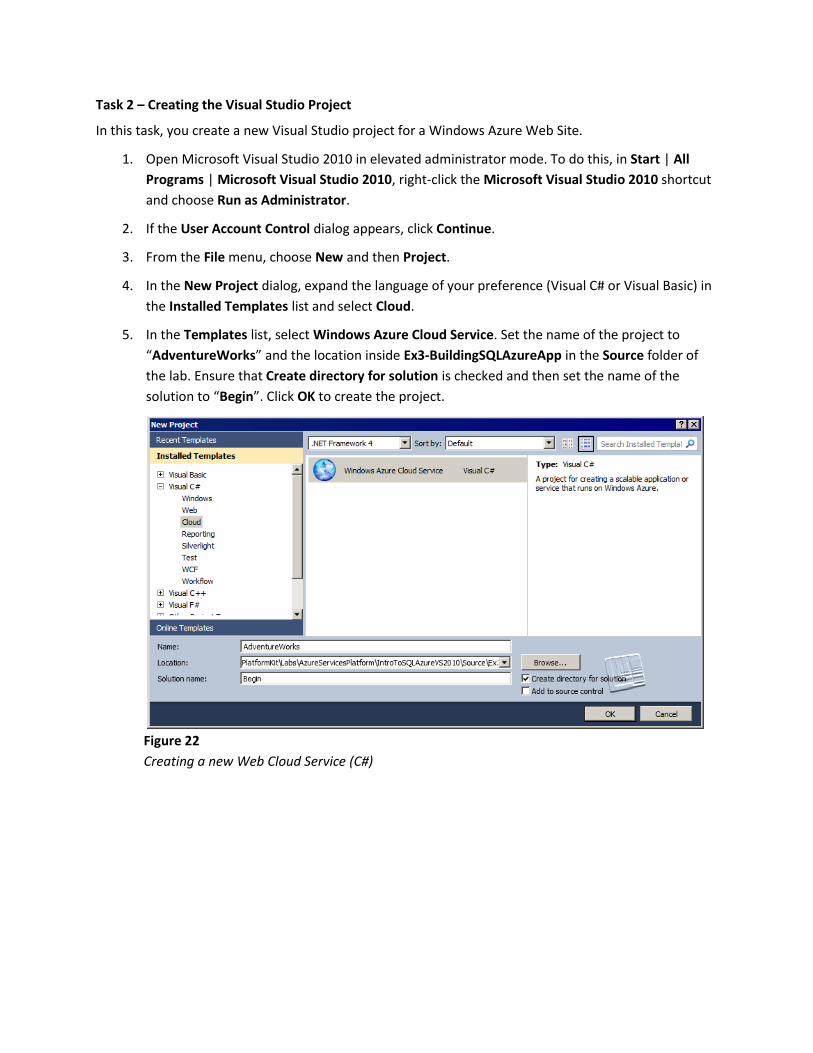
3. From the File menu, choose New and then Project.
4. In the New Project dialog, expand the language of your preference (Visual C# or Visual Basic) in
the Installed Templates list and select Cloud.
5. In the Templates list, select Windows Azure Cloud Service. Set the name of the project to
“AdventureWorks” and the location inside Ex3-BuildingSQLAzureApp in the Source folder of
the lab. Ensure that Create directory for solution is checked and then set the name of the
solution to “Begin”. Click OK to create the project.
Figure 22
Creating a new Web Cloud Service (C#)

Figure 23
Creating a new Web Cloud Service (Visual Basic)
6. In the New Cloud Service Project dialog, inside the Roles panel, expand the tab for the language
of your choice (Visual C# or Visual Basic), select ASP.NET Web Role from the list of available
roles and click the arrow (>) to add an instance of this role to the solution. Before closing the
dialog, select the new role in the right panel, click the pencil icon and rename the role as
AdventureWorksWeb. Click OK to create the cloud service solution.

Figure 24
Adding a Web Role to the Solution (C#)
Figure 25
Adding a Web Role to the Solution (VB)
7. When the project template has finished creating items, you should be presented with the
Default.aspx page. If not, open this file.
8. Ensure that you are viewing the Default.aspx page in Design View by clicking the Design button.
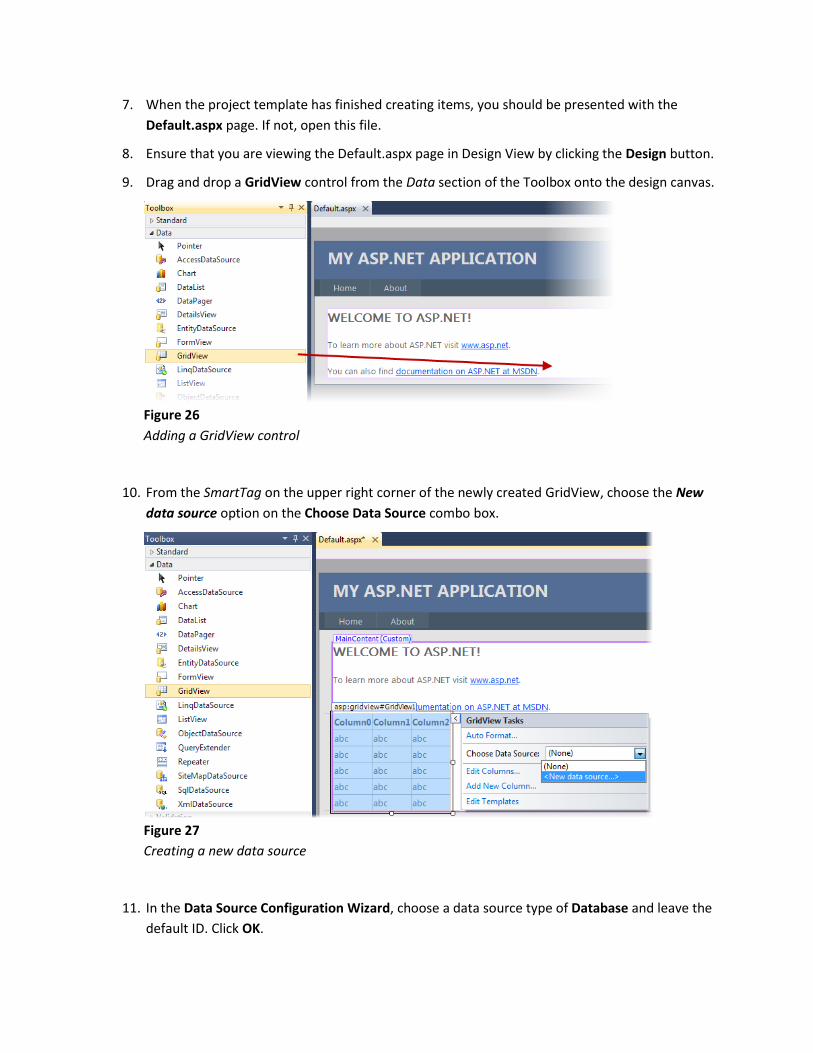
9. Drag and drop a GridView control from the Data section of the Toolbox onto the design canvas.
Figure 26
Adding a GridView control
10. From the SmartTag on the upper right corner of the newly created GridView, choose the New
data source option on the Choose Data Source combo box.
Figure 27
Creating a new data source
11. In the Data Source Configuration Wizard, choose a data source type of Database and leave the
default ID. Click OK.
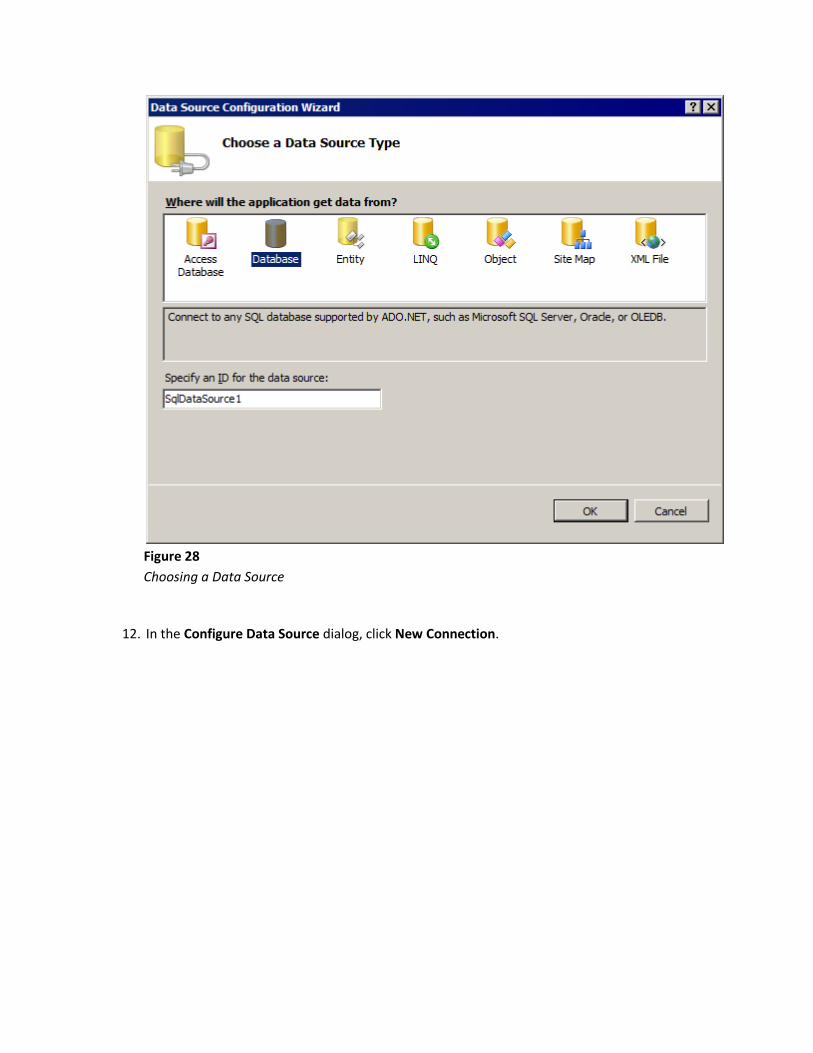
Figure 28
Choosing a Data Source
12. In the Configure Data Source dialog, click New Connection.

Figure 29
Creating a new Connection
13. If prompted by a Choose data source dialog, select Microsoft SQL Server and click Continue.
14. Now, configure a connection to your SQL Azure database. In the Add Connection dialog ensure
your provider is Microsoft SQL Server (SqlClient) selecting Microsoft SQL Server inside Data
Source list and .NET Framework Data Provider for SQL Server in the Data Provider combo. Then
set the Server name to the name of the server for your SQL Azure subscription, which you
recorded in Exercise 1 when you visited the SQL Azure portal. Next, change the authentication
type to Use SQL Server Authentication and type the credentials for your SQL Azure
subscription. Finally, enter HoLTestDB in the database name drop down list.

Figure 30
Configuring a connection to the HolTestDB database in SQL Azure
15. Press Test Connection. If the connection information is correct, you should receive a dialog
indicating success. Click OK to proceed.
Figure 31
Confirmation of a successful connection
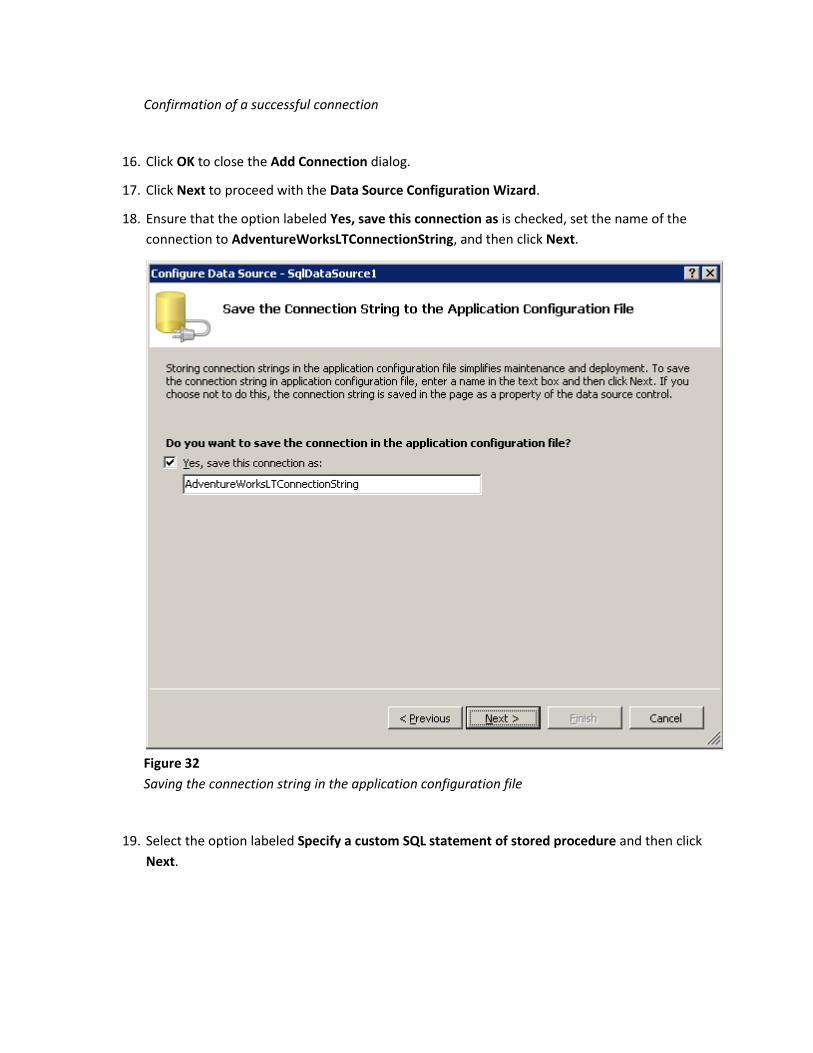
16. Click OK to close the Add Connection dialog.
17. Click Next to proceed with the Data Source Configuration Wizard.
18. Ensure that the option labeled Yes, save this connection as is checked, set the name of the
connection to AdventureWorksLTConnectionString, and then click Next.
Figure 32
Saving the connection string in the application configuration file
19. Select the option labeled Specify a custom SQL statement of stored procedure and then click
Next.
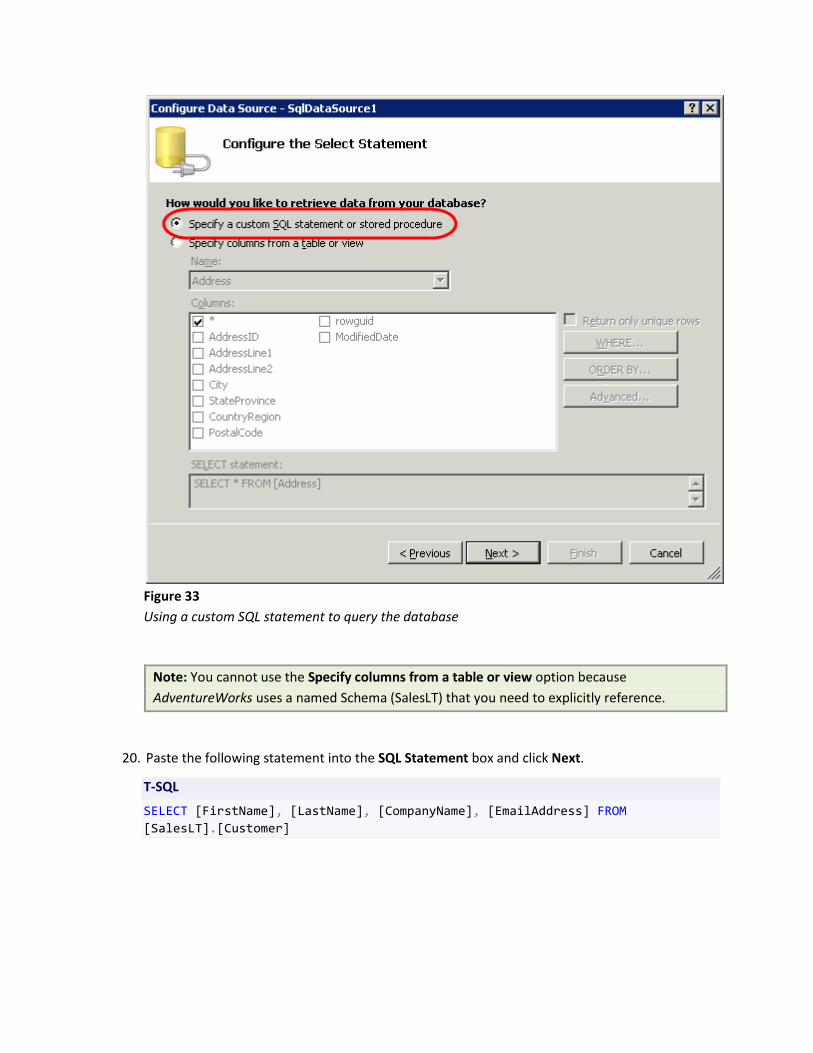
Figure 33
Using a custom SQL statement to query the database
Note: You cannot use the Specify columns from a table or view option because
AdventureWorks uses a named Schema (SalesLT) that you need to explicitly reference.
20. Paste the following statement into the SQL Statement box and click Next.
T-SQL
SELECT [FirstName], [LastName], [CompanyName], [EmailAddress] FROM
[SalesLT].[Customer]

Figure 34
Defining a custom SQL statement
21. Press Test Query and you should see results returned.
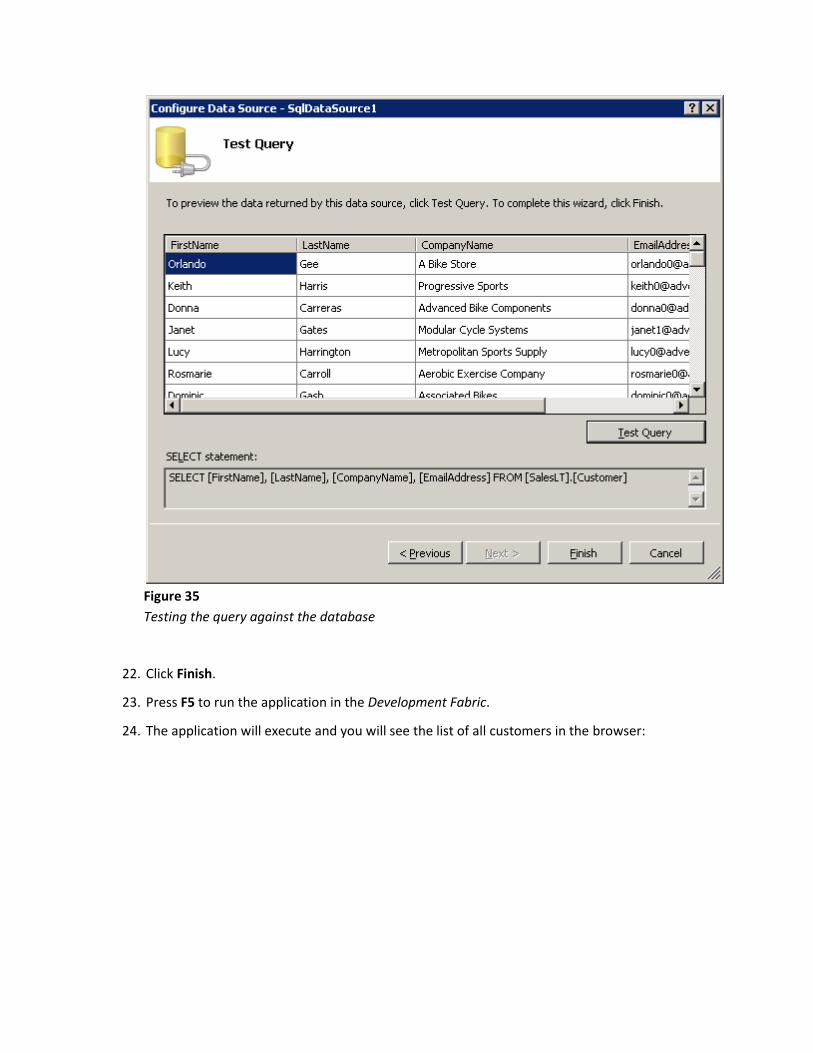
Figure 35
Testing the query against the database
22. Click Finish.
23. Press F5 to run the application in the Development Fabric.
24. The application will execute and you will see the list of all customers in the browser:

Figure 36
Retrieving a list of customers from the database
25. Close the browser window.
Exercise 4: Connecting via Client
Libraries
In this exercise, you will learn how to use ADO.NET, ODBC, OLEDB and LINQ to SQL technologies to
connect to your SQL Azure database and perform some simple T-SQL operations. In addition, you will
see how to connect to the database from other technologies like Java and PHP.

Using Microsoft Technologies, you will see that the way in which you interact with your SQL Azure
database from your applications is the same as a traditional SQL database. The main differences
between the technologies lie in the type of connection and the connection strings used to connect to
SQL Azure. After the connection is established, you can then use the appropriate inheritor of the
‘DbCommand’ to issue your commands to SQL Azure.
Task 1 – Opening the Begin Solution and Exploring the Common Functionalities
You will test the different Microsoft technologies connecting to SQL Azure and performing some tasks
against a new table. To avoid spending time implementing logic that creates, inserts, queries and deletes
a table, this exercise provides a begin solution that implements these common functionalities. This
allows you to focus on learning how to connect to SQL Azure and explore the differences between the
proposed technologies.
In this task, you will open the ConnectDemoApp solution and explore the SQLAzureConnectionDemo
class. During the exercise, you will inherit from this class for each different implementation of a data
access technology.
1. Open Microsoft Visual Studio 2010 from Start | All Programs | Microsoft Visual Studio 2010 |
Microsoft visual Studio 2010.
2. Open the begin solution provided for this exercise. To do this, from the File menu, choose Open
Project. In the Open Project dialog, navigate to Ex4-ConnectingViaClientLibraries\begin inside
the Source folder of this lab. Select the folder for the language of your preference (C# or VB),
and then open the solution ConnectDemoApp.sln inside the ConnectDemoApp folder. A
solution with the following structure should open.
Figure 37
Connect Demo App solution’s structure (C#)

Figure 38
Connect Demo App solution’s structure (Visual Basic)
3. As mentioned before, you will create a class per technology inheriting from the
SQLAzureConnectionDemo abstract class. This class provides common functionality to perform
basic operations against SQL Azure using the provider that you implement in the derived class.
The table below explains each of the methods in this class to understand how it works and
determine which methods you need to implement in the derived classes:
Method Type Description
Class Constructor Sets the connection property based on the result
of the CreateConnection abstract method that
will be implemented on the derived class.
CreateConnection Abstract A derived class implements this method in order
to create the connection according to the
underlying technology.
CreateCommand Abstract A derived class implements this method to
create a command according to the underlying
technology.
GetServerName Returns the server name from the data source. It
is a common task required to create the
connection to the database.
ConnectToSQLAzureDemo Executes the demo flow against the SQL Azure
Database. It gets a command from the derived
class using the CreateCommand method and
then executes the Execute* methods to create,
fill, query and delete a demo table.
ExecuteCreateDemoTableStatement Executes a create table statement to create the
“DemoTable” table.
ExecuteInsertTestDataStatement Executes an insert statement against the

“DemoTable” table.
ExecuteReadInsertedTestData Executes a select statement trying to retrieve the
data inserted by the previous method and calls
the ReadData method to show it in the Console.
ReadData Reads the data retrieved from the table and
displays it in the Console.
ExecuteDropDemoTable Executes a delete statement removing the
“DemoTable” table from the SQL Azure
database.
Notice that you will only have to override the CreateConnection and CreateCommand methods
on the implementation of each technology to create a connection to SQL Azure successfully.
Task 2 – Connecting to SQL Azure Using ADO.NET
In this task, you will create a class that inherits from the SQLAzureConnectionDemo class and
implements the methods to connect to SQL Azure using ADO.NET.
1. Add a new class to the project named AdoConnectionDemo. To do this, right-click the
ConnectDemoApp project in Solution Explorer and select Add | Class. In the Add New Item
dialog, make sure that you select the Class template and set the name to
AdoConnectionDemo.cs or AdoConnectionDemo.vb depending on the language of your
project.
2. Make sure that you have the following namespace directives at the top of the file:
C#
using System.Data.Common;
using System.Data.SqlClient;
Visual Basic
Imports System.Data.Common
Imports System.Data.SqlClient
3. Update the class definition to make it public and to inherit from SQLAzureConnectionDemo.
The final implementation should look like the following:
Note: In Visual Basic, the template for a new class already declares the class as Public.
C#
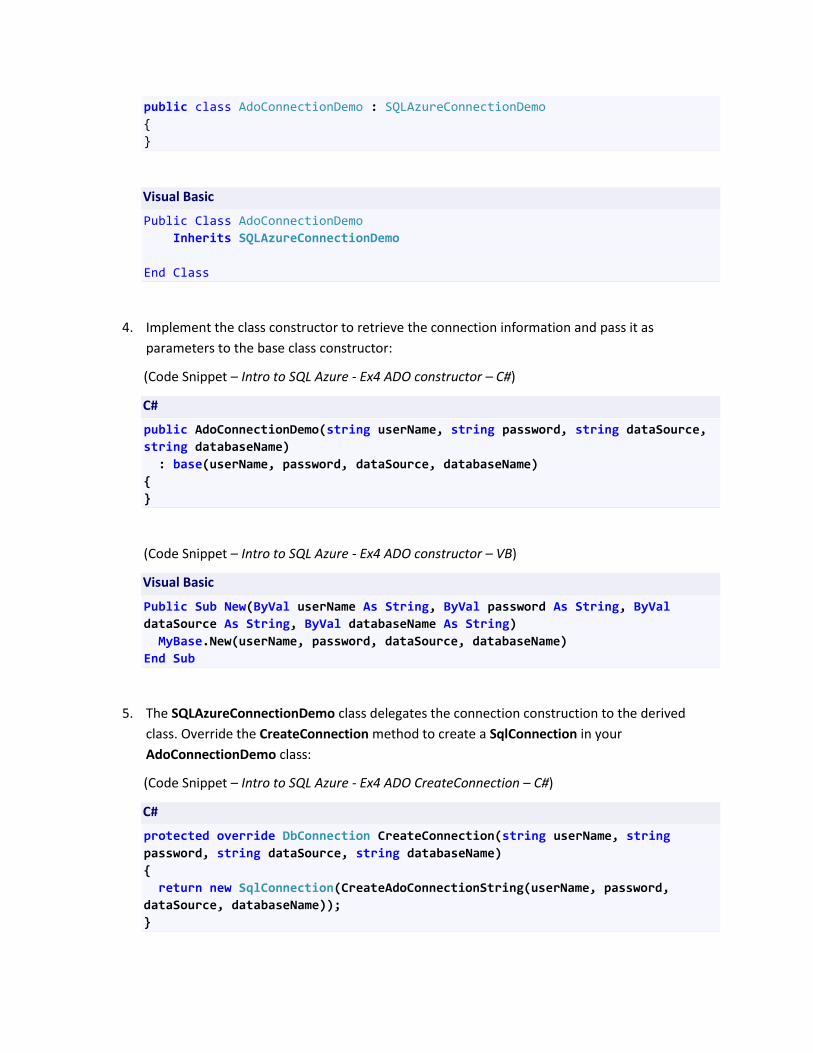
public class AdoConnectionDemo : SQLAzureConnectionDemo
{
}
Visual Basic
Public Class AdoConnectionDemo
Inherits SQLAzureConnectionDemo
End Class
4. Implement the class constructor to retrieve the connection information and pass it as
parameters to the base class constructor:
(Code Snippet – Intro to SQL Azure - Ex4 ADO constructor – C#)
C#
public AdoConnectionDemo(string userName, string password, string dataSource,
string databaseName)
: base(userName, password, dataSource, databaseName)
{
}
(Code Snippet – Intro to SQL Azure - Ex4 ADO constructor – VB)
Visual Basic
Public Sub New(ByVal userName As String, ByVal password As String, ByVal
dataSource As String, ByVal databaseName As String)
MyBase.New(userName, password, dataSource, databaseName)
End Sub
5. The SQLAzureConnectionDemo class delegates the connection construction to the derived
class. Override the CreateConnection method to create a SqlConnection in your
AdoConnectionDemo class:
(Code Snippet – Intro to SQL Azure - Ex4 ADO CreateConnection – C#)
C#
protected override DbConnection CreateConnection(string userName, string
password, string dataSource, string databaseName)
{
return new SqlConnection(CreateAdoConnectionString(userName, password,
dataSource, databaseName));
}
(Code Snippet – Intro to SQL Azure - Ex4 ADO CreateConnection – VB)
Visual Basic
Protected Overrides Function CreateConnection(ByVal userName As String, ByVal
password As String, ByVal dataSource As String, ByVal databaseName As String)
As DbConnection
Return New SqlConnection(CreateAdoConnectionString(userName, password,
dataSource, databaseName))
End Function
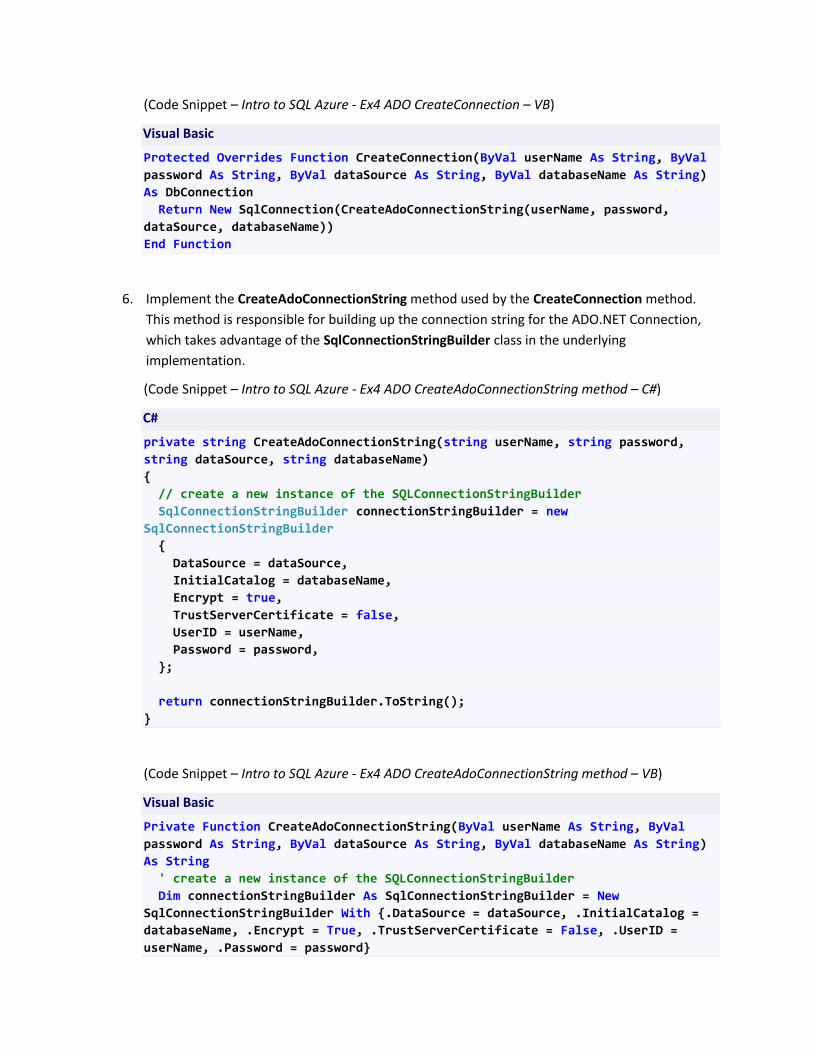
6. Implement the CreateAdoConnectionString method used by the CreateConnection method.
This method is responsible for building up the connection string for the ADO.NET Connection,
which takes advantage of the SqlConnectionStringBuilder class in the underlying
implementation.
(Code Snippet – Intro to SQL Azure - Ex4 ADO CreateAdoConnectionString method – C#)
C#
private string CreateAdoConnectionString(string userName, string password,
string dataSource, string databaseName)
{
// create a new instance of the SQLConnectionStringBuilder
SqlConnectionStringBuilder connectionStringBuilder = new
SqlConnectionStringBuilder
{
DataSource = dataSource,
InitialCatalog = databaseName,
Encrypt = true,
TrustServerCertificate = false,
UserID = userName,
Password = password,
};
return connectionStringBuilder.ToString();
}
(Code Snippet – Intro to SQL Azure - Ex4 ADO CreateAdoConnectionString method – VB)
Visual Basic
Private Function CreateAdoConnectionString(ByVal userName As String, ByVal
password As String, ByVal dataSource As String, ByVal databaseName As String)
As String
' create a new instance of the SQLConnectionStringBuilder
Dim connectionStringBuilder As SqlConnectionStringBuilder = New
SqlConnectionStringBuilder With {.DataSource = dataSource, .InitialCatalog =
databaseName, .Encrypt = True, .TrustServerCertificate = False, .UserID =
userName, .Password = password}
Return connectionStringBuilder.ToString()
End Function
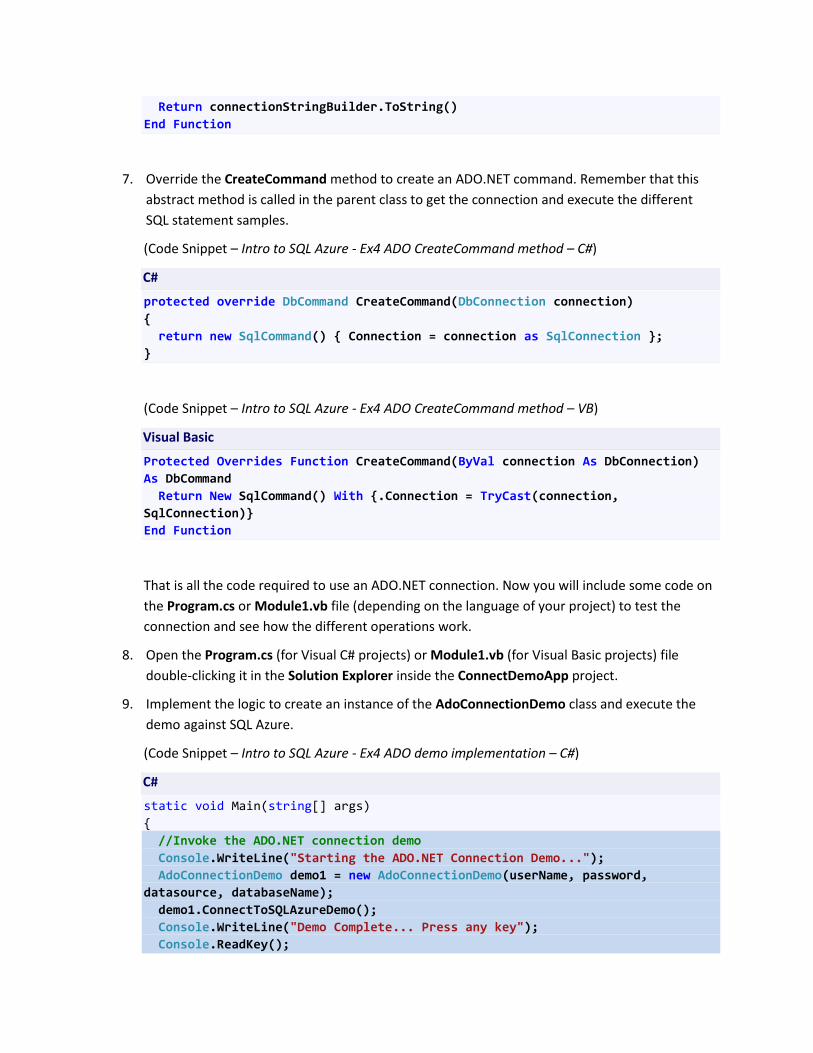
7. Override the CreateCommand method to create an ADO.NET command. Remember that this
abstract method is called in the parent class to get the connection and execute the different
SQL statement samples.
(Code Snippet – Intro to SQL Azure - Ex4 ADO CreateCommand method – C#)
C#
protected override DbCommand CreateCommand(DbConnection connection)
{
return new SqlCommand() { Connection = connection as SqlConnection };
}
(Code Snippet – Intro to SQL Azure - Ex4 ADO CreateCommand method – VB)
Visual Basic
Protected Overrides Function CreateCommand(ByVal connection As DbConnection)
As DbCommand
Return New SqlCommand() With {.Connection = TryCast(connection,
SqlConnection)}
End Function
That is all the code required to use an ADO.NET connection. Now you will include some code on
the Program.cs or Module1.vb file (depending on the language of your project) to test the
connection and see how the different operations work.
8. Open the Program.cs (for Visual C# projects) or Module1.vb (for Visual Basic projects) file
double-clicking it in the Solution Explorer inside the ConnectDemoApp project.
9. Implement the logic to create an instance of the AdoConnectionDemo class and execute the
demo against SQL Azure.
(Code Snippet – Intro to SQL Azure - Ex4 ADO demo implementation – C#)
C#
static void Main(string[] args)
{
//Invoke the ADO.NET connection demo
Console.WriteLine("Starting the ADO.NET Connection Demo...");
AdoConnectionDemo demo1 = new AdoConnectionDemo(userName, password,
datasource, databaseName);
demo1.ConnectToSQLAzureDemo();
Console.WriteLine("Demo Complete... Press any key");
Console.ReadKey();
}
(Code Snippet – Intro to SQL Azure - Ex4 ADO demo implementation – VB)
Visual Basic
Sub Main()
' Invoke the ADO.NET connection demo
Console.WriteLine("Starting the ADO.NET Connection Demo...")
Dim demo1 = New AdoConnectionDemo(_userName, _password, _datasource,
_databaseName)
demo1.ConnectToSQLAzureDemo()
Console.WriteLine("Demo Complete... Press any key")
Console.ReadKey()
End Sub
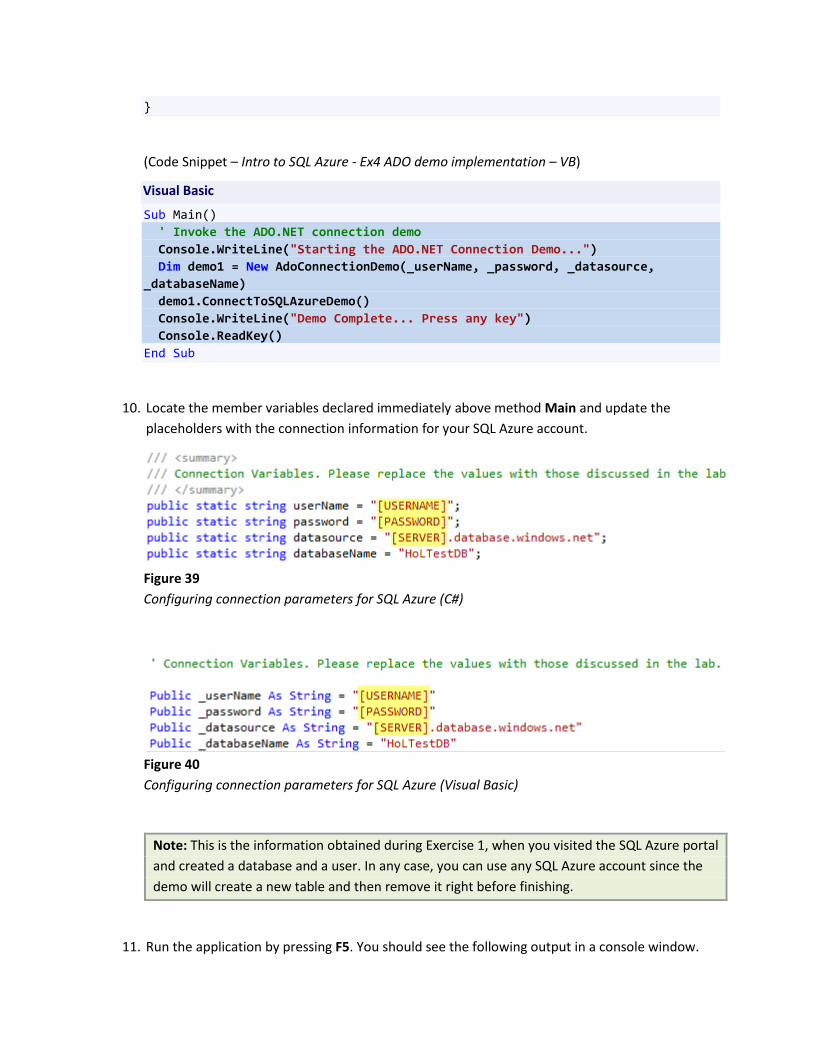
10. Locate the member variables declared immediately above method Main and update the
placeholders with the connection information for your SQL Azure account.
Figure 39
Configuring connection parameters for SQL Azure (C#)
Figure 40
Configuring connection parameters for SQL Azure (Visual Basic)
Note: This is the information obtained during Exercise 1, when you visited the SQL Azure portal
and created a database and a user. In any case, you can use any SQL Azure account since the
demo will create a new table and then remove it right before finishing.
11. Run the application by pressing F5. You should see the following output in a console window.

Figure 41
Expected output from the ADO.NET connection demo
Task 3 – Connecting to SQL Azure Using ODBC
In this task, you will create a class that inherits from the SQLAzureConnectionDemo class and
implement the methods for connecting to SQL Azure using ODBC.
1. Add a new class to the project named OdbcConnectionDemo. To do this, right-click the
ConnectDemoApp project in Solution Explorer and select Add | Class. In the Add New Item
dialog, make sure that you select the Class template and set the name to
OdbcConnectionDemo.cs or OdbcConnectionDemo.vb depending on the language of your
project.
2. Make sure that you have the following namespace directives at the top of the file:
C#
using System.Data.Common;
using System.Data.Odbc;
Visual Basic
Imports System.Data.Common
Imports System.Data.Odbc
3. Update the class definition to make it public and to inherit from SQLAzureConnectionDemo.
The final implementation should look like the following:
Note: In Visual Basic, the template for a new class already declares the class as Public.

C#
public class OdbcConnectionDemo : SQLAzureConnectionDemo
{
}
Visual Basic
Public Class OdbcConnectionDemo
Inherits SQLAzureConnectionDemo
End Class
4. Implement the class constructor to get the connection information and pass it as parameters to
the base class constructor:
(Code Snippet – Intro to SQL Azure - Ex4 ODBC constructor – C#)
C#
public OdbcConnectionDemo(string userName, string password, string dataSource,
string databaseName):
base (userName, password, dataSource, databaseName)
{
}
(Code Snippet – Intro to SQL Azure - Ex4 ODBC constructor – VB)
Visual Basic
Public Sub New(ByVal userName As String, ByVal password As String, ByVal
dataSource As String, ByVal databaseName As String)
MyBase.New(userName, password, dataSource, databaseName)
End Sub
5. Override the CreateConnection method to create an OdbcConnection in your
OdbcConnectionDemo class:
(Code Snippet – Intro to SQL Azure - Ex4 ODBC CreateConnection – C#)
C#
protected override DbConnection CreateConnection(string userName, string
password, string dataSource, string databaseName)
{
return new OdbcConnection(CreateOdbcConnectionString(userName, password,
dataSource, databaseName));
}
(Code Snippet – Intro to SQL Azure - Ex4 ODBC CreateConnection – VB)
Visual Basic
Protected Overrides Function CreateConnection(ByVal userName As String, ByVal
password As String, ByVal dataSource As String, ByVal databaseName As String)
As DbConnection
Return New OdbcConnection(CreateOdbcConnectionString(userName, password,
dataSource, databaseName))
End Function
6. Implement the CreateOdbcConnectionString method used by the CreateConnection method.
This method is responsible for building up the ODBC Drivers connection string. The proposed
implementation is using SQL Server Native Client 10.0 as its driver. You can specify any other
ODBC driver of your preference here.
(Code Snippet – Intro to SQL Azure - Ex4 ODBC CreateOdbcConnectionString method – C#)
C#
private string CreateOdbcConnectionString(string userName, string password,
string dataSource, string databaseName)
{
string serverName = GetServerName(dataSource);
OdbcConnectionStringBuilder connectionStringBuilder = new
OdbcConnectionStringBuilder
{
Driver = "SQL Server Native Client 10.0",
};
connectionStringBuilder["Server"] = "tcp:" + dataSource;
connectionStringBuilder["Database"] = databaseName;
connectionStringBuilder["Uid"] = userName + "@" + serverName;
connectionStringBuilder["Pwd"] = password;
return connectionStringBuilder.ConnectionString;
}
(Code Snippet – Intro to SQL Azure - Ex4 ODBC CreateOdbcConnectionString method – VB)
Visual Basic
Private Function CreateOdbcConnectionString(ByVal userName As String, ByVal
password As String, ByVal dataSource As String, ByVal databaseName As String)
As String
Dim serverName As String = GetServerName(dataSource)
Dim connectionStringBuilder As OdbcConnectionStringBuilder = New
OdbcConnectionStringBuilder With {.Driver = "SQL Server Native Client 10.0"}

connectionStringBuilder("Server") = "tcp:" & dataSource
connectionStringBuilder("Database") = databaseName
connectionStringBuilder("Uid") = userName & "@" & serverName
connectionStringBuilder("Pwd") = password
Return connectionStringBuilder.ConnectionString
End Function
7. Override the CreateCommand method to create an OdbcCommand. Remember that this
abstract method is called in the parent class to get the connection and execute the different
SQL statement samples.
(Code Snippet – Intro to SQL Azure - Ex4 ODBC CreateCommand method – C#)
C#
protected override DbCommand CreateCommand(DbConnection connection)
{
return new OdbcCommand() { Connection = connection as OdbcConnection };
}
(Code Snippet – Intro to SQL Azure - Ex4 ODBC CreateCommand method – VB)
Visual Basic
Protected Overrides Function CreateCommand(ByVal connection As DbConnection)
As DbCommand
Return New OdbcCommand() With {.Connection = TryCast(connection,
OdbcConnection)}
End Function
That is the specific code required to use an ODBC connection. Now you will include some code in
the Program.cs or Module1.vb file (depending on the language of your project) to test the
connection and see how the different operations work.
8. Open the Program.cs (for Visual C# projects) or Module1.vb (for Visual Basic projects) file
double-clicking it in the Solution Explorer inside the ConnectDemoApp project.
9. In method Main, implement the logic to create a new instance of the OdbcConnectionDemo
class and execute the demo against SQL Azure. You can add or replace the code from the
previous tasks based on whether you want to test all the technologies at once or only this one.
(Code Snippet – Intro to SQL Azure - Ex4 ODBC demo implementation – C#)
C#
static void Main(string[] args)
{

//...
//Invoke the ODBC connection demo
Console.WriteLine("Starting the ODBC Connection Demo...");
OdbcConnectionDemo demo2 = new OdbcConnectionDemo(userName, password,
datasource, databaseName);
demo2.ConnectToSQLAzureDemo();
Console.WriteLine("Demo Complete... Press any key");
Console.ReadKey();
}
(Code Snippet – Intro to SQL Azure - Ex4 ODBC demo implementation – VB)
Visual Basic
Sub Main()
' ...
' Invoke the ODBC connection demo
Console.WriteLine("Starting the ODBC Connection Demo...")
Dim demo2 = New OdbcConnectionDemo(_userName, _password, _datasource,
_databaseName)
demo2.ConnectToSQLAzureDemo()
Console.WriteLine("Demo Complete... Press any key")
Console.ReadKey()
End Sub
10. If you have not done so before, update the value of the member variables located immediately
above method Main by replacing the placeholders with the connection information for your
SQL Azure account.
Note: This is the information obtained during Exercise 1, when you visited the SQL Azure portal
and created a database and a user. In any case, you can use any SQL Azure account since the
demo will create a new table and then remove it right before finishing.
11. Run the application by pressing F5. You should see the following output in a console window.
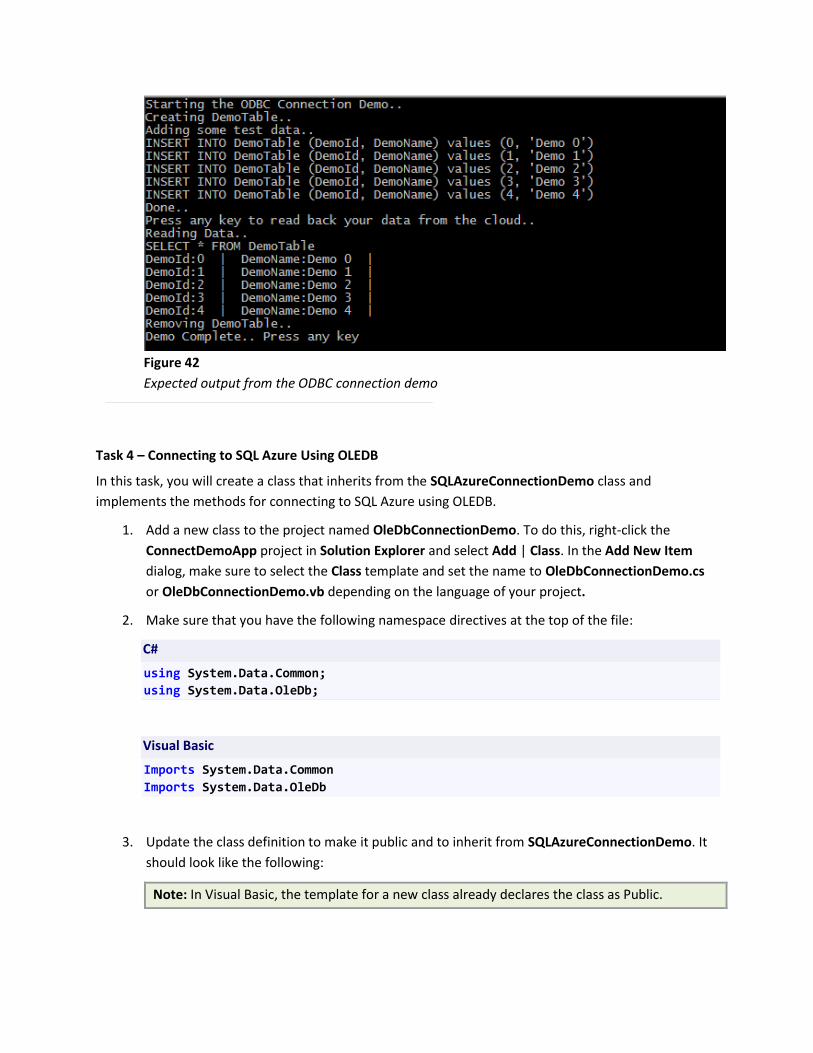
Figure 42
Expected output from the ODBC connection demo
Task 4 – Connecting to SQL Azure Using OLEDB
In this task, you will create a class that inherits from the SQLAzureConnectionDemo class and
implements the methods for connecting to SQL Azure using OLEDB.
1. Add a new class to the project named OleDbConnectionDemo. To do this, right-click the
ConnectDemoApp project in Solution Explorer and select Add | Class. In the Add New Item
dialog, make sure to select the Class template and set the name to OleDbConnectionDemo.cs
or OleDbConnectionDemo.vb depending on the language of your project.
2. Make sure that you have the following namespace directives at the top of the file:
C#
using System.Data.Common;
using System.Data.OleDb;
Visual Basic
Imports System.Data.Common
Imports System.Data.OleDb
3. Update the class definition to make it public and to inherit from SQLAzureConnectionDemo. It
should look like the following:
Note: In Visual Basic, the template for a new class already declares the class as Public.
C#
public class OleDbConnectionDemo : SQLAzureConnectionDemo
{
}
Visual Basic
Public Class OleDbConnectionDemo
Inherits SQLAzureConnectionDemo
End Class
4. Implement the class constructor to get the connection information and pass it as parameters to
the base class constructor:
(Code Snippet – Intro to SQL Azure - Ex4 OLEDB constructor – C#)
C#
public OleDbConnectionDemo(string userName, string password, string
dataSource, string databaseName)
: base(userName, password, dataSource, databaseName)
{
}
(Code Snippet – Intro to SQL Azure - Ex4 OLEDB constructor – VB)
Visual Basic
Public Sub New(ByVal userName As String, ByVal password As String, ByVal
dataSource As String, ByVal databaseName As String)
MyBase.New(userName, password, dataSource, databaseName)
End Sub
5. Override the CreateConnection method to create an OleDbConnection in your
OleDbConnectionDemo class:
(Code Snippet – Intro to SQL Azure - Ex4 OLEDB CreateConnection – C#)
C#
protected override DbConnection CreateConnection(string userName, string
password, string dataSource, string databaseName)
{
return new OleDbConnection(CreateOleDBConnectionString(userName, password,
dataSource, databaseName));
}

(Code Snippet – Intro to SQL Azure - Ex4 OLEDB CreateConnection – VB)
Visual Basic
Protected Overrides Function CreateConnection(ByVal userName As String, ByVal
password As String, ByVal dataSource As String, ByVal databaseName As String)
As DbConnection
Return New OleDbConnection(CreateOleDBConnectionString(userName, password,
dataSource, databaseName))
End Function
6. Implement the CreateOleDbConnectionString method used by the CreateConnection method.
This method is responsible for building up the connection string used to create the connection
to SQL Azure using OLEDB.
(Code Snippet – Intro to SQL Azure - Ex4 OLEDB CreateOleDbConnectionString method – C#)
C#
private string CreateOleDBConnectionString(string userName, string password,
string dataSource, string databaseName)
{
string serverName = GetServerName(dataSource);
OleDbConnectionStringBuilder connectionStringBuilder = new
OleDbConnectionStringBuilder
{
Provider = "SQLOLEDB",
DataSource = dataSource,
};
connectionStringBuilder["Initial Catalog"] = databaseName;
connectionStringBuilder["UId"] = userName + "@" + serverName;
connectionStringBuilder["Pwd"] = password;
return connectionStringBuilder.ConnectionString;
}
(Code Snippet – Intro to SQL Azure - Ex4 OLEDB CreateOleDbConnectionString method – VB)
Visual Basic
Private Function CreateOleDBConnectionString(ByVal userName As String, ByVal
password As String, ByVal dataSource As String, ByVal databaseName As String)
As String
Dim serverName As String = GetServerName(dataSource)

Dim connectionStringBuilder As OleDbConnectionStringBuilder = New
OleDbConnectionStringBuilder With {.Provider = "SQLOLEDB", .DataSource =
dataSource}
connectionStringBuilder("Initial Catalog") = databaseName
connectionStringBuilder("UId") = userName & "@" & serverName
connectionStringBuilder("Pwd") = password
Return connectionStringBuilder.ConnectionString
End Function
7. Override the CreateCommand method to create an OleDbCommand. Remember that this
abstract method is called in the parent class to get the connection and execute the different
SQL statement samples.
(Code Snippet – Intro to SQL Azure - Ex4 OLEDB CreateCommand method – C#)
C#
protected override DbCommand CreateCommand(DbConnection connection)
{
return new OleDbCommand() { Connection = connection as OleDbConnection };
}
(Code Snippet – Intro to SQL Azure - Ex4 OLEDB CreateCommand method – VB)
Visual Basic
Protected Overrides Function CreateCommand(ByVal connection As DbConnection)
As DbCommand
Return New OleDbCommand() With {.Connection = TryCast(connection,
OleDbConnection)}
End Function
That is the specific code required to use an OLEDB connection. Now you will include some code
in the Program.cs or Module1.vb file (depending on the language of your project) to test the
connection and see how the different operations work.
8. Open the Program.cs (for Visual C# projects) or Module1.vb (for Visual Basic projects) file
double-clicking it in the Solution Explorer inside the ConnectDemoApp project.
9. In method Main, implement the logic to create an instance of the OleDbConnectionDemo class
and execute the demo against SQL Azure. You can add or replace the code from the previous
tasks based on whether you want to test all the technologies at once or only this one.
(Code Snippet – Intro to SQL Azure - Ex4 OLEDB demo implementation – C#)
C#
static void Main(string[] args)
{
//...
//Invoke the OleDB connection demo
Console.WriteLine("Starting the OLEDB Connection Demo…");
OleDbConnectionDemo demo3 = new OleDbConnectionDemo(userName, password,
datasource, databaseName);
demo3.ConnectToSQLAzureDemo();
Console.WriteLine("Demo Complete... Press any key");
Console.ReadKey();
}
(Code Snippet – Intro to SQL Azure - Ex4 OLEDB demo implementation – VB)
Visual Basic
Sub Main()
' ...
' Invoke the OleDB connection demo
Console.WriteLine("Starting the OLEDB Connection Demo...")
Dim demo3 = New OleDbConnectionDemo(_userName, _password, _datasource,
_databaseName)
demo3.ConnectToSQLAzureDemo()
Console.WriteLine("Demo Complete... Press any key")
Console.ReadKey()
End Sub
10. If you have not done so before, update the value of the member variables located immediately
above method Main by replacing the placeholders with the connection information for your
SQL Azure account.
Note: This is the information obtained during Exercise 1, when you visited the SQL Azure portal
and created a database and a user. In any case, you can use any SQL Azure account since the
demo will create a new table and then remove it right before finishing.
11. Run the application by pressing F5. You should see the following output in a console window.

Figure 43
Expected output from the OLEDB connection demo
Task 5 – Connecting to SQL Azure Using LINQ to SQL
You have connected in three different ways to the database on SQL Azure. The last technology that you
are going to try will be LINQ to SQL. You will notice that the class implementation for this demo will not
inherit from the SQLAzureConnectionDemo class because when using LINQ to SQL, you do not have to
manage Connections and Commands; those are administered by the underlying technology and you do
not have to worry about them.
1. Add a new class to the project named LinqToSqlConnectionDemo. To do this, right-click the
ConnectDemoApp project in Solution Explorer and select Add | Class. In the Add New Item
dialog, make sure you select the Class template and then set the name to
LinqToSqlConnectionDemo.cs or LinqToSqlConnectionDemo.vb based on the language of your
preference.
2. Update the class definition to make it public. It should look like the following:
C#
public class LinqToSqlConnectionDemo
{
}
Visual Basic
Public Class LinqToSqlConnectionDemo
End Class
3. Only for C#, make sure that you have the following namespace directives at the top of the class:
C#
using System;
using System.Linq;
4. Add the following method to the LinqToSqlConnectionDemo class. This retrieves from the
database all the company names and prints them to the console. To do that, it takes advantage
of the AdventureWorksSqlAzureDataContext LINQ to SQL class (defined in the
AdventureWorksSqlAzure.dbml file).
(Code Snippet – Intro to SQL Azure - Ex4 LINQ ConnectToSQLAzure method – C#)
C#
/// <summary>
/// AdventureWorksSqlAzureDataContext takes care of handling your transactions
for you
/// leaving you free you use Linq to extract information stored up in the
cloud.
/// </summary>
public void ConnectToSQLAzureDemo()
{
AdventureWorksSqlAzureDataContext context = new
AdventureWorksSqlAzureDataContext();
// get all company names
IQueryable<string> companyNames = from customer in context.Customers
where customer.CustomerID < 20
select customer.CompanyName;
// display these all on the console
foreach (string company in companyNames)
{
Console.WriteLine(company);
}
}
(Code Snippet – Intro to SQL Azure - Ex4 LINQ ConnectToSQLAzure method – VB)
Visual Basic
''' <summary>
''' AdventureWorksSqlAzureDataContext takes care of handling your transactions
for you
''' leaving you free you use Linq to extraxt information stored up in the
cloud.
''' </summary>
Public Sub ConnectToSQLAzureDemo()
Dim context As New AdventureWorksSQLAzureDataContext()
' get all company names
Dim companyNames As IQueryable(Of String) = From customer In
context.Customers _
Where customer.CustomerID < 20 _
Select customer.CompanyName
' display these all on the console
For Each company As String In companyNames
Console.WriteLine(company)
Next company
End Sub
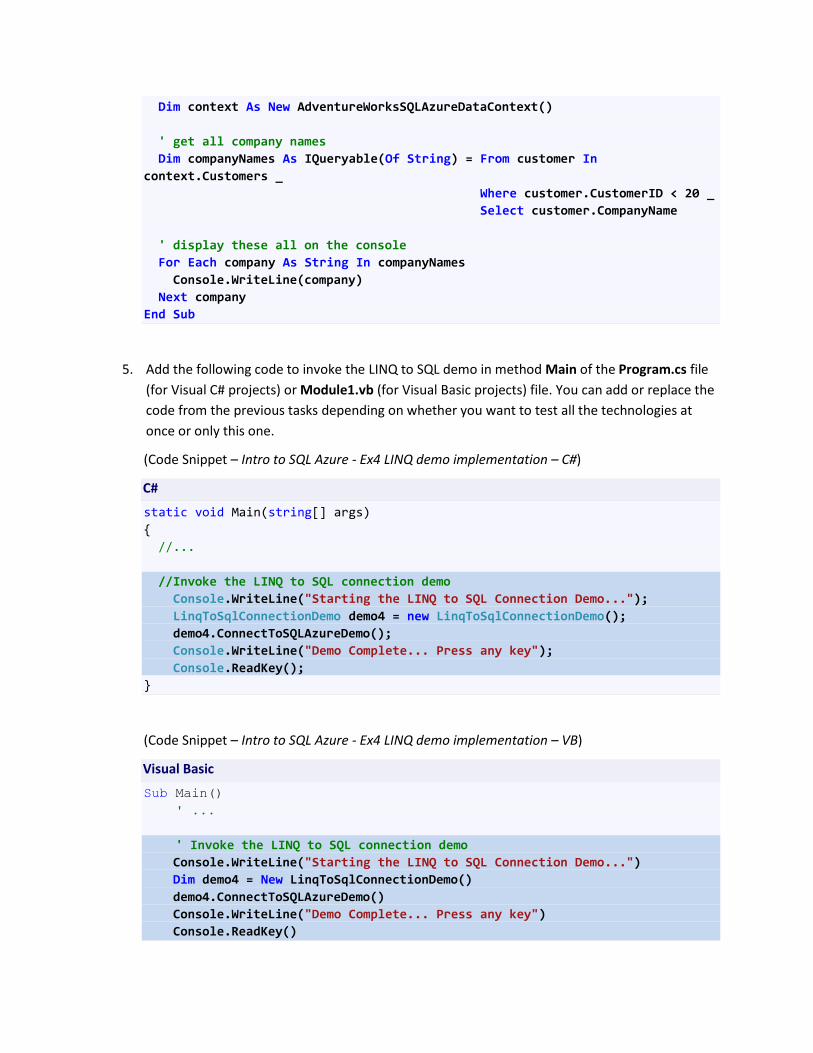
5. Add the following code to invoke the LINQ to SQL demo in method Main of the Program.cs file
(for Visual C# projects) or Module1.vb (for Visual Basic projects) file. You can add or replace the
code from the previous tasks depending on whether you want to test all the technologies at
once or only this one.
(Code Snippet – Intro to SQL Azure - Ex4 LINQ demo implementation – C#)
C#
static void Main(string[] args)
{
//...
//Invoke the LINQ to SQL connection demo
Console.WriteLine("Starting the LINQ to SQL Connection Demo...");
LinqToSqlConnectionDemo demo4 = new LinqToSqlConnectionDemo();
demo4.ConnectToSQLAzureDemo();
Console.WriteLine("Demo Complete... Press any key");
Console.ReadKey();
}
(Code Snippet – Intro to SQL Azure - Ex4 LINQ demo implementation – VB)
Visual Basic
Sub Main()
' ...
' Invoke the LINQ to SQL connection demo
Console.WriteLine("Starting the LINQ to SQL Connection Demo...")
Dim demo4 = New LinqToSqlConnectionDemo()
demo4.ConnectToSQLAzureDemo()
Console.WriteLine("Demo Complete... Press any key")
Console.ReadKey()
End Sub
6. Open the App.config file and change the relevant section to point to your SQL Azure Database,
and connect using the test user created earlier in this lab.
Note: This step is required because the AdventureWorksSQLAzureDataContext class gets the
parameters to create the connection from the configuration file.
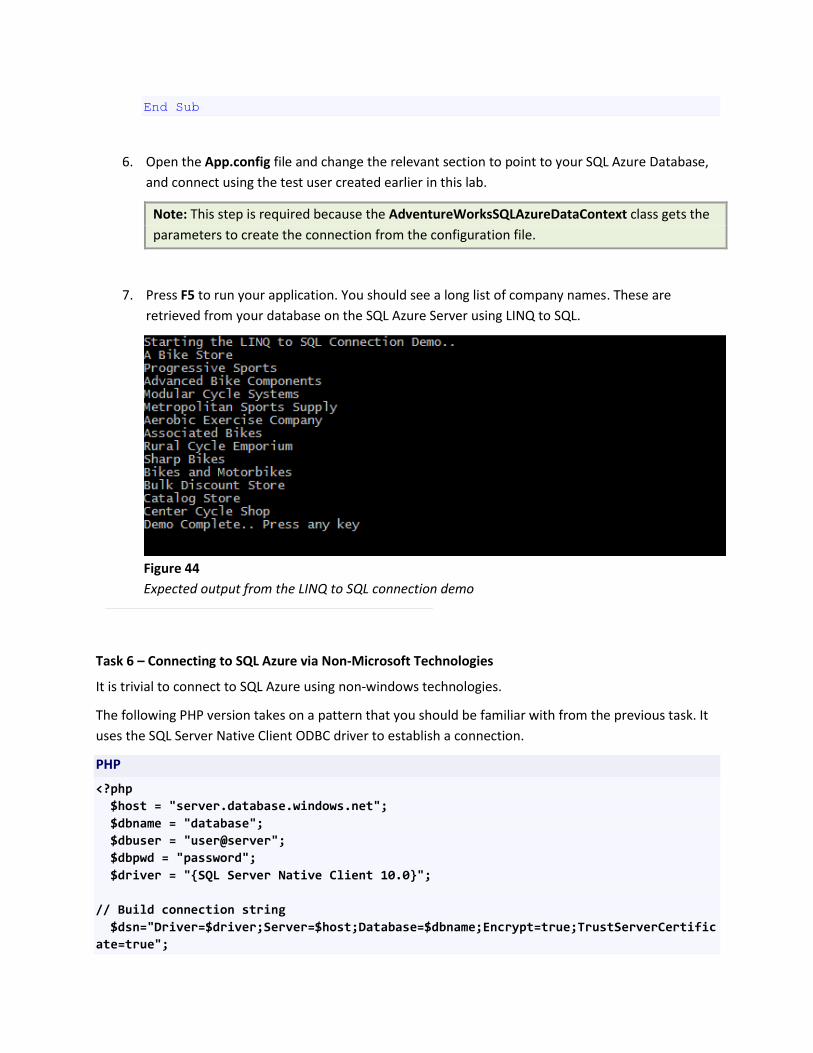
7. Press F5 to run your application. You should see a long list of company names. These are
retrieved from your database on the SQL Azure Server using LINQ to SQL.
Figure 44
Expected output from the LINQ to SQL connection demo
Task 6 – Connecting to SQL Azure via Non-Microsoft Technologies
It is trivial to connect to SQL Azure using non-windows technologies.
The following PHP version takes on a pattern that you should be familiar with from the previous task. It
uses the SQL Server Native Client ODBC driver to establish a connection.
PHP
<?php
$host = "server.database.windows.net";
$dbname = "database";
$dbuser = "user@server";
$dbpwd = "password";
$driver = "{SQL Server Native Client 10.0}";
// Build connection string
$dsn="Driver=$driver;Server=$host;Database=$dbname;Encrypt=true;TrustServerCertific
ate=true";
if (!($conn = @odbc_connect($dsn, $dbuser, $dbpwd))) {
die("Connection error: " . odbc_errormsg());
}
// Got a connection, do what you will
// Free the connection
@odbc_close($conn);
?>
Connecting to SQL Azure using JDBC is also trivial. Refer to the following code.
JAVA
// Build a connection string
String connectionUrl= "jdbc:sqlserver://server.database.windows.net;" +
"database=mydatabase;encrypt=true;user=user@server;password=*****";
// Next, make the sure the SQL Server Driver is loaded.
Class.forName("com.microsoft.sqlserver.jdbc.SQLServerDriver");
// Then attempt to get a connection. This will null or throw if we can't get a
connection.
Connection sqlConn = DriverManager.getConnection(connectionUrl);
if (sqlConn == null)
{
System.out.println("Unable to obtain connection. exiting");
System.exit(1);
}
// Got a connection, do what you will
// Free the connection
sqlConn.close();
Summary
In this lab, you have looked at the basics of working with SQL Azure. If you have any SQL Server
experience, you may have found the lab familiar and that is, indeed, the point. Working with SQL Azure
should be very familiar to anyone who has worked with SQL Server.
You learned to create new databases, logins and users for those databases. You saw that for the most
part, you could simply create objects in SQL Azure as you would with an on-premise SQL Server.

In addition, you created a simple Windows Azure application that is able to consume a SQL Azure
database.
Finally, you saw that creating connections to SQL Azure using Microsoft technologies is the same as
creating connections to any normal on-premise database.