Embed Size (px)
Citation preview
PAGE 1
Hands-OnGeometry:
Using Manipulatives in Math 10 Lines and Line Segments
Angles and Polygons
by:Kathleen Bracken
1 9 9 4
S 105.14TEACHING MATERIALS
from the STEWART RESOURCES CENTRE

PAGE i
HANDS-ON GEOMETRY:Using Manipulatives in Math 10 CoreLines and Line SegmentsAngles and Polygons
by Kathleen Bracken1994CELsS105.14
TABLE OF CONTENTS
SECTION 1: Mira ConstructionsLines and Line Segments..............................................1
SECTION 2: Pythagorean Puzzles ..................................................24
SECTION 3: Build a Clinometer.......................................................37
SECTION 4:Geometry Flash Cards ................................................44
PAGE ii
SECTION 1: MIRA CONSTRUCTIONSLines and Line Segments
Foundational Objectives:
To develop an informal understanding of the relationships between lines. (10 04 01)
Specific Objective:
Students will use a Mira to construct:
D.4, D.5, D.6, D.7 (Page 138, Math 10 Curriculum Guide)
a) congruent segments
b) the perpendicular bisector of a line segment
c) a line perpendicular to a given line from a point not on the line
d) a line perpendicular to a given line from a point on the line
e) a line parallel to a given line through a given point not on the line
f) quadrilaterals: parallelogram, rectangle, square, rhombus
Enrichment: (but highly recommended as a concluding exericse)
g) circumscribe a circle about a triangle
h) bisect an angle
i) inscribe a circle in a triangle
Time:
3 hours of work, 1/2 hour assessment
Instructional Strategies:
Independent Learning, Interactive Instruction, Instructional Methods and Activities:
1. Learning Activity Package:Students may use the following activity sheets to informally construct the required segments and lines. The final three (optional) activitiesrequire the students to use the basic constructions to construct special circles.
2. Peer Practice:Students work in groups of 2. Each pair of students requires a Mira and a compass. Partnerships made up of one strong and one weakstudent are very effective here.
* If students have not previously used the Mira, it is suggested they be given an introductory lesson on its use. (Recommended: pages 3-6 in Geometric Constructions and Investigations with a Mira).
PAGE 1

Equipment:
Mirasharp pencil or mechanical pencilcompass (for optional constructions)duplicated copies of activity package
References
Geometric Constructions and Investigations with a Mira, Ernest Woodward and Thomas Hamel, J. Weston Walch, Publisher, Portland,Maine, 1992.
Assessment Technique:
1. Formative: examination of learning activity booklet throughout the 3 days of work.
2. Summative: Contract and Peer Evaluation (see template)
a) Each student selects and records the names of 6 constructions he/she would like to be evaluated on. (Suggestion: 4 basic onesand 2 more complex ones).
b) One student acts as the examiner, one as the test taker. (If the stronger student starts as the test taker, then the exercise can bea learning exercise for the weaker student as well).
c) The test taker is given fifteen minutes to complete his/her chosen constructions. The examiner initials each item and records amark of 5 for each completed construction. Then the examiner assigns a mark out of ten for the other criteria. A mark out ofsixty is then assigned.
d) Roles are reversed for the remaining fifteen minutes.
Adaptive Dimension:
Students may complete this exercise individually as materials allow. This allows for teacher and small group sessions where more directteaching is required.
Class - Management Tip:
This package works well with the teacher working on the overhead and a more teacher-guided approach to introduce each construction.
List of Constructions:
Activity 1: Construct Congruent Segments - Sheet 1
Activity 2: Construct the Perpendicular Bisector of a Line Segment - Sheets, 2, 3, and 4
Activity 3: Construct a Line Perpendicular to a given line from a point not on the line - Sheet 5
Activity 4: Construct a line perpendicular to a given line from a point on the line - Sheet 6
Activity 5: Construct a line parallel to a given line through a given point. Sheet 7 and 8
Activity 6: Construct Quadrilaterals - Sheets 9, 10, and 11
Activity 7: Circumscribe a Circle about a Triangle - Sheets 12, 13, 14, and 15
Activity 8:a) Bisect Angles - Sheets 16 and 17b) Inscribe a Circle in a Triangle - Sheets 18, 19, and 20
Evaluation Template: Sheet 21
PAGE 2
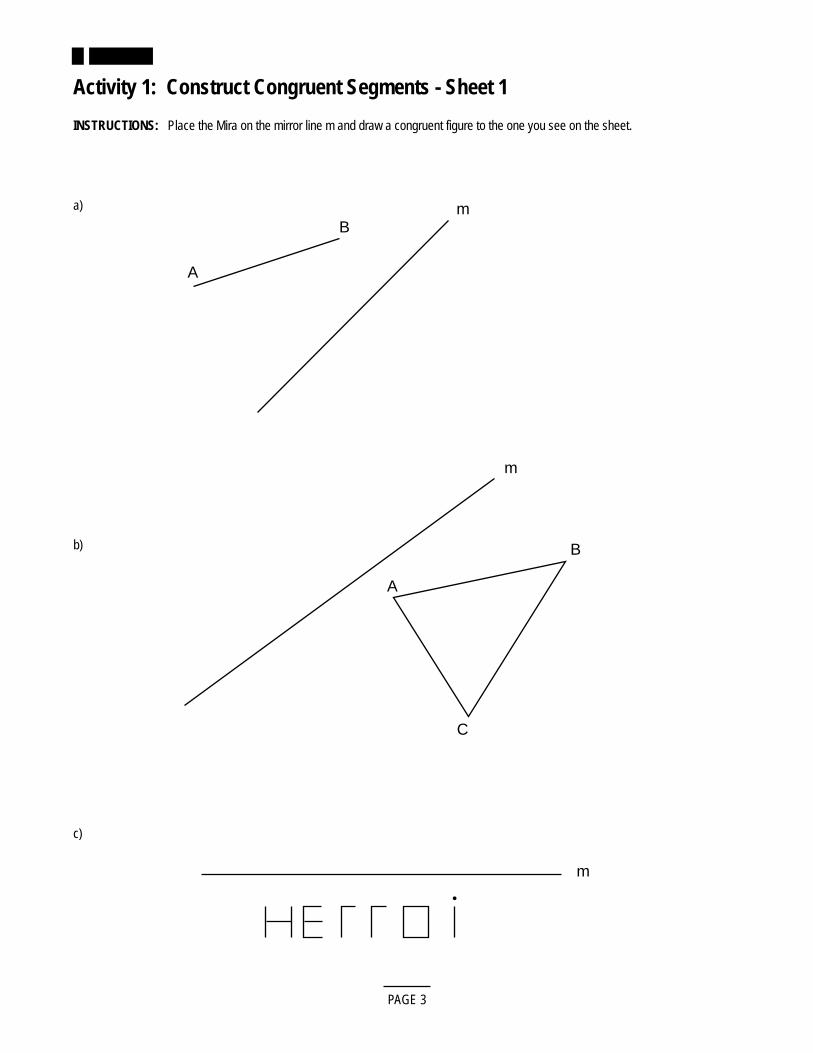
Activity 1: Construct Congruent Segments - Sheet 1
INSTRUCTIONS: Place the Mira on the mirror line m and draw a congruent figure to the one you see on the sheet.
a)
PAGE 3
A
Bm
m
A
B
C
m
b)
c)
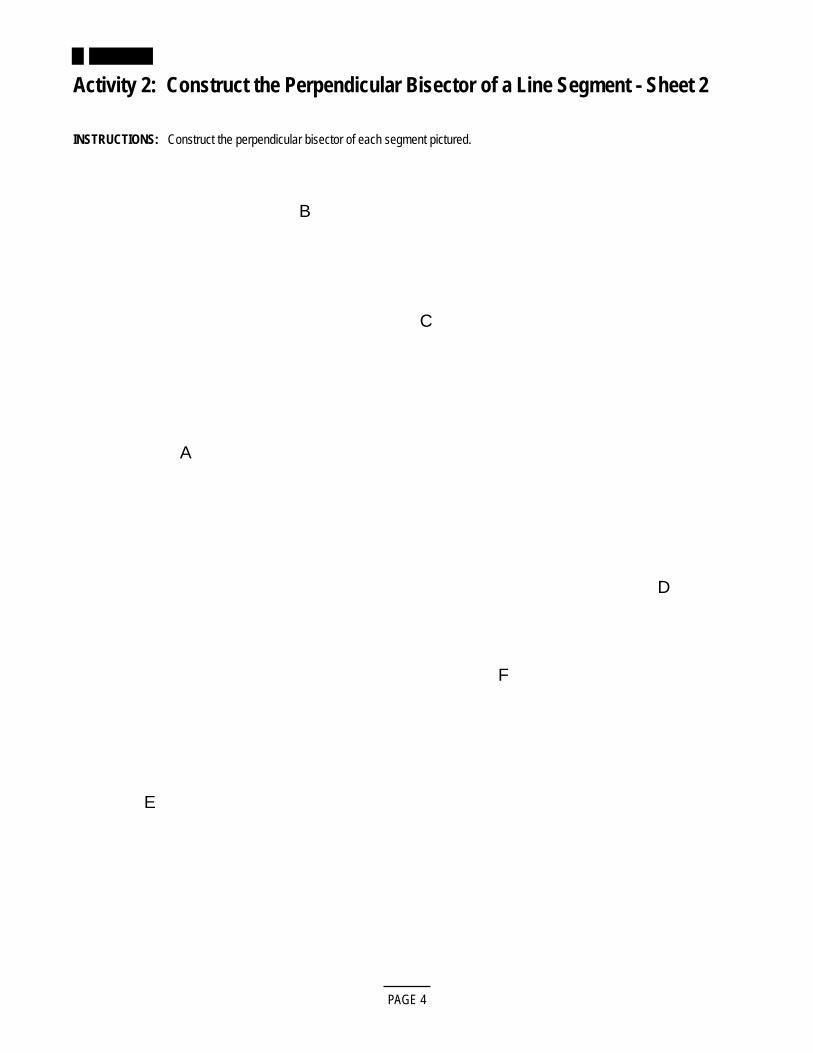
Activity 2: Construct the Perpendicular Bisector of a Line Segment - Sheet 2
INSTRUCTIONS: Construct the perpendicular bisector of each segment pictured.
PAGE 4
A
B
C
D
E
F
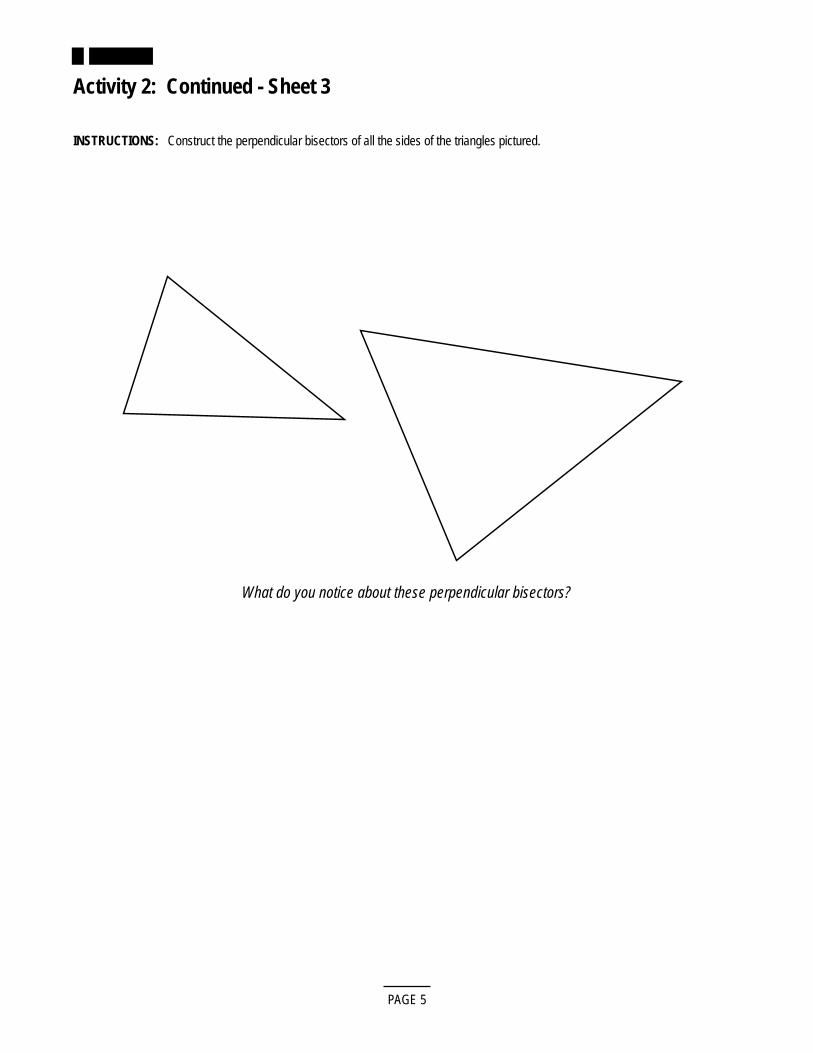
Activity 2: Continued - Sheet 3
INSTRUCTIONS: Construct the perpendicular bisectors of all the sides of the triangles pictured.
PAGE 5
What do you notice about these perpendicular bisectors?
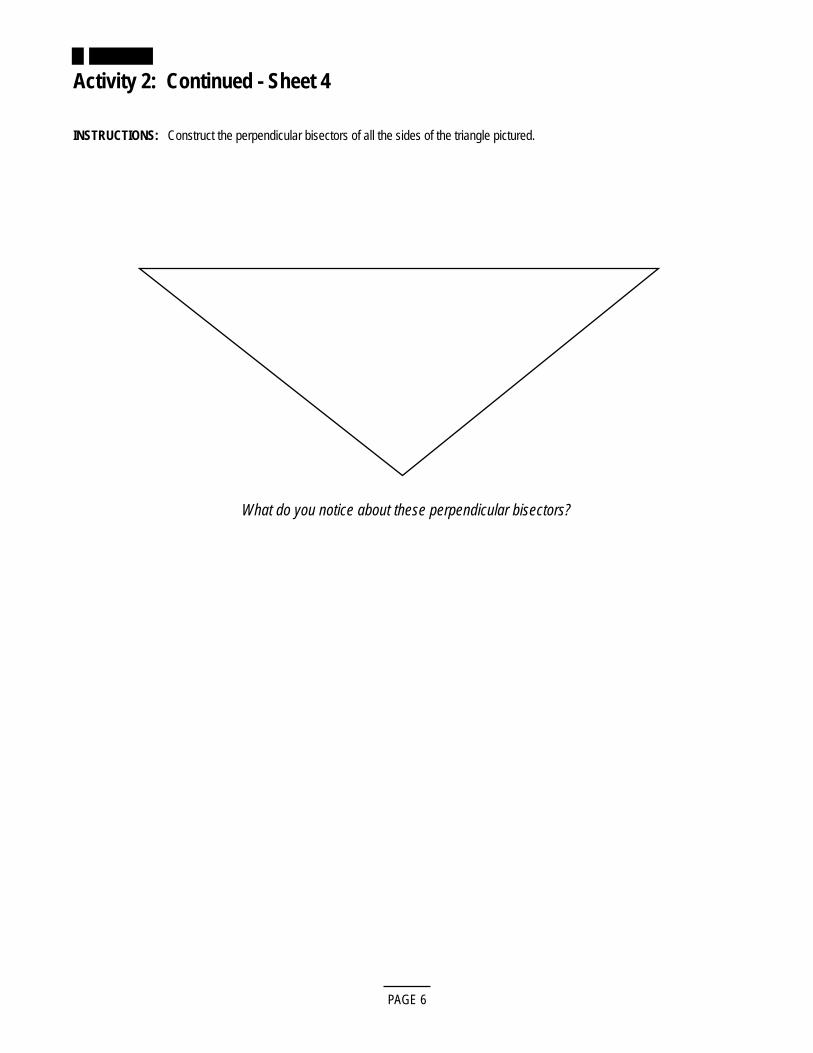
Activity 2: Continued - Sheet 4
INSTRUCTIONS: Construct the perpendicular bisectors of all the sides of the triangle pictured.
PAGE 6
What do you notice about these perpendicular bisectors?
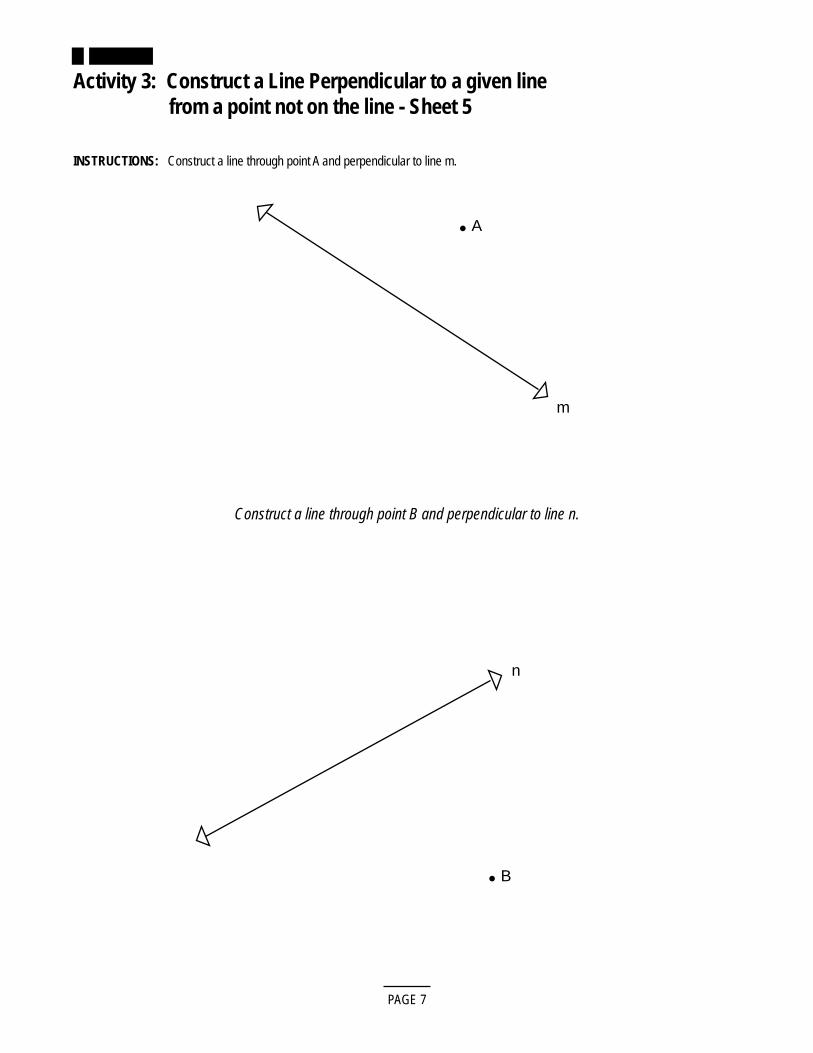
Activity 3: Construct a Line Perpendicular to a given line from a point not on the line - Sheet 5
INSTRUCTIONS: Construct a line through point A and perpendicular to line m.
PAGE 7
A
m
B
n
Construct a line through point B and perpendicular to line n.
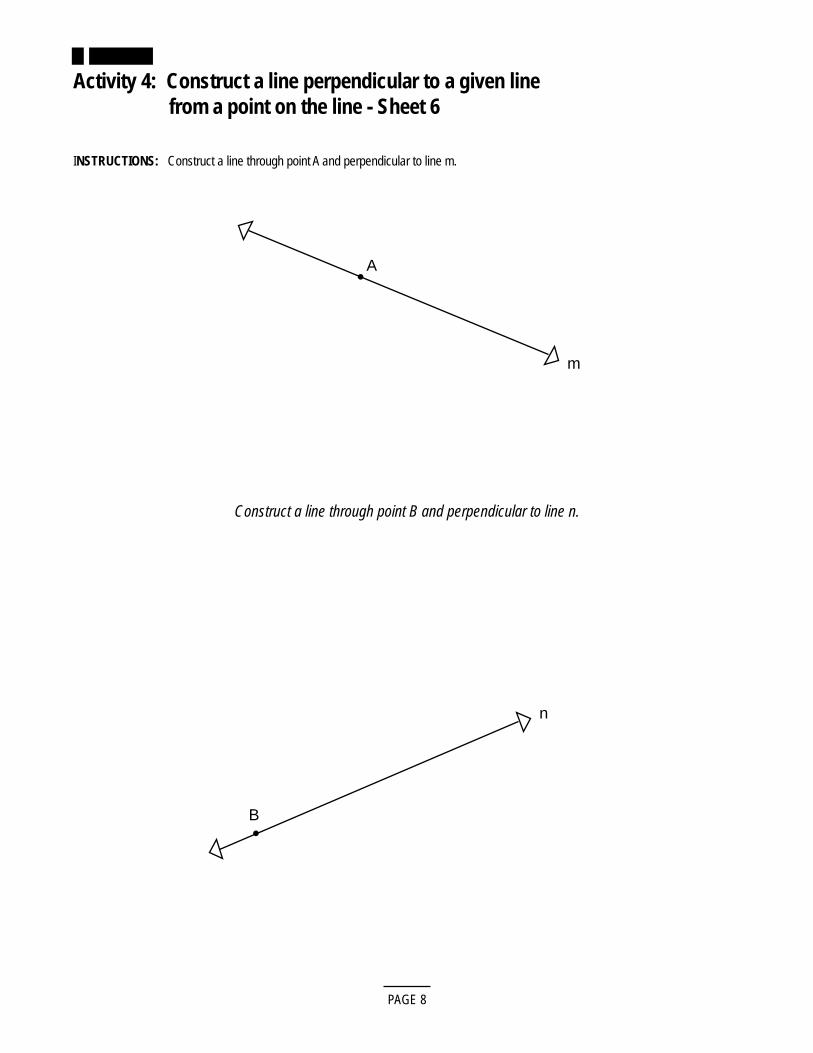
Activity 4: Construct a line perpendicular to a given line from a point on the line - Sheet 6
INSTRUCTIONS: Construct a line through point A and perpendicular to line m.
PAGE 8
A
m
B
n
Construct a line through point B and perpendicular to line n.
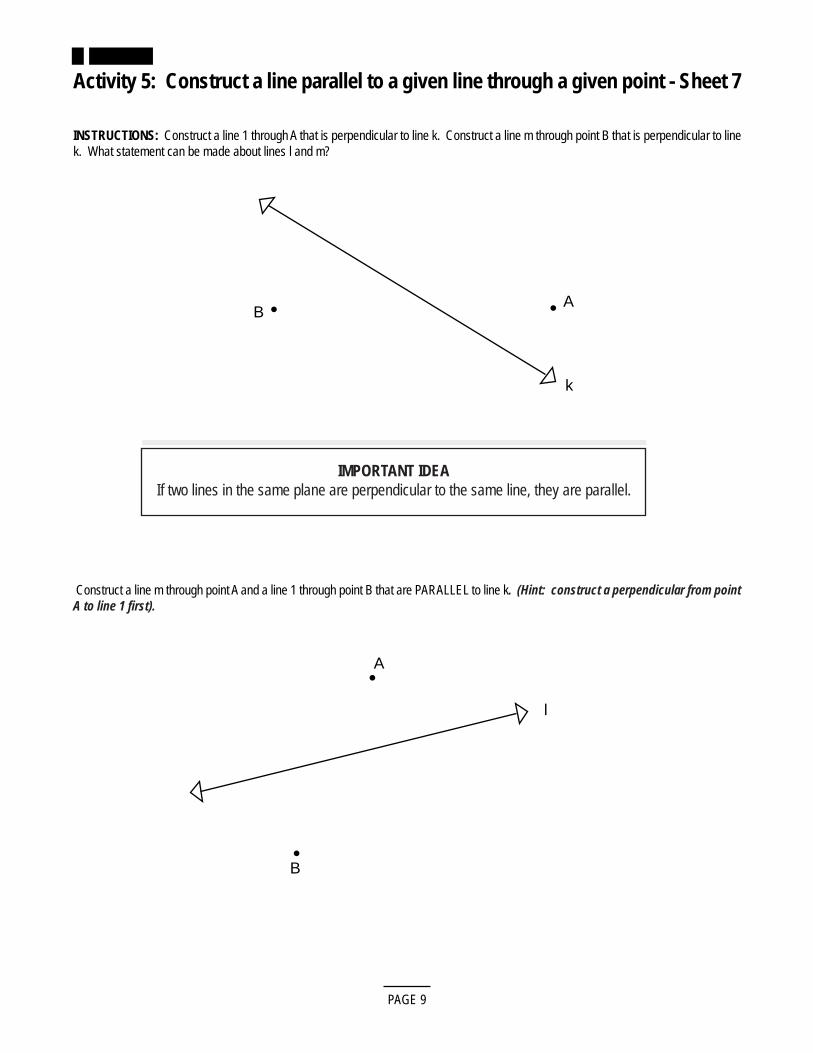
Activity 5: Construct a line parallel to a given line through a given point - Sheet 7
INSTRUCTIONS: Construct a line 1 through A that is perpendicular to line k. Construct a line m through point B that is perpendicular to linek. What statement can be made about lines l and m?
PAGE 9
A
k
A
B
B
l
Construct a line m through point A and a line 1 through point B that are PARALLEL to line k. (Hint: construct a perpendicular from pointA to line 1 first).
IMPORTANT IDEAIf two lines in the same plane are perpendicular to the same line, they are parallel.
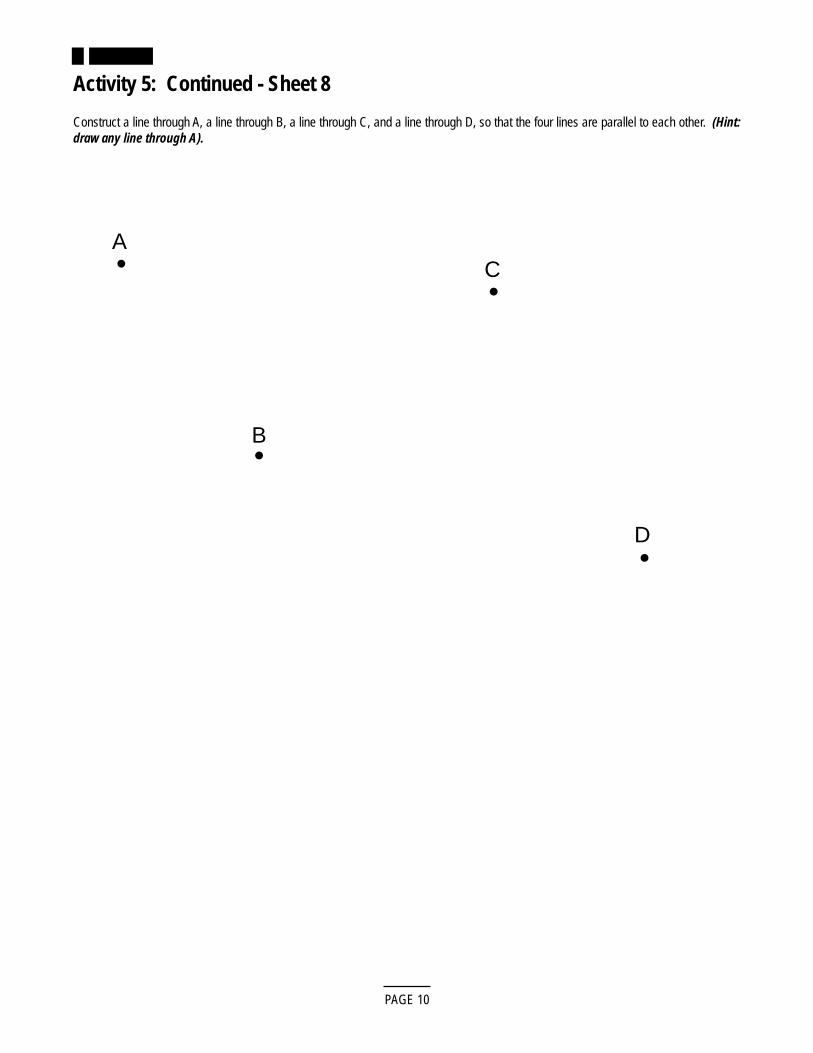
Activity 5: Continued - Sheet 8
Construct a line through A, a line through B, a line through C, and a line through D, so that the four lines are parallel to each other. (Hint:draw any line through A).
PAGE 10
A
B
C
D
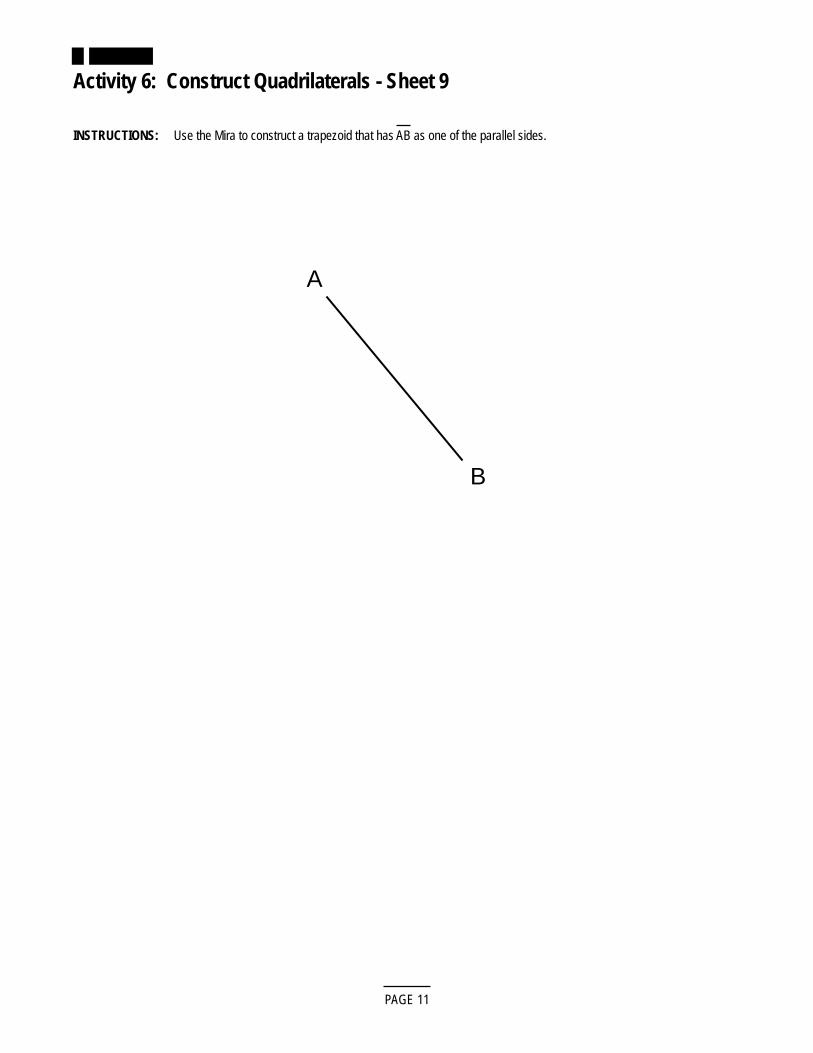
Activity 6: Construct Quadrilaterals - Sheet 9
INSTRUCTIONS: Use the Mira to construct a trapezoid that has AB as one of the parallel sides.
PAGE 11
A
B
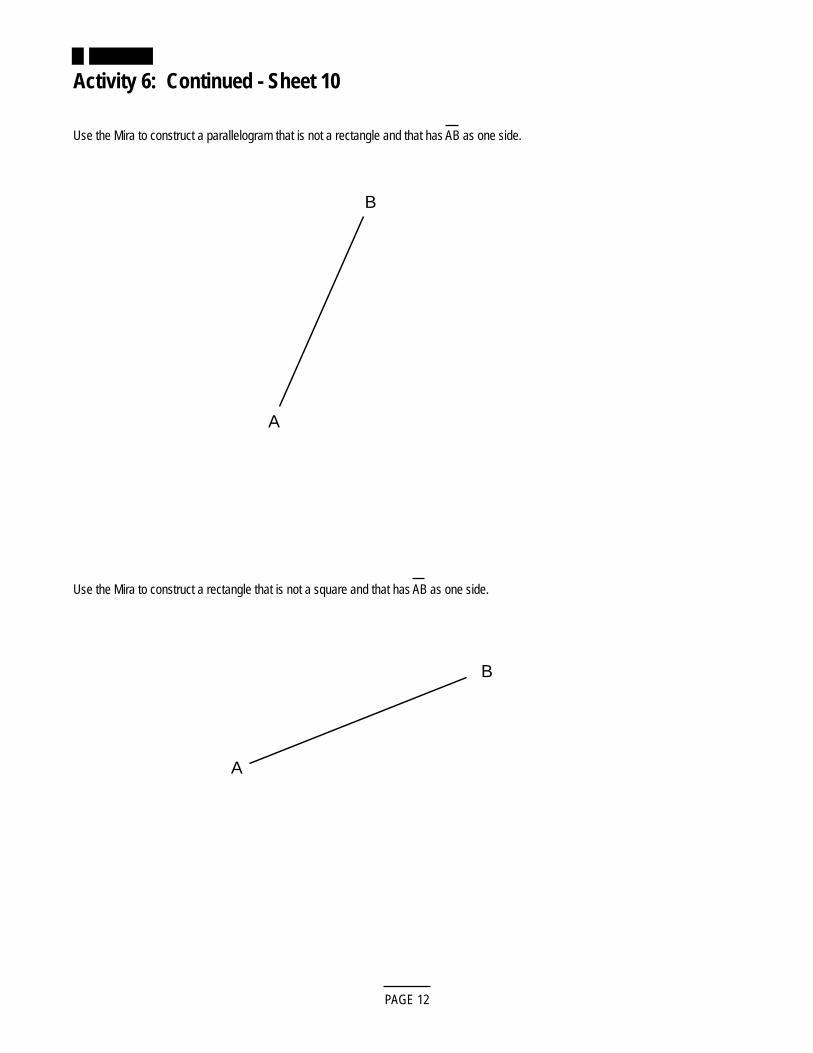
Activity 6: Continued - Sheet 10
Use the Mira to construct a parallelogram that is not a rectangle and that has AB as one side.
PAGE 12
B
A
A
B
Use the Mira to construct a rectangle that is not a square and that has AB as one side.
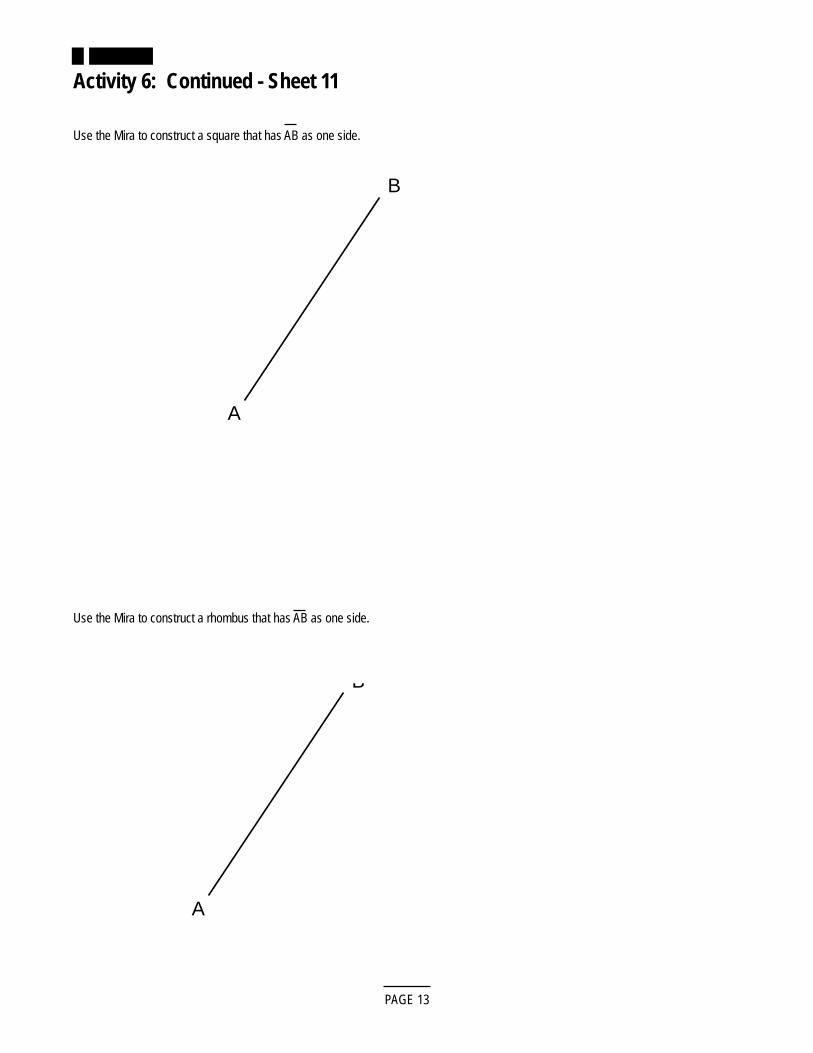
Activity 6: Continued - Sheet 11
Use the Mira to construct a square that has AB as one side.
PAGE 13
A
B
A
B
Use the Mira to construct a rhombus that has AB as one side.
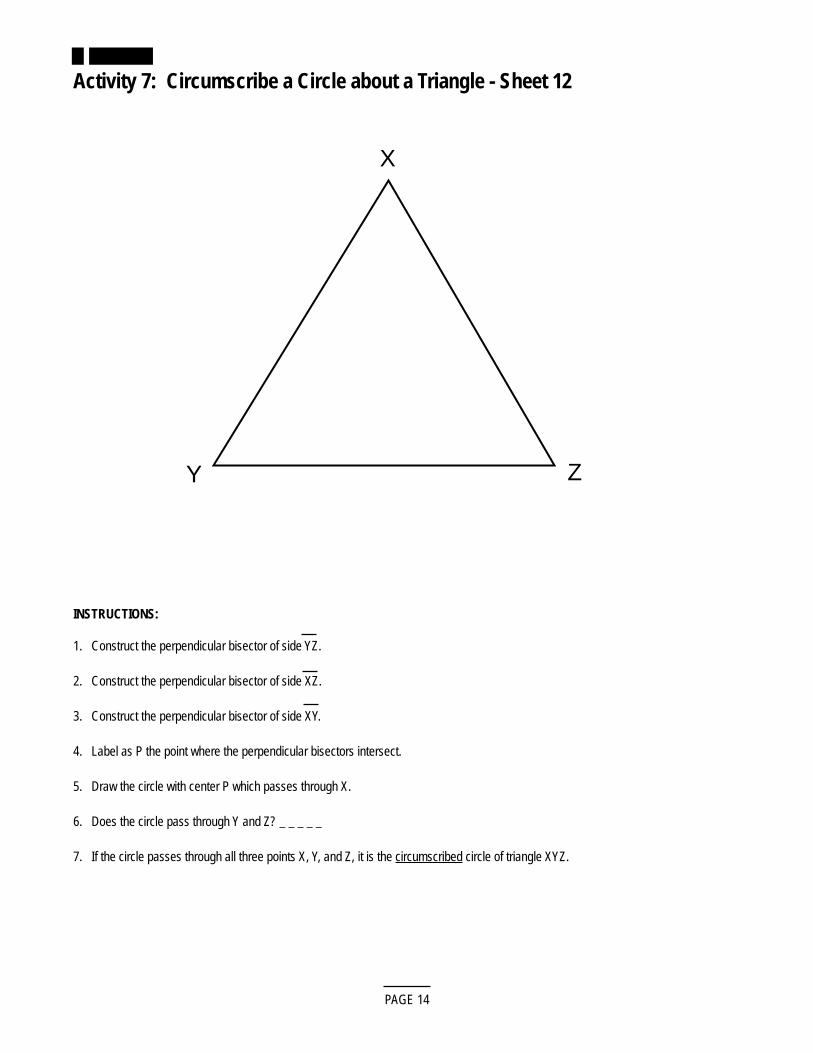
Activity 7: Circumscribe a Circle about a Triangle - Sheet 12
PAGE 14
X
Y Z
INSTRUCTIONS:
1. Construct the perpendicular bisector of side YZ.
2. Construct the perpendicular bisector of side XZ.
3. Construct the perpendicular bisector of side XY.
4. Label as P the point where the perpendicular bisectors intersect.
5. Draw the circle with center P which passes through X.
6. Does the circle pass through Y and Z? _ _ _ _ _
7. If the circle passes through all three points X, Y, and Z, it is the circumscribed circle of triangle XYZ.
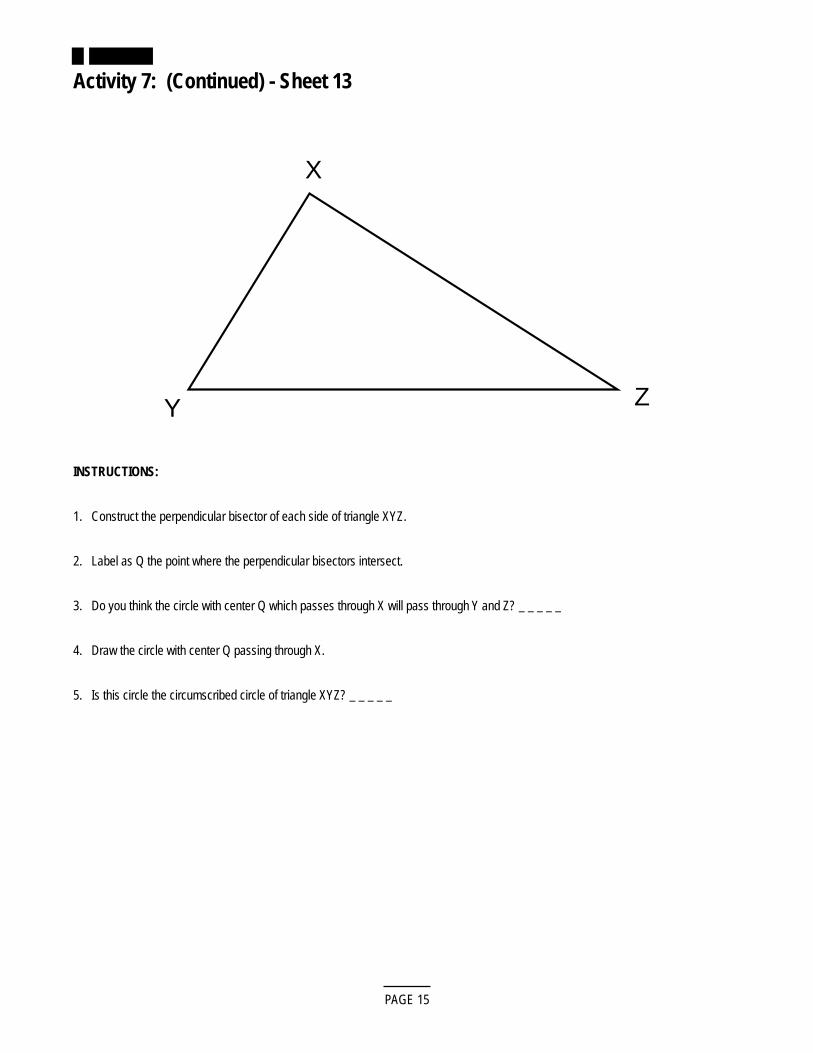
Activity 7: (Continued) - Sheet 13
PAGE 15
X
ZY
INSTRUCTIONS:
1. Construct the perpendicular bisector of each side of triangle XYZ.
2. Label as Q the point where the perpendicular bisectors intersect.
3. Do you think the circle with center Q which passes through X will pass through Y and Z? _ _ _ _ _
4. Draw the circle with center Q passing through X.
5. Is this circle the circumscribed circle of triangle XYZ? _ _ _ _ _
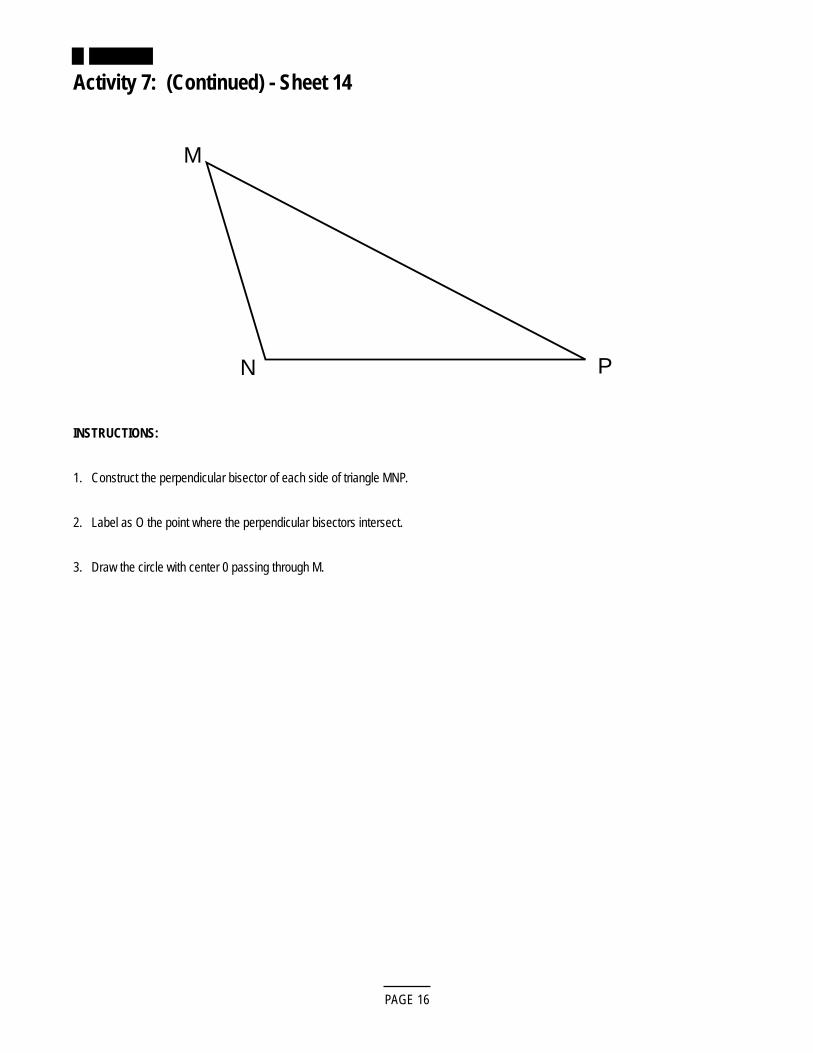
Activity 7: (Continued) - Sheet 14
PAGE 16
M
N P
INSTRUCTIONS:
1. Construct the perpendicular bisector of each side of triangle MNP.
2. Label as O the point where the perpendicular bisectors intersect.
3. Draw the circle with center 0 passing through M.
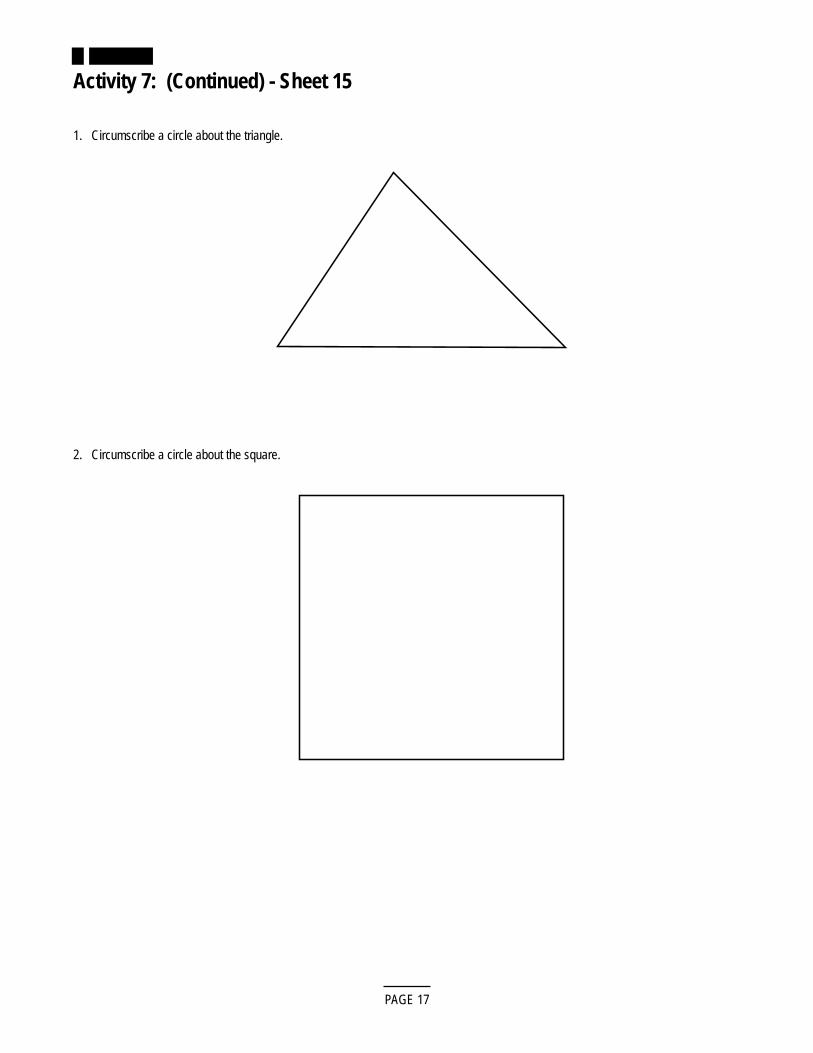
Activity 7: (Continued) - Sheet 15
1. Circumscribe a circle about the triangle.
2. Circumscribe a circle about the square.
PAGE 17

Activity 8: (a) Bisect Angles - Sheet 16
Use a Mira to bisect the angles.
a.
PAGE 18
A
M
BC
L
D
E
C
N
b.
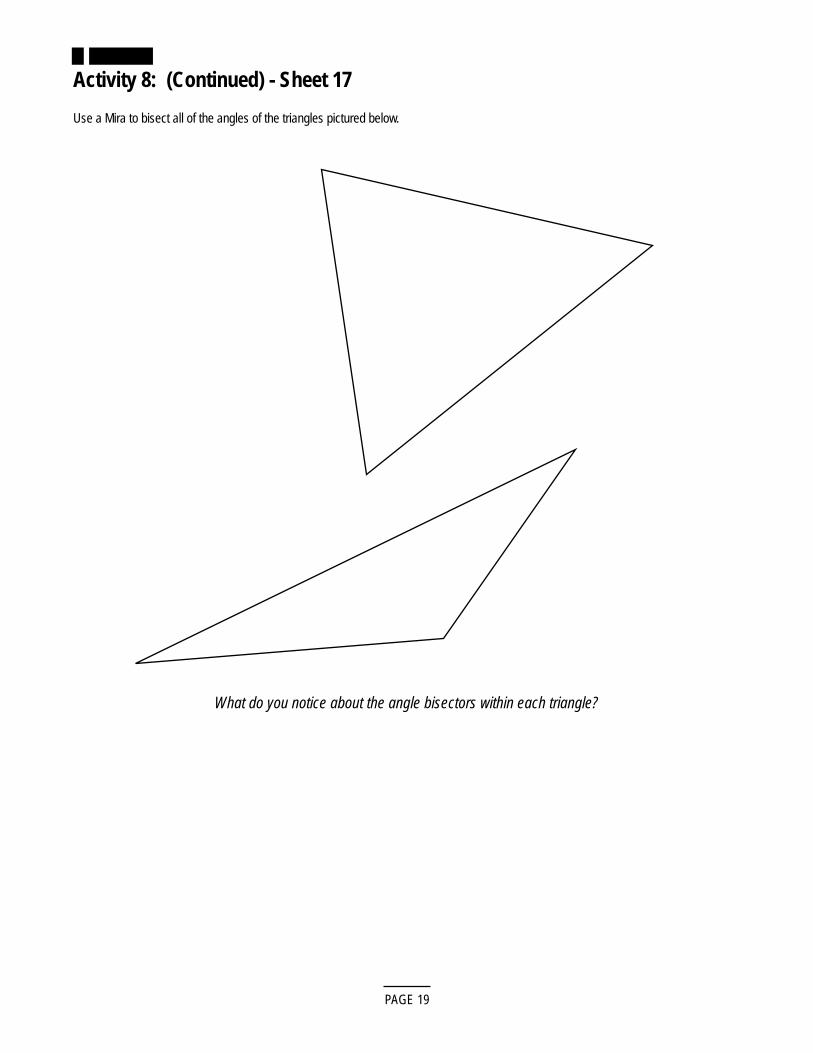
Activity 8: (Continued) - Sheet 17
Use a Mira to bisect all of the angles of the triangles pictured below.
PAGE 19
What do you notice about the angle bisectors within each triangle?

Activity 8: (b) Inscribe a Circle in a Triangle - Sheet 18
PAGE 20
INSTRUCTIONS:
1. Bisect angle ABC, angle ACB, and angle BAC of the triangle.
2. Do the bisectors meet in one point? _ _ _ _ _ Label the point of intersection Q.
3. Construct the perpendicular from Q to line BC.
4. Label as R the point where the perpendicular intersects BC.
5. Draw the circle with center Q passing through R.
6. If the circle touches but does not cross all three sides of triangle ABC, it is the inscribed circle of triangle ABC.
B C
A

Activity 8: (b) - Continued - Sheet 19
Inscribe a circle in the triangle.
PAGE 21
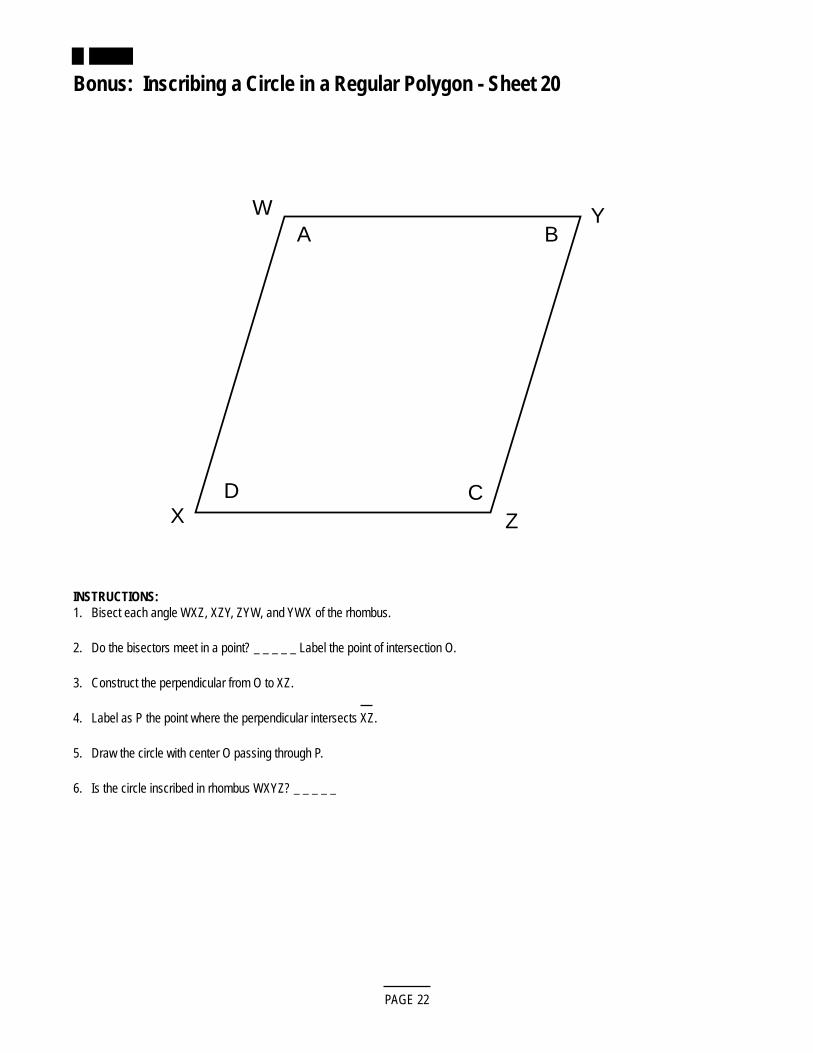
Bonus: Inscribing a Circle in a Regular Polygon - Sheet 20
PAGE 22
INSTRUCTIONS:1. Bisect each angle WXZ, XZY, ZYW, and YWX of the rhombus.
2. Do the bisectors meet in a point? _ _ _ _ _ Label the point of intersection O.
3. Construct the perpendicular from O to XZ.
4. Label as P the point where the perpendicular intersects XZ.
5. Draw the circle with center O passing through P.
6. Is the circle inscribed in rhombus WXYZ? _ _ _ _ _
W Y
ZXD
A B
C

PAGE 23
Contract for Mira Work
Student:
Partner: Class: Date:
CONTRACT QUESTIONS INITIALS MARKS (5 EACH)
1.
2.
3.
4.
5.
6.
EVALUATION CRITERIA RATING
A. Understanding 1 2 3 4 5 6 7 8 9 1 0
B. Correct Labels 1 2 3 4 5 6 7 8 9 1 0
C. Neatness 1 2 3 4 5 6 7 8 9 1 0
Comments: Overall Grade: /60
SECTION 2: PYTHAGOREAN PUZZLES
Foundational Objective:\
To develop an understanding of Pythagoras’ Theorem. (10 05 03)
Specific Objectives:
Students will assemble puzzles that demonstrate the Pythagorean Theorem.
Time:
1 Hour
Instructional Strategies:
Interactive Instruction
Instructional Methods and Activities: a) Laboratory Groups
b) Problem Solving
1. These puzzles could be used over a few days as supplemental activities or they could be an integral part of the content development.For students and teachers who are familiar with the Pythagorean Theorem, the following activities are designed so that they can reviewand extend the mathematical processes already learned.
2. Students may work individually, in pairs or in small groups. Group work tends to stimulate communication and problem-solving skillsand therefore these activities serve as excellent co-operative group activities. Encourage students to take them home and completethem with them with their families.
3. Distribute one puzzle at a time. It is recommended that each student have a copy even if working in a group. Each puzzle should becompleted and the results shared and discussed in a whole-class setting before continuing on to the next.
Equipment:
scissorsduplicated copies of puzzlesoptional: overhead transparencies of puzzles
Resources:
“Pythagorean Puzzles” by Raymond E. Spaulding in Activities from the Mathematics Teacher, edited by E. M. Maletsky and C. R. Hirch,NCTM, February, 1974.
“Pythagorean Disection Puzzles” by William A. Milner and Linda Wagner in Mathematics Teacher, April, 1993, pages 302-314.
This resource contains enrichment and extension puzzles: see Perigal’s Pythagorean Puzzle (sheet 2) and Loomis’s Pythagorean Puzzle(sheet 3).
PAGE 24
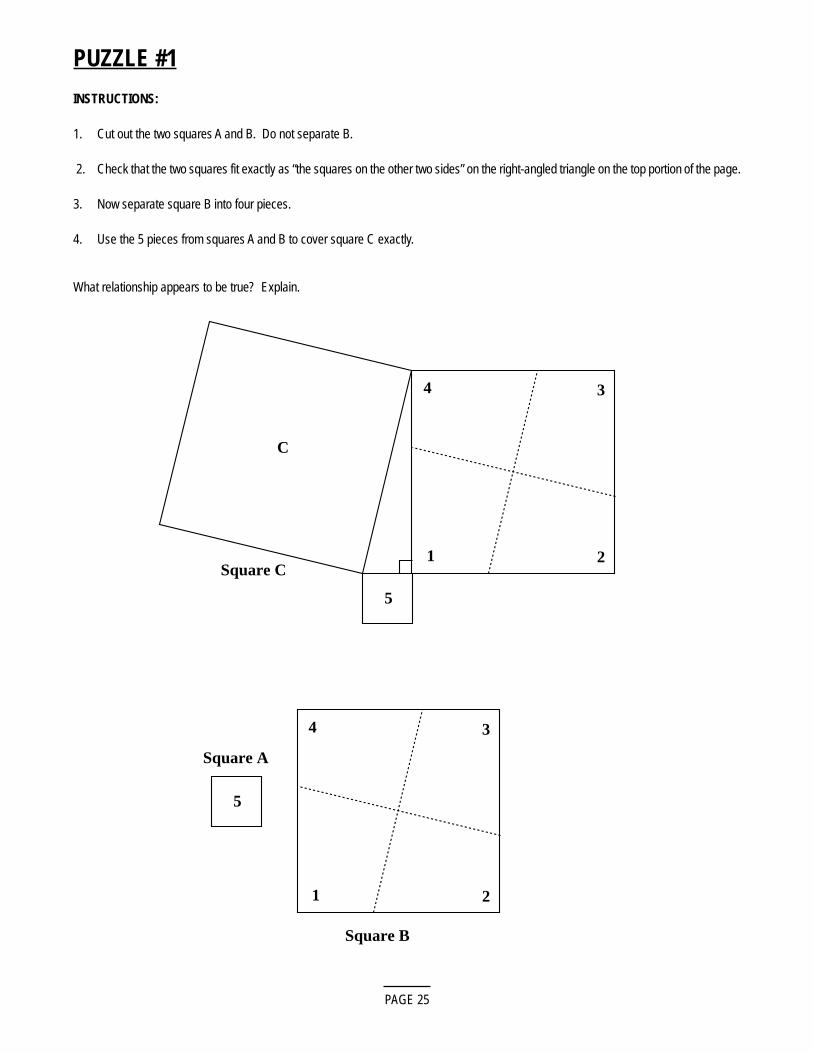
PUZZLE #1
INSTRUCTIONS:
1. Cut out the two squares A and B. Do not separate B.
2. Check that the two squares fit exactly as “the squares on the other two sides” on the right-angled triangle on the top portion of the page.
3. Now separate square B into four pieces.
4. Use the 5 pieces from squares A and B to cover square C exactly.
What relationship appears to be true? Explain.
PAGE 25
C
4 3
1 2
5
4 3
1 2
5
Square C
Square A
Square B
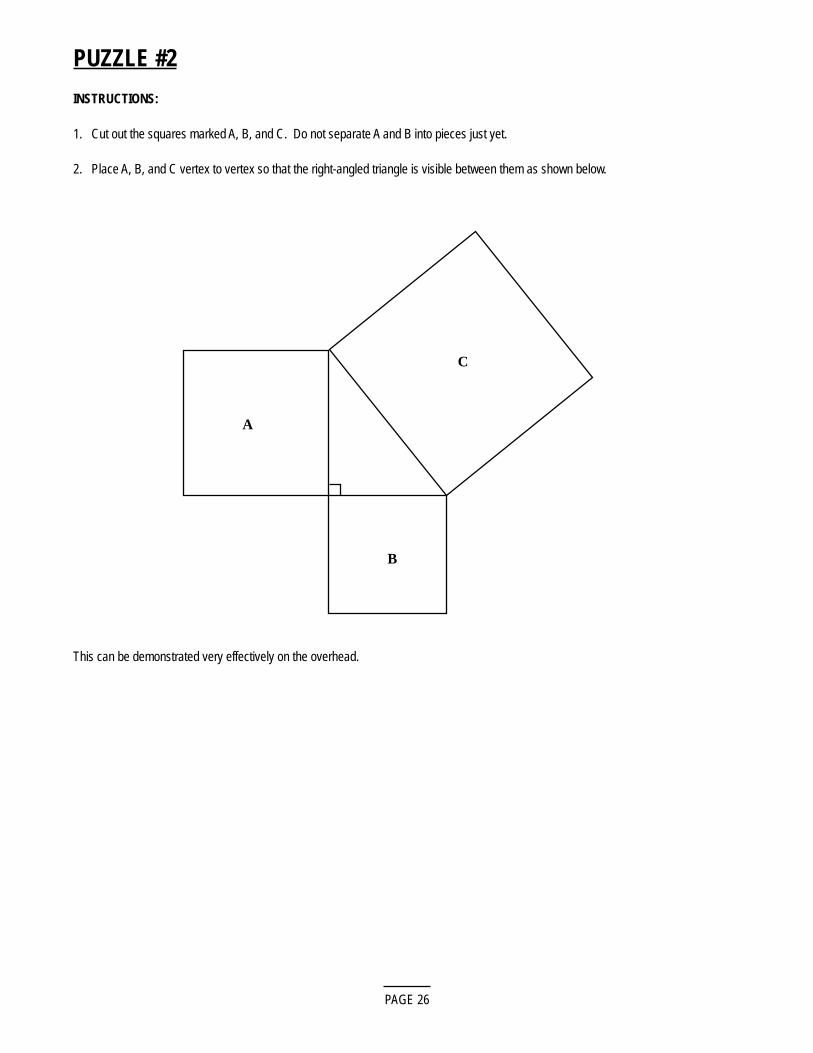
PUZZLE #2
INSTRUCTIONS:
1. Cut out the squares marked A, B, and C. Do not separate A and B into pieces just yet.
2. Place A, B, and C vertex to vertex so that the right-angled triangle is visible between them as shown below.
PAGE 26
C
A
B
This can be demonstrated very effectively on the overhead.
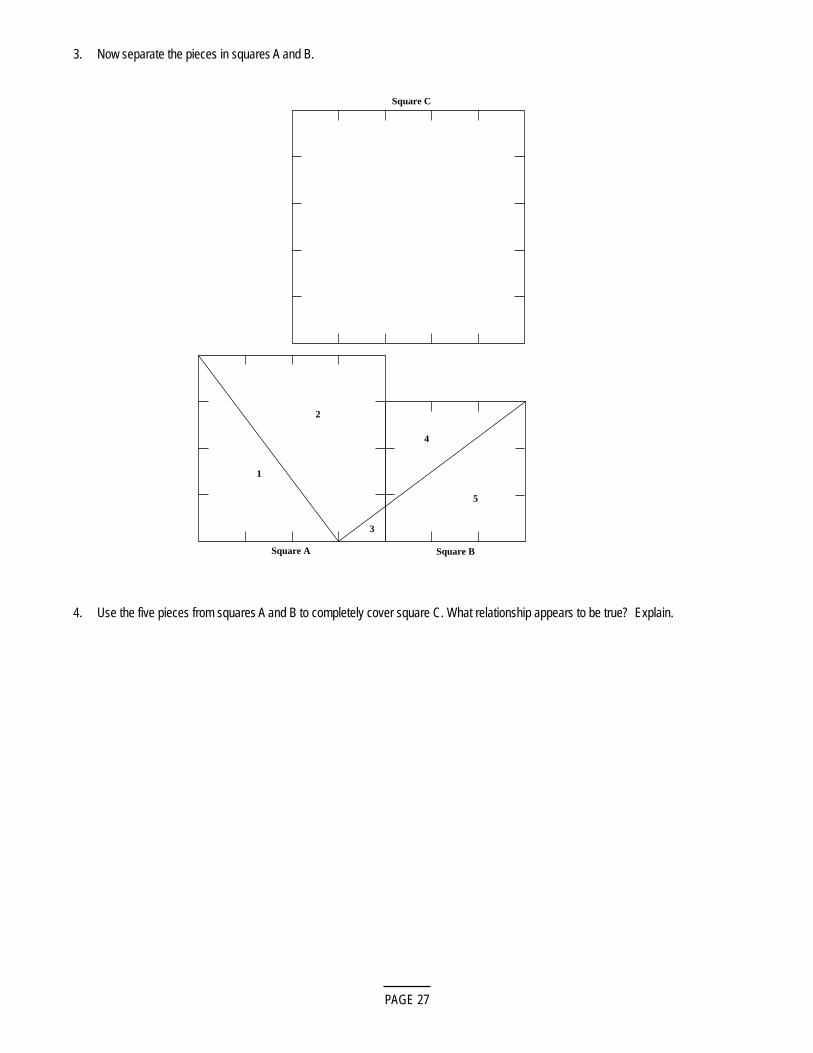
3. Now separate the pieces in squares A and B.
PAGE 27
4
3
1
2
5
Square C
Square A Square B
4. Use the five pieces from squares A and B to completely cover square C. What relationship appears to be true? Explain.
Assessment Technique:
• informal questioning• written assignment: Paragraph summing up the relationships demonstrated in the puzzles• suggested * Group evaluation form (see template)
Adaptive Dimension:
Students could try the same puzzles again using other right triangles of their own choice along with the corresponding squares. Studentswho are interested in these activities can experiment with other dissections of square regions A and B to cover square C. For excellentextension activities, see Mathematics Teacher, April 1993, pages 305-5. (See resources).
Classroom Management Tip:
There is a tremendous difference in how fast groups will solve these. Have the early ones cover up their solutions and go on with other work(homework) to enable everyone to try.
PAGE 28
Group Evaluation Form: Pythagorean Puzzles
Please meet with your group and use the checklist below as a basis for discussing how effectively your group is working. Complete thechecklist. This form will be returned to your group at the beginning of the next work session.
Use this scale. STRONGLY AGREE 1 2 3 4 5 STRONGLY DISAGREE
Our group:
a) identified clear goals; 1 2 3 4 5
b) made progress toward the goals; 1 2 3 4 5
c) shared information and ideas; 1 2 3 4 5
d) made decisions based on the views of all; 1 2 3 4 5
e) listened well to each other; 1 2 3 4 5
f) encouraged each other to participate. 1 2 3 4 5
One way we might improve our work is by:
GROUP MEMBERS: _____________________________________________ Date: ________________________________
_____________________________________________
_____________________________________________
_____________________________________________
Judy Clarke, Ron Wideman, Susan Eadie. (1990). Together we learn: Cooperative small group learning. Scarborough: Prentice-Hall Canada Inc.
Pythagorean Dissection PuzzlesTEACHER’S GUIDE
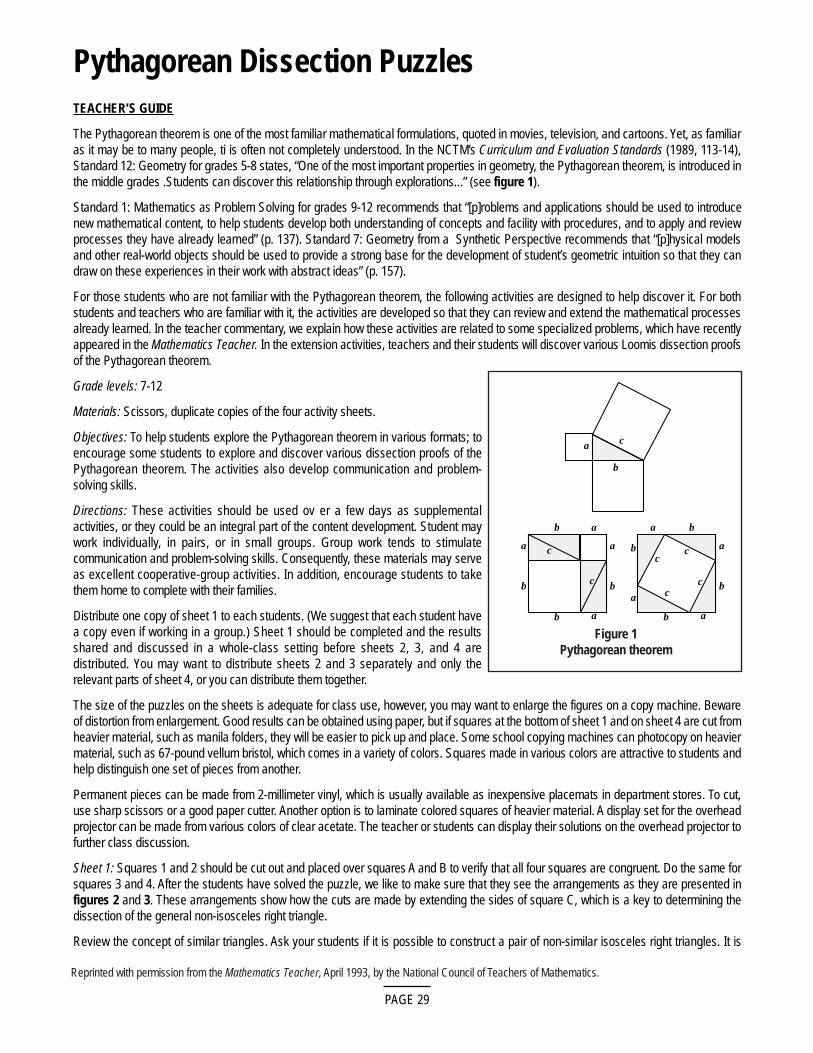
The Pythagorean theorem is one of the most familiar mathematical formulations, quoted in movies, television, and cartoons. Yet, as familiaras it may be to many people, ti is often not completely understood. In the NCTM’s Curriculum and Evaluation Standards (1989, 113-14),Standard 12: Geometry for grades 5-8 states, “One of the most important properties in geometry, the Pythagorean theorem, is introduced inthe middle grades .Students can discover this relationship through explorations...” (see figure 1).
Standard 1: Mathematics as Problem Solving for grades 9-12 recommends that “[p]roblems and applications should be used to introducenew mathematical content, to help students develop both understanding of concepts and facility with procedures, and to apply and reviewprocesses they have already learned” (p. 137). Standard 7: Geometry from a Synthetic Perspective recommends that “[p]hysical modelsand other real-world objects should be used to provide a strong base for the development of student’s geometric intuition so that they candraw on these experiences in their work with abstract ideas” (p. 157).
For those students who are not familiar with the Pythagorean theorem, the following activities are designed to help discover it. For bothstudents and teachers who are familiar with it, the activities are developed so that they can review and extend the mathematical processesalready learned. In the teacher commentary, we explain how these activities are related to some specialized problems, which have recentlyappeared in the Mathematics Teacher. In the extension activities, teachers and their students will discover various Loomis dissection proofsof the Pythagorean theorem.
Grade levels: 7-12
Materials: Scissors, duplicate copies of the four activity sheets.
Objectives: To help students explore the Pythagorean theorem in various formats; toencourage some students to explore and discover various dissection proofs of thePythagorean theorem. The activities also develop communication and problem-solving skills.
Directions: These activities should be used ov er a few days as supplementalactivities, or they could be an integral part of the content development. Student maywork individually, in pairs, or in small groups. Group work tends to stimulatecommunication and problem-solving skills. Consequently, these materials may serveas excellent cooperative-group activities. In addition, encourage students to takethem home to complete with their families.
Distribute one copy of sheet 1 to each students. (We suggest that each student havea copy even if working in a group.) Sheet 1 should be completed and the resultsshared and discussed in a whole-class setting before sheets 2, 3, and 4 aredistributed. You may want to distribute sheets 2 and 3 separately and only therelevant parts of sheet 4, or you can distribute them together.
The size of the puzzles on the sheets is adequate for class use, however, you may want to enlarge the figures on a copy machine. Bewareof distortion from enlargement. Good results can be obtained using paper, but if squares at the bottom of sheet 1 and on sheet 4 are cut fromheavier material, such as manila folders, they will be easier to pick up and place. Some school copying machines can photocopy on heaviermaterial, such as 67-pound vellum bristol, which comes in a variety of colors. Squares made in various colors are attractive to students andhelp distinguish one set of pieces from another.
Permanent pieces can be made from 2-millimeter vinyl, which is usually available as inexpensive placemats in department stores. To cut,use sharp scissors or a good paper cutter. Another option is to laminate colored squares of heavier material. A display set for the overheadprojector can be made from various colors of clear acetate. The teacher or students can display their solutions on the overhead projector tofurther class discussion.
Sheet 1: Squares 1 and 2 should be cut out and placed over squares A and B to verify that all four squares are congruent. Do the same forsquares 3 and 4. After the students have solved the puzzle, we like to make sure that they see the arrangements as they are presented infigures 2 and 3. These arrangements show how the cuts are made by extending the sides of square C, which is a key to determining thedissection of the general non-isosceles right triangle.
Review the concept of similar triangles. Ask your students if it is possible to construct a pair of non-similar isosceles right triangles. It is
PAGE 29
b a
a
aa c
c
b
b b
b
a c
ba
a
ac
c
cc
b
ba
b
Figure 1Pythagorean theorem
Reprinted with permission from the Mathematics Teacher, April 1993, by the National Council of Teachers of Mathematics.
important that students recognize that all isosceles right triangles are similar. Sometimes tilelayers cut square tiles along a diagonal to form isosceles right triangles and include thisshape in the floor design.
The puzzles on sheets 2 and 3 are each generalizations of these two isosceles-right-triangledissections. This fact is not mentioned in the student material but can be shared withstudents by looking at, and comparing their solutions to, each dissection.
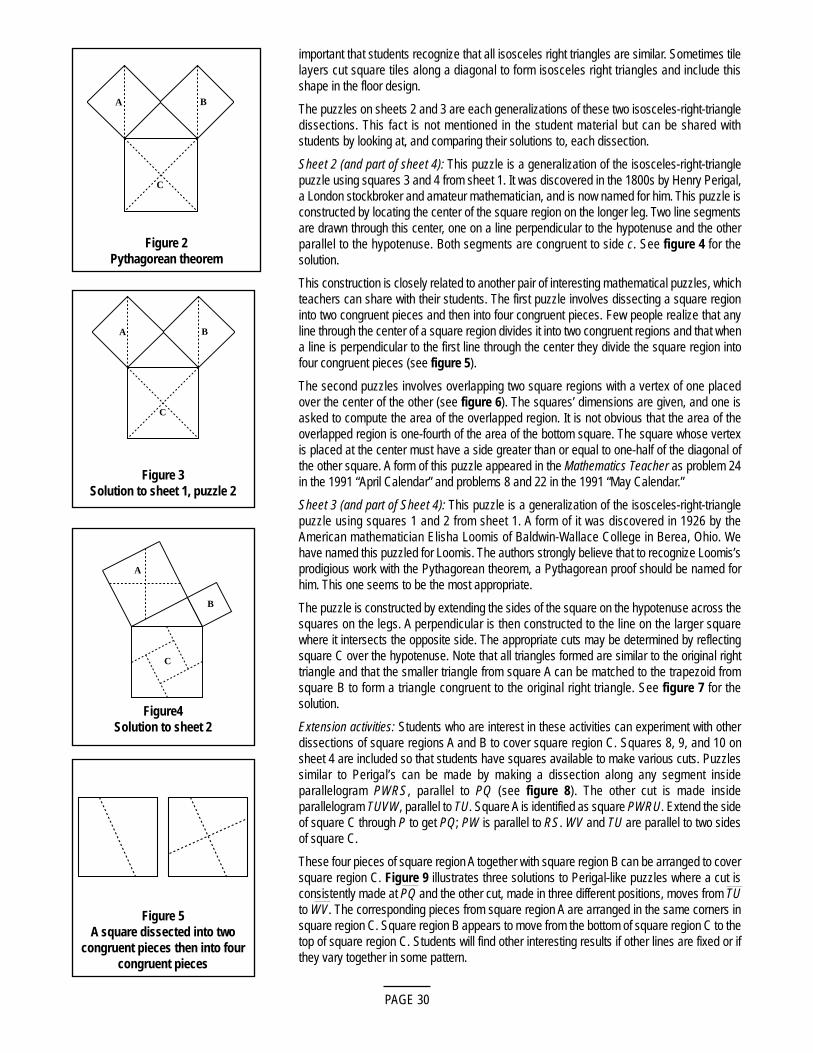
Sheet 2 (and part of sheet 4): This puzzle is a generalization of the isosceles-right-trianglepuzzle using squares 3 and 4 from sheet 1. It was discovered in the 1800s by Henry Perigal,a London stockbroker and amateur mathematician, and is now named for him. This puzzle isconstructed by locating the center of the square region on the longer leg. Two line segmentsare drawn through this center, one on a line perpendicular to the hypotenuse and the otherparallel to the hypotenuse. Both segments are congruent to side c. See figure 4 for thesolution.
This construction is closely related to another pair of interesting mathematical puzzles, whichteachers can share with their students. The first puzzle involves dissecting a square regioninto two congruent pieces and then into four congruent pieces. Few people realize that anyline through the center of a square region divides it into two congruent regions and that whena line is perpendicular to the first line through the center they divide the square region intofour congruent pieces (see figure 5).
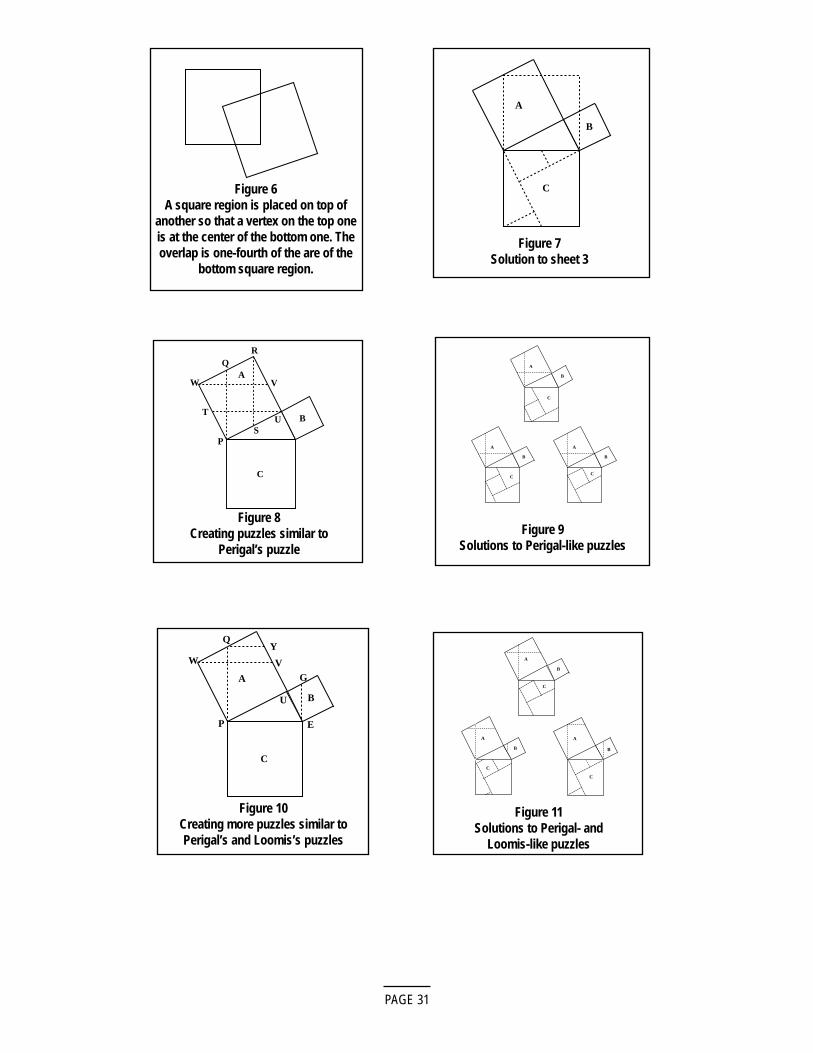
The second puzzles involves overlapping two square regions with a vertex of one placedover the center of the other (see figure 6). The squares’ dimensions are given, and one isasked to compute the area of the overlapped region. It is not obvious that the area of theoverlapped region is one-fourth of the area of the bottom square. The square whose vertexis placed at the center must have a side greater than or equal to one-half of the diagonal ofthe other square. A form of this puzzle appeared in the Mathematics Teacher as problem 24in the 1991 “April Calendar” and problems 8 and 22 in the 1991 “May Calendar.”
Sheet 3 (and part of Sheet 4): This puzzle is a generalization of the isosceles-right-trianglepuzzle using squares 1 and 2 from sheet 1. A form of it was discovered in 1926 by theAmerican mathematician Elisha Loomis of Baldwin-Wallace College in Berea, Ohio. Wehave named this puzzled for Loomis. The authors strongly believe that to recognize Loomis’sprodigious work with the Pythagorean theorem, a Pythagorean proof should be named forhim. This one seems to be the most appropriate.
The puzzle is constructed by extending the sides of the square on the hypotenuse across thesquares on the legs. A perpendicular is then constructed to the line on the larger squarewhere it intersects the opposite side. The appropriate cuts may be determined by reflectingsquare C over the hypotenuse. Note that all triangles formed are similar to the original righttriangle and that the smaller triangle from square A can be matched to the trapezoid fromsquare B to form a triangle congruent to the original right triangle. See figure 7 for thesolution.
Extension activities: Students who are interest in these activities can experiment with otherdissections of square regions A and B to cover square region C. Squares 8, 9, and 10 onsheet 4 are included so that students have squares available to make various cuts. Puzzlessimilar to Perigal’s can be made by making a dissection along any segment insideparallelogram PWRS, parallel to PQ (see figure 8). The other cut is made insideparallelogram TUVW, parallel to TU. Square A is identified as square PWRU. Extend the sideof square C through P to get PQ; PW is parallel to RS. WV and TU are parallel to two sidesof square C.
These four pieces of square region A together with square region B can be arranged to coversquare region C. Figure 9 illustrates three solutions to Perigal-like puzzles where a cut isconsistently made at PQ and the other cut, made in three different positions, moves from TUto WV. The corresponding pieces from square region A are arranged in the same corners insquare region C. Square region B appears to move from the bottom of square region C to thetop of square region C. Students will find other interesting results if other lines are fixed or ifthey vary together in some pattern.
PAGE 30
BA
C
Figure 3Solution to sheet 1, puzzle 2
A
C
B
Figure4Solution to sheet 2
Figure 5A square dissected into two
congruent pieces then into fourcongruent pieces
BA
C
Figure 2Pythagorean theorem
PAGE 31
Figure 6A square region is placed on top of
another so that a vertex on the top oneis at the center of the bottom one. Theoverlap is one-fourth of the are of the
bottom square region.
A
C
B
Figure 7Solution to sheet 3
A
RQ
W
P
V
US
C
BT
Figure 8Creating puzzles similar to
Perigal’s puzzle
A
C
B
A
C
B
A
C
B
Figure 9Solutions to Perigal-like puzzles
A
Q
W
P E
V
U
Y
G
C
B
Figure 10Creating more puzzles similar toPerigal’s and Loomis’s puzzles
A
C
B
A
C
B
A
C
B
Figure 11Solutions to Perigal- and
Loomis-like puzzles
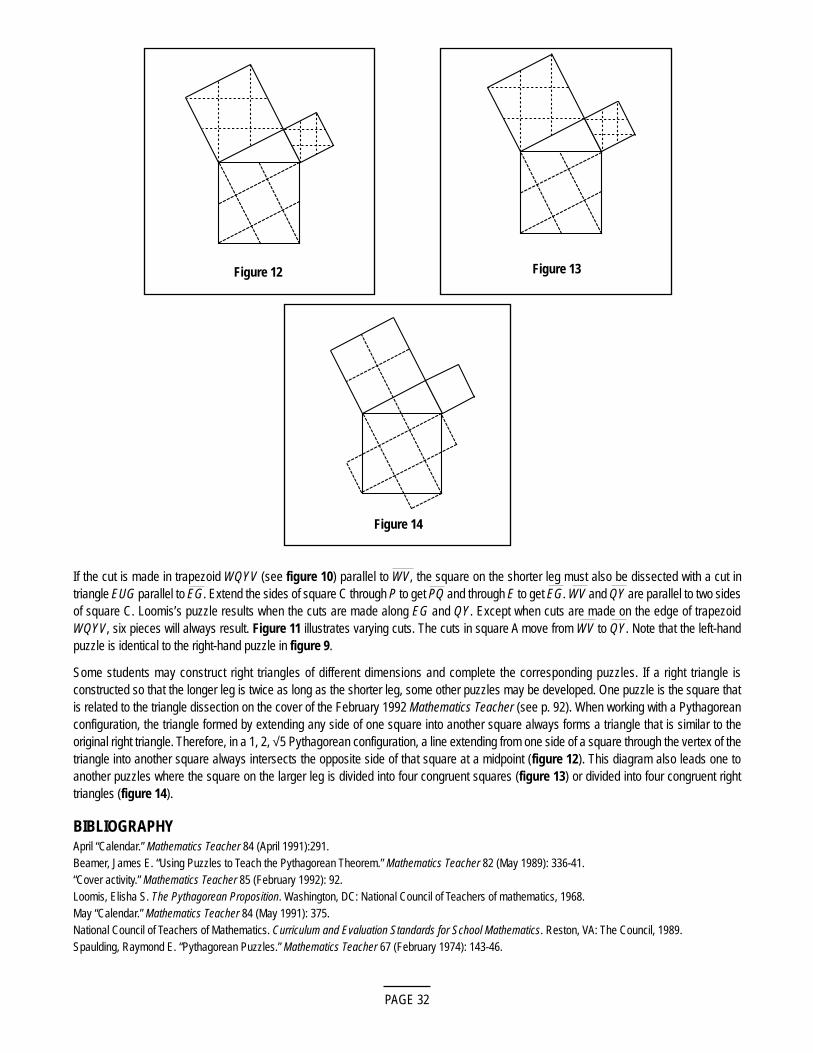
If the cut is made in trapezoid WQYV (see figure 10) parallel to WV, the square on the shorter leg must also be dissected with a cut intriangle EUG parallel to EG. Extend the sides of square C through P to get PQ and through E to get EG. WV and QY are parallel to two sidesof square C. Loomis’s puzzle results when the cuts are made along EG and QY. Except when cuts are made on the edge of trapezoidWQYV, six pieces will always result. Figure 11 illustrates varying cuts. The cuts in square A move from WV to QY. Note that the left-handpuzzle is identical to the right-hand puzzle in figure 9.
Some students may construct right triangles of different dimensions and complete the corresponding puzzles. If a right triangle isconstructed so that the longer leg is twice as long as the shorter leg, some other puzzles may be developed. One puzzle is the square thatis related to the triangle dissection on the cover of the February 1992 Mathematics Teacher (see p. 92). When working with a Pythagoreanconfiguration, the triangle formed by extending any side of one square into another square always forms a triangle that is similar to theoriginal right triangle. Therefore, in a 1, 2, √5 Pythagorean configuration, a line extending from one side of a square through the vertex of thetriangle into another square always intersects the opposite side of that square at a midpoint (figure 12). This diagram also leads one toanother puzzles where the square on the larger leg is divided into four congruent squares (figure 13) or divided into four congruent righttriangles (figure 14).
BIBLIOGRAPHYApril “Calendar.” Mathematics Teacher 84 (April 1991):291.Beamer, James E. “Using Puzzles to Teach the Pythagorean Theorem.” Mathematics Teacher 82 (May 1989): 336-41.“Cover activity.” Mathematics Teacher 85 (February 1992): 92.Loomis, Elisha S. The Pythagorean Proposition. Washington, DC: National Council of Teachers of mathematics, 1968.May “Calendar.” Mathematics Teacher 84 (May 1991): 375.National Council of Teachers of Mathematics. Curriculum and Evaluation Standards for School Mathematics. Reston, VA: The Council, 1989.Spaulding, Raymond E. “Pythagorean Puzzles.” Mathematics Teacher 67 (February 1974): 143-46.
PAGE 32
Figure 12 Figure 13
Figure 14
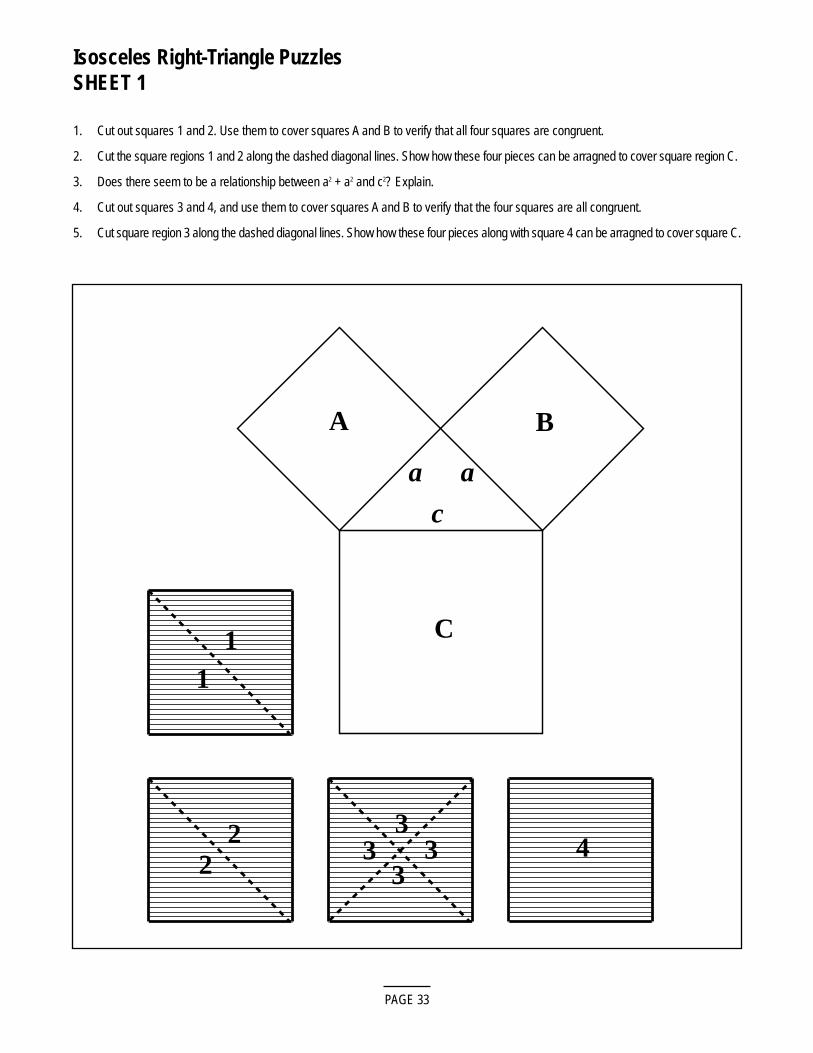
Isosceles Right-Triangle PuzzlesSHEET 1
1. Cut out squares 1 and 2. Use them to cover squares A and B to verify that all four squares are congruent.
2. Cut the square regions 1 and 2 along the dashed diagonal lines. Show how these four pieces can be arragned to cover square region C.
3. Does there seem to be a relationship between a2 + a2 and c2? Explain.
4. Cut out squares 3 and 4, and use them to cover squares A and B to verify that the four squares are all congruent.
5. Cut square region 3 along the dashed diagonal lines. Show how these four pieces along with square 4 can be arragned to cover square C.
PAGE 33
A B
C
c
a a
11
22 3
33 3 4
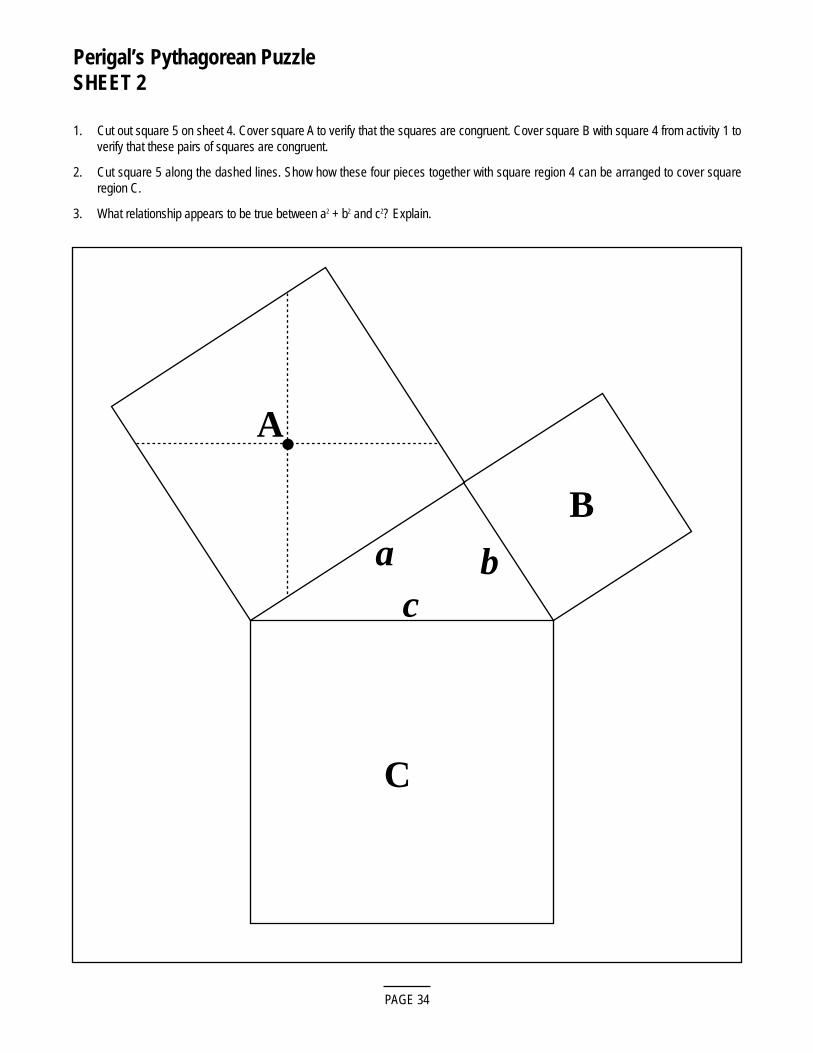
Perigal’s Pythagorean PuzzleSHEET 2
1. Cut out square 5 on sheet 4. Cover square A to verify that the squares are congruent. Cover square B with square 4 from activity 1 toverify that these pairs of squares are congruent.
2. Cut square 5 along the dashed lines. Show how these four pieces together with square region 4 can be arranged to cover squareregion C.
3. What relationship appears to be true between a2 + b2 and c2? Explain.
PAGE 34
A
B
C
ca b
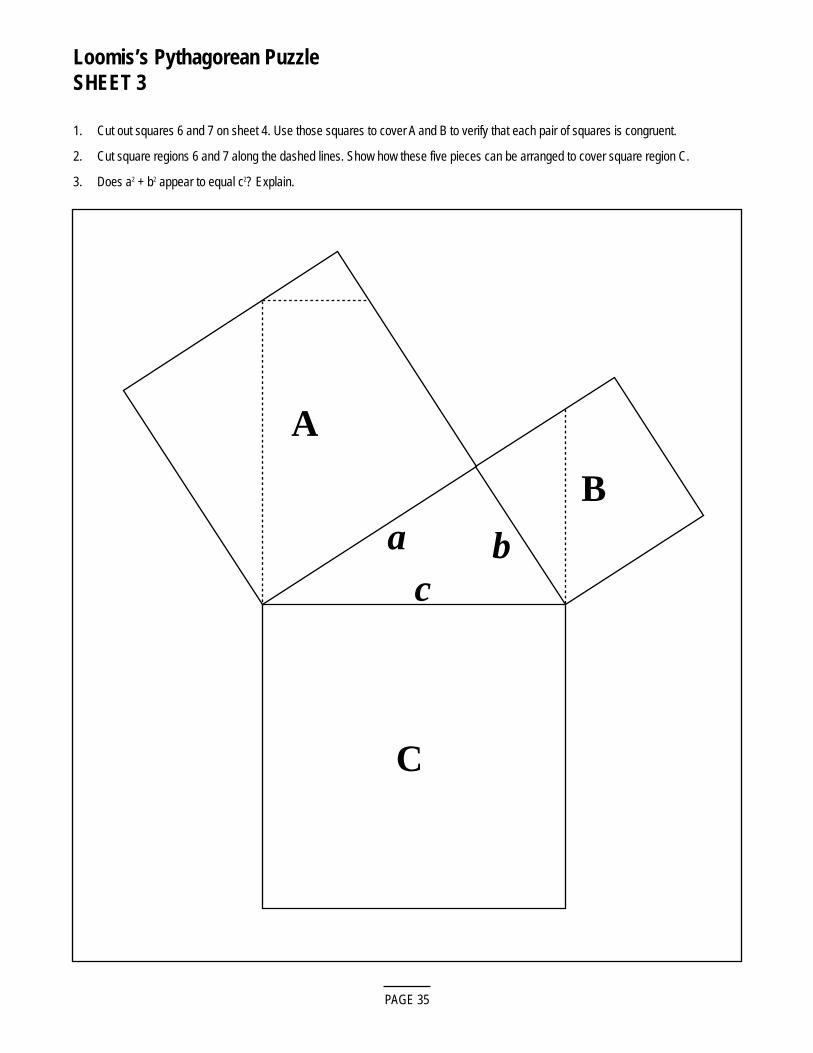
Loomis’s Pythagorean PuzzleSHEET 3
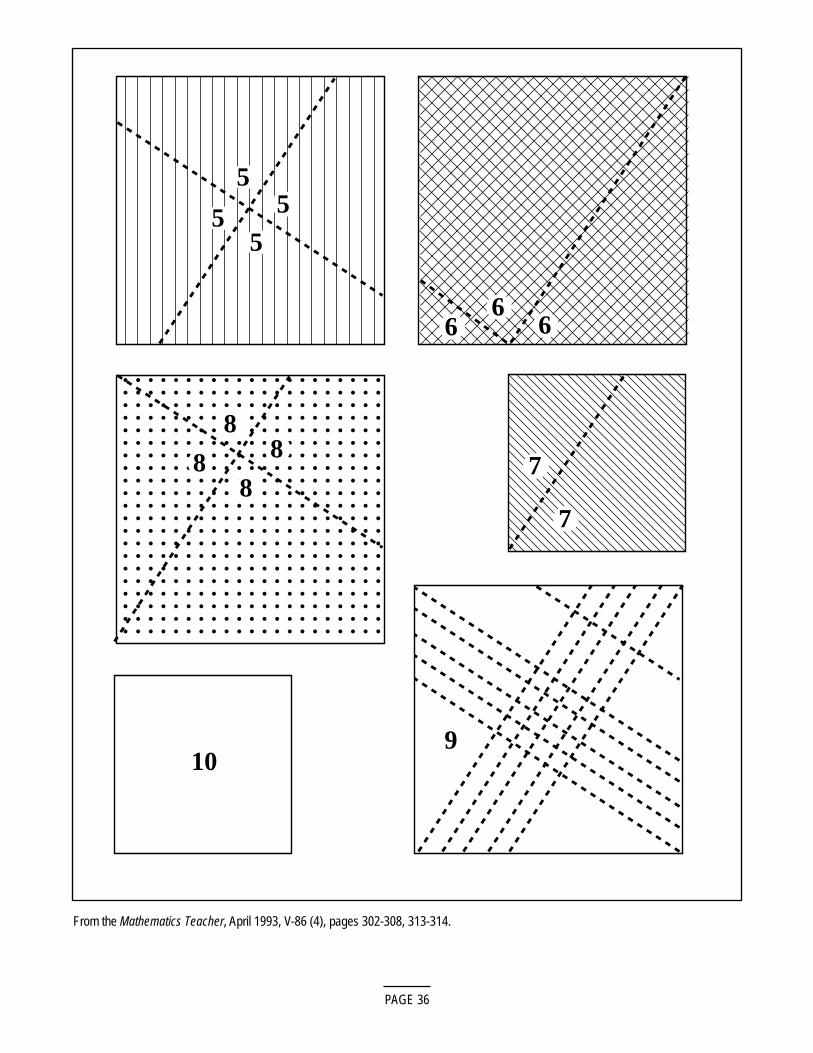
1. Cut out squares 6 and 7 on sheet 4. Use those squares to cover A and B to verify that each pair of squares is congruent.
2. Cut square regions 6 and 7 along the dashed lines. Show how these five pieces can be arranged to cover square region C.
3. Does a2 + b2 appear to equal c2? Explain.
PAGE 35
A
B
C
ca b
PAGE 36
55
55
888
88
7
7
6 66
109
From the Mathematics Teacher, April 1993, V-86 (4), pages 302-308, 313-314.

SECTION 3: BUILD A CLINOMETER
Foundational Objectives:
To develop an understanding of the primary trigonometric ratios and their applications (10 05 03).
Specific Objectives:
Apply the trigonometric ratios to problems involving right triangles.
*Students will construct an angle-measuring device called a clinometer, and will use it to measure the Angle of Elevation of severalinaccessible objects outside of the school. They will then use trig ratios to determine the heights of these objects.
Background:
Knowledge of right triangles and the three primary trigonometic ratios. (This activity only uses Tangent).
Time:
This activity takes 1 hour to set up and explain; 1/2 hour to complete measurements and 1/2 hour to do the calculations and analysis.
Classroom Management Tips:
Because of the freedom allowed to the students in this activity, it is very important that students are absolutely clear as to what is expectedof them. Clearly explain where they can go, what they do, and when to be back.
Instructional Strategies:
A. Direct Instruction
B. Interactive Instruction
C. Experiential Learning
Instructional Methods and Activities:
A. 1. Structured Overview Student should practise “Angle of Elevation” problems. Begin with a discussion of how the students could use trigonometry todetermine the measure of an inaccessible object. (See “Angle of Evaluation” Problems).
A. 2. Demonstrate use and construction of Clinometer (See instructions and pattern)
B 1. Laboratory Groups In groups of 2 or 4, have students assemble Clinometer and prepare data-collection sheet. (See “Jobs to be Done” and “DataCollection Sheet”).
B. 2. Clearly outline to students before they leave the classroom:
a) how many items they are to measure (recommendation: 5).
b) how results are to be recorded; what is to be handed in; when work is due.
PAGE 37
C. 1. Field Trip: Outline areas students may go. Suggestions: outside, anywhere on school grounds, within 1 block of school, etc. [in bad weather:gym, cafeteria, hallways, just outside the door]. BE VERY SPECIFIC!
C. 2. Outline time allowed. (Suggestion: 1/2 hour and they must be in their seats or take a zero on the project.) BE VERY SPECIFIC!
C. 3. After collecting the data, students will need about 20 minutes to complete diagrams, calculations and summary statements. *Beclear whether group or individual results are to be turned in.
Equipment:
(A) Clinometer:• piece of cardboard or stiff paper, approximately 25 cm x 30 cm. • photocopy of enlarged protractor 0 - 90°• straw• tape• scissors• thread • button
(B) Measurement Device for baseline:• Trundle Wheel or• Meter sticks or tape or• Students can pace off the distance and measure a “typical pacing step” after returning to the classroom.
(C) Data Sheet: can be hand-drawn by student or photocopied.
(D) Calculator
Instructions for Clinometer:
1. Cut out the photocopy of the protractor carefully along to 0° and the 90° lines.
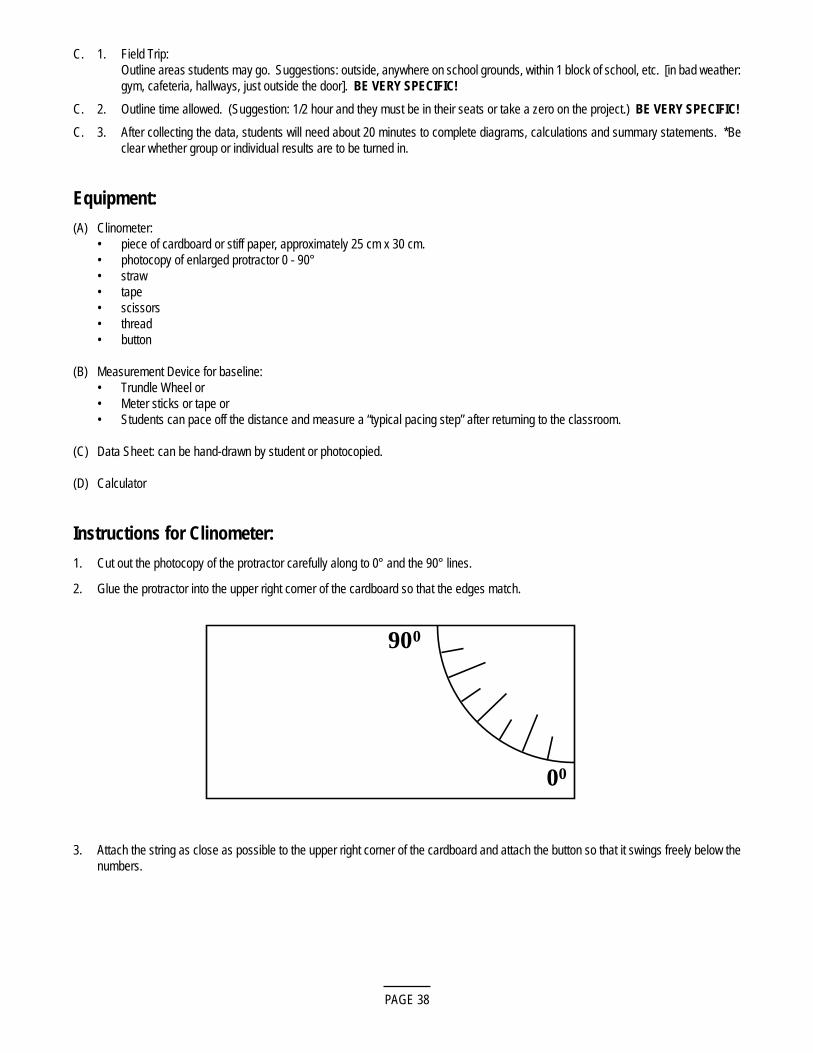
2. Glue the protractor into the upper right corner of the cardboard so that the edges match.
PAGE 38
900
00
3. Attach the string as close as possible to the upper right corner of the cardboard and attach the button so that it swings freely below thenumbers.
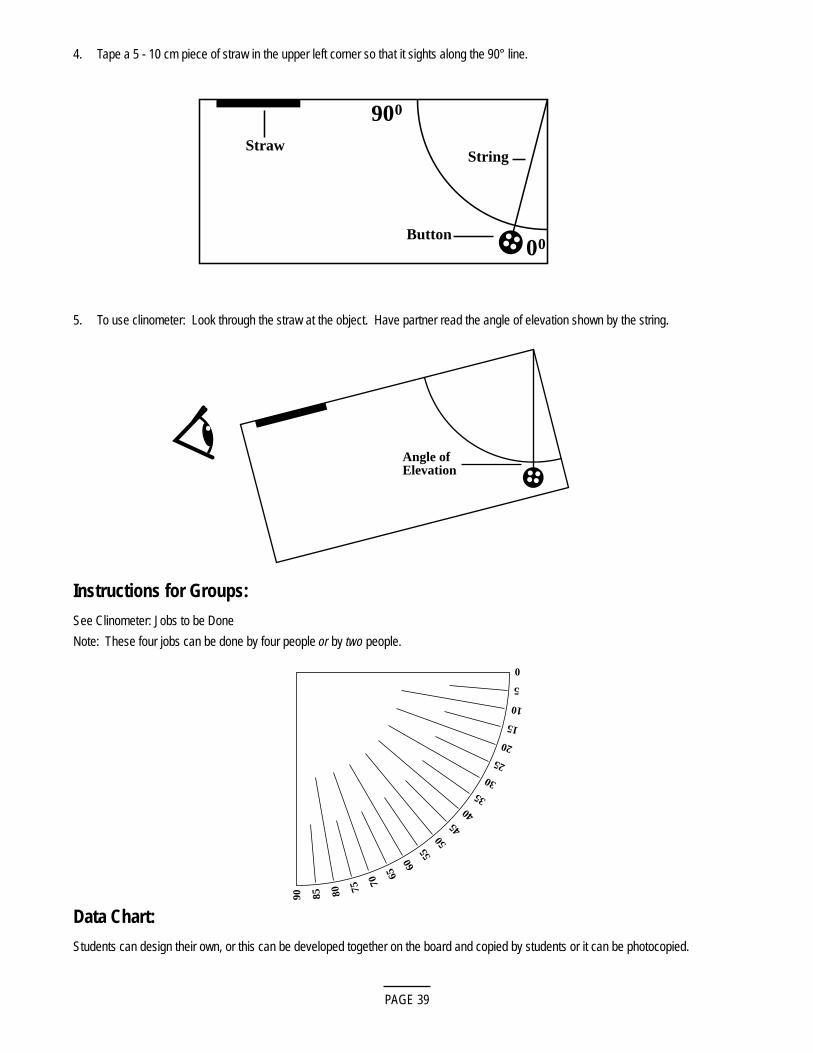
4. Tape a 5 - 10 cm piece of straw in the upper left corner so that it sights along the 90° line.
PAGE 39
900
00
String
Button
Straw
90 85 80 75
70
65
60
55
50
45
4035
3025
20
15
10
5
0
5. To use clinometer: Look through the straw at the object. Have partner read the angle of elevation shown by the string.
Angle ofElevation
Instructions for Groups:
See Clinometer: Jobs to be Done
Note: These four jobs can be done by four people or by two people.
Data Chart:
Students can design their own, or this can be developed together on the board and copied by students or it can be photocopied.
ANGLE OF ELEVATION PROBLEMS1. To measure the height of an inaccessible TV tower, a surveyor paces out a base line
of 200m and measures the angle of elevation to the top of the tower to be 62° . Howhigh is the tower?
2. A tourist stands 15m back from the base of a statue and looks up to the top of thestatue. If the angle of evaluation is 48°, find the height of the statue.
3. A student paces a base line 12m from the bottom of flagpole. She then uses aclinometer to measure a 35° Angle of Elevation. How high is the flagpole? (Thedistance from the ground to the student’s eyes is 150 cm).
PAGE 40

CLINOMETER: JOBS TO BE DONE
1. PACER: for each object to be measured, this person must pace off the distance from the object to the SIGHTER. This must be donein a straight line. The PACER must then tell the RECORDER how many paces it took.
2. SIGHTER: this person is in charge of the Clinometer. For each measurement, the SIGHTER sights the top of the object and remainsstill while the ANGLE READER has read the angle. He/she should also remain still until the PACER has measured the base line.
3. ANGLE READER: when the SIGHTER has sighted the top of the object, this person reads the size of the ANGLE OF ELEVATIONshown on the Clinometer and approximates it to the nearest degree. The ANGLE READER then tells the RECORDER the value of theangle.
4. RECORDER: this person will record on the chart the ANGLE OF ELEVATION, the number of paces in the base line and the distancefrom the sighter’s eyes to the ground.
PROCEDURES
1. The RECORDER should be the one to take the instructions and chart outside.
2. The SIGHTER should have the Clinometer.
3. When the measurements are finished, return to the classroom and copy the information collected by the RECORDER.
4. Draw the diagrams and calculate the rest of the information needed in the table.
PAGE 41

DATACHART: Clinom
eter Lab
PAGE
42
Objects to be Number of Paces Number of feet to Angle of Distance from Height ofMeasured to the Object the Object (1 pace = 0.8 m) Elevation Ground to Sighter’s Eye Object
Assessment Techniques:• Written Assignments: either individual or group results could be collected. Suggestion: collect completed data charts, diagram for
each situation and computed results.
• Quiz or test could be given.
• A portion of the evaluation could be from a Group Self- Evaluation form (see template).
Adaptive Dimension:1. This exercise can be done as a scavenger hunt. Each group can be provided with a different set (or different order) of objects.
2. This exercise could also be done as a race with a list of objects and a time limit.
PAGE 43
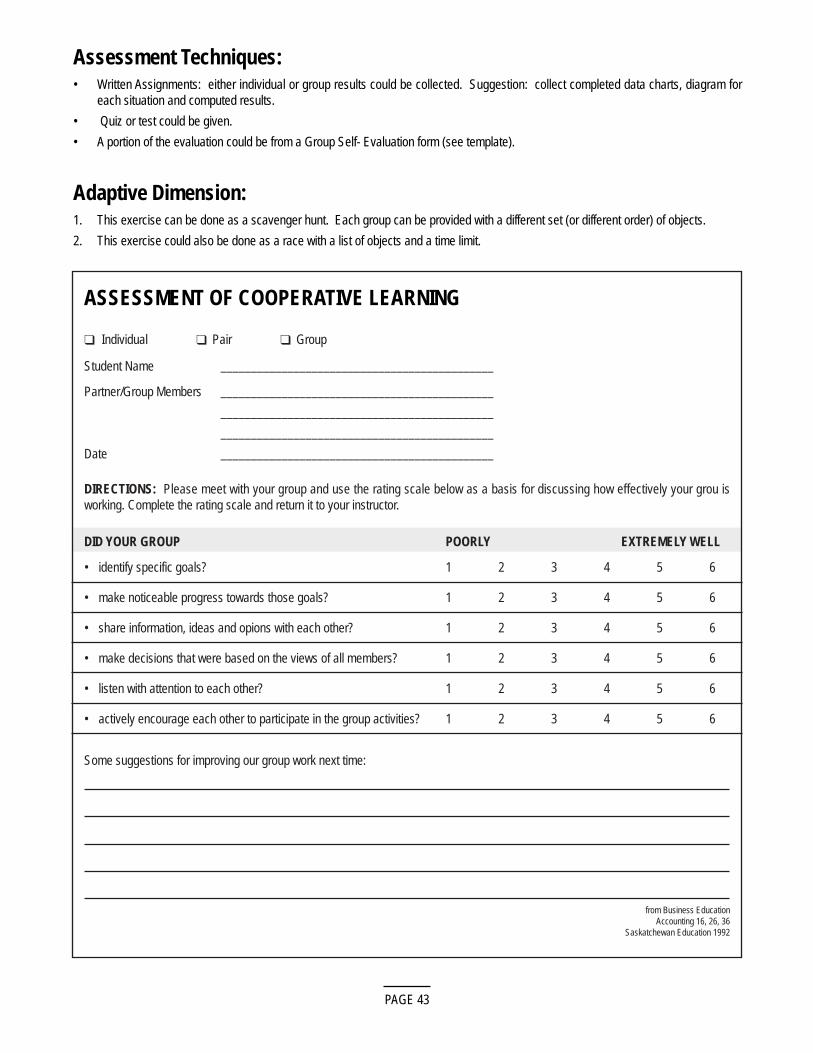
ASSESSMENT OF COOPERATIVE LEARNING
❑ Individual ❑ Pair ❑ Group
Student Name _____________________________________________
Partner/Group Members _____________________________________________
_____________________________________________
_____________________________________________
Date _____________________________________________
DIRECTIONS: Please meet with your group and use the rating scale below as a basis for discussing how effectively your grou isworking. Complete the rating scale and return it to your instructor.
DID YOUR GROUP POORLY EXTREMELY WELL
• identify specific goals? 1 2 3 4 5 6
• make noticeable progress towards those goals? 1 2 3 4 5 6
• share information, ideas and opions with each other? 1 2 3 4 5 6
• make decisions that were based on the views of all members? 1 2 3 4 5 6
• listen with attention to each other? 1 2 3 4 5 6
• actively encourage each other to participate in the group activities? 1 2 3 4 5 6
Some suggestions for improving our group work next time:
from Business EducationAccounting 16, 26, 36
Saskatchewan Education 1992
SECTION 4: GEOMETRY FLASH CARDS
Foundational Objective:
To identify and apply common properties of triangles, special quadrilaterals, and n-gons. (10 05 01)
Specific Objectives:
(Math Grade 10 Curriculum Guide)
D.1 define and illustrate line segment, ray, line, bisector, median, perpendicular line, perpendicular bisector. (Page 138)
E.1 define and illustrate acute angle, right angle, obtuse angle, straight angle, reflex angle, complementary angles, supplementaryangles, adjacent angles, vertically opposite angles, congruent angles, central angles of a polygon. (Page 140)
E.3 (a) define and illustrate polygons: convex, regular, triangle, quadrilateral, parallelogram, rectangle, rhombus, square, trapezoid,and isosceles trapezoid.
E.3 (b) define and illustrate triangles: scalene, isosceles, equilateral, acute, right and obtuse. The student will produce a deck of cardswith the name of the object on one side and definition of the object on the reverse. Then students will use these to identify andrelate common properties.
Time:
(1) Flash card review - 10 to 15 min. periods.
(2) Concept map - 30 min.
Instructional Strategy:
A. Interactive InstructionB. Indirect Instruction
Instructional Methods:
A. Peer Practice:
1. Students work in groups of 4. Have each group prepare a full set of cards with Name on one side and definition on the other.Activity sheet #1 can be enlarged, glued to stiff paper, and cut out.
[Sets of blank cards are commercially available.]
2. Students work for 10-15 min. periods with a partner. (Suggestion - the original group of 4 divides the deck in half, practises ingroups of 2’s with half the deck, then switches halves.) This can be done for practice at various times during the unit.
Games
• show name, give definition
• show definition, give name
• keep if correct, leave in pile if incorrect.
*A rough version of War can be played where the winner’s term contains the loser’s term.
Example: triangle beats line segment, polygon beats triangle.
PAGE 44
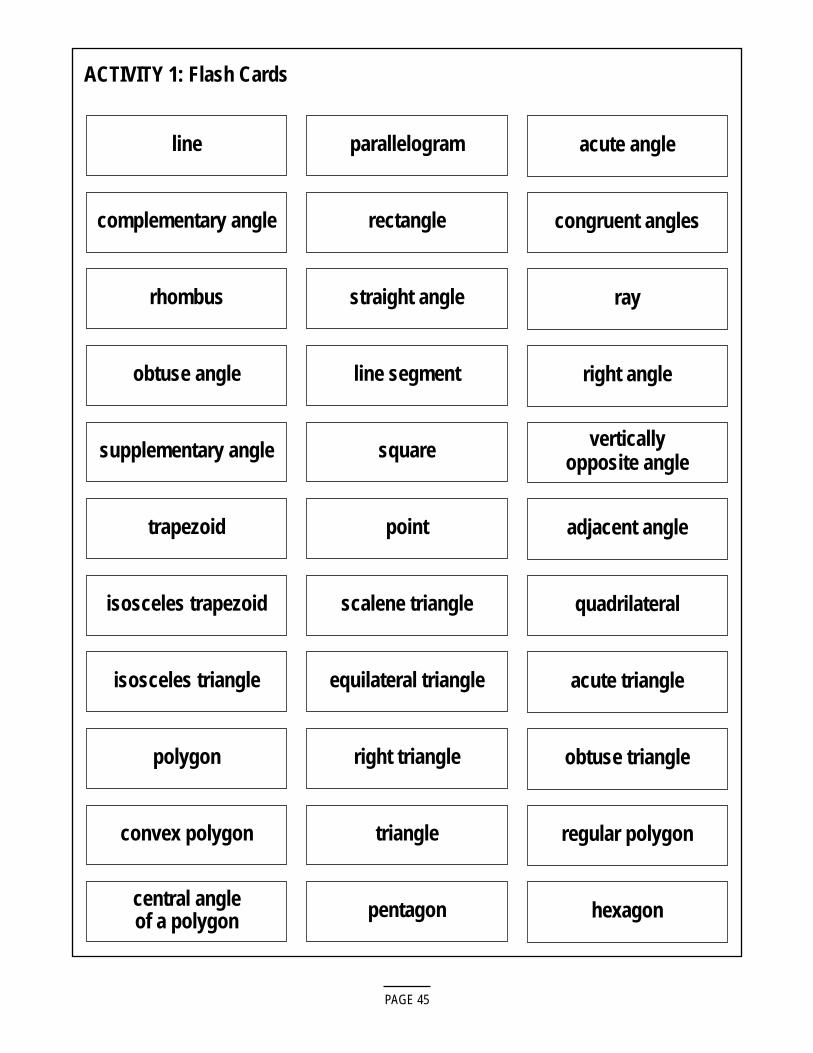
ACTIVITY 1: Flash Cards
PAGE 45
line parallelogram acute angle
complementary angle rectangle congruent angles
rhombus straight angle ray
obtuse angle line segment right angle
supplementary angle square vertically opposite angle
trapezoid point adjacent angle
isosceles trapezoid scalene triangle quadrilateral
isosceles triangle equilateral triangle acute triangle
polygon right triangle obtuse triangle
convex polygon triangle regular polygon
central angleof a polygon pentagon hexagon
B. Concept Mapping:
1. This activity is suggested for use at the end of the unit. The purpose of it is to show a logical ordering of the relationships thatstudents have been studying throughout the unit.
2. Students work in groups of 4 with one deck of cards and a large surface between them (ex. 4 desks pushed together).
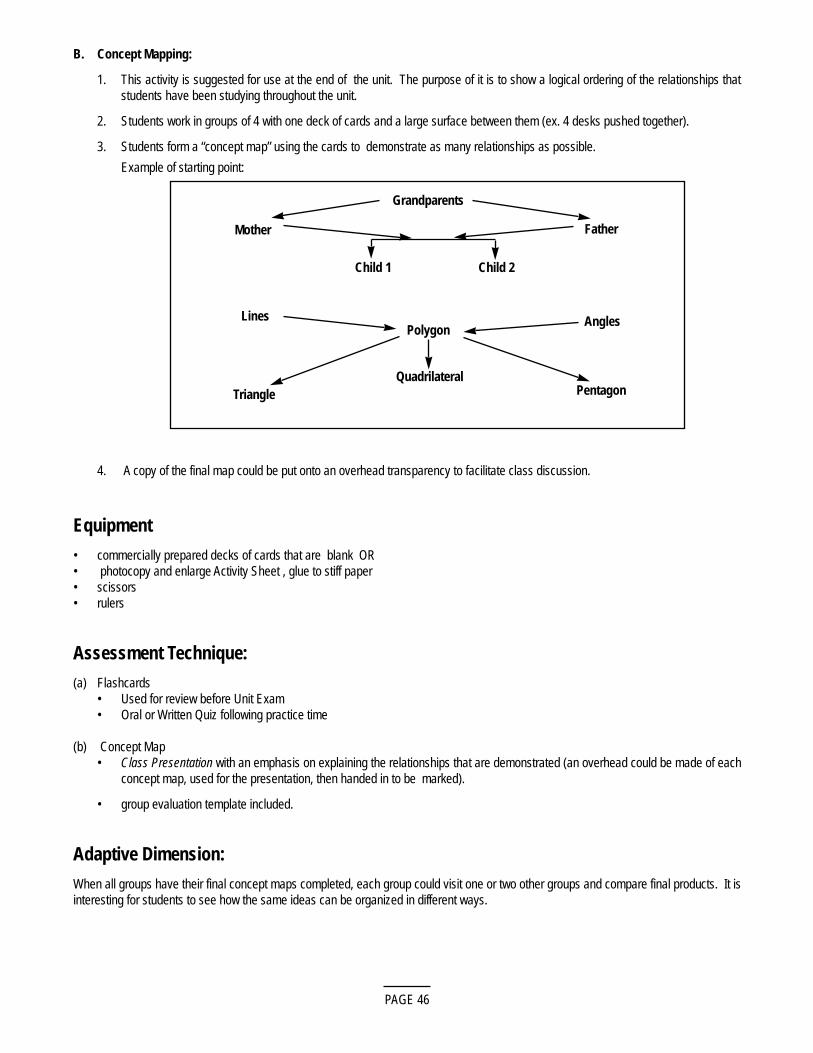
3. Students form a “concept map” using the cards to demonstrate as many relationships as possible.
Example of starting point:
4. A copy of the final map could be put onto an overhead transparency to facilitate class discussion.
Equipment
• commercially prepared decks of cards that are blank OR • photocopy and enlarge Activity Sheet , glue to stiff paper• scissors• rulers
Assessment Technique:
(a) Flashcards• Used for review before Unit Exam• Oral or Written Quiz following practice time
(b) Concept Map • Class Presentation with an emphasis on explaining the relationships that are demonstrated (an overhead could be made of each
concept map, used for the presentation, then handed in to be marked).
• group evaluation template included.
Adaptive Dimension:
When all groups have their final concept maps completed, each group could visit one or two other groups and compare final products. It isinteresting for students to see how the same ideas can be organized in different ways.
PAGE 46
Grandparents
Polygon
Quadrilateral
Father
Angles
Pentagon
Mother
Lines
Triangle
Child 1 Child 2
PAGE 47
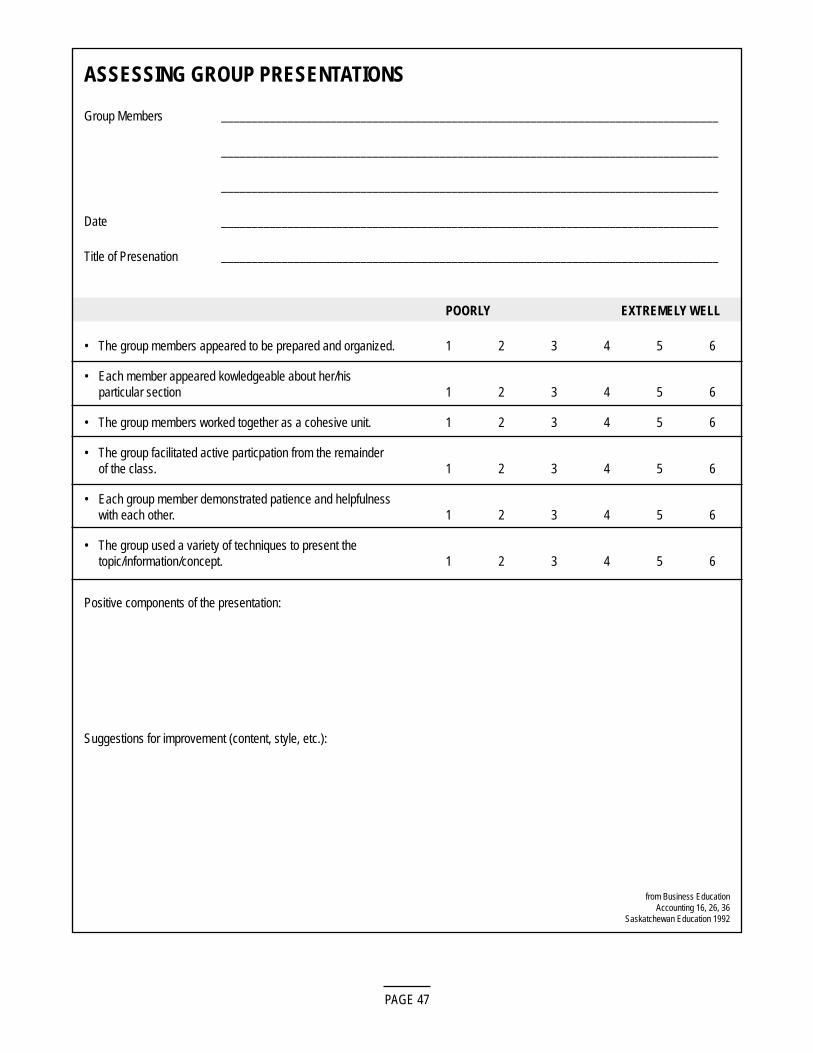
ASSESSING GROUP PRESENTATIONS
Group Members __________________________________________________________________________________
__________________________________________________________________________________
__________________________________________________________________________________
Date __________________________________________________________________________________
Title of Presenation __________________________________________________________________________________
POORLY EXTREMELY WELL
• The group members appeared to be prepared and organized. 1 2 3 4 5 6
• Each member appeared kowledgeable about her/his particular section 1 2 3 4 5 6
• The group members worked together as a cohesive unit. 1 2 3 4 5 6
• The group facilitated active particpation from the remainderof the class. 1 2 3 4 5 6
• Each group member demonstrated patience and helpfulnesswith each other. 1 2 3 4 5 6
• The group used a variety of techniques to present the topic/information/concept. 1 2 3 4 5 6
Positive components of the presentation:
Suggestions for improvement (content, style, etc.):
from Business EducationAccounting 16, 26, 36
Saskatchewan Education 1992

PAGE 48