Embed Size (px)
Citation preview
Handbook for Part-Time Tutoring and Demonstrating Staff
2017-2018
Revised: July 2017
2
Contents Welcome Tutorials in Context The Students The Benefits of Being a Tutor or Demonstrator The Roles of the Tutor
Tutorials and Students Students with ‘Adjustments’
Tutorial Preparation Administration Support and Pastoral Care for Students Marking and Feedback Lab Demonstrator Handbook
Guidelines for demonstrators Summary of Lab Facilities and Uses
Contracts and Payment Representation on School-Level Committees Support for Tutors and demonstrators
Training opportunities for tutors and demonstrators Course Organisers
Other Tutors and demonstrators Course Secretaries Central Support Facilities Dignity & Respect PG/PT Tutor Liaison Committee Feedback from Students Appendix 1: IT Appendix 2: The First Tutorial Appendix 3: Examples of Teaching Methods for Tutorials
3
Appendix 4: Learning to Deal with Problematic Situations in Tutorials Appendix 5: Tips for Essay Writing Appendix 6: Contracts and Payment Appendix 7: Useful contacts Appendix 8: Further Information Appendix 9: Sample ‘Introductory Sheet’ for First Tutorial. This is taken from a European History course but could be amended to suit any tutorial. Welcome Welcome to the tutoring and demonstrating staff of the School of History, Classics & Archaeology. The School attracts students from across the world, and the three subject areas of the School – History, Classics and Archaeology – between them offer some 32 HCA-owned undergraduate Honours degree programmes, as well as providing the opportunity for various combined Honours degrees with other CHSS Schools. Your role as a tutor on an undergraduate course is both central to the workings of the School and an important component of your ongoing academic training. Our tutors and demonstrators play a key role in the undergraduate experience, and are highly valued by staff and students alike. This handbook provides general information on tutoring and demonstrating within the School and is aimed particularly at tutors and demonstrators on first- and second-year courses (for specific guidance on third- and fourth-year courses please see the individual course organisers). The format and requirements of tutorials vary from course to course and across subject areas, so if you find something is missing from this handbook, do not hesitate to ask course organisers, administrative staff or fellow tutors. All tutors and demonstrators are expected to attend a pre-sessional briefing session. This year there will be two of these sessions, which will take place on Tuesday the 12th of September 2pm – 4.30pm and Thursday the 14th of September 10am – 12.30pm. Please note that it is mandatory for all new and existing tutors/demonstrators to attend a pre-sessional briefing session. This session will include a welcome from the Head of School, Prof. Ewen Cameron, and the Undergraduate Director, Dr Esther Mijers, as well as briefings on matters relating to payment and contracts (Mrs Laura Allison) and IT and electronic marking (Ms Karen Howie).
4
Tutorials in Context Tutorials are an essential component of undergraduate teaching, particularly for first- and second-year courses. They are designed to complement the course lectures and independent study, providing a secure environment in which students can develop their skills of critical analysis. Tutorials enable students to develop oral presentation skills through the discussion and debate of academic arguments, and through formal presentations. Written skills are also developed through the completion of coursework. A tutorial is not another lecture; the preparation, participation and engagement of students are vital to a successful tutorial. Some courses are semester-long; others are taught over the course of the academic year. A semester-long course typically lasts 11 weeks. For individual course information, check with your course organiser. Most first- and second-year courses have two to three lectures per week and one tutorial either every week or every other week (again this can vary from subject to subject). If you find you are tutoring on a course that contains new subject matter for you, it might be useful to attend the lectures which are on offer for that course (it is normal courtesy to ask the lecturer before doing this, and please note that payment is not provided should you wish to attend any of the course lectures). Tutorials usually (but not always) begin in week 2 of the semester. Course organisers will normally give advice on tutorial topics and reading. Many courses will have this material prepared and listed by the course organiser and lecturers in the course handbook. You will typically teach 50 minutes for each tutorial and this counts as one class contact hour. For each class contact hour you are expected to have spent an additional hour working on preparation and administrative duties such as recording attendance. It can seem like the preparation time is actually much longer than this for new tutors, but the process gets easier the more experience you have, and as you repeat your preparation for different tutorial groups on the same course. The course organiser will allocate the number of tutorials you will be assigned and the course administrator for your course will notify you of their time and place. The 'Learn' system contains extra information pertaining to individual courses such as course information, or individual details such as essay questions, primary sources, journal articles, tutorial lists and in some cases, lecture notes. These pages are also used for posting announcements regarding lectures, revision sessions, and essays. Many courses make use of e-learning resources for key texts, which are also accessed via Learn. All students enrolled on the course automatically have access to the LEARN site for that course and you should encourage them to check these materials regularly. Tutors should be given access to the course pages via https://www.myed.ac.uk: if you do not have access, please ask the relevant Course Administrator to add you to the system. You will need to provide them with your UUN. Each subject area also has a Programme handbook, available on the School intranet: http://www.shca.ed.ac.uk/student/undergraduate/subjects.htm.
5
The Students A single group may include students from many different cultural and linguistic backgrounds. This can have a significant impact on the group dynamic and will affect how students participate in your tutorial or demonstration. Recognising the different backgrounds and skills of individual students can help to ensure that each student receives appropriate attention, and that a healthy discussion and learning environment is maintained at all times. Students will also come from different educational backgrounds, which can affect how they act in, and react to the tutorial or demonstrating environment. For instance, some will be confident and vocal, while others will be more reserved. Some examples of student backgrounds include:
Scottish students, who may have come straight from taking their Highers (at age 16-17) or who may have stayed on at school to the age of 18, doing additional Highers, Advanced Highers or A-Levels in one or more subjects.
Students who have come through the English school system are likely to have taken AS-Levels followed by A-Levels or the International Baccalaureate at age 17-18.
Overseas students who come to the University on academic exchange (either for one semester or a whole year) or for a normal undergraduate degree programme.
‘Mature’ students of all ages and backgrounds who often come to the University from employment or transitional courses.
Students who have taken a gap year after leaving school and may be more confident than those who have come straight from school.
Some students may have learning difficulties or special needs, of which you should be aware when conducting your tutorials.
Students therefore come to their tutorials or demonstrations with different needs and expectations, which are not always immediately apparent or communicated directly to the tutor. As the tutor or demonstrator you should try to be aware of the different levels of ability and attainment within any one group. Providing students with the opportunity to introduce themselves during the first tutorial can be one way for you to get a sense of some of these differences and expectations at an early stage (see ‘The First Tutorial’ below). Not only does educational background impact on students’ experiences, so too does their initial choice of subjects and their chosen degree programmes. Scottish undergraduate degrees require four years of study and for the first two years students are required to study three courses per semester, one or two of which are normally taken from outside their major subject area. All courses must be passed to progress on to the Honours programme in their chosen degree for the final two years. If they do not progress to the Honours stage, students can transfer to the three-year Ordinary Degrees, or BA in Humanities. In most cases, students in first- and second-year tutorials will be intending to progress on to an MA Honours programme in a degree offered by the College of Art, Humanities and Social Sciences, but some may be studying for the BA. Students on combined Honours programmes are also common, for example those studying for an MA in History and English Literature or Archaeology and Architectural History. A good proportion of your students will be taking your
6
course as an ‘outside’ subject and their main interests will therefore lie in another school; this means that you could be teaching History, Classics or Archaeology to a first-year student registered for a degree in, for instance, Engineering, Informatics or Law. Visiting and exchange students from universities abroad may also be present. All of these factors can have an impact on how the students in your tutorial or demonstrating group react to, absorb and interpret the information from the course, and on how they approach the written coursework. Whatever degree your students are taking, the course on which you are teaching (provided it is a first- or second-year course) should constitute about one third of the student’s workload for that semester. It is a good idea to remind your students of this during the first tutorial! The Benefits of Being a Tutor or demonstrator Tutoring or demonstrating can be a rewarding experience, providing you with a chance to develop transferable skills which are relevant to the world of academia and beyond:
Knowledge: Tutoring or demonstrating on an undergraduate course can help develop your understanding of subject material outside your own area of research, or refresh your knowledge of general concepts and ideas.
Organisation: This can range from organising meetings with individual students who wish to discuss their work, to liaising with academic staff, administrative staff and other tutors to discuss pastoral and academic issues. Balancing tutorial or demonstrating preparation and your own work can be demanding, but it is also helpful in developing time management skills. Experiencing how an undergraduate course is run and taught can also provide you with some of the skills required to develop your own course or courses in the future, something which is becoming increasingly important for postdoctoral teaching positions.
Communication: Tutors and demonstrators develop skills in articulating ideas and concepts in a manner that can be understood by people of various backgrounds. Being able to absorb and interpret the ideas of others is a valuable skill in any workplace.
Administration: As a tutor or demonstrator you will gain insights into different parts of the University. You will become familiar with various administrative processes at both subject area and school levels, and will be working with a range of different members of staff.
The Roles of the Tutor Tutoring is a job that comes with many parts. Aside from the contact hour with the students, you will be expected to prepare for the teaching, provide support and pastoral care for individual students when necessary, ensure the timely marking of essays and assignments and provide students with constructive feedback. Tutorials and Students
7
The tutorials themselves are about active engagement and participation, rather than being another hour in which the students engage with the information and arguments presented in a lecture. Tutorials should provide an environment where students can express views and opinions on particular problems within the subject, and help students organise the material and ideas they have accumulated from lectures and private reading, in a way which will help them with essays, assignments and exams. Tutorials should allow students to:
Widen their knowledge of the subject area, complementing the information they obtain from lectures and private study.
Develop problem-solving skills and critical thinking.
Discuss themes and issues, developing strong communication skills.
Develop group and teamwork skills. All students should be encouraged to debate, express opinions, and question assumptions and explanations which are offered by others, raising critical awareness and enabling students to place their knowledge within a wider context. Students come to tutorials with their own expectations about what is required of them. It is helpful, therefore, to discuss with them what a tutorial is, and what it is not (i.e. a lecture). You should make it clear that the students have their own responsibilities to the tutorial process – their advanced preparation and contribution is vital to a successful tutorial – as well as what your own role will be throughout the course. The tutor’s role is to channel but not dominate the discussion. This can sometimes be difficult, particularly in the early tutorials when nerves can make a new tutor fill the awkward silences that will, inevitably, occur. If students do not respond immediately to a question or theme, try rephrasing it or dividing them into smaller groups to see if this helps stimulate discussion (more on this below). Students’ participation depends not only on how much advance preparation they have done (something that is hard to regulate and enforce), but also on the general atmosphere of the tutorial. Many students may not initially have the confidence to speak up in front of a group of their peers, and it is important, as far as possible, to create an atmosphere where they know they can speak up with confidence and without the fear of being embarrassed or derided. Let them know that it is OK to ask questions and that any contribution is worthwhile and valid. The students should feel that the topic is worth discussing, and that they can learn from each other. Students with ‘Adjustments’ The University is required to make ‘reasonable adjustments’ to accommodate the learning needs of students with learning difficulties, with conditions such as dyslexia the most commonly encountered. Agreed adjustments for individual students are provided by the Student Disability service (you will most likely receive these from the course administrator for your course) and must be implemented. In addition, a number of adjustments have now been ‘mainstreamed’, meaning that they must be implemented or allowed regardless of

8
whether or not a specific request has been received. For tutors, the most relevant mainstreamed adjustments are the following: 5. Students shall be notified by email of changes to arrangements/announcements such as changes to courses/room changes/cancellations. 6. Students shall be permitted to audio record lectures, tutorials and supervision sessions using their own equipment for their own personal learning. For the full policy, see: http://www.ed.ac.uk/files/atoms/files/accessible_and_inclusive_learning_policy.pdf If you have any questions regarding adjustments please speak to Dr David Silkenat. Tutorial Preparation Different tutors have different ways of preparing for their classes, but, particularly for the first few classes, it can be a good idea to have more than one approach or strategy prepared (group work, mini-presentations, etc. – see Appendix 2). The key point to remember for tutorial preparation is that you need to be flexible. You should:
Plan for different situations, such as the students being unprepared, or their general mood affecting the course of the tutorial. Discussions in small groups or class debates can sometimes liven up the room.
Be responsive to your students. Certain topics may take up more or less time than anticipated, and you need to be prepared to adjust your tutorial accordingly. Being able to cope with these changing circumstances is one of the key skills you will develop as a tutor.
Here are some general guidelines which can help you get started:
Familiarise yourself with the reading list for the tutorial and the way in which the topic fits with the lecture series. If the topic has not been covered yet in the lectures, for example, students may find it harder to grasp certain concepts.
You are not expected to know everything. New tutors often feel that they should read everything on the reading list to prepare for every eventuality and question (which is impossible to do). If you are unfamiliar with the topic, have a look at the reading, but remember you need to get the students to think critically about their topic and you do not need to memorise everything yourself.
Some tutors find that making preparatory notes can help, particularly for the first few tutorials, while you are finding your feet. Make a list of sub-topics which could be discussed in pairs or among the group as a whole. Some of the course handbooks will contain a few introductory questions for each week’s reading.
For courses which use primary sources or surviving objects, tutors should make themselves familiar with the source or object in question. For objects or teaching aids make sure you follow the procedures required by the subject area in question for using
9
these objects, such as careful handling and making sure they are returned to the correct place. See your course organiser for more information.
A tutor’s job also includes ensuring that students come to the next tutorial knowing what to expect. This process can be encouraged by discussing some of the ground rules in the first tutorial (see Appendix 2). It is essential to stay one step ahead by being aware of the tutorial topics which are coming up in the weeks ahead. Being aware of the context of the tutorials can help you to encourage the students to think about the wider themes of the course. Think of a few questions relating to the next week’s reading which you can put to your class. This will help students to focus their attention on a particular aspect of the topic and will give them an idea of what you expect from them in the following week. You may decide, for example, to divide the class into groups and give each one a different reading on which to focus. Learning outside the classroom You may wish to encourage your students to visit sites of historical interest or museums or art galleries relating to the course. If you feel that a visit to a historical site would be of benefit to students taking the course, you may wish to suggest this to the course organiser. Administration Administrative duties are an important part of the tutor’s role. Your administrative tasks will include:
Taking note of attendance: We are required to monitor the engagement and attendance of all of our students. For students on taught programmes, this is partly done by recording attendance at all small scale teaching events (i.e pre-honours tutorials). Recording formally starts from Week 3 of teaching onwards in both semesters. In the case of Tier 4 students, this is so that we can produce robust data for compliance audit by the UKVI. If we fail to demonstrate comprehensive recording/robust monitoring processes, the University could lose its licence to admit international students, which would also adversely impact on-programme Tier 4 students who have may need to transfer elsewhere. It would also affect our ability to employ staff requiring visas. In the case of non-Tier 4 students, this is for reasons of pastoral support in line with a directive from College to apply the monitoring process to all students. The mechanism for recording the data is by means on an online 'app'. There is a shortcut to the app on the desktop machines in teaching rooms.. The web address for the ‘app’ is http://edin.ac/18Xkcew. Tutors leading UG and PG small group teaching should record attendance data via the 'app' in class. There is also an option to print out your register, record attendance manually, and enter the data after the class takes place, but it will then be your responsibility both to print the register initially and to then input the data after the class (this has to be done by the end of the working day during which the class has taken place) - this is not the responsibility of course administrators. Please note, EUCLID has two-factor authentication. If you do not know your memorable word, please get in touch with IS ([email protected]).
10
Once you click on the app, you will log in and will then be presented with a screen listing details of all your courses/groups (which support staff will have pre-populated by the start of week 3 – if you look before week 3, the list might not be complete). Click on the relevant course/group, then record either a tick (present), a cross (absent) or 'E' (exempt, e.g. if you have been told about illness or unavoidable absence) against each student name. When you are taking registers, if any student isn't present, please remember to record an X to denote their absence rather than leaving it blank - otherwise, no data is recorded, which will cause problems when we run the reports for monitoring that students are engaging satisfactorily. You can change this retrospectively if you determine there is a satisfactory reason to grant an exemption. If a class does not take place for any reason (illness, individual feedback meetings are held with students) please email the details to [email protected]. Further information and online training is also available at http://www.studentsystems.is.ed.ac.uk/staff/user_guides/student_engagement/. Any technical problems with the app, please contact the School IT Team ([email protected]) and give us details.
Recording student participation: Some courses require that you make a note of students’ participation in tutorials and provide each with a mark at the end of the semester – check with your course organiser to see if this is the case and for the criteria according to which students should be assessed.
Communication with the course organiser, course administrators and your students: This should always be done through your University e-mail account – remind your students to check this account regularly. The course organiser should be informed of any students who are having particular difficulties in understanding the course material.
Reinforcing deadlines: Students will need to be reminded of upcoming deadlines for assignments – as well as of the fact that having coursework for other subjects due on the same day as well as computer problems of any type are not acceptable reasons to request an extension. If a student requires an extension, you should direct them to the course administrator for your course. Tutors do not have the power to grant extensions. Note: Managing the submission of coursework is the responsibility of the Undergraduate Teaching Organisation. Coursework will not be submitted directly to tutors. For details of the submission process see -http://www.shca.ed.ac.uk/assignment_submission/.
Electing a tutorial representative: Tutors are not required to recruit tutorial representatives. At pre-honours level tutorial representatives are recruited by the Course Organiser.

11
Support and Pastoral Care for Students As you are one of the most regular points of contact between students and the University, you may be the first to spot when a student is having difficulties of an academic or personal nature. You need to make sure that you are aware both of professional boundaries and of your own capabilities – if a student comes to you with personal difficulties which could affect her/his work you should not feel that you are solely responsible for dealing with the problem directly. Be supportive and sensitive to a student’s problems, and encourage students to contact you as soon as they are aware of an issue that has the potential to affect their academic performance, but remember that the University has a number of staff and agencies who are officially responsible for, and trained to deal with, these situations:
Every student has a Personal Tutor, who is responsible for her/his academic welfare. The School also has a Student Support Office (see list of Useful Contacts), which complements the Personal Tutor system, and maintains the personal records of students relating to special circumstances such as illness, which can affect academic performance. As a general rule, students with academic problems should be referred to their Personal Tutors. Students with personal problems can be referred either to their Personal Tutors or to the Student Support Office. If a student does not wish to speak to the Support Officers or Personal Tutor directly, ask permission to report for him/her.
A Peer Support scheme operates within HCA for first- and second-year students. The volunteers are all students of the School and are able to share their experiences and refer students on to other sources of support. For further information and details of sessions see http://www.ed.ac.uk/history-classics-archaeology/information-current-undergraduates/your-studies/support-and-advice/peer-support.
For academic issues such as poor performance in class or coursework, or language difficulties, it may be necessary to speak to the student either before or after the class, or in designated feedback events (see below) or refer the student to the course organiser. In the case of an issue which is beyond your control or capability, encourage the student to refer the matter to their Personal Tutor, course organiser or other appropriate person. Always respect the student’s confidentiality. Deal directly only with course-related problems.
Tutors should be available to meet with students at the point of the semester when coursework marks are being returned. Tutors are expected to claim for that feedback event.
A number of branches of the University offer courses which can help students with academic and/or personal issues. The Institute for Academic Development (IAD) runs a series of workshops on learning and studying for undergraduates, for which see http://www.ed.ac.uk/schools-departments/institute-academic-development. The Institute for Academic Development also run a course for tutors to give guidance on advising students on personal and academic matters.
The English Language Teaching Centre provides English language support for international students, for which see http://www.ed.ac.uk/schools-departments/english-language-teaching. The EUSA Advice Place, Student Counselling, and the Student Disability Service also offer various types of support for students.
12
Encourage students to contact you as soon as they are aware of an issue that has the potential to affect their academic performance, but remember what your own capabilities and duties are.
Marking and Feedback The marking of assignments and essays can be one of the most time-consuming aspects of being a tutor, especially when you are new to the task. The job can also be quite stressful, as you are working under the added pressure of knowing that marks go towards a student’s final grade, something of which the students themselves are very well aware. The marking of assignments is vital, as it lets the course organisers see how well students have understood the subject matter, and it lets the students themselves see where they are (and are not) making progress. Typically, course work counts for only a certain percentage (e.g. 40%) of the overall course mark. The remaining component of the overall mark comes from the degree exam. As a part-time tutor you will not usually be involved in examination marking. If you are involved in the marking of coursework, it may be useful to discuss with your tutorial groups what markers are looking for in a piece of written work. Check with the course organiser early in the semester to find out whether or not you will be marking the coursework of your own tutorial groups. Particularly for first-year courses, it can be helpful to set aside some time early in the semester to discuss briefly what is expected from written assignments. Requirements will vary from course to course, so it is important that you are clear as to the expectations of the course organiser. Some courses will have different types of coursework, such as essays and source-based analyses. If this is the case, make it clear to students what type of assignment they should be writing and when. Support and advice is always available from your course organiser with regards to marking, and in some cases, meetings will be held to establish more precisely the marking requirements for a particular course. For new tutors, course organisers may read over sample papers, discussing possible marks and any issues that may arise. The course organiser will monitor the marking and ensure that moderation is undertaken in accordance with HCA policy. Many will wish to see a sample of your marked essays (some organisers like to see them all) to double check; they will also provide you with feedback on your marks and comments. In most cases you will not be the only tutor on the course, and it can sometimes be helpful to get together with your fellow tutors for a marking session, during which you will be able to compare your own judgement and techniques with those of others. Fellow tutors can also help you phrase your comments on students’ papers in a constructive and encouraging manner. If you have trouble with a particular essay and want a second opinion, ask your course organiser. Likewise, if you suspect academic misconduct, make this known through the appropriate channels as soon as possible. Full guidance on how to read turnitin reports and what to do if you suspect academic misconduct is provided in a separate document.
13
Providing prompt, constructive feedback on essays and assignments is an essential part of the tutoring process and a key priority of the School. To ensure that feedback is provided in a timely manner, all batches of coursework carry a turnaround schedule, which indicates the precise dates by which the various marking processes must be completed. Your students will be looking to you for encouragement and for advice on how they might improve. Written feedback should always be constructive, encouraging and respectful; never write anything that you would not say to a student’s face. In almost all cases within our School, work for credit is now marked anonymously. This sometimes makes it difficult to provide useful, personalised feedback, and it makes sensitivity all the more important. Coursework submitted ‘complete and on-time’ is required to be returned to students within 15 days. Courses will set aside time for individual meetings with students to discuss their feedback. This is a chance for you to encourage students over their progress and go over any issues they might have. Your course organiser will be in touch to discuss how this feedback event will be structured and you will be paid for the feedback event. If you encounter a student who is unhappy with his/her mark, try to meet with them to discuss it and explain (tactfully) where the assignment could have been improved. Explain to them that marks are moderated and refer them to the explanation on Learn. If this does not resolve the issue, the student should be referred to the course organiser. From 2016, all marking will be done electronically except where pedagogically inappropriate. For details of how this works, please see http://bit.ly/2vEz00u for guidance and documentation. For information about how to check Turnitin’s similarity checker and what to do if you have concerns about poor referencing or plagiarism, please see the separate document on this subject. The mark scheme is also available in a separate document. Guidelines for Demonstrators Demonstrating forms an important part of the delivery of the SHCA teaching programme and your contribution is greatly valued. Health and Safety in the Labs As a demonstrator you have a responsibility to familiarise yourself with the SHCA laboratory regulations and safe practice guidelines. The regulations and guidelines are detailed in the SHCA Laboratory Users Handbook, and in Appendix 1 of this document. Lab demonstrators must attend a Laboratory Health and Safety Induction Session prior to working in the labs, and should attend this session at least once every three years thereafter. Details of the annual Laboratory Health and Safety Induction Session will be circulated to all lab users by the lab technician. You are also expected to be familiar with particular safety profile of the lab in which you are working/demonstrating. This information can be found in the blue Health and Safety
14
Information folders that are kept in each lab, which provide detailed information on the University’s Health and Safety Policy relevant to each particular lab, such as chemical and biological hazards and radiation protection. Make sure that you know what to do in an emergency. In particular, you should know: (i) how to call for help; (ii) the location of the nearest First Aid cabinet; (iii) how to find a first-aider; (iv) how to calmly and safely evacuate the laboratory; (v) the locations and mode of operation of extinguishers; and (vi) the location(s) of the technical or supervisory staff on duty. It is also important that demonstrators ensure that students work safely in the laboratories. Good Practice and Lab Hygiene Your behaviour in the lab classes should set a good example for the students. It is important to note that food and drink are not permitted in any of the SHCA labs. This is because the labs contain computing equipment and expensive specialist equipment/apparatus that may be damaged by liquid spills, as well as archaeological materials and chemicals that may be contaminated by, or contaminate, food and drink. If you do see anyone (staff or students) taking food or drink into the labs please politely remind them that they must leave any food and drink outside the lab. If a student needs to drink or eat during the class they must leave the lab to do so. Note: students don’t need to ask permission to leave the lab for this, or any other, reason. Lab coats should be worn at all times in the labs. This is to minimise the risk of personal injury or harm should there be any spills of chemicals or other hazardous materials and to prevent contamination to, or by, archaeological materials. Additional protective personal equipment appropriate to the task in hand should also be worn. If you do see lab users (staff or students) not wearing lab coats in the labs please gently remind them to do so. Everybody handling human remains should consult the Archaeology Ethics and Standards document which can be found under ‘Archaeology Guidelines’ on the School’s Ethics Procedures website (http://www.ed.ac.uk/history-classics-archaeology/research/ethics-procedures/procedures). Use of Equipment and Consumables There are a wide range of facilities and numerous pieces of apparatus/equipment that can be used for teaching/demonstrating. Please discuss your requirements with the course organizer, lab superintendent or lab technician well in advance of teaching/demonstrating to ensure that any equipment and consumables you need will be available for your class.
15
Apparatus/equipment or samples that have to be left for an extended period should be accompanied by an ‘Apparatus Working’ card that indicates the name of the responsible person and a contact number/email. Any equipment borrowed for teaching/demonstrating must be signed for and used on the understanding that the signatory is responsible for proper use and safe return. If you are using lab consumables during the lab class and stock is getting low, please ensure that you inform the course organizer or the lab technician before stock runs out. Similarly, the lab technician or lab superintendent should be notified of all breakages. This ensures that repairs or replacements can be sought promptly. What can Students Expect of a Demonstrator? Demonstrators should assist students in lab classes, explaining concepts and methods, and helping students with exercises and activities. Demonstrators are not there to tell students the answers, but to facilitate student learning and understanding. If students are requesting attention beyond the remit of a demonstrator, or are asking for assistance outside of demonstrator hours, be assertive and ask them to redirect their questions to the class organizer. Students may also seek to discuss pastoral issues with demonstrators. If a student does approach you, please remember that there are many people in the University who are specifically employed to help students. Significant pastoral issues should be referred to the Student Support Office or the Personal Tutor. Contacts If you are experiencing any difficulties arising from working as a demonstrator you should in the first instance discuss these issues with the course organizer. If this does not resolve the issue you should approach the Head of Subject Area. Summary of Lab Facilities and Uses Lab 3.20 (Chemistry lab) The main activities carried out in this lab are (i) the extraction of collagen from archaeological human and animal bone samples for isotope analysis and radiocarbon dating, and (ii) analytical x-ray fluorescence. Teaching and demonstrating are restricted to activities that require the use of hazardous chemicals or other specialist equipment housed in this lab. Lone working is not permitted within this lab and use is only granted with prior permission and at a time that is convenient for the lab technician or lab superintendent.
16
Lab 00M.03 (Teaching and research lab) This lab can be used for teaching/tutoring small classes as well as for individual research (by staff and students). Priority will be given to teaching/demonstrating. Note: while the lab is used extensively for osteoarchaeological purposes it is not reserved exclusively for this and can be used for teaching/demonstrating of non-osteoarchaeological classes as well as laying out and analysing other archaeological materials. The refrigerators in these labs can be used for any non-hazardous materials that require cold storage. However, this can only be done by prior arrangement with the lab technician or lab superintendent. All stored materials should be clearly labelled with a name and contact phone number/email address. Any materials not labelled in this way may be disposed of without notice. Note: priority will be given to the storage of prepared Synbone, both pre- and post-experimentation. If you are using this lab for teaching/demonstrating this should be indicated by placing a sign on the door of the lab, indicating the date and time of the class, and giving other users as much notice as possible. Time slots in this lab can be booked by filling in the Lab Space Booking form on the outside of the door. Lab 00M.05 (Teaching lab) The teaching lab is used for lectures and teaching large class sizes. When not in use it can be used for individual research by staff and students. Synbone experiments also take place in this space. While the lab is used extensively for osteoarchaeological purposes, it is not reserved exclusively for this and can be used for laying out and analysing other archaeological material. Lab 00M.07 (Microscope lab) This lab is principally intended for analysing samples using microscopy. The sensitive nature of the microscopes housed in this lab means that activities that create dust or particulates are not permitted. However, this lab can be used for teaching/tutoring small classes as well as for individual research (by staff and students). Note: priority will be given to teaching/demonstrating of microscopy and individual research that involves the use of microscope work. Demonstrators making use of the microscope must ensure that all users are working in accordance with the guidelines laid out in the University’s Microscope Workbench Checklist, a copy of which is placed in the blue Health and Safety Information folder within this lab. It is also available online: http://www.docs.csg.ed.ac.uk/Safety/includes/guidance/Microscope_workbench_checklist.pdf Any intended activities in this lab must be discussed with and approved by the Lab Technician in advance.
17
If you are using this lab for teaching/demonstrating this should be indicated by placing a sign on the door of the lab indicating the date and time of the class, and giving other users as much notice as possible. Time slots in this lab can be booked by filling in the Lab Space Booking form on the outside of the door. Lab G.18 (Wet processing and thin sectioning lab) This lab is used for a range of post-excavation activities including cleaning of archaeological materials (e.g. wet processing and flotation), as well as housing the thin-sectioning equipment. This is the only lab in which the sinks are equipped with sediment traps and deep enough for activities such as flotation and wet sieving, therefore all material that needs to be cleaned can only be washed only in this lab. Note: it is the responsibility of the lab users to empty the sediment traps on a regular basis. Other activities that should be carried out in this lab include gelatin preparation for Synbone experiments and post-experiment Synbone cleaning. Do not dispose Synbone in any other sinks. Any other activities in this lab must be discussed with and approved by the lab technician or lab superintendent in advance. This lab can be used for teaching/tutoring small class sizes in practical exercises, such as wet processing and post-excavation techniques. If you are using this lab for Teaching/demonstrating this should be indicated by placing a sign on the door of the lab, indicating the date and time of the class, and giving other users as much notice as possible. Time slots in this lab can be booked by filling in the Lab Space Booking form on the outside of the door. Appendix 1. SHCA Laboratory User Handbook Introduction Health and safety is of paramount importance in a laboratory environment, and it is essential that Laboratory Regulations and Laboratory Safe Working Procedures are fully understood and adhered to. As a lab user you are expected to be familiar with and to comply with these regulations and procedures. The principal purpose of this handbook is to provide information about the organisation, and regulations that govern the running of, the SHCA laboratories. Much of the information in this Handbook can also be found in the blue Health and Safety Information folders that are kept in each lab. These folders also provide more detailed information on the University’s Health and Safety Policy that are relevant to each particular lab, such as chemical and biological hazards and radiation protection. Please ensure that you are familiar with the information contained within these folders.
18
The University of Edinburgh’s full Health and Safety Policy and Codes of Practice can be found at the following link: http://www.ed.ac.uk/health-safety/policy-cop Contacts Should you have any questions relating to the use of the labs or encounter any issues when using the lab facilities or equipment please contact either the lab technician Alan Dalton ([email protected]) or the lab superintendent Catriona Pickard ([email protected]; tel 0131 6502372). Laboratory Regulations The following regulations apply to all of the SHCA labs:
1. Work safely at all times.
2. Risk assessment and safe system of work forms must be completed for all procedures being undertaken in the laboratory. This is the responsibility of the student and their supervisor.
3. Do not undertake any work unless the risks, if there are any, have been explained to you.
4. Laboratory coats or other protective clothing appropriate to the task in hand must always be worn. Laboratory coats should not be worn outside the laboratory area especially in areas of the building where food and drink are taken.
5. In addition to a laboratory coat, goggles and gloves should always be worn when handling chemicals of any type. With hazardous reagents additional precautions should be taken – follow the advice provided on Safety Data Sheets (SDS).
6. Laboratories must be kept clean and tidy at all times. Field samples, prepared samples, etc., when not in use must be clearly labelled and placed in a designated storage area.
7. All glassware, sieves, etc., must be washed, cleaned and sterilised (as appropriate) immediately after use.
8. When laying out human skeletal remains or other archaeological materials, foam mats and cork rings should always be used to minimise damage to this fragile, non-renewable resource.
9. No food or drink should be taken into or consumed in any laboratory.
10. Waste must be disposed of as indicated in the SHCA Laboratory Regulations and Safe Working Procedures Handbook.
11. In the event of an accident, or near-accident, inform the tutor in charge, the laboratory technician or the laboratory superintendent. In the event of a medical emergency ring the University emergency number (telephone 2222) and ask for the Emergency service you require. Laboratory facilities will only be made available to those willing to observe the laboratory regulations and safe working procedures.
19
Laboratory Safe Working Procedures Safe Working Procedures: general policy The use of all facilities is conditional upon the user respecting safe working procedures. This includes the completion of Risk Assessments for all activities undertaken and the immediate reporting of accidents and near accidents so that action can be taken to rectify any problems arising from working procedures. Health and Safety Regulations Work in any lab or work area is covered by several pieces of legislation which dictate safe working practices. The most relevant legislation is the Health and Safety at Work Act (1974), part one, section seven of which states, “It shall be the duty of every employee while at work to take reasonable care for the health and safety of himself and of other persons who may be affected by his acts or omissions at work; and as regards any duty or requirements imposed on his employer or any other person by or under any of the statutory provisions, to co-operate with him so far as is necessary to enable that duty or requirements to be performed or complied with”. Note: in this context a student is deemed to be an “employee”. It follows that for the sake of the safe and accurate use of a laboratory a few simple rules should always be followed. SHCA Laboratory Health and Safety Regulations No food or drink should be taken into or consumed in any laboratory. Similarly eating utensils should not be taken into or stored in any laboratory. Laboratory glassware, fridges, freezers and ovens should never be used for food storage or preparation. Protective clothing appropriate to the task in hand must be worn. Lab coats should be worn at all times in the labs. Lab coats should not be worn outside the laboratory areas. You should wash your hands after any activities involving archaeological materials or handling chemicals. Hand-washing sinks, which are clearly labelled, are available in each lab. Poor housekeeping is a major cause of accidents and, in general, a safe working area is a tidy working area. Laboratories must be kept clean and tidy at all times. Apparatus and other materials that are not immediately required should always be returned to a safe storage place, and unwanted materials, particularly combustible and flammable items, should be disposed of safely and promptly. Cleaning of laboratory bench tops, storage cupboards, apparatus and equipment, and reagent shelves is the responsibility of all lab users. All glassware, sieves, etc., must be washed, cleaned and sterilised (as appropriate) immediately after use. All spills and breakages should be cleared up immediately (see below for guidance on waste disposal). When laying out human skeletal remains or other archaeological materials, foam mats and cork rings should always be used to minimise damage to this fragile, non-renewable resource.
20
Visitors are not allowed into the laboratories except when accompanied by a member of academic staff or the lab technician. Any visitors should be provided with appropriate protective clothing. Volunteers may work in the labs following completion of a Volunteer Form and with the agreement of the lab technician or lab superintendent. Knowing the Risks: carrying out a “Risk Assessment” It is a legal requirement that we complete and have on file risk assessments for all activities undertaken in the laboratories. Guidance on risk assessment procedures can be found in the Health and Safety Commission Approved Codes of Practice, the Health and Safety Executive’s booklet "COSHH Assessments" and the Scottish Universities’ "COSHH Handbook". Electronic copies of these publications can be found on the University Health and Safety website. Forms are also available for COSHH Manual Handling risk assessments. Risk assessment forms must be completed prior to the start of work. Assessing risk involves examining the extent of the likelihood of a substance/chemical or protocol causing harm, in the actual circumstances of the work activity in question, and if it were to what the severity of the outcome could be (worst case scenario). The risk assessment should include,
(i) recognition (of hazardous properties); (ii) evaluation (of risk, likelihood and severity of outcome); and (iii) control (implementation of measures to achieve and maintain adequate control of
risk). Risk assessments should be reviewed annually and updated whenever the original risk assessment is no longer valid. It is the responsibility of individual supervisors to ensure that all the necessary information, instruction and training have been provided to allow students and staff to work safely in the laboratories. If you have not been asked to read and sign a risk assessment for any activity that you are undertaking that involves risk please ask to see one or notify the lab technician or lab superintendent. Further details on Risk Assessments and forms can be found at the following link: http://www.ed.ac.uk/health-safety/risk-assessments-checklists Lone Working Lone workers are those who work by themselves without close or direct supervision. All activities that require lone or out of hours working require a specific Lone Working Risk Assessment to be completed. This risk assessment will include general elements, e.g. routine building access arrangements for staff, students, etc., as well as elements specific to particular work activities and protocols. In line with the Health and Safety Policy, any proposed out of hours work that entails a potential risk of serious personal injury, fire or other significant hazard (should control measures for some reason fail), is prohibited. All such work must be scheduled within periods
21
of expected building occupancy, with all necessary control measures and emergency procedures in place. Guidance and advice on lone and out of hours working issues are available from the following links: http://www.docs.csg.ed.ac.uk/Safety/ra/LOOH_notes.pdf http://www.ed.ac.uk/health-safety/guidance/workplaces-general/looh Handling Chemicals Many of the chemical reagents that are commonly used are potentially dangerous. For this reason it is advisable to become acquainted with them before use. It is particularly important to remember that some chemical reagents, which may be relatively innocuous in themselves, can, when mixed together, produce dangerous substances or reactions. For this reason analytical protocols should not be modified without first checking with someone who has the knowledge to assess the likely results of the changes. Familiarise yourself with the properties of the chemicals with which you are going to be working. This information can be found in the ‘Chemical Hazards Book’ kept in room 3.20. When given instructions do read/follow them - if in doubt ask! Reference can also be made to the Hazard Data books supplied by chemical companies such as BDH which can be found in room 3.20. Read the labels on the reagent bottles before use, making sure that you have got the correct reagent (many of their names are very similar). Goggles and gloves must be worn when handling chemicals of any type. Wear sturdy shoes – sandals and trainers/plimsolls offer little protection against chemical spills. Additionally, trousers offer more protection than skirts or shorts. Long hair should be tied back. With especially hazardous reagents additional precautions should be taken. A PVC apron, heavy neoprene gloves, and a full-face visor are available. All gloves should be washed prior to removal and hands should then be washed following any work with chemicals. With dangerous reagents acquaint yourself with the appropriate procedures in the event of a spill or other accident; charts explaining the necessary precautions and safety measures are displayed in the appropriate areas. When using strong acids, oxidising agents or alkalis, or handling any chemicals that give off toxic fumes, prepare all reagents in a fume cupboard; and always use suitable containers for storing and pouring the solutions. Great care must be taken when carrying chemicals – bottles should be carried in baskets or similar containers. It is vital for the safety of subsequent users that when your work is complete users of the fume cupboard must remove all equipment and chemicals and thoroughly wash down all 13 contaminated surfaces. Remember also to wash off all traces of reagents from the outside of bottles before putting them away, and from gloves, aprons and other protective equipment before taking them off.
22
Most organic solvents are highly flammable and can form explosive mixtures with air. Many organic solvents form peroxides in storage. Organic peroxides are liable to decompose spontaneously and explosively. All solvents should therefore be stored in the solvent storage cupboard when not in use. Where possible avoid the use of hazardous chemicals. The lab technician or lab superintendent should always be informed of any proposed work that will involve unusual or severe hazards (e.g. very toxic or radioactive chemicals, known or suspected carcinogens, highly flammable materials, compressed gases, etc.). Never pipette by mouth. Chemicals should only be used in the appropriate laboratories (see below) and must not be removed from the premises. Work involving the use of chemicals must not be undertaken outside normal working hours (8.00 a.m. - 6.00 p.m. Monday-Friday) or at any time when in the event of an accident help would be unavailable. Purchase, Delivery and Storage of Chemicals All chemical (including consolidants and adhesives) purchases should be notified to the lab technician or lab superintendent to ensure that centrally held records of chemicals are kept up to date to adhere with Health and Safety legislation. All chemicals, including consolidants and adhesives should be delivered to the Chemical Laboratory (Room 3.20) and all hazardous chemicals must be stored in this laboratory. Consolidants and adhesives may be stored in other labs upon completion of appropriate risk assessments and development of safe systems of work protocols. A hard copy of the risk assessment and safe systems of work protocol must be made available in the lab in which the chemical/consolidant/adhesive is being used. All chemicals should be delivered with a safety data sheet (SDS) which should be consulted prior to use. Please consult the lab technician or lab superintendent prior to using any chemicals, consolidants, or adhesives that do not have an SDS supplied by the manufacturer. Laboratory Fume Cupboards Extractor fans must be on at all times when the fume cupboards are in use for experiments or when they contain volatile compounds. Keep hazardous chemicals at least 15 cm behind the sash of the fume cupboard. Always work with the sash in the lowest practical position and close the sash when the fume cupboard is left unattended. Do not position any equipment in the fume cupboard that will restrict closing the sash. Do not use the fume cupboards for the storage of chemicals or any other materials. Please note: the fume cupboard in G.18 is a recirculating fume cupboard and may not be suitable for all tasks involving hazardous materials. Please discuss your requirements with the lab technician or lab superintendent before carrying out any activities in this fume cupboard. Further details on safe working procedures for fume cupboards can be found at the following link:http://www.docs.csg.ed.ac.uk/Safety/policy/p5cl/p5cl3.pdf

23
Chemical Spills You must also familiarise yourself with the locations and contents of the Hazard Warning Sheets and BDH/Merck Hazard Data Books – these provide information on the correct procedure for chemical spills as well as primary advice on first aid. You must consult these charts/books when producing your risk assessment. It is your responsibility to consult the BDH/Merck Hazard Data Book before using any chemical that you are unfamiliar with, and to ensure that you are aware of what to do in an emergency. In all cases of chemical spillage onto skin or clothing the first step is to douse the affected area with clean cold water. Remove all affected clothing (you should have been wearing a lab coat) and wash skin thoroughly with water. A spill containment kit is available on the bench shelf in room 3.20. Contact of any chemical with the eyes requires immediate rinsing with water – an emergency eye shower is located in room 3.20 and there are eyewash bottles in room 3.20 and other labs. Note that contact with certain reagents, e.g. Formic acid, Bromine, etc. will always require medical attention, but emergency treatment by thorough rinsing of the contact area with water, ammonia solution (contained in eyewash bottles) and further water is recommended. Once the initial contamination has been doused, seek medical attention. Disposal of Lab Waste The disposal of chemical waste is controlled by legislation. Chemical waste should never be disposed of in sinks – if you are undertaking a protocol that produces chemical waste please discuss appropriate disposal procedures with the lab technician or lab superintendent. All containers of chemical residues/waste should be clearly labelled. Any materials that come into contact with chemicals (including ‘sharps’, such as scalpels and broken glassware) should not be disposed of to landfill. There are designated disposal bins for contaminated materials in the labs - these will be either a yellow sack or a large yellow bin with purple lid. Uncontaminated sharps (i.e. those which have not been in contact with chemicals or hazardous biological materials) should be disposed of in the small yellow bin with orange lid. Do not dispose of sharps in any other way. Biological waste should not be disposed of to landfill. Please discuss appropriate disposal procedures with the lab technician or lab superintendent. For disposal of other materials, such as electrical equipment, batteries, lab plastics that are safe for disposal, and glassware that is safe for disposal, please contact the lab technician or lab superintendent. General lab waste can be disposed of in a rubbish bin intended for landfill.
24
Guidance for the disposal of lab waste can be sought from the Waste from All Laboratories notice, which is displayed in each lab. If you are uncertain as to how any particular form of lab waste should be disposed of, please consult the lab technician or lab superintendent. Accident Prevention, Procedures and Reporting It is the responsibility of laboratory users to find out what to do in case an emergency situation arises. You should determine, before any emergency occurs, the location of the telephones, the fire alarms, the emergency fire exits and the fire-fighting equipment, and the location of first aid materials. Prevention: Bring to the attention of the lab technician, the lab superintendent or your tutor any potential hazard to safety and health. This includes reporting faulty equipment and security breaches to the lab technician or superintendent. Knowing what to do in an emergency: All laboratory users should familiarise themselves with the position of fire alarm points and the safe route of exit in the event of a fire or fire-drill. If you have not learned basic First Aid measures, or have not been trained in First Aid, you must familiarise yourself with the name(s) and location(s) of your nearest qualified First Aider(s). First aid boxes can be found in every laboratory. You should familiarise yourself with the location of these boxes. It is an essential requirement that you report (via the accident slips) the use of these boxes so that stocks can be maintained. In the event of a serious accident that requires hospital treatment call the University of Edinburgh EMERGENCY NUMBER 2222 and ask for an ambulance to be sent to Doorway 4 of the Old Medical School, Teviot Place. Emergency telephones are located outside each of the laboratories – familiarise yourself with their location. After calling for an ambulance, call for a First Aider. Arrange for someone to meet the ambulance in the courtyard. If emergency help does not arrive within 10 minutes repeat the call. Accident, Incident / Occupational Ill Health Reporting All accidents however minor should be reported to the lab technician or lab superintendent (room 3.20, telephone 502372). Near misses should also be reported to allow SHCA Health and Safety procedures to be reviewed and revised as necessary. Reports can be made in two ways:
25
1. Filling out the forms in the Accident, Incident / Occupational Ill Health Report Book that is kept in each lab (first section of the book).
2. Filling out the online form: https://www.accidents.is.ed.ac.uk/ Use one method or the other, DO NOT use both methods for the same incident. Any employee (this includes students) who feels that he/she is suffering from a health problem which may be work related, should report the matter. Reports can be made in two ways: 1. Filling out the forms in the Accident, Incident/Occupational Ill Health Report Book that is kept in each lab (second section of the book).
2. Filling out the downloadable form: http://www.ed.ac.uk/health-safety/occupational-health/ill-health-accident-reporting/ill-health-reporting Use one method or the other, DO NOT use both methods for the same health matter. Further details about accident reporting can be found at the following link: http://www.ed.ac.uk/health-safety/accident-reporting
Note: Laboratory facilities will only be made available to those willing to observe safe
working procedures.
Contracts and payment The Head of Subject Area, in collaboration with the School Resources Team, and Course Organisers, will normally offer you work tutoring up to a maximum of 4 tutorial groups per academic year. Offers are made based on the availability of work (e.g. taking into account availability of academic staff on sabbatical or research leave), in relation to your own experience, knowledge and research specialism. You will also be provided with a staff tutor UUN, which you will be issued with shortly after returning your signed contract to the University’s HR and Payroll teams. Tutoring and Demonstrating contracts Your contract and contracted hours On your appointment as an HCA Tutor or Demonstrator, you will be issued with a Guaranteed Hours contract which will be linked to the end of your third year of study as a PhD student. This will be updated annually, with an offer of a minimum number of contracted hours per session (if you are a registered PhD student, this will be a maximum of 132 hours per year as per University guidelines). Each tutor and demonstrator will also be provided with further information from the School Resources Team detailing the courses offered, and their allocation of hours that can be claimed for each assigned tutorial or demonstrating group.
26
If you are a new tutor or demonstrator, from 2016/17 you will also be required to attend up to 6 hours of paid mandatory training offered by the School. Please note that the pre-sessional briefing session is mandatory for all tutors and payment for attendance will be made. Tutors and demonstrators must not work any additional hours without the express permission of their line manager, and the School Resources Team. Any increase in hours must be approved in conjunction with the Course Organiser, Line Manager, School Resources Team and where applicable, your PhD supervisor. Group allocation process Existing tutors and demonstrators are asked on an annual basis in Semester 2 to complete a form to update their information which is held by the Resources Team, to inform allocations and availability for work in the following session. The information that you provide on this form is used to match you with the appropriate Teaching Support positions as they become available. It is also an opportunity for you to let us know the courses and areas you would be interested in to further develop your teaching skills. Over the course of the summer, the School Resources Team works with Heads of Subject and Course Organisers to match tutors and demonstrators to available positions, taking into account previous experience, expertise, knowledge, and development requests. In cases where you have put yourself forward for a position that you didn’t have previous experience on, the relevant member of academic staff will be encouraged to meet with you to establish whether you meet with the criteria required to perform the role; e.g. awareness and knowledge of the course content. This is not expected to take the form of a formal interview, but is a necessary step in order to maintain the quality of all courses. Over the course of the summer, the School Resources Team then communicates provisional offers of work to existing tutors and demonstrators, which can be subject to change as the availability of colleagues’ changes, additional groups require cover due to increased student numbers, etc. The timing of this communication varies between Subject Areas. Once a tutor or demonstrator has accepted their provisional offer, College HR and the School Resources Team work to complete and issue the required annual refresh of hours being offered, and breakdown of hours information, which tutors must officially accept by emailing [email protected] before work can commence. Claiming for tutoring work In order to receive payment, tutors and demonstrators must submit their claims for hours worked using the University’s eTime system.
27
The staff username and password with which you are issued should be used to access eTIme, through EASE (different from your student log in details). If you need help with this contact [email protected] who will provide you with your Username and Password and can help with technical issues. Please only use these 'staff log in details' when logging into EASE for accessing eTime.
Tutoring, demonstrators and Teaching Support staff are paid monthly in arrears and payments can only be made after submission of an eTime timesheet to the School Resources Team. The deadline for submission of timesheets is, unless otherwise advised, THE LAST DAY OF THE CALENDAR MONTH. The December deadline will be earlier due to the Christmas closure; the exact date will be advised once it is known. A reminder to submit eTime claims will be sent by email a few days before the monthly deadline and payment will be made at the end of the following month.
Please note that although the eTime system gives a deadline of the 5th /6th of the month, as timesheets need to be approved and second approved by the School Resources Team, claims must be submitted by our HCA internal deadline to check and locally authorise claims before being passed to Salaries for payment. Inaccurate claims may result in delayed payment. We cannot guarantee that late claims will be processed and paid in time.
How to Claim on eTime
For access to the eTime system
http://www.ed.ac.uk/finance/finance-systems/systems
Timesheets should be submitted on a monthly basis, by creating a new timesheet.
Once you have selected the correct assignment, you need to create a Timesheet for that month, to do this
select from the eTime menu
Select the appropriate month and year, and then click Create to create a new Timesheet
You should record your time worked against your different hour allocations (further info below) by creating a new task for each type.
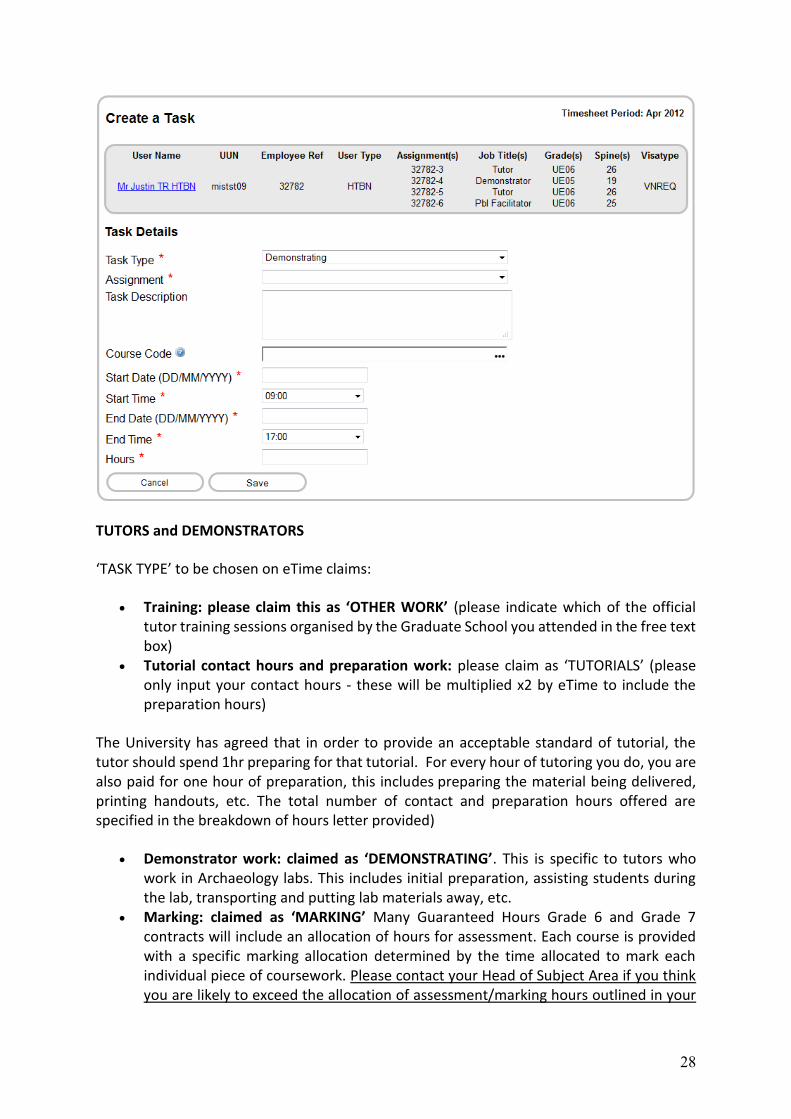
28
TUTORS and DEMONSTRATORS
‘TASK TYPE’ to be chosen on eTime claims:
Training: please claim this as ‘OTHER WORK’ (please indicate which of the official tutor training sessions organised by the Graduate School you attended in the free text box)
Tutorial contact hours and preparation work: please claim as ‘TUTORIALS’ (please only input your contact hours - these will be multiplied x2 by eTime to include the preparation hours)
The University has agreed that in order to provide an acceptable standard of tutorial, the tutor should spend 1hr preparing for that tutorial. For every hour of tutoring you do, you are also paid for one hour of preparation, this includes preparing the material being delivered, printing handouts, etc. The total number of contact and preparation hours offered are specified in the breakdown of hours letter provided)
Demonstrator work: claimed as ‘DEMONSTRATING’. This is specific to tutors who work in Archaeology labs. This includes initial preparation, assisting students during the lab, transporting and putting lab materials away, etc.
Marking: claimed as ‘MARKING’ Many Guaranteed Hours Grade 6 and Grade 7 contracts will include an allocation of hours for assessment. Each course is provided with a specific marking allocation determined by the time allocated to mark each individual piece of coursework. Please contact your Head of Subject Area if you think you are likely to exceed the allocation of assessment/marking hours outlined in your
29
initial contract paperwork, and please ensure this is done prior to exceeding your allocation. Please contact the School Resources Team if you are in any doubt about your allocation, or remaining balance.
Feedback: claimed as ‘OTHER WORK’ Feedback hours have now been standardised across the School and increased from 3 hours to 5 hours per assigned tutorial group. These are primarily intended to be used for individual meetings with students to provide feedback on coursework, but also cover email correspondence or other ad-hoc meetings with students (e.g. queries relating to tutorials and coursework), and course organisers, and other occasional sessions which a tutor might choose to hold in addition to the scheduled tutorials, e.g. coursework preparation. A maximum of 5 hours of feedback can be claimed per assigned tutorial group. Please contact the School Resources Team if you are in any doubt about your allocation, or remaining balance.
COURSE CONVENORS
‘TASK TYPE’ to be chosen on eTime claims:
Course Convener lecturing work: claimed as ‘OTHER WORK’. The Course Convener should claim one hour of preparation per each hour of lecturing undertaken and claim for the total amount of hours. The total number of contact and preparation hours offered are specified in the breakdown of hours letter provided).
Marking: claimed as ‘MARKING’. Please contact your Head of Subject Area if you think you are likely to exceed the allocation of assessment/marking hours outlined in your initial contract paperwork. Please contact the School Resources Team if you are in any doubt about your allocation, or remaining balance.
Feedback: claimed as ‘OTHER WORK’. This includes meeting students, providing support before essay submissions, e-mail correspondence, etc. The number of feedback hours should be specified in the breakdown of hours letter provided. Feedback time is up to 5hrs per group. See ‘Additional Payments’ below for further information. Please contact the School Resources Team if you are in any doubt about your allocation, or remaining balance.
Please ensure you choose the correct assignment when you have multiple contacts with the University: this is grade UE06 for Tutors and Demonstrators or grade UE07 for Course Conveners. Please note that the ‘assignment’ refers to your contract and the reference will be your staff number followed by ‘-‘ and a number (2, 3, 4..), depending on how many contracts you currently have or have had in HCA or across the UoE. If in any doubt, please check with [email protected]
2) In the ‘TASK DESCRIPTION’ of your claim please indicate:
The FULL NAME OF THE COURSE your claim is in connection with. This can be selected by entering the course name in the drop down box.
Audit procedures mean that the School needs to check your claims against course names and contract details (e.g. in terms of hours for particular tasks) that you have been offered. If there
30
are discrepancies, queries will need to be addressed, with likely delays in payment reaching you. When submitting your eTime claim, please make sure that you’ve selected the correct course from the drop down option, as this makes it easier to check and minimises the need to contact you prior to approving your claim.
If claiming under ‘OTHER WORK’, SPECIFY if the claim is for TRAINING, FEEDBACK or COURSE CONVENER WORK and give details in each case.
If claiming under ‘MARKING’, give DETAILS OF THE MARKING you have undertaken.
3) Please submit ONE PAY CLAIM PER MONTH for each COURSE you teach (regardless of how many group/s you have been allocated). The claim will include separate timesheets for each TASK TYPE, depending on the work you’ve carried out (Tutoring, Demonstrating, Marking, Other Work).
Salaries Office and Human Resources have advised that regular timesheet claims must be made throughout the session, rather a single claim for all hours undertaken at the end of a semester. Please aim to submit your timesheet each month, claiming all of hours undertaken since the previous timesheet was submitted. Claims will still be accepted for outstanding hours, or for claims that have been delayed while awaiting the completion of the contract process. All work undertaken during the academic year must be paid by 31st July, meaning all claims for the past session must be with the School HR team by 30th June.
Sickness absence/Interruptions of study In cases of sickness absence or inability to fulfil teaching or demonstrating commitments for other reasons, absences must be reported to your line manager as soon as known. Your line manager (Head of Subject Area), is responsible for liaising with the School Resources Team to advise of your absence, and where appropriate, to put in place any arrangements made for cover provided by another colleague. Please note that arrangements for cover must not be organised with your tutoring or demonstrating colleagues, due to restrictions on the maximum hours that certain categories of staff and students are permitted to work. Resources Team colleagues will also be able to confirm any entitlement to sick pay due to colleagues. Communications from the School Once you have accepted your tutoring or demonstrating contract, you will be set up with a staff email account, along with your username and password which you will use for claiming your hours worked through eTIme, etc. This email address will be added to a School HCA Tutor mailing list, through which all communications from School colleagues, such as Director of Graduate School, Resources Team, etc, will be sent. It is vital that you ensure you check this email account on a regular basis to ensure you do not miss important communications regarding training opportunities, eTime claim deadlines, etc. Please note that no correspondence will be sent to your student email address.
31
For further information about email accounts, please see Appendix 1. Representation on School-level Committees On an annual basis, Resources Team colleagues will call for tutor representatives from each of our three Subject Area to stand on our School-level Committees. Nominations will be requested for 2 representatives from Archaeology and Classics, and 4 representatives from History at the start of Semester One. In the event we receive more applications than representative slots, an election will be held. Representatives will be asked to serve on our PG PT Tutor Liaison Committee, which meets four times annually. Representatives will also be asked to ensure their subject area is represented at Undergraduate Studies Committee and Subject Area meetings. Further information on the remit and membership of the Committee is available on the Teaching Support Webpages. Training opportunities for Part-Time Tutors & Demonstrators The School considers your tutoring experience to be an important part of your wider academic development, and as such has put in place a programme of training, observation and mentoring for all tutoring staff. All tutors and demonstrators are expected to attend one of the briefing session on either Tuesday the 12th of September 2pm – 4.30pm or Thursday the 14th of September 10am – 12.30pm . New tutors or demonstrators who will be teaching in either semester in the academic year 2016-17 and those who have not previously been trained are additionally required to attend two training sessions at the start of the first semester. Existing tutors and demonstrators are recommended to attend. Attendance at these training sessions is paid. If for any reason you cannot attend, please get in touch with the training organiser in your subject area in the first instance. The dates and times are on the Teaching Support webpages. In addition to the training sessions at the beginning of the year, a further training sessions will be organized after the end of the second semester, in which you will be asked to reflect on your experiences and consider how you can develop a teaching portfolio and teaching philosophy for future job applications. IAD In addition to in-house training within HCA, the University offers training to tutors and demonstrators from across the University through the IAD, in the form of orientation and advanced courses, online resources, networking, and support for gaining professional accreditation for teaching from the Higher Education Academy (HEA). See http://www.ed.ac.uk/schools-departments/institute-academic-development/learning-teaching/tutors-demonstrators.
32
The IAD also has a mailing list for tutors/demonstrators and can support tutors who wish to seek HEA accreditation: http://www.ed.ac.uk/schools-departments/institute-academic-development/learning-teaching/tutors-demonstrators/networking. Teaching Circle All tutors and demonstrators both new and experienced, are encouraged to attend the School of History, Classics and Archaeology Teaching Circle, held regularly over the academic year. This is an informal lunchtime seminar which brings together teaching staff from across the School to share good practice, with the involvement of outside experts where appropriate. Please get in touch if you have a suggestion for a particular theme or issue you would like to see discussed in a Teaching Circle session or if you would like to lead a discussion on a particular theme. Teaching Circle 2017/18 dates: Semester 1 Tuesday 26 September, 13.00-14.00, room 2.36 Dr Catherine Bovill, Senior Lecturer in Student Engagement, Institute for Academic Development How to engage students more deeply in learning history? There is increasing interest in the idea of students and staff co-creating learning and teaching (Cook-Sather, Bovill and Felten, 2014; Healey, Flint and Harrington, 2014), and a range of benefits have been demonstrated to result from learning and teaching processes where students engage deeply. In this session I will explore a range of examples of ways in which staff and students from a range of universities are co-creating learning and teaching. I will also explore at a more fundamental level how we can try to enhance the relationships between staff and students – something that has been shown to improve academic achievement and students’ sense of belonging. This session will include a presentation and an opportunity for you to be involved in small group discussions focused on your teaching practices and future possibilities. Tuesday 31 October, 13.00-14.00, room 2.36 Dr Lynsey Russell-Watts, Careers Service Reflective Practice in Teaching In order to support students on various Edinburgh Awards and SLICCs (student-led, individually-created courses), both of which require an engagement with Reflective Practice, the Careers Service has carried out a short project identifying examples of good practice from across the university. This session will present some of these examples, and will suggest ways of incorporating Reflective Practice into your work to support students’ learning and development. You will have a chance to try out some Reflective Practice (it won’t be a diary!) and to discuss where and how this might apply in your own teaching or student support activities.
33
Training for Part-Time Tutors: Observation and Mentoring Individual teaching observation and mentoring are vital components of our tutor training. Each new tutor should be observed by a member of academic staff (either the course organiser or another member of the subject area) during one nominated tutorial class, during the semester. Following the observed session, tutors will receive feedback on their teaching, and an opportunity to discuss any problems or concerns they (or the observer) may have. In some cases, a further scheduled observation later in the semester may be required. Being observed during teaching can sometimes be a cause of anxiety, but the purpose of this exercise is to provide constructive and supportive feedback and advice. Remember that your observer has also been through this process, so try to think of it as a useful part of your development, rather than a ‘test’. Having a member of academic staff attest to your ability to teach can also be a very useful addition to a job application. Tutors are also encouraged to observe each other’s teaching sessions, which can be a great way to learn new techniques and ideas to bring back to your own classroom. The permission of the relevant course organiser should always be sought before observing another member of staff. Training for marking using online systems Training on how to use marking systems is not compulsory but will be offered regularly during the semester. Times will be advertised in emails to the School’s tutor mailing list. Support for Tutors and Demonstrators There are many people who will support you throughout your tutoring experience (for contact information see below): Course Organisers The course organiser should be your main point of contact for all matters related to a particular course, and can provide support over particular difficulties with the course content or the tutorials themselves. She/he may also be consulted if you are aware of a student having difficulties, but, as noted above, the student’s Personal Tutor is the person responsible for the academic welfare of the student. The Course Administrator is the key person to contact with any questions about the course or student issues. Course organisers will arrange a briefing at the beginning of the semester to discuss the course and provide guidance to tutors on what is expected from the students in terms of participation and coursework. Later in the semester, course organisers will discuss marking
34
and assessment with their tutors and moderate the marks and feedback of the tutorial groups. They will also organise a meeting at the end of the year for all tutors and lecturers on the course to discuss the outcomes of the course, remedy any issues that need to be resolved and discuss the feedback provided by the students (see below). Line Manager Your Line Manager is the Head of Subject (Archaeology – Dr Ulf Schoop; Classics – Prof. Gavin Kelly; History – Dr Thomas Ahnert). Course administrators The course administrator is the principal administrative contact for any course. He/she will create the online registers for you to complete for each tutorial, and should be informed if any new students appear in your class. She/he will be able to give you access to LEARN – you will need to provide him or her with your UUN – where you will be able to find the course handbook, and will be your main point of contact for collecting and returning marked coursework. School Resources Team Colleagues in the School Resources Team will be able to assist with any queries that you have regarding payment for work, eTime claims, and your contract. Resources Team colleagues also provide administrative support to the PG PT Tutor Liaison Committee and administrative support for the allocation of work, and application process for new tutors on an annual basis. Other Administrators Undergraduate Manager (Rosie Filipiak) The Undergraduate Manager line manages all Course Administrators and the School Receptionist, responsible for the oversight of all undergraduate course administration; including the management of course structures, provision of effective feedback, oversight of examination processes and all related policy and regulatory requirements. Curriculum & Quality Assurance Officer (Pim Totterdell) The Curriculum & QA Officer is responsible for course scheduling, curriculum approval and quality assurance processes, across all undergraduate and postgraduate programmes. This post also provides front-line administrative support to the School’s Academic Conduct Officer, Dr Richard Sowerby (Semester 1) and Dr Cordelia Beattie (Semester 2). Dr Zubin Mistry is Deputy Academic Conduct Officer for the current session. Student Experience Officer (Anne Brockington)
35
The Student Experience Officer is responsible for managing academic administration in relation to student support within the School, including overseeing the Student Support Office and team, and for monitoring student attendance and engagement. Student Support Officers (see details in the list of ‘Useful Contacts’) The Student Support Officers can help with any concerns you may have relating to support and pastoral care for students. Other Tutors and Demonstrators Fellow colleagues are an important source of support and information for those who are new to the job. It is likely that at least one other tutor on the same course as you either has experience on that course or teaching experience in general. Try to talk to those who have tutored or demonstrated before to see what their experiences have been and how they have dealt with any difficult situations which arose during their classes. You can discuss teaching techniques with fellow tutors or demonstrators, gaining ideas of how you can vary your own classes. As noted above, talking over marking and assessment with fellow tutors can be beneficial, helping you to build your confidence and develop your skills of assessment. Getting to know your fellow tutors and demonstrators is also helpful in other ways. Should you have to miss one of your tutorials, ask another tutor on the course to substitute for you (letting the course organiser and secretary know). Make sure that this tutor or demonstrator is given all the information needed to take your group, such as any particular themes you would like your students to discuss, or a particular tutorial format to which you would like them to adhere. Also make sure that he/she completes and returns the register of attendance, and makes a note of student participation if required. If a fellow tutor or demonstrator cannot cover your session, your course organiser may be able to help. Should you be afflicted with a long term illness which prevents you from tutoring, let the course organiser know as soon as possible. Facilities
Tutors receive a printing quota each semester which is dependent on how many tutorial groups you are tutor for. For tutorial groups which meet once per week, generally you’d receive £15 of credit (300 prints per semester). This quota should be added to your accounts by the start of semester. Please contact the School IT Team if this doesn’t happen ([email protected]). You can use the credits for printing or copying, on all University cloud printers.
As a tutor and demonstrator you must have a University card, which will give you access to buildings and libraries. If you do not already have a card you will need to apply for a new one. Information on how to do this will be provided with your contract.
Consultation rooms for meeting students to discuss confidential matters can be booked in the William Robertson Wing. You can do this using Web Room Bookings
36
(WRB) via MyEd. You can book the pods which are in the display areas on the first, first-mezzanine, second and second mezzanine floors for office hours and other meetings with students. You can also book equipment such as iPads and laptops. Please use the form: http://www.apps.shca.ed.ac.uk/bookings/
Dignity & Respect The University has a ‘Dignity and Respect’ policy that applies to staff and students, based on the principle that ‘it is the responsibility of all students and staff to ensure that we communicate, interact and conduct ourselves in a way that ensures we treat others fairly and with respect at all times’. If you feel that a tutorial debate, for example, has crossed the line between rigorous debate and disrespect or personal abuse, and that you have been unable to resolve this problem within the tutorial, you should have no hesitation in contacting the course organiser or one of our Dignity and Respect Advisors (http://www.ed.ac.uk/schools-departments/equality-diversity/help-advice/advisors). For more information, and the full ‘Dignity and Respect’ policy, see http://www.ed.ac.uk/schools-departments/equality-diversity/innovation-development/dignity-respect. Equality and Diversity The University has created a range of resources to raise awareness and understanding of equality and diversity issues and to provide online training in this area. See: http://www.ed.ac.uk/equality-diversity/training-resources Professional ethics and the use of social media The University has a social media policy which can be accessed here: http://www.ed.ac.uk/files/atoms/files/social_media_policy-employee-use-of.pdf Further guidance on the use of social media is provided here: http://www.ed.ac.uk/institute-academic-development/about-us/projects/digital-footprint/resources Feedback from Students Written feedback is sought from students for every course, and can often help new and more experienced teaching support staff to assess critically their own teaching techniques. The feedback questionnaires address all aspects of the course. Feedback is analysed by course organisers and the findings discussed at course meetings at the end of the year. Some staff like to have more direct access to feedback and will ask students to discuss with them what they felt worked about the tutorials and what did not. Be aware that some students may feel uncomfortable about discussing the course face to face, and others may feel too comfortable!

37
Staff-Student Liaison committee Meetings are held each semester for some individual courses and subject areas in general, and are another opportunity for students to provide feedback (through tutorial representatives). These are organised by the course organiser and course administrator for the course.
38
Appendix 1: IT
Email Accounts
For Guaranteed Hours staff
All guaranteed hours staff will get a staff account which is automatically generated when your contract is set up. The School IT team should get notification of the generation of the contract and will contact you to collect a staff username/password from us (should you not already have one). Please contact us if you don’t hear from us by the time you’ve signed your contract ([email protected]). Please be aware that this account will only be active during the period you are tutoring and will expire like a normal staff account at the end of your tutoring period. See the University’s account expiry policy for information (http://bit.ly/2vbiW5D)
For Scholarship tutors or demonstrators
You don’t have an automatically generated staff account because you don’t have a contract, but in order to get access to record attendance, you need a staff-like account. The School IT team will generate one for you before you start teaching, but please contact us if you don’t receive one by the start of semester ([email protected]). We will enable email for this staff account so it works identically to the account for GH tutors. Please be aware that this account will only be active during the period you are tutoring and will expire at the end of your tutoring period. See the University’s account expiry policy for information (http://bit.ly/2vbiW5D) – the accounts we set you up with are ‘Visitor’ accounts. For both GH and Scholarship tutors You’ll use your staff or staff-like account for:
Logging into eTime
Recording attendance using EUCLID
Accessing Learn sites for courses (as appropriateThis will include marking and Turnitin
access for courses you tutoring on.
We are trying to keep all ‘staff tasks’ linked to this staff account where possible. The account will also come with an email account/address, which you will need to monitor. We’d suggest that you might want to set up a forward from your staff mail to your student mail so you don’t miss anything. Information on how to do that is available at http://bit.ly/2fm9Z3V Having two accounts can make life quite complicated – sometimes you will think you’ve logged out as a student but the browser will still think you are logged in with that student account (and vice versa). This is very confusing when you are trying to access University systems like EUCLID, Learn and MyEd. We’d recommend using two browsers – if you use one for your student log-in and another for your staff log-in, when you need to use both, this should keep problems to a minimum. Please note: when you are on-campus, using Internet Explorer on a PC will mean you are automatically logged into Office365 as the user you’ve logged into the PC as.
39
Having two accounts can make life quite complicated – sometimes you will think you’ve logged out as a student but the browser will still think you are logged in with that student account (and vice versa). This is very confusing when you are trying to access University systems like EUCLID, Learn and MyEd. We’d recommend using two browsers – if you use one for your student log-in and another for your staff log-in, when you need to use both, this should keep problems to a minimum. Please note: when you are on-campus, using internet explorer on a PC will mean you are automatically logged into Office365 as the user you’ve logged into the PC as.
eMarking
The College has a requirement for all course assessment to be submitted electronically by students and for feedback to be returned to them electronically, where ‘pedagogically appropriate’. The easiest way to deal with the assignments is to mark them electronically. If you foresee any issues with doing this, please speak to the course organiser as soon as you can. You can find guidance on how to do eMarking in pre-honours courses at http://bit.ly/2vEz00u (for where the students are split into tutorial groups). If you are tutoring on a course where you are the sole marker, there are different instructions so please let us know ([email protected]). We’ll be running training for this regularly during both semesters and will advertise via the HCA tutor mailing list. Appendix 2: The First Tutorial The first tutorial with a new group of students can be a daunting experience for both new and experienced tutors, but there are some ways in which you can make the process a little less terrifying. Each tutor has their own way of approaching and dealing with tutorials – the ideas laid out below are just guidelines and you should experiment with what you think will work. Before your first tutorial it is useful to have a look at the course handbook – each course will have one and it holds essential information for the students, including contact details, course requirements and the all-important essay deadlines. All students enrolled on the course will have access to an electronic copy through Learn (but it can be useful to come to the first tutorial with a few spare copies to ensure that everyone has one). Familiarising yourself with these pieces of information will help you field questions in the first few weeks of tutorials. Introductions It is important the students in the tutorial group get to know each other as it can help build confidence and ease discussion. Different tutors have different methods for breaking the ice in the first meeting (some more awkward than others), but often the easiest thing to do is to get the students to introduce themselves to the group, by saying where they are from, what degree they are studying for, what year they are in, why they chose this course, and what
40
they expect from it. (Variations of this theme would be to make them talk to the person to their right and then introduce that person to the rest of the group rather than introducing themselves.) Ensuring that everyone introduces themselves means that everyone has spoken in the tutorial, helping to set a precedent for the rest of the semester – it can also help you to start remembering individual student’s names. Don’t forget to introduce yourself – they will be just as interested to know who you are as they are about each other. If there are any second-year students in the class you could ask them what their experiences of tutorials have been in the past. This can open up discussion of how tutorials work, and help to establish some of the ground rules of student preparation and participation. Administrative Details These are unavoidable in the first meeting and you may find that you have to reiterate them on a number of occasions depending on whether or not new students join later in the semester. Some tutors find it helpful to draw up a list of issues to be covered and procedures to be followed, a few examples of which are as follows:
Inform the group that tutorials are mandatory and that absences should be explained to you and/or the course administrator (or organiser, as applicable). Check with the course administrator for the specific procedures required, but generally more than two unexplained absences in a row should be reported by you to the course organiser and/or the course administrator. Some courses may have stricter rules.
Explain your own availability and provide contact details.
Ensure that the students are aware of Learn and what it contains for that particular course and remind them to keep checking their University e-mail account. Please note for email communications University staff can only use a student’s University email account.
Encourage them to get to grips with the library as soon as possible.
Use this opportunity to reiterate the course requirements which will be set out in the course handbook. You should discuss and explain what you expect from the students in terms of participation and coursework, or whether there are any mandatory presentations to be made.
Draw their attention to the information about academic conduct and plagiarism which can be found in the course handbooks.
Some tutors find it helpful to distribute a hard-copy sheet with their name, contact details and key information. A sample introductory sheet is included at the end of this handbook.
Once everyone has been introduced and administrative matters have been dealt with you could ask them what they think the subject they are studying is. For example, what do they think archaeology is? What do they think is meant by ‘social’ history? What is meant by the term ‘medieval’? Getting them to talk about these general issues can be a good way for you to introduce what the tutorials will be about and how you intend to run them. Emphasise that questions are welcome and that the success of the tutorial depends on the students’ willingness to participate.
41
Appendix 3: Examples of Teaching Methods for Tutorials1 There are many options when it comes to the format of tutorials and ultimately it will depend on the structure of the course and the expectations of the course organiser. Some suggestions for running a tutorial include: Open Debate This is the most common method used in tutorials, as it allows students to express their ideas as they occur to them, leaving the tutor to moderate and lead the discussion when necessary. The tutor can initiate the discussion with the questions which had been given to the class the previous week (see ‘Tutorial Preparation’ above), or can assign a student to think of some questions which have come out of the reading (see below). Open discussion is a fun way to run a tutorial, but care needs to be taken in a number of areas. Make sure that the students do not over-generalise their statements (this is common if insufficient preparation has been done in advance) and make sure that their points, as much as possible, are analytical and critical of the reading and themes which have been set. You should also take care that each student gets a chance to speak and the class is not dominated by a few confident speakers. Organised Debate This is similar to the above, but requires greater coordination by the tutor. The class is divided into as many groups as are required to represent the various views on the topic. Give the groups about 10-15 minutes to prepare their main points and then have each group deliver their findings and deliberations to the rest of the class – with each student presenting a point. The opposing groups will then have the chance to respond to the points raised. If the class is large enough you can assign a group of students to act as the chair to the debate, deciding which group provided the most compelling arguments. This activity has many different variations which you can experiment with. The main advantage of this method is that it helps to give the students a sense of control over the class, and its interactive nature can make for a lively tutorial. Syndicate Groups This can be an effective and rewarding way to manage your tutorial. By dividing the class into groups you can encourage quiet students to participate, as well as stimulate some interesting discussion. Divide the class into groups of 3 or 4 and present them with a topic to discuss. Each group can be given a different sub-topic to talk about, or you can give each group the same theme and see if they come up with different ideas. This is a useful way to break up a complex topic. Once they have discussed between themselves, each group should present back to the class the themes and ideas they have developed. Mini-Presentations
1 See S. Habeshaw, T. Habeshaw and G. Gibbs, 53 Interesting things to do in Your Seminars and Tutorials, (Bristol, 1987) for further ideas.
42
This can be a good way to ensure that each student contributes throughout the semester. Assign a student each week to introduce the reading – it only has to be a couple of minutes and they do not have to have read every single item on the list. Ask them to think of some questions which occurred to them while doing the reading and put these questions to the class. What did they like about a particular reading or topic? Do they agree with the points put across? Getting them to concentrate their thoughts into a couple of minutes can be a useful exercise for the students and can raise some points for further discussion throughout the tutorial. Tutorials based on a Primary Source or Surviving Objects Having a primary textual source or a surviving object to discuss can provide a useful structure to a tutorial. Start with an examination of the source – ask the students what they understand the source or object to mean and what its purpose was/is. If it is a textual source you could get a student to read out an extract and then get the class to discuss it. You should get the students to think about the provenance of the source, what is says, who it was written or created by, and why. Then you can move on to the wider context of the source – what does it say about the period in general and how does it relate to the wider themes of the course? If secondary reading has been suggested along with the primary source it can be helpful to discuss this and see if they can identity any changing interpretations of the source. Appendix 4: Learning to Deal with Problematic Situations in Tutorials2 No matter how much you prepare, issues will always arise which you had either not foreseen or which you are unsure how to deal with. Even if you are teaching a number of tutorials on the same course, it can be surprising how much each group can differ in energy and response from week to week. The following are some of the more common situations which can cause tutors some problems: Students who have not prepared Unfortunately this can be a common situation and it can be the result of any number of reasons. Often a student may not have prepared because of a heavy workload where tutorial preparation takes a low priority. The best way to handle such situations is to pre-empt them as much as possible – in this case by suggesting a couple of questions to bear in mind while carrying out the next week’s reading. You can then use these questions to open the discussion at the beginning of the tutorial and the students will have some knowledge of what to expect. This can be taken a step further by assigning particular readings to students – this not only can create an interesting discussion as different students will have been exposed to different perspectives, but also ensures that each week they are doing the required reading. As always, however, you should remember that you are not there to provide another lecture for the students – if they do not seem to have done the work, do not be tempted to give them a summary of the reading or a solution to the debate.
2 See D. Hounsell and S. Thompson (eds.) Tutoring and Demonstrating: A Handbook, (Edinburgh, 1995),
available on-line at http://www.ed.ac.uk/schools-departments/institute-academic-development/learning-
teaching/tutors-demonstrators/resources/handbook
43
Encouraging quiet students For first-year students in particular, the first few tutorials can be a daunting experience. You might be lucky enough to have a group of students who all participate and contribute throughout the semester. It’s likely, however, that some students will be more reluctant to participate than others, which can become a frustrating situation for the tutor. One of the most effective ways to help students build their confidence in public speaking is to divide the class into smaller groups, giving them a particular topic or problem to discuss. Discussing issues within a smaller group will help build the confidence of those students who do not like speaking in front of large numbers of people. Each group can then summarise their discussion to the rest of the class. If you have a number of students who are not participating, it can help to put these students in the same small group. If there is space and it is possible to do so, move around the room just to see that the discussion is flowing (and relevant!). Students who dominate the discussion In some ways learning to deal with dominating, talkative students is harder than encouraging the quieter students to participate. Students who regularly contribute should not be discouraged as they are important to a successful tutorial. If they talk too much, however, they can intimidate the quieter, less confident students. Once again, dividing the class into small groups can help. As with the quieter students, if you have a number of students who tend to dominate put them in the same sub-group so that other, quieter students have the opportunity to talk. Some tutors adopt the approach of allocating a question-per-student to ensure that each student has a chance to speak – while this can be helpful in ensuring that no one student dominates a tutorial, it can be perceived as ‘being picked on’ by some of the students and can have a debilitating effect if not carried out with sufficient sensitivity (also make sure that you ask open questions which require some thought and analysis, otherwise you will end up with a lot of one word answers!). Handling difficult questions The thought of being faced with a question to which you do not know the answer can be a scary one for both new and old tutors alike. You are not expected to know everything. If you do not know the answer (or if you are not sure) there are a number of ways in which you can handle this. First of all, by admitting you do not know the answer can earn you some respect from the students and it means that you do not try to answer a question without knowing the facts yourself (a slippery slope). You can try opening up the question to the rest of the group – this can be a good way to stimulate debate. If this does not produce an answer either you or the student could find out the solution and bring it up in the following class. Dealing with inaccurate points made by students As with difficult questions, it is inevitable that at some point you will be faced with a student producing an inaccurate statement. It is not always prudent to correct the student – particularly if it is only a slightly inaccurate statement and if the student has been hesitant about participating, correcting them could easily discourage them from speaking up in future. Just as awkward questions can be handled by opening them up to other students, inaccuracies
44
can sometimes be resolved by turning the point into a debate rather than you simply correcting the statement and providing the students with the answer. If a tutor constantly picks up on mistakes and draws attention to them this can create a negative atmosphere and discourage future participation. Like marking and providing feedback on written assignments, dealing with inaccurate statements should be dealt with in a constructive and positive manner. Appendix 5: Tips for Essay Writing As the sub-honours courses attract students from across the University you may find that you have students who are not used to writing a humanities or social science essay. It is useful therefore to set aside some time within the first few weeks of the semester to go over a few essay guidelines with your students. You need to be careful, however, that you do not overload them with advice. Try to stick to basic guidelines: the students should know that they can ask you for help but not that you are going to hand them everything on a plate. You should also refer students to the relevant course handbook for your subject area, available on the School intranet: http://www.shca.ed.ac.uk/student/undergraduate/subjects.htm. Resources are also provided by the IAD on their LearnBetter website: http://www.ed.ac.uk/schools-departments/institute-academic-development/undergraduate/learning-resource. The tips below may not be applicable to all courses, but they should hold at least some relevance: Planning: Encourage them to plan in advance. You will get sick of saying it, but keep reminding them about up and coming deadlines. The sooner they start to plan for it the sooner they can start getting hold of the relevant items of bibliography. Access to bibliography is getting easier with increasing digitisation, but there will still inevitably be some scramble for books and journals as the deadline approaches. Ask them to be considerate of other students and, if they are lucky enough to get hold of a book, not to hold on to it once they have finished with it. Remind the student to read the question and make sure they have understood it properly. This sounds obvious, but it is a necessary piece of advice which can often get overlooked. If the question is based on a primary source, do they understand the primary source? Can they put it into context? Is it a multi-faceted question? And, can they answer it? Once they have understood the question, suggest that they keep it in mind as they are making notes from the reading. Having the question written down in front of them will help focus their minds while they are absorbing the information from their reading. You will inevitably get asked ‘How much should I read for the essay?’ to which there is no right answer; it depends on many variable factors. The best advice you can give is to say that they read a good selection of the sources from the suggested reading list; in some cases some
45
items will really be essential. When they feel that they are picking up on information which they can see as a potential theme or strand of the essay, then they are getting close. Suggest that they write a plan for the essay – this will help them to organise their thoughts and should prevent them from presenting you with an essay that is a stream of consciousness. Writing: Essays for humanities or social science subjects essentially have the basic structure of an introduction, main text, and conclusion. Once they have completed a draft they should read it through to make sure that the conclusion matches the plan set out in the introduction – and making sure that they answer the question. Suggest that they print out drafts of the essay – seeing it on paper rather than on a computer screen can draw their attention to things which they might have missed and will make them more conscious of how the essay reads to another person. Reading it critically on paper can also help the structure and flow of the argument. Correct referencing is essential. Some subject areas and courses have prescribed or preferred methods of referencing to which you can direct students: ask your course organiser. Otherwise, it can sometimes help to produce a quick and easy guide to footnotes and references for the students early in the semester so that they have something to follow. Make sure they include a bibliography – formats differ from subject area to subject area and from course to course, so check with your course organiser if there is a particular method they would prefer. Internet sources such as Wikipedia should not be used – the student cannot know who wrote the entry and what that person’s knowledge or background is. To avoid confusion, as a general rule you could say do not use internet sources apart from those whose authorship is clearly identified and reputable, but you may want to go further than that. Make sure they stick to the word limit: some courses penalize for essays which are significantly over or under the required limit, check with your course organiser if this is the case. Part of the exercise is for students to formulate and support their arguments in a clear and concise manner: they might find the word limits frustrating, but they are important. Appendix 6: Contracts and Payment Full up to date information on contracts and payments is provided on the HCA website: http://www.ed.ac.uk/history-classics-archaeology/about-us/working-with-us/teaching-support. Please consult this website for details. If you have any questions, please contact [email protected] Appendix 7: Useful contacts
46
Please see the useful contacts list on the Teaching Support webpages Appendix 8: Further Information A number of sources have been used to compile this handbook, and if you wish further information or ideas they can be good place to start. A general Code of Practice on Tutoring and Demonstrating is provided by the University, outlining the general responsibilities of both tutors and the University. It can be found at the following link: http://www.docs.sasg.ed.ac.uk/AcademicServices/Codes/CoPTutoringDemonstrating2012.PDF The Institute for Academic Development has a useful website which contains both resources and information about their courses: http://www.ed.ac.uk/schools-departments/institute-academic-development. IAD also provide a handbook: http://www.ed.ac.uk/schools-departments/institute-academic-development/learning-teaching/tutors-demonstrators/resources/handbook Habeshaw, S., Habeshaw, T., and Gibbs, G., 53 Interesting things to do in Your Seminars and Tutorials, (Bristol, 1987) Marton, F., Hounsell, D. and Entwistle, N., (eds.) The Experience of Learning: Implications for teaching and studying in higher education, 3rd (Internet) Edition, Edinburgh: University of Edinburgh, Centre for Teaching, Learning and Assessment. See especially Chapter 12: Enabling and Shaping Understanding through Tutorials. http://www.ed.ac.uk/schools-departments/institute-academic-development/learning-teaching/staff/advice/researching/publications/experience-of-learning Further resources: Higher Education Academy resources page: http://www.heacademy.ac.uk/resources Stanford has a site which has some very useful resources for new tutors: https://teachingcommons.stanford.edu/resources/teaching/teaching-strategies/great-beginnings-things-do-early-your-class University of Edinburgh Equality and Diversity Training: http://www.ed.ac.uk/equality-diversity/training-resources Appendix 9: Sample ‘Introductory Sheet’ for First Tutorial. This is taken from a European
History course but could be amended to suit any tutorial.
47
EUROPEAN HISTORY 1a (1500-1789)
INTRODUCTORY TUTORIAL
Welcome. My name is Dr X. I am a lecturer on the European History 1a course and your tutor for the semester. We meet here at this time every week up until and including Week 11. My email address is: [email protected] Course Handbook (on ‘Learn’): It is important that you download this or refer to it regularly. It contains information on lecture dates and tutorial topics, essay questions and deadlines, referencing guidelines and reading lists. Most of your questions should be answered by the handbook. Essay Deadlines: The first assignment, an essay, is due in Week 5 Monday 13 October. Essays must be submitted … Lectures: These are a way to acquire some of the basic knowledge you will need for tutorial discussion, and to write essays and respond to exam questions. The lecturers set the exam questions so it is worth knowing what they think is important! Hand outs may be provided at these lectures and many power point slides will be shown and made available on course materials in ‘Learn’. Tutorials: These are compulsory. Get in touch via e-mail if you miss a tutorial. If you miss one without letting me know, you will receive an e-mail from the Course Organiser. Your Personal Tutor will be informed if there are continual absences. You will also be assigned a tutorial performance mark at the end of the year based on attendance and contributions in class, and on your online journal. Reading: All books recommended in the handbook are available in the Main University Library, many of them (and all essay and primary source analysis reading) in HUB reserve or online as e-reserve. This means you will be able to access key texts. Presentations: During Weeks 7-10 two-three members of the group will give a short presentation on a selected topic each week. Groups and topics will be agreed in Week 3 and short reading lists provided by me, if necessary. See overleaf for some advice on giving presentations. 10 tips on how to give a 10-minute presentation Giving a good presentation is easy if you follow the simple steps outlined in the video at http://www.youtube.com/watch?v=S5c1susCPAE and note this advice: 1. In order to communicate effectively to your audience do think about who they are and what the limits of their knowledge are likely to be. 2. In preparing you should probably spend about an hour for each 5 minutes of your presentation.
48
3. In 10 minutes you will have to focus on only a few points. 4. Once you have set your objectives you must determine your structure. If you have chosen to answer a single question you must prioritise the main arguments relevant to your answer. A question-orientated presentation may involve a number of questions and brief solutions, although beware of tiring the audience with dry repetition. Ring the changes! 5. Some of you may have chosen to present a theme and this may be communicated best by means of a sequential argument; with a fluid and linked series of arguments building up to a final conclusion. 6. You may have decided to focus on one incident or text or other piece of historical evidence and a pyramid approach may work effectively here: Begin with your focus on the piece of evidence and gradually build up the broader context as a way of demonstrating the wider significance (and relevance to the course theme). 7. A typical structure for your presentation:
a. Introduce topic/problem/question. Why is it important?/puzzling?/interesting? b. Summarise or survey briefly the existing literature on the subject, highlighting major
debates about it. c. Explain how your reading has proceeded – what did you find difficult to grasp, and
how did you overcome these difficulties? What problems remain? Can the audience help you with x, y, and z?
d. Your argument about this topic and outline of future investigations 8. You should only use visual aids (power point slides) if you feel that they are absolutely necessary and that you cannot convey your argument without an image/glossary/bibliography/graph. Try writing and giving the presentation without them first and then choose a limited number (around FIVE) which most effectively support your argument. 9. Your pace of delivery should be steady, not rushed or too slow, and your eyes should be up and turned towards the audience. 10. A little tip: a little repetition can be USEFUL.


![Training Manual March 2015[1] - Algonquin College · tutoring, the Peer Tutoring staff are here to help. Refer to the Reference section for other people and resources you can turn](https://img.pdfslide.us/doc/110x75/5f13951c4208e47c1b57cb95/training-manual-march-20151-algonquin-college-tutoring-the-peer-tutoring-staff.jpg)