Embed Size (px)
Citation preview

8/9/2019 Hand Held Ligthhouse 3016 IAQ
http://slidepdf.com/reader/full/hand-held-ligthhouse-3016-iaq 1/60

8/9/2019 Hand Held Ligthhouse 3016 IAQ
http://slidepdf.com/reader/full/hand-held-ligthhouse-3016-iaq 2/60
00
8/9/2019 Hand Held Ligthhouse 3016 IAQ
http://slidepdf.com/reader/full/hand-held-ligthhouse-3016-iaq 3/60
Lighthouse Worldwide Solutions
LMS XChange
Operating Manual
8/9/2019 Hand Held Ligthhouse 3016 IAQ
http://slidepdf.com/reader/full/hand-held-ligthhouse-3016-iaq 4/60
Copyright © 2003-2008 by Lighthouse Worldwide Solutions. All rights reserved. No part of this
document may be reproduced by any means except as permitted in writing by Lighthouse
Worldwide Solutions.
Any difficulties encountered when running other programs in conjunction with LMS XChange
will not be supported by Lighthouse Worldwide Solutions.
The information contained herein constitutes valuable trade secrets of Lighthouse Worldwide
Solutions. You are not permitted to disclose or allow to be disclosed such information except as
permitted in writing by Lighthouse Worldwide Solutions.
The information contained herein is subject to change without notice. Lighthouse Worldwide
Solutions is not responsible for any damages arising out of your use of the LMS XChange
program.
LMS XChange™ is a trademark of Lighthouse Worldwide Solutions.
Microsoft®, Microsoft Windows™, and Excel™ are trademarks of Microsoft Corporation.
LWS Part Number 248083206-1 Rev 4
8/9/2019 Hand Held Ligthhouse 3016 IAQ
http://slidepdf.com/reader/full/hand-held-ligthhouse-3016-iaq 5/60
00
248083206-1 Rev 4 t-i
Table of Contents
About This Manual
Audience ............................................................................................................................. i
Software License Agreement .............................................................................................. i
Text Conventions .............................................................................................................. iii
Additional Help ................................................................................................................. iii
Chapter 1 Overview
Basic Concepts ............................................................................................................... 1-1
Features .......................................................................................................................... 1-2
Instrument Download ........................................................................................ 1-2
Data Table .......................................................................................................... 1-2
Location Setup ................................................................................................... 1-2
Chapter 2 Getting Started
Installation ..................................................................................................................... 2-1
Startup ............................................................................................................................ 2-1
Shutdown ....................................................................................................................... 2-2
The Main Window ......................................................................................................... 2-2
Basic User Interface ....................................................................................................... 2-3
Menu .................................................................................................................. 2-3
Data Table .......................................................................................................... 2-4
Configuration Bar ............................................................................................ 2-5
Toolbar ............................................................................................................... 2-5
About window .................................................................................................... 2-6
About the Mouse ............................................................................................................ 2-7
About Microsoft Windows™ ........................................................................................ 2-8
Chapter 3 Downloading Data
Downloading Data ......................................................................................................... 3-1
Trouble shooting ............................................................................................................ 3-4
Instrument Not Found ........................................................................................ 3-4
No Data to Download ........................................................................................ 3-5
Connection Lost ................................................................................................. 3-6
8/9/2019 Hand Held Ligthhouse 3016 IAQ
http://slidepdf.com/reader/full/hand-held-ligthhouse-3016-iaq 6/60
Lighthouse LMS XChange Operating Manual
t-ii 248083206-1 Rev 4
Chapter 4 Data Display
Data Table ...................................................................................................................... 4-1
Scrolling ............................................................................................................. 4-2
Statistics ............................................................................................................. 4-2
Configuration Bar .............................................................................................. 4-3
Instrument .............................................................................................. 4-3
Show Instrument Info ................................................................ 4-3
Download Data .......................................................................... 4-4
Location ................................................................................................. 4-4
Show Location Numbers ........................................................... 4-4
Show Location Names ............................................................... 4-5
Import Location Names ......................................................................... 4-7
Save Location Names ............................................................................ 4-7
Upload Location Names ........................................................................ 4-9
Particle ................................................................................................. 4-13
Differential/Cumulative ........................................................... 4-13
Show Raw Counts .................................................................... 4-14
Show Normalized Counts ........................................................ 4-15
Show Sample Time .................................................................. 4-15
Show Sample Volume ............................................................. 4-15
Norm. Counts (Units of measure) ............................................ 4-16
Sample Time (units of measure) .............................................. 4-16
Sample Volume (units of measure) ......................................... 4-16
IAQ Instrument Data ........................................................................... 4-17
Show Mass Concentrations ...................................................... 4-17
Show PM and TPM Values ..................................................... 4-18
Environmental ...................................................................................... 4-18
Show Environmentals .............................................................. 4-18
Temperature (units of measure) ............................................... 4-19
Air Velocity (units of measure) ............................................... 4-19
Diff. Pressure (units of measure) ............................................. 4-19
Data Status ....................................................................................................... 4-19
Printing ......................................................................................................................... 4-21
Saving Data .................................................................................................................. 4-21
Chapter 5 IAQ Instrument Setup
Overview ........................................................................................................................ 5-1
Procedure ...................................................................................................................... 5-1
Index
8/9/2019 Hand Held Ligthhouse 3016 IAQ
http://slidepdf.com/reader/full/hand-held-ligthhouse-3016-iaq 7/60
00
248083206-1 Rev 4 i
About This Manual
This manual describes the LMS XChange application, a program
designed to download and analyze data from a Lighthouse SOLAIR,
HANDHELD or REMOTE ’P’ Particle Counter.
Audience The LMS XChange Manual is written for the user who wants to view
data from Lighthouse SOLAIR, HANDHELD or REMOTE ’P’ particlecounters.
If you need expanded monitoring capabilities, please contact your
Lighthouse Worldwide Solutions Sales Representative for information
on the advanced program, LMS Express or the full scale Lighthouse
Monitoring System.
SoftwareLicense
Agreement
SOFTWARE PROGRAM: LMS XChange.
IMPORTANT - THIS IS A LEGAL AGREEMENT BETWEEN YOU (EITHER AN INDIVIDUAL OR
AN ENTITY) AND LIGHTHOUSE WORLDWIDE SOLUTIONS. BY INSTALLING AND/OR USING
THE SOFTWARE, YOU ACKNOWLEDGE THAT YOU HAVE READ THIS LICENSE AGREEMENT,
UNDERSTAND IT, AND AGREE TO BE BOUND BY ITS TERMS. YOU FURTHER AGREE THATIT IS THE FULL AND COMPLETE AGREEMENT BETWEEN US, SUPERSEDING ALL PRIOR
WRITTEN OR VERBAL AGREEMENTS OF ANY KIND. IF YOU DO NOT UNDERSTAND OR DO
NOT AGREE TO THE TERMS OF THIS AGREEMENT, YOU MUST CEASE USING THIS
PRODUCT IMMEDIATELY AND PROMPTLY RETURN ALL MATERIALS (INCLUDING DISK(S)
AND WRITTEN MATERIALS) TO LIGHTHOUSE WORLDWIDE SOLUTIONS.
1. GRANT OF LICENSE. This License Agreement permits you to use one copy of the above mentioned
Lighthouse Worldwide Solutions software program (the "SOFTWARE") on a single computer. The
SOFTWARE is in "use" on a computer when it is loaded into temporary memory (i.e. RAM) or installed
into permanent memory (e.g. hard disk, CD-ROM, or other storage device) of that computer. However,
installation on a network server for the sole purpose of internal distribution shall not constitute "use" for
which a separate license is required, provided you have a separate license for each computer to which the
SOFTWARE is distributed.
2. COPYRIGHT. The SOFTWARE is owned by Lighthouse Worldwide Solutions or its suppliers and is
protected by United States copyright laws and international treaty provisions. Therefore, you must treat the
SOFTWARE like any other copyrighted material (e.g. a book or musical recording) except that you may
either (a) make one copy of the SOFTWARE solely for backup or archival purposes, or (b) transfer the
SOFTWARE to a single hard disk provided you keep the original solely for backup or archival purposes.
You may not copy the written materials accompanying the SOFTWARE.
3. OTHER RESTRICTIONS. You may not rent or lease the SOFTWARE, but you may transfer the
SOFTWARE and accompanying written materials on a permanent basis provided you retain no copies and
the recipient agrees to the terms of this Agreement. You may not reverse engineer, decompile, or
disassemble the SOFTWARE. If the Software is an update or has been updated, any transfer must include
the most recent update and all prior versions.
LIMITED WARRANTY
LIMITED WARRANTY. This program is provided "as is" without any warranty of any kind, either
8/9/2019 Hand Held Ligthhouse 3016 IAQ
http://slidepdf.com/reader/full/hand-held-ligthhouse-3016-iaq 8/60
Lighthouse LMS XChange Operating Manual
ii 248083206-1 Rev 4
expressed or implied, including, but not limited to, the implied warranties of merchantability and fitness for
a particular purpose. The entire risk as to the quality and performance of the SOFTWARE is with you, the
licensee. Should the SOFTWARE prove defective, you assume the risk and liability for the entire cost of
all necessary repair, service, or correction. Some states/jurisdictions do not allow the exclusion of implied
warranties, so the above exclusion may not apply to you. This warranty gives you specific legal rights, andyou may have other rights which vary from state/jurisdiction to state/jurisdiction. Lighthouse Worldwide
Solutions does not warrant the functions contained in the SOFTWARE will meet your requirements, or that
the operation of the SOFTWARE will be error-free or uninterrupted. Lighthouse Worldwide Solutions
does warrant that the disk(s) on which the program is furnished shall be free from defects in materials and
workmanship for a period of ninety (90) days from the date of purchase, so long as proof of purchase is
provided.
CUSTOMER REMEDIES. Lighthouse Worldwide Solutions' and its suppliers' entire liability and your
exclusive remedy shall be, at Lighthouse Worldwide Solutions' option, either (a) return of the price paid, or
(b) repair or replacement of the SOFTWARE that does not meet Lighthouse Worldwide Solutions' Limited
Warranty and which is returned to Lighthouse Worldwide Solutions with proof of purchase. This Limited
Warranty is void if failure of the SOFTWARE has resulted from accident, abuse, or misapplication. Any
replacement SOFTWARE will be warranted for the remainder of the original warranty period or thirty (30)
days, whichever is longer. Neither these remedies nor any product support services are available outside
the United States without proof of purchase from an authorized non-U.S. source.
NO OTHER WARRANTIES. To the maximum extent permitted by applicable law, Lighthouse Worldwide
Solutions and its suppliers disclaim all other warranties, either express or implied, including, but not
limited to, implied warranties of merchantability and fitness for a particular purpose, with regard to the
SOFTWARE, the accompanying written materials, and any accompanying hardware. This limited
warranty gives you specific legal rights. You may have others which vary from state/jurisdiction to state/
jurisdiction.
NO LIABILITY FOR CONSEQUENTIAL DAMAGES. To the maximum extent permitted by applicable
law, in no event shall Lighthouse Worldwide Solutions or its suppliers be liable for any damages
whatsoever (including, without limitation, damages for loss of business profits, business interruption, loss
of business information, or any other pecuniary loss) arising out of the use or inability to use this
Lighthouse Worldwide Solutions product, even if Lighthouse Worldwide Solutions has been advised of the
possibility of such damages or for any claim by any other party. Because some states/jurisdictions do not
allow the exclusion or limitation of liability for consequential or incidental damages, the above limitation
may not apply to you.
U.S. GOVERNMENT RESTRICTED RIGHTS. The SOFTWARE and documentation are subject to
export controls under the United States Export Administration Act, as amended, which prohibits exports of
certain commodities and technical data, including software, to specified countries. You hereby certify that
neither the SOFTWARE nor the documentation will be transmitted or forwarded outside of your country.
If you acquired this product in the United States, this Agreement is governed by the laws of the State of
California. Should you have any questions concerning this Agreement, or if you desire to contact
Lighthouse Worldwide Solutions for any reason, you may visit our website, www.golighthouse.com. You
will find there our currebnt address and telephone numbers, as well as additional contact information.
This product includes software developed by vbAccelerator (<http://vbaccelerator.com/>).
vbAccelerator Version 1.0 Software License
Copyright (c) 2002 vbAccelerator.com
THIS SOFTWARE IS PROVIDED "AS IS" AND ANY EXPRESSED OR IMPLIED WARRANTIES,
INCLUDING, BUT NOT LIMITED TO, THE IMPLIED WARRANTIES OF MERCHANTABILITY ND
FITNESS FOR A PARTICULAR PURPOSE ARE DISCLAIMED. IN NO EVENT SHALL VBACCEL-
ERATOR OR ITS CONTRIBUTORS BE LIABLE FOR ANY DIRECT, INDIRECT, INCIDENTAL, SPE-
CIAL, EXEMPLARY, OR CONSEQUENTIAL DAMAGES (INCLUDING, BUT NOT LIMITED TO,
PROCUREMENT OF SUBSTITUTE GOODS OR SERVICES; LOSS OF USE, DATA, OR PROFITS;
OR BUSINESS INTERRUPTION) HOWEVER CAUSED AND ON ANY THEORY OF LIABILITY,
WHETHER IN CONTRACT, STRICT LIABILITY, OR TORT (INCLUDING NEGLIGENCE OR OTH-
ERWISE) ARISING IN ANY WAY OUT OF THE USE OF THIS SOFTWARE, EVEN IF ADVISED OF
THE POSSIBILITY OF SUCH DAMAGE.
8/9/2019 Hand Held Ligthhouse 3016 IAQ
http://slidepdf.com/reader/full/hand-held-ligthhouse-3016-iaq 9/60
About This Manual
248083206-1 Rev 4 iii
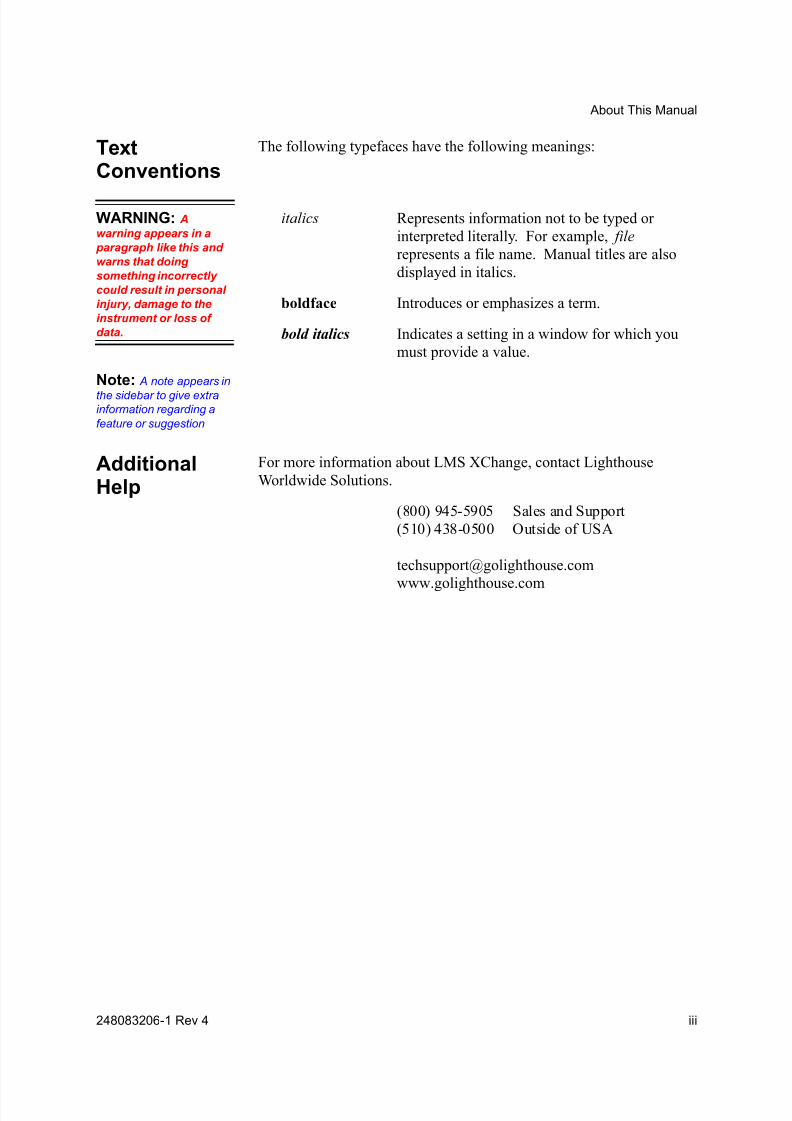
TextConventions
The following typefaces have the following meanings:
WARNING: A
warning appears in a
paragraph like this and
warns that doing
something incorrectly
could result in personal
injury, damage to the
instrument or loss of
data.
italics Represents information not to be typed or
interpreted literally. For example, file
represents a file name. Manual titles are also
displayed in italics.
boldface Introduces or emphasizes a term.
bold italics Indicates a setting in a window for which you
must provide a value.
Note: A note appears in
the sidebar to give extrainformation regarding a
feature or suggestion
AdditionalHelp
For more information about LMS XChange, contact Lighthouse
Worldwide Solutions.
(800) 945-5905 Sales and Support
(510) 438-0500 Outside of USA
www.golighthouse.com

8/9/2019 Hand Held Ligthhouse 3016 IAQ
http://slidepdf.com/reader/full/hand-held-ligthhouse-3016-iaq 10/60
Lighthouse LMS XChange Operating Manual
iv 248083206-1 Rev 4
8/9/2019 Hand Held Ligthhouse 3016 IAQ
http://slidepdf.com/reader/full/hand-held-ligthhouse-3016-iaq 11/60
00
248083206-1 Rev 4 1-1
1 Overview
The LMS XChange program is designed to be used with Lighthouse’s
SOLAIR and HANDHELD Particle Counters. LMS XChange
downloads the data collected on these instruments and displays the data
in a table that the user can view and/or save to an Excel or HTML file.
LMS XChange has the following features:
• Easy installation
• Auto-detects Lighthouse particle counters on a COM port; no
special port or driver configuration required
• Manual data download from Lighthouse particle counters
• Displays data in a table
• Allows the user to print the data table
• Allows the user to save the data to an Excel or HTML file
• Allows users to configure alphanumeric location names. Users can
also upload these names to Lighthouse instruments that support
alphanumeric location names.
Note: Time is always
displayed in 24 hour
format.
• Uses Window’s regional settings for displaying dates and decimal
numbers
BasicConcepts
Terms and concepts important to LMS XChange are explained below.
Downloaded Data The set of data downloaded from an instrument.
Includes location and channel information.
Instrument A Lighthouse particle counter, either from the SOLAIR
family of counters or the HANDHELD family of counters. The particle
counter is identified by the model of the counter.
Location Alphanumeric names assigned by the instrument to
represent different areas where samples were taken. In LMS XChange,
alphanumeric location names can be downloaded from and uploaded to
8/9/2019 Hand Held Ligthhouse 3016 IAQ
http://slidepdf.com/reader/full/hand-held-ligthhouse-3016-iaq 12/60
Lighthouse LMS XChange Operating Manual
1-2 248083206-1 Rev 4
an instrument that supports them. Instruments that do not support
alphanumeric locations names will have default location names
assigned to their locations following the format "LOCXXX" where
XXX is the location number from the instrument. In all cases Locationscan also be assigned a descriptive longer name in LMS XChange.
Data Type Describes the kind of data collected. For particle counters,
this is the micron size of the particle; for environmental sensors, this is
the kind of analog sensor (i.e. air velocity, temperature, etc.) used.
Features Instrument Download
LMS XChange will auto-detect Lighthouse instruments via a COM
port RS-232 connection.
When a download is complete, the serial number and model of the
instrument, as well as the date the data was downloaded, the range of
the data and whether the particle data is differential or cumulative will
be displayed.
Data Table
Data is displayed in a table format. Summary statistics will be
calculated per channel and displayed at the bottom of the table under
the following headings: Standard Deviation, Average, Maximum data point and Minimum data point. The Data Table can be printed or
exported to Microsoft ExcelTM *.xls, Comma Separated Value (*.csv),
or HTML (*.html, *.htm) files.
Location Setup
When the data is downloaded to LMS XChange, the location(s)
associated with the data are recorded using an alphanumeric Location
ID. By default, the "name" of the location is "LOCXXX" where
"XXX" is its numeric ID. If alphanumeric location names are set up on
the instrument, then the alphanumeric location names will bedownloaded with the data. You can update or change the location name
and a description for it. If the instrument supports alphanumeric
location names, you can upload your changed location names to the
instrument.
8/9/2019 Hand Held Ligthhouse 3016 IAQ
http://slidepdf.com/reader/full/hand-held-ligthhouse-3016-iaq 13/60
00
248083206-1 Rev 4 2-1
2 Getting Started
This chapter describes the LMS XChange environment including the
toolbar and menu commands, explains how to use the mouse and
details the operating system requirements necessary to run LMS
XChange.
Installation When installing LMS XChange, it is recommended to also install
Adobe’s free Acrobat Reader in order to be able to view this LMS
XChange manual on-line. Acrobat Reader is provided on the same CD
as LMS XChange.
Install LMS XChange by inserting the INSTALL CD into the CD drive.
The installation program should start automatically. If it does not, run
the setup.exe located in the LMS XChange CD’s root directory.
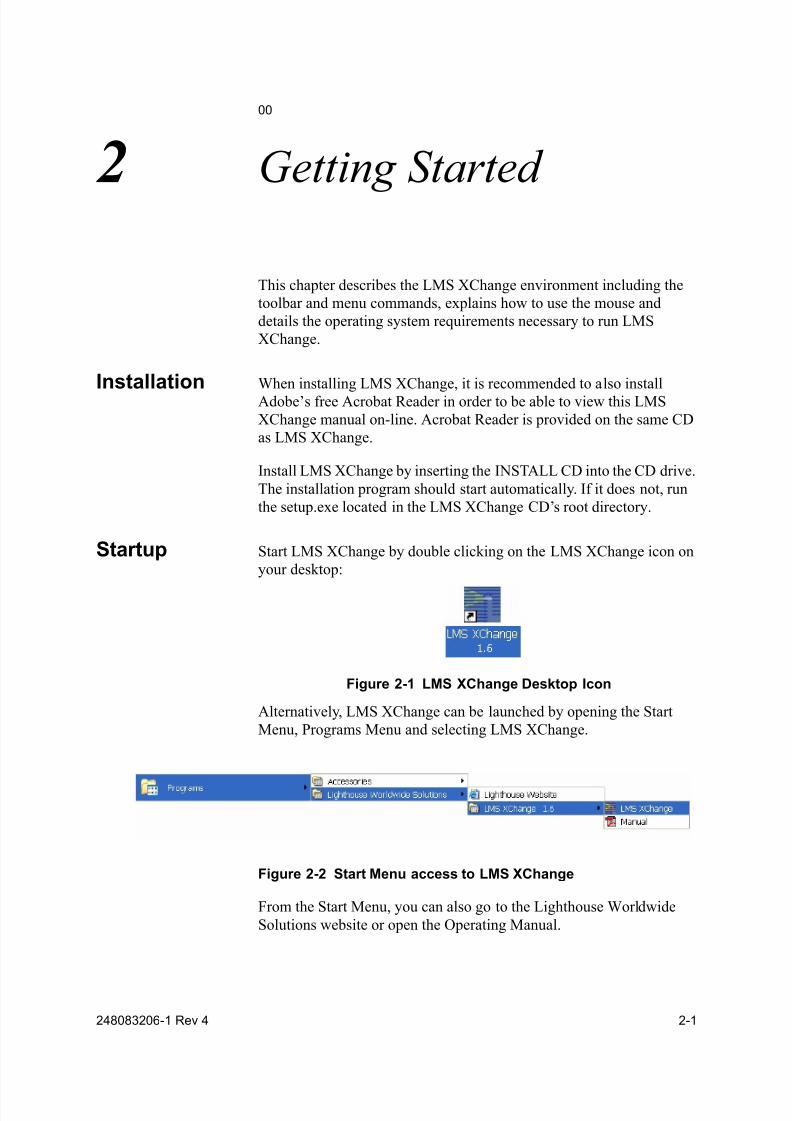
Startup Start LMS XChange by double clicking on the LMS XChange icon on
your desktop:
Figure 2-1 LMS XChange Desktop Icon
Alternatively, LMS XChange can be launched by opening the Start
Menu, Programs Menu and selecting LMS XChange.
Figure 2-2 Start Menu access to LMS XChange
From the Start Menu, you can also go to the Lighthouse Worldwide
Solutions website or open the Operating Manual.
8/9/2019 Hand Held Ligthhouse 3016 IAQ
http://slidepdf.com/reader/full/hand-held-ligthhouse-3016-iaq 14/60
Lighthouse LMS XChange Operating Manual
2-2 248083206-1 Rev 4
Shutdown To shut down LMS XChange, press Alt+F4, click on the "x" in the
upper right corner or click on the system menu (the LMS XChange
icon in upper left corner) and select “Close”.
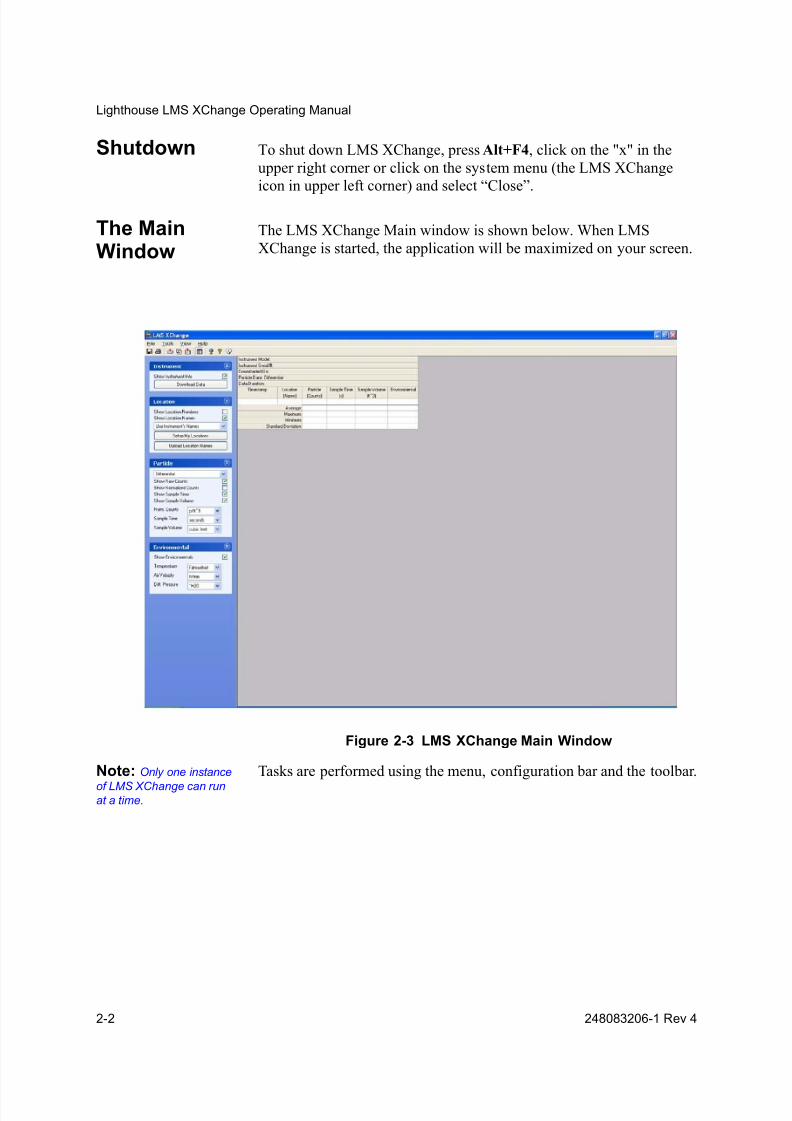
The MainWindow
The LMS XChange Main window is shown below. When LMS
XChange is started, the application will be maximized on your screen.
Figure 2-3 LMS XChange Main Window
Note: Only one instance
of LMS XChange can runat a time.
Tasks are performed using the menu, configuration bar and the toolbar.
8/9/2019 Hand Held Ligthhouse 3016 IAQ
http://slidepdf.com/reader/full/hand-held-ligthhouse-3016-iaq 15/60
Getting Started
248083206-1 Rev 4 2-3
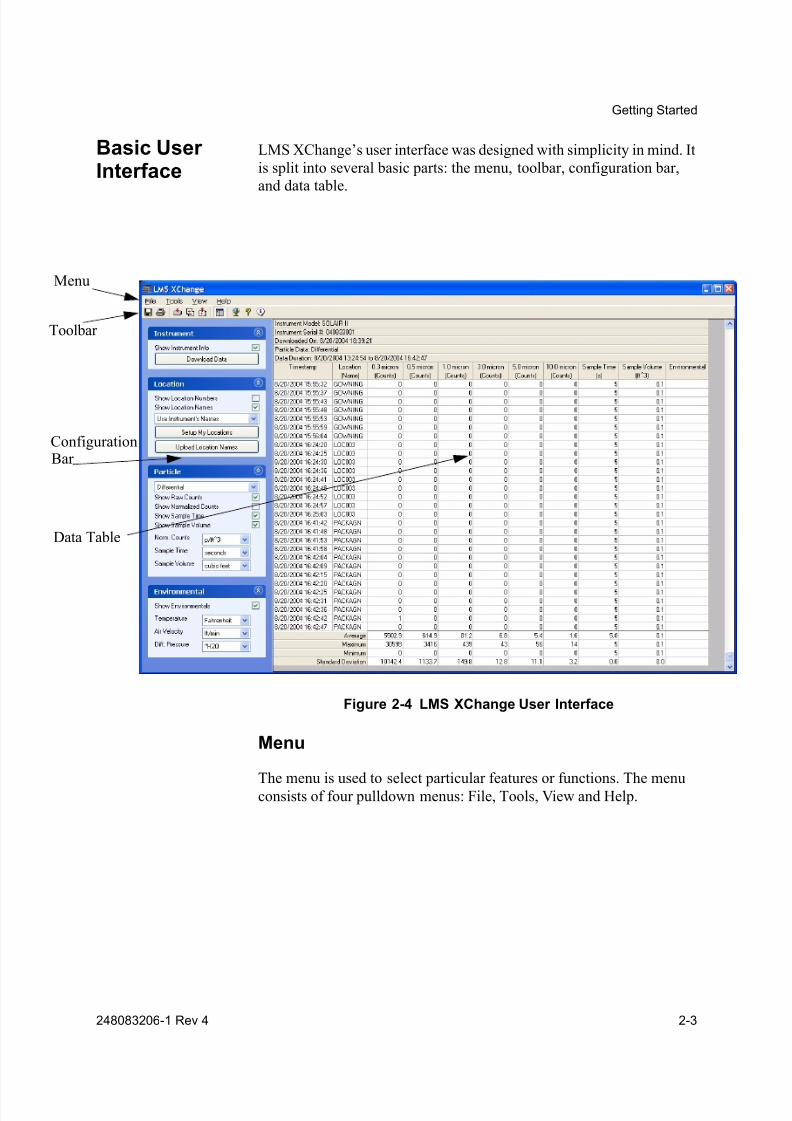
Basic UserInterface
LMS XChange’s user interface was designed with simplicity in mind. It
is split into several basic parts: the menu, toolbar, configuration bar,
and data table.
Figure 2-4 LMS XChange User Interface
Menu
The menu is used to select particular features or functions. The menuconsists of four pulldown menus: File, Tools, View and Help.
Toolbar
ConfigurationBar
Data Table
Menu

8/9/2019 Hand Held Ligthhouse 3016 IAQ
http://slidepdf.com/reader/full/hand-held-ligthhouse-3016-iaq 16/60
Lighthouse LMS XChange Operating Manual
2-4 248083206-1 Rev 4
Figure 2-5 LMS XChange Pulldown Menus
Data Table
After data is downloaded, it will be displayed on the main window’s
Data Table.
Figure 2-6 LMS XChange Data Table area
Data Table
8/9/2019 Hand Held Ligthhouse 3016 IAQ
http://slidepdf.com/reader/full/hand-held-ligthhouse-3016-iaq 17/60
Getting Started
248083206-1 Rev 4 2-5
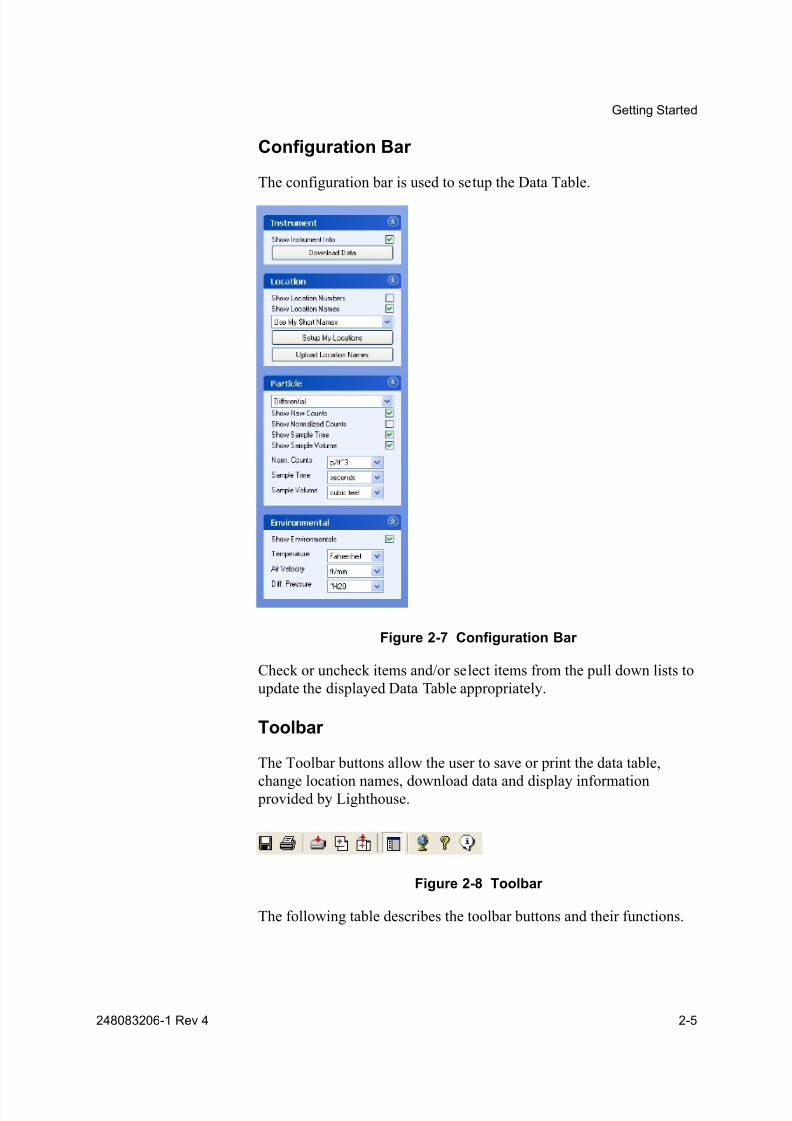
Configuration Bar
The configuration bar is used to setup the Data Table.
Figure 2-7 Configuration Bar
Check or uncheck items and/or select items from the pull down lists to
update the displayed Data Table appropriately.
Toolbar
The Toolbar buttons allow the user to save or print the data table,
change location names, download data and display information provided by Lighthouse.
Figure 2-8 Toolbar
The following table describes the toolbar buttons and their functions.
8/9/2019 Hand Held Ligthhouse 3016 IAQ
http://slidepdf.com/reader/full/hand-held-ligthhouse-3016-iaq 18/60
Lighthouse LMS XChange Operating Manual
2-6 248083206-1 Rev 4
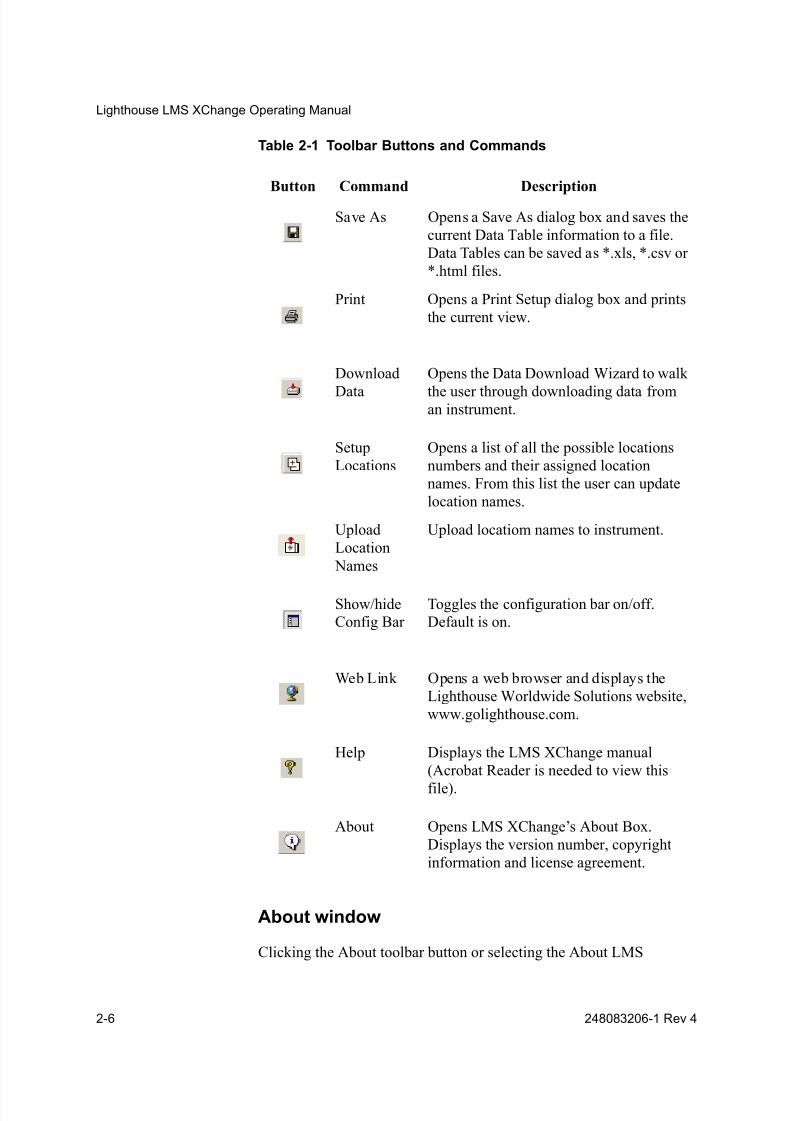
Table 2-1 Toolbar Buttons and Commands
About window
Clicking the About toolbar button or selecting the About LMS
Button Command Description
Save As Opens a Save As dialog box and saves the
current Data Table information to a file.
Data Tables can be saved as *.xls, *.csv or
*.html files.
Print Opens a Print Setup dialog box and prints
the current view.
Download
Data
Opens the Data Download Wizard to walk
the user through downloading data froman instrument.
Setup
Locations
Opens a list of all the possible locations
numbers and their assigned location
names. From this list the user can update
location names.
Upload
Location
Names
Upload locatiom names to instrument.
Show/hide
Config Bar
Toggles the configuration bar on/off.
Default is on.
Web Link Opens a web browser and displays the
Lighthouse Worldwide Solutions website,
www.golighthouse.com.
Help Displays the LMS XChange manual
(Acrobat Reader is needed to view this
file).
About Opens LMS XChange’s About Box.
Displays the version number, copyright
information and license agreement.

8/9/2019 Hand Held Ligthhouse 3016 IAQ
http://slidepdf.com/reader/full/hand-held-ligthhouse-3016-iaq 19/60
Getting Started
248083206-1 Rev 4 2-7
XChange option from the Help menu, displays the following About
window.
Figure 2-9 About Box
Select the OK button or click on the “x” in the upper right corner to
remove this window from the screen.
About theMouse
A mouse is recommended to use LMS XChange.
You can perform all LMS XChange actions with the mouse. The
exception is entering text information, which is done with the
keyboard. Use the mouse to select commands, select views and select
options in windows. Here is a list of mouse terms and their meanings:
Term Meaning
Mouse Cursor The small arrow or other symbol that
moves when you slide the mouse across
the pad.
Mouse Button A button on the mouse that you press. A
mouse usually has two or three buttons.
Click Move the mouse cursor over the
command or other object, then press and
release the left mouse button.
8/9/2019 Hand Held Ligthhouse 3016 IAQ
http://slidepdf.com/reader/full/hand-held-ligthhouse-3016-iaq 20/60
Lighthouse LMS XChange Operating Manual
2-8 248083206-1 Rev 4
Drag Move the mouse cursor over the
command or other object, then press and
hold down the mouse button while
moving the mouse.
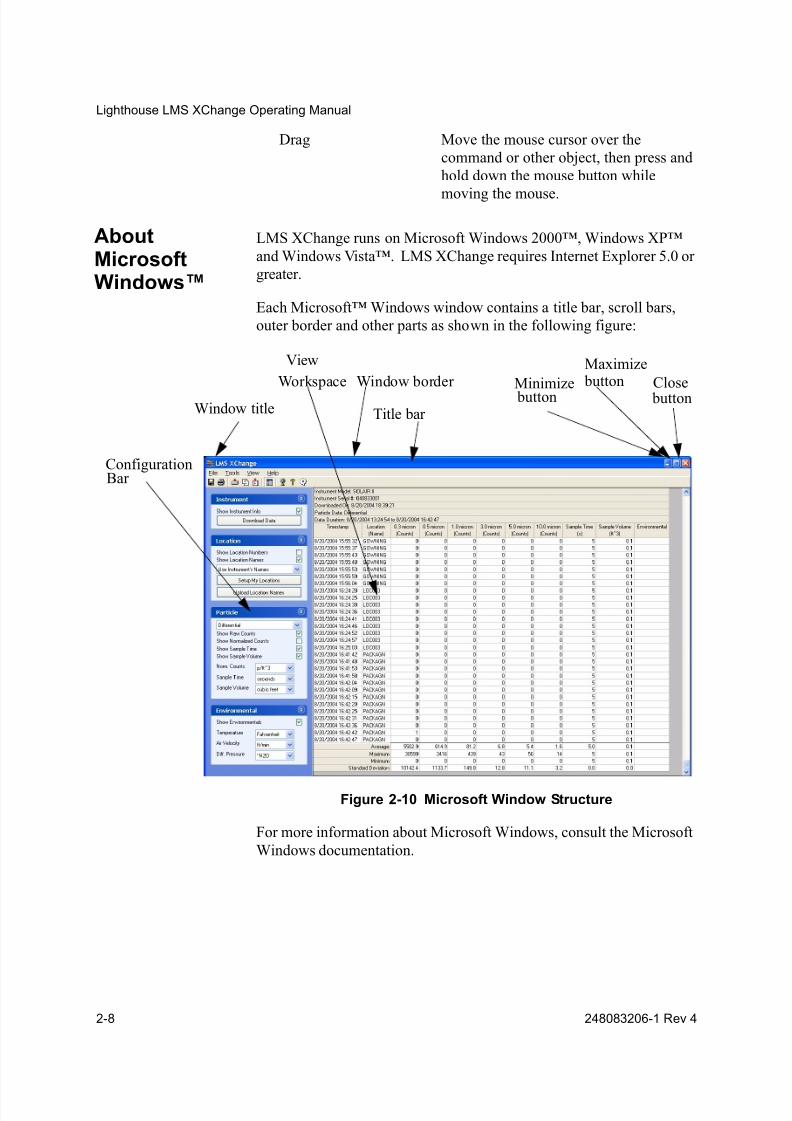
AboutMicrosoftWindows™
LMS XChange runs on Microsoft Windows 2000™, Windows XP™
and Windows Vista™. LMS XChange requires Internet Explorer 5.0 or
greater.
Each Microsoft™ Windows window contains a title bar, scroll bars,
outer border and other parts as shown in the following figure:
Figure 2-10 Microsoft Window Structure
For more information about Microsoft Windows, consult the Microsoft
Windows documentation.
Configuration
Title bar Window title
Workspace Window border Minimize button
Maximize button Close
button
View
Bar
8/9/2019 Hand Held Ligthhouse 3016 IAQ
http://slidepdf.com/reader/full/hand-held-ligthhouse-3016-iaq 21/60
00
248083206-1 Rev 4 3-1
3 Downloading Data
This chapter describes how to download data from a Lighthouse
Worldwide Solutions particle counter to LMS XChange.
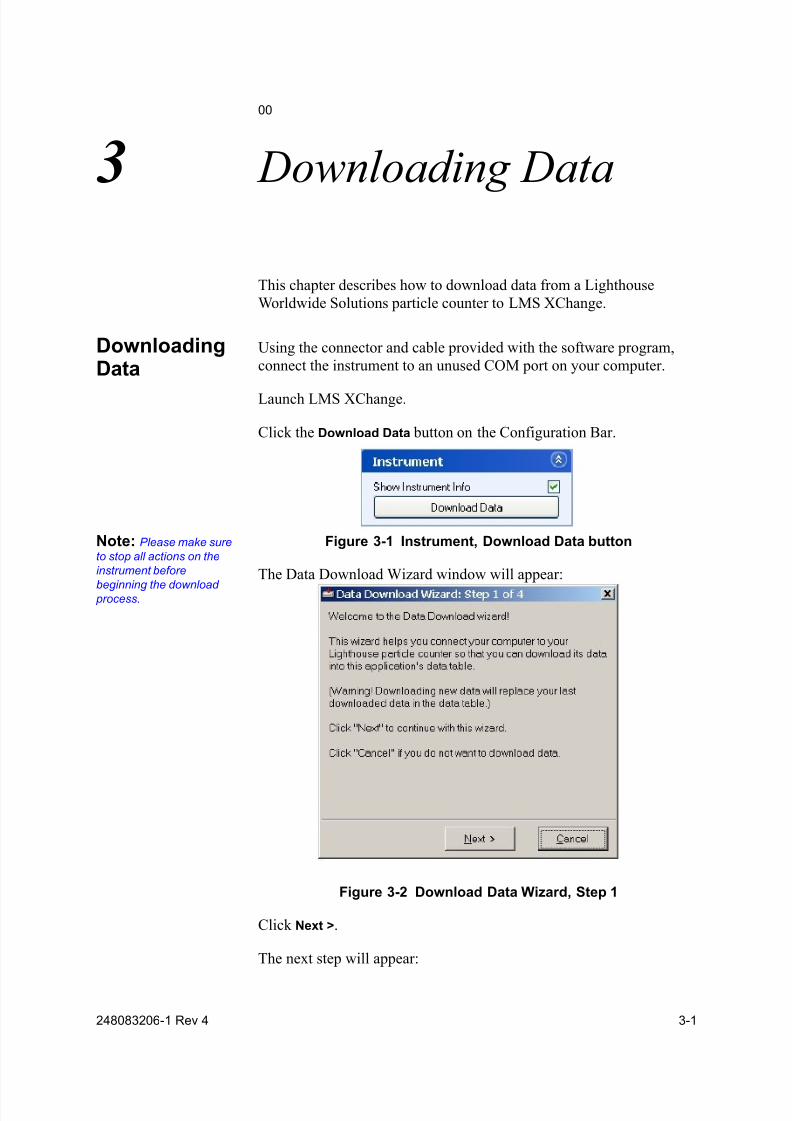
DownloadingData
Using the connector and cable provided with the software program,
connect the instrument to an unused COM port on your computer.
Launch LMS XChange.
Click the Download Data button on the Configuration Bar.
Note: Please make sure
to stop all actions on the
instrument before
beginning the download process.
Figure 3-1 Instrument, Download Data button
The Data Download Wizard window will appear:
Figure 3-2 Download Data Wizard, Step 1
Click Next >.
The next step will appear:
8/9/2019 Hand Held Ligthhouse 3016 IAQ
http://slidepdf.com/reader/full/hand-held-ligthhouse-3016-iaq 22/60
Lighthouse LMS XChange Operating Manual
3-2 248083206-1 Rev 4
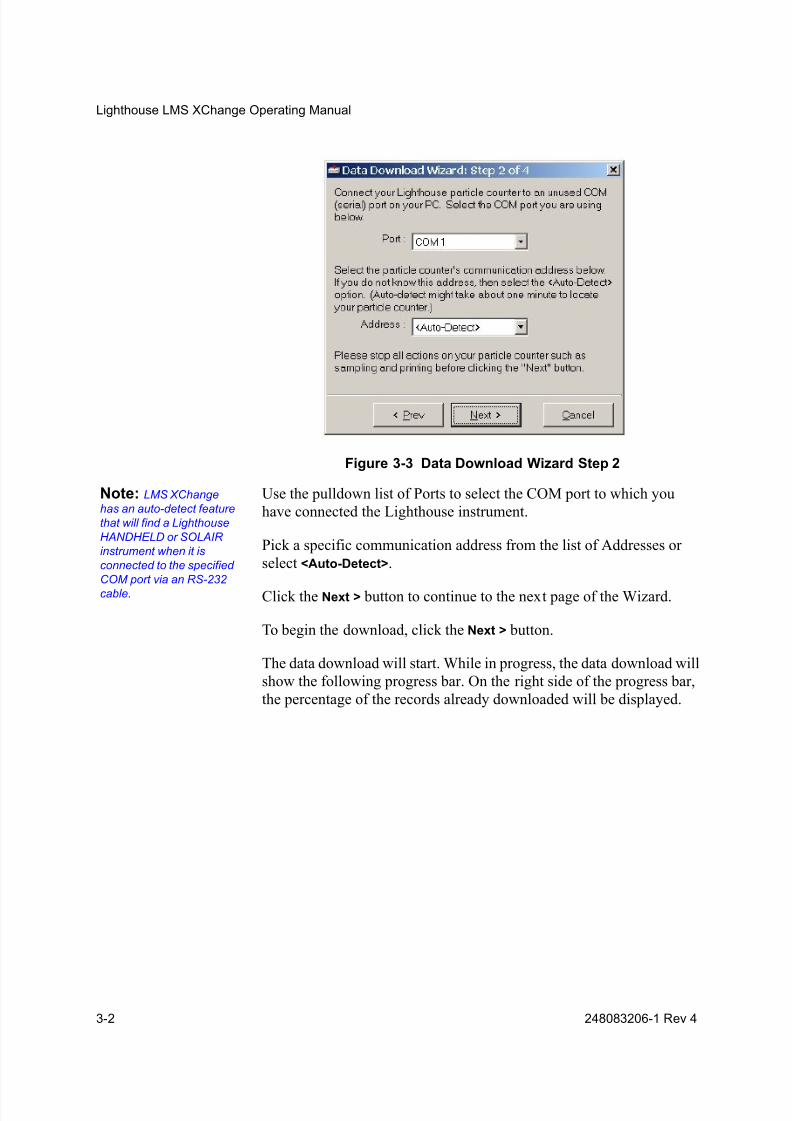
Figure 3-3 Data Download Wizard Step 2
Note: LMS XChange
has an auto-detect feature
that will find a Lighthouse
HANDHELD or SOLAIR
instrument when it is
connected to the specified
COM port via an RS-232
cable.
Use the pulldown list of Ports to select the COM port to which you
have connected the Lighthouse instrument.
Pick a specific communication address from the list of Addresses or
select <Auto-Detect>.
Click the Next > button to continue to the next page of the Wizard.
To begin the download, click the Next > button.
The data download will start. While in progress, the data download will
show the following progress bar. On the right side of the progress bar,
the percentage of the records already downloaded will be displayed.
8/9/2019 Hand Held Ligthhouse 3016 IAQ
http://slidepdf.com/reader/full/hand-held-ligthhouse-3016-iaq 23/60
Downloading Data
248083206-1 Rev 4 3-3
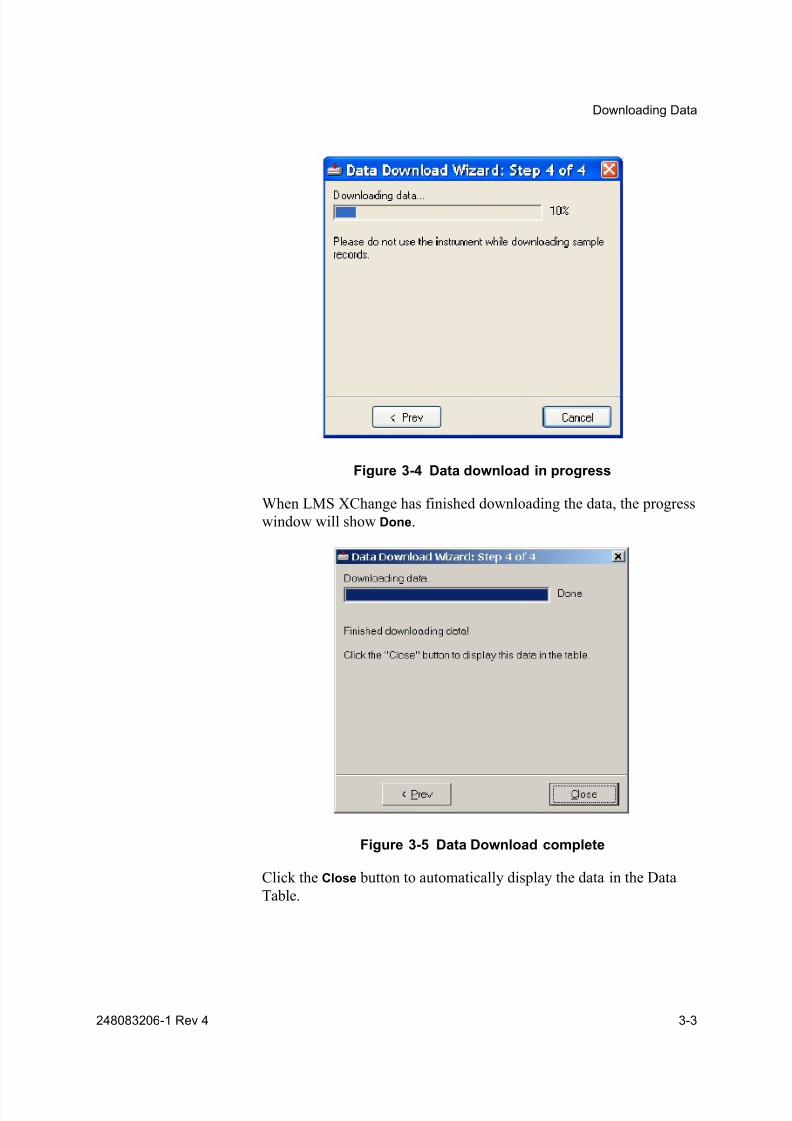
Figure 3-4 Data download in progress
When LMS XChange has finished downloading the data, the progress
window will show Done.
Figure 3-5 Data Download complete
Click the Close button to automatically display the data in the Data
Table.
8/9/2019 Hand Held Ligthhouse 3016 IAQ
http://slidepdf.com/reader/full/hand-held-ligthhouse-3016-iaq 24/60
Lighthouse LMS XChange Operating Manual
3-4 248083206-1 Rev 4
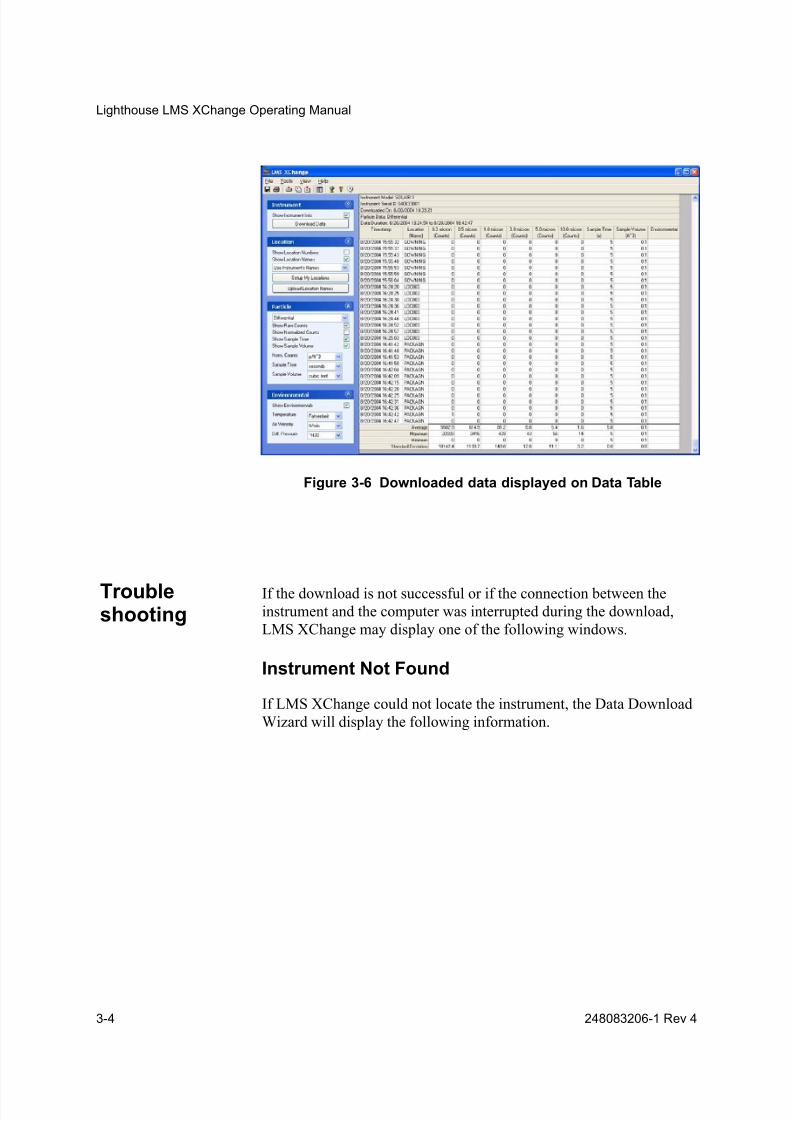
Figure 3-6 Downloaded data displayed on Data Table
Troubleshooting
If the download is not successful or if the connection between theinstrument and the computer was interrupted during the download,
LMS XChange may display one of the following windows.
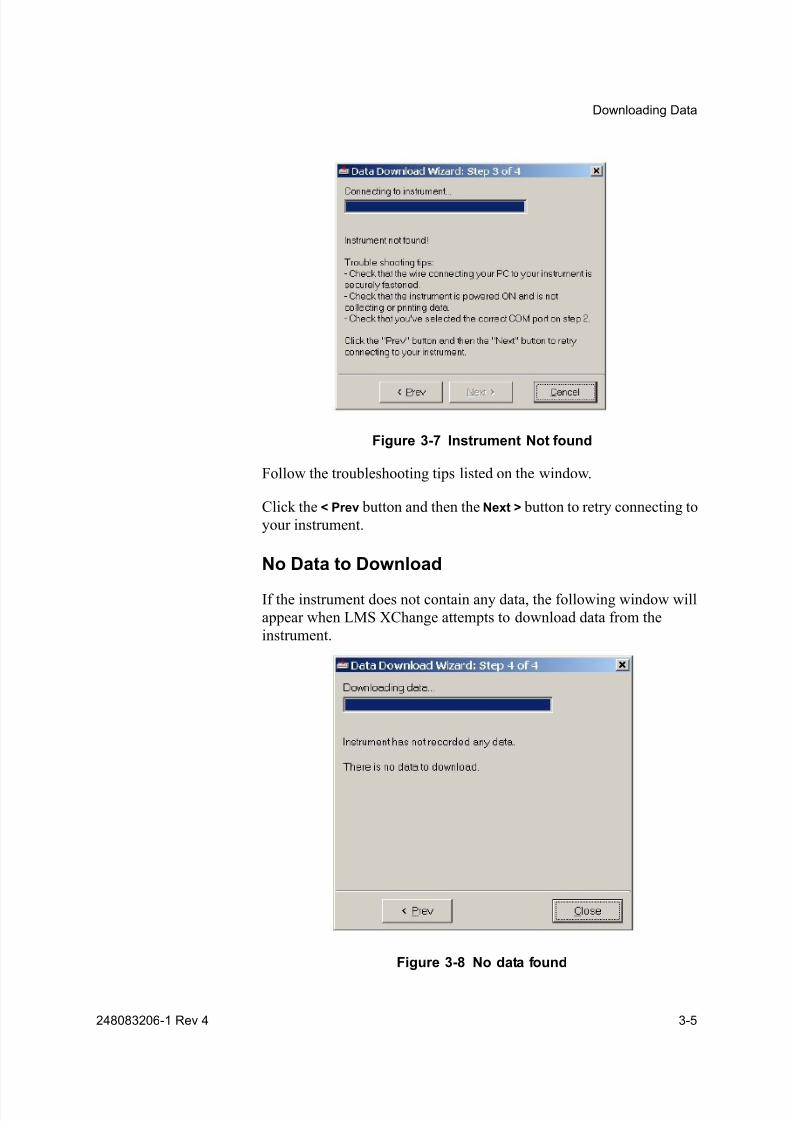
Instrument Not Found
If LMS XChange could not locate the instrument, the Data Download
Wizard will display the following information.
8/9/2019 Hand Held Ligthhouse 3016 IAQ
http://slidepdf.com/reader/full/hand-held-ligthhouse-3016-iaq 25/60
Downloading Data
248083206-1 Rev 4 3-5
Figure 3-7 Instrument Not found
Follow the troubleshooting tips listed on the window.
Click the < Prev button and then the Next > button to retry connecting to
your instrument.
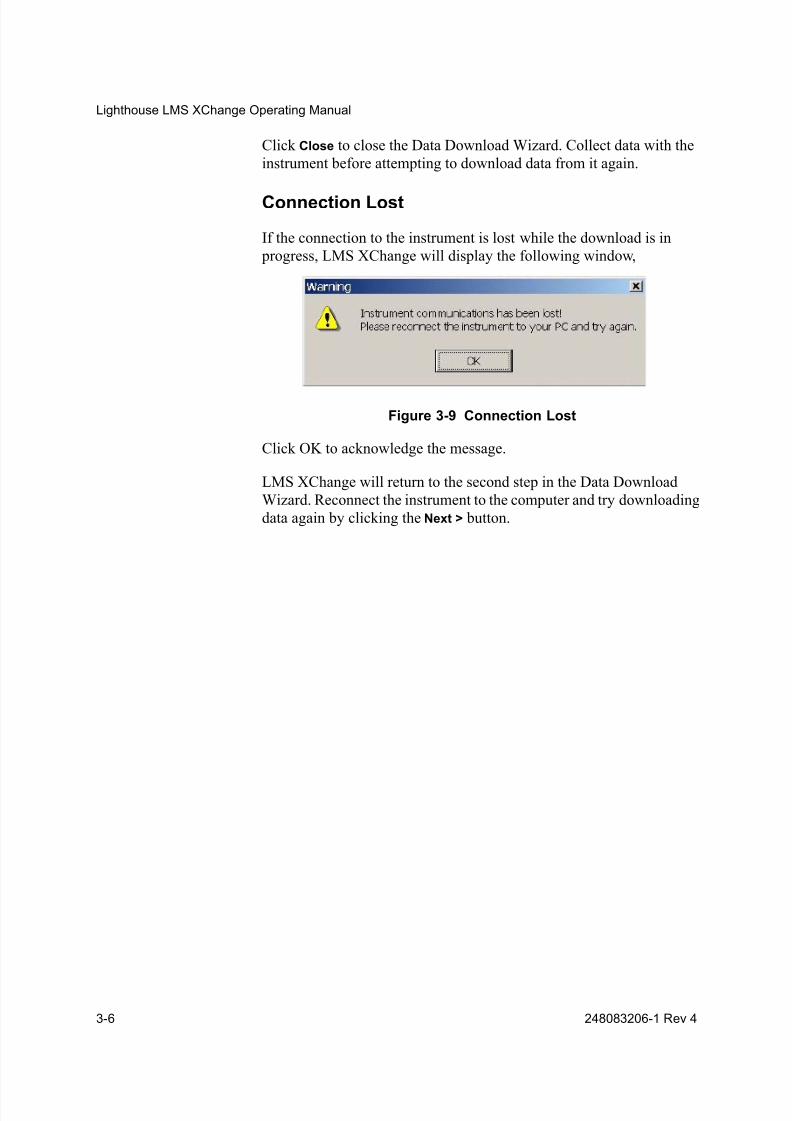
No Data to Download
If the instrument does not contain any data, the following window will
appear when LMS XChange attempts to download data from the
instrument.
Figure 3-8 No data found
8/9/2019 Hand Held Ligthhouse 3016 IAQ
http://slidepdf.com/reader/full/hand-held-ligthhouse-3016-iaq 26/60
Lighthouse LMS XChange Operating Manual
3-6 248083206-1 Rev 4
Click Close to close the Data Download Wizard. Collect data with the
instrument before attempting to download data from it again.
Connection Lost
If the connection to the instrument is lost while the download is in
progress, LMS XChange will display the following window,
Figure 3-9 Connection Lost
Click OK to acknowledge the message.
LMS XChange will return to the second step in the Data Download
Wizard. Reconnect the instrument to the computer and try downloading
data again by clicking the Next > button.
8/9/2019 Hand Held Ligthhouse 3016 IAQ
http://slidepdf.com/reader/full/hand-held-ligthhouse-3016-iaq 27/60
00
248083206-1 Rev 4 4-1
4 Data Display
This chapter describes displaying data in the Data Table.
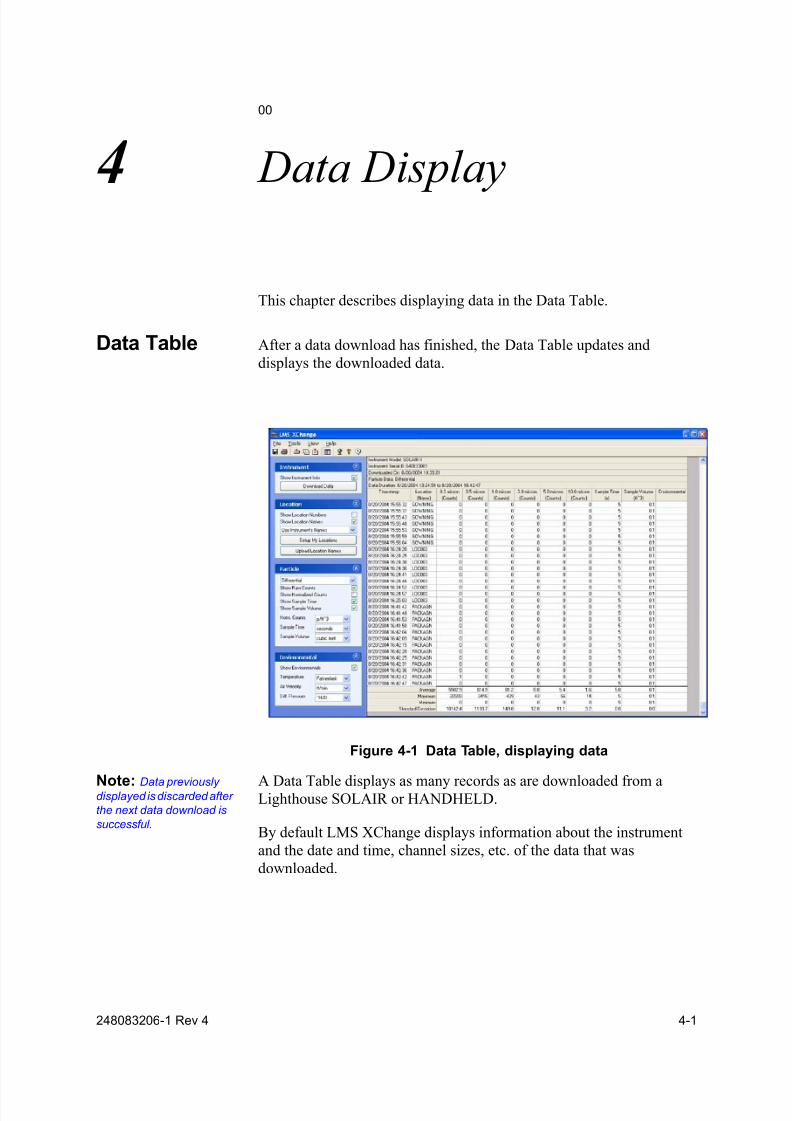
Data Table After a data download has finished, the Data Table updates and
displays the downloaded data.
Figure 4-1 Data Table, displaying data
Note: Data previouslydisplayed is discarded after
the next data download is
successful.
A Data Table displays as many records as are downloaded from aLighthouse SOLAIR or HANDHELD.
By default LMS XChange displays information about the instrument
and the date and time, channel sizes, etc. of the data that was
downloaded.
8/9/2019 Hand Held Ligthhouse 3016 IAQ
http://slidepdf.com/reader/full/hand-held-ligthhouse-3016-iaq 28/60
Lighthouse LMS XChange Operating Manual
4-2 248083206-1 Rev 4
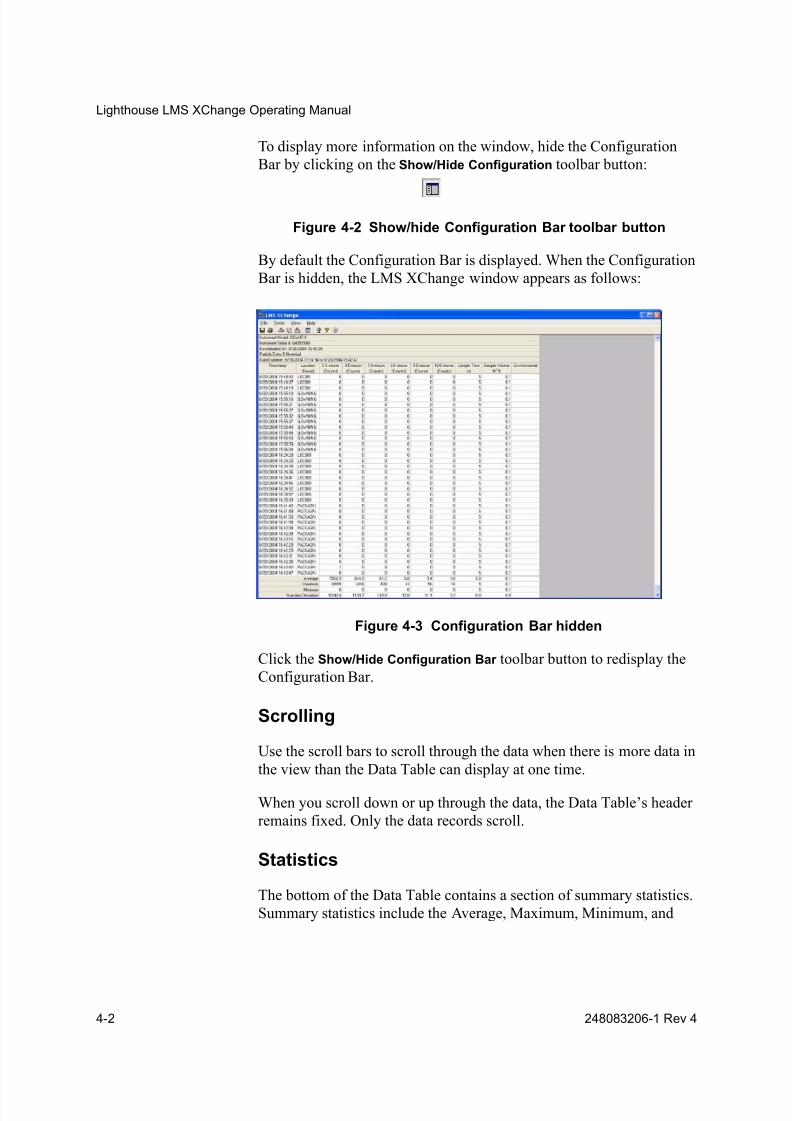
To display more information on the window, hide the Configuration
Bar by clicking on the Show/Hide Configuration toolbar button:
Figure 4-2 Show/hide Configuration Bar toolbar button
By default the Configuration Bar is displayed. When the Configuration
Bar is hidden, the LMS XChange window appears as follows:
Figure 4-3 Configuration Bar hidden
Click the Show/Hide Configuration Bar toolbar button to redisplay the
Configuration Bar.
Scrolling
Use the scroll bars to scroll through the data when there is more data in
the view than the Data Table can display at one time.
When you scroll down or up through the data, the Data Table’s header
remains fixed. Only the data records scroll.
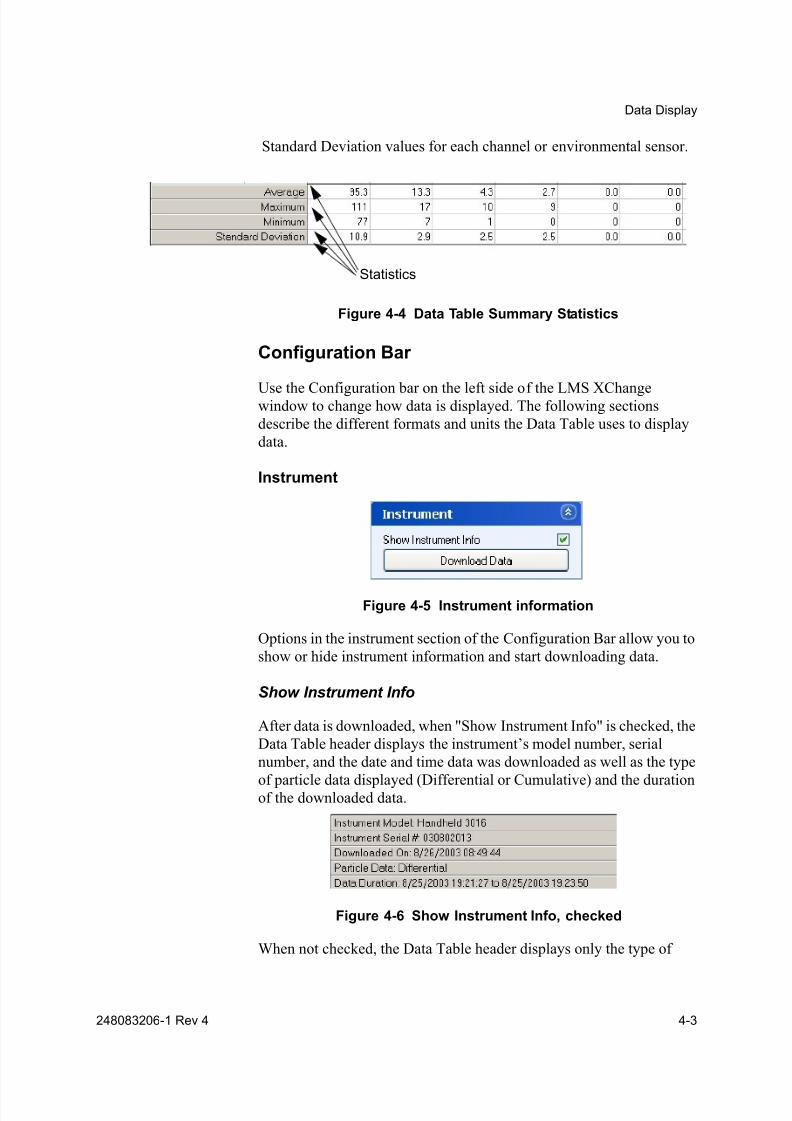
Statistics
The bottom of the Data Table contains a section of summary statistics.
Summary statistics include the Average, Maximum, Minimum, and
8/9/2019 Hand Held Ligthhouse 3016 IAQ
http://slidepdf.com/reader/full/hand-held-ligthhouse-3016-iaq 29/60
Data Display
248083206-1 Rev 4 4-3
Standard Deviation values for each channel or environmental sensor.
Figure 4-4 Data Table Summary Statistics
Configuration Bar
Use the Configuration bar on the left side of the LMS XChangewindow to change how data is displayed. The following sections
describe the different formats and units the Data Table uses to display
data.
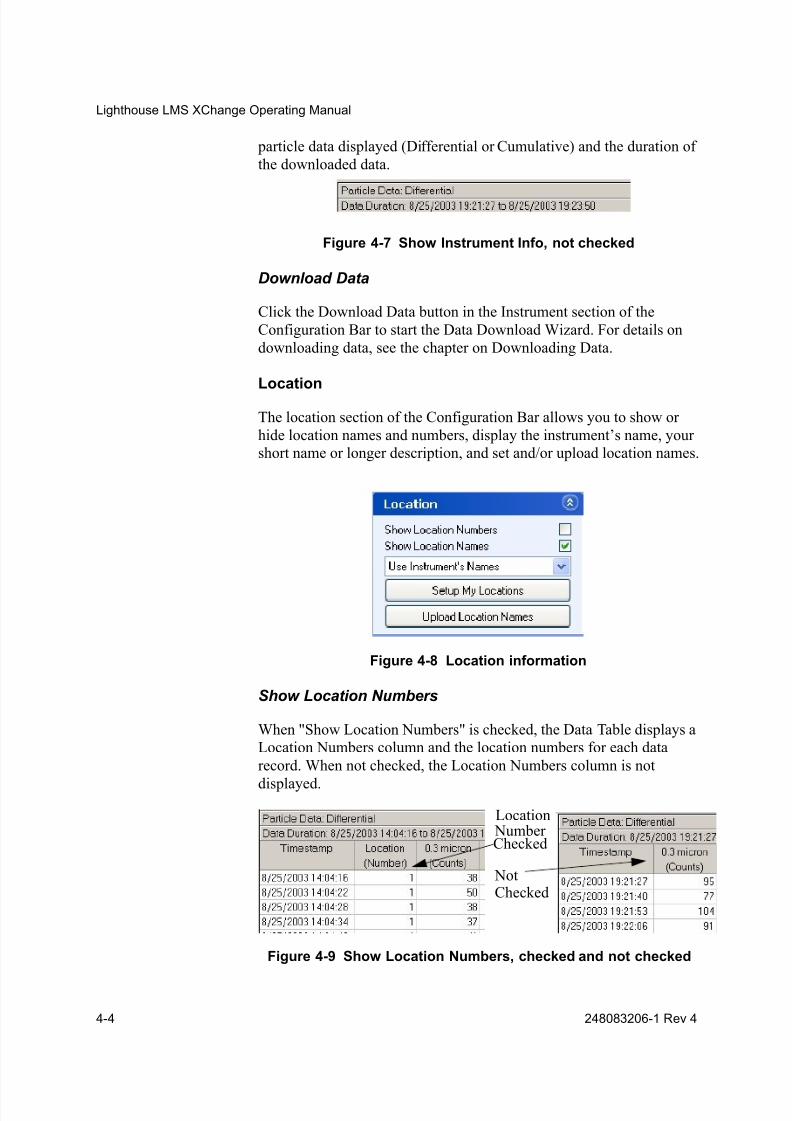
Instrument
Figure 4-5 Instrument information
Options in the instrument section of the Configuration Bar allow you to
show or hide instrument information and start downloading data.
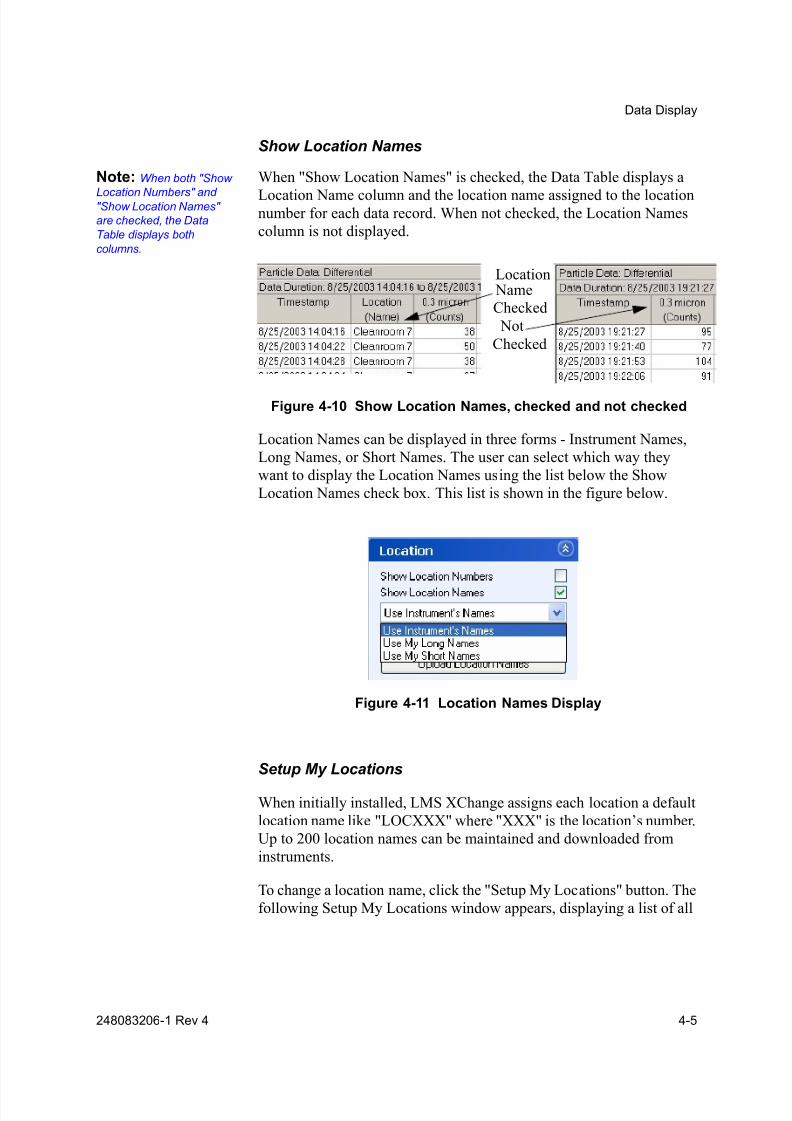
Show Instrument Info
After data is downloaded, when "Show Instrument Info" is checked, the
Data Table header displays the instrument’s model number, serial
number, and the date and time data was downloaded as well as the type
of particle data displayed (Differential or Cumulative) and the durationof the downloaded data.
Figure 4-6 Show Instrument Info, checked
When not checked, the Data Table header displays only the type of
Statistics
8/9/2019 Hand Held Ligthhouse 3016 IAQ
http://slidepdf.com/reader/full/hand-held-ligthhouse-3016-iaq 30/60
Lighthouse LMS XChange Operating Manual
4-4 248083206-1 Rev 4
particle data displayed (Differential or Cumulative) and the duration of
the downloaded data.
Figure 4-7 Show Instrument Info, not checked
Download Data
Click the Download Data button in the Instrument section of the
Configuration Bar to start the Data Download Wizard. For details on
downloading data, see the chapter on Downloading Data.
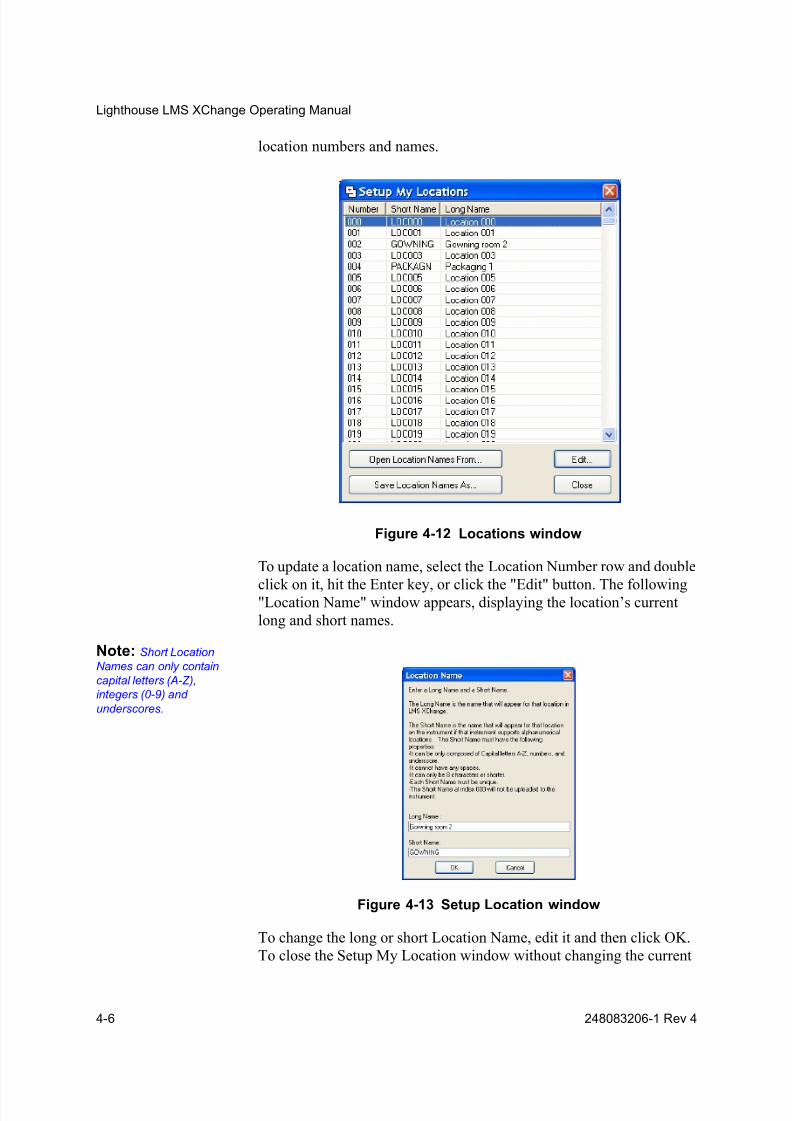
Location
The location section of the Configuration Bar allows you to show or
hide location names and numbers, display the instrument’s name, your
short name or longer description, and set and/or upload location names.
Figure 4-8 Location information
Show Location Numbers
When "Show Location Numbers" is checked, the Data Table displays a
Location Numbers column and the location numbers for each data
record. When not checked, the Location Numbers column is not
displayed.
Figure 4-9 Show Location Numbers, checked and not checked
Location Number
NotChecked
Checked
8/9/2019 Hand Held Ligthhouse 3016 IAQ
http://slidepdf.com/reader/full/hand-held-ligthhouse-3016-iaq 31/60
Data Display
248083206-1 Rev 4 4-5
Show Location Names
Note: When both "Show
Location Numbers" and"Show Location Names"
are checked, the Data
Table displays both
columns.
When "Show Location Names" is checked, the Data Table displays a
Location Name column and the location name assigned to the locationnumber for each data record. When not checked, the Location Names
column is not displayed.
Figure 4-10 Show Location Names, checked and not checked
Location Names can be displayed in three forms - Instrument Names,
Long Names, or Short Names. The user can select which way they
want to display the Location Names using the list below the Show
Location Names check box. This list is shown in the figure below.
Figure 4-11 Location Names Display
Setup My Locations
When initially installed, LMS XChange assigns each location a default
location name like "LOCXXX" where "XXX" is the location’s number.
Up to 200 location names can be maintained and downloaded from
instruments.
To change a location name, click the "Setup My Locations" button. The
following Setup My Locations window appears, displaying a list of all
Location Name
Not
Checked
Checked
8/9/2019 Hand Held Ligthhouse 3016 IAQ
http://slidepdf.com/reader/full/hand-held-ligthhouse-3016-iaq 32/60
Lighthouse LMS XChange Operating Manual
4-6 248083206-1 Rev 4
location numbers and names.
Figure 4-12 Locations window
To update a location name, select the Location Number row and double
click on it, hit the Enter key, or click the "Edit" button. The following"Location Name" window appears, displaying the location’s current
long and short names.
Note: Short Location
Names can only contain
capital letters (A-Z),
integers (0-9) and
underscores.
Figure 4-13 Setup Location window
To change the long or short Location Name, edit it and then click OK.
To close the Setup My Location window without changing the current
8/9/2019 Hand Held Ligthhouse 3016 IAQ
http://slidepdf.com/reader/full/hand-held-ligthhouse-3016-iaq 33/60
Data Display
248083206-1 Rev 4 4-7
location name, click the Cancel button.
Import Location Names
You can import Location Names by clicking the Open Location Names
From... button on the Setup My Locations window.
Locations Names are stored in a file with the extension .loc. Browse
and select the desired Location Name file and click Open. The list of
Location Names will be imported, overwriting any previously loaded
Location Names. For example, you can select the DefaultLocations.loc
file installed in the My Documents\LMS XChange\Locations folder to
restore all locations back to their initial names.
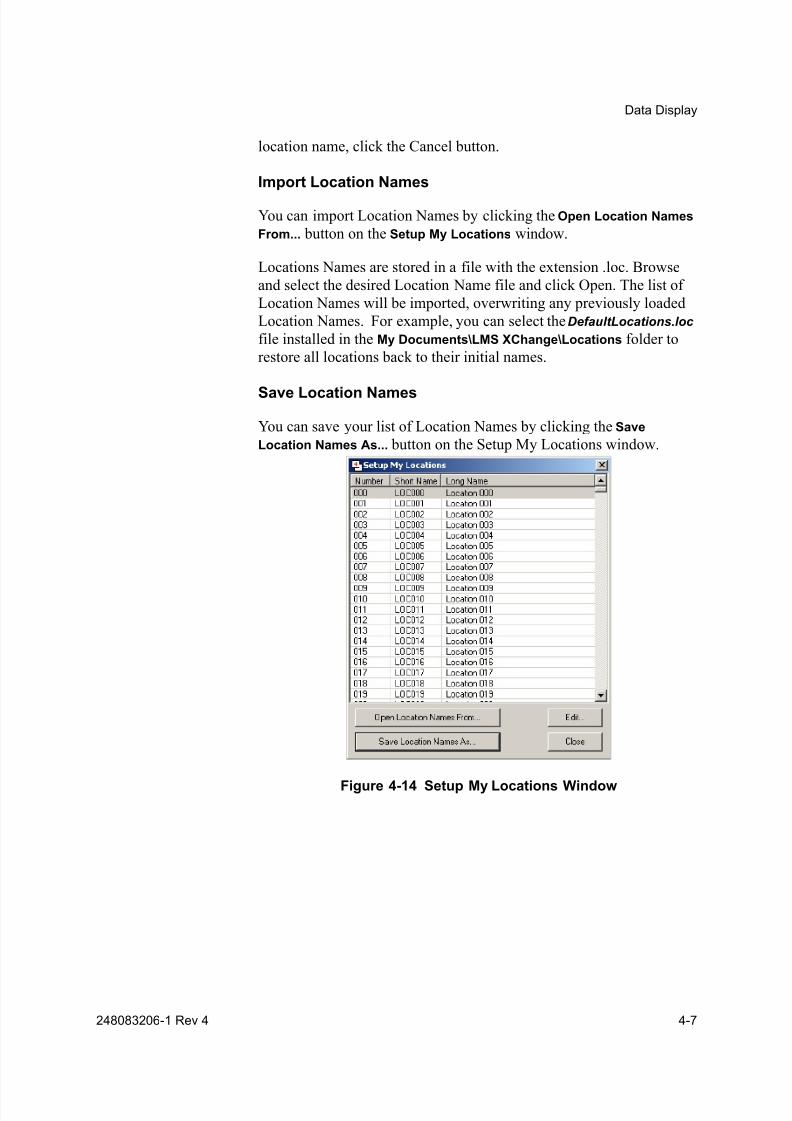
Save Location Names
You can save your list of Location Names by clicking the Save
Location Names As... button on the Setup My Locations window.
Figure 4-14 Setup My Locations Window

8/9/2019 Hand Held Ligthhouse 3016 IAQ
http://slidepdf.com/reader/full/hand-held-ligthhouse-3016-iaq 34/60
Lighthouse LMS XChange Operating Manual
4-8 248083206-1 Rev 4
The following window displays:
Figure 4-15 Save Location Names window
When the Save Location Names As window appears, you can choose to
either save the instrument’s location names or the ones you have
created in LMS XChange.
If you have a Lighthouse instrument that supports alphanumeric
location names and you have already downloaded data from the
instrument to LMS XChange, you can save the instrument’s Location Names to a file by selecting Instrument (Downloaded) Names.
As an alternative, select My Locations to save the location names you
have created or edited in LMS XChange to a file.
Note: If the instrument
has empty location names,
they are substituted with
pre-generated names
following the format,
"LOC###". "###" is the
index number for that
location name.
Click Cancel to abort saving Location Names, or click the Next button
to continue.
If you clicked Next, browse and select the directory to save the file to,
enter your desired file name (extension .loc), and click OK. Click
Cancel to exit this window without saving Location Names.
8/9/2019 Hand Held Ligthhouse 3016 IAQ
http://slidepdf.com/reader/full/hand-held-ligthhouse-3016-iaq 35/60
Data Display
248083206-1 Rev 4 4-9
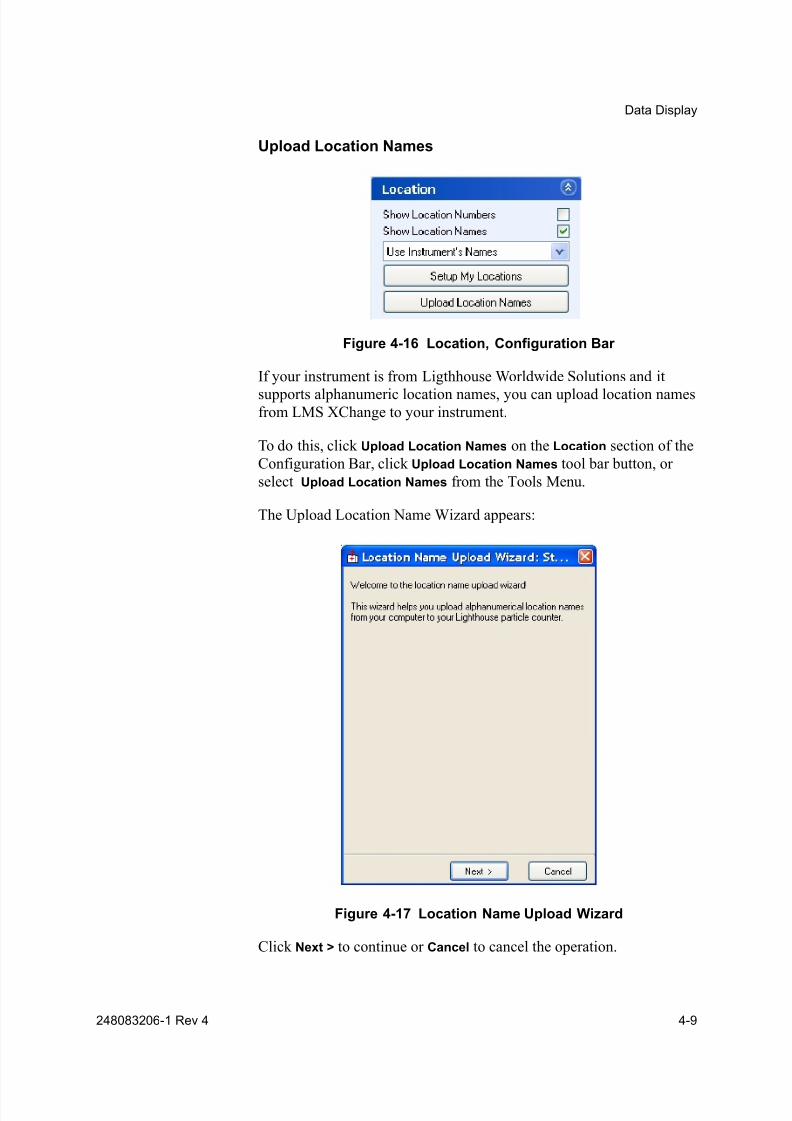
Upload Location Names
Figure 4-16 Location, Configuration Bar
If your instrument is from Ligthhouse Worldwide Solutions and it
supports alphanumeric location names, you can upload location namesfrom LMS XChange to your instrument.
To do this, click Upload Location Names on the Location section of the
Configuration Bar, click Upload Location Names tool bar button, or
select Upload Location Names from the Tools Menu.
The Upload Location Name Wizard appears:
Figure 4-17 Location Name Upload Wizard
Click Next > to continue or Cancel to cancel the operation.
8/9/2019 Hand Held Ligthhouse 3016 IAQ
http://slidepdf.com/reader/full/hand-held-ligthhouse-3016-iaq 36/60
Lighthouse LMS XChange Operating Manual
4-10 248083206-1 Rev 4
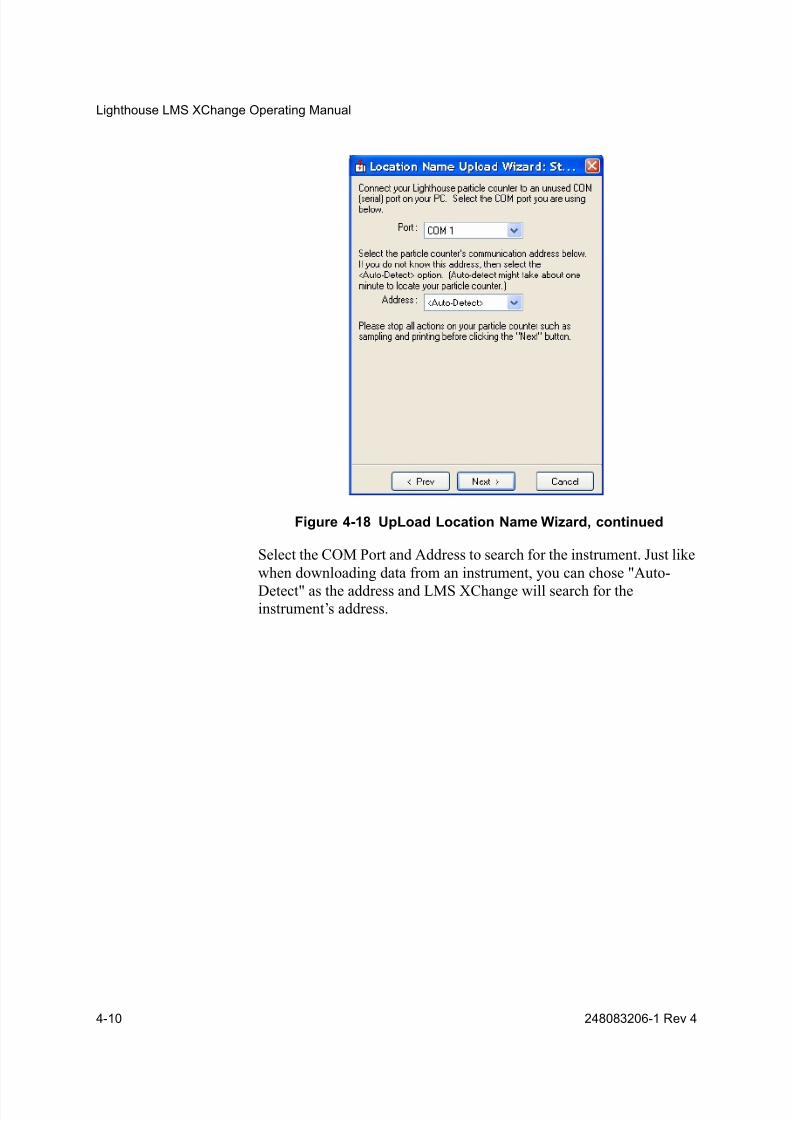
Figure 4-18 UpLoad Location Name Wizard, continued
Select the COM Port and Address to search for the instrument. Just like
when downloading data from an instrument, you can chose "Auto-
Detect" as the address and LMS XChange will search for theinstrument’s address.
8/9/2019 Hand Held Ligthhouse 3016 IAQ
http://slidepdf.com/reader/full/hand-held-ligthhouse-3016-iaq 37/60
Data Display
248083206-1 Rev 4 4-11
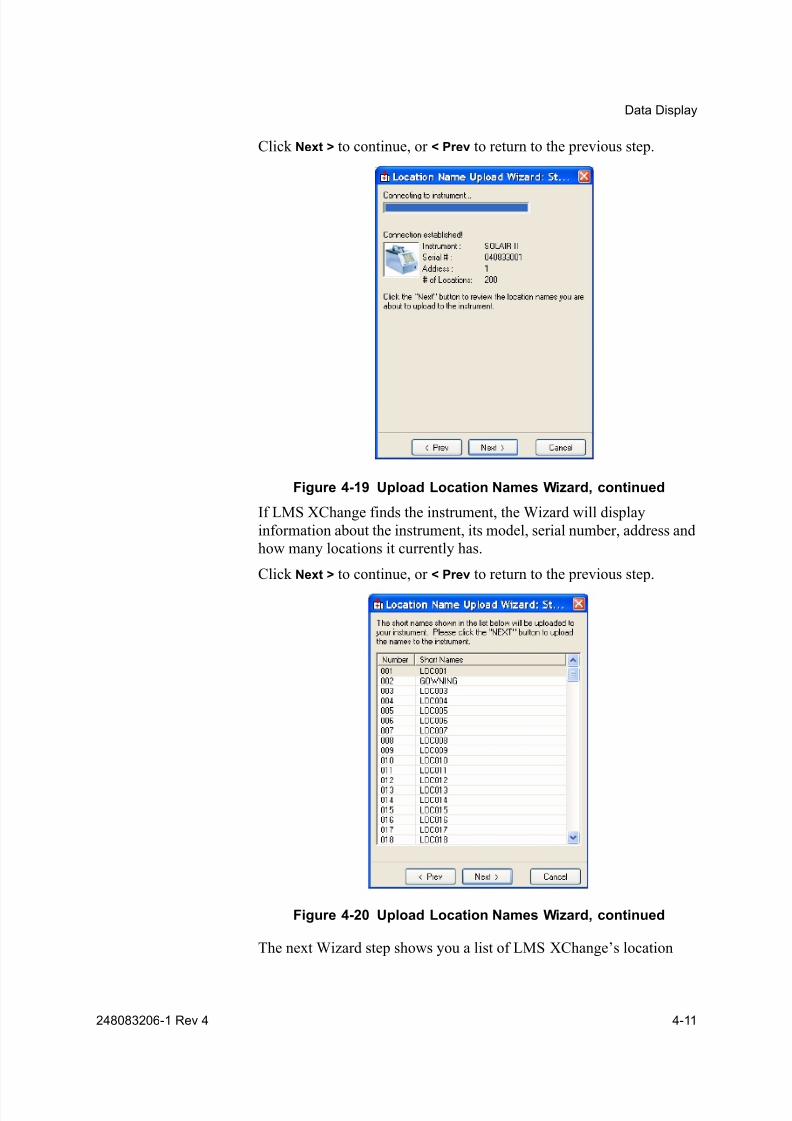
Click Next > to continue, or < Prev to return to the previous step.
Figure 4-19 Upload Location Names Wizard, continued
If LMS XChange finds the instrument, the Wizard will display
information about the instrument, its model, serial number, address and
how many locations it currently has.
Click Next > to continue, or < Prev to return to the previous step.
Figure 4-20 Upload Location Names Wizard, continued
The next Wizard step shows you a list of LMS XChange’s location
8/9/2019 Hand Held Ligthhouse 3016 IAQ
http://slidepdf.com/reader/full/hand-held-ligthhouse-3016-iaq 38/60
Lighthouse LMS XChange Operating Manual
4-12 248083206-1 Rev 4
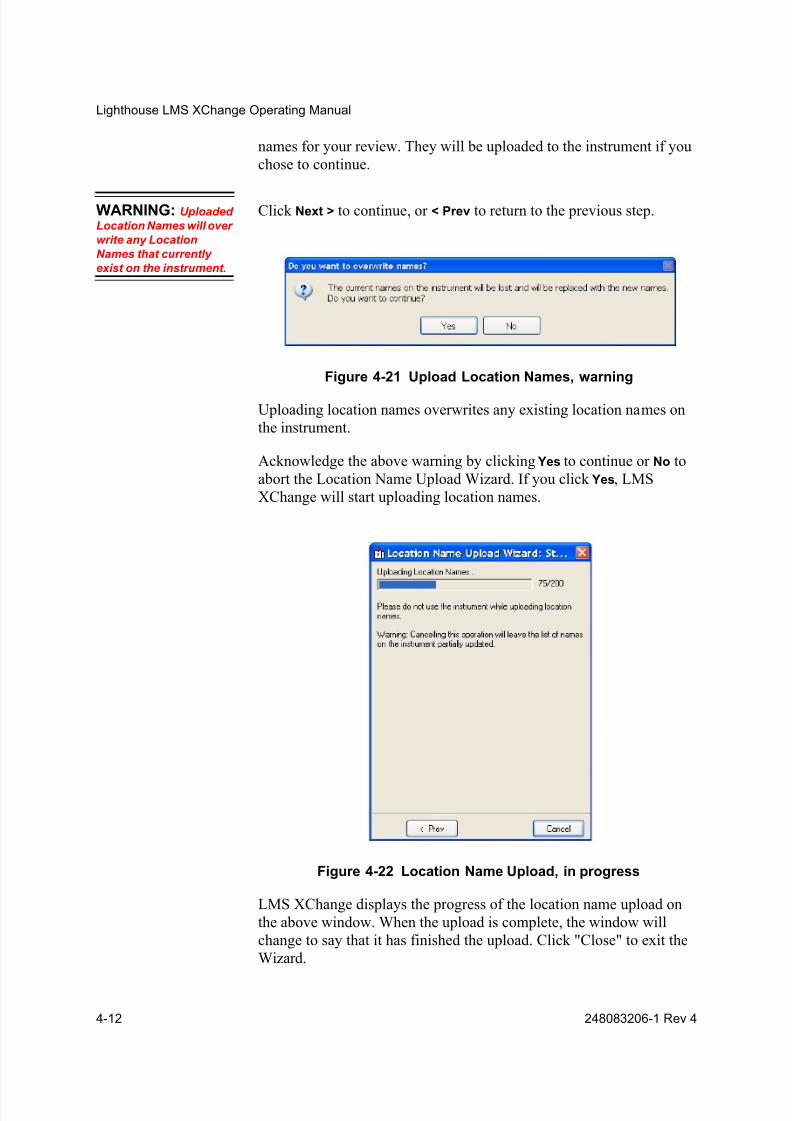
names for your review. They will be uploaded to the instrument if you
chose to continue.
WARNING: Uploaded
Location Names will over
write any Location
Names that currently
exist on the instrument.
Click Next > to continue, or < Prev to return to the previous step.
Figure 4-21 Upload Location Names, warning
Uploading location names overwrites any existing location names on
the instrument.
Acknowledge the above warning by clicking Yes to continue or No to
abort the Location Name Upload Wizard. If you click Yes, LMS
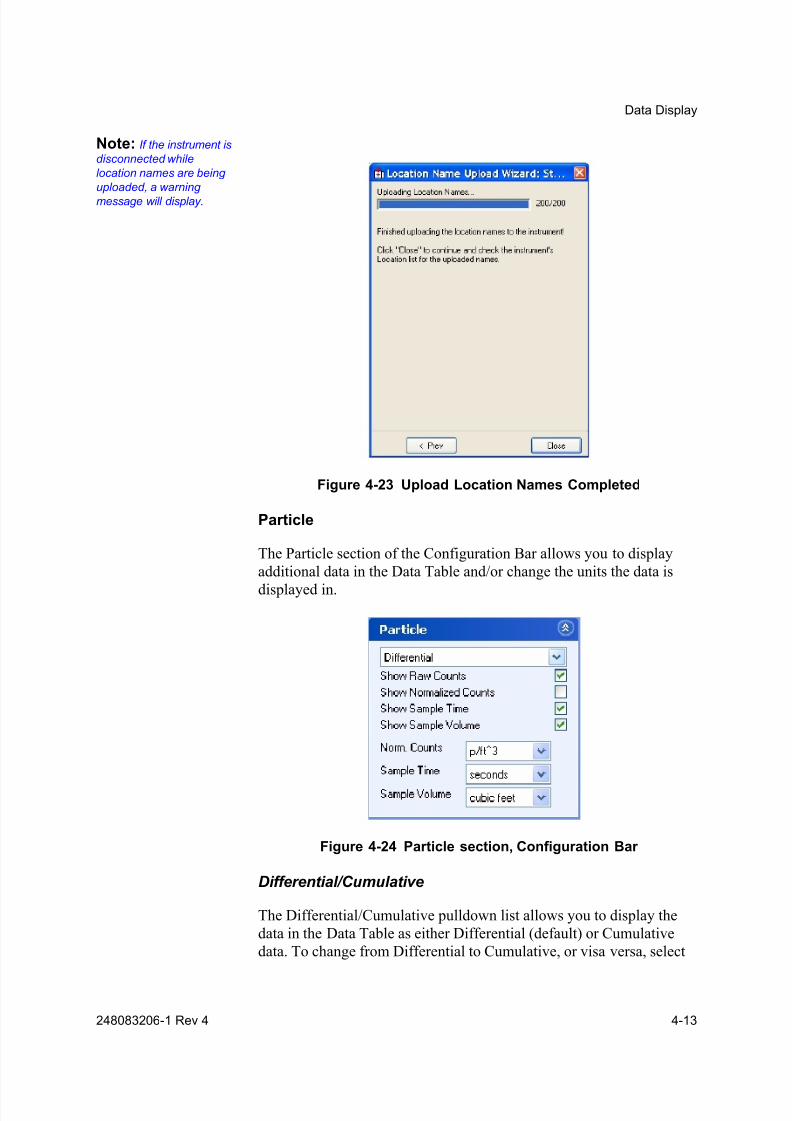
XChange will start uploading location names.
Figure 4-22 Location Name Upload, in progress
LMS XChange displays the progress of the location name upload on
the above window. When the upload is complete, the window will
change to say that it has finished the upload. Click "Close" to exit the
Wizard.
8/9/2019 Hand Held Ligthhouse 3016 IAQ
http://slidepdf.com/reader/full/hand-held-ligthhouse-3016-iaq 39/60
Data Display
248083206-1 Rev 4 4-13
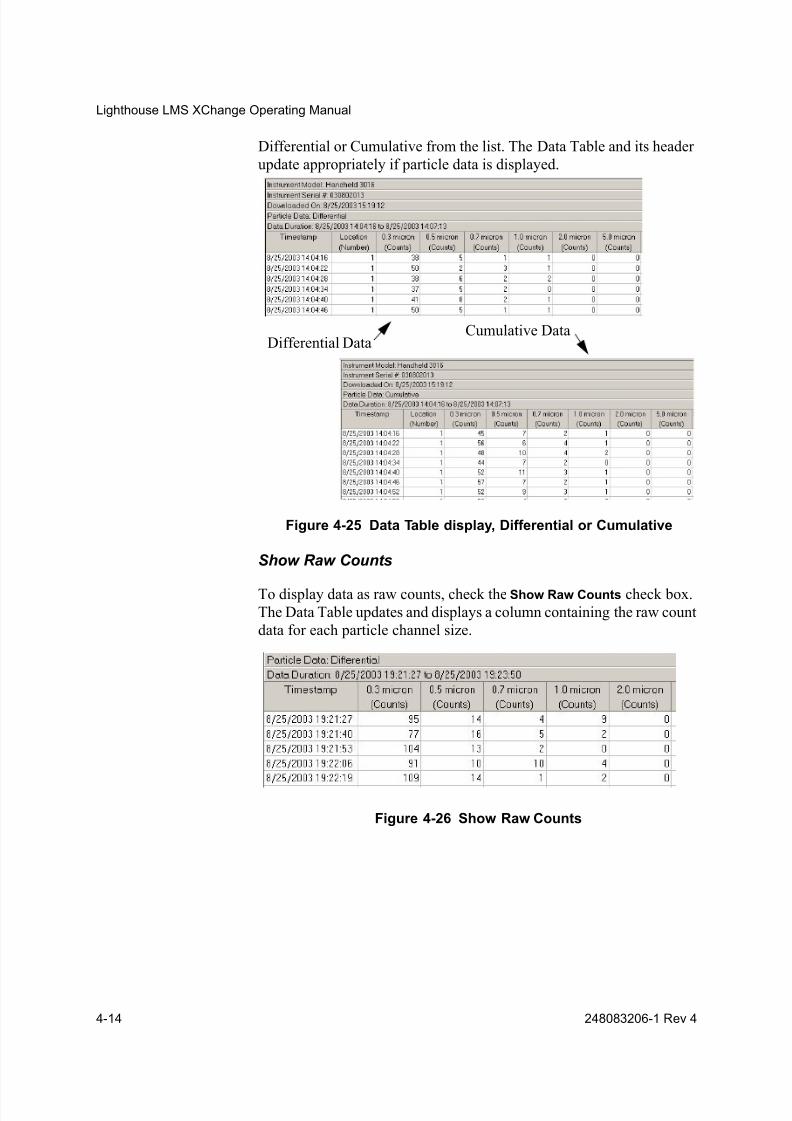
Note: If the instrument is
disconnected while
location names are being
uploaded, a warning
message will display.
Figure 4-23 Upload Location Names Completed
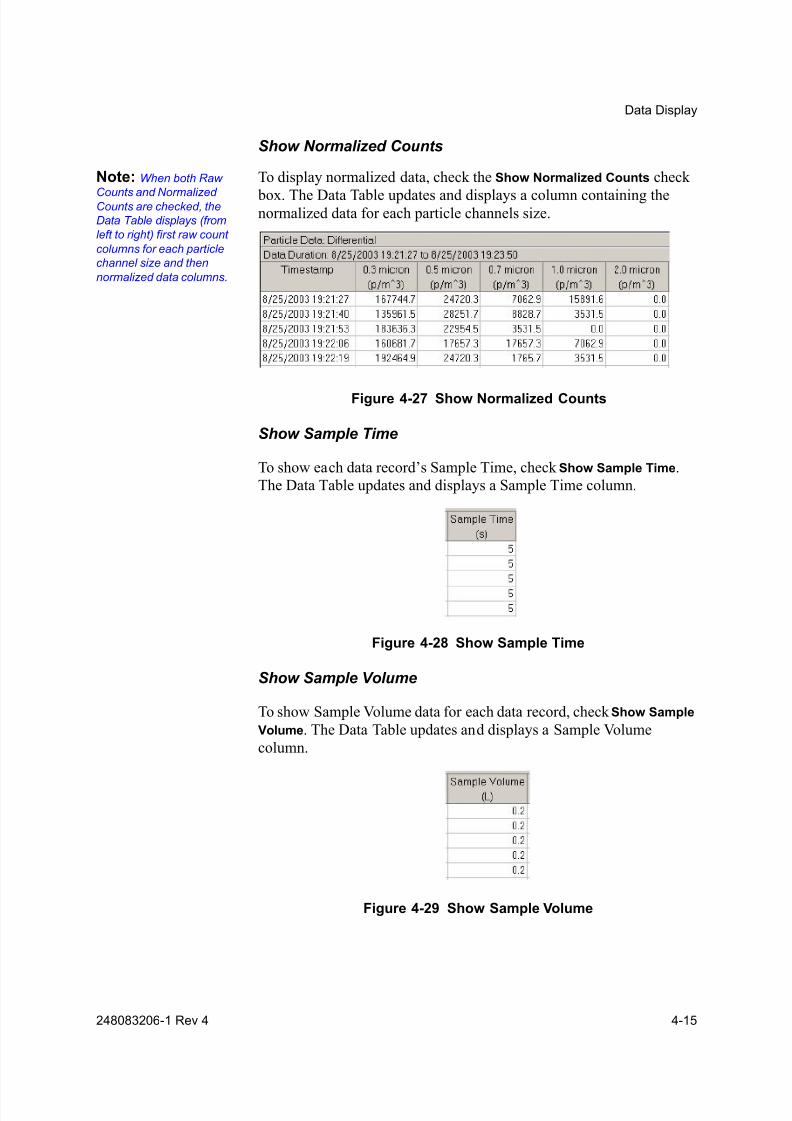
Particle
The Particle section of the Configuration Bar allows you to display
additional data in the Data Table and/or change the units the data is
displayed in.
Figure 4-24 Particle section, Configuration Bar
Differential/Cumulative
The Differential/Cumulative pulldown list allows you to display the
data in the Data Table as either Differential (default) or Cumulative
data. To change from Differential to Cumulative, or visa versa, select
8/9/2019 Hand Held Ligthhouse 3016 IAQ
http://slidepdf.com/reader/full/hand-held-ligthhouse-3016-iaq 40/60
Lighthouse LMS XChange Operating Manual
4-14 248083206-1 Rev 4
Differential or Cumulative from the list. The Data Table and its header
update appropriately if particle data is displayed.
Figure 4-25 Data Table display, Differential or Cumulative
Show Raw Counts
To display data as raw counts, check the Show Raw Counts check box.The Data Table updates and displays a column containing the raw count
data for each particle channel size.
Figure 4-26 Show Raw Counts
Differential DataCumulative Data
8/9/2019 Hand Held Ligthhouse 3016 IAQ
http://slidepdf.com/reader/full/hand-held-ligthhouse-3016-iaq 41/60
Data Display
248083206-1 Rev 4 4-15
Show Normalized Counts
Note: When both Raw
Counts and NormalizedCounts are checked, the
Data Table displays (from
left to right) first raw count
columns for each particle
channel size and then
normalized data columns.
To display normalized data, check the Show Normalized Counts check
box. The Data Table updates and displays a column containing thenormalized data for each particle channels size.
Figure 4-27 Show Normalized Counts
Show Sample Time
To show each data record’s Sample Time, check Show Sample Time.
The Data Table updates and displays a Sample Time column.
Figure 4-28 Show Sample Time
Show Sample Volume
To show Sample Volume data for each data record, check Show Sample
Volume. The Data Table updates and displays a Sample Volume
column.
Figure 4-29 Show Sample Volume
8/9/2019 Hand Held Ligthhouse 3016 IAQ
http://slidepdf.com/reader/full/hand-held-ligthhouse-3016-iaq 42/60
Lighthouse LMS XChange Operating Manual
4-16 248083206-1 Rev 4
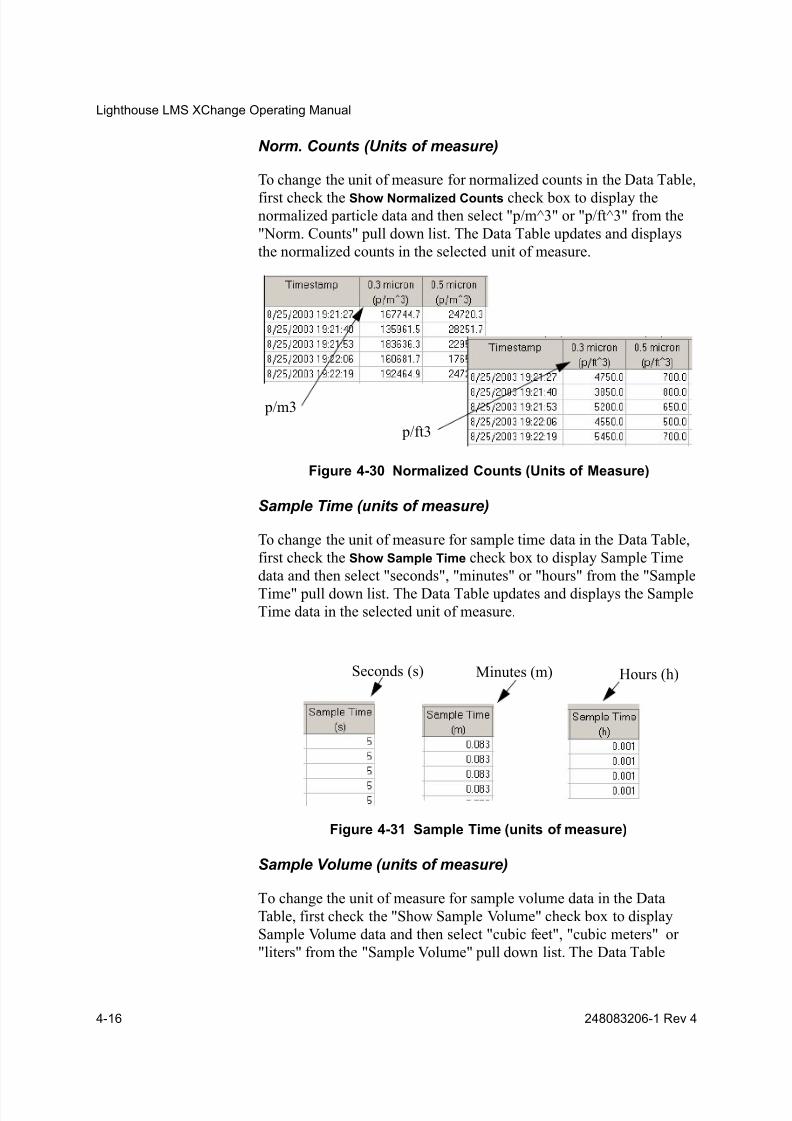
Norm. Counts (Units of measure)
To change the unit of measure for normalized counts in the Data Table,
first check the Show Normalized Counts check box to display thenormalized particle data and then select "p/m^3" or "p/ft^3" from the
"Norm. Counts" pull down list. The Data Table updates and displays
the normalized counts in the selected unit of measure.
Figure 4-30 Normalized Counts (Units of Measure)
Sample Time (units of measure)
To change the unit of measure for sample time data in the Data Table,
first check the Show Sample Time check box to display Sample Time
data and then select "seconds", "minutes" or "hours" from the "Sample
Time" pull down list. The Data Table updates and displays the SampleTime data in the selected unit of measure.
Figure 4-31 Sample Time (units of measure)
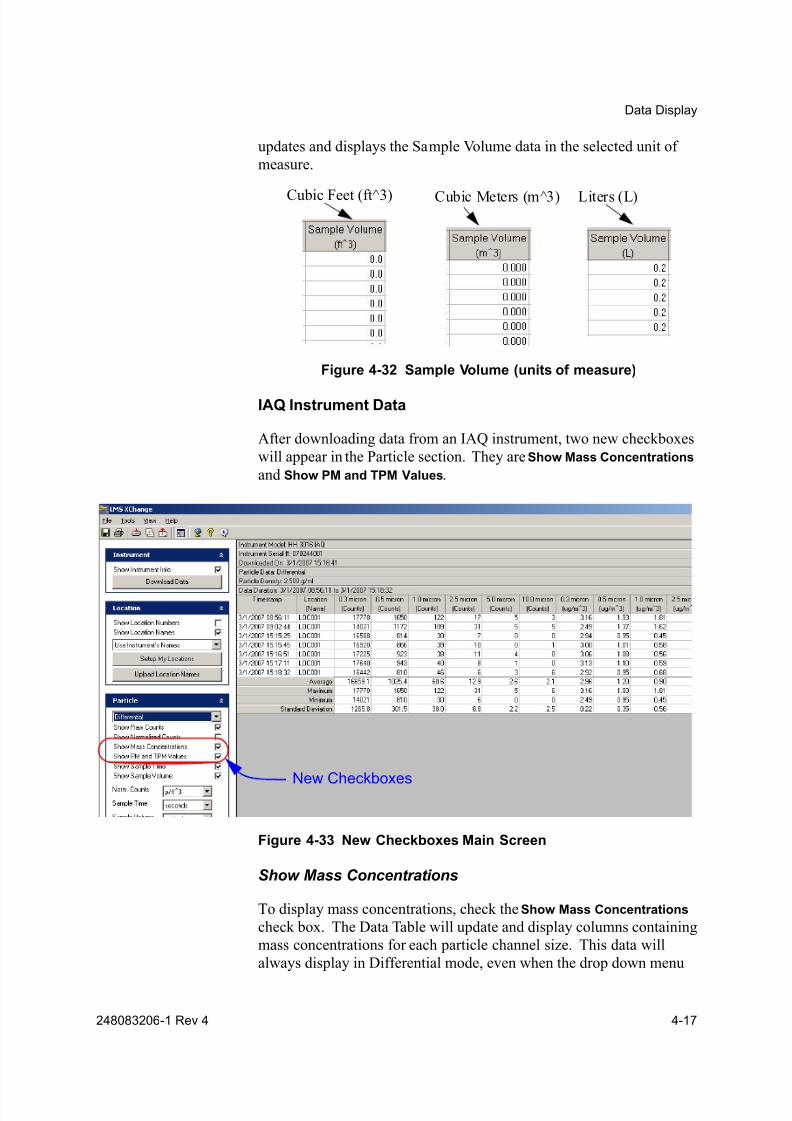
Sample Volume (units of measure)
To change the unit of measure for sample volume data in the Data
Table, first check the "Show Sample Volume" check box to display
Sample Volume data and then select "cubic feet", "cubic meters" or
"liters" from the "Sample Volume" pull down list. The Data Table
p/m3
p/ft3
Seconds (s) Minutes (m) Hours (h)
8/9/2019 Hand Held Ligthhouse 3016 IAQ
http://slidepdf.com/reader/full/hand-held-ligthhouse-3016-iaq 43/60
Data Display
248083206-1 Rev 4 4-17
updates and displays the Sample Volume data in the selected unit of
measure.
Figure 4-32 Sample Volume (units of measure)
IAQ Instrument Data
After downloading data from an IAQ instrument, two new checkboxes
will appear in the Particle section. They are Show Mass Concentrations
and Show PM and TPM Values.
Figure 4-33 New Checkboxes Main Screen
Show Mass Concentrations
To display mass concentrations, check the Show Mass Concentrations
check box. The Data Table will update and display columns containing
mass concentrations for each particle channel size. This data will
always display in Differential mode, even when the drop down menu
Cubic Feet (ft^3) Cubic Meters (m^3) Liters (L)
New Checkboxes
8/9/2019 Hand Held Ligthhouse 3016 IAQ
http://slidepdf.com/reader/full/hand-held-ligthhouse-3016-iaq 44/60
Lighthouse LMS XChange Operating Manual
4-18 248083206-1 Rev 4
box is set to Cumulative. Data units are always displayed in
micrograms per cubic meter (ug/m^3).
Show PM and TPM Values
To display Particulate Matter (PM) and Total Particulate Matter (TPM),
choose the Show PM and TPM Values check box. The Data Table will
update and display PM columns for each particle channel size, except
the first. A TPM column is displayed after the last PM column. The
data displayed is unaffected by the Differential/Cumulative drop down
menu box. Data units are always displayed in micrograms per cubic
meter (ug/m^3).
Environmental
The Environmental section of the Configuration Bar allows you to
display additional environmental data in the Data Table and/or change
the associated units of measure.
Figure 4-34 Environmental information
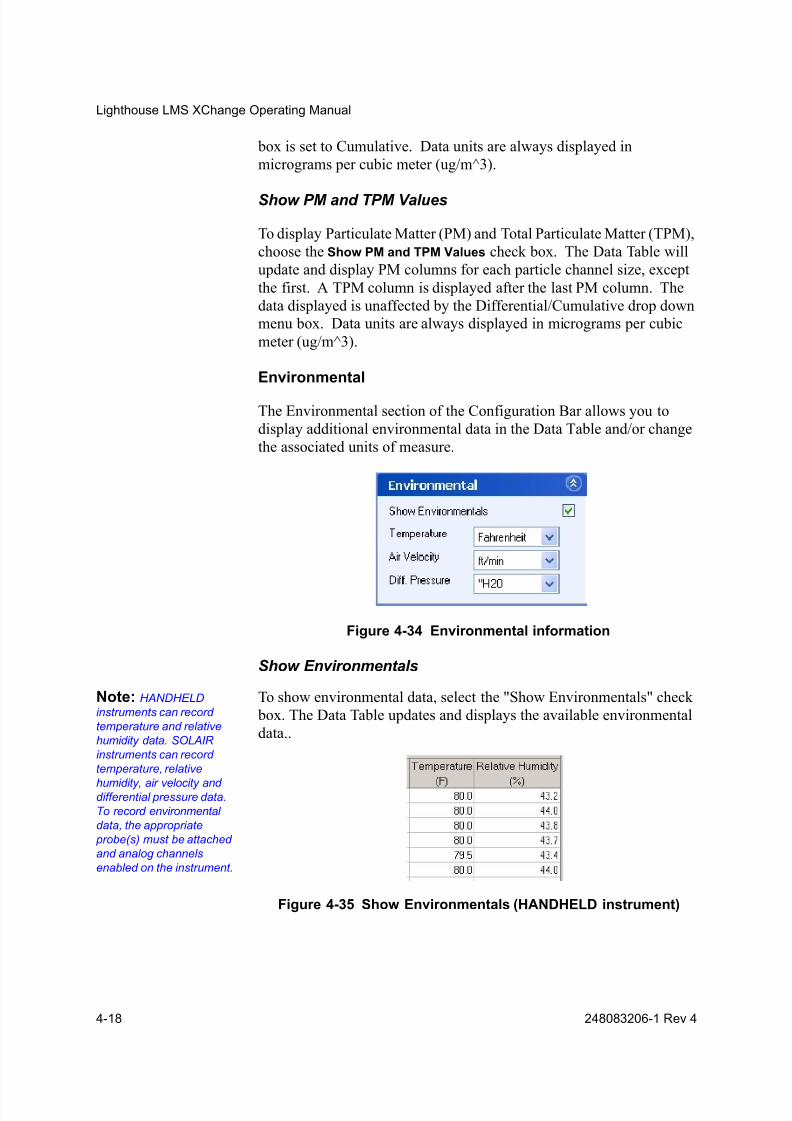
Show Environmentals
Note: HANDHELD
instruments can record
temperature and relative
humidity data. SOLAIR
instruments can record
temperature, relative
humidity, air velocity anddifferential pressure data.
To record environmental
data, the appropriate
probe(s) must be attached
and analog channels
enabled on the instrument.
To show environmental data, select the "Show Environmentals" check
box. The Data Table updates and displays the available environmental
data..
Figure 4-35 Show Environmentals (HANDHELD instrument)
8/9/2019 Hand Held Ligthhouse 3016 IAQ
http://slidepdf.com/reader/full/hand-held-ligthhouse-3016-iaq 45/60
Data Display
248083206-1 Rev 4 4-19
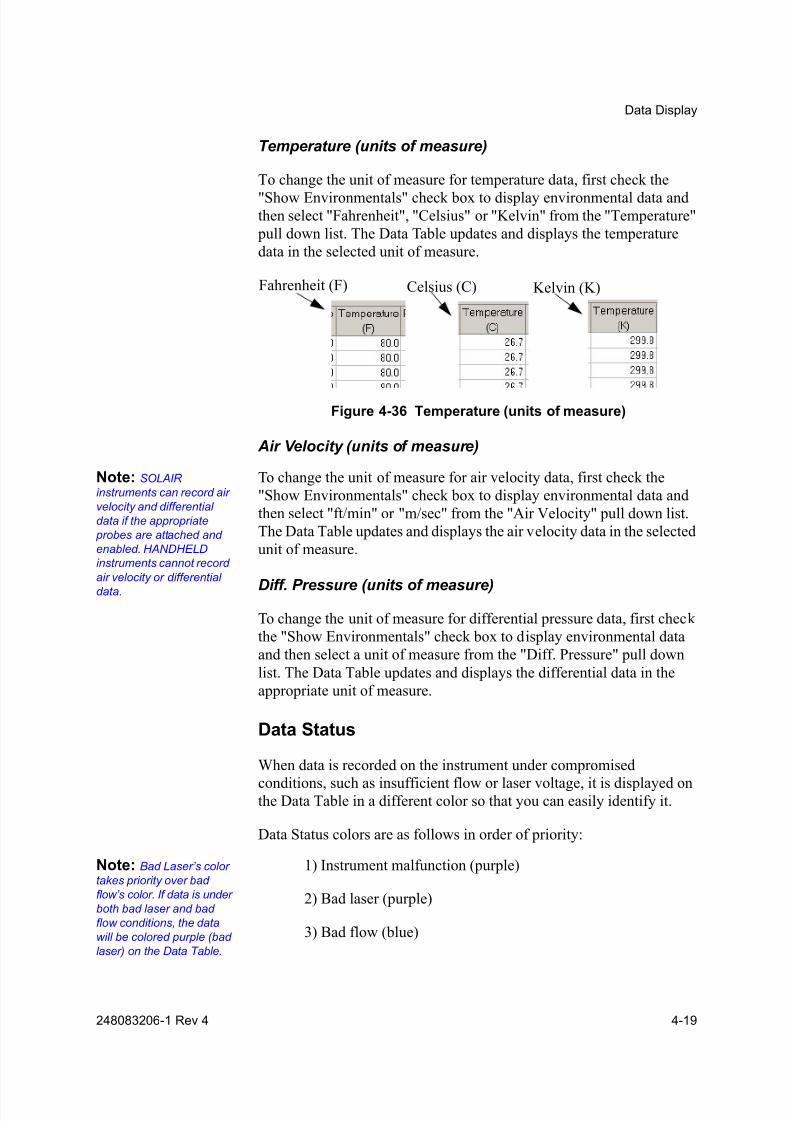
Temperature (units of measure)
To change the unit of measure for temperature data, first check the
"Show Environmentals" check box to display environmental data andthen select "Fahrenheit", "Celsius" or "Kelvin" from the "Temperature"
pull down list. The Data Table updates and displays the temperature
data in the selected unit of measure.
Figure 4-36 Temperature (units of measure)
Air Velocity (units of measure)
Note: SOLAIR
instruments can record air
velocity and differential
data if the appropriate
probes are attached and
enabled. HANDHELD
instruments cannot record
air velocity or differential
data.
To change the unit of measure for air velocity data, first check the
"Show Environmentals" check box to display environmental data and
then select "ft/min" or "m/sec" from the "Air Velocity" pull down list.
The Data Table updates and displays the air velocity data in the selected
unit of measure.
Diff. Pressure (units of measure)
To change the unit of measure for differential pressure data, first check
the "Show Environmentals" check box to display environmental data
and then select a unit of measure from the "Diff. Pressure" pull down
list. The Data Table updates and displays the differential data in the
appropriate unit of measure.
Data Status
When data is recorded on the instrument under compromised
conditions, such as insufficient flow or laser voltage, it is displayed onthe Data Table in a different color so that you can easily identify it.
Data Status colors are as follows in order of priority:
Note: Bad Laser’s color
takes priority over bad
flow’s color. If data is under
both bad laser and bad
flow conditions, the data
will be colored purple (bad
laser) on the Data Table.
1) Instrument malfunction (purple)
2) Bad laser (purple)
3) Bad flow (blue)
Fahrenheit (F) Celsius (C) Kelvin (K)
8/9/2019 Hand Held Ligthhouse 3016 IAQ
http://slidepdf.com/reader/full/hand-held-ligthhouse-3016-iaq 46/60
Lighthouse LMS XChange Operating Manual
4-20 248083206-1 Rev 4
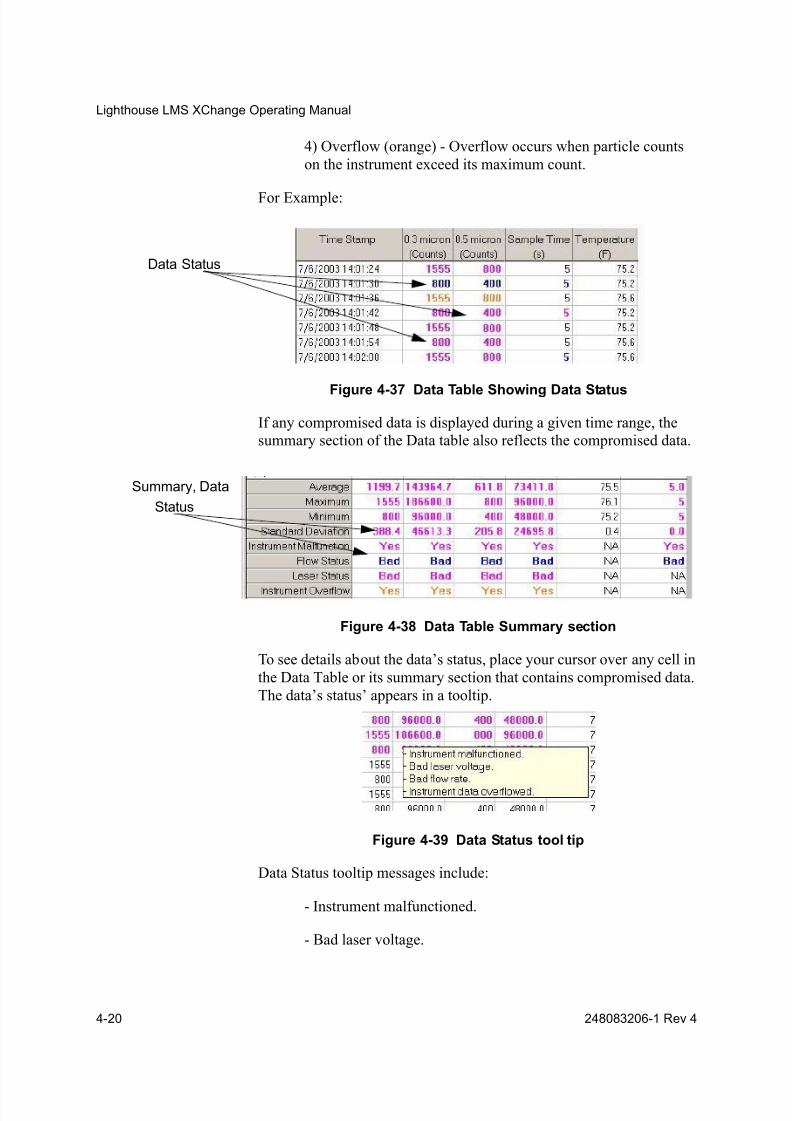
4) Overflow (orange) - Overflow occurs when particle counts
on the instrument exceed its maximum count.
For Example:
Figure 4-37 Data Table Showing Data Status
If any compromised data is displayed during a given time range, the
summary section of the Data table also reflects the compromised data.
Figure 4-38 Data Table Summary section
To see details about the data’s status, place your cursor over any cell in
the Data Table or its summary section that contains compromised data.
The data’s status’ appears in a tooltip.
Figure 4-39 Data Status tool tip
Data Status tooltip messages include:
- Instrument malfunctioned.
- Bad laser voltage.
Data Status
Summary, Data
Status
8/9/2019 Hand Held Ligthhouse 3016 IAQ
http://slidepdf.com/reader/full/hand-held-ligthhouse-3016-iaq 47/60
Data Display
248083206-1 Rev 4 4-21
- Bad flow rate.
- Instrument data overflowed.
Printing Print the displayed Data Table by clicking on the Print button on the
toolbar.
On the default print window select a printer and click OK to print the
Data Table.
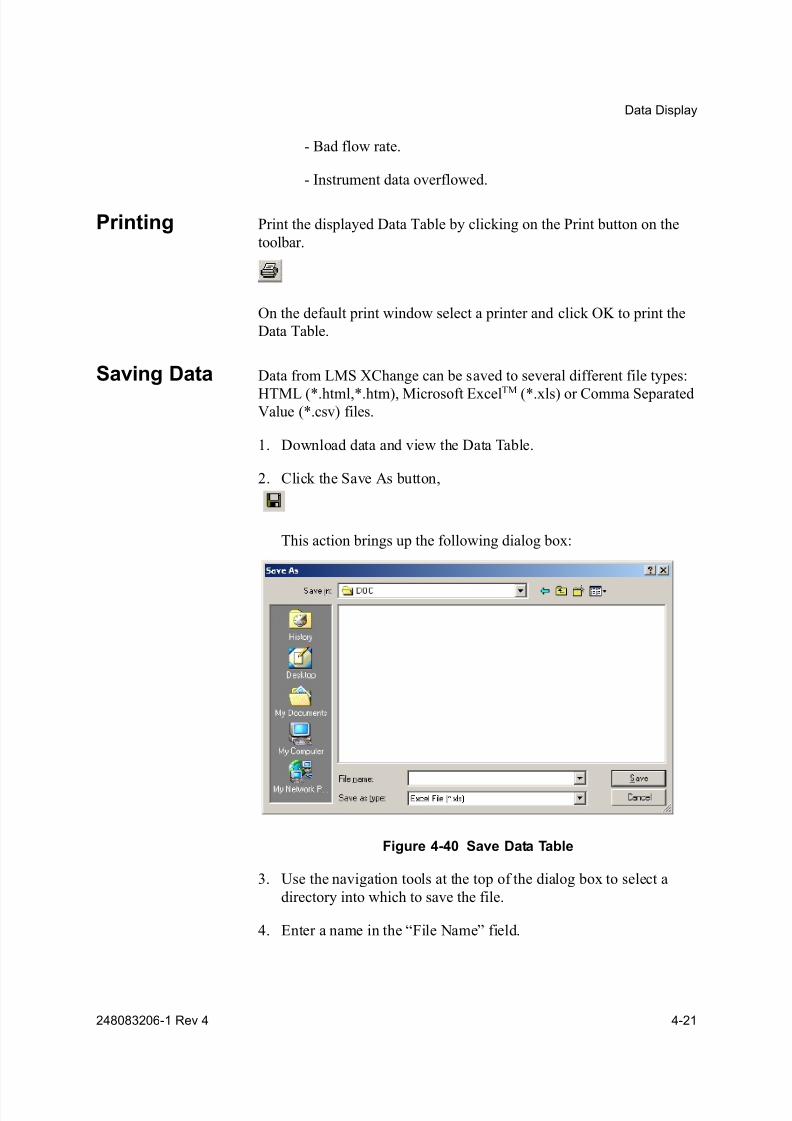
Saving Data Data from LMS XChange can be saved to several different file types:
HTML (*.html,*.htm), Microsoft ExcelTM (*.xls) or Comma SeparatedValue (*.csv) files.
1. Download data and view the Data Table.
2. Click the Save As button,
This action brings up the following dialog box:
Figure 4-40 Save Data Table
3. Use the navigation tools at the top of the dialog box to select a
directory into which to save the file.
4. Enter a name in the “File Name” field.

8/9/2019 Hand Held Ligthhouse 3016 IAQ
http://slidepdf.com/reader/full/hand-held-ligthhouse-3016-iaq 48/60
Lighthouse LMS XChange Operating Manual
4-22 248083206-1 Rev 4
5. Select which file type to save it as: *.xls, *.html or *.csv.
6. Click on Save to save.
Once saved to a Microsoft Excel or comma separated value format, the
data can be manipulated and formatted using the standard Microsoft
Excel functions.
Please refer to the Microsoft Excel manual for further information.
8/9/2019 Hand Held Ligthhouse 3016 IAQ
http://slidepdf.com/reader/full/hand-held-ligthhouse-3016-iaq 49/60
00
248083206-1 Rev 4 5-1
5 IAQ Instrument Setup
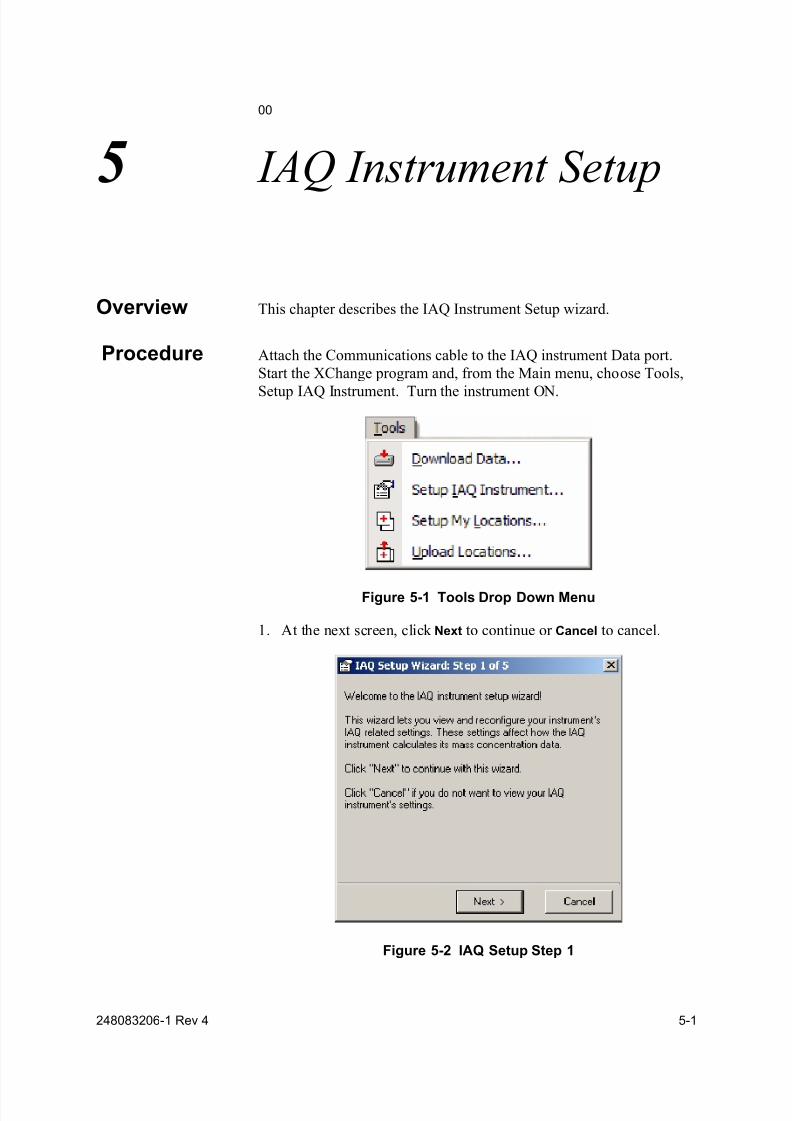
Overview This chapter describes the IAQ Instrument Setup wizard.
Procedure Attach the Communications cable to the IAQ instrument Data port.
Start the XChange program and, from the Main menu, choose Tools,
Setup IAQ Instrument. Turn the instrument ON.
Figure 5-1 Tools Drop Down Menu
1. At the next screen, click Next to continue or Cancel to cancel.
Figure 5-2 IAQ Setup Step 1
8/9/2019 Hand Held Ligthhouse 3016 IAQ
http://slidepdf.com/reader/full/hand-held-ligthhouse-3016-iaq 50/60
Lighthouse LMS XChange Operating Manual
5-2 248083206-1 Rev 4
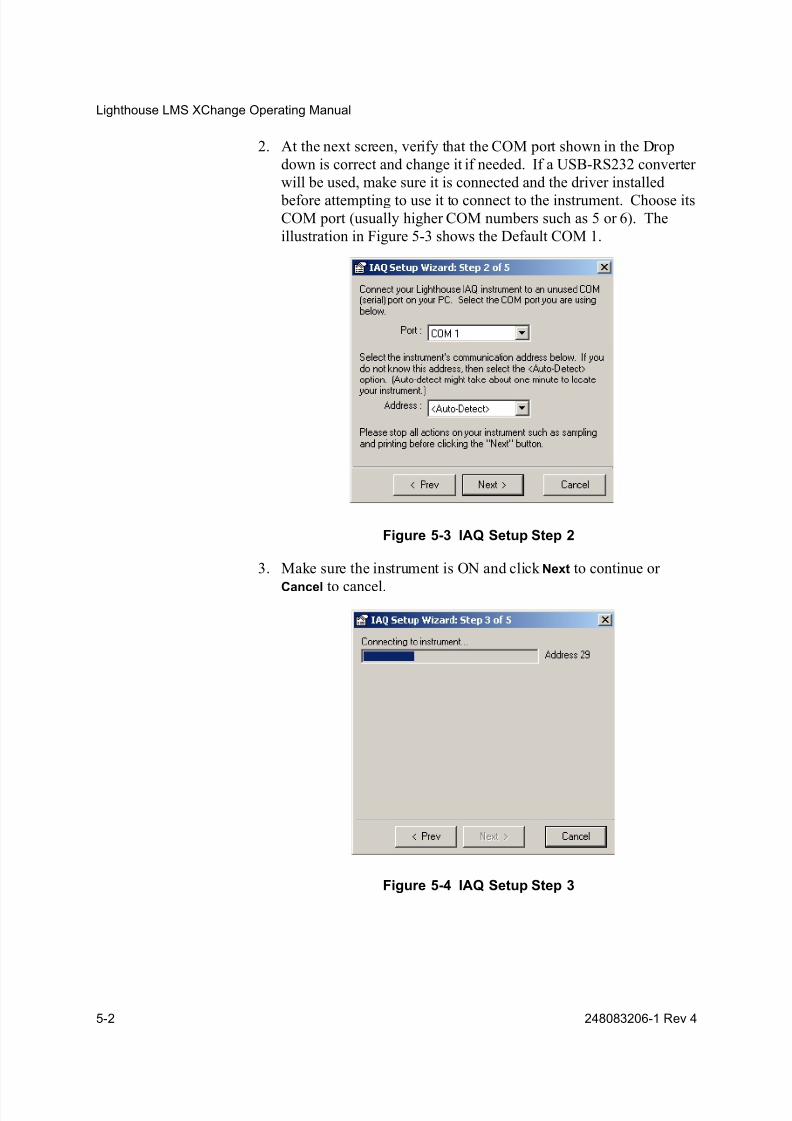
2. At the next screen, verify that the COM port shown in the Drop
down is correct and change it if needed. If a USB-RS232 converter
will be used, make sure it is connected and the driver installed
before attempting to use it to connect to the instrument. Choose itsCOM port (usually higher COM numbers such as 5 or 6). The
illustration in Figure 5-3 shows the Default COM 1.
Figure 5-3 IAQ Setup Step 2
3. Make sure the instrument is ON and click Next to continue or
Cancel to cancel.
Figure 5-4 IAQ Setup Step 3
8/9/2019 Hand Held Ligthhouse 3016 IAQ
http://slidepdf.com/reader/full/hand-held-ligthhouse-3016-iaq 51/60
IAQ Instrument Setup
248083206-1 Rev 4 5-3
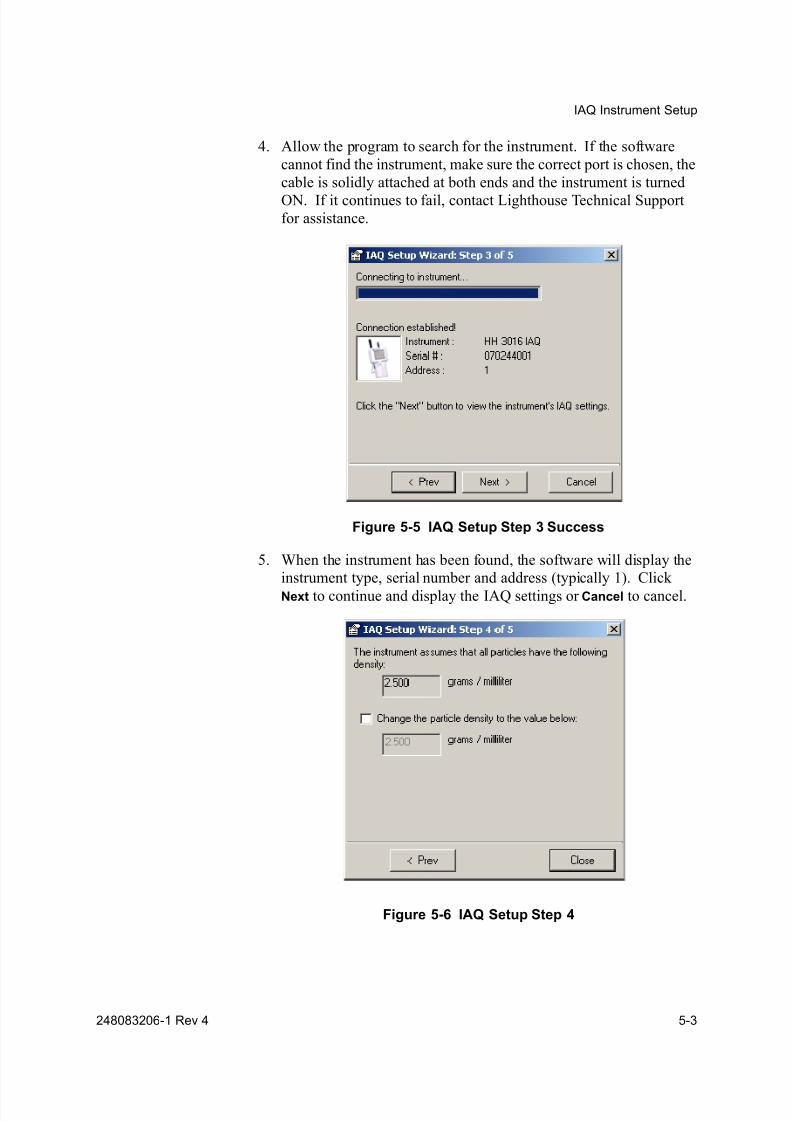
4. Allow the program to search for the instrument. If the software
cannot find the instrument, make sure the correct port is chosen, the
cable is solidly attached at both ends and the instrument is turned
ON. If it continues to fail, contact Lighthouse Technical Supportfor assistance.
Figure 5-5 IAQ Setup Step 3 Success
5. When the instrument has been found, the software will display the
instrument type, serial number and address (typically 1). Click
Next to continue and display the IAQ settings or Cancel to cancel.
Figure 5-6 IAQ Setup Step 4
8/9/2019 Hand Held Ligthhouse 3016 IAQ
http://slidepdf.com/reader/full/hand-held-ligthhouse-3016-iaq 52/60
Lighthouse LMS XChange Operating Manual
5-4 248083206-1 Rev 4
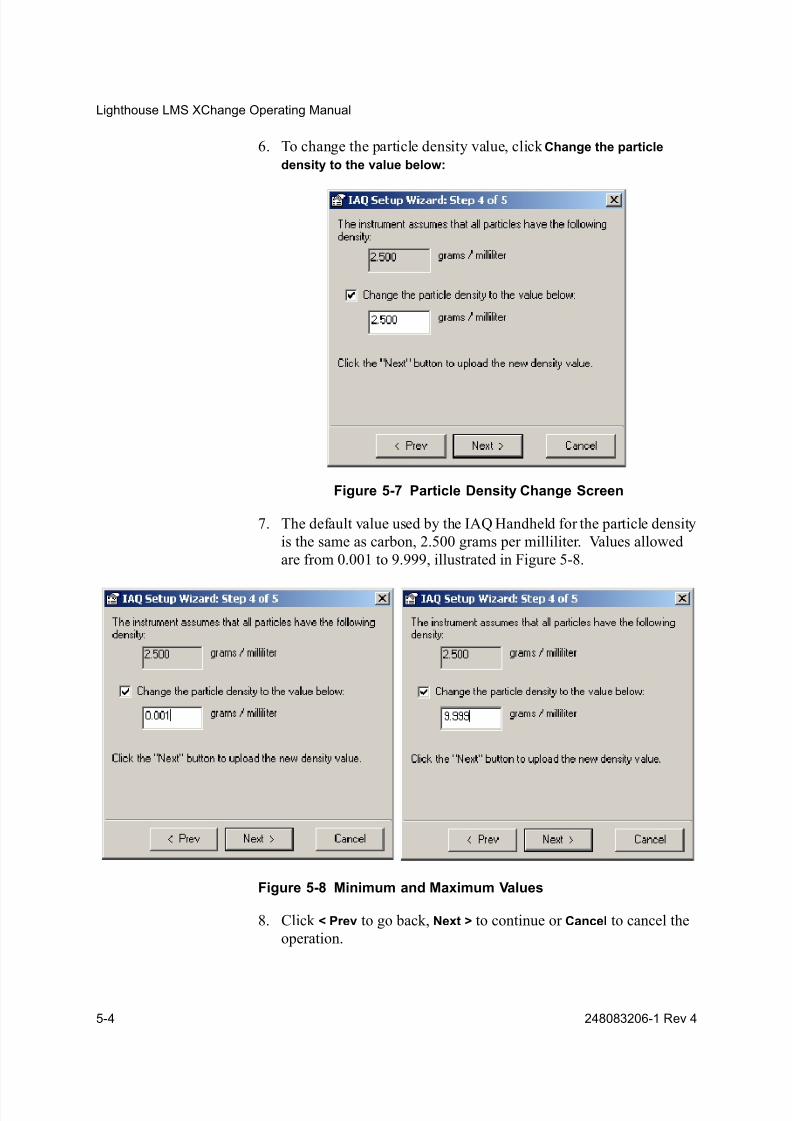
6. To change the particle density value, click Change the particle
density to the value below:
Figure 5-7 Particle Density Change Screen
7. The default value used by the IAQ Handheld for the particle density
is the same as carbon, 2.500 grams per milliliter. Values allowed
are from 0.001 to 9.999, illustrated in Figure 5-8.
Figure 5-8 Minimum and Maximum Values
8. Click < Prev to go back, Next > to continue or Cancel to cancel the
operation.
8/9/2019 Hand Held Ligthhouse 3016 IAQ
http://slidepdf.com/reader/full/hand-held-ligthhouse-3016-iaq 53/60
IAQ Instrument Setup
248083206-1 Rev 4 5-5
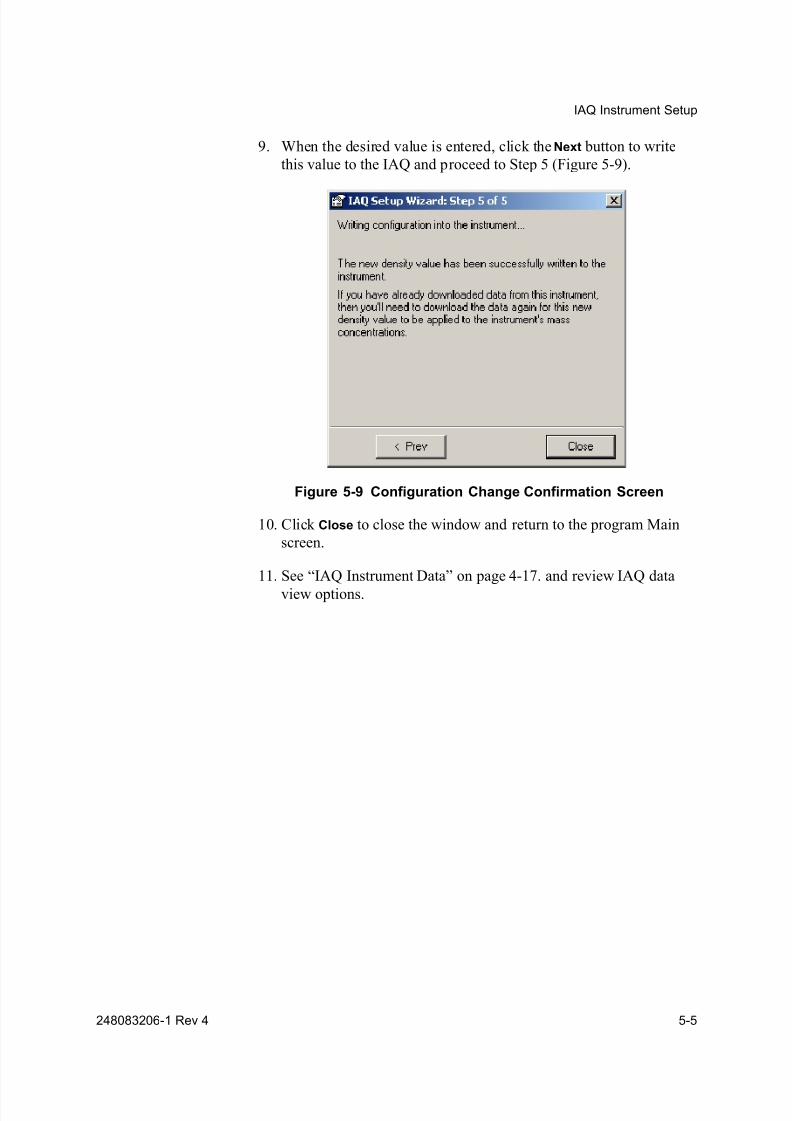
9. When the desired value is entered, click the Next button to write
this value to the IAQ and proceed to Step 5 (Figure 5-9).
Figure 5-9 Configuration Change Confirmation Screen
10. Click Close to close the window and return to the program Main
screen.
11. See “IAQ Instrument Data” on page 4-17. and review IAQ data
view options.

8/9/2019 Hand Held Ligthhouse 3016 IAQ
http://slidepdf.com/reader/full/hand-held-ligthhouse-3016-iaq 54/60
Lighthouse LMS XChange Operating Manual
5-6 248083206-1 Rev 4
8/9/2019 Hand Held Ligthhouse 3016 IAQ
http://slidepdf.com/reader/full/hand-held-ligthhouse-3016-iaq 55/60
00
248083206-1 Rev 4 I-1
Index
A
About Box 2-7
About LMS XChange 2-6
Acrobat Reader 2-1
After 4-1
Air velocity 4-19
Audience of manual 1-iAuto-Detect Sensor 3-2
Average 1-2, 4-2
B
Basic Concepts 1-1
Basic User Interface 2-3
C
Cannot find the instrument 5-3
Click, definition 2-7
COM Port 3-2
COM port 5-2
Comma Separated Value 1-2
Commands
buttons 2-6
description of 2-6
Configuration Bar 2-3, 2-5, 2-6, 4-2, 4-3
Instrument 4-3
Particle 4-13Show/Hide 4-2
Cumulative data 4-13
Cursor, definition 2-7
D
Data 4-1
Download 2-6
Data Display 4-1
Data Table 4-1
Differential or Cumulative 4-13
Show Mass Concentrations 4-17
Show normalized counts 4-15
Show PM and TPM Values 4-17
Show raw counts 4-14
Data Download 3-1, 3-2
Progress bar 3-2Data Status
Colors 4-19
Data Table 1-2, 2-3, 2-4, 4-1
Print 4-21
Save As 4-21
Scrolling 4-2
Statistics 4-2
Data Type 1-2
Default particle density 5-4
Definitions 1-1
Desktop Icon 2-1Differential data 4-13
Differential pressure 4-19
Displaying data 4-1
Download Data 2-6
Download data 4-4
Wizard 3-1
Downloaded Data 1-1
Downloading data 3-1
Connection lost 3-6
Instrument not found 3-4
No data to download 3-5Trouble shooting 3-4
Drag, definition 2-8
E
Environmental Data 4-18
Environmentals
Show 4-18
8/9/2019 Hand Held Ligthhouse 3016 IAQ
http://slidepdf.com/reader/full/hand-held-ligthhouse-3016-iaq 56/60
Lighthouse LMS XChange Operating Manual
I-2 248083206-1 Rev 4
F
Features 1-1
G
Getting started 2-1
Glossary 1-1
H
HANDHELD 3-2
Help 2-6
Help, additional 1-iiiHTML 1-2
I
IAQ Instrument Set Up wizard 5-1
IAQ Settings
Default particle density 5-4
IAQ settings 5-3
Installation 2-1
Instrument 1-1Instrument Download 1-2
Instrument Not Found 3-4
L
Lighthouse
HANDHELD particle counter 3-2
SOLAIR particle counter 3-2
LMS XChange
About window 2-6
Configuration Bar 2-5Environmental data options 4-18
Main Menu 2-3
Menu 2-3
Toolbar 2-5
Location 1-1, 4-4
Setup 1-2, 4-5
Show location names 4-5
Show location numbers 4-4
Location names 4-5
Locations
Setup 2-6
Upload 4-9
M
Main window 2-2
Manual 2-6
Manual, about 1-i
Maximum 1-2, 4-2
Menu 2-3
Microsoft Excel 1-2
Microsoft Windows, about 2-8
Minimum 1-2, 4-2Mouse, about 2-7
N
New Features and Changes 1-2
Normalized counts 4-15, 4-16
Numbers 4-4
O
Overview 5-1
P
Particle density 5-4
Particulate Matter (PM) 4-18
Print 2-6, 4-21
Printing 4-21
Progress bar 3-2
R
Raw counts 4-14
Regional Settings
date 1-1
decimal numbers 1-1
8/9/2019 Hand Held Ligthhouse 3016 IAQ
http://slidepdf.com/reader/full/hand-held-ligthhouse-3016-iaq 57/60
Index
248083206-1 Rev 4 I-3
S
Sample Time 4-15
Sample time 4-16
Sample volume 4-15, 4-16
Save as 2-6, 4-21
CSV 4-21
HTML 4-21
XLS 4-21
Saving data 4-21
Setup
Locations 2-6
Show environmentals 4-18
Show instrument info 4-3
Show location numbers 4-4
Show Mass Concentrations 4-17
Show normalized counts 4-15
Show PM and TPM Values 4-17
Show raw counts 4-14
Show sample time 4-15
Show sample volume 4-15
Show/Hide Configuration Bar 4-2
Shutdown 2-2
SOLAIR 3-2
Standard Deviation 1-2, 4-3
Startup 2-1
Summary statistics 1-2, 4-2
T
Temperature 4-19
Toolbar 2-3, 2-5, 2-6
Total Particulate Matter (TPM) 4-18
Troubleshooting
Cannot find the instrument 5-3
U
Units of measure
Air velocity 4-19
Differential pressure 4-19
Normalized counts 4-16
Sample time 4-16
Sample volume 4-16
Temperature 4-19
Upload locations 4-9
USB-RS232 converter 5-2
W
Web Link 2-6
Windows
about 2-8
main 2-2
regional settings 1-1
Wizard
Download data 3-1

8/9/2019 Hand Held Ligthhouse 3016 IAQ
http://slidepdf.com/reader/full/hand-held-ligthhouse-3016-iaq 58/60
Lighthouse LMS XChange Operating Manual
I-4 248083206-1 Rev 4

8/9/2019 Hand Held Ligthhouse 3016 IAQ
http://slidepdf.com/reader/full/hand-held-ligthhouse-3016-iaq 59/60
00

8/9/2019 Hand Held Ligthhouse 3016 IAQ
http://slidepdf.com/reader/full/hand-held-ligthhouse-3016-iaq 60/60