Embed Size (px)
Citation preview

Halo 3 Multiplayer
guide
V2.0
Compiled by : Ryu9921

This guide was made for the sole purpose of helping the average person get the skulls, achievements, and armor permutations in halo 3. I guess because I’m tired of telling people where to get the skull and/or taking them through the game to get the achievements/skulls. A lot of the information you will find here came from halo.wikia.com (halopedia) and I have tested and found it accurate. If there are any problems with anything in this guide or you wish to see something added, feel free to e-mail me at : [email protected] Any text written in the halo font (with the exeption of the text in the graphics) was written by me. The other text came from the cited source. Though, eventually I might get around to writing my own section(s), I think a simple compilation of sources will suffice for now. And lastly, all images are copyright of their respective owners, the halo name, logo, and design are property of bungie game studios and micro$oft corporation.
Thx,
Ryu9921
(edit : added my own variation of the armor table, no longer from halopedia)

Unlocking Armor Permutations
Name Chestplate (Body) Shoulders Helmet
Spartan Armor Permutations
Mark VI Default unlocked Default unlocked Default unlocked
CQB Default unlocked Default unlocked Default unlocked
EVA
Beat campaign level – Tsavo Highway on Normal difficulty
Beat campaign level – the ark on Normal
difficulty
Beat campaign on Normal difficulty
EOD
Beat campaign level – Tsavo Highway on
Legendary difficulty
Beat campaign level – the ark on Legendary
difficulty
Beat campaign on Legendary difficulty
Hayabusa Collect 5 campaign skulls Collect 9 campaign skulls
Collect all campaign skulls
Katana Unlock all achievements -none- -none-
Security -none- Earn 750 Gamer score in Halo 3
Unlock all achievements
Recon Given to memorable players by Bungie
Given to memorable players by Bungie
Given to memorable players by Bungie
Scout Unlock achievement – Too Close Too the Sun
Unlock achievement – Mongoose Mowdown
Unlock achievement – Used Car Salesman
ODST
-none-
-none-
Reach multiplayer status – Spartan
Graduate
Mark V
-none-
-none-
Reach multiplayer status – UNSC
Spartan
Rogue
-none-
-none-
Reach multiplayer status – Spartan
Officer
Elite Armor Permutations
Combat Default unlocked Default unlocked Default unlocked
Assault Default unlocked Default unlocked Default unlocked
Flight
Beat campaign level – Tsavo Highway on heroic
difficulty
Beat campaign level – The Ark on heroic
difficulty
Beat campaign on heroic difficulty
Ascetic Unlock achievement – Up Close and Personal
Unlock achievement – Overkill
Unlock achievement – Steppin’ Razor
Commando Unlock achievement – Triple Kill
Unlock achievement – Killing Frenzy
Unlock achievement – Overkill

Spartan armor permutations, as seen
on halopedia

Elite armor permutations as seen on
halopedia

Terminal locations
Terminals are closed until you approach them.
Terminals 1-3 are situated on level 6, ‘The Ark‘
Terminal 1 The first time you go inside, you will see a door almost immediately on the left across from a purple holographic panel. Simply enter this area of the level to find the first of the seven terminals.
Terminal 2When you go inside the structure to let the tanks across the bridge of light, there will be a Terminal almost directly behind the controls for the bridge. You must activate the bridge before you can access this terminal.
Terminal 3There is a part in the level in which you walk down a long hallway with white walls, and turn to the left at the end to continue. In the next room there will be a grunt wandering around, and many stacked up plasma batteries. as soon as you enter this room, go underneath the staircase on which you are standing. Underneath there will be a door, that conceals the terminal.
Terminals 4, 5, and 6 can be found on the 7th level, ‘The Covenant’
Terminal 4The fourth Terminal is located near the first elevator control. Before you ride the elevator up to find the Terminal start by looking at the access button. Next, look directly to the left you will see a dark ledge. Jump across to that, continue walking forward and the Terminal will open up.
Terminal 5After getting a Hornet vehicle, fly towards tower 2 (the one that the Elites had already disabled). A voice will remind you that Tower 2 is already clear, just to confirm you are at the right place. The Terminal is in the main hallway of the structure, across from the only door.

Terminal 6 Terminal 6 is identical to Terminal 4, only in the 3rd tower and off to the right (versus the left in Terminal 4).
Terminal 7 can be found on the final level of the game, ‘Halo‘
Terminal 7Terminal 7 is found at the beginning of the final level in Halo 3. To find it, simple head forward from the start of the level, until you encounter the area with a few structural beams going from one wall into another. At this point, turn right, and look for a beam separate from the rest. Follow this beam into a doorway. Cortana will ask you, “Where are you going?”. Turn left once inside, and the Terminal should be in full view. Cortana will say "Wait. What's that?" as a good hinter. The terminal will be in front of one of Installation 04 (II)'s pulse generators.
(word for word from halopedia’s
terminal page)

Halo 3 achievements and how to get
them
(chart from halopedia)
Icon Name Description Gamer-
points
Level Completion
Landfall Finish the first mission of the Campaign on
Normal, Heroic, or Legendary. 20
Holdout Finish the second mission of the Campaign on
Normal, Heroic, or Legendary. 20
The Road Finish the third mission of the Campaign on
Normal, Heroic, or Legendary. 20
Assault Finish the fourth mission of the Campaign on
Normal, Heroic, or Legendary. 30
Cleansing Finish the fifth mission of the Campaign on
Normal, Heroic, or Legendary. 30
Refuge Finish the sixth mission of the Campaign on
Normal, Heroic, or Legendary. 30
Last Stand Finish the seventh mission of the Campaign on
Normal, Heroic, or Legendary. 40
The Key Finish the eighth mission of the Campaign on
Normal, Heroic, or Legendary. 40
Return Finish the final mission of the Campaign on
Normal, Heroic, or Legendary. 50

Campaign Completion
Campaign Complete: Normal
Finish the Campaign on Normal. 125
Campaign Complete: Heroic
Finish the Campaign on Heroic (unlocks achievement for Normal, if not earned).
125
Campaign Complete: Legendary
Finish the Campaign on Legendary (unlocks achievements for Normal and Heroic, if not
earned). 125
Skulls
Iron Find and claim this skull. 10
Black Eye Find and claim this skull. 10
Tough Luck Find and claim this skull. 10
Catch Find and claim this skull. 10
Fog Find and claim this skull. 10
Famine Find and claim this skull. 10
Thunderstorm Find and claim this skull. 10

Tilt Find and claim this skull. 10
Mythic Find and claim this skull. 10
Others
Marathon Man Locate and access all Terminals in the Campaign. 40
Meta-game
Guerilla Score over 15,000 points in the Campaign meta-
game on the first mission. 10
Demon Score over 15,000 points in the Campaign meta-
game on the second mission. 10
Cavalier Score over 15,000 points in the Campaign meta-
game on the third mission. 10
Askar Score over 15,000 points in the Campaign meta-
game on the fourth mission. 10
Exterminator Score over 15,000 points in the Campaign meta-
game on the fifth mission. 10
Ranger Score over 50,000 points in the Campaign meta-
game on the sixth mission. 10
Vanguard Score over 50,000 points in the Campaign meta-
game on the seventh mission. 10

Orpheus Score over 15,000 points in the Campaign meta-
game on the eighth mission. 10
Reclaimer Score over 15,000 points in the Campaign meta-
game on the final mission. 10
Multiplayer
Icon Name Description G
points
Rank
Graduate Earn 5 EXP or finish 10 games to complete the
requirements for basic training (Online). 10
UNSC Spartan Earn your Sergeant rating to be recognized as a true
Spartan (Online). 15
Spartan Officer Advance to the Spartan Officer ranks (Online). 25
Achievements - Multiplayer Only
Two for One Score a Double Kill with a single spartan laser shot in a
ranked free for all playlist (Online). 5
Triple Kill Kill 3 enemies within 3 seconds of one another in a
ranked free for all playlist (Online). 5
Overkill Kill 4 enemies within 4 seconds of one another in a
ranked free for all playlist (Online). 5
Lee R Wilson Memorial
Score 5 grenade sticks in any ranked free for all playlist (Online).
5
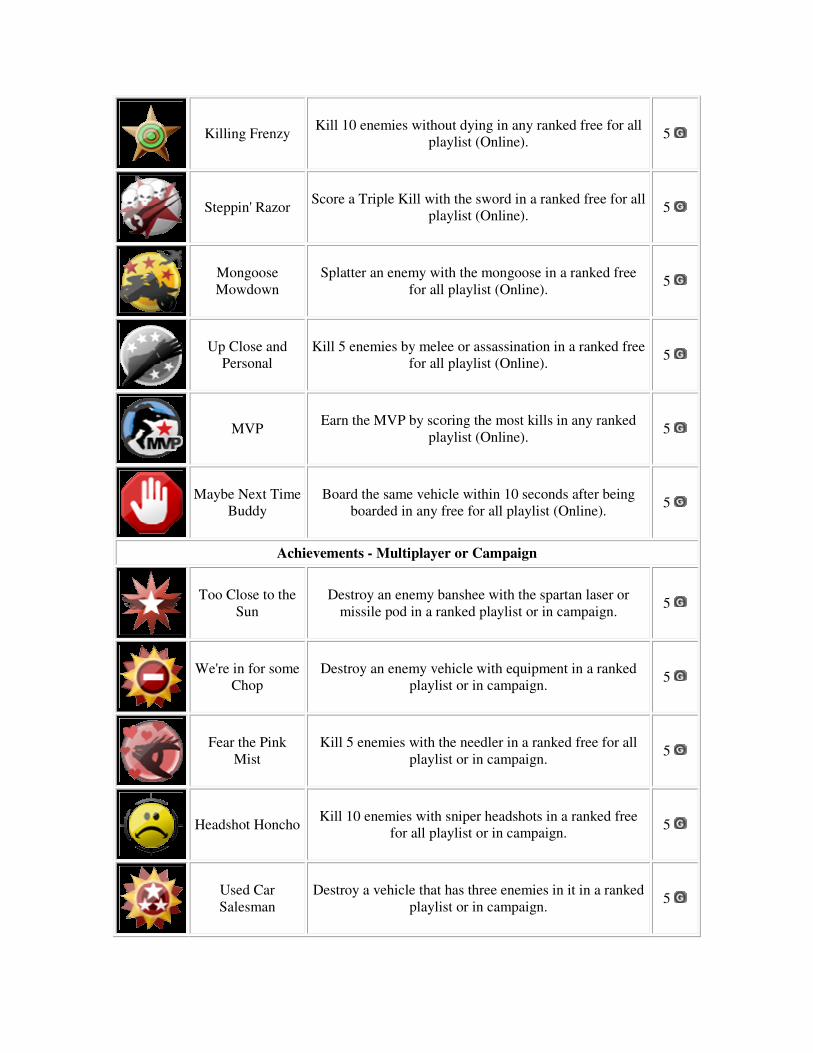
Killing Frenzy Kill 10 enemies without dying in any ranked free for all
playlist (Online). 5
Steppin' Razor Score a Triple Kill with the sword in a ranked free for all
playlist (Online). 5
Mongoose Mowdown
Splatter an enemy with the mongoose in a ranked free for all playlist (Online).
5
Up Close and Personal
Kill 5 enemies by melee or assassination in a ranked free for all playlist (Online).
5
MVP Earn the MVP by scoring the most kills in any ranked
playlist (Online). 5
Maybe Next Time Buddy
Board the same vehicle within 10 seconds after being boarded in any free for all playlist (Online).
5
Achievements - Multiplayer or Campaign
Too Close to the Sun
Destroy an enemy banshee with the spartan laser or missile pod in a ranked playlist or in campaign.
5
We're in for some Chop
Destroy an enemy vehicle with equipment in a ranked playlist or in campaign.
5
Fear the Pink Mist
Kill 5 enemies with the needler in a ranked free for all playlist or in campaign.
5
Headshot Honcho Kill 10 enemies with sniper headshots in a ranked free
for all playlist or in campaign. 5
Used Car Salesman
Destroy a vehicle that has three enemies in it in a ranked playlist or in campaign.
5

List of Skulls
Gold skulls give you an achievement, silver
skulls do not. Additionally, gold skulls will
give you a bonus multiplier when campaign
scoring is turned on (remember, the meta game
achievements can only be gotten if scoring is
set to free for all)
List of Gold Skulls
Iron
Level: Sierra 117
Directions: This skull is at the end of the level. You can find it after a part in which you cross a bridge packed with enemies. It is located on the roof of the building to the left of the building where Sergeant Johnson is being held captive (facing the entrance). You can get up by jumping onto the pipes. Go all the way to the end of the rooftop, and the skull will be there.
Icon: A skull marked with a hammer.
Effect: If you die while playing solo, you will restart at the beginning of the level (you cannot revert to the last checkpoint at any time). If any player dies while playing co-operative, you will reset to the last checkpoint.
Point Multiplier: 3x
Black Eye
Level: Crow's Nest
Directions: As soon as you start the level, move to the end of the first room where there is a locked door you will use later on in the level. The door is facing what appears to be empty weapon racks. Carefully jump on top of them. Above the racks there is a set of brown pipes connected to one larger pipe that you must jump onto. After that, jump on the larger pipe. The skull should be at the end of the larger pipe.
Icon: A skull marked with a smaller skull with a bruise under one eye. Also, the skull’s left eye is marked with a bruise underneath it.
Effect: Your personal energy shields no longer recharge normally. To do this you must melee an enemy with any weapon other than the Energy Sword.

Note: In Halo 2 the Blackeye skull could be used to give the player a full 300% overshield but the recharge effect only worked if you killed an enemy with a melee attack. In Halo 3 simply hitting an enemy with a melee attack will recharge your shield, regardless of whether the enemy dies or not. However you're no longer able to gain an overshield.
Point Multiplier: 1.5x
Tough Luck
Level: Tsavo Highway
Directions: There is a point in this level where there is a shield that is blocking all vehicles from passing it. Disable the shield and fend off the drones that follow. Proceed through the tunnel and you will be on Tsavo Highway. To your left there should be a distinguishable yellow ladder. Safely jump down on the other side of the ladder facing away from you. The support beam creates a slight bridge that goes into the cliff. At the end of this bridge there is a cliff to your left. On the cliff you should find the Tough Luck skull.
Icon: A skull marked with three clovers.
Effect: Enemies dodge grenades, needles, and vehicle assaults with a far greater success rate.
Point Multiplier: 1.5x
Catch
Level: The Storm
Directions: In the outdoor area with an AA Wraith, some Ghosts, and later a normal Wraith, there is a silo-like building past the boathouse near the edge of the cliff. Get up onto it using a vehicle and a grenade or an ally (Alternatively, you can park a Ghost next to the silo and then park a Warthog on top of it as a ramp, but this may take some practice), and the skull will be there. Note that if the non-AA Wraith's driver is killed (whether or not the Wraith is destroyed), the skull will disappear. This skull can be seen from several locations, including the boathouse where the sniper rifle is located and the landing where the regular Wraith is located. If the skull disappears, go back to your last saved checkpoint.
Note: There is a glitch in some games where this skull will not appear, even if the other instructions have been followed. In such an event, you should complete the entire campaign on at least Normal difficulty. Also note that the skull itself is affected by physics, so if a Wraith’s plasma mortar hits the top of the silo, the skull may be lost.

Icon: A skull marked with a diamond.
Effect: All AI-controlled units, friendlies or foes, throw more grenades, where applicable. The Catch skull has no effect on Flood, as they don't throw grenades.
Point Multiplier: 1.5x
Fog
Level: Floodgate
Directions: At the beginning of the level, you will walk into the destroyed city of Voi. As soon as you enter the city, there is a large building to your right after the missle silo. Take out a weapon with a scope (preferrably a battle rifle) and wait for a marine to start yelling to look in the air. A single flood soldier should appear on top of the building, ready to jump across the structure. Kill the flood just before it jumps. Hopefully, the skull will fall off the building so you can pick it up. This should take several tries. If you miss the flood or the skull is stuck on the building, just restart at the last save.
Note: Look up and to the right just BEFORE entering the city continuing to walk into it. You will see them run to the top ledge of the building, but you have a VERY limited amount of time to shoot the Flood creature. But the first time, if you're unable to shoot them, you will at least have a good idea of where to be looking the second time, and just revert to saved.
Icon: A skull marked with a swirl of fog.
Effect: Your motion sensor is no longer visible.
Point Multiplier: 1.5x
Famine
Level: The Ark
Directions: Shortly before you reach the area where Johnson flies down and contacts Commander Miranda Keyes, you will notice a small fork, the other path leading to your future destination. Pass through here, and head to the end of the stretch with the platform overhead. At the end, turn right and you will see a boulder. Use it to climb onto the platform, and walk to the last of the supports going up. It has an opening over the slanting part of the platform, and the skull is in there. Use a grenade (plasma works better), deployable cover or a brute-shot jump to get up. If you prefer, you can come back to here after getting the Scorpion and then get the skull.
Icon: A skull marked with a smaller skull.
Effect: All weapons that are dropped by enemies or are scripted to spawn on the ground (e.g., near a downed Pelican or group of dead bodies) have halved or reduced ammunition or charge. However, weapons found in cases still have the regular amount of ammo.
Point Multiplier: 2x
Thunderstorm
Level: The Covenant
Directions: There is a part in the level where there are two hornets and you are expected to take one and get to the third tower to take it down. When you get in, start to fly to the third tower. On your way there, you will see the second tower (which was disabled by the Elites). It looks exactly like the third tower (only without all the land and enemies on it). Fly over to it. There is a long part of the tower that extends out into the ocean. There is a very tall ramp that leads up to it. At the end of the extension you will find the Thunderstorm skull.
Icon: A skull marked with a lightning bolt.
Effect: All enemies (and Sangheili allies) are promoted to the next available rank. The number of shielded Flood attack forms is also increased.
Point Multiplier: 1.5x
Tilt
Level: Cortana
Directions: The skull is at the top of the large circular room where Cortana asks your name, and says it’s very nice to meet you (your screen and movement won’t change for this one). To the left of the room will be some small, somewhat fungal, growths on the walls. Using these, jump up onto a platform. There will be some more nearby, so use those to get to a large circular platform with the skull on it. The skull will not be there after you reach the next save point.
Icon: A skull marked with a smaller skull with a hole in its head.
Effect: Enemy resistances are greatly increased. Where a particular type of weapon normally does slightly reduced damage (e.g., projectiles against Brute armor, or plasma against Brute flesh), it is instead greatly reduced.
Point Multiplier: 2x
Mythic
Level: Halo
Directions: Hug the right wall from the very beginning of the level. Soon you will reach a cave with a dead end, and the skull is on the ground, among the rocks.
Icon: A skull marked with a circle with a smaller circle in it.
Effect: The health of all enemies doubles.
Point Multiplier: 2x
List of Silver Skulls
Blind
Level: Sierra 117
Directions: In the beginning of the level, you and your troops will come across a waterfall with a phantom dropping off troops. Kill all of the enemy troops to get them out of the way, and move to the right of the area. There is a rocky outcrop, and one of the larger rocks extends into the water. The blind skull is at the tip of the rock.
Icon: A skull marked with an eye with a crossed out pupil. Also, the skull’s eyes are shaded white.
Effect: Your HUD and weapon are no longer visible.
Grunt Birthday Party
Level: Crow's Nest
Directions: You will come to a part where you drop down into a tunnel, and as soon as you land, Cortana will send you a message. There will be drones in the corridor coming out of side tunnels. Go to the end of the tunnel and slowly approach the ledge. If you look down over the ledge BEFORE falling, you will see a small green platform with an arrow pointing in. Face back where you came in the corridor, and slowly back away until you drop off the edge. The second you start to drop, start moving forward. If done correctly, you should just barely "grab" the ledge and since you SHOULD already be moving forward, it will walk you into the tunnel with the skull. If it still doesn't make sense as far as where, you can look down through the end of the corridor at the floor you're standing on before you drop down, and you can vaguely see another room underneath the grating
under your feet. At the end of the hallway you drop into, there should be the Grunt Birthday Party skull.
Note: If walking backwards off the edge does not work for you, take a gravity lift and use it to propel yourself back up to the room underneath the grating after you have jumped down off the edge.
Icon: A skull marked with a candle.
Effect: If a Grunt is shot in the head with sniper rifles, beam rifles, battle rifles, carbines, or pistols, confetti explodes out of it (the explosion causes minor damage to nearby enemies), and children cheering are heard in the background.
Cowbell
Level: The Ark
Directions: After defeating the Scarab, grab a gravity lift from the small structure in the center, then continue on until you pass the room with a lot of explosive plasma containers. In the hallway after this room, there is a tall section with openings above the turning point of the hall, and the skull is in the top one of the highest of these. Use the gravity lift to get there (place the lift around the middle of the ramp, or place at the bottom of the ramp and use a brute shot jump for extra height). If your grav lift is destroyed, you can always revert to last save since the room containing the skull is a checkpoint.
Note: You should always couple this skull with the Grunt Birthday Party skull for maximum damage when encountering large numbers of Grunts.
Icon: A skull marked with a cowbell.
Effect: The force of explosions is increased immensely.
IWHBYD
Level: The Covenant
Directions: After the Arbiter kills the Prophet of Truth, kill all of the Flood in the entire area between Truth's body and the elevator that you came up on. Jump through the rings in the following order: 4, 6, 5, 4, 5, 3, and 4, with "1" being the ring closest to the elevator and "7" being the ring closest to Truth's body. If done correctly, the rings should all flash in a chasing pattern, and the skull will appear on the small bridge leading to the platform with Truth's body. It takes about 5 seconds for the rings to flash.
Note: In some cases you may need to complete the level after getting the skull to unlock it, unlike with the others. This is not always the case, however. After getting the skull

check in the level selection lobby whether it is unlocked or not. If not, reload your last checkpoint, get the skull again, and finish the level.
For more information, see: Halo 3: IWHBYD (I Would Have Been Your Daddy) Skull
(on halopedia)
Icon: A skull marked with a double helix (DNA Symbol).
Effect: Unlocks new, often humorous, dialogue for the AI.
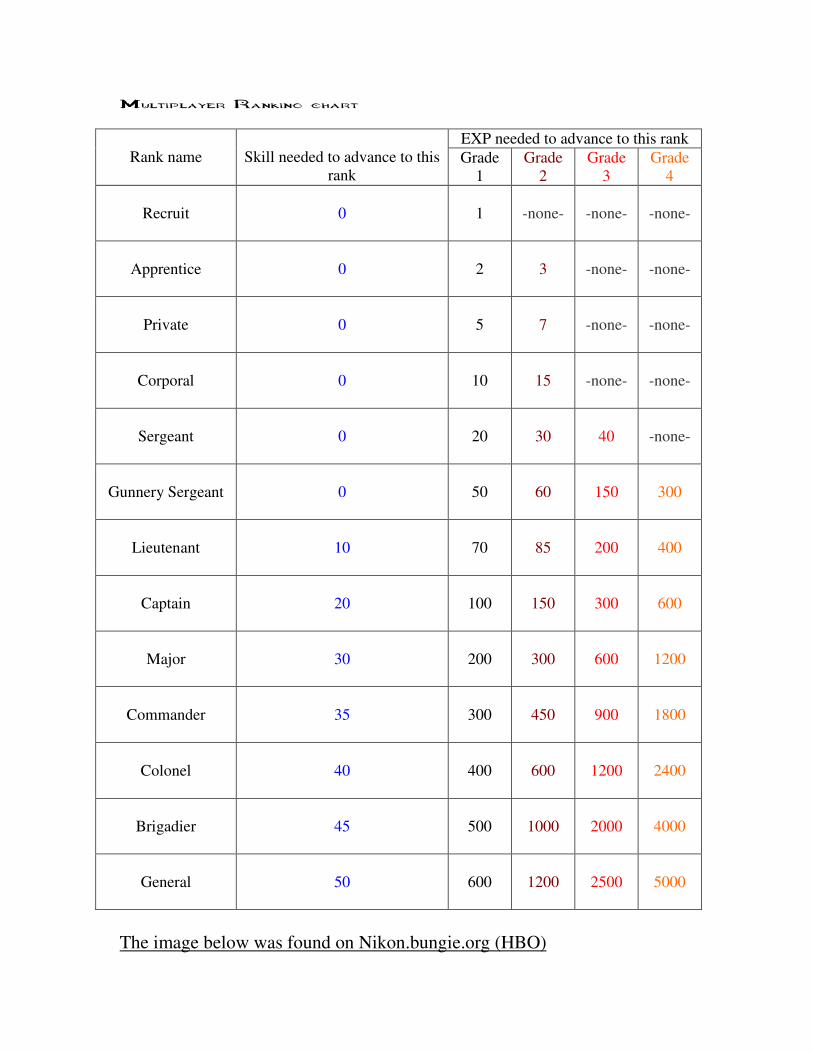
Multiplayer Ranking chart
EXP needed to advance to this rank Rank name
Skill needed to advance to this
rank Grade
1 Grade
2 Grade
3 Grade
4
Recruit
0
1
-none-
-none-
-none-
Apprentice
0
2
3
-none-
-none-
Private
0
5
7
-none-
-none-
Corporal
0
10
15
-none-
-none-
Sergeant
0
20
30
40
-none-
Gunnery Sergeant
0
50
60
150
300
Lieutenant
10
70
85
200
400
Captain
20
100
150
300
600
Major
30
200
300
600
1200
Commander
35
300
450
900
1800
Colonel
40
400
600
1200
2400
Brigadier
45
500
1000
2000
4000
General
50
600
1200
2500
5000
The image below was found on Nikon.bungie.org (HBO)

Here is a thread from bungie.net detailing the
rankings system. I’m tired of explaining this too. There is one caveat to consider before we get under weigh. Bungie is not likely, nor or ever, to release the true inner workings of the Halo 3 ranking system, but as it is based somewhat on the Microsoft Trueskill system, this is a fair approximation of the way skill ranking works in Halo 3.
What is the Trueskill system? The Trueskill system is a player skill rating system for Xbox Live. Halo 3 uses a version of the Trueskill system in order to make the matches fairly even. How Does Trueskill Work? Trueskill assigns skills on a normal distribution (bell curve, Gaussian). The Trueskill system has two main variables to consider. They are your player skill level (Mu) and your uncertainty factor (Sigma). Mu is an approximation of your skill level based upon past performance. Win games to raise Mu, and lose games to lower Mu. Sigma is the numerical representation of the range in which your true skill could lie. Play really consistently, and you have a low Sigma. Play streakily, and you have a higher Sigma. After a win, the Trueskill system adjusts your skill ranking based upon the Mu and Sigma of all the players in the game. We'll go deeper into how much it is adjusted later. Trueskill systems use a conservative ranking Ranking = mu - (K * Sigma) so your skill is likely to be higher than the actual number represented in your Halo 3 highest skill level. K is a constant assigned an arbitrary value by the developers of the game. Why don't I level up after winning X games in a row? / Why does my friend go up three levels a
game and I don't? Mu increases after a win. Always. The increase is proportional to the winner's Sigma and the
Mu difference between the winner and the loser. So, if your Sigma is high, you will proceed faster through the ranking system (in BOTH directions). If your Sigma is low, you will both gain and lose rank more slowly. So, I want a high Sigma value? While it sounds as though a high Sigma value is desirable, it CAN be a double edged sword. A high Sigma can mean you increase by one level for every win. It also means you decrease by one level for every loss. In addition, a high Sigma means that your skill ranking will be significantly lower than your actual skill owing to the conservative nature of the Ranking = mu - (K * Sigma) ranking equation.

Also, Sigma value starts out VERY high. So, if this is your friend's first time in a particular ranked hopper, and he wins consistently, his rank will rise meteorically due to his high Sigma. Myth Busting Trueskill DOES NOT take into evaluation performances inside the game. The ONLY statistics that Trueskill takes from a game are the Mu and Sigma values of all the players, and how you placed. This means that out of all of these statistics: Getting the MVP Having a High K/D ratio Getting the most medals Skill levels of those you killed / killed you Weapons you used Headshots Captures, detonations, stops, ousts, etc. NONE of them matter when calculating the Mu increase/decrease. Any link between any of these and the skill ratings are purely correlative and not causative. For example. When I play Team Slayer with my buddies on my alternate gamertag, much of the time I end up carrying the team. I created this tag to play with my buddies, and as such, have only ever played on that party with that tag. I ranked up to the level of my friends within 20 or so games, while it had taken them 50 to 100 games to reach their level. My friends thought that it was because of my frequent MVP status and my high K/D ratio that I leveled up so fast. Wrong. I leveled up fast because A) I initially had a very high Sigma, making my Mu more variable after each win, B) Starting out at a 1 and playing people in the mid teens gave me a considerable boost every time I won, and C) We won more frequently than they had in the past. Summation If you're worried that you're not getting your fair shake in the ranking system, look at the last 50 games that you've played in that hopper. (If you haven't played 50 games, play more. The system needs more data.) Take your win/loss average. If it's 65% or above, and you've been in that playlist for a while, you've probably increased in level 2 or more times over the last 50 games (or you will in the next 20 or so). Otherwise you are going to be hovering around the same level or dropping in rank. Addendum, Opinion, and Technical Notes In strict Trueskill systems, Sigma only decreases. I believe the "momentum" system in Halo 3 means that Sigma can be increased through consistent winning or losing. This is total conjecture, but I think that Sigma in Halo 3 matchmaking hoppers is proportional to the absolute value of the win/loss ratio of your last X number of games. The formula probably looks a little like: Sigma =
C ( | wins - losses | ) where C is an arbitrary constant. This would explain why when some people go on a win streak with two or more different parties, their skill goes up faster than their teammates' skill. I also believe that the system is weighted so that the peak of the normal distribution is around
level 20, not level 25. That means it will take more wins to level through 1-25 than it will 25-50. Which makes a bit of sense, if you don't want the highest levels too terribly crowded. The higher the Sigma of your opponents, the less Mu you gain from beating them. Predictable outcomes (e.g. win against a lower ranked opponent) are treated as statistically less significant. Upsets are given more weight. So, winning against lower ranked opponents doesn't do much for your Mu rating. Neither does losing against higher ranked ones. But beat a team that's 6 or more ranks above you and at least someone on your team will rank up. Trueskill ratings have no discernable correlation from hopper to hopper. When you play on a hopper you've never played on before, you are starting with a fresh Mu and a high Sigma. Team Mu and Team Sigma are the summation of the Mu and Sigma values of all the players on the team. When calculating the skill of an opponent in a team game, the system uses the Team Mu and Team Sigma values in calculation wherever rational. _________________________________________________________ Important additions, Appendices, and Member Questions Answered _________________________________________________________ "Why do I win 10 games and not level up, then delevel when I lose 2? Help!" There are several possible explanations for this. The easiest one, and the one that fits the Trueskill system EXACTLY as explained by Microsoft, is that losing against a team that is X (I believe 6 or more, but experimentation is needed to determine the true value) skill points below you can cause you to lose as much as 5 times the Mu value that winning against even level teams gains you. Of course, winning against a team that has X more skill levels than you can net you as much as 5 times the Mu gain. The reverse is true as well. Winning against a weak team can count as little as 1/5th of an even skill win. Second, and this is enlightened conjecture, your Sigma value was low at the beginning of your streak, and since your win streak is raising it, the conservative ranking system (Remember, Rank = Mu MINUS (K times Sigma)) is kicking in to reduce your apparent skill level. Your real Mu is higher, but your higher Sigma is having a negative impact. mo0vaf00 writes: (edited to clarify intent) So is there some kind of value that requires you to be inconsistent to rank up? If I win 1 game going even and win the next going +10 do I have more of a chance of ranking up than just winning 2 games getting the same score? This conclusion is popping up fairly frequently. The answer is no. The system does not look at "In Match" statistics. At all. These stats are all included in a list above. The game only looks at your wins and your losses, and the strength of the opponents you play against. Also, the system does not "reward" you for having a high Sigma value. There is ONE positive associated with high Sigma, and there are TWO negatives. Positive: Your level can move up faster through winning. Negative: Your level can move down faster through losing. Negative: The conservative ranking system ranks you lower when your Sigma is higher.

Higher Sigma simply means your level is more fluid. Sigma is good to have high when you are still reaching your appropriate skill level, but good to have low once you've reached it and are working on improving. Go to : http://www.bungie.net/Forums/posts.aspx?postID=14414600 for original post ( posted by : EL Kafungus )
For those of you that this confuses the snot out of (most of you I presume) here is my interpretation: the longer you have been playing, the harder it is to level up. Plain and simple. The system does NOT take into account that you got mvp, most kills, most medals, kill to death ratio, etc…etc… what id does count, is whether you won or lost, and what rank the people you won/lost against were. Lose against lower ranks = more level down whereas win against higher ranks = more level up. The system is very complicated in many different aspects, but this is the basic gist of what it’s doing and how it pertains to you.

MMMMap ap ap ap tipstipstipstips These tips were pulled off of the halowiki.net maps pages and were edited for spelling and grammar. Some posts were removed due to redundancy. I apologize for the choppy formatting. MS word sux. A lot.
Construct Tips
From halowiki.net
• When you are playing a team slayer or odd ball type game the best place to be is on the top ring on the side opposite of the large ramp. The only two access points to this area is from the purple lift or from the orange lift. Having two guys cover each end works amazingly. - Bondie 90
• If you're really desperate for kills, then grab the Energy Sword and camp by the top of the purple beams, so you can see both. People always come up, and you're within range to lunge at someone on either side. - BuzzyBoz
• If you're good with a BR, you can just run around in circles, maybe with the Energy Sword as a secondary weapon. I don't recommend dual wielding though, because there aren't that great of weapons for dual wielding. There are Maulers, and maybe some SMGs or Pistols, but you'll do better to pick up a BR, sniper, and frags. Plasma Grenades don't hurt either, but it seems like they're smaller and harder to stick with. - Shadowhawk
• Power Drains are especially effective at the exit of the bright orange grav lift at the back of the level (not the side that opens into the sky). When you hear someone come up, chuck a Power Drain in front of the exit because they don't have a choice to get out somewhere else. Sit by the wall with the grav lift in it, and pull out your BR (or wait 1 second and throw a frag), but be careful to stay away from the Power Drain you just threw. The instant they come out, their shields are gone, and most of the time, you've got yourself a kill. Or, if you feel particularly annoyed at the person in the grav lift, you can sit right where they come out, and run up and assassinate them. I tested it and you get shot out about 6 feet, and you cant turn around (or, stick em). - Shadowhawk
• Grab the Flamethrower and go up one of the Purple Lifts, once up there you can kill people as they come out of the lift or enter the room. Be careful though, if they enter the room from the side that leads to the Main Lift, then they will probably kill you with a BR and Grenades. If they come from the other entry, then you have a sligtly better chance of killing them. The Missile Pod also works well and even if people attack from any direction, you can still launch a missle and most likely kill them. It is great because it has a much farther range than the Flamethrower--Mr. Killtacular

• But, if you are going to get the Flamethrower, there are about six different ways into that room, and you could be ambushed. And it's REALLY hard to take out six people firing at you with only a Flamethrower. - Shadowhawk
• I always pop a few 'nades up the tubes before I go up. It's worked wonders to get rid of those campers before I go up and get assassinated, and it's even better when the whole group's up there too. -NitroJUnkie33
• Try pushing the fusion cores (located by the bottom of each purple lift) into the lift prior to throwing grenades into it. It makes a much bigger boom for an opponent waiting at the top to assassinate you. Just make sure you follow it with the frags quickly otherwise they have plenty of time to get out of the way before the grenades get there. --ReaperG80 16:30, 21 October 2007 (CEST)
• When you throw a Power Drain or Frag Grenade into a gravity lift, make sure you don't go up too quickly or you'll kill yourself instead.--Mr. Killtacular
• In Team Slayer, both sides will begin the match on the second (middle) floor. At the start of the game rush the bottom floor towards them throwing frag grenades (and if you start on the side facing the main lift sticky of the wall left) and you will get a kill or two before they can even get up the lifts. e.g. see slot 4 'construct start' - THEcareh
• Instead of rushing the bottom from the start, which people have gotten wise to, try going over the top of the center room (If you start near the grav lift). There are a stack of fusion cores just before the purple lift and you can usually get a kill or double from people coming at you along the top as well. Every game I've started in Construct I've gotten at least one kill from the blast and picked off the other guy with lowered shields. -PMA Famine
• Also, from the start after you've laid waste to the fusion core rushers, run up the narrow railing leading up to the sniper spawn platform for a quick shot at the Energy Sword. Then you have about 10 seconds before anyone else can get to it and just camp them under the walkway. - PMA Famine
• Keep your eyes on the center and opposite side of the map. You can get a lot of kills and assists with the Battle Rifle and when you throw some grenades over to the opposite side of the map when players come out from cover.
• Communication works here. In Team Slayer, one player can play back, call which elevators or ramps are being used. They can also cover the teams back if they are spawning at sword, and keep fire on those poor souls in the elevators.

• Of course it depends on game settings. If you double team when you fight and both of you die, then camp the bottom with the flamethrower and let them come to you. Here you can grab both BRs and go up main lift plus you can easily be back in the game without the lack of weapon control. In Team Slayer, camping at the two side gravity lifts are very important. I tend to like maulers and BRs. Power Drainers are very effective but it is a situational equipment and I can't speak enough of it. The MOST important equipment on this map is the bubble shield. Protect yourself for the win! - t3h w0lf (GT)
• For camping at the side elevators, flamethrowers are useful in a way, as you can "paint" the elevator with flames. (Of course warning your team before hand!) - Shiverspawn
• The maulers are found all over this map, use them. They are great in the top level when combined with the BR. - MentalBurnout
• Sometimes you can get a quick few kills with the sword on the main level on the walkway all you have to do is sit on top and look at your radar
• In the beginning of the game if you're the team that is closest to the yellow elavator, try throwing a frag grenade towards the purple elavator on the right, if there are enemies going that way to get the sword then you will automatically kill them from the multiple explosions that you triggered from those power boxes laying in front of the elevator.. This is an easy way to get a step up on the other team and make it to the top first. Espescially useful if the whole team follows one another, I've had multiple overkills here.
• Don’t forget to use your radar when you are approaching any grav lift, but some people just won’t listen. - Pappa Ton
Epitaph Tips
• Using Doors- There are quite a few shield doors in this level. Use them to your advantage. I recommend the Mauler.
• Hover and Cover- I recommend that you get a brute shot and stay near a hover ramp on either end.
• High Ground- Remember, don't run around on the bottom of the map! You're asking to get killed by someone jumping on your head. Make sure that you're on a higher level as much as possible, to set up ambushes and prevent others from ambushing you. The platforms where the rocket launcher spawns are good, but they're easy to get to, so either move to the ramps nearby or keep an eye on your motion tracker.

• There are many places to use radar effectively on this map. The ramps that wind around the outer edge of the map are good for outsmarting your opponent. Often, I'll run quickly across the floor from one shield wall to another, to bait someone. Sure enough, an opponent will start shooting at me and chase me through the shield wall and up the ramps. I'll run and pretend like I don't realize I'm being shot at and pursued. This mindlessness ALWAYS encourages the person chasing you to keep doing so. Then as I turn the corner, I duck to disappear from motion sensor and pull out my mauler. As the person approaches the corner, I jump and drop on him with a shot followed by a melee. This works everytime.
• While the floating platform has a rocket launcher and provides a great view, you are a sitting duck if you stay there long. Once you get the rocket launcher, or even if you discover that someone else has, jump over to one of the two nearby slanted beams and then walk up to the top. From there you have a lot of cover, and even more attack options.
Foundry Tips
• You can grenade jump to the highest level if you desire. While this is risky to do as it drains your shields, it could also prove useful if you have a sniper rifle and know how to use it as you have an excellent vantage point.
• Generally speaking, try to get to higher ground as much as possible.
• However there are many occasions where the higher ground is not the best option, as you will be more visible to your opponents. Better yet, keep on the low ground while making note on how to quickly get to high ground using the various spools and crates around the level.
Guardian Tips
• Dual Wielding - Due to so much close range fighting, dual wielding weapons is extremely useful.
• In general, go for the hammer. Tight corridors=hammer domination. It's in the middle, directly underneath the center platform. When playing king of the hill, grab the bubble shield (in the tree trunk) and the hammer, and camp out in the middle to rack up a high score. When approached, use the bubble shield. If someone enters the shield, use the hammer. Its a good idea to grab a medium-range weapon on the side as well, such as the battle rifle, for sniper protection.
• Battle Rifle + Shotgun - Use them. • In a team game the shotgun/hammer and BR's in the main lift room can be deadly. • Watch the choke points on either side or possible snipers straight across the level. • Use the bubble shield against snipers and other long/mid range weapons. • If you spawn anywhere near the overshield in the beginning, get it first! In free-
for-all games, I frequently find that two people start out close to it, and the person

to grab it first is likely to hopelessly kill the other while the overshield is still charging up. Forget about the needler (for now, anyways)!
• Make sure to learn the Guardian_Tactical_Jumps. The are particularly important on this map due to its small size. --Mesh
• Given the small size of the map, sounds can be very useful in determining where your opponent is. Listen for grav lifts, overshield, invisibility, and bubble shield deployments. --Mesh
• There are explosive items in the corner of the ramp leading from the yellow grav lift room to the mauler room. If someone is up there firing down into grav lift room, target the walls with a grenade or shot. Likewise, if you position yourself at the top of the ramp, make sure to blow up the walls first --Mesh
• The sniper can be very effective on this map. Snipe from the sniper tower and all three levels across the map (bottom and mid are very effective due to the hallways). --Mesh
• After getting overshield, you can take the needler if you are not confident with the sniper in order to easily kill the incoming enemy before they take the grav lift. Usually, enemy don't prepare for this one since people forget the needler. Then, get rid of the needler.
• In any team games try to save the overshield until you really have to use it. The overshield provides a short period of invincibility when it's first activated, so why waste it? Wait until you know the opposition are storming then at the last moment grab it and run head first into the guy with the biggest gun - by the time they know what's hit them you've already killed their biggest threat, claimed their power weapon and are charging the team with x2 shields. - THEcareh --Froufrou
• In team slayer having three teammates staying together to distract the other team and have the other come up from behind, or just to get that one person who is always left running around alone. This is extremely useful if they have the shotty or the hammer, just don't stick TOO close together. - titlepsychoticgirlie
• In FFA Oddball, if you spawn at the tower with sniper rifle downstairs, grab the needler and wait for other players to come to get the ball, and then just shoot enough needles to them to cause a detonation. --Live4Halo
• If getting sniped constantly, rush for the Active Camo in the Blue Room, and grab the Spikers (Dual-Wield them preferably) located a short distance from the Active Camo. From there, with whatever Camo left, grab the Overshield, and head straight for the lift. After being transported up to the second level, make the jump over to the middle platform. Use the teleport to the floating sniper platform, and rush them with dual Spikers. Melee with this works equally well if you land next to the sniper. The strategy also works great if you run straight from the lower level of the Lift Room right where the Overshield and Gravity Hammer is. From there, follow the same rush instructions. The Shotgun works too, very effective at close ranges. This strategy isn't the best on Team Slayer, however, if you have a Sniper bodyguard. To improvise, simply melee the bodyguard, and blast the sniper as he runs. If there are more than 2 people from the enemy team on the

platform, I recommend stocking up on grenades, and flushing them out from the nest, and then going after the best member with your weapon battery.
High Ground Tips
• In Rumble Pit, what I did was get the sniper and shotgun and camp at the place after the tunnel of the sniper spawn where the big cement wall is. Just camp there and snipe. When people come at you, bring out the shotty and own them. i got 15+ kills in a row without dying on this map and i also got 9 games in a row coming in first using this. - sarg338
• Take the shotty or the Brute Shot, these are deadly in the small rooms in the base, especially in the tunnel exit/entrance room –Cadab
• If you are in a CTF/Assault game, guard the gate opening panel! (it is situated on the right [facing outside the base from inside] up a small flight of stairs) it is a blue panel, and once activated the gate will open, enabling mongoose quick strikes.
• If you are defending, camp just behind the main wall, not on top! this makes you impossible to snipe and you will encounter enemies who are not as aware of your presence!
• Carbines make good medium range weapons on this map, pick them up on the gate wall, if you are on offense, pick up the battle rifle (left hand side of the map when facing the base, by the shotgun, beach-side of the damaged bunker)
• Rush the rockets! On offense (out of the base), head straight up through the sniper tunnel, and it’s just over the clay wall on your left. On defense (in the base) you have a longer run, but collect the active camo on the way and surprise anyone with the rockets and steal it for yourself!
• When starting out side the wall near the overshield there is a small tunnel leading in front the tower where the spartan laser is. Find the tunnel and you will find a grav lift. you can then use it to launch yourself up to the platform taking any camping sniper/laser user there. - Crossfire
• If you’re heading up the hill, hurry up and grab the sniper, but put it away, the AR is more useful on the run. Then go up into the camo cave and go up immediately right inside the base. If you keep following the hallway you'll see a pipe you can jump into, crouch down and head to the end of it(you will be looking across the map into the bunker building), then take out the sniper and peck them off. Grenades are great backup here in case someone becomes wise to your position. And watch you back, if someone else gets in the pipe, they are crouching too, so you won't be able to see them on radar. hit me up if this was helpful -psychoticgirlie

• It is paramount that the Ghosts be controlled on this map. If you can, hijack them and use them for your team. If not, then destroy them.
Isolation Tips
• There are two strategies that will bring you up to rank 45 without any problem. (After this it becomes more difficult such as counter tactics... ect) The first is you grab the regenerator and BR at bottom throwing it at sniper side base. Your teamate picks up first BR and fights in the regen taking sniper bringing it to Shotgun. The one who threw the Regen picks up rockets / ghost and brings it up top from the sides. (The other two follow if Team Slayer not Double Team) The third picks up rock / tree side BR and goes up top to SG while the fourth picks up SG BR and you dominate the top with ghost, rockets, sniper, and 4 BRs. ALWAYS watch the Regens. - t3h w0lf (GT)
• If you can take control of the sniper and battle riffles on the map you are in for success... Try getting one person on your team in the ghost and have him flush out everybody below ground. Then have the other three people on your team stay top-side with battle riffles and sniper. It is easy picking from there.
• I found myself in a 1 on 3 match after my teammates ditched me and this strategy works on any map, especially this one. Get the lead by one point, go to one of the bottom bases in the map and crouch for the remainder of the game. Nobody found me because I was in the last place they'd expect me and I was not on the radar from crouching. If anyone comes close, stick 'em with a spike grenade. I just tapped down the crouch button and had my self a piece of pizza watching the clock countdown to my victory. - ZOMBIEBEAR666 (now only if people had patience)
• If someone is ever chasing you to the pink warps or if you have teammates in battles directly above, just jump into the warps and it will place you on the next level without shooting you up. I've done this with people chasing me and you can throw a grenade and start shooting where they land to surprise them. - MFPokeChop
• A great strategy is to go for the sniper or shotgun immediately, and go back regenerator spawn. If you have sniper you can pick people off at long distance, BR works too to a lesser degree. People will no doubt be drawn to your location, at which time you can throw down regenerator and shotty them. The regenerator spawns very quickly too so you can keep grabbing it.
• Nice way to control this map is getting the entire team in the shotty bunker,(one in front watching and the others on the side) communication is necessary, all you do is say right or left. ARs and BRs can usually do it with a little grenade support. Teamwork is a must with this strategy; you can completely own an enemy team if this is played correctly. Just remember to stick together, but not so close that if

rockets or grenades are sent your way they get more than one. written by: psychoticgirlie
• When playing Team Doubles with a good friend, have the better one of you snipe while the other one covers you with a Ghost. Just make sure he has the rocket with him too. This way, you're pretty much invincible because of your teammates ghost defending your position. Also tell your teammate not to leave that position. The enemy will take cover behind trees and rocks and if they make the mistake of poking their head out to sneak a peak, reward them with a painful headshot. - duckieebeatd0wn
Last Resort Tips
• Combining the active camo and the radar jammer can help give you a better element of surprise when storming a base.
• Long range weapons are your friend on this map. There are many battle rifles dotted around the map, so be sure to never turn down an opportunity to get one. The sniper rifles on this map are placed in the following spots:
• Along the wall (bordering the beach) that leads up to Territory 2. It is resting against the wall on your left. (the shotgun in just past here, so go through the opening and it will be against the wall on your left)
• Resting up on the small sniper tower (Territory 3, more commonly known as Camp Froman). There are a few fusion cores here though, so be careful.
• In Objective games, make sure to get the spartan laser! It is situated on the high bridge leading to the windmill, and it is your best defense against early Warthog and Mongoose rushes!
• In Territories (defense), fighting for Territory 1 (the easiest for the offensive team to capture) is a very good idea, as the team will concentrate solely on its capture. If it is proving difficult for the opposition, the morale of them will go down. (due to, more than anything, people saying, "OMG we couldn't get 1!!!") Stalling its capture will severely affect the opponents score.
• This is the easiest map to get a perfection medal on, especially when playing Shotty Snipers. Just camp out halfway up the ramp or just below the fusion coils by Camp Froman. This spot gives you cover on the side and you can easily catch people popping out from areas beside the wind turbine. Remember to keep moving! ~ SplatterMan ~
• There are a lot of Fusion Cores on the map, which you can use to you advantage. In particular, there are some at the top middle of the turret platforms which you can blow up if you are attacking from the Spartan Laser, and there are a number both in and on top of Sniper tower. Finally, player will often go up the stairs from

Sniper tower to cat walk and snipe. So check and see if they are standing next to the Fusion Core at the top of the stairs on the catwalk. --Mesh
• When playing shotty snipes on this map, I've found the best place is in the building on the left of the map if looking from the beach. There is a cubby in there where you can kneel down snipe anyone near the turret or the ground an the right side of the map, this place also gives you enough time to see someone coming and to get the shotty ready. This is a really good spot if you're not that good with the sniper. -psychoticgirlie
• The bridge from the wheel to the base near the shotgun spawn makes a lot of noise. This is rarely a good thing, as it gives away your position. This is especially bad in a territories match, as anyone on territory 4 (the big wheel) will have plenty of warning as to when your coming and can easily crouch behind the little wall and get an easy assassination. -Timmeh1250
Narrows Tips
• Grab the Sniper Rifle and stand near the back behind the lifts and shoot across the span.
• grab the Needler and launch over the man cannons and aim at the people who are top mid... in other words the people who are in the middle of the bridge on top. the needles will bend like crazy and you can get some easy cheap kills and pwn with the needles...fear the pink mist!
• People always gather behind the lifts. Use this to your advantage.
• Run from the start and grab the rocket launcher in the middle of the top bridge.
• If you are playing Team Slayer, it is imperative to acquire the Sniper Rifle and Battle Rifle early on, all the while sending one or two players forward at the rocket launcher. Keep back and let the opponent come to you. Bait them with one or two players and back them up within the extensive cover on either side, and be sure to snipe them while they run at you. (rinse rather repeat) Let your opponent come to you and you will have the advantage. If your opponent doesn't come at you then you are forced to go to them. This is where the rocket launcher comes through, as well as a plethora of grenades. -Lipton32
• Just about anything can be launched from the man cannons on the map; weapons, grenades, fusion coils, and even equipment can be launched. If you need cover when going through man-cannon, try dropping a bubble shield in the man-cannon while you move through. If done correctly, you should fly over inside the bubble shield, perfectly safe until you land. --TheSpartanJedi 18:13, 26 October 2007 (CEST)

• The key strategy for this map is holding its strong points. Rush to grab shotgun or rockets. If you can get them, great! Get the other rushers, and BRING IT BACK TO THE STONGHOLD. Do not just start roaming around for kills, as in most ranked ungrouped parties; the kills will come to you, otherwise control you games only fight with an advantage. Be smart! A good starting strategy in Team Slayer is one that involves getting the sniper, rockets, mauler, and one BR/Mauler combo if it is possible. Then hold the man cannon side, and be sure to have a sniper in a camping spot with a view of the middle mauler. Most importantly of all, do not chase people out into the open, as this opens you up for return sniper rifle fire, and can open up seams in your base. Enjoy!
• Team Slayer: First, have one team member grab both Battle Rifles and stand back furthest on the back platform as the "Covering Shooter". Next, have two team members advance up the bridge for the Rocket Launcher. Finally, have the last team member grab the power-up on your side (either Overshield, Invisibility) and go for the Sniper Rifle to become the "Enhanced Sniper". The two bridge-fighting members will always have the help of the Covering Shooter and should be fighting just before the breech on the bridge which will allow the Covering Shooter to assist. The Enhanced Sniper should guard the Man Cannon for any incoming bogeys and snipe across the gap. Tip for Covering Shooter: Stare across the bridge without using the scope on the Battle Rifle - keep an eye on your radar for incoming bogeys from the Man Cannon and switch to the Assault Rifle for close range fighting if you spot red dots on the radar. --Killthrash 18:33, 12 November 2007 (CET)
• When playing 3 on 3 on Team Slayer, have two people head up to rockets - one with BR/Mauler to support, and one with just a Mauler to grab the rockets (the third person will likely need the BR more). The third person should grab the other BR (or alternatively, needler) at the start and head straight over the man cannon to grab the enemy team's Sniper Rifle (and power-up if it's still there) then he should head back across the lower bridge picking up the Shotgun on his way. Once rockets are secured the person who was supporting on the bridge should head underneath and grab the Sniper Rifle and power-up on your own side, then both snipers can sit at the back picking people off while the person with rockets defends them. If all goes to plan you should have 3 kills and every power weapon on the map within a minute. I don't often play with a team of 4 so I don't know how you would best utilize the 4th person. --Breadisgood
• Its always helpful in the very beginning to throw your frags down to their end. These will deplete their shields making them easier to kill. It takes some adjustment to get these throws just right, but it’s really easy once you get the hang of it. Two or three people rush rockets every time (with depleted shield two people can easily take those three out) with the third going shotty, just grab the plasmas and go on down, use the AR as you run up a before you get close enough to be shot, throw your grenades, after the kill, take the shotty and head back to your own base. That fourth person just needs to stay back with the BR or sniper

and take out anyone in the way. Teamwork and communication is essential. psychoticgirlie
• Most teams in team slayer grab what power weapons they can then return to their base. Whilst this tactic seems to work there is a more efficient strategy when looking at the layout of the map. Narrows is a single two layer bridge with multiplatform bases on either side, the actual design of the bridge allows easy access between the bridge layers but more importantly easy access to most layers of either base. Thinking tactically whit this in mind the strongest point of Narrows becomes blindingly obvious – the middle. When holding the middle you gain several advantages:
Sandtrap Tips
• Like in most large maps, you will most likely want to have a Battle Rifle handy. • It also may be important to keep your Assault Rifle for when your in close
combat, but its not a bad idea to switch it out for a Shotgun in case the fighting gets a little too cozy.
• Transportation. In this large area, its all about survival, so you will need good mobility whether it's for getting to the target or escaping it. I think a Mongoose or a Chopper would come handy in this situation.
• If you can get enough people to come with you, use the Elephant. It’s an almost impenetrable fortress on wheels, and with two turrets on each side of it, it’s perfect for owning. Plus, if you can get a Warthog or two in the rear, you now have 360-degree protection.(warning the elephant is easy target for the missle pod)
• Equipment. I find that a Power Drain or a Bubble Shield is extremely useful in this map. And when you're on an Elephant with a group of people, it doesn't hurt to keep a Regenerator handy.
• The Spartan Laser can be used incredibly effectively on this map. Use it to take out enemies in vehicles rampaging around the map or use it to pick off players running around the map.
• NEVER hop in a warthog passenger seat. It should always be 2 people per warthog. In the passenger seat you don't do much and you risk an enemy with a Spartan Laser scoring a triple kill rather than a double kill should he hit you.
• At the beginning of Big Team Battle, make sure blow the banshee up or be the first to grab it, as this being the only air vehicle in the map it can be used to create a serious advantage.
Snowbound Tips
Long Range - In this level, the carbine can be considered a deadly force combined with grenades and a bubble shield for cover.

Levels - Even though the needler is on the rooftops, it also makes you vulnerable to a simple assault rifle at close range. If you need the needler, hurry up and get off of that roof immediately.
Shotgun - The Shotgun can be deadly also if kept indoors underground. If you use the Shield Doors effectively you can be unstoppable with the shotty.
Ghost - You may want to come off the Ghost unless you know that the Spartan Laser is out of hand.
• Don't go beyond the outer boundary...You'll die, unless you have energy set as invunerable of course. The outer turrets will all fire at you but you wont die. It's fun especially with no gravity and fast speed. *NOTE by other User* (Dude, Invulnerability does not work against the guardians.)
• In a FFA game, what I did was go to the shotgun spawn and camp there. I got 15 kills while doing this without dying every time. It works, trust me. Have fun owning in Snowbound! sarg338
• On team slayer I find this tactic to work well, note that your team should stick
together at all times. Have one or two people grab whichever mid-range weapon (Carbine or BR) is at your starting base, have another player dual-wield the weapons inside your base (Plasma Rifle or Spiker, I prefer Spiker), lastly have someone grab the shotgun. Take your team inside one of the bases and watch the doors. This tactic works great if you don't mind letting the enemy come to you. My team has done this and the other team didn't even score ten points.--Spartan006 22:05, 7 November 2007 (CET)
• Even though explosions don't normally go through bubble-shields or Shield Doors, it turns out that the fusion cores by the Shotgun spawn do not obey this rule. They can be blown up by a grenade exploding on the other side of the Shield Door, and they will also damage and possibly kill someone standing on the other side of the door when they explode. You can use this to your advantage when an opponent is camping on the other side of the door.
• In Team Slayer it is a good tactic to rush the shogun seeing as there aren't many super powerful weapons to rush instead. You could also rush the Ghost if you'd like and roam above ground. Instead of boring old camping like sarg338, I suggest grabbing the shotgun and "lurking." Lurking is between camping and hunting because you roam around underground looking for people, but you let them walk into the trap and find them underground. It is a much more active tactic than camping and you don't feel like a nOOb for doing it.--Mr. Killtacular (GT=Druid Wolf 32)
• One thing a team does if they are losing is comletely get fustrated and that equals a more unorganized offense which usually results inmore losing. Just calm down

and regroup, if they are owning you underground, don't go down there, just throw some frags in the hole and run away, same if they are owning you above, pull the fight in closer quarters downstairs. This doesn't work everytime but for the most part, it can help you catch up. Each person on the team running to the fight separate will never win. psychoticgirlie
• In Team Slayer, everyone goes into the shotgun-spawn area to fight. Unfortunately, I always get teamed up with noobs ( Fine not always most of the times )who just keep "Feeding" and never bother about working as a team. To see what is feeding, go to Bad habits in team games.
Standoff Tips
• Generally do not, just rush into the middle of the map. You will die, over and over again. Hold back, wait for better weapons to spawn, such as a BR and use the cover to your advantage. - Devozade
• Using the Active Camo, Power Drainer, Battle Rifle and Plasma Grenade's work very well here also if you have a good driver the turret is awesome to use and will help you win them tough Team Slayer games. KaiQom
• Despite what Devozade says. at the start if you need practice with Spartan Laser then go get it from the middle, no one rushes there too early for fear of being gunned. but if you're quick you can grab it and a BR and run to the highest point behind your base. Then take out all vehicles and any infantry causing problems. You'll be noticed soon so be ready with a BR or shotgun (BR is better but w.e floats your boat) you can easily get a killing spree like this. When your Spartan Laser runs outta juice then just bust in with a BR and steal a kill or two and Presto! I usually am up there three minutes so the Spartan Laser Spawns again and i just keep getting it and I got a running riot like so. Best of luck. - Ohyeah92
• A BR is a must have on this map, learn where they all are placed, grab one at the start, make sure you keep reloaded and have an ample supply of spare ammunition. If you don't have one you'll get mowed down by enemies halfway across the map with BRs. - Devozade
• Remember to grab the Power Drainer when ever you have the chance it helps to take out them irritating Warthog's. Also Work as a 'Team' you wont win on this map going all alone. KaiQom
The Pit Tips
• When playing Team Slayer, at least two or three should go for the rocket at the beginning of the match. Pick up the Needler and fire it down the rocket hallway followed by Grenades. BR cover from a team mate is helpful too. One of your team mates should try to grab the camo and sneak around the side and kill the enemy from behind.
• When playing Team Slayer, one person should rush for the invisibility. It can come in handy in securing the rockets. Some teams do not think about it and are just concentrating on getting the rockets.

• Watch for players camping in the Sword room. There are two windows looking into the Sword room at the top of each ramp leading up to it. You can look into these windows to check the room, or throw grenades through them to clear the room, or lower the shields of anyone in the room. --Mesh 19:31, 3 December 2007 (CET)
• If you are camping in the Energy Sword room, you can weaken your attacker’s shields by tossing grenades out of the upper windows on each side of the room. This can kill them, or weaken their shields before they get to you. --Mesh 21:11, 3 December 2007 (CET)
• You can get on the ledge of most of the yellow walls (for example on back hall from Shotgun to Rocket to Shotgun areas, and just outside invisibility hallway). In some cases you may need to first jump on fusion coils or barrels. This maybe give you a slight advantage especially when a player is coming around a corner, as you will not be in their immediate line of sight. --Mesh 21:06, 3 December 2007 (CET)
• If you are in the mid-mauler rooms, the ceiling above you is see through (it is a grate). This can be useful to see if anyone has spawned above you, and to track which way they are going to exit (and thus set up a potential ambush). --Mesh 21:08, 3 December 2007 (CET)
• If someone is on top of the Snipe tower, you can take down their shields by bouncing grenades off the back wall onto the platform. This works particularly well if you are throwing from the bottom of the Grav lift side. --Mesh 21:09, 3 December 2007 (CET)
• Taking the Sniper Rifle into one of the Shotgun spawn corners can be very effective. You can snipe players moving in and out of the Rocket Launcher spawn hallway. Make sure to watch your radar, and use the Shotgun to take out any players who come into the room. If Grenades are thrown into the room, you can move just to the corner to avoid them. --Mesh 21:15, 3 December 2007 (CET)
• There are a number of target panels in the map that open when a player walks by them. You can use these (along with the noise they make) to detect where players are moving on the map. --Mesh 00:15, 4 December 2007 (CET)
• I have a great tip for everyone that likes The Pit. What i usually do is i start out by taking a shotgun and BR. I go down too the sniper spawn and get the sniper if it is there. From there i just what everone else does with a shotty sniper or BR. Also, if the other team has the swords or good weapons in the sword room and you cannot seem to . I ahve the best tip to help you. You have 1 person in the entrance and on the opposite entrance to the building of the sword room. Right above there is a vent-like hole that leads to the sword room. Throw grenades down there. You have a guaranteed kill! If you like The Pit, i made a really cool version of it called The Destiny. It is in my file share. My XBL name is Touchflame34. Joe(Touchflame34)
Valhalla Tips
The Mancannon not only allows Spartans through it, it also allows weapons, including grenades. If you chase someone and they run through a Mancannon, don't follow them,

just 'nade it... Also, 9 times out of 10 someone going through the mancannon will land in the same area, depending on where they hit the 'mancannon', at what angle, and if they are carying the Missle Pod/Turret will also determine where they land. Better still, plant a trip mine there, and go about your merry business. About 5 minutes later, you'll probably get a kill you'd totally forgot about... And, you can take the Mongoose and Warthog (with careful maneuvering) through the mancannons. Not useful, but cool. Also, those crates on the wall next to the mancannon...more powerful than a grenade if you push it in the cannon right behind someone.
That's all from me for now, hope you find this helpful. I'll post more tips, if these are used, at a later date, got to get on with some work now, peace!! -- --V0rador 15:42, 2 July 2007 (CEST)
When putting Trip Mine's in the Man Cannon try warning your teammates or you may get booted for betraying when you totally forgot about the Trip Mine. Also Frag Grenade's are not good to throw through the Man Cannon as they explode in the air, Plasma Grenade's on the other hand are great and i do it quite often, still yet to sticky someone though but it will be sweet if i ever do manage to do so. KaiQom
-- If you aim just above the lip of the mancannon and throw a frag it will get sucked into the stream, however, it will go farther than a player or vehicle. UberDestroyer12
Easiest way to win in Vahalla is to get two people on the warthog, drive around the outer perimeter and take out anyone you see, driver and shooter must work together in telling each other what their up against. Never hurts to go steal the enemy enemies hog, just have two people follow the warthog while riding the mongoose. Two warthogs are alomost unstoppable if you got two good players on turrets. Just remember to stay far enough away from groups of the enemy team so you don't lose the gunner. - psychotic girlie
Considering the V shape of the mancanon, the small slope angled down could also be a good place to plant a tripmine. -Ph3ax 02:03, 28 September 2007 (CEST)
Vahalla is one of the most fun maps for Slayer I think. When playing teams, it is easiest to camp at your base, have one or two snipers, and other guarding the perimeter. However, when playing FFA it is a litt different. You can't really camp unless it is in a secluded area, because you will get sniped or ambushed. A good sniping place is the right tower, you can take the banshee way up there and no one can find you unless you miss. However if you are just looking to go own ppl, i suggest getting in one of the many vehicles on Valhalla. Yeah yeah ppl complain, but its FFA doesn't really matter what they think, as long as you win:). PiNk_nAiLeD_PwN
Right at the beginning of a match, move backward, drop down and get the sniper rifle. The stand just behind the man cannon and look straight forward and up in the air. You should see opposing players being propelled toward you. It is easy to take down their shields as they 'hover' at the peak of their jump, and with practise, you can get headshots

and kills using this method. (I have only got one headshot so far, and will upload the link ASAP)BS2612
Try throwing an Energy Drain through a man-cannon. --Quartz
• On Slayer, if you're getting battered on the ground by the enemy aircraft, the Banshee, or the Warthog/Wraith turrets, dash immediately for the Missile Pod with the time it takes for your enemy to fly/drive to the other base. This is the best way to gain adequate time to lock-on and fire at the vehicle. Be sure to keep 2 or 3 rockets, though, in case the enemy decides to jump out at the last second and try to gun you down in your base. -Grunt343