Embed Size (px)
Citation preview

ESSENTIALS
ON YOUR Raspberry Pi
Written by The MagPi team
CODE VIRTUAL WORLDS
AND
IN MINECRAFT
HACKINGMAKING

SAVEUP TO25%
THE OFFICIAL RASPBERRY PI MAGAZINE
2

How to subscribe:
magpi.cc/Subs1 (UK / ROW) imsnews.com/magpi (USA)
Call +44(0)1202 586848 (UK/ROW) Call 800 428 3003 (USA)
Search ‘The MagPi’ on your app store:
3
FREE PI ZERO!Subscribe in print for six or 12 months to receive this stunning free gift
PricingGet six issues:
£30 (UK)
£45 (EU)
$69 (USA)
£50 (Rest of World)
Subscribe for a year:
£55 (UK)
£80 (EU)
$129 (USA)
£90 (Rest of World)
Direct Debit: £12.99 (UK) (quarterly)
Subscribe today & receive: A free Pi Zero v1.3 (the latest model)
A free Camera Module connector
A free USB & HDMI cable bundle
Delivered with your first issue!
Other benefits: Save up to 25% on the price
Free delivery to your door
ExclusivePioffers&discounts
Geteveryissuefirst(beforestores)

4 [ Chapter One ]
EDITORIAL Managing Editor: Russell [email protected] Contributing Editor: Rob Zwetsloot Sub Editors: Laura Clay, Phil King, Lorna Lynch Contributors: Sam Aaron, Boris Adryan, Martin O’Hanlon,
Jasper & Ozzy Hayler-Goodall
DESIGNCritical Media: criticalmedia.co.uk Head of Design: Dougal MatthewsDesigners: Lee Allen, Mike Kay Illustrator: Sam Alder
This book is published by Raspberry Pi (Trading) Ltd., Mount Pleasant House, Cambridge, CB3 0RN. The publisher, editor and contributors accept no responsibility in respect of any omissions or errors relating to goods, products or services referred to. Except where otherwise noted, content in this product is licensed under a Creative Commons Attribution-NonCommercial-ShareAlike 3.0 Unported (CC BY-NC-SA 3.0).
GET IN TOUCH [email protected] US ONLINE raspberrypi.org/magpi
In print, this product is made using paper sourced from sustainable forests and the printer operates an environmental management system which has been assessed as conforming to ISO 14001.
DISTRIBUTION Seymour Distribution Ltd2 East Poultry Ave, London EC1A 9PT | +44 (0)207 429 4000
SUBSCRIPTIONSSelect Publisher Services LtdPO Box 6337, BournemouthBH1 9EH | +44 (0)1202 586 848magpi.cc/Subs1
inecraft is a game that’s achieved monumental success - over 30 million copies, across all its various supported
formats, have been sold; not bad for a game which doesn’t really have a point! It’s classified as an Indie Sandbox game, but if it does have a point, it’s to make stuff (and people have really done that!), from fully functioning computers to scale models of the Starship Enterprise. What about Minecraft: Pi Edition? The two best things are that it’s free and it comes with an API – highly unusual features you don’t see with any other version of the game.
Using the API, you can make Minecraft your own. You can create mods which will allow you do amazing things, link it up with the real world using the Raspberry Pi’s GPIO pins, make your own mini- games, or just about anything else you can imagine.
Martin O’HanlonContributing Editor
WELCOME TO
M
HACKING & MAKING IN

[ HACKING AND MAKING IN MINECRAFT ]
5[ Don’t Panic ] 5[ Contents ]
CONTENTS
ESSENTIALS
06 [ CHAPTER ONE ]GETTING STARTED WITH MINECRAFT: PI EDITION
11 [ CHAPTER TWO ]CONTROLLING BLOCKS
18 [ CHAPTER THREE ]WALKING WITH STEVE
23 [ CHAPTER FOUR ]MINECRAFT LAVA TRAP
29 [ CHAPTER FIVE ]TNT RUN!
34 [ CHAPTER SIX ]TERRAFORMING MINECRAFT
40 [ CHAPTER SEVEN ]CREATE NATURAL DISASTERS
46 [ CHAPTER EIGHT ]MINECRAFT SPLAT
59 [ CHAPTER NINE ]USING THE GPIO TO FIND A BLOCK
65 [ CHAPTER TEN ]BECOME A MINECRAFT VJ
70 [ CHAPTER ELEVEN ]NODE-RED AND CONTROLLING MINECRAFT WITH JAVASCRIPT PT 1
76 [ CHAPTER TWELVE ]NODE-RED AND CONTROLLING MINECRAFT WITH JAVASCRIPT PT 2
81 [ CHAPTER THIRTEEN ]PI EDITION – PYTHON API REFERENCE

6
ESSENTIALS
[ Chapter One ]
[ CHAPTER ONE ]
Get off to a good start with Minecraft: Pi Edition. Play the game and write your first program using the API
ESSENTIALS
6 [ Chapter One ]
GETTING STARTED WITH MINECRAFT: PI EDITION

7
[ HACKING AND MAKING IN MINECRAFT ]
7
f you’ve never played Minecraft and want to be a master block builder, we’ll help you get stuck into Minecraft, build a house, and get started with the API.
Minecraft is a game which has achieved monumental success; over 30 million copies, across all its versions, have been sold. Not bad for a game which doesn’t really have a point! If it does have a point, as an indie sandbox game, it’s to make stuff. And people have really made stuff, from fully functioning computers to scale models of the Starship Enterprise.
The best things about Minecraft: Pi Edition are that it’s free and comes with an API; you don’t get this with any other version of Minecraft.
Minecraft is installed by default on Raspbian. If you have an older version, you can get it by opening a terminal (Menu > Accessories > Terminal), typing the commands pressing Enter after each one:
sudo apt-get update sudo apt-get install minecraft-pi
I
[ Getting Started ]
Below Use the API to write a ‘Hello Minecraft World’ program

8
ESSENTIALS
[ Chapter One ]8 [ Chapter One ]
Playing the gameClick Menu > Games > Minecraft: Pi Edition to run the game. Minecraft: Pi Edition offers one playing mode, Classic, which is all about exploring and building. Click Start Game, then click Create New (or choose an existing one) to enter a world:
> The mouse changes where you look> Holding the left button destroys blocks> Right button places blocks> W, S, A, D move you forward, backward, left, and right> 1, 2, 3, 4, 5, 6, 7, 8 change what you are holding> E opens the inventory> ESC takes you back and to the Menu> Space is jump; double-tapping Space makes you fly or stop flying
The APIThe API (application programming interface) allows you to write programs which control, alter and interact with the Minecraft world, unlocking a whole load of Minecraft hacking. How about creating massive houses at the click of a button, a game which uses a LED and buzzer to help you find a block, or recreating Nintendo’s Splatoon in Minecraft?
The API works by changing the world as the game is being played, allowing you to:
> Get the player’s position> Change (or set) the player’s position> Get the type of block> Change a block> Change the camera angle> Post messages to the player
Hello Minecraft WorldThe first program all programmers create when learning something new is called “Hello World”, which puts “Hello World” on the screen. You’re going to do the same, but in Minecraft:
[ WATCH FOR RED TEXT ]Any errors in your program will appear in the Python shell in red text.

9
[ HACKING AND MAKING IN MINECRAFT ]
01. Go to the Minecraft menu with ESC, but leave the game playing.02. Open IDLE by clicking Menu > Programming > Python 3.03. Use File > New Window to create a new program and save it as
hellominecraftworld.py.04. At the top of your program type the following code to import the
minecraft module, which will allow you to use the API and talk to the game: import mcpi.minecraft as minecraft
05. Create a connection from your program to Minecraft and call it mc: mc = minecraft.Minecraft.create()
06. Use your Minecraft connection and the function postToChat() to put a message in the chat window: mc.postToChat("Hello Minecraft World")
07. Run your program by clicking Run > Run Module.
Switch back to Minecraft and you should see the message “Hello Minecraft World” on the screen; be quick, though, as the message will only stay on the screen for 10 seconds before it disappears.
Any errors will appear in red text in the Python shell window; check your code carefully for spelling mistakes, and ensure that you have used the right upper- or lower-case letters.
When you have successfully got the message to appear on the screen, try changing it and running the program again.
Left Minecraft Pi Edition is free and has an API you can use to program it
[ Getting Started ]
[ PYTHON IS CASE-SENSITIVE ]Beware of upper- and lower-case letters; “Minecraft” and “minecraft” are different things to Python.
[ HACKING AND MAKING IN MINECRAFT ]

10
ESSENTIALS
[ Chapter One ]10 [ Chapter One ]
TeleportationUsing your new Python programming skills and the Minecraft API, you can teleport Steve around the world by adding just one more line of code to your program.
Minecraft is a world of blocks, all about 1m x 1m x 1m.The player and every block in the world has a position made up of x, y, and z; x and z are the horizontal positions and y is the vertical. By changing the player’s x, y, and z position, you can teleport them wherever you want.
The player starts at position x = 0, y = 0, z = 0, which is the spawn point, and the player’s current position is shown on the top-left of the screen.
Add the following code to your Hello Minecraft World program to teleport the player to position x = 0, y = 100, z = 0, which will put your player 100 blocks up in the air:
01. Teleport the player by setting their position: mc.player.setPos(0, 100, 0)
02. Run your program by clicking Run > Run Module.03. Switch back to Minecraft to see your player fall to the floor.
Try changing the values in setPos() to teleport your player to different places around the world; use values -125 to 125 for x and z and -64 to 64 for y, otherwise the player will be teleported outside the world.
Y
Z
X
All blocks in Minecraft have a position of X, Y, Z

11
[ HACKING AND MAKING IN MINECRAFT ]
[ CHAPTER TWO ]
ESSENTIALS
CONTROLLING BLOCKS Learn how to control blocks
in Minecraft: Pi Edition using the Python API

12
ESSENTIALS
[ Chapter One ]
ou will now write a program to turn Steve into Ice Man; he will leave trails of snow wherever he walks, and be able to turn any block into ice with a touch of his sword. A house of ice will also
appear automatically, giving Steve somewhere cold to live.The Minecraft: Pi Edition API lets you can turn any block in the world
into any other block: dirt into diamond, water into lava or stone into air! By combining functions that get the player’s position with those
that change blocks, you can make the world change around the player without them doing anything.
Changing blocksYou will use the API to make the block which the player is standing on turn to snow; by using a loop you can make this run forever then as the player moves, the blocks underneath him will keep turning to snow:
01. Open IDLE by clicking Menu > Programming > Python 3.02. Use File > New Window to create a new program and save
it as ‘iceman.py’.03. At the top of your program import the minecraft and block
modules to use the API: import mcpi.minecraft as minecraft import mcpi.block as block
04. Create a connection from your program to Minecraft and call it mc: mc = minecraft.Minecraft.create()
05. Get the player’s ‘tile’ position (the block Steve is standing on), and store it in a variable called p: p = mc.player.getTilePos()
06. Use the setBlock function to change this block to snow: mc.setBlock(p.x, p.y, p.z, block.SNOW)
07. Run your program by clicking Run > Run Module.
Go back to Minecraft and look down: the block you’re standing on will now be covered in snow. Make sure you’re standing on the ground and not flying, as you can’t put snow in the air!
Next, change the program so that it loops forever, always getting the player’s position and turning that block to snow; that way, Steve will create snow wherever he walks:
Y
12 [ Chapter Two ]

13
[ HACKING AND MAKING IN MINECRAFT ]
13[ Controlling Blocks ]
Below Modify Minecraft so that Steve leaves snow wherever he walks
01. Go back to Python and modify your iceman.py program.02. Add a while loop to the bottom of your program. This loop will
continue forever: while True:
03. The rest of your program will be indented under the while loop. If IDLE doesn’t indent the next line for you, press Tab. Add the code to find the player’s position and create the snow block: while True:
p = mc.player.getTilePos() mc.setBlock(p.x, p.y, p.z, block.SNOW)04. Run your program by clicking Run > Run Module.
Now snow will automatically cover the blocks wherever Steve walks.Try changing block.SNOW to use different blocks and see what
happens: you can find a complete list of blocks at magpi.cc/294zAfk.
[ HACKING AND MAKING IN MINECRAFT ]

14
ESSENTIALS
[ Chapter One ]14 [ Chapter Two ]
Hitting blocksWhen a block is hit with a sword by right-clicking, you can use the API to change those blocks. You’re going to change your program so that when Steve hits a block it will instantly turn to ice.
Modify your iceman.py program so that it uses the events.pollBlockHits() function to get any blocks which have been hit and turn them to ice:
01. At the end of your program, indented under the while loop, add the code to get the blocks which have been hit: while True:
for hit in mc.events.pollBlockHits():02. Indented under the for loop created above, add the code to turn the
block which has been hit to ice. mc.setBlock(hit.pos.x, hit.pos.y, hit.pos.z, block.ICE)03. Run your program by clicking Run > Run Module.
Snow should continue to cover the ground wherever Steve walks, but now when you hit a block (right-clicking while holding a sword), it will turn to ice.
Right Turn any block to ice by
hitting it with your sword
[ HITTING BLOCKS ]If blocks don’t turn to ice, check that you’re right-clicking and holding a sword.

15
[ HACKING AND MAKING IN MINECRAFT ]
Creating lots of blocksWhen you want to create lots of blocks you can use the function setBlocks() which, when passed two positions, will fill the gap in between with any block you want. The quickest and easiest way to create buildings in Minecraft is by creating a cube and then hollowing it out by creating a cube of air in the middle.
Create a new program which will build an ice house:
01. Open IDLE by clicking Menu > Programming > Python 3.02. Use File > New Window to create a new program and save it as
icehouse.py.03. Import the minecraft and block modules.
import mcpi.minecraft as minecraft import mcpi.block as block
04. Create a connection from your program to Minecraft and call it mc. mc = minecraft.Minecraft.create().
05. Get the player’s position: p = mc.player.getTilePos()
06. Use the setBlocks() function to create a cube of ice next to Steve of size 11 x 5 x 11: mc.setBlocks(p.x + 1, p.y, p.z + 1,
p.x + 10, p.y + 5, p.z + 10, block.ICE)07. Create a cube of air inside the ice, making it hollow:
mc.setBlocks(p.x + 2, p.y + 1, p.z + 2, p.x + 9, p.y + 4, p.z + 9, block.AIR)08. Run your program by clicking Run > Run Module.
A large cube of ice will appear next to Steve; if you break some of the ice blocks, you’ll see that it’s hollow and you can walk inside.
The ice house is still pretty basic and at the moment there’s no way to get in, so modify your program to create a door and put some carpet on the floor:
[ Controlling Blocks ]
[ HACKING AND MAKING IN MINECRAFT ]

16
ESSENTIALS
[ Chapter One ]
01. Add the code to your program to make a gap in the front of the ice cube for a door: mc.setBlocks(p.x + 5, p.y + 1, p.z + 1,
p.x + 6, p.y + 3, p.z + 1, block.AIR)02. Use setBlocks again to change the blocks on the floor to be made
of red wool: mc.setBlocks(p.x + 2, p.y, p.z + 2,
p.x + 9, p.y, p.z + 9, block.WOOL.id, 14)03. Run your program by clicking Run > Run Module.
A door will now appear in the ice house and a red wool carpet will be on the floor.
The number 14 on the line block.WOOL.id, 14 makes the wool red. Try changing it to a different number between 0 – 15 and running the program again, until you find a colour you like.
16 [ Chapter Two ]
Below Use code, not building, to create an ice house
[ USING DIFFERENT BLOCKS ]You will find a complete list of blocks and their data at: magpi.cc/ 294zAfk

17
[ HACKING AND MAKING IN MINECRAFT ]
17[ Controlling Blocks ]
iceman.pyfrom mcpi.minecraft import Minecraftfrom mcpi import block
mc = Minecraft.create()
while True: p = mc.player.getTilePos() mc.setBlock(p.x, p.y, p.z, block.SNOW) for hit in mc.events.pollBlockHits(): mc.setBlock(hit.pos.x, hit.pos.y, hit.pos.z, block.ICE)
Download magpi.cc/ 29eyNFt
icehouse.pyfrom mcpi.minecraft import Minecraftfrom mcpi import block
mc = Minecraft.create()
p = mc.player.getTilePos()
mc.setBlocks(p.x + 1, p.y, p.z + 1, p.x + 10, p.y + 5, p.z + 10, block.ICE)
mc.setBlocks(p.x + 2, p.y + 1, p.z + 2, p.x + 9, p.y + 4, p.z + 9, block.AIR)
mc.setBlocks(p.x + 5, p.y + 1, p.z + 1, p.x + 6, p.y + 3, p.z + 1, block.AIR)
mc.setBlocks(p.x + 2, p.y, p.z + 2, p.x + 9, p.y, p.z + 9, block.WOOL.id, 14)
[ HACKING AND MAKING IN MINECRAFT ]

18
ESSENTIALS
[ Chapter One ]
ESSENTIALS
18 [ Chapter Three ]
[ CHAPTER THREE ]
WALKING WITH STEVE
Tired of using your fingers to tap keys to move in Minecraft? Then why not use your wrist instead, and take advantage of the awesome power of the Sense HAT?
YOU’LL NEED A SENSE HAT FOR THIS PROJECT!

19
[ HACKING AND MAKING IN MINECRAFT ]
WALKING WITH STEVE
ne of the cool things about the console edition of Minecraft is that you can use a controller instead of a keyboard. The Pi edition might sometimes seem a little basic, but you can
make your game more like the console edition by deploying your Sense HAT as a tiltable controller, instead of using a keyboard. If you don’t know which way to tilt it, the arrows appearing on the LED matrix will help you.
The first thing you need to do is to install all the necessary modules. An obvious one is the Sense HAT library: if you have Raspbian Jessie, this comes bundled with it, but if not, you can install it by typing:
sudo pip install sense_hat
You’ll also need another Python module, which in turn requires the Xlib library:
sudo apt-get install python-xlibsudo pip install pyautogui
Using the pyautogui functions, you can simulate keys as if they were actually pressed. This is how you make Steve walk around his blocky world.
Instead of pressing keys, we’ll use the Sense HAT’s accelerometer to find out which direction the HAT is being tilted. Each time we measure, we get values representing the acceleration intensity of the x, y, and z axes (in Gs). These are sometimes called roll, pitch, and yaw, like on an aeroplane or a spaceship. We only need the x and y axes, as the z axis is rotation and we’re not using that.
Y
[ LIGHT THE WAY ]The arrows displayed on the LED matrix while you’re moving look
really cool, but are actually easy to generate. Using Python, we make
a 64-element list containing the arrow shape - you can customise this
to make your own shape of arrow - and then simply display it using
a different RGB colour value and with a different rotation. The Sense
HAT API makes this whole process very simple.
[ MINECRAFT & SENSE HAT ]The Sense HAT is an add-on board which attaches to the Pi’s GPIO pins. It has lots of sensors, such as the humidity sensor and the magnetometer. The sensor we’ll be using in this project is the accelerometer. It also has an 8×8 LED matrix.
[ Walking with Steve ]

20
ESSENTIALS
[ Chapter One ]20 [ Chapter Three ]
How to use itDownload or type up the code from the listing (right) into IDLE, then press F5 to run it. Make sure Minecraft is running and you’ve entered a world when you run it, otherwise lots of errors will appear! If you tilt the Sense HAT forward, the pyautogui module will trigger a W key and move Steve forward; make sure your mouse is clicked in the Minecraft window when this happens, otherwise it will just generate a ‘w’ in the Python shell. The same thing happens when you tilt it backwards, but it will generate an S. If you tilt it to the side, it will generate a D or an A, depending on which direction you’ve tilted. You still need to use the mouse to look around, and the E key to open your inventory. So, the idea is for you to get all the items you need in your hotbar, then hold the mouse in one hand and the Sense HAT in the other.
Using MinecraftWhen the program is running, you’ll only be able to walk (or fly) around using the keys when the Sense HAT is in the level position (all the LEDs will be red). Even then, you’ll only move if you tap the key repeatedly instead of holding it down. So you’re better off sticking to the Sense HAT!
Once you have written and understood this program, you could try to improve it by making the Sense HAT’s joystick open your inventory or whatever else you can think of!
The Sense HAT is in its tilted forward position: a coloured arrow on the LED matrix shows the direction

21
[ HACKING AND MAKING IN MINECRAFT ]
21[ Walking with Steve ]
from mcpi.minecraft import Minecraftimport pyautogui as pagimport timefrom sense_hat import SenseHatsh = SenseHat()
# unpresses all the keysdef unpress(): for key in [‘s’,’w’,’a’,’d’]: pag.keyUp(key)
# presses the correct keydef move(direction): unpress() pag.keyDown(direction)
# the arrowdef displayArrow(c,rot): arrow = [ e,e,e,c,c,e,e,e, e,e,c,c,c,c,e,e, e,c,c,c,c,c,c,e, c,c,e,c,c,e,c,c, c,e,e,c,c,e,e,c, e,e,e,c,c,e,e,e, e,e,e,c,c,e,e,e, e,e,e,c,c,e,e,e] sh.set_rotation(rot) sh.set_pixels(arrow) # define the coloursr = [255,0,0]e = [0,0,0]g = [0,255,0]
WalkingWithSteve.py Download magpi.cc/ 1Qr7wjw
01.02.03.04.05.06.07.08.09.10.11.12.13.14.15.16.17.18.19.20.21.22.23.24.25.26.27.28.29.30.31.32.33.34.
[ HACKING AND MAKING IN MINECRAFT ]

22
ESSENTIALS
[ Chapter One ]
b = [0,0,255]stop = [ # the stop signr,r,r,r,r,r,r,r,r,r,r,r,r,r,r,r,r,r,r,r,r,r,r,r,r,r,r,r,r,r,r,r,r,r,r,r,r,r,r,r,r,r,r,r,r,r,r,r,r,r,r,r,r,r,r,r,r,r,r,r,r,r,r,r]
mot = ‘SSSS’while True: # main loop x, y, z = sh.get_accelerometer_raw().values() x = round(x, 0) y = round(y, 0) if x == -1 and abs(y) == 0 and mot != ‘rrrr’: displayArrow(b,0) move(‘d’) # right mot = ‘rrrr’ elif x == 1 and abs(y) == 0 and mot != ‘llll’: displayArrow(b,180) move(‘a’) # left mot = ‘llll’ elif y == -1 and mot != ‘wwww’: displayArrow(g,270) move(‘w’) # fwd mot = ‘wwww’ elif y == 1 and mot != ‘bbbb’: displayArrow(g,90) move(‘s’) # back mot = ‘bbbb’ elif abs(x) == 0 and abs(y) == 0: unpress() # stop sh.set_pixels(stop) mot = ‘SSSS’
22
35.36.37.38.39.40.41.42.43.44.45.46.47.48.49.50.51.52.53.54.55.56.57.58.59.60.61.62.63.64.65.66.67.68.69.70.
[ Chapter Three ]

23
[ HACKING AND MAKING IN MINECRAFT ]
ESSENTIALS
[ CHAPTER FOUR ]
Program a game in Minecraft and see whether you can escape the Lava Trap!
THE MINECRAFT LAVA TRAP

24
ESSENTIALS
[ Chapter One ]
ou’re going to create a mini-game. A lava pit will instantly appear and Steve will be put at the centre of it; soon, the block he’s standing on will disappear so he will have to move, but
hang on: all the blocks keep disappearing!
WelcomeThe first task is to start your program and get “Welcome to the Lava Trap” to appear on the screen:
01. Start Minecraft by clicking Menu > Games > Minecraft and create a new world.
02. Press ESC to go back to the Minecraft menu but leave the game playing.
03. Open IDLE by clicking Menu > Programming > Python 3.04. Use File > New Window to create a new program and save it as
lavatrap.py.05. Type the following code into the program to import the modules
you’ll need: import mcpi.minecraft as minecraft import mcpi.block as block from time import sleep
YAbove Can you
escape the Lava Trap?
24 [ Chapter Four ]

25
[ HACKING AND MAKING IN MINECRAFT ]
[ The Minecraft Lava Trap ]
06. Create a connection to Minecraft using this code: mc = minecraft.Minecraft.create()
07. Post a message to the chat window: mc.postToChat("Welcome to the Lava Trap")
08. Run your program by clicking Run > Run Module.
You should see your message appear in the Minecraft chat window.
LavaUpdate your program so it creates the pit of lava under Steve, by adding the following code:
01. Put a 3 second delay into your program so that you can see what’s going on: sleep(3)
02. Find out where Steve is in the world: pos = mc.player.getTilePos()
03. Use setBlocks() to create an area of STONE two blocks below Steve for the LAVA to sit on: mc.setBlocks(pos.x - 5, pos.y - 2, pos.z - 5, pos.x + 5, pos.y - 2, pos.z + 5, block.STONE.id)
04. Then create the LAVA under Steve: mc.setBlocks(pos.x - 5, pos.y - 1, pos.z - 5, pos.x + 5, pos.y - 1, pos.z + 5, block.LAVA.id)
05. Run your program by clicking Run > Run Module or by pressing F5.
There will be a 3 second delay before the lava pit appears and Steve burns...Create a diamond block in the middle for Steve to stand on:
01. Create the diamond block: mc.setBlock(pos.x, pos.y - 1, pos.z, block.DIAMOND_BLOCK.id)
02. Run your program. Steve will be stuck in the middle of the lava pit.
[ HACKING AND MAKING IN MINECRAFT ]

26
ESSENTIALS
[ Chapter One ]26
Make a gameUpdate your program to make blocks under Steve disappear:
01. Post messages to the chat screen to warn the player the game is about to start: mc.postToChat("Get Ready") mc.postToChat("Blocks under you will keep disappearing") sleep(3) mc.postToChat("Go")
02. Create a variable called gameover and set it to False. It will be set to True at the end of the game: gameover = False
03. Create a loop which will continue until the game is over: while gameover == False:
04. Indented under the while loop, add the code to get Steve’s position: p = mc.player.getTilePos()
05. Turn the block under Steve to OBSIDIAN as a warning and wait for 2 seconds: mc.setBlock(p.x, p.y - 1, p.z, block.OBSIDIAN.id) sleep(2)
06. After the warning, turn the block to AIR. If Steve is standing on it, he’s going to be in the lava pit: mc.setBlock(p.x, p.y - 1, p.z, block.AIR.id) sleep(0.5)
07. Run the program. The game will start and you’ll have to put blocks down in the lava pit to escape, as otherwise they’re going to disappear and Steve will fall in.
Game overThe game is over if Steve falls into the lava. You need to modify your program to check if he has fallen into the lava and put a message on the screen:
01. Use an if statement to see if Steve’s height (y) is not equal to where he started. If it is, set the gameover variable to True: if p.y != pos.y:
gameover = True
[ Chapter Four ]

27
[ HACKING AND MAKING IN MINECRAFT ]
[ The Minecraft Lava Trap ]
02. Put a message on the screen to let the player know they have been caught in the lava trap: mc.postToChat("Game over.")
03. Run your program and see how long you can stay out of the lava.
Next stepsThis game is just the start: can you finish it? Here are some challenges:
> Make the game harder.> Make a better game arena, perhaps building a stadium or walls
around it so Steve can get out.> Add points to the game; each time Steve doesn’t fall in, he gets
a point.> Change the game so it starts easy but gets harder the longer you play.> Add a two-player (or even multiplayer!) option.
Above You’ll have to put blocks down into the lava to escape
[ HACKING AND MAKING IN MINECRAFT ]

28
ESSENTIALS
[ Chapter One ]
lavatrap.pyimport mcpi.minecraft as minecraftimport mcpi.block as blockfrom time import sleepmc = minecraft.Minecraft.create()mc.postToChat("Welcome to the Lava Trap")
sleep(3)pos = mc.player.getTilePos()mc.setBlocks(pos.x - 5, pos.y - 2, pos.z - 5, pos.x + 5, pos.y - 2, pos.z + 5, block.STONE.id)mc.setBlocks(pos.x - 5, pos.y - 1, pos.z - 5, pos.x + 5, pos.y - 1, pos.z + 5, block.LAVA.id)
mc.setBlock(pos.x, pos.y - 1, pos.z, block.DIAMOND_BLOCK.id)
mc.postToChat("Get Ready")mc.postToChat("Blocks under you will keep disappearing")sleep(3)mc.postToChat("Go")gameover = Falsewhile gameover == False: p = mc.player.getTilePos() mc.setBlock(p.x, p.y - 1, p.z, block.OBSIDIAN.id) sleep(2) mc.setBlock(p.x, p.y - 1, p.z, block.AIR.id) sleep(0.5) if p.y != pos.y: gameover = Truemc.postToChat("Game over.")
Download magpi.cc/ 29eyAlC
28 [ Chapter Four ]

29
[ HACKING AND MAKING IN MINECRAFT ]
import mcpi.minecraft as minecraftimport mcpi.block as blockfrom time import sleepmc = minecraft.Minecraft.create()mc.postToChat("Welcome to the Lava Trap")
sleep(3)pos = mc.player.getTilePos()mc.setBlocks(pos.x - 5, pos.y - 2, pos.z - 5, pos.x + 5, pos.y - 2, pos.z + 5, block.STONE.id)mc.setBlocks(pos.x - 5, pos.y - 1, pos.z - 5, pos.x + 5, pos.y - 1, pos.z + 5, block.LAVA.id)
mc.setBlock(pos.x, pos.y - 1, pos.z, block.DIAMOND_BLOCK.id)
mc.postToChat("Get Ready")mc.postToChat("Blocks under you will keep disappearing")sleep(3)mc.postToChat("Go")gameover = Falsewhile gameover == False: p = mc.player.getTilePos() mc.setBlock(p.x, p.y - 1, p.z, block.OBSIDIAN.id) sleep(2) mc.setBlock(p.x, p.y - 1, p.z, block.AIR.id) sleep(0.5) if p.y != pos.y: gameover = Truemc.postToChat("Game over.")
ESSENTIALS
[ CHAPTER FIVE ]
Can you outrun an explosion? Test your speed with this marvellous Minecraft mini-game!
TNT RUN!

30
ESSENTIALS
[ Chapter One ]
ne of the many amazing things about Raspberry Pis is that they have their own edition of Minecraft for free; what’s even better is you can code it in Python using the Minecraft API! In the
next 30 minutes you’ll create a game called TNT Run, in which you start at one end of a long line of TNT and have to make it to the safe area without the TNT exploding in your face.
The Minecraft API gives us complete control over many elements of the game; this includes teleporting players around the world and displaying helpful messages on the screen. We are also able to place blocks automatically: not just one at a time, but as a three-dimensional collection of blocks.
This game will also include a block which is unique to Pi and Pocket editions: invisible bedrock. We use this block to keep the TNT from falling to the ground when lit, and as an invisible path leading to the safe area. You may find something strange about this block when you place it next to a non-invisible block, so try experimenting with that; you need to look directly into the invisible bedrock.
TNT also behaves differently in the Pi edition. Whereas in other editions you set off TNT with flint and steel, a fire charge or a flaming arrow, in the Pi edition you just need to hit it a couple of times with
O
30 [ Chapter Five ]
Above Bash the first block to
trigger the chain reaction along the
TNT

31
[ HACKING AND MAKING IN MINECRAFT ]
31[ TNT Run ]
anything. However, you can’t just do this with any old TNT block: first, we need to set its block data value to an odd number (1, 3, 5, 7, or 9). Most blocks have a block data value and by changing this, it will alter the block’s behaviour. For example, when you set Nether Reactor Core’s block data value to 1, it appears in a red colour; if you set it to 2 then it will come out as a dark blue colour. We use these cool-looking blocks to mark where the teleporter is and as a part of the end podium. The teleporter function in the code is designed so that if you manage to get to a certain point along the line of TNT, it gives you a boost and teleports you forward.
When you create your Minecraft world, fly around it and find a cool location to create your TNT course (i.e. not when you are near a cliff or the end of the world). Your code takes the player’s position and constructs the TNT course, using this location as the starting point. When you run the code, make sure Minecraft is running, otherwise your code will give you a connection error.
Once you have finished the project, you can customise your own version of the TNT Run game by adding changes like making the row of TNT longer, or creating a fancier safe area. Also, when you’re connected to a network with other Raspberry Pis, you can join someone else’s world, create two lines of TNT and race to the safe areas simultaneously!
Left This is the safe area you need to run to: if you make it there, you’ve won
[ HACKING AND MAKING IN MINECRAFT ]

32
ESSENTIALS
[ Chapter One ]
# import all the necessary modulesfrom mcpi.minecraft import Minecraftfrom mcpi import blockimport time
# connect with the Minecraft worldmc=Minecraft.create()
# get the player’s positionpos=mc.player.getTilePos()
# check if the end of the world will engulf your creation and move you if you’re too closeif pos.z<-40:
mc.postToChat('teleporting to safer distance in progress!')
mc.player.setPos(pos.x,pos.y,-40) pos=mc.player.getTilePos()
# mark where the teleport iszpos=pos.z-40
# create the valley by hollowing it out with airmc.setBlocks(pos.x-1,pos.y+3,pos.z,pos.x+1,pos.y-7,pos.z-88,block.AIR.id)
# build the invisible bedrock supportmc.setBlocks(pos.x,pos.y-1,pos.z,pos.x,pos.y-7,pos.z,block.BEDROCK_INVISIBLE.id)mc.setBlocks(pos.x-1,pos.y-1,pos.z,pos.x,pos.y-7,pos.z,block.BEDROCK_INVISIBLE.id)mc.setBlocks(pos.x+1,pos.y-1,pos.z,pos.x,pos.y-7,pos.z,block.BEDROCK_INVISIBLE.id)mc.setBlocks(pos.x,pos.y-1,pos.z-88,pos.x-1,pos.y-7,pos.z-88,block.BEDROCK_INVISIBLE.id)mc.setBlocks(pos.x-1,pos.y-1,pos.z-88,pos.x,pos.y-7,pos.z-88,block.BEDROCK_INVISIBLE.id)mc.setBlocks(pos.x+1,
TNTRUN.py01.02.03.04.05.06.07.08.09.10.11.12.13.14.15.16.17.18.19.20.21.22.23.24.25.26.27.28.29.30.31.32.33.34.35.36.
32 [ Chapter Five ]

33
[ HACKING AND MAKING IN MINECRAFT ]
pos.y-1,pos.z-88,pos.x,pos.y-7,pos.z-88,block.BEDROCK_INVISIBLE.id)mc.setBlocks(pos.x,pos.y,pos.z,pos.x,pos.y-7,pos.z-92,block.BEDROCK_INVISIBLE.id)
# build the bombmc.setBlocks(pos.x,pos.y,pos.z,pos.x,pos.y,pos.z-88,block.TNT.id,1)
# build the end podiummc.setBlocks(pos.x-2,pos.y,pos.z-93,pos.x+2,pos.y,pos.z-97,block.GLOWING_OBSIDIAN.id)mc.setBlocks(pos.x-1,pos.y+1,pos.z-94,pos.x+1,pos.y+1,pos.z-96,block.NETHER_REACTOR_CORE.id,1)mc.setBlock(pos.x,pos.y+2,pos.z-95,block.REDSTONE_ORE.id)
# set how many teleports you haveteleport=1
# build the display teleport signal blockmc.setBlock(pos.x+1,pos.y+1,pos.z-44, block.NETHER_REACTOR_CORE.id,2)mc.setBlock(pos.x-1,pos.y+1,pos.z-44, block.NETHER_REACTOR_CORE.id,2)
# teleport player when at a certain positionwhile teleport ==1: pos=mc.player.getTilePos() if pos.z==zpos: mc.player.setPos(pos.x,pos.y,pos.z-24) teleport=0
33[ TNT Run ]
37.38.39.40.41.42.43.44.45.46.47.48.49.50.51.52.53.54.55.56.57.58.59.60.61.62.63.64.65.66.67.68.69.
Download github.com/snake48/TNTRUN
[ HACKING AND MAKING IN MINECRAFT ]

34
ESSENTIALS
[ Chapter One ]
ESSENTIALS
34 [ Chapter Six ]
[ CHAPTER SIX ]
Everyone has their favourite Minecraft block. What if you could have an entire world made out of them?
TERRAFORMING MINECRAFT

35
[ HACKING AND MAKING IN MINECRAFT ]
magine fields of gold, fit for King Midas or the dragon Smaug. Or how about a frozen landscape where everything has been turned to ice? Just think what you could do in a world where
everything is primed TNT. Using Python, we can start a terraforming process to remake a
Minecraft world to your specifications. Even on a Pi 3, this won’t be a quick process: depending on how complex your landscape is, and how much you want to transform, it may take several days. So we’ll monitor our progress by uploading data to an Initial State dashboard so that we can keep track of things remotely. If you just want to do the terraforming, there’s another version of the code without the Initial State functionality in the same GitHub repository (terraforming_no_is.py).
>STEP-01Generate your worldBefore you start coding, you need to create your Minecraft: Pi Edition world and select the block type with which you want to fill your world. This can be any block of your choice, but it has to be a solid block (not ladders or torches). Manipulating the Minecraft ecosystem can be tricky. For example, if you try to turn water directly to lava, you’ll probably end up with lakes of obsidian, so you might need an
I
> Initial State account initialstate.com
> ISStreamer and Python 3 library
> psutil Python 3 library
You’ll Need
The default setting for a placed TNT block is inert. If you want to be able to detonate them, you'll have to set their data value to 1
In this world we added snow to the blocks not to be transformed (add them to the keepblocks list in the code)

36
ESSENTIALS
[ Chapter One ]36
intermediate step: turn all the water to something inert like wool, then transform it to lava. There may also be some blocks you want to keep – snow or water, for example.
>STEP-02Get the codeMake sure your Pi is up to date and, if you want to create a remote monitoring dashboard on Initial State, download and install its data streaming library:
sudo pip3 install ISStreamer psutil
Then download the is_terraforming.py code (magpi.cc/234A3hY). Note that you’ll need to change some of the values to suit your Minecraft environment and to include your Initial State account details.
>STEP-03Tune the codeTerraforming can take a long time – we’re talking days rather than minutes. However, we can tune our code to speed things up. Explore your world and find the tallest mountain range and deepest valley. Make a note of the height (the third value displayed in the top-left corner of the screen). You can then plug these values into the code.
We’ve set the default terraforming height range from -3 to 35 on the y axis, but you can make this bigger (this will take longer) or shorter (this will take less time), depending on the size of the geological features in your world.
>STEP-04Set the speed for the power of your PiThis code should work on any Pi, but older, less powerful models may struggle if you terraform at full speed. If Minecraft can’t keep up with all the changes it’s asked to make to the landscape, it may hang. So it’s a good idea to pause after a certain number of blocks, to let Minecraft catch up. On a Pi 3, you can comfortably transform 500+ blocks before having to pause, but for a Model B you may need to deal with 50 blocks at a time. You’ll probably want to run a few experiments to find the optimum configuration for your setup.
[ Chapter Six ]

37
[ HACKING AND MAKING IN MINECRAFT ]
37[ Terraforming Minecraft ]
>STEP-05Register for an Initial State accountInitial State allows you to upload live data and plot interesting charts and graphs. A free account lets you stream 25,000 events a month and examine the last 24 hours’ worth of data in any bucket. Once you’ve registered for an account, click on the ‘create HTTPS bucket’ button (the plus symbol) and give it a suitable name. Then check ‘Configure Endpoint Keys’ and copy the Bucket Key and Access Key into your version of the code.
>STEP-06Start terraforming!If you’re using a free account, edit the code and set the Free_account variable to True. This will throttle the amount of data sent to Initial State and allow you to record the whole process without exceeding the data cap.
Start your code running and check the console for any errors. You can fly to the corner of your world and should soon be able to see the changes taking place. Once the first data reaches Initial State, you can create a cool dashboard: use the Tiles interface and play around with the different types available.
Above You can create some very strange-looking worlds, like this one where everything on the surface is made of glass
[ HACKING AND MAKING IN MINECRAFT ]

38
ESSENTIALS
[ Chapter One ]38 [ Chapter Six ]
01.02.03.04.05.06.07.08.09.
10.
11.12.
13.14.15.16.17.18.19.20.21.22.23.24.25.26.27.
28.29.30.31.32.33.
import mcpi.minecraft as minecraft # Load librariesfrom ISStreamer.Streamer import Streamerimport mcpi.block as blockimport time, datetime, psutil
for pros in psutil.pids(): # Get the Linux process number for the Minecraft program if psutil.Process(pros).name() == 'minecraft-pi' and len(psutil.Process(pros).cmdline()) == 1: pm = psutil.Process(pros)streamer=Streamer(bucket_name=":mushroom: Terraforming", bucket_key="<enter here>", access_key= "<eneter here>")Free_account = False # If using a free IS account, set to True to limit data uploads and avoid exceeding monthly limit# Function to upload various bits of data to ISdef upload_data_to_IS(speed,elapsed,blocks_processed, blocks_transformed,cpu,y,x,z,mem,pm,num_blocks): print('Uploading to Initial State') streamer.log(":snail: Run Speed",speed) streamer.log(":jack_o_lantern: Run2 Time since last "+ str(num_blocks) + "blocks",elapsed) streamer.log(":volcano: Run2 Total Blocks",blocks_processed) streamer.log(":chocolate_bar:Run2 Blocks transformed",blocks_transformed) streamer.log(":up: CPU %",cpu) streamer.log(":arrow_down: Y",y) streamer.log(":arrow_right: X",x) streamer.log(":arrow_left: Z",z) streamer.log(":question: Memory used %",mem.percent) streamer.log(":question: Minecraft Process memory used %",pm.memory_percent())
time.sleep(1)mc=minecraft.Minecraft.create() # Connect to Minecraftkeepblocks=[block.AIR.id,block.WATER.id,block.LAVA.id,block.SNOW.id, block.WATER_FLOWING.id,block.WATER_STATIONARY]counter = 0 # A bunch of variables to keep track of how many blocks have been processedblocks_processed = 0blocks_transformed = 0blocks_since = 0throttle = 5 # Use this when Free_account is True, to restrict amount of data uploadednum_blocks = 1000 # How many blocks to transform before pausing to let Minecraft catch up
is_terraforming.py

39
[ HACKING AND MAKING IN MINECRAFT ]
39[ Terraforming Minecraft ]
start = time.time()for x in range(-128,128): # the x-direction for y in range(-4,35): # the y-direction (up/down) for z in range(-128,128): # the z-direction print(x,y,z) test = mc.getBlock(x,y,z) # Read a block at x, y, z blocks_processed+=1 blocks_since+=1 if test not in keepblocks: # Don’t transform these blocks (should always contain AIR) counter+=1 if counter > num_blocks: blocks_transformed+=num_blocks counter = 0 stop = time.time() elapsed = stop - start # How long since last group of blocks were processed? speed = blocks_since/elapsed # Calculate speed cpu = psutil.cpu_percent() # Read CPU utilisation mem = psutil.virtual_memory() # Read memory usage data if Free_account: # Only bother to throttle if using free IS account if throttle == 0: upload_data_to_IS( speed,elapsed,blocks_processed, blocks_transformed,cpu,y,x,z,mem,pm,num_blocks) throttle = 5 else: throttle-=1 print(‘reducing throttle’) else: upload_data_to_IS( speed,elapsed,blocks_processed, blocks_transformed,cpu,y,x,z,mem,pm, num_blocks) time.sleep(5) # Pause to allow Minecraft to catch up start = time.time() blocks_since=0 mc.setBlock(x,y,z,block.REDSTONE_ORE.id)
print(‘Changing Block: ‘ + str(test) + ‘ (counter = ‘ + str(counter) + ‘)’) time.sleep(0.1) else: print(‘Not changing Block: ‘ + str(test) + ‘ (counter = ‘ + str(counter) + ‘)’)
34.35.36.37.38.39.40.41.42.43.44.45.46.47.48.49.50.51.52.53.54.
55.56.57.58.59.60.
61.62.63.64.
65.66.67.68.
[ HACKING AND MAKING IN MINECRAFT ]
Download magpi.cc/ 234A3hY

40
ESSENTIALS
[ Chapter One ]
ESSENTIALS
40 [ Chapter Seven ]
[ CHAPTER SEVEN ]
Cause peril in your Minecraft world by adding catastrophes such as meteors and earthquakes
CREATE NATURAL DISASTERSIN MINECRAFT
41
[ HACKING AND MAKING IN MINECRAFT ]
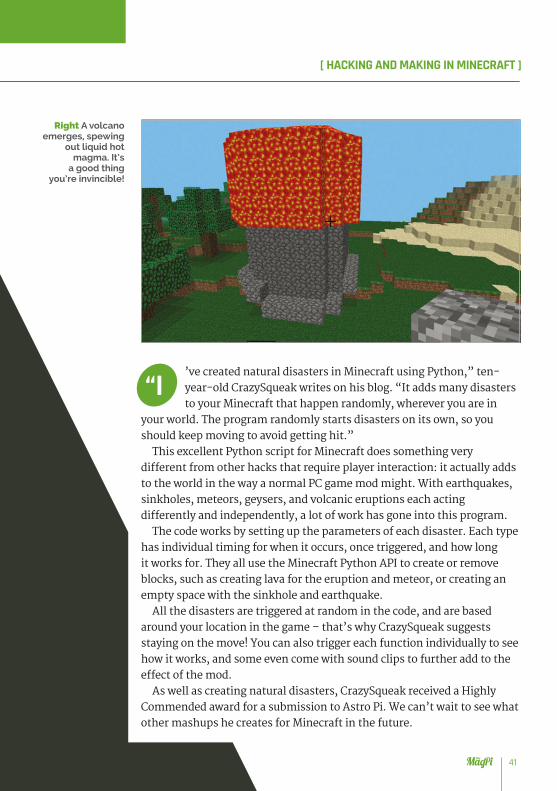
’ve created natural disasters in Minecraft using Python,” ten-year-old CrazySqueak writes on his blog. “It adds many disasters to your Minecraft that happen randomly, wherever you are in
your world. The program randomly starts disasters on its own, so you should keep moving to avoid getting hit.”
This excellent Python script for Minecraft does something very differentfromotherhacksthatrequireplayerinteraction:itactuallyaddsto the world in the way a normal PC game mod might. With earthquakes, sinkholes, meteors, geysers, and volcanic eruptions each acting differentlyandindependently,alotofworkhasgoneintothisprogram.
The code works by setting up the parameters of each disaster. Each type has individual timing for when it occurs, once triggered, and how long it works for. They all use the Minecraft Python API to create or remove blocks, such as creating lava for the eruption and meteor, or creating an empty space with the sinkhole and earthquake.
All the disasters are triggered at random in the code, and are based around your location in the game – that’s why CrazySqueak suggests staying on the move! You can also trigger each function individually to see how it works, and some even come with sound clips to further add to the effectofthemod.
As well as creating natural disasters, CrazySqueak received a Highly Commended award for a submission to Astro Pi. We can’t wait to see what other mashups he creates for Minecraft in the future.
“I
Right A volcano emerges, spewing
out liquid hot magma. It’s
a good thing you’re invincible!

42
ESSENTIALS
[ Chapter One ]42 [ Chapter Seven ]
01.02.03.04.05.06.07.08.09.10.11.12.13.14.15.16.17.18.19.20.21.22.23.24.25.26.27.28.29.30.31.32.33.34.35.36.37.38.39.
import mcpi.minecraft as mincimport mcpi.block as blockmc = minc.Minecraft.create()import random, time, pygamepygame.mixer.init()earthSound = pygame.mixer.Sound('earthquake.ogg')eruptSound = pygame.mixer.Sound('lava.ogg')meteorSound = pygame.mixer.Sound('meteor.ogg')def earthquake(x, z): mc.postToChat('Earthquake!') y = mc.getHeight(x, z) endtime = time.time() + 60 nearthtime = time.time() while endtime > time.time(): if time.time() > nearthtime: earthSound.play() nearthtime = time.time() + 5 ppos = mc.player.getPos() if ppos.x < x+15 and ppos.x > x-15: if ppos.y < y+15 and ppos.y > -60: if ppos.z < z+15 and ppos.z > z-15: mc.player.setPos(ppos.x, ppos.y, ppos.z) bx = random.randint(x-15, x+15) by = y bz = random.randint(z-15, z+15) if mc.getHeight(bx, bz) > -50: by = mc.getHeight(bx, bz) if mc.getBlock(bx, by, bz) in [block.GLASS.id, block.GLASS_PANE.id]: mc.setBlock(bx, by, bz, block.AIR.id) continue mc.setBlock(bx, by, bz, block.GRAVEL.id) mc.setBlocks(bx, by-1, bz, bx, -60, bz, block.AIR.id)def sinkhole(x, z): blks = [] y = mc.getHeight(x, z) xdist = random.randint(1, 5) for bx in range(-xdist, xdist+1): zdist = random.randint(1, 5) for bz in range(-zdist, zdist+1):
natural_disasters.py

43
[ HACKING AND MAKING IN MINECRAFT ]
[ Create Natural Disasters ] 43
blks.append([x+bx, z+bz]) earthSound.play() for blk in blks: mc.setBlocks(blk[0], mc.getHeight(blk[0], blk[1]), blk[1], blk[0],-60, blk[1], block.AIR.id) mc.setBlocks(blk[0], -55, blk[1], blk[0], -60, blk[1], block.LAVA.id) for blk in blks: mc.setBlock(blk[0], y, blk[1], block.GRAVEL.id)def geyser(x, z): y = mc.getHeight(x, z) mc.setBlocks(x-2, y+5, z-2, x+2, -60, z+2, block.WATER.id) time.sleep(25) mc.setBlocks(x-2, y+5, z-2, x+2, -60, z+2, block.AIR.id)def eruption(x, z): y = mc.getHeight(x, z) for i in range(3): eruptSound.play() mc.setBlocks(x-2, y+9, z-2, x+2, y+9, z+2, block.LAVA.id) eruptSound.play() for i in range(15): time.sleep(1) eruptSound.play() eruptSound.play() mc.setBlocks(x-2, y+10, z-2, x+2, y+10, z+2, block.WATER.id) eruptSound.play() for i in range(5): time.sleep(1) eruptSound.play() eruptSound.play() mc.setBlocks(x-2, y+10, z-2, x+2, y+10, z+2, block.AIR.id) eruptSound.play() for i in range(5): time.sleep(1) eruptSound.play() eruptSound.play() y += 1 eruptSound.play()def meteor(x, z): mc.postToChat('Meteor approaching!') y = 64 h = mc.getHeight(x, z) x -= (64 - h)
40.41.42.43.
44.45.46.47.48.49.50.51.52.53.54.55.56.57.58.59.60.61.62.63.64.65.66.67.68.69.70.71.72.73.74.75.76.77.78.79.80.
[ HACKING AND MAKING IN MINECRAFT ]
Download magpi.cc/ 1NUZ8Zm

44
ESSENTIALS
[ Chapter One ]44 [ Chapter Seven ]
meteorSound.play() while y > h: y -= 1 x += 1 mc.setBlocks(x-2, y-2, z-2, x+2, y+2, z+2, block.OBSIDIAN.id) time.sleep(0.05) mc.setBlocks(x-2, y-2, z-2, x+2, y+2, z+2, block.AIR.id) mc.setBlocks(x-2, y-2, z-2, x+2, y+2, z+2, block.LAVA.id) mc.setBlocks(x-1, y-1, z-1, x+1, y+1, z+1, block.OBSIDIAN.id)def meteor_shower(x, z): for i in range(10): mx = random.randint(x-15, x+15) mz = random.randint(z-15, z+15) meteor(mx, mz)def heatwave(x, z): y = mc.getHeight(x, z) endtime = time.time() + random.randint(50, 90) while time.time() < endtime: blkid = block.AIR.id while blkid == block.AIR.id: bx = random.randint(x-10, x+10) by = random.randint(y, y+10) bz = random.randint(z-10, z+10) blkid = mc.getBlockWithData(bx, by, bz).id blk = blkid blkd = mc.getBlockWithData(bx, by, bz).data if blkid == block.GRASS.id: blk = block.DIRT.id blkd = 0 elif blkid in [block.WATER.id, block.WATER_FLOWING.id, block.WATER_STATIONARY.id]: blk = block.WATER.id blkd = 1 elif blkid == block.LEAVES.id: blk = block.COBWEB.id blkd = 0 elif blkid == block.WOOD.id: blk = block.LAVA_STATIONARY.id blkd = 1 mc.setBlock(bx, by, bz, blk, blkd)def tsunami(x, z):
81.82.83.84.85.
86.87.88.89.90.91.92.93.94.95.96.97.98.99.100.101.102.103.104.105.106.107.108.109.110.
111.112.113.114.115.116.117.118.119.120.

45
[ HACKING AND MAKING IN MINECRAFT ]
[ Create Natural Disasters ] 45
tend = time.time() + 15 tx = x while time.time() < tend: h = mc.getHeight(tx, z) mc.setBlocks(tx, h-5, z-5, tx, h+5, z+5, block.WATER_STATIONARY.id) time.sleep(0.1) mc.setBlocks(tx, h-5, z-5, tx, h+5, z+5, block.AIR.id) time.sleep(0.1) tx += 1 hm = 5 while hm > -1: h = mc.getHeight(tx, z) mc.setBlocks(tx, h-int(hm), z-5, tx, h+int(hm), z+5, block.WATER_STATIONARY.id) time.sleep(0.1) mc.setBlocks(tx, h-int(hm), z-5, tx, h+int(hm), z+5, block.AIR.id) time.sleep(0.1) tx += 1 hm -= 0.2disasters = [tsunami, heatwave, meteor, meteor_shower, geyser, earthquake, sinkhole]def main(disasters, mc): baseed = random.randint(1, 10000) while True: t = random.randint(15, 180) t = 15 time.sleep(t) random.seed(baseed + t) baseed = random.randint(1, 10000) random.shuffle(disasters) disaster = random.choice(disasters) ppos = mc.player.getTilePos() # mc.postToChat(str(disaster) + ' in') # for c in range(3, 0, -1): # mc.postToChat(str(c)) # time.sleep(0.33) disaster(ppos.x, ppos.z)try: import _thread as threadexcept ImportError: import threadthread.start_new_thread(main, (disasters, mc))
121.122.123.124.125.126.127.128.129.130.131.132.133.
134.135.136.137.138.139.
140.141.142.143.144.145.146.147.148.149.150.151.152.153.154.155.156.157.158.159.160.
[ HACKING AND MAKING IN MINECRAFT ]

46
ESSENTIALS
[ Chapter One ]
ESSENTIALS
46 [ Chapter Eight ]
[ CHAPTER EIGHT ]
Create an exciting two-player game in Minecraft: Pi, inspired by Nintendo’s hit game game Splatoon…
MINECRAFT SPLAT

47
[ HACKING AND MAKING IN MINECRAFT ]
ou can play Minecraft: Pi Edition in multiplayer mode when two or more Raspberry Pis on the same network join the same world. In this guide, we use this technique to create a simple
versus game that’s similar to Nintendo’s Splatoon, which sees two teams trying to paint the game area in their team colours.
The objective of our game is very similar: to splat (turn to your team colour) as many blocks as possible for your side, while the opposing team will also be splatting blocks and claiming your splats for themselves. You will earn points for each block that’s still your colour at the end of the game, and the player with the most splats wins!
Y
[ Minecraft Splat ]
Below Can you escape the Lava Trap?
MINECRAFT SPLAT IS SPLIT INTO 5 PARTS:Create the framework for the program and make sure your code runs.
Build the pitch that will appear when the game starts and be the splat battleground.
Splat blocks by hitting them with a sword.
Game over and displaying the winner.
Making a better game.

48
ESSENTIALS
[ Chapter One ]48
CREATE THE PROGRAMOpen Python 2 from the Programming menu. The Python shell will appear; when it does, create a new program using File>New Window. It’s also a good idea to save your program now, using File>Save.
Import the Python modules you’ll need:
from mcpi.minecraft import Minecraftfrom mcpi import blockfrom time import sleep, timefrom random import getrandbits
You’ll need a constant to hold the colour each team will use; it’s the colour of the wool block that will be used when a player splats a block. Create a list which holds two values: 13 for green and 14 for red.
TEAMCOLS = [13,14]
Create the definition for two functions, which you will complete later in this tutorial:
def buildPitch(mc, pos): passdef splatBlock(mc, x, y, z, team): pass
You’ll need a list to hold the points each team has scored. The first element will be team 1’s score and the second team 2’s – they should both be set to 0:
points = [0,0]
Create the connection to Minecraft and post a message to the screen:
mc = Minecraft.create()mc.postToChat(“Minecraft Splat”)
At this point, you can run your program and if everything is set up, you should see the ‘Minecraft Splat’ message posted to the screen.
[ Chapter Eight ]

49
[ HACKING AND MAKING IN MINECRAFT ]
49[ Minecraft Splat ]
Now start up Minecraft: Pi Edition. Create a new game and then run your program by clicking Run>Run Module.
BUILD THE PITCHThe game needs a pitch where the action can take place; it’s a glass ‘room’ with two glass walls running down the middle.
Find the buildPitch function in your program:
def buildPitch(mc, pos): pass
The Minecraft connection, mc, and a position, pos, where the pitch should be built, should be passed to the function.
Delete the pass statement and replace it with the following code, which will create a cube of glass blocks. Then create a cube of air inside it before building the central walls of glass:
def buildPitch(mc, pos): # glass cube mc.setBlocks(pos.x - 5, pos.y - 1, pos.z - 10, pos.x + 5, pos.y + 3, pos.z + 10, block.GLASS.id) # hollow it out mc.setBlocks(pos.x - 4, pos.y, pos.z - 9, pos.x + 4, pos.y + 3, pos.z + 9, block.AIR.id)
[ HACKING AND MAKING IN MINECRAFT ]

50
ESSENTIALS
[ Chapter One ]50
# add 2 walls down the middle mc.setBlocks(pos.x, pos.y, pos.z - 7, pos.x, pos.y + 3, pos.z - 1, block.GLASS.id) mc.setBlocks(pos.x, pos.y, pos.z + 1, pos.x, pos.y + 3, pos.z + 7, block.GLASS.id)
The buildPitch function now needs to be called from your program. Add the following code to the end of the program to get the player’s position and call the function:
pos = mc.player.getTilePos()buildPitch(mc, pos)
Before the game starts, you should also include a delay to let the players get ready, and a message to let them know the game has started:
sleep(3)mc.postToChat(“Go!”)
Run the program. You should see the pitch appear around your player and the message to ‘Go!’.
[ Chapter Eight ]

51
[ HACKING AND MAKING IN MINECRAFT ]
51[ Minecraft Splat ]
SPLATTING BLOCKSThe blocks of the pitch’s walls and floor can be splatted by hitting them (right-clicking) with a sword - when you splat a glass block, it’ll turn it into a wool block of your team’s colour; splatting a block belonging to the opposition will turn it back to glass.
You earn points for each block splatted with your team’s colour, and the opposition will lose a point for each block you turn back to glass.
Find the splatBlock function in your program:
def splatBlock(mc, x, y, z, team): pass
Change the function so that it splats the block at the position x, y, z for team, which are variables passed to the function. When executed, the function will return the number of points scored for each team.
Delete the pass statement and create a list which will hold the points scored for each team:
def splatBlock(mc, x, y, z, team): pointsScored = [0,0]
The variable team, which is passed into splatBlock, will hold either a 0 or 1, depending on which team splatted the block. Use this value to create a variable to hold the other team:
otherTeam = 1 – team
Check to see if the block that was hit was a glass block; if it was, turn it into a wool block of the team’s colour, and increase the team’s score by 1:
blockHit = mc.getBlockWithData(x, y, z) if blockHit.id == block.GLASS.id: mc.setBlock(x, y, z, block.WOOL.id, TEAMCOLS[team]) pointsScored[team] += 1
If the block isn’t glass, check to see if it’s a wool block of the other team’s colour, before turning it back to glass and decreasing the other team’s score:
[ HACKING AND MAKING IN MINECRAFT ]

52
ESSENTIALS
[ Chapter One ]52
elif blockHit.id == block.WOOL.id: if blockHit.data == TEAMCOLS[otherTeam]: mc.setBlock(x, y, z, block.GLASS.id) pointsScored[otherTeam] -= 1
The last step in the splatBlock function is to return the number of points scored:
return pointsScored
Now that the splatBlock function is complete, you need to add to the code at the bottom of your program which will start the game.
You’ll find out how many players are in the game, create a loop which will continue until the end of the game, and call splatBlock each time a block is hit.
Get a list of players currently in the game and the time the game started, and store them in variables:
players = mc.getPlayerEntityIds()start = time()
[ Chapter Eight ]

53
[ HACKING AND MAKING IN MINECRAFT ]
53[ Minecraft Splat ]
Set the variable gameOver to False before creating a while loop, which will continue until gameOver is set to True when the game finishes:
gameOver = Falsewhile not gameOver:
Use pollBlockHits() to find out if any blocks have been hit, before looping through each ‘hit’ with a for loop:
blockHits = mc.events.pollBlockHits() for hit in blockHits:
Every player in Minecraft has an entity ID and these are held in the players list you created earlier. The player’s position in the list will determine what team they are on: even = team 1, odd = team 2. Use the players list and the entity ID of the player who hit the block to work out what team they are on:
team = players.index(hit.entityId) % 2
Call the splatBlock function, passing the position of the block which was hit and the team who hit it, and add the points scored to the total points for the team:
pointsScored = splatBlock(mc, hit.pos.x, hit.pos.y, hit.pos.z, team) points[0] += pointsScored[0] points[1] += pointsScored[1]
Run your program and, as before, the pitch should appear around your player. Now, however, hitting blocks (right-clicking while holding a sword) should turn the blocks to coloured wool. You could even get a friend to join your game and test turning your opponent’s blocks back to glass.
As you haven’t created the code to end the game, the program will continue forever. You can use CTRL+C or click Shell>Restart Shell in the Python shell to end the program.
[ HACKING AND MAKING IN MINECRAFT ]

54
ESSENTIALS
[ Chapter One ]54
GAME OVEREach match is 30 seconds long and the game is over when the time runs out. Under the while loop, you need to check whether the time now minus the time the game started is greater than 30 seconds. Once the game is over, you should post the team’s points to the chat window, along with the winner:
if time() - start > 30: gameOver = True mc.postToChat(“Game Over”) mc.postToChat(“Green Team = “ + str(points[0])) mc.postToChat(“Red Team = “ + str(points[1]))
if points[0] > points[1]: mc.postToChat(“Green Team wins”) else: mc.postToChat(“Red Team wins”)
Find a friend with a Raspberry Pi, challenge them to a game of Minecraft Splat, and run your program.
[ Chapter Eight ]

55
[ HACKING AND MAKING IN MINECRAFT ]
55[ Minecraft Splat ]
MAKING A BETTER SPLATThe splat made at the moment is less of a splat and more of a blob. If you want to take the program further, in the next section you will use randomisation to splatter the blocks around the block that was hit as well.
After your code to splat the block, loop through each of the blocks around the one which was hit:
for hit in blockHits: team = players.index(hit.entityId) % 2
pointsScored = splatBlock( mc, hit.pos.x, hit.pos.y, hit.pos.z, team)
points[0] += pointsScored[0] points[1] += pointsScored[1]
for x in [-1, 0, 1]: for y in [-1, 0, 1]: for z in [-1, 0, 1]:
Using the code getrandbits(1), you can randomly generate a 1 or 0, giving a 50/50 chance of it being 1. If it is, splat the block for the team and add the points to the total:
if getrandbits(1) == 1: pointsScored = splatBlock(mc, hit.pos.x + x, hit.pos.y + y, hit.pos.z + z, team) points[0] += pointsScored[0] points[1] += pointsScored[1]
Run your program again. Now, each time you splat a block, it should randomly splatter the blocks around it too.
This is just one improvement you can make to the game; the only limit is your imagination. How will you take it forward and make it your own?
The code for Minecraft Splat is on GitHub at magpi.cc/29qpm3r.
[ HACKING AND MAKING IN MINECRAFT ]

56
ESSENTIALS
[ Chapter One ]
# import modulesfrom mcpi.minecraft import Minecraftfrom mcpi import blockfrom time import sleep, timefrom random import getrandbits
TEAMCOLS = [13,14]
def buildPitch(mc, pos): # create the glass cube playing area mc.setBlocks(pos.x - 5, pos.y - 1, pos.z - 10, pos.x + 5, pos.y + 3, pos.z + 10, block.GLASS.id)
# hollow it out mc.setBlocks(pos.x - 4, pos.y, pos.z - 9, pos.x + 4, pos.y + 3, pos.z + 9, block.AIR.id)
# add 2 walls down the middle mc.setBlocks(pos.x, pos.y, pos.z - 7, pos.x, pos.y + 3, pos.z - 1, block.GLASS.id)
# add 2 walls down the middle mc.setBlocks(pos.x, pos.y, pos.z + 1, pos.x, pos.y + 3, pos.z + 7, block.GLASS.id)
def splatBlock(mc, x, y, z, team):
pointsScored = [0,0]
# who is the other team? otherTeam = 1 - team # what type of block has been hit? blockHit = mc.getBlockWithData(x, y, z) # has a glass block been hit? if blockHit.id == block.GLASS.id:
MCSplat.py01.02.03.04.05.06.07.08.09.10.11.12.13.14.15.16.17.18.19.20.21.22.23.24.25.26.27.28.29.30.31.32.33.34.35.36.37.38.39.40.
56 [ Chapter Eight ]

57
[ HACKING AND MAKING IN MINECRAFT ]
# claim it for the team mc.setBlock(x, y, z, block.WOOL.id, TEAMCOLS[team]) # increase the team’s score pointsScored[team] += 1 # was it a wool block? elif blockHit.id == block.WOOL.id: # if other team’s colour turn it back to GLASS if blockHit.data == TEAMCOLS[otherTeam]: mc.setBlock(x, y, z, block.GLASS.id) # reduce the other team’s score pointsScored[otherTeam] -= 1 return pointsScored # set up pointspoints = [0,0]
# create connection to Minecraftmc = Minecraft.create()
# post the message to the screenmc.postToChat(“Minecraft Splat”)
# find out the host player’s positionpos = mc.player.getTilePos()
# build the pitchbuildPitch(mc, pos)
sleep(3)
mc.postToChat(“Go!”)
# get a list of the playersplayers = mc.getPlayerEntityIds()
start = time()
gameOver = False
57
41.42.43.44.45.46.47.48.49.50.51.52.53.54.55.56.57.58.59.60.61.62.63.64.65.66.67.68.69.70.71.72.73.74.75.76.77.78.79.80.81.82.
Download magpi.cc/ 29qpm3r
[ Minecraft Splat ]
[ HACKING AND MAKING IN MINECRAFT ]

58
ESSENTIALS
[ Chapter One ]58
# continue till the end of the gamewhile not gameOver:
# has a block been hit? blockHits = mc.events.pollBlockHits() for hit in blockHits: # which team was it? team = players.index(hit.entityId) % 2 pointsScored = splatBlock( mc, hit.pos.x, hit.pos.y, hit.pos.z, team) # update the points points[0] += pointsScored[0] points[1] += pointsScored[1]
# splat blocks around it for x in [-1, 0, 1]: for y in [-1, 0, 1]: for z in [-1, 0, 1]: if getrandbits(1) == 1: pointsScored = splatBlock(mc, hit.pos.x + x, hit.pos.y + y, hit.pos.z + z, team) # update the points points[0] += pointsScored[0] points[1] += pointsScored[1] # if the time has run out, set game over if time() - start > 30: gameOver = True mc.postToChat(“Game Over”) mc.postToChat(“Green Team = “ + str(points[0])) mc.postToChat(“Red Team = “ + str(points[1])) if points[0] > points[1]: mc.postToChat(“Green Team wins”) else: mc.postToChat(“Red Team wins”)
83.84.85.86.87.88.89.90.91.92.93.94.95.96.97.98.99.100.101.102.103.104.105.106.107.108.109.110.111.112.113.114.115.116.117.118.119.120.121.122.123.
[ Chapter Eight ]

59
[ HACKING AND MAKING IN MINECRAFT ]
ESSENTIALS
[ CHAPTER NINE ]
Program Minecraft, and connect an LED and a buzzer to a Raspberry Pi.
USING THE GPIO TO FIND A BLOCK

60
ESSENTIALS
[ Chapter One ]
ou’re going to learn how to connect an LED and buzzer to your Raspberry Pi and create a program which will hide a gold block in Minecraft with their help. The LED will light up when you
are close to the block, and the buzzer will let you know when you are walking towards the block.
Get StartedThe first task is to start your program and get a message to appear on the Minecraft screen:
01. Start Minecraft by clicking Menu > Games > Minecraft and create a new world.
02. Press ESC to go back to the Minecraft menu but leave the game playing.
03. Open IDLE by clicking Menu > Programming > Python 3.04. Use File > New Window to create a new program and save
it as findablock.py.05. At the top of your program, type the following code to import
the Minecraft modules you’ll need: import mcpi.minecraft as minecraft import mcpi.block as block
YAbove A gold block
will be hidden at a random position;
the buzzer and LED will help you find it
60 [ Chapter Nine ]
> Breadboard
> LED and resistor
> Buzzer
> GPIO Zero magpi.cc/ 294zLHk
You’ll Need

61
[ HACKING AND MAKING IN MINECRAFT ]
06. Create a connection to Minecraft using this code: mc = minecraft.Minecraft.create()
07. Post a message to the chat window: mc.postToChat("Go find the block")
08. Run your program by clicking Run > Run Module.
You should see your message appear in the Minecraft chat window.
Hide a BlockUsing the random module, you can generate a position near the player and use the Minecraft API to create a gold block there which the player will have to find:
01. At the top of your program import the randint function from the random module. from random import randint
02. Add the following code to the bottom of your program to find out the player’s position: p = mc.player.getTilePos()
03. Generate 3 random numbers for the coordinates of the gold block: x = p.x + randint(-20, 20) y = p.y + randint(-5, 5) z = p.z + randint(-20, 20)
04. Create the gold block at this position: mc.setBlock(x, y, z, block.GOLD_BLOCK.id)
05. Run your program by clicking Run > Run Module or by pressing F5.
A gold block will be created within 20 blocks of the player - see if you can find it!
LEDs & BuzzersTo help the player find the block, you’re going to use an LED which will indicate when the player is close by, and a buzzer to let the player know they are walking towards the block.
Use your breadboard, jumper cables, LED, resistor, and buzzer to build the circuit as shown in the diagram [fig1].
[ Using the GPIO to Find a Block ]
[ HACKING AND MAKING IN MINECRAFT ]

62
ESSENTIALS
[ Chapter One ]62
When the circuit is complete, update your program to flash the LED and buzz the buzzer to let the player know the game has started:
01. Import LED, Buzzer and sleep from the gpiozero and time Python modules: from gpiozero import LED, Buzzer from time import sleep
02. Create the LED, which is connected to GPIO 24: led = LED(24)
03. Create the buzzer, which is connected to GPIO 17: buzz = Buzzer(17)
04. Turn the LED and buzzer on, sleep for 1 second and then turn them back off: led.on() buzz.on() sleep(1) led.off() buzz.off()
05. Run your program; the LED and buzzer will turn on for 1 second.
ETHERNET
USB X2 USB X2
GPIO
CAMERA
PWR IN
DISPLAY
A/V
3V3GP2GP3
GND
GND
GND
GND
GND
GND
GND
GND
GP4 GP14GP15GP18GP17
GP27GP22
GP10GP9
GP5GP6GP13GP19GP26 GP20
GP21
GP16
GP12
GP25GP11
GP7GP8
DNCDNC
3V3GP23GP24
5V5V
123456789
101112131415161718192021222324252627282930
123456789
101112131415161718192021222324252627282930
+ _ + _
+ _ + _
a b c d e f g h i j
a b c d e f g h i j
Fig1 You will build this circuit to help find the gold block
[ Chapter Nine ]

63
[ HACKING AND MAKING IN MINECRAFT ]
Making the Buzzer ‘Buzzzzzz’The buzzer should buzz when the player is getting further away from the gold block, so if the buzzer remains silent you’re getting closer.
Update your program so that it works out the distance between the player and the block, and turns the buzz on or off:
01. To calculate the distance you will use the maths square root (sqrt) function, so import it now: from math import sqrt
02. Create a variable called dist (for distance) and set it to 0: dist = 0
03. Create a variable called gameover and set it to False - it will be set to True at the end of the game when the player has found the block: gameover = False
04. Create a loop which will continue until the game is over: while gameover == False:
05. Indented under the while loop, add the code to get the player’s position: p = mc.player.getTilePos()
06. Work out the distance between the player and the gold block: xd = p.x - x yd = p.y - y zd = p.z - z dist_now = sqrt((xd*xd) + (yd*yd) + (zd*zd))
07. If the distance is going up, turn the buzzer on, else turn it off: if dist_now > dist: buzz.on() else: buzz.off()
08. Set the variable dist to dist_now so it can be compared next time around the loop: dist = dist_now
09. Run the program. The buzzer should buzz when the player is getting further away from the gold.
[ Using the GPIO to Find a Block ]
[ HACKING AND MAKING IN MINECRAFT ]

64
ESSENTIALS
[ Chapter One ]
Nearly there LEDTo give the player a chance to find the block when he is close by, the LED should light up.
01. Turn the LED on when the distance to the gold block is less than 5: if dist_now < 5: led.on() else: led.off()
02. Run your program and when you get close, the LED should light up.
Game overOnce the player finds the block, the game is over.
01. When the distance between the player is less than 1.5, set the gameover variable to True and post a message to let the player know: if dist_now < 1.5: gameover = True mc.postToChat("You got GOLD")
02. Finally, clean up by turning off your LED and buzzer: led.off() buzz.off()
03. Run your program and find the gold block!
Next stepsCan you take this program forward and make it your own? Some ideas:
> Create a timer so that you can have races trying to find the gold block.
> Add more LEDs (i.e. red, yellow and green) which show when you’re getting nearer to the gold.
> Hide several blocks which the player has to find in order.
64 [ Chapter Nine ]

65
[ HACKING AND MAKING IN MINECRAFT ]
[ CHAPTER TEN ]
ESSENTIALS
Use Sonic Pi with Minecraft to create amazing visuals for your music as you perform it!
BECOME A MINECRAFT VJ

66
ESSENTIALS
[ Chapter One ]66 [ Chapter Ten ]
veryone has built amazing structures, designed cunning traps, and even created elaborate cart tracks in Minecraft. How many of you have performed with Minecraft? We bet you didn’t
know that you could use Minecraft to create amazing visuals, just like a professional VJ.
As well as coding with Python, you can also program Minecraft with an app called Sonic Pi, which makes the coding not only easy but also incredibly fun. In this article, we’ll be showing you some of the tips and tricks that we’ve used to create performances in nightclubs and music venues around the world.
Enter a new world in Minecraft and open Sonic Pi. When we’re using Minecraft to create visuals, we try to think about what will both look interesting and also be easy to generate from code. One nice trick is to create a sandstorm by dropping sand blocks from the sky. For that, allweneedareafewbasicfns(SonicPifunctions):
> sleep - for inserting a delay between actions> mc_location - to find our current location> mc_set_block - to place sand blocks at a specific location> rrand - to allow us to generate random values within a range> live_loop - to allow us to continually make it rain sand
Y
Below All of this is powered by Sonic Pi, allowing you to make your visualisations match the music
[ MINECRAFT & SONIC PI ]Node-RED is a visual tool for wiring the Internet of Things. It takes care of technicalities, like GPIO access or internet protocols, and lets you focus on your workflow.

67
[ HACKING AND MAKING IN MINECRAFT ]
[ Become a Minecraft VJ ]
Let’s make it rain a little first, before unleashing the full power of the storm. Grab your current location and use it to create a few sand blocksupintheskynearby:
x, y, z = mc_locationmc_set_block :sand, x, y + 20, z + 5sleep 2mc_set_block :sand, x, y + 20, z + 6sleep 2mc_set_block :sand, x, y + 20, z + 7sleep 2mc_set_block :sand, x, y + 20, z + 8
When you press Run, you might have to look around a little, as the blocks may start falling down behind you depending on which direction you’recurrentlyfacing.Don’tworry:ifyoumissedthem,justpressRun again for another batch of sand rain - just make sure you’re looking the right way!
Let’s quickly review what’s going on here. On the first line, we grabbed Steve’s location as coordinates with the fn mc_location and placed them into the vars x, y, and z. Then, on the next lines, we used the mc_set_block fn to place some sand at the same coordinates as Steve, but with some modifications. We chose the same x coordinate, a y coordinate 20 blocks higher, and then successively larger z coordinates, so the sand dropped in a line away from Steve.
Why don’t you take that code and start playing around with it yourself? Try adding more lines, changing the sleep times, try mixing :sand with :gravel, and choose different coordinates. Just experiment and have fun!
[ HELP WITH FUNCTIONS ]If you’re unfamiliar with any of the built-in fns such as rrand, just type
the word into your buffer, click on ‘int’, and then press the keyboard
combo CTRL+I to bring up the built-in documentation. Alternatively, you
can navigate to the ‘lang’ tab in the Help system and then look up the
fns directly, along with all the other exciting things you can do.
[ HACKING AND MAKING IN MINECRAFT ]

68
ESSENTIALS
[ Chapter One ]68
Live loops unleashedOkay, it’s time to get the storm raging by unleashing the full power of the live_loop, Sonic Pi’s magical ability, which unleashes thefullpoweroflive-coding:changingcodeontheflywhileit’s running!
live_loop :sand_storm do x, y, z = mc_location xd = rrand(-10, 10) zd = rrand(-10, 10) co = rrand(70, 130) synth :cnoise, attack: 0, release: 0.125, cutoff: co mc_set_block :sand, x + xd, y+20, z+zd sleep 0.125end
What fun! We’re looping round pretty quickly (eight times a second), and during each loop we’re finding Steve’s location like before but thengeneratingthreerandomvalues:
> xd - the difference for x, which will be between -10 and 10> zd - the difference for z, also between -10 and 10> co - a cutoff value for the low pass filter, between 70 and 130
We then use those random values in the fns synth and mc_set_block, giving us sand falling in random locations around Steve, along with a percussive rain-like sound from the :cnoise synth.
For those of you new to live loops, this is where the fun really starts with Sonic Pi. While the code is running and the sand is pouring down, try changing one of the values, perhaps the sleep time to 0.25 or the :sand block type to :gravel. Now press the Run button again. Hey presto! Things have changed without the code even stopping. This is your gateway to performing like a real VJ. Keep practising and changing things around. How different can you make the visuals without stopping the code?
[ Chapter Ten ]

69
[ HACKING AND MAKING IN MINECRAFT ]
[ Become a Minecraft VJ ]
Epic block patternsFinally, another great way of creating interesting visuals is to generate huge patterned walls to fly towards and get close to. For this effect, we’ll need to move from placing the blocks randomly to placing them in an ordered manner. We can do this by nesting two sets of iteration; press the Help button and navigate to section 5.2 of the tutorial, ‘Iteration and Loops’, for more background on iteration. The funny |xd| after the do means that xd will be set for each value of the iteration. So, the first time it will be 0, then 1, then 2, and so on. By nesting two lots of iteration together like this, we can generate all the coordinates for a square. We can then randomly choose block typesfromaringofblocksforaninterestingeffect:
x, y, z = mc_locationbs = (ring :gold, :diamond, :glass)10.times do |xd| 10.times do |yd| mc_set_block bs.choose, x + xd, y + yd, z endend
Pretty neat. Whilst we’re having fun here, try changing bs.choose to bs.tick to move from a random pattern to a more regular one. Try changing the block types – the more adventurous of you might want to try sticking this within a live_loop so that the patterns keep changing automatically.
Now for the VJ finale. Change the two 10.times to 100.times andpressRun.Kaboom:agiganticwallofrandomlyplacedbricks.Imagine how long it would take you to build that manually with your mouse! Double-tap SPACE to enter fly mode and start swooping by for some great visual effects. Don’t stop here, though – use your imagination to conjure up some cool ideas and then use the coding power of Sonic Pi to make it real. When you’ve practised enough, dim the lights and put on a VJ show for your friends!
[ HACKING AND MAKING IN MINECRAFT ]

70
ESSENTIALS
[ Chapter One ]
ESSENTIALS
70 [ Chapter Eleven ]
[ CHAPTER ELEVEN ]
JavaScript is an interpreted programming language and one of the main components of interactive websites. With Node-RED, you can easily use it to control Minecraft
NODE-RED AND CONTROLLING MINECRAFT WITH JAVASCRIPT
PART 1

71
[ HACKING AND MAKING IN MINECRAFT ]
[ Node-RED and JavaScript ]
his article should give you a taste of a workshop Boris taught at a recent CamJam. Here, we’ll show you just how easy Node-RED is to use. You can refer to the original tutorial
(magpi.cc/1jLWFST) for a lot more detail and theory.
PreparationStart Minecraft and open a new world. Fire up Node-RED from the Programming submenu on the Raspbian desktop. After a few moments, Node-RED is going to run as a service in the background. Open a web browser (Iceweasel works best with Node-RED) and direct it to 127.0.01:1880toseetheprogrammingenvironment.Ontheleft,there’sa panel with nodes. These are visual components that you can use to build your flow. In the middle is the flow editor where you can simply drag and drop your flow together. On the right, you can switch between the help panel and the debug panel. Note that while ‘debug’ often has some negative connotation, it’s your default text output in Node-RED.
“I[ MINECRAFT & NODE-RED ]Node-RED is a visual tool for wiring the Internet of Things. It takes care of technicalities, like GPIO access or internet protocols, and lets you focus on your workflow.
[ A TOOL FOR THE INTERNET OF THINGS ]Node-RED encapsulates great functionality in already existing nodes.
Let the Twitter output node feed into the Minecraft chat, or the GPIO
input node trigger your flow with a physical button!
Below Node-RED and Minecraft on one screen can look a bit busy. Once you’re comfortable, however, Steve’s world is under your control

72
ESSENTIALS
[ Chapter One ]72
Hello World in MinecraftDrag and drop an inject node from the nodes panel into the flow editor. Once you’ve selected that inject node, you should see a general explanation about its functionality in the help panel – this is especially useful info when you select complex nodes with many different options.
Double-click your inject node in the flow editor. Once the associated dialogue opens, change the Payload to type ‘string’ and write ‘Hello World’ in the empty text field below.
The flow of information is modelled through the exchange of messages in Node-RED, which happens by passing along a variable
Right Your first flow: the code you need to write into
your function node, and configuration
details for the TCP request node
[ Chapter Eleven ]

73
[ HACKING AND MAKING IN MINECRAFT ]
73[ Node-RED and Javascript ]
called msg.Ithastwomainproperties:topicandpayload. In simple terms, these could be interpreted like the subject and body of an email. Drag and drop a debug node from the nodes library into the flow editor.
Drag and drop a function node into the editor. This is the node type that allows you to directly interact with the msg object in JavaScript. In your function node, before the line with return msg;,write:
msg.payload = "chat.post("+msg.payload+")\n";
This line is going to take the incoming payload ‘Hello World’, and assign the new content "chat.post(Hello World)\n" to the variable. chat.post is a command from the Minecraft API, which you can read about in a file called mcpi_protocol_spec.txt in the Minecraft API directory. The end of our command is indicated by a line break, the Unix character \n.
Drag and drop a TCP request node from the function section of the node panel. The server is 127.0.0.1, and the port is 4711. As we’re not expecting a return value, we’ll Return after a fixed timeout of 0ms. This connects Node-RED to the Minecraft TCP socket. If you’re keen to understand what a socket is, have a look at the original workshop material:magpi.cc/1jLWFST.
Connect the nodes by drawing connections, as in the screenshots here. Start your flow by pressing the red Deploy button in the upper-right corner. Trigger your flow by pressing the rounded rectangle to the immediate left of your inject button. Do you see your message in Minecraft?
Retrieve values from MinecraftSo far, our interaction with Minecraft has been rather one-directional. We just sent a command string that had an effect on the Minecraft world. Now we’re going to modify our flow so we can query values like our own position via the API.
In the function node, before the line with return msg;,set:
msg.payload = "player.getPos()\n";
[ HACKING AND MAKING IN MINECRAFT ]

74
ESSENTIALS
[ Chapter One ]
Instead of leaving the TCP request node after some time, we expect our Return ‘when character is received’, namely \n.
By default, the TCP request node returns a buffer, and we need to converttheinformationfromNode-REDusing:
msg.payload = msg.payload.toString();
in a new function node. The result of this new function node goes straight to our debug node.
Deploy your Node-RED flow. Now have a walk around Minecraft and trigger your flow with the inject node. Do you see what you expected in the debug panel?
Look out for the second part of this tutorial, which will cover aspects of event-driven development with Node-RED, including the interaction of Minecraft with the physical world.
74 [ Chapter Eleven ]

75
[ HACKING AND MAKING IN MINECRAFT ] [ HACK MINECRAFT ]
75[ Node-RED and JavaScript ]
[{“id”:”945e5f77.182da8”,”type”:”function”,”z”:”a59a50d2.5a65b”,”name”:”function”,”func”:”msg.payload = \”chat.post(\”+msg.payload+\”\\n\”+\”)\”;\nreturn msg;”,”outputs”:1,”noerr”:0,”x”:124,”y”:152,”wires”:[[“ec2d4ccc.7365b”]]},{“id”:”c5a42bac.ef9ba”,”type”:”debug”,”z”:”a59a50d2.5a65b”,”name”:””,”active”:true,”console”:”false”,”complete”:”false”,”x”:374,”y”:53,”wires”:[]},{“id”:”f1098e71.8eb9d”,”type”:”inject”,”z”:”a59a50d2.5a65b”,”name”:”inject”,”topic”:””,”payload”:”Hello World”,”payloadType”:”string”,”repeat”:””,”crontab”:””,”once”:false,”x”:86,”y”:53,”wires”:[[“945e5f77.182da8”,”c5a42bac.ef9ba”]]},{“id”:”ec2d4ccc.7365b”,”type”:”tcp request”,”z”:”a59a50d2.5a65b”,”server”:”127.0.0.1”,”port”:”4711”,”out”:”time”,”splitc”:”0”,”name”:””,”x”:356,”y”:151,”wires”:[[]]}]
Hello WorldDownloadHello Worldmagpi.cc/ 1Qr4USK
Player Positionmagpi.cc/ 1Qr4Xht
[{"id":"945e5f77.182da8","type":"function","z":"a59a50d2.5a65b","name":"function","func":"msg.payload = \"player.getPos()\\n\";\nreturn msg;","outputs":1,"noerr":0,"x":128,"y":153,"wires":[["ec2d4ccc.7365b","c5a42bac.ef9ba"]]},{"id":"c5a42bac.ef9ba","type":"debug","z":"a59a50d2.5a65b","name":"","active":true,"console":"false","complete":"false","x":378,"y":54,"wires":[]},{"id":"f1098e71.8eb9d","type":"inject","z":"a59a50d2.5a65b","name":"inject","topic":"","payload":"Hello World","payloadType":"string","repeat":"","crontab":"","once":false,"x":90,"y":54,"wires":[["945e5f77.182da8"]]},{"id":"ec2d4ccc.7365b","type":"tcp request","z":"a59a50d2.5a65b","server":"127.0.0.1","port":"4711","out":"char","splitc":"\\n","name":"","x":244,"y":253,"wires":[["f4f5b8bd.154d68"]]},{"id":"f4f5b8bd.154d68","type":"function","z":"a59a50d2.5a65b","name":"conversion","func":"msg.payload = msg.payload.toString();\nreturn msg;","outputs":1,"noerr":0,"x":367,"y":154,"wires":[["c5a42bac.ef9ba"]]}]
Player Position
[ HACKING AND MAKING IN MINECRAFT ]

76
ESSENTIALS
[ Chapter One ]
ESSENTIALS
76 [ Chapter Twelve ]
[ CHAPTER SIX ]
With Node-RED you can mine like a pro. Give Steve an additional sense to see if there are any exciting blocks in the neighbourhood
NODE-RED AND CONTROLLING MINECRAFT WITH JAVASCRIPT
PART 2

77
[ HACKING AND MAKING IN MINECRAFT ]
[ Node-RED and JavaScript ]
This is a summary of the block types. For example, we have 185 blocks of air (ID “0”) around us
This is the flow that tabulates all block types around you
art one of this mini-series introduced linear flows with Node-RED and Minecraft, and you should go through it before embarking on the next adventure. In part two, you’ll dive
deeper into Node-RED and JavaScript. Learn how to react to events, loop over a set of variables, and retain values from previous executions of a node in your flow. With this tutorial, we’ve got you well covered for any further explorations with Node-RED!
This tutorial takes off where we left in part one. In that tutorial, we taught you how to make a Minecraft ‘Hello World’ and how to read data from it.
PreparationTo get back to where you were, start Minecraft and open a world. Fire up Node-RED from the Programming sub-menu. Open a web browser (Iceweasel works best with Node-RED) and direct it to 127.0.0.1:1880
P
> Raspbian raspberrypi.org /downloads
> Node-RED – pre-installed on Raspbian nodered.org
> Iceweasel – installed via terminal wiki.debian.org /Iceweasel
You’ll Need

78
ESSENTIALS
[ Chapter One ]78
to see the programming environment. Arrange the windows so you can see what’s going on in Node-RED and the Minecraft world.
You should see your last flow, the one that retrieved Steve’s position and printed the coordinates in the debug panel. If not, you can download the Player Position flow from the Node-RED
flows directory (magpi.cc/1Qr4Xht) and import it before you proceed.
Calculate and store the coordinatesEdit the conversion function node, and rename it to getBlock() to reflect its new role. There’s a bit of magic in this one. The replace() and split() functions remove the trailing line break from the Minecraft message and break the components of Steve’s position into character strings. These are put into an array – a variable that saves a few values in a list – which is called arr. Convert the strings from the list into whole numbers and assign them to variables x, z, and y with parseInt() to be able to do calculations on them.
Define a variable cube_size that keeps half of the size of a cube in whose centre we’re located. With three nested for loops, iterate over this cube that spans from x - cube_size, z - cube_size, y - cube_size to x + cube_size, z + cube_size, y + cube_size. For each tuple (h, k, l), create a payload object that carries a string of the format “world.getBlock(h,k,l)\n”, and store it as an element of an array, coord_set. The function node returns [coord_set], which makes Node-RED invoke the next flow element for each list element.
Drag and drop another TCP request node from the function section of the node panel. As before, the server is 127.0.0.1 and port 4711, and we expect the returned message to be finished with \n.
Drag and drop a trigger node. Configure it such that it sends nothing and waits for 250ms, and then sends the string payload “trigger”. Check the extend delay option. This essentially means that as long as there are incoming messages at least every 250ms, the node will remain silent, but if there are no new messages, we send the trigger
Above The ‘getBlock()’
function. Lines 8-16 populate an
array with 343 (73) elements, each
carrying a payload with a world.
getBlock statement for the TCP node
[ Chapter Twelve ]

79
[ HACKING AND MAKING IN MINECRAFT ]
79[ Node-RED and JavaScript ]
Left The ‘tabulate’ function. Lines 1-4 are executed if the trigger node doesn’t receive any more results from the TCP node
message. In our case, this will indicate that the TCP request node is done with all requests.
A final function node called tabulate does a few clever bits. First, it checks if the incoming payload is “trigger”. If that’s the case, it publishes the results of a variable context.table as payload, but deletes context.table. Remember, that’s only happening after all TCP requests are finished. If TCP requests are still incoming, the second part after the else statement is relevant: the request buffer with a Minecraft block ID is converted into a string. Have a look at magpi.cc/1PvHAh4 to see what they mean; for example, 0 is air and 17 is wood. If it’s the first time we’re entering this part of the code, we’ll create an empty variable context.table: context is a special variable in Node-RED that’s persistent between different times a node is called up. If there’s no table entry for ID, we’ll create one and set it to 0, otherwise we take its current value, then we add 1. With that, the node expects more incoming IDs until the trigger message arrives.
Ultimately, we’ll have a directory of elements which we can print with a debug node; this is happening in the return statement in the tabulate node. The block type IDs are shown in quotes; the number of occurrences follows the colon. These should add up to 343, the volume of the cube around us.
We hope that this tutorial has helped you understand a few concepts that aren’t immediately obvious when using Node-RED for the first time. In part one, we promised interaction with the real world… well… just add the GPIO node. We’re sure you’ll figure it out!
[ HACKING AND MAKING IN MINECRAFT ]

80
ESSENTIALS
[ Chapter One ]80 [ Chapter Thirteen ]
Block Inventory[{"id":"533edf4.facc12","type":"function","z":"e13b1b02.1ec4e8","name":"getPos()","func":"msg.payload = \"player.getPos()\\n\";\nreturn msg;","outputs":1,"noerr":0,"x":207,"y":151,"wires":[["71429f10.8ebd6"]]},{"id":"dd58ffe0.22a7","type":"debug","z":"e13b1b02.1ec4e8","name":"","active":true,"console":"false","complete":"payload","x":642,"y":278,"wires":[]},{"id":"cc9ed7e5.336128","type":"inject","z":"e13b1b02.1ec4e8","name":"inject","topic":"","payload":"trigger","payloadType":"string","repeat":"","crontab":"","once":false,"x":98,"y":53,"wires":[["533edf4.facc12"]]},{"id":"71429f10.8ebd6","type":"tcp request","z":"e13b1b02.1ec4e8","server":"127.0.0.1","port":"4711","out":"char","splitc":"\\n","name":"","x":329,"y":74,"wires":[["a9afe2c4.56502"]]},{"id":"a9afe2c4.56502","type":"function","z":"e13b1b02.1ec4e8","name":"getBlock()","func":"var arr = msg.payload.toString().replace(/(\\n|\\r)+$/, ‘’).split(\",\");\n\nvar x = parseInt(arr[0]);\nvar z = parseInt(arr[1]);\nvar y = parseInt(arr[2])\nvar cube_size = 3;\n\nvar coord_set = []\n for (var h = x-cube_size; h < x+cube_size+1; h++) {\n for (var k = z-cube_size; k < z+cube_size+1; k++) {\n for (var l = y-cube_size; l < y+cube_size+1; l++) {\n coord_set.push({payload: \"world.getBlock(\"+h+\",\"+k+\",\"+l+\")\\n\"});\n }\n }\n }\nreturn [coord_set];","outputs":1,"noerr":0,"x":463,"y":140,"wires":[["9713fdf5.68ec"]]},{"id":"9713fdf5.68ec","type":"tcp request","z":"e13b1b02.1ec4e8","server":"127.0.0.1","port":"4711","out":"char","splitc":"\\n","name":"","x":203,"y":277,"wires":[["4958e94e.b6a718","e8e39686.171c68"]]},{"id":"4958e94e.b6a718","type":"function","z":"e13b1b02.1ec4e8","name":"tabulate","func":"if (msg.payload === \"trigger\") {\n msg.payload = context.table;\n context.table = undefined;\n return msg;\n} else {\n var ID = msg.payload.toString().replace(/(\\n|\\r)+$/, ‘’);\n \n context.table = context.table || {};\n context.table[ID] = context.table[ID] || 0;\n context.table[ID] = context.table[ID]+1;\n}","outputs":1,"noerr":0,"x":470,"y":278,"wires":[["dd58ffe0.22a7"]]},{"id":"e8e39686.171c68","type":"trigger","z":"e13b1b02.1ec4e8","op1":"1","op2":"trigger","op1type":"nul","op2type":"val","duration":"250","extend":true,"units":"ms","name":"","x":362,"y":354,"wires":[["4958e94e.b6a718"]]}]
80
DownloadBlock Inventorymagpi.cc/ 1n59yKr
[ Chapter Twelve ]

81
[ HACKING AND MAKING IN MINECRAFT ]
ESSENTIALS
[ CHAPTER FOURTEEN ]
Learn all the API functions of Minecraft: Pi from the mcpi Python library…
PI EDITION API REFERENCE
MINECRAFT:

82
ESSENTIALS
[ Chapter One ]
MINECRAFTThis is the main class and is how you create a connection to Minecraft and access the API.
82 [ Chapter Fourteen ]
.create(address = “localhost”, port = 4711)Create a connection to Minecraft => connection : Minecraft().
# use default address and portmc = minecraft.Minecraft.create()# specify ip address and portmc = minecraft.Minecraft.create("192.168.1.1", 4711)
.getBlock(x,y,z)Get a block => block id : int.
# retrieves the block type for the block at 0,0,0blockType = mc.getBlock(0,0,0)
.getBlockWithData(x,y,z)Get a block with data => block data : Block().
# retrieves a block object for the block at 0,0,0blockObj = mc.getBlockWithData(0,0,0)
.setBlock(x,y,z)Set a block.
# sets a block at an x,y,z coordinate to a particular typemc.setBlock(0,0,0,block.DIRT.id)# sets a block to a particular type and 'subtype'mc.setblock(0,0,0,block.WOOL.id, 1)

83
[ HACKING AND MAKING IN MINECRAFT ]
83[ Minecraft: Pi Edition - Python API ]
.setBlocks(x0, y0, z0, x1, y1, z1, blockType, blockData)Set a cuboid of blocks.
# sets many blocks at a time, filling the gap between 2 sets of x,y,z coordinatesmc.setBlocks(-1, -1, -1, 1, 1, 1, block.STONE.id)
.getHeight(x,z)Get the height of the world => int.
# find the y (vertical) of an x,z coordinate which represents the 'highest' (non-air) blocky = mc.getHeight(0,0)
.getPlayerEntityIds()Get the entity IDs of the connected players => [id:int].
entityIds = mc.getPlayerEntityIds()for entityId in entityIds: print entityId
.saveCheckpoint()Save a checkpoint that can be used for restoring the world.
mc.saveCheckpoint()
.restoreCheckpoint()Restore the world state to the checkpoint.
mc.restoreCheckpoint()
[ HACKING AND MAKING IN MINECRAFT ]

84
ESSENTIALS
[ Chapter One ]84
.postToChat(message)Post a message to the game chat.
# write 'Hello Minecraft World' to the chat windowmc.postToChat("Hello Minecraft World")
.setting(setting, status)Set a world setting.
# change world immutable to Truemc.setting("world_immutable", True)# change name tags visible setting to Falsemc.setting("nametags_visible", False)
MINECRAFT.PLAYERThe player class allows you to interact with the main player in the game. In a multiplayer game, this is the player who is hosting the game.
.getPos()Gets the player’s position in the world as an x, y, z of floats (decimal numbers)
i.e. if the player is in the middle of a block, x.5 is returned.
# get player’s position as floatsplayerPos = mc.player.getPos()
.setPos(x,y,z)Moves the player to a position in the world by passing x, y, z coordinates.
# set the player’s position as floatsmc.player.setPos(0.0,0.0,0.0)
[ Chapter Fourteen ]

85
[ HACKING AND MAKING IN MINECRAFT ]
[ Minecraft: Pi Edition - Python API ]
.getTilePos()Gets the position of the ‘tile’ the player is currently on as an x, y, z of integers
(whole numbers).
# get the position of the tile the player is onplayerTile = mc.player.getTilePos()
.setTilePos(x,y,z)Move the player to a tile position in the world by passing x, y, z coordinates.
# set the position of the tile the player is onmc.player.setTilePos(0,0,0)
.setting(setting, status)Set a player setting (setting, status) - setting keys: autojump.
# change the autojump setting to Truemc.player.setting("autojump", True)
MINECRAFT.ENTITYThe entity class allows you to interact with other players in the game, not just the main player, and is useful when creating programs for multiplayer games.
The entity functions should be used in conjunction with the Minecraft.getPlayerEntityIds() function.
entityIds = mc.getPlayerEntityIds()
player1EntityId = entityIds[0]
player2EntityId = entityIds[1]
[ HACKING AND MAKING IN MINECRAFT ]

86
ESSENTIALS
[ Chapter One ]86
.getPos(entityId)Gets an entity’s position in the world as an x, y, z of floats (decimal numbers)
i.e. if the entity is in the middle of a block, x.5 is returned.
# get first entity position as floatsentityPos = mc.entity.getPos(entityId)
.setPos(entityId,x,y,z)Moves the entity to a position in the world by passing x, y, z coordinates.
# set the entity’s position as floatsmc.player.setPos(entityId,0.0,0.0,0.0)
.getTilePos(entityId)Gets the position of the ‘tile’ the entity is currently on.
# get the position of the tile the entity is onentityTile = mc.entity.getTilePos(entityId)
.setTilePos(entityId, x,y,z)Move the entity to a tile position in the world by passing x, y, z coordinates.
# set the position of the tile the entity is onmc.player.setTilePos(entityId,0,0,0)
[ Chapter Fourteen ]

87
[ HACKING AND MAKING IN MINECRAFT ]
87[ Minecraft: Pi Edition - Python API ]
MINECRAFT.CAMERAThe camera class allows you to modify the view that the player sees.
.setNormal(entityId)Set camera mode to normal Minecraft view.
# set camera mode to normal for a specific playermc.camera.setNormal(entityId)
.setFixed()Set camera mode to fixed view.
# set camera mode to fixed mc.camera.setFixed()
.setFollow(entityId)Set camera mode to follow a player.
# set camera mode to follow a specific playermc.camera.setFollow(entityId)
.setPos(x,y,z)Set the camera position which will point down.
# set camera position to a specific position of x, y, zmc.camera.setPos(0,0,0)
[ HACKING AND MAKING IN MINECRAFT ]

88
ESSENTIALS
[ Chapter One ]88
MINECRAFT.EVENTS.pollBlockHits()Gets block hits, triggered by right-clicking with a sword, since the last time the
function was run => BlockEvent().
# get block event hits blockEvents = mc.events.pollBlockHits()for blockEvent in blockEvents: print blockEvent
.clearAll()Clear all old events.
# clear all events that have happened since the last .pollBlockHits callmc.events.clearAll()
[ Chapter Fourteen ]

89
[ HACKING AND MAKING IN MINECRAFT ]
[ Minecraft: Pi Edition - Python API ]
BLOCKEVENTThe BlockEvent class is how you get information about block hit events which have been returned by the Minecraft events.pollBlockHits() function.
blockEventType = blockEvent.type
.typeType of block event. There is only 1 event currently implemented –
BlockEvent.HIT = 0.
blockEventType = blockEvent.type
.posThe position of the block which was hit as x, y, z coordinates.
blockEventPos = BlockEvent.pos
.faceThe face of the block which was hit, as a number 0 – 6.
blockEventFace = BlockEvent.face
.entityIdThe entity ID of the player who hit the block.
blockEventPlayer - BlockEvent.entityId
[ HACKING AND MAKING IN MINECRAFT ]

90
ESSENTIALS
[ Chapter One ]
BLOCKThe block module provides constants which let you use blocks by their names rather than their IDs. Many blocks also have data types which let you change a block - e.g. the wool block has the ID 35 and the constant WOOL; a data ID between 0 – 16 changes the colour.
.id Constant .data Sub-type
0 AIR - -1 STONE - -2 GRASS - -3 DIRT - -4 COBBLESTONE - -5 WOOD_PLANKS 0 Oak 1 Spruce 2 Birch 3 Jungle6 SAPLING 0 Oak 1 Spruce 2 Birch 3 Jungle7 BEDROCK - -8 WATER_FLOWING | WATER - -9 WATER_STATIONARY 0 High 7 Low10 LAVA_FLOWING | LAVA - -11 LAVA_STATIONARY 0 High 7 Low12 SAND - -13 GRAVEL - -14 GOLD_ORE - -15 IRON_ORE - -16 COAL_ORE - -17 WOOD 0 Oak (up/down)
90 [ Chapter Fourteen ]
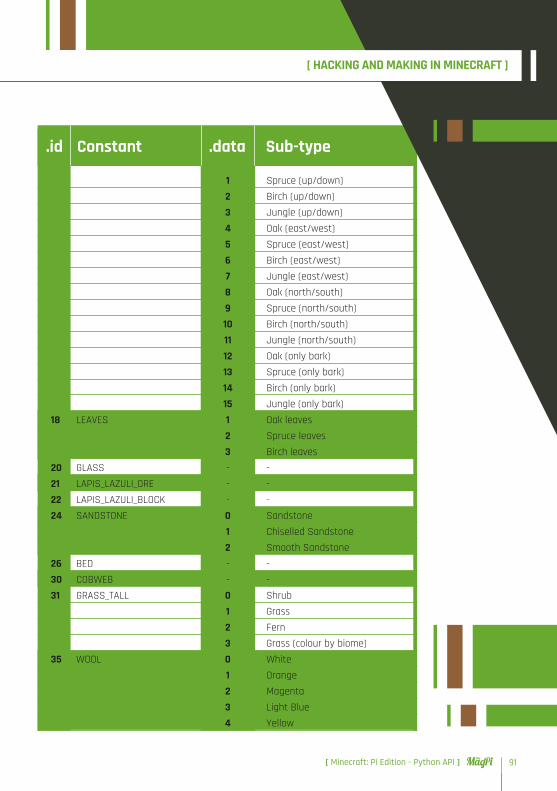
91
[ HACKING AND MAKING IN MINECRAFT ]
1 Spruce (up/down) 2 Birch (up/down) 3 Jungle (up/down) 4 Oak (east/west) 5 Spruce (east/west) 6 Birch (east/west) 7 Jungle (east/west) 8 Oak (north/south) 9 Spruce (north/south) 10 Birch (north/south) 11 Jungle (north/south) 12 Oak (only bark) 13 Spruce (only bark) 14 Birch (only bark) 15 Jungle (only bark)18 LEAVES 1 Oak leaves 2 Spruce leaves 3 Birch leaves20 GLASS - -21 LAPIS_LAZULI_ORE - -22 LAPIS_LAZULI_BLOCK - -24 SANDSTONE 0 Sandstone 1 Chiselled Sandstone 2 Smooth Sandstone26 BED - -30 COBWEB - -31 GRASS_TALL 0 Shrub 1 Grass 2 Fern 3 Grass (colour by biome)35 WOOL 0 White 1 Orange 2 Magenta 3 Light Blue 4 Yellow
.id Constant .data Sub-type
91[ Minecraft: Pi Edition - Python API ]
[ HACKING AND MAKING IN MINECRAFT ]

92
ESSENTIALS
[ Chapter One ]
.id Constant .data Sub-type
5 Lime 6 Pink 7 Grey 8 Light Grey 9 Cyan 10 Purple 11 Blue 12 Brown 13 Green 14 Red 15 Black37 FLOWER_YELLOW - -38 FLOWER_CYAN - -39 MUSHROOM_BROWN - -40 MUSHROOM_RED - -41 GOLD_BLOCK - -42 IRON_BLOCK - -43 STONE_SLAB_DOUBLE 0 Stone 1 Sandstone 2 Wooden 3 Cobblestone 4 Brick 5 Stone Brick 6 Nether Brick 7 Quartz44 STONE_SLAB 0 Stone 1 Sandstone 2 Wooden 3 Cobblestone 4 Brick 5 Stone Brick 6 Nether Brick 7 Quartz 45 BRICK_BLOCK - -46 TNT 0 Inactive
92 [ Chapter Fourteen ]

93
[ HACKING AND MAKING IN MINECRAFT ]
.id Constant .data Sub-type
1 Ready to explode47 BOOKSHELF - -48 MOSS_STONE - -49 OBSIDIAN - -50 TORCH 0 Standing on the floor 1 Pointing east 2 Pointing west 3 Pointing south 4 Pointing north51 FIRE - -53 STAIRS_WOOD 0 Ascending east 1 Ascending west 2 Ascending south 3 Ascending north 4 Ascending east (upside down) 5 Ascending west (upside down) 6 Ascending south (upside down) 7 Ascending north (upside down)54 CHEST 2 Facing north 3 Facing south 4 Facing west 5 Facing east56 DIAMOND_ORE - -57 DIAMOND_BLOCK - -58 CRAFTING_TABLE - -60 FARMLAND - -61 FURNACE_INACTIVE 2 Facing north 3 Facing south 4 Facing west 5 Facing east62 FURNACE_ACTIVE 2 Facing north 3 Facing south 4 Facing west 5 Facing east64 DOOR_WOOD - -
93[ Minecraft: Pi Edition - Python API ]
[ HACKING AND MAKING IN MINECRAFT ]

94
ESSENTIALS
[ Chapter One ]
.id Constant .data Sub-type
65 LADDER 2 Facing north 3 Facing south 4 Facing west 5 Facing east67 STAIRS_COBBLESTONE 0 Ascending east 1 Ascending west 2 Ascending south 3 Ascending north 4 Ascending east (upside down) 5 Ascending west (upside down) 6 Ascending south (upside down) 7 Ascending north (upside down)71 DOOR_IRON - -73 REDSTONE_ORE - -78 SNOW 0 Lowest 7 Highest79 ICE - -80 SNOW_BLOCK - -81 CACTUS - -82 CLAY - -83 SUGAR_CANE - -85 FENCE - -89 GLOWSTONE_BLOCK - -95 BEDROCK_INVISIBLE - -98 STONE_BRICK 0 Stone brick 1 Mossy stone brick 2 Cracked stone brick 3 Chiseled stone brick102 GLASS_PANE - -103 MELON - -107 FENCE_GATE - -246 GLOWING_OBSIDIAN - -247 NETHER_REACTOR 0 Unused 1 Active 2 Stopped / used up
94 [ Chapter Fourteen ]

95
[ HACKING AND MAKING IN MINECRAFT ]
95[ Minecraft: Pi Edition - Python API ]
[ HACKING AND MAKING IN MINECRAFT ]

96
ESSENTIALS
[ Chapter One ]
> CONQUER THE COMMAND LINE
> EXPERIMENT WITH SENSE HAT
> MAKE GAMES WITH PYTHON
> CODE MUSIC WITH SONIC PI
AVAILABLE NOW:
LEARN | CODE | MAKE
ESSENTIALS
From the makers of the official Raspberry Pi magazine
ESSENTIALS

97
[ HACKING AND MAKING IN MINECRAFT ]
OUT NOW IN PRINTONLY £3.99raspberrypi.org/magpi
GET THEM DIGITALLY:
from